


86600
1
WEST BEND
ELECTRIC STEAMER/RICE COOKER
Care and Use Instructions
TO PREVENT PERSONAL INJURY OR PROPERTY DAMAGE, READ AND FOLLOW THE INSTRUCTIONS AND/OR
WARNINGS IN THIS CARE AND USE INSTRUCTION MANUAL.
IMPORTANT SAFEGUARDS
When using electrical appliances, basic safety precautions should always be followed, including the following:
?? Read all instructions
?? Do not touch hot surfaces. Use potholders when removing cover or handling hot containers.
?? To protect against electric shock, do not immerse base, its cord or plug in water or other liquid.
?? Close supervision is necessary when any appliance is used by or near children.
?? Unplug from outlet when not in use and before cleaning. Allow to cool before putting on or taking off parts, and before cleaning
the appliance.
?? Do not operate any appliance with a damaged cord or plug or after the appliance malfunctions, or has been damaged in any
manner.
?? The use of accessory attachments not recommended by the appliance manufacturer may cause injuries.
?? Do not use outdoors.
?? Do not let cord hang over edge of table or counter, or touch hot surfaces.
?? Do not place on or near a hot gas or electric burner, or in a heated oven.
?? Extreme caution must be used when moving an appliance containing hot food, water or other hot liquids.
?? Always have timer set at OFF position, then plug cord into wall outlet. To disconnect set timer to OFF position, then remove
plug from wall outlet.
?? Do not use appliance for other than intended use.
SAVE THESE INSTRUCTIONS
Your food steamer/rice cooker needs no special care other than cleaning. For Household Use Only.
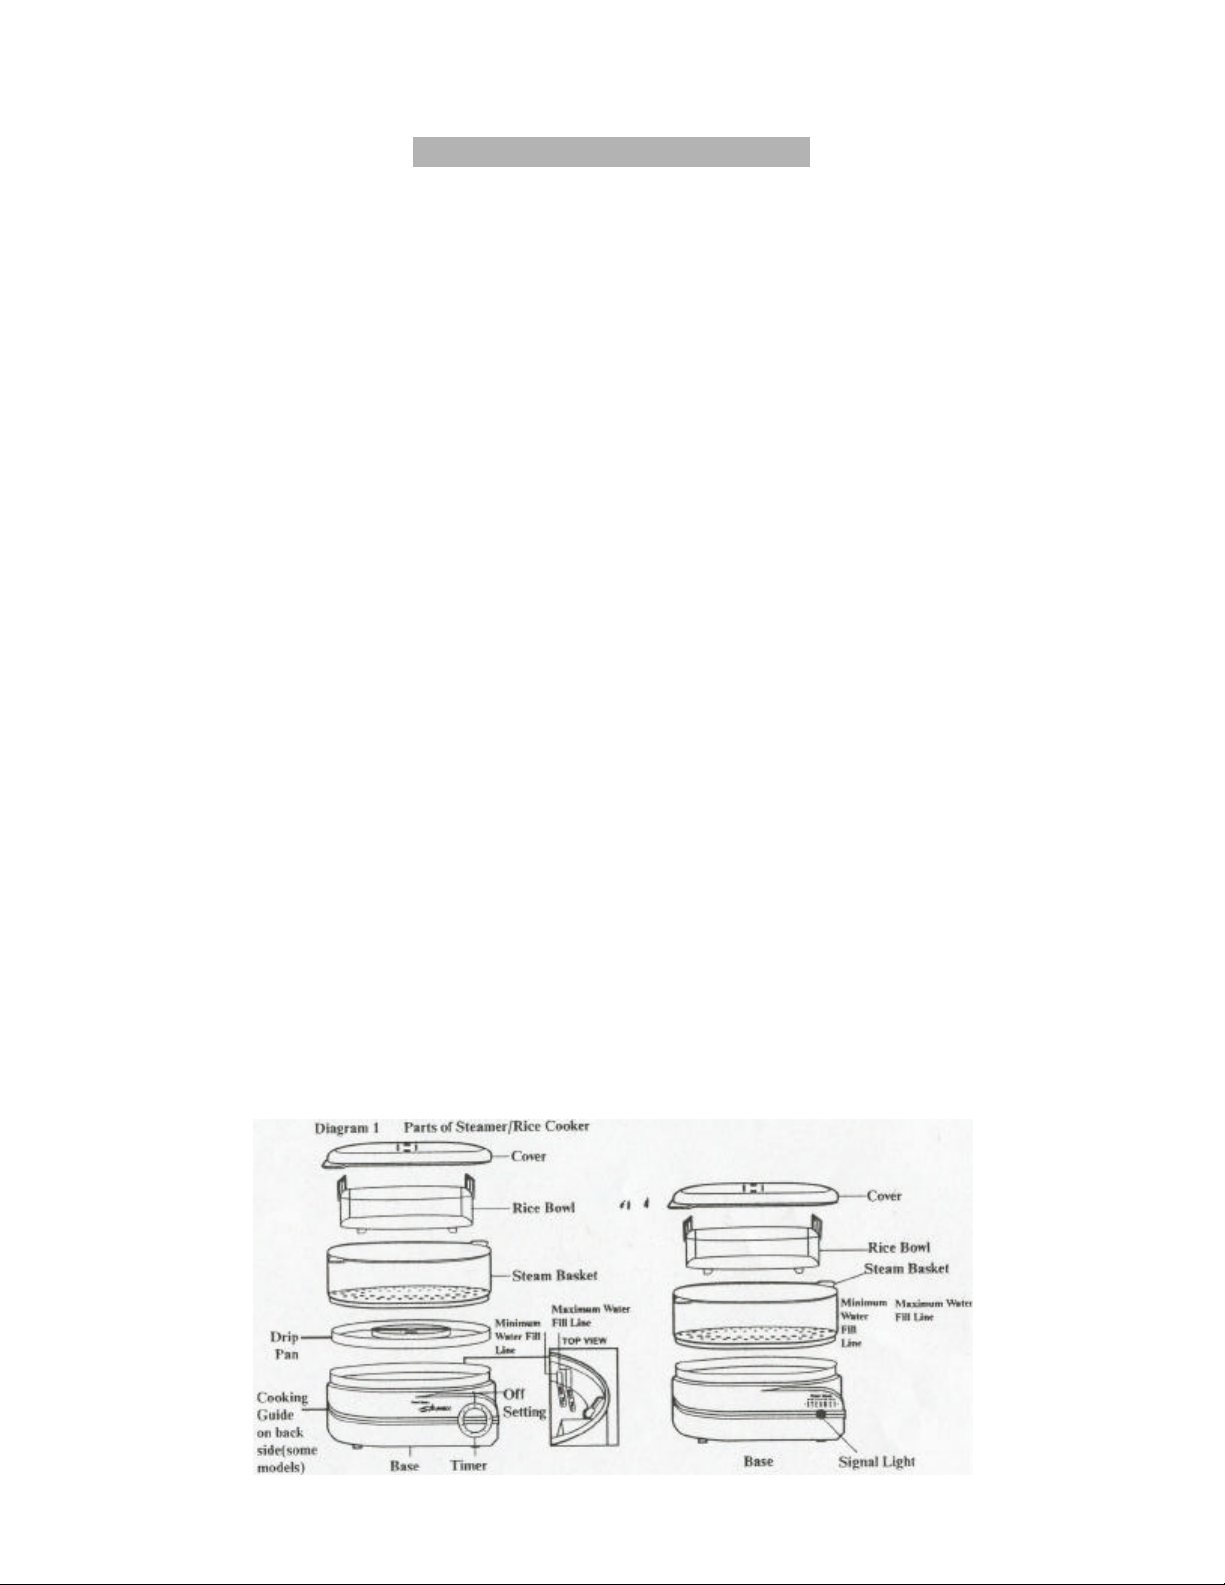
SPECIAL NOTE: this booklet contains instructions for use of two different Steamer/Rice Cookers. One model features a timer and
includes a drip pan the second model features a signal light and does not include a drip pan. Be sure to follow the correct care and use
instructions for the particular model Steamer/Rice Cooker you have.
Electrical Cord and Plug Information
This appliance has a polarized plug (one blade is wider than the other). As a safety feature, this plug will fit into a polarized outlet
only one way. If the plug doesn’t fit fully in the outlet, reverse the plug. If it still does not fit, contact a qualified electrician. Do not
attempt to defeat this safety feature. CAUTION: your food steamer/ricer cooker has a longer cord for convenience. To reduce the
risk of personal injury or property damage, do not allow cord to drape or hang over the edge of countertop or tabletop where it can be
pulled on by children or tripped over accidentally. Do not allow children to be near or use this appliance without close adult
supervision.

2
GENERAL COOKING TIPS:
?? Steaming/cooking times will vary depending on desired doneness, size and quantity of food being cooked. To prevent
overcooking, set timer for the minimum time given in chart. Rest timer if necessary to complete cooking. For model with signal
light, set a separate time to prevent overcooking.
?? To prevent possible damage to cabinets from the steam emitted from appliance, do not place appliance directly under cabinets.
?? To prevent steam burns, always use potholders when removing cover and bowls from appliance. Use long-handled utensils when
checking for doneness of food and avoid reaching over appliance when cooking.
?? Altitude affects the temperature at which water boils. Longer cooking times may be required at higher altitudes.
?? Do not place any part of appliance in a microwave, conventional oven or on any cooking or heating surface.
?? If you wish to stop cooking process before time expires on timer, simply turn timer to OFF position and unplug cord from outlet.
For model with signal light, unplug cord from outlet to stop cooking process.
?? If setting timer for less than 15 minutes, you must first set timer to the 15 -minute mark, and then turn back to the desired minutes.
This must be done to activate the timer and turn appliance on when cooking for less than 15 minutes.
?? Always make sure there is sufficient water in the base for steaming or cooking. Do not allow base to boil dry. Add water to base
if necessary.
?? After steaming or cooking, invert cover and use as a trivet for steam basket or rice bowl.
?? Two water-level markings are featured on inside of base-identified as MIN and MAX. The MIN line represents 2 cups (16 oz.) of
water and the MAX line represents 4 cups (32 oz.). Normally, the MIN amount of water is needed for up to 30 minutes of
cooking. Fill with water to MAX line for longer cooking times, 30 to 60 minutes. Maximum time that can be set on timer is 60
minutes. To hasten cooking, use hot tap water rather than cold.
CLEAN BEFORE USING THE FIRST TIME
1. Wash steam basket, rice bowl, cover and drip pan in hot soapy water, with a dishcloth, rinse and dry. These parts can also be
cleaned in an automatic dishwater, TOP RACK ONLY.
2. Wipe out inside of base with a damp soapy cloth, wipe clean with a damp cloth and dry. Wipe outside of base with a damp cloth
if necessary. CAUTION: To reduce the risk of electric shock, do not immerse base, its cord or plug in water or other liquid.
Your food steamer/rice cooker is now ready to use.
?? HOW TO STEAM FOODS – See Diagram 2 For Parts Used to steam
For model that includes drip pan and timer.
1. Place base on dry, level, heat-resistant surface away from any edge. Pour water into base to the appropriate fill line (MIN or
MAX) for food being cooked, see chart pages 6-10. Only water can be used in base. Do not add salt, seasonings or any other
liquids to base. Position drip an in base making sure it is level.
2. Place food to be steamed in steam basket and place basket into base over drip pan.
3. Cover steamer and plug cord into 120 volt AC electric outlet ONLY. Set timer for recommended cooking time given in chart.
4. When time is up, timer will ring and steamer will automatically turn off. Remove cover with potholders, being careful of
escaping steam. Check doneness of food and remove if done. If not done, cover and reset timer for a few additional minutes.
Remember: When setting timer for less than 15 minutes, you must turn time to 15 minute mark and then back to the number of
minutes you wish to time. This must be done to activate timer and turn appliance on. After cooking, steam basket can be set into
inverted cover if desired. Season foods after steaming.
5. Unplug cord from outlet and allow appli ance to cool completely before removing drip pan, cleaning or removing water from base.
?? HOW TO COOK RICE – See Diagram 3 For Parts Used To Cook Rice For model that includes drip pan and timer.
1. Place base on dry, level, heat-resistant surface away from any edge. Pour water into base to the appropriate fill line (MIN or
MAX). See Rice Cooking chart page 11. Only water can be used in base. Do not add salt, seasonings or any other liquids to
base. Place steam basket into base. (NOTE: Drip Pan Is NOT Used When Cooking Rice).
2. Add recommended amounts of rice and water to rice bowl, see chart on page 11. Place rice bowl into steam basket, making sure
rice bowl is centered in bottom of steam basket.
3. Cover cooker and plug cord into 120 volt AC electric outl et ONLY.
Set timer for recommended cooking time given in chart.
4. When time is up, timer will ring and cooker will automatically turn off. Remove cover with potholders being careful of escaping
steam. Check doneness of rice. Remember: When setting timer for less than 15 minutes, you must first turn timer to 15 minute
mark and then back to the number of minutes you wish to time. This must be done to activate timer and turn appliance on.

3
Continue cooking until water is absorbed by rice. When done, remove rice bowl with pot holders and transfer to separate serving
dish. Rice bowl can be set into inverted cover if desired.
5. Unplug cord from outlet after cooking and allow appliance to cool before cleaning or removing water from base.
??HOW TO STEAM FOODS – See Diagram 4 for Parts Used to Steam For model that has a signal light.
1. Place base on dry, level, heat-resistant surface away from any edge. Pour water into base to the appropriate fill line (MIN or
MAX) for food being cooked, see chart pages 6-10. Only water can be used in base. Do not add salt, seasonings or any other
liquids to base.
2. Place food to be steamed in stem basket and place basket into base.
3. Cover steamer and plug cord into 120 volt AC electric outlet ONLY. Signal light will glow when base is plugged in. Set timer
for recommended cooking time given in chart.
4. When time is up, unplug from outlet. Remove cover with potholders, being careful of escaping steam. Check doneness of food
and remove if done. If not done, cover, plug cord into electrical outlet and set timer for a few additional minutes. Unplug from
outlet when cooking is complete. After cooking, steam basket can be set into inverted cover if desired. Season foods after
steaming.
5. Allow appliance to cool completely before cleaning or removing drip pan from base.
?? HOW TO COOK RICE – See Diagram 5 for Parts Used To Cook Rice
For model that has a signal light.
1. Place base on dry, level, heat-resistant surface away from any edge. Pour water into base to the appropriate fill line (MIN or
MAX). See Rice Cooking charge Page 11. Only water can be used in base. Do not add salt, seasonings or any liquid to base.
Place steam basket into base.
2. Add recommended amounts of rice and water to rice bowl, see chart on page 11. Place rice bowl into steam basket, making sure
rice bowl is centered in bottom of steam basket.
3. Cover cooker and plug cord into 120 volt AC electric outlet ONLY. Signal light will glow when base is plugged in. Set a
separate timer for minimum cooking time given in chart.
4. When time is up, unplug cord from outlet. Remove cover with potholders being careful of escaping steam. Check doneness of
rice. If water is not completely absorbed by rice, cover, plug cord into electrical outlet and set timer for a few additional minutes.
Continue cooking until water is absorbed by rice. When done, unplug cord from outlet, remove rice bowl with potholders and
transfer to separate serving dish. Rice bowl can be set into inverted cover if desired.
5. Allow appliance to cool before cleaning or removing water from base.
CARE AND CLEANING:
?? Clean After Every Use
Unplug and allow to cool before cleaning. Follow “Clean Before Using The First Time” instructions on page 3.
?? Special Cleaning Instructions To Remove Mineral Deposit
After frequent use (15-20 uses), white mineral deposits and food stains will form on the inside of base, which is normal. Follow these
instructions to remove. It is important to remove mineral deposits as these can cause pitting of the metal heating unit.
1. Pour 1 cup of white distilled vinegar and 2 cups of tap water into base. Plug cord into outlet and set timer on base or set separate
timer for 20 minutes. NOTE: No other parts of appliance are needed when cleaning base.
 Loading...