

Page 1
SpotTM Vision Screener
6
9
Quick Reference
Charging the vision screener
Note: The device needs to be charged for 4 hours before use.
1. Connect the provided DC cord set and power supply/
charger together.
2. Locate the DC power connector on
the vision screener and connect the
power supply/charger. The DC power
connector easily inserts
into the vision screener.
CAUTION Using force to
connect the power charger
can damage the device and
voids the warranty.
3. Plug the DC power cord into an available wall outlet to charge
the device.
Turning on the vision screener
To turn the vision screener on, press and release the Power
button located below the Welch Allyn logo. The start-up
process takes approximately 30 seconds, then the device displays
the Home Screen.
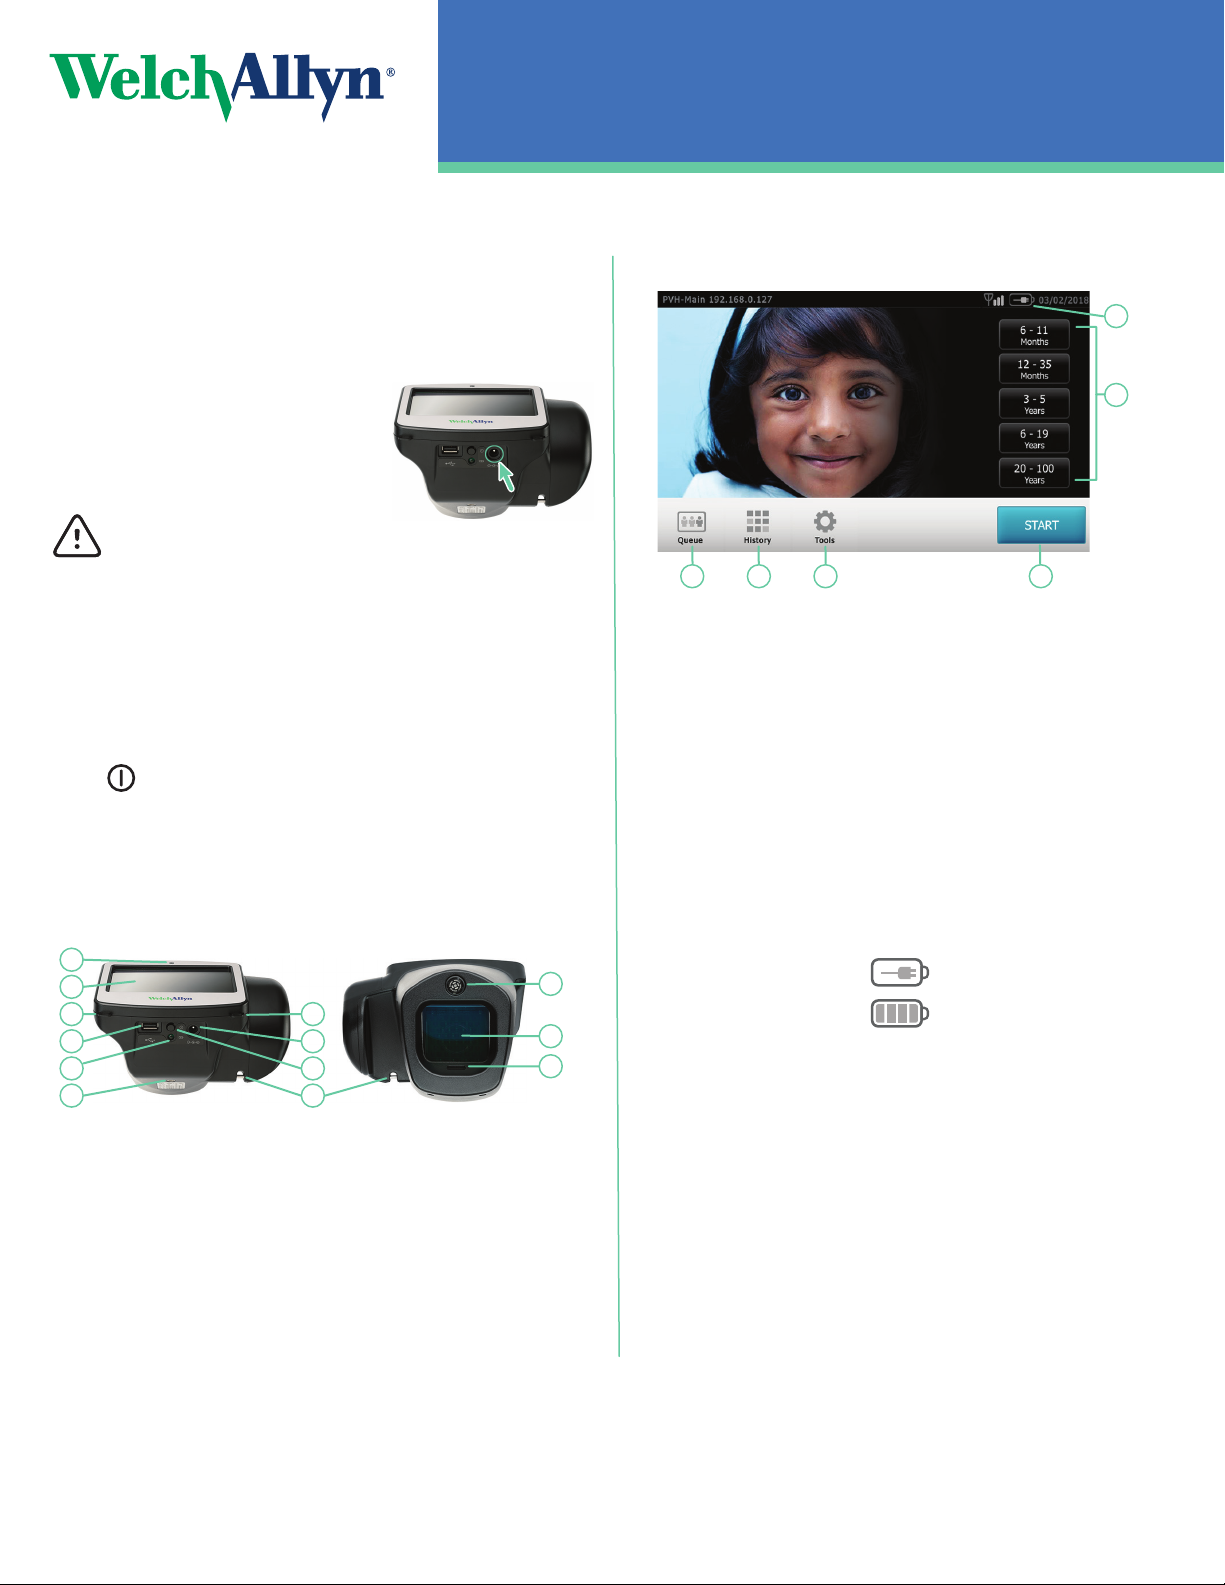
Controls, display window, and connections
1
2
3
4
5
3
7
8
10
11
12
Device home screen
5
6
1
1. Queue – View, select or search for queued subjects from a list
to begin the screening process.
2. History – View already screened subjects (completed records).
3. Tools – A variety of options to customize the vision screener.
4. The Start button allows you to:
• Enter subject information such as ID, First and Last
Name, Gender and Date of Birth (DOB)/Age (Required)
• Find queued subjects (exact match on the ID screen)
• Begin the screening process (Binocular and
Monocular available)
• Review and print screening results
5. Battery status –
• Battery Charging
• Battery charge status
6. Age Range – To begin instant screening, with no personal
subject data, select an age range of the subject from the Home
screen. You can enter subject data after the screening
if desired.
2
3 4
1. Ambient light sensor 7. AC power connector
2. LCD screen 8. Power button
3. Neck strap mount 9. Wrist strap mount
4. USB port 10. Range finder
5. Battery charge green
LED indicator (Flashing)
or charged (Continuous)
6. Tripod mount
11. Front glass
12. Speaker
1
Page 2
Spot
TM
Vision Screener–Quick Reference
How to screen a subject
Before screening
1. Dim the lights, if possible.
2. Close blinds or curtains, if possible.
3. The subject’s back should be positioned to the interfering
light source.
4. Avoid direct light into the subject’s eyes from:
• Ambient light sources
• Exterior light
• Incandescent and halogen lights
Note: Florescent light is the best testing environment,
if options are limited.
Screening a subject
If the vision screener has a location specified, the name of the
location is displayed on the top left of the screen in parentheses.
If there is no location specified, and you want a location included
in the screening information, on the Home screen touch Tools,
and then touch Location to specify the screening location.
Completed exams are saved automatically.
1. Turn on the vision screener. The Home screen appears.
2. Have the subject close his or her eyes for 10 to 15 seconds to
encourage dilation.
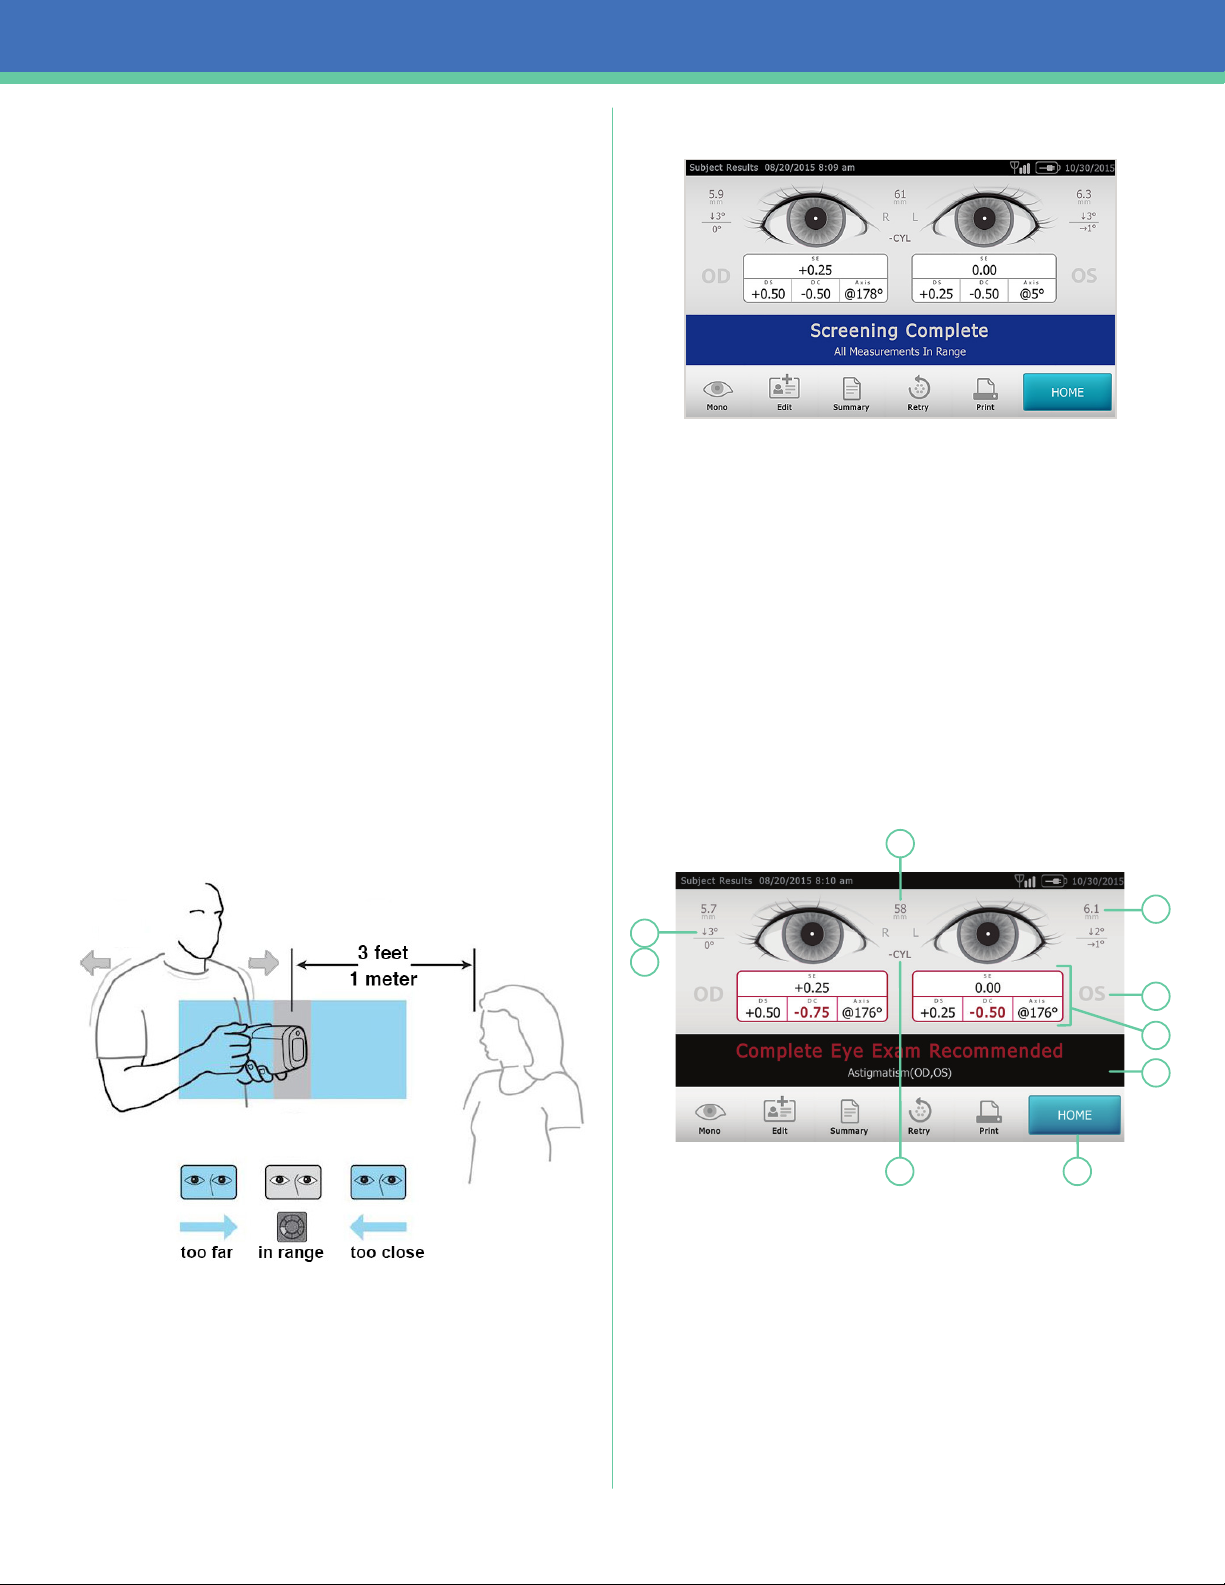
3. Stand approximately 3 feet (1 meter) from the subject with one
foot ahead of the other for stability.
4. Hold the vision screener on an even plane with the subject’s
eyes.
The Subject Results screen appears at the end of the screening
process.
Note: Do not allow the device storage to become 100% full. For
best results, when the device has accumulated 300 records,
delete all records from the vision screener. Verify you have
successfully exported the records to a USB flash drive before you
select Clear All.
Understanding the results
All results viewing options are in the Tools menu under Results.
The device displays a message indicating whether the results
are in or out of range. The message is intended to prompt the
caregiver to assess whether the subject should be referred to an
eye care specialist for further evaluation or simply be monitored
at future screenings.
Results that are out-of-range are indicated in red.
1
5. Touch the age range on the Home screen that matches the age
of the subject.
The screening begins immediately. The vision screener emits
the sound of chirping birds. This sound is intended to focus the
subject’s attention on the device. Touch the Loudspeaker icon
to mute the device.
6. Keep the vision screener steady until the screening wheel
appears, indicating the capture process is underway.
8
9
7. Pupillary distance
8. Pupil size indicator
9. Right eye (OD), Left eye (OS)
10. Complete refraction
SE – Spherical equivalent
DS – Sphere
DC – Cylinder
Axis – Axis
2
3
4
5
67
5. Screening result
6. Home
7. Cylinder convention
8. Alignment indicator
9. Degree, horizontal, vertical
2
Page 3
Spot
TM
Vision Screener–Quick Reference
Wireless network configuration
If the device is configured with your organization’s wireless
network settings, you can view screening results on a computer.
If you want to print screening results, you can connect the
device to a USB printer or you can add a wireless network
printer. To view current network settings, touch Tools and then
Network .
Wireless networks use security to protect your information.
Your organization’s system administrator can supply you with
the case-sensitive security information needed to access the
network.
Before you can connect the device to a network, you need the
following:
Field Description Requirements
SSID
Passphrase
Net work
Security
Type
The name of your
wireless network.
A passphrase, or
password, is used to
protect the privacy of
your wireless network.
None If this option is selected, the
WEP The WEP passphrase must be either
WPA/2 PSK The WPA/2 PSK passphrase must be
WPA/2 EAP-PEAP The WPA/2 EAP-PEAP username and
This name can consist of letters,
numbers, or a combination of both,
up to 32 characters.
The format of the passphrase or
password depends on which security
type you select.
connection to the wireless network
is not encrypted, and any information
sent or received on this network is
not necessarily confidential.
5, 10, 13, or 26 characters.
between 8 and 64 characters.
the password must be between 1 and
64 characters.
To connect to a wireless network
1. Touch Tools, and then touch Network .
2. To connect a device to the network, add the network name
(SSID), security type, and passphrase or password.
3. Touch OK to save your changes and return to the previous
screen.
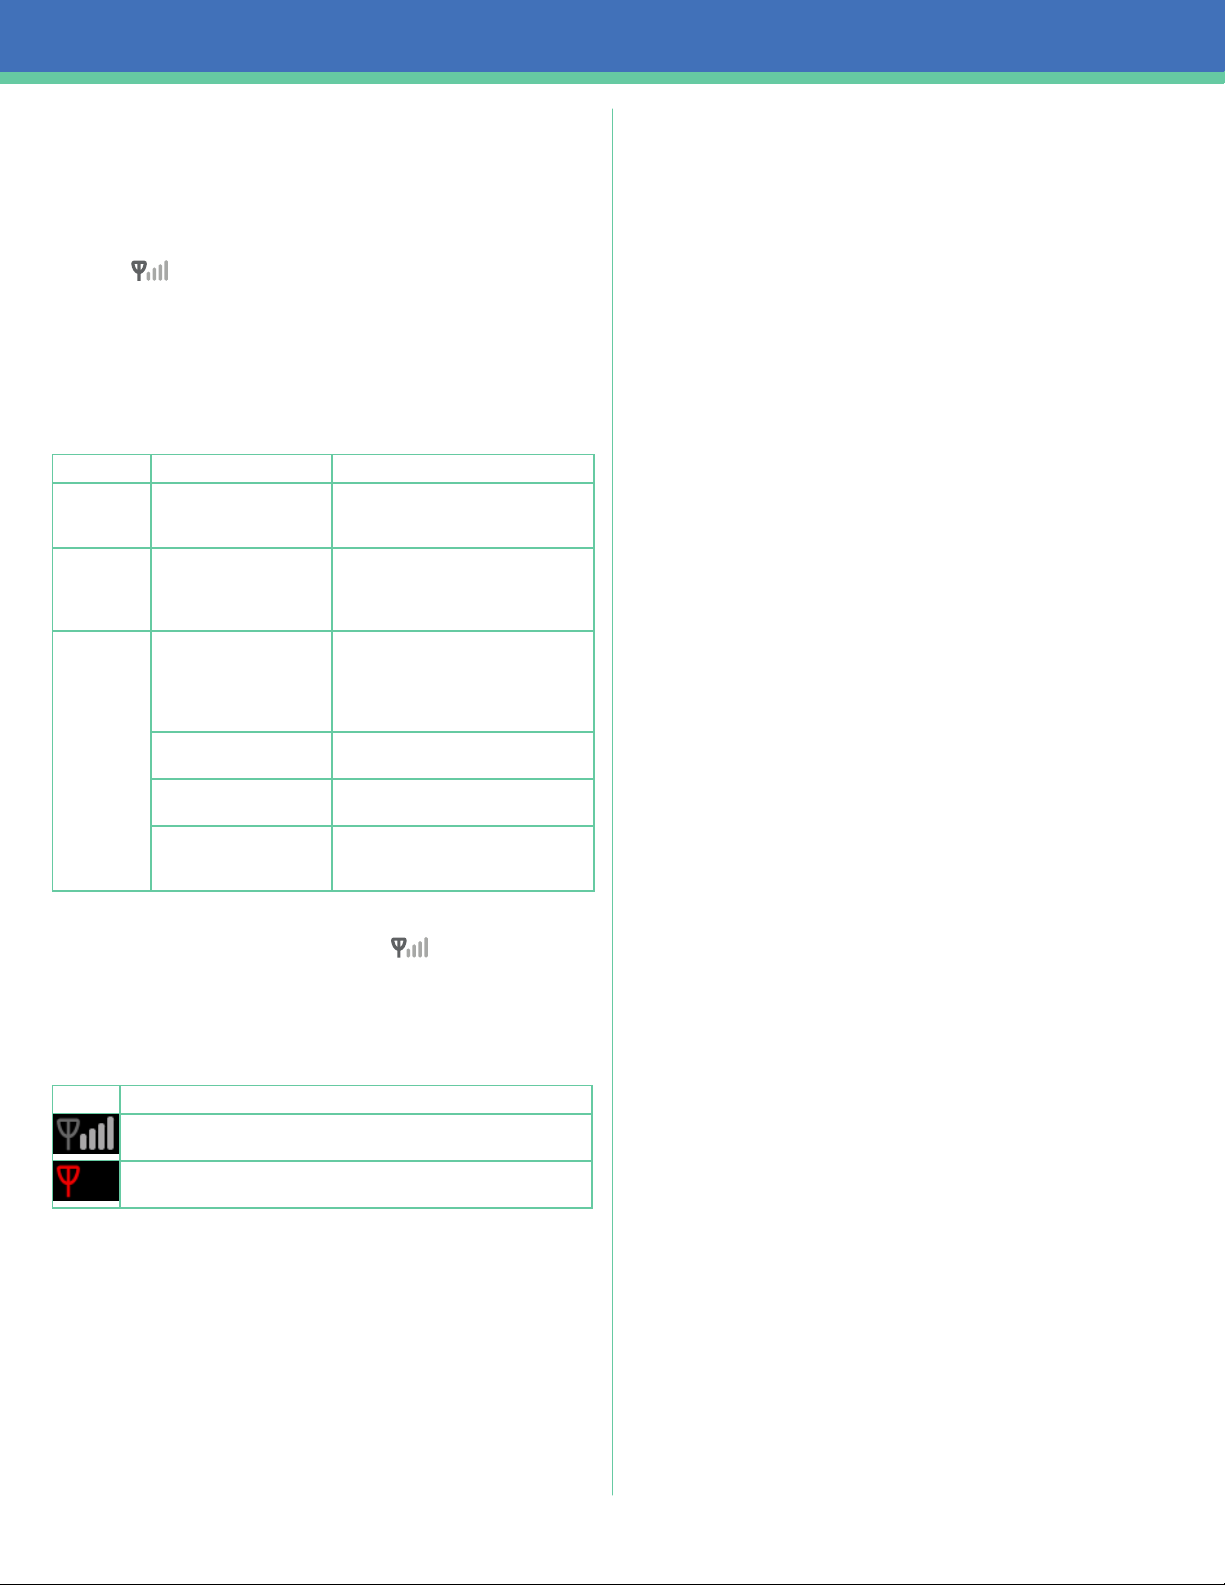
Icon Meaning
You have successfully connected the device to your wireless
network. The vertical bars indicate the strength of the connection.
The device is not connected to the network. For tips on connecting to
the network, refer to Troubleshooting.
For more detailed information, see the device Directions for use.
Connect the vision screener to a printer
The vision screener is capable of connecting and printing to most
network-capable Hewlett-Packard printers. The vision screener
also contains some generic PCL drivers that can be used with
older printers. For more information, see the device Directions for
use.
You can connect the vision screener to a USB printer or, if the
vision screener is connected to a wireless network, to a wireless
network printer.
1. Touch Tools, and then touch Printer. The Available Printers
screen appears.
2. Touch Plus. The Add Printer screen appears.
3. Select the printer to add, and then touch Save.
4. If you do not see the printer you want to add, touch Refresh.
5. To verify the printer is installed correctly, touch Print test
page.
For more detailed information, see the device Direction for use.
Troubleshooting
Accommodation
Accommodation is the automatic adjustment of the focus of the
eye by flattening or thickening of the lens.
Accommodation occurs when the subject fixates on the vision
screener. This improves vision for hyperopia (farsighted) subjects.
To reduce the possibility for a subject to accommodate
• Once the subject is seated, have the subject close his or
her eyes for 10 to 15 seconds to encourage dilation.
• Position the vision screener on the same plane with the
subject’s eyes.
• Activate the screening seconds before the subject opens
his or her eyes.
• Ask the subject to open his or her eyes to obtain quick
capture, prior to the subject’s eyes readjusting to the lights.
To encourage dilation
The vision screener yields a “Pupils too small” message
if the following occurs:
• The pupils are constricted below 4 mm.
• If the subject has something impeding the vision screener’s
infrared light source, such as blindness in one eye,
cataract, media opacity, etc.
First attempt recommendation
• Once the subject is seated, have the subject close his or
her eyes for 10-15 seconds to encourage dilation.
• Position the vision screener on an even axis with the
subject’s eyes.
• Activate the screening seconds before the subject opens
his or her eyes.
• Ask the subject to open his or her eyes, which allows
for a quick capture before the subject’s eyes readjusts to
the lights.
Second attempt recommendation
• In addition to the recommendations from the first attempt:
° Have the subject use his or her hands to shield his
or her eyes, or
° Use a book or magazine to shield his or her eyes.
3
Page 4
Spot
TM
Vision Screener–Quick Reference
Third attempt recommendation
• In addition to the recommendations from the second
attempt:
° Have the subject wear non-prescription sunglasses
to shield light, or
° Use sunglasses that wrap to block light from his
or her eyes.
Final recommendation
• Try new, darker environment and repeat the above
recommendations.
• Turn the device out of view from the subject and reactivate
the screen while rotating the device back to the subject.
Wireless issues
1. On the Home screen, verify the network name and IP address
are displayed in the upper-left corner.
2. On the Home screen, verify the wireless icon is gray and
there are vertical bars next to it indicating the strength of the
connection. If the icon is red, restart the system.
3. If the connection does not automatically reconnect, touch
Tools > Network > Security Type and enter the network
information again.
For more information on wireless issues, see the device Directions
for use.
System freeze
If the vision screener locks up and becomes unresponsive to the
touch, perform a hard system reset.
CAUTION: This procedure may cause some data loss (for
example any printer configuration or subject information).
1. Press the Power button.
2. If the Power Off screen appears, touch Confirm to shut down
the device.
3. If the Power Off screen does not appear, press and hold the
Power button.
4. Wait one minute, and then restart the device.
For complete instructions, warnings and cautions, please
consult the Directions for use that shipped with your
device.
Printer issues
1. Verify the printer is turned on and has sufficient ink or toner.
2. Print a test page directly from the printer.
3. Verify the printer is on a local network by printing to the printer
from a computer on the same network.
4. If all of the above steps have not resolved the issue, restart the
vision screener.
System restart
1. Press the Power button and hold until a confirmation screen
appears.
2. Select Confirm.
3. After the screen turns black, wait 30 seconds and press the
Power button again.
4. Verify the power cord is plugged in.
Welch Allyn Technical Support
www.welchallyn.com/support
Mat. 728906, 80024004 Ver. A
Revision date: 2018-11
© 2018, Welch Allyn, Inc.
All rights reserved
4
 Loading...