

Page 1
Ophthamoscopes,
Otoscopes and
No. 20000
Otoscope/Throat
Illuminator
Operating and Cleaning Ins tr uctions,
Tableau de remplacement de la lampe
Diagramma per la sostituzione della
lampadina e istruzioni per la pulizia
Lamp Replacement Chart
et instructions de nettoyage
Tabla de cambio de bombillas e
instrucciones de limpieza
English . . . . . 3
Français . . . . 8
Ersatzbimen-tabelle und
reinigungsanleitung
Deutsch . . . 13
Espannõl. . . 18
Italiano. . . . 23
Page 2
For guaranteed performance, use only genuine Welch Allyn
lamps.
Pour une performance garantie utiliser uniquement des lampes
Welch Allyn authentiques.
Für garantierte Leistun e verwenden S ie nur Original birnen von
Welch Allyn.
Para un rendimiento garantizado use sólo bombillas genuinas
Welch Allyn.
Per garantier prestazioni ottimali usare solo lampadine Welch
Allyn.
Page 3
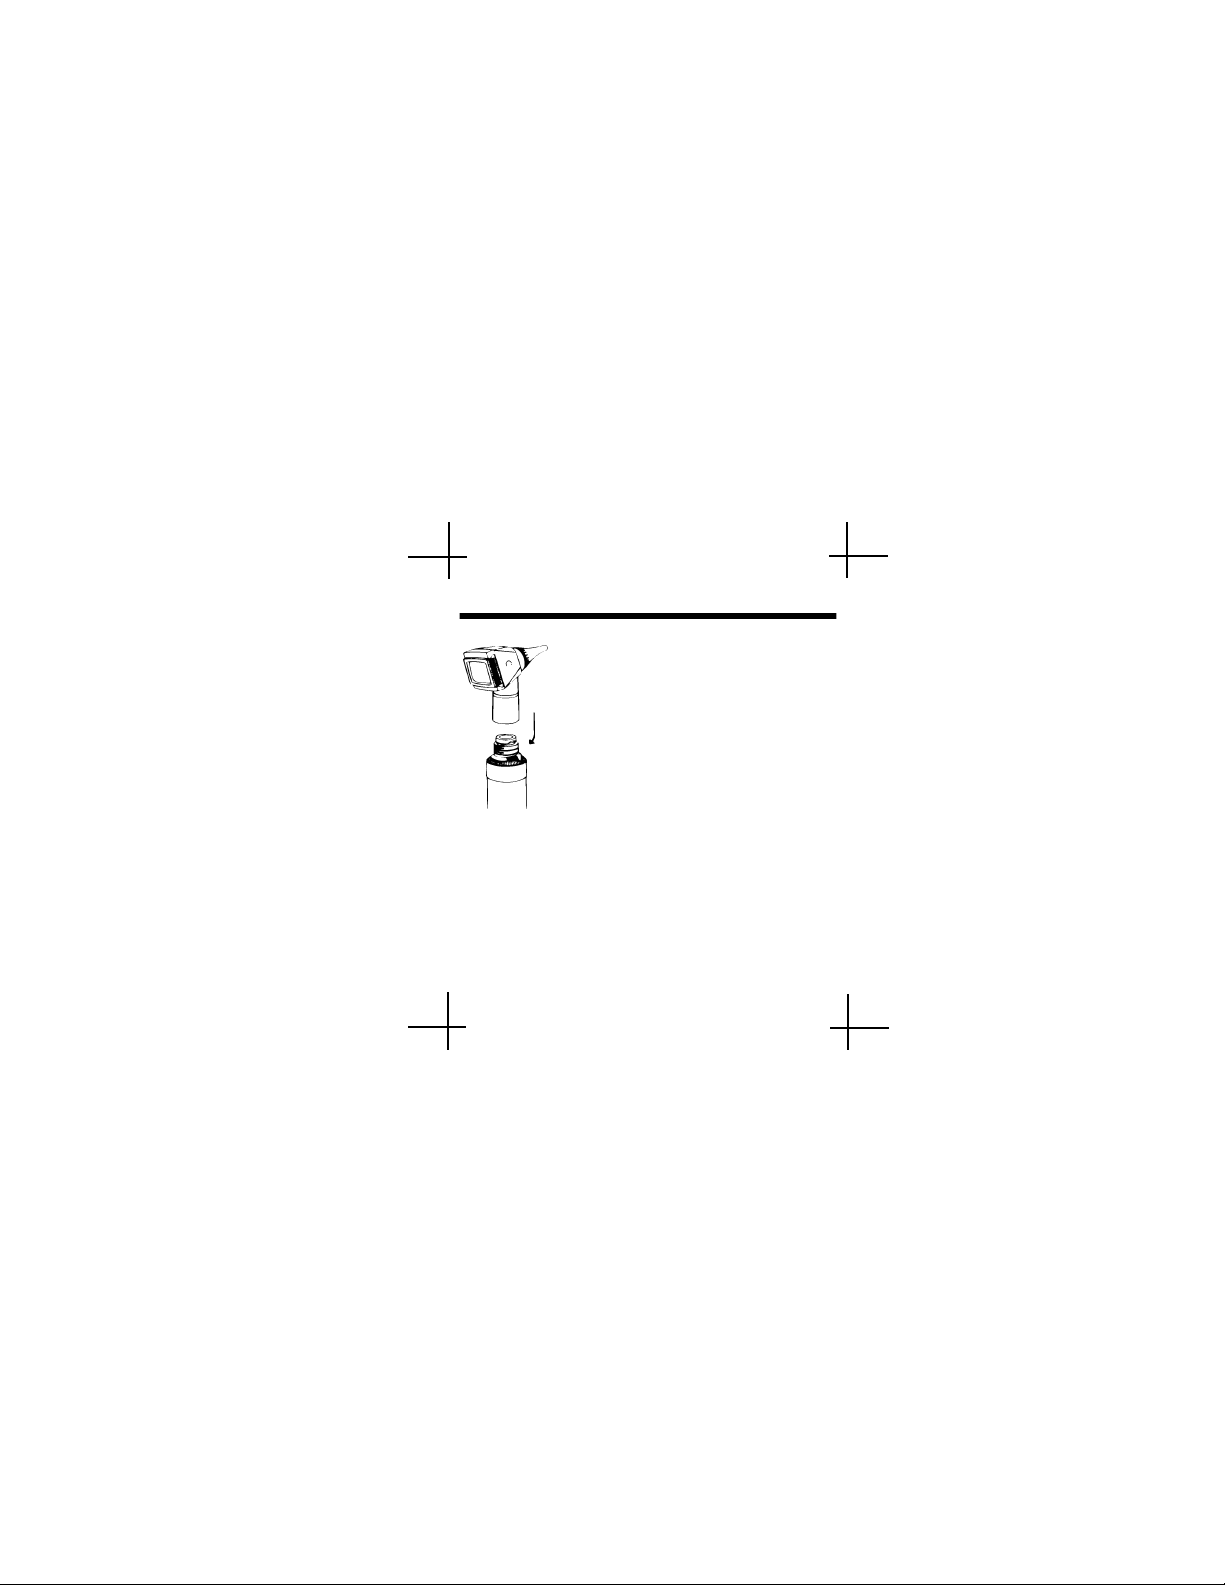
Operating Instructions for No. 20000
Otoscope/Throat Illuminator
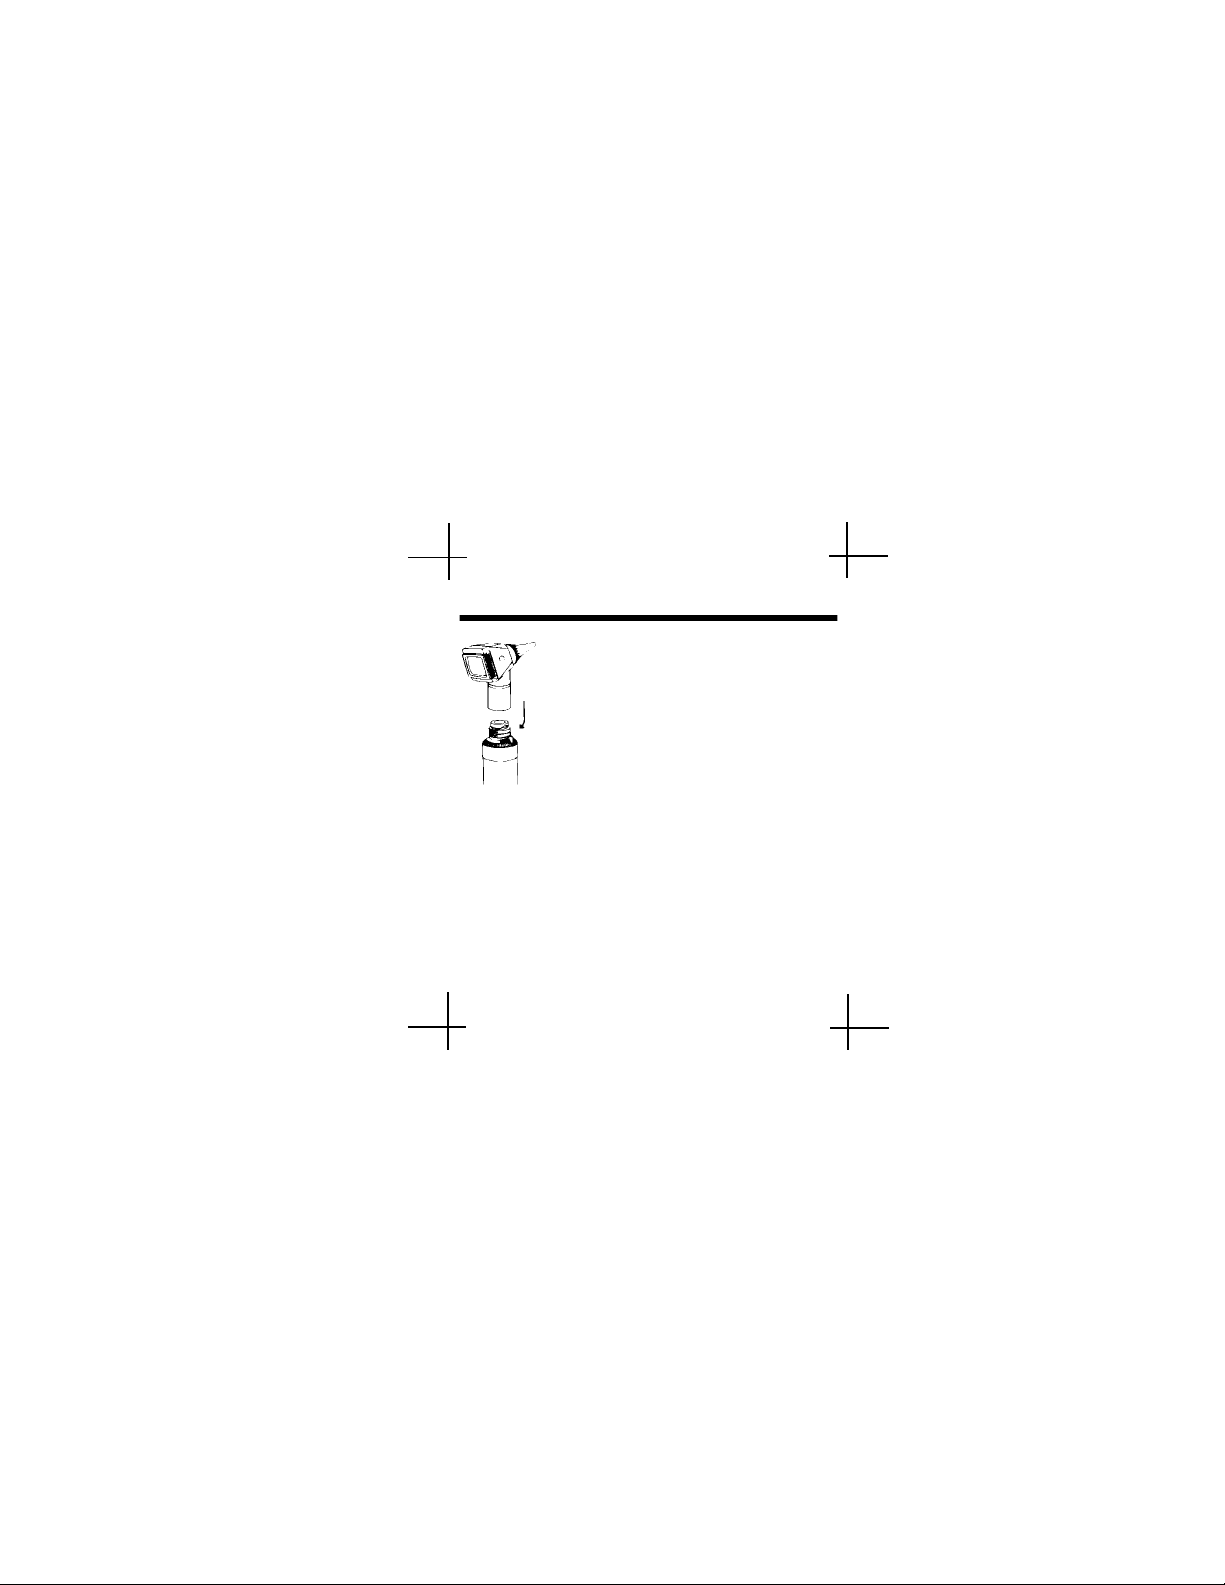
To attach Otoscope/ Throat
Illuminator to power source:
Align cutouts in the Otoscope/Thr oat
Illuminator base with lugs on power source.
Push in slightly and turn 90°. The Otoscope/
Throat Illuminator is now ready t o use. To
remove, reverse this procedur e. The
Otoscope/Throat Illuminator f its all 3.5 v.
Welch Allyn power sources.
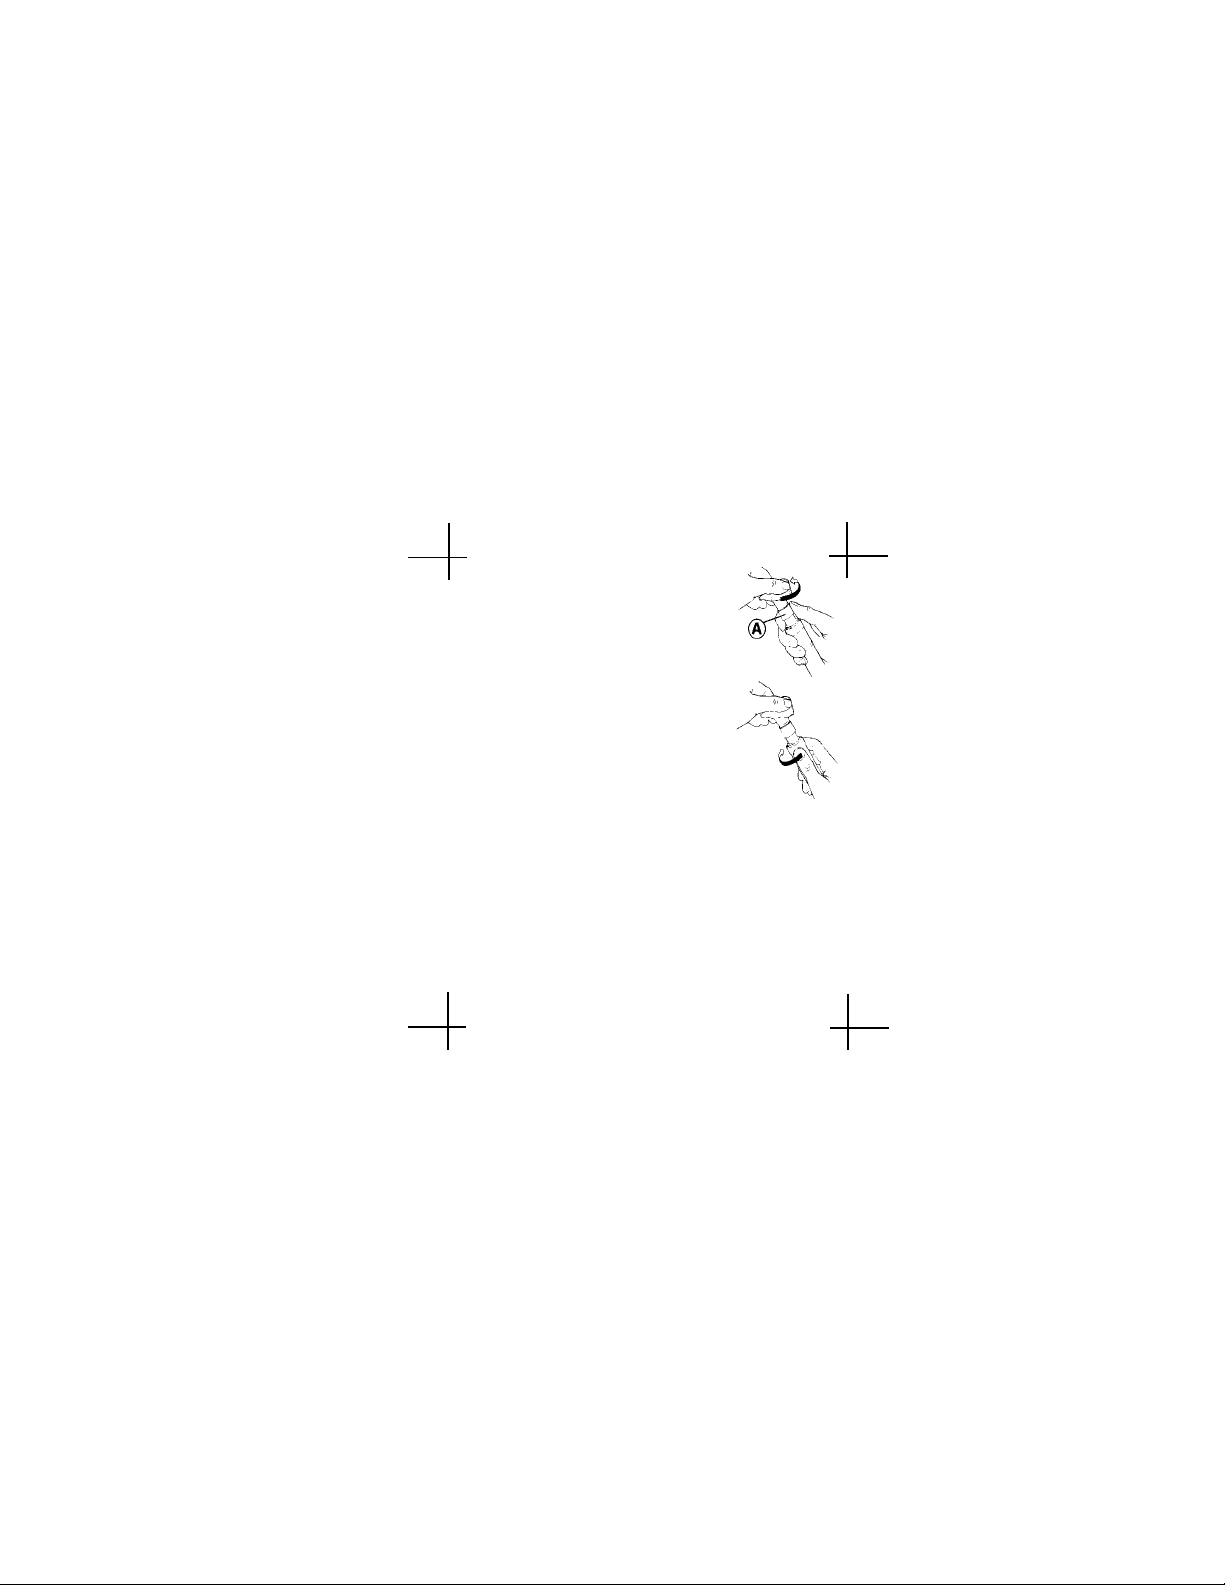
To use Throat Illuminator:
1. Grasp the otoscope section with the l ef t hand.
2. With the right hand, grasp t he throat illuminator’s
collar at A (under the silver ri ng).
3
Page 4
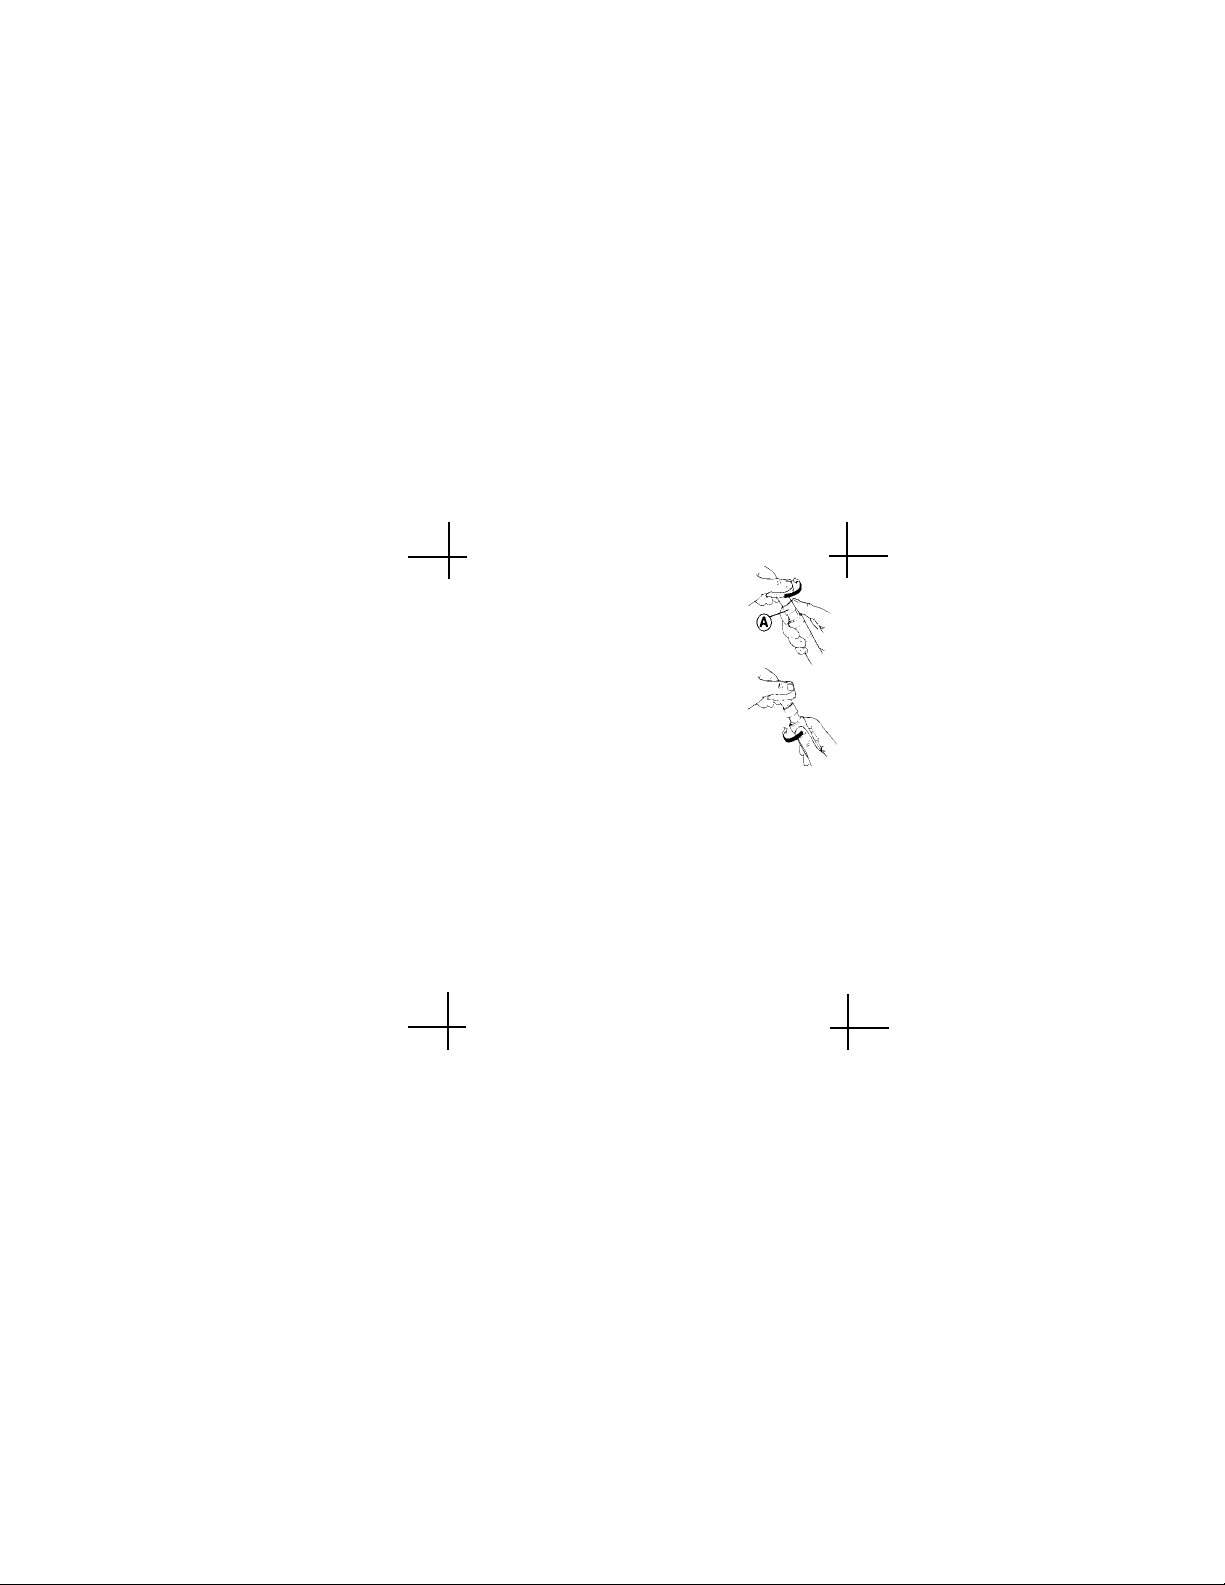
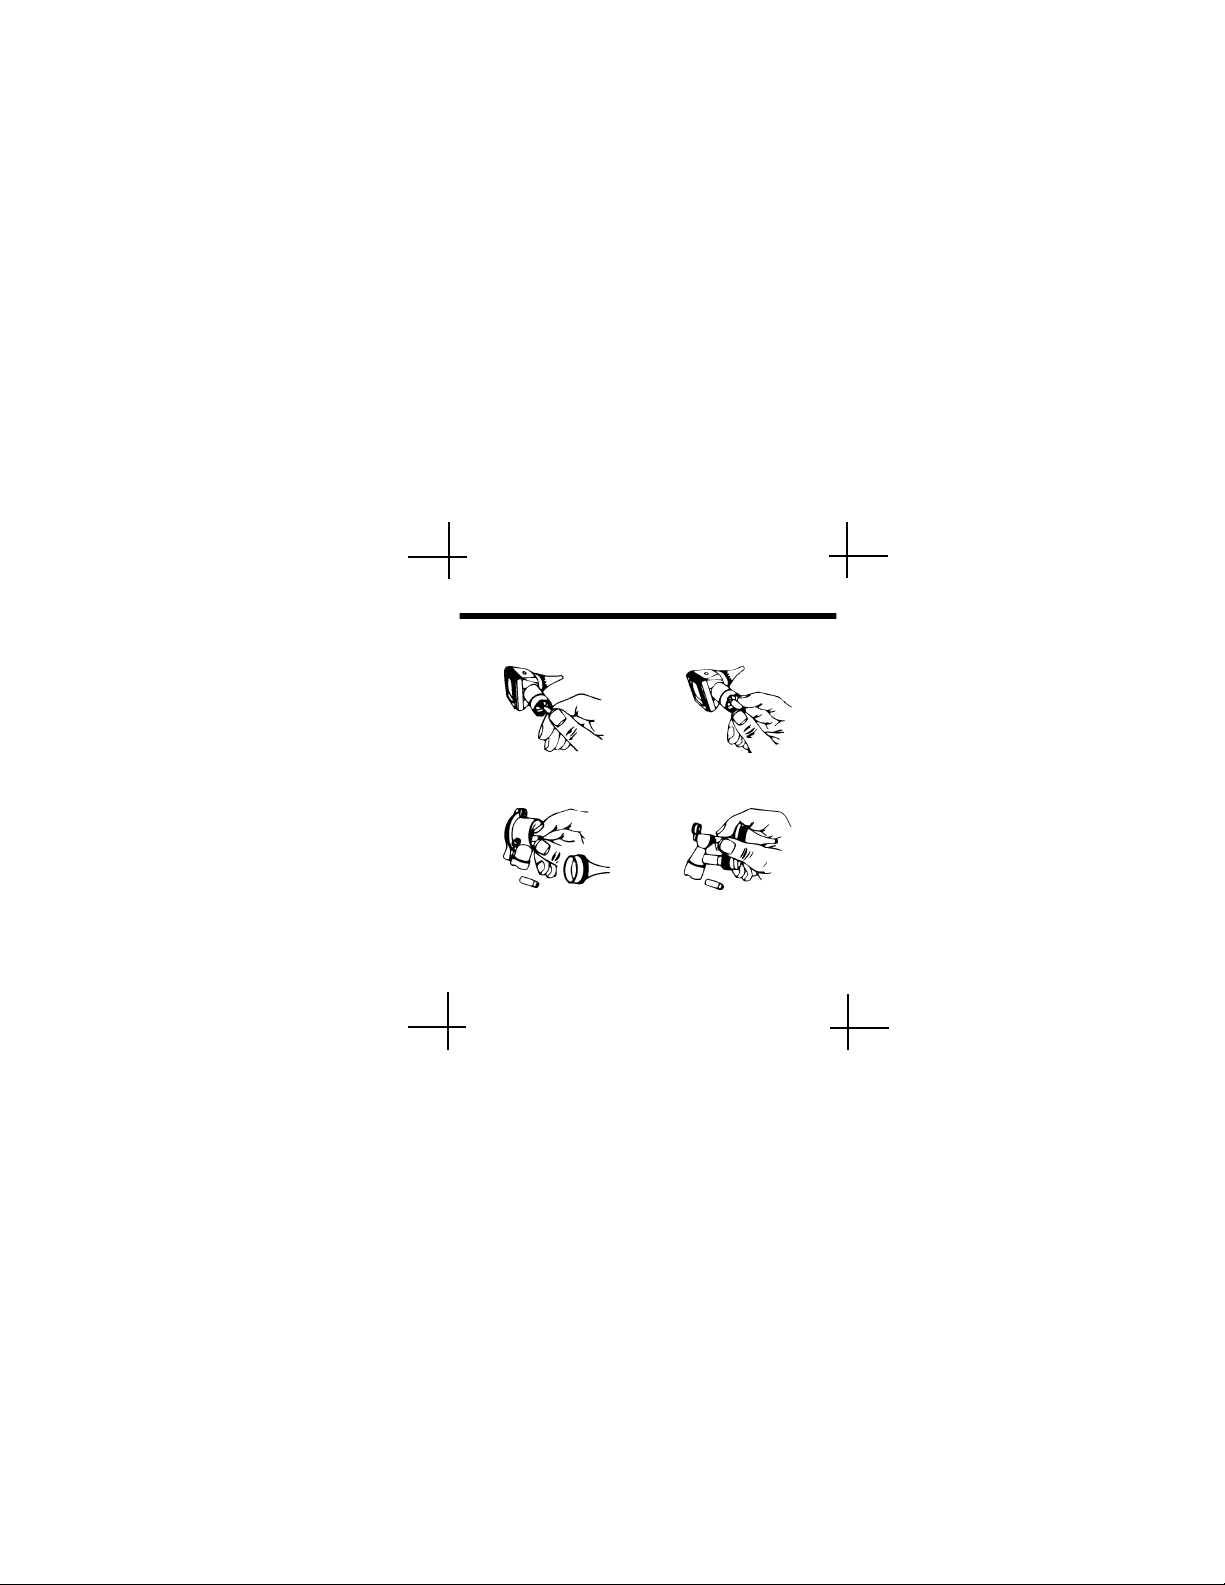
3. While holding the throat illuminator
collar stationary, twist the otoscope
section counterclockwise at A until
the otoscope section becomes loose.
4. Slide the right hand down to the
power handle, grasp it and turn it
clockwise while keeping the otoscope
section stationary, until otoscope
section is removed. The throat
illuminator is now ready for use.
T o replace otoscope section, reverse the steps
on the previous pa g e.
Note:
It is important to note that while the throat
illuminator section provides an excellent source of
general illumination, more then momentar y direct
skin contact should be avoided due to possible heat
build up.
4
Page 5

Lamp Replacement Instructions for
Welch Allyn Otoscopes
Fiber Optic Otoscopes
Conventional Otoscopes
5
Page 6

Lamp Replacement Instructions for
Welch Allyn Ophthalmoscopes
Lamp Replacement Caution:
Halogen lamps are pressurized to provide maximum
efficiency and illumination. Mistreatment may cause
shattering. Protect lamp surface against abrasio ns and
scratches. Use protective eyeglasses when handling. Be
sure power is off when replaci ng lamp. Dispose of lamp
with care.
CAUTION: Lamps may be hot. Lamp should be
Cleaning Recommen dation
Repairs and cleaning (wit h t he exception of lamp
replacement) beyond what is specif ied in the general
clean instructions section should be performed at the
factory. Do not apply alcohol, chemicals, or water to the
mirror or lenses.
allowed to cool before remo v al.
6
Page 7

Ophthalmoscopes
No. 11470, 11475 & No. 11710
Align
Ophthalmoscopes
No. 11720, 11730 & No. 11735
Align
General Cleaning Instructions
Excess solution entering the optical assembly could
Note:
damage internal components. Use caution to ensure cloth
is not saturated with solution.
The otoscope and ophthalmoscope instrument heads may be
cleaned with a dry cloth. windows may be cleaned with a cotton
swab dipped in alcohol or lens paper.
7
Page 8
Mode d’emploi de l’Otoscope/
Éclaireur de gorge no 20000
Pour raccorder l’otoscope/
eéclaireur de gorge à la source
d’alimentation:
Aligner les décopes de la base de
l’otoscope/éclaireur de gorge sur les
ergots de la source d’alimentation.
Appuyer légèrement et tourner de 90°.
L’otoscope/éclaireur de gorge est
désormais prêt à l’emploi. Pour le ret ir er,
procéder inversement. L’otoscope/
éclaireur de gorge se branche sur toutes
les sources d’alimentation Welch Allyn.
Pour utiliser l’éclaireur de gorge:
1. Saisir la partie otosco pe de la main gauche.
2. De la main droite, saisir le collier de serrage de
léclaireur de gorge au point (A) (sous la bague en
argent).
8
Page 9
3. T oute en tenant le collier de serrage
de léclaireur de gorge en position
fixe, dévisser la partie otoscope au
niveau de (A) jusqu’à ce qu’elle se
dégage.
4. Glisser la main droite jusqu’au
manche d’alimentation, le saisir et
le tourner dans le sens des aiguilles
d’une montre en maintenant la
partie otoscope immobile, jus qu’à
ce quelle se retire. L’éclaireur de
gorge est désomais prêt à l’emploi.
Pour remettre la partie otoscope
en place, procéder de manière
inverse.
REMARQUE:
Il faut noter que même si l’éclaireur de
gorge constitue une excellen te sour ce
d’éclairage général, un contact direct avec la
peau, sauf s’il est momentané, doit être
évité en raison d’une accumulatio n possible
de chaleur.
9
Page 10
Procédure de remplacement de la
lampe des otoscopes Welch Allyn
Otoscopes à fibres optiques
Otoscopes traditionnels
10
Page 11

Procédure de remplacement de la lampe
des ophtalmoscopes Welch Allyn
Mise en garde liée au remplacement de la
lampe:
Les lampes à halogène sont pressurisées pour fournier
une efficacité et un éclairage maximum. Une manipulation
incorrect rique de les briser. Protéger la surface de la
lampe contre les objets abrasifs ou qui ri squent de rayer.
Porter des lunettes de protection lors de la manipulation.
S’assurer que l’appareil est hors tension lors du
remplacement de la lampe. Jeter la lampe avec
précaution.
A TTENT ION: Les lampe s pe uvent êt re b rûla ntes . Les
laisser refroi dir avant de les reti rer.
Recommandation liée au nettoyage
Les réparations et le nettoyage (à l’e xcept ion du
remplacement de la lampe) non mention nés à la section
des consignes générales de nettoyage doivent se faire en
usine. Ne pas appliquer d’alcool, d’agents chimiques ou
d’eau au miroir ou aux lentilles.
11
Page 12

Ophthalmoscopes
N°. 11470, 11475 et N°. 11710
Aligner
Ophthalmoscopes
N°. 11720, 11730 et N°. 11735
Aligner
Consignes générales de nettoyage
Remarque :
l’ensemble optique risquant d’endommager les
composants internes, ne pas trop en ut iliser.
Les têtes d’otoscopes et d’ophta lmoscopes peuvent se
nettoyer avec un chiffon sec. Les objectifs peuvent se
nettoyer avec un bâtonnet ouaté im bibé d’alcool ou du
papier pour verres de lunettes. Veiller à ne pas gorger le
chiffon de solution.
l’infiltration d’une solut io n quelconque dans
12
Page 13

Bedienungsanleitung für die Otoskop/
Rachenleuchte Nr. 20000 von Welch
Allyn
Anschluß der Otoskop/
Rachenleuchte an die Stromquelle:
Die Ausschnitte in der Basis der Otoskop/
Rachenleuchte mit den Anschlüssen der
Stromqueele ausrichten. Vorsichtig
hineindrücken und um 90° drehen. Die
Otoskop/Rachenleuchte ist nun einsatzbereit.
Zum Herausnehmen dieses Verfahren in
umgekehrter Reihenfolge ausf"uhren. Die
Otoskop/Rachenleuchte paßt an alle 3,5 V
Stromquellen von Welch Allyn.
Gebrauch der Rachenleuchte:
1. Den Otoskopteil mit der linken Hand festhalten.
2. Den Kragen der Rachenleuchte mit der rechten Hand
am (A) (unter dem Silberring) ergreifen.
13
Page 14

3. Den Kragen der Rachenleucht e
festhalten, und gleichzeitig den
Otoskopteil am (A) nach links drehen
(entgegen dem Uhrzeigersinn), bis er
sich löst.
4. Die rechte Hand auf den Steuergriff
schieben, diesen ergreifen und nach
rechts drehen (im Uhrze igersinn), bis
sich das Otoskopteil löst. Dabei das
Otoskoptei l f es th alten. Nun ist die
Rachenleuchte einstazbe re it.
Um das Otoskopteil wieder zu befestigen,
vorstehende Schritte in umgekehrter
Reihenfolge ausfüh re n .
Hinweis:
Es wird darauf hingewiesen, daß di e
Rachenleuchte zwar eine hervorragende
Lichtquelle darstellt, daß eine längere, direkte
Berührung mit der Haut jedoch zu vermeiden ist,
da u.U. ein Wärmestau vorliege n kann.
14
Page 15

Anleitungen zum auswechseln der
Birne in Welch Allyn Otoskopen
Faseroptik-Otoskope
Herkömmliche Otoskope
15
Page 16

Anleitungen zum auswechseln der
Birne in Welch Allyn Ophtalmoskopen
Vorsich tsh i nweis bezüglich Ersatzb i rnen:
Halogenbirmen sind druckbeaufschlagt, um optimale
Leistung und Leuchtkraft zu bieten. Falsches Behandeln
kann zum Zerbrechen der Birne führen. Die
Birnenoberfläche vor Reib ung und Kratzern schützen.
Beim Umgang mit der Birne eine Schutzbrille tragen. Beim
Auswechseln der Birne sicherst ellen, daß der Strom
ausgeschaltet ist. Die Birne mit Vorsicht entsorgen.
VORSICHT: Die Bernen können heiß sein. Vor dem
Ausweschseln abkühlen lassen.
Hinweise zur Reinigung
Reparaturen und Reinigung (mit Ausnahme des
Birnenwechsels), die über die Beschreibung in dem
Abschnitt mit den allgemeinen Reinigungsanleitungen
hinausgehen, sollten nur im Werk erfolgen. Keinen
Alkohol, keine Chemikalie n und kein Wasser auf den
Spiegel oder das Glas auftragen.
16
Page 17

Ophtalmoskope
Nr. 11470, 11475 und Nr. 11710
Ausrichte
Ophthalmoscop es
No. 11720, 11730 und No. 11735
Ausrichte
Allgemeine Reinigungsanleitungen
Hinweis:
Die Instrumentenköpfe der Otoskope und Ophtalmoskope
können mit einem trockenen Tuch gereinigt werden. Zum
Reinigen der Sichtgl äser kann ein in Alkohol getauchter
Baumwolltupfer oder Glasreinigungspapier dienen.
Überschüssige Lösung, die in die Optik
eindringt, kann die internen Komponenten
beschädigen. Darauf achten, daß das T uch nicht
mit Lösung gesättigt ist.
17
Page 18

Instrucciones operativas para el
Otoscopio/Iluminador de garganta No.
20000
Para conectar el otoscopio/
iluminador de garganta a la fuente
de alimentación:
Alinee los cortes de la base del otoscopio/
iluminador de garganta con las orejetas de la
fuente de alimentación. Empuje haci a dentro
ligeramente y gire en un ángulo de 90°. El
otoscopio/iluminador de gargant a est á ahora
listo para el uso. Para retirarlo, invierta este
procedimiento. El otoscopio/iluminador de
garganta se ajusta a todas fuentes de
alimentación Welch Allyn de 3.5 v.
Para usar el iluminador de garganta:
1. Tome la sección del otoscopio con la mano
izquierda.
2. Con la mano derecha, tome el collarin del iluminador
de gargante en el (A) (bajo el aro plateado).
18
Page 19

3. Mientras sostiene el collarin del
iluminador in móv il, gi re la s ecci ón d el
otoscopio en sentido antihorario en el
(A) hasta que se suelten las secciones
del otoscopio.
4. Deslice la mano derecha hacia abajo
hasta el mango, tómelo y gírelo en
sentido horario mientras mantiene la
sección del otoscopio. El iluminador
de garganta queda así listo para el
uso.
Para reemplazar la sección del otosco pio ,
invierta los pasos anteriores.
Nota:
Es importante hacer notar que si bien la sección del
iluminador de garganta proporciona una excelente
fuente de iluminación general, debe evitarse el
contacto directo más que momentáneo con la piel
debido a la posible acumulación de calor.
19
Page 20

Instrucciones de cambio de bombillas
para otoscopios Welch Allyn
Otoscopios de fibra óptica
Otoscopios convencionales
20
Page 21

Instrucciones de cambio de bombillas
para oftalmoscopios Welch Allyn
Precaución para el cambio de bombillas:
Las bombillas halógenas están bajo presión para ofrecer
máxima eficiencia e iluminación. El maltrato puede causar
que se quiebren. Proteja la super f ici e de la bombilla
contra abrasiones y rasguños. Use anteojos pr ot ect or es
cuando manipule las bombillas. A seqúrese de que el
suministro esté cortado cuando cambie la bombil la.
Deseche la bombilla con cuidado.
PRECAUCIÓN: Las bombillas pued e n esta r
Recomendación para limpieza
Las reparaciones y limpiezas (con la excepción del cambio
de bombillas) más allá de lo especificado en la sección de
instrucciones generales de limpieza deben realizarse en la
fábrica. No aplique alco hol, agentes químicos o agua al
espejo o a los lent e s .
calientes. Debe permitirse que la
bombilla se enfríe antes de retiraria.
21
Page 22

Oftalmoscopios
No. 11470, 11745 y No. 11710
Alinear
Oftalmoscopios
No. 11720, 11730 y No. 11735
Alinear
Instrucciones general es de l imp i eza
Note:
Si entra exceso de solución al conjunt o ópt ico
puede dañar los componentes internos. Sea precavido
para asegurar que el paño no esté saturado con solución.
Las cabezas instrumentales del otoscopio y oftalmoscopio
pueden limpiarse con un paño seco. Las ventanas pueden
limpiarse con un palillo de algodón sumergido en alcohol
o papel para lentes.
22
Page 23

Istruzioni sul funzionamento
dell’Otoscopio/Illuminatore della gola
N. 20000 della Welch Allyn
Per collegare l’oto s copio/
illuminatore della gola
all’alimentazione:
Allineare le tacche poste sulla base
dell’otoscopio/illumi nat or e della gola alle
lamella della sorgente di alimentazione.
Spingerle leggermente al su o inter no e
ruotarle di 90°. L’otoscopio/illumin at o r e della
gola è ora pronto all’uso. Per estrar lo
eseguire la procedura inversa. L’otoscopio/
illuminatore della gola accetta qualsiasi
sorgente di alimentazione Welch Allyn a 3,5 v.
Uso dell’illuminatore della gola :
1. Afferrare la sezione otoscopica con la mano sinistra.
23
Page 24

2. Con la mano destra, afferrare il
collare dell’illuminator e della gola
in corrispondenza della (A ) (ubicato
sotta l’anello argentato) .
3. Tenendo immobile il collare dell-
illuminatore della gola, al punto
contrassegnato dalla (A) r uotare la
sezione otoscopica in senso
antiorario finceé le se zioni
otoscopiche non si liberano.
4. Far scorrere la mano destra lungo
l’impugnatura elettrica, afferrarla e
ruotarla in senso orario mentre si
tiene immobile la sezione
otoscopica fino a rimuovere quest’ ult ima.
L’illuminatore della gola è ora pr on t o all’uso.
Per reinstallare la sezione otoscopica,
eseguire la procedura all’inverso.
Nota:
Si osservi che, benché la sezione del l’ il luminatore
della gola constituisca una sorg ente di illuminazione
eccellente, è bene evitare il contatto prolungato con la
pelle per prevenire l’accumulo locale del calore.
24
Page 25

Istruzioni sulla sostituzione della
lampadina per gli otoscopi Welch
Allyn
Otoscopi a fibre otti che
Otoscopi tradizionali
25
Page 26

Istruzioni sulla sostituzione della
lampadrina per gli oftalmoscopi Welch
Allyn
Attenzione - sostituzione della lampadina:
La pressione presente nelle lampadine alogene garantisce
illuminazione ed efficienza massime, ma se vengono
sottoposte a uso improprio potrebbero frantumarsi.
Proteggere la superficie della lampadina da abrasioni e
graffi. Indossare occhiali protettivi mentre la si maneggia.
Accertarsi di aver scollegato l’alimentazione durante la
sostituzione della lampadina e disperdere la lampadina
bruciata in modo opportuno.
ATTENZIONE: le lampadine potrebbero essere
Suggerimenti per la pulizia
Affidare al prod uttor e la rip arazion e e la pu lizia oltre a quanto
specificato nelle istruzioni di pulizia generale (ad eccezione
della sostituzione della lampadina). Non usare alcool,
elementi chimici o acqua per pulire lo specchio o le lenti.
calde al tatto; lasciarle raffreddare
prima di rimuoverl e.
26
Page 27

Oftalmoscopi
N. 11470, 11475 e N. 11710
Allineare
Oftalmoscopi
N. 11720, 11730e N. 11735
Allineare
Istruzioni gener al i per la pulizia
Nota:
I componenti interni potrebbero danneggiarsi se si
lascia penetrare nel gruppo ott ico una quantità
eccessiva di soluzione detergente. Prestare
attenzione a non saturare il panno di soluzi one.
Pulire le testine degli otoscopi e oftalmoscopi con un
panno asciutto. Immergere un bastoncino cotonato in
alcool o servirsi dell cartine di pulizia delle lenti per pulire
le fines tre.
27
Page 28

28
Page 29

Illustration
Illustration
Abbildung
Illustración
Illustrazione
Catalog No.
Numéro de référence
Katalog-Nr.
Número de catálogo
Numero di ordinazione
20100 00200
20200* 03100
21600 00200
21700* 03100
24030*
24031*
25020* 03100
20000* 03100
Lamp No.
Numéro de lampe
de rechange
Ersatzbirnen-Nr.
Número de repuesto
de bombilla
Numero della
lampadina di
ricambio
03400
Page 30

Illustration
Illustration
Abbildung
Illustración
Illustrazione
* Fiber Optic
Catalog No.
Numéro de référence
Katalog-Nr.
Número de catálogo
Numero di ordinazione
20202* 03100
11470
11475
11710 03000
11720 04900
11730 04900
11735 04900
Lamp No.
Numéro de lampe
de rechange
Ersatzbirnen-Nr.
Número de repuesto
de bombilla
Numero della
lampadina di
ricambio
04400
Page 31

4341 State Street road, PO Box 220
Skaneateles Falls, NY 13153-0220 U.S.A.
Printed in U.S.A. Part No. 20066-11 Rev. E
 Loading...