

Page 1

Welch Allyn
Women's Health
Service Manual
Image Management System
for
Colposcopy
User’s Guide
8/3/1999
Page 2

Table of Contents
Section 2-1
OPERATOR NAMES AND PASSWORDS.................................................................................................................1
Supervisor Access Code................................................................................................................................................................................1
System Setup Information Screen ...............................................................................................................................................................2
User List and Password Screen...................................................................................................................................................................3
Operator Access Code....................................................................................................................................................................................4
To Add a New User..........................................................................................................................................................................................4
To Delete a User...............................................................................................................................................................................................4
To Edit/Change a User.....................................................................................................................................................................................4
To Add/Delete Other Colposcopists ............................................................................................................................................................5
To Delete Other Colposcopist(s)............................................................................................................................... ....................................5
SYSTEM BACKUP........................................................................................................................................................6
To Change the time or days schedule:.......................................................................................................................................................7
To Change the time or days schedule.........................................................................................................................................................8
Section 2-2
Starting the system for daily operations ................................................................................................................1
Select Patient screen.................................................................................................................................................2
To Add a New Patient.....................................................................................................................................................................................3
To Find and Select an Existing Patient - Using a Patient MR Number...............................................................................................4
To Find and Select an Existing Patient - Searching - By Complete List.............................................................................................4
To Find and Select an Existing Patient - Using the Patient Last Name..............................................................................................4
To Find and Select An Existing Patient - Searching - By First and/or Middle Name:.....................................................................5
Delete a Patient................................................................................................................................................................................................5
Edit the Patient Information Screen (access from the Select Patient screen)...............................................5
NEW VISIT (Patient with N o Prior Exams).................................................................................................................................................6
NEW VISIT (Patient With Prior Exams).......................................................................................................................................................8
TO PROCEED WITH CURRENT VISIT......................................................................................................................................................... 14
Patient History screen..............................................................................................................................................15
Laboratory and Treatment Information.................................................................................................................23
Examination Results.....................................................................................................................................................................................23
PATHOLOGY RESULTS -............................................................................................................................................................................... 24
LABORATORY TESTS -.................................................................................................................................................................................24
TREATMENTS.................................................................................................................................................................................................25
FOLLOW-UP VISITS....................................................................................................................................................................................... 25
To Update Laboratory and Treatment Inf ormat ion................................................................................................................................32
Review Previous Visit(s)..........................................................................................................................................33
Delete Visit(s).............................................................................................................................................................34
VISIT DATA SCREEN.................................................................................................................................................35
To enter visit data prior to an exam, foll owi ng an exam and to edit data of stored visits.......................................................... 35
Pre Visit Data Entry....................................................................................................................................................................................... 35
To proceed with open visit......................................................................................................................................................................... 35
To enter new or edit existing data to the V isit Data screen of a stored visit:................................................................................ 35
Page 3

Section 2-3
Acquire Images...........................................................................................................................................................1
Colposcopy Assessment Form (Cervix)..................................................................................................................4
Selection, Display and Marking of I m ages...............................................................................................................................................5
Selection, Display and Marking of I m ages...............................................................................................................................................6
Data Entry ..........................................................................................................................................................................................................7
Colposcopy Assessment Form - Vagina (Fig. 3.14)...............................................................................................9
Data Entry ..........................................................................................................................................................................................................9
Colposcopy Assessment Form - Vulva (Fig. 3.23) ............................................................................................... 11
Data Entry ........................................................................................................................................................................................................11
Colposcopy Graphic Annotation screen - Cervix...............................................................................................13
Selection, Display and Marking of I m ages.............................................................................................................................................13
Annotations.....................................................................................................................................................................................................13
Colposcopy Image Annotation screen - Cervix..................................................................................................14
Selection, Display and Marking of I m ages.............................................................................................................................................14
Colposcopy Image Annotation screen - Vulva and Vagina..............................................................................15
Selection, Display and Marking of I m ages.............................................................................................................................................15
Review Images..........................................................................................................................................................16
Split Screen ...............................................................................................................................................................17
Quarter Split Screen Display.................................................................................................................................. 20
Text and Graphics (Annotations)........................................................................................................................... 21
To apply Text and Graphics to visit f iles ret ri eved f r om st orage.......................................................................................................21
To Apply Alpha/Numeric Text....................................................................................................................................................................24
To Paint Lines and Areas.............................................................................................................................................................................24
To Erase Annotations from the displayed image:......................................................................................................................................25
To Close the System.................................................................................................................................................26
Section 2-4
Save to Disk.................................................................................................................................................................1
Save to Disk (Without Compression)..........................................................................................................................................................3
Save to Disk (With Compression) ................................................................................................................................................................4
Print ............................................................................................................................................................................... 5
Reports & Forms..........................................................................................................................................................7
Colposcopy Procedure Form.........................................................................................................................................................................9
To Print.............................................................................................................................................................................................................10
Visits to Arrange Reports........................................................................................................................................ 12
Section 2-5
Camera/Image Adjustments...................................................................................................................................... 1
System Date and Time Maintenance......................................................................................................................3
Changing the Time...........................................................................................................................................................................................4
Changing the Year...........................................................................................................................................................................................4
Changing the Month........................................................................................................................................................................................4
Changing the Day/Date...................................................................................................................................................................................4
Changing the Time Zone................................................................................................................................................................................5
Install Settings .................................................................................................................................................................................................6
Displaying the Clock.......................................................................................................................................................................................6
Page 4
SECTION 1
SYSTEM SECURITY, ACCESS AND BACKUP
For multi user locations it is recommended that only limited Supervisors on site have access to the system
operating features (system setup).
The Supervisors at each venue should generally be responsible for the system activities, including access to the
system by the individual operators (colposcopists) and the use of established system standards.
OPERATOR NAMES AND PASSWORDS
Supervisor Access Code
Before routine clinic operations are begun, a Unique System Password must be installed in each individual unit.
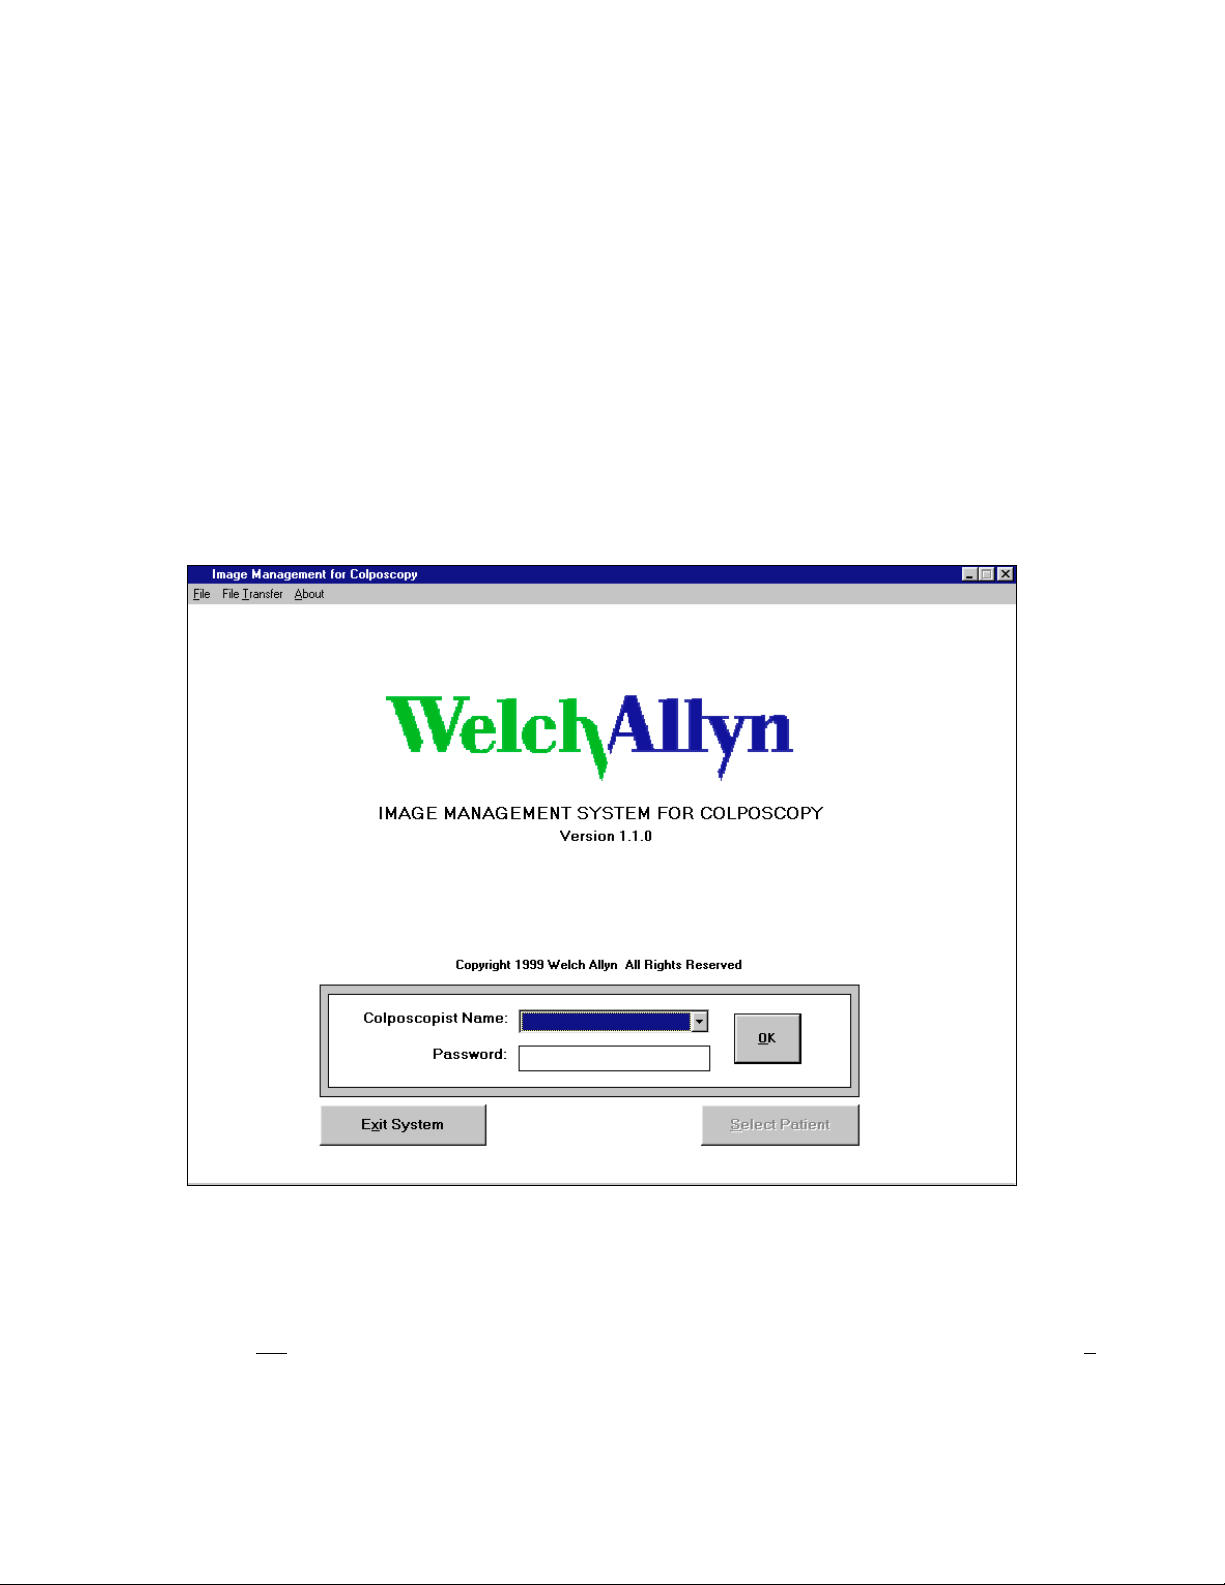
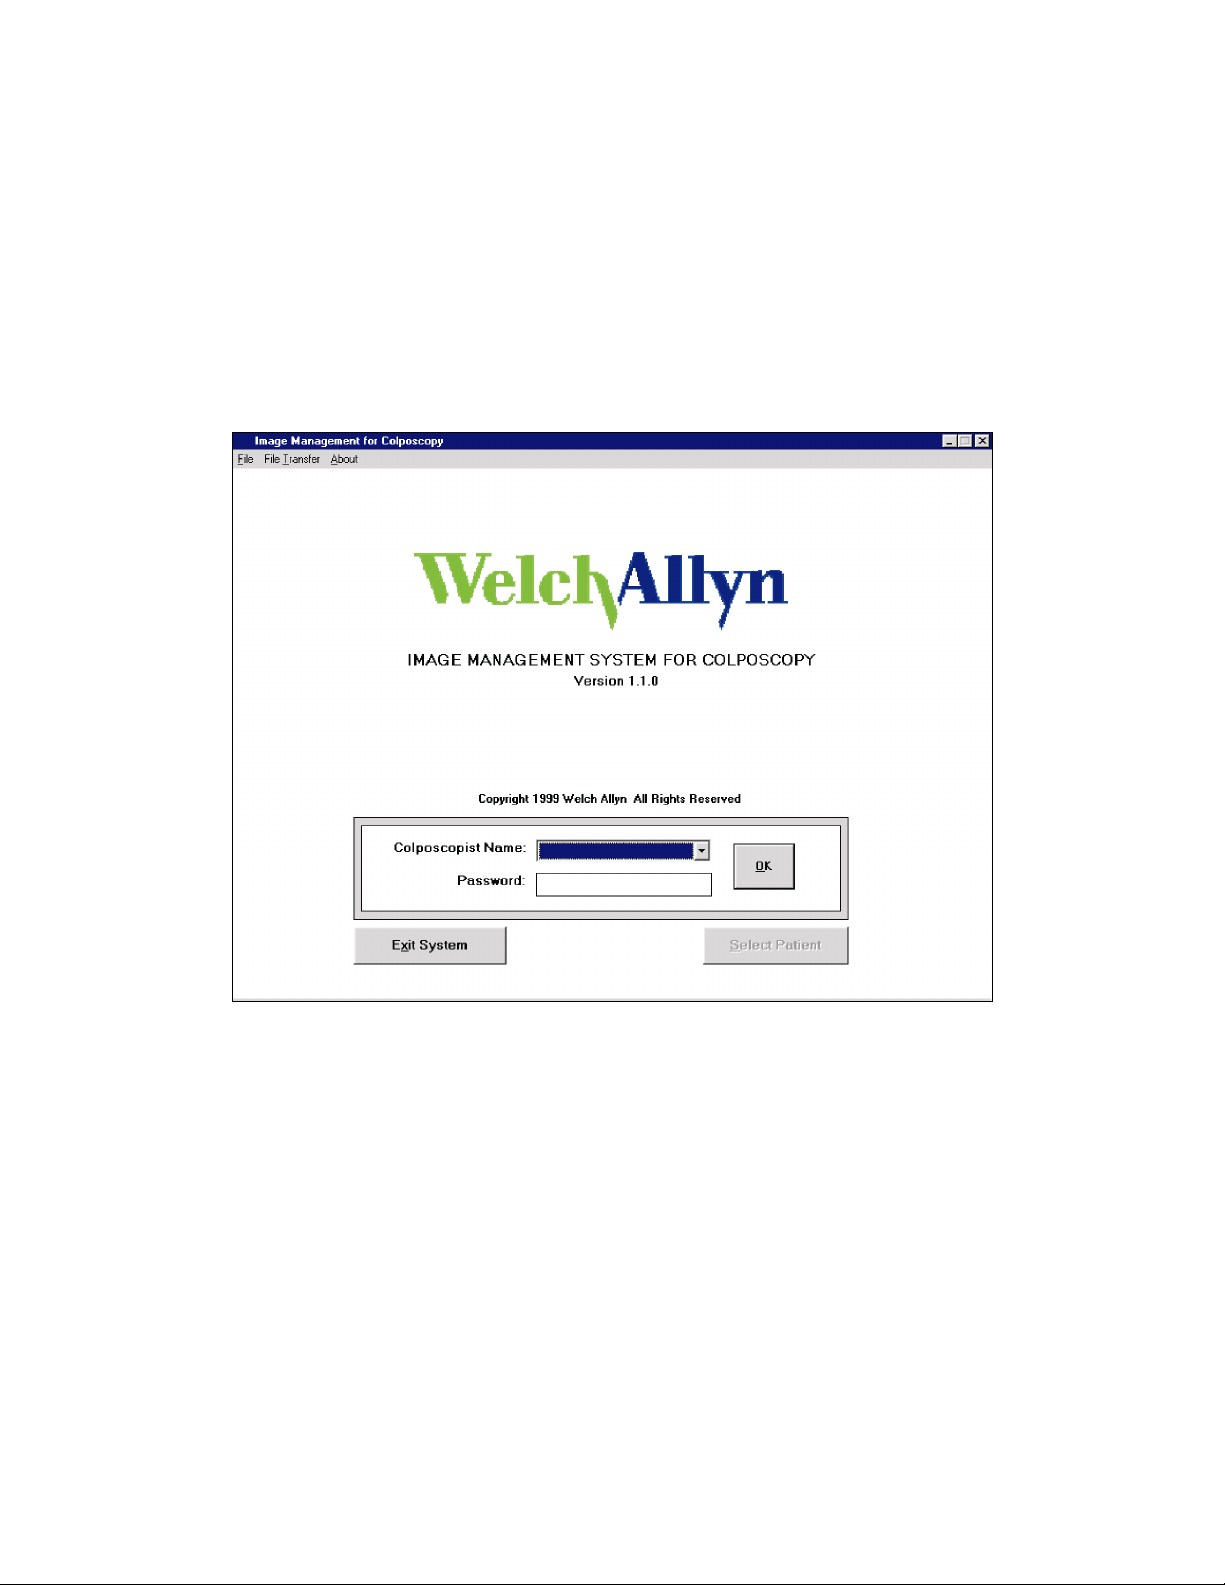
Following initial boot-up, the opening screen w ill appear (Fig. 1.1).
Fig. 1.1
• Click on File (immediately at the top left corner of the screen). A sic-line menu w ill appear. Click on S
Setup. The System Setup information screen will appear (Fig. 1.2). A prom pt will appear in the System
Password box.
Click here to return to the Table of Contents
1 - 1
8/3/1999
ystem
4444
Page 5

SECTION 1
SYSTEM SECURITY, ACCESS AND BACKUP
System Setup Information Screen
NOTE:
preset with WELCH ALLYN as the
System Password. This must be
replaced by the site system Supervisor
with the site Unique Password
Type WELCHALLYN in the System Password Box.
OK will be activated to allow access to the Syst em
Setup feature.
• Click on the Clinic Name Box and type full
Clinic Name (30 characters max).
• Review the settings below and change as
required.
• Click on Add/Edit Users . The User List and
Passwords screen will appear (Fig. 1. 3) .
Each system has been factory
Fig. 1.2
Max Position Error is preset to 0.
Save files as JPG is on ✔
Verify above
NOTE: The image acquisition “snapping” feature has been factory preset to be mouse activated. To
activate for manual or foot switch use, • Click on Foot Switch | On.
- correct if necessary.
Click here to return to the Table of Contents 4
4
44
1 - 2
8/3/1999
Page 6
SECTION 1
SYSTEM SECURITY, ACCESS AND BACKUP
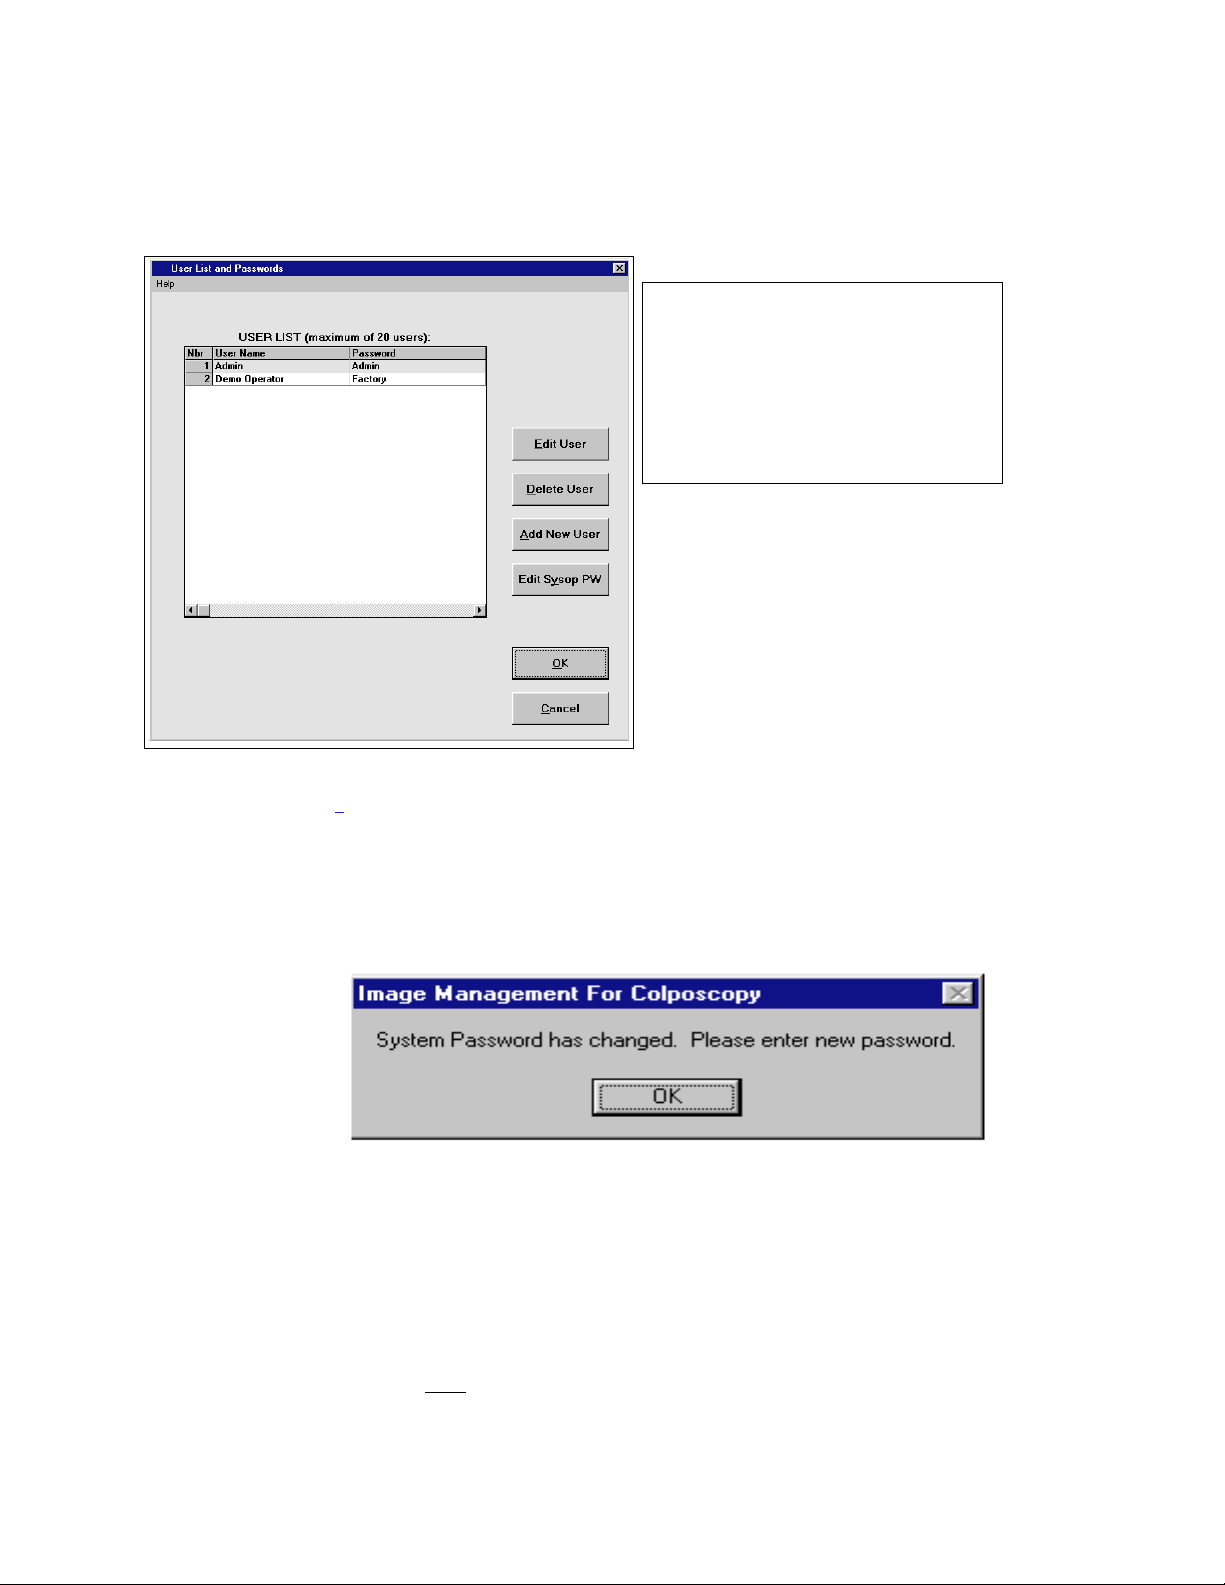
User List and Password Screen
NOTE:
System must have a
minimum of one installed operator at
all times.
Demo operator (User) Factory
(Password) is factory installed. This
should be deleted when site
operators are entered.
Fig. 1.3
• Click on Edit Sysop PW . The Sysop Password box will be activated including prompt followed by
WELCHALLYN. Double click on WELCHALLYN to highlight. Enter
Supervisor Unique Password
(20
characters max). Click on Change .
• Click on OK . The
System Setup Information
screen will appear including the following box
(Fig. 1.4).
Fig. 1.4
Click on OK . A prompt will appear in the System Password box.
Supervisor unique
Enter
Password.
All feature switches will activat e conf irming system setup.
Supervisor unique Password only
can now be used to gain access to the system.
• Click OK to return to the System Setup Infor m at ion screen.
1 - 3
8/3/1999
Page 7

SECTION 1
SYSTEM SECURITY, ACCESS AND BACKUP
Click here to return to the Table of Contents 4
4
44
Operator Access Code
Before individual operators (Colposcopists) can ut iliz e t he syst em, his/her name and
installed. These entries must be executed by t he sit e super visor w ill m a int ain a secur e r e cor d of all user nam es
and passwords.
Click Add/Edit Use r s .
User List and Passwords
screen will appear (Fig. 1. 3) .
unique
password must be
To Add a New User
• Click on Add New User . A prompt will appear in the
• Enter user name (20 characters max).
• Press Tab key. A prompt will appear in the Passw or d box.
• Enter Password (20 characters max).
• Click on Add . User name and password will be displayed on the
• Click on OK to save New User. The
or
System Setup Information
User Name
box.
User List
screen will return.
.
• Click on Cancel to cancel Add New User entry. The
System Setup Information
screen will return.
To Delete a User
• Click on designated User line to highlight.
• Click on Delete User . The selected user w ill disappear .
• Click on OK to Delete User. The
or
• Click on Cancel to cancel delete command. The
System Setup Information
System Setup Information
screen will return.
screen will return.
To Edit/Change a User
• Click on designated User Line to highlight.
• Click on Edit User . A prompt w ill appear in the
Change name as required. Press Tab key. Prompt w ill appear in
user password. Change as required.
• Click on Change . Revised name and/or password will replace designated name and/or passw or d on
List.
• Click on OK to change name and/or password. The
User Name
System Setup Information
box followed by designated user name.
Password
box followed by designated
screen will return.
User
or
• Click on Cancel to cancel change command. The
• Click OK to enter operating system.
1 - 4
System Setup Information
screen will return.
8/3/1999
Page 8

SECTION 1
SYSTEM SECURITY, ACCESS AND BACKUP
Click here to return to the Table of Contents 4
4
44
1 - 5
8/3/1999
Page 9
SECTION 1
SYSTEM SECURITY, ACCESS AND BACKUP
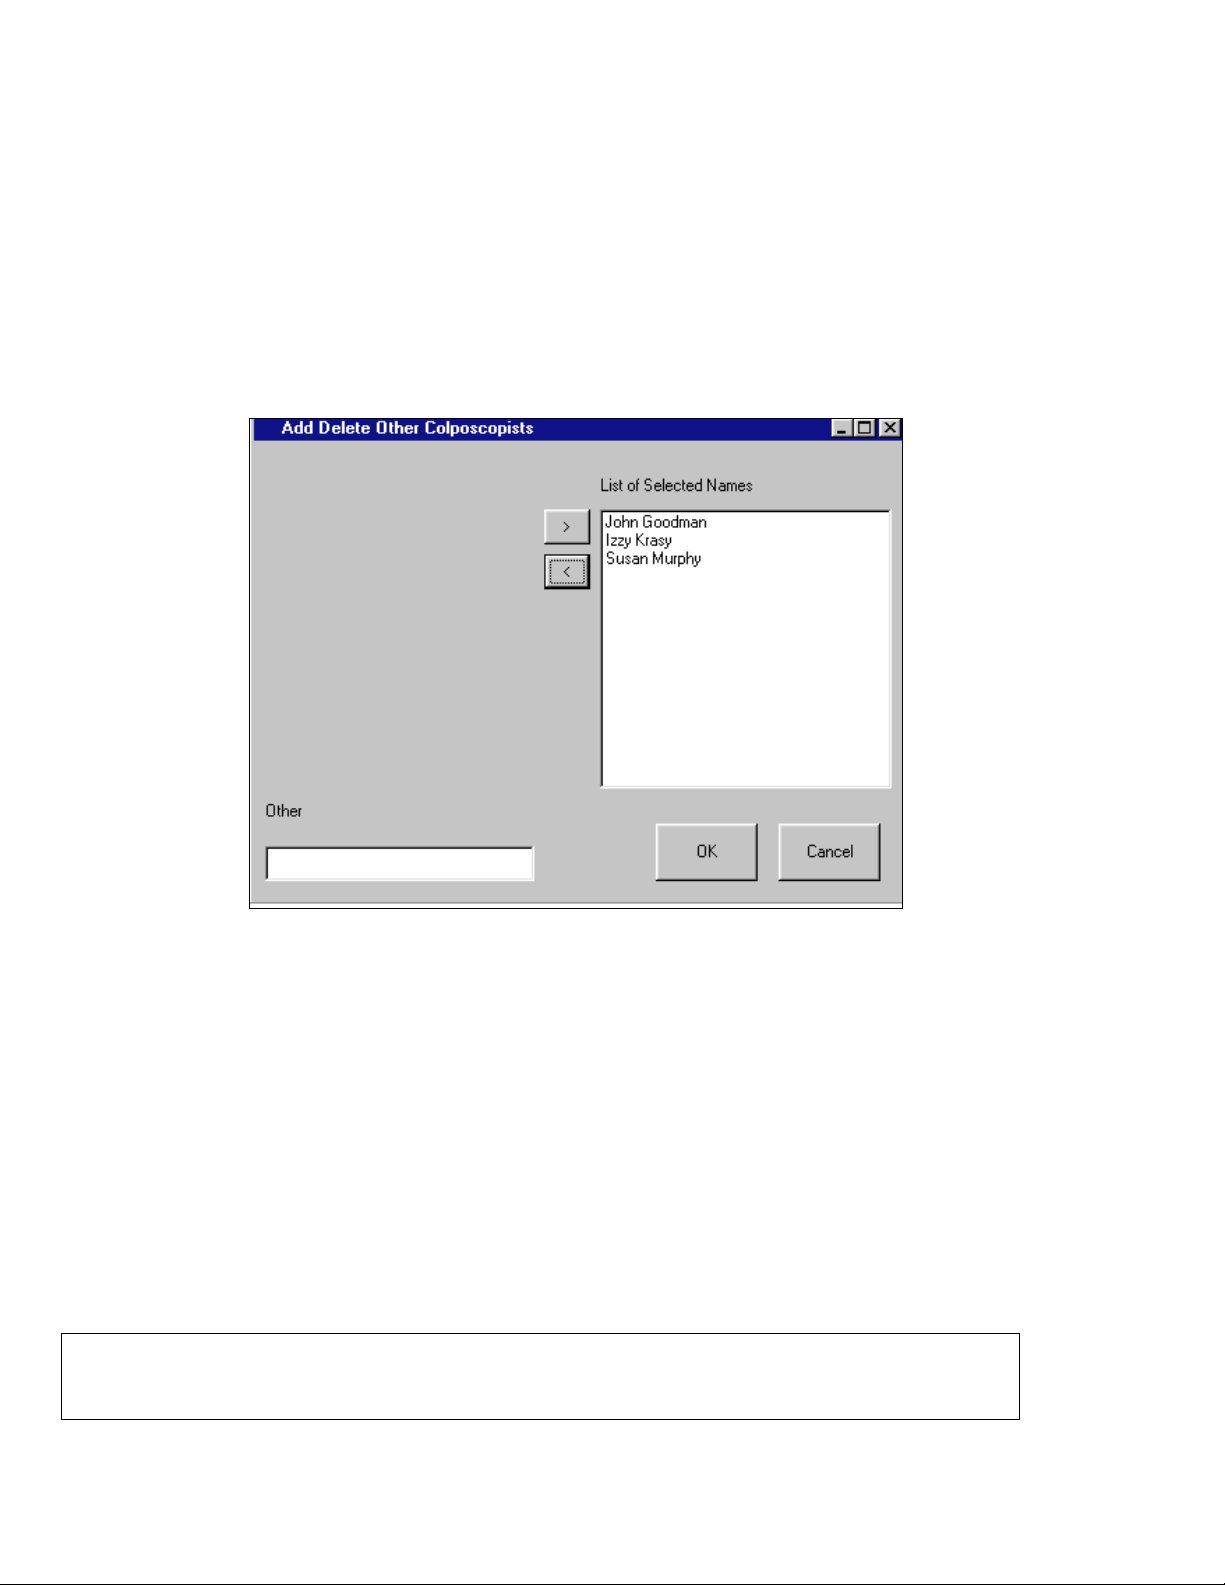
To Add/Delete Other Colposcopists
Enter the System Set up Infor m at ion screen ( Fig. 1. 2, Page 1-2).
• Enter System Password.
• Click Add/Delete Other Colposcopists . The
(Fig. 1.5).
Add or Delete Other Colposcopists screen will appear
Fig. 1.5
An active cursor will appear in the New Colposcopist box.
• Type Colposcopist’s name. • Click >. . The Colposcopist’s name will appear at t he t op of t he OTHER
COLPOSCOPIST LIST.
• Click on OK .
To Delete Other Colposcopist(s)
Click on the Colposcopist’s name to highlight. • Click <. The Colposcopist name will be removed f r om t he list .
Click on OK .
NOTE
system. When selected for a visit (See New Visit section), the
permanently included in the visit file (Visit Data) and also be included in all visit printed reports.
Other
:
Colposcopists are not primary users. The use of t heir nam es w ill not gain access t o t he
other
colposcopist(s) name will be
Click here to return to the Table of Contents 4
1 - 6
8/3/1999
4
44
Page 10

SECTION 1
SYSTEM SECURITY, ACCESS AND BACKUP
SYSTEM BACKUP
The Welch Allyn Image Management System includes an installed and pre-programmed Colorado Tape Drive.
Properly used, this feature provides
formatted tapes
Two
hard drive.
are included. Each has storage capacity equal to 50% more than the system resident
Full System Backup
of all programs and data stored in the system.
The System Backup program has been preset to execute a
day of the week. Immediately f ollow ing the backup pr ocedur e, the Backup program will automat ically perf or m a
Compare
Depending on the amount of stored data, the
long as three hours. An equal amount of time is required to per f or m t he
hours.
Up to six hours would be required to perform the
visits which is the approximate capacity of the Welch Allyn Imagement Management System (bef or e
expansion). Fewer than 22,500 visit s w ill require proportionally less time (i. e. , 1,000 visits will require 18
minutes, etc.).
To initiate the Backup feat ur e
indicator light will illuminate verifying pr oper insertion. The drive will emit sounds fo r appr oxim at ely one m inute
indicating that the tape is being properly set.
The
each day.
• Remove the tape every morning before star t ing the Welch Allyn Im age Management Syst em and st or e it in
run to verify that the files on tape match those on the syst em har d dr ive.
Full System Backup
Full System Backup/Compare
, insert a tape into t h e t a p e d r iv e . (It w ill n o t e n ter comple t e ly .) A green
Backup
a secure place (preferably a fireproof vault on or off pr emises) .
feature will automatically begin t o execut e a
Full System Backup
routine will take fro m s e v e ral minutes t o a s
Compare
Full System Backup/Compare
beginning at 11:59 p.m. each
routine for a total of up to six
routine for 22,500 patient
routine at 11:59 p.m.
• Insert the other tape. This t ape w ill be used t o execut e t he Full Syst em Backup/ Com par e r out ine at 11: 59
p.m. that evening.
The Full System Backup will overwrite all data on the tape.
• Continue to repeat the tape replacement pr ocedur e ever y mor ning alter nat ing betw een t he t w o t apes.
NOTE
: The Welch Allyn Image Management System must be left ON for the backup featur e t o oper at e.
At the end of daily use, Enter the Welch Allyn Imagement Managem ent Syst em opening screen and leave the
system in this mode.
Automatic Power saver features have been installed to minimize power usage during idle periods.
The screen saver feature will automat ically activat e af t er a f ew m inutes of m onit or non- use -- or the monitor can
be turned off. Closing the monit or w ill not af f ect t he backup f e at ur e.
1 - 7
Click here to return to the Table of Contents 4
8/3/1999
4
44
Page 11
SECTION 1
SYSTEM SECURITY, ACCESS AND BACKUP
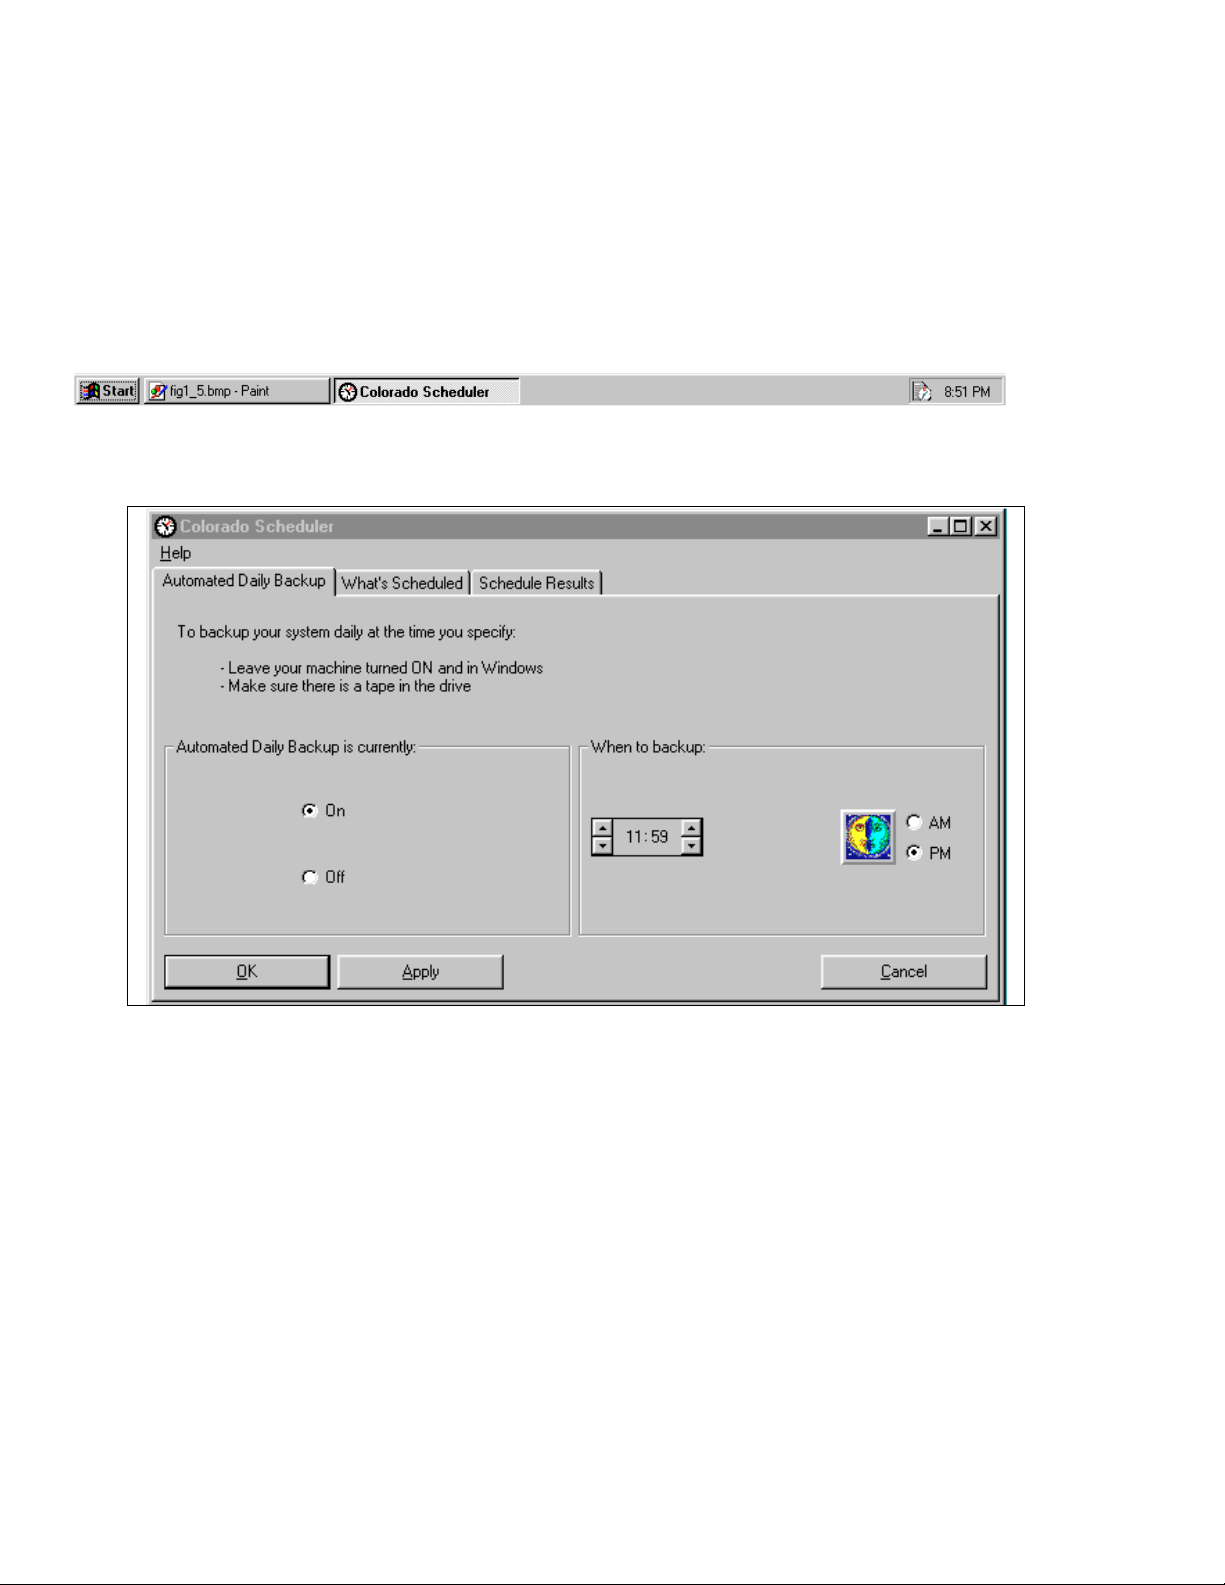
To Change the time or days schedule:
• Click Exit System on the Welch Allyn Image Management System opening screen.
• Click on the Scheduler icon at the bottom right hand side of the screen - - next t o t he clock ( Fig. 1. 6).
Fig. 1.6
The Colorado Scheduler window will appear (Fig. 1.7).
Automated Daily Backup
The
When to backup
The
• Click OK to return to the Operating System.
or
time should show 11:59 , ~ PM.
page should indicate that the Automated Daily Backup is currently ~ On.
1 - 8
Fig. 1.7
Click here to return to the Table of Contents
8/3/1999
4444
Page 12
SECTION 1
SYSTEM SECURITY, ACCESS AND BACKUP
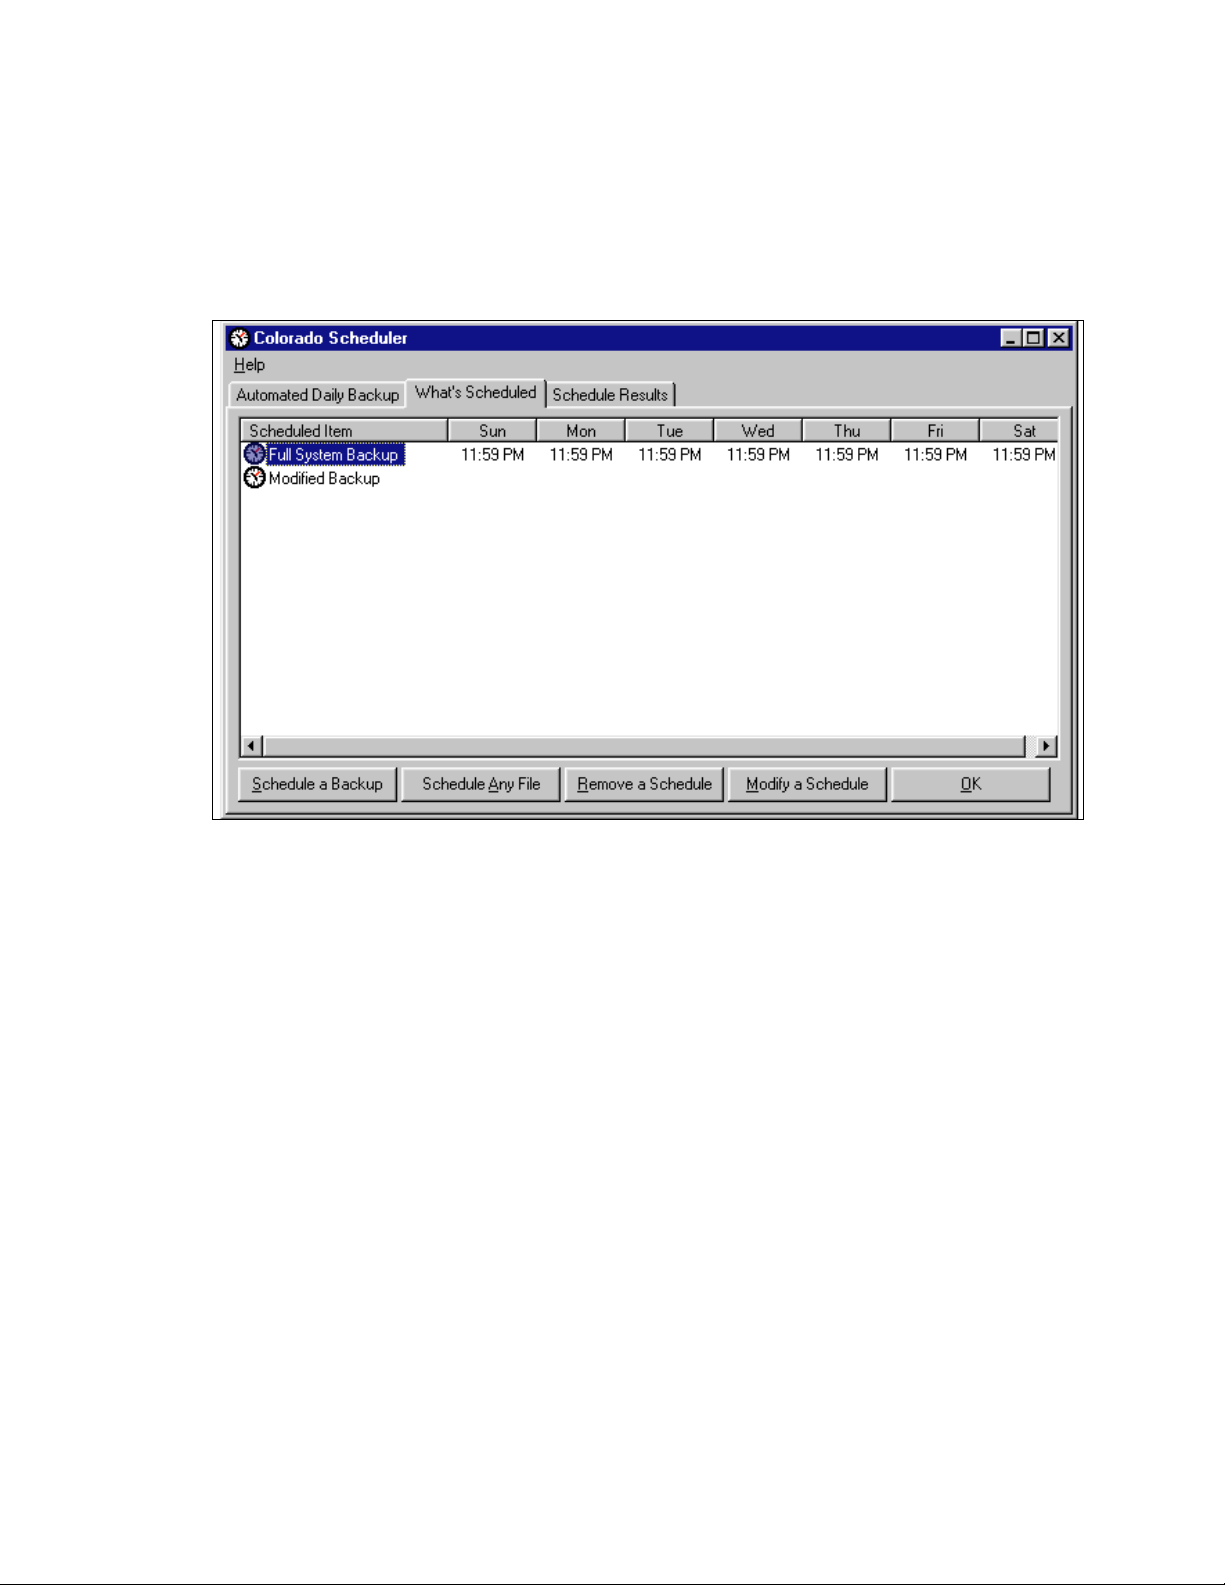
To Change the time or days schedule
• Click What’s Scheduled . The What’s Scheduled page will appear (Fig. 1. 8) .
Fig. 1.8
1 - 9
8/3/1999
Page 13

SECTION 1
SYSTEM SECURITY, ACCESS AND BACKUP
Click here to return to the Table of Contents
4444
1 - 10
8/3/1999
Page 14
SECTION 1
SYSTEM SECURITY, ACCESS AND BACKUP
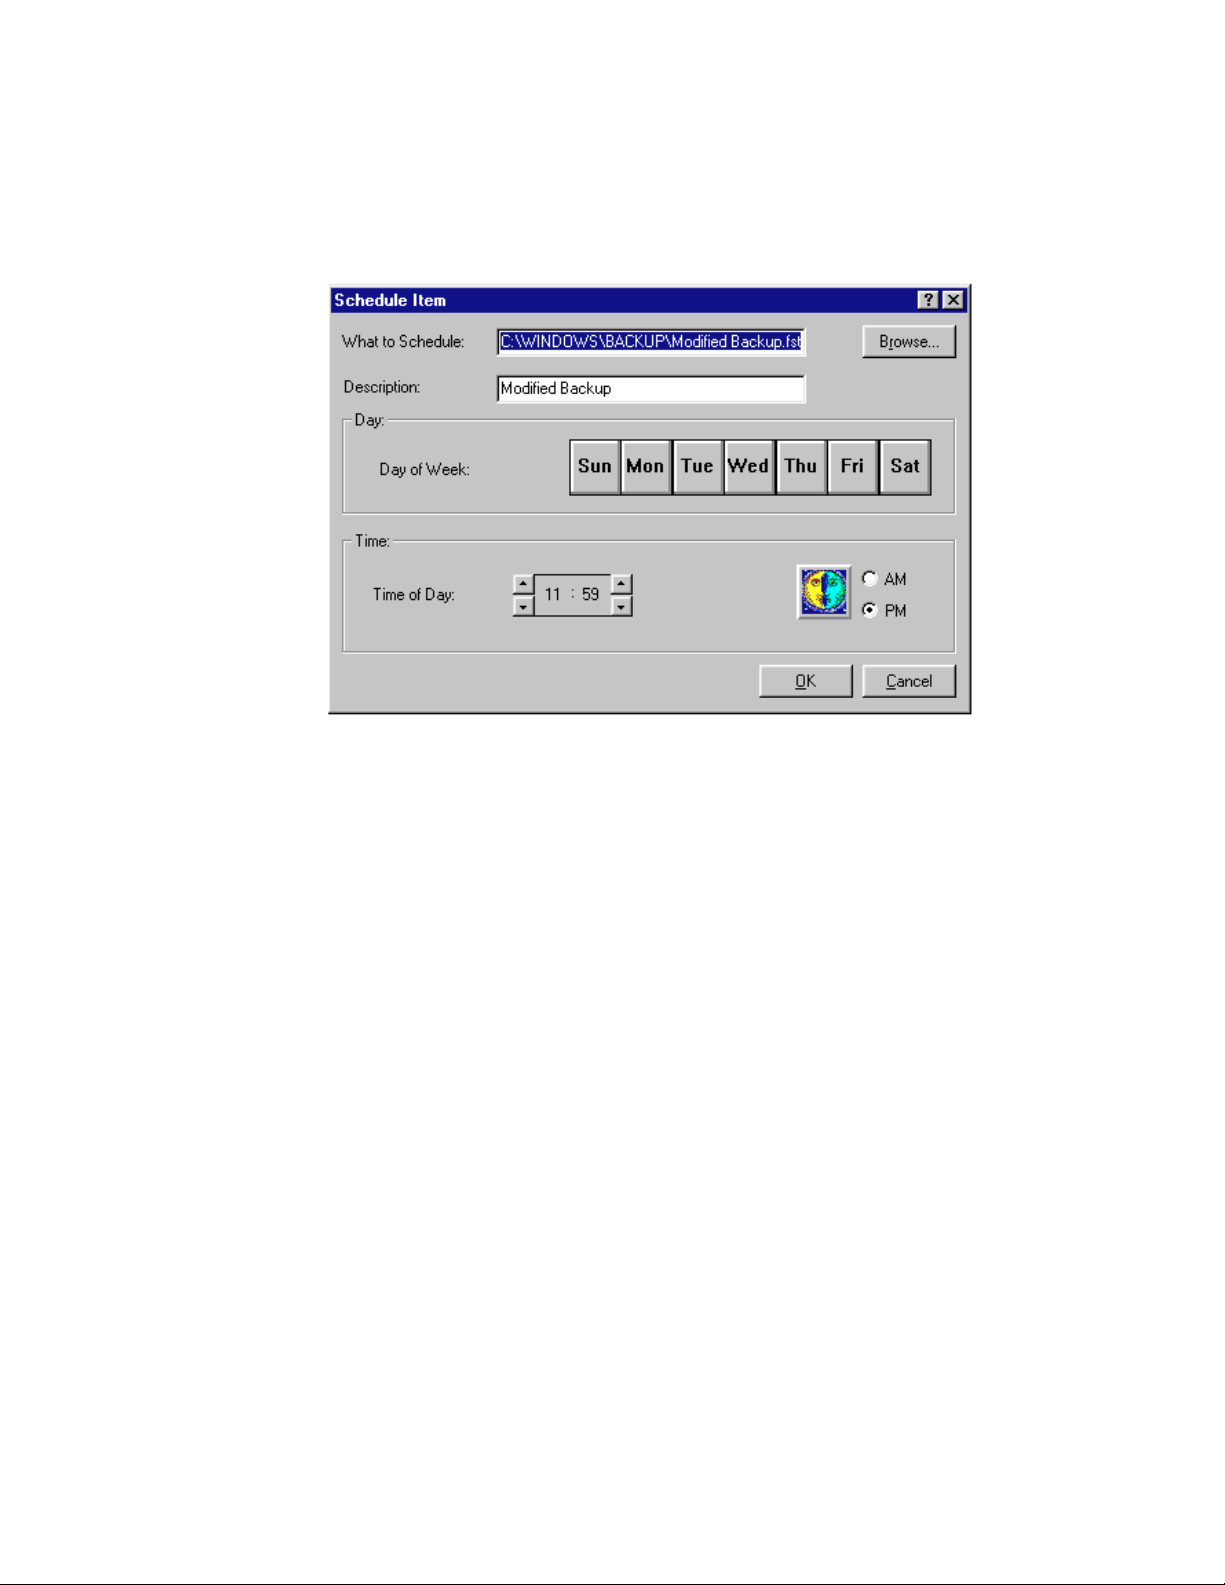
• Click Modify a Schedule. An information box will appear. • Click Yes . The Schedule Item window w ill
appear (Fig. 1.9).
Fig. 1.9
• Click on a Day of Week tile to deactivate that day and remove from schedule. (• Click again to reactivate).
• Click on Time of Day buttons ▲ or ▼ to advance or retract the hour or minutes to set new daily start t ime
schedule.
• Click on PM ~ or AM ~ to change.
• Click OK . The Colorado Scheduler will reappear displaying the revised day and time schedules. ( I f
incorrect, • Click Modify a Schedule to return to the Schedule Item window.)
• Click OK if correct. The revised schedule will be set.
REFER TO THE ENCLOSED COLORADO MANUAL FOR OTHER OPERATING TIPS AND
INSTRUCTIONS FOR EXPANDED PROTECTION OF SYSTEM DATA.
1 - 11
8/3/1999
Page 15

SECTION 1
SYSTEM SECURITY, ACCESS AND BACKUP
Click here to return to the Table of Contents
1 - 12
8/3/1999
Page 16
SECTION 2
OPERATOR INSTRUCTIONS
STARTING THE SYSTEM FOR DAILY OPERATIONS
To start The Welch Allyn Image Management System tur n t he pow er on t he com ponent s in the
following sequence:
1. Printer
2. Monitor
3. Computer
4. Other peripherals (in any order)
Following the power-up sequence, the opening scr een w ill appear (Fig. 2.1).
Patient Management and Data Ent r y
Fig. 2.1
NOTE: Access to the system is prevented pendi ng t he ent r y of an
authorized Colposcopist name and Passw or d.
• Click on the ▼ in the colposcopist name box. A list of pre-authorized colposcopist names will
appear.
• Click on the desired name to place in the name box.
• For a name that is stored after the displayed group, click and hold on the ▼ at the bottom r ight of
the list until the desired name appears.
• Click in the Password box. A blinking cursor w ill appear . Type t he select ed Colposcopist’s unique
password.
• Click on OK or press Enter. Click on Select Patient The Select Patient Screen will appear wit h a
blinking cursor at the beginning of the MR Number box (Fig. 2.2).
Click here to return to the Table of Contents
2 - 1
8/3/1999
4444
Page 17
SECTION 2
OPERATOR INSTRUCTIONS
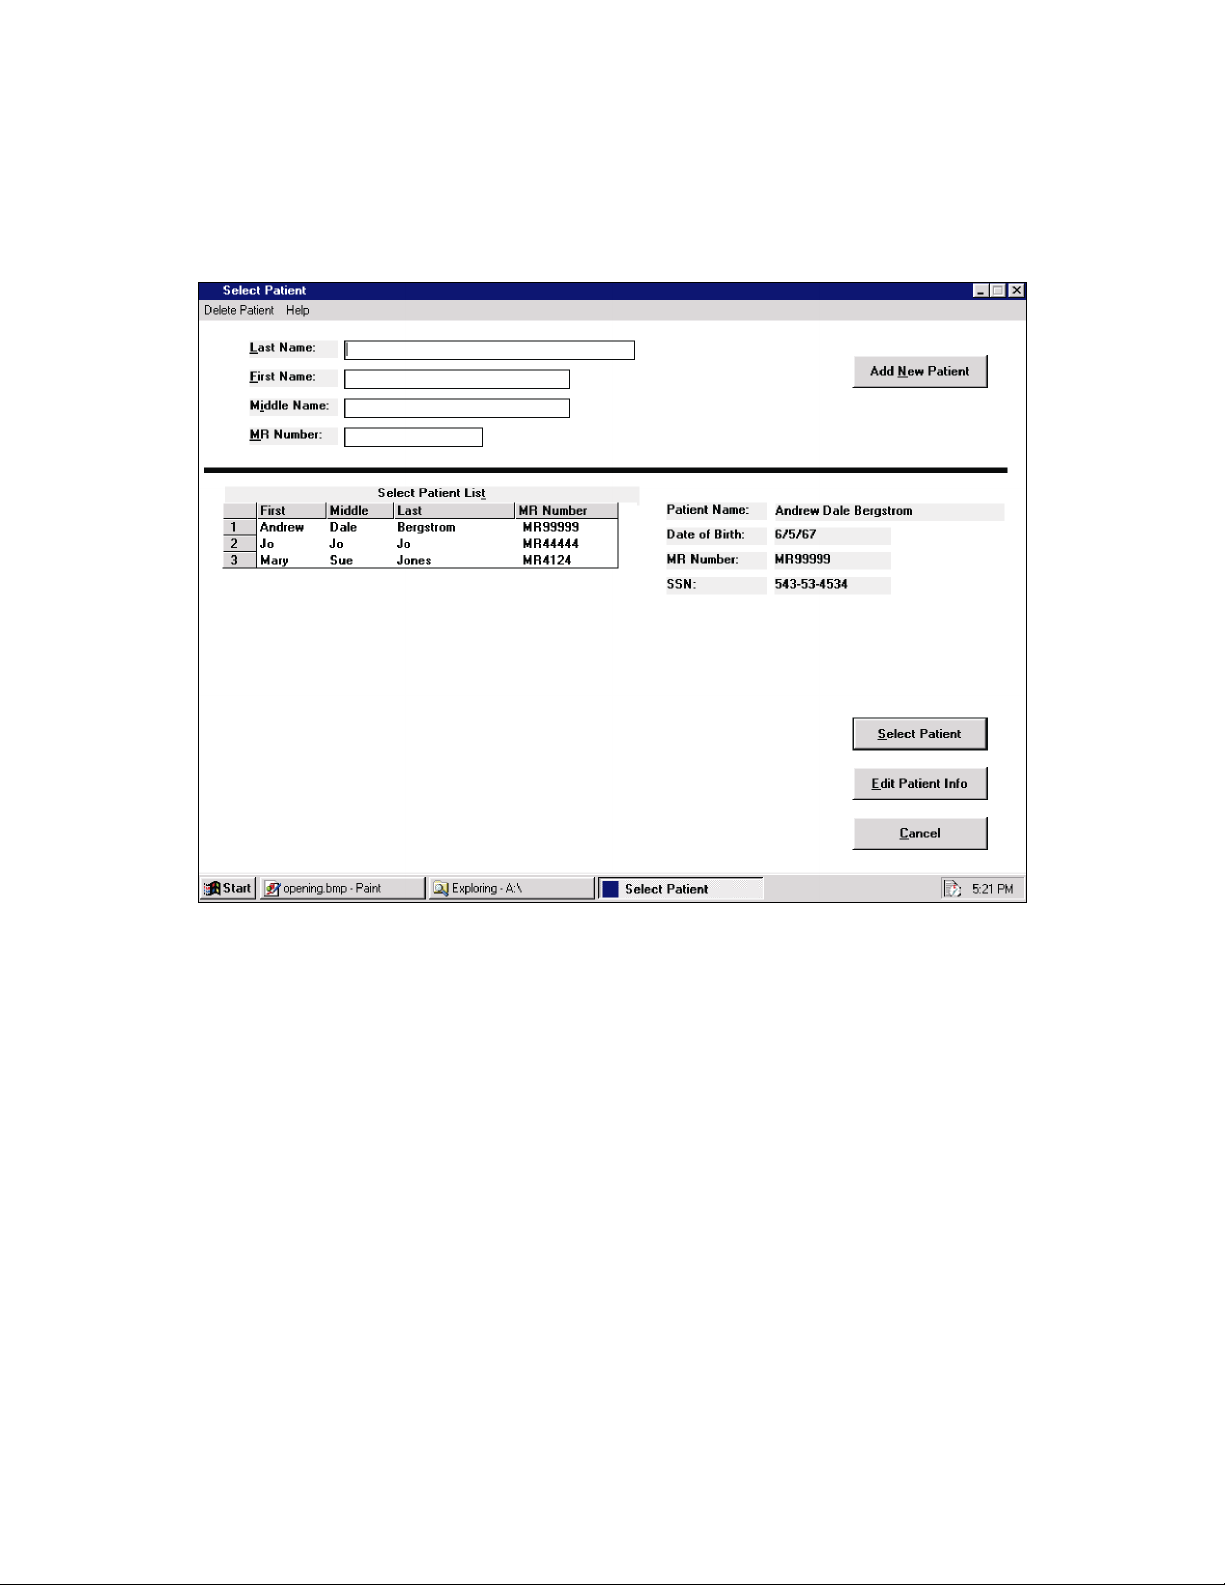
Select Patient Screen
Patient Management and Data Ent r y
Fig. 2.2
This screen allows you to add a new patient, find and select an existing patient, and edit existing patient
information.
Click here to return to the Table of Contents
¸
4444
2 - 2
8/3/1999
Page 18
SECTION 2
OPERATOR INSTRUCTIONS
To Add a New Patient
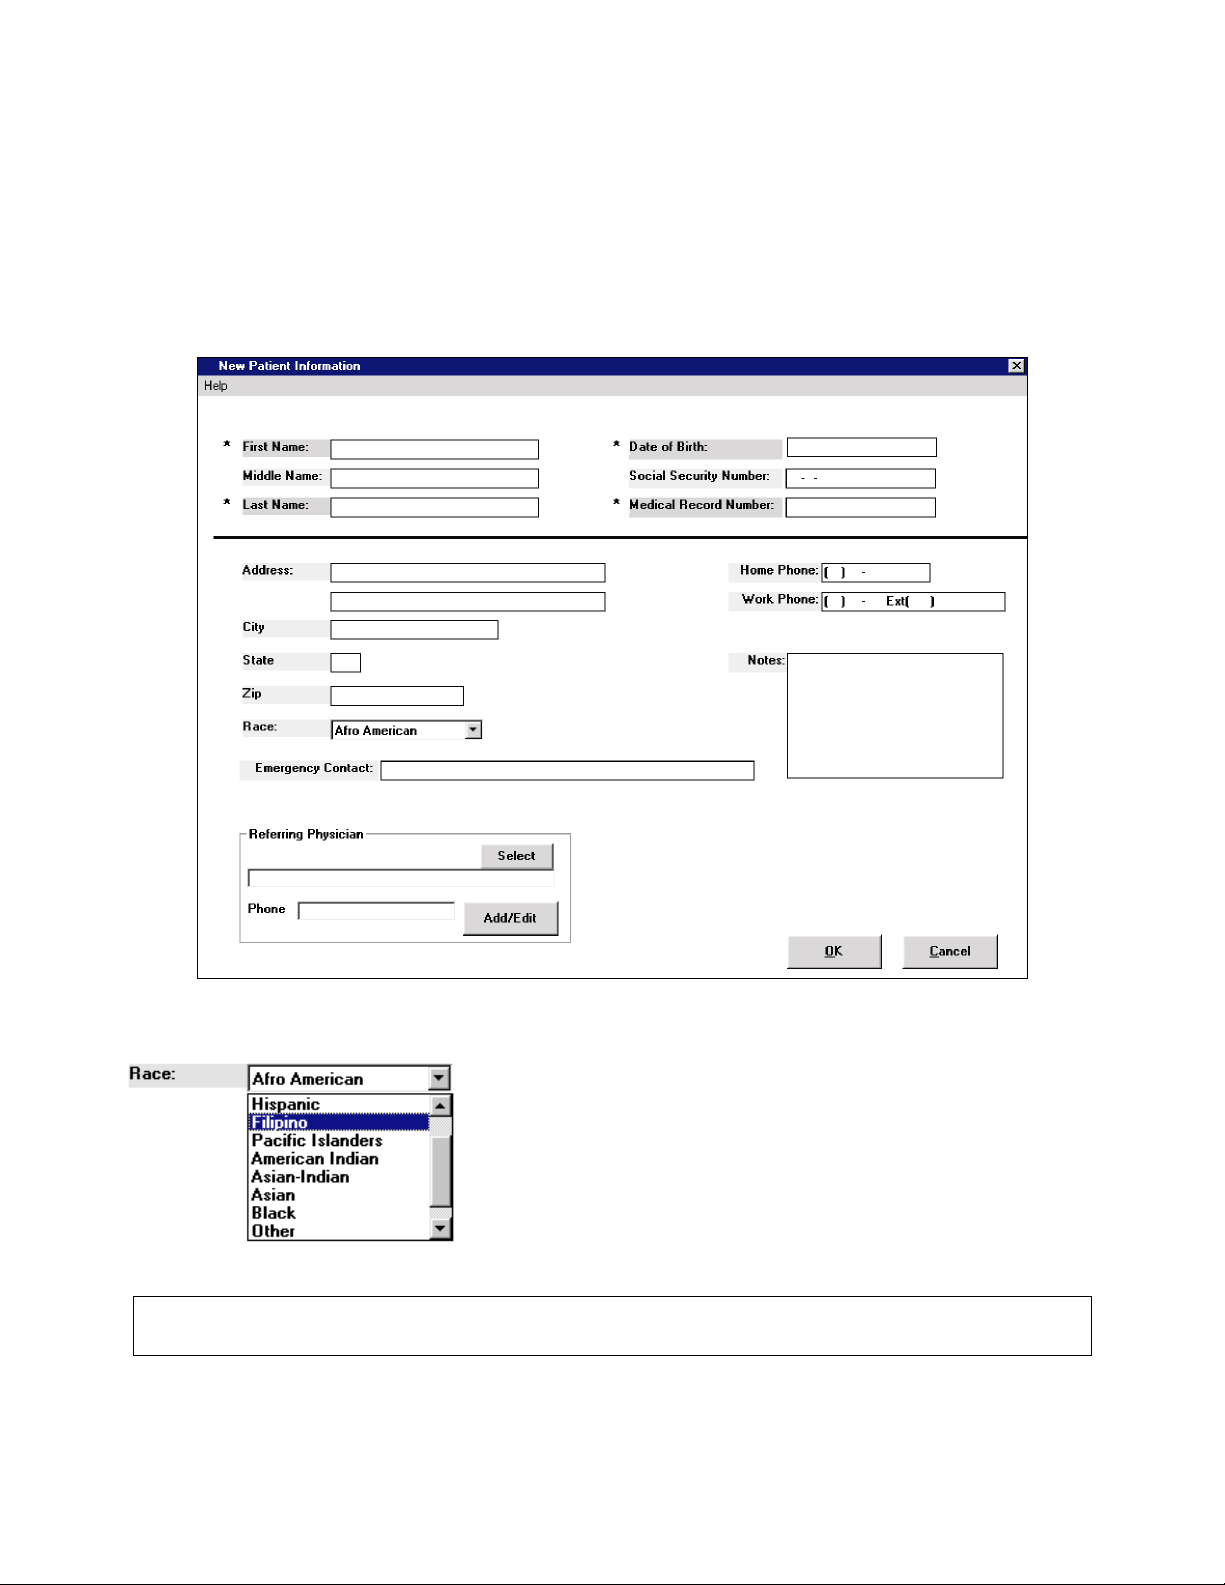
• Click on Add New Patient. The
• Enter Date Of Birth information as XX/XX/XX
Patient Information Screen
Patient Management and Data Ent r y
Patient Information
screen will appear (Fig. 2.3) .
Fig. 2.3
The Race box has a multiple choice pull-down menu (Fig. 2.4).
• Click on ▼ to display the first seven selections. For a
selection that is stored below the displayed list, click and
hold on the ▼ at the bottom right of the display until
the desired selection appears. Click on choice to enter.
Fig. 2.4
NOTE: The Patient First and Last name, Date of Birth and Medical Record Number must be
completed to enter Patient file into system data base.
Click here to return to the Table of Contents
2 - 3
8/3/1999
4444
Page 19

SECTION 2
OPERATOR INSTRUCTIONS
Following entry to each box, press the Enter or Tab key on the keyboard t o pr ogress in sequence.
• Click on OK following completion of New Patient Information entry. All data will be e n t e red to the
patient file and system data base.
The Select Patient Screen will appear. The pat ient just added will be highlighted at the top of the Select
Patient List a n d t h e Pa tient Name, Da te of Birth, MR Number an d SSN (if in file) w ill b e d is pla y e d.
• Click Select Patient to continue with patient file and current visit. The Patient Visit Cont r ol screen
will appear, Page 2-7.
or
• Click on Add New Patient to add new patients. Repeat process.
To Find and Select an Existing Patient - Using a Patient MR Number
• Enter the patient MR Number into the MR number box. As the Alpha Numberic characters are
entered, the system will aut om at ically begin t o display all t he pat ients w it h an MR num ber
beginning with the same sequence of characters.
NOTE: The MR number is exclusively unique to an individual patient. Different patients can have the same last, middle
and/or first names.
When the complete number is entered, t he desir ed patient will appear highlighted at the head of the
Select Patient List. The patient name, date of bir t h, MR num ber and Social Security Number (if
available) w ill b e d is pla y e d .
• Click on
screen will appear, Page 2-7.
Select Patient
to proceed with patient file and current visit. The Pat ient Visit Cont r ol
Patient Management and Data Ent r y
To Find and Select an Existing Patient - Using the Patient Last Name
• Click in the Last Name box. Type the Patient Last Name. As the letters are entered the system will automatically begin to
display patients with last names beginning w i th that letter sequence. When the complete last name is entered, all
patients with this name will be displayed by alphabetical order, of first name.
• Click on the desired name to highlight and to display Patient Nam e, Date of Birth, MR Num ber, and Social Security Number
(if available).
• Click on Select Patient to proceed with patient file and current visit. The Patient Visit Control screen will appear, Page
2-7, Fig. 2.5.
2 - 4
Click here to return to the Table of Contents
8/3/1999
4444
Page 20

SECTION 2
OPERATOR INSTRUCTIONS
To Find and Select An Existing Patient - Searching - By First and/or Middle
Patient Management and Data Ent r y
Name:
• Click to place cursor in
• Type all or part of the Patient first name.
OR
• Click to place cursor in Middle name box.
• Type all or part of the Patient Middle Name.
The patient names beginning with that Alpha character sequence w ill be displayed in t he Select Pat ient
List in alphabetical order.
• Click on the desired name to highlight and to display full Patient Name, Date of Birth, MR Number
and Social Security Number if on file.
• Click on Select Patient to proceed with patient file and current visit. The
screen will appear.
Delete a Patient
First
name box.
Patient Visit Control
Enter the Select Patient Screen.
Find and highlight the desired Patient name.
• Click Delete Patient located at top left of scr een. A quest ion box w ill appear r equest ing
confirmation to proceed with patient deletion.
• Click Yes to proceed. A message box will appear confir m ing delet ion. • Click OK.
The Patient file
Edit the Patient Information Screen
(access from the Select Patient screen)
Enter the Select Patient Screen
Find and highlight the desired Patient name.
The Edit Patient Info button w ill act ivat e.
• Click Edit Patient Info. The Patient I nf ormation screen for the select ed pat ient w ill appear . All dat a
entry sec tions will be ac tive.
including all visits and other data will be permanently deleted from the data base.
Edit as required.
• Click OK to save. All data will be perm anent ly ent er ed to the Patient File and system data base.
2 - 5
8/3/1999
Page 21

SECTION 2
OPERATOR INSTRUCTIONS
Patient Management and Data Ent r y
Click here to return to the Table of Contents
4444
2 - 6
8/3/1999
Page 22
SECTION 2
OPERATOR INSTRUCTIONS
NEW VISIT
(Patient with No Prior Exams)
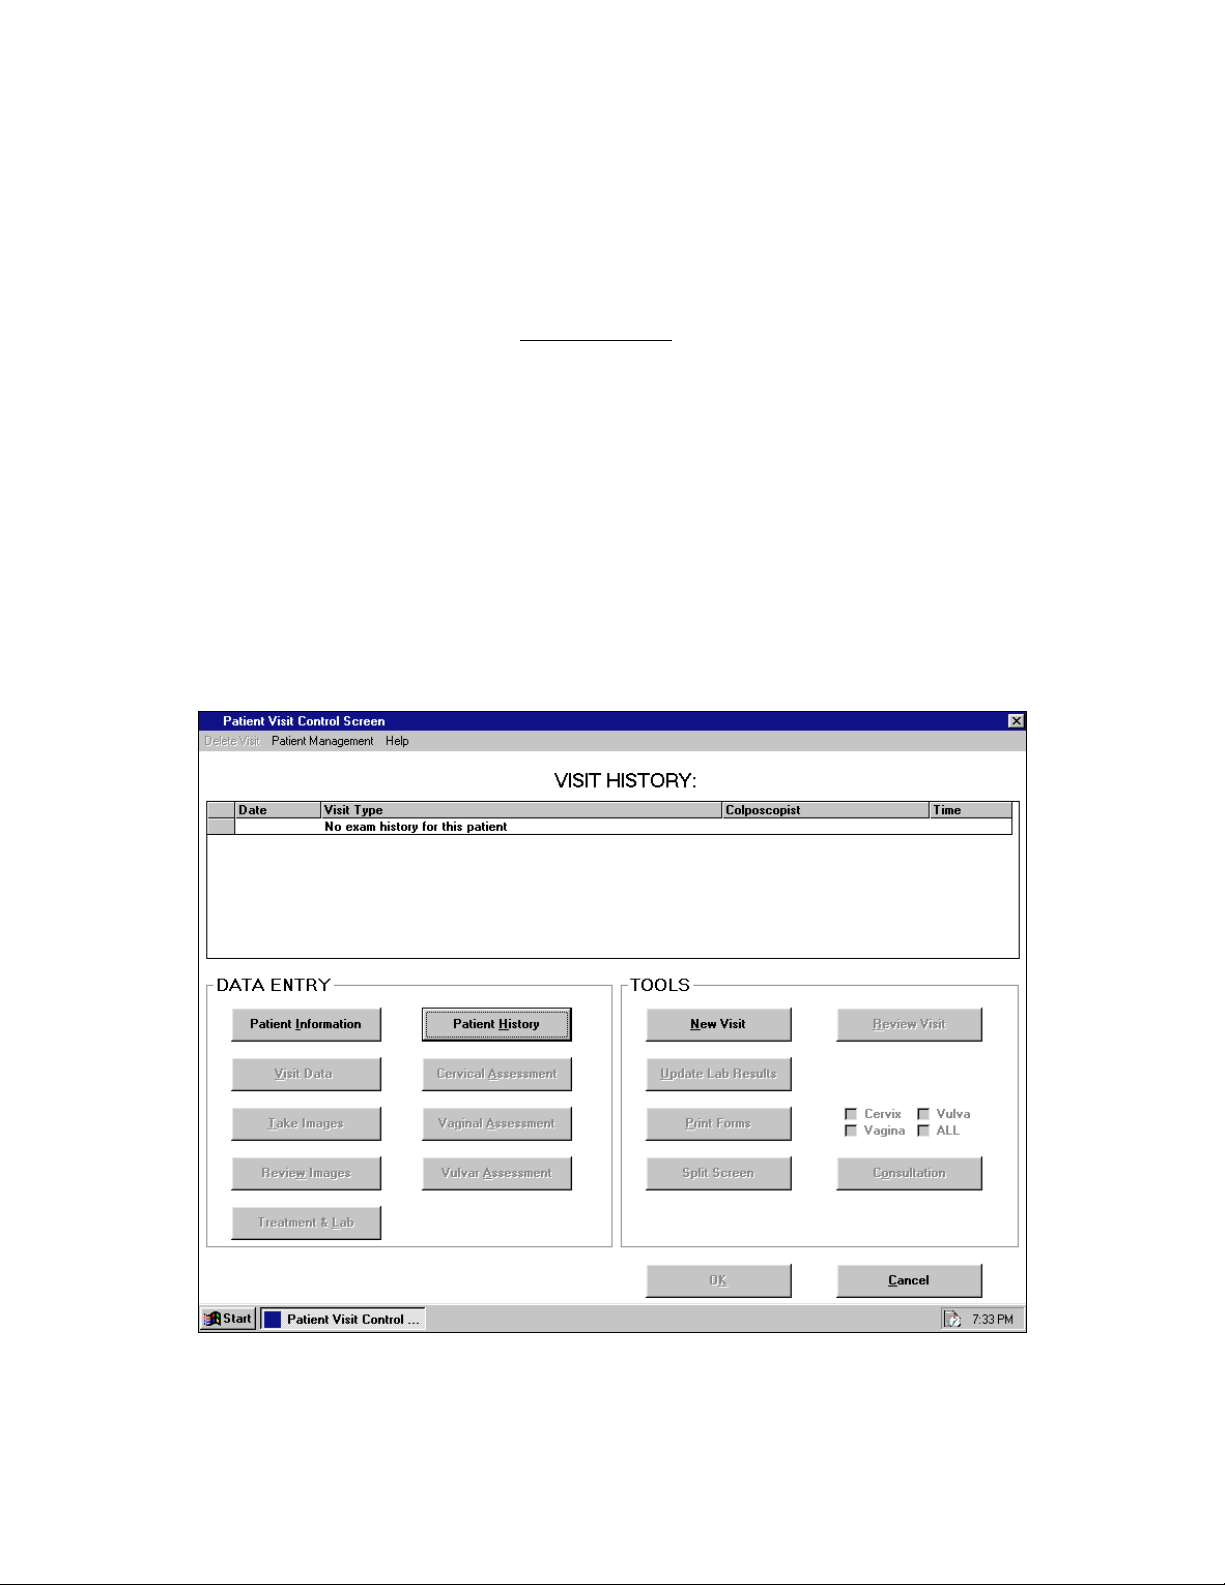
Patient Visit Control screen (Fig. 2.5)
The Visit History section for patients with
patient”.
In any order:
• Click on Patient Information to edit or review, t hen Click OK to save entries and to ret urn t o
Patient Visit Control screen.
• Click on Patient History to review and/or edit, then click OK to r et ur n t o Pat ient Visit Contr ol
screen.
• Click Cancel to return to Select Patient screen.
or
• Click New Visit to proceed with current visit. The New Visit screen will appear ( Fig. 2.6).
Patient Management and Data Ent r y
NO prior exams
will display “No exam history for t his
Fig. 2.5
2 - 7
8/3/1999
Page 23

SECTION 2
OPERATOR INSTRUCTIONS
Patient Management and Data Ent r y
Click here to return to the Table of Contents 4
4
44
2 - 8
8/3/1999
Page 24
SECTION 2
OPERATOR INSTRUCTIONS
NEW VISI T (Cont’d.)
(Patient with No Prior Exams)
The form footer will display t he Pat ient nam e and MR num ber . The Last Visit Date and Type boxes will
be blank. The current visit date will be displayed. Choose visit type then click > to add. Click OK.
The Other Colposcopist List will display the pr e registered “other” colposcopists.
The complete list of pre register ed Other Colposcopists will be listed in alphabetical or der by last nam e.
• Click on ▼ at lower right of list box to advance scroll. • Click on ▲ at upper right to reverse
scroll.
• Click to highlight the desired name(s) and click > to add to list of selected names. The selected
name(s) will appear as a perm anent par t of the current visit file.
• Highlight name and lick < to delete.
• Click on Add New above other colposcopists box to temporarily add Other Colposcopists for current
visit only. An active cursor will appear . Type t he desir ed nam e.
• Click OK . Names entered from both the O THER COLPOSCOPIST LIST and New Colposcopist box
will be entered and displayed as a permanent part of t he cur r ent visit ( s ee
These will be included in all printed reports. The t em por ar y nam e( s ) w ill be delet ed from the active
system following completion of the current visit.
Patient Management and Data Ent r y
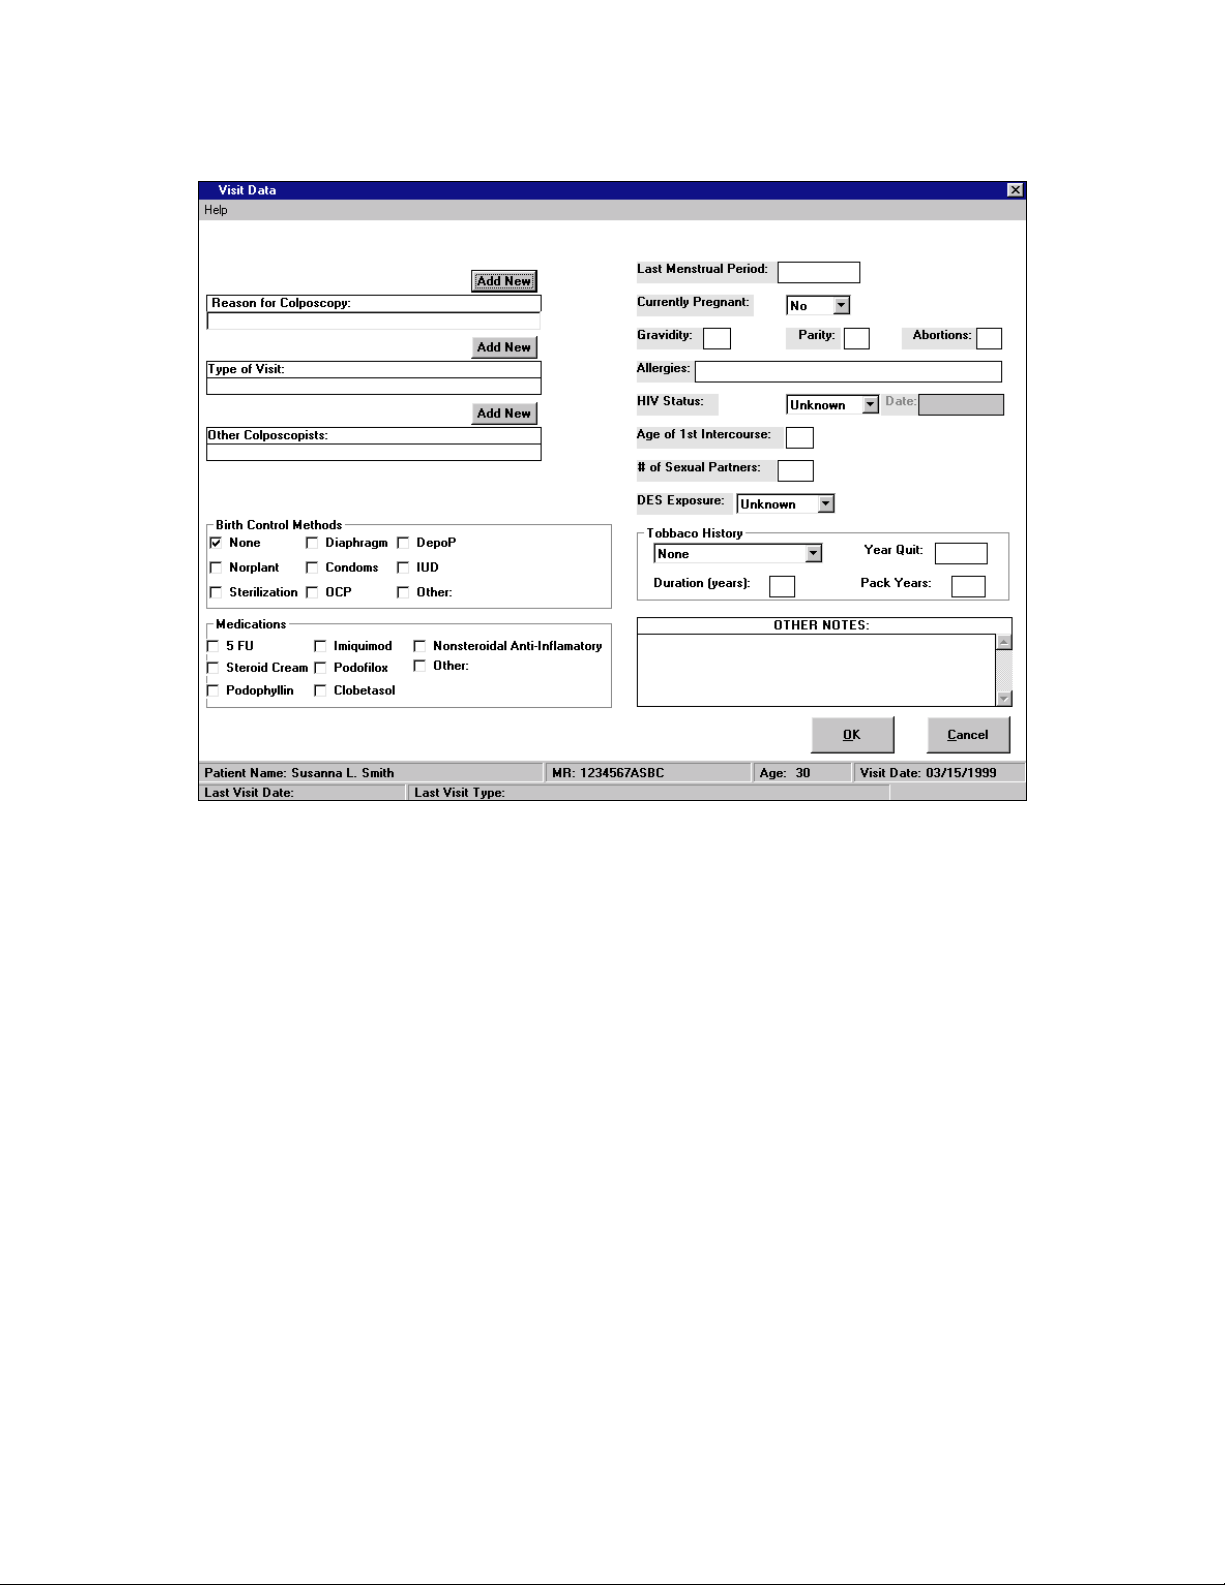
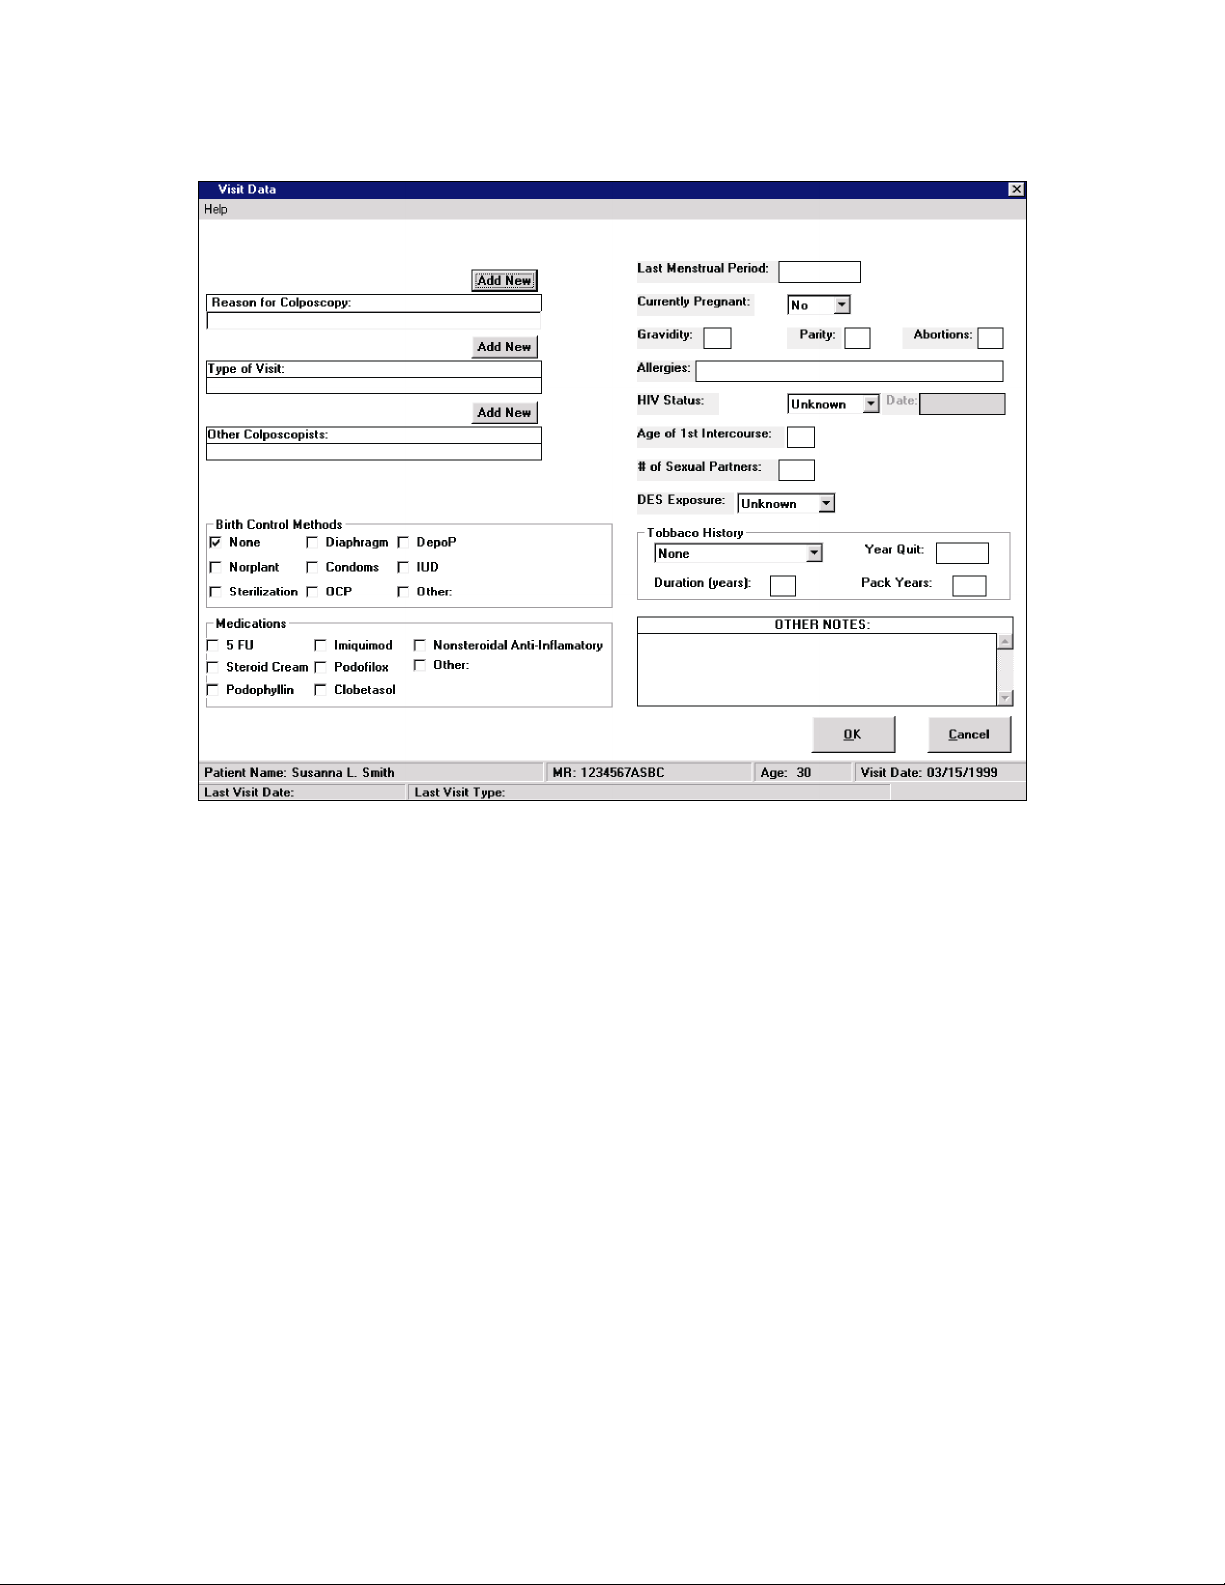
Visit Data Screen
).
Fig. 2.6
Click here to return to the Table of Contents
2 - 9
4444
8/3/1999
Page 25
SECTION 2
OPERATOR INSTRUCTIONS
NEW VISIT
(Patient with Prior Exams)
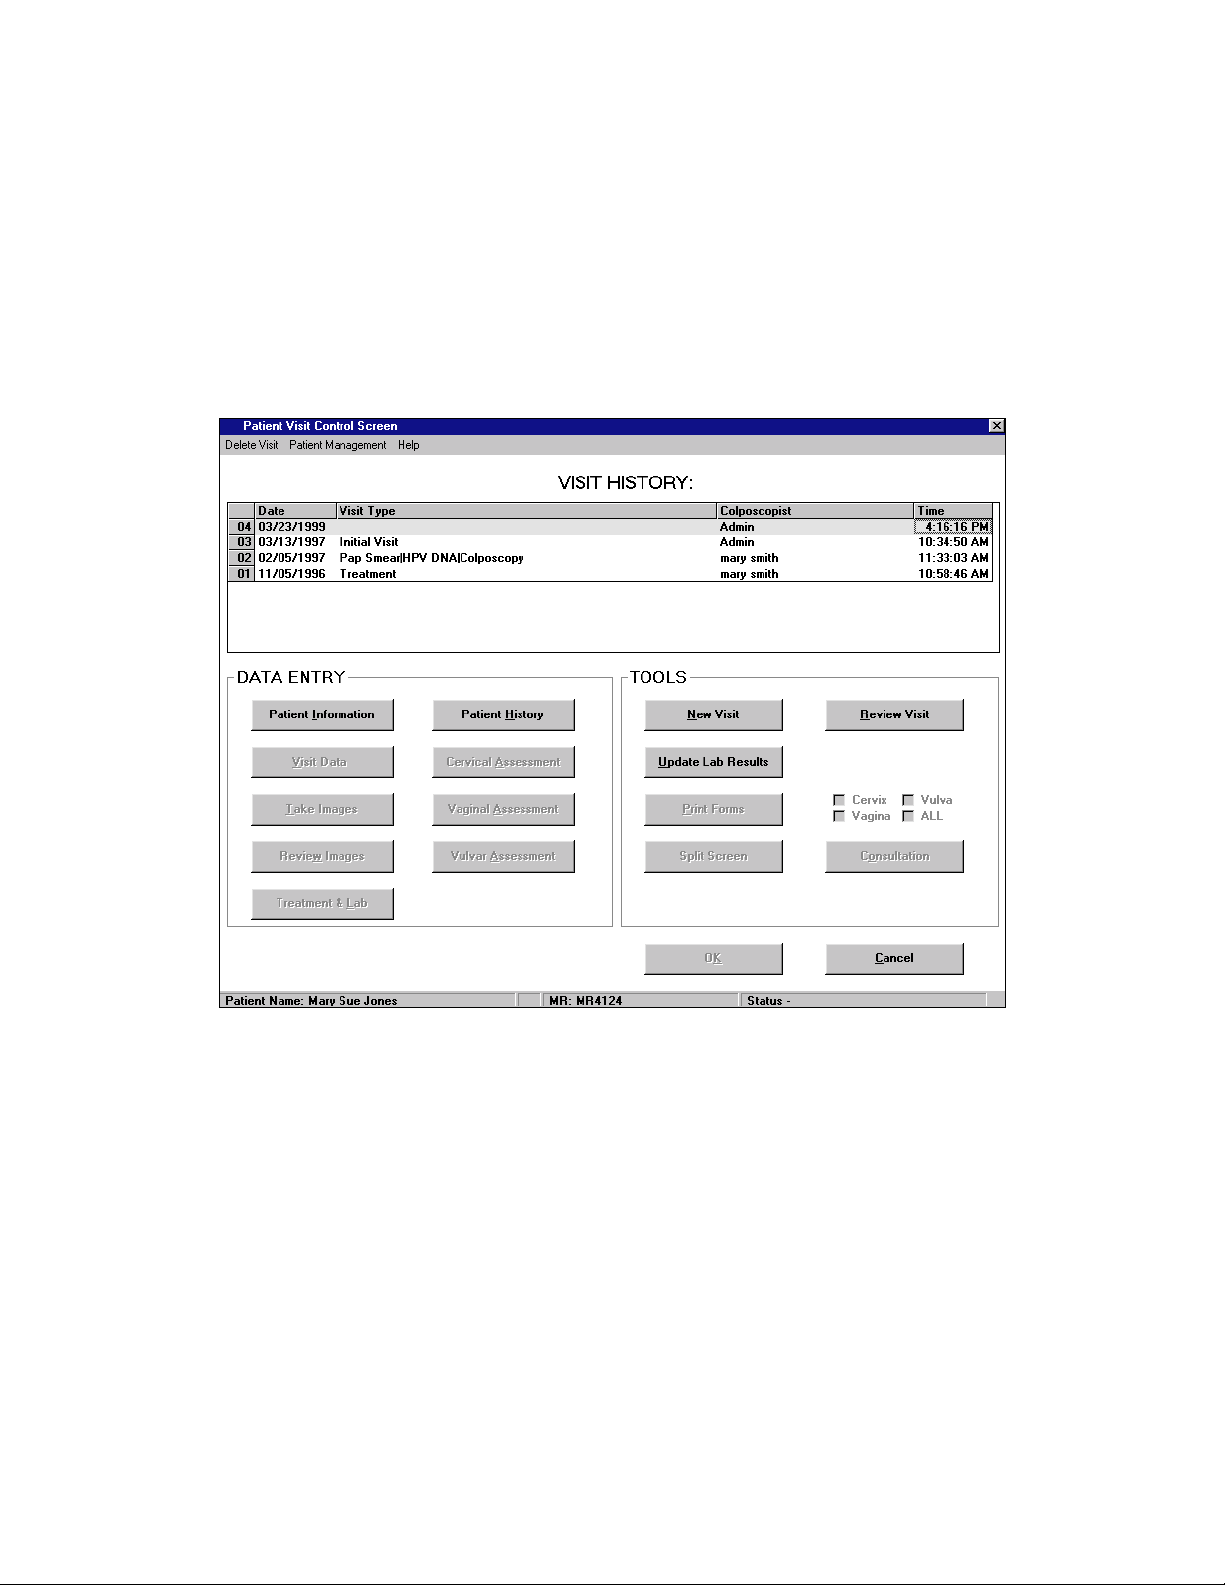
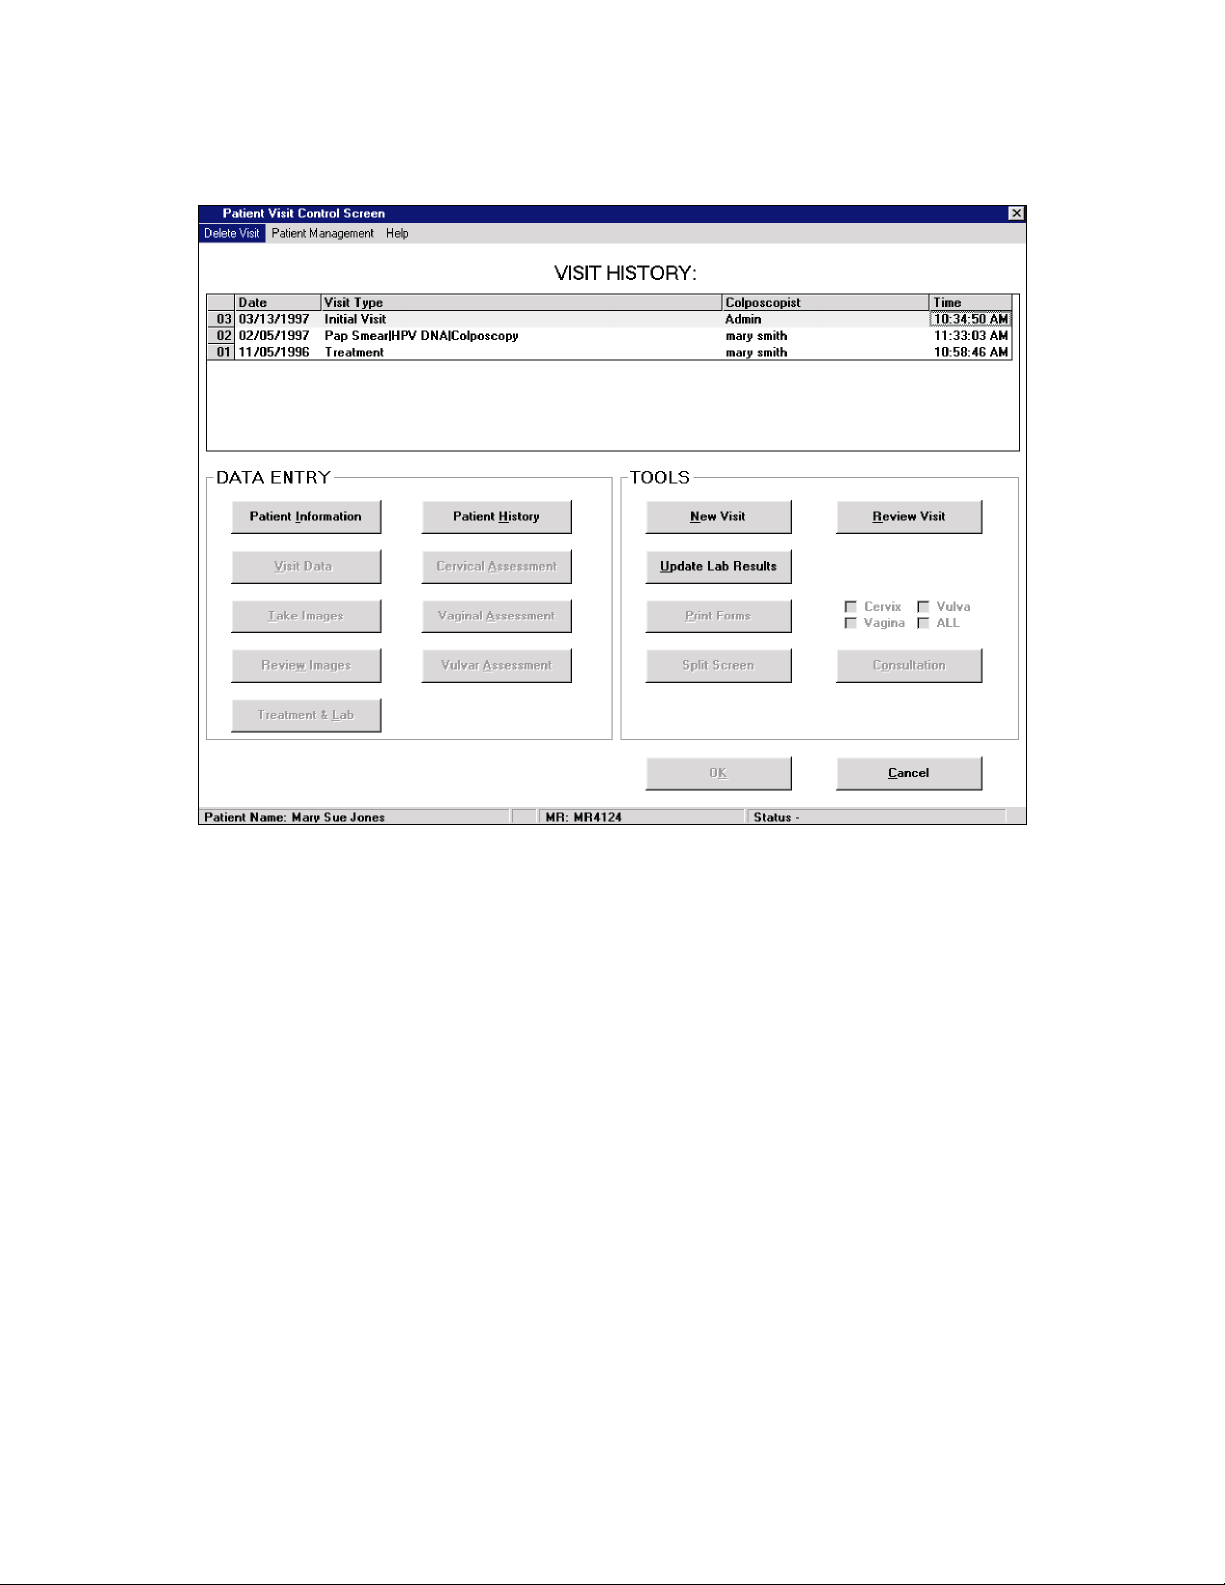
Patient Visit Control screen (Fig. 2.7)
The VISIT HISTORY section for patient
descending order including the dates, type and pr im ar y Colposcopist f or each visit . The last visit will be
highlighted.
Patient Management and Data Ent r y
WITH prior exams
will display th e nu mber of previous visit s in
Fig. 2.7
any order:
In
• Click on Patient Information to edit or review, then click OK to save entries and to return to
Patient Visit Control
• Click on Patient History to review and/or add data, then click on OK to return to
Control
• Click on Update Lab Results to review and or add data, then click OK to return to
Control
• Click Review Visit to review previous visits. See Review Previous Visit(s), Page 2-36.
• Click Cancel to return to Select Patient screen
or
• Click New Visit to proceed with current visit. The
screen. See
screen. See
screen. See
Patient History
Update Laboratory and Treatment I nf orm at i on
Edit Patient Information
, Page 2-18.
New Visit
Click here to return to the Table of Contents
2 - 10
, Page 2-5.
Patient Visit
Patient Visit
, Page 2-34.
screen will appear, Page 2-9, Fig. 2. 6.
8/3/1999
4444
Page 26
SECTION 2
OPERATOR INSTRUCTIONS
Patient Management and Data Ent r y
Fig. 2.8
• The form footer will display t he Pat ient nam e and MR num ber . The Last Visit Date and Type will be
displayed.
Proceed with selection of Other Colposcopists. (See
• Click OK . The
Visit Data screen
The form footer will display t he Pat ient Nam e, M R number , age, and Current Visit date. Type of Visit
will display th e pre-ente r e d s e lec tion (
will automatically display the date and type of t he last visit . The select ed
will be displaye d.
Visit Dat a
screen will appear.
New Visit
New Visit
, Pages 2-7 and 2-10). Patient w ith pr ior visit histor y
Click here to return to the Table of Contents
, Page 2-9)
other
colposcopist(s) name
4444
2 - 11
8/3/1999
Page 27
SECTION 2
OPERATOR INSTRUCTIONS
Patient Management and Data Ent r y
Fig. 2.9
Reason for Colposcopy
The
• Click on Add New . The Colpo Reason screen will appear (Page 2-13).
• Click on the desired line to highlight and select.
Abnormal Pap
• Click on desired line to highlight and select. The selected lines will appear in the Reason for
Colposcopy box and remain as a permanent part of the current visit recor d.
Smear
box includes a multiple choice menu.
and Treatment
lines have extended multiple choices (Figs. 2-10 and 2-11).
Instructions continued on Page 2-14.
Click here to return to the Table of Contents
2 - 12
8/3/1999
4444
Page 28

SECTION 2
OPERATOR INSTRUCTIONS
Patient Management and Data Ent r y
Fig. 2.10
Fig. 2.11
4444
2 - 13
Click here to return to the Table of Contents
8/3/1999
Page 29

SECTION 2
OPERATOR INSTRUCTIONS
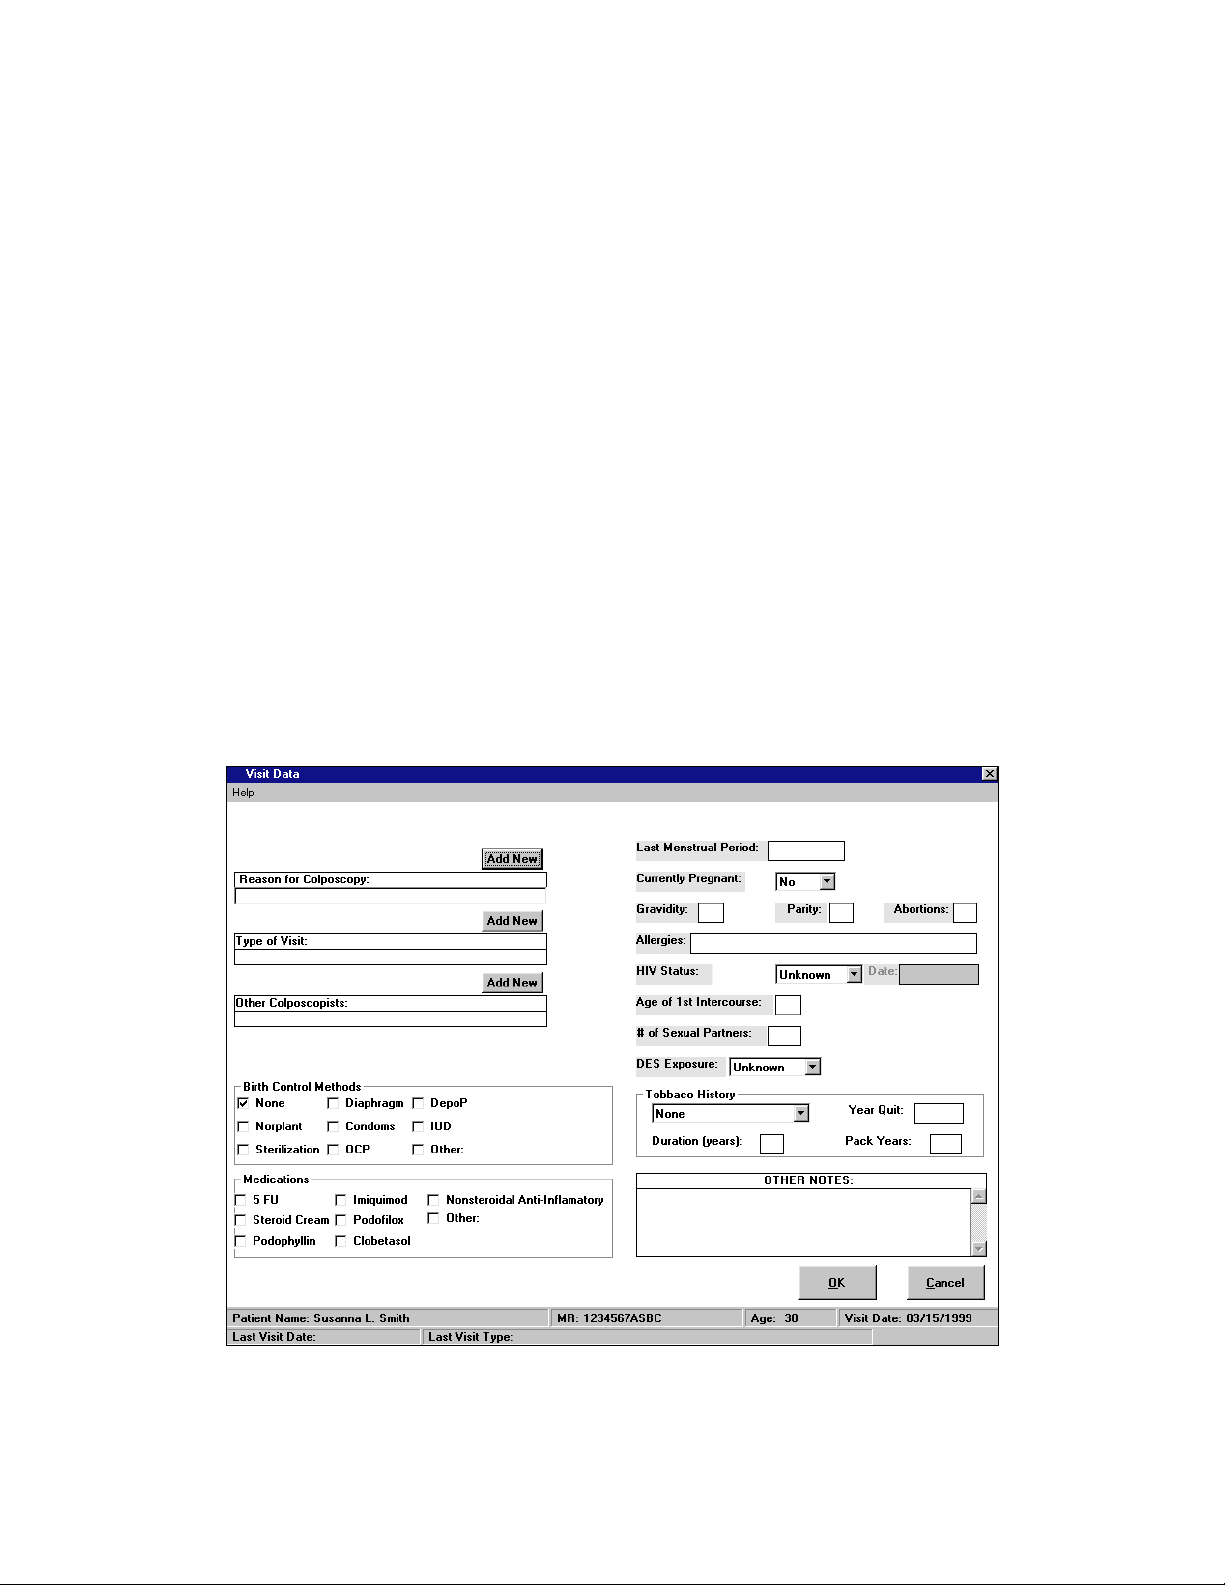
Visit Dat a
• Place cursor in Last Menstrual Period box.
• Type entry as XX/XX/XX. Press the Tab or Ent er key t o advance.
Currently Pregnant
If not correct, click on ▼ to display pull down menu and Click on
advance.
Gravidity, Parity
0
- If correct, move to t he next f ield by pressing Tab or Enter key. I f not corr ect , t ype over . Pr ess Tab
or Enter key to advance.
Birth Control M ethods
advance through field, or click mouse button on
select choic e of selection (no limit). Selection of Other will provide 40 c h a r a c ter typin g b o x for
response. Type entry, click OK and press Tab key to advance.
Allergies
H.I.V. Status
correct press Tab Key to advance. If not cor r ect , click on ▼ to display menu and click on selected
choice. The active cursor will advance to the dat e box. Type ent r y. Pr ess Tab key t o advance.
screen (Continued from Page 2-12)
will show
Abortions
and
- ✔ Condoms is default setting. If correct, advance by pressing Tab key to
- Type details. Press Tab key to advance.
has multiple choice pull down menu and date box.
Patient Management and Data Ent r y
as default setting. If correct, pr ess Tab key to pr oceed t o next f ield.
No
Yes
to select. Press Tab key to
will each show 0 as default s etting. Ent ering each box w ill h igh lig ht
Allergies
box. If not correct, click boxes individually to
Unknown
is default setting. If
Age of 1st Intercourse
or type entry and press Tab or Enter key to advance.
# Sexual Partners
and press Tab or Enter key to advance.
DES Exposure
choice. Press Tab key to advance.
Tobacco History
continue pressing tab key to pass through field. If not correct , Click on ▼ to display menu and click on
selected choice. Press Tab key to advance to
key to advance.
Duration
• Press Tab key – the system will automatically calculate and display
Medication
character typing box.
Review and correct
NOTE: Name of Primary and Other Colposcopists, and all entered Patient data will be
Other Notes
visit file.
• Click OK . The
has multiple choice pull down menus. Click on ▼ to display and click on selected
has 0 as the default setting. If correct, press Tab key to advance. If not corr ect, t ype ent r y.
: • Click menu item to select and enter m edicat ion t y pe. Select ion of Other will provide 40
automatically incl uded in printed visit r epor t s ( Col poscopy Pr ocedur e f or m s) .
: Up to 50 lines of notes may be typed and w ill be per m anent ly included as par t of this
Default setting is 0 , highlighted. If never, press Tab or Enter key t o advance
Default setting Is 0 , highlighted. If correct press Tab key to advance or t ype ent ry
has multiple choice pull down menus.
Year Quit
entries as appropriate
Patient Visit Control
.
screen will appear.
2 - 14
None
is the default setting. If correct,
box. If applicable, type entry and press Tab
Pack Years
Click here to return to the Table of Contents
.
8/3/1999
4444
Page 30
SECTION 2
OPERATOR INSTRUCTIONS
Patient Management and Data Ent r y
Fig. 2.17
In any order:
• Click on Patient Information to edit or review, then click OK to save entries and to return to
Visit Control
screen.
• Click on Patient History to review and/or edit, then click OK to return to
Patient Visit Control
screen.
• Click Cancel to return to Select Patient screen.
or
• Click New Visit to proceed with current visit. The
Visit Dat a
screen will appear (Page 2-13, Fig.
2.9).
• Click on
Visit Dat a
to review and/or edit then click on OK to return to
Patient Visit Control
• Click on Treatment and Lab to enter data. ( See
36 Page 2-28) then click on OK to return to
Lab and Treatment Informati on
Patient Visit Control
screen
screen, Figure 2-
2 - 15
8/3/1999
Patient
screen.
Page 31

SECTION 2
OPERATOR INSTRUCTIONS
Patient Management and Data Ent r y
Click here to return to the Table of Contents 4
4
44
2 - 16
8/3/1999
Page 32

SECTION 2
OPERATOR INSTRUCTIONS
CANCEL will delete
appear.
OK will save all current visit entries and term inat e t he current visit. The
Select Patient
NOTE
: A new capability has been added to the
feature allowing the following:
• Entry of patient visit data prior to the visit exam
• Entry of patient visit data following the visit
• Adding or Editing of patient visit data of previously stored visit
Instructions for this feature are on Pages 2- 39 and 2- 40.
To Proceed with Current Visit
• Click on Take Images.
Acquire Cervix Images
The
all
current visit entries - the
screen will appear.
screen will appear (Fig. 2.18) .
Patient Management and Data Ent r y
Select Patient
VISIT DATA
Acquire Images
screen
screen will
will continue in Section 3.
Fig. 2.18
2 - 17
Click here to return to the Table of Contents
8/3/1999
4444
Page 33

SECTION 2
OPERATOR INSTRUCTIONS
PATIENT HISTORY SCREEN
Patient History
The
Data can be
automatically copied
be
Laboratory and Treatment Inf orm at i on
Laboratory and Treatment Infor mat ion section.
Patient History
entered directly
screen (Fig. 2.19) will display t he pat ient ’ s comp let e hist or y of :
Previous: Pap Smears
to the
to the
screen
Patient Management and Data Ent r y
HPV Tests
Cervical Tests
Treatments of the Cervix, Vagina and Vulva
ECC Results
Biopsies of the Cervix , Vagina and Vulva
Patient History
Patient History
section and from subsequent
file. at anytime to update hist ory. Data will also
file from entries to the patient’s individual visit
Updates
to the patient’s
• Click on OK following review and/or editing to
screen will appear.
To Enter Data Directl y
screen will appear (Fig. 2.20) . (Example - Previous Pap Smears)
- •Click on Add New of the desired line item. The selected
Save
2 - 18
the new entries. The
Click here to return to the Table of Contents
Fig. 2.19
Patient Visit Control
Add New Item
4444
8/3/1999
Page 34

SECTION 2
OPERATOR INSTRUCTIONS
Add New Item Screen
(Example - Pap Sm ear )
Patient Management and Data Ent r y
The cur r ent dat e will be displayed including an active cursor at the begi nni ng of the box.
• Click on appropriate description. An extended menu may be displayed for furt her descr iption.
• Click on appro priate selec tion. Select io ns will be displaye d in the
Click on Clear to delete current entries to revise
• The date will be highlighted. Type over with cor r ect date.
or
• Click on OK. The Patient History screen will appear. The selected entries and dates ar e displayed in
NOTE
• Click on Add New of other items for additional data entry.
• Click on OK to
(Certain descriptions do not have extended menus.)
DETAILS
the item boxes.
: Selection of “other” on any menu will display a 40 charact er t yping box.
or
SAVE
entries. The entries will remain permanently in the Patient Histor y f ile. The
Patient Visit Control
screen will appear
Fig. 2.20
box.
2 - 19
8/3/1999
Page 35

SECTION 2
OPERATOR INSTRUCTIONS
To Delete Entries - before saving.
• Click on the entry line to highlight.
• Click on the activated Delete Histor y Item box. The entr y w ill be delet ed f rom the Patient History
file.
Patient Management and Data Ent r y
Click here to return to the Table of Contents 4
4
44
Complete menus for
Appear on Figures 2-22 – 2.34 on pages 2-21 through 2-25.
Previous
:
Pap Smears
HPV Tests
Cervical Tests
Treatments of the Cervix, Vagina and Vulva
ECC Results
Biopsies of the Cervix , Vagina and Vulva
2 - 20
Fig. 2.21
Click here to return to the Table of Contents
8/3/1999
4444
Page 36

SECTION 2
OPERATOR INSTRUCTIONS
Patient Management and Data Ent r y
Fig. 2.22
Fig. 2.23
Fig. 2.24
Click here to retur n t o t he Table of Contents
4444
2 - 21
8/3/1999
Page 37

SECTION 2
OPERATOR INSTRUCTIONS
Fig. 2.25
Patient Management and Data Ent r y
Fig. 2.26
Fig. 2.27
Click here to return to the Table of Contents
4444
2 - 22
8/3/1999
Page 38

SECTION 2
OPERATOR INSTRUCTIONS
Fig. 2.28
Patient Management and Data Ent r y
Fig. 2.29
Fig. 2. 30
2 - 23
Click here to retur n t o t he Table of Contents
8/3/1999
4444
Page 39

SECTION 2
OPERATOR INSTRUCTIONS
Patient Management and Data Ent r y
Fig. 2.31
Fig. 2.32
Fig. 2.33
Click here to return to the Table of Contents
4444
2 - 24
8/3/1999
Page 40

SECTION 2
OPERATOR INSTRUCTIONS
Patient Management and Data Ent r y
Fig. 2.34
2 - 25
8/3/1999
Page 41

SECTION 2
OPERATOR INSTRUCTIONS
LABORATORY AND TREATMENT INFORMATION
Laboratory and Treatment Inf orm at i on
Patient Management and Data Ent r y
screen Fig. 2.35
Fig. 2.35
The form footer will display the Pat ient nam e, M R number , age and cur r ent visit dat e.
display the pre-entered selection (
display the pr e -entered se le c t io n (Visit Data, Page 2-13) . Patients with prior his tory will aut o m a tically
display the date and type of the last visit.
Examination Results
Vaginal Microscopic Exam
proceed to next field, or click ✔ to select appropriate conditions. Press Tab key to proceed to next
field.
NOTE
: Selection of “other” display a 40 character typing box.
All entries w ill r e main as par t o f this visit informat ion .
Complete menus for
Figures 2.38 – 2.53, pages 2-31 through 2- 33
Pathology Results, Laborator y Tests, Treatments, Foll ow - up Vi si t s
Patient Visit Control
will show ✔ Not Done as default setting. If cor r ect , pr ess Tab key t o
2 - 26
, Page 2-7) and the
Reason for Colposcopy
Type of Visit
appear on
8/3/1999
will
will
Page 42

SECTION 2
OPERATOR INSTRUCTIONS
Patient Management and Data Ent r y
Click here to return to the Table of Contents 4
4
44
2 - 27
8/3/1999
Page 43

SECTION 2
OPERATOR INSTRUCTIONS
Pathology Results/Laboratory Tests
To Enter Data:
• Click on Add New of the appropriate item. The selected it em scr een will appear (Fig. 2.36).
(Example - Pap Smear)
Selected Item
screen (Example - Pap Smear) Fig. 2.36
Patient Management and Data Ent r y
Fig. 2.36
The current visit date will be displayed.
• Click on appropriate description. An extended menu may be displayed for furt her descr iption
(certain descriptions do not have extended menus).
• Click on appro priate selec tion. Select io ns will be displaye d in the Details bo x .
or
• Double Click the left mouse button to delete the entry and revise menu
NOTE
Selection of “o t h e r ” on a n y will display 40 cha racter t yp in g b ox .
• The selected entries will appear in the item box(es).
• Click on Add New of other items and repeat process to add additional data.
Click here to return to the Table of Contents
2 - 28
8/3/1999
4444
Page 44

SECTION 2
OPERATOR INSTRUCTIONS
Treatments
Cervical, Vaginal
• Click on ▼ to display
• Click on appropriate line to enter
Note: Select ion o f Ex c is ion Treatment s for Cervical, Vaginal and Vulva r will activate
NOTE
: • Click in the Notes box. An active prompt will appear in the top left cor ner . Proceed with entry
of Notes. • Click on ▲ or ▼ to scroll to review.
Up to the first eight lines will be copied to and printed on the Colposcopy Procedure Form.
Follow-Up Visits
Follow-up (WEEKS) has 0 default sett ing. •Click on 0 to highlight. Type over to enter number of weeks
for follow-up visit. The Visit s t o Schedule Repor t w ill include t he dat e of t he M onday of t he ent er ed
week(s).
Follow-up Type has multiple selection pulldown menu. • Click on ▼ to display (Page 2-33).
• Click on appropriate selection to enter. Selection will become permanent par t of visit file and will
automatically appear as Type of Visit for pat ient ’ s next visit. Entry will also be automa t ically included
in Visits to Arrange Report, Page 4-.
Vulvar
and
Pathology Results
except for None, and Normal, will activate Margins section. (Pages 2-32 through 2-33)
Pathology Results and Margins will remain act ive pending subsequent entries.
Update Lab Results
Treatment Information screen to updat e r esults.
All data entries
a visit or separately when using the Update Lab Results feature. On retur n t o the
Patient Visit Control
All entries to the Laboratory and Treatm ent I nf or m at ion sect ion w ill be a per m anent
part of the visit file and
Patient History Section
Treatment have multiple selection pulldown menus.
Patient Management and Data Ent r y
Margins
and
feature to select correct visit to access Laboratory and
to the Laboratory and Treatment sect ion
screen, •Click on OK to save file.
will be automatically copied to and displayed in the
.
sections for each. Selection of
must be saved
Pathology Results
Use
as part of
NOTE: All entries t o t he Laborat or y and Tr eat ment i nf or mat i on must be saved as par t of a visit.
To subsequently edit, use the Updat e Lab Results feature.
All entries to the Laboratory and Treatm ent Information section will become a per m anent par t of this
Visit file and
• Click on OK following completion of all entries.
Patient Visit Control
The
will also be copied to and displayed in the Patient History section
screen will appear.
Click here to return to the Table of Contents
2 - 29
.
4444
8/3/1999
Page 45

SECTION 2
OPERATOR INSTRUCTIONS
Patient Visit Control
screen
Patient Management and Data Ent r y
Complete menus for
pages 2-31 through 2-33.
Pathology Results, Laborator y Tests, Treatments, Foll ow - up Vi si t s
Fig. 2.37
appear on
Click here to return to the Table of Contents
4444
2 - 30
8/3/1999
Page 46

SECTION 2
OPERATOR INSTRUCTIONS
Patient Management and Data Ent r y
Fig. 2.38 Fig. 2.39
Fig. 2.40 Fig. 2.41
Fig. 2.42 Fig. 2.43
2 - 31
Click here to return to the Table of Contents
8/3/1999
4444
Page 47

SECTION 2
OPERATOR INSTRUCTIONS
Patient Management and Data Ent r y
Fig. 2.44
Fig. 2.46
Fig. 2.42
Fig. 2.44 Fig. 2.45
Fig. 2.46 Fig. 2.47
Fig. 2.48 Fig. 2.49
Fig. 2.50 Fig. 2.51
2 - 32
Click here to return to the Table of Contents
8/3/1999
4444
Page 48

SECTION 2
OPERATOR INSTRUCTIONS
Patient Management and Data Ent r y
Fig. 2.52 Fig. 2.53
Click here to return to the Table of Contents
4444
2 - 33
8/3/1999
Page 49

SECTION 2
OPERATOR INSTRUCTIONS
To
Update
• Select the desired patient. The
• Click to highlight the desired visit
• Click on Update Lab Results . The
selected visit will appear, including the visit dat e ( Fig. 2.54).
Laboratory and Treatment Inf orm at i on
Laboratory and Treatment Information
Patient Management and Data Ent r y
Patient Visit Information
Laboratory and Treatment Inf orm at i on
screen
screen will appear.
screen for the
Results Date
The
necessary) to enter correct date of r esults.
• Enter active fields as necessary to update patient records. Enter notes on Page 2-26. Enter Follow
up Wks. or Follow Up Type . These will be automatically entered to “Visits t o Ar r ange” Repor t .
See Page 2-26.
All data entered will become a permanent par t of t he
file and will be a u tomatica lly en tered in th e
result.
• Click OK. The Patient Visit Control screen will appear.
• Click on OK to
Fig. 2.54
will display th e c urrent da t e - highlighted , including an a c tive prompt. Type ov er (if
Patient Laboratory and Treatment I nf or m ation
SAVE
all the data entered. The
Patient History
Select Patient
2 - 34
section including the date of the report or
screen will appear.
8/3/1999
Page 50

SECTION 2
OPERATOR INSTRUCTIONS
Patient Management and Data Ent r y
Click here to return to the Table of Contents
4444
2 - 35
8/3/1999
Page 51

SECTION 2
OPERATOR INSTRUCTIONS
REVIEW PREVIOUS VISIT(S)
• Select desired Patient. The
Patient Visit Control
screen
Patient Management and Data Ent r y
Patient Visit Control
screen will appear (Fig. 2.55) .
• Click to highlight the desired visit.
• Click on Review Visit to activate selected visit data.
In any order:
• Click on Patient Information to review and/or edit. Click OK to return to
screen, this will save all entry edit s.
• Click on Visit Data to review. Click on Cancel to return to
• Click on Patient History to review and/or edit. Click on OK to return to
screen, this will save all entry edit s.
• Click on Treatment and Lab to review. Click on Cancel to return to
Click here to return to the Table of Contents
2 - 36
Patient Visit Control
Patient Visit Control
Fig. 2.55
Patient Visit Control
screen.
Patient Visit Control
screen.
4444
8/3/1999
Page 52

SECTION 2
OPERATOR INSTRUCTIONS
• Click on
• Click on OK to return to
NOTE:
by the individual assessment screens. Cervix, Vagina and Vulva may also be accessed from each other.
• Click on Image Annotation to review Colposcopy Image Annotation screens. The Cer vix screen
will appear first. Click Vagina or Vulva or Cervix again, in any order at any t ime to r eview. Click
on OK to return to
• Click on OK to return to
• Click on Review Images to Review or Print or Save (to disk) all visit images or copy to split screen.
(See Print and Save to Disk, Pages 4-?? and 4-??).
DELETE VISIT(S)
To delete a visit:
• Click on to highlight visit to be deleted.
• Click on Delete Visit located in the upper left portion of t he comput er scr een. A question box will
appear requesting confirmation to delete the selected visit.
• Click on Yes . The visit will be deleted.
NOTE: Deleting one or all visits will not delet e the patient from the system dat a base.
To delete a patient, refer to Delete a Patient, Page 2- 5.
Cervical Assessment
Patient Visit Control
Colposcopy Image Annotation screens for Cervix, Vagina and Vulva may be accessed for review
Patient Visit Control
Patient Visit Information
Patient Management and Data Ent r y
Vaginal Assessment
or
screen.
screen.
screen
Vulvar Assessment
or
to review.
2 - 37
8/3/1999
Page 53

SECTION 2
OPERATOR INSTRUCTIONS
Patient Management and Data Ent r y
Click here to return to the Table of Contents
4444
2 - 38
8/3/1999
Page 54

SECTION 2
OPERATOR INSTRUCTIONS
VISIT DATA SCREEN
To enter visit data prior to an exam, following an exam and to edit data of stor ed visits:
Pre Visit Data Entry
• Select Patient.
• Select New Visit . New Visit screen will appear.
• Enter desired data.
• Select OK .
• Enter desired data.
• Select OK .
• Proceed to complete visit
or
To save entered data and to leave visit
• Select Final Save File .
To proceed with open visit
• Select Patient.
• Select
• Enter new or edit existing data (if necessary).
• Select OK .
• Enter new or edit existing data (if necessary).
• Select OK .
• Proceed to complete visit.
New Visit
Patient Visit Control
Visit Dat a
Patient Visit Control
Patient Visit Control
Visit Dat a
Patient Visit Control
screen will appear.
Select Patient
New Visit
.
screen will appear (previously enter ed dat a w ill be displayed).
Patient Management and Data Ent r y
screen will appear.
screen will appear.
open
for subsequent completion
screen will appear.
screen will appear.
screen will appear (previously enter ed dat a w ill be displayed)
screen will appear.
2 - 39
Click here to retur n t o t he Table of Contents
8/3/1999
4444
Page 55

SECTION 2
OPERATOR INSTRUCTIONS
To enter new or edit existing data to the Vis it Data screen of a stored visi t:
• Select patient.
•
Select the desired visit.
• Select Review Visit.
• Select OK. The
• Select Visit Data . The
existing data as necessary
• Select OK . The
• Select OK. The
NOTE
: Following the Patient’s initial visit, the
Red Type.
Patient Visit Control
Visit Dat a
Visit Dat a
Patient Visit Control
Visit Dat a
Patient Management and Data Ent r y
screen will appear.
button will b e c o m e a c tive.
screen for the selected visit will appear . Enter new or edit
screen will appear.
screen will be permanently updated.
Visit Dat a
screen will display the previous visit entries in
Reason for Colposcopy and Last Menstrual
The
visit.
Entries appropriate for the curr ent visit may be left unchanged. Proceed to delete (click on once to
highlight) and enter correct data.
NOTE
: Any visits left open for subsequent completion and NOT completed during the same day (by the
system’s clock) will be autom at ically closed and post ed as a visit . This incom plet e visit should be
deleted in order to preserve the integrity of t he pat ient ’ s file.
For a visit to be complete, there must be activity in the
Period fields w ill be b lan k f o r entry during the current
Take Images
Treatment and Lab
or
features.
2 - 40
Click here to return to the Table of Contents 4
8/3/1999
4
44
Page 56

SECTION 3
OPERATOR INSTRUCTIONS
Acquire Images
• Click on Take Images to proceed with current visit. The Acquire Images screen w ill appear (Fig. 3.1)
Acquire Images screen
1. The system will be in Live mode.
2. Adjust scope for optimum focus and light . The live im age w ill be in t he full screen.
3. The default setting for Im age Type ( Cer vical) w ill be displayed.
4. Click on ▼ to select Vaginal or Vulvar to change, if required.
Click here to return to the Table of Contents
3 - 1
Fig. 3.1
4444
8/4/1999
Page 57

SECTION 3
OPERATOR INSTRUCTIONS
• Click Snap. The Live button will tu rn to Snapped. The full screen image is then frozen and its
miniature will appear in the box at the top lef t of t he scr een.
NOTE: Mouse use for SNAP commands can be replaced with use of manual or buttons on the back of
the colposcope. To activate • Click { ON in Foot Switch box on System Setup Inform at ion screen,
Page 1-2.
• Click Live to return to live mode.
• Click Snap to acquire a second image. Repeat the process until the desired number of images are
acquired (six maximum per type). Tw o images ar e r equired t o com plete t he Colposcopy
Assessment and Graphics forms (Fig. 3.4). These will be the Selected Images.
NOTE: At any time, while in the live mode, any acquired image can be replaced with other (live)
images by clicking on the image (box) to be replaced. Select the images (maximum of two) t o be
displayed in Colposcopy Assessment and Graphics forms before changing image Type or exiting
mode.
• Click Select 2 Off. The button will change to Select 2 On and a message box will appear including
instructions to select the best two images for display (the Selected Images).
• Click on each of the images (box) to be selected. A blue frame will surround each box.
NOTE: The selected image(s) are for initial display. These may be subsequently replaced before the
visit is saved by any of the other images acquired during this series.
• Click on ▼ to select Cervical, Vaginal or Vulvar at any time during this image acquisition sequence
to change for capture and storage in corr ect I m age Type f ile. The acquir ed im ages ( boxes) will turn
blank to permit capture of newly selected Image Type.
NOTE: Image(s) for Colposcopy Assessment and Graphics f or m displays must be sel ected befor e
changing Image Type or exiting mode. A maximum of six images for each type can be stored including
the selected two for display. If only one image is selected, only one will be initially displayed in the
assessment and graphics forms. A second may be selected subsequently (See Selection, Marking and
Display of Images, Page 6 )
Following Image capture and selection:
• Click on OK. The images will be stored according to Type.
• The Patient Visit Control screen will appear (Fig. 3.2)
NOTE: It is not necessary to complete taking of all images of all types during initial Acquire Images
sequence. To continue taking images or to change image, following return t o t he Patient Visit Control
screen, • Click Re-Take Images . The Acquire Images screen will appear displaying the status of t he
last image type taken in that series. If in the correct t ype m ode, pr oceed to acquire images or click on ▼
of the correct type and proceed to acquire images. All images, for all types can be added to or r et aken
and selected for display in the assessment forms. • Click on Done to return to the Patient Visit
Control screen, Fig. 3.2 The Re-Take Images feature can be used until the visit in terminated and
saved ( Final Save File ).
3 - 2
Click here to return to the Table of Contents
8/4/1999
4444
Page 58

SECTION 3
OPERATOR INSTRUCTIONS
Patient Visit Control screen
Fig. 3.2
In any order:
• Click on Cervical Assessment to proceed with Colposcopy Assessment (Cervix) (Fig. 3.3)
or
• Click on Vaginal Assessment to proceed with Colposcopy Assessment (Vagina) (Fig. 3.14)
or
• Click on Vulvar Assessment to proceed with Colposcopy Assessment (Vulva) (Fig. 3.23)
NOTE An assessment button will only be activated if images have been acquired and selected f or t hat
type.
•
Click on Re-Take Image if necessary.
See Note, Page 3-2.
Click here to return to the Table of Contents
4444
3 - 3
8/4/1999
Page 59

SECTION 3
OPERATOR INSTRUCTIONS
Colposcopy Assessment Form (Cervix)
NOTE: These instructions apply to Cervix, Vagina and Vulva
The data footer will display: Patient MR Number
Patient Age
Current Visit Date & Type
Colposcopist Name - Current Visit
The two Selected images will be displayed.
Images may be reviewed in Full Screen size at any time. Biopsy sites may be marked before, during or
after completing data entry (see Data Entry, Page 3-7). (Biopsy site markings should be made on full
screen size images before the visit is saved.) Selected images may be replaced with other images
acquired in this sequence for Colposcopy Assessment Form display. (See Selection, Display and
Marking of Images, Page 3-6.)
Fig. 3.3
NOTE: Biopsy Site mark in gs will be displayed on Images on Colposcopy Assessment form and
Colposcopy Graphics Annotation form.
Click here to return to the Table of Contents 4
3 - 4
4
44
8/4/1999
Page 60

SECTION 3
OPERATOR INSTRUCTIONS
NOTE: These instructions apply to Cervix, Vagina, and Vulva
Selection, Disp l ay and Marki ng of Images
• Click on Full Screen on either First Image or Second Image for full screen review, biopsy site
marking and/or changes of Selected images for Assessment and Graphic Annotation form
displays.
• All images acquired in this Image Type sequence are displayed. The first Selected image (icon) is
framed in light blue - the second in dark blue. The image (icon) that is cur r ent ly displayed in full
screen size is outlined in black. y Click any image (icon) to display that image in full screen size.
• Click anywhere on full screen size image to mark sequentially numbered biopsy sites. Biopsy sites
can be marked only on both First and Second Sel ect ed I m ages. (Maximum of ten per Image
Type sequence.) Biopsy sites can be marked alternately on both selected images by clicking on the
icon to display in full screen.
• Click Biopsy Menu, Erase Biopsies to delete Biopsy site markings on this image.
NOTE: Biopsy Sites can be erased only on this screen or Colposcopy Assessment screen and only
during Live Visit mode. Saved Biopsy Site Markings cannot be erased.
Fig. 3.4
NOTE: While in the full screen mode, images can be Annotated - See Text and Graphics (Annotations),
Page 3-21.
Click here to return to the Table of Contents
3 - 5
8/4/1999
4444
Page 61

SECTION 3
OPERATOR INSTRUCTIONS
NOTE: These instructions apply to Cervix, Vagina and Vulva
Selection, Disp l ay and Marki ng of Images
• Click on Select 2
Graphic Annotation form s. The button will change to Select 2
requesting that new “best” image(s) be selected.
• Click on desired image(s) (icon) to replace Selected image(s). Light blue and dark blue fra m es w ill
now outline the newly selected fi r st and second im ages r espect ively. These w ill now be displayed
on the Colposcopy Assessment and Graphic Annot at i on For m s.
NOTE: Biopsy markings on original Selected images will be de le t e d . New biopsy s ites must b e m a rked
on newly Selected images.
• Click Zoom to double size at any time.
• Click on ▼ or ▲ or hold down to incrementally pan image.
• Click on, hold down and move on vertical or horizontal frame to pan image.
• Click on Zoom to return to normal full screen size.
to change Selected images for display in Colposcopy Assessment and
Off
.
. A message box will appear
On
• Click on ▼ to select Cervical, Vaginal, or Vulvar to alternately display all images (in Full Screen size)
of each type acquired in the visit sequence.
• Click OK to return to the Colposcopy Assessment Form. (Fig. 3.3, Page 3-4). Pr oceed w ith Data
Entry (see Data Entry, Page 3-7)
or
• Click Annotate Graphics . The Colposcopy Graphic Annotation screen will appear, Page 3-13.
NOTE: While in the full screen mode, images can be Annotated - See Text and Graphics (Annotations),
Page 3-21.
Click Re-Take Images if necessary to retake or complete taking images of this type. The Acquire
Images screen will appear in live mode. The Images (icon) previously taken in this sequence w ill be
displayed including selections. Proceed to retake or complete taking images. y Click Select 2
button to change selected images. Click Done to return to Colposcopy Assessment screen.
OFF
3 - 6
Click here to return to the Table of Contents
8/4/1999
4444
Page 62

SECTION 3
OPERATOR INSTRUCTIONS
Colposcopy Assessment Form - Cervix (Fig. 3.5)
Data Entry
The data header will display: Patient MR Number
Patient Age
Current Visit Date & Type
Colposcopist Name - Current Visit
Colposcopy Assessment screen- Cervix
Colposcopy Adequacy must be completed to
complete with the visit. Click on ▼ to display
the multiple choice pull-down menu. Click on
selected choice to enter. Selection of “other”
will display 40 c h a r a c ter typin g b o x .
Display of menus continue on next page.
3 - 7
Fig. 3.5
Click here to return to the Table of Contents
8/4/1999
4444
Page 63

SECTION 3
OPERATOR INSTRUCTIONS
Colposcopy Assessment Form - Cervix
Data Entry
Colposcopic Impression:
default setting. If correct, pr oceed to
following section. Normal cannot be
selected in conjunction with any other
condition. Polyp, Cervici t i s , At r ophic
and Metalplasia can be selected in any
combination. Only one selection can be
made from Condyloma through Cancer.
AIS can be selected with any other
selections. Selecting Other will display 40
character typing box.
Margins, Color, Vessels and Iodine Stain will automatically receive an individual RCI (Reed Index) score
according to degree of response and totaled on visit file.
Fig. 3.7 Fig. 3-11
Normal is
9999
Fig. 3.8 Fig. 3-12
Fig. 3-13
Fig. 3-9 NOTES: Notes will be saved and permanent ly
▼
included as part of this visit file. Up to the
first eigh t lin e s will be autom a t ic a lly c o p ie d a n d
printed in the Colposcopy Procedure forms.
Type four **** (asterisks) to end printing of
less than eight lines.
Fig. 3-10 • Click ▼ or ▲ to scroll through
complete box when reviewing. ▼
Click here to return to the Table of Contents
3 - 8
8/4/1999
4
Page 64

SECTION 3
OPERATOR INSTRUCTIONS
Colposcopy Assessment Form - Vagina (Fig. 3.14)
Data Entry
The data footer will display: Patient MR Number
Patient Age
Current Visit Date & Type
Colposcopist Name - Current Visit
Colposcopy Assessment - Vaginal
Colposcopy Adequacy must be completed to
continue with the visit. Click on ▼ to display
the multiple choice pull-down menu. Click on
selected choice to enter. Selection of “other”
will display 40 c h a r a c ter typin g b o x .
3 - 9
Fig. 3.14
Click here to return to the Table of Contents
8/4/1999
4444
Page 65

SECTION 3
OPERATOR INSTRUCTIONS
Colposcopy Assessment Form - Vagina
Colposcopic Impression:
cannot be selected in conjunction with any other condition. Vaginitis, Adenosis and Atr ophic can be
selected alone or in any combination.
Only one selection can be made from Condyloma thr ough Cancer. Selection of o ther will displa y 4 0
character typing box.
Margins, Color, Vessels and Iodine Stain will automatically receive an individual RCI (Reed Index) score
according to degree of response and totaled on visit file.
Total Lesions: Default is 0. Click on box to highlight and type over w ith quant ity.
Fig. 3.15 Fig. 3-19
Normal is default setting. If correct, proceed to following section. Normal
9999
Fig. 3.16 Fig. 3-20
Fig. 3-17 Fig. 3-21
Fig. 3-18 Fig. 3-22
NOTES: Notes will be saved and perm anent ly ▼
included as part of this visit file. Up to the first
eight will be au tomatica lly c op ie d a nd p rinted in
the Colposcopy Procedure forms. Type
four **** (asterisks) to end printing of less than
eight lines. • Click ▼ or ▲ to scroll through
complete box when reviewing. ▼
3 - 10
Click here to return to the Table of Contents
8/4/1999
4444
Page 66

SECTION 3
OPERATOR INSTRUCTIONS
Colposcopy Assessment Form - Vulva (Fig. 3.23)
Data Entry
The data footer will display: Patient MR Number
Patient Age
Current Visit Date & Type
Colposcopist Name - Current Visit
Colposcopy Assessment - Vulva
Display of menus continue on next page.
3 - 11
Fig. 3.23
Click here to return to the Table of Contents
8/4/1999
4444
Page 67

SECTION 3
OPERATOR INSTRUCTIONS
Colposcopy Assessment Form - Vulva
Colposcopic Impression:
Normal is default setting.
9999
If correct, proceed to following section.
Normal cannot be selected in conjunction
with any other condition. Squamous
Hyperplasia, Lichen Sclerosis and
Paget’s Disease can be selected alone or
in any combination. Only one selection
can be made from Condyloma thr ough Cancer. Fig. 3-24
Selection of other will display 4 0 c ha racter typing box.
Size of Largest Lesion: 0 is default setting. • Click on box to highlight and type over with corr ect
dimension (mm).
Total Lesions: Default is 0 . Click on box to highlight and type over with quantity.
Fig. 3-25 Fig. 3-26
Fig. 3-27 Fig. 3-28
NOTES: Notes will be saved and perm anent ly ▼
included as part of this visit file. Up to the
first eigh t lin e s will be autom a t ic a lly c o p ie d a n d
printed in the Colposcopy Procedure forms.
Type four **** (asterisks) to end printing of
less than eight lines.
• Click ▼ or ▲ to scroll through
complete box when reviewing. ▲
3 - 12
Click here to return to the Table of Contents
8/4/1999
4
Page 68

SECTION 3
OPERATOR INSTRUCTIONS
Colposcopy Graphic Annotation screen - Cervix
Selection, Disp l ay and Marki ng of Images
The Selected images from the Colp os c o p y As s e s s m e n t F o rm will be displa y e d in c lud in g Biops y Si t e
Markers and Annotations.
Fig. 3.29
+Mark Biopsy Site will appear as the default set t ing in the condit ion code and descript ion box f or
graphic presentations. • Click on desired points to mark biopsy site(s) on Graphic. Biopsy site numbers
will ascend from last biopsy site number applied in Colposcopy Assessment form to a maximum of 10
per visit.
• Click Code or Description to highlight. • Click on desired points on Cervix Graphic or Images.
Codes applied to Images will also appear on Colposcopy Assessment f or m .
Annotations
• Click Circle, Text, Paint to select and apply annotations to Graphic. See Text and Graphics
(Annotations) Instructions, Page 3-21.
3 - 13
Click here to return to the Table of Contents
8/4/1999
4444
Page 69

SECTION 3
OPERATOR INSTRUCTIONS
Colposcopy Image Annotation screen - Cervix
Selection, Disp l ay and Marki ng of Images
• Click Annontations Menu, Hide Annontations to temporarily hide Annotations on both Graphic and
Images.
• Click on Annotations Menu, Display Annotations to restore.
• Click on Erase Codes to delete markings on images.
• Click on Erase Cervical Graphic to erase all markings on Graphic.
• Click OK to return to Colposcopy Assessment Form.
or
• Click Image Type drop down bar to select Cervical, Vaginal or, or Vulvar to review and/or annot at e
each Colposcopy Graphic Annotation form of the same visit at any t ime.
NOTE: All markings must be SAVED along with other visit data to
become a permanent part of the visit file.
• Click OK to return to Colposcopy Assessment Form
• Click OK to return to Patient Visit Control screen
NOTE: Following satisfactory completion of Assessments and Annotations
• Click on Final Save File to save and permanently enter all images, annotations and data
acquired to the visit file.
Codes and Annotations applied to the G r aphi c will be copied to and printed on the Colposcopy
Procedure Form.
3 - 14
Click here to return to the Table of Contents 4
8/4/1999
4
44
Page 70

SECTION 3
OPERATOR INSTRUCTIONS
Colposcopy Image Annotation screen - Vulva and Vagina
NOTE: Instructions for Vulva and Vagina are identical to those for Cervix. Only the Graphic
representations for each are differ ent ( see Figs. 3. 30 and 3. 31)
Selection, Disp l ay and Marki ng of Images
Fig. 3.30 Fig. 3.31
Codes and Annotations applied to the G r aphi c will be copied to and printed on the Colposcopy
Procedure Form.
Click here to return to the Table of Contents
3 - 15
8/4/1999
4444
Page 71

SECTION 3
OPERATOR INSTRUCTIONS
Review Images
The Review Images feature prov ide s the ability t o review All Images acquired during one visit including
all biopsy site and other annotations. This fe at ur e also pr ovides t he abilit y t o save (copy) any image to a
floppy disk for reproduction, as a hard copy pr int, and/or as a projection slide. It also executes
commands for on-line printing of an image and to copy images for split screen display.
• Select the desired patient. • Enter the Patient Visit Control screen. • Click to highlight the desired
visit.
• Click on Review Visit . A message box will appear confirming that the desir ed visit is available f or
review.
• Click on OK . •Click on Review Images . The Review Images screen w ill appear .
The screen header will display the Image Type (Cervix is t he def ault set t ing) and t he pat ient MR number .
• Click on ▼ Vagina, Vulva or Cervix again, at any time, to display the Review Images screen for each
image type.
The displayed full size image will be the “first ” of t he t w o selected images of the Colposcopy
Assessment screen of that visit for t hat I m age Type and w ill include all biopsy sit e m ar ker s, Text and
Graphics (Annotations). Its miniature (light blue frame with black outer f r ame) , a miniature of t he
“second” selected image (dark blue frame), and up to f our addit ional miniatures of t he ot her images
acquired in that visit sequence will be displayed.
All of the displayed images may be reviewed in full size.
• Click on Hide Annotations to temporarily hide all Annotations.
• Click on Display Annotations to restore Annotations.
• Click on Hide Biopsies to temporarily hide Biopsy Site Markers.
• Click on Display Biopsies to restore the Biopsy Site Markers.
• Click on any miniature image to replace the full size image.
• Click on Zoom to enlarge the full size image.
• Click on ▼ or ▲ or hold down to incrementally pan image.
• Click on, hold down and move on vertical or horizontal frames to pan image.
• Click on Zoom to return to original size.
• Click on OK. The Patient Visit Information screen will appear.
NOTE: While in the Review Images mode, All Images may be Printed, Saved to Disk (for r epr oduct ion or
other storage) and copied for Split Screen Display. See Print, Page 4- 5. See Save t o Disk, Page 4- 1
See Split Screen, Page 3-17.
3 - 16
Click here to return to the Table of Contents
8/4/1999
4444
Page 72

SECTION 3
OPERATOR INSTRUCTIONS
Split Screen
Up to 12 images can be selected for simultaneous display and comparative review. The selected
images can be of any combination of the same or different patient(s) of any visit on file.
• Select the desired patient - • Enter the Patient Visit Control screen - • Click to highlight the
desired visit
• Click on Review Visit. A message box will appear confirming that the desir ed visit is available f or
review.
• Click on OK. •Click on Review Images. The Review Images screen w ill appear ( Fig. 3.33).
Fig. 3.33
The screen header will display the Image Type (Cervix is t he def ault set t ing) and t he pat ient MR number .
Click on ▼ to select Vagina, Vulva or Cervix again, at any time, to display the Review Images screen for
each image type.
The displayed full size image will be the “first ” of t he t w o selected images of the Colposcopy
Assessment screen of that visit for that Im age Type. I t s miniature ( light blue frame w ith black outer
frame), a miniature of the “second” selected image (dar k blue fr ame) , and up t o f our additional
miniatures of the other images acquir ed in t hat visit sequence will be displayed.
4444
3 - 17
Click here to return to the Table of Contents
8/4/1999
Page 73

SECTION 3
OPERATOR INSTRUCTIONS
Up to six images from this visit can be included in the Split Screen display. Copying for entry to the split
screen must be made from the full size image.
• Click on any miniature image to replace the full size image at any time.
• Click on Image Type drop down menu to select Vagina, Vulva, Cervix again, at any time, to display
the View Images screen for each type fr om t he same visit.
• Click Copy to Split Screen to copy the displayed full size image for the split screen. A message box
will appear indicating “Image 1 of 12 copied to split scr een”. The Image number will increase with
each copied up to twelve
• Click on OK. The message box will disappear.
Repeat the selection and copying process until the desired number of images from this patient’s visit are
copied.
• Click OK. The Patient Visit Control screen will appear.
• Click to highlight another (of this patient’s) visits and repeat the selection and copying process until
the desired number of images have been copied to the split screen display (maximum of 12).
or
To Add images of other patients:
• Click Cancel. The Select Patient screen will appear.
• Select the desired patient • Enter the Patient Visit Control screen. • Click on the desired visit.
Repeat the selection process with this or other patients until the desired images are selected (maximum
12).
• Click OK. The Patient Visit Control screen will appear.
NOTE: The selection process may be terminated if less than 12 images have been selected.
• Click Split Screen . The Split Screen will appear displaying all the images selected in this sequence
including the patient(s)’ name and date of visit for each image (Fig. 3.33, Page 3-17).
NOTE: Annotations will not appear on t his display. Images can be viewed with or without annot at ions
on enlarged quarter screen and full screen displays.
3 - 18
Click here to return to the Table of Contents
8/4/1999
4444
Page 74

SECTION 3
OPERATOR INSTRUCTIONS
Fig. 3.34
Up to 4 images can be selected for simultaneous display and comparative review in quarter screen and
individual full size.
• Click on the desired image(s) for enlarged quarter screen display. The number box w ill t u r n yellow t o
indicate selection.
• Click on Zoom to view the selected images. The quarter - split scr een w ill appear ( Fig. 3.35, Page 3-
20). All existing annotations will appear.
3 - 19
Click here to return to the Table of Contents
8/4/1999
4444
Page 75

SECTION 3
OPERATOR INSTRUCTIONS
Quarter Split Screen Display
Fig. 3.35
Click Zoom 1 or Zoom 2 or Zoom 3 or Zoom 4 in any order to display the corresponding image
number in full size.
NOTE: On quarter and full screen displays. • Click Hide Annot’s to view images without annotations.
• Click Display Annot’s to view images including annotations.
•
Click OK . The Split Screen will appear (Fig. 3.33, Page 3-17).
Repeat the selection process. Any combination of up to 4 images can be selected for split screen and individual enlarged display.
Click on previously displayed i m age( s) to deactivate (yellow) sel ection.
•
Click OK on Split Screen. The
Patient Visit Control
screen will appear.
Click here to return to the Table of Contents
3 - 20
8/4/1999
4444
Page 76

SECTION 3
OPERATOR INSTRUCTIONS
Text and Graphics (Annotations)
The Text and Graphics feat u re provides the ability t o :
• Apply alpha/numeric text
• Paint lines and areas
Circles and m ea s u rement va lu e s w ill b e d is pla y e d in w h ite
Text and Paint colors can be selected from 64 color palettes.
Applied text and graphics can be saved as a permanent part of the image. Annotat ions can be revised or
added to at any time or permanently deleted at any time.
Images can be displayed and reproduced wi t h or w i t hout t he annotat ions.
Text and Graphics can be applied only to the First and Second (selected) Images acquired during a visit
for the Colposcopy Assessment Form. Text and Graphics only can be applied to the Colposcopy
Graphics Annotation screen.
NOTE: Annotations may be applied during the live visit mode or on visit files
retrieved from storage.
To apply Text and Graphics to visit fi l es retri eved from storage
• Select the desired patient. • Enter Patient Visit Control screen. • Click to highlight the desired
visit.
• Click Review Visit . A message box will appear confirming that the desir ed visit is available f or
review.
• Click Cervical Assessment or Vaginal Assessment or Vulvar Assessment. The Colposcopy
Assessment screen for the selected type w ill appear .
To apply annotations to the visit images:
• Click Full Screen on the First Image or Second Image. The Full Screen display will appear (Fig.
3.36, Page 3-22). All the images acquired in this Image Type sequence are displayed. The First
Selected image (icon) is framed in light blue - the Second Selected in dark blue. The image (icon)
currently displayed in full screen size is outlined in black.
3 - 21
8/4/1999
Page 77

SECTION 3
OPERATOR INSTRUCTIONS
Full Screen
Click here to return to the Table of Contents
4444
Fig. 3.36
NOTE: Annotations may be applied alternately to both First Selected and Second Selected images
during the same sequence. • Click on the icon to replace the image in full screen display.
Annotations may be similarly applied during the same sequence to other Image Types acquired in the
same visit. • Click Image Type ▼ to select Cervix, Vagina or Vulva at any time to display the Ful l
Screen.
Click on Annotations Menu to display Annotations choices.
• Click desired annotation feature to highlight and activate.
• Proceed with application of annotations (see following instructions).
NOTE: Annotations can be applied to Full Screen image in Zoom mode.
Following completion of annotation applications • Click OK to return to Colposcopy Assessment
screen.
3 - 22
8/4/1999
Page 78

SECTION 3
OPERATOR INSTRUCTIONS
Click here to return to the Table of Contents 4
4
44
3 - 23
8/4/1999
Page 79

SECTION 3
OPERATOR INSTRUCTIONS
• Click OK to return to Patient Visit Control screen.
or
To apply annotations to the visit graphics:
• Click Annotate Graphics. The Colposcopy Graphic Annotati on screen will appear (Fig. 3.37).
REMINDER
annotations.
: • Click Final Save Fil e before exiting vi sit mode to permanently save additions or revisions of applied
Fig. 3.37
NOTE: Annotations may be alternately applied during the same sequence to other Graphic and Image
Types of the same visit. • Click Image Type : Cervix, Vagina, Vulva at any time to display individual
Colposcopy Graphic Annotation screens.
• Click on desired condition Description Code and Annotations lines to highlight and activate.
Proceed with application of annotations (see following instructions).
3 - 24
Click here to return to the Table of Contents
8/4/1999
4444
Page 80

SECTION 3
OPERATOR INSTRUCTIONS
NOTE: Condition Description Codes and Annotat ions may be applied to graphics. Only Condition
Description Codes can be applied to Images on this screen. Description Codes applied to images on
this screen will appear on images on Colposcopy Assessment scr een and on Full Scr een Displays.
Following completion of annotation applications • Click OK to return to Colposcopy Assessment
screen.
• Click OK to return to Patient Visit Control screen.
REMINDER: • Click Final Save File before exiting visit mode to permanently save additions or revisions
of applied annotations.
To Apply Alpha/Numeric Text
• Click on Text on Annotation pull-down menu.
Move the mouse cursor to the desired start- point. • Click any mouse butt on. The Add a New Text
Label box will appear.
A blinking prom p t will be displaye d in the typing b ox . • Type th e de s ired text (50 chara c t e r spaces
maximum). The type will be black.
NOTE: Black is the Text Color default setting when the system is opened. • Click OK if black is
satisfactory. The box will disappear and t he black text will be displayed on the image.
or
• Click Text Color. The Color box will appear displaying a 48 basic color and 16 custom color palet t e.
• Click on the desired color tile. A fra me w ill appear ar ound t he t ile. • Click OK. The Color box will
disappear. The Add a New Text Label box will reappear. The t ype now appear s on t he scr een in
the selected color.
• Click OK. The box will disappear and the selected color text is displayed on the image
or
• Click Clear Text to erase to re-type. Repeat pr ocess or • Click Cancel to exit.
Repeat process to apply additional text if more than 50 character limit is required (place cursor to position
text line below or to side of previous entry) or to apply additional text to other ar eas.
To Paint Lines and Areas
• Click on Paint on the Annotation pull-down menu. The Set Paint Characteristics box will appear.
Click here to return to the Table of Contents
3 - 25
8/4/1999
4444
Page 81

SECTION 3
OPERATOR INSTRUCTIONS
The default Paint line width setting is 1. A sample of the line width is displayed. • Click on optional line
width number (2 through 6) t o select desir ed line w idt h. The sam ple line w idth w ill change t o m at c h.
NOTE: Black is the Paint color default setting. • Click OK if black is satisfactory. The
box will disappear. Move mouse cursor t o desir ed point to commence painting.
or
• Click Line Color . The Color box will appear displaying a 48 basic color and 16 custom color pallette.
• Click on the desired color tile. A fra m e w ill appear ar ound t he t ile. • Click OK. The Color box will
disappear. The Set Paint Characteristics box will reappear. The sample line now displays in the
selected color.
• Click OK. The box will disappear. Move the mouse cursor to desir ed point t o com m ence paint ing.
To Paint, depress and hold down the mouse butt on unt il line or area is completed. Move paint line
comfortably but as rapidly as possible. This w ill ext end t he paint cover a ge. Up t o 15 individual line
segments can be painted - of the same or different colors dur ing one visit sequence.
The applied paint will disappear momentarily w hen paint ing is re sumed following a line or color change.
Hold the mouse button down until all the previously applied paint is refreshed and then continue.
NOTE: Following the opening sequence the selected Text and Paint color will bec ome the def a u lt
setting for the palette until the system is closed. Change as required.
To Temporarily Remove Annotations from the disp l ayed image
• Click Hide Biopsies. The Biopsy Sites will disappear.
• Click Display Biopsies. The Biopsy Sites will reappear.
To Erase Annotations from the displayed image:
• Click Erase Annotation . The annotations will disappear.
To Replace Erased Annotations. Proceed with selection and application of desired annotations.
:
3 - 26
Click here to return to the Table of Contents
8/4/1999
4444
Page 82

SECTION 3
OPERATOR INSTRUCTIONS
To Close the System
Return to the opening screen (See Page 2-1, Fig. 2.1)
• Click on Exit System. An icon screen will appear (Fig. 3. 39)
• Click on Start. The start menu will appear ( Fig. 3. 40)
Fig. 3.39 Fig. 3.40
•Click on Shut Down. The Shut Down
Windows box will appear.
•Click on Yes
“It’s now safe to turn off your computer”
will appear.
• Power Off the computer
• Turn off the monitor
• Turn off the printer
• Turn off ot h e r ancillaries
Fig. 3.41
Click here to return to the Table of Contents
3 - 27
8/4/1999
4444
Page 83

SECTION 4
OPERATOR INSTRUCTIONS External Archiving, and Printing
Save to Disk
This feature provides the ability to save images to disk for reproduction as projection slides and hard copy
prints.
• Select the desired patient. • Enter the
visit.
• Click on Review Visit. Menu boxes confirm that the desired visit is available for review by
highlighting.
• Click on Review Images. The
Review Images
Patient Visit Con trol
screen will appear (Fig. 4.1).
screen. • Click to highlight the desired
Fig. 4.1
The screen header will display the Image Type (Cervix is the default setting) and the patient MR number.
• Click on ▼ to select Cervix, Vagina or Vulva, at any time, to display the Review Images screen for
each image type of that visit.
4444
4 - 1
Click here to return to the Table of Contents
8/4/1999
Page 84

SECTION 4
OPERATOR INSTRUCTIONS External Archiving, and Printing
Copy images from the full screen display (this is required)
• Click on any icon to replace image on full screen display.
• Insert a blank formatted disk (3½” 1.44 Mb).
• Click Save to Disk. A box will appear requesting instructions (Fig. 4.2). Click Yes to save with
Annotations.
• Click No to save without Annotations.
Fig. 4.2 Fig. 4.3
• A marking instruction box will appear (Fig. 4.3). Click OK.
.
Fig. 4.4
Click here to return to the Table of Contents
4 - 2
4444
8/4/1999
Page 85

SECTION 4
OPERATOR INSTRUCTIONS External Archiving, and Printing
Place the mouse cursor in any corner of the image.
• Click and hold down. Move towards the opposite corner. A rectangular framing line will appear and
expand to frame the image vertically and horizontally (Fig. 4.4).
After reaching the opposite corner, release the mouse button. The
The entire enclosed area is in a frame and captured for saving to disk.
Save As
Save to Disk (Without Compression)
screen will appear (Fig. 4.5).
Fig. 4.5
Tag Image File Format is the default selection for file type. *.bmp in File Name box is highlighted. Type
in file name for disk (8 characters max).
• Click on ▼ in Drives box to display drive selections.
• Click on a: • Click on OK . The image will be saved to the floppy disk in
Repeat process for other images.
• Click OK when complete to return to
screen.
NOTE
: Only one full screen image can be saved per disk in Bitmap format. The framing feature can be
used to frame only areas of interest on the image. Depending on average image area captured, more
than one image (or part thereof) can be saved to the disk.
Colposcopy Assessment
Click here to return to the Table of Contents 4
4 - 3
screen or
Bitmap format
Patient Visit Control
.
8/4/1999
4
44
Page 86

SECTION 4
OPERATOR INSTRUCTIONS External Archiving, and Printing
Save to Disk (With Compression)
To capture and compress images (or parts thereof) to maximize disk storage capacity, following the
completion of framing, the
• Click ▼ on Save file as type: box. The multiple-choice menu will appear (Fig. 4.6).
Save As
screen will appear (Fig. 4. 5).
Figs (4-5 and 4-6)
• Click JPEG (*JPG). Enter File name (8 characters max).
• Select Drive a: • Click on OK . The image will be compressed and saved to the floppy disk in JPEG
format.
Repeat process for other images.
• Click OK when complete to return to
NOTE
: Depending on color and composition, twenty five to sixty full screen images can be saved per
disk in JPEG format. Using the framing feature to frame only area of interest, considerably more can be
saved.
The image compression ratio has been factory preset to provide compression recovery with no
discernible loss of colposcopic image information.
Patient Visit Control
Click here to return to the Table of Contents 4
4 - 4
screen.
8/4/1999
4
44
Page 87

SECTION 4
OPERATOR INSTRUCTIONS External Archiving, and Printing
This features provides the ability to prin t images on line with the syst em pr inte r.
• Select the desired patient. • Enter the
visit.
• Click on Review Visit. A message box will appear confirming that the desired visit is available for
review.
• Click on Review Images. The
Review Images
Patient Visit Con trol
screen will appear (Fig. 4.7).
screen. • Click to highlight the desired
Fig. 4.7
The screen header will display the Image Type (Cervix is the default setting) and the patient MR number.
• Click on ▼ Cervix, Vagina or vulva, at any time, to display the Review Images screen for each image
type of that visit.
4444
4 - 5
Click here to return to the Table of Contents
8/4/1999
Page 88

SECTION 4
OPERATOR INSTRUCTIONS External Archiving, and Printing
Print images from the full s creen d isplay ( th is is required)
• Click on any icon to replace image on full screen display.
• Click Print Image. A box will appear requesting instructions (Fig . 4.8 ). Click Yes to Print Patient
Name and Data. Click No to print without Patient Name and Data. A box will appear requesting
instructions ( F ig. 4. 9). Clic k Yes to print with annotations. Click No to print without annotations.
Fig. 4.8 Fig. 4.9
.
Fig. 4.10
• Click on screen anywhere
• Select and load other images to repeat process. Printing will continue automatically to completion of
all requests.
or
• Click on OK to retu rn to th e
NOTE
: The Welch Allyn Image Management System has been programmed to instruct the printer to
produce prints at 1440 DPI using High Quality Ink Jet paper. Color values have been set at factory for
colposcopy standards. Please refer to the included printer operators manual for a variety of printing
options.
outside
the printer box. The box will disappear - printing will continue.
Patient Visit Control
Click here to return to the Table of Contents 4
4 - 6
screen.
4
44
8/4/1999
Page 89

SECTION 4
OPERATOR INSTRUCTIONS External Archiving, and Printing
Reports & Forms
Laboratory Test Pending Report
The
report, at any time, of outstanding laboratory test results for all patients on file.
The input data for this report is automatically generated from Visit entries to the LABORATORY AND
TREATMENT INFORMATION screen for PATHOLOGY RESULTS, LABORATORY TESTS AND
TREATMENTS. All “DONE: RESULTS PENDING” entries to Pap Smears, ECC, Cervical, Vaginal and
Vulvar Biopsies, HPV and Cervical Tests, and Pathology and Margins Results of Treatments of the Cervix,
Vagina and Vulva.
Subsequent entries of results through the Update Lab Results feature will become a permanent part of
the visit record. The result entries will automatically delete the corresponding item from the
Test Pending Reports
The report can be generated for visual review on the system screen and/or by printing.
To Access and generate the report:
.
feature provides the ability to produce a complete and current
Laboratory
• Click on File (at the top left corner of the
• Click on Lab Test Report . The
• Click Run Report. The report will display on the screen, sequentially numbered in order of date,
earliest first.
Lab Test Report
Opening
screen). A six line menu will appear.
screen will appear (Fig. 4.12).
Fig. 4.12
Fig. 4.13
• Click on > at lower right corner and hold down to scroll to display all report columns. Click < and
hold down to reverse scroll.
• Click ▼ at lower right to display patient lines stored below the screen display.
• Click ▲ to re v erse display.
• Click Print Report . The report will be printed in date order alphabet ic a l by pat ie nt la st name a nd will
include all columns and the current date (Fig. 4.13).
Click here to return to the Table of Contents
4 - 7
8/4/1999
4444
Page 90

SECTION 4
OPERATOR INSTRUCTIONS External Archiving, and Printing
• Click OK to exit mode.
REMINDER
screen to print at head of form (See Page 1-2, Fig.1.2).
: Enter Clinic name in
Full Clinic Name
box on
Fig. 4.14
System Setup Information
4 - 8
Click here to return to the Table of Contents
8/4/1999
4444
Page 91

SECTION 4
OPERATOR INSTRUCTIONS External Archiving, and Printing
Colposcopy Procedure Form
This feature prov ide s the ability to print Colposco p y Proced ure Forms f or each of t h e Cervix, Va g in a and
Vulva (Fig. 4.17)
This report will include up-to-date patient data to and including the date of report generation.
Data Includes: Data Source Page No.
- - - - - - - - - - - - - - - - -- - - - - - - - - - - - - - - - - - - - - - - - - - - - - - - - - - - - - - - - - - - - - - - - - - - - - - - - - - - - - - - - Patient Name, SSN#, MR# Patient Information Screen 2-3
Residence and Work Telephone numbers
Referring Clinicia n
Age
Visit Date, Colposcopist, Other Coloposcopists Visit History (Patient Visit Control Screen 2-6
Colpo Reason Follow-up Visits 2-26
Lab & Treatment Information screen 2-24
Gravidity, Pregnancies, Abortions Visit Data 2-10
HIV Status, Last Menstrual Period
Pregnancy Status, Tobacco History
Birth Control Methods, DES Exposure
Allergies, Total # Socia l Partners
Age 1st Intercourse
HPV Status Patient History 2-18
Last 3 Most Severe Pap Smears Lab & Treatment Information Screen 2-24
Previous ECC, Biopsy, Treatment
Pathology & Margins
Most R ecent Pap Sm ear, B i opsy, ECC
Colposcopy Adequacy, Impression Colposcopy Assessment screen 3-4
Lesion Size, Surface Contour
Notes, Images, Biopsy Sites
RCI Score
Annotated Graphics Colposcopy Graphic Annotation screen 3-13
Follow-up Visit, Follow-up Visit Type Lab & Treatment Information screen 2-24
Medication, Note s
The specimen Cervix form and data are presented to illustrate the features. Data, Images and
Annotations are not representative of actual practice.
4 - 9
Click here to return to the Table of Contents
8/4/1999
4444
Page 92

SECTION 4
OPERATOR INSTRUCTIONS External Archiving, and Printing
To Print
• Select the desired patient. Enter the
visit.
• Click Review Visit . Menu boxes will become high ligh ted confirming tha t the desi r e d vis it is available
for review
• Click Print Forms .
The print window will appear. · Double Click on 1 in copies box to highlight and type over for number of
copies required (if more than 1 is required).
• Click OK .
The images and graphics of each of the forms to be printed will be displayed briefly.
The printer status window will appear and printing will begin automatically.
• Click anywhere outside the printer status box. The box will disappear. Printing will continue.
Patient Visit Control
screen. y Click to highlight the desired
• Repeat selections and printing instructions for other patients and visit. Printing will continue
automatically to completion of all requests
or
• Click on OK to return to the Patient Visit Control screen.
NOTE
: The Welch Allyn Image Management System has been programmed to instruct the printer to
produce prints at 1440 DPI using High Quality Ink Jet paper. Color values have been set at factory for
colposcopy standards. Please refer to the included printer operators manual for a variety of printing
options.
4 - 10
Click here to return to the Table of Contents 4
8/4/1999
4
44
Page 93

SECTION 4
OPERATOR INSTRUCTIONS External Archiving, and Printing
4 - 11
Fig. 4.15
Click here to return to the Table of Contents
8/4/1999
4444
Page 94

SECTION 4
OPERATOR INSTRUCTIONS External Archiving, and Printing
Visits to Arrange Reports
Visits to Arrange Report
The
any time, of patient visits remaining to be scheduled.
The input data for this report is automatically generated by entries to the Follow-Up Visits Section in the
Laboratory and Treatment Instruction screen (Pages 2-26 and 2-33).
To access and generate the report:
feature provides the ability to produce a complete and current report, at
• Click on File (at the to p left corner of the
• Click on Visit Report . The
1 is the default for Next Number of Weeks to review. If acceptable, • Click on Create List. If not
acceptable, click on 1 to highlight, then enter desired number of next weeks to review.
• Click on Create List . The complete report of all visits to arrange within the entered number of
“Next Weeks” will appear (Fig. 4.17).
Visits to Arrange Report
Opening
screen). A six line menu will appear.
screen will appear, Fig. 4.16.
Fig. 4.16
Fig. 4.17
The report will be displayed on the screen including all the “Visits to Arrange” within the number of
weeks entered from the date of the report.
The Patient’s name, MR Number and Visit type for each will be listed. The visits will be displayed and
sequentially numbered in order of the week to be scheduled, earliest first. The date will be the Monday
of that week.
4 - 12
Click here to return to the Table of Contents
8/4/1999
4444
Page 95

SECTION 4
OPERATOR INSTRUCTIONS External Archiving, and Printing
• Click on Print Report to print report. The print window will appear. · Click OK .
The printer status window will appear and printing will being automatically.
• Click anywhere outside the printer status box. The box will disappear. Printing will continue until the
report is complete (Fig. 4.18).
To Delete visits to be scheduled:
• Click on Visit Line under Delete to mark delete visit/patient.
• Click on Remove to delete all marked Visits and Patients from
• Click OK to exit mode.
NOTE
: The Welch Allyn Image Management System has been programmed to instruct the printer to
produce prints at 1440 DPI using High Quality Ink Jet paper. Color values have been set at factory for
colposcopy standards. Please refer to the included printer operators manual for a variety of printing
options.
Visits to Schedule Report
.
Fig. 4.18
Click here to return to the Table of Contents
4 - 13
4444
8/4/1999
Page 96

SECTION 4
OPERATOR INSTRUCTIONS
External Archiving, Print ing and Transmission
DIMS Mail
This feature pr ovides the ability to send p atie n t rec or d s and rec e iv e pati en t records from compatib le
systems by:
-Floppy Disk
-Direct Modem Connection
-email
The patient records will consist of one or more visits and can include all or the two selected images
acquired during each of the visits.
To access the fea ture, • Click on
fig 1-1) under the WELCH ALLYN IMAGE MANAGEMENT SYSTEM header. A two-line selection box will
appear (fig 4.30)
File Transfer
located at the top left of the Opening Screen (page 1-1,
fig 4.30
Send
To
will appear. (fig 4.31)
fig 4.31
7R#Send Records#E\#Floppy Disk#-
• Click on File or Modem or e-mail in the Send Records To….box
Receive
or
RU#Direct Modem Connection
RU email
records , • Click on Send/Receive Records. The
Transfer Patient Records
screen
7#0#47
;2724<<<
Page 97

SECTION 4
OPERATOR INSTRUCTIONS
External Archiving, Print ing and Transmission
The Select Patient Records To Send screen will appear. (fig 4.32)
The entire list of patients stored in the DIMS primary system will be displayed in
alphabetical order by last name. •
Click on 6 at lower right of names list and hold to
advance scroll. • Click on 5 at upper right to reverse scroll.
• Click on the desired patient name to highlight for selection. The corresponding
medical rec or d (M R) numb e r will be displayed. All the v is i t re c o rd s fo r th a t p at ie n t
will be displayed inc lu din g th e time and dat e of each v is it. • Click on the desired
visit(s) to highlight for selection.
• Click on
Selected ~
acquired during the desired visit(s) or • Click on
in the Images box to include only the two Selected Images
to include all the images
All ~
acquired during the desired visits. The Send button will become activated.
fig 4.32
Note: All steps taken to this point to send records by Disk, Modem, or email are identical.
To Send Records by Floppy Disk
• Insert a blank formatted disk (3 1/2" 1.44Mb)
• Click on
and the Select The Name of the Archive File screen will appear. (fig 4.33)
Send
fig 4.33
The MR number of the Selected Patient will appear in the File name box. Change the file name if
necessary.
Click 6 on the Save in box to display the pull down menu. Click on 3 ½ Floppy [A:]
●
• Click on Save
7#0#48
;2724<<<
Page 98

SECTION 4
OPERATOR INSTRUCTIONS
The selected Patient visit(s) will be saved to the floppy disk.
Note: All the visits selected will be saved to the floppy disk under the one patient file name.
External Archiving, Print ing and Transmission
To Receive Patient Records from a Floppy Disk
• Enter the
• Insert the Floppy Disk received
• Click on File in the Receive Records From….box
The Select Transfer File to Open Screen will appear (fig 4.34)
Transfer Patient Records
screen (fig 4.31)
fig 4.34
All the Patient File Names included in the disk will be displayed.
Each Name will contain all the se lect e d visits.
• Click on the desired File Name to highlight
• Click on Open. The
Database Update Complete
"
File
.
Repeat the process until the desired number of Patient File names have been imported to the
File
.
Transfer Patient Records
The selected File Name will have been imported to the
."
screen (fig 4.31)will appear including the message
Transfer
To Review Patient Records in the Transfer File
• Enter the opening screen
• Click on
File Transfer
Transfer
• Click on
The Select Patient button at the lower right corner will chang e t o Select Patient from Transfer File.
Click on Select Patient from Transfer File.
Review Transfer Records
7#0#49
;2724<<<
Page 99

SECTION 4
OPERATOR INSTRUCTIONS
Select Patient
The
screen (fig 4.35) will appear including the
External Archiving, Print ing and Transmission
Transfer Patient Select List
Directory.
fig 4.35
To
Find
Select or Delete a patient
and
, follow the same instr u ct io n s pro v id e d in the We lc h Allyn Image
Management System primary system (pg 2-4) for these functions.
• Click on the desired patient name to highlight and select
• Click on Select Patient
Patient Visit Control
The
screen will appear (fig 4.36)
7#0#4:
;2724<<<
Page 100

SECTION 4
OPERATOR INSTRUCTIONS
• Click on the desired visit to highlight
External Archiving, Print ing and Transmission
fig 4.36
• Click on Review Visit
Review
To
System primary system (pg 2-34) for these functions.
Review
To
reports, follow the instructions provided for these functions earlier in this same section. (section #4)
the selected visit(s) follow the instructions provided in the Welch Allyn Image Management
the visit images, print images, produce split screens, save images to disk and print forms and
To Send Patient Records by Direct Modem Connection
Note: for Direct modem communication, the receiver’s system must be set in the Waiting for Call mode.
Enter the
• Click on Modem in the Send Records To….box
Transfer Patient Records
screen
• The
• Click on the desired patient name and visit(s) to highlight for selection
• Click on
• Click on Send
Select Patients Records
Selected
~
for
"
"
or
To Send
All
images
"
"
screen will appear
7#0#4;
;2724<<<
 Loading...