

Page 1

AED 20
Page 2

Table of Contents
Welch Allyn AED 20 Users Manual
Revision K compatible with software version 07.02.XX
Preface
Manufacturer............................................................................................i
FDA Medical Device Registration.........................................................i
Manufacturer's Responsibility...............................................................ii
User's Responsibility..............................................................................ii
Contact and Technical Support...........................................................iii
Declaration of Conformity......................................................................iv
Safety
Conventions Used in the Manual..........................................................v
General Cautions and Notices.............................................................vii
Patient Safety........................................................................................viii
Defibrillator and Electrode Pads...........................................................xi
Battery and Charger.............................................................................xiii
Care and Storage..................................................................................xv
Safety Symbols .....................................................................................xvi
Chapter 1 Introducing the Welch Allyn AED20
Overview of the Welch Allyn AED20...............................................1-3
Features .......................................................................................1-3
System Upgrades and Options.................................................1-4
Qualified Operators ....................................................................1-4
Getting the Welch Allyn AED20 Ready...........................................1-5
Unpacking and Inspecting.........................................................1-5
Installing the Battery...................................................................1-5
Running the Self -Test................................................................1-7
990020 – Rev. K Table of Contents TOC-1
Page 3

Getting to Know the Welch Allyn AED20.........................................1-8
Welch Allyn AED20 Configurations..........................................1-8
Functions ......................................................................................1-9
Battery Charging and Conditioning...............................................1-19
The WELCH ALLYN Quick Charger/Conditioner................1-20
Charging a Battery...................................................................1-21
Conditioning a Battery.............................................................1-21
The Alternate WELCH ALLYN Quick
Charger/Conditioner.................................................................1-22
Preparing the Welch Allyn AED20 for Storage ...........................1-24
Welch Allyn AED20 Accessories Part List ................................... 1-25
Chapter 2 Using the Welch Allyn AED20
Overview...............................................................................................2-3
Trained Operators .......................................................................2-3
Fibrillation and Defibrillation.......................................................2-3
Indications and Contraindications for Use...............................2-4
Welch Allyn AED20 Operating Procedures –
Quick Reference ...............................................................................2-6
Automated Mode.........................................................................2-6
Manual Mode...............................................................................2-7
Welch Allyn AED20 Operating Procedures –
Detailed Information.........................................................................2-8
Assess the Patient.......................................................................2-8
Start the Welch Allyn AED20.....................................................2-8
Attach the Electrode Pads and Connecting Cable .................2-9
Analyze Patient’s Heart Rhythm............................................2-12
Deliver Shock —Automated Mode........................................2-13
Deliver Shock —Manual Mode ...............................................2-15
Defibrillator Disarm...................................................................2-18
Perform CPR.............................................................................2-18
EMS Mode .................................................................................2-19
Electrode Monitoring (option).................................................2-22
Post-Use Procedures.......................................................................2-28
TOC-2 Welch Allyn AED 20 Users Manual 990020 – Rev. K
Page 4

Chapter 3 Programming the Welch Allyn AED20
Menu Structure Diagram ...................................................................3-3
Menu Structure Overview..................................................................3-4
Accessing the User Menu from Automated Mode .........................3-4
Accessing the User Menu from Manual Mode...............................3-5
User Menu...........................................................................................3-7
User Menu Structure Overview................................................3-8
Working with the Log ..................................................................3-9
Setting the Date........................................................................3-14
Setting the Time........................................................................3-15
Adjusting the Contrast..............................................................3-16
Adjusting the Speaker Volume...............................................3-17
EMS Mode.................................................................................3-18
Supervisor Menu Tree.....................................................................3-19
Supervisor Menu ..............................................................................3-20
Accessing the Supervisor Mode.............................................3-21
Supervisor Menu Items............................................................3-22
Selecting a Language..............................................................3-23
Setting the Charge Protocol....................................................3-24
Diagnostics ................................................................................3-25
Calibration..................................................................................3-26
Viewing Information on the PCMCIA Memory Card............3-30
Setting Options..........................................................................3-32
Changing Manual and Supervisor
Password Codes.......................................................................3-35
Upgrading the Welch Allyn AED20 System..........................3-36
Chapter 4 Maintaining the Welch Allyn AED20
Inspection.............................................................................................4-3
Scheduling Inspections..............................................................4-3
Power-Up and Self -Test............................................................4-4
Inspecting for Damage ...............................................................4-4
Service and Repair.....................................................................4-5
990020 – Rev. K Table of Contents TOC-3
Page 5

Checklists for Preparedness......................................................4-6
FDA Checklist .........................................................................4-6
Automated External Defibrillator
Operator’s Checklist ...........................................................4-6
Infrequent Use (Non-Rechargeable batteries) ..................4-7
Frequent Use (Recharge able batteries).............................4-8
Maintenance Schedule....................................................................4-10
General ...................................................................................... 4-10
Battery Maintenance................................................................4-12
Charger and Battery Care for
Rechargeable Batteries..................................................4-12
Recommended Battery Conditioning
Schedule...........................................................................4-13
Battery Capacity Test ........................................................ 4-14
Cleaning and Disinfecting the Welch Allyn AED20.....................4-16
Chapter 5 Troubleshooting the Welch Allyn AED20
Troubleshooting the Welch Allyn AED20........................................5-3
Attaching Electrode Pads...........................................................5-3
Analyzing Interrupted..................................................................5-4
Printing Problems........................................................................5-5
No Shock Delivered....................................................................5-5
Defibrillator...................................................................................5-6
Battery...........................................................................................5-7
Other Problems............................................................................5-8
Frequently Asked Questions .....................................................5-9
Appendix A Specifications
Technical Specifications.....................................................................A-1
Appendix B Glossary
Glossary...............................................................................................B-1
TOC-4 Welch Allyn AED 20 Users Manual 990020 – Rev. K
Page 6

Preface
Welch Allyn AED20 Users Manual
WARNING!
Do not attempt to use this equipment without
thoroughly reading and understanding these
instructions.
Manufacturer
Manufacturer MRL, Inc.
A Welch Allyn Company
1000 Asbury Drive
Buffalo Grove, IL 60089
USA
(847) 520-0300
Product Name Welch Ally n AED20
Device Type Automated External Defibrillator
FDA Medical Device Registration
The FDA Safe Medical Device Act stipulates that each enduser is required under penalty of law, to register with the
manufacturer all information pertinent to each medica l
device.
Please fill out the enclosed FDA Medical Device
Registration postcard and return it promptly to Welch Allyn.
990020 – Rev. K Preface i
Page 7

This card must be filled in and returned within 30 days of
product delivery.
If the medical device is transferred from your possession,
you must notify Welch Allyn of the new registration
information.
Manufacturer’s Responsibility
Welch Allyn, Inc. is responsible for the safety, reliability,
and performance of the Welch Allyn AED20, only if the
following conditions are met:
v Assembly operations, extensions, readjustments,
modifications, or repairs are carried out by persons authorized
by Welch Allyn.
v The Welch Allyn AED20 equipment is used in accordance
with the instructions for use.
User’s Responsibility
The user is required to be trained in basic monitoring, vital
signs assessment, and emergency cardiac care. The user
should be completely knowledgeable of the information in
the Welch Allyn AED20 Users Manual. As with all other
electronic patient care monitors, good clinical judgment
should be used when operating the Welch Allyn AED20. To
ensure patient safety and proper operation, use only Welch
Allyn-authorized parts and accessories.
ii Welch Allyn AED20 Users Manual 990020 – Rev. K
Page 8

User must save all shipping containers and packaging
materials. When shipping the Welch Allyn AED20 and
accessories for calibration, service, or upgrades, the original
shipping containers and packaging materials must be used.
Contact and Technical Support
Please contact Welch Allyn, Inc. if you have any questions
regarding this notice.
Telephone 847.520.0300
Toll-free 800.462.0777
Fax 847.520.0303
Internet www.welchallyn.com
990020 – Rev. K Preface iii
Page 9

Declaration of Conformity
Manufacturer:
Medical Research Laboratories, Inc., Welch Allyn Ireland
a Welch Allyn company Navan Business Park
1000 Asbury Drive Dublin Road
Buffalo Grove, IL 60089 Navan, Co. Meath
USA Republic of Ireland
Phone (847) 520-0300 Phone 011-353-466-7775
Fax (847) 520-0303
declares that the CE-marketed product
Product Name : Welch Allyn AED20
Device Type : Defibrillator / ECG Monitor
Model Number: 972200
Accessories: See list in manual
complies with Council Directive 93/42/EEC (Medical Device Directive) of
June 14 1993 class IIb Annex II
Standards
General: ISO 9001
EN 46001
Safety: EC 60601-1 / EN 60601-1 Class II, Type BF,
Internally Powered
Continuous operation
Defibrillator Proof
Operation
IEC 60601-1-4 / EN 60601-1-4
IEC 60601-2-4 / EN 60601-2-4
IEC 1441 / EN1441
EMC: IEC 601-1-2 / EN 60601-1-2
—————————————————————————
Joel Orlinsky Date
Director of Q.A. and Regulatory Affairs
iv Welch Allyn AED20 Users Manual 990020 – Rev. K
Page 10

Safety
Welch Allyn AED20 Users Manual
Conventions Used in the Manual
This section includes a list of conventions used in this
manual.
Warnings
Warnings alert the user to a special condition that could
result in serious personal injury or death. In this manual,
warnings are displayed as shown in the following example:
WARNING!
Conditions, hazards, or unsafe practices that can
result in serious personal injury or death.
Cautions
Cautions alert the user to a special condition that could
result in minor personal injury or damage to the equipment.
In this manual, cautions are displayed as shown in the
following example:
Caution
Conditions, hazards, or unsafe practices that can
result in minor personal injury, damage to the
Welch Allyn AED20, or loss of data.
990020 – Rev. K Safety v
Page 11

Notes
Notes contain information that augments or clarifies an
operating step. Notes do not normally contain actions. They
follow the procedural steps to which they refer. In this
manual, notes are displayed as shown in the following
example:
¥ If the Welch Allyn AED20 is used more than once per
month, it is recommended that authorized service
personnel perform a periodic inspection servicing at
least once per year.
Voice Prompts
The Welch Allyn AED20 provides audio instructions
through the built -in speaker to provide operating instruction
and assist the user during defibrillation. In this manual,
voice prompts are displayed as shown in the following
example:
— Low battery
Safety information is organized in six groups:
v General Cautions and Notices
v Patient Safety
v Defibrillator and Electrode Pads
v Battery and Charger
v Care and Storage
v Safety Symbols
vi Welch Allyn AED 20 Users Manual 990020 – Rev. K
Page 12

General Cautions and Notices
Dropped or Damaged
If the device has been dropped or damaged in
any way, refer the device to qualified service
personnel for servicing.
Ferromagnetic Equipment
ECG electrodes and cables contain
ferromagnetic materials. They must not be
used in the presence of large magnetic fields
created by magnetic resonance imaging (MRI)
equipment. The large magnetic fields
generated by an MRI device could move
ferromagnetic equipment with an extremely
violent force that could cause serious personal
injury or death to persons between the
equipment and the MRI device.
Labels
Observe all CAUTION and WARNING labels
on the equipment and accessories.
Performance
The Welch Allyn AED20 may not meet
performance specifications if stored,
transported or used outside the specified
storage or operating environmental range
limits.
990020 – Rev. K Safety vii
Page 13

Notices
Patient Safety
General
Warning Not for use on pediatric patients
Caution Patient Physical Harm
Caution Use Automated Mode only when these
U.S. Federal law restricts this device to use by
or on the order of a physician. If the battery
pack is removed for any reason, labeling of the
Welch Allyn AED20 is required indicating
out-of-service for battery operation.
This defibrillator is not to be used on patients
less than 8 years old.
Place the Welch Allyn AED20 in a position
where it cannot harm the patient should it fall.
Keep all cables and connectors away from the
patient’s neck.
conditions have been met
Use Automated Mode only on victims of
cardiac arrest who exhibit unconsciousness,
absence of breathing, and absence of pulse.
Shock Hazard
Warning Defibrillation current can cause injury
Do not touch the patient during defibrillation.
Do not touch equipment connected to or me tal
objects in contact with the patient during
defibrillation. Disconnect other electrical
viii Welch Allyn AED 20 Users Manual 990020 – Rev. K
Page 14

equipment from the patient before
defibrillating.
Caution Manual mode is for qualified users only
Only by qualified operators who have been
trained in rhythm recognition and treatment
through manual charging and delivery of
defibrillation shocks. Follow all instructions in
this users manual.
Burns
Warning Properly place defibrillation pads
Do not allow defibrillation pads to touch each
other, or to touch other ECG electrodes, lead
wires, dressings, transdermal patches, etc.
Such contact can cause patient skin burns
during defibrillation and may divert
defibrillating current away from the heart.
Remove excessive body hair, which may cause
skin burns or ineffective energy transfer.
Warning Use Welch Allyn electrode monitoring
cables only
Do not replace the electrode monitoring cable
with a substitute. Using any other cable may
cause burns to the patient.
Electrical Energy
Warning Welch Allyn AED20 can deliver 360 joules
of electrical energy
Before charging the defibrillator, verify that
the energy selected on the display is the
desired output. Disconnect any medical
electronic device that is not labeled
990020 – Rev. K Safety ix
Page 15

“defibrillation protected” from the patient. If
this electrical ene rgy is not discharged
properly, it could cause personal injury or
death to the operator or bystander. During
defibrillation, the operator and all other people
must stand clear of the patient, bed, and all
conductive surfaces in contact with the patient.
Warning Properly place defibrillation pads
Do not place electrodes near the generator of
an internal pacemaker. Always apply
electrodes to flat areas of skin. Avoid
application over folds of skin such as those
underneath the breast or on obese patients.
Excessive hair, poor adhesion, or air under
electrode may produce burns.
ECG Misinterpretation
Warning Properly place defibrillation pads
Improperly placed pads may produce incorrect
analysis and an inappropriate shock or no
shock decision advisory.
Warning Do not move patient
Handling or transporting the patient during
ECG analysis can cause incorrect or delayed
diagnosis. Follow all instructions in the
Advanced Users Manual.
Warning Cardiac pacemakers may affect rhythm
analysis
Patient pacemakers may reduce the sensitivity
of the Welch Allyn AED20 analysis and errors
in detecting shockable rhythms.
x Welch Allyn AED 20 Users Manual 990020 – Rev. K
Page 16

Warning Radio frequency (RF) interference
Do not operate the Welch Allyn AED20 in
conjunction with electrocautery or diathermy
equipment. Any equipment that emits strong
radio frequency signals can cause electrical
interference and distort the ECG signal to
cause inaccurate interpretation of rhythm.
Caution Do not use the electrode monitoring cable
for Automatic Rhythm Analysis
Proper skin preparation and the use of fresh,
high-quality monitoring electrodes are
imperative to minimize artifact when using the
electrode monitoring cable.
Defibrillator and Electrode Pads
Explosion
Warning Explosion hazard
Do not use the Welch Allyn AED20 in the
presence of flammable anesthetics or
concentrated oxygen.
Electrical Shock or Fire Hazard
Warning No internal, operator -serviceable parts
Do not open unit, remove covers or attempt to
repair the Welch Allyn AED20. All servicing
must be performed by qualified personnel.
990020 – Rev. K Safety xi
Page 17

Warning Improper use can cause injury
The Welch Allyn AED20 contains an
automatic disarm of the stored energy. If the
operator has not delivered the energy to a
patient or a test load, an internal timer will
disarm the stored energy. This stored electrical
energy can potentially cause death or injury if
discharged improperly. Follow all instructions
in this users manual.
Caution Do not immerse or expose the Welch Allyn
AED20 to water or other liquids
Do not use the defibrillator if unit has been
immersed in liquid or if excessive
condensation is visible on the device.
Caution Conductive parts should not contact other
conductive parts including the earth
Improper Device Performance
Warning Use only Welch Allyn-approved accessories
Do not use defibrillation pads , batteries, and
other accessories not approved by Welch
Allyn. Use of unauthorized accessories may
cause the device to operate improperly and
provide false measurements. Follow all
labeling instructions on the defibrillation pads
and the rechargeable battery.
Warning Do not administer a shock using the
electrode monitoring cable .
The electrode monitoring cable has protective
circuitry that prevents defibrillation energy
from being delivered to the patient. Always
check the expiration date on defibrillation
xii Welch Allyn AED 20 Users Manual 990020 – Rev. K
Page 18

pads. Do not use pads if the packaging has
been previously opened. The Welch Allyn
AED20 may interpret excessively dry
defibrillation pads as an attached electrode
monitoring cable.
Caution Do not repeatedly charge and discharge
defibrillator in rapid succession
If a need for repetitive testing arises, wait at
least 1 minute for every third discharge to
avoid damaging equipment.
Caution Improper maintenance can cause improper
performance
Follow instructions in the Advanced Users
Manual.
Caution Use Manual Mode properly
In the manual mode, if a new energy level is
selected after the charge button is pushed and
while the defibrillator is charging, the
defibrillator will automatically charge to the
new energy selection. The CHARGE button
need not be pressed again to select the new
energy level.
Battery and Charger
Battery Care
Caution Battery is shipped discharged
Charge rechargeable battery fully before use.
990020 – Rev. K Safety xiii
Page 19

Caution Use only Welch Allyn PowerStick batteries
Use either the rechargeable NiMH PowerStick
or the non-rechargeable Lithium PowerStick.
Use of any other battery can damage the
Welch Allyn AED20.
Caution Make sure the rechargeable battery is fully
charged
Loss of power during patient care could result
in injury. Always have a fully charged backup battery available.
Caution Never attempt to recharge a non-
rechargeable battery.
Caution Check capacity of a non-rechargeable
battery after each use
Replace battery if “Low Battery” is indicated.
Caution Replace rechargeable battery at 24 months
Battery replacement at 24 months is
recommended due to degradation of the battery
chemistry. Periodic maintenance and testing is
highly recommended to ensure proper battery
performance.
Charger Care
Caution Use the battery charger to maintain a full
battery charge
Make sure the charger is plugged into an AC
power source. Keep the charger in a dry,
moisture-free location, away from direct
sunlight or other heat sources. Do not block
the ventilation slots or remove the cover.
xiv Welch Allyn AED 20 Users Manual 990020 – Rev. K
Page 20

Care and Storage
Cleaning and Sterilization
Caution Clean and maintain the Welch Allyn AED20
according to instructions.
See Chapter 4, Maintaining the Welch Allyn
AED20.
Do not clean the Welch Allyn AED20 with
alcohol, ketone, or any flammable agent. Do
not autoclave the Welch Allyn AED20 or
attempt to sterilize the Welch Allyn AED20 or
any of its accessories.
Electrodes
Warning Follow manufacturer’s instructions for use
of defibrillation electrodes
Improper use of defibrillation electrodes may
cause the Welch Allyn AED20 to function
improperly or may cause skin burns. Do not
use expired, dry electrodes. Do not reuse
disposable electrodes. When obtaining a new
supply, verify that the electrodes connect
properly to the Welch Allyn AED20 prior to
putting them into service.
Caution Properly store and use defibrillation pads
Store electrodes in a cool, dry location
(between 60° and 95°F or 15° and 35 °C.). Do
not sterilize the pads, immerse, or clean the
electrodes with alcohol or solvents.
990020 – Rev. K Safety xv
Page 21

Safety Symbols
Graphical symbols, letter symbols, and signs listed below
may be found on the Welch Allyn AED20 and accessories.
Please note the use of these symbols for safe and proper use
of the equipment. For a list of icons that display operating
status information, see Chapter 1 Introducing the WELCH
ALLYN AED.
Attention, consult
accompanying
documents
Auxiliary power
operation
Caution, high voltage Positive input terminal
Dangerous voltage
Defibrillator protected,
type BF patient
connection
Earth (ground)
Negative input
terminal
Recycle battery
xvi Welch Allyn AED 20 Users Manual 990020 – Rev. K
Page 22

Chapter 1
Introducing the Welch Allyn AED20
Welch Allyn AED20 Users Manual
This chapter provides an introduction to the Welch Allyn
AED20 system and presents an overview of the Welch Allyn
AED20 controls, indicators, displays, and prompts. It also
provides instructions for getting the Welch Allyn AED20 ready
for use and preparing the unit for storage.
Overview of the Welch Allyn AED20 1-3
Features .......................................................................................1-3
Systems Upgrades and Options..............................................1-4
Qualified Operators ....................................................................1-4
Getting the Welch Allyn AED20 Ready 1-5
Unpacking and Inspecting.........................................................1-5
Installing the Battery...................................................................1-5
Running the Self -Test................................................................1-7
Getting to Know the Welch Allyn AED20 1-8
Welch Allyn AED20 Configurations .........................................1-8
Functions......................................................................................1-9
Controls..............................................................................1-10
Display................................................................................1-11
Text Prompts .....................................................................1-13
Voice Prompts...................................................................1-14
Icons...................................................................................1-16
990020 – Rev. K Introducing the Welch Allyn AED 20 1--1
Page 23

System Ready Indicator..................................................1-18
Serial Data Port................................................................1-19
Event Documentation......................................................1-19
Battery Charging and Conditioning 1-19
The Welch Allyn Quick Charger/Conditioner.......................1-20
Charging a Battery...................................................................1-21
Conditioning a Battery.............................................................1-21
The Alternate Welch Allyn Quick Charger/Conditioner...…1-22
Preparing the Welch Allyn AED20 for Storage 1-24
Welch Allyn AED20 Accessories Part List 1-25
1-2 Welch Allyn AED20 Users Manual 990020 – Rev .K
Page 24

Overview of the Welch Allyn AED20
The Welch Allyn AED20 (automated external defibrillator)
is a safe, easy to use defibrillation device designed for use
by basic life support (BLS) personnel. The unit is
lightweight and mobile and can be used in situations where
there could be several minutes before the arrival of advanced
life support (ALS) personnel.
The Welch Allyn AED20 recognizes ventricular fibrillation
and other ventricular tachycardia and guides operators
through the defibrillation process. When properly connected
to a patient who is unconscious, not breathing, and without a
pulse, the Welch Allyn AED20 analyzes the patient’s heart
rhythm, provides text and audio instruction prompts,
determines if a shockable situation exists, and, if
appropriate, automatically arms the Shock button.
The Welch Allyn AED20 delivers the defibrillation shock
through two self-adhesive, pre-gelled, low -impedance
electrode defibrillator pads. The pads, cable, and connector
are sold as disposable kits.
The Welch Allyn AED conforms to the AAMI DF39, AHA
Scientific Statement AED: Specifying and Reporting
Arrhythmia Analysis Algorithm Performance, and the IEC
standard 601-2-04 for AEDs currently under development.
Features
Welch Allyn AED20 features in clude:
v 3-step operation
v extensive voice and visual prompts for the operator
v continuous ECG, audio, and event recording for reporting
each use to a printer or computer
990020 – Rev. K Welch Allyn AED 20 Users Manual 1-3
Page 25

v daily self -test to ensure readiness
v rechargeable battery
v biphasic energy output
v lock -out protection to prevent inadvertent defibrillation
System Upgrades and Options
The Welch Allyn AED20 is an automated external
defibrillator designed for easy operation. However, It is
designed so that optional features can be added as simple
software upgr ades.
Display options include providing an ECG trace in
automated mode, showing a biphasic defibrillation
waveform, and on-screen log data review. Another option
allows the unit to be switched from automated mode to
manual mode. Manual mode allows qualified users to set the
defibrillation energy level, charge the unit, and deliver a
shock.
Qualified Operators
The Welch Allyn AED permits trained users to administer a
brief electrical shock to patients experiencing fibrillation or
sudden cardiac arrest (SCA).
A qualified operator is someone who has successfully
completed a CPR AED training course (e.g., AHA
Heartsaver course or the Red Cross CPR/AED course).
1-4 Welch Allyn AED20 Users Manual 990020 – Rev .K
Page 26

Getting the Welch Allyn AED20 Ready
Carefully unpack and inspect all the Welch Allyn AED20
system c omponents and accessories. If using the
rechargeable NiMH PowerStick battery, charge the battery
fully before installing it. Install the battery, run the self-test,
and set the date and time (see chapter 3 for instructions)
before putting the unit into ser vice.
Unpacking and Inspecting
Visually inspect the carton for any signs of damage or
mishandling (carton perforations, cuts, or dents; bent or
collapsed corners; or broken carton seal). Remove the Welch
Allyn AED from the carton and inspect it carefully.
Before proceeding:
1. Open and carefully unpack each carton.
2. Examine the instruments and accessories for
signs of damage.
3. Check the packing list to determine that all
accessories have been received.
4. Contact Welch Allyn, Inc. Service Department at
847.520.0300 if anything looks damaged or is
missing.
Installing the Battery
The Welch Allyn AED20 can use either a NiMH (Nickel
Metal Hydride) PowerStick rechargeable battery or an
extended-life, Lithium PowerStick non-rechargeable battery.
990020 – Rev. K Welch Allyn AED 20 Users Manual 1-5
Page 27
v Use the NiMH PowerStick rechargeable battery for
battery ready
applications involving frequent use.
v Use the Lithium PowerStick non-rechargeable battery for
standby use.
The battery slides into the AED case and locks firmly in
place. The battery forms the carrying handle of the We lch
Allyn AED20 and therefore, you can always be sure that the
battery is properly installed.
¥ Using a non-rechargeable battery for training or
testing will reduce the shelf -life and operating time
of the battery.
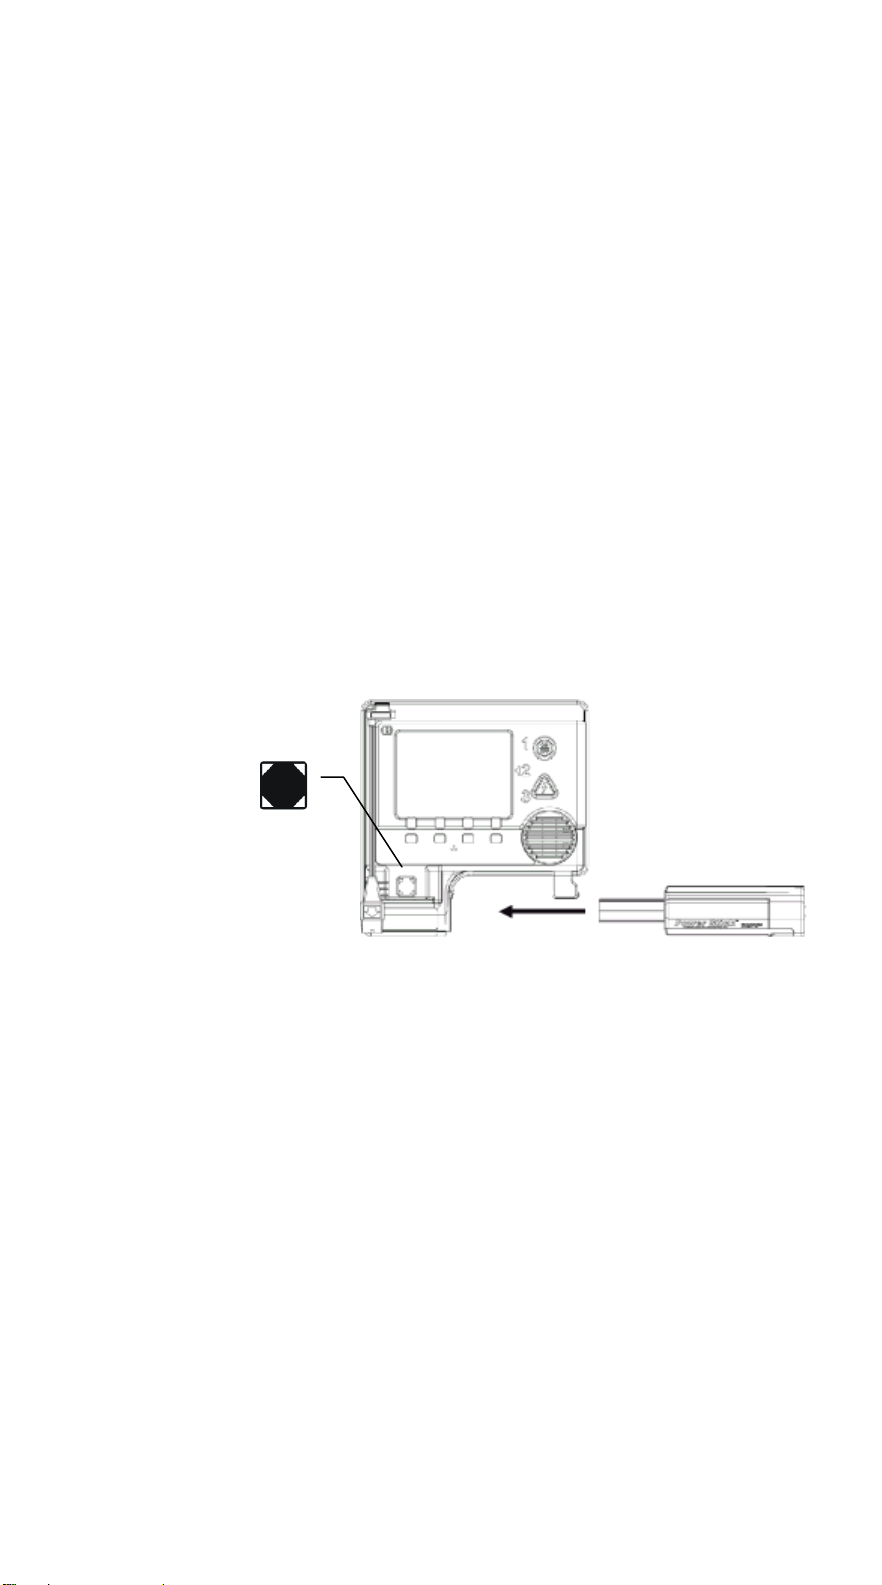
To install the battery:
1. Align the thin, flat end of the battery with the
opening in the lower front portion of the Welch
Allyn AED case.
2. Push the battery in until it “clicks” and locks into
place.
indicator
1-6 Welch Allyn AED20 Users Manual 990020 – Rev .K
Page 28
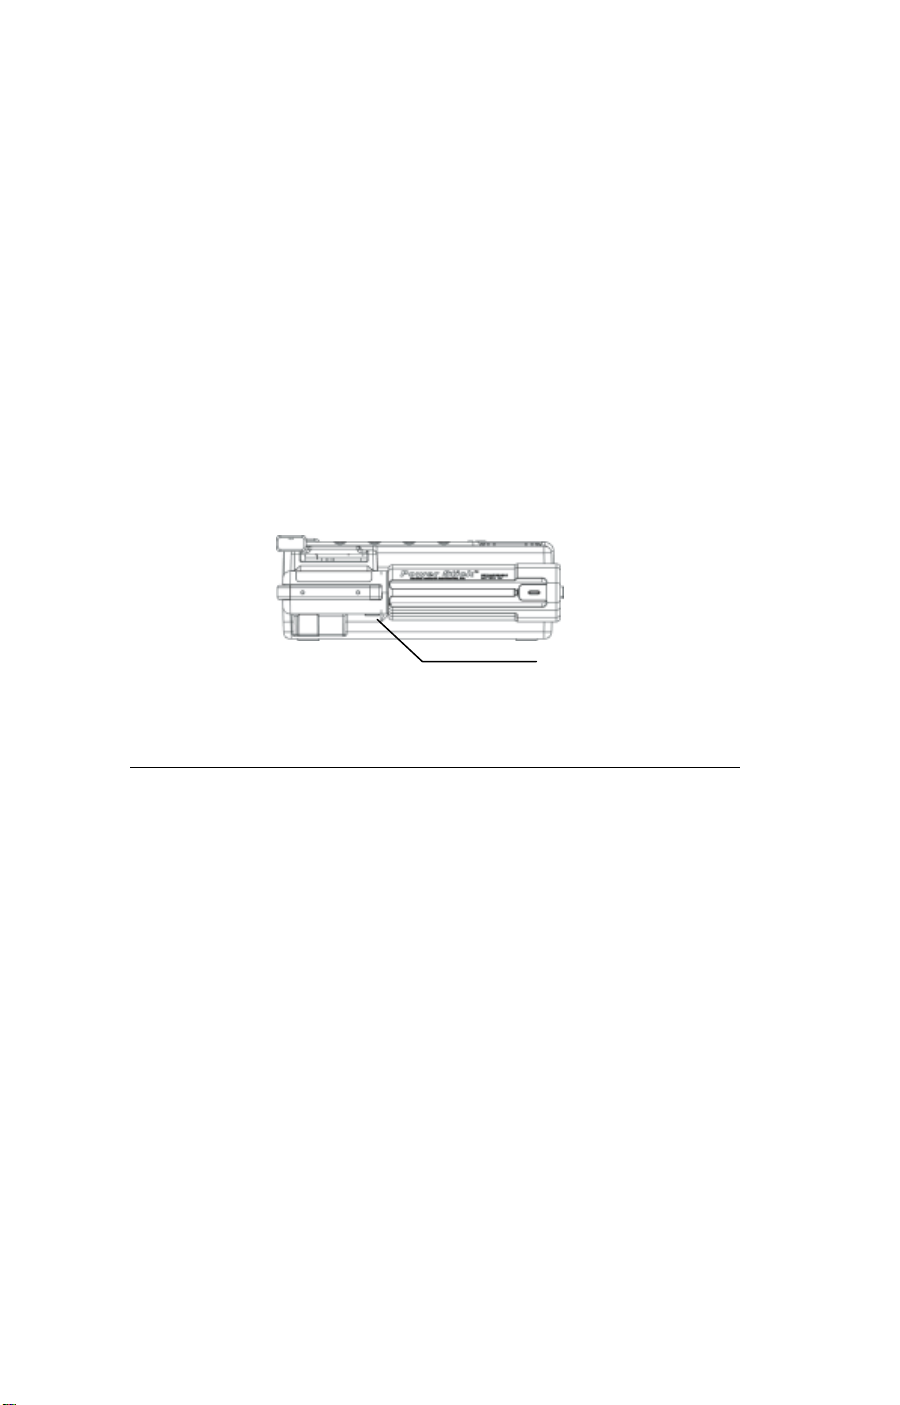
3. Make sure the battery ready indicator in the
battery lock release
lower left of the display indicates tha t the battery
has the sufficient charge. If the status indicator
displays anything other than the Battery Ready
icon, the Welch Allyn AED20 is not ready for
use.
To replace the battery:
1. Push the lock release on the bottom of the Welch
Allyn AED case where the battery inserts into the
unit.
2. Replace the battery with a backup. Recharge the
removed battery, if it is a rechargeable battery.
Running a Self-Test
After installing the battery, press the ON button to power-up
the Welch Allyn AED and automatically perform a self-test.
At power -up, the following tests are performed: battery,
main processor, memory and program, stuck key, ECG
preamp, and defibrillator.
990020 – Rev. K Welch Allyn AED 20 Users Manual 1-7
Page 29

Getting to Know the Welch Allyn AED20
The Welch Allyn AED20 is an automated exter nal
defibrillation (AED) device designed for use by trained
personnel. It features a straightforward, three -step operating
design that uses extensive voice and visual prompts to assist
the operator. With continuous ECG, audio, and event
recording, the Welc h Allyn AED20 maintains a detailed log
that can be viewed on screen or reported directly to a
computer or printer.
Welch Allyn AED20 Configurations
Three Welch Allyn AED configurations are available:
Primary AED, Secondary AED, and Manual AED.
Primary AED In this configuration, the unit provides
automated text and voice prompts to guide
the operator. It does not have an ECG
tracing capability on the display.
Secondary AED This configuration requires the optional ECG
display upgrade. Automated Text and voice
prompts are provided and a continuous ECG
tracing displays on the LCD during
operation.
Manual AED This configuration requires the optional ECG
display and Manual mode upgrades. This
configuration includes automated text and
voice prompts and an ECG tracing display.
In addition, an authorized
operator/supervisor with the proper pass
code can manually override the automated
operation of the AED. This allows the user to
manually select energy settings and
administer defibrillation shocks.
1-8 Welch Allyn AED20 Users Manual 990020 – Rev .K
Page 30
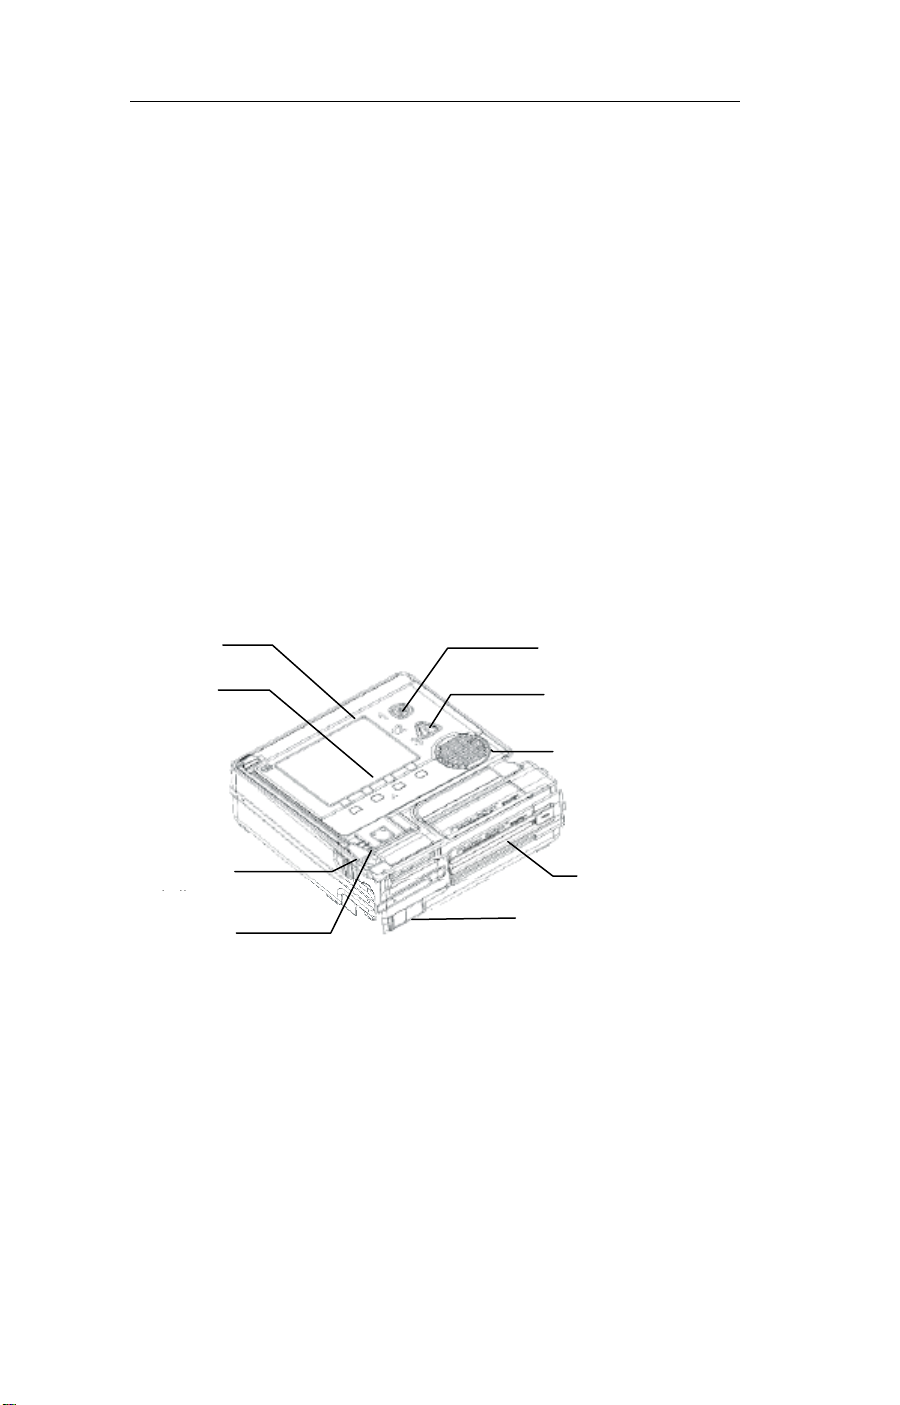
Functions
menu selection
system power switch
battery ready
defibrillator pads
connector
This section describes the following Welch Allyn AED
features:
v Controls
v Display
v Text Prompts
v Voice Prompts
v Icons
v System Ready Indicator
v Serial Data Port
v Event Documentation
Detailed information on using, programming, and
maintaining the Welch Allyn AED are presented in Chapters
2, 3, and 4, respectively.
990020 – Rev. K Welch Allyn AED 20 Users Manual 1-9
display
buttons
indicator
ON/OFF
shock button
speaker
battery
serial data port
Page 31

Controls
1 power on
2
3
The Welch Allyn AED20 is designed for ease of operation.
After putting the defibrillator pads on the patient and
connecting them to the Welch Allyn AED unit, the operator
performs this simple three-step process:
1 Turn the power ON.
2 Follow text prompts on the screen and voice prompts from
the speaker.
3 If prompted, deliver shock by pressing the flashing red
Shock button.
text and
voice prompts
shock
Power ON/OFF Green ON/OFF button to toggle system
power on/off
Shock Red Shock button to discharge defibrillator;
red LED flashes when defibrillator is fully
charged
Menu selection Four soft buttons located in the case below
the display; programmable functionality to
make menu selections in manual mode
1-10 Welch Allyn AED20 Users Manual 990020 – Rev .K
Page 32

Display
Text prompts, patient data, and event information display on
the liquid crystal display (LCD) screen. The display is a
VGA, monochrome liquid crystal display (LCD) measuring
320 x 240 pixels. The display is divided into ten functional
areas. Operating information and user instructions display in
these areas.
elapsed time heart rate shocks counter
ECG trace window
menu
selection
window
prompts window
icons window defib window
menu bar
energy
bar
990020 – Rev. K Welch Allyn AED 20 Users Manual 1-11
Page 33

The table below explains the function of each area.
Shocks Counter Displays the number of shocks
administered.
Defib Window Displays the energy level selected or
delivered. Also displays status messages.
ECG Trace
(ECG or manual
mode add-on
option)
Prompts Displays up to three lines of text (user
Elapsed Time Displays the time elapsed since the
Energy Bar
(Manual Mode only)
Heart Rate
(ECG or Manual
Mode add-on
option)
Icons Displays operating status icons. See
Displays ECG trace as a moving
waveform, if option is installed. If the defib
pads are not properly attached to the
patient or connected to the unit, a dashed
line is drawn.
instructions, directions for patient care,
error messages). See descriptions below.
system was powered ON, or time used on
current patient. The ti me format is
HH:MM:SS.
Temporary window located to the right of
the ECG Trace when the Charge button is
pressed or a shock advised situation is
detected. The selected energy level is
highlighted.
Displays number representing heart rate
(beats/minute). Dashed line displays
when rate is out of range or when defib
pad fault exists.
descriptions below.
Menu Bar
Menu Selection Displays Manual Mode or Supervisor Mode
1-12 Welch Allyn AED20 Users Manual 990020 – Rev .K
Displays four areas corres ponding to four
buttons on the case below the LCD.
Page 34

menu choices. See Chapter 3.
If the optional ECG or manual mode upgrade is installed, an
electrocardiogram trace is also displayed on a continuous
basis. Graphical screen icons provide system operational
information. The Welch Allyn AED20 operator or supervisor
can use a simple menu -driven structure to set charge
protocols and system configurations, set system operating
parameters such as display c ontrast and volume, select the
language used for text and voice, and install upgrade
options.
Text Prompts
Text prompts provide operating information and instructions.
The prompts display in the lower half of the LCD above the
icon window.
Text Prompts Descriptions
ANALYZING PADS ECG leads are properly connected and
the system is accessing the patient's
heart rhythm.
ATTACH DEFIB PADS Attach the defibrillation pads according
to the instructions given on the
package.
CHARGING System is automatically charging the
defibrillator to the energy level pre-set
in the shock protocol.
CHECK PATIENT Prompt to press the Analyze button
CHECK PULSE Check the patient's pulse.
IF NO PULSE -
START CPR
MONITORING ECG,
PRESS TO ANALYZE
990020 – Rev. K Welch Allyn AED 20 Users Manual 1-13
Check the patient's pulse and begin a
60-second CPR cycle.
AED is silently monitoring the patient’s
heart rhythm and will perform a full
Page 35

Text Prompts Descriptions
analysis if the Analyze button is
pressed.
MOTION DETECTED System has detected movement of the
electrodes or the patient as indicated
by inconsistent data readings.
NO SHOCK ADVISED System has analyzed the patient’s
heart rhythm and determined that a
shockable condition does not exist.
SHOCK ADVISED System has analyzed the patient’s
heart rhythm and determined that a
shockable condition exists.
SHOCK NOW Prepare to administer the shock.
STAND CLEAR Defibrillator is charged and ready for
shock. Do not touch or move the
patient.
Voice Prompts
The Welch Allyn AED voice prompt feature provides
instructional prompts to guide the user through the
defibrillation process without relying solely on text prompts.
The Welch Allyn AED provides audio instructions through
the built-in speaker to provide operating instruction and
assist the user during defibrillation. The voice prompts listed
in the following table parallel the text and icon displays
shown on the LCD.
¥ In the following table, the voice prompts in brackets
are for the UK version of the Welch Allyn AED20
only.
1-14 Welch Allyn AED20 Users Manual 990020 – Rev .K
Page 36

Voice Prompt Description
Analyzing heart rhythm,
do not touch the
Defibrillator pads properly attached and
connected; assessing heart rhythm
patient
Analyzing interrupted,
Patient or electrode moved
motion detected
Check airway, check
breathing, check pulse
Check patient’s airway, breathing and
pulse
[Check airway, check
breathing, check
circulation]
Check Patient Prompt to press the Analyze button
Apply defib pads to
patient’s bare chest,
connect pad to cable
Apply defib pads,
connect cable
Attach electrode pads to the patient
and connect cables to the Welch Allyn
AED (prompt at unit power up)
Defibrillator pads are not properly
attached to the patient or properly
connected to the Welch Allyn AED
If no pulse Start CPR
[Begin CPR]
Check the patient’s pulse and begin
60-second CPR cycle
Low battery Low battery charge. Replace battery.
Memory Card full Internal memory card full
No shock advised Shockable condition does not exist
Shock advised Shockable condition exists
Shock now, press the
Push the red SHOCK button
red button now
Stand clear Defibrillator charged and ready to
shock; do not touch or move patient
990020 – Rev. K Welch Allyn AED 20 Users Manual 1-15
Page 37

Stop CPR Stop CPR, wait for further instructions
It is safe to touch the
patient
Change to pads Electrode monitoring cable is attached,
Shock not delivered Attempted shock did not deliver any
Defibrillator shock has been delivered
change to defibrillator pads
energy to the patient
Icons
Icons provide operating status information. The icons are
displayed at the bottom of the LCD just above the menu bar.
Icon Name
Auxiliary Power
- +
- +
- +
Battery Level
Indicator
Battery Level
Indicator
Battery Level
Indicator
Battery Level
Indicator
Battery Level
Indicator
Contrast Indicates the level of contrast;
2
Indicates the optional auxiliary
power unit is plugged in.
Indicates the charge left in the
battery is full.
Indicates the charge left in the
battery is partially depleted.
Indicates the charge left in the
battery is low.
Indicates non-rechargeable,
single use battery.
Indicates rechargeable battery.
levels are 1 through 9.
Description
CPR timer
0 60
Log
E F
1-16 Welch Allyn AED20 Users Manual 990020 – Rev .K
CPR Timer Represents a user adjustable
second clock used to time CPR.
Log Level Indicates the amount of memory
remaining for entries in to the log.
Page 38

Icon Name
Description
Card
E F
Memory Card
Level
Printer Status Indicates log printing. Flashing
Volume Indicates the speaker volume;
Lock Memory card locked.
Recording Memory card is recording.
Indicate s the amount of memory
remaining for entries in to the
optional Memory Card.
icon indicates printer error.
4 levels are indicated.
990020 – Rev. K Welch Allyn AED 20 Users Manual 1-17
Page 39

System ready
indicator
System Ready Indicator
The battery ready indicator display, located on the lower left
corner of the Welch Allyn AED, represents the operational
readiness of the battery.
Ready Battery is properly installed,
charged, and system is ready for
use.
Do Not Use System is not ready for use. Battery
may not be properly installed,
battery charge is too low for
effective operation, or system
failure.
Flashing Battery is low and requires
changing.
1-18 Welch Allyn AED20 Users Manual 990020 – Rev .K
Page 40

Serial Data Port
The built-in Serial Data Port provides a direct connection to
a computer or printer.
Event Documentation
The Welch Allyn AED stores event documentation including
patient status, ECG traces, and treatment summary. The
information is stored in an internal log or an optional
PCMCIA external memory card. Event documentation is
time stamped and can be downloaded to a printer or to a
computer through the serial port on the Welch Allyn AED.
Battery Charging and Conditioning
¥ This section provides procedures for charging and
conditioning the NiMH PowerStick rechargeable
battery. Do not attempt to recharge the Lithium
PowerStick non-rechargeable battery.
Battery maintenance is critical to ensure that the Welch
Allyn AED20 operates reliably. Periodically check the
battery to ensure that the recommended replacement date has
not elapsed. Over time and through use, the capacity of a
battery will degrade. Properly maintaining a battery is
crucial to maximizing the battery’s capacity throughout its
life. The amount of capacity degradation varies from battery
to battery due to the conditions in which the batteries are
used and maintained. An old Powerstick rechargeable battery
should be replaced with a new one every 24 months.
990020 – Rev. K Welch Allyn AED 20 Users Manual 1-19
Page 41

¥ A completely discharged battery will require
Run
Fail
Condition
approximately 1.5 to 2 hours to recharge. Charging
time varies depending on battery capacity and state of
charge. Deeply discharged batteries and those with
higher capacity will take longer to charge. Partially
discharged batteries and those with lower capacity
will require less time to charge.
The Welch Allyn Quick Charger/Conditioner
¥ Please refer to the picture seen below. If the controls
on your charger are different than the ones shown
here, see “The Alternate Welch Allyn Quick
Charge/Conditioner” section below.
The Welch Allyn Quick Charger/Conditioner is easy to use.
The PowerStick is inserted directly into the charger, and
status lights indicate the condition of the battery.
Yellow (charging)
Yellow blinking (discharging)
Green (charge completed)
Ready
Red (Battery faulty,
Charge aborted)
Must be selected within
5 seconds of battery
insertion
1-20 Welch Allyn AED20 Users Manual 990020 – Rev .K
Page 42

Charging a Battery
To charge a battery using the Welch Allyn Quick
Charger/Conditioner:
1. Insert the battery into the charger. When the
battery is firmly seated, the yellow RUN
light illuminates.
2. Monitor the status lights. A steady yellow
Run light means the battery is charging. A
red Fail light means that the battery is not
charging due to a fault condition
3. The Run light will turn off and the green
Ready light will turn on to indicate that the
battery is fully charged.
¥ Charging battery at temperatures above 30ºC (86ºF)
increases the charging time and may result in a
gradual decline in battery capacity.
¥ When removing a battery from the charger, always
allow at least 3-5 seconds for the system to reset
prior to inserting another battery.
Conditioning a Battery
The effective life of the NiMH PowerStick battery can be
prolonged by periodic conditioning.
To initiate a battery conditioning cycle:
1. Insert the battery into the charger.
990020 – Rev. K Welch Allyn AED 20 Users Manual 1-21
Page 43

2. Press the conditioning button on the charger
Green (ready)
Yellow (condition)
Yellow flashing (fault/condition)
control panel within 5 seconds of insertion.
The yellow Run light blinks as the battery
is being discharged.
¥ At the end of the conditioning, the charger
automatically begins a normal charge cycle.
3. Monitor the charging light. The yellow
Run light turns off and the green Ready
light turns on when the battery is fully
charged.
The Alternate Welch Allyn Quick Charger/Conditioner
The Alternate Welch Allyn Quick Charger/Conditioner is
easy to use. The PowerStick is inserted directly into the
charger. Status lights indicate the condition of the battery.
Yellow (charging)
Power
Ready or Conditioning
Charge or Fault/Condition
Conditioning
Charging a Battery
To charge a battery using the Welch Allyn Quick
Charger/Conditioner:
1-22 Welch Allyn AED20 Users Manual 990020 – Rev .K
Page 44

1. Insert the battery into the charger. When the
battery is firmly seated, the yellow Charge
light illuminates.
2. Monitor the charging light. Steady yellow
means charging. Flashing yellow means
that the battery is not charging due to a
Fault condition.
3. The Charge light turns off and the green
Ready light turns on when the battery is
fully charged.
¥ Charging battery at temperatures above 30ºC (86ºF)
increases the charging time and may result in a
gradual decline in battery capacity.
¥ When removing a battery from the charger, always
allow at least 3-5 seconds for the system to reset
prior to inserting another battery.
Conditioning a Battery
The effective life of the NiMH PowerStick battery can be
prolonged by periodic conditioning.
To initiate a battery conditioning cycle:
1. Insert the battery into the charger.
2. Press the conditioning button on the charger
control panel. The yellow readyconditioning light illuminates solid and the
yellow charge/fault/conditioning flashes.
990020 – Rev. K Welch Allyn AED 20 Users Manual 1-23
Page 45

¥ At the end of the conditioning, the charger
automatically begins a normal charge cycle.
3. Monitor the charging light. The Charge
light turns off and the green Ready light
turns on when the battery is fully charged.
Preparing the Welch Allyn AED20 for Storage
After each use, any event documentation should be retrieved
from the internal log or external memory card and printed.
Any error messages or malfunctions should be reported and
corrective actions taken before storing the unit for reuse.
Then, the Welch Allyn AED should be inspected, cleaned,
and a new supply of electrode pads restocked to prepare the
unit for its next use.
During storage, the Welch Allyn AED performs periodic
self-tests including the functionality of the unit and the
status of the battery and internal circuitry. A more detailed
test of the unit's operation and battery status should be
performed on a regular basis. See Chapter 4 Maintaining the
Welch Allyn AED for more information.
1-24 Welch Allyn AED20 Users Manual 990020 – Rev .K
Page 46

Welch Allyn AED20 Accessories Part List
Welch Allyn AED20
970200 Welch Allyn AED with two defibrillation pads and operations
manual.
Welch Allyn AED20 Options
970201 ECG Display
970202 Manual Override with ECG Display (970201)
970203 Log Review
Welch Allyn AED20 Accessories
001829 Welch Allyn PowerStick - Rechargeable battery
001830 Welch Allyn PowerStick - Non-rechargeable battery
981125E Battery Charger, 1Bay (to be used with 001829)
981123E Battery Charger, 2Bay (to be used with 001829)
900216 Welch Allyn AED Carrying Case
001855 Multipurpose Defibrillation Pads (10 pair / box)
002119 Welch Allyn AED Parallel Communications Kit
002120 Welch Allyn AED PC Data Transfer / Serial Comm Kit
002128 IEC Electrode Monitoring Cable
002130 AHA Electrode Monitoring Cable
980136 Welch Allyn Cardiolog Datacard – 4 MB
980143 Welch Allyn AED Trainer
001910 Welch Allyn Smartview Software Review Program
001962 Welch Allyn Smartlink Software
980139 Welch Allyn Patient Simulator
900165 Data Printer
990020 – Rev. K Welch Allyn AED 20 Users Manual 1-25
Page 47

Chapter 2
Using the Welch Allyn AED20
Welch Allyn AED20 Users Manual
This chapter provides information for using the Welch Allyn
AED20 with a patient. It also provides the instructions for
operating Welch Allyn AED20 in automated or manual mode
and the procedures to follow after using the unit.
Overview 2-3
Trained Operator s.......................................................................2-3
Fibrillation and Defibrillation......................................................2-3
Indications and Contraindications for Use ..............................2-4
Indications............................................................................2-5
Contraindication..................................................................2-5
Welch Allyn AED20 Operating Procedures-Quick
Reference 2-6
Automated Mode .........................................................................2-6
Manual Mode...............................................................................2-7
Welch Allyn AED20 Operating Procedures-Detailed
Information 2-8
Assess the Patient ......................................................................2-8
Start the Welch Allyn AED20....................................................2-8
Attach the Electrode Pads and Connecting Cable................2-9
Analyze Patient’s Heart Rhythm.............................................2-12
Deliver Shock —Automated Mode.........................................2-13
Deliver Shock —Manual Mode...............................................2-15
Enter Manual Mode..........................................................2-15
990020 – Rev K Using the Welch Allyn AED20 2-1
Page 48

Select the Energy Level................................................. 2-16
Charge the Defibrillator ....................................................2-16
Disarm the Defibrillator............................................................2-18
Perform CPR.............................................................................2-18
EMS Mode .................................................................................2-19
Electrode Monitoring (option).................................................2-22
Post-Use Procedures 2-28
2-2 Welch Allyn AED20 Users Manual 990020 – Rev. K
Page 49

Overview
Trained Operators
The Welch Allyn AED20 is capable of operating in an
automated and in a manual mode. In either mode, the
operator must be trained to use the unit and understand the
indications and contraindications for use.
The Welch Allyn AED20 is intended to treat patients in
cardiopulmonary arrest. It is for use in either in -hospital or
out-of-hospital arrests. It is intended that the operator is
authorized by a physician/medical director, and has the
following training skills:
Manual Mode:
v American Heart Association Advanced Cardiac Life
Support certification or equivalent.
v Training in the use of the Welch Allyn AED20.
Automated Mode:
v American Heart Association Heartsaver course, American
Red Cross CPR/AED course or equivalent
v Training in the use of the Welch Allyn AED20.
Fibrillation and Defibrillation
Ordinarily the heart produces regular electrical activity —
normal sinus rhythm (NSR). Fibrillation is an abnormal
heart rhythm that replaces the normal rhythmic contraction
of the heart. During fibrillation, irregular cardiac electrical
activity causes rapid, uncoordinated twitching movements.
990020 – Rev. K Using the Welch Allyn AED20 2-3
Page 50

As a result, the heart cannot pump blood effectively causing
a lack of appropriate circulation and pulse.
Defibrillation is the delivery of a brief, high-energy pulse of
electricity to the heart muscle using a device called a
defibrillator. Defibrillation restores the normal cardiac
electrical activity and allows the heart’s natural pacemaker
areas to regain normal function.
The Welch Allyn AED20, using direct current, applies a
brief, high-energy pulse of electricity to the heart to
counteract fibrillation of the heart muscle and restore a
normal heartbeat.
The Welch Allyn AED20 will only administer a
defibrillation pulse to a patient exhibiting a shockable
cardiac rhythm. Shockable rhythms are described in
Appendix A. A ll other rhythms are determined “nonshockable” and the patient is not a candidate for
defibrillation. Cardiopulmonary resuscitation (CPR),
medication, and supplemental oxygen may also be required
to effectively resuscitate the patient.
Indications and Con traindications for Use
Once the Welch Allyn AED20 is connected via the
defibrillation electrode pads to the patient, the instrument
assesses the patient’s cardiac status and indicates whether the
patient is a candidate for defibrillation. The Welch Allyn
AED20 will only administer a defibrillation pulse (shock) to a
patient exhibiting a shockable cardiac rhythm. All other
rhythms are non -shockable and the patient is not a candidate
for defibrillation. Cardiopulmonary resuscitation (CPR),
medication, and sup plemental oxygen may also be required to
2-4 Welch Allyn AED20 Users Manual 990020 – Rev. K
Page 51

effectively resuscitate a patient. This defibrillator should not
be used in automated mode on patients less than 8 years old.
Defibrillation may be effective against cardiac arrhythmias
such as:
v Cardiac arrest
v Ventricular fibrillation
v Ventricular tachycardia
The biphasic waveform employed by the Welch Allyn AED20
has not been clinically tested on pediatric patients. The
Welch Allyn AED20 has not been evaluated for
cardioversion of atrial fibrillation.
Indications
Prior to using the Welch Allyn AED20, the patient should be
assessed by a trained person as described on page 2-3. If
defibrillation with the Welch Allyn AED20 is indicated, all
of the following signs should be present during patient
assessment:
v Unconsciousness
v Absence of breathing
v Absence of pulse
Contraindications
The Welch Allyn AED20 should NOT be used if the patient
exhibits any of the following signs:
v Patient is conscious
v Patient is breathing
v Patient has a pulse
990020 – Rev. K Using the Welch Allyn AED20 2-5
Page 52

Welch Allyn AED20 Operating Procedures — Quick Reference
The following instructions provide an experienced operator
with the main steps for using the Welch Allyn AED20 in
Automated Mode and Manual Mode. Detailed operating
information and procedures are given in the next subsection
(pages 2-8 t hrough 2-18.)
Automated Mode - Quick Reference
Assess the Patient
See the instructions in the detailed information in the next
subsection (page 2-8).
Attach Electrodes
See the instructions in the detailed information in the next
subsection (page 2-9).
Start the Welch Allyn AED20 and Deliver a Shock
1. Push the green ON/OFF button located at
the upper right corner of the Welch Allyn
AED20 next to the large number “1”.
2. Listen to voice prompts and read text
instructions on the screen next to the large
number "2 ".
3. If prompted press the red Shock button
next to the large number "3".
Perform CPR, if prompted.
2-6 Welch Allyn AED20 Users Manual 990020 – Rev. K
Page 53

Manual Mode - Quick Reference
Assess the Patient
See the instructions in the detailed information in the next
subsection (page 2-8).
Attach the Electrode Pads and Connect the Cable
See the instructions in the detailed information in the next
subsection (page 2-9).
Start the Welch Allyn AED20 and Deliver a Shock
1. Push the green ON/OFF button located at
the upper right corner of the Welch Allyn
AED20 ne xt to the large number “1”.
2. Press the button below Manual to display
the manual mode password screen.
3. Enter the numeric manual mode passcode.
Press Enter to accept the passcode and
display the Manual Mode operating screen.
4. Select energy with the up and down arrows.
5. Press the Charge button.
6. Press the red flashing Shock button next to
the large number "3" to deliver the shock.
990020 – Rev. K Using the Welch Allyn AED20 2-7
Page 54

Welch Allyn AED20 Operating Procedures – Detailed Information
The Quick Reference operating procedures in the preceding
subsection provide the main steps when operating the Welch
Allyn AED20 in Automated or Manual Mode.
v Assess the Patient
v Start the Welch Allyn AED20
v Attach the Electrodes and Connect the Cable
v Analyze Patient’s Heart Rhythm
v Deliver the Shock (Automate d or Manual Mode)
v Perform CPR
For each step, detailed operating information or procedures
follow.
Assess the Patient
Before using the Welch Allyn AED20, assess the patient’s
condition. Use the unit only if all of the following patient
signs are present:
v Unconsciousness
v Absence of breathing
v Absence of pulse
Start the Welch Allyn AED20
Push the green ON/OFF button next to the large number “1”
to power-on the Welch Allyn AED20. The unit will start in
Automated Mode.
2-8 Welch Allyn AED20 Users Manual 990020 – Rev. K
Page 55

To operate the unit in Manual Mode, pr ess the button below
Manual on the status bar to display the manual mode
passcode screen. Use the buttons below the arrows on
display to select the numeric passcode. Press the button
below Enter to accept the passcode and display the manual
mode operating screen.
ON/OFF button
Attach the Electrode Pads and Connect the Cable
For defibrillation to be effective, it is important to correctly
place the pads on the patient and connect the electrodes to
the Welch Allyn AED20.
Before applying pads to the patient’s chest be sure to:
v Remove all clothing covering chest
v Wipe off any water, moisture, or perspiration
v Press the pads firmly to make sure they adhere securely to
the chest.
990020 – Rev. K Using the Welch Allyn AED20 2-9
Page 56

WARNING!
Excessive body hair may affect the operation of the electrodes
or cause skin burns on the patient. Remove body hair as needed
to ensure that the electrode pads make proper contact with the
patient's chest.
To attach electrodes and connect cable:
1. Open the package containing the defibrillation
pads and cable.
2. Peel off the backing from the electrode pad
labeled RA. Place this pad just below the
patient’s right collar bone (sternum).
2-10 Welch Allyn AED20 Users Manual 990020 – Rev. K
Page 57

3. Peel off the backing from the electrode pad
connect cable from
Manual
-
+
labeled LL. Place this pad over the ribs on
the patient’s left side below the breast
(apex).
4. Plug the pad connector into the Welch
Allyn AED20 on the left side of the unit.
defib pads
5. Check the battery level icon above the
Menu bar on the display screen to make
sure there is sufficient power to charge the
defibrillator.
battery level icon
00:12:53 Shocks: 0
Log
E F
180
SELF TEST PASSED
Supervisor
HR
system ready indicator
990020 – Rev. K Using the Welch Allyn AED20 2-11
Page 58

If pads are not properly applied or the cable is not properly
connected to the Welch Allyn AED20, it will alert the user
with text and voice.
— Apply pads to patient’s bare
chest, connect defib pads to cable
Analyze Patient’s Heart Rhythm
When the pads are properly applied and conne cted, the
Welch Allyn AED20 announces then automatically analyzes
the patient's heart rhythm to determine if a shock is
indicated.
— Analyzing heart rhythm. Do not
touch the patient
Caution
Do not touch or move the patient while the Welch
Allyn AED20 is analyzing the heart rhythm.
Rhythm analysis takes approximately 12-16 seconds. During
this time, any movement, including CPR and patient
transport, may interrupt analysis and delay the defibrillation
prompts. Text and voice prompt will alert user if patient or
electrodes move.
— Analyzing interrupted, motion
detected
2-12 Welch Allyn AED20 Users Manual 990020 – Rev. K
Page 59

Deliver Shock — Automated Mode
The Welch Allyn AED20 will only administer a shock to a
patient exhibiting a shockable cardiac rhythm. All other
rhythms are determined “non -shockable” and therefore the
patient is not a candidate for defibrillation.
If it is not a shockable condition, the Welch Allyn AED20
will alert the user with text and voice.
— No shock advised
If a shockable condition is detected, the Welch Allyn AED20
will alert user with text and voice.
— Shock advised
To deliver a shock:
1. Make sure the Shock button next to the
large number “3” is flashing. This indicates
that the unit is properly charged.
WARNING!
Make sure no one is touching the patient before
you press the Shock button. Loudly announce,
“Stand back! Do not touch the patient.” and
look down the entire length of the patient to
ensure there is no contact with a bystander or
conductive surface before pressing the Shock
button.
990020 – Rev. K Using the Welch Allyn AED20 2-13
Page 60

— Stand clear
— Shock now, press the red button
now
2. Push Shock to deliver a shock.
Shock button
¥ The Welch Allyn AED20 will not allow the operator
to charge or discharge the defibrillator unless a
shockable rhythm is detected while in automated
mode.
After delivering a shock, the Welch Allyn AED20 continues
to analyze the heart rhythm and determines whether
additional shocks are indicated. The unit is programmed for
a supervisor -configurable protocol that indicates the number
of shocks delivered, the energy of each shock, and possible
CPR interventions.
2-14 Welch Allyn AED20 Users Manual 990020 – Rev. K
Page 61

Deliver Shock — Manual Mode
The Welch Allyn AED20 can operate as a manual AED
when it is configured with the manual mode options.
Enter Manual Mode
When the power is on the Welch Allyn AED20 starts in
automated mode. It may be switched to manual mode at
anytime dur ing the use in automated mode by pressing the
Manual button and entering a password. Press Enter to
accept the manual mode password. If the number is correct,
the manual mode operating screen displays.
From the manual mode screen, the operator can Charge or
Disarm the defibrillator and adjust the energy level of the
charge to be delivered.
990020 – Rev. K Using the Welch Allyn AED20 2-15
Page 62

Select Energy Level
Press the buttons under the up/down energy arrows to
increase or decrease the energy level of the charge. The
energy charge levels available are : 2, 5, 7, 10, 20, 30, 50,
70, 100, 150, 200, 300, and 360 Joules. The energy level
selected displays is the lower right corner of the LCD.
Charge Defibrillator
Press the Charge button to charge the defibrillator. An
intermittent tone will sound as the defibrillator charges. A
bar will extend upwards on the right side of the display until
it reaches the selected energy level. Once the selected energy
level is reached, a solid tone will sound and the red Shock
button will flash.
¥ Charge time is approxima tely 8 seconds. The unit is
capable of delivering back-to-back shocks in less
than 30 seconds.
00: 00: 00
+-
Log
E F
Energy Energy Charge
Select energy
HR ---
Menu
Shocks: 0
Disarm
Charge and/or disarm defibrillator
300J
Menu
360
300
200
150
100
70
50
30
20
10
7
5
2
Selected energy
Charging bar
Selected energy
2-16 Welch Allyn AED20 Users Manual 990020 – Rev. K
Page 63

To deliver a shock:
1. Make sure the Shock button next to the
large number “3” is flashing. This indicates
that the unit is properly charged.
2. Push Shock to deliver a shock.
Shock button
WARNING!
Make sure no one is touching the patient before
you press the Shock button. Loudly announce,
“Stand back! Do not touch the patient.” and look
down the entire length of the patient to ensure
there is no contact before pressing the Shock
button.
After delivering a shock, the Welch Allyn AED20 continues
to analyze the heart rhythm and prompts the operator if
additional shocks are indicated.
990020 – Rev. K Using the Welch Allyn AED20 2-17
Page 64

Defibrillator Disarm
If the defibrillator is charged and the Shock button is not
pressed, the Welch Allyn AED20 must be disarmed.
v The unit will automatically discharge in Automated Mode
(30 seconds) or Manual Mode (60 seconds). In Automated
Mode after 25 seconds, there will be a warning tone to
indicate that the defibrillator will disarm automatically.
v In Manual Mode, the operator can disarm the defibrillator
by pressing the Disarm button.
v The operator can press the ON/OFF button and turn off
the unit.
Perform CPR
If the heart rhythm is not treatable with defibrillation, the
Welch Allyn AED20 displays and announces the message No
Shock Advised. The Welch Allyn AED20 will direct the
operator, every minute, to perform cardiopulmonary
resuscitation (CPR) to effectively resuscitate the patient.
— No shock advised (Only Spoken once)
— It is safe to touch the patient
— Check airway, check breathing, check
pulse (circulation)
— If no pulse start (begin) CPR
The Welch Allyn AED20 will continue to assess the patient’s
heart rhythm. If the signal is non-shockable, No Shock Advised
2-18 Welch Allyn AED20 Users Manual 990020 – Rev. K
Page 65

will continue to flash on the display, but if the Welch Allyn
AED20 detects a shockable rhythm it will direct the operator to
stand back as it begins to analyze the patient’s hea rt rhythm.
— Analyzing heart rhythm. Do not touch the
patient
If the patient is pulseless, apneac, and unconscious, when
directed, perform cardiopulmonary resuscitation in accordance
with the procedures and techniques presented in your CPR
training. The Welch Allyn AED20 also directs the operator to
perform CPR after three consecutive, delivered shocks. During
the CPR cycle, the Welch Allyn AED20 will not be assessing
the patient's heart rhythm.
At the end of the CPR cycle (15, 30, 60, or 90 seconds), the
Welch Allyn AED20 will prompt you to stop CPR and not
touch the patient so it can assess the heart rhythm, confirm its
analysis, and determine if a shockable condition exists.
— Stop CPR
A CPR cycle can be interrupted and analysis resumed at any
time by pressing the ANALYZE button.
EMS Mode
EMS mode is a feature specifically designed for use by an
Emergency Medical Technician. EMS mode is recommended
when continuous AED mode analysis is required while
990020 – Rev. K Using the Welch Allyn AED20 2-19
Page 66

transporting a patient or performing another procedure such
Menu
E F -
Vol
4
as intubation. EMS Mode is a supervisor selectable mode of
operation that performs continuous background analysis, but
requires the user to press the Analyze button for full analysis
in response to a prompt from the AED20. The follow ing
section describes the operation and various features of EMS
mode.
Background Monitoring
When the unit is powered on in EMS mode, it is
automatically set to a Voice Off mode. This means that the
AED will analyze silently and will not speak any voice
prompts unless it detects a shockable rhythm. A screen
similar to the one seen below will be displayed.
00:12:53
HR
180
Shocks: 0
MONITORING ECG
PRESS TO ANALYZE
+
Log
Analyze
No
Card
When this screen is active, no voice prompts will be spoken,
but the AED will continuously analyze the patient’s heart
rhythm.
If a shockable rhythm is detected, the screen will change and the AED
will speak and display CHECK PATIENT.
2-20 Welch Allyn AED20 Users Manual 990020 – Rev. K
Page 67

Menu
-
Vol
4
00:12:53
HR
180
Shocks: 0
CHECK PATIENT
PRESS TO ANALYZE
When the “CHECK PATIENT” prompt is spoken, the user should
verify that the patient is pulseless, apneac, and unconscious, and
eliminate sources of motion artifact before pressing the Analyze button
to Enter Voice On mode. In Voice On mode, the AED will issue verbal
prompts, fully analyzing the patient’s heart rhythm and charging the
defibrillator if necessary. Follow normal AED mode operating
procedures in Voice On mode.
Log
E F
+
Analyze
No
Card
¥ The Analyze button can be pressed at any time in
EMS mode to perform a full analysis of the patient’s
heart rhythm.
¥ The “Check Patient” prompt may be spoken in
response to excessive motion artifact or CPR.
Eliminate sources of motion artifact before pressing
the Analyze button.
If defibrillation is necessary, the AED will perform the
normal three-shock SAED protocol set by the supervisor. If a
patient is successfully defibrillated, the AED will return to
Voice Off mode. If three successive shocks are delivered, the
CPR timer will begin after the third shock. Following
990020 – Rev. K Using the Welch Allyn AED20 2-21
Page 68

completion of CPR, the unit will speak “Stop CPR” and
return to Voice Off mode to continue background monitoring.
Electrode Monitoring (option)
An optional electrode monitoring cable (002128-IEC,
002130-AHA) is available for use with the Welch Allyn
AED20. The operator uses low cost standard ECG electrodes
to assess patients who do not meet the criteria for using the
automated mode, for example, a patient who has a pulse, or
is consc ious, but has chest pains.
Electrode monitoring is recommended for use in manual
mode for extended monitoring or monitoring while in
transport. When the electrode monitoring cable is attached,
the Welch Allyn AED20 analyzes the patient’s rhythm while
in automated mode, but will not charge the defibrillator or
allow the operator to deliver a shock.
WARNING!
Do not administer a shock using the electrode
monitoring cable. The electrode monitoring cable
has protective circuitry that prevents
defibrillation energy from being delivered to the
patient.
Always check the expiration date on defibrillation
pads and do not use pads if the packaging has
been previously opened. The Welch Allyn AED20
may interpret excessively dry defibrillation pads
as an attached electrode monitoring cable.
Using the Electrode Monitoring Cable
To use electrode monitoring:
2-22 Welch Allyn AED20 Users Manual 990020 – Rev. K
Page 69

1. Attach electrode monitoring cable to Welch
Allyn AED20.
2. Properly prepare the patient's skin prior to
attaching the electrodes. Clean the skin
sites with a coarse, dry terry cloth. Then,
clean the skin with alcohol and allow to dry
completely before applying the electrodes.
3. Connect each lead of the electrode
monitoring cable to the appropriate
disposable electrode. Arrange the
electrodes as shown below. Attach an
electrode to the sternum (RA) area of chest
and the other to the apex area (LL) of the
chest.
Caution
Do not use the electrode monitoring cable for
Automatic Rhythm Analysis due to the possibility
of artifact. Proper skin preparation and the use of
fresh, high-quality monitoring electrodes are
imperative to minimize artifact when using the
electrode monitoring cable.
990020 – Rev. K Using the Welch Allyn AED20 2-23
Page 70

Red(AHA)/Green(IEC)
Electrode Placement
White(AHA)/Red(IEC)
Electrode Placement
Charge
Menu
RA
LL
Using the Electrode Monitoring in Manual Mode
The Welch Allyn AED20 displays MONITORING ONLY at
the bottom of the prompts window during normal Manual
Mode operation.
00: 00: 00
HR ---
Shocks: 0
MONITORING ONLY
+-
Log
E F
Energy ↓↓ Energy ↑↑
4 Vol
Menu
2-24 Welch Allyn AED20 Users Manual 990020 – Rev. K
Page 71

When the operator presses the Charge button, an audible
tone sounds and CHANGE TO PADS flashes on the display.
00: 00: 00
If purchased, Manual mode is
accessible by pressing the "Manual"
button. Manual mode allows the
operator to select energy, charge the
defibrillator, and deliver a shock to the
patient manually.
CHANGE TO PADS
-
+
Log
E F
Energy Energy Charge
HR ---
Menu
Shocks: 0
Disarm
Menu
360
300
200
150
100
70
50
30
20
10
7
5
2
If the operator attempts to deliver a shock using the
electrode monitoring cable, SHOCK NOT DELIVERED
displays on the screen and no energy is delivered to the
patient.
Caution
Do not replace the electrode monitoring cable
with a substitute. Using any other cable may
cause burns to the patient.
990020 – Rev. K Using the Welch Allyn AED20 2-25
Page 72

Attempting to Use Electrode Monitoring in Automated Mode
Monitoring
Analyze
It is recommended not to use the electrode monitoring cable
for Automatic Rhythm Analysis. If the Welch Allyn AED20
is set to Automated Mode when the electrode monitoring
cable is attached, MONITORING ONLY will flash in the
Defib window.
00: 00: 00
+-
Log
E F
4 Vol
HR ---
Shocks: 0
Menu
Only
While the electrode monitoring cable is attached, the Welch
Allyn AED20 will only analyze the heart rhythm when the
Analyze button is pressed. Do not move or touch the patient
while analyzing with the electrode monitoring cable. When
the analyze button is pressed, the Welch Allyn AED20 will
begin an analysis cycle.
Press the Analyze button, the Welch Allyn AED20 will
speak Analyzing and display ANALYZING and STAND
CLEAR and go through the analysis cycle.
— Analyzing
2-26 Welch Allyn AED20 Users Manual 990020 – Rev. K
Page 73

If the result is a non-shockable waveform, the AED will
sound a double beep and display NO SHOCK ADVISED. If
the result is a shockable waveform, the AED will speak
Change to Pads, sound 5 beeps, and display CHANGE TO
PADS, CH ECK PATIENT, IF NO PULSE START CPR.
— Change to Pads
The Welch Allyn AED20 will continue to wait for the
Analyze button to be pushed while in Automated Mode. The
AED will not allow the user to shock the patient with the
monitoring cable attached.
990020 – Rev. K Using the Welch Allyn AED20 2-27
Page 74

Post-Use Procedures
After each use, the Welch Allyn AED20 should be inspected,
cleaned, and a new supply of electrode pads restocked to
prepare the unit for its next use. Any event documentation
should be retrieved from the internal log or external memory
card and printed.
Print or transfer the log information from the internal
memory or the external memory PCMCIA card. After data
retrieval, clear the internal memory. Any error messages or
malfunctions should be reported and corrective actions taken
before storin g the unit for reuse.
During storage, the Welch Allyn AED20 performs periodic
self-tests including the functionality of the unit and the
status of the battery and internal circuitry. A more detailed
test of the unit's operation and battery status should be
performed on a regular basis. See Chapter 4 Maintaining the
Welch Allyn AED20 for more information.
2-28 Welch Allyn AED20 Users Manual 990020 – Rev. K
Page 75

Chapter 3
Programming the Welch Allyn AED20
Welch Allyn AED20 Users Manual
This chapter explains how to set the basic system operating
options through the User Menu (Automated or Manual
Mode). It also provides information on accessing and setting
the advanced system operating options using the Supervisor
Menu.
Menu Structure Diag ram 3-3
Menu Structure Overview 3-4
Accessing the User Menu from Automated Mode 3-4
Accessing the User Menu from Manual Mode 3-5
User Menu 3-7
User Menu Structure Overview................................................3-8
Working with the Log ..................................................................3-9
Setting the Date........................................................................3-14
Setting the Time........................................................................3-15
Adjusting the Contrast..............................................................3-16
Adjusting the Speaker Volume ...............................................3-17
Enabling EMS Mode.................................................................3-18
Supervisor Menu Tree 3-19
990020 – Rev. K Programming the Welch Al lyn AED20 3-1
Page 76

Supervisor Menu 3-20
Accessing the Supervisor Mode............................................3-21
Supervisor Menu Items............................................................3-22
Selecting a Language..............................................................3-23
Setting the Charge Protocol....................................................3-24
Diagnostics................................................................................3-25
Calibration..................................................................................3-26
Viewing Information on the PCMCIA Memory Card...........3-30
Setting Options .........................................................................3-32
Changing Manual and Supervisor
Password Codes ......................................................................3-35
Upgrading the Welch Allyn AED20 System.........................3-36
3-2 Welch Allyn AED20 Users Manual 990020 – Rev. K
Page 77

Menu Structure Diagram
990020 – Rev. K Programming the Welch Allyn AED20 3-3
Page 78

Menu Structure Overview
The operating options are available to the operator through
a simple menu structure. The basic system operating
options are accessed through the User Menu in either
Automated or Manual Mode. The advanced system
operating options are accessed through the Supervisor
Menu.
The Welch Allyn AED20 has the capability for certain
menu buttons to auto repeat. Buttons with more than one
choice will auto repeat, and the up and down arrows will
scroll through the choices for a selection. To make a
button auto-repeat, hold it down until the desired choice is
selected.
Accessing the User Menu from Automated Mode
When the Welch Allyn AED20 is powered-up, the unit
performs a self test and the start-up screen displays.
Access the User Menu by pressing “Menu” in the lower
right corner.
00: 00: 00
HR ---
Shocks: 0
Self Test Passed
+-
Log
E F
4 Vol
3-4 Welch Allyn AED20 Users Manual 990020 – Rev. K
Menu
Page 79

¥ If the Manual Mode is purchased, MANUAL
appears in place of the contrast menu on start-up
screen. .
Accessing the User Menu from Manual Mode
¥ Only available on units with Manual Mode
purchased.
When the Welch Allyn AED20 is powered-up with the
Manual Mode option installed, the unit performs a self test
and the manual mode start-up screen displays.
Self Test Passed
To access the Manual Mode Menu:
1. Press Manual to display the manual mode
passcode screen.
0
123
Enter00
990020 – Rev. K Programming the Welch Allyn AED20 3-5
Page 80

2. Press the button below the corresponding
number to select that digit of the manual
mode passcode.
3. Repeat Step 2 for each digit of the
passcode until the correct number
displays.
¥ The default password is 123.
4. Press Enter to accept the passcode. If the
number is correct, the Welch Allyn
AED20 enters manual mode.
5. Press Menu to display the User Menu
screen.
MenuEnergy Energy Charge
User Menu
¥ Press Back to return to the manual mode
operating screen.
3-6 Welch Allyn AED20 Users Manual 990020 – Rev. K
Page 81

User Menu
User Menu
Use the two arrow buttons on the bottom menu to move
from one menu selection to the next. The selected menu
item is highlighted by a black box. Push the Select button
to select the highlighted menu item.
selections
Log Allows viewing, hearing, pointing, or transferring
of the internal log.
Date Display the curren t date, and set and save a new
date (month, day, year) using the buttons below
the Menu Bar.
Time Display the current time, set, and save a new
time (hour, minute) using the buttons below the
Menu Bar.
Settings Adjust the LCD contrast and adjust the volume
of the system audio and save the settings.
Supervisor Enter the password code using the buttons
below the Menu Bar to display the Supervisor
Menu selections.
990020 – Rev. K Programming the Welch Allyn AED20 3-7
Page 82

Clear
Print
Month
Day
4
Back
Vol
Hour
Save
0
Enter 0 0
For each menu item selected, the corresponding option
appears at the bottom of the display. If Supervisor is
selected, the user must enter the correct supervisor
passcode in order to enter the Supervisor Menu selection
screen.
User Menu Structure Overview
Log
Date
Time
Settings
Supervisor
EMS Off
Setup
Year
Minute
Enter Supervisor Code
Back
Save
Enter Supervisor Menus/Enable EMS Mode
The subsections that follow explain how to set the options
available through the User Menu. The procedures included
are:
v Working with the log
v Setting the date
v Setting the time
v Adjusting the contrast
v Adjusting the speaker volume
v Enabling EMS Mode
3-8 Welch Allyn AED20 Users Manual 990020 – Rev. K
Page 83

Working with the Log
connect cable end
with bead to the data
The log contains a record of ECG tracings and timestamped system status events. The log can be printed to a
parallel printer, printed to a serial printer, or transferred to
a PC for viewing. Use the appropriate setup procedure to
connect the printer or PC to the Welch Allyn AED20, then
follow the instr uctions for printing.
port
To setup a parallel printer:
¥ The Welch Allyn AED Parallel
Communication Kit (002119) is required for
this connection.
1. Connect the male end of the DB25Modular adapter (550790) to the DB25
female end of the Serial to Paralle l
converter (900412 or 900416). Connect
the Serial Cable (551778) into the AED20
serial data port and to the DB25-Modular
adapter (550790)
990020 – Rev. K Programming the Welch Allyn AED20 3-9
Page 84

2. Connect the Serial to Parallel converter to
the parallel printer port on your printer.
Connect the AC Power adapter to the
Serial to Parallel converter and plug in the
AC Power adapter to a wall outlet.
3. Make sure the Serial to Parallel converter
dip switches are set to 57600 baud. See
the instructions included with the
communication kit for details.
To setup a serial printer:
¥ The Welch Allyn AED PC Data
Transfer/Serial Communication Kit
(002120) is required for this connection.
1. Connect the Serial Communication Cable
(551778) into the Welch Allyn AED20
serial data port and the other end to the
Serial Printer Trans fer Adapter (520469).
2. Connect the Serial Printer Transfer
Adapter to the serial printer.
To setup a PC for viewing:
¥ The Welch Allyn AED PC Data
Transfer/Serial Communication Kit
(002120) is required for this connection.
3-10 Welch Allyn AED20 Users Manual 990020 – Rev. K
Page 85

ECG or Text can be used to tra nsfer data to a PC or the
RS232 option with Welch Allyn Smartlink software can be
used for easy data archiving and playback.
1. Connect the Serial Communication Cable
(551778) into the Welch Allyn AED20
serial data port and the other end into the
PC Data Transfer Adapter (520468).
2. Connect the PC Data Transfer Adapter to
the 9-pin serial port on your PC.
3. Use the Terminal or Serial
Communications program on the PC to set
the port settings to 57600 baud, N, 8, 1.
When the printer or PC is properly setup, turn on the output
device and the Welch Allyn AED20. Use the following
procedure to print the log.
To print the log or ECG data:
1. Access the User Menu. Select Log to
display the Log menu bar.
Log
Clear
990020 – Rev. K Programming the Welch Allyn AED20 3-11
Print
Setup
Back
Page 86

2. Press Setup to display the Output Mode
menu bar.
3. Select Text or ECG and the appropriate
baud rate. Press Back to return to the Log
menu bar.
¥ ECG Setting only works with a parallel
printer.
4. Press Print to print the log entries. A
steady printer icon replaces the log icon to
confirm printing.
¥ A flashing printer icon indicates an error.
Verify that the cable and adapter are
connected correctly and check that the
printer is online and has paper.
An example printout with typical information is
shown below.
3-12 Welch Allyn AED20 Users Manual 990020 – Rev. K
Page 87

5. Press Clear to remove all log entries.
6. Press Back to return to the Main Menu.
990020 – Rev. K Programming the Welch Allyn AED20 3-13
Page 88

Setting the Date
Use the date screen to change the date. Use the menu
selection buttons below the menu bar to change the date
displayed.
To set a new date:
1. Access the User Menu. Select Date and
display the Date menu bar.
2. Press the buttons below the month, date,
and year to change the date displayed.
3. Press Save to enter the date displayed and
return to the User Menu.
¥ Setting the date will force a new patient into the
entry log.
3-14 Welch Allyn AED20 Users Manual 990020 – Rev. K
Page 89

Setting the Time
The Welch Allyn AED20 time-stamps are events saved to
the log. A 24-clock is used for time displays (e.g., 14:24 is
used for 2:24 p.m.). Use the time screen and the menu
selection buttons below the menu bar to change the time
displayed.
To set a new time:
1. Access the User Menu. Select Time to
display the Time menu bar.
Time
Hour Minute Save
2. Press the buttons below the hour and
minute to change the time displayed.
3. Press Save to enter the time displayed and
return to the User Menu.
¥ Setting the time will force a new patient
into the entry log.
990020 – Rev. K Programming the Welch Allyn AED20 3-15
Page 90

Adjusting the Contrast
The contrast of the Welch Allyn AED20 liquid crystal
display can be adjusted. There are nine pre-set contrast
levels available. Use the contrast screen and the menu
selection button below the menu bar to change the contrast
of the LCD.
To adjust the LCD contrast:
1. Access the User Menu. Select Settings to
display the Settings screen and menu bar.
2. Press the contrast button ( ) to change
the contrast of the LCD. The number next
to the contrast icon changes
corresponding to increases in the contrast
(1-9).
3. Press Back to return to the User Menu.
3-16 Welch Allyn AED20 Users Manual 990020 – Rev. K
Page 91

Adjusting the Speaker Volume
The volume of the voice prompts through the Welch Allyn
AED20 speaker can be adjusted. There are four pre-set
volume levels available. Use the volume screen and the
menu selection button below the menu bar to change the
volume of the voice prompts.
To adjust the volume:
1. Access the User Menu. Select Settings to
display the Settings screen and menu bar.
Settings
4
Vol
Back
2. Press Volume ( ) to change the
volume of the voice prompts through the
Welch Allyn AED20 speaker. The
indicator in the volume icon changes to
one of four positions.
3. Press Back to return to the User Menu.
990020 – Rev. K Programming the Welch Allyn AED20 3-17
Page 92

Enabling EMS Mode
0
Enter 0 0
EMS mode is a feature specifically designed for use by an
Emergency Medical Technician. EMS mode is
recommended when continuous AED mode analysis is
required while transporting a patient or performing another
procedure such as intubation. EMS Mode is a supervisor
selectable mo de of operation that performs continuous
background analysis, but requires the user to press the
Analyze button for full analysis in response to a prompt
from the AED20.
Log
Date
Time
Settings
Supervisor
EMS Off
Enter Supervisor Code
1 2 3
Reboot in EMS Mode
To Enable EMS Mode:
1. Access the User Menu. Select EMS Off
to display the Passcode Entry screen.
2. Enter the Supervisor passcode.
3. If the passcode is correct, the unit will
reboot with EMS Mode ON.
¥ Follow the same procedure to turn EMS
Mode OFF.
3-18 Welch Allyn AED20 Users Manual 990020 – Rev. K
Page 93

Supervisor Menu Tree
Enter
Supervisor
Passcode
Language
Protocol
Diag
Card
Setup
Upgrade
Code
AED PRGM
00.05.07
SRAM
512 KB
01/01/00
00: 00: 00
Log
Date
Time
Settings
Supervisor
+-
Log
E F
English
200
SWRev BackCal Defaults
Prg AED Erase Info
Options
Upgrade Menu
Manual BackSupr
xx.xx.xx BackDEF: B PS: A
Prg AED BackErase Info
Software BackLoad Save
Options
HR ---
Menu
Software Rev
Card
Prg AED
123456789
Setup
Unit ID CPR TMR
Select
Select
Shocks: 0
Back
Save
Back300 360
Back
BackUnit ID CPR TMR
Back
Back
16 Character entry
ECG OFF BackAudio ON 60 Hz
Options
CPR Timer
Select
60 Sec Back
Back
990020 – Rev. K Programming the Welch Allyn AED20 3-19
Page 94

Supervisor Menu
The subsections that follow explain how to access the
Supervisor Mode Menu and set the options available
through that menu. The procedures included are:
v Accessing the supervisor menu
v Selecting a language
v Setting the charge protocol
v Viewing software revisions
v Enabling/disabling the memory card
v Enabling/disabling ECG and audio options
v Changing manual/supervisor password codes
v Upgrading the Welch Allyn AED20 system
3-20 Welch Allyn AED20 Users Manual 990020 – Rev. K
Page 95

Accessing the Supervisor Menu
The Supervisor Menu is accessed from the User Menu
screen.
To access the Supervisor Menu:
1. Go to the User Menu as described earlier
in this chapter.
2. Use the up and down arrows to choose
Supervisor, and press select.
3. Enter the passcode and press enter. If
passcode is correct, the Supervisor menu
will appear.
0
123
Enter00
990020 – Rev. K Programming the Welch Allyn AED20 3-21
Page 96

Supervisor Menu Items
Language
Protocol
Diag
Card
Setup
Upgrade
Code
Language Select text and audio language using the
buttons below the Menu Bar. (Restart the
Welch Allyn AED20 to activate the language
selected.)
Protocol Select the energy level protocol using the
buttons below the Menu Bar. Standard
(default) protocol is 200J, 300J, and 360J
(150J, 200J, 300J in the UK).
Diag View software revisions/ reset factory defaults.
Card Access PCMCIA card functions.
Setup Enable or disable the ECG trace and audio
recording 50/60 Hz. Set unit ID and set time
for the CPR timer.
Upgrade Add upgrade options to the system.
Code Set both the Manual Mode and the Supervisor
Mode pass code numbers using the buttons
below the Menu Bar.
3-22 Welch Allyn AED20 Users Manual 990020 – Rev. K
Page 97

Selecting a Language
The language used for text on icons, screen displays, and
prompts and used for voice prompts can be changed if the
Welch Allyn AED20 has the language option upgrade
installed.
To select a different language:
1. Access the Supervisor Menu. Select
Language and display the Language
screen and menu bar.
English Back
Language
2. Press the buttons below the arrows to
change the language.
3. Press Save to select the language
displayed and return to the Supervisor
Menu.
4. Restart the Welch Allyn AED20 to
activate the language selected and change
the screen text and voice prompts.
990020 – Rev. K Programming the Welch Allyn AED20 3-23
Page 98

Setting the Charge Protocol
The standard Welch Allyn AED20 charge protocol
provides a sequence of three defibrillator shocks. The
default protocol setting is 200 Joules, 300 Joules, and 360
Joules (150 Joules, 200 Joules, and 300 Joules for the UK).
Use the menu selection button below the menu bar to
change the shock charge displayed.
To set a new shock charge:
1. Access the Supervisor Menu. Select
Protocol and display the protocol menu
bar.
200
Protocol
2. Press button below the digit to toggle the
values.
3. Press Save to enter the charge displayed
and return to the Supervisor Menu.
Energy Selections Available
First
Shock
Second
Shock
Third
Shock
150 J 150 J 150 J
200 J 200 J 200 J
300 J 300 J
360 J
Save300 360
3-24 Welch Allyn AED20 Users Manual 990020 – Rev. K
Page 99

Diagnostics
Use the diagnostics screen to view the installed versions of
the software and restore factory defaults.
To view software revisions:
1. Access the Supervisor Menu. Select Diag
to display the Diagnostics screen and
menu bar.
Diag
SWRev
BackCal Defaults
2. Press SWRev to display the revisions of
the current software for the motherboard
xx.xx.xx, defibrillator DEF: and the
power supply PS.
xx.xx.xx BackDEF: B PS: A
Software Rev
¥ Pressing the leftmost button while the
motherboard software revision is
displayed will display the FPGA device
revision.
3. Press Back to return to the Diag menu.
Press Back again to return to the
Supervisor Menu.
990020 – Rev. K Programming the Welch Allyn AED20 3-25
Page 100

Calibration
SWRev Cal Defaults Back
Diag
Batt Pre Lo Pre Hi Back
¥ Battery and threshold calibration should
be performed by authorized service
personal only.
To restore factory defaults
1. Access the Supervisor Menu. Select Diag.
to display the Diagnostics Menu.
SWRev Cal Defaults Back
2. Press Defaults to return the values to the
factory settings.
3. Press Back to return to the Supervisor
Menu.
Calibration
Diag
3-26 Welch Allyn AED20 Users Manual 990020 – Rev. K
 Loading...