

Page 1

®
Acuity
and
Mobile Acuity LT
Central Monitoring Systems
Directions for use
Software version 8.2x
Page 2

ii Welch Allyn Acuity Central Monitoring System
© 2013 Welch Allyn. All rights are reserved. To support the intended use of the product described in this publication,
the purchaser of the product is permitted to copy this publication, for internal distribution only, from the media
provided by Welch Allyn. No other use, reproduction, or distribution of this publication, or any part of it, is permitted
without written permission from Welch Allyn.
Welch Allyn FOSS. This product may contain software known as “free” or “open source” software (FOSS). Welch
Allyn uses and supports the use of FOSS. We believe that FOSS makes our products more robust and secure, and
gives us and our customers greater flexibility. To learn more about FOSS that may be used in this product, please visit
our FOSS website at www.welchallyn.com/opensource.
Welch Allyn assumes no responsibility for any injury to anyone, or for any illegal or improper use of the product, that
might result from failure to use this product in accordance with the instructions, cautions, warnings, or statement of
intended use published in this manual.
Welch Allyn, Acuity, AcuityLink, Propaq, Micropaq, Flexible Monitoring and FlexNet are registered trademarks of
Welch Allyn. ParamSet is a trademark of Welch Allyn. For patent information, please visit www.welchallyn.com/
patents.
C-LOCK and Nellcor are registered trademarks of Nellcor Puritan Bennett. Masimo and Signal IQ are registered
trademarks of Masimo Corporation.
Software in this product is copyrighted by Welch Allyn or its vendors. All rights are reserved. The software is protected
by United States of America copyright laws and international treaty provisions applicable worldwide. Under such laws,
the licensee is entitled to use the copy of the software incorporated with this instrument as intended in the operation
of the product in which it is embedded. The software may not be copied, decompiled, reverse-engineered,
disassembled or otherwise reduced to human-perceivable form. This is not a sale of the software or any copy of the
software; all right, title and ownership of the software remain with Welch Allyn or its vendors.
For information about any Welch Allyn product, visit www.welchallyn.com/about/company/locations.htm.
Manual DIR 80018355 Ver A
Welch Allyn Protocol, Inc.
8500 SW Creekside Place
Beaverton, Oregon 97008-7101 USA
Regulatory Affairs Representative
Welch Allyn Limited
Navan Business Park
Dublin Road, Navan
County Meath, Republic of Ireland
www.welchallyn.com
Page 3

Contents
1 - General information ......................................1
2 - Acuity System overview ...................................9
iii
Indications for use ................................................1
General description................................................1
Conventions .....................................................2
General warnings and cautions.......................................3
Acuity System compliance with safety standards ........................7
Related documents................................................8
System configurations .............................................9
Central station screen.............................................16
3 - Admit and begin monitoring ..............................25
Preadmit a patient to Acuity System monitoring ........................25
Readmit a discharged patient .......................................27
Begin patient monitor communication with the system...................28
Enter and confirm a patient’s ID or room at the central station .............40
4 - Adjust monitoring settings and patient information ...........43
Set up typical monitoring at the Virtual Monitor .........................43
Adjust a patient’s alarm limits.......................................46
Adjust general printing settings .....................................48
Adjust a patient’s waveform displays .................................51
Arrhythmia Analysis option .........................................52
ST Analysis option ...............................................69
Edit patient information ...........................................79
5 - Respond to alarms and alerts .............................83
Overview of central station alarm and alert indications ...................83
Suspend an audible alarm or alert tone for 90 seconds ...................84
Remove a latched arrhythmia alarm ..................................87
Respond to specific alarms and alerts ................................88
Summary of Acuity System alarm and alert levels .......................95
6 - Review or print patient data ...............................97
Review patient data ..............................................97
Print and review printouts.........................................115
Page 4

iv Contents Welch Allyn Acuity Central Monitoring System
7 - Move a monitored patient ...............................125
Move the patient and monitor to a new location .......................125
Move the patient to a different monitor ..............................131
8 - Discontinue Acuity System monitoring ....................133
Stop monitoring a patient .........................................133
Discharge a patient from Acuity System monitoring ....................136
9 - Status icons ...........................................137
Status icon colors ...............................................137
Patient/monitor status icons .......................................138
System component status icons ...................................145
10 - Troubleshooting and maintenance .......................149
Contact information .............................................149
Contents ......................................................150
Troubleshooting ................................................151
Maintenance ...................................................164
11 - Specifications ........................................175
Monitor/Acuity System compatibility ................................175
General system monitoring capabilities ..............................175
Acuity System heart rate .........................................177
Acuity System pacemaker detection ................................178
Acuity System alarm and alert indications ............................179
Electromagnetic standards compliance ..............................184
Acuity System customizable defaults and factory defaults ...............188
Warranty................................................201
Index ...................................................203
Page 5

1
1
General information
Indications for use
The Acuity®Central Monitoring Station is intended to be used by clinicians for the central
monitoring of neonatal, pediatric, and adult patients in health care facilities.
In addition to the central monitoring of patient data, waveforms, alarms and alerts, the
Acuity software can include operational modules to provide extended recording of patient
data (Full Disclosure), arrhythmia monitoring and ST analysis.
• Full disclosure stores patient data for up to 96 hours
• Arrhythmia monitoring module provides real-time monitoring and alarms for specific
changes in cardiac rhythms. The clinician is responsible for determining the clinical
significance of each detected arrhythmia event or alarm. The arrhythmia module is not
intended for use with neonatal patients.
• ST analysis module provides real-time monitoring and alarms for ST segment
deviations, from a reference beat, for patients with suspected heart disease and
anomalies. The clinician is responsible for determining the clinical significance of each
selected ST segment deviation or alarm. The ST analysis module is not intended for
use with neonatal patients.
General description
The Acuity Central Monitoring System (Acuity System) is Welch Allyn’s central monitoring
solution. It consists of a central monitoring station, Acuity System software and a
collection of other commercially available networking products.
The Acuity System is available in multiple product configurations. Acuity Systems can be
customized to meet a customer’s unique needs based on hospital policy, health care
facility size and patient census and floor layout. In all cases, the user must carefully review
the features and functionality of the Acuity System to ensure that selected configurations
meet specific clinical needs.
The Acuity System supports patient information management, patient vital-sign alarm and
equipment alert management, patient data and waveform monitoring and review, system
administration and ongoing service.
The Welch Allyn Connectivity Server (WACS) module consists of a server platform on
which one or more of the following software options are installed: Web Server (Acuity
System patient printout files available on Web browsers), AcuityLink®(Acuity System
patient information delivered to mobile devices), HL7 Interface options, Third Party Data
Stream Interface and Clinician Notifier Barcode Interface.
Page 6

2 Chapter 1 General information Welch Allyn Acuity Central Monitoring System
Acuity System software further processes data acquired from patient monitors. Acuity
Systems with the Arrhythmia Analysis module calculate heart rate using multiple ECG
leads and arrhythmia analysis algorithms.
The Acuity System is not directly connected to patients. It is designed to be used as a
central monitoring system for a set of patient monitors that support both continuously and
intermittently acquired data. Supported monitors include, but are not limited to, the
following Welch Allyn devices: Propaq
Welch Allyn 1500 Patient Monitor®, as configured to interface with the Acuity System.
The Acuity System and distributed monitoring devices are prescription devices to be used
by authorized health care professionals using standard institutional procedures and
standards of care for patient monitoring. Staff training in the operation of the Acuity
System and the patient monitoring devices connected to it is essential for optimal use.
Users should be skilled at the level of a technician, nurse, physician, health care provider
or medical specialist, with the knowledge and experience to acquire and interpret
patients’ vital-signs data.
Individuals using the Acuity System should be familiar with its operation as described in
this manual, and they should understand all warnings and cautions in the manual.
®
Encore, Propaq CS, Propaq LT , Micropaq®, and
Conventions
WARNING Indicates conditions or practices that could lead to illness, injury, or
death.
Caution Indicates conditions or practices that could damage the equipment or
other property.
On the product, means “Consult the accompanying documentation.”
Page 7

Directions for use Chapter 1 General information 3
General warnings and cautions
Warnings
Related to system components and configuration
WARNING Use only accessories approved by Welch Allyn. The use of any
other accessories can result in inaccurate patient data, can damage the
equipment, and can void your product warranty. See the accessory list or visit
www.welchallyn.com.
WARNING Always use accessories according to the standards of your facility
and according to the manufacturer's directions.
WARNING Welch Allyn has verified that Welch Allyn-specified network
requirements for this Acuity System have been met. Altering the cabling or
connecting the Acuity System to another type of power source could damage
the equipment, cause system restarts or hazardous conditions on the network,
or result in inaccurate patient information at the Acuity Central Station.
WARNING Do not change Acuity System components or configuration, such as
removing or adding a printer or substituting hardware, without approval by Welch
Allyn. Such changes could degrade system performance and affect patient
monitoring.
WARNING Devices connected to the Acuity System must be certified for
overall system compliance according to the European Norm 60601-1 and 60950
safety standards. The interconnection of any device with an Acuity System must
comply with IEC 60601-1-1. Devices listed in the Acuity System installation
planning guide comply with these standards. If in doubt about network
connectors or devices, please consult your facility’s Biomedical Engineering
department or Welch Allyn Technical Support.
WARNING It is strongly recommended that Acuity Systems be installed with
continuous power sources and redundant means of operator surveillance, such
as secondary central stations and hallway message panels. Acuity System
alarms, alerts or other events can go unnoticed if clinical personnel are not
present at the Acuity Central Station or if interruptions occur in power or system
operations. You are responsible to provide percent reliable power to the central
station. The central station will only work with reliable AC power.
WARNING Ensure that no headphones or headphone adapters are connected to
the headphone input of your computer. A connection in the headphone jack of a
computer will cancel speaker output for any audible alarms associated with the
Acuity System.
Page 8

4 Chapter 1 General information Welch Allyn Acuity Central Monitoring System
WARNING Ensure that the volume level on your computer is not set too low or
is not set to mute as this may cause you to miss audible alarms generated from
the Acuity System.
WARNING Replace central station hardware within the the lesser of 3 years or
the original equipment manufacturer’s specification. Failure to perform
preventative maintenance can impact system performance and availability.
WARNING The bedside patient monitor is the primary alarming source for the
patient, and the central station is a backup alarm source. The central station is
only as reliable as its network and should be relied on only as a backup alarming
device.
WARNING Lethal arrhythmia (LTA) analysis by the central station is only as
reliable as the connection to the bedside monitor. With the exception of the
Welch Allyn 1500 monitor in a disconnected state, which provides its own LTA
analysis and alarm, the central station is the primary source for LTA analysis. LTA
alarms will occur at the central station and will also be communicated to the
bedside monitor for annunciation. Thus, in a central station workflow, LTA
analysis and alarming will only be as reliable as the network.
WARNING A paired system CPU (high-availability pair) is strongly recommended
to provide system redundancy.
WARNING The electronic medical record system (EMR) is not intended to serve
as a primary monitoring system for alarms or as an exclusive source for patient
data in determining patient care. The Acuity System is capable of transferring
historical patient data to most customer-specified EMR systems through the
Welch Allyn Connectivity Server (WACS). However, the transferred patient data is
not a substitute for the patient data collected by the primary monitoring system.
Related to close physical surveillance and specific patient populations
WARNING It is important that clinicians understand and communicate to all
staff using the Acuity Central Station that any arrhythmia analysis software
program is an effective tool to assist in patient care, but arrhythmia analysis
packages are unable to achieve 100 percent accuracy for all morphologies and
occurrences of QRS and PVC detection. Thus, close physical surveillance and
clinical interpretation of cardiac data must still be an integral part of every
patient’s care. Clinicians must review all data obtained from the Acuity System
before implementing therapy based on the data.
WARNING Ensure that Acuity System patients are kept under close
surveillance, especially patients prone to arrhythmia events. Use the Acuity
System only in conjunction with close surveillance by trained clinicians.
Page 9

Directions for use Chapter 1 General information 5
WARNING Do not use the Arrhythmia Analysis or ST Analysis feature on
neonates. The Arrhythmia Analysis and ST Analysis options are not intended for
use with neonatal patients.
WARNING Keep all pacemaker patients under close observation. Rate meters
might continue to count the pacemaker rate during occurrences of cardiac arrest
or some arrhythmias. Do not rely solely upon rate meter alarms.
WARNING Central station alarms and other events can go unnoticed if clinical
personnel are not present at the central station or if interruptions occur in power
or system operations.
WARNING The leading cause of patient death or serious injury reported with the
use of patient monitoring equipment is failure to respond to alarms notifying the
user of an adverse change in patient condition. If you are relying on visual alarm
notifications, maintain a clear line of sight and remain within 4 meters of the
central station. If you are relying on audio alarm notifications, make sure that you
can hear audio alarms from where you are. Set the volume as needed considering
the environment and ambient noise levels. Verify that the alarm is audible to a
clinician working at the maximum distance from the central station.
Related to monitoring interruption
WARNING If you view an Acuity System display remotely and its primary Acuity
System fails, you lose all access to the remote display. Monitoring a patient at an
Auto-Open Secondary (AOS) or Patient List Review (PLR) remote station is not a
substitute for monitoring a patient at the primary Acuity Central Station.
WARNING Use wireless monitors only on patients who can tolerate
intermittent monitoring interruptions. All wireless systems are prone to
intermittent signal dropout. During signal dropout periods, arrhythmia and STsegment analyses cannot be performed, and the Acuity System does not show
alarms or alerts.
WARNING If an Acuity Central Station display is intentionally or inadvertently
muted, alarm and alert tones do not occur at the display. If your central station
display includes audible tones, remain aware of whether they are occurring. If
they appear to have stopped, ensure that tones are restored.
WARNING If normal central processing unit (CPU) operation is interrupted, for
example, during CPU maintenance, scheduled and unscheduled reboots, power
loss or a high-availability (HA) CPU switchover period, central station monitoring
and analysis temporarily stop.
The Acuity System cannot collect patient review data during the interruption
period. That data becomes permanently unavailable.
Auto-reboots and HA CPU switchovers occur infrequently, but poor
environmental conditions and failure to perform preventative maintenance can
increase frequency of occurrence.
Page 10

6 Chapter 1 General information Welch Allyn Acuity Central Monitoring System
WARNING Whenever an interruption in Acuity System CPU operation occurs,
please contact Welch Allyn Technical Service soon to ensure that your entire
system has returned to normal operating condition and that it does not require
further service.
WARNING Auto-reboots can occur during internal software checks, and wireless
connection can be occasionally disrupted. During this period, the bedside
monitors continue to provide their primary alarming functions.
Cautions
Caution U. S. Federal law restricts this device to sale by or on the order of a
physician.
Caution Make sure that your barcode scanner is properly configured by Welch
Allyn before use.
Page 11

Directions for use Chapter 1 General information 7
Acuity System compliance with safety standards
The CE Mark and Notified Body Registration Number signify that the product meets all essential
requirements of European Medical Device Directive 93/42/EEC.
Table 1. Acuity System compliance with safety standards
Acuity System component(s) Product category Organization and
Propaq Encore, Propaq CS, Propaq LT, Welch Allyn
1500 Patient Monitor and Micropaq monitors
Wireless Micropaq, Propaq LT and Propaq CS
monitors
All components operating together as a system Electromagnetic compatibility for
All components operating together as a system Medical Systems IEC 60601-1-1:2000
All information systems components Information Technology Equipment EN 60950:1994
Acuity System cordless receiver cabinet Electromagnetic compatibility FCC Class A
a. When the equipment is operated in a commercial environment, Class A limits provide reasonable protection against
harmful interference. The equipment generates, uses and can radiate radio frequency energy; if it is not used in
accordance with this reference guide, orif it is modified from original installation, itmight cause harmful interference
to radio communications. Operation of this equipment in a residential area is likely to cause harmful interference, in
which case the user is required to correct the interference at his own expense.
Medical Equipment EN 60601-1:1990
Medical Equipment
standard
A1:1992, A2:1995
IEEE 802.11, Wireless
LAN Medium Access
Control (MAC) and
Physical Layer (PHY)
Specifications
IEEE 802.11a, 802.11e,
802.11h, 802.1X, 5 GHz
IEC 60601-1-2:2007
a
Page 12

8 Chapter 1 General information Welch Allyn Acuity Central Monitoring System
Related documents
Acuity and Mobile Acuity LT Central Monitoring Systems
Directions for use
Acuity and Mobile Acuity LT Central Monitoring Systems directions for use and
in-service guide CD-ROM (multilanguage)
Acuity and Mobile Acuity LT Central Monitoring Systems directions for use
Acuity Central Monitoring System in-service guide (English)
Mobile Acuity LT installation guide (printed)
Mobile Acuity LT System installation guide (En, Fr, Ger, Sp, It, Pol)
Quick card
Acuity System Icons (English, printed)
Welch Allyn Connectivity Server (WACS)
Welch Allyn Connectivity Server (WACS) CD-ROM (English):
Welch Allyn Connectivity Server directions for use
Welch Allyn Connectivity Server programmer’s guide
AcuityLink-Clinician Notifier directions for use
AcuityLink-Clinician Notifier Software
AcuityLink-Clinician Notifier software installation instructions (English)
Welch Allyn patient monitors
Micropaq Monitor directions for use CD-ROM (multilanguage)
Propaq LT Monitor directions for use CD-ROM (multilanguage)
Propaq CS Monitor directions for use CD-ROM (multilanguage)
Propaq Encore Monitor directions for use CD-ROM (multilanguage)
Welch Allyn 1500 Patient Monitor directions for use CD-ROM (multilanguage)
Page 13

9
2
Acuity System overview
System configurations
Acuity Central Monitoring System
Mobile Acuity LT System
The Acuity System consists of an Acuity Central Station that receives, displays and
analyzes information from various wireless and hardwired monitoring devices. Mobile
Acuity LT Central Stations are laptop computers.
Some Acuity Systems can send patient data to Internet browsers and hospital information
systems (HISs) via the optional Welch Allyn Connectivity Server (WACS). The systems can
receive patient information also from HISs.
The FlexNet®concept allows several Acuity Systems to centrally monitor groups of
patients resident on local Acuity Systems within a hospital and on networked Acuity
Systems in smaller clinics or hospitals. Transfers can occur from system to system and
remote viewing of real-time and historical Full Disclosure data is available for consultation
from any of the Acuity Systems.
Page 14

10 Chapter 2 Acuity System overview Welch Allyn Acuity Central Monitoring System
Diagram of the System
A
K
L
A. Hallway message panel Optional panels, located throughout a unit, visually indicate alarms and some alerts.
B. Welch Allyn 1500 Patient
Monitor
J
G
H
I
Hardwired, full-featured monitors with 12-lead ECG analysis and large displays
B
C
D
E
F
C. Propaq Encore monitor Hardwired, portable, full-featured vital-sign monitors
D. Propaq CS monitor Wireless or hardwired full-featured vital-sign monitors with large displays
E. Micropaq monitor Small, wireless monitors that measure ECG and SpO
ambulatory patients
F. Propaq LT monitor Small, wireless monitors that measure ECG/Resp, SpO
capable of displaying large numerics.
G. Wireless access point Connects wireless monitors and the Acuity Central Station.
H. Acuity Central Station Monitors all connected patients, stores patient information, and displays alarms and
I. Laser printer Optional laser printers give you printouts of various types of patient information.
J. Welch Allyn Connectivity
Server (WACS)
K. Hospital network Carries information to the Acuity System and carries patient data to the hospital
L. Mobile device running
Clinician Notifier software
Note
Some patient monitors that can communicate within the Acuity System might not
alerts.
An option to the Acuity System. WACS is a server platform on which software options
are installed.
information system (HIS/CIS).
AcuityLink is a WACS option that delivers Acuity System patient information to mobile
devices running Clinician Notifier software.
. These monitors are useful for
2
and NIBP. These monitors are
2
be represented in this diagram.
Page 15

Directions for use Chapter 2 Acuity System overview 11
Networked Acuity System features
Networked Acuity Systems include various features. This section presents these network
features:
• Remote Patient List Review (PLR) station
• Paired system CPUs (high-availability pairs)
Remote Patient List Review (PLR) station
Networked Acuity System with a remote Patient List Review (PLR) station
Some networked Acuity Systems include one or more remote Patient List Review
stations. Clinicians can do these things at a PLR station:
• Open Waveform Windows.
• Open a Virtual Monitor.
• View realtime vital signs in all relevant windows.
• Open review windows.
• Print records and specify auto-printing for a patient.
WARNING If you view an Acuity System display remotely and its primary Acuity
System fails, you lose all access to the remote display. Monitoring a patient at an
Auto-Open Secondary (AOS) or Patient List Review (PLR) remote station is not a
substitute for monitoring a patient at the primary Acuity Central Station.
Page 16

12 Chapter 2 Acuity System overview Welch Allyn Acuity Central Monitoring System
To open a Waveform Window on a PLR station screen
PLR stations are typically part of an extended Acuity System network.
To open a patient’s Waveform Window from a PLR station, first locate the patient via the
Patient List, and then open the patient’s Waveform Window.
1. In the lower left corner of the Acuity Central Station screen, click .
The Patient List window appears.
2. Scroll the patient list.
• If the patient is listed, proceed to Step 4.
• If the patient is not listed, click Other Patients to view networked Acuity System
units.
The Other Patients Lists window appears.
3. List patients by one of these criteria:
• Click Unit, and then select the unit name from the list in the box on the right.
• Click Last Name or First Name, and then click the first letter of the name.
4. Click a column heading to sort the list by name, location or ID.
Actively monitored patients are listed at the top.
5. Locate the patient name in the list, and then click the name.
6. Click .
The patient’s Waveform Window appears on the PLR station screen.
To close a Waveform Window on a PLR station screen
1. Drag the corresponding map icon to .
The Waveform Window and map icon close.
Page 17

Directions for use Chapter 2 Acuity System overview 13
Flexible patient access (FPA) using virtual network computing (VNC)
Note
The FPA using VNC configuration is a licensable feature. To order this feature,
contact your Welch Allyn sales representative (see page ii).
The flexible patient access option allows you to connect to a Patient List Remote using a
VNC connection. Each purchased VNC license allows one VNC client to view real-time and
full-disclosure data on monitored patients.
The Acuity Central Station supports two editions of the VNC server, however these two
editions cannot be mixed on a single Patient List Remote. The VNC Free Edition Server is
pre-installed as a part of the Acuity System, however a license must be purchased in order
to use FPA. The VNC Enterprise Edition Server offers features not included in the free
edition, and can be purchased for an additional fee.
There are three screen resolutions available for the VNC connection.
Resolution View type Standard port number
1280 x 1024 Standard resolution 5
1680 x 1050 Widescreen resolution 6
1024 x 704 Single patient view 7
To log on to flexible patient access using VNC
1. Ensure that you have installed a version of the VNC client application.
2. Launch your VNC client application.
The VNC connection screen appears.
3. Enter the IP address or host name, a colon, and the port number of the VNC server
and press OK. Do not add spaces between your entries.
Note
It is recommended that your biomedical engineer work with your facility’s IT
department and add the host name of your VNC port forwarder to the domain
name server (DNS), so that changes to the port forwarder IP address do not affect
VNC users. It is also recommended that you use “acuity” as the host name of the
port forwarder.
Page 18

14 Chapter 2 Acuity System overview Welch Allyn Acuity Central Monitoring System
4. Enter your VNC client password.
If you are using the VNC Enterprise Edition Server, enter your user name and
password.
5. Press OK.
The Remote Patient List Review window appears. For more information see “Remote
Patient List Review (PLR) station” on page 11.
Note
FPA connections are not shared between individual client connections. The Acuity
Central Station allows only one client to connect to each display session. When
you disconnect from a remote viewing session, the windows and views are not
reset. It is recommended that you close all patient windows on the viewing client
before disconnecting.
Page 19

Directions for use Chapter 2 Acuity System overview 15
Paired system CPUs (High-availability pairs) and switchovers
Acuity Systems that typically support at least 29 patients include a high availability (HA)
central processing unit (CPU). The HA CPU is a redundant Acuity System CPU.
An HA CPU assumes control if the Acuity System CPU’s operation is interrupted. An HA
CPU “switchover” occurs to ensure minimal loss of Acuity Central Station monitoring
capability. Historical data that had been gathered by the non-operational CPU before the
switchover might not be available for some patients until that CPU becomes operational.
At any one time, displays in a paired CPU system should all receive input from either the
Acuity System CPU or the HA CPU.
To ensure that all displays in a paired CPU system receive input from the same CPU
Yellow indicator: input received from the Acuity System HA CPU.
No yellow indicator: input received from the Acuity System CPU.
Acuity System CPU
Acuity System HA CPU
During normal operating conditions
1. Ensure that none of the displays shows a yellow indicator in the top right corner.
If none shows a yellow indicator, the system is receiving input properly. If any display
shows a yellow indicator, proceed to the next step.
2. On any display with a yellow indicator, press the video input button, generally located
on the front of the display.
All displays now receive input from the Acuity System CPU, and alarms and alerts
appear on all of them. No displays show a yellow indicator.
During interruption of Acuity System CPU operation
1. Ensure that all displays show a yellow indicator in their top right corners.
If any display does not show a yellow indicator, proceed to the next step.
2. On any display without a yellow indicator, press the video input button, generally
located on the front of the display.
All displays now receive input from the Acuity System HA CPU, and they all show a
yellow indicator. If one or more of the displays is blank, or if all Virtual Monitors do not
reappear with their original border colors in approximately five minutes, see Table 10
on page 151.
WARNING Whenever an interruption in Acuity System CPU operation occurs,
please contact Welch Allyn Technical Service soon to ensure that your entire
system has returned to normal operating condition and that it does not require
further service.
Page 20

16 Chapter 2 Acuity System overview Welch Allyn Acuity Central Monitoring System
Central station screen
Note
Depending upon the default screen color scheme of your Acuity Central Station
(black-on-white or color-on-black), your screen colors may not match those shown
in this manual.
Depending upon the selected screen view, the Acuity Central Station screen can include
these areas:
• Map area
• Virtual Monitor
• Utility space
• Waveform Windows area
E. Virtual Monitor F. Screen view buttons
G. Message window
A. Utility space
B. Waveform Windows
D. System buttons C. Acuity System map
A. Utility space Displays a patient’s Setup windows, Review windows, Patient List
B. Waveform Windows Abbreviated Virtual Monitors.
C. Acuity System map Shows the location and status of patients, and it displays status icons for
D. System buttons Open the patient list, show patients who are connected to wireless
E. Virtual Monitor Displays the patient’s vital-signs information and status.
window, and Central Station Printer windows.
system equipment.
You open a patient’s Waveform Window or Virtual Monitor by clicking the
patient’s map icon once or twice.
monitors, open system administration windows, and sort the order of
Waveform Windows.
Page 21

Directions for use Chapter 2 Acuity System overview 17
F. Screen view buttons Change the overall Acuity System screen view. They vary in appearance
G. Message window Displays the date and time or the location of alarms and alerts. It matches
Note
Welch Allyn Acuity Systems communicate with some patient monitors that
include Masimo
®
Corporation SpO2measurement capabilities. If a monitor
according to your system configuration.
(optional) hallway message panel messages.
communicating with your Acuity System has such capabilities, the monitor’s
corresponding Acuity System Virtual Monitor, Waveform Window, some review
windows and some printouts include SpO2Perfusion Index (PI) and Signal IQ
TM
indicators and numerics.
For more information regarding Perfusion Index (PI) and Signal IQTM, please refer
to Masimo Corporation literature or http://www.masimo.com.
Page 22

18 Chapter 2 Acuity System overview Welch Allyn Acuity Central Monitoring System
System screen views
You can change the screen view of the Acuity Central Station display by clicking these
buttons along the top left of the Acuity Central Station screen. Your system includes some
or all of these choices.
If your system includes multiple screens, the additional screens show Waveform
Windows or Virtual Monitors.
Button Description
Expands the map to cover most of the Acuity Central Station screen. Map shows
room locations and status icons of all monitored patients. One Virtual Monitor and
review window cover part of the map.
Map View
The 4-waveforms view shows four Waveform Windows, two utility windows and
one Virtual Monitor. A utility window can cover the map.
4-Waveforms
View
8-Waveforms View
12-Waveforms View
Half Screen Review View
Full-Screen Review View
2-Utilities
View
If your system includes multiple screens, this view can show two utility windows
and one Virtual Monitor.
Shows eight Waveform Windows and one Virtual Monitor. A utility window can
cover the map.
Shows 12 Waveform Windows. A Virtual Monitor can cover the map and can be
replaced by a utility window.
The top half of this view shows a review window and the bottom right quarter of
the screen shows four Waveform Windows. The map in the bottom left quarter
might be covered by a Virtual Monitor or utility window.
If your system includes multiple screens, a Virtual Monitor replaces the Waveform
Windows.
Shows one review window for one patient.
Shows three Virtual Monitors and one utility window that can cover the map;
shows no Waveform Windows.
All Monitors View
Page 23

Directions for use Chapter 2 Acuity System overview 19
System buttons
The system buttons in the lower left corner of the Acuity Central Station screen provide
quick access to frequently used system-wide functions.
The Patient List button opens the Patient List window, which enables you to preadmit, readmit, transfer,
and discharge patients in your Acuity System. You can also view and print stored waveforms and trends
of patients who have not been monitored by the Acuity System for (up to) 96 hours.
If your Acuity System is connected within a network of Acuity Systems, depending upon the type of
network, you can perform the above functions for networked patients. You can also locate networked
patients, edit their patient information, change their alarm limits and suspend their alarms and alerts.
A Patient List button is displayed also in review windows that have been opened by way of the Patient
List window.
When you click and hold the View Wireless button, the map icons of all patients that are connected to
wireless monitors change to Wireless icons; other patient icons become gray boxes. The map returns to
normal when you release the button on your mouse or trackball.
The System Administration button opens a window that allows designated system administrators to
create new user identifications and to adjust system time.
The Sort Windows button sorts all Waveform Windows and any open Virtual Monitor windows by room
number, in alphanumeric order. The sorting only applies to the current screen view.
• Waveform Windows for monitors without confirmed patient IDs are located at the end.
• For networked Acuity Systems with more than one Acuity System unit, rooms are grouped together
according to Acuity System unit.
• The order in which windows are displayed depends on how your system has been configured.
Generally, windows are displayed from top to bottom and left to right.
If the Sort Windows button is grayed-out, your system is not configured to sort windows. In this
case, each Waveform Window space is assigned to a particular room, and unassigned wireless
monitors occupy unoccupied Waveform Window spaces. Wireless monitors are “bumped out” to
different unoccupied spaces if their spaces become occupied by hardwired monitors.
Page 24

20 Chapter 2 Acuity System overview Welch Allyn Acuity Central Monitoring System
Central station map and status icons
Your system includes a map that is similar to one of these examples. An Acuity Central
Station map shows status icons for these things:
• System components
• Each patient monitor (and associated patient) that is communicating with the Acuity
System
For a complete description of all Acuity status icons, see “Status icons” on page 137.
Wireless Monitor:
F. Room assigned
G. No room assigned
A. Networked Acuity Systems
B. No ID assigned
C. Acuity Central Station
D. Patient/monitor status icon
E. Inactive Acuity System location
C. Acuity Central Station
A. Networked Acuity Systems These status icons represent networked Acuity Systems, and they indicate the state
of communications with the networked systems.
B. No ID assigned No patient ID number has been assigned to the patient connected to this monitor.
C. Acuity Central Station Icon indicates the Acuity Central Station status. Click to open the Acuity Central
Station Printers window.
Page 25

Directions for use Chapter 2 Acuity System overview 21
D. Patient/monitor status icon Icons appear at locations with active monitors. Click a map icon once to open the
E. Inactive Acuity System location No hardwired monitor is connected to this Acuity System port, or no wireless
Wireless Monitor:
F. Room assigned
G. No room assigned
patient’s Waveform Window or twice to open the Virtual Monitor. For details about
all map icons, see “Patient/monitor status icons” on page 138.
monitor has been assigned to this location.
A room number has been assigned to this patient connected to a wireless monitor.
No room number has been assigned to this patient connected to a wireless monitor.
The number is the device ID number, and it is replaced by the room number after the
room number is assigned.
Page 26

22 Chapter 2 Acuity System overview Welch Allyn Acuity Central Monitoring System
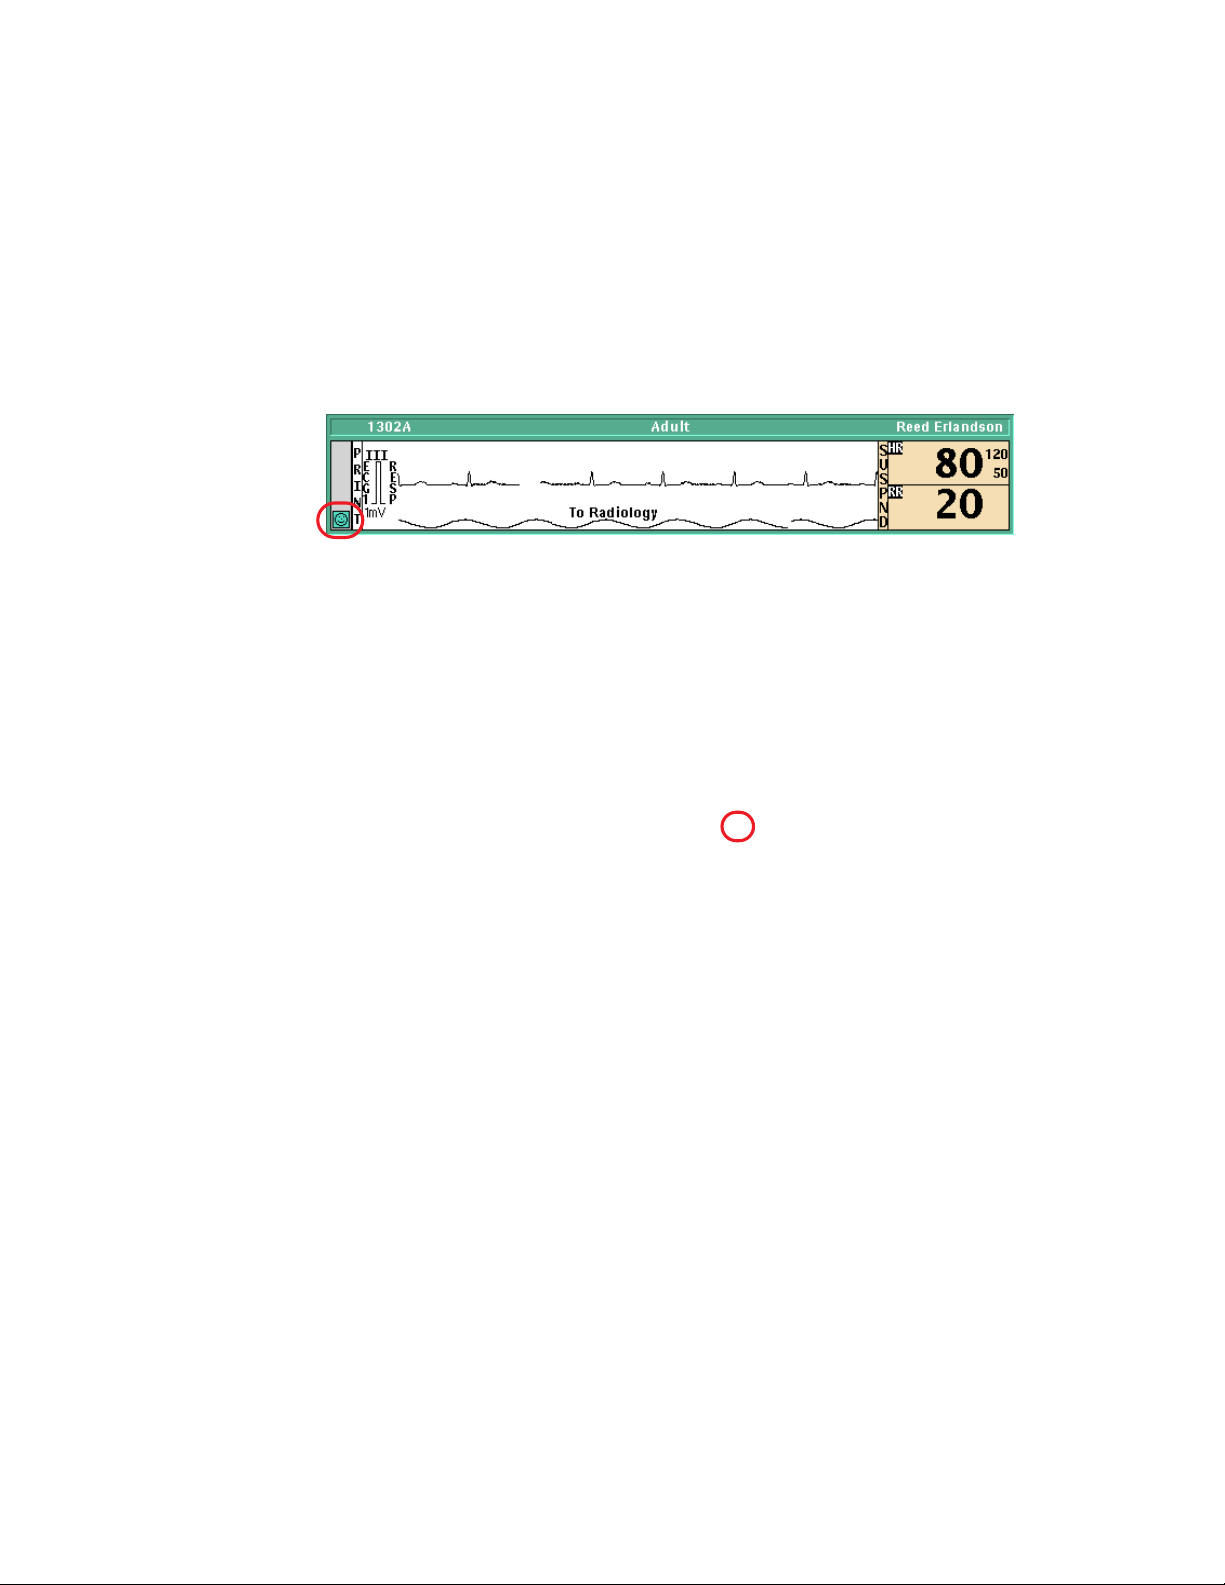
Waveform Window
A Waveform Window is an abbreviated Virtual Monitor.
E. ECG lead F. Note G. Patient mode/alarm and alert messages
A. Alarm
limits
D. Patient/monitor status
icon
A. Alarm limits Alarm limit settings
B. Vital-sign values Vital signs in alarm are shown by numbers in a red field.
C. Snapshot printing area Click in the waveform area to print a snapshot print at the central printer.
D. Patient/monitor status icon Click the Patient/ Equipment status icon to open the Virtual Monitor. For
E. ECG lead The adjacent waveform is derived from this ECG lead.
F. Note From the Patient ID Setup window, you can type a temporary note to
G. Patient mode/alarm and alert messages Alarm and alert messages replace the patient mode indicator.
C. Snapshot printing area
Click in this area to suspend or resume an audible alarm tone. An NIBP
numeric reduces in size after 16 minutes.
details about all status icons, see “Status icons” on page 137.
appear here. For details, see “Add or remove a note in a patient’s
Waveform Window” on page 81.
Color indicates status: red, alarm; yellow, alert; green, patient vital signs
within limits and normal equipment operation; and blue, intentional
disconnection.
B. Vital-sign values
To open a patient’s Waveform Window
A patient’s map icon
• On the Acuity Central Station screen map, click the patient’s map icon.
Note
If you are viewing from a Patient List Review (PLR) station, see “To open a
Waveform Window on a PLR station screen” on page 12.
Page 27

Directions for use Chapter 2 Acuity System overview 23
Virtual Monitor
An Acuity System Virtual Monitor represents a patient monitor and the information
obtained from the monitor. The appearance and button sequences can differ from the
actual patient monitor.
Options or monitor functions that are not available are shown in faint gray type.
H. ECG lead
G. Waveforms
F. Patient/
monitor
status icon
A. CO2,IPI MCO2indicates mainstream CO2.SCO2indicates sidestream CO2. IPI indicates
Integrated Pulmonary Index and displays when the IPI feature is enabled on the
Welch Allyn 1500 Patient Monitor.
B. Bells Bells appear in larger numeric zones.
• Solid bell indicates that all of this vital sign’s alarm limits are set.
• Half-shaded bell indicates that some of this vital sign’s alarm limits are set.
• Bell missing from larger numeric zone indicates that none of this vital sign’s
alarm limits are set.
I. Color indicates status.
A.CO2,IPI
B. Bells
C. Numerics
D. Buttons
E. Patient
mode/
messages
C. Numerics Up to eight labeled numeric displays
D. Buttons Buttons are visible when the pointer is within the window. Options or monitor
E. Patient mode/messages Alarm and alert messages replace patient mode indicator.
F. Patient/monitor status icon Patient/monitor status icon. For details about all status icons, see “Status icons”
G. Waveforms Up to three waveform display areas
functions that are not available or active are shown in faint gray type.
• Setup: Opens setup windows for Patient ID, Alarms, Printouts, Waveform
Window, Arrhythmia Alarms, and ST Analysis.
• Review: Opens review windows for Graphical Trends, Tabular Trends/Events,
Waveforms, Arrhythmia Events, and OxyCRG.
• Suspend: Suspends an audible alarm tone for 90 seconds.
• Snapshot: Prints a snapshot at the Acuity Central Station printer.
on page 137.
For patient monitors that include Masimo SpO
indicator beneath SpO
Corporation literature.
wave is Signal IQTM. For more information, refer to Masimo
2
measurement capabilities,
2
Page 28
24 Chapter 2 Acuity System overview Welch Allyn Acuity Central Monitoring System
H. ECG lead The adjacent waveform is derived from this ECG lead. If you want to review
I. Color indicates status. Red, patient alarm; Yellow, equipment or patient alert; Green, patient vital signs
waveforms from all leads, click Review, Waveforms to open the Waveforms
Review window.
within limits and normal equipment operation; Blue, intentional disconnection
To open a patient’s Virtual Monitor
Take one of these steps at the Acuity Central Station screen:
• Click the status icon in the patient’s Waveform Window.
• Click the patient’s map icon.
Page 29

25
3
Admit and begin monitoring
Preadmit a patient to Acuity System monitoring
If you know a patient’s ID number before the patient is admitted, you can save time that
would be spent later by preadmitting the patient at the Acuity Central Station.
When a preadmitted patient arrives:
• If the patient is connected to a wireless monitor, at the patient monitor you can
simply confirm the patient ID and add a room number.
• If the patient is connected to a hardwired monitor, you can go to the Acuity Central
Station and confirm the patient by entering only the ID number.
If a patient is already monitored by a networked Acuity System, a duplicate entry is not
allowed, because patient information could be lost.
To preadmit a patient to Acuity System monitoring
1. In the lower left corner of the Acuity Central Station screen, click .
The Patient List window appears.
2. Click Admit.
The Admit Patient window appears
3. Specify a location.
• If you know the patient’s room number, click the number.
• If you do not know the patient’s room number, click UNASSIGNED.
You can enter the room number later via the Patient List or the Virtual Monitor.
4. Type or scan other patient information.
5. Carefully review your entries for accuracy.
6. Click Confirm.
The information is stored.
Page 30

26 Chapter 3 Admit and begin monitoring Welch Allyn Acuity Central Monitoring System
To assign a room number for a preadmitted patient, via the Patient List
1. In the lower left corner of the Acuity Central Station screen, click .
The Patient List window appears.
2. Select the patient’s name.
3. Click Transfer.
The Transfer Patient window appears.
4. Click a unit name in the list.
5. Click a room.
6. Click Confirm.
The information is stored.
Page 31

Directions for use Chapter 3 Admit and begin monitoring 27
Readmit a discharged patient
You can readmit a patient to the Acuity System if the patient’s name still remains in the
Patient List.
If a patient has been discharged from the Acuity System, but the system still holds the
patient’s data, the patient remains in the list. The Acuity System stores patient data for 24
to 96 hours after monitoring stops.
To readmit a discharged patient
1. In the lower left corner of the Acuity Central Station screen, click .
The Patient List window appears.
2. Select the patient’s name.
If the patient’s name does not appear in the patient list, see “Preadmit a patient to
Acuity System monitoring” on page 25 to admit the patient.
3. Click Readmit.
The location becomes UNASSIGNED. If you do not know the patient’s room number,
you can enter it later via the Patient List or Virtual Monitor.
4. If you know the patient’s room number, take these steps:
a. Click Transfer.
The Transfer Patient window opens.
b. Click a unit name in the list.
c. Click a room.
5. Click Confirm.
The information is stored.
Page 32

28 Chapter 3 Admit and begin monitoring Welch Allyn Acuity Central Monitoring System
Begin patient monitor communication with the system
For information about patient monitors that are part of your Acuity System but are not
shown in this chapter, consult the patient monitor manufacturer’s literature.
Connect a hardwired monitor to the system
To connect the monitor to the system
1. Connect the Acuity System network cable.
a. Connect the cable to the Acuity System
network connector on the bedside monitor.
b. Connect the other end of the cable to the
bedside network connector.
For Propaq CS and Propaq Encore monitors,
connect the network cable to the bedside
connector labeled with this symbol: .
For a Welch Allyn 1500 Patient Monitor,
connect the network cable to the bedside connector labeled with this symbol:
.
The cable clicks into place when it is properly attached. Ensure that the cable is
neither damaged nor broken.
WARNING Ensure that you connect the proper monitor network cable to the
proper wall jack. Using the wrong network cable or the wrong wall jack
connector could damage the monitor, or not send data to the Acuity System.
Ensure that the monitor is properly connected to the network before you start
monitoring the patient.
2. If the monitor is on, take one of these steps:
Propaq CS monitor
Welch Allyn 1500
Patient Monitor
Propaq Encore
monitor
• If it was not monitoring this patient, turn it off and on again to clear prior trends
and alarm limits.
• If it was monitoring this patient and you want to save this patient’s trends and
alarm limits, keep it turned on.
3. If the monitor is off, turn on the monitor.
Caution Make sure you acknowledge the “Confirm Patient?” prompt on your
monitor before switching the monitor from a wireless connection to a hardwired
connection (or vice versa). Failure to confirm the patient can result in a licensing
error.
To connect the patient to the monitor
1. Attach the lead wires to the electrodes.
2. Apply the electrodes to the patient.
Page 33

Directions for use Chapter 3 Admit and begin monitoring 29
3. Attach the cables to the monitor last, to optimize waveform interpretation during the
initial Acuity System learning phase.
To respond to the CONFIRM PATIENT? prompt
1. If you see the CONFIRM PATIENT? prompt, respond as follows:
WARNING Carefully verify the patient’s ID and name before you respond to the
CONFIRM PATIENT? prompt. If you assign another patient’s ID number, the
Acuity System could combine patients’ Full Disclosure review information.
• If the indicated patient is the correct patient, press YES.
The patient is confirmed at the Acuity Central Station.
The Acuity System sends unit default alarm limits and unit settings to the patient
monitor.
• If the indicated patient is incorrect, press NO.
The MONITOR SETTINGS? prompt appears.
2. If you see the MONITOR SETTINGS? prompt, click one of these buttons:
.
NEITHERPRESETS BOTHCLR TREND
• Clears current trend
values.
• Keeps current alarm
limits and displays.
• Keeps current trend
values.
• Uses Acuity System
Presets-- default alarm
limits and displays.
• Clears current trend
values.
• Uses Acuity System
Presets-- default alarm
limits and displays.
• Keeps current trend
values.
• Keeps current alarm
limits and displays.
Page 34

30 Chapter 3 Admit and begin monitoring Welch Allyn Acuity Central Monitoring System
At the central station, the patient map icon remains in the yellow ID or RM
unconfirmed state until the ID and room are confirmed.
To enter patient information
1. Verify that the patient mode matches the monitored patient’s age (Adult, Pediatric or
Neonate).
• For a Propaq CS monitor: If the mode shown at the top of the screen is incorrect,
touch SETUP, MORE, CHANGE, and then touch the appropriate mode.
• For a Propaq Encore monitor: Press SETUP, MORE, and check the patient mode.
If the mode is incorrect, press NEXT to highlight the mode, and then press
CHANGE until the correct mode is shown.
• For a Welch Allyn 1500 Patient Monitor: If the mode shown in the Information
field is incorrect, press the Menu key, use the trim knob to scroll to Patient
Mode, press the trim knob to enter the menu, and select the appropriate mode.
2. If the patient is not confirmed, write down the patient’s name, ID and room number,
and ensure that the information is delivered to the Acuity Central Station for patient
confirmation.
At the central station, the patient map icon remains in the yellow ID or RM
unconfirmed state until the ID and room are confirmed.
3. (Optional) Customize alarm limits using patient monitor keys or the Alarms Setup
window at the Acuity Central Station. See “Adjust a patient’s alarm limits” on
page 46.
WARNING When a patient is connected to a monitor, ensure that the default
alarm limits are appropriate for the patient. The system uses Acuity System
Presets values for Arrhythmia Analysis and ST Analysis limits and monitor default
values for all other limits (if the monitor can save default values).
Before you set customized alarm limits for a patient, confirm the patient’s ID and
room number. Otherwise, customized limits might be lost.
Page 35

Directions for use Chapter 3 Admit and begin monitoring 31
Start communication between a wireless monitor and the system
For information about patient monitors that are part of your Acuity System but are not
shown in this chapter, consult the patient monitor manufacturer’s literature.
Note
Micropaq monitor
To start Micropaq monitor communication with the Acuity System and connect the
patient to the monitor
Perform steps in the following order to ensure that both the monitor and the Acuity
Central Station display the default ECG leads.
1. Use a Micropaq monitor that is designated for use within the Acuity System network
If a wireless patient monitor operates outside of its wireless communication
area, the monitor aggressively searches for connection with the central station
and depletes its battery life at a faster rate. If it searches for an extended period
of time (typically more than four hours), it can display a system fault error that
necessitates turning the monitor off and on again.
WARNING Do not attempt to monitor neonatal patients’ ECGs using a
Micropaq monitor. Micropaq monitors are intended for use with adult and
pediatric patients only.
in which the patient will be monitored.
2. Install a newly charged battery in the battery compartment at the back of the
Micropaq monitor, using a bottom-to-top approach.
3. Immediately determine the patient mode, which appears briefly on the first Micropaq
monitor screen.
If the patient mode does not match the patient age, change the mode at the Acuity
Central Station. See “Change the Patient Mode” in Table 2 on page 43.
4. Attach the lead wires to the electrodes.
5. Apply the electrodes to the patient.
6. Attach the cables to the monitor last, to optimize waveform interpretation during the
initial Acuity System learning phase.
Page 36

32 Chapter 3 Admit and begin monitoring Welch Allyn Acuity Central Monitoring System
To enter patient information
1. If prompted, press to highlight the unit in which the patient will be monitored,
and then press to select it.
If the keys are locked, simultaneously hold down and to release the menus.
2. Scroll the patient list, and take one of these steps:
• If you see the patient’s ID/name, select it, and then select the patient’s room
number. The patient is confirmed at the Acuity Central Station.
If you do not know the patient’s room number, choose Select room at Central.
• If you do not see the patient’s ID/name, choose Select patient at Central.
3. If you did not enter a patient ID/name and room number, take these steps:
a. Write down the patient name, ID, room number and the four-digit serial number
that is in the upper right corner of the Micropaq monitor screen.
b. Ensure that the information is delivered to the Acuity Central Station for patient
confirmation.
At the central station, the patient map icon remains in the yellow ID or RM
unconfirmed state until the ID and room are confirmed.
4. (Optional) Customize alarm limits using patient monitor keys or the Alarms Setup
window at the Acuity Central Station. See “Adjust a patient’s alarm limits” on
page 46.
WARNING When a patient is connected to a monitor, ensure that the default
alarm limits are appropriate for the patient. The system uses Acuity System
Presets values for Arrhythmia Analysis and ST Analysis limits and monitor default
values for all other limits (if the monitor can save default values).
Before you set customized alarm limits for a patient, confirm the patient’s ID and
room number. Otherwise, customized limits might be lost.
Page 37

Directions for use Chapter 3 Admit and begin monitoring 33
Propaq LT monitor
To start Propaq LT monitor communication with the Acuity System and connect the
patient to the monitor
1. Use a Propaq LT monitor that is designated for use within the Acuity System network
in which the patient will be monitored.
2. Turn on the monitor.
3. In the top right area of the Propaq LT monitor screen, verify that the battery icon is
green, which indicates that the battery is fully charged.
If it is not green, monitor the patient with another (fully charged) monitor.
4. Attach the lead wires to the electrodes.
5. Apply the electrodes to the patient.
6. Attach the cables to the monitor last, to optimize waveform interpretation during the
initial Acuity System learning phase.
7. Look for a steady green light at the top of the monitor to confirm that the monitor is
communicating with the Acuity System.
If the monitor is not communicating with the Acuity System, use another monitor.
Page 38

34 Chapter 3 Admit and begin monitoring Welch Allyn Acuity Central Monitoring System
To enter patient information
1. Specify whether existing patient data will be saved.
• If the patient matches the name on the Propaq LT monitor screen, press an arrow
key to highlight Continue Patient, and then press to select it. The patient’s
data is saved and a unit list appears.
• If the patient does not match the name on the Propaq LT monitor screen, press
an arrow key to highlight Start New Patient, and then press to select it.
Patient data is cleared and a unit list appears.
If the keypad, display or backlight is locked, simultaneously press , and .
2. Select the unit in which your patient will be monitored.
A patient list appears.
3. Scroll the patient list, and take one of these steps:
• If you see the patient’s ID/name, take these steps:
a. Select the ID/name.
A room list appears.
b. Select the patient’s room.
The patient is confirmed at the Acuity Central Station.
• If you do not see the patient’s ID/name, take these steps:
a. Write down the patient’s name, ID, room number and the last four-digits of the
serial number that is on the back of the Propaq LT monitor.
b. Ensure that the information is delivered to the Acuity Central Station for patient
confirmation.
At the central station, the patient map icon remains in the yellow ID or RM
unconfirmed state until the ID and room are confirmed.
4. Along the top of the Propaq LT monitor screen, verify that the patient mode matches
the monitored patient’s age (Adult, Pediatric or Neonate).
If it does not match, take these steps:
a. Select the current patient mode.
b. Select the appropriate patient mode, and then follow the prompts.
5. (Optional) Customize alarm limits using patient monitor keys or the Alarms Setup
window at the Acuity Central Station. See “Adjust a patient’s alarm limits” on
page 46.
WARNING When a patient is connected to a monitor, ensure that the default
alarm limits are appropriate for the patient. The system uses Acuity System
Presets values for Arrhythmia Analysis and ST Analysis limits and monitor default
values for all other limits (if the monitor can save default values).
Before you set customized alarm limits for a patient, confirm the patient’s ID and
room number. Otherwise, customized limits might be lost.
Page 39

Directions for use Chapter 3 Admit and begin monitoring 35
Wireless Propaq CS monitor
To start wireless Propaq CS monitor communication with the system
1. Use a Propaq CS monitor that is designated for use within the Acuity System network
in which the patient will be monitored.
2. Verify that the Acuity System network cable is not plugged into the Acuity System
network connector on the monitor.
3. If the monitor is on, take one of these steps:
• If it was not monitoring this patient, turn it off and on again to clear prior trends
and alarm limits.
• If it was monitoring this patient and you want to save this patient’s trends and
alarm limits, keep it turned on.
4. If the monitor is off, turn on the monitor.
5. If you see a low battery indicator on the top of the Propaq CS monitor screen, connect
the monitor to AC power to charge it, or use another monitor.
6. Verify that ON NETWORK flashes in the upper left corner of the Propaq CS monitor
screen.
This could take a few minutes. If ON NETWORK does not appear, use another
monitor and contact qualified service personnel.
To connect the patient
1. Attach the lead wires to the electrodes.
2. Apply the electrodes to the patient.
3. Attach the cables to the monitor last, to optimize waveform interpretation during the
initial Acuity System learning phase.
Page 40

36 Chapter 3 Admit and begin monitoring Welch Allyn Acuity Central Monitoring System
To enter patient information
1. If you see the CONFIRM PATIENT? prompt, follow the prompts.
For instructions, see “To respond to the CONFIRM PATIENT? prompt” on page 29
2. If the monitor displays a choice of units, scroll to highlight the unit in which the patient
will be monitored, and then touch Select.
A patient list appears.
3. Scroll the patient list, and take one of these steps:
• If you see the patient’s ID/name in the patient list, take these steps:
a. Highlight the patient, and then touch Select.
A room list appears.
b. If you know the patient’s room number, highlight the number, and then touch
Select. The patient is confirmed at the Acuity Central Station.
If you do not know the patient’s room number, highlight Select room at Central,
and then touch Select.
• If you do not see the patient’s ID/name in the patient list, highlight Select patient at
Central, and then touch Select.
4. Along the top of the Propaq CS monitor screen, verify that the patient mode matches
the patient’s age (Adult, Pediatric or Neonate).
If the patient mode does not match, touch SETUP, MORE, CHANGE, and then touch
the appropriate mode.
5. If you did not enter a patient ID/name and room number, take these steps:
a. Write down the patient’s name, ID, room number and the last four-digits of the
serial number that is under the handle of the Propaq CS monitor.
b. Ensure that the information is delivered to the Acuity Central Station for patient
confirmation.
At the central station, the patient map icon remains in the yellow ID or RM
unconfirmed state until the ID and room are confirmed.
6. (Optional) Customize alarm limits using patient monitor keys or the Alarms Setup
window at the Acuity Central Station. See “Adjust a patient’s alarm limits” on
page 46.
WARNING When a patient is connected to a monitor, ensure that the default
alarm limits are appropriate for the patient. The system uses Acuity System
Presets values for Arrhythmia Analysis and ST Analysis limits and monitor default
values for all other limits (if the monitor can save default values).
Before you set customized alarm limits for a patient, confirm the patient’s ID and
room number. Otherwise, customized limits might be lost.
Page 41

Directions for use Chapter 3 Admit and begin monitoring 37
Important considerations: connecting a monitor to the Acuity System
Related to specific patient populations
WARNING Always check patient mode in the border of the Waveform Window
or Virtual Monitor. Incorrect patient mode can result in unsuitable alarm settings,
inaccurate heart rate readings and inappropriate arrhythmia and ST-segment
analyses.
Related to wireless monitoring
WARNING Use wireless monitors only on patients who can tolerate
intermittent monitoring interruptions. All wireless systems are prone to
intermittent signal dropout. During signal dropout periods, arrhythmia and STsegment analyses cannot be performed, and the Acuity System does not show
alarms or alerts.
WARNING Check for a light above the monitor screen or a wireless icon ( ) on
the screen to ensure that communication is established between the monitor and
the Acuity System. means communication is not established. If you cannot
establish communication, use another monitor, and contact qualified service
personnel.
WARNING Auto-reboots occur and wireless connection is occasionally
disrupted. During this period, the bedside monitors continue to provide their
primary alarming functions. Auto-reboots occur infrequently, due to poor
environmental conditions. Failure to perform preventative maintenance can
increase the frequency of occurrence.
Related to hardwired monitoring
WARNING Ensure that you connect the proper monitor network cable to the
proper wall jack. Using the wrong network cable or the wrong wall jack connector
could damage the monitor, or not send data to the Acuity System. Ensure that the
monitor is properly connected to the network before you start monitoring the
patient.
Related to trends and alarm limits
WARNING Before you use a monitor on a new patient, always turn off the
monitor for a few seconds, and then turn it on again. This clears the prior patient’s
trends and alarm limits.
WARNING Always check alarm limits when a monitor reestablishes
communication with the Acuity System. If you change limits at a monitor while it
is not communicating with the Acuity System (for example, during transport or
signal dropout), when you reestablish communication with the system, the limits
might change to Acuity System Presets values.
Page 42

38 Chapter 3 Admit and begin monitoring Welch Allyn Acuity Central Monitoring System
Related to leads, cables and the ECG display
WARNING Ensure that the Acuity System network cable is neither damaged
nor broken. An Acuity System cable is the sole link between a hardwired monitor
and an Acuity System.
WARNING Always replace disconnected lead wires immediately. If a lead wire
becomes disconnected and a second lead is not available, the Virtual Monitor
might show the same lead for ECG1 and ECG2.
WARNING Carefully monitor lead-wire connections of patients prone to
arrhythmia events. If a lead wire disconnects during an event, the Acuity
System’s ability to accurately detect the event can be compromised.
WARNING If your system includes arrhythmia analysis, and if you connect,
change or move an electrode, ensure that a RELEARN alert occurs at the patient
monitor and the virtual monitor.
Moving or changing an electrode can change the beat morphology. If the system
does not learn the new morphology, it might not alarm or it might cause false
alarms. The relearn process establishes the new morphology as the normal ECG
rhythm for arrhythmia and ST-segment analyses.
• If a RELEARN alert occurs after changing or moving an electrode, carefully
evaluate the new ECG rhythm and the current ST segment for all active leads
to make sure that the Acuity System has learned an appropriate rhythm. For
evaluation instructions, see “Respond to a RELEARN alert” on page 91.
• If a RELEARN alert does not occur after changing or moving an electrode,
initiate a relearn event. For instructions, see “To initiate relearn of a patient’s
ECG rhythm for arrhythmia and ST-segment analyses” on page 65.
WARNING Minimize patient movement during a RELEARN, as movement
creates noise during the reading. If the system learns an abnormal rhythm or
learns a rhythm during noise, it designates the learned rhythm as normal.
Thereafter, rhythms of this type might not trigger an alarm. Ensure that the
patient remains still for 5 minutes after the RELEARN before allowing them to
move.
Page 43

Directions for use Chapter 3 Admit and begin monitoring 39
WARNING Ensure these things to minimize false HR, Arrhythmia Analysis and
ST Analysis alarms, and to achieve optimal event detection and analysis:
• ECG cable, lead wires and electrodes are undamaged.
• Patient’s skin is properly prepared.
• Electrodes are placed using standard good practices.
• 5-wire ECG cable is used. A 3-wire cable limits arrhythmia and ST-segment
analyses to a single lead, and ST analysis is disabled when a lead failure
occurs.
• LL electrode is connected. Otherwise, only one ECG lead is available and
arrhythmia and ST-segment analyses are effected.
• Patient monitor and Virtual Monitor display these things:
-HR numeric and ECG waveform
-Non-noisy signal. If signal is noisy, reduce patient movement and increase
distance from other electrical devices.
-Correct patient mode for the patient
• Virtual Monitor ECG 1 and 2 display these things:
-ECG waveform
-Waveform amplitude at least 160 µV, peak-to-peak
-QRS complex amplitude at least twice the P or T wave amplitude
Page 44

40 Chapter 3 Admit and begin monitoring Welch Allyn Acuity Central Monitoring System
Enter and confirm a patient’s ID or room at the central station
A patient’s Acuity System window borders and icons are in a yellow (alert) state if the
patient’s ID and room number have not been confirmed.
You can scan or type missing patient information and confirm the information at the
central station in the Patient ID Setup window.
Once the information is confirmed, the patient’s window borders and icons change to the
green, “patient monitoring OK” state. If the borders and icons do not turn green, another
alert or patient alarm is occurring.
To enter patient information
At the Acuity Central Station screen, hardwired monitors are identified by room number,
and wireless monitors are identified by their serial numbers.
Note
1. Click the patient’s or icon in the patient’s Waveform Window or on the
2. Scan or type the patient’s ID number in the ID# field.
3. Press the Tab or Enter key on your keyboard to advance a line.
The Acuity System does not accept these scanned items: Double quotation
marks, middle names (one middle initial is accepted) and spaces and periods.
map.
The Patient ID Setup windows appear.
Patient ID window 1
If you are prompted, this patient ID was pre-entered via the hospital central
information system, the Acuity Patient List window, a wireless monitor, or a mobile
device running AcuityLink Clinician Notifier software.
If the prompt information is correct, click Accept and other information fills in.
4. If necessary, scan or type the patient’s name, and press Tab or Enter to advance.
5. If necessary, scan or type the room number.
Up to five characters, including numbers, letters and dashes, are accepted.
6. Check the listed patient monitor model and serial number to ensure that they indicate
your patient’s monitor.
Page 45

Directions for use Chapter 3 Admit and begin monitoring 41
7. Click Next Page to enter additional patient demographics such as date of birth,
gender, height, weight, ethnicity, and medications.
The second page of the Patient ID setup window appears.
Patient ID window 2
To confirm the patient
1. Carefully review your entries for accuracy.
2. Click Confirm.
If a prompt appears telling you that the same ID number has been previously used,
carefully review the ID number, and then take one of these steps:
• Click Do Anyway to confirm the ID with the name that you have entered.
Review data is combined.
• Click Go Back to return to the Patient ID Setup window, revise the ID or name,
and then click Confirm again.
You have completed the patient ID confirmation process. The Acuity System sends
unit default alarm limits and settings to the patient monitor.
3. (Optional) Customize alarm limits. For details, see “Adjust a patient’s alarm limits” on
page 46.
Page 46

42 Chapter 3 Admit and begin monitoring Welch Allyn Acuity Central Monitoring System
Page 47

Adjust monitoring settings and
43
4
patient information
Set up typical monitoring at the Virtual Monitor
This table presents typical monitoring functions that you can set up at the Acuity Central
Station using the Virtual Monitor.
Note
Table 2. Typical monitoring functions at the Virtual Monitor
NIBP and SpO2spot checks
Task Clicks at Virtual Monitor Notes
Start an NIBP
measurement (except for
a Micropaq monitor).
When a patient is intentionally disconnected from the central station, or a patient
connected to the Welch Allyn 1500 Patient Monitor is in Standby mode, the
patient’s waveform display resets to the default view when reconnected to the
central station.
1. NIBP,
2. START
Can be started also at the patient monitor.
(Propaq LT monitor) Start
an SpO
2 spot check
measurement.
Patient mode and alarms
(Micropaq monitor)
Change the patient mode.
Temporarily suppress the
potential for audible
alarm tones.
1. SpO
2. START
1. MAIN MENU
2. MORE
3. MORE
4. NEXT
5. CHANGE
1. SUSPEND
2. When ready to return to
,
2
normal monitoring:
RESUME
SpO2Spot Mode must be turned on at the monitor.
You can change a Micropaq monitor’s patient mode only at
the Acuity Central Station. For all other patient monitors, you
can change patient mode only at the patient monitor.
WARNING Always check patient mode in the
border of the Waveform Window or Virtual Monitor.
Incorrect patient mode can result in unsuitable
alarm settings, inaccurate heart rate readings and
inappropriate arrhythmia and ST-segment analyses.
Although any alerts for this patient are displayed, SUSPEND
suppresses alert tones for 90 seconds.
Page 48

44 Chapter 4 Adjust monitoring settings and patient information Welch Allyn Acuity Central Monitoring System
Table 2. Typical monitoring functions at the Virtual Monitor
Response time: SpO
and CO
2
2
Task Clicks at Virtual Monitor Notes
(Propaq Encore and CS
monitors) Set SpO
response time.
2
1. SpO2 or SpO2/CO2
2. SpO2
3. MORE
Can be changed also at the patient monitor.
4. RESPONSE
(Propaq Encore and CS
monitors) Set CO
response time.
2
1. SpO2/CO2
2. CO2
3. MORE
Can be changed also at the patient monitor.
4. RESPONSE
Waveforms and pacer display
Adjust sweep speed of
all waveforms except
CO
and RESP.
2
Optimize all waveform
scales (except CO
2
Turn on or turn off the
pacer display.
1. MAIN MENU
2. MORE
3. MORE
4. NEXT
5. CHANGE
1. MAIN MENU
).
2. MORE
3. STATSCALE
No Arrhythmia Analysis
option:
Waveform sweep speed changes in the Virtual Monitor and
Waveform Window.
You can adjust RESP sweep speed separately in this window,
and CO
Waveforms are adjusted for best display in the Virtual
Monitor and Waveform Window.
1. ECG or ECG/RESP
2. MORE, (MORE), (MORE)
3. NEXT
4. CHANGE
Arrhythmia Analysis option:
The pacer display is shown as a dashed line in the waveform
areas of the Virtual Monitor, Waveform Window and
Waveforms Review window.
1. Setup
2. Arrhythmia Alarms
3. Pacer Display
Also set Analyze Pacer for
arrhythmia monitoring. For
instructions, please see
page 62 .
sweep speed changes with it.
2
WARNING Keep all pacemaker patients under close
observation. Rate meters might continue to count the
pacemaker rate during occurrencesof cardiac arrest or
some arrhythmias. Do not rely solely upon rate meter
alarms.
WARNING Always turn on Analyze Pacers for paced
patients, and always turn off Analyze Pacers for nonpaced patients. The Acuity System analyzes
arrhythmias based on whether the Analyze Pacers
setting is on or off. The Analyze Pacers setting is Off
by default
.
Page 49

Directions for use Chapter 4 Adjust monitoring settings and patient information 45
Table 2. Typical monitoring functions at the Virtual Monitor
Lead selection: ECG and respiration
Task Clicks at Virtual Monitor Notes
Change the RESP lead. 1. ECG/RESP
Select or change ECG
lead for display.
Note: If a Virtual Monitor
represents a Propaq
Encore, Propaq CS or
Welch Allyn 1500 Patient
Monitor, the leads that
you select for ECG 1 and
ECG 2 are used also for
arrhythmia analysis.
For details regarding
leads used for arrhythmia
and ST-segment
analyses, for all types of
patient monitors, see
Table 35 on page 191 and
Table 36 on page 193.
2. MORE
3. RESP LEAD
1. ECG or ECG/RESP
2. ECG1 LEAD
3. ECG2 LEAD
Lead indicators are shown in the respiration waveform areas
of the Virtual Monitor and Waveform Window.
Available leads:
Monitors using 5-lead ECG cables: Leads I, II, III, aVR, aVL,
aVF and V
Lead indicators: Indicators are shown in ECG waveform
areas of each patient’s Virtual Monitor and Waveform
Window, and in the Wave Select status window.
If you want to review waveforms from all leads, view the
patient’s Waveforms Review window. For instructions, see
page 104.
Propaq Encore, and Propaq CS monitors--changing
leads when they are using two lead vectors:
If you change the ECG1 Lead from a V lead to a limb lead, the
ECG2 Lead changes to a V lead.
If you change the ECG1 Lead from a limb lead to a V Lead, the
ECG2 Lead changes to Lead II.
Welch Allyn 1500 Patient Monitor, Propaq LT monitor-leads shown at Acuity System and patient monitor:
Select the sameleads at both places to view ECG information
from the same leads in both places.
A lead failure forPropaq LT monitor patients can result in lead
selections that are different at the Acuity Central Station.
WARNING Ensure these things to minimize false HR, Arrhythmia Analysis and ST Analysis alarms, and to
achieve optimal event detection and analysis:
•ECG cable, lead wires and electrodes are undamaged.
•Patient’s skin is properly prepared.
•Electrodes are placed using standard good practices.
•5-wire ECG cable is used. A 3-wire cable limits arrhythmia and ST-segment analyses to a single lead, and ST
analysis is disabled when a lead failure occurs.
•LL electrode is connected. Otherwise, only one ECG lead is available and arrhythmia and ST-segment
analyses are effected.
•Patient monitor and Virtual Monitor display these things:
-HR numeric and ECG waveform
-Non-noisy signal. If signal is noisy, reduce patient movement and increase distance from other electrical
devices.
-Correct patient mode for the patient
•Virtual Monitor ECG 1 and ECG 2 display these things:
-ECG waveform
-Waveform amplitude at least 160 µV, peak-to-peak
-QRS complex amplitude at least twice the P or T wave amplitude
WARNING Minimize patient movement during a RELEARN, as movement creates noise during the reading. If
the system learns an abnormal rhythm or learns a rhythm during noise, it designates the learned rhythm as
normal. Thereafter, rhythms of this type might not trigger an alarm. Ensure that the patient remains still for 5
minutes after the RELEARN before allowing them to move.
Page 50

46 Chapter 4 Adjust monitoring settings and patient information Welch Allyn Acuity Central Monitoring System
Adjust a patient’s alarm limits
In the Alarms Setup window, you can adjust a patient’s alarm limits individually or as a
group.
WARNING Before you set customized alarm limits for a patient, confirm the
patient’s ID and room number. Otherwise, customized limits might be lost.
To adjust a patient’s alarm limits
1. In the patient’s Virtual Monitor, click Setup, Alarms.
The Alarms Setup window appears.
Patient’s measured value
Limits
Limits-pair
Slider head
These open the Alarms, Printouts, Waveform Window, Arrhythmia Alarms and ST Analysis
Setupwindows.
2. Check vital-sign boxes along the bottom of the screen to view corresponding alarm
limits.
3. Adjust alarm limits in one of these ways:
• Adjust limits for one vital sign at a time.
Click On or Off next to the limits-pair to adjust the pair. Click On to turn the alarm
limits on, and click Off to turn the alarm limits off.
Click and move a slider head to set or turn off a lower or upper limit.
Click Auto Set to set a limits-pair close to the patient’s current vital-sign values.
• Reset limits for all vital signs at once.
Click Alarm Set, and then click one of these options:
Stat Set sets all limits based on the patient’s current vital-sign values.
Presets sets all limits to preset values. For details, see Table 34 on page 190.
All Alarms On turns on any limits that are off, with the values that they last held.
Page 51

Directions for use Chapter 4 Adjust monitoring settings and patient information 47
Important considerations: adjusting alarm limits
WARNING Patients for whom alarming has been turned off must be kept under
close physical surveillance. Turning off alarming disables both audio and visual
alarm indicators.
WARNING Do not use Stat Set or Auto Set for a patient in an alarm state! Use
these buttons only when your patient’s vital sign values are in an acceptable
range.The buttons adjust alarm limits based on the patient’s current vital-sign
values.
WARNING Always check alarm limits when a monitor reestablishes
communication with the Acuity System. If you change limits at a monitor while it
is not communicating with the Acuity System (for example, during transport or
signal dropout), when you reestablish communication with the system, the limits
might change to Acuity System Presets values.
WARNING Minimize patient movement during a RELEARN, as movement
creates noise during the reading. If the system learns an abnormal rhythm or
learns a rhythm during noise, it designates the learned rhythm as normal.
Thereafter, rhythms of this type might not trigger an alarm. Ensure that the
patient remains still for 5 minutes after the RELEARN before allowing them to
move.
\
WARNING False alarms may occur in some situations. You must understand
and address the cause of the false alarms whenever possible to eliminate the
possibility of repeated false alarms and alarm fatigue, which might result in a
failure to respond to an actual alarm situation.
WARNING Central station alarms and other events can go unnoticed if clinical
personnel are not present at the central station or if interruptions occur in power
or system operations.
WARNING The leading cause of patient death or serious injury reported with the
use of patient monitoring equipment is failure to respond to alarms notifying the
user of an adverse change in patient condition. If you are relying on visual alarm
notifications, maintain a clear line of sight and remain within 4 meters of the
central station. If you are relying on audio alarm notifications, make sure that you
can hear audio alarms from where you are. Set the volume as needed considering
the environment and ambient noise levels. Verify that the alarm is audible to a
clinician working at the maximum distance from the central station.
Page 52

48 Chapter 4 Adjust monitoring settings and patient information Welch Allyn Acuity Central Monitoring System
Adjust general printing settings
This section presents information about these tasks:
• Setting preferences for a patient’s Acuity Central Station vital-signs printouts.
• Coordinating printers and print jobs for the entire Acuity System.
If you want to set these preferences instead, see these pages:
• For arrhythmia event alarm printing, see “Adjust preferences for a patient’s arrhythmia
alarming” on page 61.
• For ST-segment deviation alarm printing, see “Set alarm preferences for ST Analysis”
on page 74.
Page 53

Directions for use Chapter 4 Adjust monitoring settings and patient information 49
Adjust preferences for a patient’s central station printouts
This section presents the Printouts Setup window, in which you can specify details
regarding automatic central station printouts.
To adjust preferences for a patient’s printouts
1. In the patient’s Virtual Monitor, click Setup, Printouts.
The Printouts Setup window appears.
Prints a Snapshot printout at
the Acuity Central
Station.
These open the Alarms, Printouts, Waveform Window and Arrhythmia Alarms and ST Analysis Setup
windows.
2. Set preferences in these areas of the window:
• Central Alarm Print: Check a vital-sign box to set automatic printing of an alarm
print if an alarm occurs for that vital-sign.
• Print on Alarm Delay: Move the slider to set the time delay (in seconds) between
an alarm and the onset of an alarm printout.
If the duration of an alarm is shorter than this delay period, no alarm print is
generated.
• Central Auto Print: Click an interval for automatic snapshot printouts (Auto Prints)
to occur.
• Central OxyCRG Alarm Print: Check a vital-sign box to set automatic printing of an
OxyCRG print if an alarm occurs for that vital sign.
OxyCRG printouts combine HR/PR, CO2, RR/BR and SpO2vital signs, if active.
Note
On some monitors, RR/BR is labeled RRECG/RRCO2. RR and RRECG are
respiration rates derived from ECG, while BR and RRCO2 are respiration rates
derived from CO
.
2
Page 54

50 Chapter 4 Adjust monitoring settings and patient information Welch Allyn Acuity Central Monitoring System
Coordinate system print jobs and central station printers
This section presents the Acuity Central Station Printer window, from which you can
coordinate printers and pending print jobs for the entire Acuity System.
To coordinate print jobs
1. On the Acuity Central Station map where the Acuity Central Station icon is located,
click .
The Print Jobs view of the Central Station Printer window appears.
Processing
the request
Print next
Alarm print
Printer status
2. Click a print job to highlight it.
3. Click any of these buttons:
• Click Print Next to print the job next.
• Click Delete, and then Delete Selection to delete the print job.
Note
To coordinate printers
1. Click .
2. Do any of these things:
If appears beside a print job, see Table 18 on page 163 for troubleshooting
information.
The Printers View appears.
• Read messages to check printer status.
• Click a printer to highlight it, and then click Disable to disable the printer or
Enable to enable the printer.
Page 55

Directions for use Chapter 4 Adjust monitoring settings and patient information 51
Adjust a patient’s waveform displays
You can select waveforms for display in a patient’s Virtual Monitor and Waveform Window.
Note
Only three waveforms can be displayed at a time in the Virtual Monitor. These
waveforms are displayed based on their priority. Make sure you turn off all
waveforms you do not want displayed. For a list of waveform priorities, see
“Virtual Monitor” on page 189 or “Waveform Window” on page 190.
To adjust waveform displays for a patient’s Virtual Monitor
You can select or deselect up to three vital-sign waveforms for viewing.
1. In the patient’s Virtual Monitor, click MAIN MENU, MORE, WAVE SEL.
2. Click NEXT to highlight a waveform.
3. Click ON/OFF.
To adjust waveform displays for a patient’s Waveform Window
1. In the patient’s Virtual Monitor, click Setup, Waveform Window.
The Waveform Window Setup window appears.
Copy of the Waveform Window
Closes the patient’s
Waveform Window
on the Acuity Central
Station screen.
Note: If you need to
close a Waveform
Window from a
Patient List Review
(PLR) station, see
These open the Alarms, Printouts, Waveform Window, Arrhythmia
Alarms and ST Analysis Setup windows.
page 12.
2. Click 1 or 2 to select the number of waveforms to display in the Waveform Window.
3. Check a vital-sign box to display a waveform.
If ECG is monitored, ECG1 is always displayed and cannot be deselected.
NIBP is selected for display if it is the only vital sign monitored.
Page 56

52 Chapter 4 Adjust monitoring settings and patient information Welch Allyn Acuity Central Monitoring System
Arrhythmia Analysis option
The Acuity System Arrhythmia Analysis module analyzes patient ECG data to detect
specific changes in cardiac rhythms. The system uses up to three ECG leads to detect
normal beats, ventricular beats and to analyze arrhythmias.
The Arrhythmia Analysis options are not intended for use on neonatal patients, and
arrhythmia analysis is disabled in the Neonate mode.
Arrhythmia Analysis terms
These terms are used throughout this section:
alarm level. A setting that indicates an individual arrhythmia type’s priority and associated
audible alarm tone. Alarm level designations can be lethal, high, medium, low, or off.
arrhythmia alarm limit. An appropriate numeric threshold for an arrhythmia type.
arrhythmia type. A specific arrhythmia category.
artifact. A disturbance or movement of the patient or sensors that adds errors to
measured parameters. Caused by muscle movement or shivering, electrical
interference, or vibration.
event. The occurrence of an arrhythmia event, arrhythmia or ST-segment relearn event,
learning done event or snapshot printout event.
event marker. A notation that indicates the time when an event occurred. Event markers
appear in most review windows and in some printouts. Event notations are ♥ for
arrhythmia alarms, ♥ for arrhythmia events, and ▼ for relearn and snapshot events.
lethal arrhythmia. The Acuity System defines VFib (ventricular fibrillation), asystole, and
VTach (ventricular tachycardia) as lethal arrhythmias. In the Arrhythmia Alarms Setup
window, the alarm level for these arrhythmia types is permanently set to LETHAL,
and alarming cannot be turned off.
PVC. Premature ventricular contraction.
Page 57

Directions for use Chapter 4 Adjust monitoring settings and patient information 53
relearn. An Arrhythmia Analysis function that causes the Acuity system to relearn a
patient’s normal ECG rhythm. The Acuity System uses the relearned rhythm as a
guideline to identify arrhythmia events (arrhythmia relearn) and to analyze deviation of
the ECG ST-segment offset (ST relearn).
When relearn occurs for a patient
Both arrhythmia and ST relearn events occur after these things:
• ST/Arr Relearn is clicked in the Arrhythmia Alarms Setup window.
• Single ECG is clicked in the Arrhythmia Alarms Setup window
• Patient connection, some lead changes or lead failures, system restart
Only an arrhythmia relearn event occurs after these things:
• RELEARN is clicked in the Arrhythmia Alarms Setup window. A RELEARN button
(instead of an ST/Arr Relearn button) indicates that the system does not include
the ST Analysis option.
• Analyze Pacers is clicked in the Arrhythmia Alarms Setup window. ST Analysis is
disabled when Analyze Pacers is enabled.
Only an ST relearn event occurs after this:
• ST RELEARN is clicked in the ST Analysis Setup window.
WARNING Minimize patient movement during a RELEARN, as movement
creates noise during the reading. If the system learns an abnormal rhythm or
learns a rhythm during noise, it designates the learned rhythm as normal.
Thereafter, rhythms of this type might not trigger an alarm. Ensure that the
patient remains still for 5 minutes after the RELEARN before allowing them to
move.
What occurs in a patient’s windows during and after a relearn event
• Virtual Monitor and Waveform Window: In all instances except clicking ST
RELEARN, a visual RELEARN alert occurs. HR is taken from the patient monitor
instead of from the arrhythmia software, and real-time waveforms display as
usual.
• ST Analysis Setup window: The waveform slice displays NO VALID BEATS, and
the Acuity System can take up to 30 seconds to update the waveform.
• Most review windows and some printouts: Relearn and Learning Done event
markers (▼) appear.
Page 58

54 Chapter 4 Adjust monitoring settings and patient information Welch Allyn Acuity Central Monitoring System
Arrhythmia event definitions
The Acuity System Arrhythmia Analysis module is not an atrial arrhythmia analysis
package.
Depending upon which arrhythmia analysis option that your Acuity System includes, your
system detects one of these groups of arrhythmia types:
• Lethal Arrhythmia Analysis option: The system detects only lethal arrhythmias (VFib,
asystole and VTach).
• Full Arrhythmia Analysis option: The system detects lethal arrhythmias (VFib, asystole
and VTach) and all of the arrhythmia types shown in Table 5 on page 56.
Normal sinus rhythm
Table 3. Normal sinus rhythm
QRS Normal sinus rhythm example
Q-T intervalP-R interval
R
P
T
S
Q
QRS duration
Page 59

Directions for use Chapter 4 Adjust monitoring settings and patient information 55
Lethal Arrhythmia Analysis option: events detected
Table 4. Definitions of lethal arrhythmia events
a
Arrhythmia event and definition Waveform example
b
VFib
(ventricular fibrillation)
Chaotic quivering of the ventricles
accompanied by rapid irregular waves but
no formed QRS complexes.
Asystole
Absence of any detected beat for 4 or
more seconds.
VTach (ventricular tachycardia)
A run of premature ventricular beats that
exceeds the PVC run alarm limit and that
meets or exceeds the patient’s VTach
alarm limit.
Note: The American Heart Association
describes sustained and nonsustained
ventricular tachycardia as follows:
Ventricular tachycardia can be referred to
as sustained or nonsustained. Sustained
refers to an episode that lasts at least 30
seconds and generally requires
termination by antiarrhythmia drugs,
antitachycardia pacing techniques or
electrical cardioversion. Nonsustained
ventricular tachycardia suggests that the
episodes are short (three beats or longer)
and terminate spontaneously.
a. Alarming for lethal arrhythmias cannot be turned off.
b. VFib is detected within 6 seconds if the waveform fulfills these conditions:
Absence of fast slew-rate activity (QRS-like activity)
Wave rate higher than 130 bpm
Average peak-to-peak wave amplitude higher than 200 µV
Wave period variance higher than a specific threshold
Page 60

56 Chapter 4 Adjust monitoring settings and patient information Welch Allyn Acuity Central Monitoring System
Full Arrhythmia Analysis option: additional events detected
Table 5. Full Arrhythmia Analysis option: events detected in addition to lethal events
Arrhythmia event and definition
PVC run (ventricular run)
A run of three to six consecutive,
premature ventricular beats that meets or
exceeds the patient’s VTach alarm limit.
VRhythm (ventricular rhythm)
A run of successive ventricular beats that
is less than the V Tach alarm limit,and the
number of successive ventricular beats is
greater than or equal to three.
Couplet
Two consecutive ventricular beats that are
preceded and followed by a normal beat.
PVC/min
Premature ventricular beats that are
greater or equal to the patient’s PVC/min
alarm limit.
Waveform example
Bigeminy
Three or more successive cycles
consisting of a normal beat followed by a
premature ventricular beat. Bigeminy is
independent of the average heart rate.
Trigeminy
Three or more successive cycles of two
normal beats followed by a premature
ventricular beat. Trigeminy is independent
of the average heart rate.
Tachycardia
A HR greater than or equal to the patient’s
tachycardia alarm limit. If the tachycardia
limit is decreased past the HR high limit,
the HR high limit will decrease to a value
equal to the tachycardia limit.
Page 61

Directions for use Chapter 4 Adjust monitoring settings and patient information 57
Table 5. Full Arrhythmia Analysis option: events detected in addition to lethal events
Arrhythmia event and definition
Bradycardia
A HR less than or equal to the patient’s
bradycardia alarm limit. If the bradycardia
limit is increased past the HR low limit,
the HR low limit will increase to a value
equal to the bradycardia limit.
Pause
The R-to-R interval that is greater than or
equal to two times the average R-to-R.
Irregular (irregular rhythm)
An irregularity in the R-to-R interval over a
series of at least 16 non-ventricular beats.
NonCapture (pacemaker noncapture)
For pacemaker patients with the Analyze
Pacers option enabled, a beat does not
directly follow a pacer.
Waveform example
Page 62

58 Chapter 4 Adjust monitoring settings and patient information Welch Allyn Acuity Central Monitoring System
Open an Arrhythmia Alarms Setup window
In the Arrhythmia Alarms Setup window, you can adjust some or all these preferences for
a patient, depending on your Arrhythmia Analysis option:
• Turn off alarming for all arrhythmia types except the lethal arrhythmias (VFib, asystole
and VTach).
• Adjust alarm limits for one arrhythmia type at a time or set all arrhythmia limits to
Presets values.
• Adjust alarming preferences (alarming level priority, minimum duration that an
irregular rhythm arrhythmia must occur for alarming, and Print on Alarm).
• Set special preferences for patients with pacemakers.
• Initiate relearn of a patient’s ECG rhythm for arrhythmia and ST-segment analyses.
WARNING Before you set customized alarm limits for a patient, confirm the
patient’s ID and room number. Otherwise, customized limits might be lost.
To open an Arrhythmia Alarms Setup window
• In the patient’s Virtual Monitor, click Setup, Arrhythmia Alarms.
The Arrhythmia Alarms Setup window appears.
If your window appears abbreviated, your system includes the Lethal Arrhythmia
Analysis option (lethal arrhythmia detection, only).
These open the Alarms, Printouts, Waveform Window,
Arrhythmia Alarms and ST Analysis Setup windows.
Undoes what has been done since the
window was opened, except relearn.
Page 63

Directions for use Chapter 4 Adjust monitoring settings and patient information 59
Turn off alarming for all arrhythmia types except lethal arrhythmias
WARNING Turning off alarming for arrhythmia types and ST Analysis disables
both audio and visual alarm indicators. Although alarming for lethal arrhythmias
cannot be turned off, patients susceptible to arrhythmias must be kept under
close physical surveillance if their alarming has been turned off for any arrhythmia
types.
To turn off alarming for all arrhythmia types except lethal arrhythmias (VFib,
asystole and VTach)
1. In the patient’s Virtual Monitor, click Setup, Arrhythmia Alarms.
If your window appears abbreviated, your system detects lethal arrhythmias only.
Alarming for lethal arrhythmia types cannot be turned off.
2. Click Alarms Set, Arrhythmia Off.
In the patient’s review windows, arrhythmia event markers appear as ♥. However,
lethal arrhythmia events still appear as ♥.
Page 64

60 Chapter 4 Adjust monitoring settings and patient information Welch Allyn Acuity Central Monitoring System
Adjust a patient’s arrhythmia alarm limits
WARNING If you set the bradycardia alarm limit higher than the HR lower limit,
the Acuity System adjusts the HR lower limit to the new bradycardia limit. If you
set the tachycardia limit lower than the HR upper limit, the Acuity System sets
the HR upper limit to the new tachycardia limit. In either case, a message appears
in the upper border of the Arrhythmia Alarms Setup window telling you HR alarm
limits have changed.
WARNING Minimize patient movement during a RELEARN, as movement
creates noise during the reading. If the system learns an abnormal rhythm or
learns a rhythm during noise, it designates the learned rhythm as normal.
Thereafter, rhythms of this type might not trigger an alarm. Ensure that the
patient remains still for 5 minutes after the RELEARN before allowing them to
move.
To adjust a patient’s arrhythmia alarm limits
1. In the patient’s Virtual Monitor, click Setup, Arrhythmia Alarms.
2. Set alarm limits in one of these ways:
• In the Limit column, click the arrows next to the arrhythmia type to set alarm
limits for one arrhythmia type at a time.
• Click Alarms Set, Presets to set all arrhythmia limits to preset values.
For Presets values, see Table 35 on page 191.
3. If the patient has a pacemaker, see “To set additional arrhythmia analysis preferences
for a pacemaker patient” on page 62.
Page 65

Directions for use Chapter 4 Adjust monitoring settings and patient information 61
Adjust preferences for a patient’s arrhythmia alarming
To adjust preferences for a patient’s arrhythmia alarming
1. In the patient’s Virtual Monitor, click Setup, Arrhythmia Alarms.
Single ECG enables you to
select one lead for
arrhythmia analysis. This
is useful if false alarms
occur because of a
patient’s unique beat
morphology. For details,
see Table 14 on
page 156.
Always turn off Analyze
Pacers for non-paced
patients.
2. Adjust preferences for alarming.
• Alarm Level: To specify the alarming priority for an arrhythmia type, click the arrow
next to the arrhythmia, and then select an alarm level.
If an alarm level is set to off and an event of that type occurs, ♥ appears in the
patient’s review windows.
For a description of alarm levels, see Table 6 on page 95.
WARNING Turning off alarming for arrhythmia types and ST Analysis disables
both audio and visual alarm indicators. Although alarming for lethal arrhythmias
cannot be turned off, patients susceptible to arrhythmias must be kept under
close physical surveillance if their alarming has been turned off for any arrhythmia
types.
WARNING Minimize patient movement during a RELEARN, as movement
creates noise during the reading. If the system learns an abnormal rhythm or
learns a rhythm during noise, it designates the learned rhythm as normal.
Thereafter, rhythms of this type might not trigger an alarm. Ensure that the
patient remains still for 5 minutes after the RELEARN before allowing them to
move.
• Pause Limit (under Options): To adjust the number of seconds that a Pause event
must occur before the Acuity System alarms, click an arrow to specify seconds,
and then check the Pause Limit box. The default when Pause Limit is not checked
is the R-to-R interval that is greater than or equal to two times the average R-to-R.
• Irregular limit (under Options): To adjust the minimum duration that an irregular
rhythm arrhythmia must occur before the Acuity System alarms, click an arrow to
specify seconds, and then check the Irregular Limit box.
Page 66

62 Chapter 4 Adjust monitoring settings and patient information Welch Allyn Acuity Central Monitoring System
• Print on Alarm: To specify that central station alarm printouts occur for a specific
arrhythmia type alarm, check the Print on Alarm box next to the arrhythmia type.
3. If the patient has a pacemaker, see “To set additional arrhythmia analysis preferences
for a pacemaker patient” on page 62.
Set additional arrhythmia analysis preferences for a pacemaker patient
WARNING Always turn on Analyze Pacers for paced patients, and always turn
off Analyze Pacers for non-paced patients. The Acuity System analyzes
arrhythmias based on whether the Analyze Pacers setting is on or off. The
Analyze Pacers setting is Off by default.
To set additional arrhythmia analysis preferences for a pacemaker patient
1. In the patient’s Virtual Monitor, click Setup, Arrhythmia Alarms.
2. Carefully evaluate the patient’s current rhythm to ensure that you want the Acuity
System to relearn it as the patient’s normal ECG rhythm.
A relearn occurs in the next step.
3. Check the Analyze Pacers box to enable specialized arrhythmia analysis.
Pacer Display is turned on also. If you prefer not to view the pacer display, clear the
Pacer Display box.
A RELEARN alert occurs at the patient’s Virtual Monitor and Waveform Window. The
alert remains until relearn is finished.
4. Carefully evaluate the new ECG rhythm to ensure that the Acuity System has learned
an appropriate rhythm. For evaluation instructions, see “Respond to a RELEARN
alert” on page 91.
5. If Noncapture is listed in the arrhythmia list, set an Alarm Level and Print on Alarm for
pacemaker noncapture.
WARNING Keep all pacemaker patients under close observation. Rate meters
might continue to count the pacemaker rate during occurrences of cardiac arrest
or some arrhythmias. Do not rely solely upon rate meter alarms.
Page 67

Directions for use Chapter 4 Adjust monitoring settings and patient information 63
Initiate relearn of a patient’s ECG rhythm
Description of the relearn function
Relearn is an Arrhythmia Analysis function that causes the Acuity system to relearn a
patient’s normal ECG rhythm. The Acuity System uses the relearned rhythm as a guideline
to identify arrhythmia events (arrhythmia relearn) and to analyze deviation of the
ECG ST-segment offset (ST relearn).
When relearn occurs for a patient
Both arrhythmia and ST relearn events occur after these things:
• ST/Arr Relearn is clicked in the Arrhythmia Alarms Setup window.
• Single ECG is clicked in the Arrhythmia Alarms Setup window
• Patient connection, some lead changes or lead failures, system restart
Only an arrhythmia relearn event occurs after these things:
• RELEARN is clicked in the Arrhythmia Alarms Setup window. A RELEARN button
(instead of an ST/Arr Relearn button) indicates that the system does not include
the ST Analysis option.
• Analyze Pacers is clicked in the Arrhythmia Alarms Setup window. ST Analysis is
disabled when Analyze Pacers is enabled.
What occurs in a patient’s windows during and after a relearn event
• Virtual Monitor and Waveform Window: A visual RELEARN alert occurs, HR is taken
from the patient monitor instead of from the arrhythmia software, and real-time
waveforms display as usual.
• ST Analysis Setup window: The waveform slice displays NO VALID BEATS, and the
Acuity System can take up to 30 seconds to update the waveform.
• Most review windows and some printouts: Relearn and Learning Done event markers
(▼) appear.
WARNING Minimize patient movement during a RELEARN, as movement
creates noise during the reading. If the system learns an abnormal rhythm or
learns a rhythm during noise, it designates the learned rhythm as normal.
Thereafter, rhythms of this type might not trigger an alarm. Ensure that the
patient remains still for 5 minutes after the RELEARN before allowing them to
move.
Page 68

64 Chapter 4 Adjust monitoring settings and patient information Welch Allyn Acuity Central Monitoring System
.
WARNING In Acuity Systems that include an Arrhythmia option, a relearn
function causes the system to learn a patient's normal ECG rhythm. If the
system learns an abnormal rhythm or learns a rhythm during noise, it designates
the learned rhythm as a normal. Thereafter, rhythms of this type might not trigger
an alarm.
A relearn event can be initiated by a user or by the system. System relearns are in
response to these circumstances:
• Patient connection
• Lead change or failure
• System restart
During an arrhythmia relearn event, the system posts a RELEARN alert in the
patient's Virtual Monitor and Waveform Window. Carefully observe a patient
during an Acuity System learning period. During learning, the system detects
only VFib and asystole arrhythmias.
After a relearn event, "Relearn" and "Learning Done" event markers (▼) appear in
most of the patient's review windows and some printouts. After relearn, carefully
evaluate the new ECG rhythm and the current ST segment for all active leads to
ensure that the system learned an appropriate rhythm. For evaluation
instructions, see “To respond to a RELEARN alert” on page 92.
Page 69

Directions for use Chapter 4 Adjust monitoring settings and patient information 65
To initiate relearn of a patient’s ECG rhythm for arrhythmia and ST-segment
analyses
The relearn operation cannot be undone.
1. In the patient’s Virtual Monitor, click Setup, Arrhythmia Alarms.
The Arrhythmia Alarms Setup window appears.
If your window appears abbreviated, your system includes the Lethal Arrhythmia
Analysis option (lethal arrhythmia detection, only).
2. Carefully evaluate the patient’s current rhythm to ensure that you want the Acuity
System to establish it as the patient’s normal ECG rhythm.
3. Click ST/Arr Relearn or RELEARN.
A RELEARN alert occurs at the patient’s Virtual Monitor and Waveform Window. The
alert remains until relearn is finished.
4. Carefully evaluate the new ECG rhythm and ST segment to ensure that the Acuity
System has learned an appropriate rhythm. For instructions, see “Respond to a
RELEARN alert” on page 91.
Page 70

66 Chapter 4 Adjust monitoring settings and patient information Welch Allyn Acuity Central Monitoring System
Important considerations: Arrhythmia Analysis
Related to Arrhythmia Analysis options, patient populations and patient surveillance
WARNING The Acuity System Arrhythmia Analysis options are not atrial
arrhythmia analysis packages: they are ventricular analysis packages. An Acuity
System with the Full Arrhythmia Analysis option detects these arrhythmia types:
ventricular fibrillation, asystole, ventricular tachycardia, PVC run (ventricular run),
VRhythm (ventricular rhythm), couplet, PVC per minute (ventricular beats per
minute), bigeminy, trigeminy, tachycardia, bradycardia, irregular (irregular
rhythm), pause, and noncapture (pacemaker noncapture).
WARNING In some clinical environments and due to some physiologic
differences among patients, the Acuity System might not alarm for occurrences
of ventricular tachycardia, ventricular fibrillation, or asystole. For instance,
asystole is defined as an absence of any detected beat for four or more seconds.
Patient pathologies where indications of electrical activity continue to exist
without adequate cardiac function might not be recognized as asystole.
WARNING Do not use the Arrhythmia Analysis or ST Analysis feature on
neonates. The Arrhythmia Analysis and ST Analysis options are not intended for
use with neonatal patients.
WARNING It is important that clinicians understand and communicate to all staff
using the Acuity Central Station that any arrhythmia analysis software program is
an effective tool to assist in patient care, but arrhythmia analysis packages are
unable to achieve 100 percent accuracy for all morphologies and occurrences of
QRS and PVC detection. Thus, close physical surveillance and clinical
interpretation of cardiac data must still be an integral part of every patient’s care.
Clinicians must review all data obtained from the Acuity System before
implementing therapy based on the data.
WARNING The Welch Allyn 1500 Patient Monitor provides primary alarming,
including LTAs. The central station provides a secondary alarm, and is only as
reliable as its network. When connection to the central station is lost, the Welch
Allyn 1500 Patient Monitor acts as a standalone monitor and provides the primary
alarm. When connected to the central station, the monitor provides the primary
alarm based on a signal from the central station.
WARNING Do not use Arrhythmia Analysis or ST Analysis on networks with
heavy Class 1 services such as voice over IP (VOIP).
Page 71

Directions for use Chapter 4 Adjust monitoring settings and patient information 67
Related to patient monitor heart rate indications
WARNING All heart rate alarms are valid, even if the HR value at the central
station differs from that at the monitor.
If your system includes an Arrhythmia Analysis option, the Acuity System heart
rates for adult and pediatric patients are a result of system software analysis.
The HR/PR numeric changes to “---” in the Virtual Monitor, Waveform Window,
review windows, and system printouts when the system detects ventricular
fibrillation or asystole. However, an apparently valid heart rate numeric might
show in the patient monitor.
Related to electrodes, leads and ECG display
WARNING If your system includes arrhythmia analysis, and if you connect,
change or move an electrode, ensure that a RELEARN alert occurs at the patient
monitor and the virtual monitor.
Moving or changing an electrode can change the beat morphology. If the system
does not learn the new morphology, it might not alarm or it might cause false
alarms. The relearn process establishes the new morphology as the normal ECG
rhythm for arrhythmia and ST-segment analyses.
• If a RELEARN alert occurs after changing or moving an electrode, carefully
evaluate the new ECG rhythm and the current ST segment for all active leads
to make sure that the Acuity System has learned an appropriate rhythm. For
evaluation instructions, see “Respond to a RELEARN alert” on page 91.
• If a RELEARN alert does not occur after changing or moving an electrode,
initiate a relearn event. For instructions, see “To initiate relearn of a patient’s
ECG rhythm for arrhythmia and ST-segment analyses” on page 65.
WARNING Ensure these things to minimize false HR, Arrhythmia Analysis and
ST Analysis alarms, and to achieve optimal event detection and analysis:
• ECG cable, lead wires and electrodes are undamaged.
• Patient’s skin is properly prepared.
• Electrodes are placed using standard good practices.
• 5-wire ECG cable is used. A 3-wire cable limits arrhythmia and ST-segment
analyses to a single lead, and ST analysis is disabled when a lead failure
occurs.
• LL electrode is connected. Otherwise, only one ECG lead is available and
arrhythmia and ST-segment analyses are effected.
• Patient monitor and Virtual Monitor display these things:
-HR numeric and ECG waveform
-Non-noisy signal. If signal is noisy, reduce patient movement and increase
distance from other electrical devices.
-Correct patient mode for the patient
• Virtual Monitor ECG 1 and ECG 2 display these things:
-ECG waveform
-Waveform amplitude at least 160 µV, peak-to-peak
-QRS complex amplitude at least twice the P or T wave amplitude.
Page 72

68 Chapter 4 Adjust monitoring settings and patient information Welch Allyn Acuity Central Monitoring System
WARNING Carefully monitor lead-wire connections of patients prone to
arrhythmia events. If a lead wire disconnects during an event, the Acuity
System’s ability to accurately detect the event can be compromised.
WARNING Minimize patient movement during a RELEARN, as movement
creates noise during the reading. If the system learns an abnormal rhythm or
learns a rhythm during noise, it designates the learned rhythm as normal.
Thereafter, rhythms of this type might not trigger an alarm. Ensure that the
patient remains still for 5 minutes after the RELEARN before allowing them to
move.
Page 73

Directions for use Chapter 4 Adjust monitoring settings and patient information 69
ST Analysis option
The Acuity System ST Analysis option analyzes the ST segment of current ECG beats
relative to the ST segment of a reference beat. Specifically, the system reports mm or mV
of deviation between the current beat’s ST-segment offset and the reference beat’s
ST-segment offset.
The system learns the reference beats when a learning or relearn function occurs. For a
listing of when learning or relearn functions occur, see “When ST relearn occurs for a
patient” on page 75.
In the ST Analysis Setup window, you can do the following things:
• Specify analysis preferences.
• Set alarm limits.
• Set ST alarming priority level.
• Set Print on Alarm.
• View current beats and reference beats.
• View current deviation values, including alarm values.
• Initiate relearn of a patient’s reference beats for ST analysis only.
ST analysis is not performed in these circumstances:
• If Analyze Pacers is set on in the patient’s Arrhythmia Alarms Setup window.
• If the patient monitor is set in neonate mode.
• During the occurrence of arrhythmia events.
Page 74

70 Chapter 4 Adjust monitoring settings and patient information Welch Allyn Acuity Central Monitoring System
Examine the ST Analysis Setup window
The ST Analysis Setup windows in this section are shown in alarm.
To open an ST Analysis Setup window
• In the patient’s Virtual Monitor, click Setup, ST Analysis.
The ST Analysis Setup window appears.
I. Measurement
offset
H. Setup window buttons
G. Display leads
To examine the ST Analysis Setup window
J. J-points
(green)
A. Current beat (white)
B. Deviation from
reference beat
C. Measurement leads
D. Isoelectric reference
baseline (green)
E. Reference beat (green)
F. Undo button
A. Current beat (white) The current beat is shown for one or two leads.
B. Deviation from reference beat Deviation (mm or mV) of the current ST-segment offset from the
C. Measurement leads Analysis is performed on the selected leads.
D. Isoelectric reference baseline (green) Horizontal line marks the isoelectric reference baseline for the
E. Reference beat (green) The reference beat is learned when the Acuity System learning or
F. Undo button Undoes what has been done since the window was opened,
G. Display leads One or two active leads can be displayed.
H. Setup window buttons Open Alarms, Printouts, Waveform Window, Arrhythmia Alarms
reference ST-segment offset, for each lead.
Red numbers indicate alarm values.
ECG waveform.
relearn function occurs.
except ST RELEARN and measurement Lead choices.
and ST Analysis Setup windows.
Page 75

Directions for use Chapter 4 Adjust monitoring settings and patient information 71
I. Measurement offset The point at which the ST-segment analysis is performed, as
J. J-points (green) Vertical green reference line intersects each beat at the J-point,
Turn on or off ST analysis
WARNING If a patient’s ST analysis is turned off, the patient’s ECG is not
analyzed for ST-segment deviations. ST alerts or alarms are not generated, and
ST information is not stored as graphical trends. The Acuity System can be
configured to set ST analysis to Off as a default setting. For further information,
see your system administrator.
To turn on or off ST analysis
1. In the patient’s Virtual Monitor, click Setup, ST Analysis.
The ST Analysis Setup window appears.
determined by the number of ms or mV after the J-point.
the end of QRS and the start of the ST segment.
2. Click On or Off in the ST Analysis area.
Page 76

72 Chapter 4 Adjust monitoring settings and patient information Welch Allyn Acuity Central Monitoring System
View current beats and ST-segment deviation values
To view current beats and ST-segment deviation values
1. In the patient’s Virtual Monitor, click Setup, ST Analysis.
The ST Analysis Setup window appears.
2. Beneath the waveforms, click the arrows to select the leads used for one or both lead
displays.
3. View current ST-segment deviation values in the Deviation column.
Alarm values are red.
Graphical trend values are shown in the Graphical Trends Review window. For
instructions on how to view ST trends, see “Review graphical trends” on page 99).
Page 77

Directions for use Chapter 4 Adjust monitoring settings and patient information 73
Set analysis preferences for a patient’s ST analysis
To set analysis preferences for ST analysis
1. In the patient’s Virtual Monitor, click Setup, ST Analysis.
The ST Analysis Setup window appears.
J-points (green)
2. Leads: In the Lead column, check leads to be used for ST Analysis.
Depending on the patient monitor, some of these choices cannot be deselected.
3. Measurement Offset: Click to set the offset from the J-point. This is the point at
which the ST measurement is made.
If you click Auto, the Acuity System selects the offset based on the patient’s heart
rate.
Page 78

74 Chapter 4 Adjust monitoring settings and patient information Welch Allyn Acuity Central Monitoring System
Set alarm preferences for ST Analysis
WARNING Turning off alarming for arrhythmia types and ST Analysis disables
both audio and visual alarm indicators. Although alarming for lethal arrhythmias
cannot be turned off, patients susceptible to arrhythmias must be kept under
close physical surveillance if their alarming has been turned off for any arrhythmia
types.
To set ST analysis alarm preferences
1. In the patient’s Virtual Monitor, click Setup, ST Analysis.
The ST Analysis Setup window appears.
2. Set alarm limits in one of these ways:
• In the Alarm Limits area, click the arrows to set the lower and upper limits for
deviation from the reference beat.
• Click Presets to select preset ST Analysis settings.
Clicking Presets resets alarm limits, alarm level, measurement offset and Print on
Alarm. (For ST Analysis Presets values, see Table 36 on page 193.)
3. Set alarming indications.
• Print on Alarm: Click On or Off to specify whether central station alarm printouts
occur for ST Analysis alarms.
• Alarm Level: Click to set the alarming level priority for ST alarms.
For a description of alarm levels, see Table 6 on page 95.
If you set Alarm Level to OFF, the system continues ST Analysis for checked
leads, but it generates no ST alarms.
Page 79

Directions for use Chapter 4 Adjust monitoring settings and patient information 75
Initiate a relearn of a patient’s reference beats for ST analysis
Description of the Relearn function
Arrhythmia and ST relearn is an Arrhythmia Analysis function that causes the Acuity
system to relearn a patient’s normal ECG rhythm. The Acuity System uses the relearned
rhythm as a guideline to identify arrhythmia events (arrhythmia relearn) and to analyze
deviation of the ECG ST-segment offset (ST relearn).
If you want to establish a new ST reference beat without changing the normal ECG
rhythm used for arrhythmia analysis, initiate relearn in the ST Analysis Setup window.
When ST relearn occurs for a patient
• Only ST reference beat learning occurs when ST RELEARN is clicked in the ST
Analysis Setup window.
• ST relearn also occurs along with Arrhythmia relearn when certain buttons are clicked
in the Arrhythmia Alarms Setup window. For details, see “Initiate relearn of a patient’s
ECG rhythm” on page 63.
What occurs in a patient’s windows during and after ST RELEARN is clicked
• ST Analysis Setup window: The waveform slice displays NO VALID BEATS, and the
Acuity System can take up to 30 seconds to update the waveform.
• Most review windows and some printouts: Relearn and Learning Done event markers
(▼) appear.
Page 80

76 Chapter 4 Adjust monitoring settings and patient information Welch Allyn Acuity Central Monitoring System
To initiate a relearn of a patient’s reference beats for ST-segment analysis
The relearn operation cannot be undone.
1. In the patient’s Virtual Monitor, click Setup, ST Analysis.
The ST Analysis Setup window appears.
2. Carefully evaluate the patient’s current ST segment for all active leads to ensure that
you want the Acuity System to establish the beat as the patient’s reference beat for
ST Analysis.
3. Click ST RELEARN.
The waveform area displays NO VALID BEATS for up to 30 seconds.
The current beat for each ECG lead becomes the reference beat, and the deviation
value for each current beat becomes zero.
4. Closely examine the current ST segment for all active leads to ensure that the Acuity
System has defined an appropriate ST analysis reference beat.
Page 81

Directions for use Chapter 4 Adjust monitoring settings and patient information 77
Important considerations: ST Analysis
WARNING Before you set customized alarm limits for a patient, confirm the
patient’s ID and room number. Otherwise, customized limits might be lost.
WARNING Do not use the Arrhythmia Analysis or ST Analysis feature on
neonates. The Arrhythmia Analysis and ST Analysis options are not intended for
use with neonatal patients.
WARNING The ST algorithm has been tested for accuracy of segment data. As
with all computerized ST analysis systems, the Acuity System cannot replace
skilled care and proper surveillance by a clinician. A clinician must review all data
obtained from the Acuity System, including the significance of ST-segment
changes, before implementing therapy based on this data.
WARNING Ensure these things to minimize false HR, Arrhythmia Analysis and
ST Analysis alarms, and to achieve optimal event detection and analysis:
• ECG cable, lead wires and electrodes are undamaged.
• Patient’s skin is properly prepared.
• Electrodes are placed using standard good practices.
• 5-wire ECG cable is used. A 3-wire cable limits arrhythmia and ST-segment
analyses to a single lead, and ST analysis is disabled when a lead failure
occurs.
• LL electrode is connected. Otherwise, only one ECG lead is available and
arrhythmia and ST-segment analyses are effected.
• Patient monitor and Virtual Monitor display these things:
-HR numeric and ECG waveform
-Non-noisy signal. If signal is noisy, reduce patient movement and increase
distance from other electrical devices.
-Correct patient mode for the patient
• Virtual Monitor ECG 1 and ECG 2 display these things:
-ECG waveform
- Waveform amplitude at least 160 µV, peak-to-peak
-QRS complex amplitude at least twice the P or T wave amplitude
Page 82

78 Chapter 4 Adjust monitoring settings and patient information Welch Allyn Acuity Central Monitoring System
WARNING In Acuity Systems that include an Arrhythmia option, a relearn
function causes the system to learn a patient's normal ECG rhythm. If the
system learns an abnormal rhythm or learns a rhythm during noise, it designates
the learned rhythm as a normal. Thereafter, rhythms of this type might not trigger
an alarm.
A relearn event can be initiated by a user or by the system. System relearns are in
response to these circumstances:
• Patient connection
• Lead change or failure
• System restart
During an arrhythmia relearn event, the system posts a RELEARN alert in the
patient's Virtual Monitor and Waveform Window. Carefully observe a patient
during an Acuity System learning period. During learning, the system detects
only VFib and asystole arrhythmias.
After a relearn event, "Relearn" and "Learning Done" event markers (▼) appear in
most of the patient's review windows and some printouts. After relearn, carefully
evaluate the new ECG rhythm and the current ST segment for all active leads to
ensure that the system learned an appropriate rhythm. For evaluation
instructions, see “To respond to a RELEARN alert” on page 92.
WARNING Minimize patient movement during a RELEARN, as movement
creates noise during the reading. If the system learns an abnormal rhythm or
learns a rhythm during noise, it designates the learned rhythm as normal.
Thereafter, rhythms of this type might not trigger an alarm. Ensure that the
patient remains still for 5 minutes after the RELEARN before allowing them to
move.
Page 83

Directions for use Chapter 4 Adjust monitoring settings and patient information 79
Edit patient information
You can revise information within the Acuity System as follows:
• Edit a patient name
• Edit clinical information
• Edit a patient ID (Add an amended patient ID)
• Add a note to a patient’s Waveform Window
If you want to change a patient’s room number, see “Arrange a patient move from the
patient monitor” on page 129.
Edit any patient information except a patient ID
Sometimes it is necessary to change or correct patient information. You might wish to
correct the spelling of the name or change clinical information.
If you are monitoring a patient with a Propaq LT monitor, you can edit this information at
the monitor instead, if you like.
To edit any patient information except a patient ID
1. At the Acuity Central Station, click .
The Patient List window appears.
2. Click the patient’s name to highlight it, and then click Edit.
The Edit Patient Information window appears.
3. Position the cursor after the information that you want to change, and press the
Backspace key until the incorrect information is gone. Type the new information.
4. Click Confirm.
The information is stored.
Page 84

80 Chapter 4 Adjust monitoring settings and patient information Welch Allyn Acuity Central Monitoring System
Edit a patient ID number: add an amended (revised) patient ID
Once a patient ID number is confirmed, it cannot be changed. However, if your Acuity
System includes the amended ID feature, you can revise an original patient ID number by
adding an amended ID. If necessary, you can change this amended ID again later.
If you’re monitoring a patient with a Propaq LT monitor, you can edit this information at the
monitor instead.
Both IDs appear on printouts.
To add an amended (revised) patient ID
1. In a patient’s Virtual Monitor, click Setup, Patient ID.
The Patient ID Setup window appears.
2. Type or scan the number on the Amended ID line.
3. Carefully review your entries for accuracy.
4. Click Confirm.
The information is stored.
Page 85

Directions for use Chapter 4 Adjust monitoring settings and patient information 81
Add or remove a note in a patient’s Waveform Window
If you would like to attach a note or reminder to a patient’s Waveform Window, such as
when the patient temporarily moves to another location, you can enter the information in
the Patient ID Setup window
The note remains in the Waveform Window until you remove it, even during wireless
dropout.
Always remove a patient note when it is no longer relevant, to ensure that proper patient
care is delivered.
To add or remove a note in a patient’s Waveform Window
1. Click the patient’s map icon or Waveform Window icon.
The patient’s Virtual Monitor appears.
2. Click Setup, Patient ID.
The Patient ID Setup window appears.
Patient Note
3. Add or remove a note.
• To add a note, scan or type up to 20 characters on the Patient Note line.
Carefully check your note.
Note
4. Click Confirm.
5. Click Close.
Patient notes that are entered when the monitor is not connected to the network
will not be displayed on secondary or remote Virtual Monitors. Only the most
recent patient note will be displayed when the monitor reconnects to the
network.
• To remove a note, use the Backspace key on your keyboard.
The information is stored.
Page 86

82 Chapter 4 Adjust monitoring settings and patient information Welch Allyn Acuity Central Monitoring System
Page 87

83
5
Respond to alarms and alerts
Overview of central station alarm and alert indications
• Alarms indicate patient vital-sign violations by showing red window borders, icons
and vital-sign highlights. All alarms are associated with audible tones.
• Alerts indicate equipment problems or low-level patient information alerts by showing
yellow window borders and icons. Some alerts are associated with audible tones.
When conditions are corrected, the green, “patient monitoring OK” state is restored.
Figure 1. Acuity Central Station screen showing a patient in alarm
A. Alarm and alert messages
B. Border color changes
C. Matching alarm and alert
D. Shortest route to the patient
A. Alarm and alert messages Alarm and alert messages are displayed in the message window.
B. Border color changes Borders of Virtual Monitors and Waveform Windows in alarm change
C. Matching alarm and alert icons Matching alarm or alert icons appear.
D. Shortest route to the patient Shortest route from the Acuity Central Station to the patient’s bedside.
icons
color and display specific messages.
Page 88

84 Chapter 5 Respond to alarms and alerts Welch Allyn Acuity Central Monitoring System
Suspend an audible alarm or alert tone for 90 seconds
All patient alarms and some alerts are associated with tones (for details, see Table 6 on
page 95).
You can silence tones temporarily from these places:
• Acuity Central Station
• Patient monitor
• (Optional) Mobile device running AcuityLink Clinician Notifier software
To suspend an audible alarm or alert tone from a Waveform Window
Suspend Area
1. Bring your pointer into the Waveform Window.
2. Click in the numerics area to the right of the word SUSPND.
Tones are suspended for 90 seconds.
To suspend an audible alarm or alert tone from a Virtual Monitor
1. Bring your pointer into the Virtual Monitor.
2. Click Suspend.
Tones are suspended for 90 seconds.
Page 89

Directions for use Chapter 5 Respond to alarms and alerts 85
Important considerations: suspending an audible alarm or alert tone
Related to indications
WARNING During an alarm or alert suspension period, be aware of new visual
alarm indications that might occur on the patient monitor or Virtual Monitor.
During a suspension period, these things occur at the Virtual Monitor and patient
monitor:
• Audible tones are suspended for 90 seconds unless RESUME is clicked at
the central station or the alarm tone is reset at the patient monitor.
• Alarms for lethal events—apnea, asystole, ventricular tachycardia, and
ventricular fibrillation—override the suspend state.
• All other new alarms for the same patient are indicated only visually, by
additional red numeric highlights and arrhythmia or ST status messages.
• New equipment alerts are indicated only after the first alarm and alert
conditions are corrected.
WARNING If an Acuity Central Station display is intentionally or inadvertently
muted, alarm and alert tones do not occur at the display. If your central station
display includes audible tones, remain aware of whether they are occurring. If
they appear to have stopped, ensure that tones are restored.
WARNING False alarms may occur in some situations. You must understand
and address the cause of the false alarms whenever possible to eliminate the
possibility of repeated false alarms and alarm fatigue, which might result in a
failure to respond to an actual alarm situation.
WARNING Central station alarms, alerts, and other events can go unnoticed if
clinical personnel are not present at the central station or if interruptions occur in
power or system operations.
WARNING The leading cause of patient death or serious injury reported with the
use of patient monitoring equipment is failure to respond to alarms notifying the
user of an adverse change in patient condition. If you are relying on visual alarm
notifications, maintain a clear line of sight and remain within 4 meters of the
central station. If you are relying on audio alarm notifications, make sure that you
can hear audio alarms from where you are. Set the volume as needed considering
the environment and ambient noise levels. Verify that the alarm is audible to a
clinician working at the maximum distance from the central station.
Page 90

86 Chapter 5 Respond to alarms and alerts Welch Allyn Acuity Central Monitoring System
Related to heart rate (HR) and arrhythmia alarms
WARNING All heart rate alarms are valid, even if the HR value at the central
station differs from that at the monitor.
If your system includes an Arrhythmia Analysis option, the Acuity System heart
rates for adult and pediatric patients are a result of system software analysis.
The HR/PR numeric changes to “---” in the Virtual Monitor, Waveform Window,
review windows, and system printouts when the system detects ventricular
fibrillation or asystole. However, an apparently valid heart rate numeric might
show in the patient monitor.
Related to NIBP alarms
WARNING Always identify the source of an alarm before you suspend or
silence it. When an NIBP alarm is suspended, the window borders and icon
colors at the central station are the pre-alarm color instead of the typical red
“Alarm Suspended” status.
WARNING If a noninvasive blood pressure reading is suspect, repeat the
measurement, watching a manometer (if the monitor has one) to verify the
reading. If you are still uncertain about the reading, use another method.
Page 91

Directions for use Chapter 5 Respond to alarms and alerts 87
Remove a latched arrhythmia alarm
If your Acuity System is configured to allow latched alarms, indications for certain
arrhythmia alarms remain (or latch) in the Waveform Window, even after the alarm
condition has ceased.
• Depending on configuration, lethal, high-level and possibly medium-level arrhythmia
alarms visually latch in Waveform Windows. (For details about arrhythmia alarm
levels, see “To adjust preferences for a patient’s arrhythmia alarming” on page 61.)
• After the alarm condition becomes inactive, latching indications remain until you clear
the latched alarm or until the alarm is replaced by another latched alarm of equal or
higher priority.
• If you attempt to remove a latch for an alarm condition that is still active, the visual
latch remains.
To remove a latched arrhythmia alarm
The latched alarm
Red bar: Lethal or high-level arrhythmia alarm
Red and yellow bar: medium-level arrhythmia alarm
Take one of these steps:
• Click the colored bar to remove the latching indication(s).
• Click to remove the latching indication(s) and review the event.
The Arrhythmia Events Review window appears.
The cursor clears the text and bar as it sweeps across the window.
Page 92

88 Chapter 5 Respond to alarms and alerts Welch Allyn Acuity Central Monitoring System
Respond to specific alarms and alerts
This section describes a few of the Acuity System alarms and alerts and how to respond
to them.
Respond to a DROPOUT alert
When there is a loss of bi-directional communication between a wireless monitor and the
Acuity System, an audible DROPOUT equipment alert occurs at the monitor and at the
Acuity Central Station.
The monitor continues to provide local alarms and alerts, but alarms generated by the
Acuity System, such as arrhythmia or ST analysis alarms, are not indicated, and you
cannot access any Acuity System windows related to the patient.
To respond to a DROPOUT alert
Take one of these steps:
• Click SUSPEND.
The audible tone is suspended for 90 seconds,.
• Click RESET.
Alert indications stop and the Virtual Monitor is in the blue, “patient intentionally
disconnected” state.
If the monitor resumes communication with the Acuity System, the Virtual Monitor,
Waveform Window and patient icon return to the green, “patient monitoring OK”
state.
WARNING Auto-reboots occur and wireless connection is occasionally
disrupted. During this period, the bedside monitors continue to provide their
primary alarming functions. Auto-reboots occur infrequently, due to poor
environmental conditions. Failure to perform preventative maintenance can
increase the frequency of occurrence.
Page 93

Directions for use Chapter 5 Respond to alarms and alerts 89
Dismiss a CHECK PATIENT HR/PR alert
A patient monitor uses a single lead to calculate heart rate, and an Acuity System with an
Arrhythmia Analysis option uses more sophisticated arrhythmia analysis algorithms.
Thus the patient monitor and Acuity Central Station heart rate readings for the same
patient can differ. Differences mostly occur in response to these conditions:
• Rare ECG morphologies, such as “tall ‘T’ waves”
• Certain paced rhythms
• Noise or artifact
If the patient monitor displays a higher heart rate, it can present a heart rate alarm that the
Acuity Central Station does not present.
If this condition occurs for a defined period, the patient’s Acuity System Virtual Monitor
might display a silent equipment alert (as defined by your system administrator) to inform
you of the monitor alarm.
If the heart rate alarm stops at the patient monitor, the Acuity System dismisses this
message.
Note
To dismiss a CHECK PATIENT HR/PR alert
• Click DISMISS.
You can attempt to reduce erroneous or nuisance heart rate alarms if the patient
monitor is a Propaq LT, CS or Encore. For instructions, see Table 14 on page 156.
The patient’s Virtual Monitor and Waveform Window return to the green, “patient
monitoring OK” state.
Page 94

90 Chapter 5 Respond to alarms and alerts Welch Allyn Acuity Central Monitoring System
Dismiss an arrhythmia or ST alarm message
When you suspend an arrhythmia or ST alarm, the audible alarm tone is suspended for 90
seconds as usual. However, the Acuity System Virtual Monitor displays a visual message
to call attention to the alarm.
To dismiss an arrhythmia or ST alarm message
• Click DISMISS.
The border remains red, but the message is dismissed and you can see the
waveforms.
Page 95

Directions for use Chapter 5 Respond to alarms and alerts 91
Respond to a RELEARN alert
WARNING In Acuity Systems that include an Arrhythmia option, a relearn
function causes the system to relearn a patient's normal ECG rhythm. If the
system learns an abnormal rhythm or learns a rhythm during noise, it designates
the learned rhythm as normal. Thereafter, rhythms of this type might not trigger
an alarm.
A relearn event can be initiated by a user or by the system. System relearns are in
response to these circumstances:
• Patient connection
• Lead change or failure
• System restart
During an arrhythmia relearn event, the system posts a RELEARN alert in the
patient's Virtual Monitor and Waveform Window. Carefully observe a patient
during an Acuity System learning period. During learning, the system detects
only VFib and asystole arrhythmias.
After a relearn event, "Relearn" and "Learning Done" event markers (▼) appear in
most of the patient's review windows and some printouts. After relearn, carefully
evaluate the new ECG rhythm and the current ST segment for all active leads to
ensure that the system learned an appropriate rhythm.
WARNING Minimize patient movement during a RELEARN, as movement
creates noise during the reading. If the system learns an abnormal rhythm or
learns a rhythm during noise, it designates the learned rhythm as normal.
Thereafter, rhythms of this type might not trigger an alarm. Ensure that the
patient remains still for 5 minutes after the RELEARN before allowing them to
move.
Page 96

92 Chapter 5 Respond to alarms and alerts Welch Allyn Acuity Central Monitoring System
To respond to a RELEARN alert
1. In the patient’s Virtual Monitor, carefully evaluate the new ECG rhythm to ensure that
the Acuity System has learned an appropriate rhythm.
2. Check the relearned ECG rhythm in the Waveforms Review window:
a. Click Review, Waveforms.
The Waveforms Review window appears.
b. Click the Arrhythmia Relearn event marker (▼) shown at the time of the Relearn
event.
c. Examine the rhythm that the system learned to ensure that it appropriate.
3. If your Acuity System includes the ST Analysis option, examine the ST segment:
a. Click Setup, ST Analysis.
The ST Analysis Setup window appears.
b. Examine the current ST segment for all active leads to ensure that the Acuity
System defined an appropriate ST analysis reference beat.
4. If the new ECG rhythm or ST segment is not appropriate, wait until the patient’s ECG
rhythm is suitable to be learned as a normal ECG rhythm, and then initiate a relearn.
For instructions, see “To initiate relearn of a patient’s ECG rhythm for arrhythmia and
ST-segment analyses” on page 65.
Page 97

Directions for use Chapter 5 Respond to alarms and alerts 93
Respond to a CHECK LEADS alert
The visual CHECK LEADS alert appears when the number of PVCs exceeds the normal
ranges of PVC activity. The alert remains for a brief period.
To respond to a CHECK LEADS alert
1. Verify that the patient’s lead wires and electrodes are in good condition.
2. Verify that the electrodes were placed using standard good practices.
3. Click Review, Waveforms.
The Waveforms Review window appears.
4. Review the patient’s waveforms for accurate beat labeling.
A normal beat is indicated by a dot.
5. If it is necessary to initiate Relearn to establish the patient’s normal ECG rhythm, see
“To initiate relearn of a patient’s ECG rhythm for arrhythmia and ST-segment
analyses” on page 65.
Page 98

94 Chapter 5 Respond to alarms and alerts Welch Allyn Acuity Central Monitoring System
Respond to an arrhythmia NOISE alert
The visual NOISE alert occurs when the Acuity System can’t analyze arrhythmia because
of excessive electrical noise.
The Acuity System invalidates individual noisy leads and then re-validates them when
noise is no longer detected.
At the Acuity Central Station, there is no heart rate reading during this alert, but the
patient monitor might present a heart rate.
To respond to an arrhythmia NOISE alert
1. Verify that the patient’s lead wires and electrodes are in good condition.
2. Verify that the electrodes were placed using standard good practices.
Page 99

Directions for use Chapter 5 Respond to alarms and alerts 95
Summary of Acuity System alarm and alert levels
Alarm and alert levels determine which alarms or alerts are indicated if multiple alarms or
alerts occur for a patient. This table shows a summary of alarm and alert levels. For a
complete list of icons, see “Status icons” on page 137.
Table 6. Summary of alarm and alert levels at the Acuity System
Alarms (red) Monitor equipment
Lethal arrhythmia alarms
Ventricular fibrillation, asystole and
ventricular tachycardia
Lethal-level alarm tone:
BEEP BEEP BEEP BEEP.....
(Four loud beeps followed by a pause)
High-level alarms:
Arrhythmias with alarm levels set
a
to high
ST-segment offset if alarm level set to
b
high
Apnea alarms
High-level alarm tone:
BEEP BEEP BEEP.....
(Three loud beeps followed by a pause)
Medium-level alarms:
Arrhythmias with alarm levels set
to medium
ST-segment offset if alarm level set to
medium
Patient vital-sign alarms
Medium-level alarm tone:
BEEP beep...
(One loud and one softer beep, followed
by a brief pause)
Low-level alarms:
No Continuous Heart/
Pulse Rate alarms
Arrhythmias with alarm levels set to low
ST Analysis with alarm level set to low
alerts (yellow)
Alerts:
Monitor Cannot
Communicate
Too Many Monitors
Monitor
Communication Lost
Monitor Problem
Alert Tone:
beep............ beep
(A soft beep followed
by a long pause)
Note: Some Monitor
Problem alerts are not
associated with
audible tones.
System equipment
alerts (yellow)
Low-level alerts:
Hallway Message
Panel Problem
Unrecognized
Networked Acuity
System
Central Printer Problem
Swap Space Low
Network Problem
Connectivity Server
Unavailable
Some Connectivity
Services Unavailable
Patient information
alerts (yellow)
Low-level alerts:
Alarm(s) Off
Unconfirmed Patient
ID
Unconfirmed Room
Number
These alerts are not
associated with
audible tones.
Low-level alarm tone:
beep...beep...beep.........
(Three spaced, soft beeps, followed by a
pause)
a. Arrhythmia alarm levels are setin the Arrhythmia Alarms Setup window. Arrhythmia alarmsare further prioritized by list order in this
window.
b. ST alarm levels are set in the ST Analysis Setup window.
Devices Running
Clinician Notifier are
Not Reachable
These alerts are not
associated with audible
tones.
Page 100

96 Chapter 5 Respond to alarms and alerts Welch Allyn Acuity Central Monitoring System
 Loading...