

Page 1

9600 Plus Calibration Tester
Page 2

© 2017 Welch Allyn. All rights are reserved. To support the intended use
of the product described in this publication, the purchaser of the product
is permitted to copy this publication, for internal distribution only, from
the media provided by Welch Allyn. No other use, reproduction, or
distribution of the publication, or any part of it, is permitted without
written permission from Welch Allyn.
Welch Allyn assumes no responsibility for any injury to anyone, or for any
illegal or improper use of the product, that may result from failure to use
this product in accordance with the instructions, cautions, warnings, or
statement of intended use published in this manual.
Welch Allyn is a registered trademark of Welch Allyn. Braun ThermoScan
is a registered trademarks of Braun Corporation.
Printed in Mexico
DIR 80020333 Ver A
Revised: 2017-06
Page 3

Contents
Introduction . . . . . . . . . . . . . . . . . . . . . . . . . . . . . . . . . . 1
Symbols and Descriptions . . . . . . . . . . . . . . . . . . . . . . . . . . 2
Cautions . . . . . . . . . . . . . . . . . . . . . . . . . . . . . . . . . . . . . . . . 3
Unpacking the 9600 Plus Calibration Tester . . . . . . . . . . . . . 4
Controls and Indicators . . . . . . . . . . . . . . . . . . . . . . . . . 5
LCD Display . . . . . . . . . . . . . . . . . . . . . . . . . . . . . . . . . . . . . 5
Power On Sequence. . . . . . . . . . . . . . . . . . . . . . . . . . . . . . . 7
Front of the 9600 Plus Calibration Tester . . . . . . . . . . . . . . . 7
Operation. . . . . . . . . . . . . . . . . . . . . . . . . . . . . . . . . . . .11
9600 Plus Calibration Tester Setup. . . . . . . . . . . . . . . . . . . 11
Changing the Calibration Set Point Temperature . . . . . . . . 11
Welch Allyn SureTemp and SureTemp Plus Thermometers 13
Braun ThermoScan Pro 4000 Model. . . . . . . . . . . . . . . . . . 15
Braun ThermoScan Pro 6000 model. . . . . . . . . . . . . . . . . . 18
Braun ThermoScan Pro 3000 Model. . . . . . . . . . . . . . . . . . 23
Troubleshooting inaccurate readings . . . . . . . . . . . . . . . . . 25
i
Maintenance . . . . . . . . . . . . . . . . . . . . . . . . . . . . . . . . 27
Cleaning . . . . . . . . . . . . . . . . . . . . . . . . . . . . . . . . . . . . . . . 27
Problem Solving . . . . . . . . . . . . . . . . . . . . . . . . . . . . . . . . . 28
Specifications . . . . . . . . . . . . . . . . . . . . . . . . . . . . . . . . . . . 31
Electromagnetic Compatibility . . . . . . . . . . . . . . . . . . . . . . 32
Page 4

ii
Warranty and Service . . . . . . . . . . . . . . . . . . . . . . . . . 33
Limited Warranty . . . . . . . . . . . . . . . . . . . . . . . . . . . . . . . . 33
Service . . . . . . . . . . . . . . . . . . . . . . . . . . . . . . . . . . . . . . . . 34
Introduction . . . . . . . . . . . . . . . . . . . . . . . . . . . . . . . . . . 1
Symboles et descriptions . . . . . . . . . . . . . . . . . . . . . . . . . . . 2
Mises en garde . . . . . . . . . . . . . . . . . . . . . . . . . . . . . . . . . . . 3
Déballage du testeur d’étalonnage 9600 Plus . . . . . . . . . . . 4
Commandes et indicateurs . . . . . . . . . . . . . . . . . . . . . . 5
Affichage ACL . . . . . . . . . . . . . . . . . . . . . . . . . . . . . . . . . . . . 5
Séquence de mise en marche . . . . . . . . . . . . . . . . . . . . . . . 7
Avant du testeur d’étalonnage 9600 Plus . . . . . . . . . . . . . . . 7
Fonctionnement . . . . . . . . . . . . . . . . . . . . . . . . . . . . . .11
Installation du testeur d’étalonnage 9600 Plus. . . . . . . . . . 11
Modification de la température du point d'étalonnage . . . . 11
Thermomètres Welch Allyn SureTemp et SureTemp Plus . 13
Modèle Braun ThermoScan Pro 4000. . . . . . . . . . . . . . . . . 15
Modèle Braun ThermoScan Pro 6000. . . . . . . . . . . . . . . . . 19
Modèle Braun ThermoScan Pro 3000. . . . . . . . . . . . . . . . . 24
Résolution des problèmes de relevés incorrects . . . . . . . . 26
Entretien . . . . . . . . . . . . . . . . . . . . . . . . . . . . . . . . . . . 27
Nettoyage . . . . . . . . . . . . . . . . . . . . . . . . . . . . . . . . . . . . . . 27
Dépannage . . . . . . . . . . . . . . . . . . . . . . . . . . . . . . . . . . . . . 28
Spécifications . . . . . . . . . . . . . . . . . . . . . . . . . . . . . . . . . . . 31
Compatibilité électromagnétique . . . . . . . . . . . . . . . . . . . . 32
Page 5

Directions for Use Contents iii
Garantie et entretien . . . . . . . . . . . . . . . . . . . . . . . . . . 33
Garantie limitée. . . . . . . . . . . . . . . . . . . . . . . . . . . . . . . . . . 33
Entretien . . . . . . . . . . . . . . . . . . . . . . . . . . . . . . . . . . . . . . . 34
Einführung. . . . . . . . . . . . . . . . . . . . . . . . . . . . . . . . . . . 1
Symbole und Beschreibungen . . . . . . . . . . . . . . . . . . . . . . . 2
Vorsicht . . . . . . . . . . . . . . . . . . . . . . . . . . . . . . . . . . . . . . . . . 3
Auspacken des Kalibriertesters 9600 Plus . . . . . . . . . . . . . . 4
Bedienelemente und Anzeigen . . . . . . . . . . . . . . . . . . . 5
Flüssigkristallanzeige . . . . . . . . . . . . . . . . . . . . . . . . . . . . . . 5
Einschaltreihenfolge . . . . . . . . . . . . . . . . . . . . . . . . . . . . . . . 7
Vorderseite des Kalibriertesters 9600 Plus . . . . . . . . . . . . . . 7
Betrieb. . . . . . . . . . . . . . . . . . . . . . . . . . . . . . . . . . . . . .11
Konfiguration des Kalibriertesters 9600 Plus . . . . . . . . . . . 11
Ändern der Kalibrier-Sollwerttemperatur. . . . . . . . . . . . . . . 11
Die Thermometer SureTemp und SureTemp Plus von
Welch Allyn . . . . . . . . . . . . . . . . . . . . . . . . . . . . . . . . . . . . . 13
Das Modell ThermoScan Pro 4000 von Braun . . . . . . . . . . 15
Modell Braun ThermoScan Pro 6000 . . . . . . . . . . . . . . . . . 18
Das Modell ThermoScan Pro 3000 von Braun . . . . . . . . . . 23
Fehlerbehebung bei ungenauen Werten . . . . . . . . . . . . . . 25
Wartung. . . . . . . . . . . . . . . . . . . . . . . . . . . . . . . . . . . . 27
Reinigung . . . . . . . . . . . . . . . . . . . . . . . . . . . . . . . . . . . . . . 27
Fehlerbehebung . . . . . . . . . . . . . . . . . . . . . . . . . . . . . . . . . 28
Technische Daten . . . . . . . . . . . . . . . . . . . . . . . . . . . . . . . . 31
Elektromagnetische Verträglichkeit. . . . . . . . . . . . . . . . . . . 32
Gewährleistung und Service . . . . . . . . . . . . . . . . . . . . 33
Beschränkte Gewährleistung . . . . . . . . . . . . . . . . . . . . . . . 33
Service . . . . . . . . . . . . . . . . . . . . . . . . . . . . . . . . . . . . . . . . 34
Page 6

iv
Page 7

1
1
Introduction
The 9600 Plus Calibration Tester verifies calibration of the
following thermometers:
®
• Welch Allyn SureTemp
986)
• Welch Allyn SureTemp
OEM)
• Braun ThermoScan
The 9600 Plus Calibration Tester provides a tightly regulated
temperature source that eliminates the setup, precision
calibration, and maintenance requirements of water baths and
other general purpose calibration equipment. The user takes
the “temperature” of the 9600 Plus Calibration Tester with the
knowledge and assurance that precise readings are obtained
because the unit is factory calibrated to National Institute of
Standards and Technology (NIST) or equivalent devices. User
adjustments are not required or recommended.
The “blackbody” of the 9600 Plus Calibration System acts as
a heat reservoir for the thermistor probe and as a heat
radiator for the infrared ear thermometers.
models (678, 678 OEM, 679 and
®
Plus models (690, 692 and 692
®
Pro 3000, Pro 4000, and Pro 6000
The unit contains solid-state circuitry for long-term stability
with minimal maintenance. Welch Allyn uses only precision
components in the construction of the 9600 Plus Calibration
Tester. To maintain traceability to NIST or equivalent, return
the 9600 Plus Calibration Tester to the factory for annual
calibration.
Page 8
2 Chapter 1 Introduction Welch Allyn 9600 Plus Calibration Tester
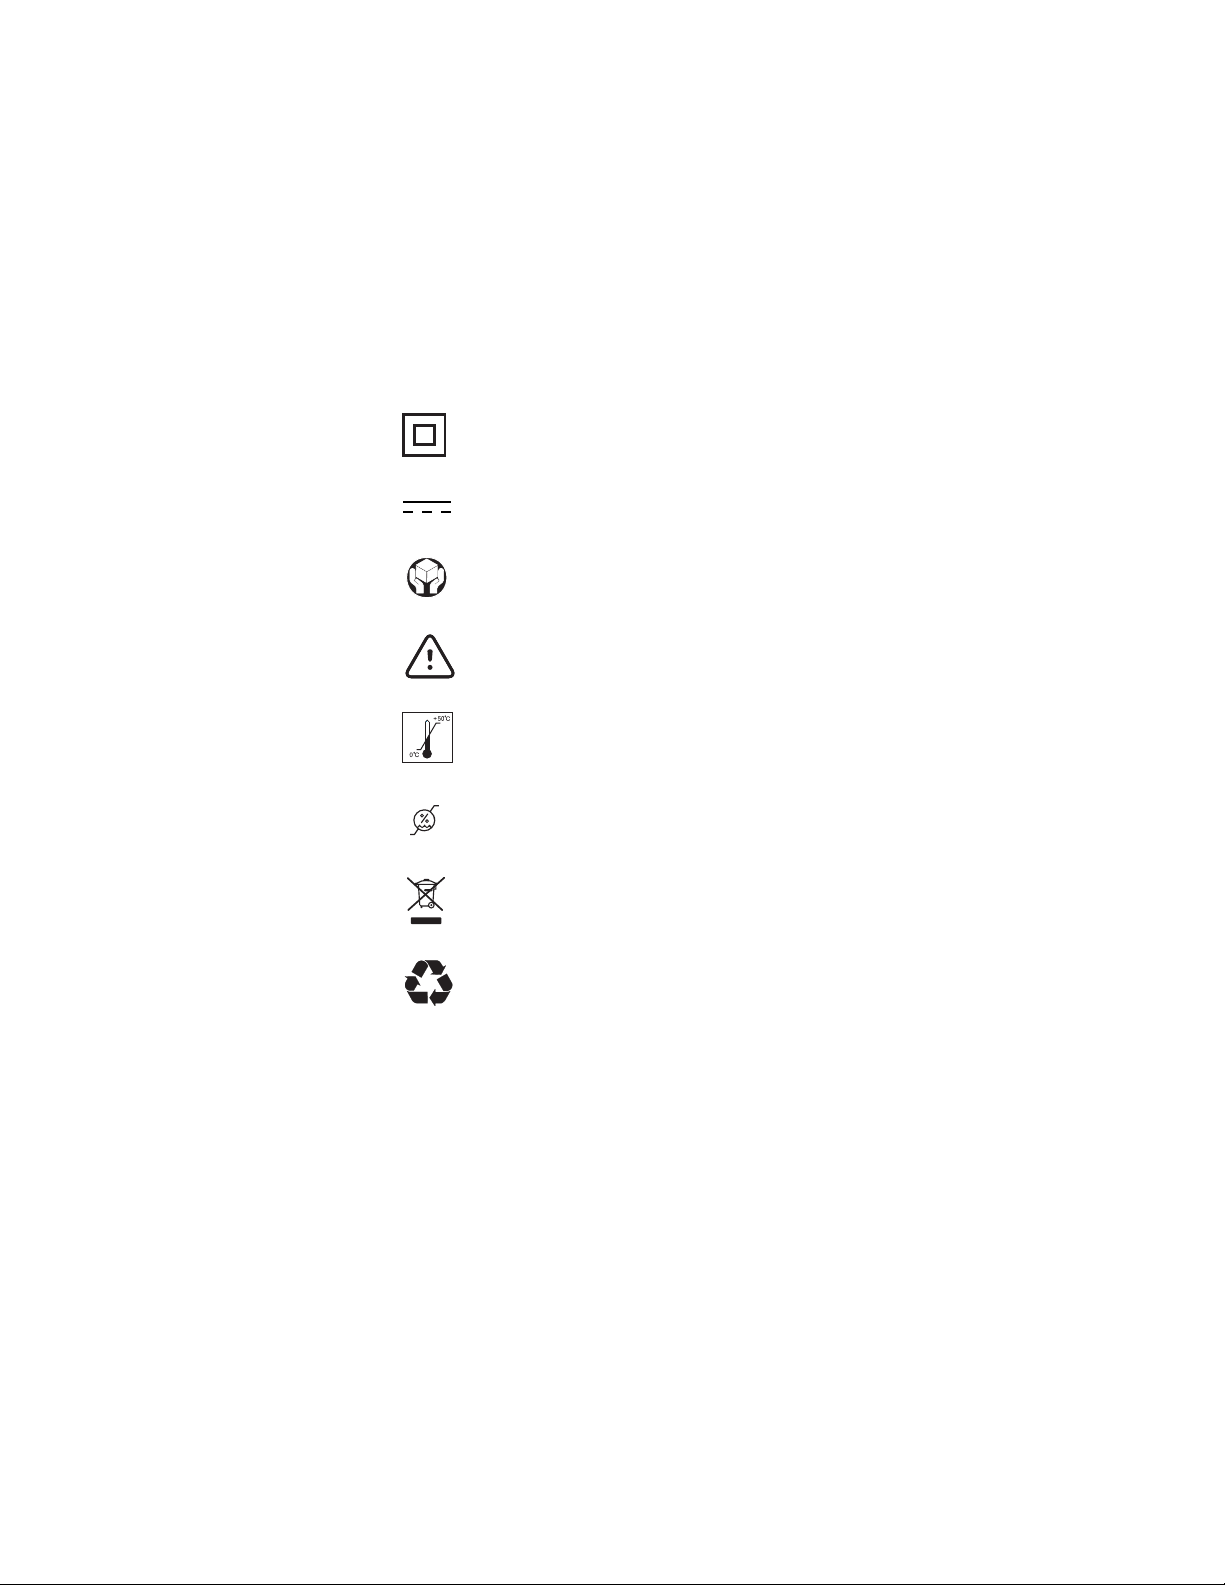
Symbols and Descriptions
Double Insulation.
Direct Current.
Handle with Care.
Attention! Caution; Consult Directions for Use for more
information.
Transport/Storage Temperature
95%
15%
Relative Humidity
Separate collection for electronic equipment
Recyclable
Page 9

Directions for Use Chapter 1 Introduction 3
Cautions
A caution statement in this manual identifies a condition or
practice which, if not corrected or discontinued immediately,
could lead to equipment failure, equipment damage, or data loss.
Caution Do not immerse or soak the 9600 Plus
Calibration Tester in any type of fluid.
Caution Only trained Biomedical personnel should
operate the 9600 Plus Calibration Tester and conduct
calibration verification of thermometers.
Caution When not using the Thermistor or Ear Device
Ports, keep them covered with the Dust Cover.
Caution Store thermometers for testing in the same
room as the 9600 Plus Calibration Tester for
approximately 30 minutes prior to testing to allow the
thermometer to reach ambient room temperature.
Caution Do not clean the Thermistor or Ear Device
Ports. Doing so may damage the surface. Only a Welch
Allyn authorized Service Center should clean the Device
Ports.
Page 10

4 Chapter 1 Introduction Welch Allyn 9600 Plus Calibration Tester
Unpacking the 9600 Plus Calibration Tester
Unpack the 9600 Plus Calibration Tester and inspect for missing
items. Retain the shipping materials to return the device to
Welch Allyn for recalibration.
The following items are enclosed:
• A 9600 Plus Calibration Tester
• A package containing a power supply and four mains plug
inserts
• The Directions for Use
• A Carrying Case
If any of these items are missing after opening, please contact
Welch Allyn Customer Service at the number provided on
page 34.
Page 11
5
Current Cavity
Temperature
Temperature
Units
Calibration Set
Point Temperature
Set Point
Mode
Celsius/Fahrenheit
Selection Button
Temperature
Selection
Button
2
Controls and Indicators
LCD Display
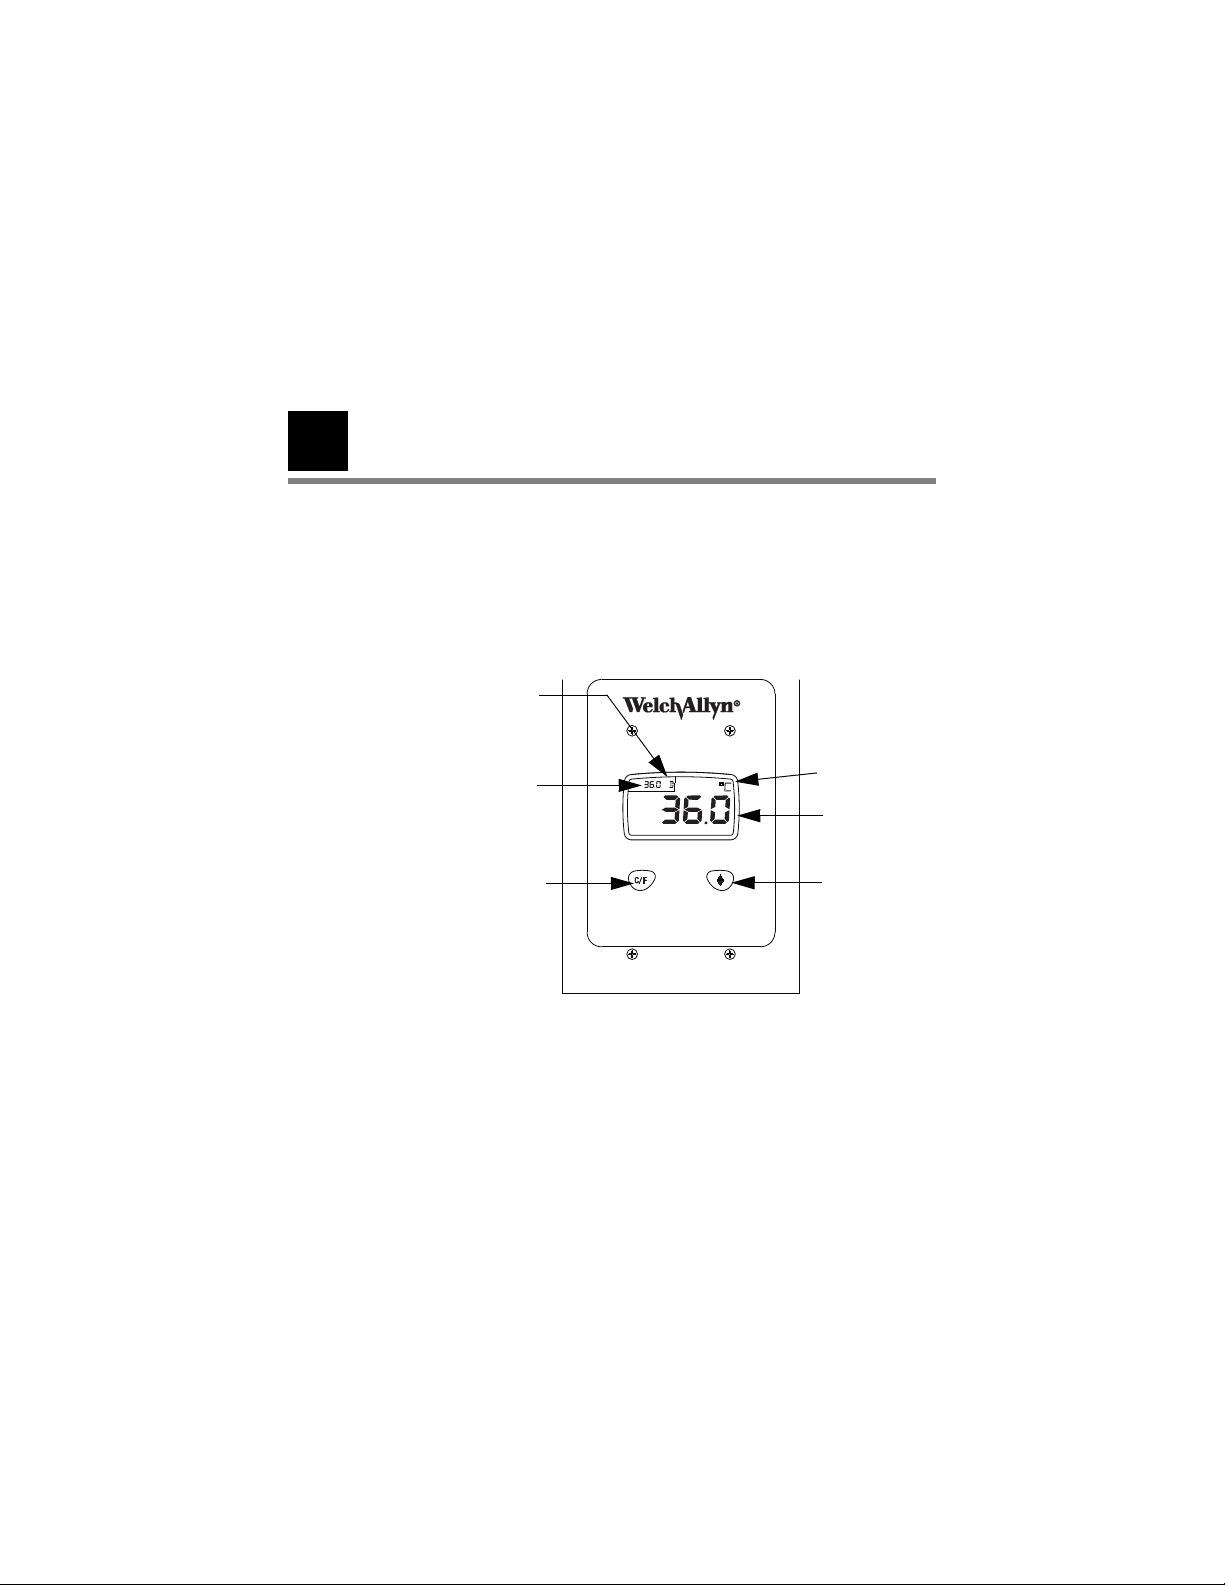
Figure 1. LCD Display and Front Buttons
Calibration Set Point Temperature
There are three Calibration Set Point temperatures used to
test the calibration of the thermometer. The three
temperatures are 36° C (96.8° F), 38.5° C (101.3° F), and 41°
Page 12

6 Chapter 2 Controls and Indicators Welch Allyn 9600 Plus Calibration Tester
C (105.8° F). The LCD displays the current Calibration Set Point
Temperature in the upper left corner of the LCD.
Current Cavity Temperature
The current temperature of the 9600 Plus Calibration Tester is
indicated by the large numbers in the center of the display
(Figure 1).
As the device is transitioning to the current Calibration Set Point
Temperature, the actual temperature flashes on the display.
When the device reaches the Calibration Set Point Temperature,
the temperature in the center of the display stops flashing.
Temperature Units
The 9600 Plus Calibration Tester is capable of displaying the
temperature in degrees Fahrenheit or Celsius.
Set Point Mode
The LCD will display either a "D" (Default) or "L" (Last Used) in the
upper left hand corner (Figure 1). The 9600 Plus Calibration
Tester has two set point modes of operation. The Default mode
(from the factory) causes the 9600 Plus Calibration Tester to heat
up to the lowest set point (36.0
Used mode causes the 9600 Plus Calibration Tester to heat up to
the last temperature setting that was used.
°
C / 96.8°F) upon startup. The Last
To change the Set Point Mode, press and hold the C/F and Arrow
buttons below the LCD display simultaneously until a single audio
beep is heard. A “D” or an “L” will appear in the upper left corner
of the display for the new mode.
Page 13

Directions for Use Chapter 2 Controls and Indicators 7
Power On Sequence
The 9600 Plus Calibration Tester receives power from a wallmount power pack that plugs into the back of the unit. There is
no ON/OFF switch. On power up, the 9600 Plus Calibration
Tester performs internal self-checks, displays an all-segments
test pattern, beeps and displays the device’s current
temperature. The 9600 Plus Calibration Tester immediately
applies heat, if needed, to reach the selected Calibration Set
Point Temperature.
Front of the 9600 Plus Calibration Tester
Temperature Selection Button
This button allows the user to select one of three set point
temperatures: 36.0
°
(105.8
To scroll from one set point to the next, press and hold the
Temperature Selection button until a beep is heard. The newly
selected set point appears in the upper left corner of the LCD
display. The device’s current temperature is displayed, will start
to flash, and continue flashing until the cavity reaches the
equilibrium at the new set point.
F).
°
C (96.8°F), 38.5°C (101.3°F), or 41.0°C
Celsius/Fahrenheit Selection Button
This button allows the user to select degrees Celsius or degrees
Fahrenheit. To change the temperature units, press and hold the
C/F button until a beep is heard. The temperatures will appear in
either “°C” or “°F”, see (Figure 1).
Page 14
8 Chapter 2 Controls and Indicators Welch Allyn 9600 Plus Calibration Tester
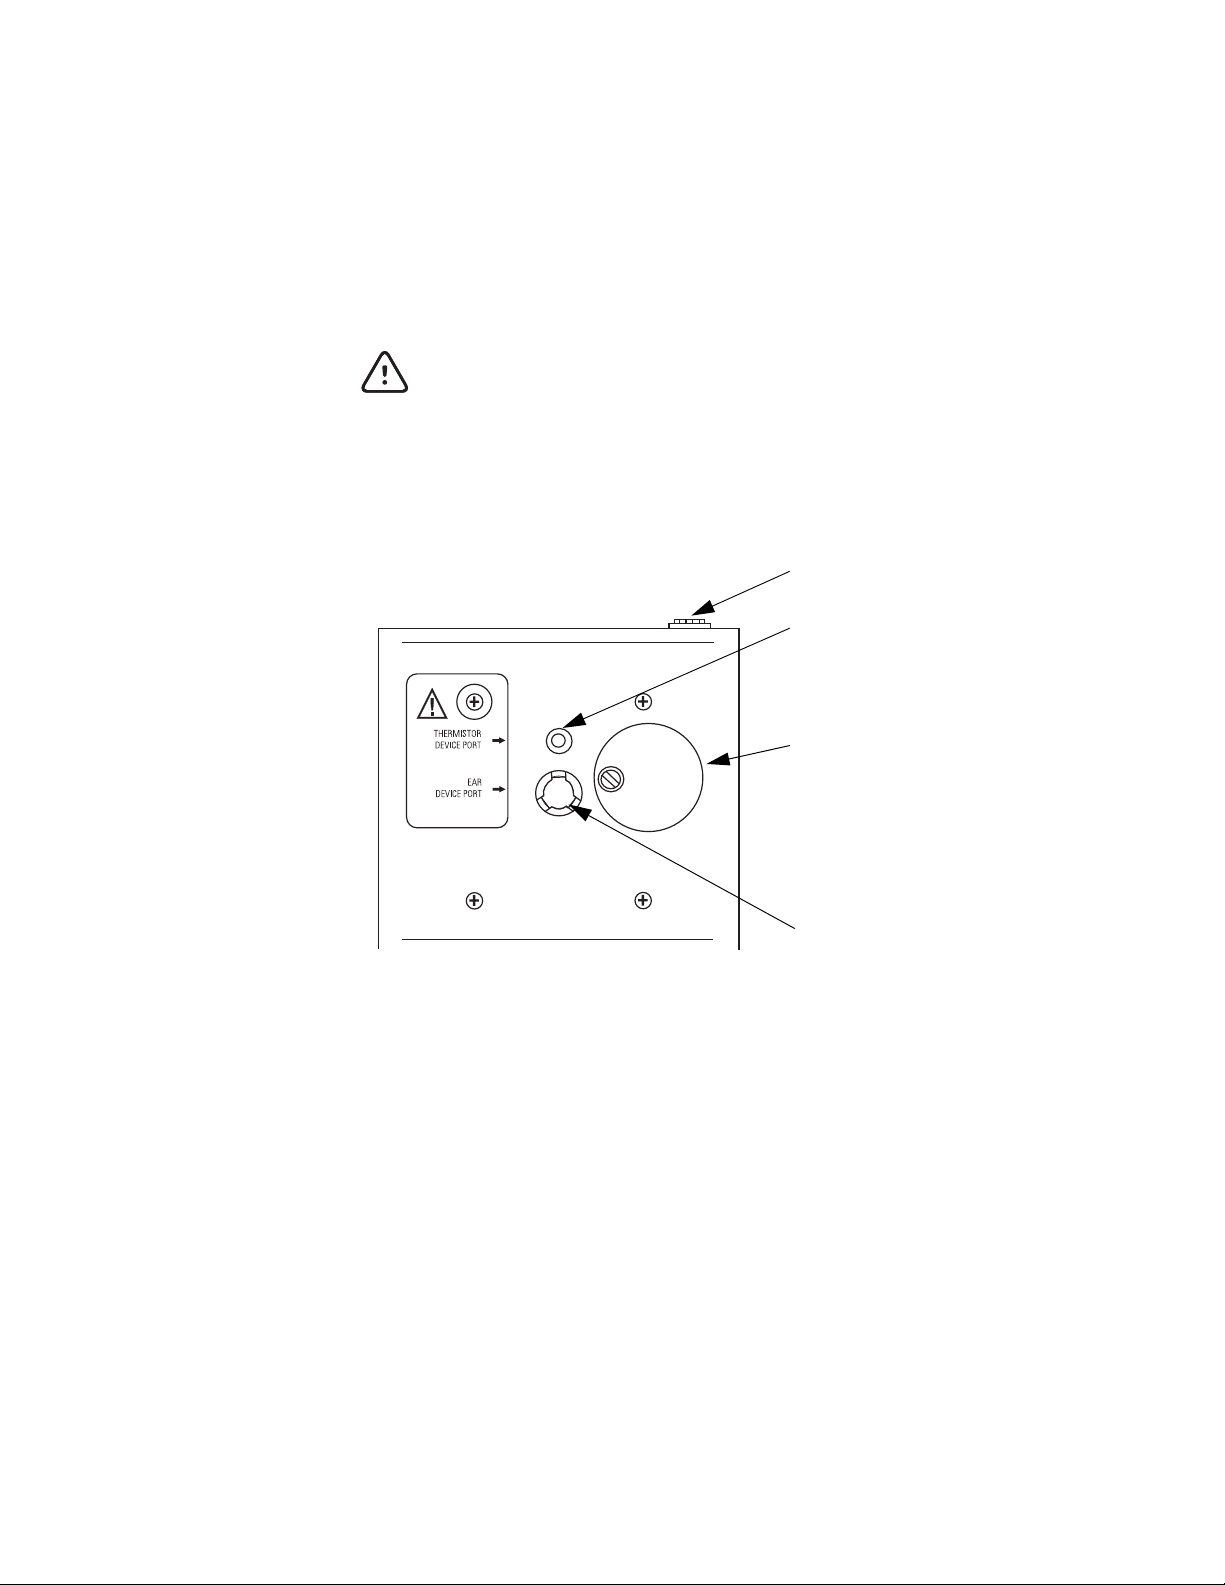
Thermistor
Device Port
Ear Device
Port
Dust Cover
Power Jack
Caution Verify the thermometer being tested and the
9600 Plus are set to use the same temperature scale
before running a test. Reference the thermometers
directions for use to change its temperature scale
Figure 2. Front of the 9600 Plus Calibration Tester
Page 15

Directions for Use Chapter 2 Controls and Indicators 9
Dust Cover
This black, plastic cover keeps dust from entering the Thermistor
and Ear Device Ports. To expose the Thermistor and Ear Device
Ports, rotate the Dust Cover counter clockwise. To cover the
ports, rotate the Dust Cover clockwise.
Caution When not using the Thermistor or Ear Device
Ports, keep them covered with the Dust Cover.
Thermistor and Ear Device Ports
The Ear Device Port is the larger of the two ports located under
the dust cover and is for the Braun ThermoScan Pro 3000 and
Pro 4000 ear thermometers (Figure 2).
The Thermistor Device Port is the smaller port located under the
dust cover and is for the SureTemp and SureTemp Plus
thermometers.
The surface texture inside the Ear Device Port is painted with a
special dull, black paint to enable Ear device readings. You can
only see its surface under bright light. The Thermistor Device
Port is not painted black. Keep both clean and dry.
The coating in the device ports of the unit is fragile, so please
follow the cleaning instructions carefully. Do not touch the
surface, and do not allow any foreign objects to be inserted into
the ports. Avoid spilling liquids onto the unit. If liquid or other
contaminants enter the unit, Welch Allyn can not assure proper
calibration and you must return the unit to Welch Allyn for
recalibration.
Page 16

10 Chapter 2 Controls and Indicators Welch Allyn 9600 Plus Calibration Tester
Page 17

11
3
Operation
9600 Plus Calibration Tester Setup
Place the 9600 Plus Calibration Tester on a level surface away
from sunlight, drafts, and other sources of heat or cold. The
9600 Plus Calibration Tester takes approximately 20 minutes
to heat to the lowest setting. When testing several
thermometers at all three temperatures, it is recommended
to test all probes at one Calibration Set Point Temperature
before proceeding to the next Calibration Set Point
Temperature. To further expedite testing start at the lowest
Calibration Set Point Temperature. The 9600 Plus Calibration
Tester does not have an internal fan, causing the cool down
time to be greater than the time it takes to heat up.
Changing the Calibration Set Point Temperature
To scroll from one set point to the next, press and hold the
Temperature Selection button until a beep is heard. The
newly selected set point appears in the upper left corner of
the LCD display. The device’s current temperature is
displayed, starts to flash, and continues flashing until the
cavity reaches the equilibrium at the new set point.
Page 18
12 Chapter 3 Operation Welch Allyn 9600 Plus Calibration Tester
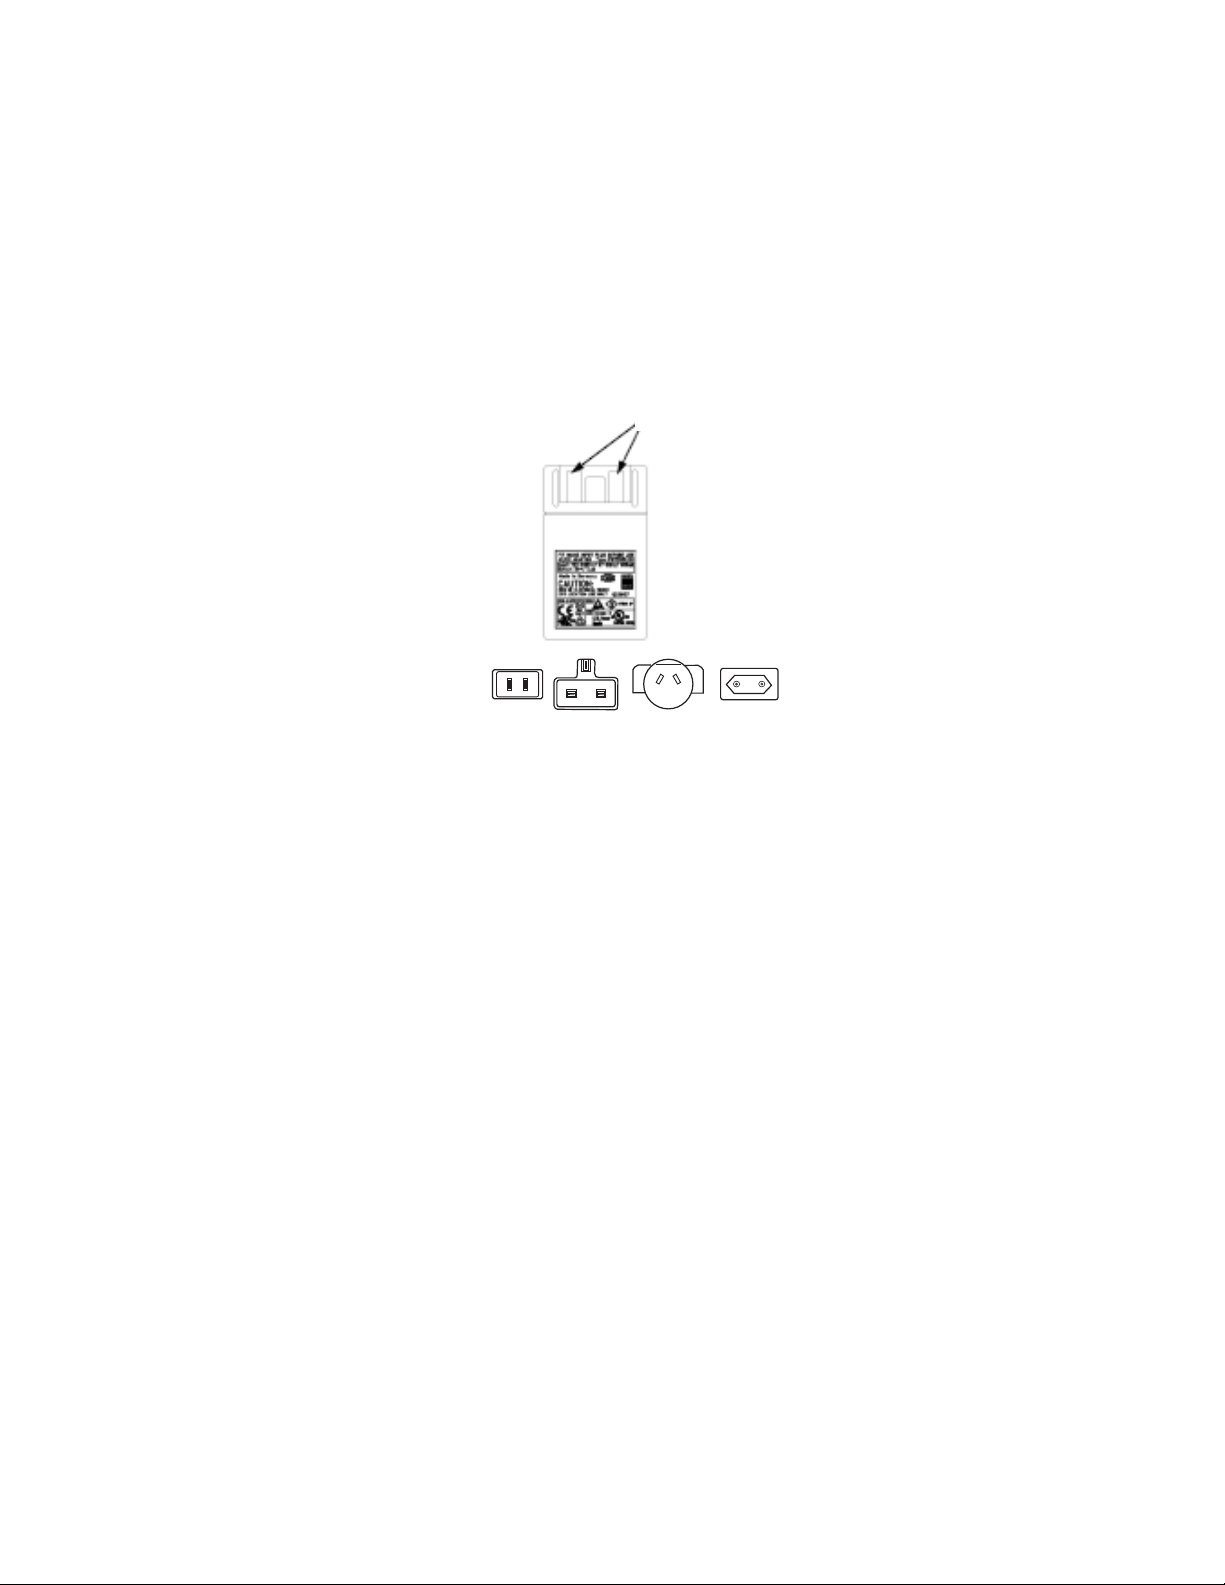
UKUS EUAUS
Two prongs in the
power adapter
Figure 3. Power Adapter and Mains Plug Inserts
For the setup:
1. Choose the proper mains plug insert and slide it over the two
prongs in the power converter (Figure 3).
2. Plug the power adapter into the 9600 Plus Calibration Tester
3. Observe the Set Point Mode in the upper left hand corner of
(Figure 2) and the opposite end into a wall outlet.
the LCD display (Figure 1). If the unit displays a “D”, it is in
Default Mode and will heat to the lowest Set Point
Temperature. If you do not want to conduct testing at this Set
Point Temperature, press and hold the Temperature Selection
button to select the desired setting. The temperature display
will flash before staying on continuously to indicate the 9600
Plus Calibration Tester has stabilized and is ready for use.
Page 19

Directions for Use Chapter 3 Operation 13
Note
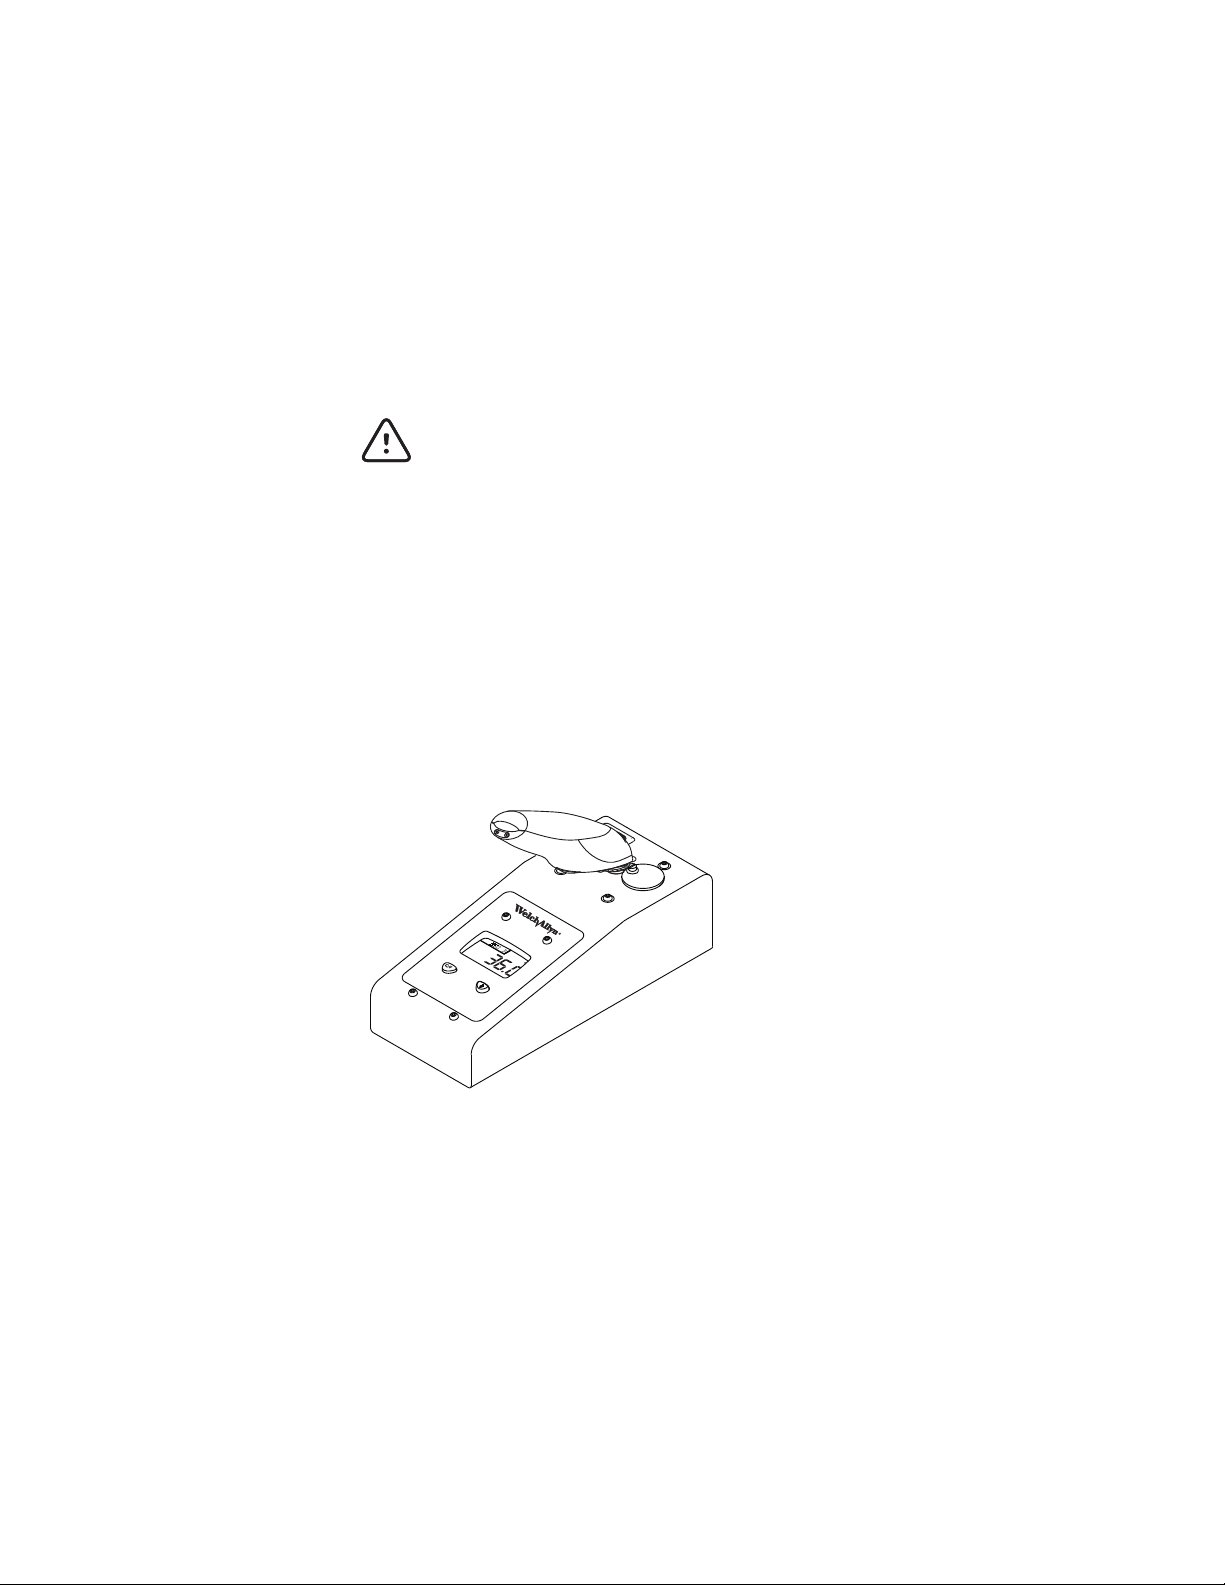
Welch Allyn SureTemp and SureTemp Plus Thermometers
Caution Store thermometers for testing in the same
room as the 9600 Plus Calibration Tester for
approximately 30 minutes prior to testing to allow the
thermometer to reach ambient room temperature.
Prior to testing visually inspect the probe for any physical
damage. Damaged probes must be replaced.
Figure 4. 9600 Plus Calibration Tester with the Welch Allyn SureTemp
Plus Thermometer
To begin calibration verification of the thermometers:
1. Remove the probe from the probe well and clean it with either
a 70% isopropyl alcohol solution, a 10% chlorine bleach
Page 20

14 Chapter 3 Operation Welch Allyn 9600 Plus Calibration Tester
solution, or a non-staining disinfectant. Let the probe air dry.
Do not apply a probe cover.
2. Place the thermometer in Monitor Mode, refer to the
thermometer’s Operator's Manual.
3. Insert the probe into the Thermistor Device Port (Figure 4).
4. Wait for approximately one minute or until temperature on the
thermometer is stable for ten seconds. Compare the
thermometer's temperature reading to the 9600 Plus'
Calibration Set Point Temperature. If the temperatures are
within ±0.1° C (±0.2° F), the thermometer is within
calibration.
5. Test all available thermometers for calibration verification at
the current Calibration Set Point Temperature. Proceed to the
next Calibration Set Point Temperature, see "Changing the
Calibration Set Point Temperature" (page 11).
Page 21
Directions for Use Chapter 3 Operation 15
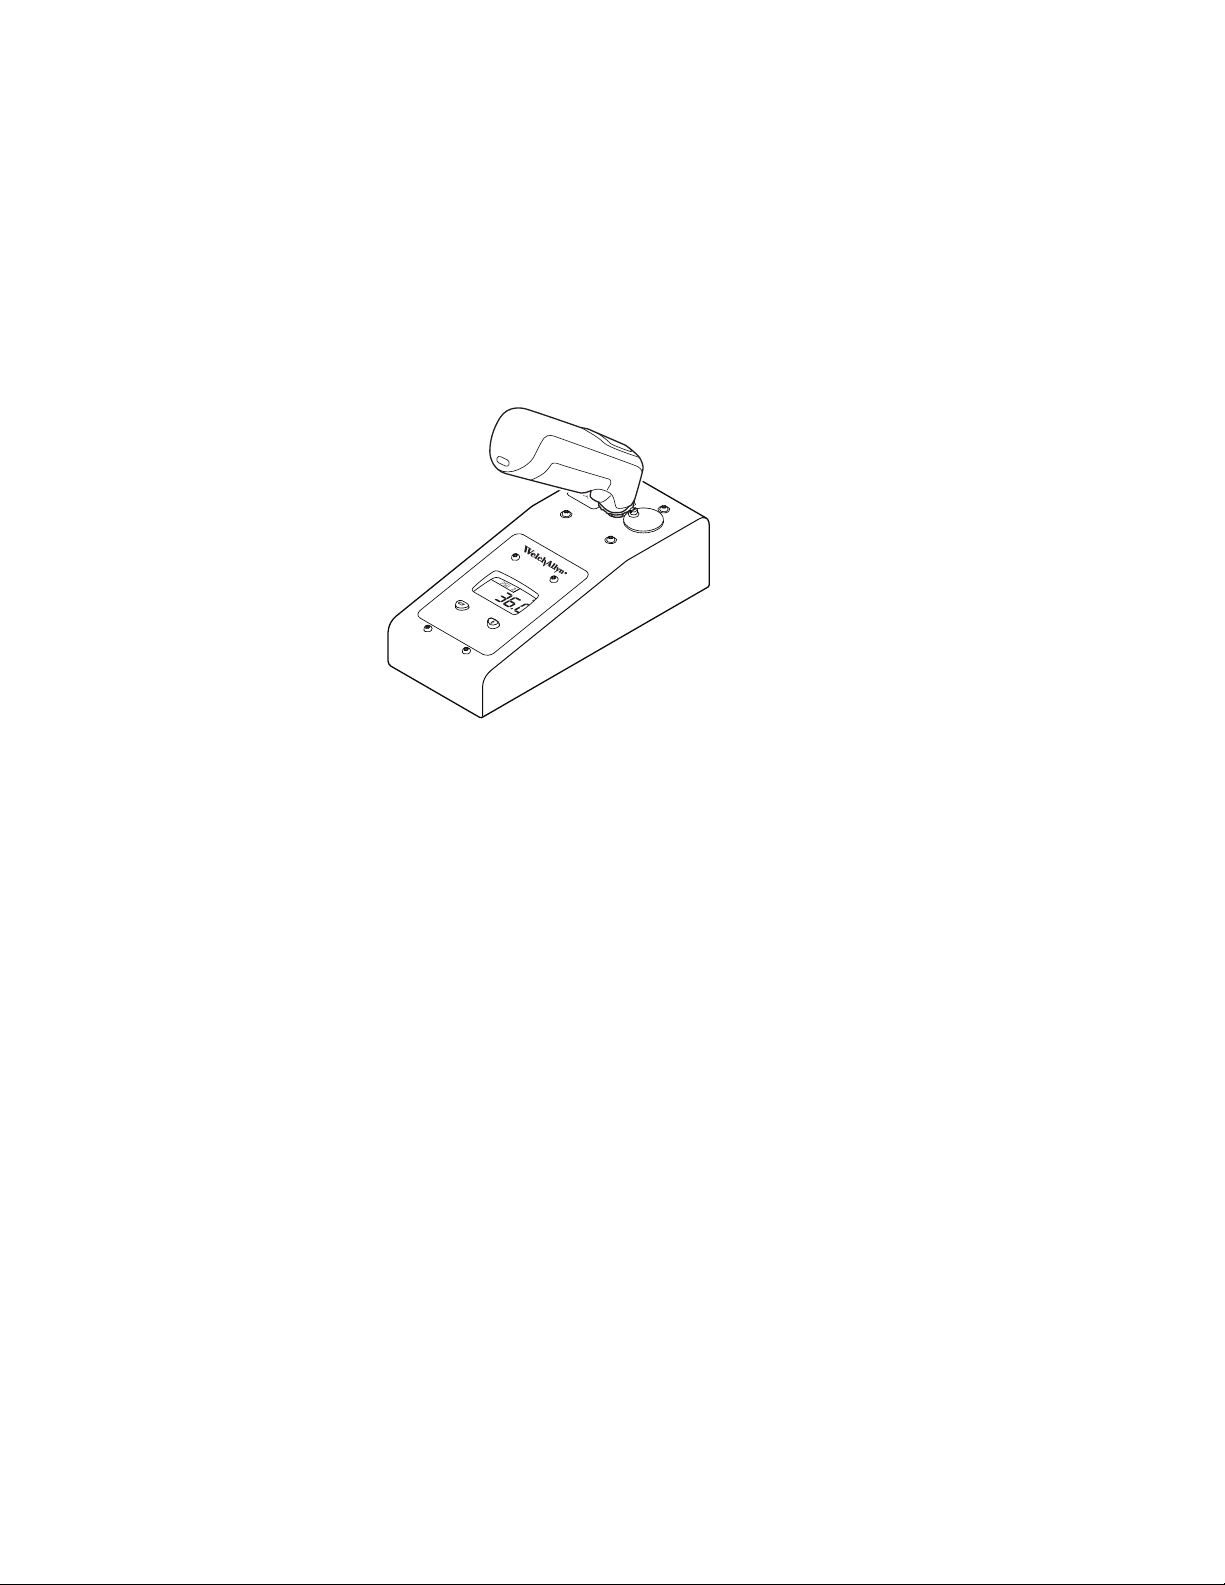
Braun ThermoScan Pro 4000 Model
Caution Store thermometers for testing in the same
room as the 9600 Plus Calibration Tester for
approximately 30 minutes prior to testing to allow the
thermometer to reach ambient room temperature.
Caution The ambient temperature must be stable and
within the range of 18.3°C (65.0°F) – 26.7°C (80.0°F).
Caution Prolonged body contact with the thermometer
may impact measurements. When instructed to wait
before performing the next step place the thermometer
on the work surface.
Figure 5. 9600 Plus Calibration Tester with the Braun ThermoScan
Pro 4000
To begin calibration verification of the thermometers:
Page 22

16 Chapter 3 Operation Welch Allyn 9600 Plus Calibration Tester
1. Check the probe tip lens window for displacement. There
shouldn't be any gap in the seam formed between bezel and
the lens window. If a gap exists the unit is damaged and must
be replaced.
2. Gently wipe the probe tip with a cotton swab slightly
moistened with isopropyl alcohol using care not to displace
the lens window; remove excess alcohol with a clean cotton
swab, and let air dry for 5 minutes. Do not use any chemical
other than alcohol to clean the probe window.
3. Place the Braun ThermoScan Pro 4000 in Calibration Mode
using the following steps.
a. Push and release the I/O MEM button to turn the product
on. The display will show symbols and functions. The Pro
4000 will perform an automatic self check. After a few
seconds you will hear a beep and see three dashed lines, a
sound symbol, and ° C or ° F on the display.
b. Push the I/O MEM button again and keep it pressed for the
following steps:
• After approximately. 3 seconds the “OFF” symbol will
flash on the display (keep the button depressed).
• When you hear a beep, release the button immediately.
• The Pro 4000 is now in calibration check mode and the
display is flashing and showing the “CAL” symbol.
4. After entering calibration mode (CAL), wait 1 minute before
taking the first temperature.
Caution Prolonged body contact with the thermometer
may impact measurements. When instructed to wait
before performing the next step place the thermometer
on the work surface.
Page 23

Directions for Use Chapter 3 Operation 17
5. Apply a new probe cover.
6. Place the probe firmly into the Ear Device Port (Figure 5).
7. Wait approximately 3 seconds, press the thermometer Start
button, and watch for the “Exac Temp” light to flash.
8. Leave the thermometer in the 9600 Plus Calibration Tester
until you hear a beep.
9. Remove the Pro 4000 Thermometer from the 9600 Plus
Calibration Tester and read the temperature in the
thermometer’s display. If the temperatures are within ±0.2° C
(±0.4° F), the thermometer is within calibration.
10.Wait 1 full minute before taking another reading with the
same thermometer. Repeated measurements in short
sequence may cause higher readings.
Caution Prolonged body contact with the thermometer
may impact measurements. When instructed to wait
before performing the next step place the thermometer
on the work surface.
11. The probe cover must be replaced with a new probe cover
before each reading, to remove any residual heat absorbed
from the 9600 Plus Calibration Tester
12.The device will exit CAL mode after four minutes.
13.When using only one 9600 Plus Calibration Tester, test all
available thermometers for calibration verification at the
current Calibration Set Point Temperature. Proceed to the next
Calibration Set Point Temperature, see "Changing the
Calibration Set Point Temperature" (page 11).
Page 24

18 Chapter 3 Operation Welch Allyn 9600 Plus Calibration Tester
Braun ThermoScan Pro 6000 model
Caution Store thermometers for testing in the same
room as the 9600 Plus Calibration Tester for
approximately 30 minutes prior to testing to allow the
thermometer to reach ambient room temperature.
Caution The ambient temperature must be stable and
within the range of 18.3°C (65.0°F) – 26.7°C (80.0°F)
Caution Set the temperature scales on the 9600 Plus
to match the Braun Thermoscan PRO 6000’s default
temperature scales.
Caution Prolonged body contact with the thermometer
may impact measurements. When instructed to wait
before performing the next step place the thermometer
on the work surface.
Caution On older versions of the 9600 Plus, the dust
cover screw can interfere with the proper positioning of
the Braun 6000 in the ear device port. Use the Braun
6000 test fixture (Welch Allyn part number 411690) to
ensure proper positioning.
Page 25
Directions for Use Chapter 3 Operation 19
Figure 6. 9600 Plus Calibration Tester with the Braun ThermoScan
Pro 6000
A Braun Pro 6000 Calibration Fixture (material number 411690) is
available for use with older 9600 Plus calibration testers where
the dust cover screw might interfere with the proper alignment
of the Braun 6000 in the ear device port.
The older models have a dust cover screw that rises above the Oring washer. Newer models have a dust cover screw that is
recessed into the washer.
When using the calibration fixture, follow the instructions
provided with the fixture to install it to the calibration tester.
To begin calibration verification of the thermometers:
1. Check the probe tip lens window for displacement. There
should not be any gap in the seam formed between the bezel
and the lens window. If there is a gap, the unit is damaged
and must be replaced.
Page 26

20 Chapter 3 Operation Welch Allyn 9600 Plus Calibration Tester
Note
2. Gently wipe the probe tip with a cotton swab slightly
moistened with isopropyl or ethyl alcohol. Use care not to
displace the lens window. Remove excess alcohol with a
clean cotton swab, and let air dry for 5 minutes. Do not use
any chemical other than alcohol to clean the probe window.
3. Place the Braun ThermoScan Pro 6000 in Calibration Mode
using the following steps.
a. With the thermometer in sleep mode, press and release
C/F.
b. IMMEDIATELY (while all segments of the LCD are
illuminated during self-test) press and hold C/F and Mem.
c. After 5 seconds the thermometer will emit a long beep.
During the beep release Mem and C/F. The thermometer
is now in Calibration Check Mode, indicated by CAL
displayed on the screen for 0.25 seconds every second
4. After entering calibration mode (CAL), wait 1 minute before
taking the first temperature.
Do not hold the thermometer while waiting. This allows
the thermometer to remain at ambient room
temperature.
5. Apply a new probe cover. If applied properly a short beep
sounds and the flashing probe cover icon will disappear from
the display.
6. Wait for the screen to flash three dashes (- - -) alternating with
CAL.
7. If you are using the Braun 6000 test fixture, place the Braun
Pro 6000 in the fixture as shown in the assembly instructions
(material number 721533). If the Braun Pro 6000 adapter is
Page 27

Directions for Use Chapter 3 Operation 21
Note
Note
not used, place the probe firmly into the ear device port
(Figure 6). It is important to ensure that the device is
perpendicular in the port, directly aligned with the calibration
tester sensor and not at an angle or tilted. Firmly push the
device down into the well to insure perpendicularity and that
the probe is fully seated in device port. Visually check to
ensure proper alignment. Do not apply too much pressure
once the device is firmly seated, as this may cause your hand
to waiver and tilt or move the device during testing.
8. Wait 5 seconds, press the thermometer Measure button, and
watch for the green ExacTemp light to flash.
9. Leave the thermometer in the 9600 Plus Calibration Tester
until the ExacTemp light stops flashing and you hear a beep.
10.Remove the Pro 6000 Thermometer from the 9600 Plus
Calibration Tester and read the temperature in the
thermometer’s display. If the temperatures are within ±0.2 °C
(±0.4 °F), the thermometer is within calibration.
If temperatures are outside ±0.2 °C, verify the test
procedure was strictly observed and repeat the
calibration check two more times at this temperature. If
any two subsequent test are within the acceptable limits
the test may be considered a pass. If all three readings
are out of calibration, call Welch Allyn for service.
11. Replace the probe cover to reset the thermometer before
taking the next measurement. Wait for the thermometer
screen to flash three dashes (- - -) alternating with CAL
Do not hold the thermometer while waiting. This allows
the thermometer to remain at ambient room
temperature.
Page 28

22 Chapter 3 Operation Welch Allyn 9600 Plus Calibration Tester
Note
Note
The probe cover must be replaced with a new probe
cover before each reading, to remove any residual heat
absorbed from the 9600 Plus Calibration Tester.
12.Wait one full minute before taking another reading with the
same thermometer. Repeated measurements in short
sequence may cause higher readings.
Do not hold the thermometer while waiting. This allows
the thermometer to remain at ambient room
temperature.
13.When using only one 9600 Plus Calibration Tester, test all
available thermometers for calibration verification at the
current calibration set point temperature before proceeding to
the next calibration set point temperature. See "Changing the
Calibration Set Point Temperature" (page 11).
14.The device will exit CAL mode after 10 minutes of inactivity, or
can be forced to exit by holding both C/F and Mem for 5
seconds. After exiting Calibration Check Mode the
thermometer will return to Sleep Mode.
Page 29

Directions for Use Chapter 3 Operation 23
Braun ThermoScan Pro 3000 Model
Caution Store thermometers for testing in the same
room as the 9600 Plus Calibration Tester for
approximately 30 minutes prior to testing to the
thermometer to reach ambient room temperature.
Caution The ambient temperature must be stable and
within the range of 18.3°C (65.0°F) – 26.7°C (80.0°F).
Caution Prolonged body contact with the thermometer
may impact measurements. When instructed to wait
before performing the next step place the thermometer
on the work surface.
Figure 7. 9600 Plus Calibration Tester with Braun ThermoScan Pro 3000
1. Clean the probe tip with a cotton swab slightly moistened
with isopropyl alcohol, remove excess alcohol with a clean
cotton swab, and let air dry for 5 minutes. Do not use any
chemical other than alcohol to clean the probe window.
Page 30

24 Chapter 3 Operation Welch Allyn 9600 Plus Calibration Tester
2. Place the Braun ThermoScan Pro 3000 in calibration check
mode using the following steps.
a. Wait until the thermometer is in Standby mode (the screen
is blank).
b. Press down and hold the Activation button, do not release
until Step d.
c. Press the /Mem button.
d. The LCD will flash “CAL” after the self check sequence.
The display will flash “CAL”, even if you have taken a
temperature.
e. Release both buttons.
3. Apply a new probe cover. Place the device firmly into the Ear
Device Port (Figure 7).
4. Wait approximately three seconds, press the thermometer
Activation button, and listen for the beep.
5. Remove the Pro 3000 Thermometer from the 9600 Plus
Calibration Tester and read the temperature in the
thermometer’s display. If the temperatures are within ±0.2° C
(±0.4° F), the thermometer is within calibration.
6. Wait one full minute before taking another reading with the
same thermometer. Repeated measurements in short
sequence may cause higher readings.
7. The device will exit Cal mode after approximately 4 minutes.
8. Test all available thermometers for calibration verification at
the current Calibration Set Point Temperature. Proceed to the
next Calibration Set Point Temperature, see "Changing the
Calibration Set Point Temperature" (page 11).
Page 31

Directions for Use Chapter 3 Operation 25
Troubleshooting inaccurate readings
1. Make sure that the sensor window is clean and free of debris
2. Always use new probe covers when calibration testing Braun
thermometers.
3. Make sure that the ear and non-contact thermometers are in
calibration mode.
4. Make sure that the thermistor thermometers are in monitor
mode.
5. If the measurement takes longer than 5 seconds, or an ERR
message appears in the display, verify the thermometer is in
calibration mode.
6. Make sure that the thermometer is not affected by any radiant
or conductive heating or cooling.
7. If no other cause is found, allow the thermometer to sit
untouched for 5 minutes before re-testing.
Page 32

26 Chapter 3 Operation Welch Allyn 9600 Plus Calibration Tester
Page 33

27
4
Maintenance
Cleaning
To clean the 9600 Plus Calibration Tester:
1. Unplug the electrical cord from the back of the unit.
2. Using a cloth slightly dampened with a solution of warm
3. Rinse the cloth with water and thoroughly wring it out.
4. Wipe off the soap and water from the 9600 Plus.
5. Let the 9600 Plus Calibration Tester dry for 15 minutes.
6. Plug the electrical cord into the back of the unit.
water and mild soap, clean the outside of the unit. Take
extra care so that soap and water do not enter the two
device ports.
Caution Do not clean the Thermistor or Ear Device
Ports. Doing so may damage the surface. Only a
Welch Allyn authorized Service Center should clean
the Device Ports.
Page 34

28 Chapter 4 Maintenance Welch Allyn 9600 Plus Calibration Tester
Problem Solving
Error Problem Solution
E s Calibration Tester cannot reach
Set Point Temperature because
room or device is too warm.
E t Calibration Tester cannot reach
Set Point Temperature because
room or device is too cold.
Voltage Power adapter voltage problem Call Welch Allyn for replacement
E0.1 Broken Heater, not heating at
all
E0.2 Heater run away (heater does
not turn off at appropriate time)
E0.3 Open thermistor Return to Welch Allyn for service
E0.4 Shorted thermistor Return to Welch Allyn for service
E0.5 Open RCAL resistor Return to Welch Allyn for service
E0.6 Shorted RCAL resistor Return to Welch Allyn for service
E0.7 Open PTB resistor Return to Welch Allyn for service
Ambient temperature and/or device
temperature should be within 18.3°C
to 26.7
°C (65°F to 80°F). Allow 30
minutes for thermal accommodation
prior to testing.
Ambient temperature and/or device
temperature should be within 18.3
to 26.7°C (65°F to 80
minutes for thermal accommodation
prior to testing.
Return to Welch Allyn for service
Return to Welch Allyn for service
°F). Allow 30
°C
E0.8 Shorted PTB resistor Return to Welch Allyn for service
E0.9 Catastrophic internal failure Return to Welch Allyn for service
E1.1 Device not calibrated Return to Welch Allyn for service
E1.3 EEPROM failure Return to Welch Allyn for service
Page 35

Directions for Use Chapter 4 Maintenance 29
9600 Plus Calibration Tester Checks
If several thermometers do not pass the calibration verification
tests, check the 9600 Plus Calibration Tester to determine if it is
out of calibration. Before sending the unit to an authorized Welch
Allyn service center, complete the checks listed below.
1. Check the calibration date on the side of the 9600 Plus
Calibration Tester. If the 9600 Plus Calibration Tester was
calibrated over 12 months ago, do not use it. Send it to an
authorized Welch Allyn Service center immediately for
calibration.
2. Ensure no one has tampered with the 9600 Plus Calibration
Tester. If someone has tampered with the unit or the
calibration label(s), the calibration settings and warranty are
void. Send it to an authorized Welch Allyn Service center
immediately for calibration.
3. Ensure the 9600 Plus Calibration Tester is not exposed to
extreme temperatures that can damage the precision
thermistor. Exposure to high heat can cause the resistance
versus temperature characteristic of the unit to shift, causing
the 9600 Plus Calibration Tester to become inaccurate. Send
it to an authorized Welch Allyn Service center immediately for
calibration.
Page 36

30 Chapter 4 Maintenance Welch Allyn 9600 Plus Calibration Tester
Environmental Checks
1. Verify that there is no excessive moisture or steam in the air.
High humidity (above 90%) can cause electrical leakages that
can temporarily shift the device out of calibration. If the
thermometers and/or the 9600 Plus Calibration Tester are
exposed to such conditions, allow each device to sit at normal
room temperature and humidity for at least 30 minutes before
conducting a calibration test.
2. Avoid exposure to extreme temperatures. Thermal gradients
in the thermometer or the 9600 Plus Calibration Tester can
cause unpredictable effects. Verify the 9600 Plus Calibration
Tester is within the specified ambient temperature range of
18.3° C (65.0° F) to 26.7° C (80.0° F). Verify the ambient room
temperature is stable and their are no drafts around the 9600
Plus Calibration Tester.
Page 37

Directions for Use Chapter 4 Maintenance 31
Specifications
Power
Requirements
Current Heating: 480 mA
Power
Consumption
Calibration Tester Length: 254 mm (10.00”)
Weight (without Power Pack): 0.75 kg (1.65 lbs)
Power Pack
(approximate
dimensions)
Environment Storage Temperature: 0°C – 50°C (32°F – 122°F)
Ambient Operating Temperature: 18.3° C to 26.7°C (65° F to 80° F)
Operating Humidity: 20% to 95% RH. Non-Condensing
Operating
Specifications
Height (with plug inserted): 62 mm (2.44”)
Maximum Pressure/Altitude: <
Voltage: 100 - 240 V 50/60 Hz
After Warm-Up: 185 mA
Heating: 2.4 W
After Warm-Up: 0.92 W
Width: 105 mm (4.13”)
Height: 85 mm (3.34”)
Length: 86 mm (3.38”)
Width: 51 mm (2.00”)
Weight: 0.18 kg (0.40 lbs)
Controlled Temperature of 9600 Plus
Low Setting: 36
Intermediate Setting: 38.5
High Setting: 41
Temperature Accuracy: ±0.05° C (0.1
o
C (96.8oF)
o
C (101.3oF)
o
C (105.8oF)
2000 meters.
o
F)
Heating and
Cooling Times
Tested at an ambient
of 23.9°C (75°F)
Installation Category II
Pollution Degree II
Room Temperature to Low Setting: Approximately 20 min.
Low Setting to Intermediate Setting: Approximately 6 min.
Intermediate Setting to High Setting: Approximately 6 min.
Cool from High Setting to Low Setting: Approximately 25 min.
Page 38

32 Chapter 4 Maintenance Welch Allyn 9600 Plus Calibration Tester
Electromagnetic Compatibility
This product has been tested and found to comply with all
applicable requirements of council directive 89/336/EEC and its
amendments.
This product has been tested and found to comply with FCC Part
15.107, Class B. These limits are designed to provide reasonable
protection against harmful interference in a typical (medical)
installation. This equipment generates, uses and can radiate radio
frequency energy and if not used in accordance with the
instructions, may cause harmful interference to other devices in
close proximity. However, there is no guarantee that interference
will not occur in a particular setting. If this equipment does cause
harmful interference with other devices, which can be
determined by turning the equipment off and on, the user is
encouraged to try to correct the interference by one or more of
the following measures:
• Reorient or relocate the receiving device
• Increase the separation between equipment
• Connect the equipment into an outlet on a circuit different
from that to which the other device(s) is connected.
• Consult the manufacturer or field service technician for help.
Page 39

33
5
Warranty and Service
Limited Warranty
Instrumentation purchased new from Welch Allyn is warranted
to be free from defects in material and workmanship under
normal use and service for a period of one year from the date
of first shipment from Welch Allyn. This warranty shall be
fulfilled by Welch Allyn or its authorized representative
repairing or replacing, at Welch Allyn’s discretion, any such
defect free of charge for parts and labor.
Welch Allyn should be notified via telephone of any defective
product and the item should be immediately returned,
securely packaged and postage prepaid to Welch Allyn. Loss
or damage in shipment shall be at purchasers’ risk.
Welch Allyn will not be responsible for loss associated with
the use of any Welch Allyn product that (1) has had the serial
number defaced, (2) has been repaired by anyone other than
an authorized Welch Allyn Service Representative, (3) has be
altered, or (4) has been used in any manner other than in
accordance with instructions.
THIS WARRANTY IS EXCLUSIVE AND IN LIEU OF ANY
IMPLIED WARRANTY OF MERCHANTABILITY, FITNESS
FOR PARTICULAR PURPOSE, OR OTHER WARRANTY OF
QUALITY, WHETHER EXPRESS OR IMPLIED, Welch Allyn
WILL NOT BE LIABLE FOR ANY INCIDENTAL OR
CONSEQUENTIAL DAMAGES.
Page 40

34 Chapter 5 Warranty and Service Welch Allyn 9600 Plus Calibration Tester
Service
Before returning a product for repair or annual calibration you
must obtain authorization from Welch Allyn. An RMA (Return
Merchandise Authorization) number is given to you from our
service personnel. Be sure to note this number on the outside of
your shipping box. Returns without an RMA number will not be
accepted for delivery. Please contact your customer service
representative at the appropriate Welch Allyn service center
listed below for further information.
All equipment used in calibrating the 9600 Plus Calibration Tester
is traceable to NIST.
Welch Allyn assumes no responsibility if the 9600 Plus
Calibration Tester is calibrated at an unauthorized service center.
Send the 9600 Plus Calibration Tester to any authorized service
center for recalibration.
To find a service center near you, go to http://
www.welchallyn.com/en/about-us/locations.html.
Page 41

Testeur d’étalonnage 9600 Plus
Page 42

© 2017 Welch Allyn. Tous droits réservés. Pour utiliser le produit
conformément à l'usage prévu décrit dans la présente publication,
l'acheteur du produit est autorisé à copier la présente publication, en vue
d'une distribution interne uniquement, en utilisant le support fourni par
Welch Allyn. Aucune autre utilisation, reproduction ou distribution
partielle ou totale de la publication, n'est autorisée sans le consentement
écrit de Welch Allyn.
Welch Allyn n’assume aucune responsabilité en cas de blessure de
quiconque, ou en cas d’utilisation illégale ou inadéquate du produit
découlant d’une utilisation non conforme aux instructions, avertissements
et mises en garde ou encore à la déclaration d’indications, publiés dans le
présent manuel.
Welch Allyn est une marque déposée de Welch Allyn. Braun ThermoScan
est une marque déposée de Braun Corporation.
Imprimé aux États-Unis.
DIR 80020333 Ver A
Révision : 2017-03
Page 43

Table des Matières
Introduction . . . . . . . . . . . . . . . . . . . . . . . . . . . . . . . . . . 1
Symboles et descriptions . . . . . . . . . . . . . . . . . . . . . . . . . . . 2
Mises en garde . . . . . . . . . . . . . . . . . . . . . . . . . . . . . . . . . . . 3
Déballage du testeur d’étalonnage 9600 Plus . . . . . . . . . . . 4
Commandes et indicateurs . . . . . . . . . . . . . . . . . . . . . . 5
Affichage ACL . . . . . . . . . . . . . . . . . . . . . . . . . . . . . . . . . . . . 5
Séquence de mise en marche . . . . . . . . . . . . . . . . . . . . . . . 7
Avant du testeur d’étalonnage 9600 Plus . . . . . . . . . . . . . . . 7
Fonctionnement . . . . . . . . . . . . . . . . . . . . . . . . . . . . . . 11
Installation du testeur d’étalonnage 9600 Plus. . . . . . . . . . 11
Modification de la température du point d'étalonnage . . . . 11
Thermomètres Welch Allyn SureTemp et SureTemp Plus . 13
Modèle Braun ThermoScan Pro 4000. . . . . . . . . . . . . . . . . 15
Modèle Braun ThermoScan Pro 6000. . . . . . . . . . . . . . . . . 19
Modèle Braun ThermoScan Pro 3000. . . . . . . . . . . . . . . . . 24
Résolution des problèmes de relevés incorrects . . . . . . . . 26
i
Entretien . . . . . . . . . . . . . . . . . . . . . . . . . . . . . . . . . . . 27
Nettoyage . . . . . . . . . . . . . . . . . . . . . . . . . . . . . . . . . . . . . . 27
Dépannage . . . . . . . . . . . . . . . . . . . . . . . . . . . . . . . . . . . . . 28
Spécifications . . . . . . . . . . . . . . . . . . . . . . . . . . . . . . . . . . . 31
Compatibilité électromagnétique . . . . . . . . . . . . . . . . . . . . 32
Garantie et entretien . . . . . . . . . . . . . . . . . . . . . . . . . . 33
Garantie limitée. . . . . . . . . . . . . . . . . . . . . . . . . . . . . . . . . . 33
Entretien . . . . . . . . . . . . . . . . . . . . . . . . . . . . . . . . . . . . . . . 34
Page 44

ii
Page 45

1
1
Introduction
Le testeur d’étalonnage 9600 Plus vérifie l’étalonnage des
thermomètres suivants :
• Les thermomètres SureTemp
(678, 678 OEM, 679 et 986)
• Les thermomètres SureTemp
Plus (690, 692 et 692 OEM)
• Braun ThermoScan® Pro 3000, Pro 4000 et Pro 6000
Le testeur d’étalonnage 9600 Plus fournit une source de
température étroitement régulée qui permet d’éliminer le
réglage, l’étalonnage de précision et les besoins d’entretien
des bains-marie et autres équipements d’étalonnage d’usage
général. L’utilisateur prend la « température » du testeur
d’étalonnage 9600 Plus en ayant l’assurance d’obtenir une
lecture précise, car l’appareil est étalonné conformément aux
normes du National Institute of Standards and Technology
(NIST) ou de dispositifs équivalents. Il n’est pas nécessaire ni
recommandé d’effectuer des réglages.
Le « corps noir » du système 9600 Plus Calibration System
agit comme un réservoir thermique pour la sonde de
thermistance et comme un radiateur thermique pour les
thermomètres auriculaires à infrarouges.
®
de Welch Allyn modèles
®
de Welch Allyn modèles
L’appareil contient des circuits intégrés lui conférant une
stabilité à long terme avec un minimum d’entretien. Welch
Allyn n’utilise que des composants de précision dans la
fabrication du testeur d’étalonnage 9600 Plus. Pour maintenir
la traçabilité de l’appareil en regard d’organismes tels que le
Page 46

2 Chapitre 1 Introduction Welch Allyn Testeur d’étalonnage 9600 Plus
95%
15%
NIST ou l’équivalent, rapporter le testeur d’étalonnage 9600 Plus à
l’usine pour un étalonnage annuel.
Symboles et descriptions
Double isolation
Courant continu
Manipuler avec soin
Attention ! Avertissement ; consulter les instructions pour de
plus amples informations.
Température de transport/conservation
Humidité relative
Collecte sélective pour l’équipement électronique
Recyclable
Page 47

Mode d’emploi Chapitre 1 Introduction 3
Mises en garde
Les mises en garde de ce manuel identifient les conditions ou
pratiques qui, si elles ne sont pas corrigées ou arrêtées
immédiatement, risquent de provoquer des défectuosités de
l’équipement, d’endommager le matériel ou de conduire à une
perte de données.
Mise en garde Ne pas immerger ou plonger le testeur
d’étalonnage 9600 Plus dans quelque liquide que ce
soit.
Mise en garde Seul le personnel biomédical formé peut
faire fonctionner le testeur d’étalonnage 9600 Plus et
effectuer une vérification de l’étalonnage des
thermomètres.
Mise en garde Lorsque les ports de sonde à
thermistance ou de dispositif auriculaire ne sont pas
utilisés, les recouvrir du capuchon anti-poussière.
Mise en garde Stockez les thermomètres à tester dans
la même salle que le testeur d'étalonnage 9600 Plus
environ 30 minutes à l'avance afin qu'ils atteignent la
température ambiante de la pièce.
Mise en garde Ne pas nettoyer les ports de sonde à
thermistance ou de dispositif auriculaire. Cela risque
d’endommager leur surface. Seul un centre d’entretien
Welch Allyn agréé peut nettoyer les ports de dispositif.
Page 48

4 Chapitre 1 Introduction Welch Allyn Testeur d’étalonnage 9600 Plus
Déballage du testeur d’étalonnage 9600 Plus
Ouvrir la boîte du testeur d’étalonnage 9600 Plus et vérifier s’il
manque des pièces. Conserver les matériaux d’emballage afin de
retourner l’appareil à Welch Allyn pour un réétalonnage.
Les pièces suivantes sont comprises dans l’emballage :
• Un testeur d’étalonnage 9600 Plus
• Un ensemble contenant un bloc d’alimentation et quatre
fiches de prises principales
• Un mode d’emploi
• Une mallette de transport
Si après ouverture de l’emballage l’un de ces articles s’avère
manquant, prière de contacter le service à la clientèle de
Welch Allyn au numéro indiqué à la page 34.
Page 49

5
Température
actuelle cavité
Unités
température
Température
consigne
étalonnage
Mode valeur
consigne
Bouton sélection
Celsius/Fahrenheit
Bouton
sélection
température
2
Commandes et indicateurs
Affichage ACL
Figure 1. Affichage ACL et boutons avant
Température de consigne d’étalonnage
Il existe trois températures de consigne d’étalonnage
utilisées pour vérifier l’étalonnage du thermomètre. Ces trois
températures sont 36 °C (96,8 °F), 38,5 °C (101,3 °F) et 41 °C
(105,8 °F). L’écran ACL affiche la température de consigne
d’étalonnage actuelle dans l’angle supérieur gauche de
l’écran.
Page 50

6 Chapitre 2 Commandes et indicateurs Welch Allyn Testeur d’étalonnage 9600 Plus
Température actuelle de la cavité
La température actuelle de la cavité du testeur d’étalonnage
9600 Plus est indiquée par de grands chiffres au centre de l’écran
(Figure 1).
Tandis que l’appareil passe graduellement à la température de
consigne d’étalonnage choisie, la température réelle clignote à
l’écran. Dès que l’appareil atteint la température de consigne
d’étalonnage, la température affichée au centre de l’écran arrête
de clignoter.
Unités de température
Le testeur d’étalonnage 9600 Plus est capable d’afficher la
température en degrés Fahrenheit ou en degrés Celsius.
Mode de valeur de consigne
L’écran ACL affichera un « D » (Default/Par défaut) ou un « L »
(Last Used/Dernière utilisation) dans l’angle supérieur gauche
(Figure 1). Le testeur d’étalonnage 9600 Plus possède deux
modes de valeur de consigne de fonctionnement. Le mode « D »
(Default/Par défaut) force le testeur d’étalonnage 9600 Plus à
chauffer à la plus faible valeur de consigne (36,0
lorsqu’il est mis en marche. Le mode « L » (Last Used/Dernière
utilisation) force le testeur d’étalonnage 9600 Plus à chauffer à la
dernière valeur de température réglée.
°C / 96,8 °F)
Pour modifier le Mode de valeur de consigne, maintenir simultanément les touches C/F et Flèche sous l’écran ACL jusqu’à ce
qu’une tonalité se fasse entendre une fois. Un « D » ou un « L »
apparaîtra dans l’angle supérieur gauche de l’écran pour indiquer
le nouveau mode.
Page 51

Mode d’emploi Chapitre 2 Commandes et indicateurs 7
Séquence de mise en marche
Le testeur d’étalonnage 9600 Plus est alimenté par un bloc
d’alimentation mural qui se branche à l’arrière de l’appareil. Il n’y
a pas d’interrupteur MARCHE/ARRÊT. Lors de la mise sous
tension, le testeur d’étalonnage 9600 Plus effectue une autovérification interne, teste tous les segments d’affichage, émet un
signal sonore et affiche la température actuelle de l’appareil.
Le testeur d’étalonnage 9600 Plus se met immédiatement à
chauffer, le cas échéant, pour atteindre la Température de
consigne d’étalonnage.
Avant du testeur d’étalonnage 9600 Plus
Bouton de sélection de température
Ce bouton permet à l’utilisateur de sélectionner l’une des trois
températures de consigne : 36,0
ou 41,0
Pour passer de l’une à l’autre des valeurs de consigne, maintenir
la touche de Sélection de température jusqu’à ce qu’une tonalité
se fasse entendre. La valeur de consigne nouvellement choisie
apparaît dans l’angle supérieur gauche de l’écran ACL. La
température actuelle de l’appareil est affichée et commence à
clignoter jusqu’à ce que la cavité atteigne le point d’équilibre avec
la nouvelle valeur de consigne.
°C (105,8 °F).
°C (96,8 °F), 38,5 °C (101,3 °F),
Bouton de sélection Celsius/Fahrenheit
Ce bouton permet à l’utilisateur de sélectionner les degrés Celsius
ou les degrés Fahrenheit. Pour changer d’unité de température,
maintenir la touche C/F jusqu’à ce qu’une tonalité se fasse
entendre. Les températures apparaîtront soit en degrés « °C » ou
« °F », voir (Figure 1).
Attention Avant de procéder au test, vérifiez que le
thermomètre testé et le testeur 9600 Plus sont
configurés pour utiliser la même échelle de température.
Consultez le mode d'emploi des thermomètres pour
modifier l'échelle de température.
Page 52

8 Chapitre 2 Commandes et indicateurs Welch Allyn Testeur d’étalonnage 9600 Plus
Port de sonde à
thermistance
Port de dispositif
auriculaire
Capuchon antipoussière
Fiche
d’alimentation
Figure 2. Avant du testeur d’étalonnage 9600 Plus
Capuchon anti-poussière
Ce couvercle de plastique noir empêche les poussières de
pénétrer dans les ports de sonde à thermistance et de dispositif
auriculaire. Pour exposer les ports de sonde à thermistance et de
dispositif auriculaire, faites pivoter le capuchon anti-poussière
vers la gauche. Pour couvrir les ports, faites pivoter le capuchon
vers la droite.
Mise en garde Lorsque vous n’utilisez pas les ports de
sonde à thermistance ou de dispositif auriculaire,
recouvrez-les avec le capuchon anti-poussière.
Page 53

Mode d’emploi Chapitre 2 Commandes et indicateurs 9
Ports de sonde à thermistance et de dispositif auriculaire
Le port de dispositif auriculaire est le plus grand des deux ports
situés sous le capuchon anti-poussière. Il est destiné aux
thermomètres auriculaires Braun ThermoScan Pro 3000 et
Pro 4000 (Figure 2).
Le port de sonde à thermistance est le plus petit des deux ports
situés sous le capuchon anti-poussière. Il est destiné aux
thermomètres SureTemp et SureTemp Plus.
La texture de la surface intérieure du port de dispositif auriculaire
est peinte avec un enduit noir mat spécial permettant la lecture
d’un dispositif auriculaire. Sa surface n’est visible que sous une
lumière vive. Le port de sonde à thermistance n’est pas peint en
noir. Les deux doivent demeurer propres et secs.
L’enduit du port de dispositif est fragile. Suivre soigneusement
les instructions de nettoyage. Ne pas toucher la surface et ne
laisser aucun objet étranger pénétrer dans les ports. Éviter toute
éclaboussure de liquide sur l’appareil. Si un liquide ou tout autre
contaminant pénètre dans l’appareil, Welch Allyn ne peut pas
garantir son étalonnage et il doit être retourné à Welch Allyn pour
être réétalonné.
Page 54

10 Chapitre 2 Commandes et indicateurs Welch Allyn Testeur d’étalonnage 9600 Plus
Page 55

11
3
Fonctionnement
Installation du testeur d’étalonnage 9600 Plus
Placer le testeur d’étalonnage 9600 Plus sur une surface
plane à l’abri des rayons du soleil, des courants d’air et de
toute source de chaleur ou de refroidissement. Le testeur
d’étalonnage 9600 Plus met environ 20 minutes à chauffer
pour atteindre la première température de consigne. Pour
tester plusieurs thermomètres aux trois températures, il est
recommandé de les tester tous à une même température de
consigne d’étalonnage avant de passer à la température
d’étalonnage suivante. Pour accélérer la procédure de test,
commencer par la température d’étalonnage la plus basse.
Le testeur d’étalonnage 9600 Plus ne comporte pas de
ventilateur interne, le temps de refroidissement étant donc
supérieur au temps de chauffage.
Modification de la température du point d'étalonnage
Pour passer d'un point d'étalonnage au point suivant,
appuyez sur le bouton Temperature Selection (Sélection de la
température) et maintenez-le enfoncé jusqu'au bip sonore.
Le point d'étalonnage nouvellement sélectionné s'affiche
dans le coin supérieur gauche de l'écran LCD. La
température actuelle du dispositif s'affiche, commence à
clignoter et continue à clignoter jusqu'à ce que la cavité
parvienne à l'équilibre sur le nouveau point d'étalonnage.
Page 56

12 Chapitre 3 Fonctionnement Welch Allyn Testeur d’étalonnage 9600 Plus
RUUS EURAUS
Adaptateur d’alimentation
à deux broches
Figure 3. Adaptateur d’alimentation et prises principales
Pour l’installation :
1. Choisir la fiche de prise principale appropriée et la glisser sur les
deux broches dans le convertisseur d’alimentation (Figure 3).
2. Brancher l’adaptateur d’alimentation dans le testeur
d’étalonnage 9600 Plus (Figure 2) et brancher l’autre
extrémité dans une prise murale.
3. Observer le Mode de valeur de consigne dans l’angle
supérieur gauche de l’écran ACL (Figure 1). Si l’appareil affiche
un « D », il est en mode Default/par défaut et chauffera à la
température de consigne la plus basse. Si vous ne souhaitez
pas effectuer de test à cette température de consigne,
maintenez le bouton de sélection de température pour choisir
la valeur désirée. L’affichage de la température clignotera un
certain temps avant de devenir continu pour indiquer que le
testeur d’étalonnage 9600 Plus s’est stabilisé et est prêt à
être utilisé.
Page 57

Mode d’emploi Chapitre 3 Fonctionnement 13
Remarque
Thermomètres Welch Allyn SureTemp et SureTemp Plus
Mise en garde Stockez les thermomètres à tester
dans la même salle que le testeur d'étalonnage
9600 Plus environ 30 minutes à l'avance afin qu'ils
atteignent la température ambiante de la pièce.
Avant de procéder au test, inspectez la sonde
visuellement afin de déceler d'éventuels
dommages physiques. Les sondes endommagées
doivent être remplacées.
Figure 4. Testeur d’étalonnage 9600 Plus avec le thermomètre
Welch Allyn SureTemp Plus
Page 58

14 Chapitre 3 Fonctionnement Welch Allyn Testeur d’étalonnage 9600 Plus
Pour commencer la vérification de l’étalonnage des thermomètres :
1. Retirer la sonde du puits de sonde et la nettoyer avec une
solution à 70 % d’alcool isopropylique ou une solution à 10 %
d’agent chloré de blanchiment ou encore avec un désinfectant
ne tachant pas. Laisser la sonde sécher à l’air libre. Ne pas
utiliser une protection de sonde.
2. Placer le thermomètre en mode Moniteur, consulter le
manuel de l’utilisateur du thermomètre.
3. Insérer la sonde dans le port de sonde à thermistance
(Figure 4).
4. Attendre environ une minute ou jusqu’à ce que la température
du thermomètre soit stable pendant dix secondes. Comparer la
lecture du thermomètre à la température de consigne du
testeur d’étalonnage 9600 Plus. Si les températures sont à
moins de ±0,1 °C (±0,2 °F) d’écart, le thermomètre respecte la
norme d’étalonnage.
5. Vérifier l’étalonnage de tous les thermomètres à la température
de consigne actuelle. Passer à la température de consigne
suivante, voir « Modification de la température du point
d'étalonnage » (page 11).
Page 59

Mode d’emploi Chapitre 3 Fonctionnement 15
Modèle Braun ThermoScan Pro 4000
Mise en garde Stockez les thermomètres à tester dans
la même salle que le testeur d'étalonnage 9600 Plus
environ 30 minutes à l'avance afin qu'ils atteignent la
température ambiante de la pièce.
Mise en garde La température ambiante doit être
stable et comprise entre 18,3 °C et 26,7 °C (65,0 °F et
80,0 °F).
Mise en garde Un contact prolongé du thermomètre
avec le corps peut avoir un impact sur les mesures.
Lorsqu'il est indiqué de patienter avant de passer à
l'étape suivante, placez le thermomètre sur le plan
de travail.
Figure 5. Testeur d’étalonnage 9600 Plus avec le thermomètre Braun
ThermoScan Pro 4000
Page 60

16 Chapitre 3 Fonctionnement Welch Allyn Testeur d’étalonnage 9600 Plus
Pour commencer la vérification de l’étalonnage des
thermomètres :
1. Recherchez un éventuel déplacement sur la lentille de la
pointe de la sonde. Il ne doit y avoir aucun vide dans le joint
formé entre la lunette et la fenêtre de la lentille. S'il existe un
vide, l'unité est endommagée et doit être remplacée.
2. Nettoyez délicatement la pointe de la sonde à l'aide d'un
coton-tige légèrement imbibé d'alcool isopropyle en veillant à
ne pas déplacer la fenêtre de la lentille, enlevez l'excédent
d'alcool à l'aide d'un coton-tige propre et laissez sécher à l'air
libre pendant 5 minutes. N'utilisez aucun produit chimique
autre que de l'alcool pour nettoyer la fenêtre de la sonde..
3. Placer le thermomètre Braun ThermoScan Pro 4000 en Mode
étalonnage en procédant comme suit.
a. Appuyer et relâcher le bouton I/O MEM pour le mettre
sous tension. L’afficheur indiquera les symboles et les
fonctions. Le Pro 4000 effectuera un autocontrôle
automatique. Après quelques secondes, un signal sonore
se fait entendre, puis trois tirets, un symbole de son et le
signe °C ou °F apparaissent sur l’écran.
b. Appuyer de nouveau sur le bouton I/O MEM et le
maintenir pour les étapes suivantes :
• Au bout de 3 secondes environ, le symbole « OFF »
clignote à l'écran (maintenez le bouton enfoncé).
• Lorsqu’un signal sonore retentit, relâcher aussitôt le
bouton.
• Le Pro 4000 est maintenant en mode d’étalonnage et
l’affichage clignote en indiquant le symbole « CAL ».
Page 61

Mode d’emploi Chapitre 3 Fonctionnement 17
4. Une fois le mode étalonnage entré (CAL), patientez 1 minute
avant de prendre la première température.
Attention Un contact prolongé du thermomètre avec le
corps peut avoir un impact sur les mesures. Lorsqu'il est
indiqué de patienter avant de passer à l'étape suivante,
placez le thermomètre sur le plan de travail.
5. Appliquez un nouveau couvre-sonde.
6. Placer fermement la sonde dans le port de dispositif
auriculaire (Figure 5).
7. Attendez environ 3 secondes, appuyez sur le bouton
Start (Démarrer) du thermomètre et attendez que la lumière
« Exac Temp » clignote.
8. Laisser le thermomètre dans le testeur d’étalonnage 9600
Plus jusqu’au signal sonore.
9. Retirer le thermomètre Pro 4000 du testeur d’étalonnage
9600 Plus et lire la température affichée sur le thermomètre.
Si les températures sont à moins de ±0,2 °C (±0,4 °F) d’écart,
le thermomètre respecte la norme d’étalonnage.
10.Attendez 1 minute complète avant de prendre une autre
mesure avec le même thermomètre. Des mesures répétées
sur une courte séquence peuvent entraîner des résultats plus
élevés.
Attention Un contact prolongé du thermomètre avec le
corps peut avoir un impact sur les mesures. Lorsqu'il est
indiqué de patienter avant de passer à l'étape suivante,
placez le thermomètre sur le plan de travail.
11. Le couvre-sonde doit être remplacé par un nouveau couvresonde avant chaque relevé afin de supprimer toute chaleur
résiduelle absorbée par le testeur 9600 Plus.
Page 62

18 Chapitre 3 Fonctionnement Welch Allyn Testeur d’étalonnage 9600 Plus
12.Le dispositif quittera le mode d’étalonnage CAL après quatre
minutes.
13.Lorsque vous n'utilisez qu'un seul testeur d'étalonnage 9600
Plus, procédez à un test de vérification de l'étalonnage de
tous les thermomètres disponibles à la température actuelle
du point d'étalonnage. Passez à la température du point
d'étalonnage suivante, voir « Modification de la température
du point d'étalonnage » (page 11).
Page 63

Mode d’emploi Chapitre 3 Fonctionnement 19
Modèle Braun ThermoScan Pro 6000
Attention Stockez les thermomètres à tester dans la
même salle que le testeur d'étalonnage 9600 Plus
environ 30 minutes à l'avance afin qu'ils atteignent la
température ambiante de la pièce.
Attention La température ambiante doit être stable et
comprise entre 18,3 °C et 26,7 °C (65,0 °F et 80,0 °F).
Attention Définissez les échelles de température du
modèle 9600 Plus pour qu'elles correspondent aux
échelles de température par défaut du modèle Braun
Thermoscan PRO 6000.
Attention Un contact prolongé du thermomètre avec le
corps peut avoir un impact sur les mesures. Lorsqu'il est
indiqué de patienter avant de passer à l'étape suivante,
placez le thermomètre sur le plan de travail.
Attention Sur les versions antérieures du modèle 9600
Plus, la vis de la housse de protection peut gêner le bon
positionnement du modèle Braun 6000 dans le port du
dispositif auriculaire. Utilisez le montage d'essai Braun
6000 (Welch Allyn, référence 411690) pour garantir le
bon positionnement.
Page 64

20 Chapitre 3 Fonctionnement Welch Allyn Testeur d’étalonnage 9600 Plus
Figure 6. Utilisation du testeur d'étalonnage 9600 Plus avec le
thermomètre Braun ThermoScan Pro 6000
L'outil d'étalonnage Braun Pro 6000 (référence 411690) peut être
utilisé avec les anciens modèles de testeurs d'étalonnage 9600
Plus sur lesquels la vis de la housse de protection risque de
gêner le bon alignement du port du dispositif auriculaire
Braun 6000.
Les anciens modèles ont une vis de housse de protection qui
dépasse de la rondelle du joint torique. Les nouveaux modèles
ont une vis de housse de protection qui est encastrée dans
la rondelle.
Lorsque vous utilisez l'outil d'étalonnage, suivez les instructions
fournies pour l'installer sur le testeur d'étalonnage.
Pour commencer la vérification de l'étalonnage des
thermomètres :
1. Recherchez un éventuel déplacement sur la lentille de la
pointe de la sonde. Il ne doit y avoir aucun vide dans le joint
formé entre la lunette et la fenêtre de la lentille. S'il existe un
vide, l'unité est endommagée et doit être remplacée.
Page 65

Mode d’emploi Chapitre 3 Fonctionnement 21
Remarque
2. Nettoyez délicatement la pointe de la sonde à l'aide d'un
coton-tige légèrement imbibé d'alcool isopropyle ou d'alcool
éthylique. Veillez à ne pas déplacer la fenêtre de la lentille.
Enlevez l'excédent d'alcool à l'aide d'un coton-tige propre et
laissez sécher à l'air libre pendant 5 minutes. N'utilisez aucun
produit chimique autre que de l'alcool pour nettoyer la fenêtre
de la sonde.
3. Placez le thermomètre Braun ThermoScan Pro 6000 en mode
étalonnage en procédant comme suit.
a. Lorsque le thermomètre est en mode veille, appuyez et
relâchez le bouton C/F.
b. Appuyez IMMÉDIATEMENT (lorsque tous les segments de
l'écran LCD sont éclairés pendant le test d'autodiagnostic)
et maintenez enfoncés les boutons
C/F
et
Mem
.
c. Au bout de 5 secondes, le thermomètre émet un long bip.
Pendant le bip, relâchez les boutons Mem et C/F. Le
thermomètre est désormais en mode de vérification de
l'étalonnage, indiqué les lettres CAL qui s'affichent à
l'écran pendant 0,25 seconde, toutes les secondes.
4. Une fois en mode étalonnage (CAL), attendez 1 minute avant
de prendre la première température.
Posez le thermomètre pendant l'attente afin qu'il
conserve la température ambiante de la pièce.
5. Appliquez un nouveau couvre-sonde. S'il est correctement
appliqué, un bip court retentit et l'icône clignotante du
couvre-sonde disparaît de l'écran..
6. Attendez l'affichage de trois tirets clignotant (- - -) en
alternance avec les lettres CAL.
7. Si vous utilisez le montage d'essai Braun 6000, placez le
thermomètre Braun Pro 6000 dans le montage, comme
indiqué dans les instructions d'assemblage (référence
721533). Si vous n'utilisez pas l'adaptateur Braun Pro 6000,
Page 66

22 Chapitre 3 Fonctionnement Welch Allyn Testeur d’étalonnage 9600 Plus
Remarque
enfoncez solidement la sonde dans le port du dispositif
auriculaire (Figure 6). Il est important de s'assurer que le
dispositif est perpendiculaire au port, directement aligné avec
la sonde du testeur d'étalonnage et non incliné. Appuyez
fermement sur le dispositif dans le logement pour garantir la
perpendicularité et l'insertion complète de la sonde dans le
port du dispositif. Effectuez un contrôle visuel pour vérifier le
bon alignement. N'exercez pas trop de pression une fois le
dispositif fermement installé, votre main pourrait bouger et
incliner ou déplacer le dispositif lors du test.
8. Attendez 5 secondes, appuyez sur le bouton Measure
(Mesurer) du thermomètre et attendez que la lumière verte
« ExacTemp » clignote.
9. Laissez le thermomètre dans le testeur d'étalonnage 9600
Plus jusqu'à ce que la lumière « ExacTemp » arrête de
clignoter et que vous entendiez un bip.
10.Retirez le thermomètre Pro 6000 du testeur d'étalonnage
9600 Plus et lisez la température sur l'écran du thermomètre.
Si les températures sont d'environ ±0,2 °C (±0,4 °F), le
thermomètre est dans la plage d'étalonnage.
Si les températures sont en dehors de la plage
±0,2 °C, vérifiez que la procédure de test a été
strictement observée et répétez la vérification de
l'étalonnage encore deux fois à cette température.
Si les deux tests suivants sont dans les limites
acceptables, le test peut être considéré comme
concluant. Si les trois mesures sont en dehors de
l'étalonnage, appelez Welch Allyn pour obtenir
de l'aide.
11. Remplacez le couvre-sonde pour réinitialiser le thermomètre
avant de prendre la mesure suivante. Attendez que le
Page 67

Mode d’emploi Chapitre 3 Fonctionnement 23
Remarque
Remarque
Remarque
thermomètre affiche trois tirets clignotant (- - -) en alternance
avec les lettres CAL.
Posez le thermomètre pendant l'attente afin qu'il
conserve la température ambiante de la pièce.
Le couvre-sonde doit être remplacé par un nouveau
couvre-sonde avant chaque relevé afin de supprimer
toute chaleur résiduelle absorbée par le testeur
d'étalonnage 9600 Plus.
12.Attendez une minute complète avant de prendre une autre
mesure avec le même thermomètre. Des mesures répétées
sur une courte séquence peuvent entraîner des résultats plus
élevés.
Posez le thermomètre pendant l'attente afin qu'il
conserve la température ambiante de la pièce.
13.Lorsque vous n'utilisez qu'un seul testeur d'étalonnage 9600
Plus, procédez à un test de vérification de l'étalonnage de
tous les thermomètres disponibles à la température actuelle
du point d'étalonnage avant de passer à la température de
point d'étalonnage suivante. Voir « Modification de la
température du point d'étalonnage » (page 11).
14.Le dispositif quitte le mode CAL après 10 minutes d'inactivité,
ou lorsque vous appuyez sur les boutons C/F et Mem
enfoncés pendant 5 secondes. Après avoir quitté le mode
de vérification de l'étalonnage, le thermomètre repasse
en mode veille.
Page 68

24 Chapitre 3 Fonctionnement Welch Allyn Testeur d’étalonnage 9600 Plus
Modèle Braun ThermoScan Pro 3000
Mise en garde Stockez les thermomètres à tester dans
la même salle que le testeur d'étalonnage 9600 Plus
environ 30 minutes à l'avance afin qu'ils atteignent la
température ambiante de la pièce.
Mise en garde La température ambiante doit être
stable et comprise entre 18,3 °C et 26,7 °C (65,0 °F
et 80,0 °F).
Mise en garde Un contact prolongé du thermomètre
avec le corps peut avoir un impact sur les mesures.
Lorsqu'il est indiqué de patienter avant de passer à
l'étape suivante, placez le thermomètre sur le plan
de travail.
Figure 7. Testeur d’étalonnage 9600 Plus avec le thermomètre Braun
ThermoScan Pro 3000
Page 69

Mode d’emploi Chapitre 3 Fonctionnement 25
1. Nettoyer l’extrémité de la sonde avec un tampon de ouate
légèrement humecté d’alcool isopropylique, essuyer le
surplus d’alcool avec un tampon de ouate propre et laisser
sécher à l’air libre 5 minutes. Utiliser uniquement de l’alcool
pour nettoyer la fenêtre de la sonde.
2. Placer le thermomètre Braun ThermoScan Pro 3000 en Mode
étalonnage en procédant comme suit.
a. Attendre que le thermomètre se place en mode Veilleuse
(écran vide).
b. Appuyer sur le bouton Activation, et le maintenir jusqu’à la
fin de l’Étape d.
c. Appuyer sur le bouton /Mem.
d. Après la séquence d’autocontrôle, les lettres « CAL » se
mettent à clignoter sur l’écran ACL. Les lettres « CAL »
clignoteront, même si une température a été prise.
e. Relâcher les deux boutons.
3. Appliquer une nouvelle protection de sonde. Placer
fermement le dispositif dans le port de dispositif auriculaire
(Figure 7).
4. Attendre environ trois secondes, appuyer sur le bouton
Activation du thermomètre et attendre le signal sonore.
5. Retirer le thermomètre Pro 3000 du testeur d’étalonnage
9600 Plus et lire la température affichée sur le thermomètre.
Si les températures sont à moins de ±0,2 °C (±0,4 °F) d’écart,
le thermomètre respecte la norme d’étalonnage.
6. Attendre une minute complète avant d’effectuer une autre
lecture avec le même thermomètre. Des intervalles de
mesure plus rapprochés risquent de fausser les lectures
à la hausse.
Page 70

26 Chapitre 3 Fonctionnement Welch Allyn Testeur d’étalonnage 9600 Plus
7. Le dispositif quittera le mode d’étalonnage CAL après environ
quatre minutes.
8. Vérifier l’étalonnage de tous les thermomètres à la
température de consigne actuelle. Passer à la température de
consigne suivante, voir « Modification de la température du
point d'étalonnage » (page 11).
Résolution des problèmes de relevés incorrects
1. Vérifiez que la fenêtre de la sonde est propre et sans débris.
2. Utilisez toujours des couvres-sondes nouveaux pour tester
l'étalonnage des thermomètres Braun.
3. Vérifiez que les thermomètres auriculaires et sans contact
sont en mode étalonnage.
4. Vérifiez que les thermomètres à thermistance sont en mode
surveillance.
5. Si la mesure prend plus de 5 secondes, ou si un message
d'erreur (« ERR ») s'affiche à l'écran, vérifiez que le
thermomètre est en mode étalonnage.
6. Vérifiez que le thermomètre n'est pas impacté par un
chauffage ou un refroidissement radiant ou conducteur.
7. Si aucune autre cause n'est trouvée, posez le thermomètre
pendant 5 minutes avant de procéder à un nouveau test.
Page 71

27
4
Entretien
Nettoyage
Pour nettoyer le testeur d’étalonnage 9600 Plus :
1. Débrancher le cordon électrique situé à l’arrière de
l’appareil.
2. À l’aide d’un chiffon légèrement humidifié d’une solution
d’eau chaude et de détergent doux, nettoyer l’extérieur de
l’appareil. Faire très attention que l’eau et le détergent
n’entrent pas dans les deux ports de dispositif.
3. Rincer le chiffon à l’eau et l’essorer à fond.
4. Éponger le détergent et l’eau de l’appareil 9600 Plus.
5. Laisser le testeur d’étalonnage 9600 sécher pendant
15 minutes.
6. Brancher le cordon électrique à l’arrière de l’appareil.
Mise en garde Ne pas nettoyer les ports de sonde
à thermistance ou de dispositif auriculaire. Cela
risque d’endommager leur surface. Seul un centre
d’entretien Welch Allyn agréé peut nettoyer les ports
de dispositif.
Page 72

28 Chapitre 4 Entretien Welch Allyn Testeur d’étalonnage 9600 Plus
Dépannage
Erreur Problème Solution
E s Le testeur d’étalonnage ne peut
atteindre la température de
consigne, car la pièce ou le
dispositif est trop chaud(e).
E t Le testeur d’étalonnage ne peut
atteindre la température de
consigne, car la pièce ou le
dispositif est trop froid(e).
Tension Problème de tension de
l’adaptateur d’alimentation
E0.1 Unité de chauffage défectueuse,
ne chauffe pas du tout
E0.2 L’unité de chauffage s’emballe (ne
s’éteint pas au moment adéquat)
E0.3 La sonde à thermistance est
ouverte
E0.4 La sonde à thermistance est
court-circuitée
La température ambiante et/ou la
température du dispositif doivent être
comprises entre 18,3 °C et 26,7 °C
(65
°F et 80 °F). Attendre 30 minutes
avant d’effectuer un test afin de
permettre une accomodation thermique.
La température ambiante et/ou la
température du dispositif doivent être
comprises entre 18,3
(65 °F et 80
avant d’effectuer un test afin de
permettre une accomodation thermique.
Appeler Welch Allyn pour un
remplacement
Renvoyer le dispositif au centre
d’entretien Welch Allyn
Renvoyer le dispositif au centre
d’entretien Welch Allyn
Renvoyer le dispositif au centre
d’entretien Welch Allyn
Renvoyer le dispositif au centre
d’entretien Welch Allyn
°F). Attendre 30 minutes
°C et 26,7 °C
E0.5 La résistance RCAL est ouverte Renvoyer le dispositif au centre
E0.6 La résistance RCAL est court-
circuitée
d’entretien Welch Allyn
Renvoyer le dispositif au centre
d’entretien Welch Allyn
Page 73

Mode d’emploi Chapitre 4 Entretien 29
Erreur Problème Solution
E0.7 La résistance PTB est ouverte Renvoyer le dispositif au centre
d’entretien Welch Allyn
E0.8 La résistance PTB est court-
circuitée
E0.9 Panne interne catastrophique Renvoyer le dispositif au centre
E1.1 Dispositif non étalonné Renvoyer le dispositif au centre
E1.3 Défaillance EEPROM Renvoyer le dispositif au centre
Renvoyer le dispositif au centre
d’entretien Welch Allyn
d’entretien Welch Allyn
d’entretien Welch Allyn
d’entretien Welch Allyn
Vérifications du testeur d’étalonnage 9600 Plus
Si plusieurs thermomètres ne réussisent pas le test d’étalonnage,
vérifier le testeur d’étalonnage 9600 Plus pour établir s’il donne
des résultats hors plage. Avant d’envoyer l’appareil à un centre
d’entretien Welch Allyn agréé, effectuer les vérifications cidessous.
1. Vérifier la date d’étalonnage indiquée sur le côté du testeur
d’étalonnage 9600 Plus. Si le testeur d’étalonnage 9600 Plus a
été étalonné il y plus de 12 mois, ne pas l’utiliser. Le renvoyer
aussitôt à un centre d’entretien Welch Allyn agréé pour un
réétalonnage.
2. S’assurer que personne n’a modifié le testeur d’étalonnage
9600 Plus. Si quelqu’un a modifié l’appareil ou les étiquettes
qui y sont apposées, les réglages d’étalonnage et la garantie
sont nuls. Le renvoyer aussitôt à un centre d’entretien Welch
Allyn agréé pour un réétalonnage.
Page 74

30 Chapitre 4 Entretien Welch Allyn Testeur d’étalonnage 9600 Plus
3. S’assurer que le testeur d’étalonnage 9600 Plus n’est pas
exposé à des températures extrêmes pouvant endommager
la précision de la thermistance. L’exposition du testeur
d’étalonnage 9600 Plus à des températures élevées peut
altérer ses caractéristiques de résistance et de température,
le rendant imprécis. Le renvoyer aussitôt à un centre
d’entretien Welch Allyn agréé pour un réétalonnage.
Vérifications environnementales
1. S’assurer qu’il n’y a pas d’excès d’humidité ni de vapeur dans
l’air. Une humidité élévée (supérieure à 90 %) peut provoquer
des fuites électriques pouvant temporairement nuire à la
précision d’étalonnage de l’appareil. Si les thermomètres et/ou
le testeur d’étalonnage 9600 Plus sont exposés à de telles
conditions, laisser reposer chaque dispositif à une température
et humidité ambiantes normales pendant au moins 30 minutes
avant d’effectuer un test d’étalonnage.
2. Éviter d’exposer l’appareil à des températures extrêmes.
Les gradients thermiques du thermomètre ou du testeur
d’étalonnage 9600 Plus peuvent entraîner des effets
imprévisibles. Vérifier que le testeur d’étalonnage 9600 Plus
se situe dans une plage de température ambiante comprise
entre 18,3 °C (65,0 °F) et 26,7 °C (80,0 °F). Vérifiez la stabilité
de la température ambiante de la pièce et l'absence de
courants d'air autour du testeur d'étalonnage 9600 Plus.
Page 75

Mode d’emploi Chapitre 4 Entretien 31
Spécifications
Alimentation Tension : 100 - 240 V 50/60 Hz
Courant Chauffage : 480 mA
Consommation Chauffage : 2,4 W
Testeur
d’étalonnage
Poids (sans bloc d'alimentation) : 0,75 kg (1,65 livres)
Bloc d’alimentation
(Dimensions
approximatives)
Environnement Température d’entreposage : 0 °C – 50 °C (32 °F – 122 °F)
Température ambiante de fonctionnement : 18,3 °C à 26,7 °C (65 °F à 80 °F)
Humidité de fonctionnement : HR de 20 % à 95 %. Sans condensation
Spécifications de
fonctionnement
Temps de chauffage
et de refroidissement
Testé à une
température ambiante
de 23,9 °C (75 °F)
De la température de la pièce au réglage inférieur : Environ 20 minutes.
Du réglage inférieur au réglage intermédiaire : Environ 6 minutes.
Du réglage intermédiaire au réglage supérieur : Environ 6 minutes.
Refroidissement du réglage supérieur au réglage inférieur : Environ
Hauteur (avec prises insérées) : 62 mm (2,44 po.)
Température contrôlée de l’appareil 9600 Plus
Réglage intermédiaire : 38,5 °F (101,3 °F)
Précision de la température : ±0,05 °C (0,1 °F)
Altitude/pression maximum : <
Après réchauffement : 185 mA
Après réchauffement : 0,92 W
Longueur : 254 mm (10,00 po.)
Largeur : 105 mm (4,13 po.)
Hauteur : 85 mm (3,34 po.)
Longueur : 86 mm (3,38 po.)
Largeur : 51 mm (2,00 po.)
Poids : 0,18 kg (0,40 livre)
Réglage inférieur : 36 °F (96,8 °F)
Réglage supérieur : 41 °F (105,8 °F)
2 000 mètres.
25 minutes.
Catégorie d’installation II
Niveau de pollution II
Page 76

32 Chapitre 4 Entretien Welch Allyn Testeur d’étalonnage 9600 Plus
Compatibilité électromagnétique
Ce produit a été testé et constaté conforme à toutes les
exigences en vigueur de la directive du conseil 89/336/EEC et à
ses modifications.
Ce produit a été testé et constaté conforme aux exigences du
FCC Partie 15.107, Classe B. Ces limites visent à offrir une
protection raisonnable contre les interférences nuisibles dans
une installation (médicale) type. Cet équipement génère, utilise
et peut émettre des radiofréquences, et s’il n’est pas utilisé
conformément aux instructions, peut causer des interférences
nuisibles à d’autres appareils situés à proximité. Par contre, il
n’est pas garanti que des interférences ne se produiront pas dans
une installation particulière. Si l’équipement produit des
interférences nuisibles à d’autres appareils, ce qui peut être
vérifié en allumant et en éteignant l’équipement, l’utilisateur est
incité à corriger ce problème par l’un ou l’autre des moyens
suivants :
• Réorienter ou repositionner le dispositif de réception
• Augmenter la distance entre les appareils
• Brancher l’équipement dans une prise de courant appartenant
à un circuit distinct de celui dans lequel les autres appareils
sont branchés.
• Consulter le fabricant ou un technicien du service
d’assistance pour toute aide.
Page 77

33
5
Garantie et entretien
Garantie limitée
Les instruments neufs achetés auprès de Welch Allyn sont
garantis contre tout vice de matériau et de main-d’oeuvre,
dans des conditions normales d’utilisation et d’entretien,
pendant une période d’un an à compter de la date de la
première expédition effectuée par Welch Allyn. La présente
garantie est exécutée par Welch Allyn ou par l’un de ses
représentants agréés, qui réparera ou remplacera, à la
discrétion de Welch Allyn, n’importe lequel desdits vices,
les pièces et la main-d’oeuvre étant gratuites.
Welch Allyn doit être informé par téléphone de l’existence de
tout produit défectueux et ce dernier doit être immédiatement
renvoyé à Welch Allyn, bien emballé et pré-affranchi. L’acheteur
assume tout risque de perte ou d’endommagement pendant le
transport.
Welch Allyn ne sera pas tenu responsable des pertes
associées à l’utilisation d’un produit Welch Allyn (1) dont le
numéro de série est dégradé, (2) qui a été réparé par un
individu autre qu’un représentant d’entretien Welch Allyn
agréé, (3) qui a été modifié, ou (4) qui a été utilisé d’une
manière non conforme aux instructions.
LA PRÉSENTE GARANTIE EST EXCLUSIVE ET REMPLACE
TOUTE GARANTIE IMPLICITE OU GARANTIE DE VALEUR
MARCHANDE, D’APTITUDE À UN USAGE PARTICULIER OU
AUTRE GARANTIE DE QUALITÉ, QU’ELLE SOIT EXPRESSE
OU IMPLICITE, Welch Allyn DÉCLINANT TOUTE
RESPONSABILITÉ QUANT AUX DOMMAGES INDIRECTS
OU CONSÉCUTIFS.
Page 78

34 Chapitre 5 Garantie et entretien Welch Allyn Testeur d’étalonnage 9600 Plus
Entretien
Vous devez obtenir l’autorisation de Welch Allyn avant de
renvoyer un produit pour réparation ou étalonnage annuel. Un
numéro d’autorisation de renvoi de marchandise (ARM) vous sera
donné par notre personnel du service d’entretien. N’oubliez pas
d’inscrire ce numéro à l’extérieur du carton de réexpédition. Les
renvois sans numéro ARM ne seront pas acceptés. Pour de plus
amples informations, veuillez contacter le représentant du
service à la clientèle de votre centre d’entretien Welch Allyn,
tel qu’indiqué ci-dessous.
Tout l’équipement utilisé pour l’étalonnage du testeur
d’étalonnage 9600 Plus est traçable conformément au NIST.
Welch Allyn ne peut être tenu pour responsable si le testeur
d'étalonnage 9600 Plus est étalonné auprès d'un centre de
services non agréé. Envoyez le testeur d'étalonnage 9600 Plus
à un centre de services agréé pour tout nouvel étalonnage.
Pour trouver le centre de services le plus proche de chez vous,
consultez le site http://www.welchallyn.com/en/about-us/
locations.html.
Page 79

Kalibriertester 9600 Plus
Page 80

© 2017 Welch Allyn. Alle Rechte vorbehalten. Zum Zwecke des
bestimmungsgemäßen Gebrauchs des beschriebenen Produkts ist es
dem Käufer des Produkts gestattet, dieses Dokument zur internen
Weitergabe von dem von Welch Allyn bereit gestellten Medium zu
kopieren. Darüber hinaus darf dieses Dokument ohne vorherige
schriftliche Genehmigung von Welch Allyn weder ganz noch in Auszügen
verwendet, vervielfältigt oder weitergegeben werden.
Welch Allyn übernimmt keine Haftung für Verletzungen oder für illegale
oder falsche Verwendung des Produkts, die sich ergeben, weil das Produkt
nicht in Übereinstimmung mit den Anweisungen, Vorsichtshinweisen,
Warnhinweisen oder den Informationen zum bestimmungsgemäßen
Gebrauch in dieser Anleitung verwendet wurde.
Welch Allyn ist ein eingetragenes Warenzeichen von Welch Allyn. Braun
ThermoScan ist ein eingetragenes Warenzeichen der Braun Corporation.
Gedruckt in den USA.
DIR 80020333 Ver. A
Überarbeitet: März 2017
Page 81

Inhaltsverzeichnis
Einführung . . . . . . . . . . . . . . . . . . . . . . . . . . . . . . . . . . . 1
Symbole und Beschreibungen . . . . . . . . . . . . . . . . . . . . . . . 2
Vorsicht . . . . . . . . . . . . . . . . . . . . . . . . . . . . . . . . . . . . . . . . . 3
Auspacken des Kalibriertesters 9600 Plus . . . . . . . . . . . . . . 4
Bedienelemente und Anzeigen . . . . . . . . . . . . . . . . . . . 5
Flüssigkristallanzeige . . . . . . . . . . . . . . . . . . . . . . . . . . . . . . 5
Einschaltreihenfolge . . . . . . . . . . . . . . . . . . . . . . . . . . . . . . . 7
Vorderseite des Kalibriertesters 9600 Plus . . . . . . . . . . . . . . 7
Betrieb. . . . . . . . . . . . . . . . . . . . . . . . . . . . . . . . . . . . . .11
Konfiguration des Kalibriertesters 9600 Plus . . . . . . . . . . . 11
Ändern der Kalibrier-Sollwerttemperatur. . . . . . . . . . . . . . . 11
Die Thermometer SureTemp und SureTemp Plus von
Welch Allyn . . . . . . . . . . . . . . . . . . . . . . . . . . . . . . . . . . . . . 13
Das Modell ThermoScan Pro 4000 von Braun . . . . . . . . . . 15
Modell Braun ThermoScan Pro 6000 . . . . . . . . . . . . . . . . . 18
Das Modell ThermoScan Pro 3000 von Braun . . . . . . . . . . 23
Fehlerbehebung bei ungenauen Werten . . . . . . . . . . . . . . 25
i
Wartung. . . . . . . . . . . . . . . . . . . . . . . . . . . . . . . . . . . . 27
Reinigung . . . . . . . . . . . . . . . . . . . . . . . . . . . . . . . . . . . . . . 27
Fehlerbehebung . . . . . . . . . . . . . . . . . . . . . . . . . . . . . . . . . 28
Technische Daten . . . . . . . . . . . . . . . . . . . . . . . . . . . . . . . . 31
Elektromagnetische Verträglichkeit. . . . . . . . . . . . . . . . . . . 32
Gewährleistung und Service . . . . . . . . . . . . . . . . . . . . 33
Beschränkte Gewährleistung . . . . . . . . . . . . . . . . . . . . . . . 33
Service . . . . . . . . . . . . . . . . . . . . . . . . . . . . . . . . . . . . . . . . 34
Page 82

ii
Page 83

1
1
Einführung
Der Kalibriertester 9600 Plus überprüft die Kalibrierung der
folgenden Thermometer:
• Welch Allyn SureTemp
986)
• Welch Allyn SureTemp
OEM)
• Braun ThermoScan® Pro 3000, Pro 4000 und Pro 6000
Der Kalibriertester 9600 Plus ist eine genau geregelte
Temperaturquelle, die die Konfiguration, exakte Kalibrierung
und Wartung von Wasserbädern und anderen
Universalkalibriereinrichtungen überflüssig macht. Der
Benutzer misst die Temperatur des Kalibriertesters 9600 Plus
und kann sicher sein, dass er exakte Messungen erhält, weil
dieser Kalibriertester ab Werk mit einem Normal des National
Institute of Standards and Technology (NIST) oder mit einem
äquivalenten Normal kalibriert ist. Einstellungen des Benutzers
sind weder erforderlich noch werden diese empfohlen.
Der „schwarze Körper“ des Kalibriersystems 9600 Plus
dient als Wärmespeicher für die Thermistorsonde sowie
zur Erzeugung der Wärmestrahlung für die InfrarotOhrthermometer.
®
-Modelle (678, 678 OEM, 679 und
®
Plus-Modelle (690, 692 und 692
Das Gerät enthält Halbleiterschaltkreise, die lange stabil sind
und kaum Wartung erfordern. Welch Allyn verwendet für den
Bau des Kalibriertestgeräts 9600 Plus nur Präzisionskomponenten. Um die Übereinstimmung mit einem Eichnormal
der NIST oder einer äquivalenten Einrichtung zu gewähr-
Page 84

2 Kapitel 1 Einführung Welch Allyn Kalibriertester 9600 Plus
95%
15%
leisten, sollten Sie den Kalibriertester 9600 Plus einmal pro Jahr
zur Kalibrierung ins Werk einschicken.
Symbole und Beschreibungen
Doppelt isoliert
Gleichstrom
Vorsichtig behandeln
Achtung! Weitere Informationen finden Sie in der
Gebrauchsanleitung.
Transport-/Lagertemperatur
Relative Luftfeuchtigkeit
Separate Erfassung von Elektronikteilen
Recyclingfähig
Page 85

Gebrauchsanleitung Kapitel 1 Einführung 3
Vorsicht
Ein Vorsicht-Vermerk in dieser Anleitung weist auf einen Zustand
oder eine Handlung hin, die zu Ausfall des Geräts, dessen
Beschädigung oder zum Datenverlust führen könnte, wenn nicht
eingegriffen wird.
Vorsicht Den Kalibriertester 9600 Plus nicht in
Flüssigkeit eintauchen oder einweichen.
Vorsicht Nur geschultes biomedizinisches Personal
sollte den Kalibriertester 9600 Plus verwenden und die
Kalibrierung von Thermometern damit überprüfen.
Vors i cht Wenn die Anschlüsse für den Thermistor oder
das Ohrmessgerät nicht verwendet werden, diese mit
der Staubschutzkappe abdecken.
Vorsicht Die zu prüfenden Thermometer vor der
Prüfung etwa 30 Minuten lang in dem gleichen Raum
wie den Kalibriertester 9600 Plus aufbewahren, damit
sie Raumtemperatur erreichen können.
Vorsicht Den Thermistoranschluss und den Anschluss
für das Ohrthermometer nicht reinigen. Dies könnte das
Instrument beschädigen. Nur Vertragswerkstätten von
Welch Allyn dürfen die Geräteanschlüsse reinigen.
Page 86

4 Kapitel 1 Einführung Welch Allyn Kalibriertester 9600 Plus
Auspacken des Kalibriertesters 9600 Plus
Den Kalibriertester 9600 Plus auspacken und den Lieferumfang
auf Vollständigkeit überprüfen. Den Verpackungskarton
aufbewahren, um das Gerät zur Rekalibrierung an Welch Allyn
zurückzusenden.
Folgende Teile gehören zum Lieferumfang:
• Ein Kalibriertester 9600 Plus
• Eine Packung mit Stromversorgung und vier Netzsteckern
• Gebrauchsanleitung
• Eine Transporttasche
Wenn eines dieser Teile beim Öffnen der Verpackung fehlt, den
Kundendienst von Welch Allyn verständigen. Die Nummer finden
Sie unter Seite 34.
Page 87

5
Aktuelle
Innentemperatur
Temperatureinheit
Kalibriersolltemperatur
Sollwertmodus
Auswahltaste für °C/°F
Temperaturauswahltaste
2
Bedienelemente und Anzeigen
Flüssigkristallanzeige
Abbildung 1. LCD-Display und Tasten auf der Frontseite
Kalibriersolltemperatur
Es gibt drei Kalibriersolltemperaturen, die zur Prüfung der
Kalibrierung des Thermometers verwendet werden. Diese
drei Temperaturen sind: 36 °C (96,8 °F), 38,5 °C (101,3 °F)
und 41 °C (105,8 °F). Das LCD-Display zeigt die aktuelle
Solltemperatur der Kalibrierung in der oberen linken Ecke an.
Page 88

6 Kapitel 2 Bedienelemente und Anzeigen Welch Allyn Kalibriertester 9600 Plus
Aktuelle Innentemperatur
Die aktuelle Temperatur des Kalibriertesters 9600 Plus wird mit
großen Ziffern in der Mitte des Displays angezeigt (Abbildung 1).
Wenn das Gerät auf die aktuelle Solltemperatur der Kalibrierung
umschaltet, blinkt die Isttemperatur auf dem Display. Wenn das
Gerät die Solltemperatur der Kalibrierung erreicht, blinkt die
Temperaturanzeige in der Mitte des Displays nicht mehr.
Temperatureinheiten
Der Kalibriertester 9600 Plus kann die Temperaturen in °C oder
in °F anzeigen.
Sollwertmodus
Auf dem LCD-Display wird entweder ein „D“ (Standardeinstellung) oder ein „L“ (letzte Einstellung) oben links angezeigt
(Abbildung 1). Der Kalibriertester 9600 Plus besitzt zwei Betriebs-
arten für die Sollwerte. Der Standardmodus (ab Werk eingestellt)
erwärmt den Kalibriertester 9600 Plus bis zur unteren Solltemperatur (36,0
der Betriebsart „Letzte Einstellung“ wird der Kalibriertester 9600
Plus auf die zuletzt verwendete Temperatur eingestellt.
°C/96,8 °F), wenn das Gerät eingeschaltet wird. In
Zur Veränderung des Sollwertmodus die Taste C/F und die
Pfeiltaste unter dem LCD-Display gleichzeitig gedrückt halten,
bis ein einzelner Piepton ausgegeben wird. In der oberen linken
Ecke des Displays erscheint für den neuen Betriebsmodus ein
„D“ oder ein „L“.
Page 89

Gebrauchsanleitung Kapitel 2 Bedienelemente und Anzeigen 7
Einschaltreihenfolge
Der Kalibriertester 9600 Plus wird über eine Steckdosennetzteil
mit Energie versorgt, dessen Kabel an der Rückseite des Geräts
angeschlossen wird. Es gibt keinen Ein-/Ausschalter. Beim
Einschalten führt das Kalibriergerät 9600 Plus verschiedenen
interne Prüfungen durch, zeigt ein Testmuster zur Prüfung aller
Anzeigesegmente, gibt Pieptöne aus und zeigt die aktuelle
Gerätetemperatur an. Der Kalibriertester 9600 Plus heizt sich bei
Bedarf sofort auf, um die gewünschte Solltemperatur für die
Kalibrierung zu erreichen.
Vorderseite des Kalibriertesters 9600 Plus
Temperaturauswahltaste
Mit dieser Taste kann der Benutzer eine der drei Solltemperaturen auswählen: 36,0 °C (96,8 °F), 38,5 °C (101,3 °F) oder
41,0 °C (105,8 °F).
Um von einem Sollwert zum nächsten zu wechseln, die Taste zur
Temperaturauswahl gedrückt halten, bis ein Piepton zu hören ist.
Der neu ausgewählte Sollwert erscheint in der oberen linken Ecke
des LCD-Displays. Die aktuelle Temperatur des Geräts wird
angezeigt, beginnt zu blinken und blinkt weiter, bis die Temperatur
im Inneren des Geräts bei neuen Solltemperatur stabilisiert hat.
Auswahltaste für °C/°F
Mit dieser Taste kann der Benutzer die Anzeige in °C der °F
auswählen. Zur Änderung der Temperatureinheiten die Taste C/F
gedrückt halten, bis ein Piepton ausgegeben wird. Die Temperatur
wird entweder in „°C“ oder „°F“ angezeigt (Abbildung 1).
Vorsicht Überprüfen Sie vor Durchführung des Tests,
ob das zu prüfende Thermometer und der 9600 Plus auf
dieselbe Temperaturskala eingestellt sind. Ziehen Sie die
Gebrauchsanweisungen der Thermometer zu Rate, um
dessen Temperaturskala zu ändern.
Page 90

8 Kapitel 2 Bedienelemente und Anzeigen Welch Allyn Kalibriertester 9600 Plus
Anschluss für den
Thermistor
Anschluss für das
Ohrthermometer
Staubschutzkappe
Stromversorgungsstecker
Abbildung 2. Vorderseite des Kalibriertesters 9600 Plus
Staubschutzkappe
Diese schwarze Kunststoffkappe verhindert, dass Staub in die
Anschlüsse für Thermistor und Ohrthermometer gelangt. Zum
Öffnen der Anschlüsse für Thermistor und Ohrthermometer die
Staubschutzkappe nach links drehen. Zum Abdecken der
Anschlüsse die Staubschutzkappe nach rechts drehen.
Vor s ich t Wenn die Anschlüsse für den Thermistor oder
das Ohrmessgerät nicht verwendet werden, diese mit
der Staubschutzkappe abdecken.
Page 91

Gebrauchsanleitung Kapitel 2 Bedienelemente und Anzeigen 9
Anschlüsse für Thermistor und Ohrthermometer
Der Anschluss für das Ohrthermometer ist der größere der
beiden Anschlüsse unter der Staubschutzkappe und eignet sich
für die Ohrthermometer Braun ThermoScan Pro 3000 und Pro
4000 (Abbildung 2).
Der Anschluss für den Thermistor ist der kleinere Anschluss
unter der Staubschutzkappe und für die Thermometer SureTemp
und SureTemp Plus vorgesehen.
Die Oberfläche in dem Anschluss für das Ohrthermometer ist mit
einer besonders matten schwarzen Farbe versehen, damit
Messungen mit dem Ohrthermometer durchgeführt werden
können. Die Oberfläche selbst ist nur unter hellem Licht
erkennbar. Der Anschluss für den Thermistor ist nicht schwarz
gestrichen. Beide Anschlüsse sauber und trocken halten.
Die Farbbeschichtung der Geräteanschlüsse ist empfindlich.
Daher die Reinigungsanweisungen strikt einhalten. Die
Oberfläche nicht berühren und keine Fremdkörper in die
Anschlüsse einführen. Es dürfen keine Flüssigkeiten in das Gerät
gelangen. Wenn Flüssigkeiten oder andere Verunreinigungen in
das Gerät gelangen, kann Welch Allyn eine ordnungsgemäße
Kalibrierung nicht garantieren, und Sie müssen das Gerät zur
Rekalibrierung an Welch Allyn zurücksenden.
Page 92

10 Kapitel 2 Bedienelemente und Anzeigen Welch Allyn Kalibriertester 9600 Plus
Page 93

11
3
Betrieb
Konfiguration des Kalibriertesters 9600 Plus
Den Kalibriertester 9600 Plus auf eine ebene Fläche stellen,
auf der er vor Sonnenlicht, Zugluft und anderen Wärme- oder
Kältequellen geschützt ist. Der Kalibriertester 9600 Plus
benötigt etwa 20 Minuten, bis die niedrigste Solltemperatur
erreicht ist. Wenn mehrere Thermometer bei allen drei
Temperaturen getestet werden, sollten zuerst alle Sonden
mit einer kalibrierten Solltemperatur getestet werden, bevor
zur Kalibrierung auf die nächste Solltemperatur umgeschaltet
wird. Die Prüfung lässt sich zudem beschleunigen, wenn
zunächst die niedrigste Solltemperatur kalibriert wird. Der
Kalibriertester 9600 Plus besitzt keinen internen Lüfter,
sodass die Abkühlzeit länger ist als die Aufheizzeit.
Ändern der Kalibrier-Sollwerttemperatur
Um von einem Sollwert zum nächsten zu scrollen, drücken
und halten Sie die Taste für die Temperaturauswahl gedrückt,
bis ein Piepton zu hören ist. Der neu ausgewählte Sollwert
wird in der oberen linken Ecke des LCD-Displays angezeigt.
Die aktuelle Temperatur des Geräts wird angezeigt, beginnt
zu blinken und blinkt weiter, bis die Innentemperatur mit dem
neu eingestellten Sollwert im Gleichgewicht ist.
Page 94

12 Kapitel 3 Betrieb Welch Allyn Kalibriertester 9600 Plus
UKUS EUAUS
Zwei Kontakte im
Netzteil
Abbildung 3. Netzteil und in der Netzgerätebuchse
Konfiguration:
1. Den richtigen Netzgerätestecker auswählen und über die
beiden Kontakte im Netzteil schieben (Abbildung 3).
2. Das Netzteil mit dem Kalibriertester 9600 Plus und das
3. Die Anzeige des Sollwertmodus in der oberen linken Ecke des
andere Ende mit einer Wandsteckdose verbinden
(Abbildung 2).
LCD-Displays verfolgen (Abbildung 1). Wird auf dem Display
ein „D“ angezeigt, arbeitet das Gerät im Standardmodus und
stellt zuerst die niedrigste Solltemperatur ein. Soll mit dieser
Solltemperatur keine Prüfung durchgeführt werden, die Taste
zur Temperaturauswahl gedrückt halten und die gewünschte
Einstellung auswählen. Die Temperaturanzeige blinkt
zunächst und wechselt dann auf Dauerlicht, um anzuzeigen,
dass sich der Kalibriertester 9600 Plus stabilisiert hat und
einsatzbereit ist.
Page 95

Gebrauchsanleitung Kapitel 3 Betrieb 13
Hinweis
Die Thermometer SureTemp und SureTemp Plus von Welch Allyn
Vorsicht Die zu prüfenden Thermometer vor der
Prüfung etwa 30 Minuten lang in dem gleichen Raum
wie den Kalibriertester 9600 Plus aufbewahren, damit
sie Raumtemperatur erreichen können.
Unterziehen Sie die Sonde vor Beginn des Prüfverfahrens einer Sichtprüfung hinsichtlich physischer Schäden.
Beschädigte Sonden müssen ersetzt werden.
Abbildung 4. Der Kalibriertester 9600 Plus und die Thermometer
SureTemp Plus von Welch Allyn
Beginn der Überprüfung der Kalibrierung der Thermometer:
Page 96

14 Kapitel 3 Betrieb Welch Allyn Kalibriertester 9600 Plus
1. Die Sonde aus der Sondenvertiefung entfernen und entweder
mit 70%igem Isopropanol oder mit einer 10%igen
Hypochloridlösung oder mit fleckenfreiem Desinfektionsmittel
reinigen. Die Sonde an der Luft trocknen lassen. Keine
Sondenhülle verwenden.
2. Das Thermometer in den Monitormodus entsprechend der
Bedienanleitung des Thermometers schalten.
3. Die Sonde in den Anschluss für den Thermistor einführen
(Abbildung 4).
4. Etwa eine Minute warten, bis die Temperatur am
Thermometer 10 Sekunden lang stabil angezeigt wird. Die
Thermometertemperaturanzeige mit der Solltemperatur des
Kalibriertester 9600 Plus vergleichen. Wenn beide
Temperaturen um maximal ± 0,1 °C (± 0,2 °F) voneinander
abweichen, ist das Thermometer korrekt kalibriert.
5. Alle verfügbaren Thermometer, deren Kalibrierung überprüft
werden soll, mit der aktuellen Kalibriersolltemperatur überprüfen.
Danach mit der nächsten Kalibriersolltemperatur fortsetzen.
Siehe dazu
(Seite 11)
„Ändern der Kalibrier-Sollwerttemperatur“
.
Page 97

Gebrauchsanleitung Kapitel 3 Betrieb 15
Das Modell ThermoScan Pro 4000 von Braun
Vorsicht Die zu prüfenden Thermometer vor der
Prüfung etwa 30 Minuten lang in dem gleichen Raum
wie den Kalibriertester 9600 Plus aufbewahren, damit
sie Raumtemperatur erreichen können.
Vorsicht Die Umgebungstemperatur muss stabil sein
und innerhalb des Bereichs von 18,3 °C (65,0 °F) –
26,7 °C (80,0 °F) liegen.
Vorsicht Längerer Körperkontakt mit dem Thermometer kann Messungen beeinflussen. Wenn Sie
angewiesen werden, vor Durchführung des nächsten
Schritts zu warten, legen Sie das Thermometer auf die
Arbeitsfläche.
Abbildung 5. Kalibriertester 9600 Plus mit Braun ThermoScan Pro 4000
Beginn der Kalibrierüberprüfung der Thermometer:
Page 98

16 Kapitel 3 Betrieb Welch Allyn Kalibriertester 9600 Plus
1. Prüfen Sie das Fenster der Sondenspitzenlinse hinsichtlich
Verschiebungen. In der Naht zwischen Rahmen und
Linsenfenster darf kein Abstand sein. Wenn ein Abstand
vorhanden ist, ist die Einheit beschädigt und muss ersetzt
werden.
2. Wischen Sie die Sondenspitze mit einem mit Isopropylalkohol
leicht angefeuchteten Wattetupfer vorsichtig ab, und achten
Sie dabei darauf, das Linsenfenster nicht zu verschieben;
entfernen Sie überschüssigen Alkohol mit einem sauberen
Wattetupfer, und lassen Sie die Sondenspitze 5 Minuten lang
an der Luft trocknen. Verwenden Sie außer Alkohol keine
Chemikalien zur Reinigung des Sondenfensters.
3. Das Thermometer ThermoScan Pro 4000 von Braun mit
folgenden Schritten auf den Kalibriermodus einstellen.
a. Die Taste I/O MEM kurz drücken, um das Gerät
einzuschalten. Auf dem Display werden Symbole und
Funktionen angezeigt. Das Modell Pro 4000 führt eine
automatische Eigenüberprüfung durch. Nach einigen
Sekunden hören Sie einen Piepton und sehen drei
Strichellinien sowie ein Soundsymbol und die Anzeige °C
oder °F auf dem Display.
b. Die Taste I/O MEM erneut drücken und für folgende
Schritte gedrückt halten:
• Nach etwa 3 Sekunden blinkt das „OFF“-Symbol auf
der Anzeige (halten Sie die Taste gedrückt).
• Sobald ein Piepton ertönt, die Taste loslassen.
• Damit ist das Thermometer Pro 4000 auf Kalibrierüberprüfung eingestellt, und auf dem Display blinkt das
Symbol „CAL“.
4. Nach Eingabe des Kalibriermodus (CAL) warten Sie 1 Minute,
bevor Sie die erste Temperatur messen.
Vorsicht Längerer Körperkontakt mit dem Thermometer kann Messungen beeinflussen. Wenn Sie
angewiesen werden, vor Durchführung des nächsten
Schritts zu warten, legen Sie das Thermometer auf die
Arbeitsfläche.
Page 99

Gebrauchsanleitung Kapitel 3 Betrieb 17
5. Bringen Sie eine neue Sondenhülle an.
6. Die Sonde fest in den Anschluss für das Ohrthermometer
drücken (Abbildung 5).
7. Warten Sie etwa 3 Sekunden, drücken Sie die Start-Taste des
Thermometers, und warten Sie dann, bis die Lampe „Exac
Temp“ blinkt.
8. Das Thermometer in dem Kalibriertester 9600 Plus lassen, bis
ein Piepton zu hören ist.
9. Das Thermometer Pro 4000 aus dem Kalibriertester 9600
Plus herausnehmen und die Temperatur auf dem Display des
Thermometers ablesen. Wenn beide Temperaturen um
maximal ± 0,2 °C (± 0,4 °F) voneinander abweichen, ist das
Thermometer korrekt kalibriert.
10.Warten Sie eine volle Minute, bevor Sie einen weiteren Wert
mit demselben Thermometer ablesen. In kurzen Abständen
wiederholte Messungen können zu höheren Werten führen.
Vorsicht Längerer Körperkontakt mit dem Thermometer kann Messungen beeinflussen. Wenn Sie
angewiesen werden, vor Durchführung des nächsten
Schritts zu warten, legen Sie das Thermometer auf die
Arbeitsfläche.
11. Die Sondenhülle muss jedes Mal, bevor ein Wert abgelesen
wird, gegen eine neue ausgetauscht werden, um eventuell
verbliebene Restwärme des Kalibriertesters 9600 Plus zu
entfernen.
12.Nach etwa vier Minuten schaltet das Gerät den
Kalibriermodus ab.
13.Wenn Sie nur einen Kalibriertester 9600 Plus verwenden,
testen Sie alle für die Kalibrierprüfung verfügbaren
Thermometer an der aktuellen Kalibrier-Sollwerttemperatur.
Fahren Sie mit der nächsten Kalibrier-Sollwerttemperatur fort.
Informationen dazu finden Sie unter „Ändern der Kalibrier-
Sollwerttemperatur“ (Seite 11).
Page 100

18 Kapitel 3 Betrieb Welch Allyn Kalibriertester 9600 Plus
Modell Braun ThermoScan Pro 6000
Vorsicht Die zu prüfenden Thermometer vor der
Prüfung etwa 30 Minuten lang in dem gleichen Raum
wie den Kalibriertester 9600 Plus aufbewahren, damit
sie Raumtemperatur erreichen können.
Vorsicht Die Umgebungstemperatur muss stabil
sein und innerhalb des Bereichs von 18,3 °C (65,0 °F) 26,7 °C (80,0 °F) liegen.
Vorsicht Stellen Sie die Temperaturskalen am 9600
Plus so ein, dass sie zu den Standard-Temperaturskalen
des Braun Thermoscan PRO 6000 passen.
Vorsicht Längerer Körperkontakt mit dem Thermometer kann Messungen beeinflussen. Wenn
Sie angewiesen werden, vor Durchführung des nächsten
Schritts zu warten, legen Sie das Thermometer auf
die Arbeitsfläche.
Vorsicht Bei älteren Versionen des 9600 Plus kann die
Schraube des Staubschutzes bei der ordnungsgemäßen
Positionierung des Braun 6000 im Anschluss für das
Ohrthermometer stören. Verwenden Sie die Braun 6000
Prüfvorrichtung (Welch Allyn Teilenummer 411690), um
eine ordnungsgemäße Positionierung sicherzustellen.
 Loading...