

Page 1
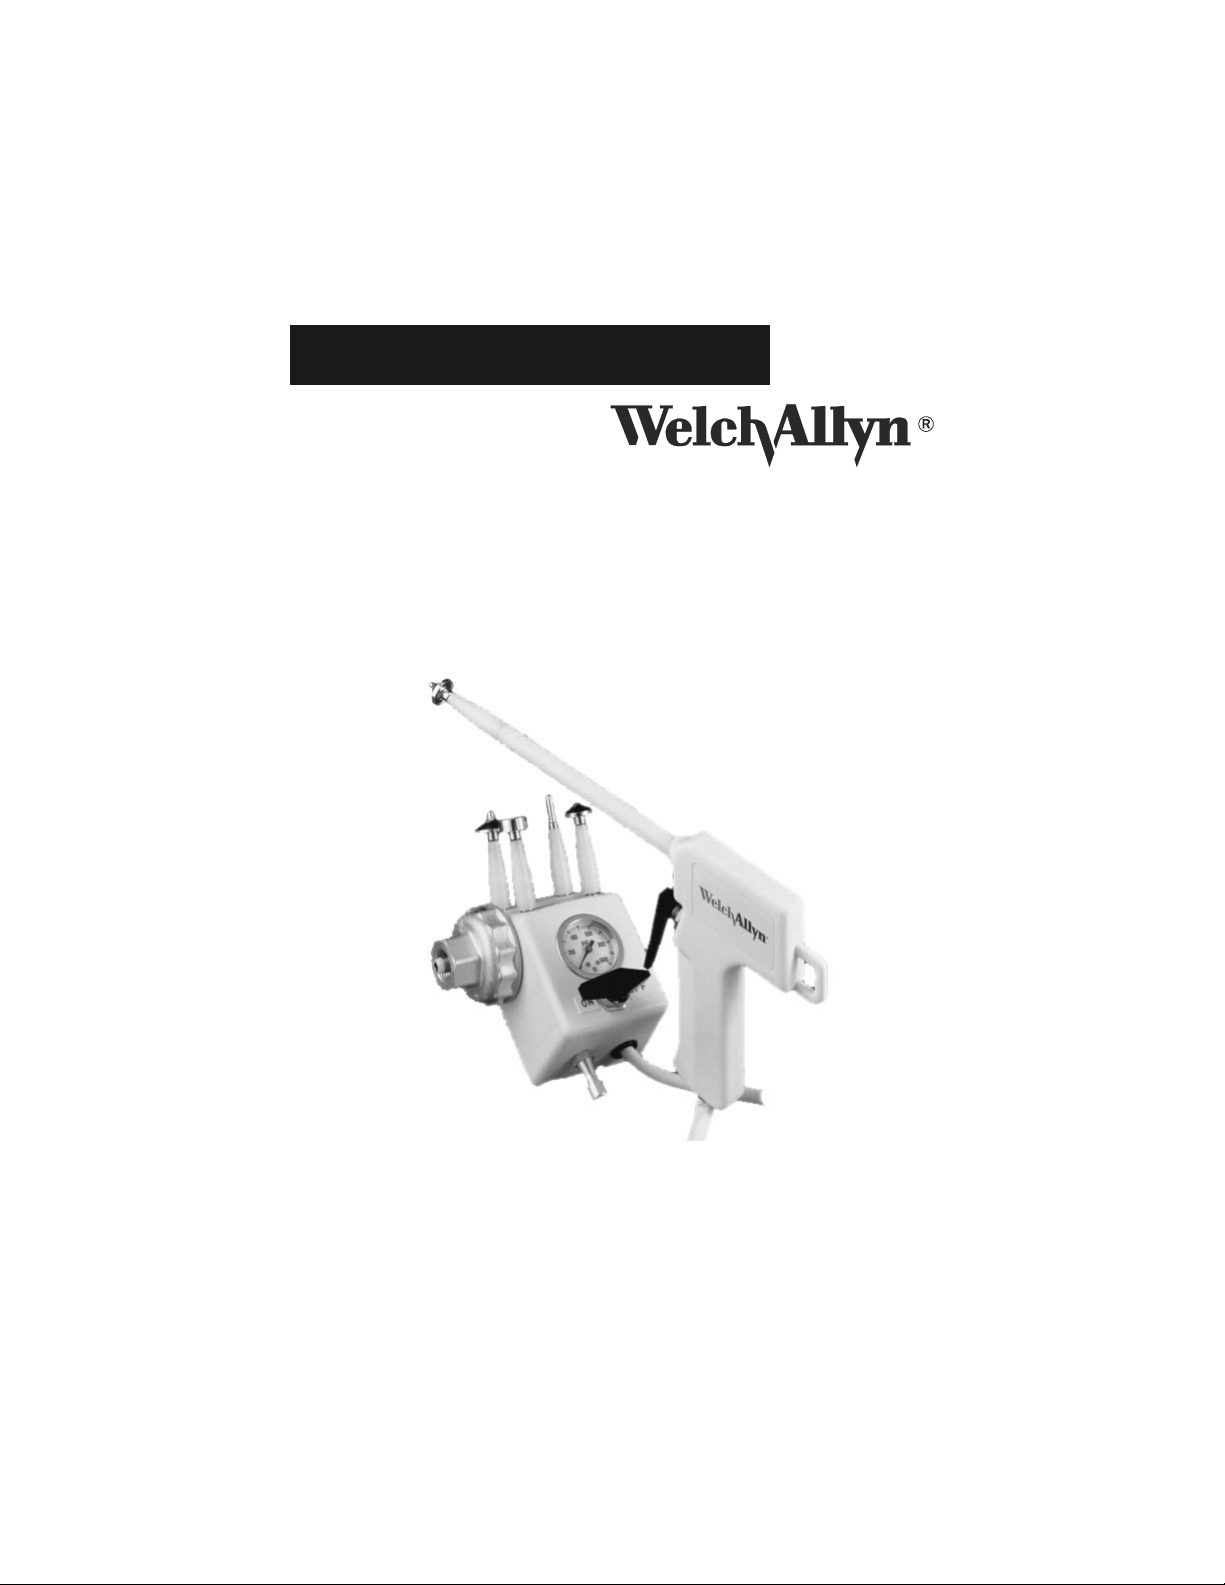
Cryosurgery System
REF 88372
Operating Manual
Page 2

Table of Contents
Introduction . . . . . . . . . . . . . . . . . . . . . . . . . . . . . . . . . . . . . 1
Precautions . . . . . . . . . . . . . . . . . . . . . . . . . . . . . . . . . . . . . 1
The Cryosurgery System . . . . . . . . . . . . . . . . . . . . . . . . . . . 2
General Instructions . . . . . . . . . . . . . . . . . . . . . . . . . . . . . . 4
Scavenging Hose . . . . . . . . . . . . . . . . . . . . . . . . . . . . . . . . . 4
Directions for Use . . . . . . . . . . . . . . . . . . . . . . . . . . . . . . . . 5
Care and Storage . . . . . . . . . . . . . . . . . . . . . . . . . . . . . . . . . 8
Cleaning . . . . . . . . . . . . . . . . . . . . . . . . . . . . . . . . . . . . . . . . 8
Disinfection . . . . . . . . . . . . . . . . . . . . . . . . . . . . . . . . . . . . . 8
Sterilization . . . . . . . . . . . . . . . . . . . . . . . . . . . . . . . . . . . . . 9
Service . . . . . . . . . . . . . . . . . . . . . . . . . . . . . . . . . . . . . . . . . 9
Accessories . . . . . . . . . . . . . . . . . . . . . . . . . . . . . . . . . . . . . 9
Warranty . . . . . . . . . . . . . . . . . . . . . . . . . . . . . . . . . . . . . . 11
Page 3

Introduction
Thank you for purchasing the Welch Allyn, Inc. Cryosurgery System for
use in your clinic or private practice.
Each system is meticulously handcrafted and thoroughly tested prior to
shipment. Proper care and maintenance ensures a long and useful life.
This Operating Manual is intended to acquaint you with your new Cryosurgery System, its directions for use, cleaning and storage, and the
necessary safety precautions.
Precautions
Do not store gas cylinders above normal room temperatures.
Use only Medical Grade Nitrous Oxide (N
Do not crimp or tightly bend the gas hose. Coil the hose no tighter than
an 8-inch circle. If a hose is damaged, replace it.
Verify the O-ring is in place at the end of the cryogun prior to installing
a cryotip. Inspect O-ring and replace if cracked or damaged.
Hand tighten all connections. Tools are not necessary.
Turn the gas cylinder valve off before disconnecting the console from
the gas cylinder.
Verify the gas is off at the console before changing tips.
If a cryotip is dropped, inspect for damage and replace as necessary.
This manual is not meant to teach the proper technique or any of the
medical considerations regarding the use of this equipment. Welch
Allyn recommends that prospective users obtain appropriate training
before using this equipment as improper use is potentially hazardous
to the patient and the user. DO NOT use this device without proper
training.
1
O)/Carbon Dioxide (CO2) gas.
2
Page 4

CAUTION: FEDERAL LAW RESTRICTS THE SALE OF THIS DEVICE TO OR
ON THE ORDER OF A LICENSED MEDICAL PRACTITIONER OR DESIGNATED AGENT.
WARNING: EXPOSURE TO NITROUS OXIDE (N
O) MAY RESULT IN
2
IMPAIRMENT OF PERFORMANCE, COGNITION, OR DEXTERITY. VENTILATE WELL.
IT IS THE USER’S RESPONSIBILITY TO FIT THE EXHAUST HOSE
BETWEEN THE CRYOSURGERY UNIT EXHAUST AND DISPOSAL POINT
TO MINIMIZE NITROUS OXIDE (N
O)/CARBON DIOXIDE (CO2) EXPO-
2
SURE.
The Cryosurgery System
READ THIS ENTIRE MANUAL BEFORE OPERATING
YOUR NEW CRYOSURGERY INSTRUMENT.
The Cryosurgery System is designed for easy assembly and operation.
No tools are necessary.
The system is delivered in an attaché carrying case along with cleaning plugs, a gas scavenging hose, and a package of replacement “O”
rings. On the end of the cryogun barrel is a tip protector, which is
removed when the cryotip is used and replaced when the cryogun is
not in use.
A 20# N
O (Nitrous Oxide) or CO2 (Carbon Dioxide) gas cylinder is
2
available for the Cryosurgery Unit. Nitrous Oxide/Carbon Dioxide is
used as the refrigerant for the cryogenic process. Use the N
O/CO2
2
only in a well-ventilated area. A 20-ft. scavenging hose is provided to
divert used gas away from the operator. Use the mobile hand cart for
cylinder movement. Do not drag, slide, or roll the cylinder. Store the
cylinders upright and firmly secured to prevent falling or accidentally
2
Page 5
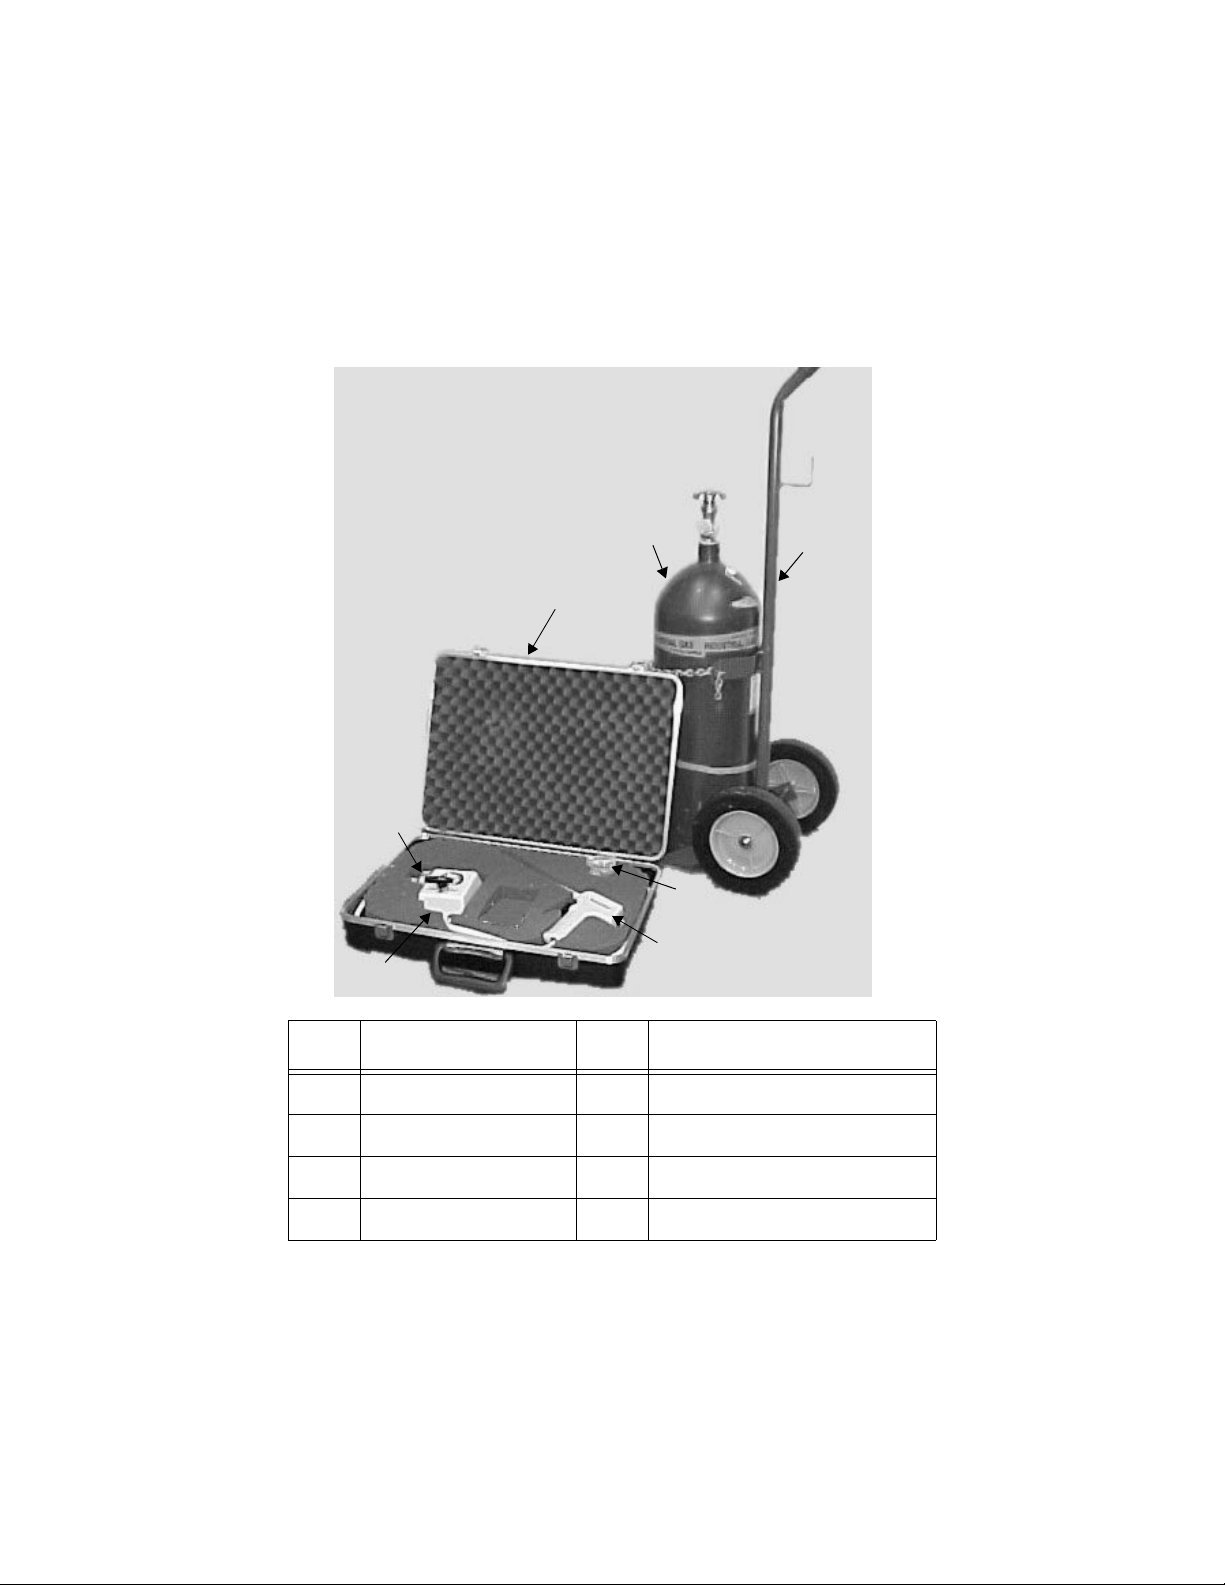
getting knocked over. Refill the compressed gas cylinders only by qualified producers of compressed gases. Do not allow the storage cylinder
temperature to exceed normal room temperatures.
1
2
3
4
5
7
6
No. Description No. Description
1 20# Cylinder 5 Cleaning Plugs and “O” Rings
2 20# Mobile Cart 6 Console
3 Carrying Case 7 Cyrogun
4 Quick Connect
3
Page 6

General Instructions
Check the gas cylinder to verify that it contains adequate gas. The
pressure gauge should read between 600 and 800 PSI for proper freeze
to occur. A pressure below 600 PSI may not provide enough pressure
for sufficient freeze or defrost.
Securely seat the gas cylinder onto the mobile cart and hold it into
place with the safety chain provided.
Examine the tubing leading from the console to the gun by running the
line between the thumb and forefinger, checking for any kinks or abrupt
bends. A kink in the line can cause a weakness which can erupt under
pressure.
Inspect the “O” ring seal located between the tip and the gun barrel
prior to each use.
Scavenging Hose
A 20’ scavenging hose is provided with the unit to divert the N2O/CO2
gas away from the operator and patient to a remote, well-ventilated or
uninhabited area. Push one end of the scavenging hose over the
exhaust muffler on the console (a small amount of mild soapy water on
the inside diameter of the hose will ease this operation) of the cryo
unit and lead the other end o a remote, well-ventilated or uninhabited
area.
4
Page 7

Directions for Use
1. A 20# CO2 tank requries an adapter (supplied). Verify the plastic gasket (1) is in place (as shown) prior to fastening the adapter to the tank
valve.
(1)
2. Tighten the quick-connect
to medical grade N
gas supply as shown (or to
the adapter). (A)
O/CO2
2
3. Connect the gas scavenging
hose to the exhaust muffler
on console. Vent to remote
location. (B)
(A)
(B)
5
Page 8

4. Select the proper tip for the cryo procedure and unscrew the protective
shield (C) from the end of the cryogun. Hand tighten the cryo tip (D)
onto the gun.
NOTE: Verify the O-ring is in place at the end of the cryogun prior to
installing a cryotip. Inspect O-ring and replace if cracked or damaged.
(C)
5. Open the gas supply valve on cylinder.
6. Turn the arrow valve
to ON position.
Verify pressure is in
the working range.
(D)
NOTE: this manual is not meant to teach the proper technique or any
of the medical considerations regarding the use of this equipment.
Welch Allyn recommends that prospective users obtain appropriate
6
Page 9

training before using this equipment as improper use is potentially hazardous to the patient and the user. DO NOT use this device without
proper training.
7. Apply probe to surgical
site and squeeze the
trigger to freeze
(normal time is approx.
3 minutes).
8. Release trigger and remove the tip from the site and allow to stand for
approximately 3 minutes. Repeat steps 6 and 7 one time.
9. When the procedure is
complete, turn the
arrow valve to the OFF
position.
10. Close the gas supply valve on the cylinder.
7
Page 10

Care and Storage
Upon completion of the surgical procedure, shut off the system at both
the console and the tank. A squeeze of the trigger releases any residual gas in the console. Remove the cryo tip from the gun for cleaning
and place the tip protector onto the end of the gun. Wipe down the gun
barrel. The console can remain connected to the gas cylinder and the
gun can hang on the mobile cart hook. Or, disconnect the system and
return to the carrying case for storage.
Cleaning
WARNING: DO NOT USE BLEACH OR ANY PRODUCT CONTAINING
CHLORINE IN THE CLEANING OF THIS PRODUCT.
CAUTION: DO NOT RINSE OR SOAK TIPS WITHOUT FIRST INSTALLING
CLEANING PLUGS. VERIFY THE CLEANING PLUGS HAVE RUBBER ORINGS IN PLACE TO PREVENT LIQUID FROM ENTERING THE TIPS.
NOTE: NOT USING CLEANING PLUGS WILL CONTRIBUTE TO UNIT
MALFUNCTION.
Clean the cryogun and tips by wiping down with alcohol. Clean the tips
in a mild soap and water solution with cleaning plugs installed and Orings in place. After cleaning, remove the cleaning plugs and return to
the storage pouch. For storage, cleaning tips also fit on the metal studs
located on the console.
Disinfection
To disinfect the tips, soak in a cold disinfectant with cleaning plugs
installed and O-rings in place. Clean tips before disinfecting. Follow
the disinfectant manufacturer’s guidelines for disinfection.
8
Page 11

Sterilization
WARNING: DO NOT AUTOCLAVE THIS INSTRUMENT
NOTE: DO ALL CLEANING AND STERILIZATION WITH CLEANING
PLUGS AND O-RINGS IN PLACE ON TIPS.
COLD STERILIZATION: Sterilize the tips by soaking in a cold sterilant
with cleaning plugs installed and O-rings in place. Follow the sterilant
manufacturer’s guidelines for sterilization.
ETO STERILIZATION: Thoroughly clean and dry cryotips prior to ETO
Sterilization. Do not exceed 130° F or 100 PSI when sterilizing the tips.
Service
Customers with instruments requiring service should contact the
Welch Allyn Technical Service Department at (800) 535-6663, 315685-4100, or FAX: 315-685-4653.
Accessories
Contact Welch Allyn Customer Service for additional information on
the following accessories:
Part Number Description
88374 General Purpose Cryotip- Round End
88376 General Purpose Cryotip- Flat End
88378 Exocervical Cryotip
88380 Exo/Endocervical Cryotip - Short Top
88382 Exo/Endocervical Cryotip - Long Top
88384 Special Exo/Endocervical Cyrotip
88386 Large Exocervical Cryotip
9
Page 12

Part Number Description
88388 Jumbo Exo/Endocervical Cryotip
88390 Curved Anorectal Cryotip
88392 Condyloma Cryotip
88394 Derm Bevel Cryotip
88396 Berm Bevel Large Cryotip
88398 Maxiderm Cryotip
88400 Microderm Cryotip
88402 Soll Lash Epillating Cryotip
88404 “E” Cylinder Tank Adapter, CO
88406 “E” Cylinder Tank Adapter, N2O
88408 20 Lbs Cylinder N
88410 20 Lbs Cylinder CO
O
2
2
88412 20 Lbs Cylinder Cart
88414 7 Lbs E-Cylinder N
88416 7 Lbs E-Cylinder CO
O
2
2
88420 Carrying Case
88422 O-Rings (package of 10)
88424 Cleaning Plugs (package of 4)
10
2
Page 13

Warranty
One Year Limited Warranty On New Instruments
Instrumentation purchased new from Welch Allyn, Inc. (Welch Allyn) is
warranted to be free from original defects in the material and workmanship under normal use and service for a period of one year from
the date of first shipment from Welch Allyn. This warranty shall be fulfilled by Welch Allyn or its authorized representative repairing or
replacing at Welch Allyn’s discretion, any such defect, free of charge
for parts and labor.
Welch Allyn should be notified via telephone of any defective product
and the item should be immediately returned, securely packaged and
postage prepaid to Welch Allyn. Loss or damage in shipment shall be
at purchaser’s risk.
Welch Allyn will not be responsible for loss associated with the use of
any Welch Allyn product that (1) has had the serial number defaced, (2)
has been repaired by anyone other than an authorized Welch Allyn
Service Representative, (3) has been altered, or (4) has been used in a
manner other than in accordance with instructions.
THIS WARRANTY IS EXCLUSIVE AND IN LIEU OF ANY IMPLIED WARRANTY OF MERCHANTABILITY, FITNESS FOR PARTICULAR PURPOSE,
OR OTHER WARRANTY OF QUALITY, WHETHER EXPRESSED OR
IMPLIED. WELCH ALLYN WILL NOT BE LIABLE FOR ANY INCIDENTAL
OR CONSEQUENTIAL DAMAGES.
If you have questions regarding any Welch Allyn products, please call
Customer Service at (800) 535-6663, 315-685-4560, or FAX:315-685-
3361.
11
Page 14

4341 State Street Road
Skaneateles Falls, NY 13153, U.S.A.
Tel.: 1-315-685-4560 or 1-800-535-6663
Fax: 1-315-685-3361
Printed in the USA 883723 Rev. B
 Loading...