

Page 1
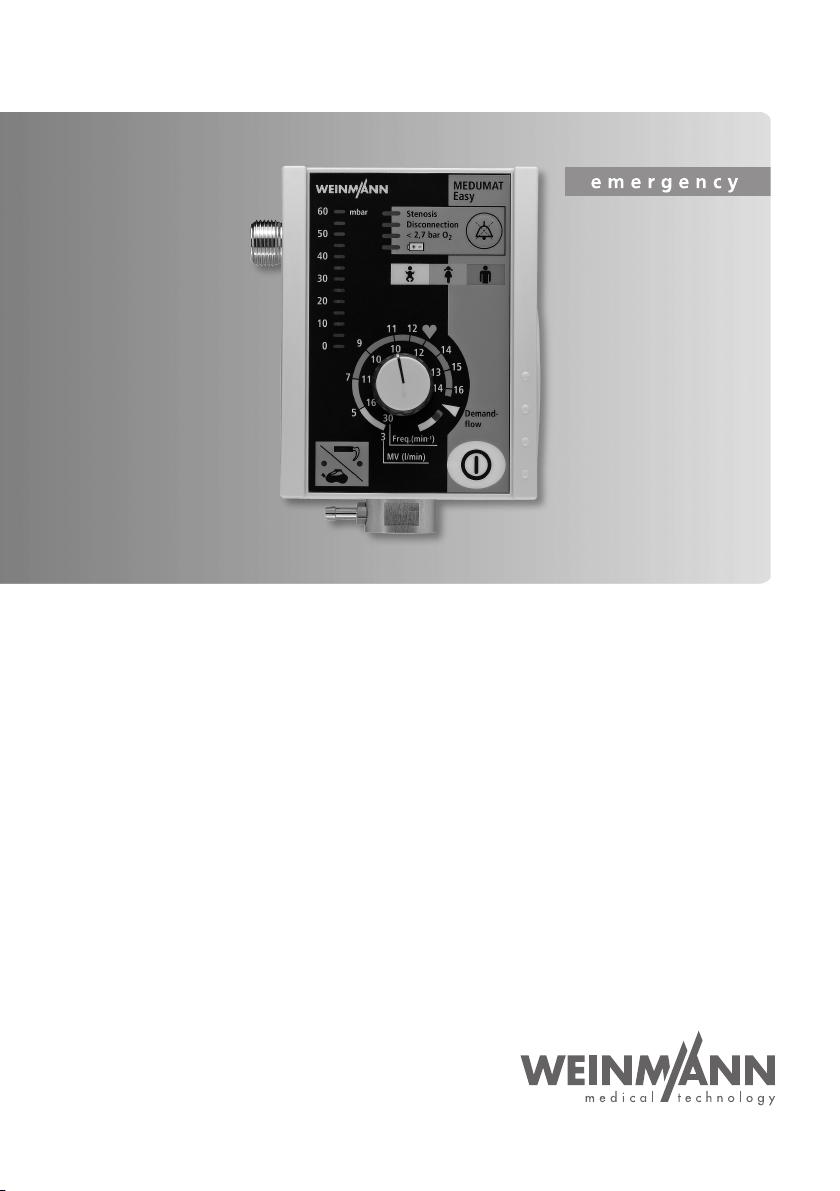
MEDUMAT Easy
Ventilator
Aparato de respiración artificial
Ventilador
Description and instructions for use
Descripción del aparato e instrucciones
Descrição e instruções de funcionamento
Page 2

English 3
Español 70
Português 146
Page 3

EN
English
Contents
1. Overview . . . . . . . . . . . . . . . . . . . 4
1.1 Device . . . . . . . . . . . . . . . . . . . . . 4
1.2 Special symbols on the ventilator . 6
2. Legend . . . . . . . . . . . . . . . . . . . . . . 9
3. Description . . . . . . . . . . . . . . . . . 10
3.1 Intended use. . . . . . . . . . . . . . . . 10
3.2 Owner/operator and user
qualification . . . . . . . . . . . . . . . . 11
3.3 Ventilation function . . . . . . . . . . 11
3.4 Demandflow function . . . . . . . . 12
3.5 Patient hose system with patient
valve. . . . . . . . . . . . . . . . . . . . . . 12
3.6 Audio response . . . . . . . . . . . . . 13
4. Safety instructions . . . . . . . . . . 14
4.1 Safety regulations . . . . . . . . . . . . 14
5. Installation . . . . . . . . . . . . . . . . . 18
5.1 Connecting the oxygen cylinder . 18
5.2 Ventilation hose . . . . . . . . . . . . . 19
5.3 Wall mounting set . . . . . . . . . . . 21
6. Using the ventilator . . . . . . . . . 22
6.1 Switching on / self test . . . . . . . . 22
6.2 Selecting the ventilation settings 23
6.3 Performing ventilation . . . . . . . . 25
6.4 Monitoring ventilation . . . . . . . . 25
6.5 Ventilation with PEEP valve . . . . 26
6.6 Ventilation with filter . . . . . . . . . 26
6.7 Demandflow . . . . . . . . . . . . . . . 27
6.8 Terminating ventilation or
Demandflow . . . . . . . . . . . . . . . 28
6.9 Alarm signals . . . . . . . . . . . . . . . 29
6.10 Audio response for user guidance 32
6.11 Calculation of oxygen content/
remaining operating time . . . . . 37
6.12 Alternative ventilation procedures 39
7. Hygienic preparation . . . . . . . . 40
7.1 MEDUMAT Easy . . . . . . . . . . . . . . 40
7.2 Patient valve . . . . . . . . . . . . . . . . 40
7.3 Ventilation hose . . . . . . . . . . . . . . 42
7.4 Masks . . . . . . . . . . . . . . . . . . . . . 42
7.5 Fittings. . . . . . . . . . . . . . . . . . . . . 42
7.6 Cleaning and disinfection
procedure . . . . . . . . . . . . . . . . . . 43
8. Functional checks . . . . . . . . . . . 45
8.1 Intervals . . . . . . . . . . . . . . . . . . . . 46
8.2 Checking for leaks in the system . 47
8.3 Check patient hose system . . . . . 48
8.4 Checking the minute volume . . . . 49
8.5 Checking maximum ventilation
pressure . . . . . . . . . . . . . . . . . . . . 50
8.6 Checking Demandflow . . . . . . . . 51
8.7 Checking the alarm systems . . . . . 52
9. Troubleshooting . . . . . . . . . . . . 54
10. Servicing . . . . . . . . . . . . . . . . . . . 56
10.1 Batteries . . . . . . . . . . . . . . . . . . . 57
10.2 Change valve membrane in
patient valve . . . . . . . . . . . . . . . . 58
10.3 Storage . . . . . . . . . . . . . . . . . . . . 58
10.4 Disposal . . . . . . . . . . . . . . . . . . . 59
11. Product and accessories . . . . . . 60
11.1 Standard product . . . . . . . . . . . . . 60
11.2 Accessories . . . . . . . . . . . . . . . . . 60
11.3 Spare parts . . . . . . . . . . . . . . . . . 62
12. Technical data . . . . . . . . . . . . . . 63
12.1 Pneumatic / electronic systems . . . 65
12.2 Relationship between ventilation
parameters. . . . . . . . . . . . . . . . . . 66
13. Warranty . . . . . . . . . . . . . . . . . . . 67
14. Declaration of conformity . . . . 67
15. Index . . . . . . . . . . . . . . . . . . . . . . 68
Contents 3
Page 4
EN
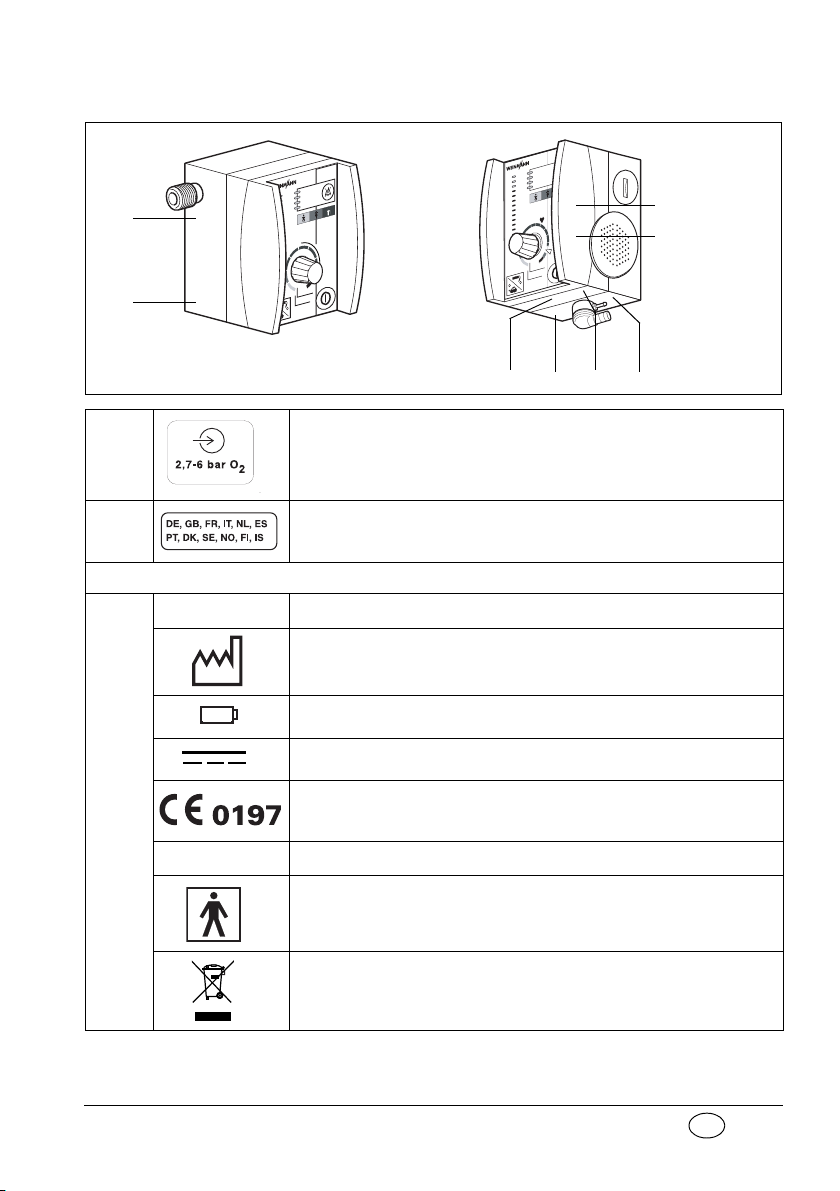
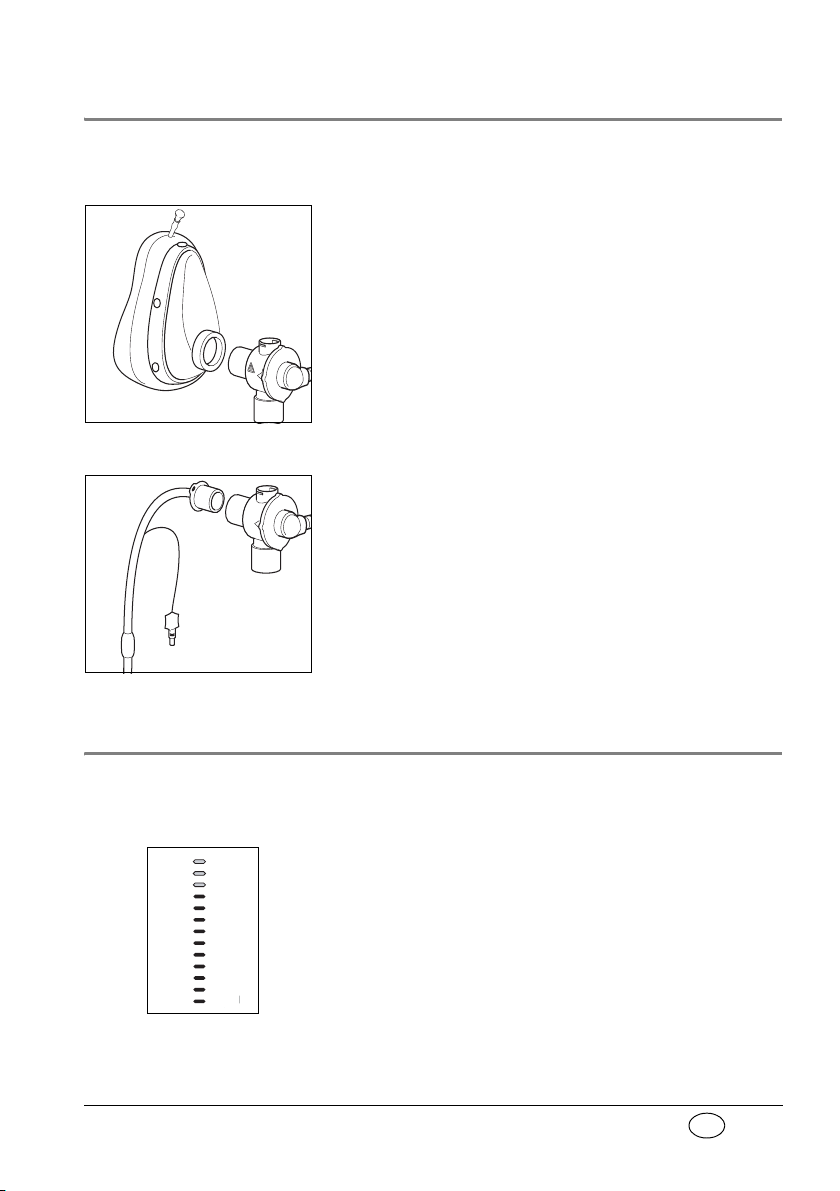
1. Overview
Stenosis
Disconnection
< 2,7 bar O
2
16
15
13
14
14
12
12
11
10
10
9
11
16
7
5
30
3
MV (l/min)
Freq.(min
-1
)
Demandflow
60
mbar
50
40
30
20
10
0
MEDUMAT
Easy
A
2
5
4
3
9
8
6
1
7
1.1 Device
4 Overview
Page 5
EN
B
10
14
13
11
12
15
C
16
17
19
20
18
21
or
Overview 5
Page 6
EN
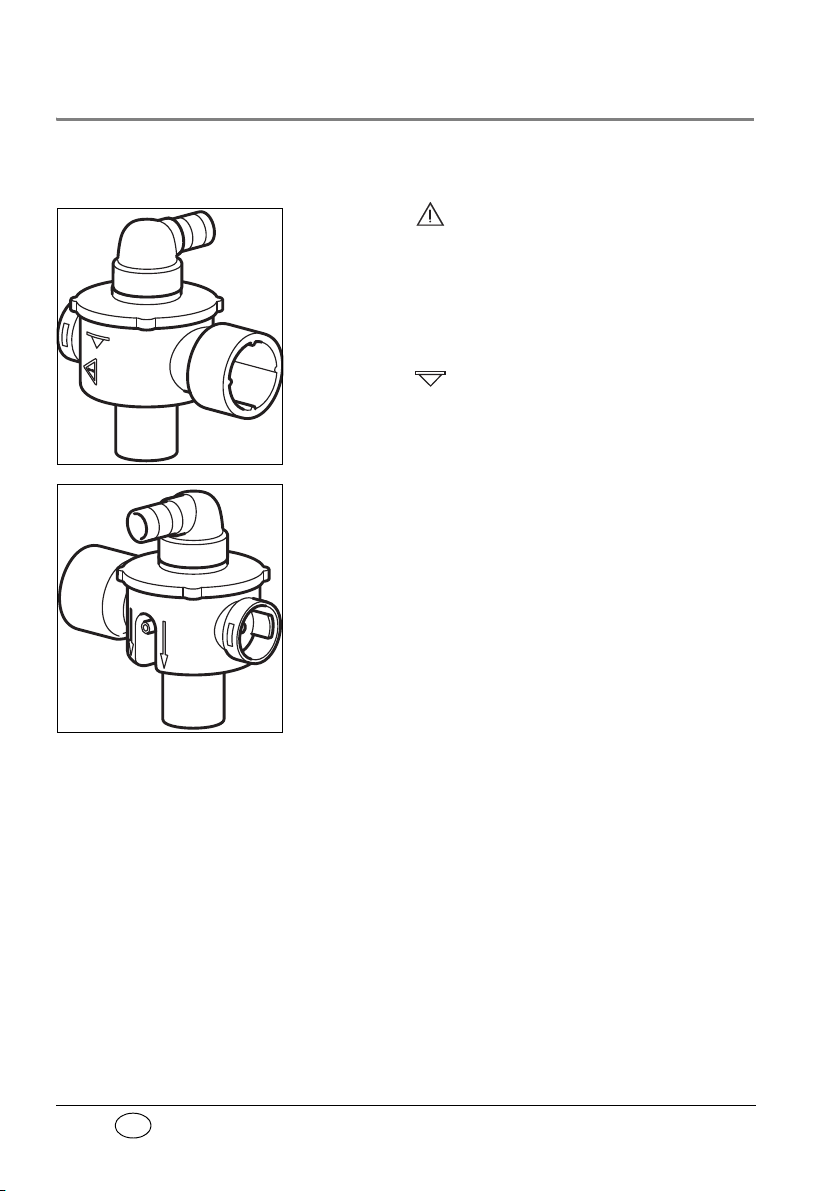
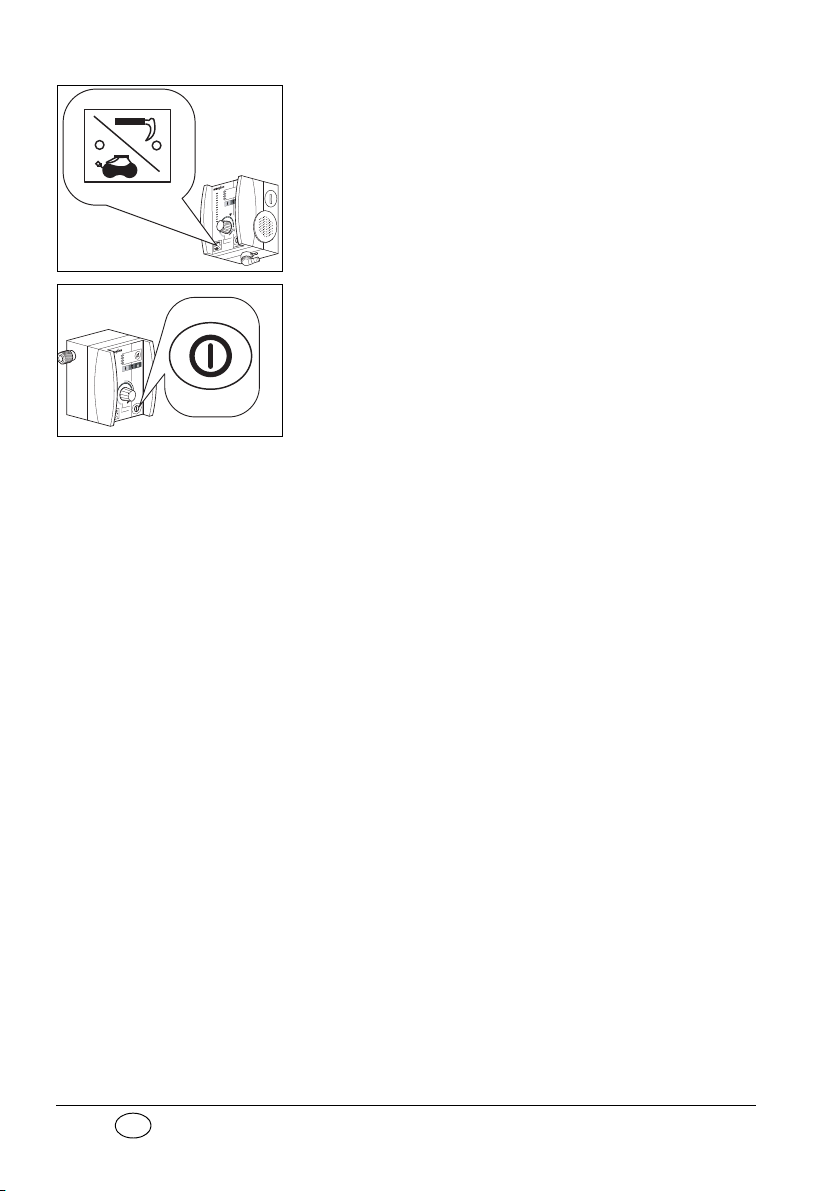
1.2 Special symbols on the ventilator
Position
> PSU< 134°
Patient valve
The symbol on the patient valve is a reminder
that the lip membrane must be changed immediately if it becomes crinkled, sticky or misshapen. The patient must not be used again until the membrane has
been changed, as this could cause malfunction (see
“8.3 Checking patient hose system” on page 48).
The symbol indicates the correct position for
insertion of the lip membrane.
When connecting the patient valve, take care to ensure that the direction of respiratory gas flow is correct (see arrows).
6 Overview
Page 7
EN
MEDUMAT Easy
5678
3
2
1
4
+–
1 Inlet 2,7 - 6 bar O
2
2 Languages available on this device
MEDUMAT Easy device information plate
SN
Serial number of device
Year of manufacture
3.6 V lithium battery
Direct voltage
3
IP54
CE symbol (confirms that the product conforms to the
applicable European directives)
Protection against ingress of water
Protection class BF
Do not dispose of device in domestic waste
Overview 7
Page 8
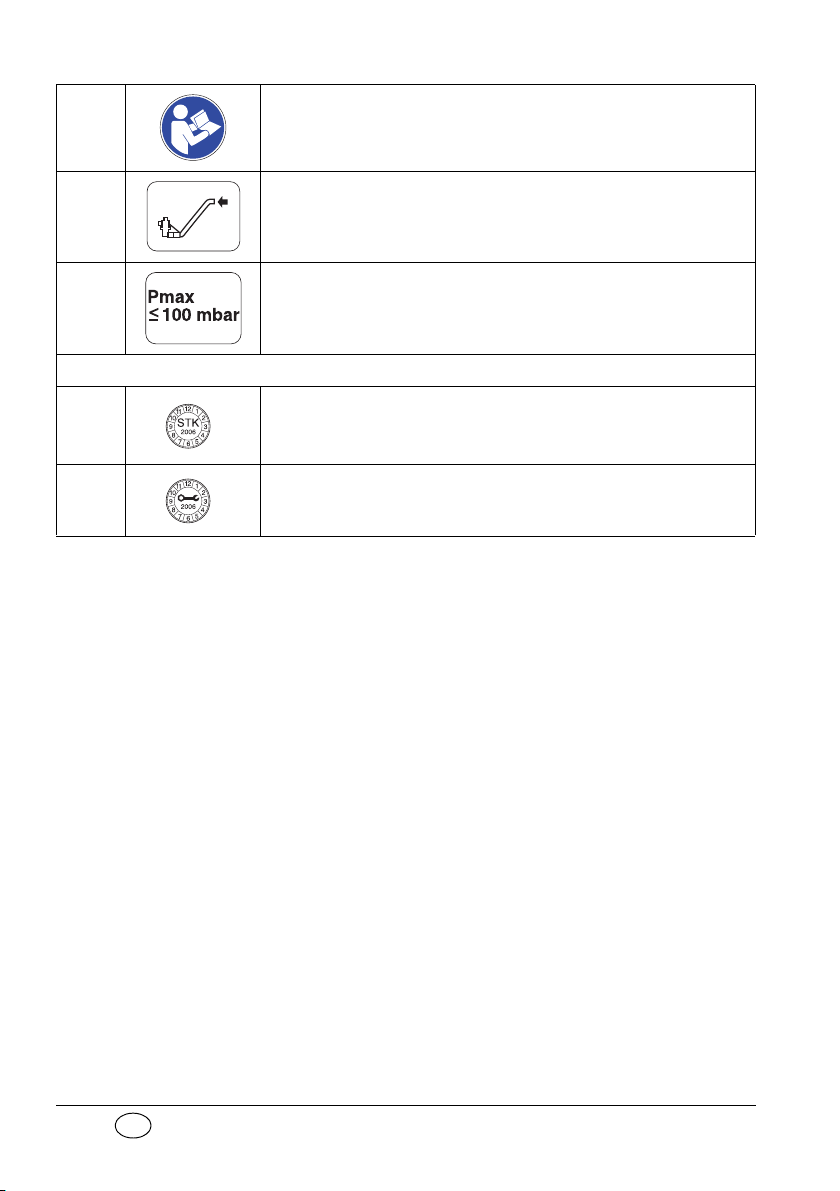
EN
4 Follow instructions for use
5 Tube system connection
6 Maximum pressure ≤100 mbar
Safety check and servicing label
Safety check label: (in Germany only) marks when the next
7
8 Servicing label: indicates when the next service is due.
safety check as per §6 of the German law relating to users of
medical devices is required.
8 Overview
Page 9

EN
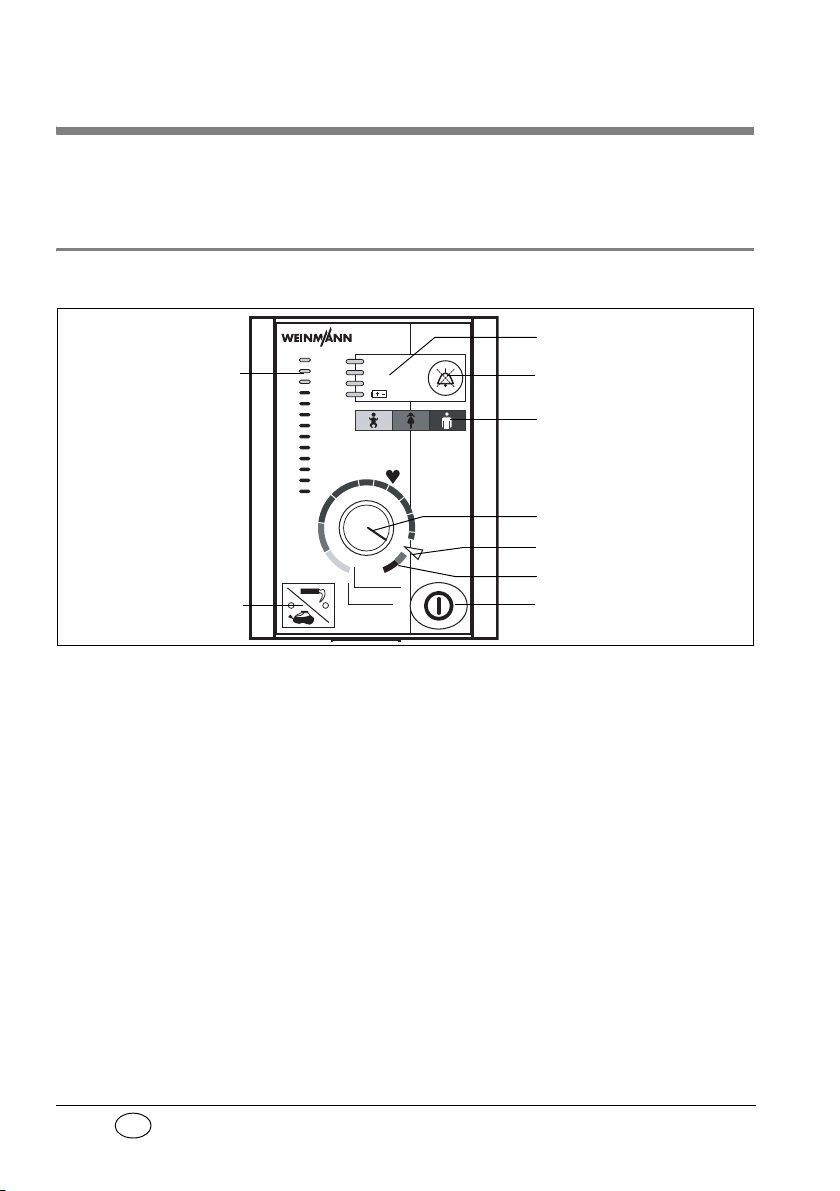
2. Legend
A: MEDUMAT Easy control panel
1 Mask/tube ventilation switch with indicator LEDs
2 Ventilation pressure gauge
3 Alarm panel
4 Alarm mute button
5 Colour code
6 Regulator knob, ventilation parameters
7 Stop notch
8 LED Demandflow
9 ON/OFF switch
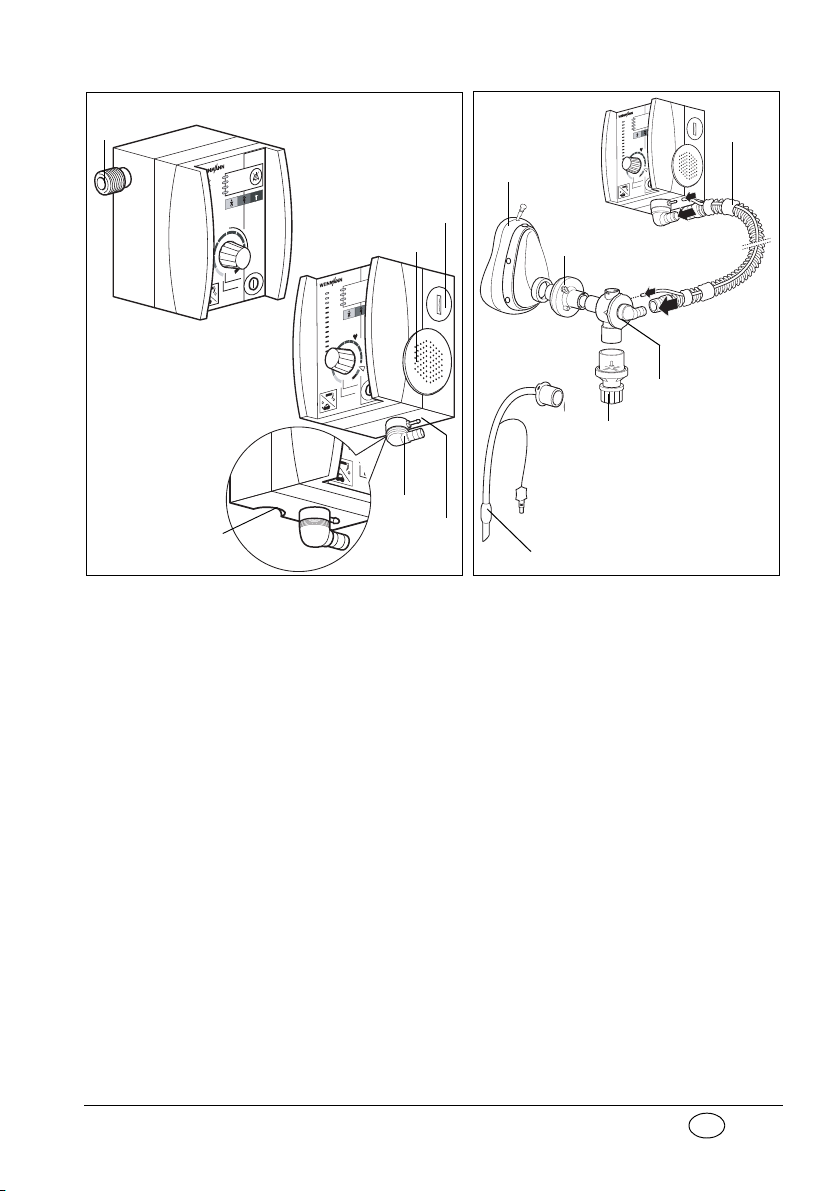
B: MEDUMAT Easy connections
10 Pressurized gas connection
11 Battery compartment
12 Speaker
13 Pressure gauge hose connection
14 Ventilation hose connection
15 Relief outlet valve
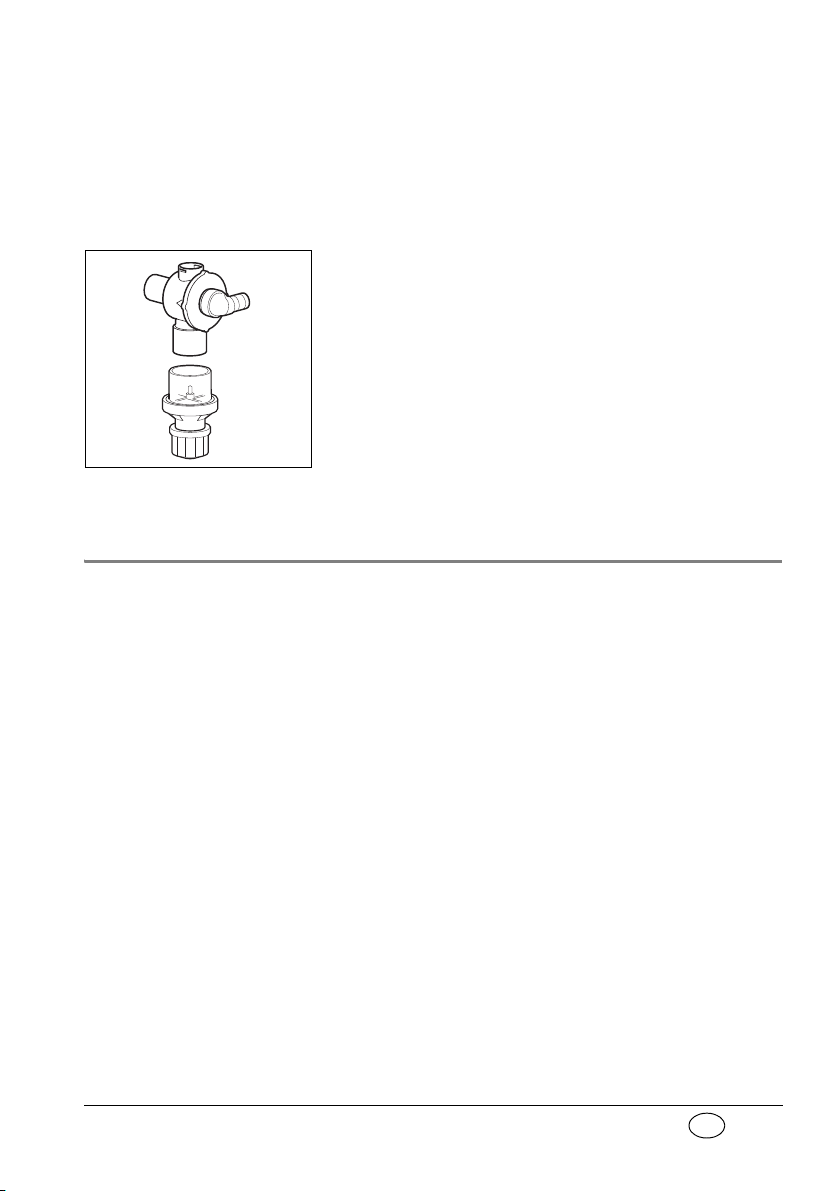
C: MEDUMAT Easy device combinations
16 Ventilation mask
17 Ventilation hose
18 Filter
19 Patient valve
20 PEEP valve
21 Tube
Legend 9
Page 10

EN
3. Description
3.1 Intended use
MEDUMAT Easy is an automatic oxygen respiration
device (short-term ventilator) with additional inhalation facility.
You can use MEDUMAT Easy:
• to revive patients at the site of the emergency;
• for longer periods in more protracted
emergencies;
• for short-term O
mask.
You can use MEDUMAT Easy while transporting
patients:
• between the various rooms and departments of
a hospital;
• between the hospital and other premises;
• in emergencies;
• when transport over considerable distances is
planned.
MEDUMAT Easy:
• is designed to provide controlled ventilation to
persons of 10 kg body weight or more;
• is used to treat respiratory arrest;
• can be preset to parameters that ensure evenly
balanced ventilation, provided that the selected
maximum ventilation pressure P
exceeded.
inhalation using a respiration
2
is not
max
10 Description
Page 11
EN
• permits respiration-controlled oxygen inhalation
16
15
13
14
14
12
12
11
10
10
9
11
16
7
5
30
3
MV (l/min)
Freq.(min
-1
)
Demandflow
10
0
in Demand mode.
3.2 Owner/operator and user qualification
As an owner/operator or user, you must be familiar
with the operation of this medical device. Observe
the legal requirements for operation and use (in Germany, the regulations governing owner/operators of
medical devices apply in particular). Basic recommendation: get a person authorized by WEINMANN
Emergency to provide you with proper instruction
about the handling, use and operation of this medical device.
3.3 Ventilation function
MEDUMAT Easy operates within a pressure range of
2.7 to 6 bar and at a flow rate of not less than
70 l/min O
It uses high-pressure, medicinal-grade oxygen. An
external pressure reducer brings this down to the required operating pressure. The oxygen supply is fed
in at input valve.
The ventilation settings are continuously variable.
These settings (frequency and volume per minute
are coupled) and the inspiration/expiration ratio of
1:1.67 are regulated by internal electronic control
mechanisms.
The gas for inspiration flows along the hose and
through the patient valve and either the mask or
tube into the patient’s airways. The patient valve is
. It has a built-in power pack.
2
Description 11
Page 12
EN
fitted with a lip membrane that enables expired gas
9
60
mbar
50
40
30
20
10
0
16
15
13
14
14
12
12
11
10
10
9
11
16
7
5
30
3
MV (l/min)
Freq.(min
-1
)
Demandflow
10
0
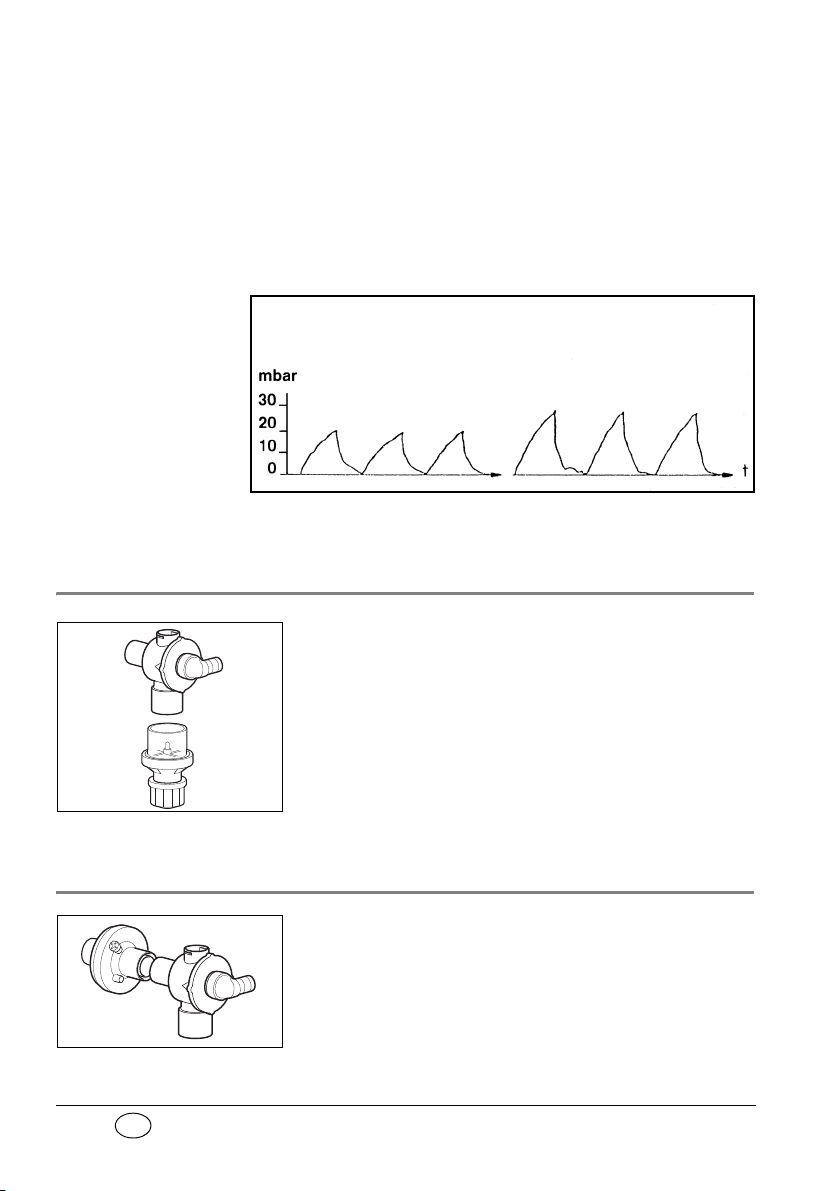
Demandflow setting
Respiration hose connection
Expiration
tube
Connection
for pressure
gauge tube
Mask/tube
connection
Spontaneous
breathing tube
to be conducted away through the expiration tube.
You can check the course of ventilation at ventilation
pressure gauge.
3.4 Demandflow function
The Demandflow setting switches the
MEDUMAT Easy breathing-controlled O
Such inhalation must be carried out with the respiration mask. A small inspiration (trigger) pulse causes
oxygen to continue flowing until slight overpressure
interrupts the flow. Expiration then takes place via
the patient valve as in ventilation.
inhalation.
2
3.5 Patient hose system with patient valve
The respiratory gas is routed to the patient via the
patient hose system with patient valve. The patient
hose system with patient valve is designed so that
even if the ventilator fails, spontaneous breathing is
possible, regardless of which ventilation mode you
have selected.
12 Description
Page 13

EN
3.6 Audio response
The device has an audio response facility that can be
switched on for user guidance, especially for users
who have little practice.
If audio response is not required, a key combination
can be used to switch it off (see “6.10 Audio response for user guidance” on page 32).
Description 13
Page 14

EN
4. Safety instructions
4.1 Safety regulations
For your own safety, the safety of your patients, and
to comply with the requirements of EU Directive 93/
42/EEC, please observe the following points:
General
• Please read the directions for use carefully. They
are an integral part of the ventilator and must be
kept available for reference at all times.
• Use the MEDUMAT Easy for the described purpose only (see “3.1 Intended use” on page 10).
• The user must subject the patient hose system to
a functional check and a visual inspection before
use (see “8.3 Checking patient hose system” on
page 48).
14 Safety instructions
Note: • Do not use the MEDUMAT Easy in toxic environ-
ments or where there is a risk of explosion.
• MEDUMAT Easy is not suitable for hyperbaric
use (pressure chamber).
• Do not use MEDUMAT Easy with flammable
anesthetics.
• A back-up ventilator should always be available
in case of technical failure.
• Before starting to work with MEDUMAT Easy,
you must understand how to operate it.
• To prevent infection or bacterial contamination,
please observe section “7. Hygienic preparation” on page 40.
Page 15
EN
• MEDUMAT Easy should be used only by medically qualified personnel who have had training
in ventilation techniques. Incorrect use can cause
severe physical injury.
• Please note that a safe distance must be maintained between MEDUMAT Easy and equipment
that emits HF radiation (e.g. mobile phones),
otherwise malfunctions may occur (see “ Recommended safe distances between portable or
mobile HF telecommunication devices (e.g. mobile phones) and MEDUMAT Easy” on page 64).
• We recommend that maintenance work such as
inspections and repairs be performed only by the
manufacturer, WEINMANN Emergency, or by
qualified technicians expressly authorized by
WEINMANN Emergency.
• Malfunctions and a lack of biocompatibility may
result if third-party articles are used. Please note
that in such cases all warranty entitlement and liability claims shall be void where items other
than the accessories recommended in the instructions for use or original spare parts are
used.
• Design changes to the device are not permitted
and may put patients and users at risk.
Oxygen
Spontaneous explosive reactions can occur if highpressure oxygen comes into contact with flammable
substances (fat, oil, alcohol etc.):
• Keep the equipment and all screw connections
absolutely free from oil and grease.
• Always wash your hands before starting to work
on the oxygen supply.
Safety instructions 15
Page 16

EN
• Smoking and open flames are strictly prohibited
in the vicinity of all fittings containing or transporting oxygen.
• During assembly and when changing the oxygen
cylinder, only hand pressure should be used
when tightening the screw connections to the
cylinder and to the pressure reducer. Never use
tools for this purpose. Excessive tightening damages the screw threads and seals, and can cause
leaks.
• Protect oxygen cylinders from accidental falls. If
a cylinder falls over, the pressure reducer or the
valve may break off and cause a violent explosion.
Important • Always open the valve of the oxygen cylinder
slowly to prevent pressure damage to the other
fittings.
• The oxygen cylinder should never be completely
emptied, as this may allow air containing moisture to enter the cylinder and cause corrosion.
Ventilation/Operation
16 Safety instructions
• Both patient and ventilator must be kept under
constant observation during ventilation.
• When connecting the patient valve, please ensure that the direction of respiratory gas flow
(> patient >) is correct. Make sure that neither
the expiration tube nor the spontaneous breathing tube on the patient valve are blocked or their
function impeded in any other way, e.g. by the
patient’s position.
Note: • Disposable hose system WM 28110 is intended
to be used only once.
Page 17

EN
Software
• Extensive validation tests have been performed
to minimize risks arising from software errors.
Accessories
• Please protect the silicone and rubber components from UV radiation and prolonged exposure to direct sunlight, as this can make them
brittle and friable.
Safety instructions 17
Page 18
EN
5. Installation
A permanent mounting is usually necessary only
when MEDUMAT Easy is installed as a fixture in rescue vehicles, helicopters or aircraft.
If MEDUMAT Easy is supplied complete on a portable system or in an emergency rucksack, it is ready
for use and requires no further installation. Separate
directions for use are supplied for portable systems
and emergency rucksacks.
In order to ensure safe and reliable operation, functional tests must be carried out after installation (see
“8. Functional checks” on page 45).
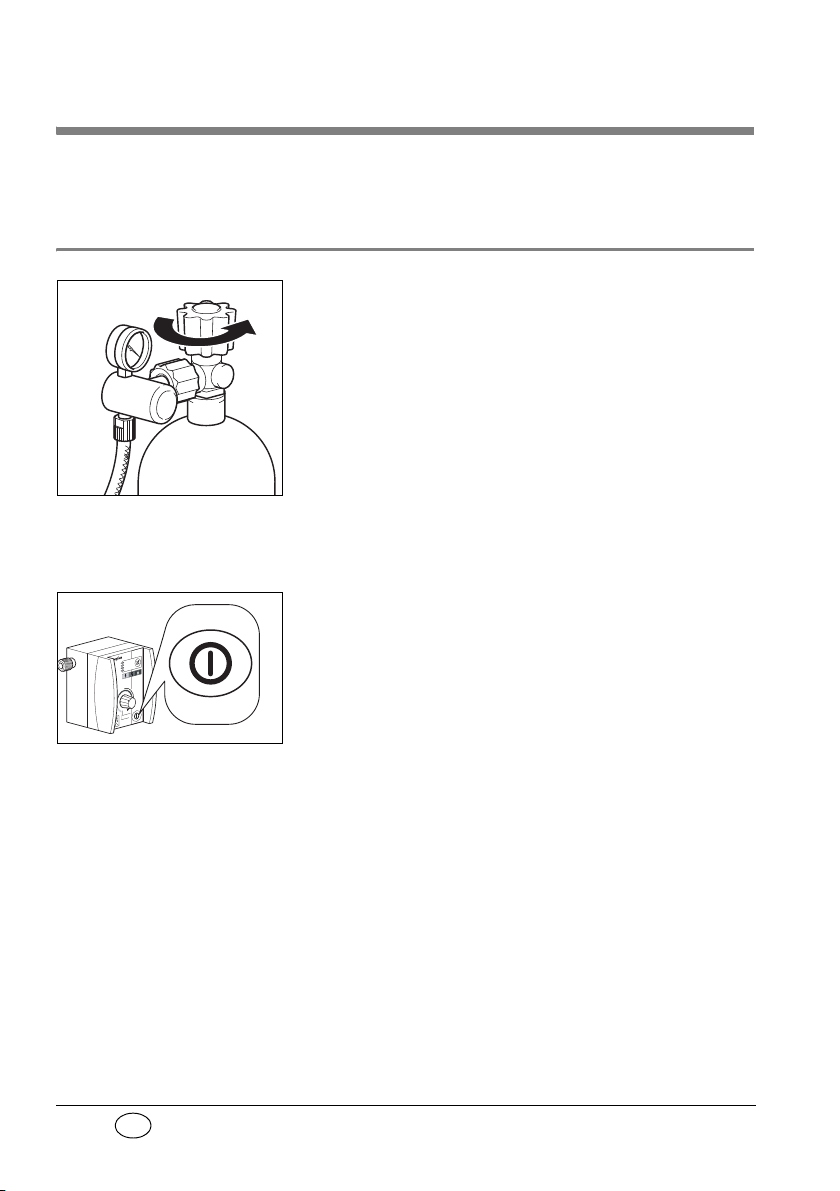
5.1 Connecting the oxygen cylinder
Always wash your hands thoroughly before starting
any work on the oxygen supply. Products containing
hydrocarbons (e.g. oils, greases, alcohols, hand
creams, sticking plasters) may cause explosive reactions if they come into contact with high-pressure oxygen.
18 Installation
Never use wrenches or similar tools to tighten or
loosen the screw connections.
Removing the empty cylinder
1. Close the valve of the oxygen cylinder.
Switch on MEDUMAT Easy with ON/OFF switch.
This exhausts any residual oxygen and depressurizes the ventilator. Wait until the pressure
gauge on the pressure reducer shows an oxygen
content of zero before undoing the screw connection by hand.
Page 19
EN
2. First switch off MEDUMAT Easy again.
3. Then loosen the screw connection to the
cylinder.
Connecting the new cylinder
1. First briefly open and close the valve of the new
oxygen cylinder. This should blow out any particulate matter.
Keep the valve opening away from the body,
making sure that neither yourself nor other persons can be injured by escaping particles.
2. Next use the fluted connecting nut to couple the
pressure reducer to the valve on the oxygen cylinder. Tighten the connecting nut by hand.
3. If the pressure hose is not already connected to
the exit from the pressure reducer, make this
connection with the G 3/8 connecting nut.
4. Screw the other end of the pressure hose on to
pressure gas connection on the MEDUMAT Easy
if this has not yet been done.
5.2 Ventilation hose
1. Slide the pressure gauge tube onto connection.
2. Slide the ventilation hose onto connection.
Make sure that this does not cause any kinks in
the pressure gauge tube already connected. If
necessary, turn the ventilation hose while sliding
on as appropriate.
Installation 19
Page 20
EN
Always grasp the ventilation hose and
P
o
s
i
ti
on
>
P
S
U
< 13
4°
pressure gauge tube by their end only,
otherwise they may be damaged or split.
3. Connect the patient valve to the other end of the
ventilation hose and pressure gauge tube.
4. If a mask is being used for ventilation, attach the
mask connection to the patient valve (identical
with tube connection),
or
if the patient is intubated, attach the patient
valve to the tube.
20 Installation
Filter
If a filter is to be used, this should be installed
between the patient side connector on the patient
valve and the mask or tube.
Always follow the instructions supplied by the
manufacturer of the filter.
Page 21
EN
Note: Please note that the respiratory resistance of the
entire system is increased when an HME filter or bacteria filter is used and under certain circumstances,
may exceed the value permitted by EN 794-3.
PEEP valve
If a PEEP valve is to be used, this should be inserted
into the expiration tube on the patient valve.
To adjust the PEEP valve, always follow the instructions supplied by its manufacturer.
5.3 Wall mounting set
A wall mounting set (see “11.2 Accessories” on
page 60) is available for permanent fixing, e.g. on a
vertical surface inside a vehicle.
Please refer to the sheet enclosed with the wall
mounting set for details of dimensions and installation procedure.
Installation 21
Page 22
EN
6. Using the ventilator
6.1 Switching on / self test
1. Open the valve of the oxygen cylinder slowly.
The pressure gauge will now show the pressure
in the cylinder.
2. Where appropriate, calculate how long the remaining oxygen will last (see “6.11 Calculation
of oxygen content/remaining operating time”
on page 37). Always change the cylinder in good
time, e.g. when the pressure is lower than
50 bar, to ensure that oxygen is available for an
adequate period.
3. Select the desired ventilation settings (see “6.2
Selecting the ventilation settings” on page 23).
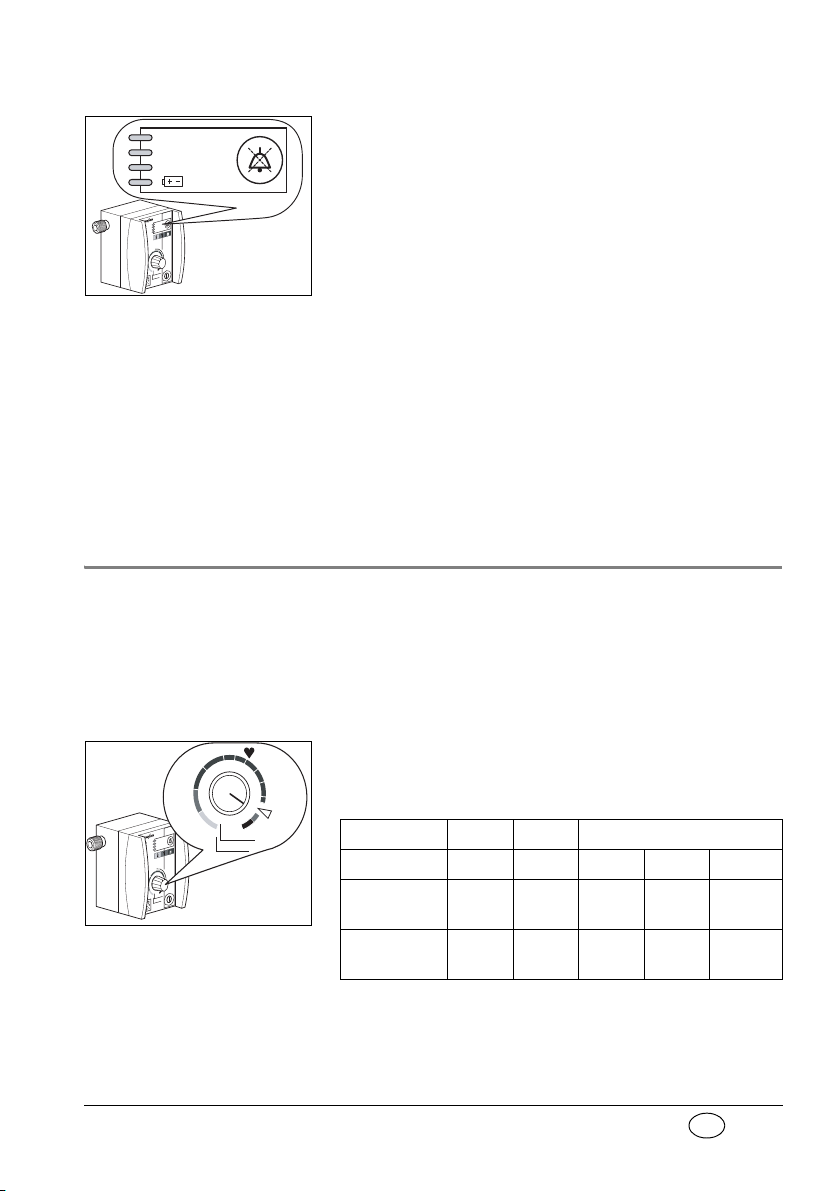
4. Switch on the MEDUMAT Easy with ON/OFF
switch. The ventilator will then run a self test
lasting approx. 2 seconds.
If audio response is enabled, you will hear before
the self test the sentence “Open oxygen cylinder”.
22 Using the ventilator
Page 23
EN
During this test, the four LEDs in alarm panel 3
flash on and off and a short alarm tone sounds.
Stenosis
Disconnection
< 2,7 bar O
2
If an error is found, all the LEDs in alarm panel
continue flashing and an alarm sounds. If this happens, MEDUMAT Easy must not be used for ventilation.
If audio response is enabled, you will hear the
message “Device malfunction! Administer alternative ventilation”.
After the self test, the ventilator repeatedly
checks the oxygen cylinder pressure until adequate pressure is detected. Otherwise an alarm is
sounded.
The MEDUMAT Easy will then start to function
with the selected ventilation settings.
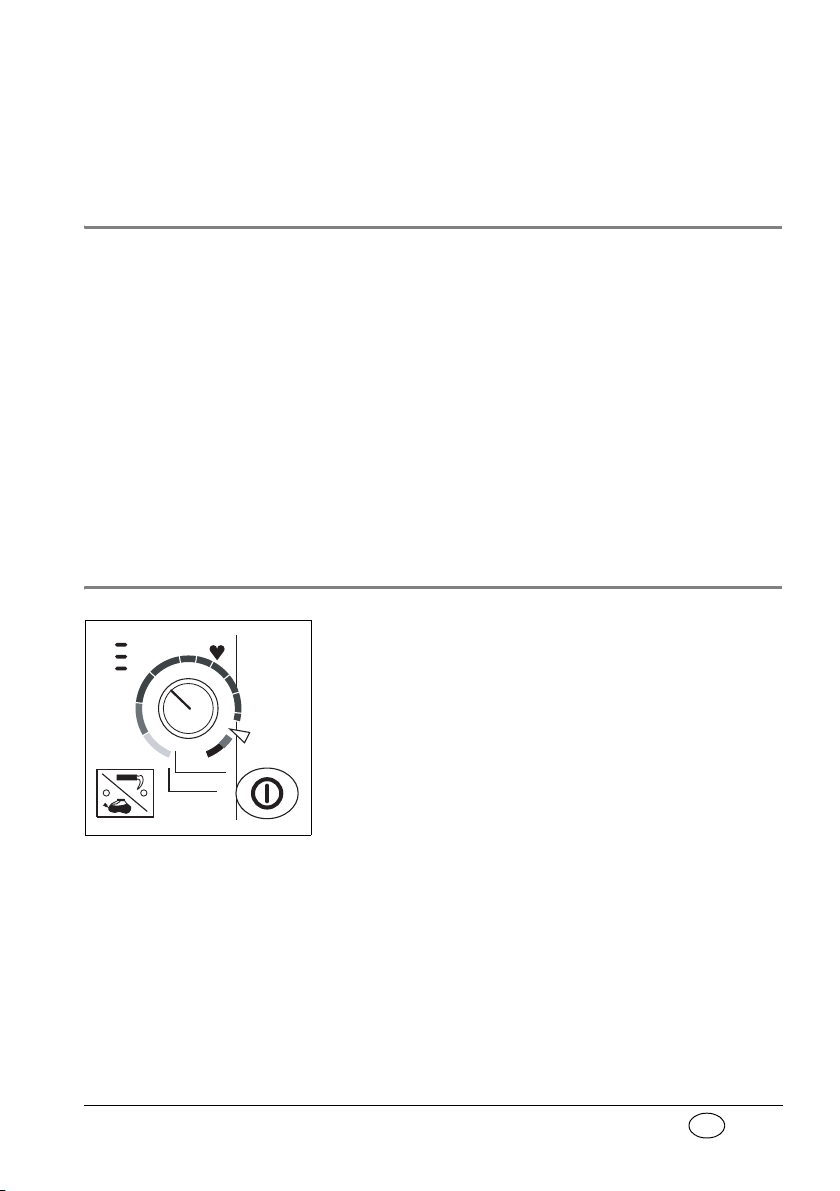
6.2 Selecting the ventilation settings
We recommend selection before switching on, to
prevent unnecessary waste of oxygen.
3
Respiratory frequency and minute
volume
12
11
9
10
14
12
10
15
13
7
11
14
30
3
Freq.(min
MV (l/min)
16
Demandflow
-1
)
16
5
13
14
1,1
0,6
0,3
1. Set the respiratory frequency and the minute
volume with regulator knob.
Recommended ventilation settings:
yellow orange brown
Body weight 10 kg 30 kg 60 kg 80 kg 110 kg
Respiratory
frequency
Minute
volume
-1
30 min
16 min-111 min-110 min-110 min
3 l/min 5 l/min 7 l/min 9 l/min 11 l/min
Using the ventilator 23
-1
Page 24
EN
The figures shown in the table are only recommendations. Different settings may be required
in cases of pulmonary damage or for special indications.
To see the relationship between the values, see
diagram “12.2 Relationship between ventilation
parameters” on page 66.
Maximum ventilation pressure
1. Use the mask/tube switch to set the maximum
ventilation pressure. The LEDs light up in active
mode.
Recommended maximum ventilation pressure:
Device
Audio response up
to serial number
7999
From serial number
8000 and following
repair/servicing/
firmware update
Mask ventilation
20 mbar 45 mbar
Audio response
enabled: “Mask
ventilation mode. Tilt
back head, secure
mask tightly”
Audio response
enabled: “Ventilation
pressure limit
20 mbar”
Intubation
Audio response
enabled: “Tube
ventilation mode.
Ventilation pressure
limit 45 mbar”
Audio response
enabled: “Ventilation
pressure limit
45 mbar”
24 Using the ventilator
If the maximum level is reached, e.g. in cases where
compliance is inadequate, MEDUMAT Easy sets off a
stenosis alarm (see “ Stenosis alarm” on page 30).
Note: The mask/tube switch can only be operated when
the ventilator is switched on.
Page 25
EN
6.3 Performing ventilation
P
o
s
i
ti
on
>
P
S
U
< 13
4°
9
60
mbar
50
40
30
20
10
0
Ventilation mask
1. Attach the mask to the patient valve.
2. If necessary, insert a Guedel tube to keep the
airways open before putting on the mask.
3. Place the mask over the patient's mouth and
nose.
4. Tilt the head back and use the E-C technique
ensure the mask is hermetically sealed.
Intubation
The patient will normally be intubated before the
tube is connected to the patient valve.
1. Attach the patient valve to the connector of the
tracheal tube.
2. Monitor the respiratory parameters during ventilation. This will indicate whether the tube is correctly positioned and ventilation is adequate.
1)
to
6.4 Monitoring ventilation
The patient must be monitored constantly during
ventilation.
You can read off ventilation pressure on the ventilation pressure gauge.
High airway resistance, as a result of obstructions or
external cardiac massage for example, will change
1. See also: Resuscitation, Volume 46 (2000), Special Issue International Guidelines 2000 for CPR and ECC -
A Consensus on Science; p. 115-125.
Using the ventilator 25
Page 26
EN
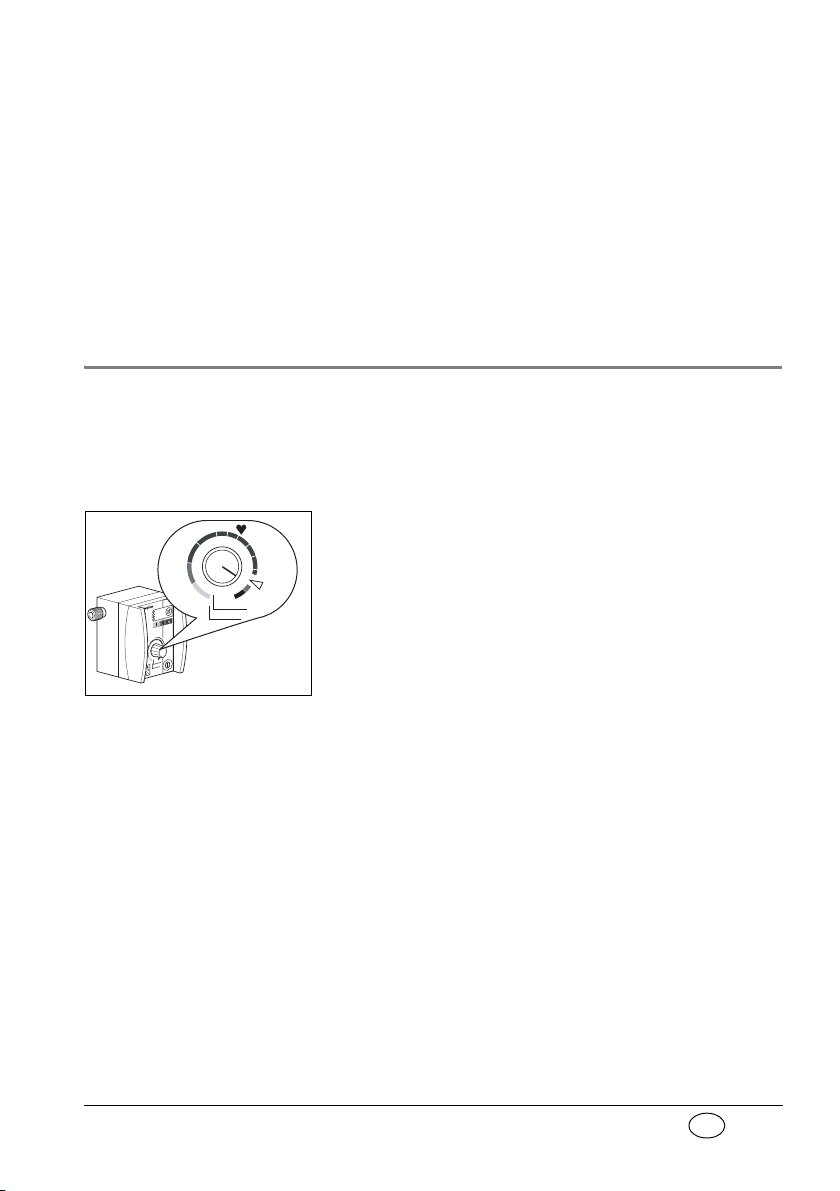
the tidal volume set. Use suitable volume measuring
Example of ventilation sequence before and after
lung compliance diminishes
devices to check the tidal volume actually administered.
Check respiratory parameters during ventilation.
If lung compliance diminishes during ventilation, the
ventilator will react by increasing the ventilation
pressure at constant volume.
6.5 Ventilation with PEEP valve
A PEEP valve can be fitted to the expiration tube on
the patient valve with an adapter.
This valve makes it possible to use positive end-expiratory pressure (PEEP).
Please see the PEEP valve instructions for details of
settings.
6.6 Ventilation with filter
A conventional filter with standard 15/
22 connectors can be fitted on the inspiration tube
of the patient valve for hygiene purposes and to condition the air for inspiration. This will increase both
26 Using the ventilator
Page 27
EN
13
14
0,3
0,6
1,1
16
15
13
14
14
12
12
11
10
10
9
11
16
7
5
30
3
MV (l/min)
Freq.(min
-1
)
Demandflow
6.7 Demandflow
Note: A PEEP valve must not be fitted when using the
inspiratory and expiratory resistance. You should
therefore monitor ventilation pressure and ventilation volume very carefully.
A close watch must be kept for any increase in dead
space, especially in children.
Always be sure to follow the instructions supplied by
the manufacturer of the filter.
ventilator in Demandflow mode.
Demandflow must be switched on for O
inhalation.
2
To switch the MEDUMAT Easy to Demandflow
mode, turn the ventilation settings regulator knob
until it engages in the fixed point marked by the
white triangle. The green LED indicates that it is
ready for operation. If audio response is enabled, the
ventilator announces “Demandflow mode”.
Attach the mask to the patient valve and place it over
the patient’s mouth and nose. Hold the mask to ensure a firm seal. The flow is switched on by the patient breathing in (triggering the device). When the
patient starts to breathe out, the flow stops and the
expired air is removed via the patient valve. The patient should breathe calmly and evenly. The Demandflow cannot be altered. At higher breath rates, fresh
air is automatically mixed in with the oxygen. This is
done via the spontaneous breathing tube of the
patient valve.
The Demandflow mode is ended by turning the regulator knob back to ventilation mode from the index
Using the ventilator 27
Page 28

EN
position marked by the white triangle, or by switching off the ventilator.
If audio response is activated, the ventilator confirms
the return to ventilation mode by announcing:
“Mask ventilation mode. Tilt back head, secure mask
tightly” (from serial number 8000 and following repair/servicing/firmware update: “Ventilation pressure limit 20 mbar”).
6.8 Terminating ventilation or Demandflow
Important
Never empty the oxygen
cylinder completely. Return the cylinder for filling
while it still contains residual pressure. This prevents
entry of moist atmospheric
air that can cause
corrosion.
1. Check the oxygen supply on the pressure reducer gauge. Always change the cylinder in good
time, e.g. when the pressure is lower than
50 bar, to ensure that oxygen is available for an
adequate period.
2. Close the valve of the oxygen cylinder.
3. Switch off the MEDUMAT Easy. To prevent the
ventilator being switched off unintentionally, ON/
OFF switch must be kept pressed down for at least
2 seconds until the LEDs in the alarm panel
3 light
up. If audio response is enabled, the ventilator announces: “Close oxygen cylinder”.
28 Using the ventilator
Page 29
EN
6.9 Alarm signals
Stenosis
Disconnection
< 2,7 bar O
2
+–
Alarm panel signals the following alarms:
Stenosis: Stenosis, or maximum ventilation
pressure P
reached in two succes-
max
sive inspiration phases
Disconnection:Disconnection between
MEDUMAT Easy and patient in two
successive inspiration phases
< 2.7 bar: Drop in oxygen pressure to below
2.7 bar
: Battery charge inadequate
All the visual alarms are accompanied by an acoustic
alarm.
If the ventilator detects a malfunction during the self
test after switching on or during continuous operation, all LEDs in the alarm panel stay flashing on and
off, and an alarm tone sounds. If audio response is
enabled, you will hear the message “Device malfunction! Administer alternative ventilation”.
In this case you must not use the MEDUMAT Easy.
The failure alarm can be confirmed by pressing the
ON/OFF switch.
The patient valve is designed to enable spontaneous
breathing in the event of equipment failure.
When is the alarm set off?
An alarm signal is given as soon as any one of the
functional problems mentioned above occurs. The
relevant LED starts flashing and an acoustic signal
sounds. If audio response is enabled, the user also
hears additional information about the individual
alarm.
Using the ventilator 29
Page 30

EN
Simultaneous disconnection and drop in oxygen
pressure will initially set off only the < 2.7 bar alarm.
Stenosis alarm
Actual ventilation pressure exceeds the maximum
ventilation pressure (20 or 45 mbar).
MEDUMAT Easy briefly switches to expiration if the
maximum ventilation pressure is exceeded, but then
tries to continue inspiration in the same inspiration
phase.
If the maximum ventilation pressure is exceeded for
a second time during the same inspiration phase, the
unit finally switches to expiration and vents the patient tube system completely. The next inspiration
begins with the following ventilation stroke according to the frequency selected. This does not affect
the set frequency.
The alarm is set off if airway resistance is exceeded
in
two successive inspiration phases. This is intended
to prevent false alarms, e.g. due to coughing.
If audio response is enabled, the unit announces
“Check airways and minute volume” (from serial
number 8000 and following repair/servicing/firmware update: “Check airways and settings”).
30 Using the ventilator
Disconnection alarm
As a rule this alarm is due to interruption of the
breathing system.
The alarm is set off when the rise in pressure fails to
reach at least 8 mbar in
phases.
If audio response is enabled, the unit announces
“Check ventilation system and settings”.
two successive inspiration
Page 31

EN
Disconnection alarm in Demandflow
+–
mode
If the patient does not trigger MEDUMAT Easy within 15 seconds, the “Disconnection” alarm is given. If
audio response is enabled, the unit announces “Rule
out respiratory arrest and check mask fit”.
< 2.7 bar O2 alarm
Oxygen pressure at the pressure connection to the
MEDUMAT Easy has dropped to less than 2.7 bar. The
reason is usually an almost empty oxygen cylinder.
In this case MEDUMAT Easy can no longer function
correctly because the operating parameters are no
longer within the permissible limits.
If audio response is enabled, the ventilator announces:
“Check pressure hose system and gas supply”.
alarm
The battery is failing. Failure of the automatic ventilation function must be expected. Immediate steps
must therefore be taken to provide alternative ventilation (see “6.12 Alternative ventilation procedures” on page 39).
If audio response is enabled, you will hear the message: “Device malfunction! Administer alternative
ventilation”.
The ventilator must be switched off before the battery can be changed (see “ Changing the main battery” on page 57).
Cancelling acoustic alarm
If there is an alarm, you can temporarily cancel the
acoustic alarm by pressing the alarm mute button:
Using the ventilator 31
Page 32

EN
Stenosis: 30 seconds
+–
Disconnection: 30 seconds
< 2.7 bar: 30 seconds
: 120 seconds
Even if audio response is enabled, no messages will
be output for the periods stated. The visual alarm
will continue to flash.
If the cause of the alarm is not eliminated, the acoustic alarm will start to sound again after a short interval. Audio response will also resume automatically.
Both the visual and acoustic alarms are cancelled automatically as soon as the malfunction is eliminated.
6.10 Audio response for user guidance
Selecting language / Switching off audio
guidance
The language setting can only be selected if the unit
is switched off.
To select a language or to switch off the audio response facility, proceed as follows:
1. Hold down the mask/tube switch. Switch on the
ventilator at the ON/OFF switch.
2. Then release the mask/tube switch. The unit is
now in the language selection menu. The ventilation pressure gauge displays the most recent
language setting. The following languages are
assigned to the individual LEDs:
32 Using the ventilator
Page 33

EN
Device number mbar Language, Level 1
60 Icelandic
55 Finnish
50 Norwegian
45 Swedish
WM 28000
WM 28100
(French variant)
WM 28050
(French variant)
WM 28020
40 Danish
35 Portuguese
30 Spanish
25 Dutch
20 Italian
15 French
10 English
5 German Brazilian Portuguese
0 Audio response off Audio response off
60 Farsi
55 Thai
50 Indonesian
45 Turkish
40 Arabic
35 Japanese
30 Chinese
25 Czech
20 Russian
15 Polish
10 English
5 German Korean
0 Audio response off Audio response off
Language, Level 2
(Stenosis and disconnection
alarm LEDs come on)
Still free
Still free
Using the ventilator 33
Page 34
EN
3. Press mask/tube switch as many times as necessary until the LED for the desired language lights
up and a corresponding message is heard (example: LED 10 mbar, language: English, message:
“Selected language: English”). After five
seconds the new selection is stored.
Tip:
By pressing the ON/OFF switch briefly you can
store the language selection without waiting for
five seconds.
As there are more languages than LEDs on the
ventilation pressure gauge, a new cycle starts on
Level 2 once the 60 mbar LED has been reached.
Level 2 is displayed by the stenosis and disconnection alarm LEDs. Once the last language on
Level 2 has been reached, the cycle starts again
at 0 mbar on Level 1 and the stenosis and disconnection alarm LEDs go out.
Select the setting 0 (0 mbar) if you want to
switch off the audio response facility. You will
then hear the message: “Audio response is off!”
in the language most recently selected.
34 Using the ventilator
After approx. 5 seconds the new setting is automatically stored. The LED for the selected language goes out.
Audio response messages
The following is a list of the individual audio response messages with notes on what they mean.
Note the differences between the audio responses.
The audio responses change from serial number
8000 and following repair/servicing/firmware update (see Table 2).
Page 35

EN
Table 1:
Audio response up to
serial number 7999
“Open oxygen cylinder” Open oxygen cylinder valve slowly.
“Check respiration and
select mode”
“Adjust settings”
“Connect patient”
“Demandflow mode” Demandflow mode is selected.
“Mask ventilation mode”
“Tilt head back”
“Secure mask tightly”
“Tube ventilation mode”
“Ventilation pressure limit
45 mbar”
“Check airways and minute
volume”
“Device malfunction”
“Administer alternative
ventilation”
“Check pressure hose
system and gas supply”
“Rule out respiratory arrest
and check mask fit”
“Close oxygen cylinder”
“Check ventilation system
and settings“
“Selected language:
English” (Deutsch, Français,
...)
“Audio response is off” Confirmation that audio response is deactivated.
Depending on whether or not the patient is breathing, set
MEDUMAT Easy to one of the modes Demandflow (Page 27), mask
ventilation or intubation (Page 24).
Depending on patient weight, set respiration frequency and minute
volume (Page 23).
Connect patient to ventilator via ventilation hose and patient valve
using the patient mask or the connector of the tracheal tube.
Mask ventilation mode is selected.
While tilting the head back, use the E-C technique to seal the mask.
Tube ventilation mode is selected.
Maximum ventilation pressure for tube ventilation.
MEDUMAT Easy has measured excessive airway resistance. Check the
airways or adjust respiratory frequency and minute volume settings to
suit the patient (Page 23).
The device is faulty or the battery is failing. The device can no longer be
used for ventilation. You must therefore use another ventilation method
(Page 39).
MEDUMAT Easy has measured low pressure on the inlet side. Check
whether the O
oxygen hose is not leaking, kinked or jammed.
MEDUMAT Easy can no longer detect a breathing pulse (trigger) in
Demandflow mode. Check the patient’s breathing, and if necessary
switch to a different ventilation mode. Check the connections and
mask fit.
After switching off the ventilator, turn off the O2 cylinder or the external
O
supply.
2
Disconnection: a pressure rise of 8 mbar is not achieved during the
inspiration phase under controlled ventilation. This is usually due to an
interruption of the ventilation system or to a low minute volume setting.
Check the connections or adjust the minute volume to suit the patient.
When selecting the language for the audio response, press the mask/
tube switch as many times as necessary until the desired language is
announced.
cylinder still contains sufficient oxygen and that the
2
Meaning
Using the ventilator 35
Page 36

EN
Table 2:
Audio response from
serial number 8000 and
following repair/
servicing/firmware
update
“Open oxygen cylinder” Open oxygen cylinder valve slowly.
Depending on patient weight, set respiration frequency and minute
“Adjust settings and connect
patient!”
“Demandflow mode!” Demandflow mode is selected.
“Ventilation pressure limit
45 mbar”
“Ventilation pressure limit
20 mbar”
“Check airways and settings!”
“Device malfunction!”
“Administer alternative
ventilation!”
“Check pressure hose system
and gas supply!”
“Rule out respiratory arrest and
check mask fit.”
“Close oxygen cylinder.”
“Check ventilation system and
settings!”
“Selected language: English”
“Audio response is off!” Confirmation that audio response is deactivated.
volume (Page 23). Connect patient to ventilator via ventilation hose
and patient valve using the patient mask or the connector of the
tracheal tube.
Tube ventilation mode is selected.
Maximum ventilation pressure for tube ventilation.
Mask ventilation mode is selected.
Maximum ventilation for mask ventilation.
MEDUMAT Easy has measured excessive airway resistance. Check the
airways or adjust respiratory frequency and minute volume settings to
suit the patient (Page 23).
The device is faulty or the battery is failing. The device can no longer
be used for ventilation. You must therefore use another ventilation
method (Page 39).
MEDUMAT Easy has measured low pressure on the inlet side. Check
whether the O
oxygen hose is not leaking, kinked or jammed.
MEDUMAT Easy no longer measures respiratory pulse (trigger) in
Demandflow mode. Check the patient’s breathing, and if necessary
switch to a different ventilation mode. Check the connections and
mask fit.
After switching off the ventilator, turn off the O2 cylinder or the exter-
nal O
supply.
2
Disconnection: a pressure rise of 8 mbar is not achieved during the
inspiration phase under controlled ventilation. This is usually due to an
interruption of the ventilation system or to a low minute volume set-
ting. Check the connections or adjust the minute volume to suit the
patient.
When selecting the language for the audio response, press the
mask/ tube switch as many times as necessary until the desired lan-
guage is announced.
cylinder still contains sufficient oxygen and that the
2
Meaning
36 Using the ventilator
Page 37

EN
6.11 Calculation of oxygen content/remaining op-
Real ventilation time (min) =
oxygen content (l)
MV (l/min)
Real ventilation time =
1000 l
11 l/min
= 91 min = 1 h 31 min
erating time
Oxygen content of cylinder
Oxygen volume = volume of cylinder x cylinder pressure.
Cylinder volume x cylinder pressure = oxygen content
Example 1
Example 2
Real ventilation time
Example:
O
content = 1000 l; MV = 11 l/min.
2
This gives the following equation:
10 l x 200 bar = 2000 l
10 l x 100 bar = 1000 l
Using the ventilator 37
Page 38

EN
Real Demandflow time
Inhalation flow 45 l/min
Patient data:
Inspiration : Expiration (I : E) = 1 : 2
Respiratory frequency = 10 min
-1
:
I = 2 sec
= 0.033 min
E = 4 sec
= 0.066 min
I = 2 sec
= 0.033 min
t
BV = 1,5 l
Max. flow
BV = 1,5 l
Example:
Breathing volume (BV) = inhalation flow x inhalation time
For the above example:
Breathing volume = 45 l/min x 0.033 min= 1,5 l
Minute volume (MV) = respiratory frequency x BV
For the above example:
Minute volume (MV) = 10 min-1 x 1.5 l = 15 l/min
Real Demandflow time (min) =
oxygen content (l)
MV (l/min)
Real Demandflow time =
2000 l
15 l/min
= 133 min = 2 h 13 min
Example:
content = 2000 l, MV = 15 l/min.
O
2
This gives the following equation:
38 Using the ventilator
Page 39

EN
6.12 Alternative ventilation procedures
If MEDUMAT Easy ceases to function during a ventilation procedure, the following alternatives can be
applied:
Ventilation bags
1. Remove the patient valve from the tube or the
mask.
2. Replace it with the ventilation bag, e.g. a
WEINMANN Emergency COMBIBAG
WM 11000, and perform manual ventilation.
Exhaustion of oxygen supply
In emergency situations when the oxygen supply
runs out, MEDUMAT Easy can also be operated with
respiratory air.
Using the ventilator 39
Page 40

EN
7. Hygienic preparation
After every use the MEDUMAT Easy and any acces-
sories used must undergo hygienic preparation.
• Be sure to carry out a functional check after every hygienic preparation (see “8. Functional
checks” on page 45).
•
This product may contain disposable items. Dis-
posable items are intended to be used only once.
So use these items only once and do
cess them. Reprocessing disposable items may
impair the functionality and safety of the product and lead to unforeseeable reactions as a result of ageing, embrittlement, wear, thermal
load, the effects of chemical processes, etc.
7.1 MEDUMAT Easy
You can keep MEDUMAT Easy clean by simply wiping with disinfectant as described in section 7.6 .
Never immerse MEDUMAT Easy in disinfectants or
other liquids. Otherwise damage may be caused to
the unit, thus endangering users and patients.
not repro-
7.2 Patient valve
40 Hygienic preparation
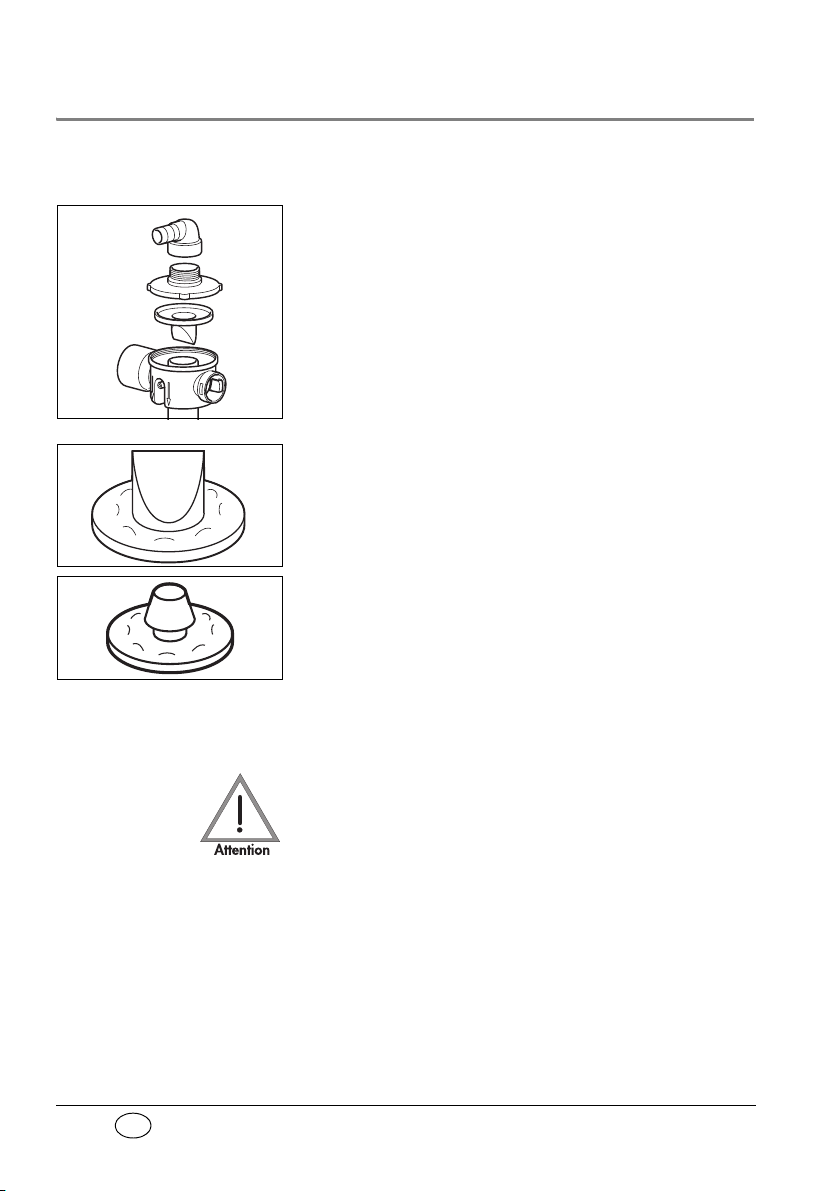
1. Disconnect the patient valve from the hoses.
Always grasp the hoses by their ends. Otherwise you
might damage or tear them.
Page 41
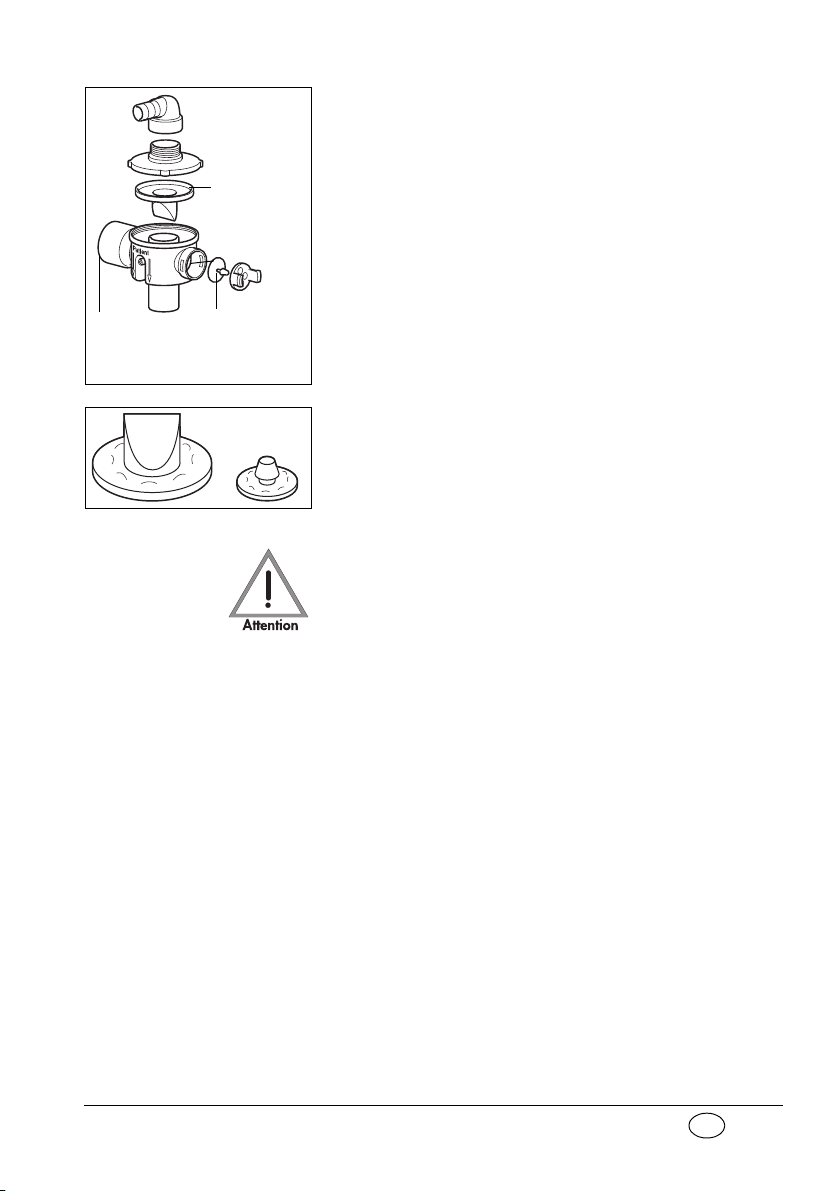
EN
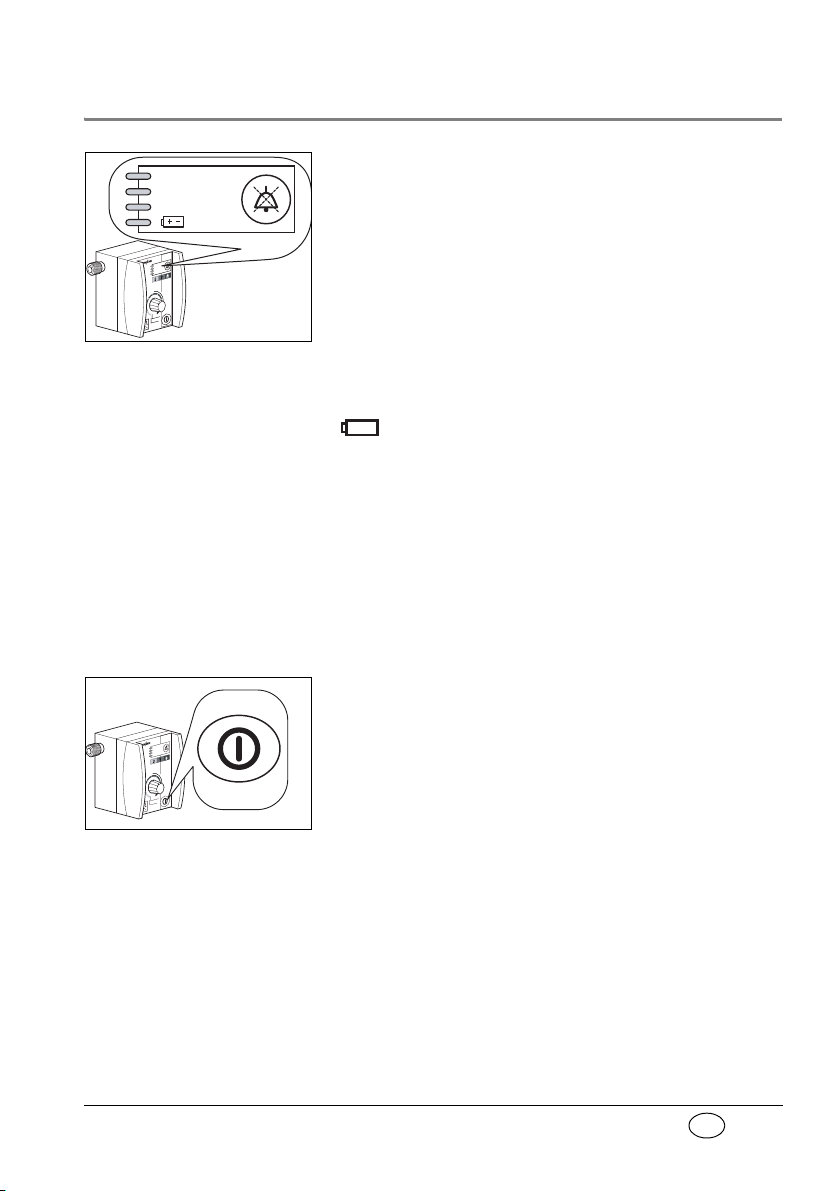
2. Dismantle the patient valve as shown in the ad-
Lip
membrane
Disc membrane
Expiration tube
Disc membrane
Spontaneous
breathing tube
jacent diagram. It is neither necessary nor permissible to remove the membrane in the
spontaneous breathing tube for cleaning and
disinfection.
3. Crinkled, misshapen and sticky lip and valve
membranes must be replaced.
4. Perform the hygienic preparation as described in
section 7.6.
5. Reassemble the patient valve. When reassembling, make sure that the lip membrane is correctly positioned.
6. Always perform a functional check before using
the valve again (see “8.3 Checking patient hose
system” on page 48).
Hygienic preparation 41
Page 42

EN
7.3 Ventilation hose
Caution! Only reusable hose system WM 22520 (scope of
supply) is suitable for the hygienic preparation described here. Do
WM 28110 available as an accessory to hygiene
preparation. Replace it with a new one.
1. Take the ventilation hose and the pressure
2. Perform the hygienic preparation as described in
3. For reassembling, see “5.2 Ventilation hose” on
7.4 Masks
not subject disposable hose system
gauge hose off both connection ports.
Caution! Always grasp the hoses at the end, as
shown in the drawing, otherwise the hoses may
be damaged or torn off. Close both ends of the
pressure gauge hose.
section 7.6.
page 19.
7.5 Fittings
42 Hygienic preparation
Perform the hygienic preparation of the masks as
described in section 7.6.
Ensure that no liquids get into the connections for
the oxygen fittings, otherwise there is a risk of explosion, especially if you are using products for disinfecting by wiping which contain alcohol.
For external cleaning of fittings (e.g. pressure reducer, valve), use only a clean cloth. The cloth may be dry
or moistened with clean water.
Page 43

EN
Never immerse the fittings in disinfectants or other
liquids. You may only disinfect them by wiping. On
no account may liquid get into the pressure reducer,
as this could cause explosions.
7.6 Cleaning and disinfection procedure
Hygienic preparation of the MEDUMAT Easy and the
accessories used should be performed as described
in the following table.
Observe the instructions for the disinfectant used.
We recommend gigasept
disinfection and terralin
tion. You are recommended to wear suitable gloves
(e.g. household or disposable gloves) during disinfection procedures.
®
FF (new) for immersion
®
protect for wipe disinfec-
Description of
component
MEDUMAT Easy
Patient valve
Silicone ventilation
mask
Ventilation hose
Hose casing, reusable
Oxygen fittings
Cleaning Disinfection
With a dry or
damp cloth
in warm water
with a mild
household
detergent
Wipe with a dry
or damp cloth
With a dry or
damp cloth
Wiping Not permissible
Immerse in dilute
solution so that all
surfaces, inside and out,
are thoroughly wetted
without bubbles. Wait
until the full exposure
time has elapsed. After
disinfection, rinse all
parts thoroughly inside
and out with distilled
water and leave to dry.
Rinse cycle 30°C,
no spin
Wiping Not permissible
(1) To disinfect the pressure gauge tube of the
ventilation hose, proceed as follows:
Thermal
disinfector
Rinsing
programme up to
95 °C (thermal
disinfection in
automatic
cleansing unit)
(1)
Possible during
cycle
Sterilization
Not
permissible
Steam
sterilization at
134 °C in
devices to
EN 285,
residence time
at least 5 - 18
minutes.
Not permitted
Not
permissible
Hygienic preparation 43
Page 44
EN
1. Connect one end of the pressure gauge tube to
a sterile disposable 20-ml syringe.
2. Immerse the other end in the dilute disinfectant
solution (for gigasept
®
FF (new): residence time
15 minutes).
3. Draw the disinfectant solution through the pressure gauge tube into the syringe until the latter
is full. Do not flush through the pressure gauge
tube in the opposite direction!
4. Detach the syringe from the pressure gauge
tube and empty it out completely.
5. Repeat the procedure 5 more times.
6. After disinfection, the pressure gauge tube must
be rinsed with distilled water at least 8 times using the same principle.
You can support the subsequent drying process
with medical compressed air or medical oxygen.
Then allow the components to dry thoroughly. If any
water is left in the patient valve or the pressure
gauge tube of the ventilation hose, the unit may not
function correctly.
44 Hygienic preparation
Page 45

EN
8. Functional checks
Before each use, after each dismantling and reassembly, and at the very least every 6 months, the user must
carry out functional checks on the ventilator.
Note: Before carrying out the functional check on
MEDUMAT Easy, you must connect the ventilation
hose and the patient valve.
MEDUMAT Easy must not be used if the functional
checks reveal defects or deviations from the specified parameters.
First try to correct the error with the help of the information provided in section “9. Troubleshooting”
on page 54. If this is not possible, have the unit repaired by the manufacturer – WEINMANN
Emergency – or by specialists explicitly authorized by
WEINMANN Emergency.
A complete functional check includes:
• “8.2 Checking for leaks in the system” on
page 47;
• “8.3 Checking patient hose system” on
page 48;
• “8.4 Checking the minute volume” on page 49;
• “ Checking the breath volume” on page 49;
• “8.5 Checking maximum ventilation pressure”
on page 50;
• “8.6 Checking Demandflow” on page 51;
• “8.7 Checking the alarm systems” on page 52;
We recommend that you always hold reserve stocks
of the following items:
• replacement washers for the connections;
Functional checks 45
Page 46

EN
8.1 Intervals
• lip membranes for the patient valve.
Note: Ensure that the test bag is not damaged and test its
function regularly, e.g. in the context of device
servicing.
Before each use:
• Perform a functional check.
After each use or dismantling:
• Clean, disinfect or sterilize the ventilator and its
components (see “7. Hygienic preparation” on
page 40);
• Check the lip membrane in the patient valve (see
“8.3 Checking patient hose system” on
page 48). It must not be crinkled, sticky or misshapen.
• Perform a functional check.
46 Functional checks
At least every 6 months, if the ventilator
has not been used in the meantime:
• Perform a functional check.
Page 47

EN
8.2 Checking for leaks in the system
1. Open the valve of the oxygen cylinder slowly.
You can now read the pressure in the cylinder
from the gauge on the pressure reducer. For example, a reading of 200 bar means that the cylinder is full, whereas 100 bar means it is half full.
Always change the cylinder in good time, e.g.
when the pressure is lower than 50 bar, to ensure that oxygen is available for an adequate period.
2. Close the cylinder valve again.
3. Watch the needle of the gauge on the pressure
reducer for approx. 1 minute. If it stays in the
same place, the system is free of leaks. If the
needle drops steadily, there is a leak somewhere.
Repairing leaks
Always keep a stock of
washers for the connections available.
Important
The screw connections on
the oxygen lines must be
tightened by hand only.
1. Prepare a soap/water solution using non-perfumed soap.
2. Wet all the screw and hose connections with the
solution. Bubbles will form at the site of the leak.
3. Depressurize the system:
To do this, first close the oxygen cylinder. Switch
on MEDUMAT Easy briefly until the pressure
gauge on the O
cylinder reads “0”. Then switch
2
off MEDUMAT Easy again.
4. If leaks are discovered, the defective components must be changed.
5. After changing, make a fresh check for leaks.
6. If it proves impossible to eliminate the leak, the
ventilator will have to be repaired.
Functional checks 47
Page 48
EN
8.3 Checking patient hose system
Checking reusable hose system
1. Dismantle the patient valve.
2. Carry out a visual check of all components for
cracks or other physical damage.
The lip membrane must be replaced if it is crinkled, sticky or misshapen. It must no longer be
used for ventilation as it could cause serious
functional problems.
Also perform a visual check of the valve membranes in the expiration and spontaneous
breathing arms. To do so, there is no need to dismantle the valve membranes. Crinkled, misshapen or sticky valve membranes must be replaced,
however, as they can lead to considerable malfunctions.
3. Reassemble the patient valve.
When reassembling, make sure that the lip
membrane is correctly positioned.
48 Functional checks
Checking disposable hose system
Visual inspection
Check the following items by inspecting the patient
hose system:
• the patient valve and the connectors may not
exhibit any external damage, cracks or dirt.
Page 49

EN
• the hose connections must be located firmly and
securely on the connecting pieces.
• the patient valve and emergency air membranes
may not exhibit any damage or deformation.
8.4 Checking the minute volume
Checking ventilation frequency
1. Open the valve of the oxygen cylinder slowly.
2. Switch on MEDUMAT Easy.
3. Select the following settings:
– Frequency: 30 min
– Mask/tube switch:
4. Count the number of inspiration phases over a
period of exactly one minute. The figure should
lie between 28 and 32.
5. Turn up the frequency to 14 min
before the index point).
6. Count the number of inspiration phases over a
period of exactly one minute. The figure should
lie between 12 and 16.
-1
(left limit)
(P
: 45 mbar)
max
-1
(right limit
Inspiration stroke=
MV/frequency = 10/10 = 1
Checking the breath volume
1. MEDUMAT Easy must be switched off and the
oxygen cylinder must be open.
2. Attach the test bag to the patient valve with the
adapter from test set WM15323.
3. Select the following settings:
– MV: 10 l/min (between 9 and 11) /
Frequency: 10 min
–P
: (45 mbar)
max
4. Switch on MEDUMAT Easy. The test bag must
become fully inflated during inspiration. This
-1
Functional checks 49
Page 50

EN
ensures a breath volume of 1 litre per inspiration
stroke. At all events the test bag is not sufficiently inflated if a disconnection alarm is set off.
Note: During the expiration phase, you must simulate
the expiration stroke of the test bag by hand. To
do so, place the test bag on a firm base. During
the expiration phase, press the test bag with the
flat of your hand until the volume is completely expelled through the patient valve.
5. Switch off MEDUMAT Easy again.
6. Detach the test bag from the patient valve.
7. Select the following settings:
– MV 3 L/min / frequency 30 min
–P
: (45 mbar)
max
-1
8. Switch on MEDUMAT Easy and close the patient
connection at the patient valve. A stenosis alarm
should be set off.
9. Switch off MEDUMAT Easy again.
8.5 Checking maximum ventilation pressure
Important
Be sure to use the test bag.
If you hold the tube connection closed by hand, the
needle swings across and
correct reading of the precise figure is impossible.
50 Functional checks
1. MEDUMAT Easy must be switched off and the
oxygen cylinder must be open.
2. Attach the test bag to the patient valve with the
adapter from test set WM15323.
3. Select the following settings:
– MV: 7 l/min / frequency: 11 min
–P
: (20 mbar)
max
-1
4. Switch on MEDUMAT Easy.
Check that the needle of the pressure gauge on
the MEDUMAT Easy is standing at “0”.
During this test you must not assist the expiration stroke. This ensures that the pressure builds
up slowly. Between 15 and 25 mbar
Page 51

EN
MEDUMAT Easy must set off the stenosis alarm.
Usually this occurs after the second inspiration
stroke.
5. Switch the mask/tube switch to .
6. Repeat the check for intubation ventilation with
the settings:
– MV: 9 l/min / frequency: 10 min
–P
: (45 mbar)
max
-1
If audio response is enabled, the ventilator must
announce “Tube ventilation mode, ventilation
pressure limit 45 mbar” (from serial number
8000 and following repair/servicing/ firmware
update: “Ventilation pressure limit 45 mbar”).
During this test you must not assist the expiration stroke. This ensures that the pressure builds
up slowly. Between 40 and 50 mbar
MEDUMAT Easy must set off the
stenosis alarm.
Usually this occurs after the second inspiration
stroke.
7. Switch off MEDUMAT Easy again.
8.6 Checking Demandflow
1. Make sure that MEDUMAT Easy is switched off
and the oxygen cylinder is open.
2. Attach the test bag to the patient valve with the
adapter from test set WM 15323.
3. Select the setting “Demandflow”.
4. Switch on MEDUMAT Easy. The green “Demandflow” LED lights up.
If audio response is enabled, the ventilator announces “Demandflow mode”.
5. Simulate an inspiration pulse by hand by firmly
squeezing and quickly releasing the test bag.
Functional checks 51
Page 52

EN
6. The MEDUMAT Easy switches the flow on and
then immediately off again. This test can be repeated several times.
7. Switch off MEDUMAT Easy again.
8.7 Checking the alarm systems
Important
In the case of the stenosis
alarm and the disconnection alarm, the alarm signal
(or message) is only set off
when the cause of the
alarm is repeated in two
successive inspiration
phases. This prevents the
alarm being triggered by a
very short-lived dysfunction.
Important
In this test the rise in pressure is so strong that the
pressure gauge needle may
overswing into the red
zone. There are technical
reasons for this, and it does
not indicate any malfunction.
Stenosis
1. Open the oxygen cylinder.
2. Remove the tube or the ventilation mask from
the patient valve.
3. Switch on MEDUMAT Easy.
4. Switch the mask/tube switch to .
5. Keep the ventilation connector on the patient
valve closed with the flat of your hand during
two successive inspiration phases. The
stenosis
alarm should be set off.
If audio response is enabled, the ventilator announces “Check airways and minute volume”
(from serial number 8000 and following repair/
servicing/ firmware update: “Check airways and
settings”).
Disconnection (interruption of breathing system)
52 Functional checks
1. First proceed as for the stenosis alarm.
2. Then remove your hand. The
stenosis alarm
should now cease (LED goes out, acoustic alarm
stops sounding).
Page 53

EN
After two successive inspiration phases the dis-
+–
connection
alarm should be set off. If audio response is enabled, the ventilator announces
“Check ventilation system and settings”.
Drop in O2 pressure (<2.7 bar O2)
1. Open the valve of the oxygen cylinder slowly.
2. Switch on MEDUMAT Easy.
3. Close the valve on the oxygen cylinder. When
the oxygen pressure in the system has fallen below 2.7 bar, the
<2.7 bar O
alarm should be set
2
off.
If audio response is enabled, the ventilator announces “Check pressure hose system and gas
supply”.
Power supply ( )
The alarm that indicates a failing battery is checked
automatically in the self test that runs when
MEDUMAT Easy is switched on.
The power supply is in order if no alarm is set off
when the valve on the oxygen cylinder is opened and
MEDUMAT Easy is switched on and starts to
function.
Functional checks 53
Page 54

EN
9. Troubleshooting
+–
Fault Cause Remedy
MEDUMAT Easy defective. Arrange for repair.
Replace battery in battery compartment
MEDUMAT Easy will not
switch on.
Stenosis alarm
(excessive airway
resistance)
Disconnection alarm
(breathing system
interrupted).
< 2.7 bar alarm (oxygen
pressure too low).
alarm. Battery failing or fuse defective.
Battery failing.
Airways obstructed. Remove obstruction.
Kink or obstruction in ventilation
hose/mask/tube.
Tube incorrectly positioned. Correct tube position.
MEDUMAT Easy defective. Arrange for repair.
Ventilation hose leaking/slipped
out.
Pressure gauge hose leaking/
slipped out.
MEDUMAT Easy defective. Arrange for repair.
Oxygen cylinder nearly empty. Change O2 cylinder (5.1, page 18).
Oxygen valve closed. Open oxygen valve.
Pressure reducer defective. Replace pressure reducer.
Kink or blockage in oxygen hose. Take corrective action.
(10.1, page 57).
If ventilator still refuses to switch on,
have internal auxiliary battery replaced
by manufacturer or authorized
specialists.
Remove kink or obstruction; if
necessary replace parts.
Check connections.Mask/tube incorrectly positioned.
Replace battery in battery compartment
(10.1, page 57).
If ventilator still refuses to switch on,
have internal auxiliary battery replaced
by manufacturer or authorized
specialists.
54 Troubleshooting
Page 55

EN
Fault Cause Remedy
Visual alarms flashing, but
no acoustic alarm and no
audio response.
Acoustic alarm, but no
visual alarm flashing.
Acoustic alarm sounds
and all visual alarms
flashing.
Alarm: Device
malfunction.
No audio response. Audio response deactivated.
MEDUMAT Easy is
functioning, but without
any displays.
MV too low.
Unusually high oxygen
consumption.
MEDUMAT Easy will not
switch off.
Pressure gauge not
reading “0”.
Short-term electronic problem or
defect in electronic system.
Device defective.
Pressure gauge hose on
MEDUMAT Easy or on patient
valve slipped off.
Kink in pressure gauge hose.
Ventilation parameter(s)
incorrectly set.
MEDUMAT Easy defective. Arrange for repair.
Leak in oxygen supply. Find and eliminate leak (8.2, page 47).
Operating error.
MEDUMAT Easy defective. Arrange for repair.
Switch off, then on again.
If error recurs, arrange for repairs.
Activate audio response (6.10,
page 32).
Check pressure gauge hose.
Check ventilation parameter(s).
Keep button pressed for at least 3
seconds.
Troubleshooting 55
Page 56
EN
10. Servicing
Have the cleaned and disinfected device serviced at
regular intervals. Servicing, safety checks ([sicherheitstechnische Kontrollen or STKs] in accordance
with §6 of the German law governing the owners/
operators of medical devices - only applies to Germany) and maintenance measures such as servicing and
repairs may only be performed by the manufacturer
or by specialists expressly so authorized by the manufacturer.
Maintain the following intervals:
Interval Parts affected
– System components: e.g. carrying
systems, tube connections*
Every 2 years (service
and safety check)
Every 4 years
Every 10 years Steel and aluminum oxygen cylinders
– Accessories
– Test bag
– Oxygen fittings
– Specified wear parts relevant to
safety
– Oxygen fittings
– Specified wear parts relevant to
safety
*Disposable hose system WM 28110 does not
require any maintenance.
Person to carry
out
Manufacturer or
specialists expressly
so authorized by
the manufacturer
56 Servicing
Page 57

EN
10.1 Batteries
MEDUMAT Easy is equipped with two batteries:
• Main battery (lithium battery 3.6 V) for main
power supply. This may be changed by the operator.
• A CR2430 button cell. This can only be changed
by specialist personnel. It supplies auxiliary power to the electronic system if the main battery
fails. This makes it possible to set off an alarm
even if the main battery fails.
The battery capacity is calculated to be sufficient for
power requirements under normal operating conditions for the full period between the two-yearly services. The batteries are completely replaced every
two years during servicing.
We recommend having the batteries changed only
by the manufacturer – WEINMANN Emergency – or
by qualified specialists expressly authorized by the
manufacturer. Special precautions need to be taken
during the change in order to protect the electronic
system.
In an emergency, proceed as follows:
Changing the main battery
1. Make sure the ventilator is switched off.
2. Open the battery compartment on the side of
the MEDUMAT Easy (e.g. with a coin).
3. Remove the old 3.6 V lithium battery.
4. Insert a new battery. Make sure it is inserted the
right way round.
5. Close the battery compartment again.
Important
The 3.6 V lithium battery is a special battery for this
Servicing 57
Page 58

EN
unit. Use only batteries supplied by
Spontaneous
breathing
arm
Expirationarm
WEINMANN Emergency.
10.2 Change valve membrane in patient valve
If one of the valve membranes in the expiration or
spontaneous breathing arms of the patient valve is
crinkled, sticky or misshapen, it must be changed.
Spontaneous breathing arm
1. Take the spontaneous breathing insert out of
the patient valve. To do so, push the two locking lugs out of their seat, using a small screwdriver, for example.
2. Pull the defective valve membrane out of the
spontaneous breathing insert using pointed
tweezers.
3. Put in a new valve membrane.
4. Push the spontaneous breathing insert back into
the patient valve.
10.3 Storage
58 Servicing
Expiration arm
1. Use pointed tweezers to pull the defective valve
membrane out of the expiration arm.
2. Insert a new valve membrane.
If you do not intend to use MEDUMAT Easy for a
long period, we recommend the following storage
precautions:
Page 59

EN
Important Remember that the ventilator still requires servicing
10.4 Disposal
1. Clean and disinfect the ventilator (see “7. Hygienic preparation” on page 40).
2. Store MEDUMAT Easy in a dry place.
3. The battery can remain inside the unit even for
lengthy periods.
at the specified intervals even when in storage, otherwise it cannot be used when removed from
storage.
Note For disposable hose system WM 28110, observe the
storage temperature of -40 °C to 70 °C at a relative
humidity of 15 % to 95 %. This product can be
stored for a maximum of 2 years.
Do not dispose of the unit with domestic waste. For
proper disposal of the device and its components,
please contact a certified waste disposal site for electronic goods. Ask your Environmental Officer or local
council for the address. The device packaging (cardboard and inserts) can be disposed of in paper recycling facilities.
Disposing of batteries/rechargeable
batteries
Used batteries/rechargeable batteries may not be
disposed of in domestic waste. Contact WEINMANN
Emergency or your local authority waste disposal department.
Disposing of the patient hose system
After use, the patient hose system should be disposed of properly with plastics.
Servicing 59
Page 60

EN
11. Product and accessories
11.1 Standard product
MEDUMAT Easy, complete WM 28000
comprising:
– MEDUMAT Easy, single unit WM 28010
– Operating instructions WM 16862
– Summary of operating instructions WM 16844
– Set of mounting attachments WM 15007
– Ventilation hose and patient valve
with spontaneous breathing facility (reusable) WM 22520
– Ventilation mask for adults, size 5 WM 5074
– Test kit for functional checks WM 15323
11.2 Accessories
The following accessories are not included with the standard product:
1. Oxygen cylinder, 2 litres WM 1822
2. Aluminium lightweight oxygen cylinder, 2 litres WM 1814
3. Oxygen cylinder, 0.8 litres WM 1818
4. WM pressure reducer OXYWAY Fix III WM 30301
5. Set, permanent fixing kit WM 15197
6. PEEP valve with conical connection WM 3215
7. Patient hose system and patient valve (disposable) WM 28110
8. Ventilation mask, transparent, with inflatable silicone rim:
– for children and juveniles, size 3 WM 5082
9. Rendell-Baker ventilation mask, silicone:
– children, approx. 3 – 12 years, size 3 WM 5063
10. Oropharyngeal tube:
– for adults WM 3165
– for juveniles WM 3163
– for children WM 3162
60 Product and accessories
Page 61

EN
11. Disposable ventilation mask
– size 3, for children and juveniles WM 10563
– size 5, for adults WM 10565
12. Set tracheal tubes (disposable):
– Set tracheal tubes WM 15075
– Set tracheal tubes, DIN 13232-N WM 15076
– Set tracheal tubes, DIN 13232-K WM 15077
13. Pressure hoses:
– 1m, straight connection nozzle with nut at both ends WM 22301
– 1m, straight connection nozzle with nut and angled
connection nozzle with nut WM 22302
– 3m, sealing nipple and plug acc. to DIN 13260 WM 22303
– 3m, sealing nipple and bayonet WM 22304
– 3m, sealing nipple and straight connection nozzle
with nut WM 22306
– 3m, sealing nipple and angled connection nozzle
with nut WM 22307
– 3m, DIN 13260 plug and
straight connection nozzle with nut WM 22308
– 3m, sealing nipple (AGA) and straight connection
nozzle with nut WM 22309
– 3m, bayonet (male) and
straight connection nozzle with nut WM 22311
–3m with O
plug acc. to DIN 13260 and
2
straight connection nozzle with nut WM 22312
– 3m, sealing nipple (AGA) and angled connection
nozzle with nut WM 22313
– 3m, bayonet (male) and angled connection nozzle
with nut WM 22314
– 1m, straight connection nozzle with nut and
screw nozzle WM 22316
– 3m, sealing nipple (Walther) and sealing nipple (AGA) WM 22288
– 3m, bayonet seal at both ends WM 22371
14. Set, adapter G3/8-NIST, set of 5 WM 15554
15. O
plug DIN 13260-S-O2 for GCS socket WM 2057
2
16. Angle adapter for French coupling WM 22910
17. Hose casing WM 8297
Product and accessories 61
Page 62

EN
11.3 Spare parts
1. Washer for pressure hose WM 1145/31
2. Set of mounting attachments WM 15007
3. Battery, Li 3.6 V WM 28045
4. Ventilation hose and patient valve
with spontaneous breathing facility (reusable) WM 22520
comprising:
– respiration tube, twin lumen WM 22647
– patient valve WM 3280
5. Patient valve WM 3280
comprising:
– connection nozzle to patient hose WM 3213
– upper control element WM 3181
– Lip membrane WM 3211
– Bottom control element fitted WM 3285
consisting of:
– Bottom control element for spontaneous breathing WM 3281
– insert, spontaneous breathing arm WM 3282
– valve membrane for spontaneous breathing arm WM 3284
– valve membrane for expiration arm WM 3212
– O-ring 15/1,5 WM 1145/118
62 Product and accessories
Page 63

EN
12. Technical data
MEDUMAT Easy
Dimensions
LxHxB in mm
100x145x90
incl. connections
Weight incl.
accessories
approx. 0.6 kg
Device category
(93/42/EEC)
II b
Operation:
Temperature range
Humidity
Air pressure
–18 °C to +60 °C
max. 95 %
70 kPa
(1)
to 110 kPa
Storage –40 °C to +70 °C
Electromagnetic
compatibility (EMC)
according to
EN 60601-1-2
and EN 794-3:
– Radio interference
suppression
– Radio interference
resistance
Test parameters and limit
values can be requested
from the manufacturer
(WEINMANN Emergency
Medical Technology
GmbH + Co. KG,
Frohboesestraße 12,
22525 Hamburg,
Germany).
EN 55011 B
EN 61000-4 Parts 2 to 6,
Part 11
Control
timing pulse, volume
constant
Gas input Medical oxygen
Operating pressure 2.7 to 6.0 bar
(2)
Minimum gas
volume required
70 l/min O
2
Insp-exp. ratio (I:E) 1:1.67
Ventilation frequency
continuously variable
from 10 to 30 min
-1
Minute volume (MV)
continuously variable
from 3 to 16 l/min
MV tolerances:
Room temp. (20 °C)
–18 °C to +60 °C
for 3 l/min = ±20 %
for >3 l/min = ±15 %
for 3 l/min = ±35%
for >3 l/min = ±20%
Max. ventilation
pressure
20 or 45 mbar
(3)
O2 concentration 100 % O2 (at least 98 %)
Pressurized gas
connection
External thread G 3/8
Ventilation hose
connection
External diameter 13 mm
Patient valve
– inspiration tube
– mask/endotracheal
tube
15 mm socket
22 mm plug
ISO 5356-1
Patient valve
– expiration tube
30 mm socket
ISO 5356-1
Power supply
Life expectancy
Max. storage period
maintenance-free lithium
battery 3.6 V; 5.2 Ah,
> 2 years
10 years after delivery
Auxiliary power for
alarm system
Max. storage period
Button cell CR2430
10 years after delivery
Ventilation hose
– Spiral silicone DN 10
– PVC hose DN 8,
disposable
Degree of protection
against water
IP54
Standards applied EN 794–3; EN 1789
(1) Under normal atmospheric conditions, 70 kPa
correspond to a maximum altitude for use of
approx. 3,000 meters.
(2) 1 bar =ˆ 100 kPa
(3) 1 mbar =ˆ 1 hPa
MEDUMAT Easy
Technical data 63
Page 64

EN
Subject to technical change without
notice.
MEDUMAT Easy
Alarm sound
pressure
60 dB (A)
Pressure gauge
accuracy
±5% of upper range
value
Patient valve
resistance, reusable:
Inspiration
Expiration
Spont. breathing
<6 mbar
(3)
at 60 l/min
<6 mbar
(3)
at 60 l/min
1.5 mbar
(3)
at 30 l/min
Resistance of patient
hose system,
disposable (as per
EN 794-3):
Inspiration
Expiration
Spont. breathing
22,4 mbar
(3)
at 60 l/min
3,46 mbar
(3)
at 60 l/min
1,54 mbar
(3)
at 30 l/min
Elasticity of breathing
system
negligible
Patient valve
dead space
12,8 ml (reusable)
8 ml (disposable)
Materials used for
disposable hose system
PC, silicone, PVC, PP, PS,
EVA, K-Resin
®
Components with
critical flow direction
Patient valve
Components
containing latex
None
Demandflow mode:
– trigger
– peak flow
– shut-off pressure
< 1 mbar
(3)
> 40 l/min
3 mbar
MEDUMAT Easy
Recommended safe distances between portable or mobile HF
telecommunication devices (e.g. mobile phones) and MEDUMAT Easy
Rated output of HF
device
in W
0.01 0.12 0.23
0.1 0.34 0.73
11.20 2.30
10 3.40 7.30
100 12.00 23.00
64 Technical data
Safe distance depending on transmission frequency
in m
80 MHz - 800 MHz 800 MHz – 2.5 GHz
Page 65

EN
12.1 Pneumatic / electronic systems
V6
V5
V4
V2
V1
V3
Relief valve
3/2-way valve
Function
Pneumatic system
Pressure regulator
Booster valve with
Flow
Coupling element
Respiratory frequency
Position
Demandflow
Battery
Sound
source
M/T
O/I
LED bar graph
4bar
Electronic
system
2,7-6bar 2,5 bar
RF/MV
100mbar
Patient valve
Exp.
Insp.
metering facility
100mbar
10mbar
PpEPpEPp
E
MPU speech module
Stenosis
Disconnection
< 2,7
Batterie
P
Ventilation
hose
Pressure
gauge tube
The input pressure at p is max. 6 bar. This is reduced
by V1 to 2.5 bar dyn. This is the input pressure at V2,
V3 and V4.
Inspiration
An electrical impulse to V2 opens V3 and closes V4.
Oxygen flows through the ventilation hose to the patient valve. If the ventilation pressure in the patient
valve reaches >100 mbar, the relief valve V5 will
open.
Expiration
A fresh electrical impulse closes V2. The relief valve
V4 opens and vents the ventilation hose. The patient
breathes out through the patient valve.
Technical data 65
Page 66

EN
Demandflow
Minute volume (MV) in l/min
Frequency in l/min
Minute volume (V
t
) in l
1,10,1 0,3 0,6 0,9 1,1 1,1
An inspiration impulse (trigger) at V2 opens valves
V3 and V4.
Electronic system
The microprocessor-controlled electronic system sets
the ventilation parameters and monitors ventilation,
and also O
visual and acoustic alarm is given. The ventilator has
an audio response facility that can be switched on
for user guidance.
supply and power supply. If necessary, a
2
12.2 Relationship between ventilation parameters
The following diagram shows the relationship between the ventilation parameters “minute volume”
and “respiratory frequency”:
66 Technical data
Page 67

EN
13. Warranty
WEINMANN Emergency gives the customer a limited
manufacturer warranty on new original WEINMANN
Emergency products and any replacement part fitted
by WEINMANN Emergency in accordance with the
warranty conditions applicable to the product in
question and in accordance with the warranty
periods from date of purchase as listed below. The
warranty conditions can be downloaded from
www.weinmann-emergency.de on the Internet.
We can also send you the warranty conditions on request.
In the event of a claim under warranty, contact your
specialist dealer.
Product
WEINMANN Emergency devices including accessories (except
masks) for oxygen medicine and emergency medicine
Masks including accessories, rechargeable batteries, batteries
(unless quoted differently in the technical documentation),
sensors, tube systems
Disposable products None
Warranty
period
2 years
6 months
14. Declaration of conformity
WEINMANN Emergency Medical Technology GmbH
+ Co. KG declares herewith that the product complies fully with the respective regulations of the Medical Device Directive 93/42/EEC. The unabridged text
of the Declaration of Conformity can be found on
our website at www.weinmann-emergency.de
Warranty 67
Page 68

EN
15. Index
accessories............................................60
alternative ventilation procedures .........39
audio response
general...........................................13
messages .......................................34
settings ..........................................32
batteries ...............................................57
cleaning................................................40
demandflow
checking ........................................51
general...........................................12
settings ..........................................27
switching off ..................................28
disposal ................................................59
Filter .....................................................20
functional checks..................................45
intubation.............................................25
operating time......................................37
patient valve
checking ........................................48
cleaning .........................................40
general...........................................12
PEEP valve.............................................21
safety instructions.................................14
servicing ............................................... 56
spare parts............................................62
storage .................................................58
triggering .............................................27
troubleshooting ....................................54
ventilation
general...........................................11
settings ..........................................23
with additional equipment .............26
ventilation mask ................................... 25
Warranty ..............................................67
, 26
, 26
68 Index
Page 69

Page 70

ES
Español
Indice
1. Esquema . . . . . . . . . . . . . . . . . . . 71
1.1 Aparato . . . . . . . . . . . . . . . . . . . . 71
1.2 Señalizaciones especiales en el
aparato . . . . . . . . . . . . . . . . . . . . 73
2. Esquema . . . . . . . . . . . . . . . . . . . 76
3. Descripción del aparato . . . . . . 77
3.1 Uso conforme a lo dispuesto . . . . 77
3.2 Cualificación del propietario y del
usuario. . . . . . . . . . . . . . . . . . . . . 78
3.3 Función respiratoria . . . . . . . . . . . 78
3.4 Función Demandflow . . . . . . . . . 79
3.5 Sistema de mangueras para
pacientes con válvula del paciente 80
3.6 Función de voz . . . . . . . . . . . . . . 80
4. Indicaciones de seguridad . . . . 81
4.1 Disposiciones de seguridad . . . . . . 81
5. Montaje . . . . . . . . . . . . . . . . . . . . 85
5.1 Conexión de la botella de oxígeno. 85
5.2 Tubo respiratorio . . . . . . . . . . . . . 87
5.3 Conjunto de montaje para
sujeción mural . . . . . . . . . . . . . . . 89
6. Mando . . . . . . . . . . . . . . . . . . . . . 90
6.1 Conexión/Autochequeo . . . . . . . . 90
6.2 Ajuste de los valores de respiración
artificial . . . . . . . . . . . . . . . . . . . . 91
6.3 Aplicación de la respiración
artificial . . . . . . . . . . . . . . . . . . . . 93
6.4 Supervisión de la respiración
artificial . . . . . . . . . . . . . . . . . . . . 94
6.5 Respiración artificial con la
válvula PEEP . . . . . . . . . . . . . . . . 95
6.6 Respiración artificial con filtros . . . 95
6.7 Demandflow . . . . . . . . . . . . . . . . 96
6.8 Finalización de la respiración
artificial o de Demandflow . . . . . . 97
6.9 Avisos de alarma . . . . . . . . . . . . . 97
6.10 Función de voz como guía
para el usuario . . . . . . . . . . . . . 102
6.11 Cálculo de nivel de llenado/
tiempo de funcionamiento . . . . 108
6.12 Respiración artificial alternativa . 110
7. Tratamiento higiénico . . . . . . 111
7.1 MEDUMAT Easy. . . . . . . . . . . . . 111
7.2 Válvula del paciente . . . . . . . . . 112
7.3 Tubo respiratorio . . . . . . . . . . . . 113
7.4 Máscaras . . . . . . . . . . . . . . . . . . 113
7.5 Válvulas . . . . . . . . . . . . . . . . . . . 113
7.6 Aplicación . . . . . . . . . . . . . . . . . 114
8. Controles de funcionamiento 117
8.1 Plazos . . . . . . . . . . . . . . . . . . . . 118
8.2 Comprobación de la
estanqueidad del sistema. . . . . . 119
8.3 Comprobación del sistema de
mangueras para pacientes . . . . 120
8.4 Comprobación del volumen
de respiración por minuto . . . . . 121
8.5 Comprobación de la presión
respiratoria máxima . . . . . . . . . . 123
8.6 Comprobación de Demandflow 124
8.7 Comprobación de las alarmas . . 125
9. Averías y soluciones . . . . . . . . 127
10. Mantenimiento . . . . . . . . . . . . 129
10.1 Baterías . . . . . . . . . . . . . . . . . . . 130
10.2 Cambiar la membrana de disco
en la válvula del paciente . . . . . . 131
10.3 Almacenamiento . . . . . . . . . . . 132
10.4 Eliminación . . . . . . . . . . . . . . . . 132
11. Volumen de suministro . . . . . . 134
11.1 Volumen de suministro de serie . 134
11.2 Accesorios . . . . . . . . . . . . . . . . 134
11.3 Piezas de repuesto . . . . . . . . . . 136
12. Datos técnicos . . . . . . . . . . . . . 137
12.1 Sistema neumático / Sistema
electrónico. . . . . . . . . . . . . . . . . 139
12.2 Relación entre los valores de
respiración artificial . . . . . . . . . . 141
13. Garantía . . . . . . . . . . . . . . . . . . 142
14. Declaración de conformidad . 142
15. Listado de palabras clave . . . . 143
70 Indice
Page 71

ES
1. Esquema
Stenosis
Disconnection
< 2,7 bar O
2
16
15
13
14
14
12
12
11
10
10
9
11
16
7
5
30
3
MV (l/min)
Freq.(min
-1
)
Demandflow
60
mbar
50
40
30
20
10
0
MEDUMAT
Easy
A
2
5
4
3
9
8
6
1
7
1.1 Aparato
Esquema 71
Page 72

ES
B
10
14
13
11
12
15
C
16
17
19
20
18
21
otros
72 Esquema
Page 73

ES
1.2 Señalizaciones especiales en el aparato
Position
> PSU< 134°
Válvula del paciente
El símbolo en la válvula del paciente indica que
si la membrana labial está doblada, viscosa o desplazada, debe cambiarse de inmediato. En este caso, no
utilice la válvula del paciente bajo ningún concepto
para respiración artificial, puesto que podrían producirse fallos de funcionamiento (véase “8.3 Comprobación del sistema de mangueras para pacientes” en
la página 120).
El símbolo advierte de la posición de colocación
correcta de la membrana labial.
Cuando conecte la válvula del paciente, tenga en
cuenta el sentido de flujo del gas respiratorio hacia el
paciente (flecha).
Esquema 73
Page 74

ES
MEDUMAT Easy
5678
3
2
1
4
+–
1 Entrada 2,7 - 6 bar O2.
2 Idiomas disponibles para el aparato
Placa de características del aparato MEDUMAT Easy
SN Número de serie del aparato
Año de fabricación
3
74 Esquema
IP54
Betería de litio de 3,6 V
Tensión continua
Marca CE (confirma que el producto cumple las directivas
europeas vigentes)
Protección contra la penetración de agua
Clase de protección BF
No eliminar el aparato tirándolo a la basura doméstica
Page 75

ES
4 Seguir el manual de instrucciones
5 Conexión del sistema de tubos flexibles
6 Presión máxima ≤100 mbar
Adhesivos de STK y de mantenimiento
Adhesivo de STK: (sólo en la República Federal Alemana)
7
Señaliza cuándo es preciso realizar el siguiente control técnico
de seguridad según el Art. 6 de la Normativa para los
distribuidores de productos técnicos.
8
Adhesivo de mantenimiento: Señaliza cuándo debe llevarse a
cabo el próximo trabajo de mantenimiento.
Esquema 75
Page 76

ES
2. Esquema
A: Panel de mando de MEDUMAT Easy
1 Conmutador Respiración con máscara/
Intubación con indicadores LED de control
2 Manómetro para presión de respiración artificial
3 Panel de alarmas
4 Tecla de silenciar la alarma
5 Leyenda de los colores
6 Botón de ajuste de los valores de respiración
artificial
7 Enclavamiento
8 LED Demandflow
9 Interruptor de encendido/apagado
B: Conexiones de MEDUMAT Easy
10 Conexión del gas a presión
11 Compartimiento de la batería
12 Altavoz
13 Conexión del tubo de medición de la presión
14 Conexión del tubo de respiración artificial
15 Válvula de salida de sobrepresión
76 Esquema
C: Combinaciones de aparatos
MEDUMAT Easy
16 Máscara respiratoria
17 Tubo respiratorio
18 Filtro
19 Válvula del paciente
20 Válvula PEEP
21 Tubo
Page 77

ES
3. Descripción del aparato
3.1 Uso conforme a lo dispuesto
MEDUMAT Easy es un aparato de respiración artificial de oxígeno automático (aparato de respiración
artificial de poca duración) con inhalación adicional.
Puede utilizar MEDUMAT Easy:
• Para reanimación en el lugar de auxilio
• De forma prolongada en situación de
emergencia prolongada
• Para inhalación de O
máscara respiratoria
Para transportar al paciente puede utilizar
MEDUMAT Easy:
• Entre las habitaciones y plantas de un hospital
• Entre el hospital y otros lugares
• En situaciones de emergencia
• Durante un transporte planificado de largo
recorrido
MEDUMAT Easy:
• Sirve para respiración artificial controlada de
personas a partir de unos 10 kg de peso.
• Se emplea para terapia de parada respiratoria.
• Garantiza con parámetros respiratorios regulables
una respiración homogénea, adecuada al paciente, siempre que no se sobrepase la presión de respiración máxima P
de poca duración con una
2
.
máx
Descripción del aparato 77
Page 78

ES
• en el modo Demand posibilita una inhalación de
16
15
13
14
14
12
12
11
10
10
9
11
16
7
5
30
3
MV (l/min)
Freq.(min
-1
)
Demandflow
10
0
oxígeno controlada por la respiración.
3.2 Cualificación del propietario y del usuario
Como propietario o usuario debe conocer el manejo
de este producto médico. Tenga en cuenta los requisitos legales para su funcionamiento y utilización (en
Alemania especialmente la Reglamentación para
usuarios de productos médicos). Recomendación básica: deje que una persona autorizada por
WEINMANN Emergency le instruya correctamente
en el manejo, la utilización y el funcionamiento de
este producto médico.
3.3 Función respiratoria
MEDUMAT Easy trabaja con una presión de funcionamiento de entre 2,7 y 6 bares, una corriente de
volumen de al menos 70 l/min O
corriente interno.
Como gas respiratorio sirve oxígeno sanitario altamente comprimido, que se reduce en un regulador
de presión externo a la presión de funcionamiento
necesaria. El suministro de oxígeno tiene lugar en la
toma de gas presurizado.
Los valores respiratorios regulables de forma continua (la frecuencia y el volumen por minuto están enlazados), y la proporción de inspiración/expiración de
1:1,67 son regulados dentro del aparato mediante
salidas de control electrónico.
78 Descripción del aparato
y un suministro de
2
Page 79

ES
A través del tubo respiratorio, el gas de inspiración es
9
60
mbar
50
40
30
20
10
0
16
15
13
14
14
12
12
11
10
10
9
11
16
7
5
30
3
MV (l/min)
Freq.(min
-1
)
Demandflow
10
0
Posición Demandflow
conducido a los pacientes por la válvula y la máscara
respiratoria o el tubo. Una membrana labial en la válvula del paciente garantiza que pueda exhalarse el
gas de espiración en el ala de espiración.
La evolución de la respiración artificial se controla en
el manómetro para respiración artificial.
3.4 Función Demandflow
Cuando se selecciona Demandflow, MEDUMAT Easy
cambia a la inhalación de O
ración. La inhalación debe realizarse con la máscara
respiratoria. Con el impulso (desencadenante) de
inspiración el oxígeno fluye hasta que una ligera sobrepresión interrumpe el flujo y la espiración se realiza a través de la válvula del paciente, al igual que en
la respiración artificial.
controlada por la respi-
2
Descripción del aparato 79
Page 80
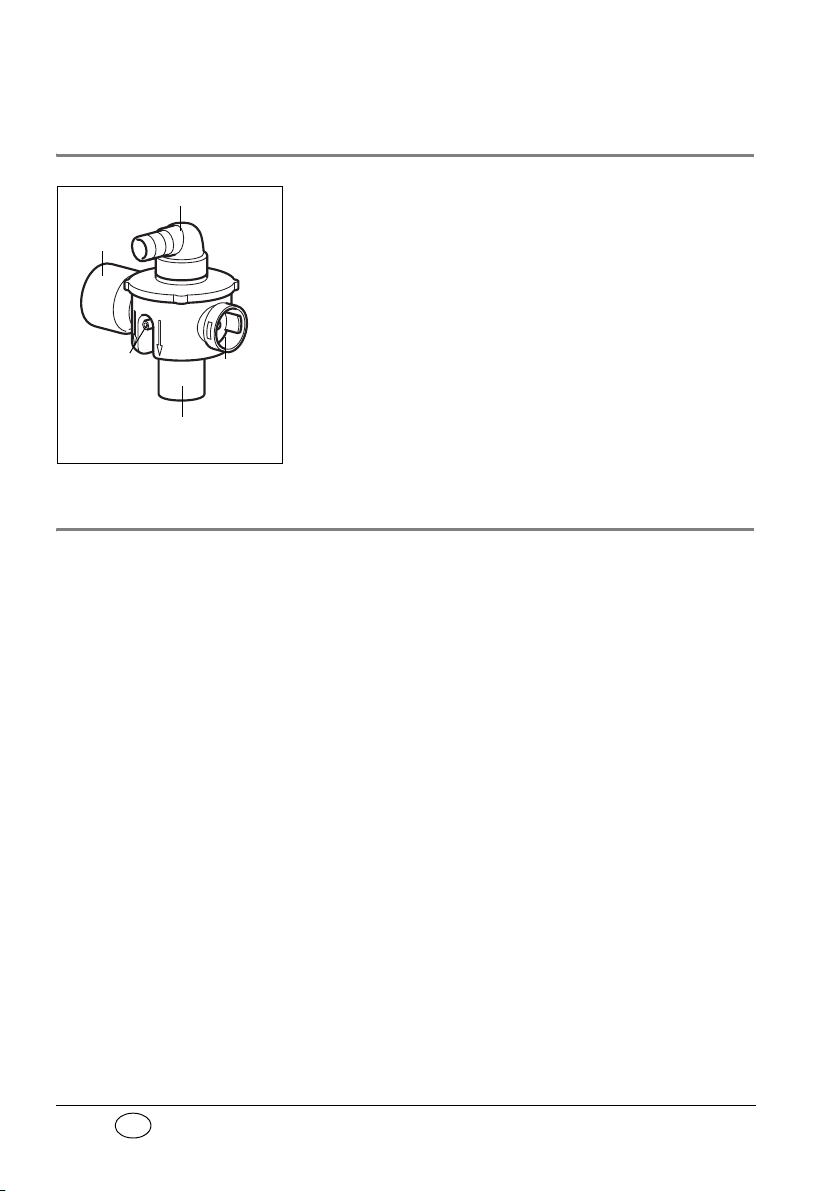
ES
3.5 Sistema de mangueras para pacientes con
Conexión del tubo respiratorio
Brazo de
espiración
Conexión del
tubo del
manómetro
Conexión de
máscara/tubo
Brazo de
respiración espontánea
válvula del paciente
El gas respiratorio llegará conducido al paciente por
el sistema de mangueras para pacientes con válvula
del paciente. El sistema de mangueras para pacientes con válvula del paciente ha sido construido de
modo que también es posible una respiración espontánea en caso de que se produzca un fallo del aparato de respiración artificial, independientemente
del modo de respiración que haya elegido.
3.6 Función de voz
El aparato cuenta con una función de voz que puede
activarse como guía para el usuario, sobre todo si tiene poca experiencia.
Si no desea utilizar la función de voz, puede desactivarla mediante una combinación de teclas (véase
“6.10 Función de voz como guía para el usuario” en
la página 102).
80 Descripción del aparato
Page 81

ES
4. Indicaciones de seguridad
4.1 Disposiciones de seguridad
Por su propia seguridad personal, así como por la de
sus pacientes, y para cumplir con los requerimientos
estipulados en la Directiva 93/42/CEE, observe los
siguientes puntos:
Aspectos generales
• Lea atentamente hasta el final este manual de
instrucciones. Forma parte del aparato y debe
estar disponible en todo momento.
• Utilice MEDUMAT Easy sólo para las finalidades
de uso descritas (véase “3.1 Uso conforme a lo
dispuesto” en la página 77).
• Antes del uso, el usuario ha de someter el sistema de mangueras para pacientes a un control visual y de funcionamiento (véase “8.3
Comprobación del sistema de mangueras para
pacientes” en la página 120).
Nota: • No utilice MEDUMAT Easy en ambientes tóxicos
o con riesgo de explosión.
• MEDUMAT Easy no es adecuado para trabajar a
hiperbares (cámara de presión).
• El MEDUMAT Easy no debe utilizarse con
sustancias narcóticas inflamables.
• En caso de avería, tenga preparado un medio de
respiración artificial alternativo.
• Antes de trabajar con MEDUMAT Easy debe
haber comprendido su manejo.
Indicaciones de seguridad 81
Page 82

ES
• Para evitar una infección o una contaminación
bacteriana, lea el apartado “7. Tratamiento
higiénico” en la página 111.
• Utilice MEDUMAT Easy sólo si tiene formación
médica y conoce la técnica de respiración artificial. El uso indebido podría provocar lesiones físicas graves.
• Compruebe que entre MEDUMAT Easy y aparatos que emitan radiación HF (p. ej., móviles),
haya una distancia de seguridad, ya que podrían
producirse fallos (véase “ Distancias de seguridad recomendadas entre aparatos de telecomunicación HF portátiles y móviles (p. ej., móviles) y
la MEDUMAT Easy” en la página 139).
• Recomendamos que deje el mantenimiento y las
inspecciones y trabajos de reparación en manos
del fabricante WEINMANN Emergency o en manos de personal experto expresamente autorizado por éste.
• Si se utilizan artículos de otros fabricantes, pueden darse fallos de funcionamiento e incompatibilidades biológicas. Tenga en cuenta que en
estos casos perderá cualquier derecho de garantía o de indemnización si no utiliza los accesorios
recomendados en las instrucciones de uso ni las
piezas de repuesto originales.
• Las modificaciones constructivas del aparato no
están permitidas y pueden poner en peligro tanto al paciente como al usuario.
82 Indicaciones de seguridad
Oxígeno
El oxígeno altamente comprimido en contacto con
sustancias inflamables (grasa, aceite, alcohol, etc.)
puede producir reacciones explosivas espontáneas:
• Mantenga los aparatos y todos los tornillos
completamente libres de aceite y grasa.
Page 83

ES
• Antes de trabajar con el suministro de oxígeno,
lávese bien las manos.
• Está terminantemente prohibido fumar o prender
fuego cerca de las válvulas que conducen el
oxígeno.
• Durante el montaje y cuando cambie la botella,
apriete sólo con la mano las tuercas de la botella
de oxígeno y del regulador de presión. No use
nunca herramientas. Si se aprieta mucho, pueden dañarse las roscas y las juntas, lo cual provocaría fugas.
• Proteja las botellas de oxígeno para evitar accidentes. Si la botella cayera sobre el regulador de
presión o la válvula, podrían desprenderse y provocar explosiones fuertes.
Importante • Abra siempre la válvula de la botella despacio
para evitar sacudidas de presión en las válvulas.
• No vacíe las botellas de oxígeno del todo, puesto
que podría penetrar aire humedecido y provocar
corrosión.
Respiración artificial / Manejo
• Durante la respiración artificial, debe vigilar continuamente al paciente y el aparato de respiración.
• Cuando conecte la válvula del paciente, tenga
en cuenta el sentido de flujo (> paciente >) del
gas respiratorio. Procure que el brazo de espiración y el brazo de respiración espontánea de la
válvula del paciente no estén cubiertos ni impedidos, p. ej., por la colocación del paciente.
Nota: • El sistema de mangueras no reutilizables
WM 28110 está previsto para ser usado una
única vez.
Indicaciones de seguridad 83
Page 84

ES
Software
• Los riesgos debidos a fallos del software deberían minimizarse mediante un control de calidad
exhaustivo del software del aparato.
Accesorios
• Proteja las piezas de silicona o goma de los rayos
UV y de la luz directa del sol, ya que podrían
volverse frágiles y quebradizas.
84 Indicaciones de seguridad
Page 85

ES
5. Montaje
El montaje de MEDUMAT Easy sólo suele ser necesario en caso de montaje estacionario en embarcaciones de salvamento, helicópteros o aviones.
En caso de que el MEDUMAT Easy se suministre
completo en un sistema de carga o en una mochila
de emergencia, el aparato está listo para el servicio y
no requiere más montaje. Existen instrucciones de
uso independientes para sistemas de carga y mochilas de emergencia.
Tras el montaje debe llevar a cabo un control de funcionamiento (véase “8. Controles de funcionamiento” en la página 117) para garantizar un
funcionamiento seguro.
5.1 Conexión de la botella de oxígeno
Lávese bien las manos antes de trabajar con el suministro de oxígeno. Los compuestos de hidrocarburos
(p. ej., aceites, grasas, alcoholes rectificados, cremas
de manos u otros apósitos adhesivos) pueden producir reacciones explosivas si entran en contacto con
oxígeno altamente comprimido.
No utilice en ningún caso llaves para atornillar u otras
herramientas para apretar o aflojar tuercas.
Desmontaje de la botella vacía
1. Cierre la válvula de la botella de oxígeno.
Encienda MEDUMAT Easy mediante el interruptor de encendido/apagado. De este modo, el oxígeno residual saldrá y el aparato quedará sin
Montaje 85
Page 86
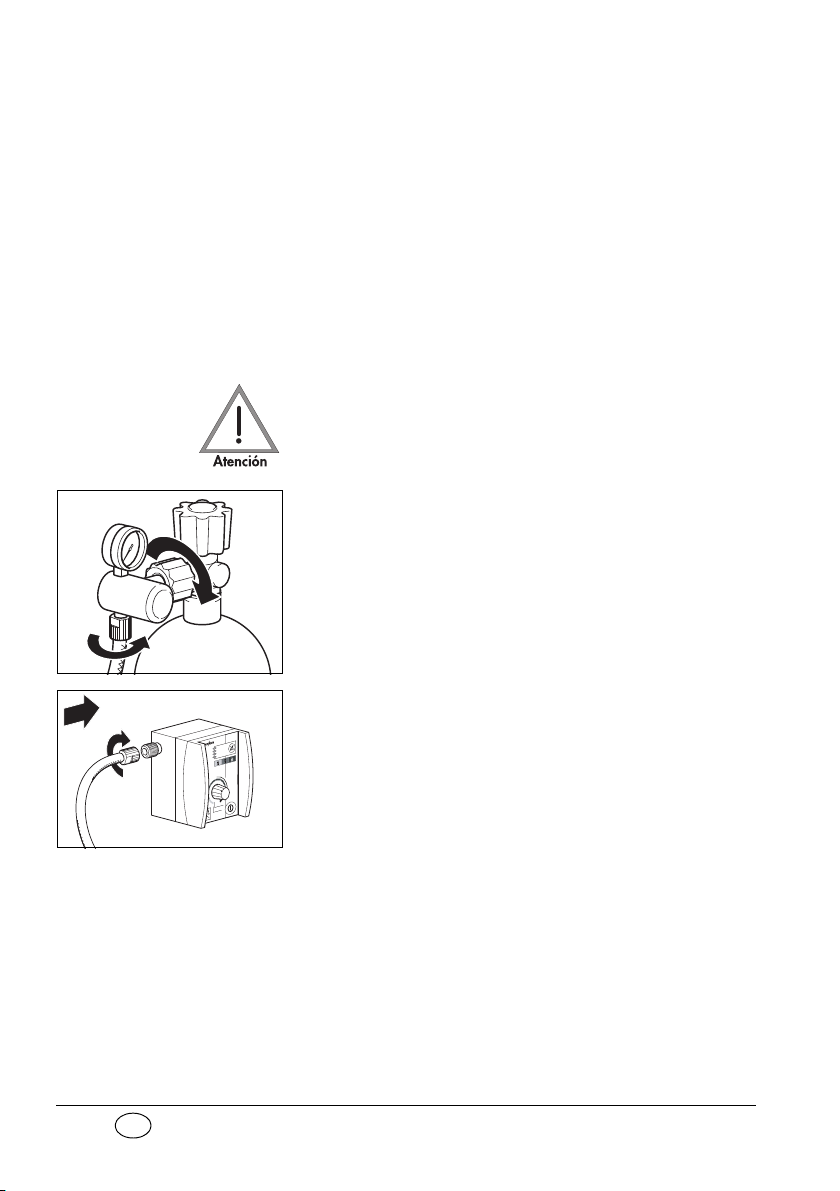
ES
presión. Sólo si el manómetro del regulador de
presión señala 0 bares se puede aflojar el atornillado con la mano.
2. Vuelva a desconectar MEDUMAT Easy.
3. Afloje el atornillado manual de la botella.
Conexión de una botella nueva
1. Abra un poco la válvula de la nueva botella de oxígeno y vuelva a cerrarla. De esta forma, las posibles partículas de suciedad se eliminarán
soplando.
Mantenga la abertura de la válvula alejada del
cuerpo, orientada de forma que las partículas
que puedan salir proyectadas no puedan causar
lesiones a nadie.
2. Atornille el regulador de presión con la tuerca
estriada a la válvula de la botella. Apriete la tuerca.
3. En caso necesario, atornille el tubo de presión
con la tuerca G 3/8 a la salida del regulador de
presión.
86 Montaje
4. En caso necesario, atornille el otro extremo del
tubo de presión a la conexión de gas a presión
de MEDUMAT Easy.
Page 87

ES
5.2 Tubo respiratorio
P
o
s
i
ti
on
>
P
S
U
< 13
4°
1. Inserte el tubo de medición de la presión en la
2. Inserte el tubo respiratorio en la toma. Asegúre-
3. Introduzca el otro extremo del tubo respiratorio y
4. En caso de respiración con máscara, conecte la
toma.
se de no doblar durante el proceso el tubo de
medición de la presión ya conectado. Si fuera
preciso, gire el tubo respiratorio durante la inserción en la medida necesaria.
Sujete el tubo respiratorio y el tubo de medición de la presión exclusivamente por los
extremos. De lo contrario, los tubos pueden sufrir daños o romperse al insertarlos y sacarlos.
el tubo de medición de la presión en la válvula del
paciente.
máscara respiratoria a la válvula del paciente
(como si fuera el tubo),
o bien,
Montaje 87
Page 88

ES
conecte la válvula del paciente al tubo tras la
intubación.
Filtro
Si utiliza un filtro, instálelo entre la conexión del
paciente y el tubo o la máscara.
Siga las instrucciones del fabricante del filtro.
Nota: Tenga en cuenta que la resistencia respiratoria del
sistema completo al usar un filtro HME o un filtro de
bacterias aumenta, según las circunstancias, por encima del valor permitido según EN 794-3.
Válvula PEEP
88 Montaje
Si utiliza una válvula PEEP, conéctela al ala de
espiración de la válvula del paciente.
Siga las instrucciones del fabricante de la válvula
PEEP respecto al ajuste.
Page 89

ES
5.3 Conjunto de montaje para sujeción mural
Para montajes fijos, p. ej., en la pared de un vehículo,
puede adquirir un conjunto de montaje (véase “11.2
Accesorios” en la página 134).
Encontrará los datos sobre dimensiones y el procedimiento de montaje en la hoja que se adjunta con el
conjunto de montaje.
Montaje 89
Page 90

ES
6. Mando
6.1 Conexión/Autochequeo
1. Abra lentamente la válvula de la botella de
oxígeno. El manómetro de contenido señala la
presión de la botella.
2. Dado el caso, calcule el tiempo de funcionamiento restante (véase “6.11 Cálculo de nivel de
llenado/tiempo de funcionamiento” en la
página 108). Debe cambiar la botella a tiempo,
por ejemplo, si tiene menos de 50 bares, para
asegurar que funcione el tiempo suficiente.
3. Ajuste los valores de respiración (véase “6.2
Ajuste de los valores de respiración artificial” en
la página 91).
4. Para MEDUMAT Easy la conexión, pulse el interruptor de encendido/apagado. Se realizará un
autochequeo automático de unos 2 segundos.
Si está activada la función de voz, antes del autochequeo se oirá la frase "¡Abrir la botella de
oxígeno!".
90 Mando
Page 91
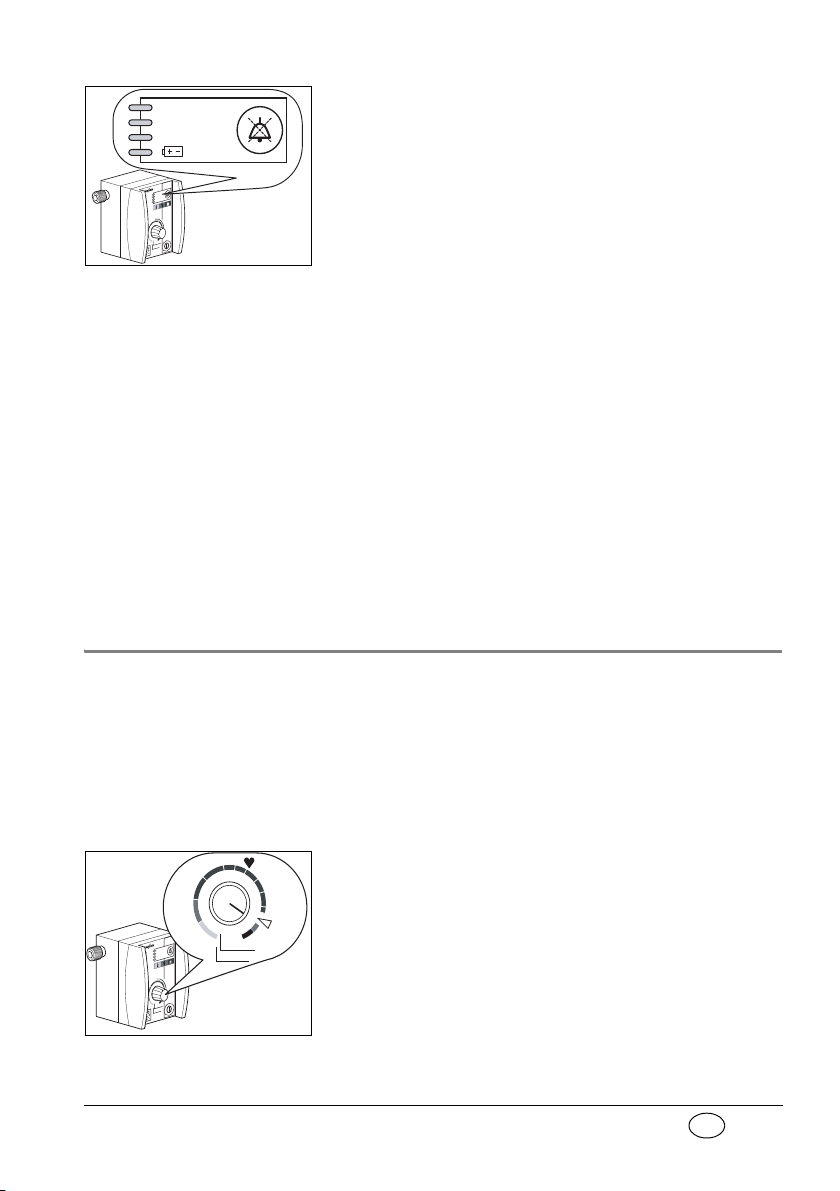
ES
Stenosis
Disconnection
< 2,7 bar O
2
Durante el chequeo los cuatro indicadores LED
del panel de alarma parpadean y suena un tono
de alarma breve.
Si se detecta un error, los indicadores LED parpadean ininterrumpidamente en el panel de alarma
y suena una alarma. MEDUMAT Easy no debe
ser conectado para respiración artificial en tal
caso.
Si está activada la función de voz, se oirá el
mensaje "¡Fallo del equipo. Aplicar ventilación
general!".
Después del autochequeo, el aparato consulta la
presión de la botella de oxígeno de forma cíclica
hasta que detecte una presión suficiente. Si no
detecta una presión suficiente, se oirá el mensaje
de alarma correspondiente.
A continuación puede empezar MEDUMAT Easy
a funcionar con los valores ajustados.
6.2 Ajuste de los valores de respiración artificial
Recomendamos efectuar el ajuste de los valores de
respiración artificial antes del encendido, con el fin
de no consumir oxígeno de forma innecesaria.
Frecuencia respiratoria y volumen
respiratorio por minuto
12
11
9
10
14
12
10
15
13
7
11
14
30
3
Freq.(min
MV (l/min)
16
Demandflow
-1
)
16
5
13
14
1,1
0,6
0,3
1. Ajuste el volumen respiratorio por minuto y la
frecuencia respiratoria correspondiente mediante el botón de ajuste de los valores de respiración
artificial.
Mando 91
Page 92
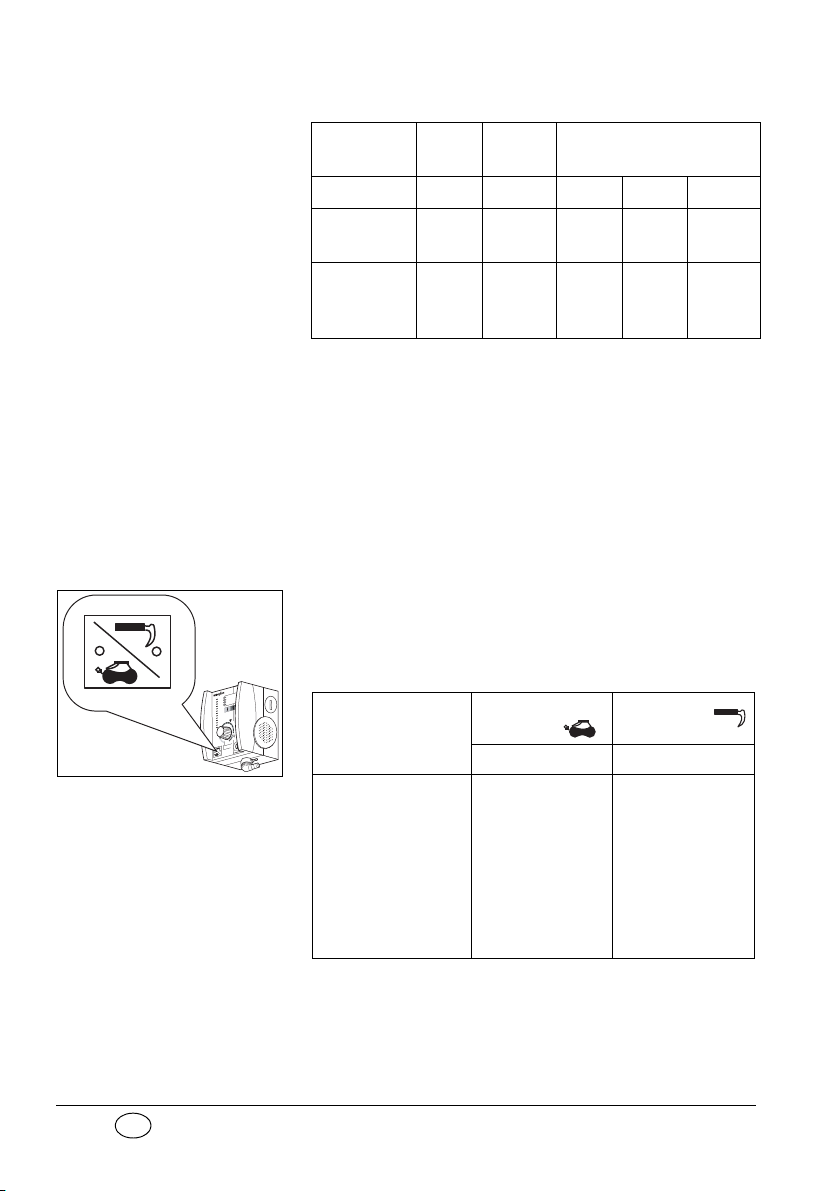
ES
Valores de respiración artificial recomendados:
Amari-
Peso 10 kg 30 kg 60 kg 80 kg 110 kg
Frecuencia
respiratoria
Vol umen de
respiración
por minuto
30 min
3 l/min 5 l/min 7 l/min 9 l/min 11 l/min
Naranja Marrón
llo
-1
16 min-111 min-110 min-110 min
Los valores de la tabla son los que se recomiendan. Los valores podrían variar, por ejemplo, en
caso de lesiones pulmonares o indicaciones
especiales.
Para ver la relación entre estos valores, consulte
el diagrama “12.2 Relación entre los valores de
respiración artificial” en la página 141.
Presión máxima de respiración
1. Ajuste la presión respiratoria con el conmutador
Respiración con máscara/intubación. El indicador LED se enciende cuando el modo está activo.
Presión máxima de respiración recomendada:
Dispositivo
Mensaje de voz
hasta número de
serie 7999
Respiración con
máscara
20 mbar 45 mbar
Función de voz
activada: "Modo
de ventilación por
mascarilla. Hiperextender la
cabeza, ajustar
herméticamente
la mascarilla".
Intubación
Función de voz
activada: "Modo
de ventilación por
tubo. Límite de
presión ventilatoria 45 mbar".
-1
92 Mando
Page 93

ES
Presión máxima de respiración recomendada:
P
o
s
i
ti
on
>
P
S
U
< 13
4°
Dispositivo
A partir del número
de serie 8000 y después de reparación/
mantenimiento/
actualización del
firmware
Respiración con
máscara
Función de voz
activada: "Límite
de presión de
ventilación a
20 mbar".
Si se alcanza la presión máxima para respiración artificial, p. ej., con un rendimiento limitado, se disparará MEDUMAT Easy una alarma de estenosis (véase “
Alarma Stenosis” en la página 99).
Nota: El conmutador Respiración con máscara/Intubación
1 sólo puede encenderse si el aparato está encendi-
do.
6.3 Aplicación de la respiración artificial
Intubación
Función de voz
activada: "Límite
de presión de
ventilación a
45 mbar".
Máscara respiratoria
1. Acople la máscara a la válvula del paciente.
2. Para dejar libres las vías respiratorias, introduzca
un tubo Guedel antes de colocar la máscara.
3. Coloque la máscara respiratoria sobre la boca y
la nariz del paciente.
4. Estire la cabeza del paciente y coloque herméticamente la máscara al mismo tiempo per mezzo
della tecnica E-C
1. Véase también: Resuscitation, Volume 46 (2000), Special
Issue - International Guidelines 2000 for CPR and ECC A Consensus on Science; página 115-125.
1)
.
Mando 93
Page 94

ES
Tubo
9
60
mbar
50
40
30
20
10
0
Normalmente se intuba al paciente antes de conectar el tubo a la válvula del paciente.
1. Conecte la válvula del paciente al conector del
tubo traqueal.
2. Durante la respiración artificial, compruebe los
parámetros respiratorios. De esta forma podrá
cerrar el tubo por el sitio correcto y obtener una
ventilación suficiente.
6.4 Supervisión de la respiración artificial
Durante la respiración artificial debe vigilar constantemente al paciente.
Puede consultar la lectura de la presión de respiración en el manómetro de respiración artificial.
Las resistencias fuertes en las vías respiratorias, p. ej.
por obstrucciones de las vías respiratorias o por masaje externo del corazón, modifican el volumen tidal
ajustado. Utilice instrumentos adecuados para la
medición del volumen, a fin de controlar el volumen
tidal realmente aplicado.
Compruebe los parámetros respiratorios durante la
respiración asistida.
94 Mando
Page 95

ES
Si disminuye el rendimiento de los pulmones, el apa-
Ejemplo de procedimiento de respiración artificial antes y después de la reducción del rendi-
rato reacciona con un aumento de la presión respiratoria si el volumen respiratorio es constante.
6.5 Respiración artificial con la válvula PEEP
Puede adaptar una válvula PEEP en el ala de
espiración de la válvula del paciente.
La válvula facilita la respiración artificial con una
presión espiratoria positiva (PEEP).
Consulte el manual de instrucciones de la válvula
PEEP para saber cómo ajustarla.
6.6 Respiración artificial con filtros
Para la higiene y climatización del aire de respiración
puede colocar en el ala de inspiración de la válvula
del paciente filtros con conexiones normales de 15/
22 mm. De esta forma se aumenta no sólo la resistencia de inspiración sino también la de espiración.
De ahí que deba vigilar la presión y el volumen de
respiración con especial cuidado.
Debe observar el incremento del volumen muerto
sobre todo en niños.
Mando 95
Page 96

ES
6.7 Demandflow
13
14
0,3
0,6
1,1
16
15
13
14
14
12
12
11
10
10
9
11
16
7
5
30
3
MV (l/min)
Freq.(min
-1
)
Demandflow
Nota: En el modo Demandflow no se pueden utilizar válvu-
Consulte asimismo el manual de instrucciones del
fabricante.
las PEEP.
Para la inhalación de O
debe activar Demandflow.
2
Mueva el botón de ajuste de los valores de respiración artificial más allá del punto de enclavamiento
junto al triángulo blanco MEDUMAT Easy para cambiar al modo Demandflow. El indicador LED verde
muestra que el aparato está listo para el funcionamiento. Si está activada la función de voz, el aparato
emitirá a la vez el mensaje "¡Modo Demandflow!".
Encaje la máscara en la válvula del paciente y colóquela sobre la boca y la nariz del paciente. Compruebe
que la máscara esté hermética. Durante la inspiración
(desencadenamiento) del paciente, se activará el flujo.
En la espiración inicial, el flujo se detiene y el aire espirado sale por la válvula del paciente. El paciente
debe respirar de forma homogénea y tranquila. Demandflow no puede modificarse. En caso de impulsos
respiratorios superiores, el oxígeno se mezcla automáticamente con aire fresco. Esta mezcla tiene lugar en
el brazo de respiración espontánea de la válvula del
paciente.
96 Mando
Para finalizar el modo Demandflow, vuelva a mover
el enclavamiento junto al triángulo blanco al modo
de respiración artificial o apague el aparato.
Si está activada la función de voz, el aparato confirmará el regreso al modo de respiración artificial con
el mensaje: "Modo de ventilación por mascarilla, hi-
Page 97

ES
perextender la cabeza, ajustar herméticamente la
Stenosis
Disconnection
< 2,7 bar O
2
mascarilla" (a partir del número de serie 8000 y después de reparación/mantenimiento/actualización del
firmware: "Límite de presión de ventilación a
20 mbar").
6.8 Finalización de la respiración artificial o de Demandflow
¡Importante!
No vacíe nunca la botella
de oxígeno. Deje la botella
siempre con una presión residual de relleno con el fin
de que no penetre aire, ya
que podría producir corrosión.
1. Compruebe la reserva de oxígeno en el manó-
2. Cierre la válvula de la botella de oxígeno.
3. Desconecte MEDUMAT Easy. Como protección
6.9 Avisos de alarma
El panel de alarma muestra las alarmas siguientes:
Stenosis: Estenosis o alcance de la presión máxi-
metro del regulador de presión. En caso de que
el manómetro marque 50 bares o menos, cambie la botella con antelación para garantizar un
tiempo de funcionamiento suficiente.
contra desconexiones inesperadas, debe mantener
pulsado el interruptor de encendido/apagado al
menos 2 segundos, hasta que se iluminen los indicadores LED en el panel de alarma. Si está activada
la función de voz, se oirá el mensaje "¡Cerrar la botella de oxígeno!".
ma de respiración artificial P
máx
en dos
fases de inspiración sucesivas.
Mando 97
Page 98

ES
Disconnection:Desconexiones entre
+–
MEDUMAT Easy y el paciente en dos
fases de inspiración sucesivas.
< 2,7 bar: Descenso de la presión del suministro
de oxígeno por debajo de 2,7 bares.
: No se ha alcanzado el voltaje de bate-
ría necesario.
Además de todas las alarmas ópticas, se disparará
una alarma acústica.
Si durante el autochequeo posterior al encendido o
durante el funcionamiento se detecta un fallo de
funcionamiento, todos los indicadores LED parpadearán en el panel de alarma de forma ininterrumpida y sonará un tono de alarma. Si está activada la
función de voz, se oirá el mensaje “¡Fallo del aparato. Hacer respiración general!” (a partir del número
de serie 8000 y después de reparación/mantenimiento/actualización del firmware: "¡Fallo del equipo. Aplicar ventilación general!").
MEDUMAT Easy no debe utilizarse en este caso. La
alarma de avería puede confirmarse con el interruptor de encendido/apagado.
La válvula del paciente está construida de tal modo
que, en caso de fallo, siempre es posible una respiración espontánea.
98 Mando
Accionamiento de la alarma
Tan pronto se produce el fallo mencionado anteriormente, se dispara una alarma. El indicador LED correspondiente parpadea y suena una señal de
alarma. Si está activada la función de voz, el usuario
recibirá además información adicional sobre cada
alarma.
Page 99

ES
Si hay una desconexión simultánea y se reduce la
presión del suministro de oxígeno, se disparará sólo
la alarma
< 2.7 bar.
Alarma Stenosis
La presión respiratoria real sobrepasa el valor máximo (20 ó 45 mbares).
MEDUMAT Easy cambia momentáneamente a espiración si se supera la presión respiratoria máxima,
pero a continuación intenta continuar la inspiración
todavía en la misma fase de inspiración.
Si se supera por segunda vez la presión respiratoria
máxima, durante la misma fase de inspiración, el
aparato cambia definitivamente a espiración y desairea completamente el sistema de tubos del paciente.
La siguiente inspiración se inicia con el siguiente impulso de respiración artificial conforme a la frecuencia ajustada. La frecuencia establecida no se ve
influenciada.
La alarma se dispara si se sobrepasa la resistencia respiratoria en
pues, deben evitarse alarmas por fallos, p. ej., por
tos.
Si está activada la función de voz, se oirá el mensaje
"Comprobar las vías respiratorias y el volumen litro
minuto" (a partir del número de serie 8000 y después de reparación/mantenimiento/actualización del
firmware: "Comprobar las vías respiratorias y los parámetros").
dos fases de inspiración sucesivas. Así
Alarma Disconnection
Esta alarma suele deberse a una interrupción del sistema respiratorio.
Mando 99
Page 100

ES
La alarma se disparará cuando no se alcance un au-
+–
mento de presión de al menos 8 mbares en
de inspiración sucesivas.
Si está activada la función de voz, se oirá el mensaje
"Comprobar el sistema de ventilación artificial y los
parametros" (a partir del número de serie 8000 y
después de reparación/mantenimiento/actualización
del firmware: "¡Comprobar sistema de ventilación y
los parámetros!").
dos fases
Alarma Disconnection en el modo
Demandflow
Si el paciente no pone en marcha MEDUMAT Easy
antes de 15 segundos, se disparará la alarma "Disconnection". Si está activada la función de voz, se
oirá el mensaje "¡Descartar paro respiratorio o comprobar el ajuste hermético de la mascarilla!".
100 Mando
Alarma < 2,7 bar O
La presión del oxígeno en la toma de presión de
MEDUMAT Easy ha descendido por debajo de los 2,7
bares. Normalmente, esto se debe a un vaciado rápido
de la botella de oxígeno.
En este caso MEDUMAT Easy no puede funcionar
correctamente, ya que los valores de funcionamiento no están dentro de la tolerancia permitida.
Si está activada la función de voz, se oirá el mensaje:
"¡Comprobar el sistema de tubos y el suministro de
oxígeno!".
2
Alarma
La capacidad de la batería se agota y la función automática de respiración artificial fallará. Conecte de
inmediato la respiración artificial alternativa (véase
 Loading...