

Page 1
®
Model No. WECR43062
Serial No.
Write the serial number in the space
above for future reference.
Serial Number Decal
QUESTIONS?
As a manufacturer, we are committed to providing complete
customer satisfaction. If you
have questions, or if there are
missing or damaged parts, we
will guarantee complete satisfaction through our Customer
Service Department.
Please CALL:
0345-089009
Or WRITE:
ICON Fitness Lifestyle Ltd.
Greenwich House
223 North Street
Sheepscar
Leeds LS7 2AA
West Yorkshire
CAUTION
Read all precautions and instructions in this manual before
using this equipment. Save this
manual for future reference.
USER'S MANUAL
Page 2

®
WEIDER is a registered trademark of ICON Health & Fitness, Inc.
2
Page 3

TABLE OF CONTENTS
IMPORTANT PRECAUTIONS . . . . . . . . . . . . . . . . . . . . . . . . . . . . . . . . . . . . . . . . . . . . . . . . . . . . . . . . . . . . . . . .3
BEFORE YOU BEGIN . . . . . . . . . . . . . . . . . . . . . . . . . . . . . . . . . . . . . . . . . . . . . . . . . . . . . . . . . . . . . . . . . . . . . .4
ASSEMBLY . . . . . . . . . . . . . . . . . . . . . . . . . . . . . . . . . . . . . . . . . . . . . . . . . . . . . . . . . . . . . . . . . . . . . . . . . . . . . . .5
OW TO USE THE SHAPE GLIDER . . . . . . . . . . . . . . . . . . . . . . . . . . . . . . . . . . . . . . . . . . . . . . . . . . . . . . . . . . .6
H
CONDITIONING GUIDELINES . . . . . . . . . . . . . . . . . . . . . . . . . . . . . . . . . . . . . . . . . . . . . . . . . . . . . . . . . . . . . . . .7
MAINTENANCE AND STORAGE . . . . . . . . . . . . . . . . . . . . . . . . . . . . . . . . . . . . . . . . . . . . . . . . . . . . . . . . . . . . . .9
PART LIST . . . . . . . . . . . . . . . . . . . . . . . . . . . . . . . . . . . . . . . . . . . . . . . . . . . . . . . . . . . . . . . . . . . . . . . . . . . . . .10
EXPLODED DRAWING . . . . . . . . . . . . . . . . . . . . . . . . . . . . . . . . . . . . . . . . . . . . . . . . . . . . . . . . . . . . . . . . . . . . .11
HOW TO ORDER REPLACEMENT PARTS . . . . . . . . . . . . . . . . . . . . . . . . . . . . . . . . . . . . . . . . . . . . .Back Cover
IMPORTANT PRECAUTIONS
WARNING: To reduce the risk of serious injury, read the following important precautions before
using the SHAPE GLIDER.
1. Read all instructions in this manual before
using the SHAPE GLIDER.
2. It is the responsibility of the owner to ensure
that all users of the SHAPE GLIDER are adequately informed of all precautions.
3. The SHAPE GLIDER should not be used by
persons weighing more than 250 pounds
(115 kg).
4. Keep children under the age of 12 and pets
away from the SHAPE GLIDER at all times.
5. Place the SHAPE GLIDER on a level surface
during use. Cover the floor beneath the
SHAPE GLIDER to protect it.
6. Regularly inspect and tighten all parts of the
SHAPE GLIDER.
7. When inserting the handlebar post into the
pedal frame or the wheel tube (refer to the
drawing on page 4), make sure that the
spring clip snaps into the hole in the pedal
frame or the wheel tube.
8. When exercising, do not wear loose clothing
that could become caught on the SHAPE
GLIDER. Always wear athletic shoes.
9. Use the SHAPE GLIDER only as described in
this manual.
10. The decal shown below has been placed on
the SHAPE GLIDER. If the decal is missing,
or if it is not legible, please call our
Customer Service Department, toll-free, to
order a free replacement decal (see ORDERING REPLACEMENT PARTS on the back
cover of this manual). Apply the decal in the
location shown.
WARNING: Before beginning this or any exercise program, consult your physician. This is especially important for persons over the age of 35 or persons with pre-existing health problems. Read all
instructions before using. ICON assumes no responsibility for personal injury or property damage
sustained by or through the use of this product.
3
Page 4
BEFORE YOU BEGIN
Thank you for selecting the new SHAPE GLIDER from
EIDER. The SHAPE GLIDER offers a unique form
W
of low-impact exercise that uses both the upper body
and the lower body for greater cardiovascular benefits
and increased toning.
For your benefit, please read this manual carefully
before using the SHAPE GLIDER. If you have addi-
tional questions, please call our Customer Service
Department at 0345-089009. To help us assist you,
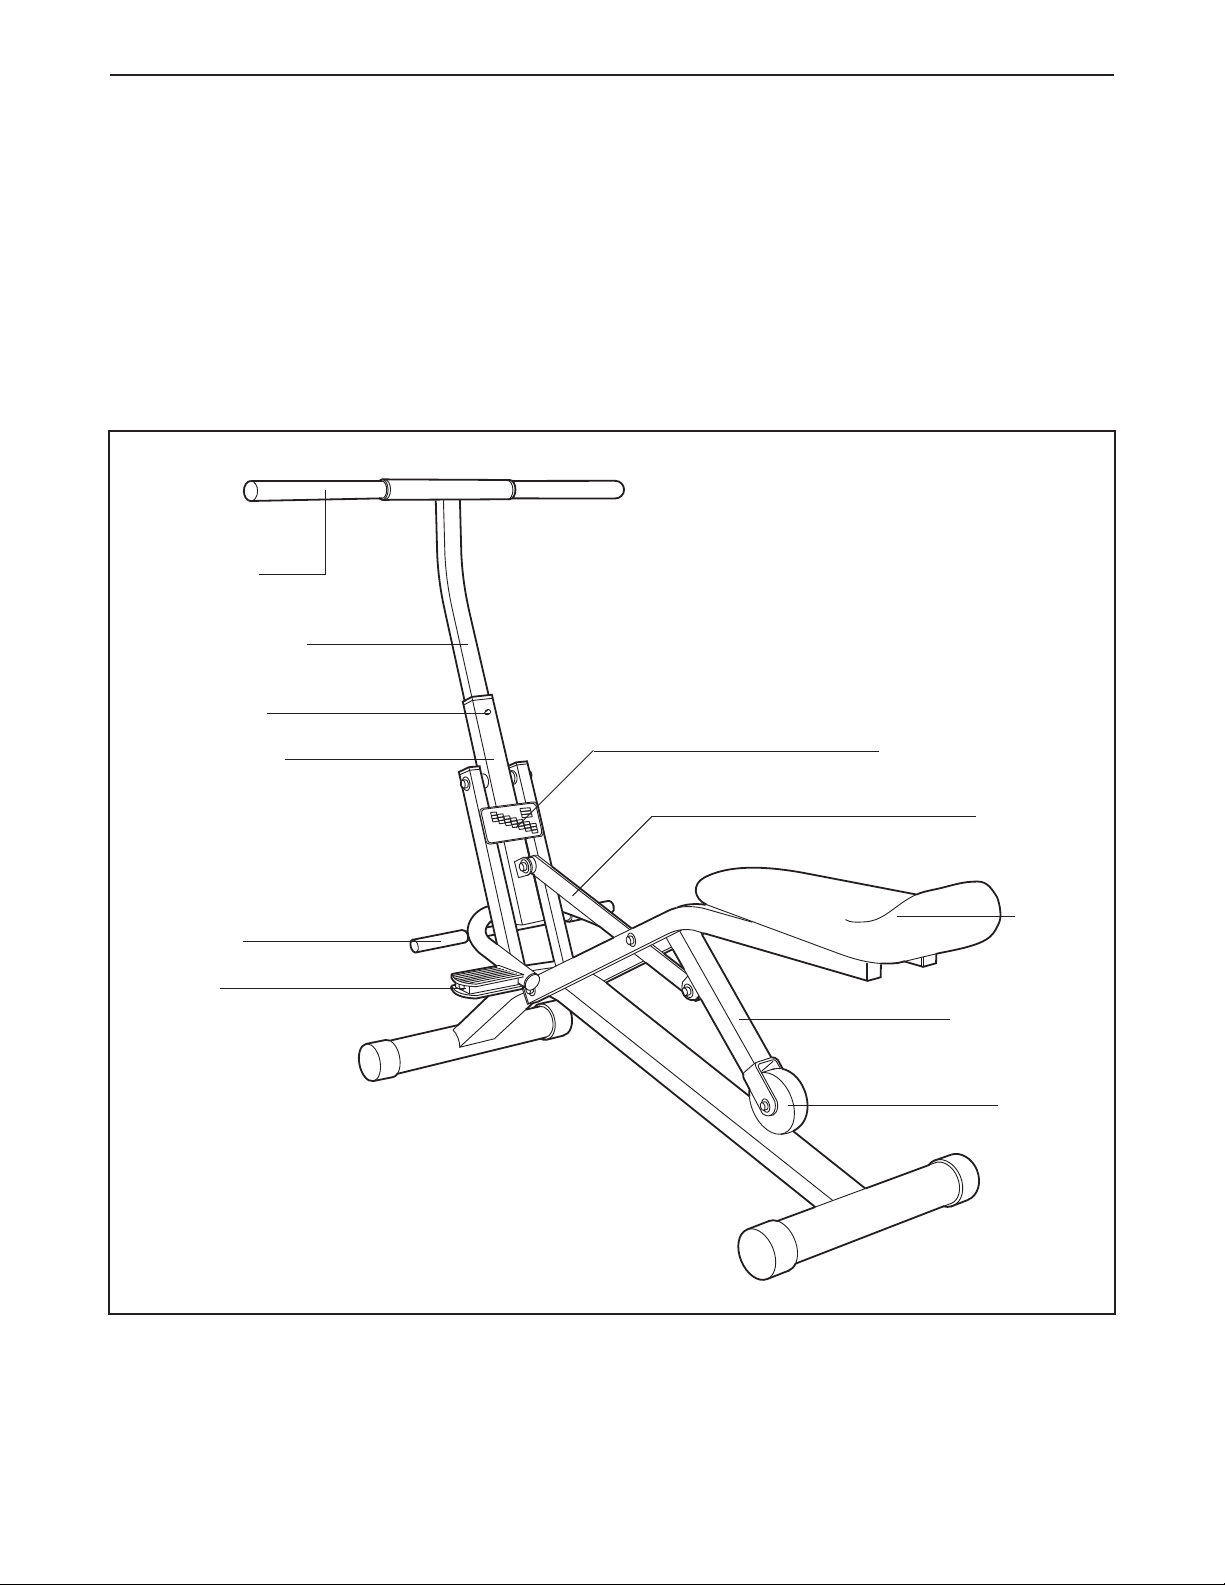
Handlebar
Handlebar Post
Spring Clip
please note the product model number and serial
umber before calling. The model number is
n
WECR43062. The serial number can be found on a
decal attached to the SHAPE GLIDER (see the front
cover of this manual for the location).
Before reading further, please take a moment to familiarise yourself with the parts that are labelled in the
drawing below.
Pedal Frame
Footrest
Pedal
Training Zone Chart
Link Arm
Seat
Wheel Tube
Wheel
4
Page 5

ASSEMBLY
For your convenience, the SHAPE GLIDER is shipped in the storage position. To set up the SHAPE GLIDER for
use, place it in a cleared area and remove all packing materials. Do not dispose of the packing materials until
the SHAPE GLIDER is fully set up. Setting up the SHAPE GLIDER may require a hammer (not included).
. Remove the Lock Pin (16) from the tube under
1
the Base (11).
1
11
16
2. Raise the Upright Frame (8) and hold it in the
position shown. Insert the Lock Pin (16) through
the Upright Frame and the tube under the Base
(11). Note: It may be helpful to lubricate the
holes and use a hammer to tap in the Lock
Pin.
3. Raise the Seat (3) and hook the Link Arm (10) onto
the Butterfly Bushing (25) on the Pedal Frame (6).
Push down on the Link Arm to make sure it is
fully seated on the Butterfly Bushing.
2
8
16
3
3
10
11
Push
Down
25
6
4. Press the Spring Clip (32) in the Handlebar Post
(5). Insert the Handlebar Post into the Pedal
Frame (6). Make sure that the Spring Clip
snaps into the indicated hole in the Pedal
Frame.
To fold the SHAPE GLIDER for storage, refer to
MAINTENANCE AND STORAGE on page 9.
4
5
32
Hole
6
5
Page 6
HOW TO USE THE SHAPE GLIDER
he SHAPE GLIDER features three different modes:
T
the full body mode, the upper body mode, and the
lower body mode.
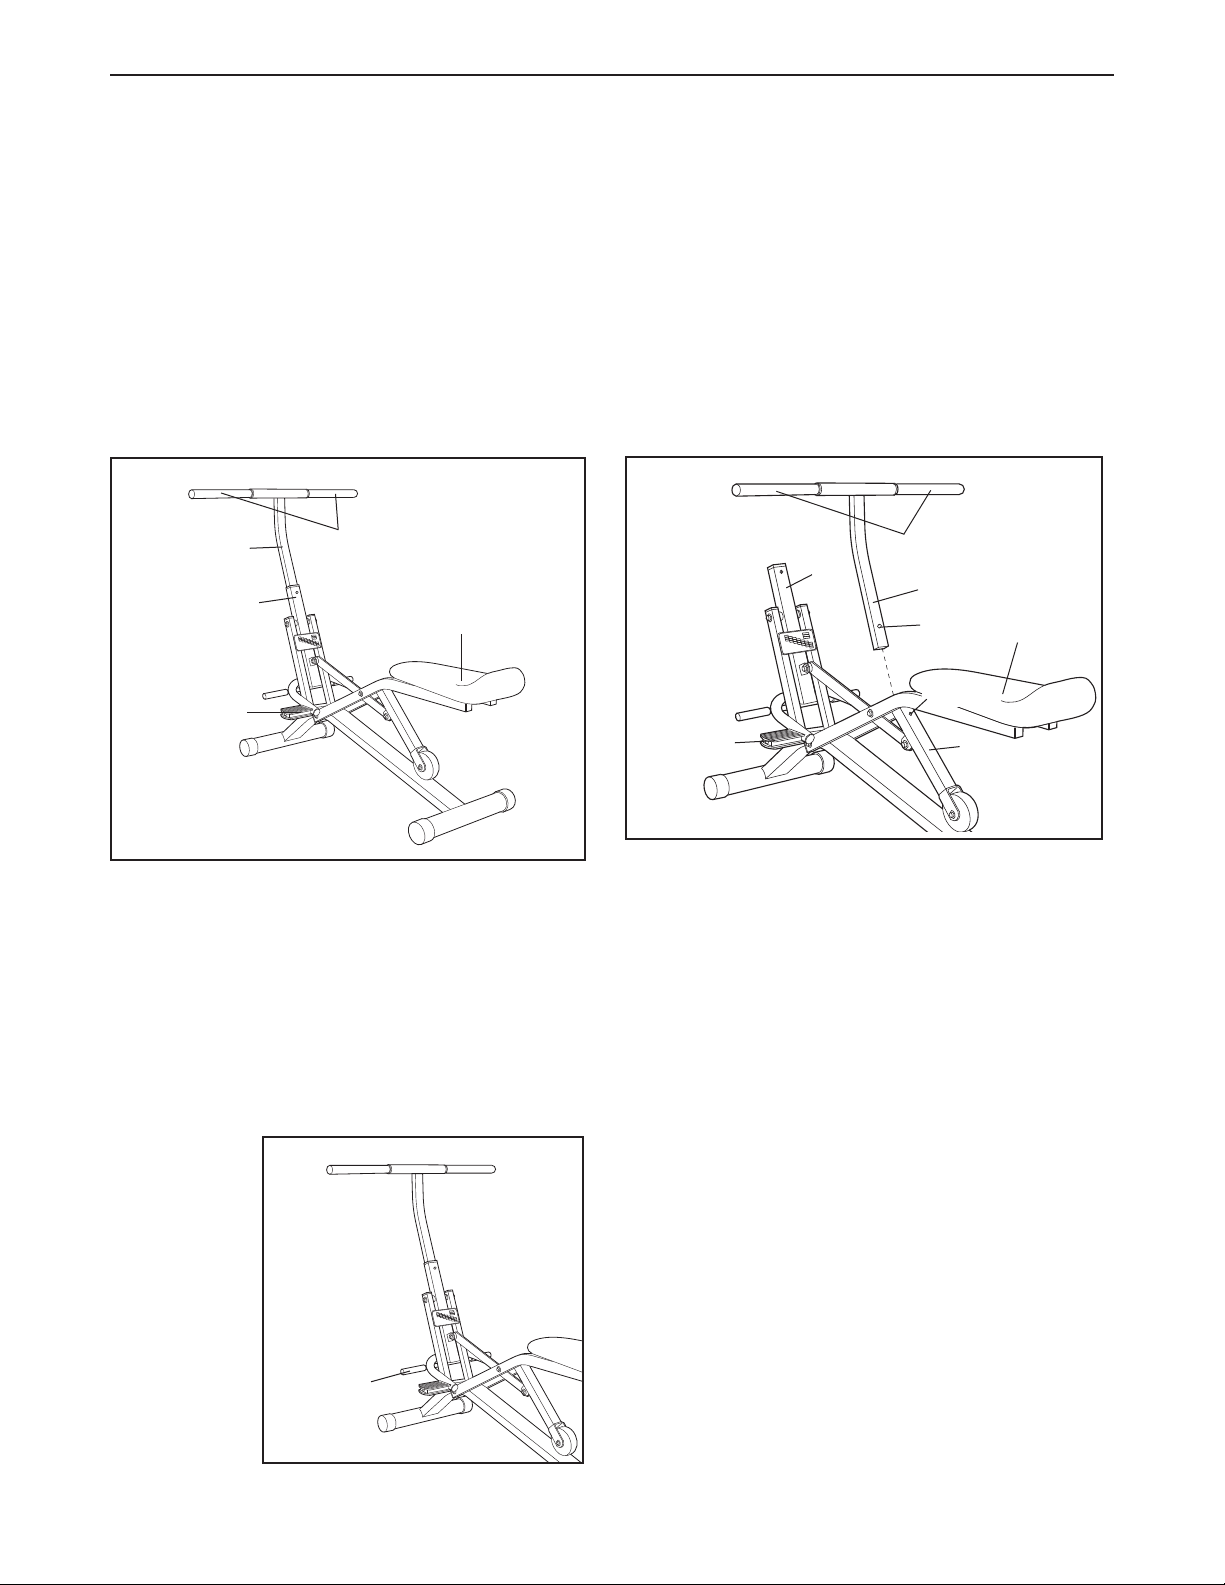
HOW TO USE THE FULL BODY MODE
Make sure that the Handlebar Post (5) is in the Pedal
Frame (6). Sit on the Seat (3), place your feet on the
Pedals (22), and hold the Foam Grips (1). To give variety to your exercise, place your hands close together
or far apart, or use an overhand or underhand grip.
OW TO USE THE LOWER BODY MODE
H
To exercise the muscles of your lower body, the position of the handlebar should be changed. First, press
the Spring Clip (32) and slide the Handlebar Post (5)
out of the Pedal Frame (6). Press the Spring Clip
again and insert the Handlebar Post into the Wheel
Tube (9). Make sure that the Spring Clip snaps into
the indicated hole in the Wheel Tube. Sit on the
Seat (3), place your feet on the Pedals (22), and hold
the Foam Grips (1).
5
6
22
To begin exercising, pull the handlebar towards your
waist whilst pushing the pedals away with your legs.
Return to the starting position. This completes one
repetition. Repeat, moving with a smooth, continuous
motion. Be sure to move through the full range of
motion, maintain a steady pace, and keep your back
straight.
HOW TO USE THE UPPER BODY MODE
1
3
1
6
22
To exercise, push the pedals away with your legs.
Return to the starting position. Repeat, moving with a
smooth, continuous motion. Be sure to concentrate on
using the muscles of your lower body.
5
32
Hole
3
9
To focus on
the muscles
of your
upper body,
exercise as
described
above, but
place your
feet on the
footrests
instead of
the pedals.
Footrest
6
Page 7

CONDITIONING GUIDELINES
The following guidelines will help you to plan your
exercise program. Remember that proper nutrition and
adequate rest are essential for successful results.
WARNING: Before beginning this or any exercise program, consult your physician. This is
especially important for persons over the age
of 35 or persons with pre-existing health
problems.
EXERCISE INTENSITY
Whether your goal is to burn fat or to strengthen your
cardiovascular system, the key to achieving the
desired results is to exercise with the proper intensity.
The proper intensity level can be found by using your
heart rate as a guide. The chart below shows recommended heart rates for fat burning, maximum fat burning, and cardiovascular (aerobic) exercise.
To find the proper heart rate for you, first find your age
near the bottom of the chart (ages are rounded off to
the nearest ten years). Next, look above your age and
find the three numbers in light grey boxes. The three
numbers are your “training zone.” The lowest number
is the recommended heart rate for fat burning; the
middle number is the recommended heart rate for
maximum fat burning; the highest number is the recommended heart rate for aerobic exercise.
your body begin to use stored fat calories for energy. If
your goal is to burn fat, adjust your pace until your
heart rate is near the lowest number in your training
one as you exercise.
z
Maximum Fat Burning
For increased fat burning, adjust your pace until your
heart rate is near the middle number in your training
zone as you exercise.
Aerobic Exercise
If your goal is to strengthen your cardiovascular system, your exercise must be “aerobic.” Aerobic exercise
is activity that requires large amounts of oxygen for
prolonged periods of time. This increases the demand
on the heart to pump blood to the muscles, and on the
lungs to oxygenate the blood. For aerobic exercise,
adjust your pace until your heart rate is near the highest number in your training zone.
HOW TO MEASURE YOUR HEART RATE
To measure
your heart rate,
first exercise
for at least four
minutes. Then,
stop exercising
and place two
fingers on your
wrist as
shown. Take a
six-second
heartbeat count, and multiply the result by 10 to find
your heart rate. For example, if your six-second heartbeat count is 14, your heart rate is 140 beats per
minute. (A six-second count is used because your
heart rate will drop rapidly when you stop exercising.)
Adjust your pace until your heart rate is at the desired
level.
WORKOUT GUIDELINES
Each workout should include the following three parts:
Fat Burning
To burn fat effectively, you must exercise at a relatively low intensity level for a sustained period of time.
During the first few minutes of exercise, your body
uses easily accessible carbohydrate calories for energy. Only after the first few minutes of exercise does
A warm-up, lasting 5 to 10 minutes. Begin with slow,
controlled stretches, and progress to more rhythmic
stretches to increase the body temperature, heart rate,
and circulation in preparation for strenuous exercise.
(Refer to SUGGESTED STRETCHES on page 8.)
7
Page 8

Training zone exercise, consisting of 20 to 30 min-
utes of exercising with your heart rate in your training
zone. (See the chart on page 7 to find your training
one.)
z
cool-down, with 5 to 10 minutes of stretching.
A
Thorough stretching offsets muscle contractions and
other problems caused when you stop exercising suddenly. Stretching for increased flexibility is also most
effective after exercising. A proper cool-down should
SUGGESTED STRETCHES
leave you relaxed and comfortably tired.
EXERCISE FREQUENCY
To maintain or improve your condition, plan three
orkouts each week, with at least one day of rest
w
between workouts. After a few months of regular exercise, you may complete up to five workouts each
week, if desired. The key to success is make exercise
a regular and enjoyable part of your everyday life.
The correct form for several basic stretches is shown at the
right. Move slowly as you stretch—never bounce.
1. Toe Touch Stretch
Stand with your knees bent slightly and slowly bend forward
from your hips. Allow your back and shoulders to relax as you
reach down toward your toes as far as possible. Hold for 15
counts, then relax. Repeat 3 times. Stretches: Hamstrings,
back of knees and back.
2. Hamstring Stretch
Sit with one leg extended. Bring the sole of the opposite foot
toward you and rest it against the inner thigh of your extended
leg. Reach toward your toes as far as possible. Hold for 15
counts, then relax. Repeat 3 times for both legs. Stretches:
Hamstrings, lower back and groin.
3. Calf/Achilles Stretch
With one leg in front of the other, reach forward and place
your hands against a wall. Keep your back leg straight and
your back foot flat on the floor. Bend your front leg, lean forward and move your hips toward the wall. Hold for 15 counts,
then relax. Repeat 3 times for both legs. To cause further
stretching of the achilles tendons, bend your back leg as well.
Stretches: Calves, achilles tendons and ankles.
1
2
3
4
4. Quadriceps Stretch
With one hand against a wall for balance, reach back and
grasp one foot with your other hand. Bring your heel as close
to your buttocks as possible. Hold for 15 counts, then relax.
Repeat 3 times for both legs. Stretches: Quadriceps and hip
muscles.
5. Inner Thigh Stretch
Sit with the soles of your feet together and your knees outward. Pull your feet toward your groin area as far as possible.
Hold for 15 counts, then relax. Repeat 3 times. Stretches:
Quadriceps and hip muscles.
8
5
Page 9

MAINTENANCE AND STORAGE
Inspect and tighten all parts of the SHAPE GLIDER regularly.
he SHAPE GLIDER should be oiled every six months.
T
Apply a few drops of light multi-purpose oil in the locations shown at the right. Be sure to apply oil to both sides
of the SHAPE GLIDER.
Apply Oil
Apply Oil
The unique SHAPE GLIDER can be folded for easy storage. Follow the steps below to fold the SHAPE GLIDER.
1. If the Handlebar Post (5) is in the Wheel Tube (9), the
Handlebar Post must be moved to the Pedal Frame
(6) before the SHAPE GLIDER can be folded. Press
the Spring Clip (32) and slide the Handlebar Post out
of the Wheel Tube. Press the Spring Clip again and
insert the Handlebar Post into Pedal Frame (6). Make
sure that the Spring Clip snaps into the indicated hole
in the Pedal Frame.
2. Firmly hold the handlebar (not shown) and lift the Link
Arm (10) off the Butterfly Bushing (25) on the Pedal
Frame (6). Lower the Seat (3).
1
Hole
6
2
3
5
32
9
25
10
6
3. Refer to drawing 3a. Firmly hold the handlebar (not
shown) to prevent it from falling. Remove the Lock
Pin (16) From the Upright Frame (8) and the Base
(11).
Refer to drawing 3b. Lower the Handlebar Frame (8).
Insert the Lock Pin (16) into the tube under the Base
(11).
To set up the SHAPE GLIDER for use, refer to ASSEMBLY on page 5.
9
3a
16
3b
8
11
8
11
16
Page 10

PART LIST—Model No. WECR43062 R0498A
Key No. Qty. Description
1
21Handlebar
31Seat
4 2 Handlebar Bushing
51Handlebar Post
61Pedal Frame
71Seat Frame
81Upright Frame
91Wheel Tube
10 1 Link Arm
11 1 Base
12 4 Base Endcap
13 1 Wheel
14 1 Wheel Spacer
15 2 151mm Rod
16 1 Lock Pin
17 1 60mm Rod
18 1 34mm Rod
Note: "#" indicates a non-illustrated part. Specifications are subject to change without notice. See the back cover
of this manual for information about ordering replacement parts.
2 Handlebar Foam Grip
Key No. Qty. Description
9 1 144mm Rod
1
20 1 51mm Rod
21 6 20mm x 40mm x 2mm Endcap
22 2 Pedal
23 2 Footrest Foam
24 2 Pedal Frame Endcap
25 1 Butterfly Bushing
26 2 Seat Screw
27 4 1/2” Pushnut
28 10 1/2” Hat Cap
29 2 3/8” Hat Cap
30 1 Link Arm Bushing
31 6 Pivot Bushing
32 1 Spring Clip
33 1 13mm Washer
34 2 Handlebar Post Bushing
#1User's Manual
10
Page 11

EXPLODED DRAWING—Model No. WECR43062 R0498A
27
27
21
34
34
32
1
2
3
4
5
6
7
8
9
10
11
12
13
14
15
16
1
4
12
12
12
15
17
18
19
20
21
22
23
24
25
26
21
22
24
23
28
28
28
28
28
28
28
28
28
29
29
30
31
31
31
31
31
33
11
Page 12

ORDERING REPLACEMENT PARTS
To order replacement parts, contact the ICON Fitness Lifestyle Ltd. office, or write:
CON Fitness Lifestyle Ltd.
I
Greenwich House
223 North Street
Sheepscar
Leeds LS7 2AA
West Yorkshire
Tel: Country Code: 0345-089009
Fax: 0113-2411120
To help us assist you, please be prepared to give the following information:
• The MODEL NUMBER of the product (WECR43062).
• The NAME of the product (WEIDER
• The SERIAL NUMBER of the product (see the front cover of this manual).
• The KEY NUMBER and DESCRIPTION of the part(s) from page 10 of this manual.
®
SHAPE GLIDER).
Part No.146150 R0498A Printed in China © 1998 ICON Health & Fitness, Inc.
 Loading...