

Page 1

IMP ORTAN_ MANA
!!!!i!!!!!!!i!!!!!ii_!_ii_iiii:i:i
ii!i!i!iiiiiiiiii:i:!:!:i:i
:!:!:!:!i!i!!i!iiiii_iiiiii
iliiiiiiiiii!_!!iii
ii!!iiii_i_!ii!iii
!ii%ii!!!:!:i
..... :.:.......::::::::::::::::::::::::::::::::::::::::::::::
Do Not Throw
TRADEMARK®
!!i!ii!ii!!!i!i!i!i!i
i_ WARNING: Read the Operator's
Manual and follow all Warnings and
Safety Instructions. Failure to do so
can result in serious injury.
\
OPERATOR'S MANUAL
MODEL:
CORDLESS TRIMMER!GROOMER
Always Wear Eye Protection During Operation 53o-4oo235-1-22989
Page 2
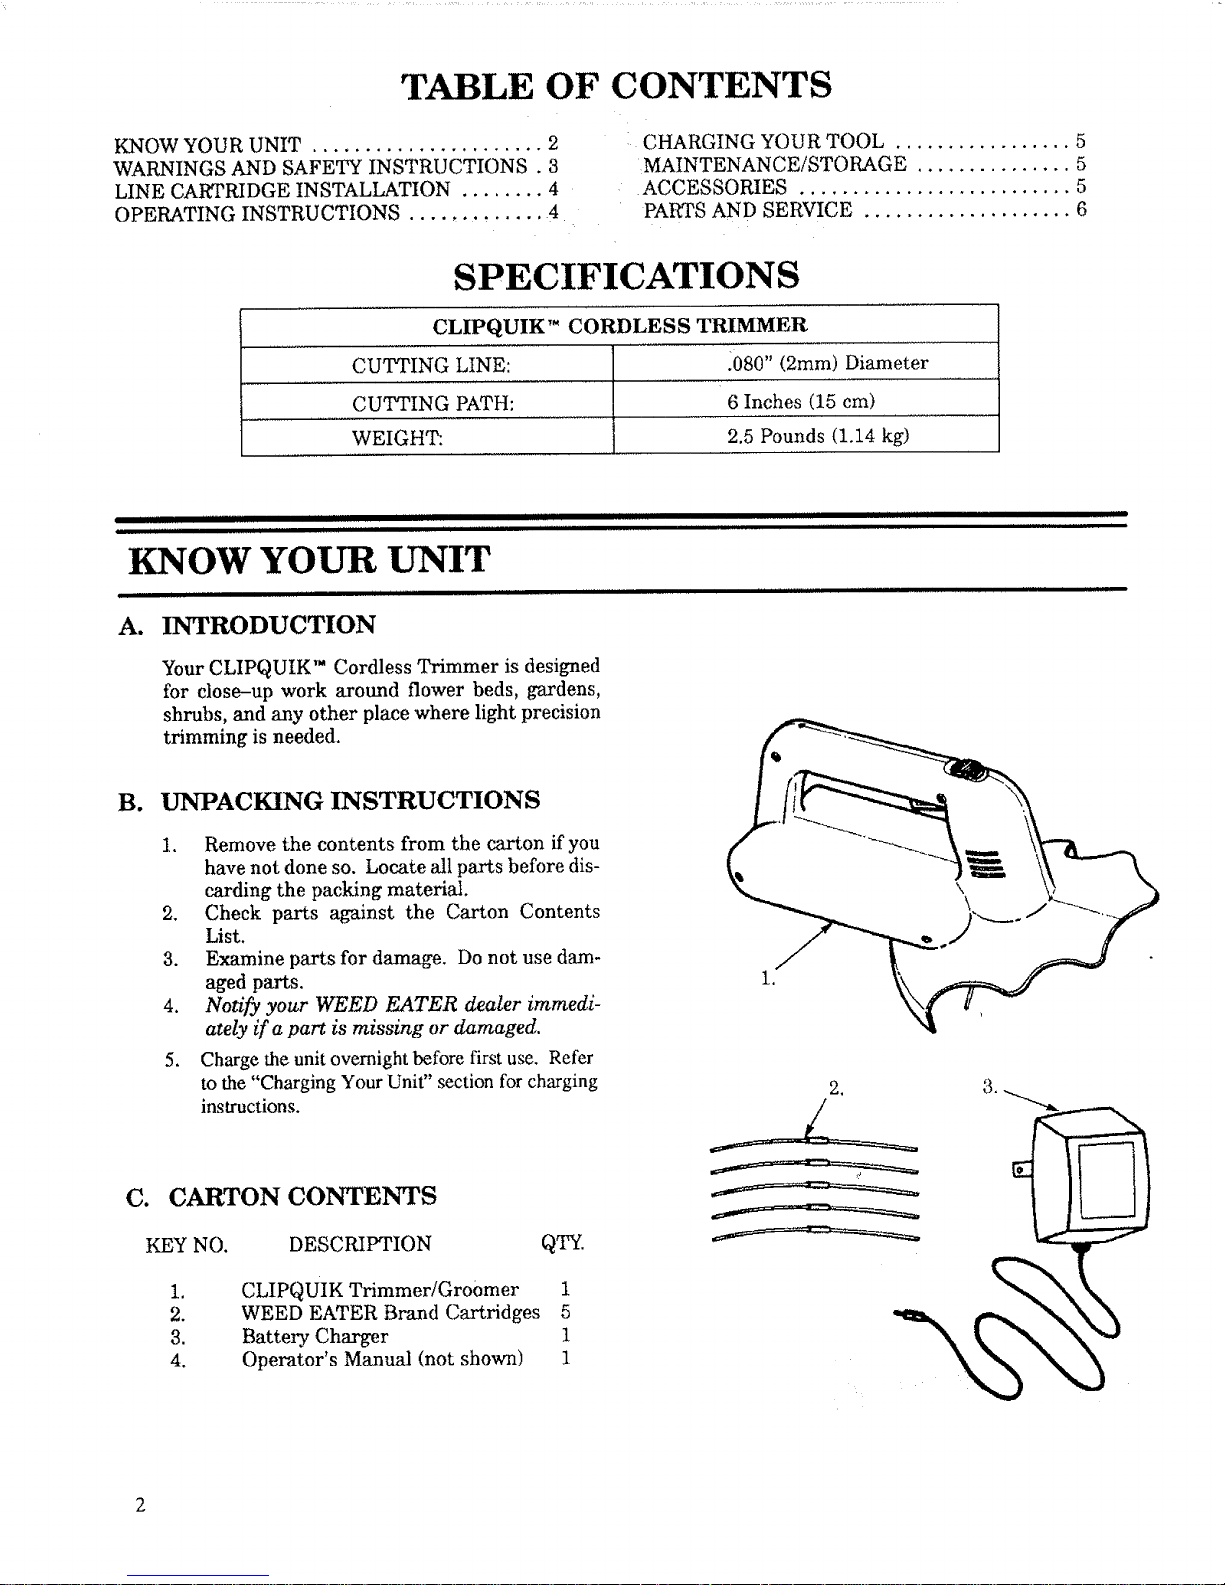
TABLE OF CONTENTS
KNOW YOUR UNIT ...................... 2
WARNINGS AND SAFETY INSTRUCTIONS . 3
LINE CARTRIDGE INSTALLATION ........ 4
OPERATING INSTRUCTIONS ............... 4
CHARGING YOUR TOOL ................. 5
MAINTENANCE/STORAGE ............... 5
ACCESSORIES .......................... 5
PARTS AND SERVICE .................... 6
SPECIFICATIONS
CLIPQUIK '_ CORDLESS TRIMMER
CUTTING LINE: .080" (2mm) Diameter
CUTTING PATH: 6 Inches (15 cm)
WEIGHT: 2.5 Pounds (1.14 kg)
..... n I,,n,H,n I nl nil I n nHnl
I I U,n I t
KNOW YOUR UNIT
i mn ,ll,lll nl : ..........
A. INTRODUCTION
I iiii II II I IIIIIIII ijlll IIII I I iii1[i
Your CLIPQUIK" Cordless Trimmer is designed
for close-up work around flower beds, gardens,
shrubs, and any other place where light precision
trimming is needed.
B. UNPACKING INSTRUCTIONS
1. Remove the contents from the carton if you
have not done so. Locate all parts before dis-
carding the packing material.
2. Check parts against the Carton Contents
List.
3. Examine parts for damage. Do not use dam-
aged parts.
4. Notify your WEED EATER dealer immedi-
ately if a part is missing or damaged.
5. Charge the unit overnight before first use. Refer
to the "Charging Your Unit" section for charging
instructions.
C. CARTON CONTENTS
KEY NO. DESCRIPTION QTY.
,
2.
3.
4.
CLIPQUIK Trimmer/Groomer 1
WEED EATER Brand Cartridges 5
Battery Charger 1
Operator's Manual (not shown) 1
\
Page 3

! i ......................... ,,,,,,,H,,,I II IllllllllllII I _ll ..
...................... H,'lu' ll,I
A WARNINGS AND SAFETY INSTRUCTIONS
m, i
WARNING
When using a cordless trimmer, these basic safety precautions must be followed to reduce the
risk of injur_ fire, and electrical shock. Failure to follow all instructions can result in blind-
ness or other serious injury.
OPERATOR SAFETY
1. Always wear eye protection to prevent loss
of vision.
2. Secure long hair above shoulder length with
a hair net to prevent entanglement with the
cutting line or being drawn into the air vents.
Do not use this unit while wearing loose
clothing or items such as necklaces and
bracelets.
3. Keep others including children, animals, by-
standers, and helpers a safe distance away.
The trimmer line will throw objects. Stop
the motor if you are approached.
4. Inspect the area to be cut before each use.
Remove all objects such as rocks, broken
glass, wire, etc. which could be thrown, be-
come entangled in the trimmer line, or could
cause injury when assuming the operating
position.
5. Inspect the line holder each time the line is
replaced. Do not operate unit if the line
holder is chipped or cracked, or if the tab will
not close over the metal sheath on the line.
6. Restrict your unit to users who understand
and follow all warnings and safety instruc-
tions in this manual.
7. Use onlyWEED EATER Brand replacement
cartridges. Never use homemade substi-
tutes that can fly off of the unit. Never use
other materials such as wire, string, rope,
etc. Wire can break offand become a danger-
ous missile.
8. Never turn the operating end of this unit to-
ward your face except as instructed in the
"Line Cartridge Installation" section. Avoid
accidental starting. Do not carry this unit
with your finger on the trigger. Keep all
parts of your body away from the trimmer
line when your finger is on or near the trig-
ger. Use care in replacing line. Never touch
the trigger while replacing line.
9. Use this unit only for jobs explained in this
manual. This unit was not designed to be
used as an edger.
10. Keep firm footingand balance. Do not over-
reach or use unit above shoulder level.
11. Do not operate the unit while it is attached
to the charger.
A ELECTRICAL SAFETY
12. Use only the charger provided with your
unit. Use of any other charger could perma-
nently damage the battery and the charger.
13.Use the charger with standard household
electrical outlets only. Do not abuse the
charger or charger cord. Do not use the
charger if the charger or charger cord is
damaged.
14. Use the charger indoors only.
15.Store and charge this unit in a dry location
and out of the reach of children.
16. Do not charge the battery or use the unit in
an explosive or corrosive environment.
Avoid areas where flammable liquids or
gasses are present to avoid creating a fire or
explosion.
17. Do not attempt to repair the unit including
the battery. Line replacement and cleaning
the unit are the only items suitable for user
maintenance. Battery replacement must be
performed only by an authorized service
dealer.
18. Do not insert any object into the motor area
including the cooling vents.
19. Do not incinerate or mutilate the battery.
Batteries contain hazardous cheir_icals. Dis-
pose of properly.
20. Use only the proper charger for this unit.
21. Do not charge unit at temperatures lower
than 32 ° F (0 ° C). Charging the unit at low
temperatures can damage the batte_
22. Do not submerge the unit in water or let wa-
ter flow onto the case.
,_, TOOL SAFETY
23. Keep air vents on the motor housing free of
debris to avoid overheating the motor.
24. Clean unit with a damp sponge and house-
hold detergent. Never use metal objects to
clean the unit.
25. Do not force the unit. You will achieve better
results and less risk of injury by not crowd-
ing the line into the cutting area.
Page 4

,i,,i,,,,,,, , , ,,,,,, ,,,
....... ,,,,, ,,,,,,,, ..................................................
LINE CARTRIDGE INSTALLATION
WARNING:
Never touch the trigger or switch lock-out
when installing the trimmer line. Contact
with a spinning trimmer line can result in se-
rious injury.
1. Hold the tool with the Line Holder toward you. Fig-
ure 1.
2. Lift the Tab on the Line Holder. Figure 1.
When performing step 3, make sure trimmer
lines that are curved are installed with the ends of the
trimmer line curved away from the shield. Figure 1
(inset, lower right), if the line contacts the shield
when the unit is running, stop the motor and reinstall
line until it no longer contacts unit while rotating.
3. Place the metal sheath (on the trimmer line) into the
slot in the Line Holder. Figure 1 (inset, lower left).
Be sure the metal sheath is pushed to the bot-
tom of the slot in the Line Holder.
_._. _..-_ Shield
Metal
Sheath
Line Holder
Closed _/_?__._
Line'____._
Curved Away _i
From Shield
4. Push the Tab down to the closed position. Figure 1
(inset, lower right).
Figure 1
II IIIIII IIII II IIIIIIIIIIIIII IIIII IIIIIII II IIIII J
................................. i ......................................
OPERATING INSTRUCTIONS
A WARNING:
Always wear eye protection. Never lean over
the unit or use the unit above shoulder height.
Rocks or debris can ricochet or be thrown into
eyes and face and cause blindness or other se-
rious injury.
• The tip of the line does the cutting. Allow the
line to cut at its own pace. You will achieve better re-
suits by not crowding the line into the cutting area.
The right and wrong ways are shown in Figure 2.
• The nylon line wears faster and will need to be
replaced more frequently when you cut
against rocks, bricks, concrete, metal fences,
etc., than against trees or wooden fences.
• Avoid letting the Line Holder continuously
contact the ground during normal cutting.
Constant contact will cause line holder damage and
premature line wear. The right and wrong ways are
shown in Figure 2.
• Keep air vents on the motor housing free of
debris to avoid overheating the motor. Clean before
each use. See Figure 4 for air vent locations.
WRONG
WAY
RIGHT
WAY
Figure 2
To Operate Your Unit:
1. Assume the operating position shown in Figure 3.
2. Hold the unit with the shield and trimmer line parallel to and
above the ground. Figure 2.
3. Push the Switch Lock-out either forward or backward, then
squeeze the Switch Trigger. Figure 4. Hold the Switch
Trigger while cutting; the motor will stop after the Switch
Trigger is released.
4, Ease the trimmer line into material to be cut.
5. When you finish cutting, release the Switch Trigger. The
Switch Lock-out will automatically return to the locked
position.
Page 5

Operating
Position
Figure 3
CHARGING YOUR UNIT
Switch
Lock-out
Air Vents
Figure 4
IIIIIIII I ii ii I i
WARNING:
Never charge the battery in an explosive or
corrosive environment. Avoid areas where
flammable liquids or gasses are present to
avoid creating a fire or explosion.
• Use the charger with standard household electrical
outlets only.
• Do not charge unit at temperatures lower than 35 °
F (2 o C). Charging the unit at low temperatures can
damage the battery.
• Continuous charging will not damage the unit and is
recommended. It is normal fox"the charger to become
hot during charging.
• Charge the unit overnight before first use.
• Fully charge the unit before and after winter storage.
1. Plug the Charger Connector into the Receptacle on
the back of the unit. Figure 5.
2. Plug the Charger into a standard household electri-
cal receptacle of the proper voltage. See the voltage
specifications on the charger. Figure 5.
IIIIIIIIIIIIII III
,lllmmlll
MAINTENANCE/STORAGE
Standard
Household
S Receptacle
Recep
Charge
Indicator
Light
t
Charger
Connector
Air Vents
Figure 5
3. Charge unit for a minimum of 16 hours to ensure a
full charge.
4. Recharge the battery to a full charge after each use.
Recharging the battery after each use will preserve
battery life. Failure to recharge' battery may de-
crease battery life significantly.
5. The Charge Indicator Light on the handle will glow
when the unit is being charged.
JlJ]] t [ II
ill Jl
A WARNING:
Never touch the trigger or switch lock-out
when cleaning the line holder or shield. Con-
tact with a spinning trimmer line can result in
serious injury.
1. Clean the Line Holder and Shield after every use.
2. Make sure the Receptacle and Air Vents are free of
obstructions. Figure 5.
3. Store unit with the battery fully charged in a cool, dry
place and out of the reach of children.
4. Store unit at temperatures between 0° and 75 ° F
(-18 ° and 24 ° C).
5. Always charge the battery after winter storage.
6. Store the battery charger with the unit.
iiiiiii i ii ] illlllll f ,,,,, ,,
ACCESSORIES
Illllll I IIII I IIII I II
III ii11 II rl I
SAFETY GLASSES
......................................................................... 952-006537
REPLACEMENT WEED LINE Brand Cartridges ................................................ 952-701617
REPLACEMENT BATTERY CHARGER (U.S./Canada) ........................................... 530-400233
REPLACEMENT BATTERY CHARGER (Australia) .............................................. 530-400246
Page 6

...................................... ,,,, H,,,,,,,, ,,, I ,1,1,1 IIIll Illllllllllllll
PART S AND SERVICE
Your PoulanfWeed Eater product has been expertly engineered and carefully manufactured to
rigid quality standards. As with all mechanical products, some adjustments or part replacement may
be necessary during the life of your unit.
IN THE U.S.A.:
FOR SERVICE OR REPLACEMENT PARTS:
1. Consult the yellow pages of your phone directory for the name of the nearest PoulanfWeed Eater
Master Service Dealer (under "saws" for Chain Saws or under "lawnmowers" for Trimmers,
Bm.lshcutters, and Blowers) or Skil Service Center (under "Tools-electric").
2. For replacement parts, have available the following information:
a. Description of the tool.
b. Model Number.
c. Description of part.
NOTE:
PoulanfWeed Eater Division provides parts and service through its authorized distribu-
tors and dealers; therefore, all requests for parts and service should be directed to your
local dealer(s). The philosophy of Poulan/Weed Eater Division is to continually improve
all of its products. If the operating characteristics or the appearance of your product
differs from those described in this Operator's Manual, please contact your local
PoulaniWeed Eater Dealer for updated information and assistance. Always update your
tool when improvements are made available, especially those related to safety. Parts
and repair service are not available direetlyTrom Poulan/Weed Eater Division, White
Consolidated Industries, Inc.
IN U.S.A., CONTACT :
POd/WEED EATER
I)[_ WHITE CONSOL|DATED INDUSTRIES, |NC.
SHREVEPORt, LOUISIANA 71139_9329
IN CANADA, CONTACT :
POUIANfWEED EATER
421 BENTLEY _PRE_P
MARKItAM, ONTARIO L3R 9T2
IN AUSTRALIA, CONTACT :
WEED EATER
635 WAVERLY ROAD
GLENWAVERLY, VIC, 3150
PRINTED IN HONG KONG
@1989 Poulan/Weed Eater Division White Consolidated Industries, Inc.
 Loading...