

Page 1
WAVES
DTS Neural UpMix
USER GUIDE
Page 2

2
Table of Contents
Chapter 1 – Introduction ................................................................. 3
1.1 Welcome ................................................................................................................... 3
1.2 Product Overview ...................................................................................................... 3
1.3 Concepts and Terminology ........................................................................................ 4
1.4 Components .............................................................................................................. 4
1.5 Sample Rate Support ................................................................................................ 4
Chapter 2 – Quick Start Guide ........................................................ 4
Chapter 3 – Interface and Controls ................................................ 6
3.1 Interface .................................................................................................................... 6
3.2 Controls ..................................................................................................................... 8
Waves DTS Neural UpMix
User Guide
Page 3

3
Chapter 1 – Introduction
1.1 Welcome
Thank you for choosing Waves! In order to get the most out of your Waves processor,
please take the time to read through this manual.
In conjunction, we also suggest you become familiar with www.wavesupport.net. There
you will find an extensive answer base, the latest tech specs, detailed installation guides,
new software updates, and info on your Waves product licenses. By signing up at
www.wavesupport.net, you will receive personalized information on your registered
products, reminders when updates are available, and more.
1.2 Product Overview
DTS Neural Surround technology is the industry-leading technology for the postproduction and live mixing communities, providing unparalleled control and consistency
and enabling the creation of Quad 5.1 or 7.1 content from stereo or 5.1 source material.
The Waves DTS Neural UpMix plugin is intended for projects where original source
elements are not available in the desired multichannel mixing format. Combining
precision and creative flexibility, this plugin provides comprehensive creative controls to
adjust for soundfield width and depth, channel layout, output levels and LFE filtering. It
also includes a final limiter.
The DTS Neural UpMix plugin is especially useful for catalog films, TV series,
documentaries, menus, deleted scenes, and featurettes.
Key Use Cases
Live and playback sports broadcasts
Live and playback music events
Internet streaming and webcasting
Terrestrial radio broadcasting
Post-production for catalog film and television episodic content
Waves DTS Neural UpMix
User Guide
Page 4

4
1.3 Concepts and Terminology
Surround Channels are divided and displayed into different orders according to different
standards. The DTS Neural UpMix plugin supports the following surround channels:
Quad – 4 Channels: Left, Right, Left Surround, Right Surround
5.1 – 6 Channels: Left, Right, Center, LFE, Left Surround, Right Surround
7.1 – 8 Channels: Left, Right, Center, LFE, Left Side Surround, Right Side
Surround, Left Surround, Right Surround
(7.1 support is according to ITU 159 and not the 7.1 SDDS format)
The meters within the plugins display the input and output channels according to the ITU
standard, which may differ from the meter order displayed in your DAW. The plugin
assures that the correct input and output channels are routed correctly.
1.4 Components
WaveShell technology enables us to split Waves processors into smaller plugins, which
we call components. Having a choice of components for a particular processor gives
you the flexibility to choose the configuration best suited to your material.
The DTS Neural UpMix plugin has four components:
Stereo to Quad
Stereo to 5.1
Stereo to 7.1
5.1 to 7.1
1.5 Sample Rate Support
The DTS Neural UpMix plugin supports 44.1 kHz and 48 kHz sample rates.
Waves DTS Neural UpMix
User Guide
Page 5

5
Chapter 2 – Quick Start Guide
The DTS Neural UpMix plugin launches with default settings. Due to the nature of
upmixing, the plugin will not have the same number of inputs and outputs. For example,
if you are upmixing from stereo to 7.1, the plugin will have two inputs and eight outputs.
DTS Neural UpMix behaves differently in different DAWs. Here are two examples:
Pro Tools
The track on which you insert the plugin on must have the same number of channels as
the plugin’s inputs. For example, if you are doing a stereo-to-7.1 upmix, you must start
by creating a stereo track.
When you insert the DTS Neural UpMix plugin on the track, the list of inserts will show
the versions of the plugin that have a stereo input. For example, if you select the Stereoto-7.1 component, Pro Tools will reconfigure that track to have eight outputs. You will
notice that Pro Tools changes the track display to show eight output meters. You will
now need to assign outputs to this track, and you will see that Pro Tools will only offer to
connect a 7.1 buss.
Nuendo
You must create a track that has the same number of channels as the output of the DTS
Neural UpMix plugin. For example, if you do a stereo-to-5.1 upmix, you need a track with
six channels. If you do a stereo-to-7.1 upmix or a 5.1-to-7.1 upmix, you need a track with
eight channels.
Next, drag the input audio file onto the newly created track. The plugin accepts both
interleaved stereo and interleaved 5.1 files. If you drag an interleaved stereo file onto a
5.1 or 7.1 track, Nuendo will place the input channels onto the first two channels of the
track. If you drag an interleaved 5.1 file onto a 7.1 track, Nuendo will place the input
channels on the first six channels of the track. Then, go to the Inserts and select the
DTS Neural UpMix plugin. This will bring up the plugin’s user interface. Now when you
play the input track, it will be processed through the plugin.
Waves DTS Neural UpMix
User Guide
Page 6

6
Chapter 3 – Interface and Controls
3.1 Interface
5.1 to 7.1
Stereo to 7.1
Waves DTS Neural UpMix
User Guide
Page 7

7
Stereo to 5.1
Stereo to Quad
Waves DTS Neural UpMix
User Guide
Page 8
8
3.2 Controls
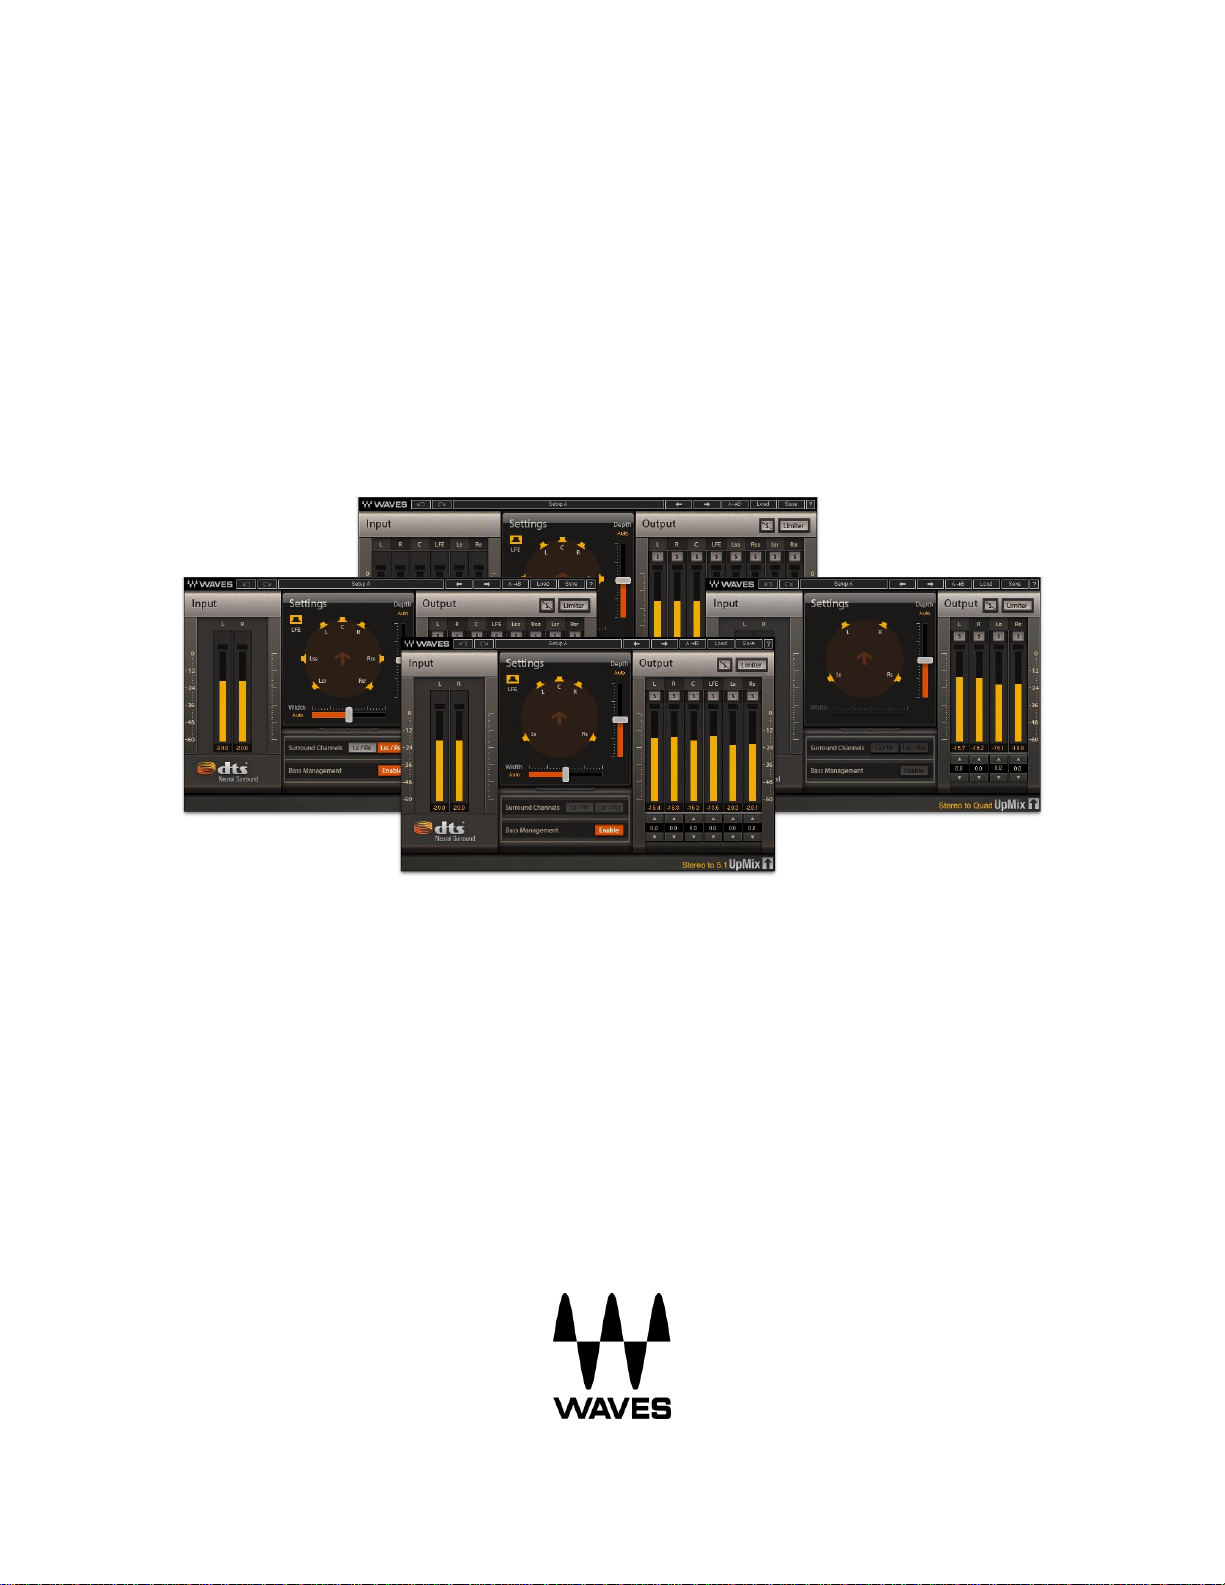
Input Meters
Indicate the level of the incoming signal.
The number of input meters is either two or
six, depending on your chosen component.
The meters have a peak hold of one second (standard in
Waves plugins). The peak indication can be cleared by
clicking on the red indication.
Additionally, a numerical display field below each meter
displays the held peak value in dBFS.
Latency Control
Use the Latency switch at the bottom of each component to
select the latency mode. Values are Low and High.
Default: High.
Ranges:
Low: 1272 samples
High: 2296 samples
Settings Section
The Settings section is in the middle
screen. Here,
determine how the sound is processed during upmixing.
you can
adjust the parameters
of the main
that
Waves DTS Neural UpMix
User Guide
Page 9
9
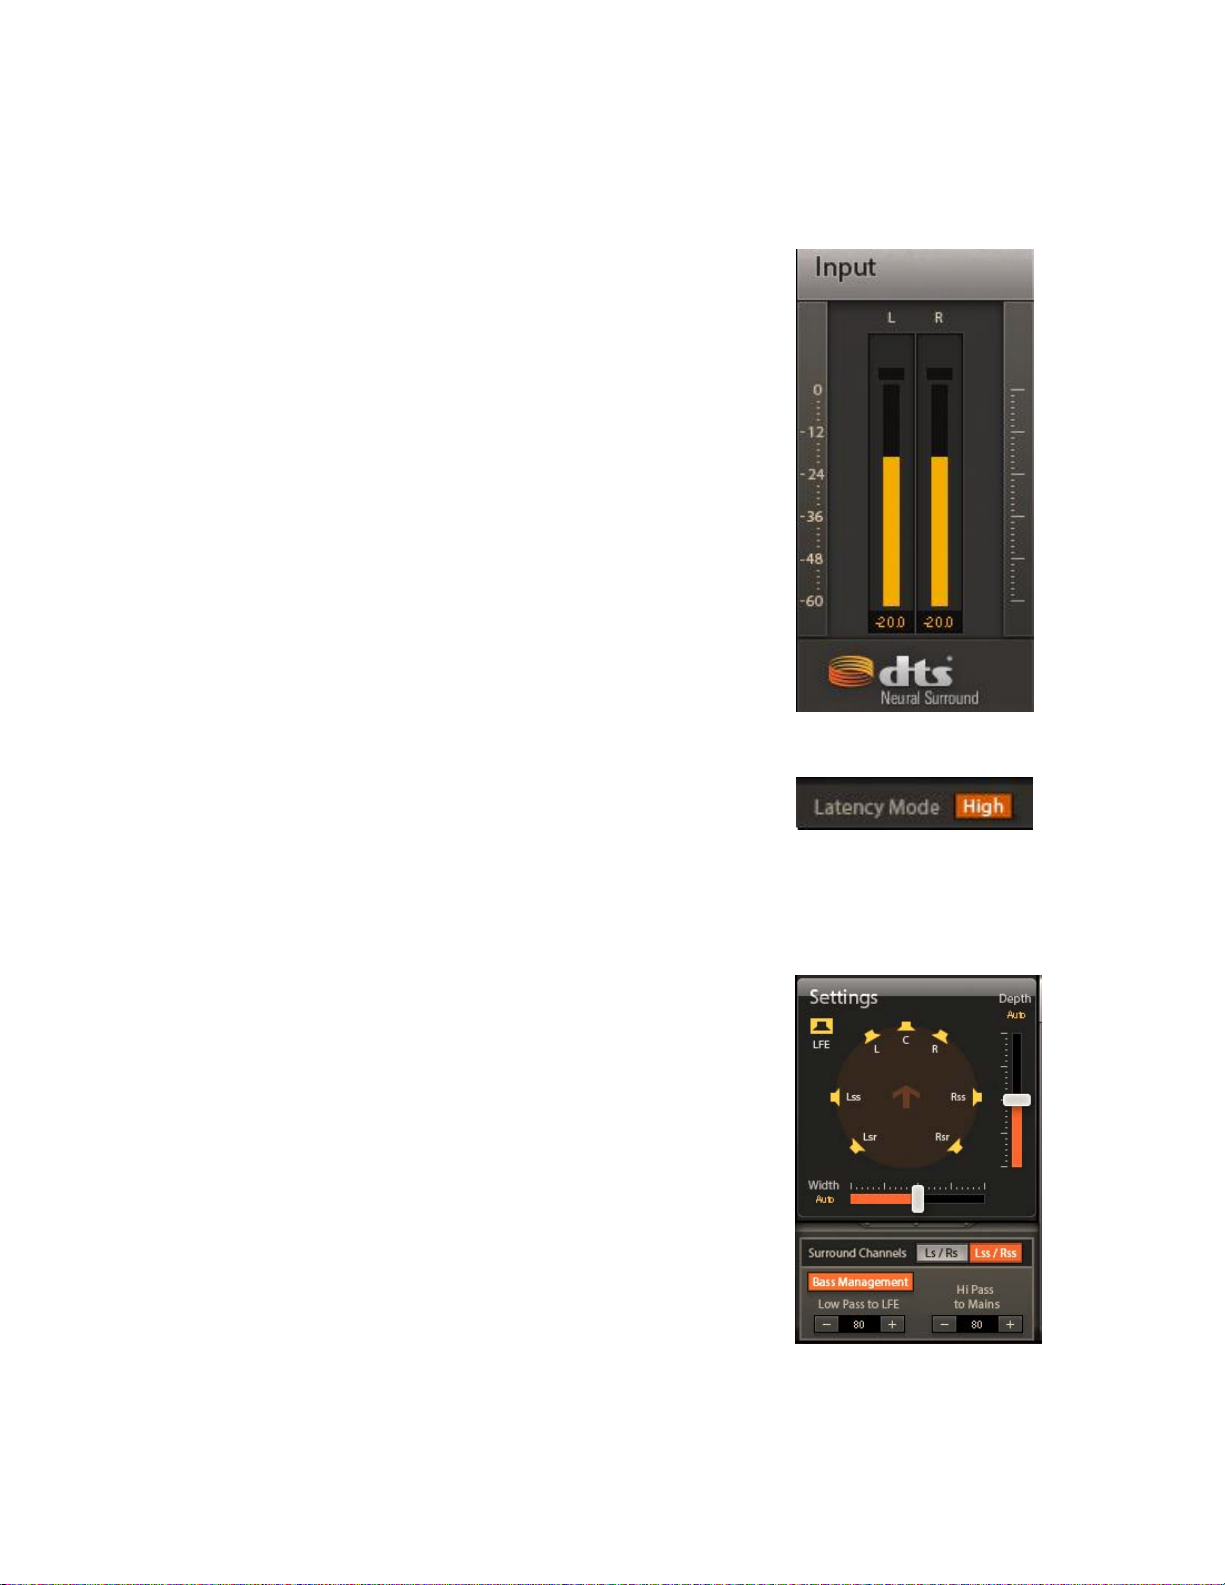
Depth
The Depth control lets you adjust the balance between
the front and rear speakers during the upmix process.
Moving the slider up shifts the balance toward the front
speakers; moving it down shifts the balance toward the
rear speakers. The box above the slider gives a numeric
indication of the balance
When the slider is in the center, the indicator at the
bottom displays "Auto." This default Auto setting results
in an unbiased upmix based on the phase and intensity
of the input material. As the slider moves toward the
bottom, the indicator shows a down-arrow to indicate
that the balance is weighted toward the surround
speakers. When the slider is moved above the center,
the indicator shows an up-arrow to indicate that the
balance is weighted toward the front speakers.
For 2.0 input, this fader will dictate the distribution of the
surround image between the front L/R/C channels and
the surround Ls/Rs/Lsr/Rsr channels.
For 5.1 input, this fader will dictate the distribution of
the surround image between the Ls/Rs (or Lss/Rss)
channels and the Lsr/Rsr channels.
Range: -100% to 100%
Default: Auto (0%)
Width
In speaker systems that have Left, Right, and Center speakers,
a sound in the center can be reproduced either by playing it out
of the Center speaker, or by playing it at equal volume out of both
the Left and Right speakers, creating a "phantom" center.
Waves DTS Neural UpMix
User Guide
Page 10
10
The choice of whether to have a "true" center or a "phantom" center is an artistic decision. A true
center results in a highly focused sound, whereas a phantom center presents a sound that
appears to be much wider upon playback.
The Width control determines whether the Center channel information will be played as a true
center, a phantom center, or a blend of the two. When the control is completely to the right, the
Center sound will be a phantom center, and the indicator at the right will show "100%". When the
control is all the way to the left, all of the Center sound will be a true center coming out of the
Center speaker; the indicator will show “-100%”.
NOTE: The Width parameter is not available in the Stereo-to-Quad or 5.1-to-7.1 components.
Range: -100% to 100%
Default: Auto (0%)
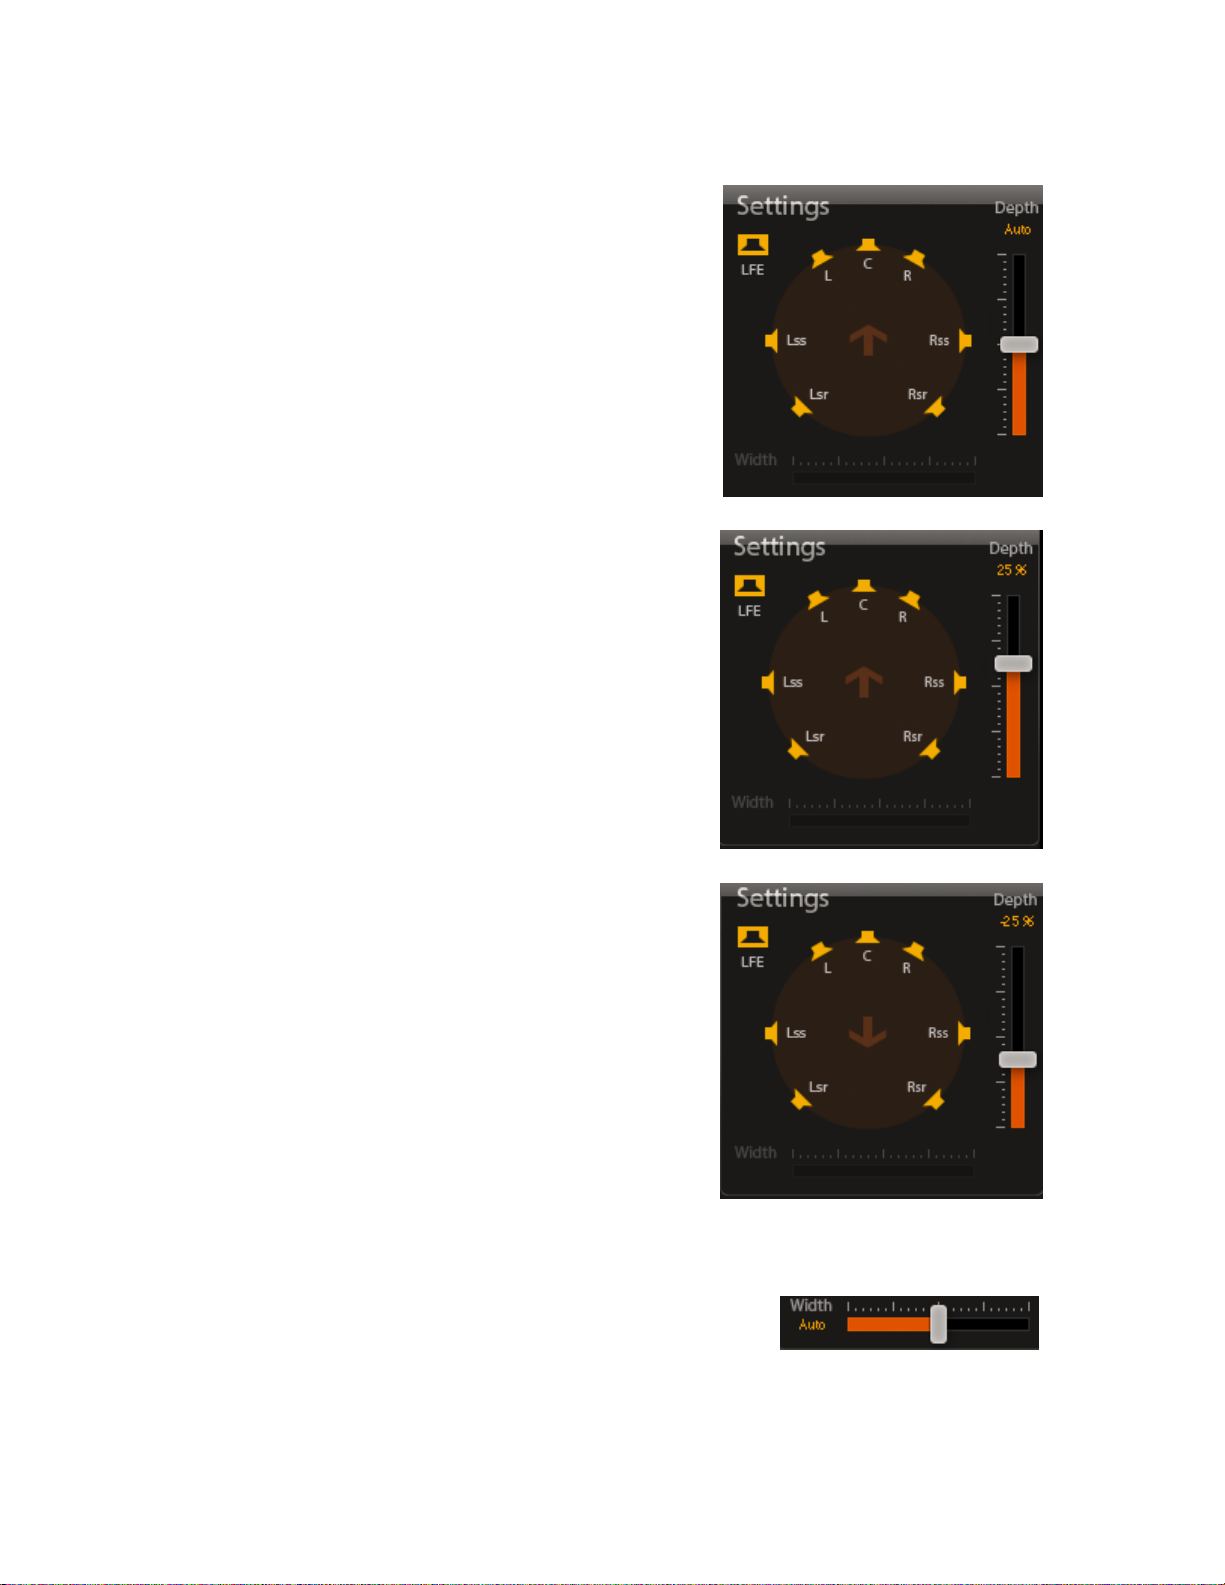
Surround Channel
When upmixing from stereo to 7.1, two slightly different output speaker configurations are
available. In one layout, "Lss/Rss," the middle surround speakers are positioned at the side of the
listener (+/- 90 degrees). In the other layout, "Ls/Rs," the middle surround speakers are
positioned slightly to the rear of the listener (+/-110 degrees). The plugin shows a diagram of the
selected speaker configuration.
Options: Ls/Rs or Lss/Rss
Default: Lss/Rss
Waves DTS Neural UpMix
User Guide
Page 11

11
Bass Management Section
Bass Management separately controls the low-
frequency filtering between the LFE channel and the
main channels. When the section is switched off, no
LFE is generated. When switched on, these two
controls are available:
Low Pass to LFE directs input channels content below this frequency range to the LFE channel.
Low Pass to LFE is available in these components: Stereo to 5.1; Stereo to 7.1; 5.1 to 7.1.
Range: 20 Hz–200 Hz
Default: 80
Hi Pass to Mains adjusts the hi-pass filter cutoff frequency of the main channels. This
control is independent of LFE filtering. High Pass to Mains is available in these
components: Stereo to 5.1; Stereo to 7.1.
Range: 20 Hz–200 Hz
Default: 80
Output Section
The output section has metering, soloing, and gain
trim for each channel, plus a limiter that operates on
all channels
Waves DTS Neural UpMix
User Guide
Page 12
12
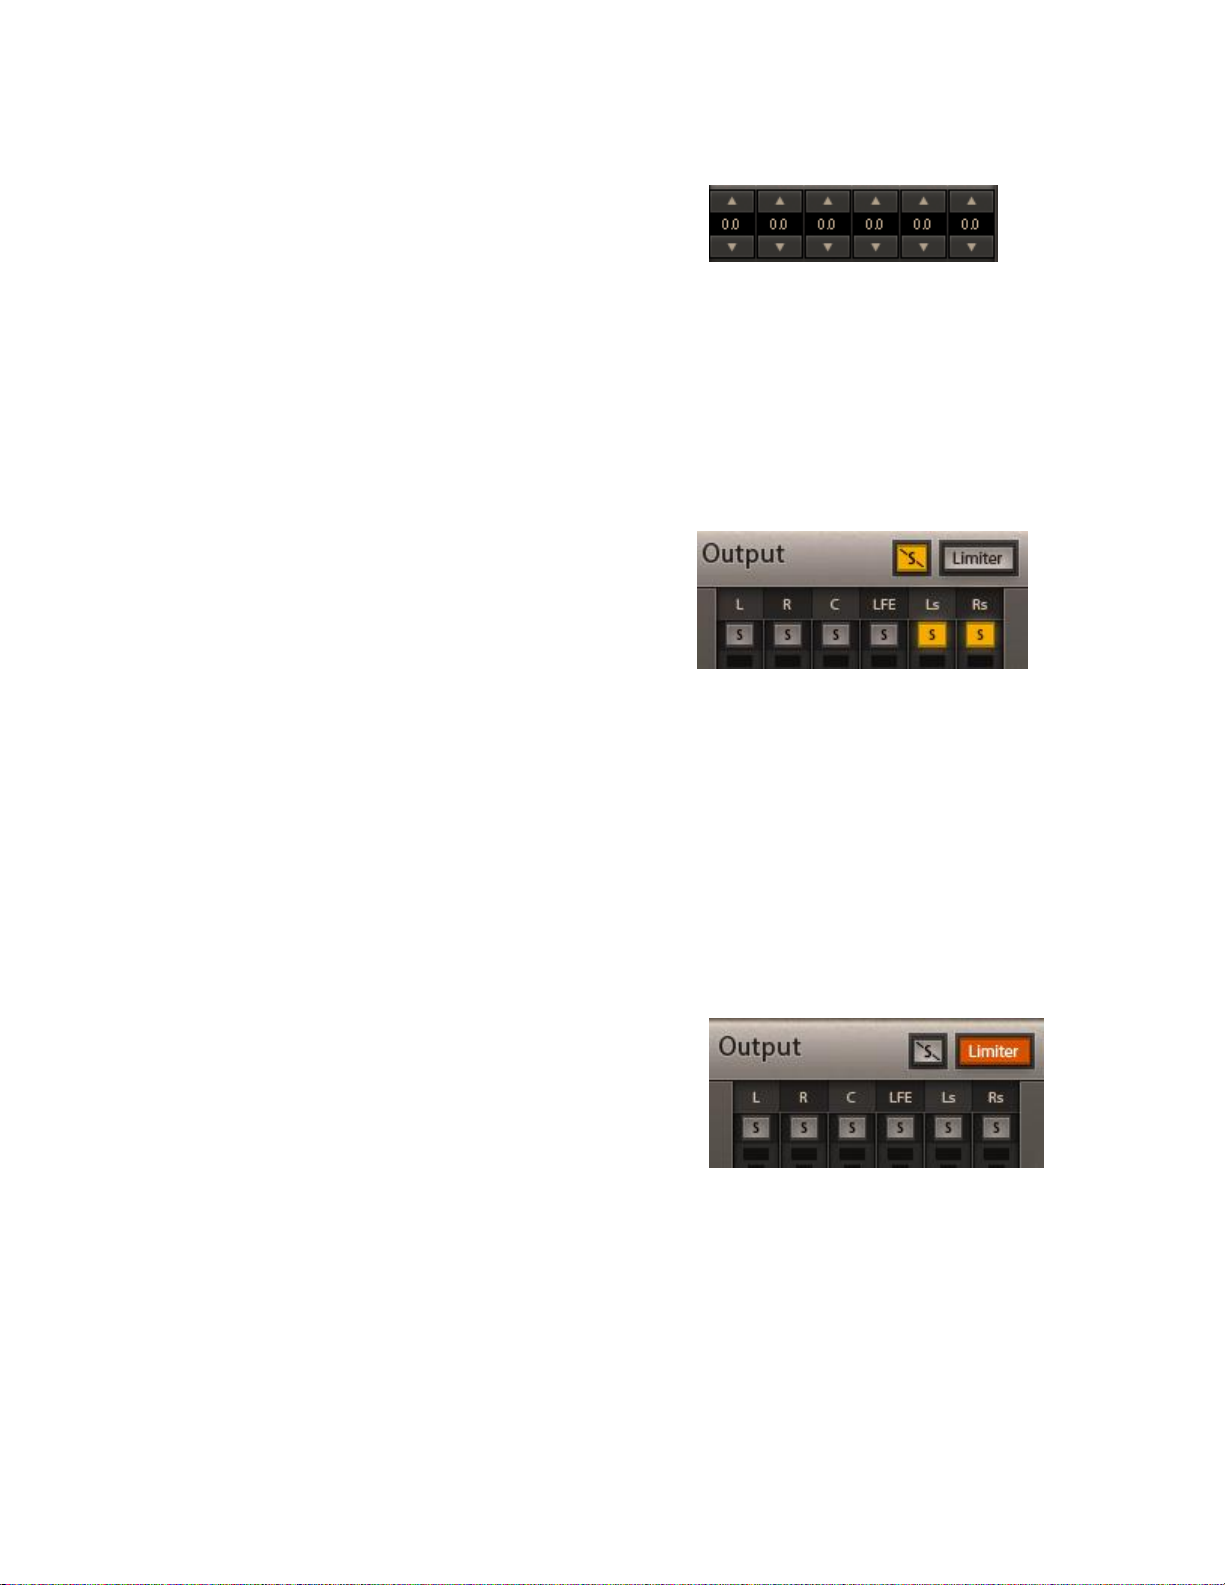
Output Gain
The gain trim allows you to fine tune the balance of the
resulting upmix. Clicking on the arrow up/down buttons
increases or decreases the output gain by 0.5 dB per
click. You can double-click the value window for text entry,
or click-and-drag the value window to change values.
Range: 9.0 dB to -9.0 dB
Default: 0 dB
Solo
When a Solo button is enabled, it will turn yellow and
mute all other channels. Clicking the Solo button again
will turn Solo off. You can solo multiple channels by
clicking on additional Solo buttons while pressing the
Shift key.
Options: On/Off
Default: Off
Clear Solo
When a channel is soloed, the Clear Solo button will illuminate. Pressing the Clear Solo button
will deactivate ALL selected solos
Limiter
The output section has a limiter that can be used to limit
the output level of all channels. When you click on the
Enable button, the button becomes orange, and the
limiter becomes active. By default, the limiter is disabled
and the output ceiling is set to 0.0 dBFS.
Options: On/Off
Default: Off
Waves DTS Neural UpMix
User Guide
Page 13
13
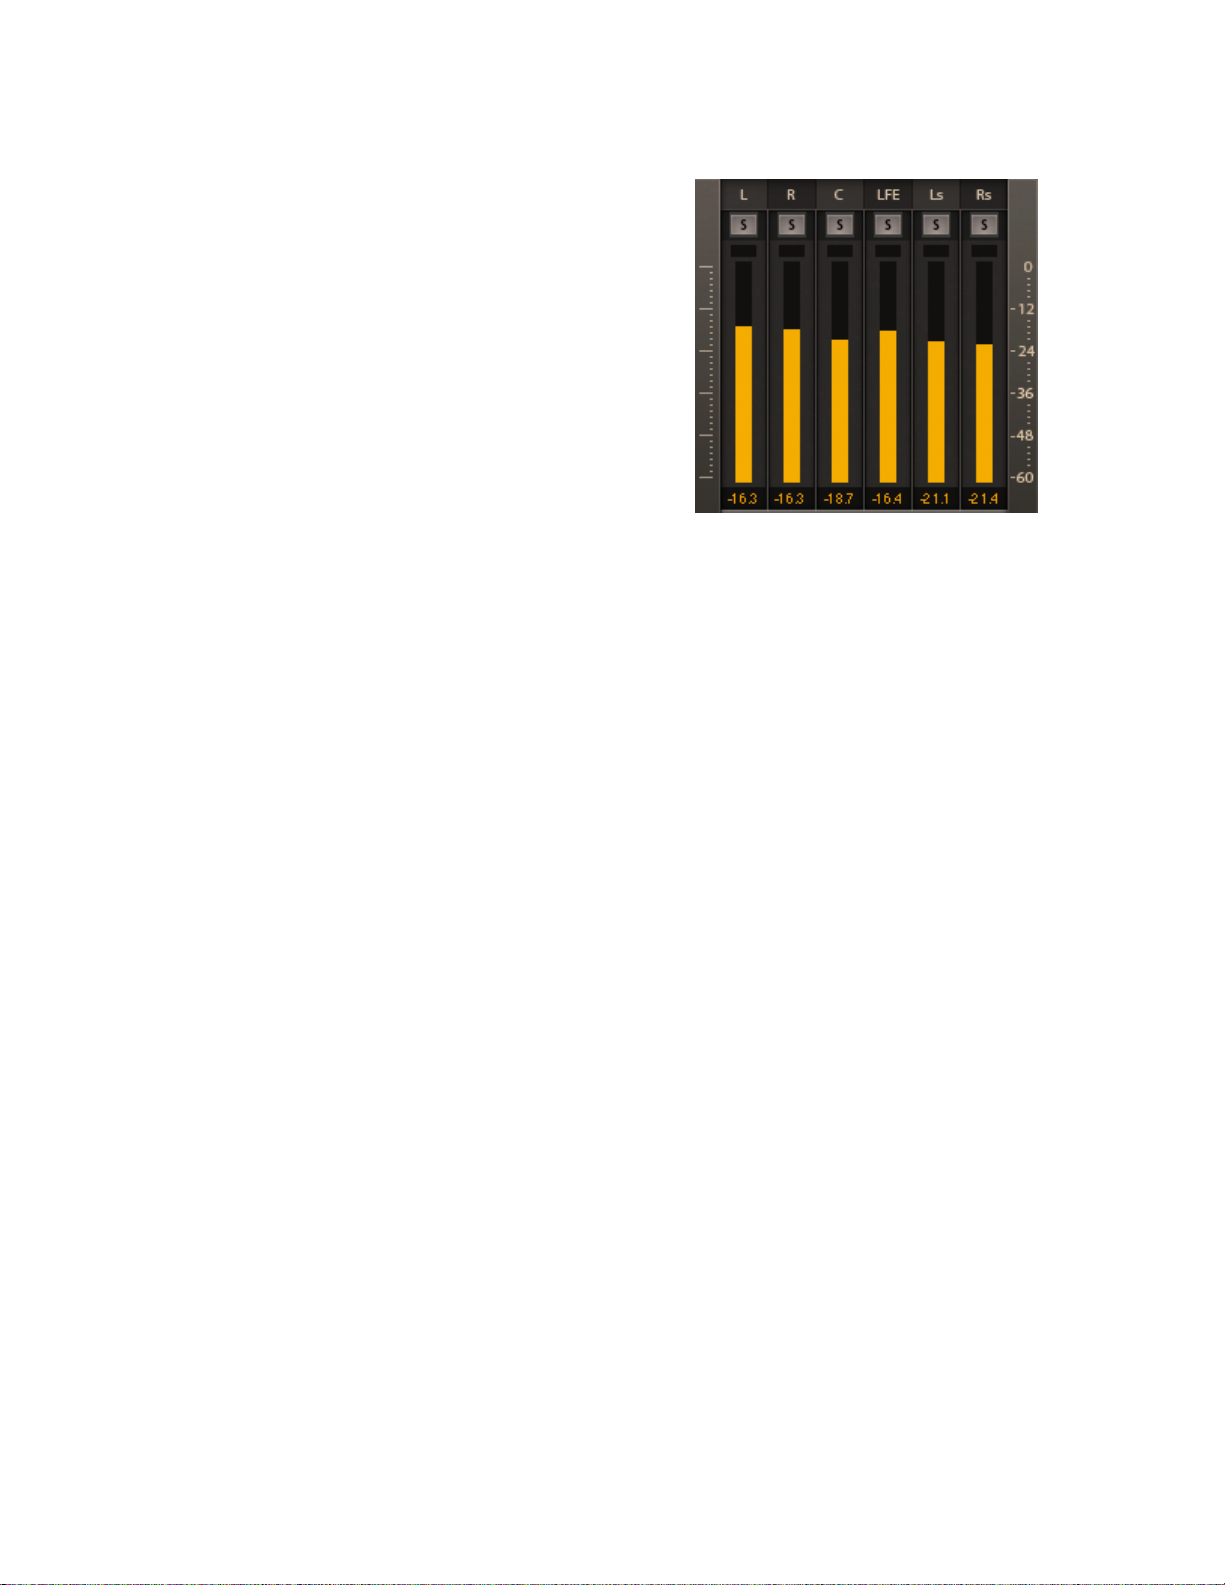
Output Meters
Indicate the level of the outgoing signal. The number
of output meters is either four, six, or eight, depending
on your chosen component.
The meters have a peak hold of one second (standard
in Waves plugins). The peak indication can be cleared
by clicking on the Red indication.
Additionally, a numerical display field below each meter
will display the held peaks value in dBFS.
Waves DTS Neural UpMix
User Guide
 Loading...