


1
TABLE OF CONTENTS
IMPORTANT SAFETY INSTRUCTIONS.................................................................................2
PARTS CHECK LIST................................................................................................................3
HANDSET LA Y OUT...................................................................................................................4
BASE LAYOUT.................................................................................................................... ......5
GETTING STARTED...............................................................................................................6
Installation of Battery Pack in Handset..............................................................................6
Setting up your VT 9161......................................................................................................7
Set Time.......................................................................................................................7
Ringer Selection............................................................................................................7
Set Auto Answer On / Off..............................................................................................7
T one / Pulse Selection....................................................................................................8
Wall Mounting....................................................................................................................8
The Handset Display.........................................................................................................9
BASIC OPERATION................................................................................................................10
Making Calls.....................................................................................................................10
Volume Control................................................................................................................10
Channel Changing..............................................................................................................10
Using Redial................................................................................................................... .....11
Answering Calls................................................................................................................11
Auto Answer .......................................................................................................................11
Flash.................................................................................................................................11
Hold......................................................................................................................................11
Page...................................................................................................................................12
ADVANCED OPERATION......................................................................................................13
CALLER ID/CALL W AITING ID.........................................................................................13
Receiving and Storing Calls.......................................................................................13
Saving Caller ID to the Phone Book...........................................................................13
Deleting Single Caller ID Records..............................................................................14
Deleting All Caller ID Memory ......................................................................................14
Dialing from Caller ID..................................................................................................14
PHONE BOOK.................................................................................................................15
Storing a name and number into the Phone Book.......................................................15
Reviewing and Dialing from the Phone Book..............................................................16
Editing Phone Book Records.......................................................................................16
Deleting Phone Book Records......................................................................................17
Moving a Phone Book Record...................................................................................17
MESSAGE WAITING.......................................................................................................18
CALL BLOCK AND BLOCK PREFIX..............................................................................19
OPTIONAL HEADSET INSTALLATION AND OPERATING INSTRUCTIONS..............20
ADDITIONAL INFORMATION...............................................................................................21
Maintenance.....................................................................................................................21
In Case of Difficulty...........................................................................................................22
Warranty Statement...........................................................................................................24
RBRC Seal...................................................................................................................25
FCC & IC Regulations..........................................................................................................26
T echnical Specifications....................................................................................................28

2
IMPORTANT SAFETY INSTRUCTIONS
When using your telephone equipment, basic safety precautions should always be followed
to reduce the risk of fire, electric shock and injury to persons, including the following:
1. Read and understand all instructions.
2. Follow all warnings and instructions marked on the product.
3. Unplug this product from the wall outlet before cleaning. Do not use liquid cleaners or
aerosol cleaners. Use a damp cloth for cleaning.
4. Do not use this product near water (for example, near a bath tub, kitchen sink, or
swimming pool).
5. Do not place this product on an unstable cart, stand, or table. The product may fall,
causing serious damage to the product.
6. Slots and openings in the cabinet and the back or bottom are provided for ventilation. To
protect it from overheating, these openings must not be blocked by placing the product
on the bed, sofa, rug, or other similar surface. This product should never be placed near
or over a radiator or heat register. This product should not be placed in a built-in
installation where proper ventilation is not provided.
7. This product should be operated only from the type of power source indicated on the
marking label. If you are not sure of the type of power supply to your home, consult your
dealer or local power company.
8. Do not allow anything to rest on the power cord. Do not locate this product where the
cord will be abused by persons walking on it.
9. Never push objects of any kind into this product through cabinet slots as they may touch
dangerous voltage points or short out parts that could result in a risk of fire or electric
shock. Never spill liquid of any kind on the product.
10. To reduce the r isk of electr ic shock, do not disassemble this product. If service or repair
work is required, contact VTECH Customer Service at 1-800-595-9511. Opening or
removing cabinet parts other than specified access doors may expose you to dangerous voltages or other risks. Incorrect reassembling can cause electric shock when the
appliance is subsequently used.
11. Do not overload wall outlets and extension cords as this can result in the risk of fire or
electric shock.
12. Unplug this product from the wall outlet :
A. When the power supply cord or plug is damaged or frayed.
B. If liquid has been spilled into the product.
C. If the product has been exposed to rain or water.
D. If the product does not operate normally by the following the operating instructions.
Adjust only those controls that are covered by the operating instructions because
improper adjustment of other controls may result in damage and will often require
extensive work to restore the product to normal operation.
E. If the product has been dropped and the cabinet has been damaged.
F. If the product exhibits a distinct change in performance.
13. Avoid using a telephone (other than a cordless type) during an electrical storm. There
may be a remote risk of electric shock from lightning.
14. Do not use the telephone to report a gas leak in the vicinity of the leak.
SAVE THESE INSTRUCTIONS

3
PARTS CHECK LIST
1. Base Unit
2. Handset
3. Owner’s Manual
4. AC Power Adaptor
5. Telephone Cord
6. Battery Pack
7. Belt Clip
8. Wall Mounting Bracket
Base
Adaptor
Belt Clip
Handset
Battery Pack
Wall Mounting Bracket
Telephone Line Cord
Owner’s Manual
OWNER’S MANUAL
SELECT
PHONE
HOLD
OFF
123
456
789
0
ABC DEF
GHI JKL MNO
PQRS TUV WXYZ
TONE OPER
MEM PROG
REDIAL
NEW CHAN PAUSE
FLASH
CID
MIC
ANSWER
ON/OFF
REC/MEMO
NEW CALL
MESSAGE
PLAY/STOP
IN USE/CHARGE
1
MAILBOX
3
MAILBOX
2
MAILBOX
DELETE
TIME/SET
SELECT MENU
VOL
PAGE
REPEAT/SLOW SKIP/QUICK
VT 9161
900
MHz
4
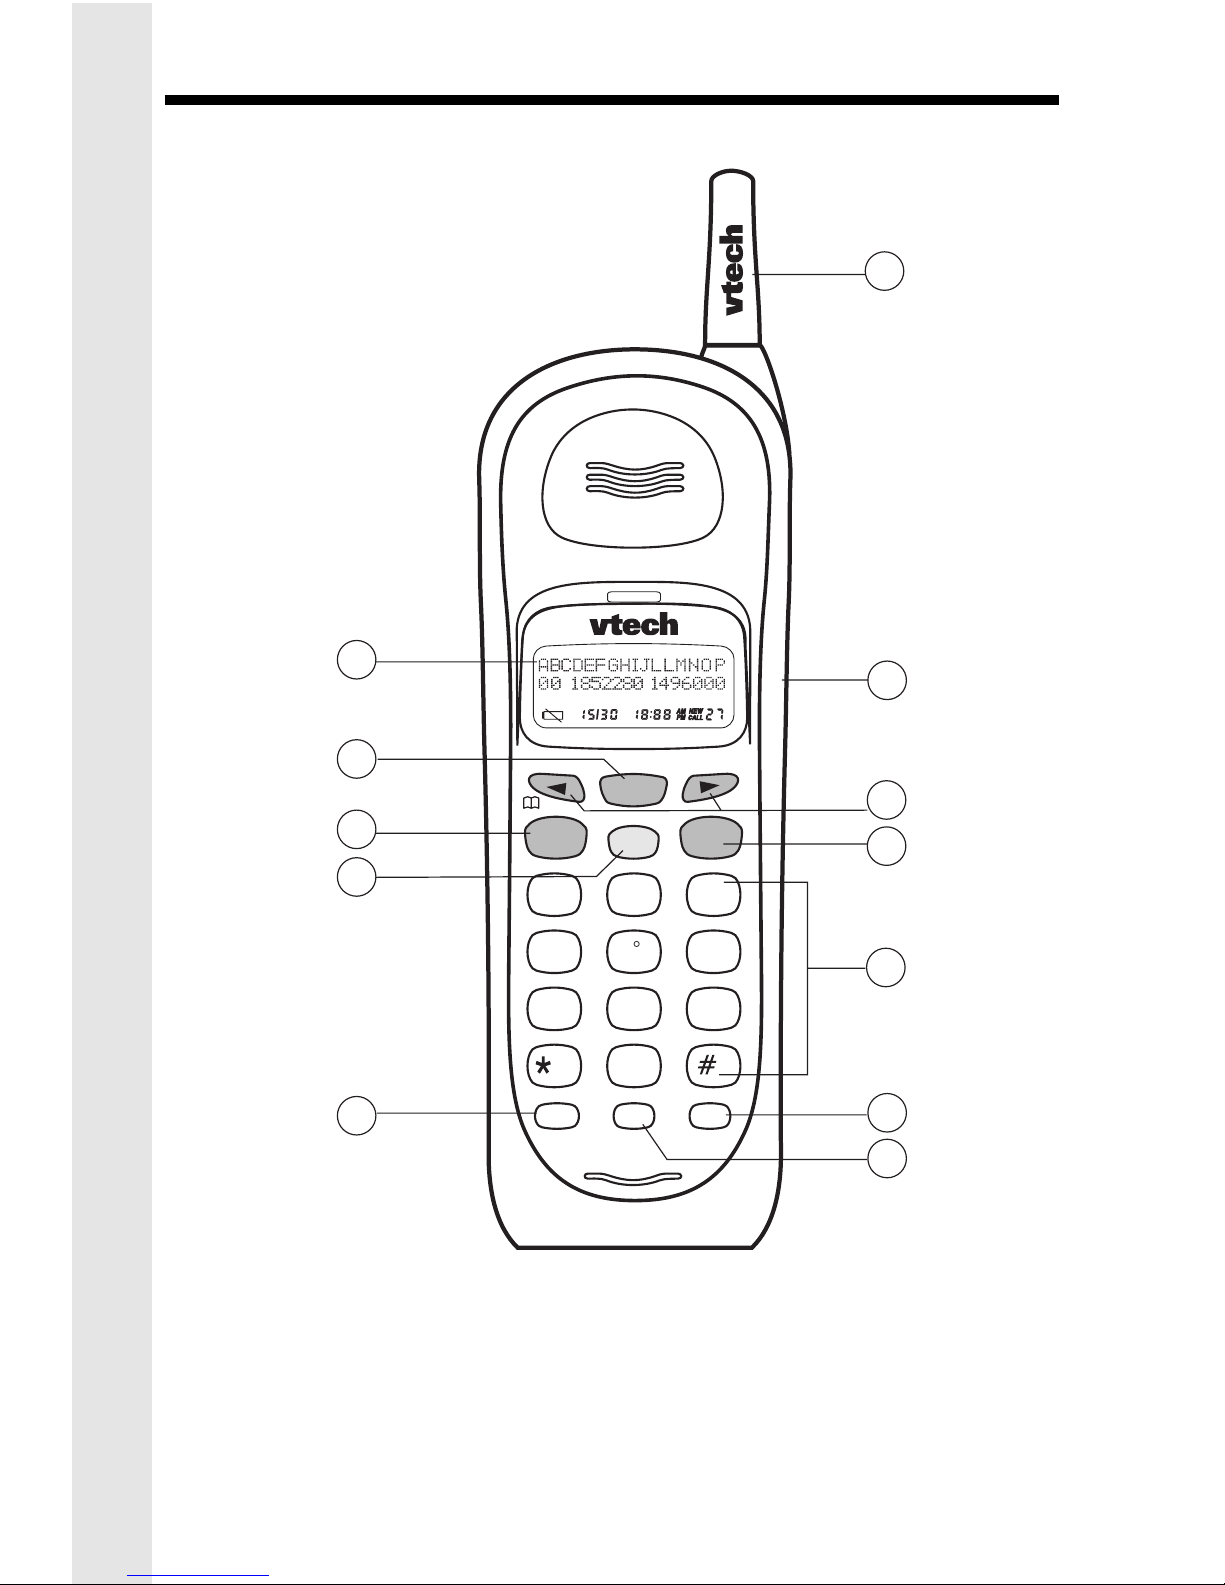
HANDSET LAYOUT
1. LCD Display
2. SELECT
3. Navigation Keys
4. PHONE
5. HOLD
6. MEM/NEW
7. Antenna
8. Headset Jack(2.5mm)
9. OFF
10.Dialing Keys
11. REDIAL/PAUSE
12. PROG/CHAN
2
4
5
6
1
7
8
11
12
3
10
9
SELECT
PHONE
HOLD
OFF
123
456
789
0
ABC DEF
GHI JKL MNO
PQRS TUV WXYZ
TONE OPER
MEM PROG
REDIAL
NEW CHAN PAUSE
FLASH
CID
5
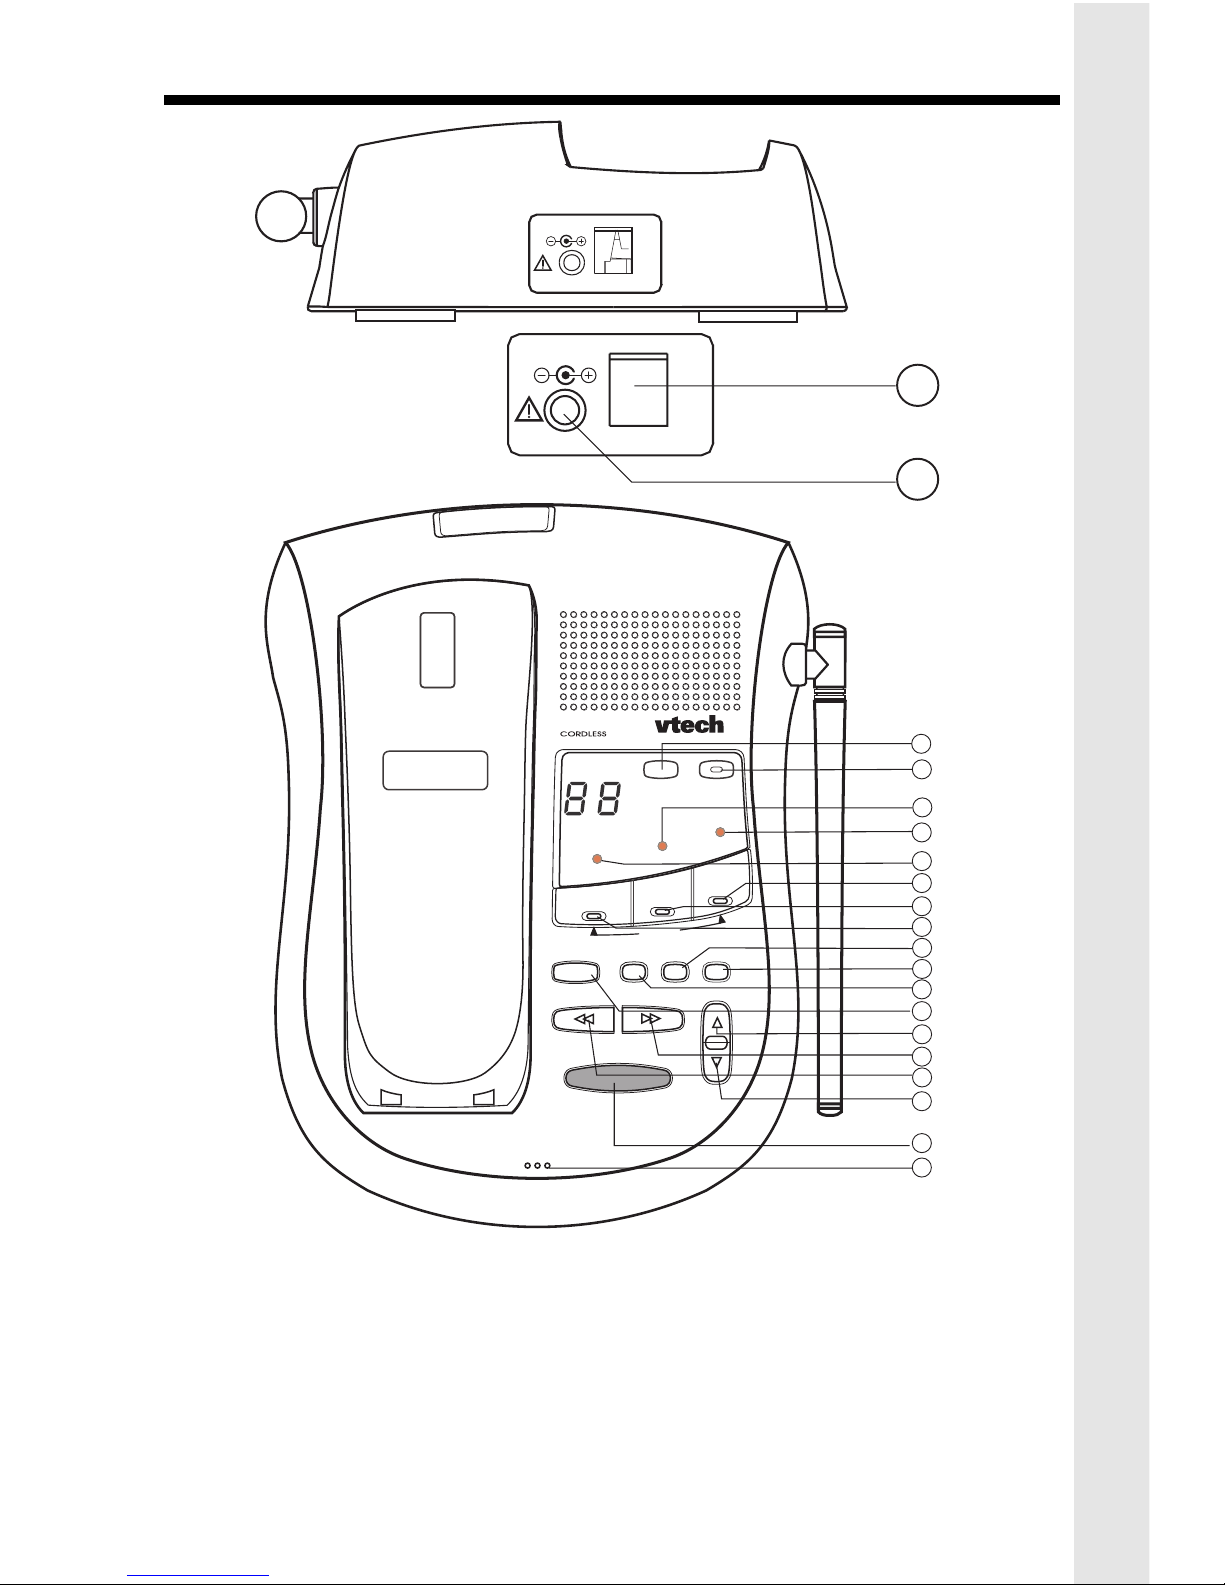
BASE LAYOUT
1. Phone Cord Jack
2. Power Jack
3. Rec/Memo
4. Answer On/Off
5. Charging
6. New Call
7. In Use
8. Mail Box 3
9. Mail Box 2
10. Mail Box 1
11. Menu
12. Select
13. Time/ Set
14. Delete
15. V olume Up
16. Skip/Quick
17. Repeat/Slow
18. Volume Dow
19. Page
20. Mic
TEL. LINE
9V DC
TEL. LINE
9V DC
1
2
3
4
5
6
7
8
9
MIC
ANSWER
ON/OFF
REC/MEMO
NEW CALL
MESSAGE
PLAY/STOP
IN USE/CHARGE
1
MAILBOX
3
MAILBOX
2
MAILBOX
DELETE
TIME/SET
SELECT MENU
VOL
PAGE
REPEAT/SLOW SKIP/QUICK
VT 9161
900
MHz
11
10
12
13
15
16
17
18
19
20
14
6
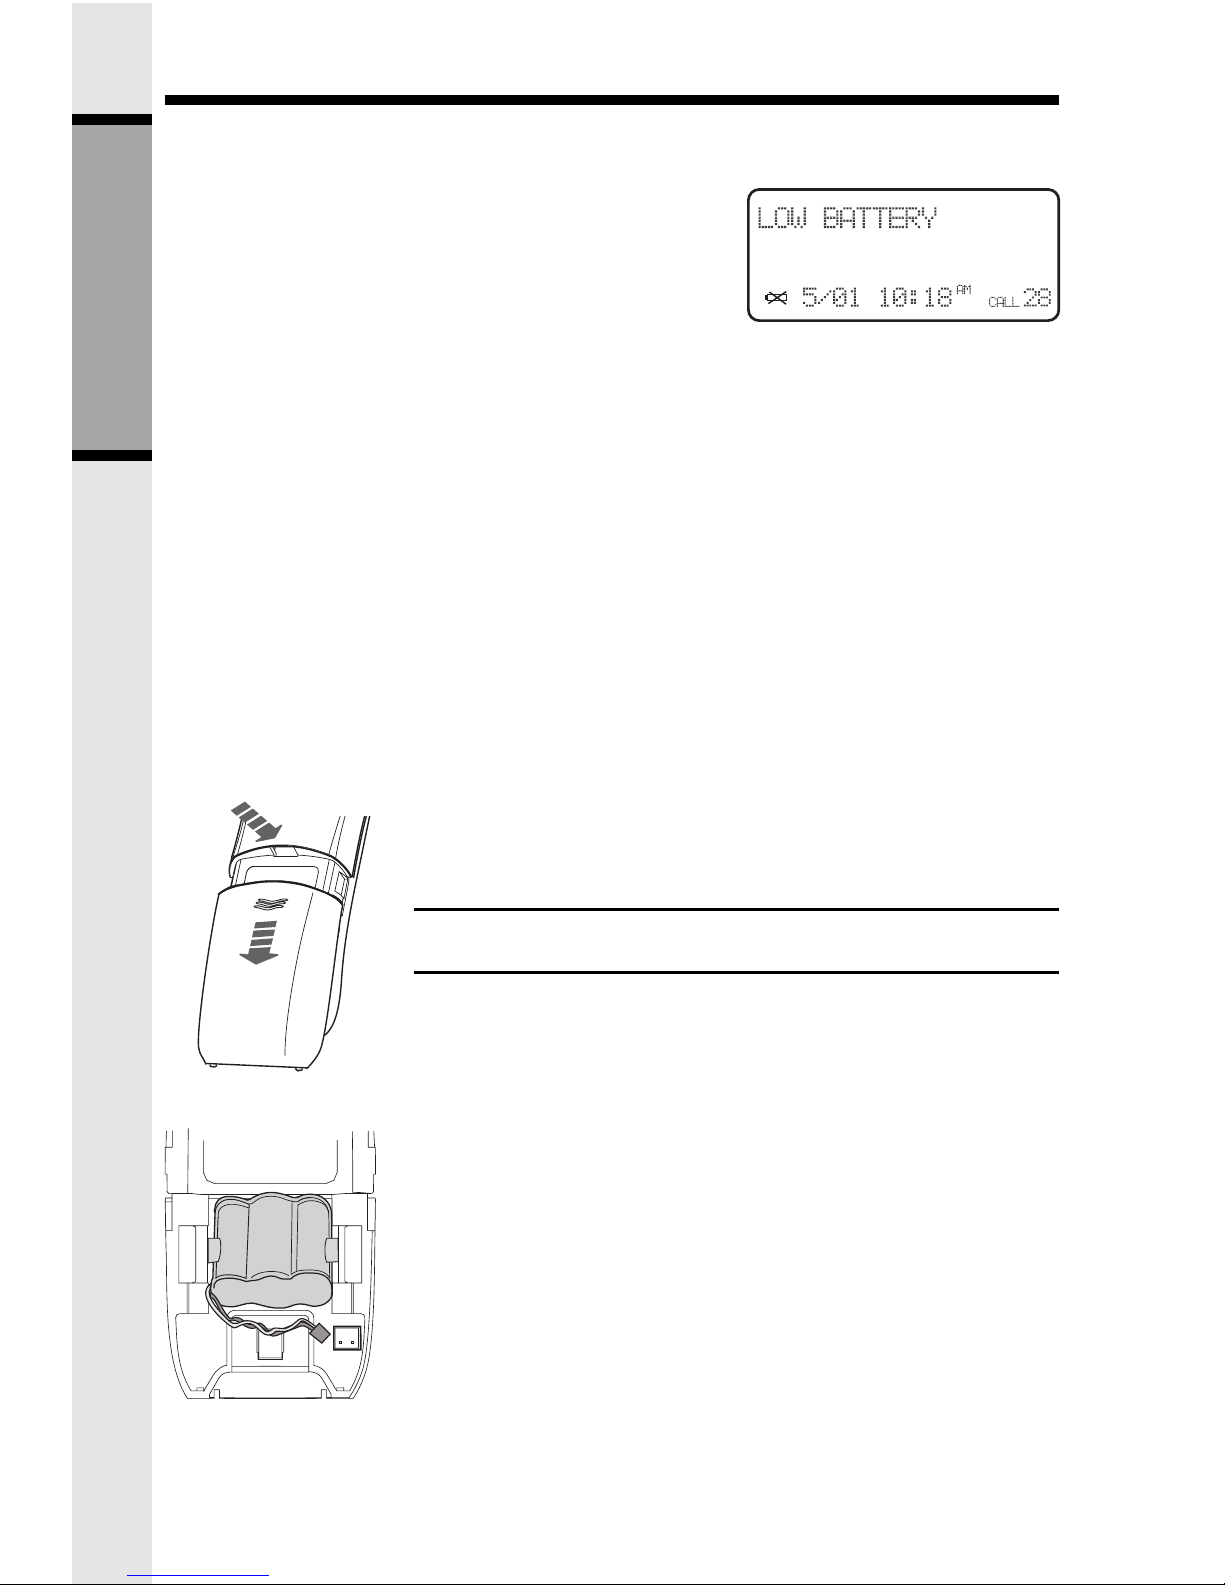
The Handset of your
VT 9161
is powered by a rechargeable battery pack. It charges
automatically whenever the Handset is in the Base Unit. The battery pack needs charging
when:
• The low battery icon and message are displayed:
• A double beep will be generated every 16 seconds.
To charge the battery pack, place the Handset in the Base Unit. The IN USE/CHARGE
indicator will light to show the Handset is seated properly and the battery pack is charging. It
is recommended that the battery pack should be charged for at least 16 hours initially.
Afterwards, 8 hours of maintenance charging should be sufficient.
To replace the batter y pack, follow the steps below:
1. Remove the battery case cover by pressing on the ridged lines and sliding downward.
2. Discard the old battery pack by pulling firmly on the battery cords. Don’t put the old
battery pack in a trash compactor or a fire - it could burst. Please recycle.
3. Snap in the new battery pack, with the wires in the lower left corner. Insert the battery
plug into the socket, aligning the two holes in the plug with the socket pins.
4. Place the cord in the case so it rests below the battery pack.
5. Replace the battery case cover by sliding the cover upwards.
6. Place the Handset in the cradle of the Base Unit to allow it to
charge for 16 hours.
CAUTION: To Reduce the Risk of Fire or Injury, Read and
Follow the Instructions
IMPORTANT:
Do not dispose of this battery pack into household garbage. For
information on recycling or proper disposal, consult your local
solid waste collection or disposal organization.
1. Use only VTech rechargeable battery pack, or equivalent.
2. Do not dispose of the battery pack in a fire. The cell may
explode.
3. Do not open or mutilate the battery pack. Released electrolyte
is corrosive and may cause damage to the eyes or skin. It
may be toxic if swallowed.
4. Exercise care in handling batteries in order not to short the
battery with conducting materials such as rings, bracelets,
and keys. The battery pack or conductor may overheat and
cause burns.
To purchase replacement battery packs, call VTech at 1-800-595-9511.
INSTALLATION OF BATTERY PACK IN HANDSET
GETTING STARTED
7
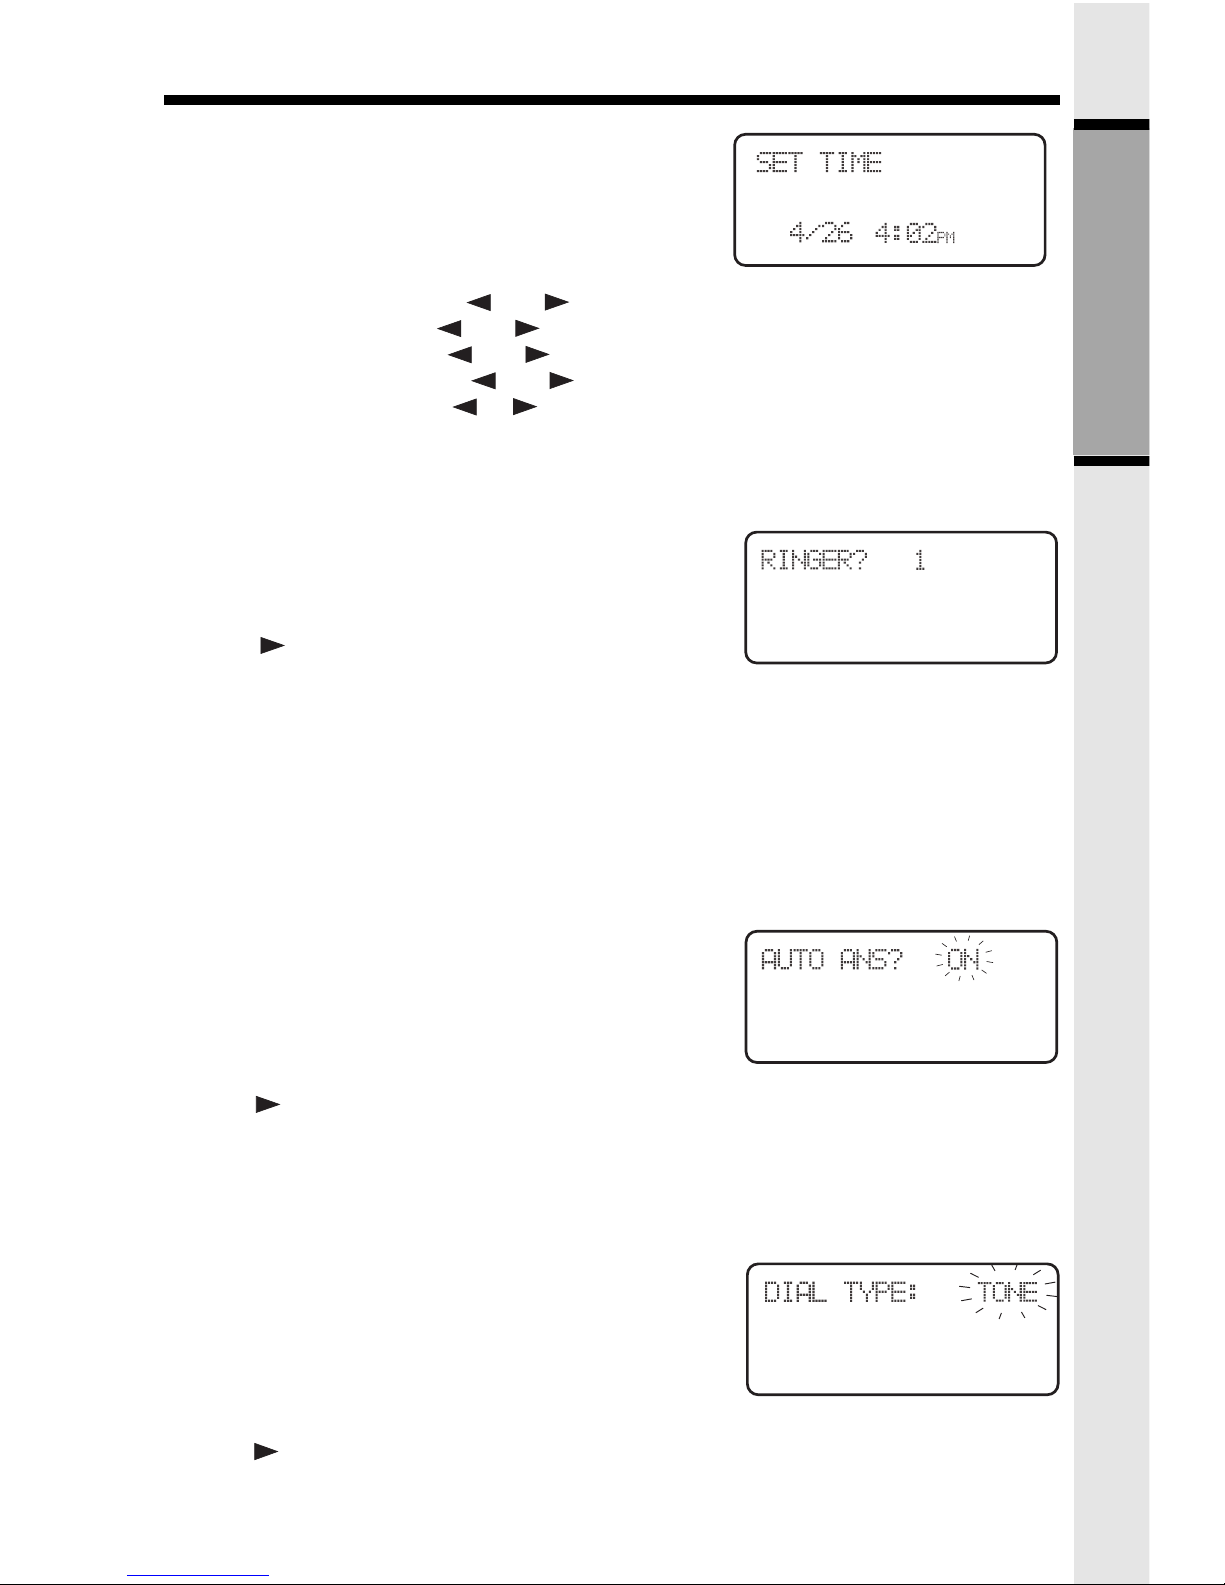
SET TIME
1. Press PROG/CHAN until SET TIME is displayed
2. Press SELECT.
The month is flashing. Use and to select the current month. Press SELECT.
The day is flashing. Use and to select the correct day. Press SELECT.
The hour is flashing. Use and to select the current hour. Press SELECT.
The minute is flashing. Use and to select the correct minute. Press SELECT.
AM or PM is flashing. Use or to choose between AM and PM. Press SELECT.
TIME/DATE
programming is complete.
RINGER SELECTION
1. Press PROG/CHAN repeatedly, until RINGER?
and the current ringer setting (1,2,3,4 or OFF) is
displayed.
2. Press to cycle through the different ringer
settings. You will hear a sample of each ring
style.
3. Press SELECT to confirm your choice.
NOTE: If the ringer is set to OFF, the display will
show “RINGER OFF” in idle mode.
SET AUT O ANSWER ON/OFF
If you want your
VT 9161
to automatically answer calls when you pick the Handset up from
the Base cradle, set AUTO ANS to ON.
1. Press PROG/CHAN repeatedly, until AUTO
ANS? OFF (or ON) is displayed.
2. Press to choose OFF or ON.
3. Press SELECT to confirm your choice.
TONE/PULSE SELECTION
NOTE: Your
VT 9161
is factory-preset for TONE
dialing.
1. To change dialing mode, press PROG/CHAN
repeatedly , until DIAL TYPE: TONE (or PULSE)
is displayed.
2. Press to choose TONE or PULSE.
3. Press SELECT to confirm your choice.
GETTING STARTED
SETTING UP YOUR
VT 9161
8
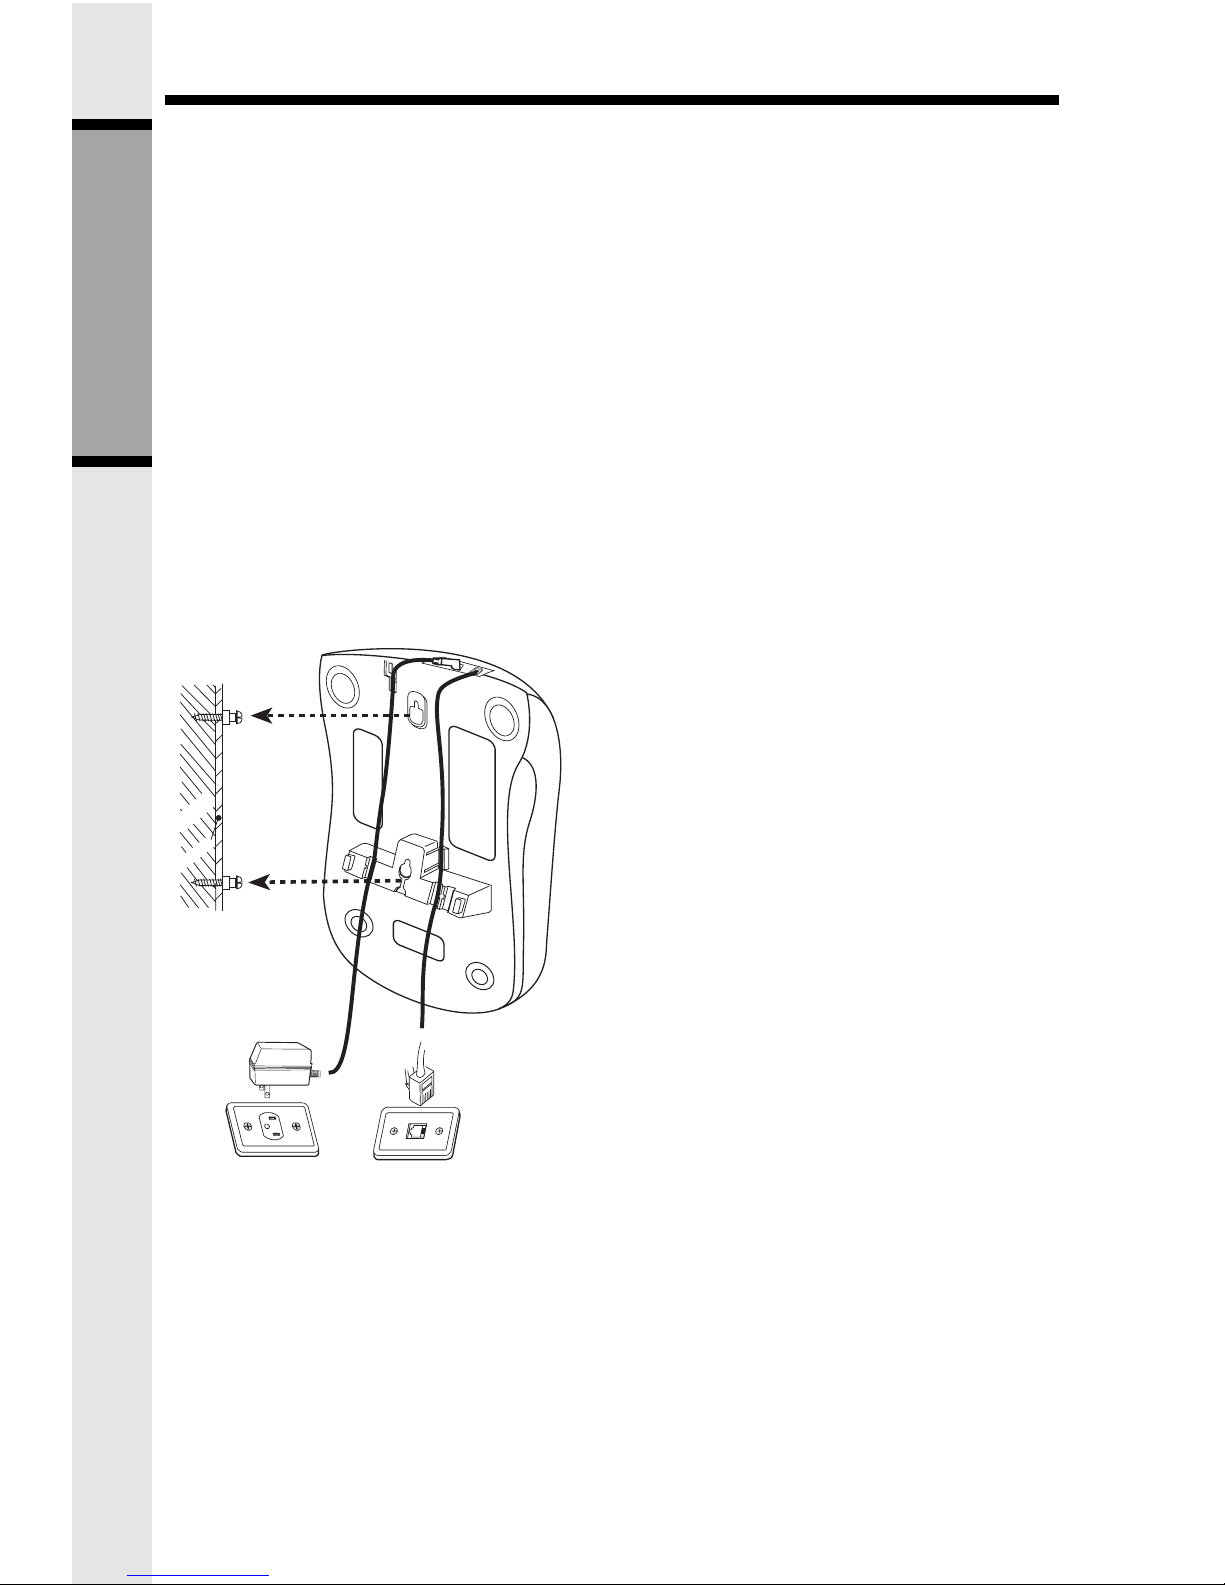
The Wall Mount bracket is designed for use on standard Wall Mount plates only.
1. Line up the tabs on the wall mount adaptor with the holes on the bottom of the Base Unit.
Snap the wall mount bracket firmly in place.
2. Plug the AC adaptor into an electrical outlet, and the DC connector to the back of the Base
Unit. If the Handset battery pack has not been charged previously, place the Handset in the
Base Unit cradle, and allow it to charge for 16 hours.
3. Connect the telephone line cord to the jack on the back of the Base Unit, and the other end
to the wall jack.
4. Mount the Base Unit on the w all. P osition the Base Unit so the mounting stubs will fit into the
holes on the wall mount bracket. Slide Base Unit down on the mounting stubs until it locks
into place.
5. Flip down the wall mount tab on the Base to secure the Handset when cradled.
wallboard
wooden
stud
GETTING STARTED
WALL MOUNTING
9
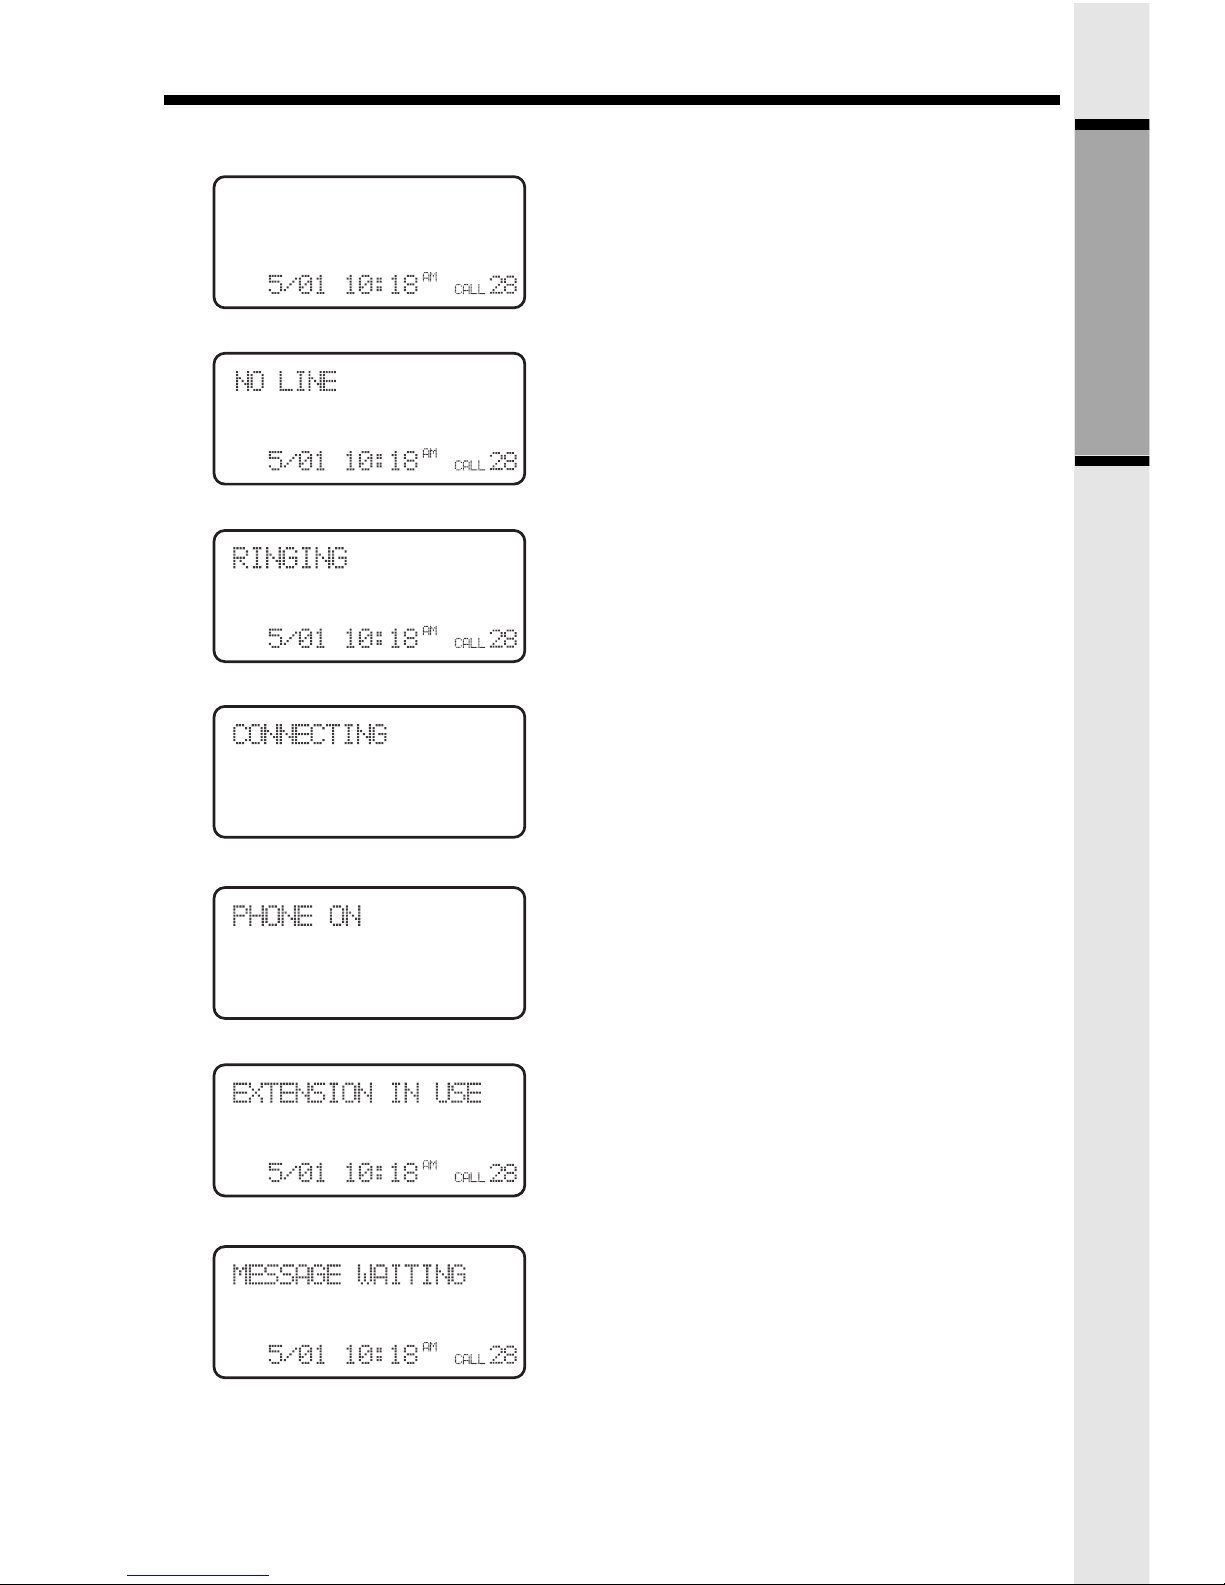
If the display says: It means:
The Handset is in idle mode
A telephone line has not been
connected to the Base Unit.
Or the line is out of servce.
Indicates incoming call
Waiting for dial tone
` Handset is in use
A parallel phone is in use
Messages in your phone company
Voicemail have been received
THE HANDSET DISPLAY
GETTING STARTED
10
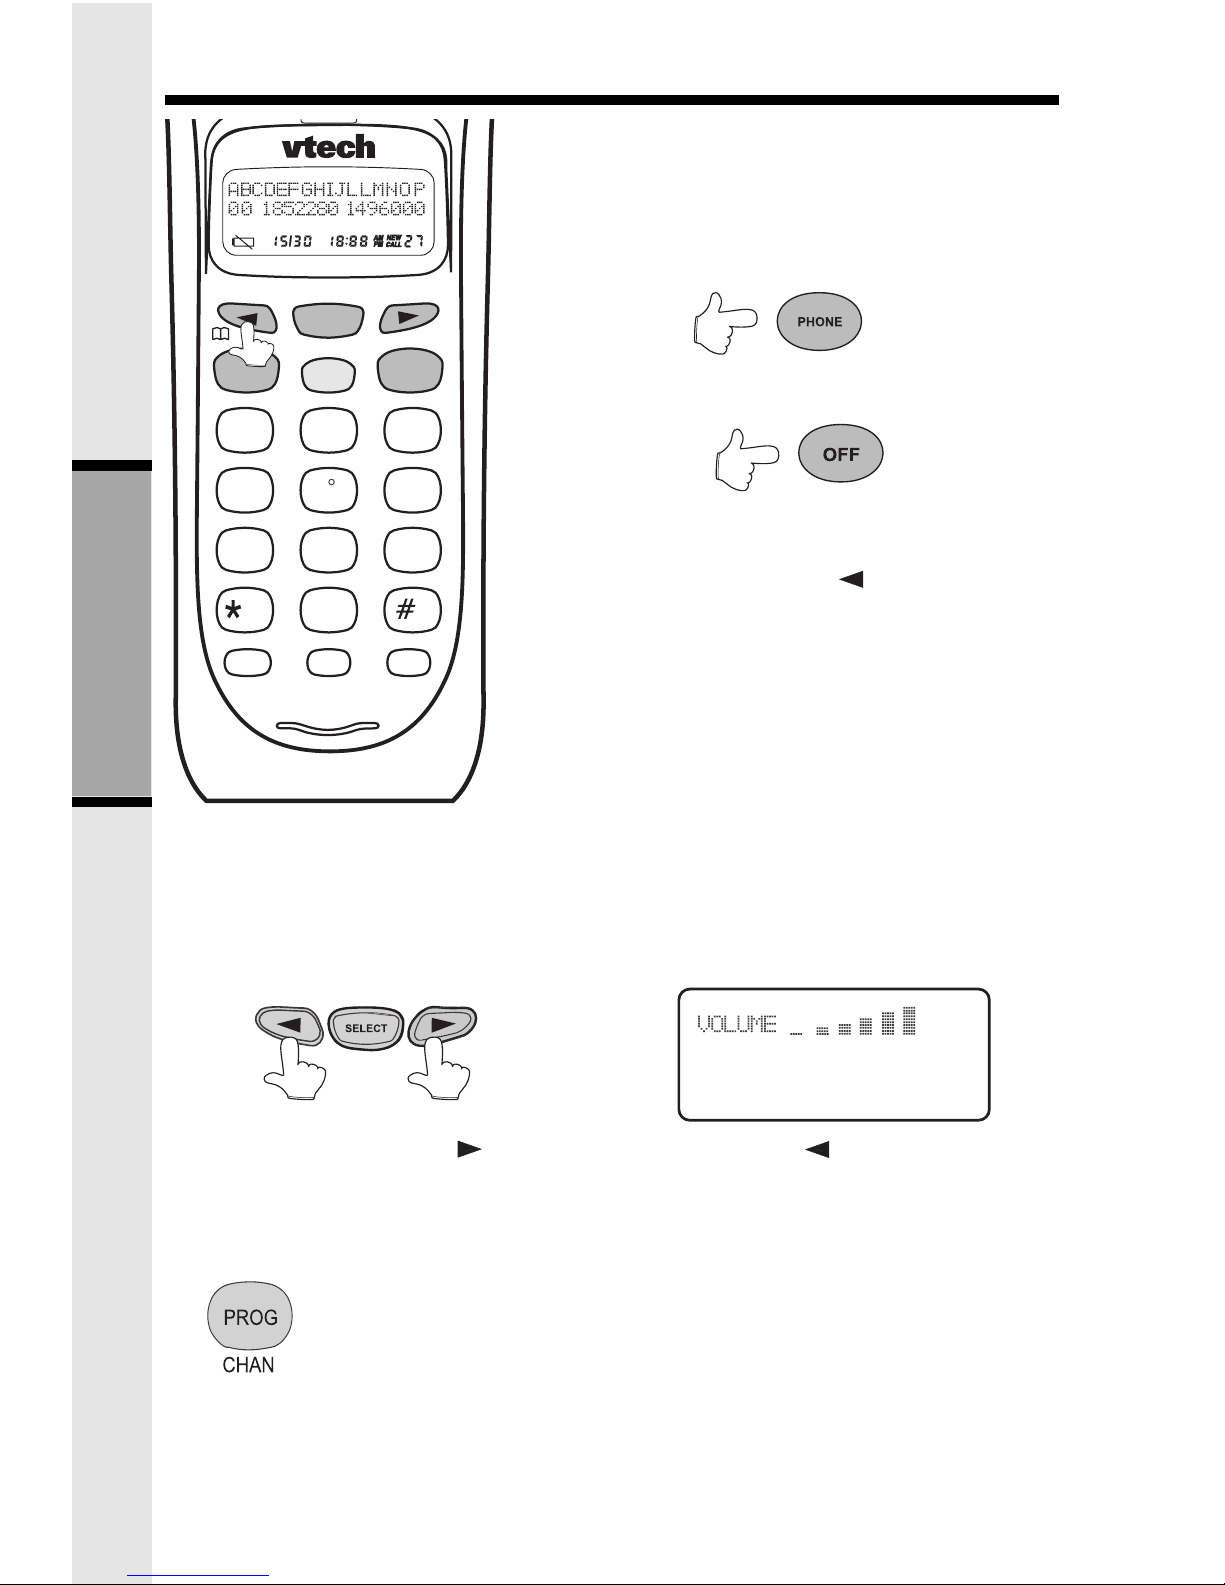
MAKING CALLS
Method 1------Live Dialing
Press PHONE. Dial the phone number.
Press OFF to end your call.
Method 2------Pre-dialing
Dial the phone number. Use the key to backspace if
you make a dialing mistake. Then press PHONE.
Press OFF to end your call.
When the handset is in use, the IN USE/CHARGE light
on the Base Unit will flash. When the Handset is in the
Base Unit cradle, the IN USE/CHARGE light glows
steadily.
V OLUME CONTROL
While you are on a call, press to raise the inbound volume and to lower it. The handset
will display the relative volume setting as you adjust it.
CHANNEL CHANGING
If you experience noise or interference while on a call, you may be too far
from the Base Unit, or in an obstructed area. Tr y moving to a different
location. If this does not improve the transmission, press PROG/CHAN.
You can press this key more than once, if necessary.
NOTE: This feature only operates while you are on an active call.
BASIC OPERATION
BASIC OPERATION
SELECT
PHONE
HOLD
OFF
123
456
789
0
ABC DEF
GHI JKL MNO
PQRS TUV WXYZ
TONE OPER
MEM PROG
REDIAL
NEW CHAN PAUSE
FLASH
CID

11
USING REDIAL
1. Press PHONE. Listen for dial tone.
2. Press REDIAL/PAUSE. The last number you called will automatically be redialed.
OR
1. Press REDIAL so that the number is shown on the display.
2. Press PHONE.
To save the phone number in the phone book directory,
1. Press REDIAL. On top of the number, “SAVE TO MEMORY” is flashing.
2. Press SELECT. You can edit the number or enter the name of the entr y. ( Please see
STORING A NAME AND NUMBER INTO THE PHONE BOOK for details.)
3. Press SELECT when you have finished. The entry will be saved in the lowest available
location that is displayed on the lower right cor ner.
ANSWERING CALLS
To answer a call, press any key other than the OFF key.
After you review the Caller ID on the phone and you do not want to answer the call, you can
stop the ringer by pressing OFF without dropping the call.
(Note: This is not available when the Handset is on cradle.)
AUT O ANSWER
When Auto Answer is set to ON (see SETTING UP YOUR
VT 9161
), your Handset will
automatically answer an incoming call when you remove it from the Base cradle.
FLASH
When you receive a
Call Waiting
alert, press
PHONE/FLASH to switch to the incoming call.
Press PHONE/FLASH again to return to the first call.
BASIC OPERATION
BASIC OPERATION
REDIAL

12
BASIC OPERATION
HOLD
To place your call on hold, press HOLD. Press HOLD again
to return to your call.
NOTE: If you have a call on hold, and pick up a parallel extension phone, your
VT9161
will
automatically drop the call and return to idle mode.
PAGE
The Page Feature
• This feature is useful if you have
misplaced the handset.
• Press it a secord time to cancel a page.
• The base will ring the handset for 60
seconds (STANDBY mode) or one
page tone (PHONE mode) before
ending the page automatically.
BASIC OPERATION
TO PAGE THE
HANDSET FROM
THE BASE
Press PAGE
TO END A PAGE AT
THE HANDSET
Press OFF
MIC
PLAY/STOP
DELETE
TIME/SET
SELECT MENU
VOL
PAGE
REPEAT/SLOW SKIP/QUICK
SELECT
PHONE
HOLD
OFF
123
456
789
0
ABC DEF
GHI JKL MNO
PQRS TUV WXYZ
TONE OPER
FLASH
CID
13
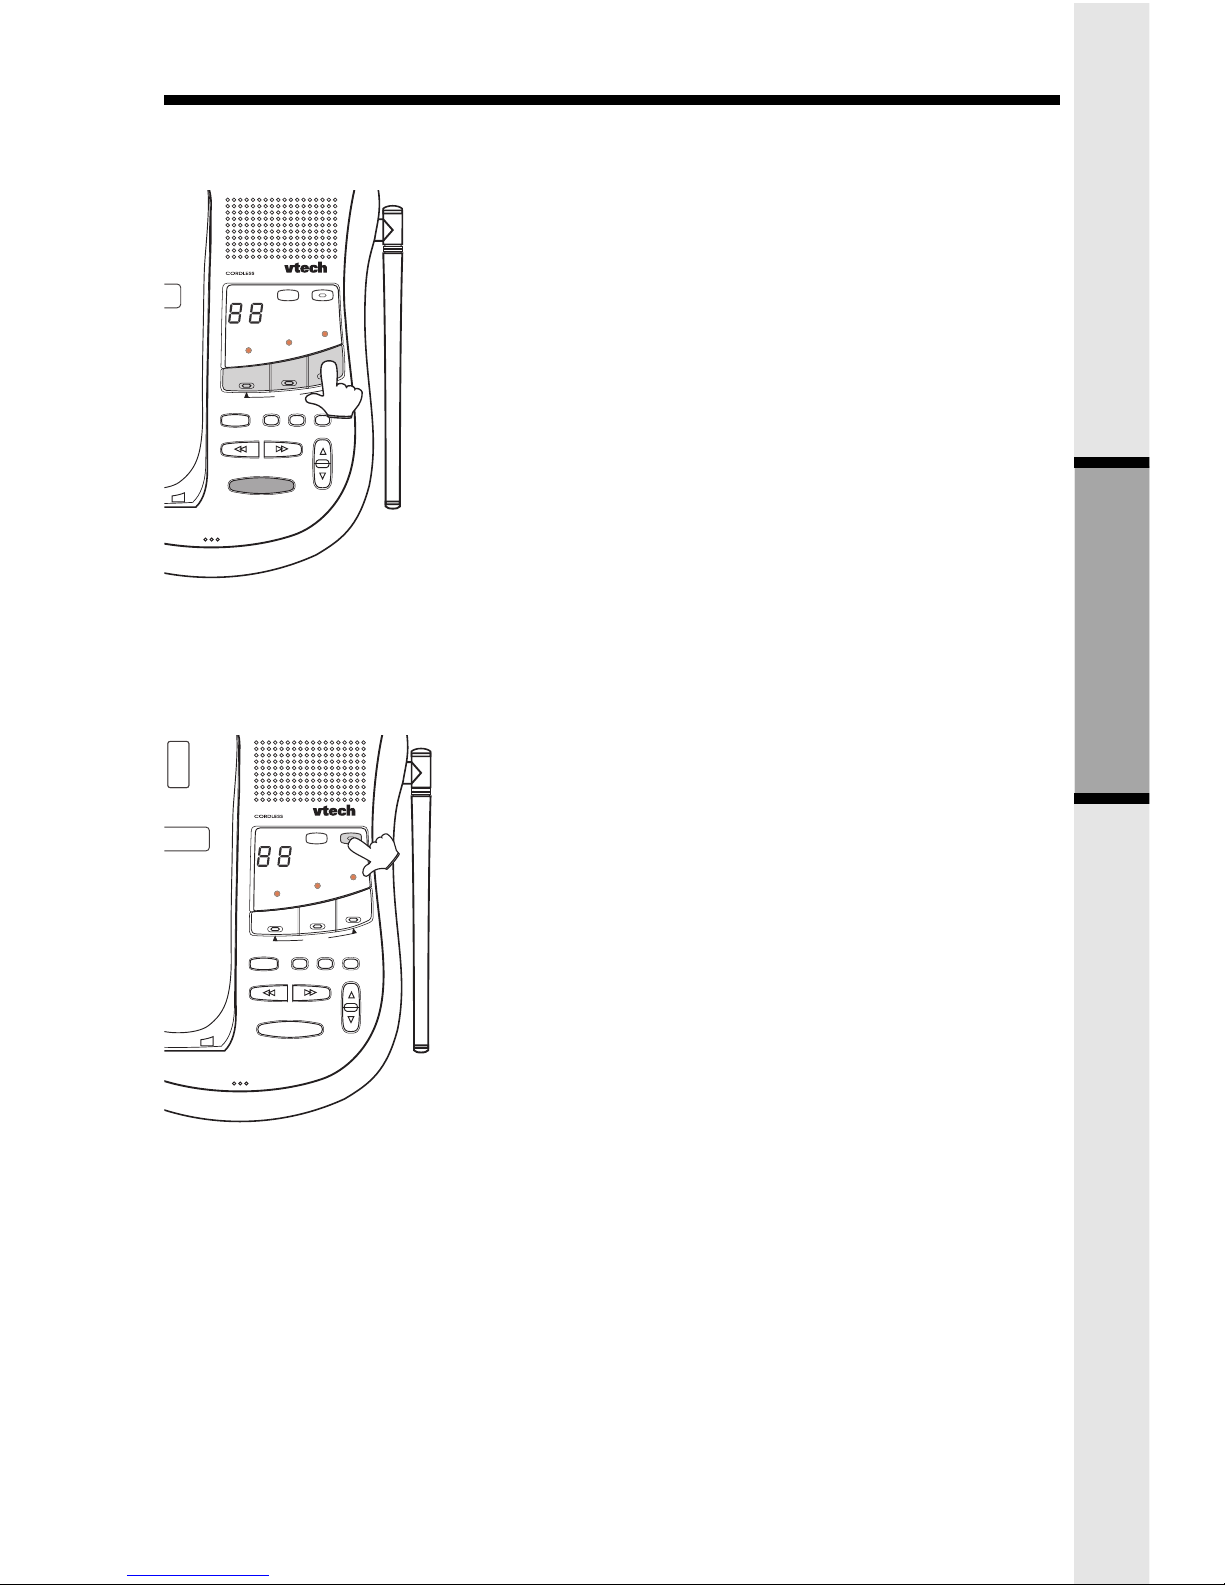
MAILBOX LED’ s
The MAILBOX LED’s (1,2,3) indicate the status of messages in each mailbox.
ANSWER ON/OFF LED
ANSWER LED will remain off if ITAD is not in auto-answer mode.
ANSWER LED remains on steadily when ITAD is in auto-answer mode.
ITAD BASE LEDS
MAILBOX LEDS
STATUS:
FLASH: New
messages are waiting
ON: Old messages
inside
OFF: No messages
MIC
ANSWER
ON/OFF
REC/MEMO
NEW CALL
MESSAGE
PLAY/STOP
IN USE/CHARGE
1
MAILBOX
3
MAILBOX
2
MAILBOX
DELETE
TIME/SET
SELECT MENU
VOL
PAGE
REPEAT/SLOW SKIP/QUICK
VT 9161
900
MHz
MIC
ANSWER
ON/OFF
REC/MEMO
NEW CALL
MESSAGE
PLAY/STOP
IN USE/CHARGE
1
MAILBOX
3
MAILBOX
2
MAILBOX
DELETE
TIME/SET
SELECT MENU
VOL
PAGE
REPEAT/SLOW SKIP/QUICK
VT 9161
900
MHz
ANSWER LED
STATUS:
ON: ITAD is in auto-
answer mode
OFF:ITAD is NOT in
auto-answer mode
BASIC OPERATION

14
REC/MEMO KEY
MAILBOX X
(1,2&3 ) KEY
ANSWER ON KEY
DELETE KEY
TIME/SET KEY
SELECT KEY
MENU KEY
VOLUME UP KEY
VOLUME DOWN KEY
SKIP/QUICK KEY
REPEAT/SLOW KEY
ANSWER ON/OFF KEY- - - - - - - - - - - -
This key is used to turn ON and OFF the
ITAD.
• While in the OFF mode.
1. The cordless phone will still operate
normally, but the ITAD will not answer
calls.
2. The ITAD can be reactivated remotely
by 10 successive rings on an incoming
call.
• When the IT AD is ON, the ANSWER LED
is on.
MAILBOX X ( 1,2 or 3) KEY- - - - - - -
• The ITAD stores the messages into different mailboxes for retrieval by the corresponding mailbox user. For example, Mailbox 1 is for John, Mailbox
2 is for Jane, etc.
• Press MAILBOX X key to playback the
incoming message in corresponding
mailbox. Press the MAILBOX X key
again will terminate the playback.
• When in menu mode, press any of the
mailbox keys to return to idle mode.
REC / MEMO KEY
The REC/MEMO key is used to record memos at the base unit in to the current selection. The
maximum record time per memo/message is 4 minutes.
ITAD BASE KEYPAD FUNCTIONS
ITAD BASE KEYPAD
MIC
ANSWER
ON/OFF
REC/MEMO
NEW CALL
MESSAGE
PLAY/STOP
IN USE/CHARGE
1
MAILBOX
3
MAILBOX
2
MAILBOX
DELETE
TIME/SET
SELECT MENU
VOL
PAGE
REPEAT/SLOW SKIP/QUICK
VT 9161
900
MHz
WHEN ITAD IS ON
THE ANSWER LED
IS ILLUMINATED
To Select Desired
Mailbox:
Press MAILBOX X
(1,2 or 3)
MAILBOX X KEY
MIC
ANSWER
ON/OFF
REC/MEMO
NEW CALL
MESSAGE
PLAY/STOP
IN USE/CHARGE
1
MAILBOX
3
MAILBOX
2
MAILBOX
DELETE
TIME/SET
SELECT MENU
VOL
PAGE
REPEAT/SLOW SKIP/QUICK
VT 9161
900
MHz
BASIC OPERATION
 Loading...