


USER’S MANUAL

Table of Contents Page
.........................................................................................................
Copyright ....................................................................................................... 1
Disclaimer and Limitation of Liability ...................................................1
1 INTRODUCTION
1.1 Phusion™ Components........................................................2
1.2 Touchpad Layout .....................................................................6
1.3 Battery Installation ................................................................... 8
1.4 Adjusting the Clock After Battery Replacement ........... 8
1.5 How to Use the Action Menu ............................................. 9
2 DIGITAL CAMERA
2.1 Digital Camera: What is it? ................................................. 10
2.2 Commands ..............................................................................10
2.3 Using the Digital Camera ...................................................11
2.4 Adjust the Picture Contrast and Brightness .................. 11
2.5 How to Use the Schedule Photo Taking Function .....11
2.6 How to Use Timer Photo Taking ......................................12
3 PHOTO BROWSER
3.1 Photo Browser: What is it? ................................................. 13
3.2 Commands ..............................................................................13
3.3 Using the Photo Browser .................................................... 14
3.4 Deleting a Photo ....................................................................14
3.5 Show or Hide the Date & Time ........................................ 15
3.6 Viewing Photos from Schedule Photo Taking .............15
3.7 Viewing Today’s Photos .......................................................15
4 MY PHOTO GALLERY
4.1 My Album ................................................................................ 16
4.1.1 My Album: What is it? ......................................................... 16
4.1.2 Commands ..............................................................................16
4.1.3 Using My Album ................................................................... 18

Table of Contents Page
.........................................................................................................
4.1.4 Creating a New Album ....................................................... 18
4.1.5 Deleting an Album ................................................................ 19
4.1.6 Playing an Album as a Slide Show ................................. 20
4.1.7Viewing Photos in an Album............................................20
4.1.8 Arranging the Order of the Photos in an Album ...... 20
4.1.9 Attaching a Note to Your Photos .....................................21
4.1.10 Deleting a Photo from an Album ....................................21
4.1.11 Adding More Photos to an Album ................................ 22
4.1.12 Adding Album Cover and End Pages ........................... 22
4.1.13 Deleting a Cover or End Page ......................................... 23
4.2 Photo Maker .......................................................................... 23
4.2.1 Photo Maker: What is it? ................................................... 23
4.2.2 Commands ............................................................................. 23
4.2.3 Using Photo Maker .............................................................. 24
4.2.4 Adding Effects to a Photo .................................................. 25
4.2.5 Adding Special Effects to a Photo ................................... 25
4.2.6 Deleting Photos with Effects ............................................. 26
4.2.7 Editing Photos with Effects ................................................ 27
4.2.8 Editing a Photo with a Special Effect .............................. 27
4.2.9 Viewing a Photo Full Screen ............................................. 28
4.2.10 Replacing a Photo ................................................................ 28
4.3 Slide Show Maker ................................................................ 28
4.3.1 Slide Show Maker: What is it? ......................................... 28
4.3.2 Commands ............................................................................. 29
4.3.3 Using the Slide Show Maker ............................................. 31
4.3.4 Creating a New Slide Show ............................................... 31
4.3.5 Deleting a Slide Show ......................................................... 32
4.3.6 Viewing a Slide Full Screen ............................................... 32
4.3.7 How to Play an Album as a Slide Show ....................... 33
4.3.8 How to Play a Slide Show .................................................. 33
4.3.9 Excluding a Photo from a Slide Show ........................... 33
4.3.10 Changing the Order of the Photos
in a Slide Show ...................................................................... 34

Table of Contents Page
.........................................................................................................
4.3.11 Adding the Transition and Sound Effect....................... 34
4.3.12 Adding Cover and End Slides .......................................... 35
4.3.13 Adding More Photos to a Slide Show ........................... 35
4.4 Card Maker ............................................................................ 36
4.4.1 Card Maker: What is it? ..................................................... 36
4.4.2 Commands ............................................................................. 36
4.4.3 Using Card Maker ............................................................... 37
4.4.4 Creating a New Card .......................................................... 38
4.4.5 Editing a Card ........................................................................39
4.4.6 Deleting a Card .....................................................................40
4.4.7 Viewing a Card Full Screen ............................................... 40
4.4.8 Replacing a Photo ................................................................ 40
4.4.9 Inserting Clip Art ................................................................... 41
4.4.10 Inserting Text from the Word List ....................................41
5 MY ORGANIZER
5.1 My Mailbox ............................................................................ 42
5.1.1 My Mailbox: What is it? ..................................................... 42
5.1.2 Folders in My Mailbox........................................................ 42
5.1.3 Commands ............................................................................. 43
5.1.4 Using My Mailbox ............................................................... 44
5.1.5 Creating a New Message .................................................. 44
5.1.6 Editing a Message ................................................................ 44
5.1.7 Saving a Message to the Drafts Folder ......................... 44
5.1.8 Sending a Message to the Outbox ................................ 44
5.1.9 Adding an Address .............................................................. 45
5.1.10 Viewing Message Information ......................................... 45
5.1.11 Viewing an Attachment ...................................................... 45
5.1.12 Deleting a Message ............................................................. 45
5.1.13 Spell Checking ...................................................................... 45
5.1.14 Inserting a Photo ................................................................... 46
5.1.15 Inserting a Sentence ............................................................ 46
5.1.16 Inserting a Smiley Icon ....................................................... 46

Table of Contents Page
.........................................................................................................
5.2 My Address Book ................................................................. 46
5.2.1 My Address Book: What is it? .......................................... 46
5.2.2 Commands ............................................................................. 47
5.2.3 Using My Address Book .................................................... 47
5.2.4 Finding an Address Book Entry ....................................... 48
5.2.5 Creating an Address Book Entry ..................................... 48
5.2.6 Creating a Personal Address Book Entry ...................... 48
5.2.7 Creating a Group Address Book Entry ......................... 49
5.2.8 Editing an Address Book Entry ........................................ 49
5.2.9 Deleting Address Book Files ............................................. 50
5.3 My Calendar ...........................................................................51
5.3.1 My Calendar: What is it? ....................................................51
5.3.2 Commands ..............................................................................51
5.3.3 Using My Calendar .............................................................. 52
5.3.4 Adding an Event ................................................................... 52
5.3.5 Calendar View Shortcuts .................................................... 53
5.3.6 Viewing a Specific Date ...................................................... 53
5.3.7 Deleting All the Events on a Specific Day .................... 54
5.4 My Memo Pad ...................................................................... 54
5.4.1 My Memo Pad: What is it? ............................................... 54
5.4.2 Commands ............................................................................. 54
5.4.3 Using My Memo Pad ......................................................... 55
5.4.4 Creating and Editing Memos ........................................... 55
5.4.5 Deleting .................................................................................... 55
5.4.6 Inserting a Smiley Icon ....................................................... 56
5.5 My Money Manager ........................................................... 56
5.5.1 My Money Manager: What is it? .................................... 56
5.5.2 Commands ............................................................................. 56
5.5.3 Viewing My Money Manager ......................................... 57
5.5.4 Renaming the Folder ........................................................... 58
5.5.5 Creating a New Entry ......................................................... 58
5.5.6 Viewing Another Folder ..................................................... 59

Table of Contents Page
.........................................................................................................
5.5.7 Viewing a Statement ........................................................... 59
5.6 My Database .......................................................................... 60
5.6.1 My Database: What is it? ................................................... 60
5.6.2 Commands ............................................................................. 60
5.6.3 Viewing My Database ......................................................... 60
5.6.4 Adding a Record .................................................................... 61
5.6.5 Creating a New Database .................................................. 61
5.6.6 Deleting a Record ................................................................. 62
5.6.7 Deleting a Database ............................................................ 62
5.7 School Subjects ..................................................................... 62
5.7.1 School Subjects: What is it? .............................................. 62
5.7.2 Commands ............................................................................. 63
5.7.3 Viewing School Subjects .................................................... 63
5.7.4 Creating a New School Subjects Table ......................... 63
5.7.5 Deleting Contents in the School SubjectsTable ......... 64
5.8 To Do List ................................................................................ 65
5.8.1 To Do List: What is it? ......................................................... 65
5.8.2 Commands ............................................................................. 65
5.8.3 Symbols Displaying the Status of Tasks
in the To Do List.................................................................... 66
5.8.4 Using the To Do List ............................................................ 66
5.8.5 Creating a New Task ........................................................... 66
5.8.6 Viewing the To Do List Index Screen ............................ 67
5.8.7 Viewing the Content of the To Do List ......................... 67
5.8.8 Editing a Task ......................................................................... 67
5.8.9 Deleting Task Contents ....................................................... 67
5.8.10 Deleting a Task ...................................................................... 67
5.8.11 Setting Task Options ........................................................... 68
5.8.12 Setting Date Options ........................................................... 68

Table of Contents Page
.........................................................................................................
6 MY ACCESSORIES
6.1 Clock.........................................................................................69
6.1.1 Clock: What is it?..................................................................69
6.1.2 Commands.............................................................................69
6.1.3 Viewing the Clock................................................................69
6.1.4 Changing the Clock Settings............................................70
6.1.5 Changing the Date & Time Format...............................70
6.2 City Locator.............................................................................71
6.2.1 City Locator: What is it?......................................................71
6.2.2 Commands..............................................................................71
6.2.3 Viewing the City Locator....................................................71
6.2.4 Viewing City Info..................................................................72
6.3 Mini-Calculator......................................................................73
6.3.1 Mini-Calculator: What is it?...............................................73
6.3.2 Using Mini-Calculator.........................................................73
6.3.3 Touchpad Keys and their Mini-Calculator Function.74
6.4 Unit Conversion....................................................................75
6.4.1 Unit Conversion: What is it?.............................................75
6.4.2 Using Unit Conversion.......................................................75
6.5 Birthday List............................................................................76
6.5.1 Birthday List: What is it?.....................................................76
6.5.2 Commands.............................................................................76
6.5.3 Using the Birthday List.......................................................76
6.5.4 Birthday List Alarm Setting................................................76
6.6 My Profile................................................................................77
6.6.1 My Profile: What is it?.........................................................77
6.6.2 Commands.............................................................................77
6.6.3 Using My Profile...................................................................77

Table of Contents Page
.........................................................................................................
7 ENTERTAINMENT
7.1 Photo Puzzle .......................................................................... 78
7.1.1 Photo Puzzle: What is it? ................................................... 78
7.1.2 Commands ............................................................................. 78
7.1.3 Playing Photo Puzzle ........................................................... 78
7.1.4 Game Settings ....................................................................... 79
7.2 Photo Tic-Tac-Toe .................................................................. 79
7.2.1 Photo Tic-Tac-Toe: What is it? ........................................... 79
7.2.2 Commands ............................................................................. 80
7.2.3 Playing Photo Tic-Tac-Toe ................................................... 80
7.2.4 Game Settings ....................................................................... 80
7.3 Trivia ........................................................................................... 81
7.3.1 Trivia: What is it? .................................................................... 81
7.3.2 Commands ..............................................................................81
7.3.3 Playing Trivia ...........................................................................81
7.3.4 Selecting a Skill Level .......................................................... 82
7.4 Pegged ..................................................................................... 82
7.4.1 Pegged: What is it? .............................................................. 82
7.4.2 Commands ............................................................................. 83
7.4.3 Playing Pegged ...................................................................... 83
7.4.4 Selecting Different Puzzles ................................................ 84
7.5 Word Chamber ..................................................................... 84
7.5.1 Word Chamber: What is it? .............................................. 84
7.5.2 Commands ............................................................................. 84
7.5.3 Playing Word Chamber...................................................... 85
7.5.4 Game Settings ....................................................................... 85
7.6 Phortune Cookies ................................................................. 86
7.6.1 Phortune Cookies: What is it? .......................................... 86
7.6.2 Commands ............................................................................. 86
7.6.3 Playing Luck Today .............................................................. 86
7.6.4 Playing Friendship ................................................................ 88

Table of Contents Page
.........................................................................................................
8 WORDS & MATH
8.1 Math Games .......................................................................... 89
8.1.1 Tangrams ................................................................................. 89
8.1.1.1 Tangrams: What is it? .......................................................... 89
8.1.1.2 Commands ............................................................................. 89
8.1.1.3 Playing Tangrams ................................................................. 89
8.1.1.4 Rotating Shapes .................................................................... 90
8.1.1.5 Flipping Shapes ..................................................................... 90
8.1.1.6 Selecting Different Puzzles................................................ 90
8.1.1.7 Using Hints .............................................................................. 91
8.1.2 Mathimage .............................................................................. 91
8.1.2.1 Mathimage: What is it? ....................................................... 91
8.1.2.2 Commands ............................................................................. 92
8.1.2.3 Playing Mathimage .............................................................. 92
8.1.3 Grid Grad ................................................................................ 93
8.1.3.1 Grid Grad: What is it? ......................................................... 93
8.1.3.2 Commands ............................................................................. 93
8.1.3.3 Playing Grid Grad ................................................................ 93
8.1.3.4 Erasing Points Plotted on the Grid ................................. 94
8.1.3.5 Selecting a Skill Level .......................................................... 94
8.2 Word Games .......................................................................... 95
8.2.1 Word Puzzle ........................................................................... 95
8.2.1.1 Word Puzzle: What is it? .................................................... 95
8.2.1.2 Commands ............................................................................. 96
8.2.1.3 Playing Word Puzzle ........................................................... 96
8.2.1.4 Selecting a Skill Level .......................................................... 96
8.2.2 Clue Counter ......................................................................... 97
8.2.2.1 Clue Counter: What is it? .................................................. 97
8.2.2.2 Commands ............................................................................. 97
8.2.2.3 Playing Clue Counter .......................................................... 98
8.2.3 Analogies ................................................................................. 98
8.2.3.1 Analogies: What is it? .......................................................... 98
8.2.3.2 Commands ............................................................................. 98
8.2.3.3 Playing Analogies ................................................................. 99

Table of Contents Page
.........................................................................................................
8.2.3.4 Selecting a Skill Level .......................................................... 99
8.3 Translator ............................................................................... 100
8.3.1 Translator: What is it? ........................................................ 100
8.3.2 Using Translator .................................................................. 100
8.4 Spell Checker ........................................................................ 101
8.4.1 Spell Checker: What is it? ................................................. 101
8.4.2 Commands ............................................................................101
8.4.3 Using Spell Checker ...........................................................101
8.4.4 Customizing the Spell Checker ..................................... 102
9 TOOLS
9.1 My Setup ............................................................................... 103
9.1.1 Memory Manager .............................................................. 103
9.1.1.1 Memory Manager: What is it? ....................................... 103
9.1.1.2 Commands ........................................................................... 103
9.1.1.3 Using the Memory Manager ......................................... 103
9.1.1.4 Deleting Files ........................................................................ 104
9.1.1.5 How to Reset Memory ..................................................... 104
9.1.2 Changing the Sound Setup ............................................ 105
9.1.2.1 Sound Setup: What is it? ................................................. 105
9.1.2.2 How to Use the Sound Setup ........................................ 105
9.1.3 Auto Shut-Off Time ........................................................... 106
9.1.3.1 Auto Shut-Off Time: What is it? .................................... 106
9.1.3.2 Using Auto Shut-Off Time .............................................. 106
9.1.4 Date & Time Format .......................................................... 107
9.1.4.1 Date & Time Format: What is it? ................................... 107
9.1.4.2 Using Date & Time Format ............................................. 107
9.1.5 User Mode ............................................................................ 108
9.1.5.1 User Mode: What is it? ..................................................... 108
9.1.5.2 Using User Mode ............................................................... 108
9.1.6 Locking the Unit ................................................................. 109
9.1.6.1 Lock Unit: What is it? ........................................................ 109
9.1.6.2 Using Lock Unit .................................................................. 109

Table of Contents Page
.........................................................................................................
9.2 Phusion™ Tutor ...................................................................110
9.2.1 Phusion™ Tutor: What is it? ............................................110
9.2.2 Using Phusion™ Tutor ...................................................... 110
9.3 VTech® PC Link Software ................................................ 110
Appendix: Smiley Icons ....................................................................... 111
Appendix: Battery Notices ................................................................... 112
VTe ch® Phusion™ ON-LINE ............................................................112
FCC NOTICE ........................................................................................... 114
Copyright
Copyright® 2000 VTech Industries, LLC All rights reserved. VTech
and the VTech logo are registered trademarks. Phusion™ and the
Phusion™ logo are trademarks of VTech Industries, LLC.
Disclaimer and Limitation of Liability
VTech Industries, LLC and its suppliers assume no responsibility for
any damage or loss resulting from the use of this handbook. VTech
Industries, LLC and its suppliers assume no responsibility for any
loss or claims by third parties that may arise through the use of
this software. VTech Industries, LLC and its suppliers assume no
responsibility for any damage or loss caused by deletion of data
as a result of malfunction, dead battery, or repairs. Be sure to make
backup copies of important data on other media to protect against
data loss.
Important!
®
Please read the VTech
Agreement before using the accompanying software
program(s). Using any part of the software indicates that
you accept the terms of the Phusion™ End User Software
License Agreement.
This manual was prepared during software development. Some
screens in this manual may not appear exactly as the screens found
in the final product.
End User Software License
®
VTech
Phusion™ PC Link software is supplied on 3.5" disks. If
you do not have access to a 3.5" floppy disk drive for your
computer, you can download the VTech® Phusion™ PC Link
software on-line from www.myphusion.com.
1
1 INTRODUCTION
Welcome to the Phusion™ digital camera organizer. This guide is
designed to help you set up and run your digital camera organizer.
It describes all you need to know about how to use your Phusion™
digital camera organizer and the applications that come with it.
1.1 Phusion™ Components
Front
2

Important Buttons and Features
Digital Camera With Phusion™’s Digital Camera, you
can take up to 25 black and white digital
pictures. Use the LCD screen to see what
the Digital Camera sees in real-time, so
you can always get the perfect shot. Also,
you’ll never need film or film developing.
You can take a picture and see the results
instantly. Each picture is instantly stored
in Phusion™’s Photo Browser. For even
greater flexibility, you can rotate the
Digital Camera 180° for more picture
taking fun.
Photo Button Press the button to capture the photos
that appear in the Digital Camera.
Power Button Turns your Phusion™ on or off. If your
Phusion™ is turned off, pressing the
Power button turns the unit on. If your
Phusion™ is turned on, pressing the
Power button turns the unit off.
Contrast Control You can adjust the appearance of the
LCD screen for the clearest display.
Depending on the lighting conditions or
temperature of the environment where
you use your digital camera organizer,
you may need to adjust the contrast.
To adjust the contrast, rotate the Control
up or down to increase or decrease the
contrast.
3

Stylus and Stylus Slot The stylus slides in and out of the slot.
To use the stylus, remove it from the slot
and hold it as you would a pen or pencil.
Use the stylus to press the keys on the
Touchpad or to press the Directional Pad
and other buttons.
Touchpad The Touchpad is very similar to a computer
keyboard. Use the stylus to press the keys
on the Touchpad. See the section,
“Touchpad Layout” for more information
on each key.
Cancel Button Press Cancel to return to the previous
screen.
OK Button Press OK to move the cursor to the next
line, or to confirm an action or command.
Menu Button Press Menu to launch the Action menu.
The Action menu contains additional
commands for your Phusion™ digital
camera organizer.
Directional Pad Press the Directional Pad to move the
cursor up, down, left or right on the
screen. Also, the Directional Pad can be
used to adjust the settings on your
Phusion™ digital camera organizer.
On menu screens such as the Main
menu, press Right to move the cursor
couter-clockwise. Press Left to move the
cursor clockwise.
4
Back
Cradle Connector This port connects to the cradle, which
is connected to the serial port on your
PC. Place the Phusion™ into the cradle
to backup data or transfer data to and
from your PC.
Battery Cover Covers the batteries that power your
Phusion™ digital camera organizer.
Reset Button Under normal use, you should not have
to use the Reset button. If your Phusion™
digital camera organizer stops responding,
press Reset to restart.
5
Cradle
PC Link Connector The PC Link Connector connects to the
serial port on your PC using the serial
cable included with your Phusion™.
1.2 Touchpad layout
This key is used to activate the number
keys. If you press the Fn key then press
the Y key, the number 6 will appear on
the screen. Also, you can press the Fn
key then H key to view the Tutor
information.
6
Press this key before pressing the letter
keys to type capital letters.
Cap
Press this key if you want to type all
letters as capital letters. Press this key
again to continue typing in lower case
letters.
Space Press this key to insert a space between
words or letters.
Arrow keys Press these keys to move the cursor up,
down, left or right.
Press this key to move the cursor to the
next line or confirm an action.
Press this key to delete any character to
the left of the cursor.
AC/C Used in the Mini-Calculator. Press this
key once to clear your most recent entry.
Press the key again to clear all entries
in the Mini-Calculator.
7
1.3 Battery Installation
Two (2) AA size batteries power your Phusion™ digital camera
organizer. Here is how to install them:
1. Be sure your Phusion™ digital
camera organizer is turned off.
2. Open the battery cover on the
back of your Phusion™ digital
camera organizer.
3. Insert two (2) new AA size
batteries as shown.
4. Close the battery cover.
If your Phusion™ digital camera organizer stops working or
if the screen appears dim, make sure the batteries are fresh
and installed properly.
1.4 Adjusting the Clock After Battery Replacement
The internal clock stops when the batteries are removed. You
will be asked to adjust the time on your Phusion™.
1. If you need to adjust the clock, choose Yes.
2. Then adjust the time on the following screen.
3. After adjusting each of the clock settings, your changes
will be saved automatically.
8
1.5 How to Use the Action Menu
Press the Menu button on your Phusion™ digital camera
organizer to view the Action menu.
The Action menu is arranged in a
cross section that allows you to
access commands using the fewest
button presses. Use the Directional
Pad to select a command, then
press OK to continue.
9
2 DIGITAL CAMERA
2.1 Digital Camera: What is it?
The pictures you take can be used in some of the learning
activities and games. You can add pictures to your address
book, too. You can even transfer pictures to and from your
PC. Each picture is instantly stored in Phusion™‘s Photo
Browser.
Where is it?
You can open the Digital Camera from the Main menu of
your Phusion™ digital camera organizer. The Digital Camera
can also be accessed from other applications that use your
digital pictures.
2.2 Commands
(Schedule Photo Taking) Automatically take a series of
photos over a set time.
(Timer Photo Taking) Automatically take a photo after
10 seconds.
(Show Date & Time) Display the date and time when
a photo was taken.
(Hide Date & Time) Hide the date and time when a
photo was taken.
(Delete This Photo) Delete the current photo.
10
2.3 Using the Digital Camera
1. Use the Directional Pad to select (Digital Camera)
from the Main menu and press OK.
2. On the LCD screen, you can instantly see what the
Digital Camera sees in real-time.
3. Press the Photo button to take a picture.
2.4 Adjust the Picture Contrast and Brightness
1. You can adjust the contrast and brightness of each picture
using the Directional Pad.
2. Press Up and Down to adjust the picture contrast.
3. Press Left or Right to adjust the brightness of the picture.
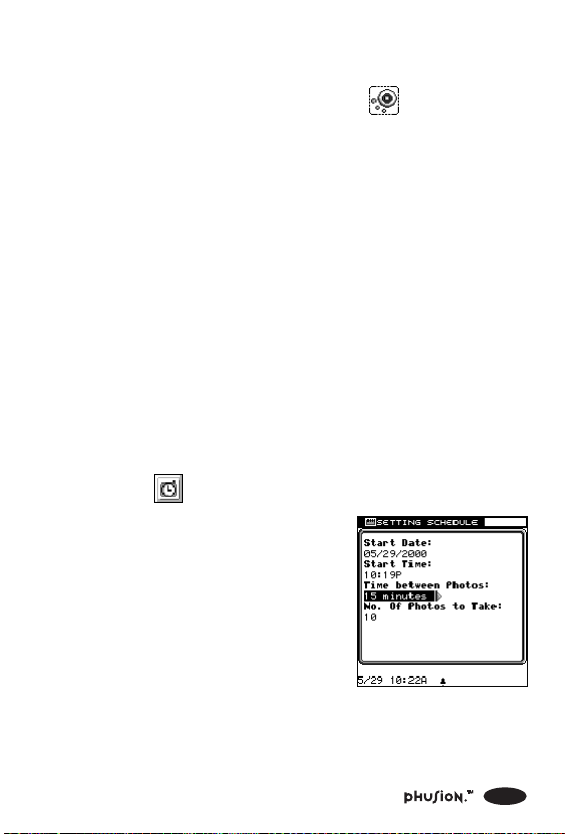
2.5 How to Use the Schedule Photo Taking Function
1. Select (Schedule Photo Taking) from the Action menu.
2. Enter the Start Date, Start Time,
time between photos, and the
number of photos to take.
3. After setting the date and time options, press OK.
4. Turn the unit off.
11

2.6 How to Use Timer Photo Taking
1. Select (Timer Photo Taking) from the Action
menu.
2. Once Timer Photo Taking is active, Phusion™ will take
a picture in 10 seconds.
12
3 PHOTO BROWSER
3.1 Photo Browser: What is it?
The Photo Browser is a collection of digital photos taken by
you. Once a picture is taken, it is automatically stored in the
Photo Browser. Your Phusion™ digital camera organizer stores
up to 25 digital pictures.
Where is it?
You can find Photo Browser in the Main menu.
3.2 Commands
(Delete) Delete the current photo or all photos.
(This File) Delete the selected photo.
(All Files) Permanently delete all photos.
(View Today’s Photos) View the photos taken today.
(View Scheduled Photos) View the photos taken during
Schedule Photo Taking.
(Hide Date & Time) Hide the date and time when a
photo was taken.
(Show Date & Time) Display the date and time when
a photo was taken.
(Go Back) Go back to the previous menu.
13
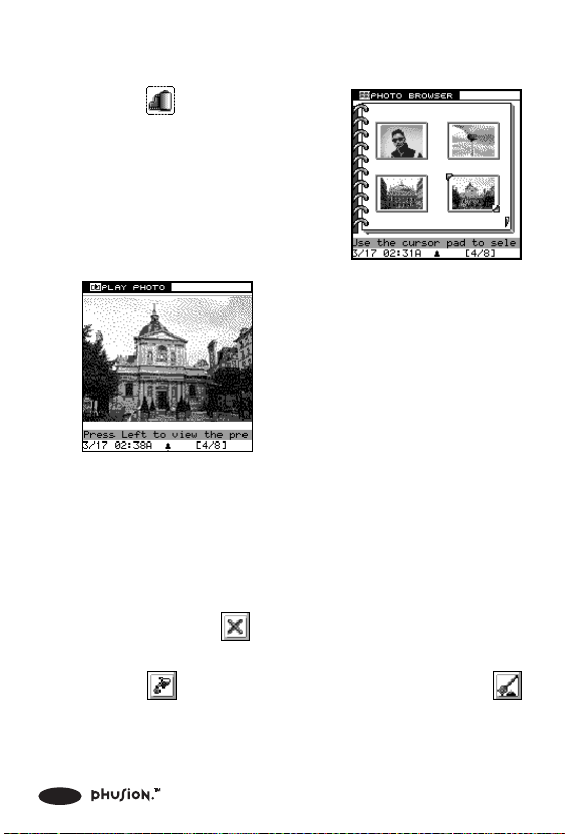
3.3 Using the Photo Browser
1. Select (Photo Browser) from
the Main menu and press OK.
2. Use the Directional Pad to select
a photo and press OK
to view it.
3.4 Deleting a Photo
1. Select Photo Browser from the Main menu and press OK
to open it.
2. Select a photo you want to delete using the Directional
Pad and select
(Delete) from the Action menu.
3. A sub-menu will pop up. From this sub-menu, you can
select
(All Files) to delete all the photos in the Photo Browser.
14
(This File) to delete the selected photo or
3.5 Show or Hide the Date & Time
1. Select (Show Date & Time) from the Action menu
after you have opened the Photo Browser.
2. If the date and time isn’t shown,
press OK. The date and time
of when each photo was taken
will appear on screen.
3. Select (Hide Date & Time)
and press OK again to hide the
date and time of when each
photo was taken.
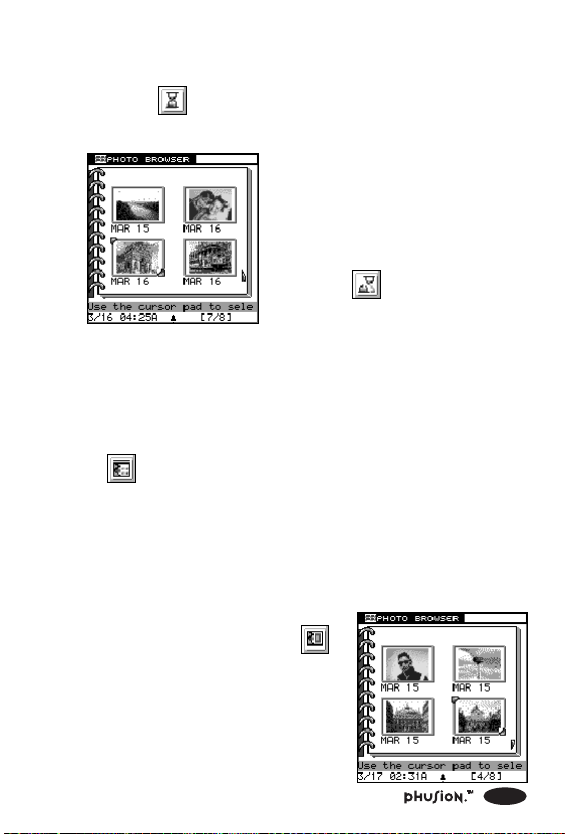
3.6 Viewing Photos from Schedule Photo Taking
1. At the Photo Browser, use the Directional Pad to select
(View Scheduled Photos) from the Action menu.
2. Press OK. The photos taken during the Schedule Photo
Taking mode will be displayed on screen.
3.7 Viewing Today’s Photos
1. At the Photo Browser, use the
Directional Pad to select
(View Today’s Photos) from the
Action menu.
2. Press OK. Photos taken during
the current day will be displayed
on screen.
15
4 MY PHOTO GALLERY
Use My Photo Gallery to organize your photos! In My Photo Gallery,
you can create slide shows and photo albums. You can even add
special effects or Clip Art to your pictures.
4.1 My Album
4.1.1 My Album: What is it?
My Album helps you store, organize and add notes to your
photos. You can re-order or create Cover and End Pages for
the album.
Where is it?
You can find My Album in the My Photo Gallery folder.
4.1.2 Commands
(New) Create a new album.
(Delete) Delete the current album or all albums.
(This File) Delete the selected album.
(All Files) Permanently delete all albums.
(Edit) Edit the selected album.
(Play Album) Play the selected album as a slide show.
(Re-Order) Arrange the order of the photos in the
album.
16
(Undo Order) Undo Re-order and use original order.
(Attach Notes) Attach a note to the selected photo.
(Album Tools) Edit the current photo album.
(Album Cover Page) Create a cover page using a
template.
(Album End Page) Create an end page using a template.
(Add More Photos) Add more photos to the album,
by taking new photos or by selecting photos from the
photo Browser.
(Exclude This Photo) Exclude this photo from the
selected album.
(Save) Save the current album.
(Insert Clip Art) Insert Clip Art from the Clip Art Browser.
(Insert Text) Select a font style and add text to your
photo.
(Change Cover) Change the current cover page of the
selected album.
(Change End) Change the current end page of the
selected album.
17
4.1.3 Using My Album
1. Select (My Photo Gallery) from the Main menu using
the Directional Pad.
2. Select
(My Album) using the Directional Pad and press
OK.
3. You are now in the main
album screen.
4. To edit an album, select the
album, then select (Edit)
from the Action menu.
5. After you have edited or created a new album, choose
(Save) to save your changes.
4.1.4 Creating a New Album
1. From the main album screen, select (New) from the
Action menu.
2. Type in the name of the new
album using the Touchpad.
18
3. Select the photo source. You
can take a new photo using the
Digital Camera, or you can
select a photo from the Photo
Browser.
4. Press OK to confirm your selected photo. The selected
photo will be added to your album. To deselect a photo,
press OK again. When you have finished adding photos,
press Cancel to view the complete Album.
5. To save your album, select
(Save) from the Action menu
and press OK.
4.1.5 Deleting an Album
1. At the album main screen, select the album you want to
delete.
2. Select
(Delete) from the Action menu using the
Directional Pad and press OK.
3. In the following sub-menu, you can select either
(This File) to delete the selected album or (All Files)
to delete all of your albums.
19

4.1.6 Playing an Album as a Slide Show
1.At the album main screen, select (Play Album) from
the Action menu.
4.1.7 Viewing Photos in an Album
1.Use the Directional Pad to
select the album you want to
view and press OK.
2. Use the Directional Pad to select a photo you want to
view and press OK.
4.1.8 Arranging the Order of the Photos in an Album
1.At the album main screen, select (Edit) from the Action
menu.
2.Select
Action menu and press OK.
3.To undo the last move, select
OK.
4.Select the photos in the order you want, then select
(Save) to save your changes.
20
(Re-Order) from the
(Undo Order) and press

4.1.9 Attaching a Note to Your Photos
1. At the album Edit screen, select a photo.
2. Select
OK.
3. Type in your note.
(Attach Notes) from the Action menu and press
4. After you have finished typing
your note, press OK to save it.
4.1.10 Deleting a Photo from an Album
1. At the album Edit screen, select a photo you want to delete.
2. Select
and press OK.
(Exclude This Photo) from the Action menu
21

4.1.11 Adding More Photos to an Album
1. At the album Edit screen, select (Album Tools) from
the Action menu.
2. Select
3. Select the photo source. You
can take a new photo using the
Digital Camera, or you can
select a photo from the Photo
Browser.
4. The selected photos will be
added to the album
automatically.
(Add More Photos) and press OK.
4.1.12 Adding Album Cover and End Pages
1. Select (Album Tools) from the Action menu and press
OK.
2. Select
from the sub-menu and press OK.
(Album Cover Page) or (Album End Page)
3. In the following screen, you will
see templates you can use to
create your cover or end page.
4. Select a photo and press OK
to edit it.
22

5. Select (Insert Clip Art) from the Action menu to add
Clip Art or select
6. Select (Save) to save the photo.
(Insert Text) to add text to the photo.
4.1.13 Deleting a Cover or End Page
If you want to delete a cover or end page, select (Exclude
this Photo).
4.2 Photo Maker
4.2.1 Photo Maker: What is it?
The Photo Maker allows you to add effects, hairstyles or
backgrounds to your photos.
Where is it?
You can find Photo Maker in the My Photo Gallery folder.
4.2.2 Commands
(New) Add a new effect to a photo.
(Delete) Delete current file or all files.
(This File) Delete the selected file.
(All Files) Permanently delete all files.
(Edit) Edit the selected photo.
(Insert Clip Art) Insert Clip Art from the Clip Art Browser.
23

(Insert Text) Add text to a photo.
(Save) Save the current photo.
(Undo Effect) Undo the last photo effect.
(Replace Photo) Select a new photo.
4.2.3 Using Photo Maker
1. Select (My Photo Gallery) from the Main menu using
the Directional Pad.
2. Select
(Photo Maker) using the Directional Pad.
3. You are now in the Photo Maker main screen. Two
templates are provided. Select a template and press OK.
4. Now you can choose from
different effects. Select
(New) from the Action menu
to create a new photo and add
effects.
5. To edit a photo, select the photo and choose (Edit)
from the Action menu.
6. After you have edited or created a new photo, choose
(Save) to save your changes.
24

4.2.4 Adding Effects to a Photo
1. Open Photo Maker and select the Photo Effects template,
then press OK to enter the Photo Effects screen.
2. Select
(New) from the
Action menu.
3. Select the photo source. You
can take a new photo using the
Digital Camera, or you can
select a photo from the Photo
Browser.
4. Select a photo effect and press OK to confirm your
selection.
5. Select
(Save) from the
Action menu to save your
changes.
4.2.5 Adding Special Effects to a Photo
1. Open Photo Maker and select the Special Effects template.
2. Select
(New) from the Action menu.
25

3. Select a hairstyle or background
template from the template
Photo Browser and press OK.
4. Select the photo source. You
can take a new photo using the
Digital Camera, or you can
select a photo from the Photo
Browser.
5. Select (Save) from the
Action menu to save your
changes.
4.2.6 Deleting Photos with Effects
1. Select the photo you want to delete in the Photo Effects
or Special Effects screen.
2. Select
(Delete) from the Action menu using the
Directional Pad and press OK.
3. In the following sub-menu, you can select
to delete the selected photo. Selecting
all the photos in the Browser.
26
(This File)
(All Files) will delete

4.2.7 Editing Photos with Effects
1. Select a photo you want to edit
from the Photo Effect screen.
2. Select
(Edit) from the Action
menu and press OK to enter
the Edit screen.
3. At the Edit screen, select (Insert Clip Art) from Action
menu to insert Clip Art or select
(Insert Text) to add
text.
4. Select
(Save) to save your changes.
4.2.8 Editing a Photo with a Special Effect
1. Select a photo you want to edit
from the Special Effects screen.
2. Select (Edit) from the Action menu and press OK to
enter the Edit screen.
3. At the Edit screen, select a special effect.
4. Select a background or hairstyle.
5. Select
(Save) to save your changes.
27

4.2.9 Viewing a Photo Full Screen
1. At Photo Effects or Special
Effects screen select a photo
you want to view and press
OK.
2. The selected photo will be
displayed full screen.
4.2.10 Replacing a Photo
1. If you’re not satisfied with the photo you selected, you
can select
select another photo.
(Replace photo) from the Action menu to
2. Select
(Save) and press OK to save the photo.
4.3 Slide Show Maker
4.3.1 Slide Show Maker: What is it?
The Slide Show Maker converts your digital photo album into
a slide show.
28

Where is it?
You can find Slide Show Maker in the My Photo Gallery folder.
4.3.2 Commands
(New) Create a new slide show.
(Delete) Delete the current file or all files.
(This File) Delete the selected file.
(All Files) Permanently delete all files.
(Play Show) Play slide show.
(Play Album) Convert an album into a slide show using
default transition & sound effects.
(Loop Show) Play a slide show continuously. Press
Cancel to stop the slide show.
(Re-Order Slides) Change the order of the slides.
(Transition & Sound) Add or Edit slide transition & sound
effects.
(Save) Save changes.
(Edit) Edit slide show.
(Exclude This Slide) Exclude the selected photo from
the slide show.
29

(Slide Tools) Create a slide cover page and end page,
or add more slides to your show.
(Slide Cover Page) Create a cover slide using the
provided templates.
(Slide End Page) Create an end slide using the provided
templates.
(Add More Slides) Add more slides to the show by
taking new photos or by selecting saved photos.
(Undo Order) Undo the Re-Order and use previous
order.
(Save Order) Save changes in the slide order.
(Insert Clip Art) Insert Clip Art from the Clip Art Browser.
(Insert Text) Add text to the current slide.
(Change Cover) Change the current cover page.
(Change End) Change the current end page.
30

4.3.3 Using the Slide Show Maker
1. Select (My Photo Gallery) from the Main menu using
the Directional Pad.
2. Select
(Slide Show Maker)
using the Directional Pad, and
press OK.
3. Select (New) from the Action menu to create a new
slide show, or select
(Edit) to enter the Slide Show
Edit screen.
4. To view a slide show, select
(Play Show) from the
Action menu.
4.3.4 Creating a New Slide Show
1. Select (New) from the Action menu.
2. Type in a name for the new
slide show. Then select the slide
show source.
3. You can add photos using the
Digital Camera or select
photos from the Photo Browser.
31

4. Use the Directional Pad to place
the cursor over a photo. Press
OK to add it to the Slide Show.
To deselect a photo, place the
cursor over the photo, and
press OK again.
5. When you have finished adding photos, press Cancel to
view the photos in the show.
4.3.5 Deleting a Slide Show
1. Select the slide show you want to delete.
2. Select
3. You can select either
slide show or
(Delete) from the Action menu and press OK.
(This File) to delete the selected
(All Files) to delete all of the slide shows.
4.3.6 Viewing a Slide Full Screen
1. Select the slide show you want to view using the Directional
Pad, and press OK.
2. On the next screen, you can
see all the slides in the selected
slide show.
32

3. Choose the slide you want to
view and press OK.
4.3.7 How to Play an Album as a Slide Show
1. Select (Play Album) from the Action menu using the
Directional Pad, and press OK.
2. The screen will switch to the Album main screen. Select
the album you want to view.
3. Press OK to confirm your selection, the selected album
will be automatically converted into a slide show.
4.3.8 How to Play a Slide Show
1. Select the slide show you want to view using the Directional
Pad, and press OK.
2. Select
OK.
(Play Show) from the Action menu and press
4.3.9 Excluding a Photo from a Slide Show
1. Select (Edit) to enter the Edit screen from the Action
menu and press OK.
2.Select a photo you want to exclude, using the Directional
Pad.
3. Select
and press OK.
(Exclude This Slide) from the Action menu,
33

4.3.10 Changing the Order of the Photos in a Slide
Show
1. Select the slide show you want to edit using the Directional
Pad.
2. Select
Show Edit screen.
3. Select
OK.
4. Select a slide you want to move
using the Directional Pad, then
press OK. Place the slide in the
new position using the
Directional Pad, then press OK
to confirm the move.
5. Once you have finished editing the order of the slides,
press
(Edit) from the Action menu to enter the Slide
(Re-Order) from the Action menu and press
(Save) to save your changes.
4.3.11 Adding the Transition and Sound Effects
1. Select the slide show you want to edit using the Directional
Pad.
2. Select
Show Edit screen.
34
(Edit) from the Action menu to enter the Slide

3.To edit the slide transition and
sound effect, select
(Transition & Sound) from the
Action menu, and press OK.
4.Use the Directional Pad to select a transition or sound effect.
Press OK or Enter to confirm your selections.
5.Select
(Save) to save your changes.
4.3.12 Adding Cover and End Slides
1.At the Slide Show Edit screen, select (Slide Tools) from
the Action menu.
2.Select
(Slide Cover Page) or (Slide End Page)
from the Action menu, and press OK.
Choose a slide template from the template menu, and press OK.
3.
4.On the next screen, you can select (Insert Clip Art)
to insert Clip Art or select
(Insert Text) to add text
to the slide.
5.After you have finished editing the slides, select
(Save)
to save your changes.
4.3.13 Adding More Photos to a Slide Show
1.At the Slide Show Edit screen, select (Slide Tools) from
the Action menu.
2.Select
(Add More Slides) from the sub-menu and press
OK.
35

3. Select a photo source. You can
add photos using the Digital
Camera or select photos from
the Photo Browser.
4. After selecting the photos, press OK to add the photos
to the current slide show.
4.4 Card Maker
4.4.1 Card Maker: What is it?
With Card Maker and pictures from the Digital Camera, you
can create greeting cards, invitations, and more. Card Maker
also includes different styles of borders and Clip Art to help
you design the perfect card. To print your card, you can
transfer your card files to your PC using the VTech
Phusion™ PC Link.
Where is it?
You can find Card Maker in the My Photo Gallery folder.
4.4.2 Commands
®
(New) Create a new card.
(Use Template 1) Create a card with a template.
(Use Template 2) Create a card with a template.
36

(Edit) Edit the selected card.
(Delete) Delete the current card or all cards.
(This File) Delete the selected card.
(All Files) Permanently delete all cards.
(Insert Clip Art) Insert Clip Art from the Clip Art Browser.
(Insert Text From Word List) Insert text from the Word
List.
(Save) Save the current card.
(Replace Photo) Select another photo to replace the
current photo.
(Insert Smiley Icon) Add a smiley icon to a photo.
4.4.3 Using Card Maker
1. Select (My Photo Gallery) from the Main menu using
the Directional Pad.
2. Select
(Card Maker) using the Directional Pad, and
press OK.
3. You can choose from four
styles of cards. Select a card
style and press OK.
37

4. Select a card template and
press OK to go to edit you
card.
5. Select (New) from the Action menu to create a new
card. Also you can select
(Use Template 1) or
(Use Template 2) to create a card using a template.
6. To edit a card, select the card, then select
(Edit) from
the Action menu.
7. Choose
(Save) to save your changes.
4.4.4 Creating a New Card
1. Select (New) from the Action menu to create a new
card. Also you can select
(Use Template 1) or
(Use Template 2) to create a card using a template.
2. Type in a name for your new card, then press OK.
3. If you’re creating a greeting
card, select the border, and
press OK.
4. Select a photo source. You can
add photos using the Digital
Camera or select photos from
the Photo Browser.
38

5.Press OK to confirm your photo choice and go to the
Card Maker Edit screen.
6. At the Edit screen, you can select
from Action menu to insert Clip Art or select
(Insert Clip Art)
(Insert
Text From Word List) to insert text from the Word List.
7. Once you have finished the
editing, select
(Save) from
the Action menu and press OK
to save your card.
4.4.5 Editing a Card
1.Select a card you want to edit in the Card Maker Browser.
2.Select
(Edit) from the Action
menu and press OK to enter
the Edit screen.
3.At the Edit screen, select
(Insert Clip Art) from the Action
menu to insert Clip Art or
select
(Insert Text From
Word List) to insert text from
the Word List.
4.Once you have finished editing, select
(Save) from
the Action menu and press OK to save your card.
39

4.4.6 Deleting a Card
1. Select the card you want to delete in the Card Maker
Browser.
2. Select
Directional Pad and press OK.
3. In the following sub-menu, you can select
to delete the selected card, or
all of the cards in the Card Maker Browser.
(Delete) from the Action menu using the
(This File)
(All Files) to delete
4.4.7 Viewing a Card Full Screen
1. In the Card Maker Browser,
select the card you want to
view, then press OK.
4.4.8 Replacing a Photo
1. When you are creating a new card, you can select a photo
source. You can add photos using the Digital Camera or
select photos from the Photo Browser. If you don’t like
the photo, select
menu to use another one.
2. Select
(Save) and press OK to save your changes.
(Replace photo) from the Action
40

4.4.9 Inserting Clip Art
1. At the Edit screen, select (Insert Clip Art) from the
Action menu.
2. A Clip Art box will appear.
3. Choose a Clip Art design using
the Directional Pad.
4. Press OK to add the selected Clip Art design to the photo.
4.4.10 Inserting Text from the Text List
1. At the Card Maker Edit screen, select (Insert Text From
Word List) from the Action menu.
2. Select a text message from the
Text List, then press OK to
continue.
41

5 MY ORGANIZER
My Organizer provides different applications that will help you
manage your daily life.
5.1 My Mailbox
5.1.1 My Mailbox: What is it?
My Mailbox allows you to write messages. Using the VTech
Phusion™ PC Link software, you can transfer your messages
to your PC. If you already have an e-mail address and Internet
Service Provider, you can transfer your messages to your PC,
copy the messages into your own e-mail software, then send
the messages from your PC.
Where is it?
You can find My Mailbox in the My Organizer folder.
5.1.2 Folders in My Mailbox
There are three folders in My Mailbox. Each folder serves
a separate purpose. Here’s an introduction to each of the
folders:
Write Message
You can compose a new message by selecting the (Write
Message).
®
Outbox
All of the messages that you have finished, but have not yet
transferred to your PC are stored in your
To read a message in the Outbox, use the Directional Pad
to select a message in the list, then press OK.
42
(Outbox).

Drafts
You can save a message that you have not yet finished in
(Drafts) box. To read a message, use the Directional
the
Pad to select a message in the list, then press OK.
5.1.3 Commands
(Write Message) Create a new message.
(Edit Message) Edit the current message.
(Place in Outbox) Send this message to the Outbox.
(Delete) Delete the selected message.
(View Attachment) Show the attached file.
(View More Info) View address information.
(Save as Drafts) Save your message in the Drafts folder.
(Add Address) Search the Address Book for addresses
and automatically add them to the address list.
(Spell Checker) Check the spelling of a word.
(Insert Photo) Insert a photo into your message.
(Insert Sentence) Insert a sentence into your message.
(Insert Smiley Icon) Insert a smiley icon into your
message.
43

5.1.4 Using My Mailbox
1. Select (My Mailbox) in the My Organizer folder using
the Directional Pad and press OK.
2. You will now see three folders: Write Message, Outbox
and Drafts. Select one using the Directional Pad.
5.1.5 Creating a New Message
You can write a new message by selecting
(Write Message) from the (My Mailbox) folder.
5.1.6 Editing a Message
Press Menu to open the Action menu then select (Edit
Message) to edit the current message.
5.1.7 Saving a Message to the Drafts Folder
You can save a message that you have not yet finished writing
in the Drafts folder.
1. Create a new message or edit a selected message in the
Compose screen.
2. Press Menu to open the Action menu then select
(Save as Drafts) to save your message to the Drafts folder.
5.1.8 Sending a Message to the Outbox
After you finish typing a new message or editing an old one,
you can press Menu to open the Action menu then select
(Place in Outbox) to send this message to the Outbox.
44

5.1.9 Adding an Address
Press Menu to open the Action menu then select (Add
Address) to search the Address Book for addresses and
automatically add them to the address list. Names and e-mail
addresses of both Personal and Group categories will be
shown. Personal address entries will be displayed followed by
Group address entries.
5.1.10 Viewing Message Information
Press Menu to open the Action menu then select (View
More Info) to see all information.
5.1.11 Viewing an Attachment
Press Menu to open the Action menu then select (View
Attachment) to see the photo attachment.
5.1.12 Deleting a Message
Press Menu to open the Action menu then select (Delete)
to delete the selected message.
5.1.13 Spell Checking
The Spell Checker helps you check for any typing mistakes.
Place the cursor next to the word you want to check. Press
Menu to open the Action menu, then select
Checker).
(Spell
45

5.1.14 Inserting a Photo
You can attach an image to your message when editing or
creating a new message. Press Menu to open the Action menu
then select
in the upper right-hand corner of the screen.
(Insert Photo). The attached photo will appear
5.1.15 Inserting a Sentence
You can insert a sentence into your message when editing
or creating a new message. Place the cursor in the position
you want to insert the sentence. Press Menu to open the Action
menu then select
(Insert Sentence).
5.1.16 Inserting a Smiley Icon
You can insert the smiley icon into your message when editing
or creating a new message. Place the cursor in the position
you want to insert the icon. Press Menu to open the Action
menu then select
(Insert Smiley Icon).
5.2 My Address Book
5.2.1 My Address Book: What is it?
My Address Book on your VTech® Phusion™ helps you
organize and store all of your friends’ addresses, telephone
numbers and e-mail addresses, either by individual (Personal
files) or by group list (Group files). You can use My Address
Book to quickly access a telephone number of a friend or
family member.
Where is it?
You can find My Address Book in the My Organizer folder.
46

5.2.2 Commands
(New File) Create a new Personal file.
(New Group) Create a new Group file.
(Edit) Modify the current file.
(Change View) View Personal files, Group files, or All
files.
(Group Only) Display Group files only.
(Personal Only) Display Personal files only.
(All Files) Display all files.
(Delete) Delete the current file or all files.
(All Files) Permanently delete all files.
(This File) Delete the selected file.
(Insert Photo) Add a photo to this file.
(Add Recipient) Insert e-mail address from the Personal
file when creating Group file.
5.2.3 Using My Address Book
Select (My Address Book) in
the My Organizer folder using the
Directional Pad. Then press OK.
47

5.2.4 Finding an Address Book Entry
Select the entry you would like to view from the list, then
press OK to view the selected record.
If you want to locate a specific Address Book entry without
scrolling through the list of files, you can type the first few
letters of a person’s name in the ‘Find by Name’ field, My
Adress Book will automatically find matching entries.
5.2.5 Creating an Address Book Entry
Choose (New File) from the Action menu to add a new
entry.
My Address Book contains two different types of files. An
individual’s address is stored in your Address Book as a
Personal entry. A Group entry is a group of addresses.
5.2.6 Creating a Personal Address Book Entry
1. After you have opened your Address Book, select
(New File) from the Action menu. This will open the My
Address Book Edit screen.
2. At the Edit screen, you can
type in the person’s name,
telephone number, e-mail
address, birthday, home or work
address.
3. Select (Save) from the Action menu to save your entry.
48

5.2.7 Creating a Group Address Book Entry
1. After you have opened your Address Book, select
(New Group) from the Action menu. This will open the
Edit screen for Group files.
2. At the Edit screen, type in the
name of the group you are
creating and the e-mail
addresses of the people you
would like in that group.
3. To add e-mail addresses to the Group entry, select
(Add Recipient) from the Action menu. You will then see
a list of your Personal files.
4. Select the Personal entry you would like to add to the
Group, using the Directional Pad or the Find by Name
feature, and press OK. The Name and e-mail address of
this Personal entry will be added to the Group entry.
5. Select
(Save) from the Action menu to save your entry.
5.2.8 Editing an Address Book Entry
To edit an Address Book entry, select it from the list, then
choose
(Edit) from the Action menu. Select (Save)
from the Action menu to save your entry.
49

5.2.9 Deleting Address Book Files
There are two ways to delete files from your Address Book.
To delete a single Address Book entry:
1. After you have opened My Address Book, select the entry
you want to delete.
2. Choose
(Delete) from the Action menu.
3. Then choose (This File) from the Action menu.
4. The entry will be removed from My Address Book.
To delete all of the files in your Address Book:
1. After you have opened My Address Book, choose
(Delete) from the Action menu.
2. Select
(All Files) from the Action menu and press OK.
3. All of the files in your Address Book will be deleted.
Important!
If you choose to delete all files when you are viewing the
Personal files in your Address Book, only the Personal files
will be deleted. If you choose to delete all files when you
are viewing the Group files in your Address Book, only the
Group files will be deleted.
50

5.3 My Calendar
5.3.1 My Calendar: What is it?
My Calendar helps you keep track of special events, parties
and exams. You can view your schedule in either daily or
monthly formats. You can use My Calendar any time you want
to keep track of an event that you need to remember.
Where is it?
My Calendar is located in the My Organizer folder.
5.3.2 Commands
(New) Create a new event.
(Edit) Edit the current event.
(Delete) Delete event(s).
(All Events) Permanently delete all events from the
Calendar.
(This Event) Delete the selected event.
(Full Day Events) Delete all events in a day.
(Save) Save all changes.
(View Today) View the current day’s schedule.
(Go To Date) Go to a specified date.
(Daily View) View the selected date.
(Monthly View) View the selected month.
(Date & Time Format) Change the date and time format
used in the Calendar.
51

(Previous Day) Go to the previous day’s schedule.
(Next Day) Go to the following day’s schedule.
5.3.3 Using My Calendar
1. Select (My Calendar) in the My Organizer folder.
2. The next screen is the “Monthly
View” of the current month.
Dots will appear next to the
dates that have a scheduled
event.
3. To view all of the events for
that day, select a day, then
press OK.
5.3.4 Adding an Event
1. To add an event to a specific
day in the Daily View, you can
choose
(New) from
the Action menu.
2. Enter the Event Date and Time. Set how far in advance
you want to be reminded of the event. Finally, enter the
name of the event (for example, "football game").
3. Choose
(Save) from the Action menu to save your
event.
52

Important!
If the small dot seen on “Monthly View” is near the top
of the date box, then the event on that day is scheduled
before 12:00pm. If the small dot is near the bottom of the
date box, then the event on that day is scheduled after
12:00pm.
5.3.5 Calendar View Shortcuts
In the “Monthly View” of My Calendar, there are a few
shortcuts that can be used to change what day, week or month
you are viewing.
Try these quick My Calendar touchpad shortcuts:
Up arrow key Moves the cursor to the same day of
the previous week.
Down arrow key Moves the cursor to the same day of
the next week.
Left arrow key Moves the cursor to the previous day.
Right arrow key Moves the cursor to the next day.
Enter key or OK Displays the Daily View of the selected
day.
5.3.6 Viewing a Specific Date
1. Select (Go To Date) from the Action menu.
2. Type in the date that you would like to view.
3. Press OK.
53

5.3.7 Deleting All the Events on a Specific Day
1. In the Daily View, select (Delete) from the Action
menu.
2. Choose
on that day.
(Full Day Events) to delete all of the events
5.4 My Memo Pad
5.4.1 My Memo Pad: What is it?
My Memo Pad is an application that allows you to type a
quick note or reminder.
Where is it?
My Memo Pad is located in the My Organizer folder.
5.4.2 Commands
(New) Create a new memo.
(Edit) Edit the selected memo.
(Save) Save the memo.
(Delete This File) Delete the selected file.
(Delete) Delete the current memo or all memos.
(This File) Delete the selected memo.
(All Files) Permanently delete all memos.
(Insert Smiley Icon) Insert a smiley icon.
54

5.4.3 Using My Memo Pad
1. Select (My Memo Pad) in
the My Organizer folder.
2. Select a memo to view it.
5.4.4 Creating and Editing Memos
1. Choose (New) from the Action menu to create a new
memo.
2. Select
3. When you have finished typing or editing your memo,
choose
(Edit) to edit the selected memo.
(Save) to save it.
5.4.5 Deleting
1. If you want to delete the contents of the current memo,
at the Edit screen of the memo, choose
File) from the Action menu.
(Delete This
55

2. If you want to delete the selected memo, at the Index
screen of the memo, choose
(This File) from the sub-menu.
(Delete), then select
3. If you want to delete all the memos, choose
then select
(All Files) from the sub-menu.
5.4.6 Inserting a Smiley Icon
1. At the Edit screen of the memo, place the cursor where
you would like to insert a smiley icon, then choose
(Insert Smiley Icon) from the Action menu.
2. Choose a Smiley icon from the list using the Directional
Pad.
5.5 My Money Manager
5.5.1 My Money Manager: What is it?
My Money Manager helps you track your allowance, earnings
and your spending. You can also create folders to categorize
your income and expenses.
Where is it?
My Money Manager is located in the My Organizer folder.
5.5.2 Commands
(New) Create a new file.
(Edit) Edit the selected file.
(Delete),
(Save) Save changes.
56

(Delete This File) Delete the current file.
(Delete) Delete the current file or all files.
(This File) Delete the selected file.
(All Files) Permanently delete all files.
(Statement) View Statements from the current or
previous month.
(This Month) Show the net income for the current
month.
(Last Month) Show the net income for the previous
month.
(Rename Folder) Change the name of an existing folder.
(Change Folder) Switch to another folder.
5.5.3 Viewing My Money Manager
There are 5 folders in My Money Manager. By default, they
are numbered Folder 1 through Folder 5.
1. Select
(My Money Manager) in the My
Organizer folder.
2. The first folder you will see is
Folder 1. If you have used this
application before, you will see
the last folder you have used.
57

3. If there are entries in the folder, you can read the details
about each entry by highlighting the entry and pressing
OK.
5.5.4 Renaming the Folder
1. To rename a folder, select (Rename Folder).
2. Type in the new name of the
folder.
5.5.5 Creating a New Entry
1. To create a new entry in a folder, select (New).
2. Enter the date of the transaction,
the amount, the type of entry
(income or expense), and any
details about the entry.
58

5.5.6 Viewing Another Folder
1. Select (Change Folder) to
list all of the folders.
2. Select the folder you want to view.
5.5.7 Viewing a Statement
A statement is a brief summary of the income and expenses
from all of your folders. You can choose to view the statement
of the current month or the previous month.
1. While you are viewing a folder, select Menu to open the
Action menu.
2. Choose
(Statement) from the Action menu.
3. To view the current month’s
statement, choose
(This
Month) from the sub-menu. To
review the last month’s
statement, choose
(Last
Month)
59

5.6 My Database
5.6.1 My Database: What is it?
My Database allows you to create and maintain your own
simple database. With this database you can keep a record
of nearly everything - all of your personal items, collections,
CDs, or games.
Where is it?
My Database is located in the My Organizer folder.
5.6.2 Commands
(Create New Database) Create a new database.
(Delete Database) Delete the selected database.
(Add Record) Add a new record to the database.
(Delete Record) Delete the selected record from the
current database.
5.6.3 Viewing My Database
1. Select (My Database) in
the My Organizer folder.
60

2. Select the name of the database using the Directional Pad
and press OK to view the contents of the database.
3. There are 2 fields or columns
in each database. Each entry
into a database is called a
record.
5.6.4 Adding a Record
1. To add a new record to an existing database, select
(Add Record) and press OK.
2. Type in the data you want to add and press OK.
5.6.5 Creating a New Database
1. At the main screen of My Database, select (Create
New Database) and press OK.
2. Enter the name of the new
database, and the titles for each
column.
61

3. After creating the structure of
the new database, you can
input your data.
5.6.6 Deleting a Record
1. At the index screen of an existing database, select the
record you want to delete.
2. Choose
press OK.
(Delete Record) from the Action menu and
5.6.7 Deleting a Database
1. On the main screen of My Database, select the database
you want to delete.
2. Choose
press OK.
(Delete Database) from the Action menu and
5.7 School Subjects
5.7.1 School Subjects: What is it?
Use School Subjects to list your classes for each day of the
week.
Where is it?
School Subjects is located in the My Organizer folder.
62

5.7.2 Commands
(New) Clear the School Subjects table.
(Edit) Change the content of the selected cell.
(Delete) Clear the content of the selected cell.
5.7.3 Viewing School Subjects
Select (School Subjects) in the
My Organizer folder.
5.7.4 Creating a New School Subjects Table
1. On the main screen of School Subjects, move the cursor
to the cell you want to edit.
2. Press Menu, then choose
3. Choose the method of inputting
(Edit) to edit the cell.
the new subject.
63

4. If you choose “Let’s see the list”,
you can choose the new subject
from a list of common school
subjects.
5. If you choose “I’ll type it myself”,
you can enter the name of a
subject not on the list. Each
subject name can be up to 5
characters in length.
5.7.5 Deleting Contents in the School Subjects Table
To clear the contents of a selected cell, move the cursor to
that cell, press Menu then choose
table, choose
(New) from the Action menu.
(Delete). To clear the
64

5.8 To Do List
5.8.1 To Do List: What is it?
To Do List helps you prioritize and assign due dates to
assignments or common tasks. It’s a great tool that helps you
keep track of all the things you need to do! The To Do List
displays each task in priority order with the high priority items
listed first. High priority items are marked “1”. Low priority
items are marked ”3". If a task has a medium priority, it is
marked with a “2”.
Where is it?
To Do List is located in the My Organizer folder.
5.8.2 Commands
(New) Enter a new task.
(Edit) Edit or modify a task.
(Save) Save your changes to the task.
(Delete This File) Delete the selected task.
(Delete) Delete current task or all tasks.
(This File) Delete this task.
(All Files) Delete all tasks.
(Date Option) Hide or show start date and due date
of tasks.
(Task Option) Sort and automatically delete tasks
according to your preferences.
65

C key Change the status (complete or incomplete) of
a task.
5.8.3 Symbols Displaying the Status of Tasks in the To Do List.
This symbol means that the task has been completed.
This symbol means that the task is overdue.
5.8.4 Using the To Do List
1. Select (To Do List) in the
My Organizer folder.
2. Select a task from the list using the Directional Pad, to
view the task status, start date, due date, priority, and
details.
5.8.5 Creating a New Task
1. Choose (New) from the
Action menu to create a new
task.
2. When you have finished
entering your task, choose
(Save) from the Action menu
and press OK.
66

5.8.6 Viewing the To Do List Index Screen
1. Open the (To Do List) in
the My Organizer folder.
2. Each task is arranged by priority.
5.8.7 Viewing the Content of the To Do List
1. Select a task in the index screen and press OK.
2. You can see the status, start date, due date, priority and
details of the selected task.
5.8.8 Editing a Task
If you want to create a new task or edit an old one, you
can use the Edit screen to edit the selected record.
1. Choose
the selected task.
2. The next screen will allow you to edit your task.
(Edit) button from the Action menu to edit
5.8.9 Deleting Task Contents
1. At the Edit screen of the task, choose (Delete This
File) from the Action menu and press OK.
5.8.10 Deleting a Task
1. At the Index screen of the To Do List, choose (Delete),
then select
(This File) from the sub-menu.
67

2. If you want to delete all of the tasks in the To Do List,
choose
(Delete), then select (All Files) from the
sub-menu.
5.8.11 Setting Task Options
You can auto-delete completed tasks or sort tasks using a
variety of methods. You can also select the viewing range of
tasks in your To Do List.
1. At the Index screen of the To Do List., choose
Option) from the Action menu.
2. A screen will appear asking you
to select how you want to
arrange your To Do List.
3. Press OK to confirm your
choices and continue.
5.8.12 Setting Date Options
1. Choose (Date Option) from the Action menu when
you are creating a task.
2. A screen will appear asking if
you want to input a Start Date
or Due Date.
3. Press OK to confirm your
choices and continue.
68
(Task

6 MY ACCESSORIES
6.1 Clock
6.1.1 Clock: What is it?
The Clock program displays the current date and time. You
can use the Clock program when you need to set the time
and date or change how they are displayed. You can also
set the clock for Daylight Savings Time, choose a home city,
or set the built-in alarm clock.
Where is it?
The Clock program is located in the My Accessories folder.
6.1.2 Commands
(Edit) Change the date and the time.
(Change Date & Time Format) Change the format in
which the date and time are displayed.
(Save) Save current settings and format.
6.1.3 Viewing the Clock
1. Select (Clock) in the My
Accessories folder.
69

6.1.4 Changing the Clock Settings
1. While in the Clock program, choose (Edit) from the
Action menu.
2. Use the Directional Pad to set
the date, time, Home City,
Daylight Savings Time and the
alarm.
3. Select (Save) to save the settings.
6.1.5 Changing the Date & Time Format
1. While in the Clock program, choose (Change Date
& Time Format) from the Action menu.
2. Use the Directional Pad to
change the format in which the
date and time are displayed.
70

6.2 City Locator
6.2.1 City Locator: What is it?
City locator allows you to view the location of more than 50
cities around the globe on Phusion’s world map. The selected
city is highlighted on the world map by a flashing square.
Where is it?
City locator is located in the My Accessories folder.
6.2.2 Commands
(City Info.) Show information about the selected city.
6.2.3 Viewing the World Clock
1.Select (City Locator) in the
My Accessories folder.
2.Press Right to open the pull down menu, then choose
the World City you would like to display.
71

6.2.4 Viewing City Info.
1. While in the City Locator program, select (City Info.).
2. To exit this screen, press the Cancel button.
72

6.3 Mini-Calculator
6.3.1 Mini-Calculator: What is it?
Mini-Calculator provides simple calculation features to help you
solve numerical problems of addition, subtraction, multiplication
and division.
Where is it?
Mini-Calculator is located in the My Accessories folder.
6.3.2 Using Mini-Calculator
1. Select (Mini-Calculator) in
the My Accessories folder.
2. On the next screen, you can
type in the digits and calculation
symbols (
selecting the corresponding
touchpad keys.
, , , ) by
73

6.3.3 Touchpad Keys and their Mini-Calculator
▲
Function:
Key Function
Q1
W2
E3
R4
T5
Y6
U7
I8
O9
P0
K
L
M
▲
Enter =
AC/C
74

6.4 Unit Conversion
6.4.1 Unit Conversion: What is it?
Unit Conversion converts values from different measurement
units. Unit Conversion will convert Imperial and Metric units.
Where is it?
Unit Conversion is located in the My Accessories folder.
6.4.2 Using Unit Conversion
1. Select (Unit Conversion) in the My Accessories folder.
2. Choose a measurement category from the sub-menu.
3. Unit Conversion displays the
available units for the selected
category. Use the Directional
Pad to move the cursor to the
unit you want to convert. The
value next to the unit will
automatically change to the
default setting. Enter the value
you want to convert. Unit
Conversion will automatically
convert the values across all of
the units in the category.
75

6.5 Birthday List
6.5.1 Birthday List: What is it?
Birthday List keeps a record of your friends’ birthdays, and
alerts you to upcoming birthdays.
Where is it?
You can find Birthday List in the My Accessories folder.
6.5.2 Commands
(Alarm) Set the alarm to remind you of an upcoming
birthday.
6.5.3 Using the Birthday List
1. Open (Birthday List) from
the My Accessories folder.
2. The birthday entries recorded
in the Address Book will be
displayed.
6.5.4 Birthday List Alarm Setting
1. Choose (Alarm) from the Action menu.
2. Set how far in advance the
Birthday List should notify you
of upcoming birthdays.
76

6.6 My Profile
6.6.1 My Profile: What is it?
My Profile stores your personal information.
Where is it?
You can find My Profile in the My Accessories folder.
6.6.2 Commands
(Save) Save changes.
6.6.3 Using My Profile
1. Highlight (My Profile) in the My Accessories folder
using the Directional Pad and press OK.
2. Type in your personal information.
3. When you have finished creating or editing My Profile,
Press Menu to open the Action menu and choose
(Save).
77

7 ENTERTAINMENT
7.1 Photo Puzzle
7.1.1 Photo Puzzle: What is it?
The object of this game is to arrange the tiles to form a picture
with the empty square in the lower right hand corner of the
screen.
Where is it?
You can find Photo Puzzle in the Entertainment folder.
7.1.2 Commands
(New) Begin a new game.
(Settings) Set the skill level and select a puzzle picture.
(Undo) Undo the last move.
(Hints) Show the original picture.
7.1.3 Playing Photo Puzzle
1. First, study the photo carefully,
then press OK to start the
timer and begin solving the
puzzle.
2. Use the Directional Pad to arrange the tiles.
3. Press Cancel to quit the game at any time.
78

7.1.4 Game Settings
1. Choose (Settings) from the Action menu.
2. Select a skill level using the Directional Pad, then press
OK.
3. Next, you’ll need to select a picture source. You can:
• Take a new picture using the
Digital Camera.
• Use a picture from the Photo
Browser.
• Use a picture from the Puzzle
Library.
• Or use the current picture.
4. Press OK to continue.
7.2 Photo Tic-Tac-Toe
7.2.1 Photo Tic-Tac-Toe: What is it?
The object of this game is to be the first player to line up
three of your own pictures vertically, horizontally, or diagonally.
Where is it?
You can find Photo Tic-Tac-Toe in the Entertainment folder.
79

7.2.2 Commands
(New) Begin a new game.
(Settings) Modify the game settings.
(Undo) Undo the last move.
7.2.3 Playing Photo Tic-Tac-Toe
1. Select (Photo Tic-Tac-Toe) from the Entertainment
folder.
2. Press OK to start the game, use
the Directional Pad to place
your picture, then press OK.
The current player is displayed
at the bottom of the screen.
7.2.4 Game Settings
1. Choose (Settings) from the
Action menu.
2. Choose an opponent. You can
™
play against Phusion
or
against a friend.
3. Decide who will move first.
80

4. Next, you’ll need to select a picture source. You can:
• Take a new picture using the Digital Camera.
• Use a picture from the Photo Browser.
• Use a picture from the Game Piece Library.
5. Press OK or Enter to continue.
7.3 Trivia
7.3.1 Trivia: What is it?
Test your knowledge with 1,000 questions from five different
topics: Food, Sports, People, Nature, and Entertainment. Each
game is made up of five questions. You have 60 seconds
to answer each question.
Where is it?
You can find Trivia in the Entertainment folder.
7.3.2 Commands
(Select Level) Select the skill level.
7.3.3 Playing Trivia
1. Select (Trivia) in the
Entertainment folder.
2. Choose a topic using the
Directional Pad, then press OK
to continue.
81

3. Use the Directional Pad to select
an answer. You can also enter
your answer using the
Touchpad. Press the letter (A,
B or C ) corresponding to the
correct answer, then press OK
or Enter.
7.3.4 Selecting a Skill Level
1. Choose (Select Level) from the Action menu.
2. On the next screen, use the
Directional Pad to select a skill
level, then press OK.
7.4 Pegged
7.4.1 Pegged: What is it?
The object of the game is to jump all the pegs until only
one peg remains. The game is over when only one peg
remains or when no other moves can be made. A peg that
has been jumped is automatically removed from the board.
Where is it?
You can find Pegged in the Entertainment folder.
82

7.4.2 Commands
(Restart) Begin a new game.
(Level) Set the skill level.
7.4.3 Playing Pegged
1. Select (Pegged) from the
Entertainment folder.
2. Use the Directional Pad to select
a peg, and press OK. The
selected peg will appear gray.
3. To select another peg, place the
cursor over a new peg, then
press OK.
4. Use the Directional Pad to select a space to place the peg.
• A peg can only jump one peg at a time.
• A peg can only jump adjacent pegs.
• A peg must land in an open space directly on the other
side of the jumped peg.
• Only horizontal and vertical jumps are allowed- you
cannot jump pegs diagonally.
5. Keep jumping pegs until there is only one peg left on
the board, or until no other moves can be made.
6. Press Cancel to quit the game at any time.
7. Select Restart from the Action menu to start over, or select
Level to select a new puzzle.
83

7.4.4 Selecting Different Puzzles
You can select puzzles with different levels of difficulty.
1. Choose
Action menu.
2. Use the Directional Pad to select
a puzzle from the puzzle list.
More difficult puzzles appear at
the bottom of the puzzle list.
Press OK to begin.
(Level) from the
7.5 Word Chamber
7.5.1 Word Chamber: What is it?
The object of the game is to collect the letters in a maze,
while avoiding the creatures in the maze. Collect all of the
letters to form a word.
Where is it?
You can find Word Chamber in the Entertainment folder.
7.5.2 Commands
(New) Begin new game.
(Settings) Set the skill level.
84

7.5.3 Playing Word Chamber
1. Select (Word Chamber)
from the Entertainment folder.
2. Use the Directional Pad to move
the character around the maze.
Move over a letter to get it.
3. Collect all of the letters to win.
4. Press Cancel to quit the game at any time.
7.5.4 Game Settings
1. Choose (Settings) from the Action menu.
2. Use the Directional Pad to select
a skill level, then press OK to
start.
85

7.6 Phortune Cookies
7.6.1 Phortune Cookies: What is it?
Phortune Cookies uses your digital photo and a personal
information profile to calculate your fortune. Phortune Cookies
has two modes of play: Luck Today and Friendship. In Luck
Today, you’ll see what the day may hold in store for you.
Phortune Cookies will also reveal your lucky number and lucky
color. In Friendship, you can check the status of your friendship
with a pal, or you can see what the future holds for two
friends.
Important!
If this is your first time playing Phortune Cookies, you must
first complete your personal information profile in Luck
Today.
Where is it?
You can find Phortune Cookies in the Entertainment folder.
7.6.2 Commands
(New) Begin a new game.
(Edit) Change the photo and fill in your personal
information.
7.6.3 Playing Luck Today
1. Choose (Phortune Cookies) from the Entertainment
folder.
86

2. If this is your first time playing
Phortune Cookies, you must
first enter your personal
information in Luck Today.
3. At the Luck Today screen, select
menu to choose a photo of
yourself and enter your personal
information profile. After you
have completed your personal
information profile, press OK to
continue.
4. Your fortune for today will
appear on screen instantly.
(Edit) from the Action
5. Press Cancel to continue.
87

7.6.4 Playing Friendship
Important!
If this is your first time playing Phortune Cookies, you must
first complete your personal information profile in Luck
Today.
1. Use the Directional Pad to select Friendship, then press
OK.
2. Friendship has two modes of play:
• To see how you rate with a friend, select With a Friend.
• To see what’s in store for two of your friends, select
Friend Vs. Friend.
3. If this is your first time playing Phortune Cookies, you must
first enter your personal information in Luck Today. See
Luck Today for additional information.
4. If you are playing the With a Friend mode:
• After you have completed your friend’s personal
information profile, press OK to continue.
• Phortune Cookies will reveal a friendship rating and
detailed message.
5. If you are playing the Friend Vs. Friend mode:
• After you have completed both of your friend’s personal
information profiles, press OK to continue.
• Phortune Cookies will reveal a friendship rating and
detailed message.
88

8 WORDS & MATH
8.1 Math Games
Your VTech® Phusion™ includes three fun math games!
8.1.1 Tangrams
8.1.1.1 Tangrams: What is it?
Tangrams is an ancient Chinese puzzle that uses geometric
shapes to create silhouettes of animals or everyday shapes.
There are seven geometric shapes. Choose a silhouette and
try to recreate it. Each shape can be flipped or rotated, but
you must use all seven shapes, and none of the shapes may
overlap.
Where is it?
You can find Tangrams in Math Games folder, which is located
in the Words & Math folder.
8.1.1.2 Commands
(Rotate Shape) Rotate the selected shape clockwise.
(Flip Shape) Flip the selected shape vertically.
(Change Puzzle) Select a new puzzle.
(Hide/Show Puzzle) Display or hide a puzzle.
(Solution) Show puzzle solution.
8.1.1.3 Playing Tangrams
1. The silhouette you have to recreate will appear in the topleft corner of the screen.
89
 Loading...