

Page 1
USER’S MANUAL
Page 2

Table of Contents Page
.........................................................................................................
Copyright ....................................................................................................... 1
Disclaimer and Limitation of Liability ...................................................1
1 INTRODUCTION
1.1 Phusion™ Components........................................................2
1.2 Touchpad Layout .....................................................................6
1.3 Battery Installation ................................................................... 8
1.4 Adjusting the Clock After Battery Replacement ........... 8
1.5 How to Use the Action Menu ............................................. 9
2 DIGITAL CAMERA
2.1 Digital Camera: What is it? ................................................. 10
2.2 Commands ..............................................................................10
2.3 Using the Digital Camera ...................................................11
2.4 Adjust the Picture Contrast and Brightness .................. 11
2.5 How to Use the Schedule Photo Taking Function .....11
2.6 How to Use Timer Photo Taking ......................................12
3 PHOTO BROWSER
3.1 Photo Browser: What is it? ................................................. 13
3.2 Commands ..............................................................................13
3.3 Using the Photo Browser .................................................... 14
3.4 Deleting a Photo ....................................................................14
3.5 Show or Hide the Date & Time ........................................ 15
3.6 Viewing Photos from Schedule Photo Taking .............15
3.7 Viewing Today’s Photos .......................................................15
4 MY PHOTO GALLERY
4.1 My Album ................................................................................ 16
4.1.1 My Album: What is it? ......................................................... 16
4.1.2 Commands ..............................................................................16
4.1.3 Using My Album ................................................................... 18
Page 3

Table of Contents Page
.........................................................................................................
4.1.4 Creating a New Album ....................................................... 18
4.1.5 Deleting an Album ................................................................ 19
4.1.6 Playing an Album as a Slide Show ................................. 20
4.1.7Viewing Photos in an Album............................................20
4.1.8 Arranging the Order of the Photos in an Album ...... 20
4.1.9 Attaching a Note to Your Photos .....................................21
4.1.10 Deleting a Photo from an Album ....................................21
4.1.11 Adding More Photos to an Album ................................ 22
4.1.12 Adding Album Cover and End Pages ........................... 22
4.1.13 Deleting a Cover or End Page ......................................... 23
4.2 Photo Maker .......................................................................... 23
4.2.1 Photo Maker: What is it? ................................................... 23
4.2.2 Commands ............................................................................. 23
4.2.3 Using Photo Maker .............................................................. 24
4.2.4 Adding Effects to a Photo .................................................. 25
4.2.5 Adding Special Effects to a Photo ................................... 25
4.2.6 Deleting Photos with Effects ............................................. 26
4.2.7 Editing Photos with Effects ................................................ 27
4.2.8 Editing a Photo with a Special Effect .............................. 27
4.2.9 Viewing a Photo Full Screen ............................................. 28
4.2.10 Replacing a Photo ................................................................ 28
4.3 Slide Show Maker ................................................................ 28
4.3.1 Slide Show Maker: What is it? ......................................... 28
4.3.2 Commands ............................................................................. 29
4.3.3 Using the Slide Show Maker ............................................. 31
4.3.4 Creating a New Slide Show ............................................... 31
4.3.5 Deleting a Slide Show ......................................................... 32
4.3.6 Viewing a Slide Full Screen ............................................... 32
4.3.7 How to Play an Album as a Slide Show ....................... 33
4.3.8 How to Play a Slide Show .................................................. 33
4.3.9 Excluding a Photo from a Slide Show ........................... 33
4.3.10 Changing the Order of the Photos
in a Slide Show ...................................................................... 34
Page 4

Table of Contents Page
.........................................................................................................
4.3.11 Adding the Transition and Sound Effect....................... 34
4.3.12 Adding Cover and End Slides .......................................... 35
4.3.13 Adding More Photos to a Slide Show ........................... 35
4.4 Card Maker ............................................................................ 36
4.4.1 Card Maker: What is it? ..................................................... 36
4.4.2 Commands ............................................................................. 36
4.4.3 Using Card Maker ............................................................... 37
4.4.4 Creating a New Card .......................................................... 38
4.4.5 Editing a Card ........................................................................39
4.4.6 Deleting a Card .....................................................................40
4.4.7 Viewing a Card Full Screen ............................................... 40
4.4.8 Replacing a Photo ................................................................ 40
4.4.9 Inserting Clip Art ................................................................... 41
4.4.10 Inserting Text from the Word List ....................................41
5 MY ORGANIZER
5.1 My Mailbox ............................................................................ 42
5.1.1 My Mailbox: What is it? ..................................................... 42
5.1.2 Folders in My Mailbox........................................................ 42
5.1.3 Commands ............................................................................. 43
5.1.4 Using My Mailbox ............................................................... 44
5.1.5 Creating a New Message .................................................. 44
5.1.6 Editing a Message ................................................................ 44
5.1.7 Saving a Message to the Drafts Folder ......................... 44
5.1.8 Sending a Message to the Outbox ................................ 44
5.1.9 Adding an Address .............................................................. 45
5.1.10 Viewing Message Information ......................................... 45
5.1.11 Viewing an Attachment ...................................................... 45
5.1.12 Deleting a Message ............................................................. 45
5.1.13 Spell Checking ...................................................................... 45
5.1.14 Inserting a Photo ................................................................... 46
5.1.15 Inserting a Sentence ............................................................ 46
5.1.16 Inserting a Smiley Icon ....................................................... 46
Page 5

Table of Contents Page
.........................................................................................................
5.2 My Address Book ................................................................. 46
5.2.1 My Address Book: What is it? .......................................... 46
5.2.2 Commands ............................................................................. 47
5.2.3 Using My Address Book .................................................... 47
5.2.4 Finding an Address Book Entry ....................................... 48
5.2.5 Creating an Address Book Entry ..................................... 48
5.2.6 Creating a Personal Address Book Entry ...................... 48
5.2.7 Creating a Group Address Book Entry ......................... 49
5.2.8 Editing an Address Book Entry ........................................ 49
5.2.9 Deleting Address Book Files ............................................. 50
5.3 My Calendar ...........................................................................51
5.3.1 My Calendar: What is it? ....................................................51
5.3.2 Commands ..............................................................................51
5.3.3 Using My Calendar .............................................................. 52
5.3.4 Adding an Event ................................................................... 52
5.3.5 Calendar View Shortcuts .................................................... 53
5.3.6 Viewing a Specific Date ...................................................... 53
5.3.7 Deleting All the Events on a Specific Day .................... 54
5.4 My Memo Pad ...................................................................... 54
5.4.1 My Memo Pad: What is it? ............................................... 54
5.4.2 Commands ............................................................................. 54
5.4.3 Using My Memo Pad ......................................................... 55
5.4.4 Creating and Editing Memos ........................................... 55
5.4.5 Deleting .................................................................................... 55
5.4.6 Inserting a Smiley Icon ....................................................... 56
5.5 My Money Manager ........................................................... 56
5.5.1 My Money Manager: What is it? .................................... 56
5.5.2 Commands ............................................................................. 56
5.5.3 Viewing My Money Manager ......................................... 57
5.5.4 Renaming the Folder ........................................................... 58
5.5.5 Creating a New Entry ......................................................... 58
5.5.6 Viewing Another Folder ..................................................... 59
Page 6

Table of Contents Page
.........................................................................................................
5.5.7 Viewing a Statement ........................................................... 59
5.6 My Database .......................................................................... 60
5.6.1 My Database: What is it? ................................................... 60
5.6.2 Commands ............................................................................. 60
5.6.3 Viewing My Database ......................................................... 60
5.6.4 Adding a Record .................................................................... 61
5.6.5 Creating a New Database .................................................. 61
5.6.6 Deleting a Record ................................................................. 62
5.6.7 Deleting a Database ............................................................ 62
5.7 School Subjects ..................................................................... 62
5.7.1 School Subjects: What is it? .............................................. 62
5.7.2 Commands ............................................................................. 63
5.7.3 Viewing School Subjects .................................................... 63
5.7.4 Creating a New School Subjects Table ......................... 63
5.7.5 Deleting Contents in the School SubjectsTable ......... 64
5.8 To Do List ................................................................................ 65
5.8.1 To Do List: What is it? ......................................................... 65
5.8.2 Commands ............................................................................. 65
5.8.3 Symbols Displaying the Status of Tasks
in the To Do List.................................................................... 66
5.8.4 Using the To Do List ............................................................ 66
5.8.5 Creating a New Task ........................................................... 66
5.8.6 Viewing the To Do List Index Screen ............................ 67
5.8.7 Viewing the Content of the To Do List ......................... 67
5.8.8 Editing a Task ......................................................................... 67
5.8.9 Deleting Task Contents ....................................................... 67
5.8.10 Deleting a Task ...................................................................... 67
5.8.11 Setting Task Options ........................................................... 68
5.8.12 Setting Date Options ........................................................... 68
Page 7

Table of Contents Page
.........................................................................................................
6 MY ACCESSORIES
6.1 Clock.........................................................................................69
6.1.1 Clock: What is it?..................................................................69
6.1.2 Commands.............................................................................69
6.1.3 Viewing the Clock................................................................69
6.1.4 Changing the Clock Settings............................................70
6.1.5 Changing the Date & Time Format...............................70
6.2 City Locator.............................................................................71
6.2.1 City Locator: What is it?......................................................71
6.2.2 Commands..............................................................................71
6.2.3 Viewing the City Locator....................................................71
6.2.4 Viewing City Info..................................................................72
6.3 Mini-Calculator......................................................................73
6.3.1 Mini-Calculator: What is it?...............................................73
6.3.2 Using Mini-Calculator.........................................................73
6.3.3 Touchpad Keys and their Mini-Calculator Function.74
6.4 Unit Conversion....................................................................75
6.4.1 Unit Conversion: What is it?.............................................75
6.4.2 Using Unit Conversion.......................................................75
6.5 Birthday List............................................................................76
6.5.1 Birthday List: What is it?.....................................................76
6.5.2 Commands.............................................................................76
6.5.3 Using the Birthday List.......................................................76
6.5.4 Birthday List Alarm Setting................................................76
6.6 My Profile................................................................................77
6.6.1 My Profile: What is it?.........................................................77
6.6.2 Commands.............................................................................77
6.6.3 Using My Profile...................................................................77
Page 8

Table of Contents Page
.........................................................................................................
7 ENTERTAINMENT
7.1 Photo Puzzle .......................................................................... 78
7.1.1 Photo Puzzle: What is it? ................................................... 78
7.1.2 Commands ............................................................................. 78
7.1.3 Playing Photo Puzzle ........................................................... 78
7.1.4 Game Settings ....................................................................... 79
7.2 Photo Tic-Tac-Toe .................................................................. 79
7.2.1 Photo Tic-Tac-Toe: What is it? ........................................... 79
7.2.2 Commands ............................................................................. 80
7.2.3 Playing Photo Tic-Tac-Toe ................................................... 80
7.2.4 Game Settings ....................................................................... 80
7.3 Trivia ........................................................................................... 81
7.3.1 Trivia: What is it? .................................................................... 81
7.3.2 Commands ..............................................................................81
7.3.3 Playing Trivia ...........................................................................81
7.3.4 Selecting a Skill Level .......................................................... 82
7.4 Pegged ..................................................................................... 82
7.4.1 Pegged: What is it? .............................................................. 82
7.4.2 Commands ............................................................................. 83
7.4.3 Playing Pegged ...................................................................... 83
7.4.4 Selecting Different Puzzles ................................................ 84
7.5 Word Chamber ..................................................................... 84
7.5.1 Word Chamber: What is it? .............................................. 84
7.5.2 Commands ............................................................................. 84
7.5.3 Playing Word Chamber...................................................... 85
7.5.4 Game Settings ....................................................................... 85
7.6 Phortune Cookies ................................................................. 86
7.6.1 Phortune Cookies: What is it? .......................................... 86
7.6.2 Commands ............................................................................. 86
7.6.3 Playing Luck Today .............................................................. 86
7.6.4 Playing Friendship ................................................................ 88
Page 9

Table of Contents Page
.........................................................................................................
8 WORDS & MATH
8.1 Math Games .......................................................................... 89
8.1.1 Tangrams ................................................................................. 89
8.1.1.1 Tangrams: What is it? .......................................................... 89
8.1.1.2 Commands ............................................................................. 89
8.1.1.3 Playing Tangrams ................................................................. 89
8.1.1.4 Rotating Shapes .................................................................... 90
8.1.1.5 Flipping Shapes ..................................................................... 90
8.1.1.6 Selecting Different Puzzles................................................ 90
8.1.1.7 Using Hints .............................................................................. 91
8.1.2 Mathimage .............................................................................. 91
8.1.2.1 Mathimage: What is it? ....................................................... 91
8.1.2.2 Commands ............................................................................. 92
8.1.2.3 Playing Mathimage .............................................................. 92
8.1.3 Grid Grad ................................................................................ 93
8.1.3.1 Grid Grad: What is it? ......................................................... 93
8.1.3.2 Commands ............................................................................. 93
8.1.3.3 Playing Grid Grad ................................................................ 93
8.1.3.4 Erasing Points Plotted on the Grid ................................. 94
8.1.3.5 Selecting a Skill Level .......................................................... 94
8.2 Word Games .......................................................................... 95
8.2.1 Word Puzzle ........................................................................... 95
8.2.1.1 Word Puzzle: What is it? .................................................... 95
8.2.1.2 Commands ............................................................................. 96
8.2.1.3 Playing Word Puzzle ........................................................... 96
8.2.1.4 Selecting a Skill Level .......................................................... 96
8.2.2 Clue Counter ......................................................................... 97
8.2.2.1 Clue Counter: What is it? .................................................. 97
8.2.2.2 Commands ............................................................................. 97
8.2.2.3 Playing Clue Counter .......................................................... 98
8.2.3 Analogies ................................................................................. 98
8.2.3.1 Analogies: What is it? .......................................................... 98
8.2.3.2 Commands ............................................................................. 98
8.2.3.3 Playing Analogies ................................................................. 99
Page 10

Table of Contents Page
.........................................................................................................
8.2.3.4 Selecting a Skill Level .......................................................... 99
8.3 Translator ............................................................................... 100
8.3.1 Translator: What is it? ........................................................ 100
8.3.2 Using Translator .................................................................. 100
8.4 Spell Checker ........................................................................ 101
8.4.1 Spell Checker: What is it? ................................................. 101
8.4.2 Commands ............................................................................101
8.4.3 Using Spell Checker ...........................................................101
8.4.4 Customizing the Spell Checker ..................................... 102
9 TOOLS
9.1 My Setup ............................................................................... 103
9.1.1 Memory Manager .............................................................. 103
9.1.1.1 Memory Manager: What is it? ....................................... 103
9.1.1.2 Commands ........................................................................... 103
9.1.1.3 Using the Memory Manager ......................................... 103
9.1.1.4 Deleting Files ........................................................................ 104
9.1.1.5 How to Reset Memory ..................................................... 104
9.1.2 Changing the Sound Setup ............................................ 105
9.1.2.1 Sound Setup: What is it? ................................................. 105
9.1.2.2 How to Use the Sound Setup ........................................ 105
9.1.3 Auto Shut-Off Time ........................................................... 106
9.1.3.1 Auto Shut-Off Time: What is it? .................................... 106
9.1.3.2 Using Auto Shut-Off Time .............................................. 106
9.1.4 Date & Time Format .......................................................... 107
9.1.4.1 Date & Time Format: What is it? ................................... 107
9.1.4.2 Using Date & Time Format ............................................. 107
9.1.5 User Mode ............................................................................ 108
9.1.5.1 User Mode: What is it? ..................................................... 108
9.1.5.2 Using User Mode ............................................................... 108
9.1.6 Locking the Unit ................................................................. 109
9.1.6.1 Lock Unit: What is it? ........................................................ 109
9.1.6.2 Using Lock Unit .................................................................. 109
Page 11

Table of Contents Page
.........................................................................................................
9.2 Phusion™ Tutor ...................................................................110
9.2.1 Phusion™ Tutor: What is it? ............................................110
9.2.2 Using Phusion™ Tutor ...................................................... 110
9.3 VTech® PC Link Software ................................................ 110
Appendix: Smiley Icons ....................................................................... 111
Appendix: Battery Notices ................................................................... 112
VTe ch® Phusion™ ON-LINE ............................................................112
FCC NOTICE ........................................................................................... 114
Page 12

Copyright
Copyright® 2000 VTech Industries, LLC All rights reserved. VTech
and the VTech logo are registered trademarks. Phusion™ and the
Phusion™ logo are trademarks of VTech Industries, LLC.
Disclaimer and Limitation of Liability
VTech Industries, LLC and its suppliers assume no responsibility for
any damage or loss resulting from the use of this handbook. VTech
Industries, LLC and its suppliers assume no responsibility for any
loss or claims by third parties that may arise through the use of
this software. VTech Industries, LLC and its suppliers assume no
responsibility for any damage or loss caused by deletion of data
as a result of malfunction, dead battery, or repairs. Be sure to make
backup copies of important data on other media to protect against
data loss.
Important!
®
Please read the VTech
Agreement before using the accompanying software
program(s). Using any part of the software indicates that
you accept the terms of the Phusion™ End User Software
License Agreement.
This manual was prepared during software development. Some
screens in this manual may not appear exactly as the screens found
in the final product.
End User Software License
®
VTech
Phusion™ PC Link software is supplied on 3.5" disks. If
you do not have access to a 3.5" floppy disk drive for your
computer, you can download the VTech® Phusion™ PC Link
software on-line from www.myphusion.com.
1
Page 13
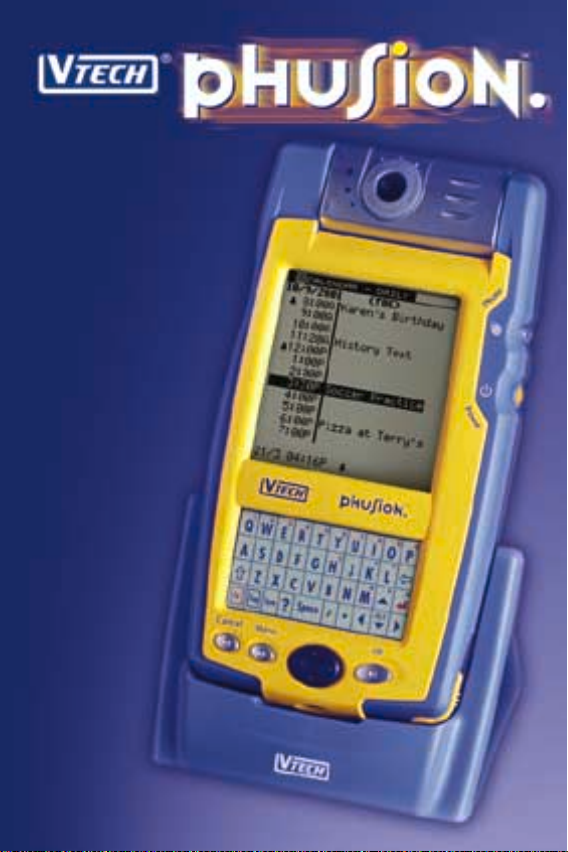
1 INTRODUCTION
Welcome to the Phusion™ digital camera organizer. This guide is
designed to help you set up and run your digital camera organizer.
It describes all you need to know about how to use your Phusion™
digital camera organizer and the applications that come with it.
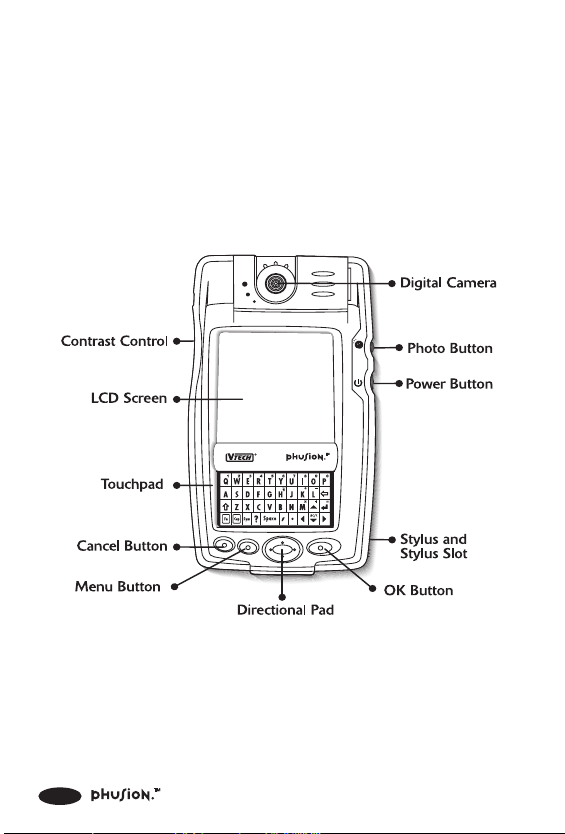
1.1 Phusion™ Components
Front
2
Page 14

Important Buttons and Features
Digital Camera With Phusion™’s Digital Camera, you
can take up to 25 black and white digital
pictures. Use the LCD screen to see what
the Digital Camera sees in real-time, so
you can always get the perfect shot. Also,
you’ll never need film or film developing.
You can take a picture and see the results
instantly. Each picture is instantly stored
in Phusion™’s Photo Browser. For even
greater flexibility, you can rotate the
Digital Camera 180° for more picture
taking fun.
Photo Button Press the button to capture the photos
that appear in the Digital Camera.
Power Button Turns your Phusion™ on or off. If your
Phusion™ is turned off, pressing the
Power button turns the unit on. If your
Phusion™ is turned on, pressing the
Power button turns the unit off.
Contrast Control You can adjust the appearance of the
LCD screen for the clearest display.
Depending on the lighting conditions or
temperature of the environment where
you use your digital camera organizer,
you may need to adjust the contrast.
To adjust the contrast, rotate the Control
up or down to increase or decrease the
contrast.
3
Page 15

Stylus and Stylus Slot The stylus slides in and out of the slot.
To use the stylus, remove it from the slot
and hold it as you would a pen or pencil.
Use the stylus to press the keys on the
Touchpad or to press the Directional Pad
and other buttons.
Touchpad The Touchpad is very similar to a computer
keyboard. Use the stylus to press the keys
on the Touchpad. See the section,
“Touchpad Layout” for more information
on each key.
Cancel Button Press Cancel to return to the previous
screen.
OK Button Press OK to move the cursor to the next
line, or to confirm an action or command.
Menu Button Press Menu to launch the Action menu.
The Action menu contains additional
commands for your Phusion™ digital
camera organizer.
Directional Pad Press the Directional Pad to move the
cursor up, down, left or right on the
screen. Also, the Directional Pad can be
used to adjust the settings on your
Phusion™ digital camera organizer.
On menu screens such as the Main
menu, press Right to move the cursor
couter-clockwise. Press Left to move the
cursor clockwise.
4
Page 16
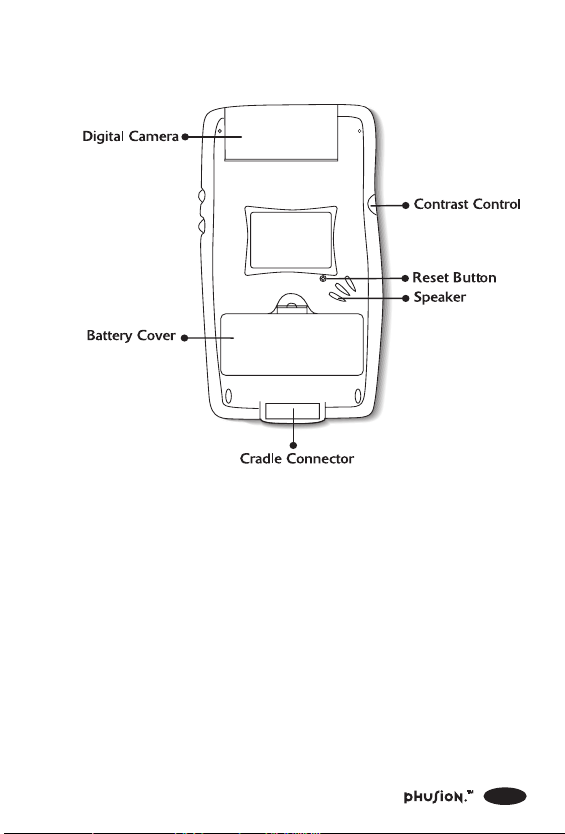
Back
Cradle Connector This port connects to the cradle, which
is connected to the serial port on your
PC. Place the Phusion™ into the cradle
to backup data or transfer data to and
from your PC.
Battery Cover Covers the batteries that power your
Phusion™ digital camera organizer.
Reset Button Under normal use, you should not have
to use the Reset button. If your Phusion™
digital camera organizer stops responding,
press Reset to restart.
5
Page 17
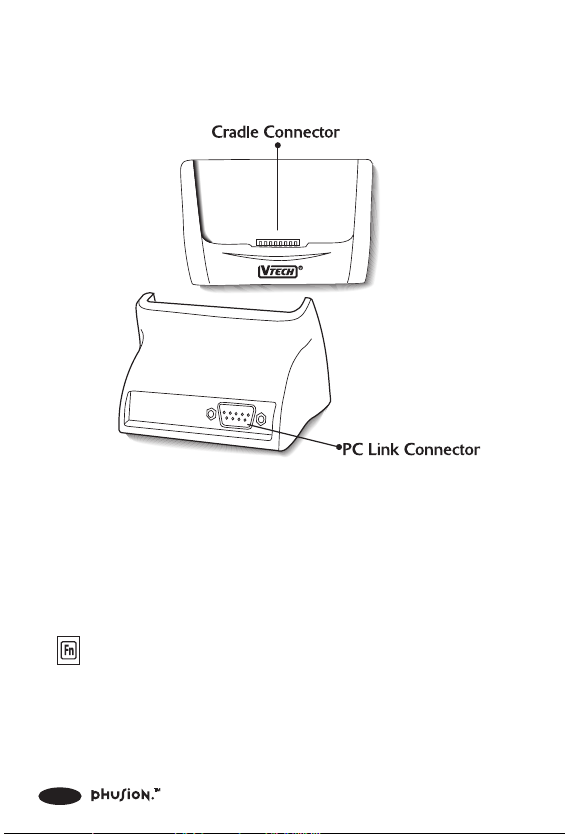
Cradle
PC Link Connector The PC Link Connector connects to the
serial port on your PC using the serial
cable included with your Phusion™.
1.2 Touchpad layout
This key is used to activate the number
keys. If you press the Fn key then press
the Y key, the number 6 will appear on
the screen. Also, you can press the Fn
key then H key to view the Tutor
information.
6
Page 18
Press this key before pressing the letter
keys to type capital letters.
Cap
Press this key if you want to type all
letters as capital letters. Press this key
again to continue typing in lower case
letters.
Space Press this key to insert a space between
words or letters.
Arrow keys Press these keys to move the cursor up,
down, left or right.
Press this key to move the cursor to the
next line or confirm an action.
Press this key to delete any character to
the left of the cursor.
AC/C Used in the Mini-Calculator. Press this
key once to clear your most recent entry.
Press the key again to clear all entries
in the Mini-Calculator.
7
Page 19
1.3 Battery Installation
Two (2) AA size batteries power your Phusion™ digital camera
organizer. Here is how to install them:
1. Be sure your Phusion™ digital
camera organizer is turned off.
2. Open the battery cover on the
back of your Phusion™ digital
camera organizer.
3. Insert two (2) new AA size
batteries as shown.
4. Close the battery cover.
If your Phusion™ digital camera organizer stops working or
if the screen appears dim, make sure the batteries are fresh
and installed properly.
1.4 Adjusting the Clock After Battery Replacement
The internal clock stops when the batteries are removed. You
will be asked to adjust the time on your Phusion™.
1. If you need to adjust the clock, choose Yes.
2. Then adjust the time on the following screen.
3. After adjusting each of the clock settings, your changes
will be saved automatically.
8
Page 20

1.5 How to Use the Action Menu
Press the Menu button on your Phusion™ digital camera
organizer to view the Action menu.
The Action menu is arranged in a
cross section that allows you to
access commands using the fewest
button presses. Use the Directional
Pad to select a command, then
press OK to continue.
9
Page 21

2 DIGITAL CAMERA
2.1 Digital Camera: What is it?
The pictures you take can be used in some of the learning
activities and games. You can add pictures to your address
book, too. You can even transfer pictures to and from your
PC. Each picture is instantly stored in Phusion™‘s Photo
Browser.
Where is it?
You can open the Digital Camera from the Main menu of
your Phusion™ digital camera organizer. The Digital Camera
can also be accessed from other applications that use your
digital pictures.
2.2 Commands
(Schedule Photo Taking) Automatically take a series of
photos over a set time.
(Timer Photo Taking) Automatically take a photo after
10 seconds.
(Show Date & Time) Display the date and time when
a photo was taken.
(Hide Date & Time) Hide the date and time when a
photo was taken.
(Delete This Photo) Delete the current photo.
10
Page 22

2.3 Using the Digital Camera
1. Use the Directional Pad to select (Digital Camera)
from the Main menu and press OK.
2. On the LCD screen, you can instantly see what the
Digital Camera sees in real-time.
3. Press the Photo button to take a picture.
2.4 Adjust the Picture Contrast and Brightness
1. You can adjust the contrast and brightness of each picture
using the Directional Pad.
2. Press Up and Down to adjust the picture contrast.
3. Press Left or Right to adjust the brightness of the picture.
2.5 How to Use the Schedule Photo Taking Function
1. Select (Schedule Photo Taking) from the Action menu.
2. Enter the Start Date, Start Time,
time between photos, and the
number of photos to take.
3. After setting the date and time options, press OK.
4. Turn the unit off.
11
Page 23

2.6 How to Use Timer Photo Taking
1. Select (Timer Photo Taking) from the Action
menu.
2. Once Timer Photo Taking is active, Phusion™ will take
a picture in 10 seconds.
12
Page 24

3 PHOTO BROWSER
3.1 Photo Browser: What is it?
The Photo Browser is a collection of digital photos taken by
you. Once a picture is taken, it is automatically stored in the
Photo Browser. Your Phusion™ digital camera organizer stores
up to 25 digital pictures.
Where is it?
You can find Photo Browser in the Main menu.
3.2 Commands
(Delete) Delete the current photo or all photos.
(This File) Delete the selected photo.
(All Files) Permanently delete all photos.
(View Today’s Photos) View the photos taken today.
(View Scheduled Photos) View the photos taken during
Schedule Photo Taking.
(Hide Date & Time) Hide the date and time when a
photo was taken.
(Show Date & Time) Display the date and time when
a photo was taken.
(Go Back) Go back to the previous menu.
13
Page 25

3.3 Using the Photo Browser
1. Select (Photo Browser) from
the Main menu and press OK.
2. Use the Directional Pad to select
a photo and press OK
to view it.
3.4 Deleting a Photo
1. Select Photo Browser from the Main menu and press OK
to open it.
2. Select a photo you want to delete using the Directional
Pad and select
(Delete) from the Action menu.
3. A sub-menu will pop up. From this sub-menu, you can
select
(All Files) to delete all the photos in the Photo Browser.
14
(This File) to delete the selected photo or
Page 26

3.5 Show or Hide the Date & Time
1. Select (Show Date & Time) from the Action menu
after you have opened the Photo Browser.
2. If the date and time isn’t shown,
press OK. The date and time
of when each photo was taken
will appear on screen.
3. Select (Hide Date & Time)
and press OK again to hide the
date and time of when each
photo was taken.
3.6 Viewing Photos from Schedule Photo Taking
1. At the Photo Browser, use the Directional Pad to select
(View Scheduled Photos) from the Action menu.
2. Press OK. The photos taken during the Schedule Photo
Taking mode will be displayed on screen.
3.7 Viewing Today’s Photos
1. At the Photo Browser, use the
Directional Pad to select
(View Today’s Photos) from the
Action menu.
2. Press OK. Photos taken during
the current day will be displayed
on screen.
15
Page 27
4 MY PHOTO GALLERY
Use My Photo Gallery to organize your photos! In My Photo Gallery,
you can create slide shows and photo albums. You can even add
special effects or Clip Art to your pictures.
4.1 My Album
4.1.1 My Album: What is it?
My Album helps you store, organize and add notes to your
photos. You can re-order or create Cover and End Pages for
the album.
Where is it?
You can find My Album in the My Photo Gallery folder.
4.1.2 Commands
(New) Create a new album.
(Delete) Delete the current album or all albums.
(This File) Delete the selected album.
(All Files) Permanently delete all albums.
(Edit) Edit the selected album.
(Play Album) Play the selected album as a slide show.
(Re-Order) Arrange the order of the photos in the
album.
16
Page 28

(Undo Order) Undo Re-order and use original order.
(Attach Notes) Attach a note to the selected photo.
(Album Tools) Edit the current photo album.
(Album Cover Page) Create a cover page using a
template.
(Album End Page) Create an end page using a template.
(Add More Photos) Add more photos to the album,
by taking new photos or by selecting photos from the
photo Browser.
(Exclude This Photo) Exclude this photo from the
selected album.
(Save) Save the current album.
(Insert Clip Art) Insert Clip Art from the Clip Art Browser.
(Insert Text) Select a font style and add text to your
photo.
(Change Cover) Change the current cover page of the
selected album.
(Change End) Change the current end page of the
selected album.
17
Page 29
4.1.3 Using My Album
1. Select (My Photo Gallery) from the Main menu using
the Directional Pad.
2. Select
(My Album) using the Directional Pad and press
OK.
3. You are now in the main
album screen.
4. To edit an album, select the
album, then select (Edit)
from the Action menu.
5. After you have edited or created a new album, choose
(Save) to save your changes.
4.1.4 Creating a New Album
1. From the main album screen, select (New) from the
Action menu.
2. Type in the name of the new
album using the Touchpad.
18
Page 30
3. Select the photo source. You
can take a new photo using the
Digital Camera, or you can
select a photo from the Photo
Browser.
4. Press OK to confirm your selected photo. The selected
photo will be added to your album. To deselect a photo,
press OK again. When you have finished adding photos,
press Cancel to view the complete Album.
5. To save your album, select
(Save) from the Action menu
and press OK.
4.1.5 Deleting an Album
1. At the album main screen, select the album you want to
delete.
2. Select
(Delete) from the Action menu using the
Directional Pad and press OK.
3. In the following sub-menu, you can select either
(This File) to delete the selected album or (All Files)
to delete all of your albums.
19
Page 31
4.1.6 Playing an Album as a Slide Show
1.At the album main screen, select (Play Album) from
the Action menu.
4.1.7 Viewing Photos in an Album
1.Use the Directional Pad to
select the album you want to
view and press OK.
2. Use the Directional Pad to select a photo you want to
view and press OK.
4.1.8 Arranging the Order of the Photos in an Album
1.At the album main screen, select (Edit) from the Action
menu.
2.Select
Action menu and press OK.
3.To undo the last move, select
OK.
4.Select the photos in the order you want, then select
(Save) to save your changes.
20
(Re-Order) from the
(Undo Order) and press
Page 32

4.1.9 Attaching a Note to Your Photos
1. At the album Edit screen, select a photo.
2. Select
OK.
3. Type in your note.
(Attach Notes) from the Action menu and press
4. After you have finished typing
your note, press OK to save it.
4.1.10 Deleting a Photo from an Album
1. At the album Edit screen, select a photo you want to delete.
2. Select
and press OK.
(Exclude This Photo) from the Action menu
21
Page 33

4.1.11 Adding More Photos to an Album
1. At the album Edit screen, select (Album Tools) from
the Action menu.
2. Select
3. Select the photo source. You
can take a new photo using the
Digital Camera, or you can
select a photo from the Photo
Browser.
4. The selected photos will be
added to the album
automatically.
(Add More Photos) and press OK.
4.1.12 Adding Album Cover and End Pages
1. Select (Album Tools) from the Action menu and press
OK.
2. Select
from the sub-menu and press OK.
(Album Cover Page) or (Album End Page)
3. In the following screen, you will
see templates you can use to
create your cover or end page.
4. Select a photo and press OK
to edit it.
22
Page 34

5. Select (Insert Clip Art) from the Action menu to add
Clip Art or select
6. Select (Save) to save the photo.
(Insert Text) to add text to the photo.
4.1.13 Deleting a Cover or End Page
If you want to delete a cover or end page, select (Exclude
this Photo).
4.2 Photo Maker
4.2.1 Photo Maker: What is it?
The Photo Maker allows you to add effects, hairstyles or
backgrounds to your photos.
Where is it?
You can find Photo Maker in the My Photo Gallery folder.
4.2.2 Commands
(New) Add a new effect to a photo.
(Delete) Delete current file or all files.
(This File) Delete the selected file.
(All Files) Permanently delete all files.
(Edit) Edit the selected photo.
(Insert Clip Art) Insert Clip Art from the Clip Art Browser.
23
Page 35

(Insert Text) Add text to a photo.
(Save) Save the current photo.
(Undo Effect) Undo the last photo effect.
(Replace Photo) Select a new photo.
4.2.3 Using Photo Maker
1. Select (My Photo Gallery) from the Main menu using
the Directional Pad.
2. Select
(Photo Maker) using the Directional Pad.
3. You are now in the Photo Maker main screen. Two
templates are provided. Select a template and press OK.
4. Now you can choose from
different effects. Select
(New) from the Action menu
to create a new photo and add
effects.
5. To edit a photo, select the photo and choose (Edit)
from the Action menu.
6. After you have edited or created a new photo, choose
(Save) to save your changes.
24
Page 36

4.2.4 Adding Effects to a Photo
1. Open Photo Maker and select the Photo Effects template,
then press OK to enter the Photo Effects screen.
2. Select
(New) from the
Action menu.
3. Select the photo source. You
can take a new photo using the
Digital Camera, or you can
select a photo from the Photo
Browser.
4. Select a photo effect and press OK to confirm your
selection.
5. Select
(Save) from the
Action menu to save your
changes.
4.2.5 Adding Special Effects to a Photo
1. Open Photo Maker and select the Special Effects template.
2. Select
(New) from the Action menu.
25
Page 37

3. Select a hairstyle or background
template from the template
Photo Browser and press OK.
4. Select the photo source. You
can take a new photo using the
Digital Camera, or you can
select a photo from the Photo
Browser.
5. Select (Save) from the
Action menu to save your
changes.
4.2.6 Deleting Photos with Effects
1. Select the photo you want to delete in the Photo Effects
or Special Effects screen.
2. Select
(Delete) from the Action menu using the
Directional Pad and press OK.
3. In the following sub-menu, you can select
to delete the selected photo. Selecting
all the photos in the Browser.
26
(This File)
(All Files) will delete
Page 38

4.2.7 Editing Photos with Effects
1. Select a photo you want to edit
from the Photo Effect screen.
2. Select
(Edit) from the Action
menu and press OK to enter
the Edit screen.
3. At the Edit screen, select (Insert Clip Art) from Action
menu to insert Clip Art or select
(Insert Text) to add
text.
4. Select
(Save) to save your changes.
4.2.8 Editing a Photo with a Special Effect
1. Select a photo you want to edit
from the Special Effects screen.
2. Select (Edit) from the Action menu and press OK to
enter the Edit screen.
3. At the Edit screen, select a special effect.
4. Select a background or hairstyle.
5. Select
(Save) to save your changes.
27
Page 39

4.2.9 Viewing a Photo Full Screen
1. At Photo Effects or Special
Effects screen select a photo
you want to view and press
OK.
2. The selected photo will be
displayed full screen.
4.2.10 Replacing a Photo
1. If you’re not satisfied with the photo you selected, you
can select
select another photo.
(Replace photo) from the Action menu to
2. Select
(Save) and press OK to save the photo.
4.3 Slide Show Maker
4.3.1 Slide Show Maker: What is it?
The Slide Show Maker converts your digital photo album into
a slide show.
28
Page 40

Where is it?
You can find Slide Show Maker in the My Photo Gallery folder.
4.3.2 Commands
(New) Create a new slide show.
(Delete) Delete the current file or all files.
(This File) Delete the selected file.
(All Files) Permanently delete all files.
(Play Show) Play slide show.
(Play Album) Convert an album into a slide show using
default transition & sound effects.
(Loop Show) Play a slide show continuously. Press
Cancel to stop the slide show.
(Re-Order Slides) Change the order of the slides.
(Transition & Sound) Add or Edit slide transition & sound
effects.
(Save) Save changes.
(Edit) Edit slide show.
(Exclude This Slide) Exclude the selected photo from
the slide show.
29
Page 41

(Slide Tools) Create a slide cover page and end page,
or add more slides to your show.
(Slide Cover Page) Create a cover slide using the
provided templates.
(Slide End Page) Create an end slide using the provided
templates.
(Add More Slides) Add more slides to the show by
taking new photos or by selecting saved photos.
(Undo Order) Undo the Re-Order and use previous
order.
(Save Order) Save changes in the slide order.
(Insert Clip Art) Insert Clip Art from the Clip Art Browser.
(Insert Text) Add text to the current slide.
(Change Cover) Change the current cover page.
(Change End) Change the current end page.
30
Page 42

4.3.3 Using the Slide Show Maker
1. Select (My Photo Gallery) from the Main menu using
the Directional Pad.
2. Select
(Slide Show Maker)
using the Directional Pad, and
press OK.
3. Select (New) from the Action menu to create a new
slide show, or select
(Edit) to enter the Slide Show
Edit screen.
4. To view a slide show, select
(Play Show) from the
Action menu.
4.3.4 Creating a New Slide Show
1. Select (New) from the Action menu.
2. Type in a name for the new
slide show. Then select the slide
show source.
3. You can add photos using the
Digital Camera or select
photos from the Photo Browser.
31
Page 43
4. Use the Directional Pad to place
the cursor over a photo. Press
OK to add it to the Slide Show.
To deselect a photo, place the
cursor over the photo, and
press OK again.
5. When you have finished adding photos, press Cancel to
view the photos in the show.
4.3.5 Deleting a Slide Show
1. Select the slide show you want to delete.
2. Select
3. You can select either
slide show or
(Delete) from the Action menu and press OK.
(This File) to delete the selected
(All Files) to delete all of the slide shows.
4.3.6 Viewing a Slide Full Screen
1. Select the slide show you want to view using the Directional
Pad, and press OK.
2. On the next screen, you can
see all the slides in the selected
slide show.
32
Page 44

3. Choose the slide you want to
view and press OK.
4.3.7 How to Play an Album as a Slide Show
1. Select (Play Album) from the Action menu using the
Directional Pad, and press OK.
2. The screen will switch to the Album main screen. Select
the album you want to view.
3. Press OK to confirm your selection, the selected album
will be automatically converted into a slide show.
4.3.8 How to Play a Slide Show
1. Select the slide show you want to view using the Directional
Pad, and press OK.
2. Select
OK.
(Play Show) from the Action menu and press
4.3.9 Excluding a Photo from a Slide Show
1. Select (Edit) to enter the Edit screen from the Action
menu and press OK.
2.Select a photo you want to exclude, using the Directional
Pad.
3. Select
and press OK.
(Exclude This Slide) from the Action menu,
33
Page 45

4.3.10 Changing the Order of the Photos in a Slide
Show
1. Select the slide show you want to edit using the Directional
Pad.
2. Select
Show Edit screen.
3. Select
OK.
4. Select a slide you want to move
using the Directional Pad, then
press OK. Place the slide in the
new position using the
Directional Pad, then press OK
to confirm the move.
5. Once you have finished editing the order of the slides,
press
(Edit) from the Action menu to enter the Slide
(Re-Order) from the Action menu and press
(Save) to save your changes.
4.3.11 Adding the Transition and Sound Effects
1. Select the slide show you want to edit using the Directional
Pad.
2. Select
Show Edit screen.
34
(Edit) from the Action menu to enter the Slide
Page 46

3.To edit the slide transition and
sound effect, select
(Transition & Sound) from the
Action menu, and press OK.
4.Use the Directional Pad to select a transition or sound effect.
Press OK or Enter to confirm your selections.
5.Select
(Save) to save your changes.
4.3.12 Adding Cover and End Slides
1.At the Slide Show Edit screen, select (Slide Tools) from
the Action menu.
2.Select
(Slide Cover Page) or (Slide End Page)
from the Action menu, and press OK.
Choose a slide template from the template menu, and press OK.
3.
4.On the next screen, you can select (Insert Clip Art)
to insert Clip Art or select
(Insert Text) to add text
to the slide.
5.After you have finished editing the slides, select
(Save)
to save your changes.
4.3.13 Adding More Photos to a Slide Show
1.At the Slide Show Edit screen, select (Slide Tools) from
the Action menu.
2.Select
(Add More Slides) from the sub-menu and press
OK.
35
Page 47

3. Select a photo source. You can
add photos using the Digital
Camera or select photos from
the Photo Browser.
4. After selecting the photos, press OK to add the photos
to the current slide show.
4.4 Card Maker
4.4.1 Card Maker: What is it?
With Card Maker and pictures from the Digital Camera, you
can create greeting cards, invitations, and more. Card Maker
also includes different styles of borders and Clip Art to help
you design the perfect card. To print your card, you can
transfer your card files to your PC using the VTech
Phusion™ PC Link.
Where is it?
You can find Card Maker in the My Photo Gallery folder.
4.4.2 Commands
®
(New) Create a new card.
(Use Template 1) Create a card with a template.
(Use Template 2) Create a card with a template.
36
Page 48

(Edit) Edit the selected card.
(Delete) Delete the current card or all cards.
(This File) Delete the selected card.
(All Files) Permanently delete all cards.
(Insert Clip Art) Insert Clip Art from the Clip Art Browser.
(Insert Text From Word List) Insert text from the Word
List.
(Save) Save the current card.
(Replace Photo) Select another photo to replace the
current photo.
(Insert Smiley Icon) Add a smiley icon to a photo.
4.4.3 Using Card Maker
1. Select (My Photo Gallery) from the Main menu using
the Directional Pad.
2. Select
(Card Maker) using the Directional Pad, and
press OK.
3. You can choose from four
styles of cards. Select a card
style and press OK.
37
Page 49

4. Select a card template and
press OK to go to edit you
card.
5. Select (New) from the Action menu to create a new
card. Also you can select
(Use Template 1) or
(Use Template 2) to create a card using a template.
6. To edit a card, select the card, then select
(Edit) from
the Action menu.
7. Choose
(Save) to save your changes.
4.4.4 Creating a New Card
1. Select (New) from the Action menu to create a new
card. Also you can select
(Use Template 1) or
(Use Template 2) to create a card using a template.
2. Type in a name for your new card, then press OK.
3. If you’re creating a greeting
card, select the border, and
press OK.
4. Select a photo source. You can
add photos using the Digital
Camera or select photos from
the Photo Browser.
38
Page 50

5.Press OK to confirm your photo choice and go to the
Card Maker Edit screen.
6. At the Edit screen, you can select
from Action menu to insert Clip Art or select
(Insert Clip Art)
(Insert
Text From Word List) to insert text from the Word List.
7. Once you have finished the
editing, select
(Save) from
the Action menu and press OK
to save your card.
4.4.5 Editing a Card
1.Select a card you want to edit in the Card Maker Browser.
2.Select
(Edit) from the Action
menu and press OK to enter
the Edit screen.
3.At the Edit screen, select
(Insert Clip Art) from the Action
menu to insert Clip Art or
select
(Insert Text From
Word List) to insert text from
the Word List.
4.Once you have finished editing, select
(Save) from
the Action menu and press OK to save your card.
39
Page 51

4.4.6 Deleting a Card
1. Select the card you want to delete in the Card Maker
Browser.
2. Select
Directional Pad and press OK.
3. In the following sub-menu, you can select
to delete the selected card, or
all of the cards in the Card Maker Browser.
(Delete) from the Action menu using the
(This File)
(All Files) to delete
4.4.7 Viewing a Card Full Screen
1. In the Card Maker Browser,
select the card you want to
view, then press OK.
4.4.8 Replacing a Photo
1. When you are creating a new card, you can select a photo
source. You can add photos using the Digital Camera or
select photos from the Photo Browser. If you don’t like
the photo, select
menu to use another one.
2. Select
(Save) and press OK to save your changes.
(Replace photo) from the Action
40
Page 52

4.4.9 Inserting Clip Art
1. At the Edit screen, select (Insert Clip Art) from the
Action menu.
2. A Clip Art box will appear.
3. Choose a Clip Art design using
the Directional Pad.
4. Press OK to add the selected Clip Art design to the photo.
4.4.10 Inserting Text from the Text List
1. At the Card Maker Edit screen, select (Insert Text From
Word List) from the Action menu.
2. Select a text message from the
Text List, then press OK to
continue.
41
Page 53

5 MY ORGANIZER
My Organizer provides different applications that will help you
manage your daily life.
5.1 My Mailbox
5.1.1 My Mailbox: What is it?
My Mailbox allows you to write messages. Using the VTech
Phusion™ PC Link software, you can transfer your messages
to your PC. If you already have an e-mail address and Internet
Service Provider, you can transfer your messages to your PC,
copy the messages into your own e-mail software, then send
the messages from your PC.
Where is it?
You can find My Mailbox in the My Organizer folder.
5.1.2 Folders in My Mailbox
There are three folders in My Mailbox. Each folder serves
a separate purpose. Here’s an introduction to each of the
folders:
Write Message
You can compose a new message by selecting the (Write
Message).
®
Outbox
All of the messages that you have finished, but have not yet
transferred to your PC are stored in your
To read a message in the Outbox, use the Directional Pad
to select a message in the list, then press OK.
42
(Outbox).
Page 54

Drafts
You can save a message that you have not yet finished in
(Drafts) box. To read a message, use the Directional
the
Pad to select a message in the list, then press OK.
5.1.3 Commands
(Write Message) Create a new message.
(Edit Message) Edit the current message.
(Place in Outbox) Send this message to the Outbox.
(Delete) Delete the selected message.
(View Attachment) Show the attached file.
(View More Info) View address information.
(Save as Drafts) Save your message in the Drafts folder.
(Add Address) Search the Address Book for addresses
and automatically add them to the address list.
(Spell Checker) Check the spelling of a word.
(Insert Photo) Insert a photo into your message.
(Insert Sentence) Insert a sentence into your message.
(Insert Smiley Icon) Insert a smiley icon into your
message.
43
Page 55

5.1.4 Using My Mailbox
1. Select (My Mailbox) in the My Organizer folder using
the Directional Pad and press OK.
2. You will now see three folders: Write Message, Outbox
and Drafts. Select one using the Directional Pad.
5.1.5 Creating a New Message
You can write a new message by selecting
(Write Message) from the (My Mailbox) folder.
5.1.6 Editing a Message
Press Menu to open the Action menu then select (Edit
Message) to edit the current message.
5.1.7 Saving a Message to the Drafts Folder
You can save a message that you have not yet finished writing
in the Drafts folder.
1. Create a new message or edit a selected message in the
Compose screen.
2. Press Menu to open the Action menu then select
(Save as Drafts) to save your message to the Drafts folder.
5.1.8 Sending a Message to the Outbox
After you finish typing a new message or editing an old one,
you can press Menu to open the Action menu then select
(Place in Outbox) to send this message to the Outbox.
44
Page 56

5.1.9 Adding an Address
Press Menu to open the Action menu then select (Add
Address) to search the Address Book for addresses and
automatically add them to the address list. Names and e-mail
addresses of both Personal and Group categories will be
shown. Personal address entries will be displayed followed by
Group address entries.
5.1.10 Viewing Message Information
Press Menu to open the Action menu then select (View
More Info) to see all information.
5.1.11 Viewing an Attachment
Press Menu to open the Action menu then select (View
Attachment) to see the photo attachment.
5.1.12 Deleting a Message
Press Menu to open the Action menu then select (Delete)
to delete the selected message.
5.1.13 Spell Checking
The Spell Checker helps you check for any typing mistakes.
Place the cursor next to the word you want to check. Press
Menu to open the Action menu, then select
Checker).
(Spell
45
Page 57
5.1.14 Inserting a Photo
You can attach an image to your message when editing or
creating a new message. Press Menu to open the Action menu
then select
in the upper right-hand corner of the screen.
(Insert Photo). The attached photo will appear
5.1.15 Inserting a Sentence
You can insert a sentence into your message when editing
or creating a new message. Place the cursor in the position
you want to insert the sentence. Press Menu to open the Action
menu then select
(Insert Sentence).
5.1.16 Inserting a Smiley Icon
You can insert the smiley icon into your message when editing
or creating a new message. Place the cursor in the position
you want to insert the icon. Press Menu to open the Action
menu then select
(Insert Smiley Icon).
5.2 My Address Book
5.2.1 My Address Book: What is it?
My Address Book on your VTech® Phusion™ helps you
organize and store all of your friends’ addresses, telephone
numbers and e-mail addresses, either by individual (Personal
files) or by group list (Group files). You can use My Address
Book to quickly access a telephone number of a friend or
family member.
Where is it?
You can find My Address Book in the My Organizer folder.
46
Page 58

5.2.2 Commands
(New File) Create a new Personal file.
(New Group) Create a new Group file.
(Edit) Modify the current file.
(Change View) View Personal files, Group files, or All
files.
(Group Only) Display Group files only.
(Personal Only) Display Personal files only.
(All Files) Display all files.
(Delete) Delete the current file or all files.
(All Files) Permanently delete all files.
(This File) Delete the selected file.
(Insert Photo) Add a photo to this file.
(Add Recipient) Insert e-mail address from the Personal
file when creating Group file.
5.2.3 Using My Address Book
Select (My Address Book) in
the My Organizer folder using the
Directional Pad. Then press OK.
47
Page 59

5.2.4 Finding an Address Book Entry
Select the entry you would like to view from the list, then
press OK to view the selected record.
If you want to locate a specific Address Book entry without
scrolling through the list of files, you can type the first few
letters of a person’s name in the ‘Find by Name’ field, My
Adress Book will automatically find matching entries.
5.2.5 Creating an Address Book Entry
Choose (New File) from the Action menu to add a new
entry.
My Address Book contains two different types of files. An
individual’s address is stored in your Address Book as a
Personal entry. A Group entry is a group of addresses.
5.2.6 Creating a Personal Address Book Entry
1. After you have opened your Address Book, select
(New File) from the Action menu. This will open the My
Address Book Edit screen.
2. At the Edit screen, you can
type in the person’s name,
telephone number, e-mail
address, birthday, home or work
address.
3. Select (Save) from the Action menu to save your entry.
48
Page 60

5.2.7 Creating a Group Address Book Entry
1. After you have opened your Address Book, select
(New Group) from the Action menu. This will open the
Edit screen for Group files.
2. At the Edit screen, type in the
name of the group you are
creating and the e-mail
addresses of the people you
would like in that group.
3. To add e-mail addresses to the Group entry, select
(Add Recipient) from the Action menu. You will then see
a list of your Personal files.
4. Select the Personal entry you would like to add to the
Group, using the Directional Pad or the Find by Name
feature, and press OK. The Name and e-mail address of
this Personal entry will be added to the Group entry.
5. Select
(Save) from the Action menu to save your entry.
5.2.8 Editing an Address Book Entry
To edit an Address Book entry, select it from the list, then
choose
(Edit) from the Action menu. Select (Save)
from the Action menu to save your entry.
49
Page 61

5.2.9 Deleting Address Book Files
There are two ways to delete files from your Address Book.
To delete a single Address Book entry:
1. After you have opened My Address Book, select the entry
you want to delete.
2. Choose
(Delete) from the Action menu.
3. Then choose (This File) from the Action menu.
4. The entry will be removed from My Address Book.
To delete all of the files in your Address Book:
1. After you have opened My Address Book, choose
(Delete) from the Action menu.
2. Select
(All Files) from the Action menu and press OK.
3. All of the files in your Address Book will be deleted.
Important!
If you choose to delete all files when you are viewing the
Personal files in your Address Book, only the Personal files
will be deleted. If you choose to delete all files when you
are viewing the Group files in your Address Book, only the
Group files will be deleted.
50
Page 62
5.3 My Calendar
5.3.1 My Calendar: What is it?
My Calendar helps you keep track of special events, parties
and exams. You can view your schedule in either daily or
monthly formats. You can use My Calendar any time you want
to keep track of an event that you need to remember.
Where is it?
My Calendar is located in the My Organizer folder.
5.3.2 Commands
(New) Create a new event.
(Edit) Edit the current event.
(Delete) Delete event(s).
(All Events) Permanently delete all events from the
Calendar.
(This Event) Delete the selected event.
(Full Day Events) Delete all events in a day.
(Save) Save all changes.
(View Today) View the current day’s schedule.
(Go To Date) Go to a specified date.
(Daily View) View the selected date.
(Monthly View) View the selected month.
(Date & Time Format) Change the date and time format
used in the Calendar.
51
Page 63
(Previous Day) Go to the previous day’s schedule.
(Next Day) Go to the following day’s schedule.
5.3.3 Using My Calendar
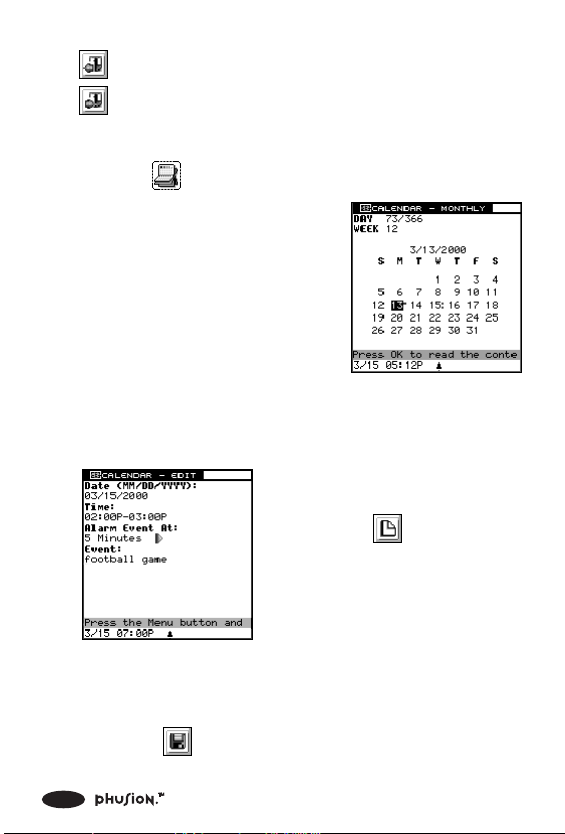
1. Select (My Calendar) in the My Organizer folder.
2. The next screen is the “Monthly
View” of the current month.
Dots will appear next to the
dates that have a scheduled
event.
3. To view all of the events for
that day, select a day, then
press OK.
5.3.4 Adding an Event
1. To add an event to a specific
day in the Daily View, you can
choose
(New) from
the Action menu.
2. Enter the Event Date and Time. Set how far in advance
you want to be reminded of the event. Finally, enter the
name of the event (for example, "football game").
3. Choose
(Save) from the Action menu to save your
event.
52
 Loading...