

Page 1

© 2009 VTech
Printed in China
91-002394-007-000
Ride & Learn Giraffe Bike
Page 2

Dear Parent,
Ever nice the look on your baby’s face when th learn something
new through their own discovery? ese self-accomplished
moments are a parent’s greatest reward. To help fulfill them,
VTech® created the Jungle Gym® series ts.
ese unique interactive learning ts directly respond to what
children do naturally – play! Using innovative technology, these
ts react to baby’s interactions, making each play perience fun
and unique as th learn age-appropriate concepts like first words,
numbers, shapes, colors and music. More importantly, VTech®’s
Jungle Gym® ts develop baby’s mental and physical abilities by
inspiring, engaging and teaching.
At VTech®, we know that a child has the ability to do great things.
at’s why all our electronic learning products are uniquely
designed to develop a child’s mind and allow them to learn to the
best their ability. We thank you for trusting VTech® with the
important job helping your child learn and grow!
Sincerely,
Julia Fitzgerald
Vice President, Marketing
Vtech Electronics, NA
To learn more about the Jungle Gym® series and her VTech® ts, visit www.vtechkids.com
Page 3

3
Introduction
INTRODUCTION
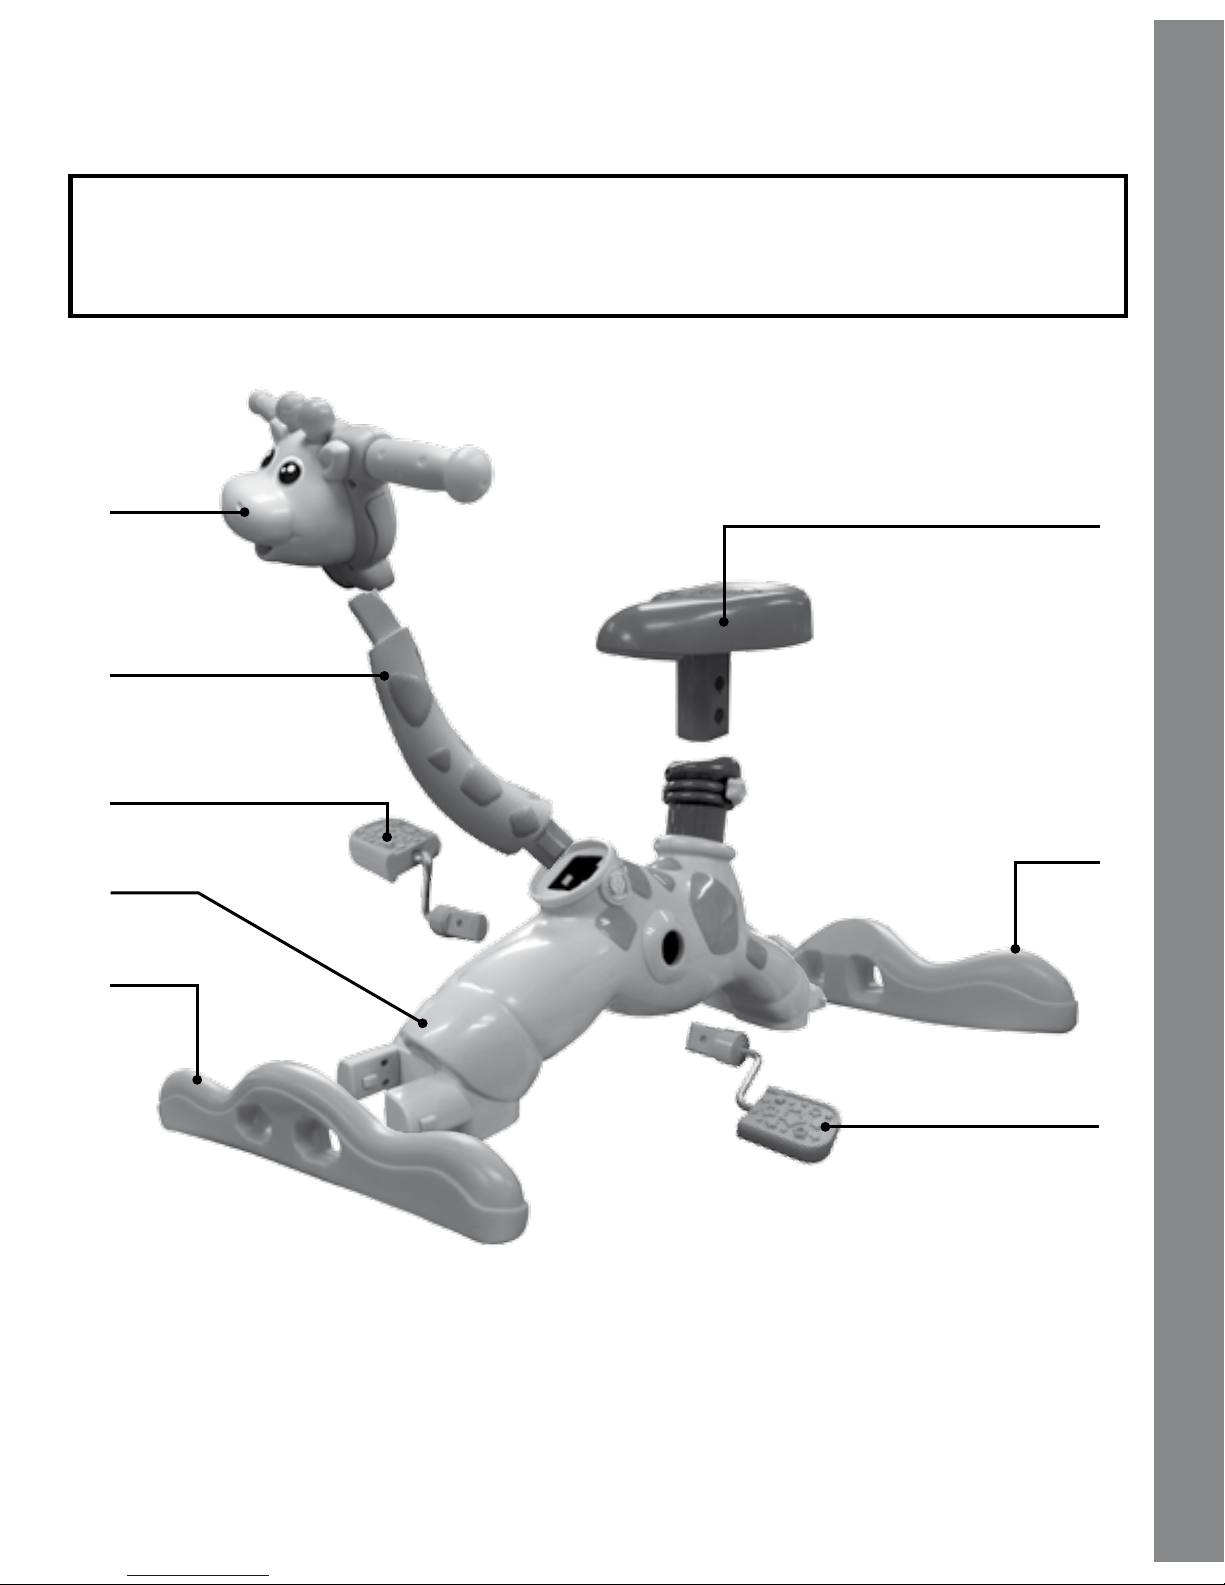
Thank you for purchasing the VTech® Ride & Learn Giraffe Bike.
The VTech® Ride & Learn Giraffe Bike encourages learning through
active play! The more your child pedals, the more he learns about
animals, the alphabet, counting and more. This cute giraffe-inspired bike
features an animated LCD screen, eight light-up animal buttons and an
adjustable, bouncy seat with two positions that grows with your child.
PEDAL
HANDLE
ADJUSTABLE
BOUNCY SEAT
LIGHT-UP ANIMAL
BUTTONS
MODE
SELECTOR
SLIDE
BUTTON
ON/OFF
BUTTON
TWISTING
KNOB
Page 4

4
INCLUDED IN THIS PACKAGE
One instruction manual
WARNING: All packing materials, such as tape, plastic sheets,
wire ties and tags are not part of this toy, and should
be discarded for your child’s safety.
Included in This Package
One giraffe head with electronic parts One giraffe neck
One giraffe body One bouncy seat
Two base pieces Two pedals
Page 5

5
GETTING STARTED
BATTERY INSTALLATION
1. Make sure the unit is turned OFF.
2. Locate the battery cover on the left side
of the giraffe’s head. Use a screwdriver to
loosen the screw.
3. Install 3 new ‘AA’ (AM-3/LR6) batteries
following the diagram inside the battery
box. (The use of new alkaline batteries is
recommended for maximum performance.)
4. Replace the battery cover and tighten the screw to secure.
BATTERY NOTICE
• Install batteries correctly observing the polarity (+, -) signs to avoid
leakage.
• Do not mix old and new batteries.
• Do not mix batteries of different types: alkaline, standard (carbonzinc) or rechargeable (nickel-cadmium).
• Remove the batteries from the equipment when the unit will not be
used for an extended period of time
• Always remove exhausted batteries from the equipment.
• Do not dispose of batteries in re.
• Do not attempt to recharge ordinary batteries.
• The supply terminals are not to be short-circuited.
• Only batteries of the same and equivalent type as recommended
are to be used.
WE DO NOT RECOMMEND THE USE OF RECHARGEABLE
BATTERIES.
Getting Started
Page 6
6
ASSEMBLY INSTRUCTIONS
Assembly Instructions
With the VTech® Ride & Learn Giraffe Bike, safety comes rst. To
ensure your child’s safety, please only assemble this product by an
adult.
A
B
D
C
E
F
G
E
A. Giraffe head
B. Giraffe neck
C. Giraffe body
D. Front base piece
E. Pedals
F. Back base piece
G. Bouncy seat
Page 7
7
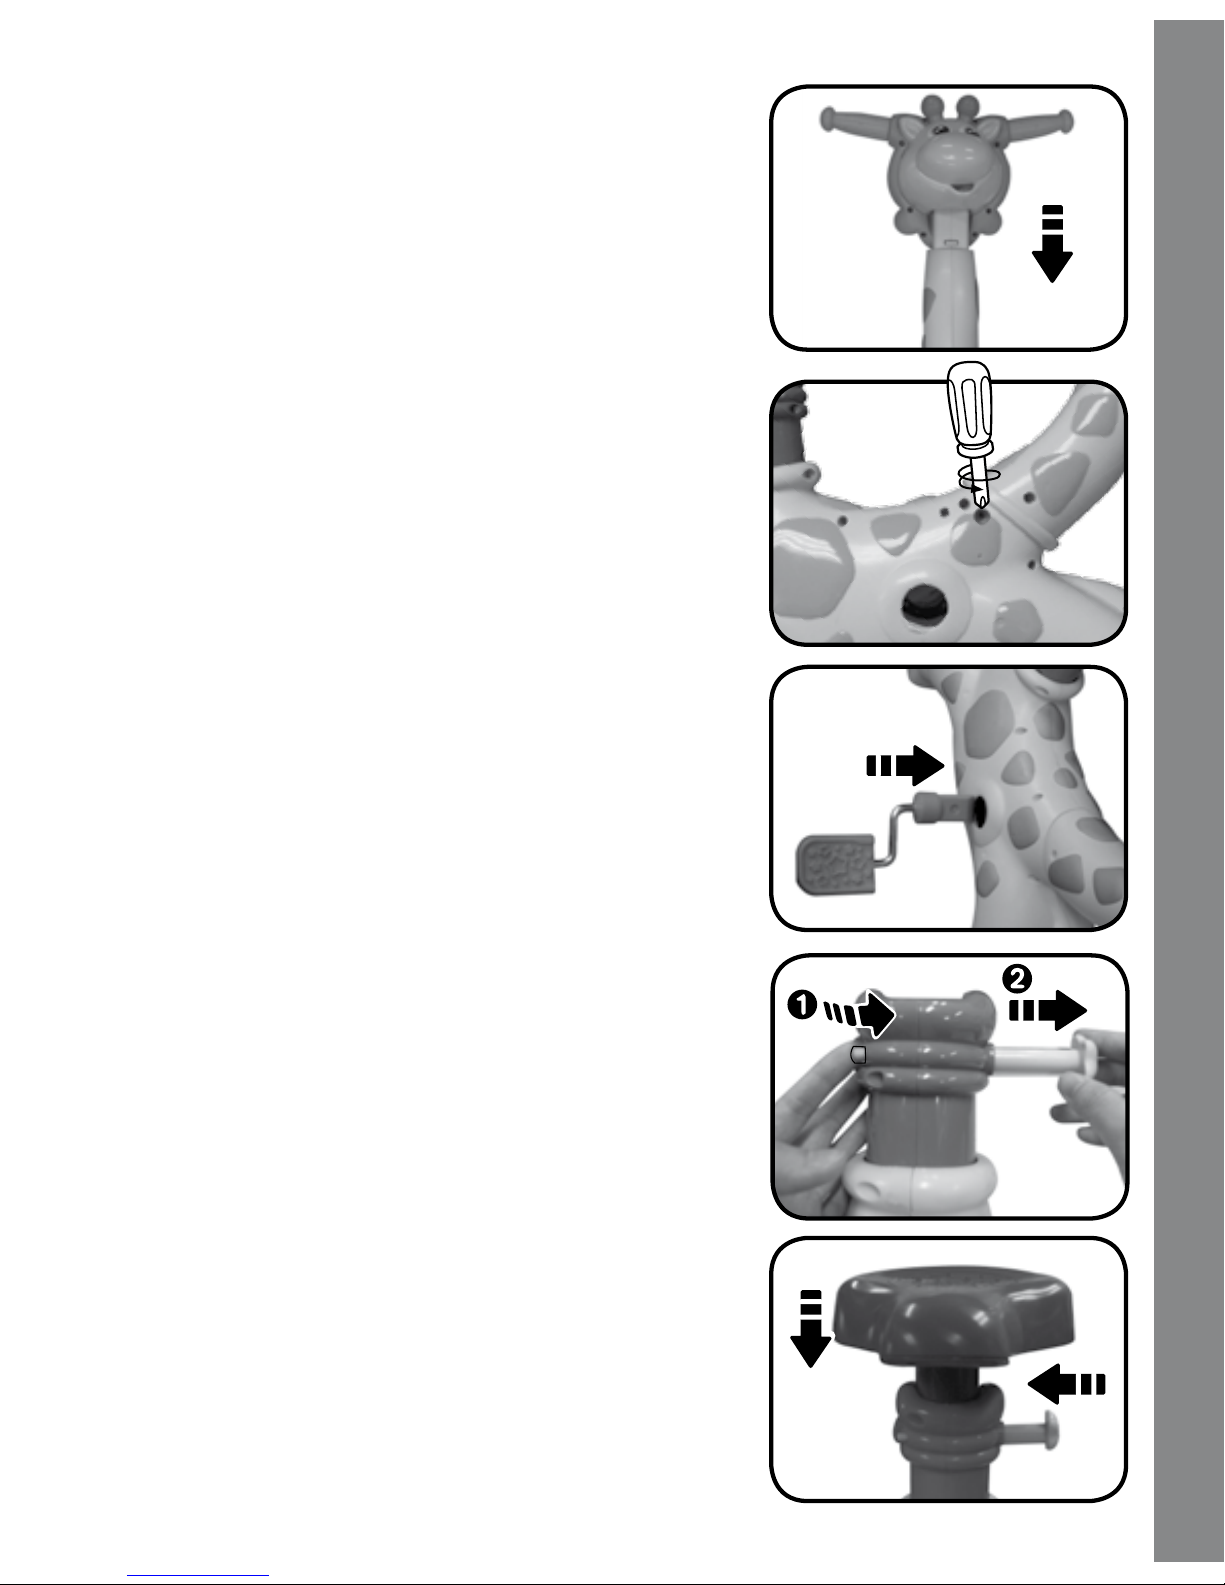
1. To attach the neck to the head, insert
the neck into the slot at the bottom of the
head. You will hear a loud ‘click’ sound.
This indicates that the head is securely
xed into the neck.
2. To attach the neck to the body, use a
screwdriver to loosen the long screw
attached to the front of the body. Pull
the long screw out. Insert the neck into
the slot on the body. You will hear a loud
‘click’ sound. This indicates that the neck
is securely xed into the body. Push the
long screw into the hole and tighten the
screw with a screwdriver.
3. To attach the pedals to the body, insert
them into the holes on the sides of the
body. You will hear a loud ‘click’ sound.
This indicates that the pedals are securely
xed into the body.
4. To attach the bouncing seat to the body,
rst unlock the seat peg by moving the
latch to the unlock position and pulling out
the seat peg. Insert the seat into the slot
on the top of the body. Set the seat height
by inserting the peg into the holes in the
seat. The seat has two different height
positions. After inserting the piece into its
proper position, you will hear a click to let
you know the piece is secure.
Assembly Instructions
Page 8

8
5. To attach the base pieces to the giraffe
body, insert the front and back pieces
on the body into the holes in the base
pieces. You will hear loud click sounds.
This indicates that the base pieces are
securely xed to the body.
Once the Ride & Learn Giraffe Bike is assembled, it cannot be
disassembled.
ATTENTION: The maximum weight for this product is 42 pounds.
It is not recommended for children older than 36
months.
PRODUCT FEATURES
1. ON/OFF BUTTON
To turn the unit ON, press the ON/OFF
BUTTON ( ). To turn the unit OFF,
press the ON/OFF BUTTON again.
Product Features
Page 9

9
2. PEDALS
Turn the pedals forward to play games or
hear music.
3. BOUNCY SEAT
Bounce on the seat to hear fun sounds!
The seat adjusts to two height positions.
Use the peg to secure the seat to your
desired position.
4. TWISTING KNOB
Twist the knob to play games or hear fun
sounds.
5. SLIDE BUTTON
Slide the button to hear fun sounds.
Product Features
Page 10

10
6. ANIMAL BUTTONS
Press an animal button to play games
or learn something about that animal.
Eight animal buttons feature a turtle,
rhinoceros, monkey, zebra, lion, parrot,
kangaroo and gorilla.
7. AUTOMATIC SHUT-OFF
To preserve battery life, the VTech® Ride & Learn Giraffe Bike will
automatically power-down after several minutes without input. The
unit can be turned on again by pressing the ON/OFF BUTTON.
For safety, parental guidance is suggested when child is playing.
ACTIVITIES
1. RACING MODE
Chase an animal to win a prize! When you
hear, “Press an animal button,” press an
animal button to choose an animal to chase.
Pedal as fast as you can or twist the twisting
knob to catch up to the animal and win your
prize. During the race, press the other animal
buttons to hear animal sounds. Slide the slide
button or bounce on the seat to accelerate.
2. ABC MODE
Pedal to learn your ABCs! Stop on a letter
to learn about an object that starts with
that letter. Press the animal buttons to hear
animal sounds or learn which letter starts
the animal’s name. Slide the slide button or
bounce on the seat to hear fun sounds and
Activities
Page 11

11
Activities
make the screen shake. Twist the knob to move through the letters. If
you don’t pedal or press any buttons for ve seconds, you’ll hear the
Alphabet Song and see the letters move on the screen.
3. COUNTING MODE
Pedal to count the animals! You’ll be asked to
pedal to nd a specic number of one animal.
Move the pedals, twist the knob or press that
animal’s button to count more. Press the
other animal buttons to hear animal sounds.
Slide the slide button or bounce on the seat
to make the screen shake.
4. ANIMAL MODE
Pedal to nd the animals! You’ll be asked
to pedal to nd a specic animal. Move the
pedals or twist the knob to nd the animal.
Stop pedaling when you nd it. Press the
animal buttons to hear animal sounds and
learn about the animals. Slide the slide
button or bounce on the seat to make the
screen shake.
5. MUSIC MODE
Press an animal button to hear music! While
a melody plays, move the pedals or twist the
knob to make the music play faster. Press the
animal button again to hear animal sounds.
Slide the slide button or bounce on the seat
to hear fun sounds.
Page 12

12
SONG LYRICS
Song 1
Come, let’s take a ride,
Through the countryside.
We’ll learn ABCs.
Pedaling’s a breeze!
Song 2
Turn pedals, go round and round.
You’re riding fast, making happy sounds!
CARE & MAINTENANCE
1. Keep the unit clean by wiping it with a slightly damp cloth.
2. Keep the unit out of direct sunlight and away from any direct heat
source.
3. Remove the batteries when the unit is not in use for an extended
period of time.
4. Do not drop the unit on hard surfaces and do not expose the unit to
moisture or water.
TROUBLESHOOTING
If for some reason the program/activity stops working or malfunctions,
please follow these steps:
Care & Maintenance/Troubleshooting
Page 13

13
1. Please turn the unit OFF.
2. Interrupt the power supply by removing the batteries.
3. Let the unit stand for a few minutes, then replace the batteries.
4. Turn the unit
ON. The unit should now be ready to play again.
5. If the product still does not work, replace with a new set of
batteries.
If the problem persists, please call our Consumer Services Department
at 1-800-521-2010 in the U.S. or 1-877-352-8697 in Canada, and a
service representative will be happy to help you.
For information on this product’s warranty, please call VTech® 1-800521-2010 in the U.S., or 1-877-352-8697 in Canada.
IMPORTANT NOTE:
Creating and developing Active Play products is accompanied
by a responsibility that we at VTech® take very seriously. We
make every effort to ensure the accuracy of the information,
which forms the value of our products. However, errors
sometimes can occur. It is important for you to know that
we stand behind our products and encourage you to call our
Consumer Services Department at 1-800-521-2010 in the
U.S., or 1-877-352-8697 in Canada, with any problems and/or
suggestions that you might have. A service representative will
be happy to help you.
Note:
This equipment has been tested and found to comply with the limits for
a Class B digital device, pursuant to Part 15 of the FCC Rules. These
limits are designed to provide reasonable protection against harmful
interference in a residential installation. This equipment generates, uses
and can radiate radio frequency energy and, if not installed and used in
accordance with the instructions, may cause harmful interference to radio
Other Info
Page 14

14
communications. However, there is no guarantee that interference will
not occur in a particular installation. If this equipment does cause harmful
interference to radio or television reception, which can be determined by
turning the equipment off and on, the user is encouraged to try to correct
the interference by one or more of the following measures:
• Reorient or relocate the receiving antenna
• Increase the separation between the equipment and receiver
• Connect the equipment into an outlet on a circuit different from that
to which the receiver is connected
• Consult the dealer or an experienced radio/TV technician for help
Caution: Changes or modications not expressly approved by the party
responsible for compliance could void the user’s authority to operate
the equipment.
THIS DEVICE COMPLIES WITH PART 15 OF THE FCC
RULES. OPERATION IS SUBJECT TO THE FOLLOWING TWO
CONDITIONS: (1) THIS DEVICE MAY NOT CAUSE HARMFUL
INTERFERENCE, AND (2) THIS DEVICE MUST ACCEPT ANY
INTERFERENCE RECEIVED, INCLUDING INTERFERENCE THAT
MAY CAUSE UNDESIRED OPERATION.
THIS CLASS B DIGITAL APPARATUS COMPLIES WITH
CANADIAN ICES-003.
CET APPAREIL NUMÉRIQUE DE LA CLASSE B EST CONFORME
À LA NORME NMB-003 DU CANADA.
Other Info
 Loading...