

Page 1

T
Compatible with
Hearing Aid T-Coil
TIA-1083
Congratulations
on purchasing your new VTech product.
Before using this telephone, please read the
Important safety instructions
on page 34 of this manual.
This manual has all the feature operations and troubleshooting necessary to install and operate
your new VTech telephone. Please review this manual thoroughly to ensure proper installation
and operation of this innovative and feature rich VTech product. For support, shopping, and
everything new at VTech, visit our website at www.vtechphones.com.
In Canada, please visit www.vtechcanada.com.
The ENERGY STAR® program (www.energystar.gov) recognizes and encourages
the use of products that save energy and help protect our environment. We are
proud to mark this product with the ENERGY STAR® label indicating it meets the
latest energy efficiency guidelines.
Telephones identified with this logo have reduced noise and interference when
used with most T-coil equipped hearing aids and cochlear implants. The TIA-1083
Compliant Logo is a trademark of the Telecommunications Industry Association.
Used under license.
i
Page 2

Table of contents
Getting started . . . . . . . . . . . . . . .1
Parts checklist . . . . . . . . . . . . . . . . 1
Telephone base and charger installation . . . 2
Battery installation and charging . . . . . . . 3
Mounting bracket installation . . . . . . . . . 4
Handset layout . . . . . . . . . . . . . . . . 6
Telephone base layout . . . . . . . . . . . .7
Telephone settings . . . . . . . . . . . . . 8
Date and time . . . . . . . . . . . . . . . . . 8
Ringer. . . . . . . . . . . . . . . . . . . . . 9
Ringer volume . . . . . . . . . . . . . . . . 9
Dial mode . . . . . . . . . . . . . . . . . . 10
Home area code . . . . . . . . . . . . . . 10
Language . . . . . . . . . . . . . . . . . . 11
Clear voicemail . . . . . . . . . . . . . . . 11
Telephone operation . . . . . . . . . . . 12
Make calls . . . . . . . . . . . . . . . . . 12
Answer calls . . . . . . . . . . . . . . . . 12
End calls . . . . . . . . . . . . . . . . . . 12
Volume . . . . . . . . . . . . . . . . . . . 12
Channel . . . . . . . . . . . . . . . . . . . 12
Call waiting . . . . . . . . . . . . . . . . . 13
Temporary tone dialing . . . . . . . . . . . 13
Redial . . . . . . . . . . . . . . . . . . . . 14
Find handset . . . . . . . . . . . . . . . . 14
Transfer an external call . . . . . . . . . . 15
Directory . . . . . . . . . . . . . . . . . . 16
Store a directory entry . . . . . . . . . . . 16
Character chart . . . . . . . . . . . . . . . 17
Review the directory . . . . . . . . . . . . 17
Edit a directory entry . . . . . . . . . . . . 18
Delete a directory entry . . . . . . . . . . . 19
Copy a directory entry into speed dial . . . 20
Dial a number from the directory . . . . . . 20
Speed dial . . . . . . . . . . . . . . . . . 21
Store a speed dial entry . . . . . . . . . . 21
Edit a speed dial entry . . . . . . . . . . . 22
Delete a speed dial entry . . . . . . . . . . 23
www.vtechphones.com
ii
Page 3

Table of contents
Dial a speed dial number . . . . . . . . . . 23
Reassign speed dial locations . . . . . . . 24
About caller ID . . . . . . . . . . . . . . . 25
Call log . . . . . . . . . . . . . . . . . . . 26
Review the call log . . . . . . . . . . . . . 27
Make call log entries ready to dial . . . . . 27
Dial a call log number. . . . . . . . . . . . 28
Save a call log entry to the directory . . . . 29
Delete from the call log . . . . . . . . . . . 30
Call log display screen messages . . . . . 31
Appendix . . . . . . . . . . . . . . . . . . 32
Handset display screen messages . . . . . 32
Battery . . . . . . . . . . . . . . . . . . . 33
Important safety instructions . . . . . . . . 34
Troubleshooting . . . . . . . . . . . . . . . 35
Operating range . . . . . . . . . . . . . . 44
Maintenance . . . . . . . . . . . . . . . . 44
About cordless telephones . . . . . . . . . 45
Warranty . . . . . . . . . . . . . . . . . . 45
FCC, ACTA and IC regulations . . . . . . . 47
The RBRC® seal . . . . . . . . . . . . . . 48
Technical specications . . . . . . . . . . 49
Index . . . . . . . . . . . . . . . . . . . . 50
www.vtechphones.com
iii
Page 4
Getting started
Parts checklist
Your telephone contains the following items. Save your sales receipt and original
packaging in case your telephone needs warranty service.
To purchase
•
replacement
batteries or power
adapters, visit our
website at www.
vtechphones.
com or call
1 (800) 595-9511.
In Canada, go to
www.vtechcanada.
com or call 1 (800)
267-7377.
Getting started
Basic operation
1. Handsets
(2 for CS5111-2,
3 for CS5111-3)
5. Battery compartment
covers
(2 for CS5111-2,
3 for CS5111-3)
2. Telephone line cord
6. Batteries
(2 for CS5111-2,
3 for CS5111-3)
3. Telephone base
power adapter
7. Telephone base with
mounting bracket
4. Chargers and charger adapters
(1 for CS5111-2,
2 for CS5111-3)
www.vtechphones.com
8. User’s manual
1
Page 5
Use only the
•
power adapters
supplied with this
product. To order
a replacement,
visit our website at
www.vtechphones.
com or call
1 (800) 595-9511.
In Canada, go to
www.vtechcanada.
com or call 1 (800)
267-7377.
The power
•
adapters are
intended to be
correctly oriented
in a vertical
or oor mount
position. The
prongs are not
designed to hold
the plug in place
if it is plugged into
a ceiling or an
under-the-table/
cabinet outlet.
Getting started
Telephone base and charger installation
Install the telephone base and charger as shown below. Make sure that the
electrical outlet is not controlled by a wall switch. If you subscribe to high-speed
Internet service (Digital Subscriber Line - DSL) through your telephone lines,
you must install a DSL lter between the telephone base and the telephone
wall jack. The lter will prevent noise and caller ID problems caused by DSL
interference. Please contact your DSL service provider for more information
about DSL lters.
Telephone
wall jack
DSL lter (not included)
required if you have
DSL high-speed
Internet service
Telephone line cord
Telephone base
Telephone base
power adapter
Electrical outlet
(not controlled by
a wall switch)
Charger
adapter
Charger
2
www.vtechphones.com
Page 6
Getting started
Battery installation and charging
Install the battery as shown below. The battery may have enough charge for
short calls. For best performance, charge the battery for at least 16 hours before
use. When the battery power is low, LOW BATTERY will be displayed and will
ash on the handset screen. When fully charged, the handset battery provides
approximately ve hours of talk time or six days of standby time.
Insert the plug of the battery as indicated. Make sure it is plugged securely
1.
and matches the color-coded label inside the battery compartment.
Place the battery with the label THIS SIDE UP facing up and the wires inside
2.
the battery compartment.
Align the battery compartment cover at against the battery compartment,
3.
then slide it upwards until it clicks into place.
Charge the handset by placing it in the telephone base or charger. The handset
4.
charge light will be on when charging.
If the handset will
•
not be used for
a long period of
time, remove the
battery to prevent
possible leakage.
To purchase a
•
replacement
battery, visit our
website at www.
vtechphones.
com or call
1 (800) 595-9511.
In Canada, go to
www.vtechcanada.
com or call 1 (800)
267-7377.
Getting started
Basic operation
1
2
3
www.vtechphones.com
4
3
Page 7

Getting started
AC 7.5V
Mounting bracket installation
Your telephone base comes with the mounting
bracket installed, ready for desktop use. You may
also mount your telephone onto a standard telephone
wall plate.
Wall mounting bracket installation:
To prepare the telephone base for wall mounting,
you will need to remove the bracket if it is currently
attached for desktop use. Press on the tabs located
on the legs of the bracket to loosen, then lift the
bracket up and away from the telephone base.
First, insert the lower portion tabs of the mounting
1.
bracket into the lower grooves in the telephone
base, then snap the upper portion tabs of the
mounting bracket into place.
Mount the telephone base on the wall by positioning
2.
it so the mounting studs will t into the holes on the
telephone base and mounting bracket. Slide the
telephone base down on the mounting studs until
it locks into place.
To remove the bracket, press both upper portion
3.
tabs rmly inward and pull the bracket downward
4
until it releases from the grooves.
www.vtechphones.com
Mounting bracket in wall
mount orientation
upper portion tabs
Mounting bracket
lower
portion
tabs
lower groove
upper grooves
Page 8
Getting started
AC 7.5V
Mounting bracket installation (continued)
Desktop/tabletop bracket installation:
Your telephone comes ready for table or desktop use. If you have repositioned
the bracket for wall mounting and now want to return to desktop use, follow these
steps:
Insert the lower portion tabs of the mounting bracket into the upper grooves
1.
of the telephone base.
Snap the upper portion tabs of the bracket into place.
2.
To remove the bracket, press both upper portion tabs rmly inward and pull
3.
the bracket upward until it is released from the grooves.
Getting started
Basic operation
www.vtechphones.com
5
Page 9
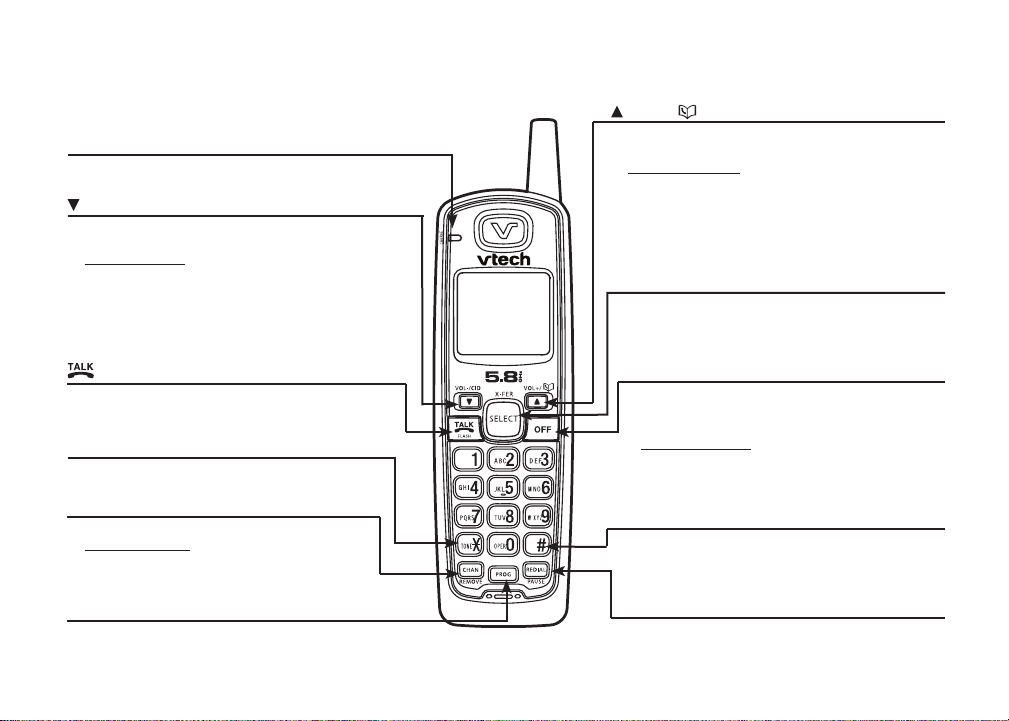
Getting started
Handset layout
CHARGE light
• On when the handset is cha rging in the
telephone base or charger.
/VOL-/CID
• When the phone is not in use, press to review
the call log.
• Press and hold to adjust the ringer volume when
in idle mode.
• During a call, press to decrease the listening
volume. A double beep will sound at the lowest
setting.
• Press to scroll down while in programming
mode or reviewing the redial list.
/FLASH
• Press to make or answer a call.
• During a call, press to receive an incoming
call when you receive a call waiting alert.
TONE
*
• Press to switch to tone dialing temporarily
when using the pulse service (page 13).
CHAN/REMOVE
• Switch to a clearer channel while on a call.
• Press and hold to delete all records in the
call log when the phone is not in use.
When reviewing the call log or redial list,
•
press to delete the desired record.
PROG
• Press to enter programming mode while
the phone is not in use.
6
www.vtechphones.com
/VOL+/
• Press to display the directory when the phone
is not in use.
• Press and hold to adjust the ringer volume
when the telephone is not in use.
• During a call, press to increase the listening
volume. A double beep will sound when the
highest setting is reached.
Press to scroll up while in programming mode
•
or reviewing the redial list.
SELECT/X-FER
• Press to store a programming option or a
directory entry.
• During a call, press to transfer a call to
another handset.
OFF
• During a call, press to hang up.
• While the handset is ringing, press to silence
the ringer.
• Press and hold for two seconds when the
telephone is not in use to erase the MISSED
CALLS display.
• During programming, press to exit without
making changes.
#
• Press repeatedly to display other dialing options
when reviewing the call log (page 27).
•
Press to use the CLR VOICEMAIL feature
from the main menu.
REDIAL/PAUSE
• Press repeatedly to review the redial list .
• While dialing or entering numbers into the
directory, press to insert a dialing pause.
Page 10
Getting started
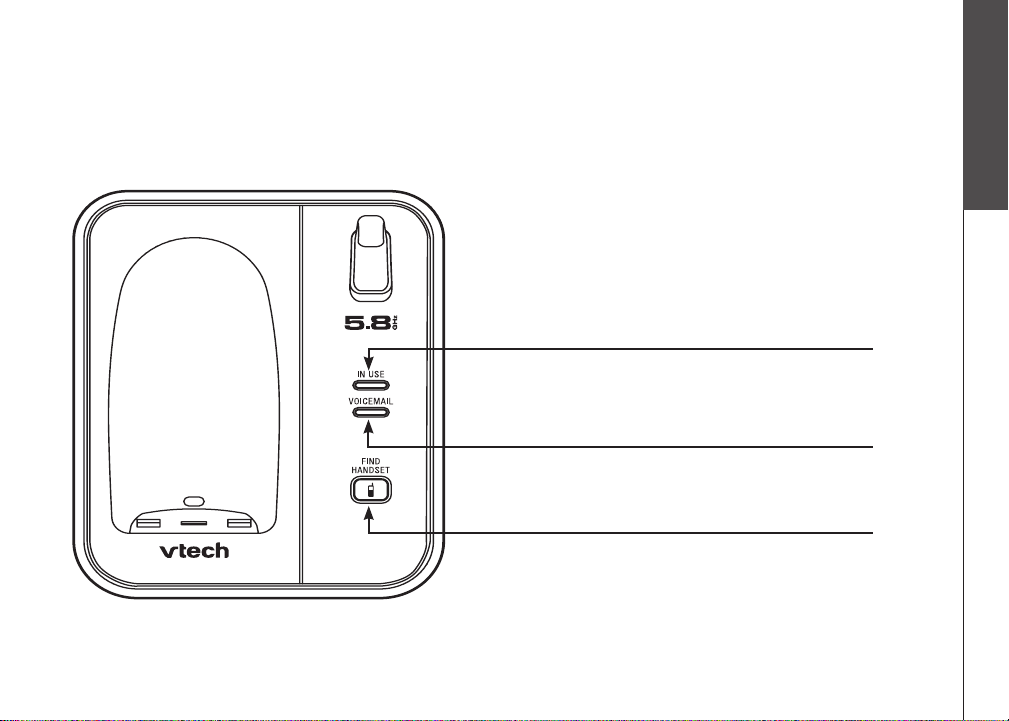
Telephone base layout
IN USE light
Flashes when there is an incoming call.
•
On when the handset is in use.
•
VOICEMAIL light
Flashes when you have new voicem ai l fro m your
•
telephone company.
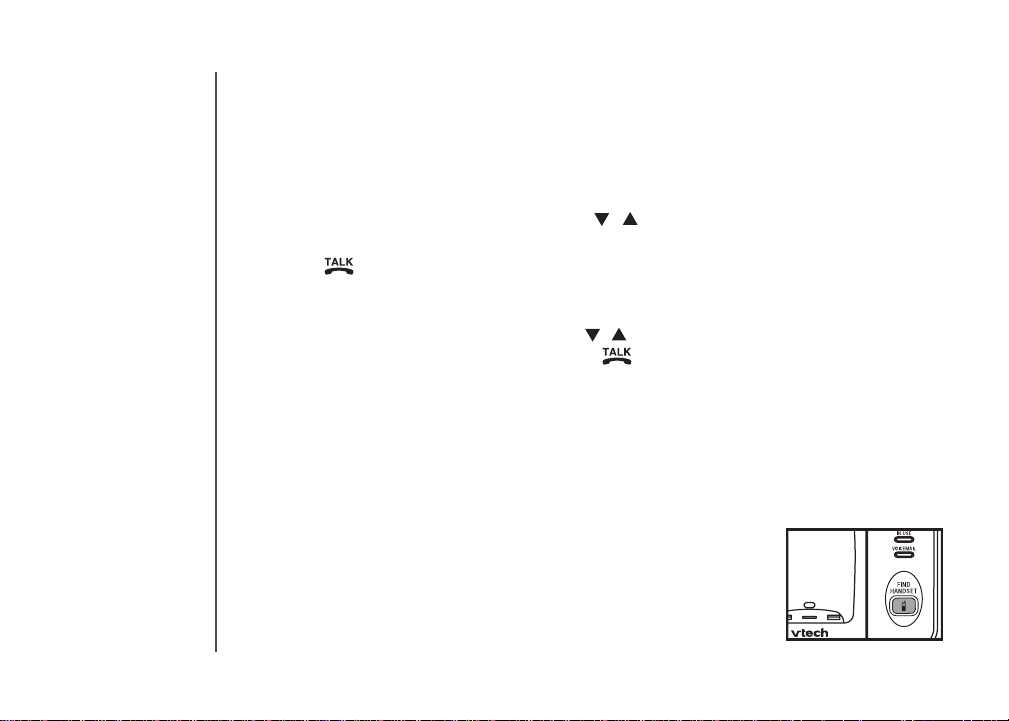
FIND HANDSET
Press to page all handsets.•
Getting started
Basic operation
www.vtechphones.com
7
Page 11

In the event of a
•
power failure, the
time may need to
be reset.
Telephone settings
Date and time
If you subscribe to caller ID service, the date and time will be set automatically
with the next incoming call. If you do not have caller ID service, you can set the
date and time manually and individually for each system handset.
Press PROG when the handset is in idle mode.
1.
Press or until DATE/TIME is displayed. Press SELECT.
2.
When the month is ashing, press or until the screen displays the correct
3.
month and then press SELECT.
When the date is ashing, press or until the screen displays the correct
4.
date and then press SELECT.
When the hour is ashing, press or until the screen displays the correct
5.
hour and then press SELECT.
When the minute is ashing, press or until the screen displays the correct
6.
minute and then press SELECT.
When AM or PM is ashing, press or to choose between AM or PM and
7.
then press SELECT. You will hear a conrmation tone.
8
www.vtechphones.com
Page 12
Telephone settings
Ringer
You can select from different ringers.
Press PROG when the handset is not in use.
1.
Press or until the screen displays RINGER: and the current setting.
2.
Press SELECT. The current setting ashes, and you will hear a sample of the ringer.
3.
Press or to select RINGER: 1, 2, 3, or 4. You will hear a sample of each
4.
ring tone.
Press SELECT to conrm your selection. You will hear a conrmation tone.
5.
Ringer volume
You can change the ringer volume to a comfortable level or turn the ringer off.
Press PROG when the handset is not in use. Press or until the screen
1.
displays RINGER VOL: and the current setting.
Press SELECT. The current setting ashes, and you will hear a sample of the
2.
ringer volume.
Press or to select ringer volume from OFF, LOW or HI. You will hear a
3.
sample of the selected volume level.
Press SELECT to conrm your selection. You will hear a conrmation tone.
4.
-OR-
Press and hold or
1.
when the handset is not in use. The current setting ashes and you will hear a sample
of the ringer volume.
Press or to select ringer volume from OFF, LOW or HI. You will hear a
2.
sample of the selected volume level.
Press SELECT to conrm your selection. You will hear a conrmation tone.
3.
until the screen displays RINGER VOL: and the current setting
www.vtechphones.com
If the ringer
•
volume is set to
OFF,
RINGER OFF
and will be
displayed.
Even if the ringer
•
volume is set to
OFF, the handsets
will still ring when
you press
FIND HANDSET.
Telephone settings
Basic operation
9
Page 13

If, in the future,
•
your phone
service provider
requires you to
dial the area code
when making a
local call, or you
want to cancel the
home area code
you have already
programmed,
reprogram your
home area code
to 000.
Press
•
CHAN/REMOVE
when in the home
area code menu
to delete the
stored home area
code. ___ will be
displayed.
Telephone settings
Dial mode
If you have touch tone service, the telephone is ready for use as soon as the
battery is charged. If you have pulse (rotary) service, you will need to change
the dial mode.
Press PROG when the handset is not in use.
1.
Press or until the screen displays DIAL MODE: and the current setting.
2.
Press SELECT. The current setting ashes.
3.
Press or to select TONE or PULSE.
4.
Press SELECT to conrm your selection. You will hear a conrmation tone.
5.
Home area code
If you dial your local calls using only seven digits (area code not required), you can
program your home area code, following the steps below. By programming your
home area code, when you receive a call within your local area, the telephone
number will automatically be stored without the area code in the call log.
Press PROG when the handset is not in use.
1.
Press or until the screen displays HOME AREA CODE.
2.
Press SELECT. The stored area code is displayed with the first digit
3.
ashing.
Use the dial key pad to enter the desired home area code.
4.
Press SELECT to conrm. You will hear a conrmation tone.
5.
10
www.vtechphones.com
Page 14

Telephone settings
Language
Press PROG when the handset is not in use.
1.
Press or until LANGUAGE is displayed.
2.
Press SELECT. The current setting ashes.
3.
Press or until the screen displays the desired language (ENGLISH,
4.
ESPANOL or FRANCAIS).
Press SELECT to conrm your selection. You will hear a conrmation tone.
5.
Clear voicemail
If you subscribe to voicemail services provided by your telephone company,
NEW VOICEMAIL and will be displayed on the handset and the VOICEMAIL
light on the telephone base will ash when you have a new voicemail message.
To turn this indicator off:
Press PROG when the handset is not in use.
1.
Press or until the screen displays CLR VOICEMAIL.
2.
Press SELECT. The screen displays CLEAR? and the current setting ashes.
3.
Press or to select YES.
4.
Press SELECT to conrm your selection. You will hear a conrmation tone.
5.
www.vtechphones.com
The clear
•
voicemail feature
only turns off the
display
NEW VOICEMAIL
and on the
handset and the
VOICEMAIL
light on the
telephone base.
It does not delete
your voicemail
message(s).
Telephone settings
Basic operation
11
Page 15
The call timer
•
will be activated
during a call to
show call duration.
The handset will
•
beep if it is moved
out of range while
on a call.
Telephone operation
Make calls
Press /FLASH and then use the dial pad keys to dial a number.
•
-OR-
Enter the phone number rst. You can press to backspace and press
1.
CHAN/REMOVE to erase digits.
Press /FLASH to dial.
2.
Answer calls
Press any dial pad keys (except /VOL-/CID, /VOL+/ and OFF) to answer
•
an incoming call.
End calls
Press OFF or put the handset back to the telephone base or charger to end
•
a call.
Volume
Press /VOL-/CID or /VOL+/ to adjust the listening volume during
•
a conversation.
Channel
Press CHAN/REMOVE to switch to a clearer channel while on a call.
•
12
www.vtechphones.com
Page 16

Telephone operation
Call waiting
If you subscribe to call waiting service and you are on a call when a new call
comes in, you will hear a beep. The caller ID information will be displayed if
you subscribe to combined caller ID with call waiting service from your local
telephone company.
Press /FLASH on the handset to put the current call on hold and answer
•
the incoming call.
Press /FLASH at anytime to alternate between calls.
•
Temporary tone dialing
If you have pulse (rotary) service, you can change from pulse to touch tone dialing
during a call by pressing TONE*. This is useful if you need to send touch tone
signals to access telephone banking or long distance services.
Once you have initiated your call by dialing the phone number in pulse (rotary), press
TONE*. Now, all subsequent key presses will be sent as touch tone signals.
After you hang up, the phone will return to pulse (rotary) dialing for the next call.
Telephone operation
Basic operation
www.vtechphones.com
13
Page 17
Telephone operation
Redial
The telephone stores the ve most recently dialed telephone numbers on the
•
redial list. When the list is full, the oldest entry is deleted to make room for the
new entry.
Press REDIAL/PAUSE, then press
•
review the redial list. Press CHAN/REMOVE to delete the displayed number.
Press /FLASH, then press REDIAL/PAUSE to dial the last telephone
•
number dialed.
-OR-
Press REDIAL/PAUSE, then press
the desired entry displays, then press /FLASH to dial the number.
Find handset
Press FIND HANDSET on the telephone base to locate the handsets when
•
the telephone is not in use and there is no handset in the telephone base. All
handsets will ring and **PAGING** will be displayed on all handset screens.
Press FIND HANDSET again or put the handset back in the telephone base
•
to stop the paging tone of all handsets.
-OR-
Press OFF on the selected handset or put it back in the
charger to stop the paging tone of that particular handset.
, or REDIAL/PAUSE
, or REDIAL/PAUSE
repeatedly to
repeatedly until
14
www.vtechphones.com
Page 18

Telephone operation
Transfer an external call
An external call can be forwarded to another handset during a conversation.
While on a call, press SELECT/X-FER on the originating handset and its
1.
screen will show CALL TRANSFERED.
When the other handset rings, press /FLASH on that handset to answer
2.
and its screen will show TRANSFERED CALL.
After the other handset has answered the transferred call, the originating
3.
handset screen will display SYSTEM HS BUSY.
Press /FLASH on the originating handset to cancel the call forwarding
•
before the other handset answers the call.
If the forwarded call is not answered within 30 seconds, the call will be forwarded
•
back to the originating handset. Press /FLASH on the originating handset
to answer the call. The call will be disconnected if the originating handset does
not answer within 30 seconds.
Telephone operation
Basic operation
www.vtechphones.com
15
Page 19

• Each handset has
an independent
directory.
Telephone operation
Directory
The directory can store up to 20 entries (including nine speed dial entries). Each
entry may consist of a number up to 24 digits and a name up to 14 characters.
Store a directory entry
Press PROG when the handset is not in use. The screen displays DIRECTORY.
1.
Press SELECT. The screen displays ENTER NAME.
2.
Use the dial pad keys to enter the name. See the Character chart on page 17.
3.
Press to move the cursor to the left or to the right.
•
Press CHAN/REMOVE to erase a character.
•
When nished, press SELECT or PROG. The screen displays ENTER NUMBER.
4.
Use the dial pad keys to enter the telephone number.
5.
Press to move the cursor to the left or to the right.
•
Press CHAN/REMOVE to erase a digit.
•
Press REDIAL/PAUSE to insert a dialing pause (P will be displayed).
•
Press SELECT or PROG. The screen displays DISTINCT RING? and the
6.
current setting.
Press or to choose Y (yes) if you wish to customize this entry or choose
7.
N (no) for a normal ringer. If you choose Y, a will be displayed with the
directory entry.
Press SELECT or PROG to conrm and you will hear a conrmation tone.
8.
16
www.vtechphones.com
Page 20

Telephone operation
Character chart
Use the dial pad keys and the chart below to enter a name (up to 14 characters).
An error tone will sound if you try to enter more than 14 characters. Each press
of a particular key causes the characters to be displayed in the following order:
Dial key
1 1
2 A B C 2
3 D E F 3
4 G H I 4
5 J K L 5
6 M N O 6
7 P Q R S 7
8 T U V 8
9 W X Y Z 9
0 0
*
# &
Review the directory
Press /VOL+/ when the handset is not in use. The screen displays
1.
DIRECTORY.
Press or to scroll through the entries stored in the directory alphabetically.
2.
- OR -
Press the dial pad key for the rst letter of the name you want to search. If
necessary, scroll
or to nd the desired entry.
Characters by nu mbe r o f k ey pre sse s
1 2 3 4 5 6
*
,
, - . #
www.vtechphones.com
• When you reach
the end of the list
in the directory,
END OF LIST will
be shown on the
screen and there
will be an error
tone.
• If you press a
dial pad key for
alphabetical
search while in
the directory and
there are no entries
starting with the
letters of that key,
NO DATA will be
displayed on the
screen.
Telephone operation
Basic operation
17
Page 21

Telephone operation
Edit a directory entry
Press /VOL+/ when the handset is not in use. The screen displays
1.
DIRECTORY.
Press or to scroll through the entries stored in the directory alphabetically.
2.
- OR -
Press the dial pad key for the rst letter of the entry you want to edit. If
necessary, scroll
When the screen displays the desired entry, press
3.
SELECT. Then press or until EDIT ashes.
Press SELECT. The screen displays the name and
4.
number. The cursor appears at the beginning of the name.
• Use the dial pad keys to edit the name.
• Press to move the cursor to the left or to the right.
• Press CHAN/REMOVE to erase a character.
Press SELECT to move on to the phone number.
5.
• Use the dial pad keys to edit the number.
• Press to move the cursor to the left or to the right.
• Press CHAN/REMOVE to erase a digit.
• Press REDIAL/PAUSE to insert a dialing pause (P will be displayed).
Press SELECT. The screen displays DISTINCT RING? and the current setting.
6.
or to nd the desired entry.
SPEED EDIT DEL
8005959511
18
www.vtechphones.com
Page 22

Telephone operation
Press or to choose Y (yes) if you wish to customize this entry, or choose
7.
N (no) for a normal ringer. If you choose Y, a will be displayed with the
directory entry.
Press SELECT to conrm and you will hear a conrmation tone.
8.
Delete a directory entry
Press /VOL+/ when the handset is not in use. The screen displays
1.
DIRECTORY.
Press or to scroll through the entries stored in the directory alphabetically.
2.
- OR -
Press the dial pad key for the rst letter of the entry you want to delete. If
necessary, scroll or to nd the desired entry.
When the screen displays the desired entry, press
3.
SELECT. Then press or until DEL (delete) ashes.
Press SELECT. The screen displays ERASE NO YES
4.
and the number. The current choice ashes.
Press until YES ashes.
5.
Press SELECT. You will hear a conrmation beep.
6.
www.vtechphones.com
SPEED EDIT DEL
8005959511
Telephone operation
Basic operation
19
Page 23

Telephone operation
Copy a directory entry into speed dial
Press /VOL+/ when the handset is not in use. The screen displays
1.
DIRECTORY.
Press
2.
3.
4.
5.
Dial a number from the directory
1.
2.
3.
or to scroll through the entries stored in the directory alphabetically.
- OR -
Press the dial pad key for the rst letter of the entry you want to copy. If
necessary, scroll
When the screen displays the desired entry, press
SELECT. Then press or until SPEED ashes.
or to nd the desired entry.
SPEED EDIT DEL
8005959511
Press SELECT. The screen displays ENTER 1-9.
Press a key (1-9) to copy this entry from the directory to the speed dial memory
and assign the memory location. You will hear a conrmation beep. A memory
location number (01 through 09) will be displayed with this entry.
Press /VOL+/ when the handset is not in use. The screen displays
DIRECTORY.
Press or to scroll through the entries stored in the directory alphabetically.
- OR -
Press the dial pad key for the rst letter of the desired entry. If necessary, scroll
or to nd the desired entry.
When the screen displays the desired entry, press /FLASH.
20
www.vtechphones.com
Page 24

Telephone operation
Speed dial
Your telephone can store up to nine telephone numbers with names (up to 14
characters and 24 digits in each location) in the speed dial memory locations
you assign in the handset.
Store a speed dial entry
Press PROG when the handset is not in use and then press or until the
1.
screen displays SPEED DIAL.
Press SELECT. The screen displays ENTER 1-9.
2.
Press a key (1 through 9) to assign the speed dial location where this number
3.
will be stored. The screen displays ENTER NAME.
Use the dial pad keys to enter the name (see the Character chart on page
4.
17) and then press SELECT or PROG .
Press to move the cursor to the left or to the right.
•
Press CHAN/REMOVE to erase a character.
•
The screen displays ENTER NUMBER.
5.
Use the dial pad keys to enter the telephone number, and then press SELECT
6.
or PROG.
Press to move the cursor to the left or to the right.
•
Press CHAN/REMOVE to erase a digit.
•
Press REDIAL/PAUSE to insert a dialing pause (P will be displayed).
•
The screen displays DISTINCT RING? and the current setting.
7.
The entries stored
•
in the speed
dial memor y will
be numbered
01 through 09
and share the
memory in the
director y.
Press OFF at any
•
time to exit speed
dial mode.
If the location is
•
not empty, the
new entry will
replace the old
entry and the
old entry will
be moved to a
director y location.
Telephone operation
Basic operation
www.vtechphones.com
21
Page 25

Telephone operation
Press or to choose Y (yes) if you wish to customize this entry, or choose N
8.
(no) for a normal ringer. If you choose Y, a will be displayed with the entry.
Press SELECT or PROG to conrm. You will hear a conrmation tone.
9.
Edit a speed dial entry
Press and hold the speed dial location key (1-9) of the desired entry when the
1.
handset is not in use.
When the screen displays the entry you want to edit,
2.
press SELECT. Then press or until EDIT ashes.
Press SELECT. The screen displays the name and
3.
number. The cursor appears at the beginning of the
name. Use the dial pad keys to edit the name.
Press to move the cursor to the left or to the right.
•
Press CHAN/REMOVE to erase a character.
•
Press SELECT to move on to the phone number. Use the dial pad keys to
4.
edit the number.
Press to move the cursor to the left or to the right.
•
Press CHAN/REMOVE to erase a digit.
•
Press REDIAL/PAUSE to insert a dialing pause (P will be displayed).
•
Press SELECT. The screen displays DISTINCT RING? and the current setting.
5.
SPEED EDIT DEL
8005959511
01
22
www.vtechphones.com
Page 26

Telephone operation
Press or to choose Y (yes) if you wish to customize this entry, or choose
6.
N (no) for a normal ringer. If you choose Y, a will be displayed with the
directory entry.
Press SELECT to conrm. You will hear a conrmation tone.
7.
Delete a speed dial entry
Press and hold the speed dial location key (1-9) of the
1.
desired entry when the handset is not in use.
When the screen displays the desired entr y, press
2.
SELECT. Then press or until DEL (delete) ashes.
Press SELECT. The screen displays ERASE NO YES and the number. The
3.
current choice ashes.
Press until YES ashes.
4.
Press SELECT. You will hear a conrmation beep.
5.
SPEED EDIT DEL
8005959511
01
Dial a speed dial number
Press and hold a speed dial location key (1-9) of the desired entry when the
1.
handset is not in use.
Press /FLASH to dial the displayed number.
2.
www.vtechphones.com
Telephone operation
Basic operation
23
Page 27

Telephone operation
Reassign speed dial locations
Press and hold the speed dial location key (1-9) of the desired entry when the
1.
handset is not in use.
When the screen displays the desired entry, press
2.
SELECT. Press or until SPEED ashes.
Press SELECT. The screen displays ENTER 1-9.
3.
Press a key (1-9) to reassign this entry into another memory location. You will
4.
hear a conrmation beep.
SPEED EDIT DEL
8005959511
01
24
www.vtechphones.com
Page 28

Telephone operation
About caller ID
The caller ID with call waiting feature in this telephone lets you see the name
and telephone number of the caller before answering the call, even when already
on a call. These features require services provided by your local telephone
company.
Contact your telephone company if:
you have both caller ID and call waiting, but as separate services (you may need
•
combined service),
•
you have only caller ID service, or only call waiting service, or
you do not subscribe to any caller ID or call waiting services but wish to try
•
these services.
You can use this telephone with regular caller ID service, and you can use its
other features without subscribing to either caller ID or combined caller ID with
call waiting service. There may be fees for these services, and these services
may not be available in all areas.
The caller ID features will work only if both you and the caller are in areas offering
caller ID service, and if both telephone companies use compatible equipment.
Telephone operation
Basic operation
www.vtechphones.com
25
Page 29

If you answer
•
a call before
the information
appears on the
screen, it will not
be stored in the
call log.
The time on
•
all handsets is
automatically set
and updated with
incoming caller ID
information if you
subscribe to this
service.
Due to regional
•
service
differences,
the caller ID
information may
not be available
for every incoming
call. In addition,
the callers may
intentionally
block their names
and/or telephone
numbers.
26
Telephone operation
Call log
Caller’s name
Caller’s tele ph one
number
If you subscribe to caller ID service, information about each caller will be displayed
after the rst or second ring.
The call log can store up to 45 entries.
•
When the call log is full, the earliest entry will be deleted to make room for new
•
incoming call information.
CID EMPTY will be displayed if there is no record in the call log.
•
Each handset has its own independent call log. If you delete one or all call log
•
entries from one handset, it will not affect the call log of other handset(s).
www.vtechphones.com
VTECH
800-595-9511
NEW05
AM
6:10
Time of call
08/17
Date of call
New call log indicator and
location in the call log
Page 30

Telephone operation
Review the call log
Press /VOL-/CID to view the call log.
1.
Press or to scroll through the entries.
2.
There will be an error tone when you reach the end of the call log list and the
screen will display END OF LIST.
Make call log entries ready to dial
Although the call log entries received have 10 digits (the
area code plus the seven-digit number), in some areas,
you may need to dial only the seven digits, or a 1 plus the
seven digits, or a 1 plus the area code plus the seven digits.
You can change the number of digits that you dial from or
store in the call log.
While reviewing the call log, press # repeatedly to display
different dialing options for local and long distance numbers
before dialing or saving the telephone number in the
directory. See the example on the right.
You may also press 1 repeatedly to add or remove a 1 in
front of the telephone number before dialing or saving it in
the directory. See the examples on the right.
When the number displayed is in the correct format for
dialing, press /FLASH to call the number.
800-595-9511
1-800-595-9511
595-9511
1-595-9511
800-595-9511
1-800-595-9511
595-9511
1-595-9511
If you have
•
programmed a
home area code
(page 10), only
the last seven
digits of the
incoming phone
numbers from
that area code
will be displayed
while reviewing
the call log. Press
# repeatedly to
display all possible
dialing options.
Telephone operation
Basic operation
www.vtechphones.com
27
Page 31

Telephone operation
Dial a call log number
Press /VOL-/CID to enter the call log when the telephone is not in use.
1.
Press or to select the desired entry, then press /FLASH.
2.
-OR-
Press /VOL-/CID to enter the call log when the telephone is not in use.
1.
Press or to select the desired entry.
2.
Press SELECT, then DIAL ashes.
3.
Press /FLASH or SELECT.
4.
28
www.vtechphones.com
Page 32

Telephone operation
Save a call log entry to the directory
Press /VOL-/CID to enter the call log when the telephone is not in use.
1.
Press or to select the desired entry. If you wish to
2.
change how the number is saved, press # repeatedly
until the desired option displays. See the Make call log
entries ready to dial section on page 27.
Press SELECT, then press or until PROGRAM
3.
ashes.
Press SELECT again.
4.
Enter or edit the name if necessary. See the Character
5.
chart on page 17.
Press to move the cursor to the left or to the right.
•
Press CHAN/REMOVE to erase a character.
•
Press SELECT to move on to the phone number.
Edit the number if necessary.
6.
Press to move the cursor to the left or to the right.
•
Press CHAN/REMOVE to erase a digit.
•
Press REDIAL/PAUSE to insert a dialing pause (P will be displayed).
•
Press SELECT to continue.
Press or to choose Y (yes) if you wish to customize this entry, or choose
7.
N (no) for a normal ringer. If you choose Y, a will be displayed with the
directory entry.
Press SELECT to conrm. You will hear a conrmation tone.
8.
www.vtechphones.com
800-595-9511
NEW28
5:40PM 12/30
DIAL PROGRAM
800-595-9511
NEW28
5:40PM 12/30
DISTINCT RING? N
8005959511
Telephone operation
Basic operation
29
Page 33

Telephone operation
Delete from the call log
Delete an entry:
Press /VOL-/CID to enter the call log when the telephone is not in use.
1.
Press or to select the entry to be deleted.
2.
Press CHAN/REMOVE. You will hear a conrmation beep.
3.
Delete all entries:
Press and hold CHAN/REMOVE when the telephone is not in use. The screen
1.
displays ERASE ALL? N Y. The current choice ashes.
Press until Y (yes) ashes.
2.
Press SELECT. You will hear a conrmation beep.
3.
30
www.vtechphones.com
Page 34

Telephone operation
Call log display screen messages
Displays: When:
PRIVATE NAME
The caller is blocking the name information.
PRIVATE NUMBER
PRIVATE CALLER
UNKNOWN NAME
UNKNOWN NUMBER
UNKNOWN CALLER
Th e calle r is b locking t h e tel e phone number
information.
The caller i s bloc k ing t he name and numb er
information.
This caller’s name is unavailable.
This caller’s number is unavailable.
No information is available about this caller.
www.vtechphones.com
Telephone operation
Basic operation
31
Page 35

Handset display screen messages
Displays: When:
LOW BATTERY
CID EMPTY
CONNECTING...
DIRECTORY EMPTY
MEMORY FULL
XX MISSED CALLS
NEW VOICEMAIL
**PAGING**
PHONE
**RINGING**
RINGER OFF
SCANNING...
SYSTEM HS BUSY
The battery needs to be recharged.
There are no call log entries.
The cordless handset is searching for the telephone base.
There are no directory entries.
The directory is full.
There are unreviewed calls in the call log.
There are new voicemail message(s) from the local telephone
company.
The cordless handset locator has been activated.
The handset is in use.
There is an incoming call.
The handset ringer is turned off.
The telephone base is searching for another available channel.
Another system handset is in use.
32
www.vtechphones.com
Page 36

Battery
After the battery is fully charged for 16 hours, you can expect the following performance:
Operation Operating time
While in use (talking) Five hours
While not in use (standby*) Six days
*Handset is off the telephone base but not in use.
The battery needs charging when:
•
A new battery is installed in the handset.
The handset beeps.
•
LOW BATTERY is displayed and the battery indicator on the handset screen is ashing.
•
CAUTION:
To reduce the risk of re or injury to persons, read and follow these instructions:
Use only the battery(ies) provided or equivalent. To order a replacement, visit our website at www.vtechphones.com or
•
call 1 (800) 595-9511. In Canada, go to www.vtechcanada.com or call 1 (800) 267-7377.
Do not dispose of the battery(ies) in a re. Check with local waste management codes for special disposal instructions.
•
Do not open or mutilate the battery(ies). Released electrolyte is corrosive and may cause burns or injury to the eyes or
•
skin. The electrolyte may be toxic if swallowed.
•
Exercise care in handling batteries in order not to create a short circuit with conductive materials such as rings, bracelets,
and keys. The battery and/or conductor may overheat and cause burns.
•
Charge the battery(ies) provided with or identied for use with this product only in accordance with the instructions and
limitations specied in this manual.
WARNING:
TO PREVENT FIRE OR SHOCK HAZARD, DO NOT EXPOSE THIS PRODUCT TO WATER OR ANY TYPE OF MOISTURE.
Appendix
www.vtechphones.com
33
Page 37

Important safety instructions
When usi ng your tel ephone equipm ent, basic safet y precautions should a lways be followed to reduce the risk of re, elec tric sh ock and i njury, includin g the following:
Read and un derst and all instruc tions .
1.
Follow all warnings and ins truct ions mar ked on the p roduc t.
2.
Unplug t his product from the wall o utlet before cleaning. D o not use li quid or ae rosol c leaner s. Use a damp cloth for cleaning.
3.
Do not use t his product near water (for exa mple, near a bathtub, kitchen sink, or swimming pool).
4.
Do not place this pr oduct on an unst able ta ble, she lf, stand o r other un stable surfaces.
5.
Slots and openings in the back or bot tom of the tel ephone base and han dset are prov ided f or ventilation . To protec t them from overheati ng, th ese op enings
6.
must not be blo cked by placin g the pr oduct on a soft sur face s uch as a bed, s ofa or r ug. Thi s product should never be placed ne ar or over a radiator or he at
register. This prod uct sho uld not be placed i n any area wh ere prop er ventil ation is n ot provi ded.
This product sh ould be o perated only from the t ype of p ower s ource indi cated on t he marking labe l. If you are no t sure of the t ype of p ower supply in your
7.
home, consult you r dealer o r local p ower com pany.
Do not allow anyth ing to res t on the power cord. D o not inst all this product where t he cord m ay be walked o n.
8.
Never push objects of any kind into this product through the slots in the telephon e base or handset because they may touch dange rous voltage points or create
9.
a short c ircui t. Never sp ill liquid of any ki nd on the produc t.
To reduce th e risk of elect ric sho ck, do not disassemble this produ ct, but take it to a n authorized servic e facility. Opening or re moving parts of the telephon e
10.
base or han dset other than speci ed a ccess doors may expos e you to da ngerous vol tages or ot her r isks. Incor rect reass emblin g can caus e ele ctric shock
when the p roduc t is subs equent ly used.
Do not overload wall o utlets and extension co rds.
11.
Unplug t his product from the wall o utlet and refer servic ing to an aut horize d serv ice facility under the f ollowi ng cond itions:
12.
When the p ower supply cord or plug is d amaged o r frayed.
A.
If liqui d has been spille d onto the produc t.
B.
If the pro duct ha s been exp osed to rain or water.
C.
If the pro duct do es not operate normally by following the oper ating instructions. Adjust only those c ontro ls that are c overed by th e operat ion instructions.
D.
Improp er adjustment of other controls may resul t in damage and often requires extensive work by an authorized technician to restore the product to
normal o perati on.
If the pro duct ha s been dropped and the tel ephone base and /or hand set has be en damag ed.
E.
If the pro duct exhibits a d istinct change in per forman ce.
F.
Avoid usin g a telephone (other than cor dless) du ring an el ectrical sto rm. Ther e is a remote risk of el ectri c shock from lightning.
13.
Do not use t he telep hone to re port a g as leak in the vicinity of the leak .
14.
Only put t he hand set of your te lepho ne next to your ear whe n it is in nor mal tal k mode.
15.
The power adapters are inten ded to be correctly orie nted in a ver tica l or oor mount pos ition. T he prongs are not designe d to hold the plug in p lace if it is
16.
plugged into a ceiling or an under-th e-table/cabinet out let.
SAVE THESE INSTRUCTIONS
34
www.vtechphones.com
Page 38

Troubleshooting
If you have difculty with your telephone, please try the suggestions below. For Customer Service, visit
our website at www.vtechphones.com, or call 1 (800) 595-9511; in Canada, call 1 (800) 267-7377.
Problem Suggestion
My telephone does not
work at all.
LOW BATTERY is
displayed on screen.
Make sure the battery is install ed and c harged correctly (page 3). For optimum daily
•
performance, return the handset to the telephone base or charger after use.
Make sure the power adapter is securely plugged into an outlet not controlled by a wall
•
switch.
Make sure the telephone line cord is plugged rmly into the telephone base and the wall jack.
•
Unplug the unit’s electrical power. Wait for approximately 15 seconds, then plug it back in.
•
Allow up to one minute for the handset and telephone base to synchronize.
Charge the battery in the handset for at least 16 hours.
•
Remove and re-insert the battery. If that still does not work, it may be necessary to purchase
•
a new battery.
Disconnect the telephone base from the jack and plug in a working telephone. If this telephone
•
does not work, the problem is probably in the wiring or the local service. Call the local telephone
company.
Place the handset in the telephone base or charger for recharging.
•
Remove and re-install the battery and use it normally until fully depleted, then recharge the
•
handset in the telephone base or charger for 16 hours.
If the above measures do not correct the problem, the battery may need to be replaced.
•
Appendix
www.vtechphones.com
35
Page 39

Troubleshooting
Problem Suggestion
The battery does not
charge in the handset
or the handset battery
does not accept
charge.
The CHARGE light is
off.
Make sure the handset is placed in the telephone base or charger correctly. The handset
•
CHARGE light on the handset should be on.
Remove the batter y from the handset and then re-install it in the handset. Put the handset
•
back in the telephone base or charger and charge for 16 hours.
If the handset is in the telephone base or charger but the handset CHARGE light is not on,
•
see The CHARGE light is off in this section.
It may be necessar y to purchase a new battery. Please see the Battery section of this user’s
•
manual (page 33).
The telephone might be malfunctioning. Please see the Warranty section of this user’s manual
•
(page 45) for further instruction.
Clean the charging contacts on the handset(s) and telephone base each month using a pencil
•
eraser or a dry non-abrasive fabric.
Make sure the power adapter and telephone line cord are plugged in correctly and securely.
•
Unplug the power adapter. Wait for 15 seconds before plugging it back in. Allow up to one
•
minute for the handset and telephone base to reset.
The telephone might be malfunctioning. Please see the Warranty section of this user’s manual
•
(page 45) for further instruction.
36
www.vtechphones.com
Page 40

Troubleshooting
Problem Suggestion
There is no dial tone. First, try all the above suggestions.
•
Move the handset closer to the telephone base. It might be out of range.
•
The telephone line cord might be malfunctioning. Try installing a new telephone line cord.
•
Disconnect the telephone base from the telephone jack and connect a different telephone. If
•
there is no dial tone on the other telephone either, the problem is in your wiring or local service.
Contact your local telephone company.
My hand set displays
CONNECTING...
Move the handset closer to the telephone base. You might have moved out of range.•
Appendix
www.vtechphones.com
37
Page 41

Troubleshooting
Problem Suggestion
The telephone does
not ring when there is
an incoming call.
Make sure the ringer is on (page 9).
•
Make sure the telephone line cord and power adapter are plugged in properly (page 2).
•
The handset may be too far from the telephone base. Move it closer to the telephone base.
•
There may be too many extension telephones on the telephone line to allow all of them to ring
•
simultaneously. Try unplugging some of them.
If the other telephones in your home are having the same problem, the problem is in the wiring
•
or local service. Contact the local telephone company (charges may apply).
Other electronic products can cause interference to your cordless telephone. Try installing your
•
telephone as far away as possible from the following electronic devices: wireless routers, radios,
radio towers, pager towers, cellular telephones, digital telephones, intercoms, room monitors,
televisions, VCRs, personal computers, kitchen appliances, and other cordless telephones.
Test a working telephone at the telephone jack. If another telephone has the same problem, the
•
problem is in the telephone jack. Contact your local telephone company (charges may apply)
The telephone line cord might be malfunctioning. Try installing a new telephone line cord.
•
Remove and re-insert the battery and place the handset in the telephone base.
•
Wait for the handset to synchronize with the telephone base. Allow up to one minute for this
•
to take place.
.
38
www.vtechphones.com
Page 42

Troubleshooting
Problem Suggestion
I cannot dial out. First, try all the above suggestions.
•
Make sure there is a dial tone before dialing. It is normal if the handset takes a second or two
•
to synchronize with the telephone base before producing a dial tone. Wait an extra second
before dialing.
Make sure the telephone is set to the correct dial type (pulse dial or tone dial) for the ser vice
•
in your area. See Dial mode on page 10 to set the dial type.
If the other telephones in your home are having the same problem, the problem is in the wiring
•
or local service. Contact your local telephone company (charges may apply).
Eliminate any background noise. Noise from a television, radio, or other appliances may
•
cause the telephone not to dial out properly. If you cannot eliminate the background noise,
rst try muting the handset before dialing, or dialing from another room in your home with less
background noise.
Appendix
www.vtechphones.com
39
Page 43

Troubleshooting
Problem Suggestion
There is noise
or interference
during a telephone
conversation.
My calls cut in and out
when I am using the
cordless handset.
The handset may be out of range. Move it closer to the telephone base.
•
Appliances or other cordless telephones plugged into the same circuit as the telephone base
•
can cause interference. Try moving the appliance or telephone base to another outlet.
Other electronic products can cause interference to your cordless telephone. Try installing your
•
telephone as far away as possible from the following electronic devices: wireless routers, radios,
radio towers, pager towers, cellular telephones, digital telephones, intercoms, room monitors,
televisions, VCRs, personal computers, kitchen appliances, and other cordless telephones.
If your telephone is plugged in with a modem or a surge protector, plug the telephone (or
•
modem/surge protector) into a different location. If this doesn’t solve the problem, re-locate
your telephone or modem farther apart from each other, or use a different surge protector.
The layout of your home or ofce might be limiting the operating range. For better reception,layout of your home or ofce might be limiting the operating range. For better reception,
•
try moving the telephone base to a central location within the home that has fewer obstructions
between the telephone base and the handset.
Disconnect the telephone base from the telephone jack and plug in a corded telephone. If
•
calls are still not clear, the problem is probably in the wiring or local service. Contact the local
telephone company (charges may apply).
If the other telephones in your home are having the same problem, the problem is in the wiring
•
or local service. Contact the local telephone company (charges may apply).
If you subscribe to high-speed Internet ser vice (Digital Subscriber Line - DSL) through your
•
telephone lines, you must install a DSL lter between the telephone base and the telephone
wall jack. The lter will prevent noise and caller ID problems caused by DSL interference.
40
www.vtechphones.com
Page 44

Troubleshooting
Problem Suggestion
I hear other calls when
using the telephone.
I hear noise in the
handset, and none of
the keys or buttons
work.
My caller ID features are
not working properly.
Disconnect the telephone base from the telephone jack. Plug in a different telephone. If
•
there are still other calls, the problem is probably in the wiring or local service. Call your local
telephone company.
Press CHAN/REMOVE to switch to a clearer channel when on a call.
•
Make sure the telephone line cord is plugged in securely.
•
Remove and re-insert the battery.
•
Caller ID is a subscription service. You must subscribe to this service from your local telephone
•
company for this feature to work on your telephone.
The caller may not be calling from an area which supports caller ID.
•
Both you and the caller’s telephone companies must use equipment which are compatible
•
with caller ID service.
If you subscribe to high-speed Internet ser vice (Digital Subscriber Line - DSL) through your
•
telephone lines, you must install a DSL lter between the telephone base and the telephone
wall jack. The lter will prevent noise and caller ID problems caused by DSL interference.
Please contact your DSL service provider for more information about DSL lters.
Appendix
www.vtechphones.com
41
Page 45

Troubleshooting
Problem Suggestion
The system does
not receive caller ID,
or the system does
not display caller ID
during call waiting.
Make sure you subscribe to caller ID with call waiting features provided by the local telephone
•
company.
The caller may not be calling from an area which supports caller ID.
•
Both you and the caller’s telephone companies must use equipment which are compatible
•
with caller ID service.
If you subscribe to high-speed Internet ser vice (Digital Subscriber Line - DSL) through your
•
telephone lines, you must install a DSL lter between the telephone base and the telephone
wall jack. The lter will prevent noise and caller ID problems caused by DSL interference.
Please contact your DSL service provider for more information about DSL lters.
Caller ID entries do not
match t he numbers I
need to dial.
42
Although the call log entries you receive have 10 digits, (the area code plus the seven-digit
•
number,) in some areas, you may need to dial only seven digits, or a 1 plus the seven digits,
or a 1 plus the area code plus the seven digits. You can change the number of digits that you
dial or store from the call log.
While reviewing the call log, press # repeatedly to display these dialing options for local and
•
long distance numbers before dialing or saving the telephone number.
www.vtechphones.com
Page 46

Troubleshooting
Problem Suggestion
My cordless handset
beeps and is not
performing normally.
Common cure for
electronic equipment
Make sure the power cord is securely plugged into the telephone base. Plug the unit into a
•
different working electrical outlet not controlled by a wall switch.
Move the handset closer to the telephone base. It may be out of range.
•
Reset the telephone base by unplugging the unit’s electrical power. Wait for 15 seconds
•
and plug it back in again. Allow up to one minute for the handset and the telephone base to
synchronize.
Other electronic products can cause interference to your cordless telephone. Try installing
•
your telephone as far away from these electronic devices as possible: wireless routers, radios,
radio towers, pager towers, cellular telephones, intercoms, room monitors, televisions, personal
computers, kitchen appliances and other cordless telephones.
If the unit is not responding normally, try putting the handset in the telephone base. If it does
•
not seem to respond, try the following (in the order listed):
Disconnect the power to the telephone base.
•
Disconnect the battery on the handset.
•
Wait a few minutes before connecting the power to the telephone base.
•
Re-install the battery and place the handset in the telephone base or charger.
•
Wait for the handset to synchronize with the telephone base. Allow up to one minute for this
•
to take place.
Appendix
www.vtechphones.com
43
Page 47

Operating range
This cordless telephone operates with the maximum power allowed by the Federal Communications Commission (FCC). Even so, this handset and telephone base can
communicate over only a certain distance - which can vary with the locations of the telephone base and handset, the weather, and the layout of your home or ofce.
When the handset is out of range, the handset will display CONNECTING...
If there is a call while the handset is out of range, it might not ring, or if it does ring, the call might not connect well when you press /FLASH. Move closer to the
telephone base, then press /FLASH to answer the call.
If the handset moves out of range during a telephone conversation, there might be interference.
To improve reception, move closer to the telephone base.
Maintenance
Taking car e of your te lepho ne
Your cordless telep hone co ntains s ophis ticate d elect ronic pa rts, so it must be t reated wi th care.
Avoid roug h treatment
Place the handse t down gen tly. Save the or igina l packing materi als to prot ect your telepho ne if you ever n eed to shi p it.
Avoid wate r
Your teleph one ca n be da maged if it gets wet. Do not use th e handset outdoors in the rain, o r handle it with wet hands. Do not instal l the telepho ne bas e near a
sink, bat htub or shower.
Elect rical s torms
Electr ical storms can sometimes caus e power sur ges harm ful to ele ctron ic equipment. Fo r your own sa fety, take ca ution when using electrical a pplian ces dur ing stor ms.
Clean ing your te lephone
Your telephon e has a durable plastic casin g that should retain its luster for many years. Cl ean it only with a soft cloth slig htly dam pened with water or a mild soap.
Do not use excess water or cleaning solvents of any k ind.
Remember that electrical appliances can cause serious injury if used when you are wet or standing in the water. If the telephone base should fall into the water, DO
NOT RETRIEVE IT UNTIL YOU UNPLUG THE POWER CORD AND TELEPHONE LINE CORD FROM THE WALL. Then pull the unit out by the unplugged cords.
44
www.vtechphones.com
Page 48

About cordless telephones
Privacy: The same features that make a cordless telephone convenient create some limitations. Telephone calls are tran smitte d between the telephone base and
•
the cordle ss handset by radio waves, so there is a possibilit y that the cordless tele phone conversatio ns could be intercep ted by radio receiving equipment within
range of t he cord less han dset. Fo r this rea son, you s hould no t think of c ordle ss telephone co nversat ions as b eing as pr ivate as those on corded telephon es.
Elect rical Powe r: The telepho ne base of this cordl ess teleph one must be conne cted to a working elec trical outlet. The electric al outlet shou ld not be controll ed
•
by a wall swit ch. Call s cannot b e made from the cor dless h andset if the telephone b ase is un plugged or switc hed of f, or if the el ectri cal power is interrupted.
Potent ial T V in terf erence: So me cordles s tele phone s operate at frequ encie s that may c ause inter ferenc e to televis ions and VCRs. To minimize o r preve nt
•
such inter feren ce, do not place th e telephone base of the cord less telephone near or on top of a TV or VCR. If interferen ce is experienced, moving the cordless
telephone far ther away fr om the TV or VCR will of ten reduce or eliminate the inter ferenc e.
Recha rgea ble batteri es: Thi s produ ct con tains e ither Nickel- cadmium or Ni ckel-metal hyd ride recharg eable b atteries. Exercise c are in handlin g batteries in
•
order not to create a short circu it with cond uctin g material such as rings, bracelets , and keys. The batter y or conduc tor may overheat and cause harm. Observe
proper p olarity between the batter y and the batter y charger.
Nickel -cadmium recha rgea ble batteri es: Dispose o f these batter ies in a safe man ner. Do not b urn or punctur e the battery. Like other batter ies of this ty pe,
•
if burne d or punc tured, they could releas e causti c materi al which could c ause injury.
Warranty
What do es this limited warran ty cover?
The manufacturer of this V Tech Prod uct warrants to the holder of a va lid pr oof of purchase (“Consum er” o r “you ”) that the Produc t and a ll acc essor ies pr ovided
in t he sales package (“Prod uct ”) are free from defects in m aterial an d wo rkman ship, purs uant to the follo wing terms an d c onditions, when inst alled and used
normal ly and in accor dance with the Produ ct ope rating i nstru ction s. This limited warrant y exte nds onl y to the Consum er for Pro ducts purch ased an d used i n the
United States of Am erica a nd Canad a.
What wil l VTech do if the Product is not free f rom def ects i n mater ials an d workma nship during th e limite d warra nty pe riod (“ Materially D efec tive Pro duct ”)?
During the limited warranty period, VTech’s author ized service representative will repair or replace at VTech’s option, without charge, a Materially Defective Product. If
we repair the Product, we may use new or refurbished replacement parts. If we choose to replace the Product, we may replace it with a new or refurbishe d Product of
the same or similar design. We will retain defective parts, modul es, or equipment. Repair or repl acemen t of the Product, at VTech’s opti on, is your exclusive remedy.
VTech will return the repaire d or replacement Produc ts to you in working c ondit ion. You should expec t the repair or replaceme nt to take ap proximately 30 days.
How long i s the limited warrant y perio d?
The limite d warranty period for the Prod uct extends for ONE (1) YEAR from the date of purchas e. If VTech repairs or repl aces a Materially Defec tive Produ ct under
the terms of this limited warranty, this limited warra nty also applies to the repair ed or replacement Product for a period of either (a) 90 days from the date the repaired
or replacement Pr oduct is shipped to you or (b) the time remainin g on the original one-year w arrant y; whic hever is lo nger.
What is not covered by this limited warran ty?
This lim ited warr anty does not cover:
1. Produ ct that has been subjected to m isuse, accident , shipping or oth er physi cal damage, impro per installatio n, abno rmal operation or ha ndling, neglect,
inundation, re, water or other liquid intrus ion; or
Appendix
www.vtechphones.com
45
Page 49

Warranty
2. Produ ct that ha s been da maged du e to repair, alteratio n or modi cation by anyone other tha n an authorized ser vice representative of VTech; or
3. Produ ct to the ex tent that the problem experienc ed is cau sed by sig nal condition s, network reliabilit y, or cable or antenna systems; or
4. Produ ct to the ex tent that the problem is caused by us e with non-VTech acc essor ies; or
5. Produ ct whos e warranty/quality sti ckers, produc t serial number plates or el ectro nic serial numbers have been remove d, altere d or rendered illegible; o r
6. Produ ct purcha sed, used , servic ed, or shipped for repair from out side the Unit ed States of America or Canada, or used for commerc ial or institutiona l purpose s
(inclu ding but not limited to Products us ed for rental purp oses); or
7. Produ ct retur ned wit hout a vali d proof of purcha se (see item 2 b elow); or
8. Charg es for ins tallation or set up, adjustment of cu stomer c ontrol s, and installat ion or repair of syst ems outs ide the u nit.
How do you get warranty se rvic e?
To obtain warranty ser vice in the United States of America , please call 1 (800) 595- 9511. In Canada , please call 1 (800) 267-7377. NOTE: Before calling for service,
please r eview the user’s manual - a che ck of the Pr oduct’s contr ols and features may save you a ser vice c all.
Except as prov ided by appli cable law, you assume the risk of loss or damage during trans it and transp ortation and are responsibl e for deliver y or handling cha rges
incurr ed in the transpor t of the Product(s) to the ser vice loc ation. VTech will return repaired or replace d Product under this limited warrant y. Trans port ation, deli very
or handl ing charges are p repaid . VTech ass umes no r isk for d amage or loss of t he Produ ct in transit. I f the Product failure is n ot covere d by this limited warrant y,
or proof of pur chase does not meet th e terms of thi s limited warrant y, VTech will notif y you and will re quest th at you author ize the cos t of repair prior to any further
repair ac tivit y. You must pay for th e cost of re pair and r eturn shipping costs fo r the repair of Products th at are not covered by this limite d warranty.
What must you return with t he Prod uct to get warra nty se rvic e?
1.
Return the entire o riginal packag e and con tents in cludi ng the Pro duct to t he VTech ser vice locati on along with a des cript ion of the m alfun ction or difculty ; and
2. Inclu de “val id proof of purch ase” (sales recei pt) ident ifyi ng the Pro duct purchased (Produ ct model) and the date of pur chase or receip t; and
3. Provid e your name, complete and correct mailing ad dress, and telephone number.
Other Limita tions
This warrant y is the c omplete and exclusive agr eement between you and VTech. I t supersede s all other writ ten or oral commu nicati ons r elated to this Product.
VTech prov ides no other war rantie s for thi s Product. The warrant y exclu sively d escri bes all of VTech’s res ponsi biliti es regarding the Produ ct. Th ere are no other
express w arranties. No on e is autho rized to ma ke modi cations to this limited warrant y and you should not rely on any su ch modicati on.
State/ Provinc ial Law Rights: Th is warranty gives you specic legal rights, and yo u may also have other ri ghts, wh ich var y from st ate to state o r provin ce to province.
Limitations: Impl ied warranties, incl uding tho se of tness for a particular purp ose and merch antability (an unwritten warranty that the Product is t for ordinar y use)
are lim ited to one year from the date of purc hase. Some states/provin ces d o not allow limitations on how long an imp lied warrant y las ts, so the above limitation
may not apply to you. In no event shall VTech be liable for any i ndirect, s pecia l, in cidental, consequential, or simi lar d amages (inc luding, but not limited to lost
prots o r revenue, inability to use t he Produ ct or other associated equipment, the cost of substitute e quipm ent, and c laims by t hird par ties) res ulting f rom the use
of this Produ ct. S ome st ates/p rovinc es do not al low the exclusion or limit ation of inc ident al or consequential dam ages, s o the above l imitat ion or exclus ion may
not appl y to you.
Please retain your original sales receipt as proof of purchase.
46
www.vtechphones.com
Page 50

FCC, ACTA and IC regulations
FCC Part 15
This equi pment has been tested and found to comply wit h the requirements for a Clas s B digital dev ice under Part 15 of the Federal Comm unicat ions Commissio n
(FCC) rules. These requirements are intended to provid e reasonab le protection against harmful interference in a resid ential installation. This equip ment
generates, uses and can rad iate radio fre quenc y energy and, if not installe d and used in accor dance with the instr uctio ns, may cause harmful inter ference to radio
commun ications. However, ther e is no guara ntee th at interferen ce will not occur in a partic ular install ation. If this equipment does c ause harmful inter ferenc e to
radio or television r eception, which can be determined by turn ing the equipmen t of f and on, th e user is en couraged t o tr y to correct t he in terference by one or by turning the eq uipment of f an d on, the us er is encoura ged to try to cor rect the interfere nce by one orby tur ning the equipment off and o n, the us er is encouraged to t ry to co rrect the interf erence by one or
more of the following measures:
Reorie nt or relo cate the r eceiv ing antenna.
•
Increa se the separatio n between the equ ipment and rece iver.
•
Connect the equipment into an out let on a circuit di ffere nt from th at to whic h the rec eiver is c onnec ted.
•
Consul t the dealer or an experienc ed radi o/T V techn ician for help.
•
Change s or modicat ions to this equipmen t not expressly appr oved by the party responsibl e for co mpliance could void the user’s authority to operate the
equipm ent.
This device complies wit h Part 15 of the FCC ru les. O perati on is s ubjec t to th e following t wo co nditions: (1) this device may not cause harmful inter feren ce, and
(2) this devic e must accept any inter ference recei ved, including in terfer ence that may cause und esired operation. Privacy of communicatio ns may not be ensured
when usi ng this te lephone.
To ensure safety of user s, the FCC has establishe d criteri a for the amount of radio frequen cy energy that can be safely absorbed by a user or bystander accordin g
to the intended u sage of t he prod uct. T his pro duct has been tested and found to compl y with the FCC criteria. The han dset may b e safely held against th e ear of
the user. The tel ephon e base shal l be installed and us ed such th at parts of the user’s body other than the han ds are maintained at a distanc e of approxi mately 20
cm (8 inches) or more. If yo u choos e to use a clipping d evice, p lease make sure to on ly use the suppli ed VTech belt clip.
This Cla ss B digi tal apparatus co mplie s with Can adian ICES-0 03.
FCC Part 68 and ACTA
This equipment compl ies wit h Part 68 of the FCC rules and with technical req uirements adopted by the Admini strati ve Counc il for Termin al Atta chments (ACTA).
The la bel o n the back or bot tom of this equi pment contains, a mong other things, a produc t ide ntier in the for mat US:A AAEQ ##TX XXX . This iden tier must be
provided to your lo cal telephone c ompany upon req uest.
The plug and jack used to conn ect this equi pment to premises wiring and the telephone network must comply with appli cable Part 68 rules and tech nical
requirements adopted by ACTA. A compliant tele phone cor d and modular plug is provi ded with this product. It is design ed to be connected to a com patibl e modular
jack that i s also com pliant . An RJ11 jack should normally be used for connecting to a single line and an RJ14 jack for two lines. See Installation Instructions in the
user’s manual.
The R inger Equivalence Number (REN) is used to de termine how many devic es you may conne ct to your telep hone line and s till have them ring when yo u are
called. The REN for this produc t is enc oded as the 6th and 7th characters foll owing the US: in the produ ct identier (e.g., i f ## is 03 , the REN i s 0.3). In most, but
not all are as, the su m of all RENs s hould be ve (5.0) or les s. For more information, pl ease co ntact yo ur loca l teleph one com pany.
This e quipment may not be used with Party Lines. If you have s pecia lly wired al arm di aling equipment connected to your telephon e line, ensur e the conne ction
of this equi pment does not di sable your alarm e quipme nt. If you have ques tions about what w ill disable alarm equipment, consult your telephone company or a
quali ed inst aller.
www.vtechphones.com
Appendix
47
Page 51

FCC, ACTA and IC regulations
If this equipm ent is malfunc tioni ng, it must be unplugg ed from the modul ar jack until the problem has been corre cted. Repa irs to this telephone equipm ent can only
be made by the manufacturer o r its auth orized agents. Fo r repair proced ures, fol low the in struc tions o utline d under t he Limited Warrant y.
If this equipment is c ausing harm to the telephone net work, the teleph one comp any may temporarily discont inue your telephon e servi ce. The telephone c ompany
is req uired to not ify you before in terrup ting s ervi ce. If advan ce notice is not practical, you w ill be notied as soon as p ossib le. You wi ll be given the oppor tunit y
to co rrect the prob lem and t he te lephone company is required to inform you of your right to le a complaint with the FCC. Your telep hone company may make
change s in its facilit ies, equ ipment, operation, or procedures th at could affec t the proper fun ction ing of th is prod uct. The telep hone company is requir ed to noti fy
you if suc h changes are plan ned.
If this pr oduct i s equip ped with a corde d or cordless han dset, it is hearing aid compatible.
If this product has me mory dialing lo cations, you may choose to store em ergency teleph one numbers (e.g., polic e, re, medical) in these locations. If you do store
or test eme rgenc y number s, please:
Remain on the line a nd brie y explai n the reas on for the call before hanging up.
Perfor m such ac tivities in off-peak h ours, su ch as ear ly morning or late eve ning.
Indust ry Cana da
Operation is subje ct to the following two co nditions: (1) this device may not cau se harmful interference, and (2) this device mus t accept any interference, inc luding
interference that may cau se unde sired op eratio n.
The term ‘ ’IC: ‘’ before the certicatio n/regi strati on number only signies t hat the In dustr y Canada techni cal spe cic ations were met.
The Rin ger Equi valenc e Numb er (REN) for this terminal equi pment i s 0.1. The REN is a n indi cation of the maximum numb er of devices allowed to be co nnected
to a telephone inter face. T he term inatio n on an inter face may consi st of a ny combinatio n of devices subjec t only to the requir ement that the sum of the REN s of
all the devices d oes not exc eed ve.
This pro duct me ets the applicable Ind ustr y Canada te chnic al specications.
The RBRC® seal
The RBRC® seal on the nickel- cadmium batter y indicates that VTech Communications, Inc. is voluntarily participatin g in an industry program
to colle ct and re cycle these bat teries at the end of t heir use ful lives, when taken out of servic e within the United States and Canad a.
The RBRC® progra m provid es a conve nient al ternati ve to plac ing use d nickel -cad mium bat teries into the trash or mu nicipal waste, which
may be ille gal in your area.
VTech’s part icipation in RBRC® makes it easy for you to drop off th e spent ba tter y at local r etaile rs participating in th e RBRC® program or
at aut horize d VTech pro duct ser vice cente rs. Please call 1-800-8 -BATTE RYTM for information on Ni- Cd b atter y re cycling an d disposal
bans/restric tions in your area . VTech’s involveme nt in this progra m is part of its commit ment to protec ting our envir onment and co nser ving
natural resourc es.
RBRC® is a regi stere d trad emark o f Rechargea ble Bat ter y Recycl ing Corporation.
48
www.vtechphones.com
Page 52

Technical specications
Frequency control Crystal controlled PLL synthesizer
Transmit frequency Handset: 5857.20-5865.90 MHz
Telephone base: 912.75-917.10MHz
Channels 30
Nominal effective range Maximum power allowed by FCC and IC. Actual operating range may vary according
to environmental conditions at the time of use.
Size Handset: 7.32in X 2.01in X 1.57in (186.0mm X 51.0mm X 40.0mm)
Telephone base: 4.33in X 5.34in X 3.78in (110.0mm X 135.6mm X 96.0mm)
Charger: 3.19in X 3.62in X 1.97in (81.0mm X 92.0mm X 50.0mm)
Weight Handset: 5.14oz (145.6g) (including battery)
Telephone base: 5.26oz (149g)
Charger: 2.37oz (67.2g)
Power requirements Handset: 3.6V 400mAh Ni-Cd battery
Telephone base: 7.5V AC @ 200mA
Charger: 7.5V AC @150mA
Memory Handset directory: 20 memory locations (9 speed dial inclusive);
up to 24 digits and 14 characters
Handset call log: 45 memory locations; up to 11 digits and 15 characters
Appendix
www.vtechphones.com
49
Page 53

Index
A
About caller ID 25
About cordless telephones 45
Answer calls 12
Dial a speed dial number 23
Dial mode 10
Director y 16
DSL lter 2
B
Battery 3, 33
C
Call log 26
Call log display screen messages 31
Call waiting 13
Channel 12
Character chart 17
Charging 3
Clear voicemail 11
Copy a directory entry into speed dial 20
D
Date and time 8
Delete a directory entry 19
Delete a speed dial entry 23
Delete from the call log 30
Dial a call log number 28
Dial a number from the directory 20
50
E
Edit a directory entr y 18
Edit a speed dial entry 22
End calls 12
F
FCC, ACTA and IC regulations 47
Find handset 14
H
Handset display screen messages 32
Home area code 10
I
Installation 2
L
Language 11
www.vtechphones.com
Page 54

Index
M
Maintenance 44
Make call log entries ready to dial 27
Make calls 12
Mounting bracket installation 4
T
Technical specications 49
Temporary tone dialing 13
Transfer an external call 15
Troubleshooting 35
O
Operating range 44
P
Parts checklist 1
R
RBRC® seal 48
Reassign speed dial locations 24
Redial 14
Review the call log 27
Review the directory 17
Ringer 9
Ringer volume 9
S
Save a call log entry to the directory 29
Speed dial 21
Store a directory entry 16
Store a speed dial entry 21
V
Volume 12
W
Warranty 45
www.vtechphones.com
Appendix
51
Page 55

VTECH TELECOMMUNICATIONS LTD.
A member of THE VTECH GROUP OF COMPANIES.
Distributed in the U.S.A. by VTech Communications, Inc. Beaverton, Oregon
Distributed in Canada by VTech Technologies Canada, Ltd., Richmond, B.C.
Copyright ©2008 for VTECH TELECOMMUNICATIONS LTD.
Printed in China.
91-002139-020-100
Page 56

Models:
CS5111-2
CS5111-3
User’s manual
w w w . v t e c h p h o n e s . c o m
 Loading...