

Page 1

Models: CS5111/CS5113
User’s manual
w w w.v t e c h p h o n e s . c o m
Page 2

Before using this telephone, please read the
T
Compatible with
Hearing Aid T-Coil
TIA-1083
Important safety instructions on page 22
of this manual.
For support, shopping, and everything new at VTech, visit our website at
www.vtechphones.com.
The ENERGY STAR® program (www.energystar.gov) recognizes and
encourages the use of products that save energy and help protect our
environment. We are proud to mark this product with the ENERGY STAR®
label indicating it meets the latest energy efciency guidelines.
Telephones identied with this logo have reduced noise and interference when
used with most T-coil equipped hearing aids and cochlear implants. The TIA1083 Compliant Logo is a trademark of the Telecommunications Industry
Association. Used under license.
In Canada, please visit www.vtechcanada.com.
Page 3

Table of contents
Getting started . . . . . . . . . . . . . . . . 1
Parts checklist . . . . . . . . . . . . . . . . . 1
Telephone base installation . . . . . . . 2
Battery installation and charging . . . 3
Wall bracket installation . . . . . . . . . . 3
Wall bracket installation . . . . . . . . 3
Desktop/tabletop bracket
installation . . . . . . . . . . . . . . . . . 4
Handset layout . . . . . . . . . . . . . . . . . 5
Telephone base layout . . . . . . . . . . . 6
Telephone settings . . . . . . . . . . . . 7
Date and time . . . . . . . . . . . . . . . . . . 7
Ringer. . . . . . . . . . . . . . . . . . . . . . . . 7
Ringer volume . . . . . . . . . . . . . . . . . 7
Dial mode . . . . . . . . . . . . . . . . . . . . . 8
Home area code. . . . . . . . . . . . . . . . 8
Language . . . . . . . . . . . . . . . . . . . . . 9
Clear voicemail. . . . . . . . . . . . . . . . . 9
Telephone operation . . . . . . . . . . 10
Make calls . . . . . . . . . . . . . . . . . . . 10
Answer calls . . . . . . . . . . . . . . . . . . 10
End calls . . . . . . . . . . . . . . . . . . . . 10
Volume . . . . . . . . . . . . . . . . . . . . . . 10
Channel . . . . . . . . . . . . . . . . . . . . . 10
Call waiting . . . . . . . . . . . . . . . . . . . 10
Temporary tone dialing. . . . . . . . . . 10
Redial . . . . . . . . . . . . . . . . . . . . . . . 11
Find handset. . . . . . . . . . . . . . . . . . 11
Directory. . . . . . . . . . . . . . . . . . . . . 11
Store a directory entry . . . . . . . . . . 11
Character chart . . . . . . . . . . . . . . . 12
Review the directory. . . . . . . . . . . . 12
Edit a directory entry . . . . . . . . . . . 12
Delete a directory entry . . . . . . . . . 13
Copy a directory entry into
speed dial . . . . . . . . . . . . . . . . . . 14
Dial a number from the directory . . 14
Speed dial . . . . . . . . . . . . . . . . . . . 14
Store a speed dial entry . . . . . . . . . 14
Edit a speed dial entry . . . . . . . . . . 15
Delete a speed dial entry . . . . . . . . 16
Dial a speed dial number . . . . . . . . 16
Reassign speed dial locations . . . . 16
About caller ID . . . . . . . . . . . . . . . . 16
Call log . . . . . . . . . . . . . . . . . . . . . . 17
Review the call log . . . . . . . . . . . . . 17
Make call log entries
ready to dial . . . . . . . . . . . . . . . . 18
Dial a call log number. . . . . . . . . . . 18
Save a call log entry
to the directory . . . . . . . . . . . . . . 18
Delete from the call log . . . . . . . . . 19
Delete an entry . . . . . . . . . . . . . . 19
Delete all entries . . . . . . . . . . . . . 19
Call log display screen
messages . . . . . . . . . . . . . . . . . . 19
Appendix. . . . . . . . . . . . . . . . . . . . 20
Handset display screen
messages . . . . . . . . . . . . . . . . . . 20
Battery . . . . . . . . . . . . . . . . . . . . . . 21
Important safety instructions . . . . . 22
Troubleshooting . . . . . . . . . . . . . . . 23
Operating range . . . . . . . . . . . . . . . 28
Maintenance. . . . . . . . . . . . . . . . . . 28
About cordless telephones. . . . . . . 28
Warranty. . . . . . . . . . . . . . . . . . . . . 29
FCC, ACTA and IC regulations . . . 31
The RBRC® seal. . . . . . . . . . . . . . . 32
Technical specications . . . . . . . . . 33
Index. . . . . . . . . . . . . . . . . . . . . . . . 34
ii
Page 4
Getting started
OPER
DEF
JKL
P
QRS
W
XYZ
TUV
MNO
TONE
ABC
CHARGE
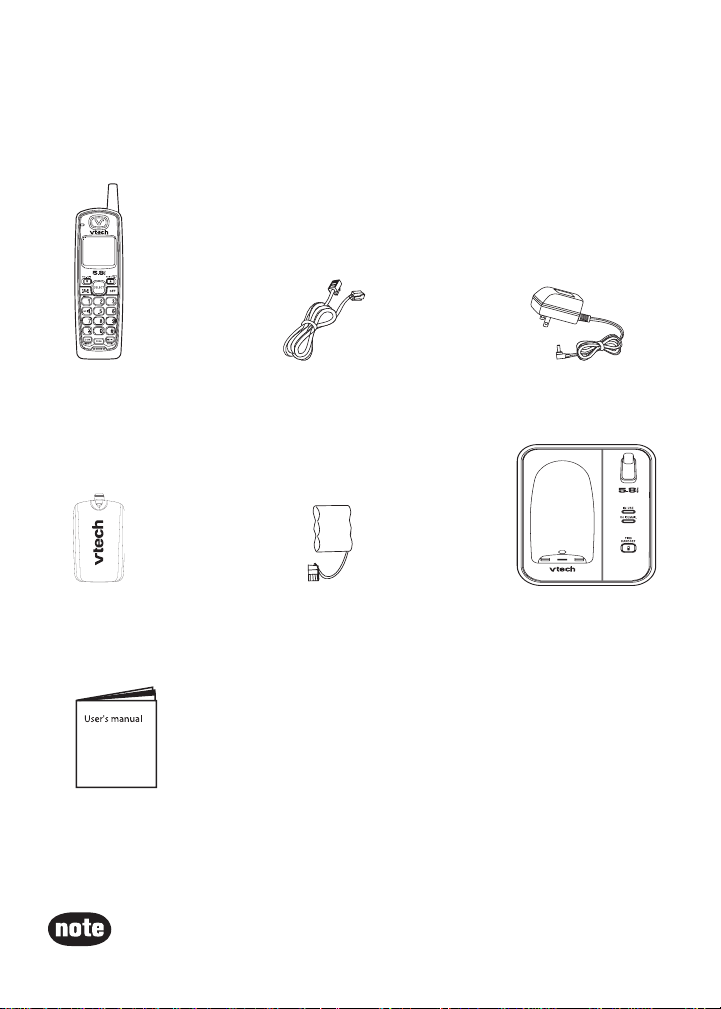
Parts checklist
Your telephone contains the following items. Save your sales receipt and
original packaging in the event warranty service is necessary.
1. Handset
cover
7. User’s manual
2. Telephone line cord
3. Telephone base
power adapter
5. Battery4. Battery compartment
6. Telephone base with
wall bracket
To purchase replacement batteries or power adapters, visit our website
•
at www.vtechphones.com or call 1 (800) 595-9511. In Canada, go to
www.vtechcanada.com or call 1 (800) 267-7377.
1
Page 5
Getting started
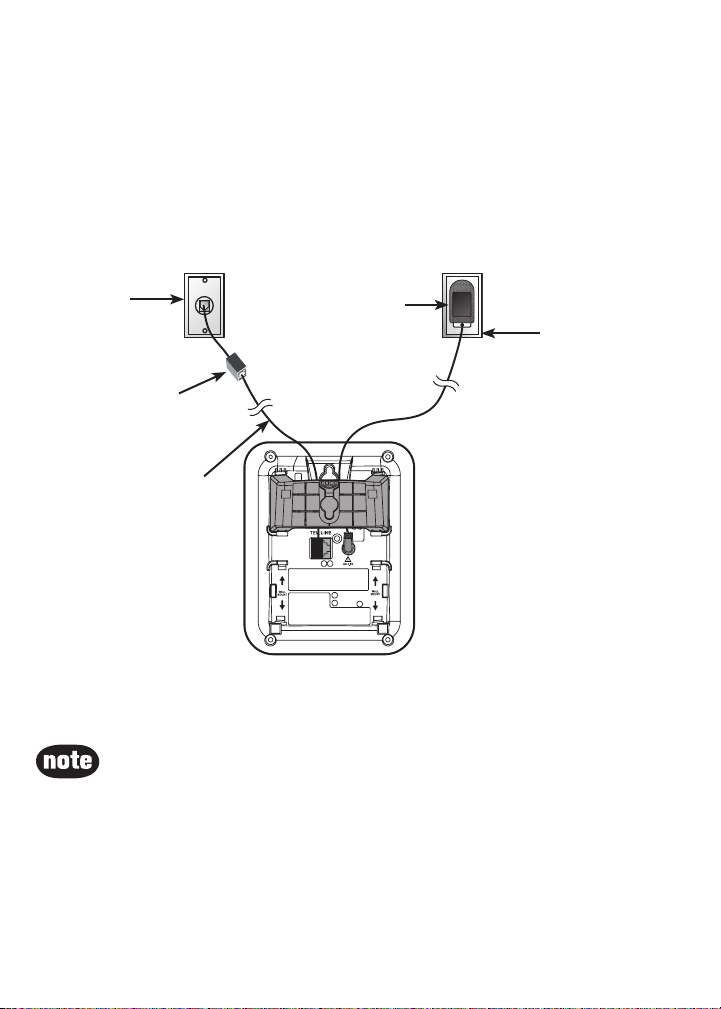
Telephone base installation
If you subscribe to high-speed Internet service (Digital Subscriber Line
- DSL) through your telephone lines, you must install a DSL lter between
the telephone base and the telephone wall jack to prevent noise and caller
ID problems caused by DSL interference. Please contact your DSL service
provider for more information about DSL lters.
Telephone
wall jack
DSL lter (not included)
required if you have
DSL high-speed
Internet service
Telephone line cord
Use only the power adapters supplied with this product. To order a
•
replacement, visit our website at www.vtechphones.com or call 1 (800)
595-9511. In Canada, go to www.vtechcanada.com or call 1 (800) 267-7377.
The power adapters are intended to be correctly oriented in a vertical or
•
oor mount position.
Telephone base
power adapter
Electrical outlet
(not controlled by
a wall switch)
Telephone base
2
Page 6
Getting started
OPER
DEF
JKL
P
QRS
W
XYZ
TUV
MNO
TONE
ABC
CHARGE
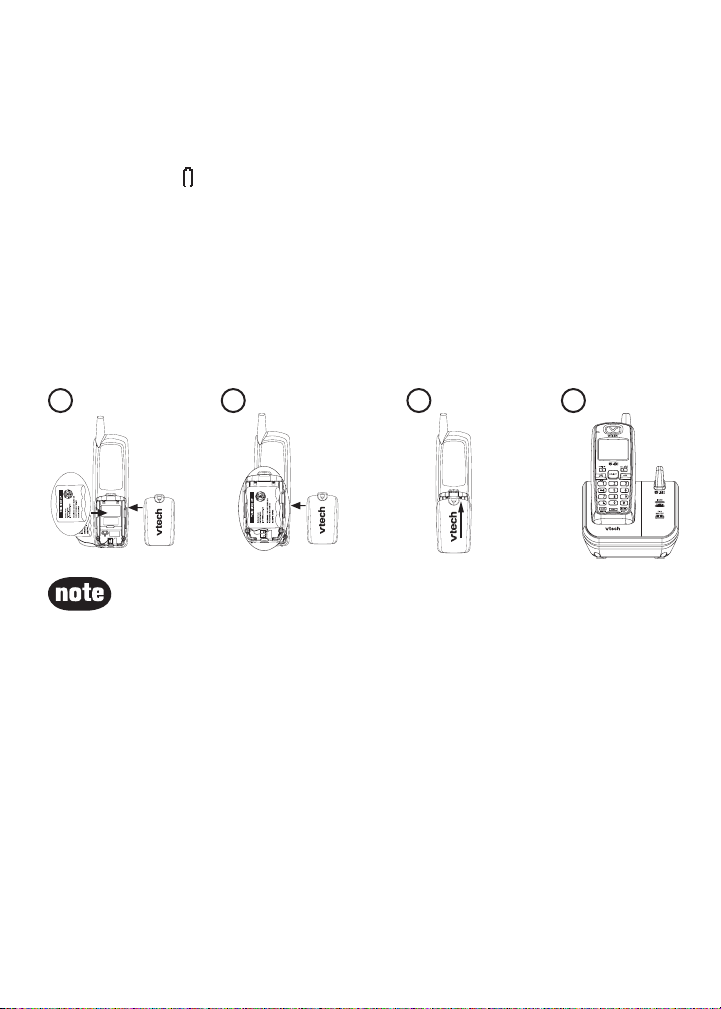
Battery installation and charging
Install the battery as shown below. The battery may have enough charge for
short calls and then completely charge and drain the battery two or three times
every three months afterwards. For best performance, charge the battery for at
least 16 hours before rst use. When the battery power is low, LOW BATTERY
is displayed and ashes on the handset screen.
Insert the plug of the battery as indicated. Make sure it is plugged securely
1.
and matches the color-coded label inside the battery compartment.
Place the battery with the label THIS SIDE UP facing up, and the wires
2.
inside the battery compartment.
Align the battery compartment cover at against the battery compartment,
3.
then slide it upwards until it clicks into place.
Charge the handset by placing it in the telephone base. The handset charge
4.
light is on when charging.
1 2 3
If the handset will not be used for a long period of time, remove the battery
•
4
to prevent possible leakage.
To purchase replacement batteries, visit our website at www.vtechphones.com
•
or call 1 (800) 595-9511. In Canada, go to www.vtechcanada.com or call 1
(800) 267-7377.
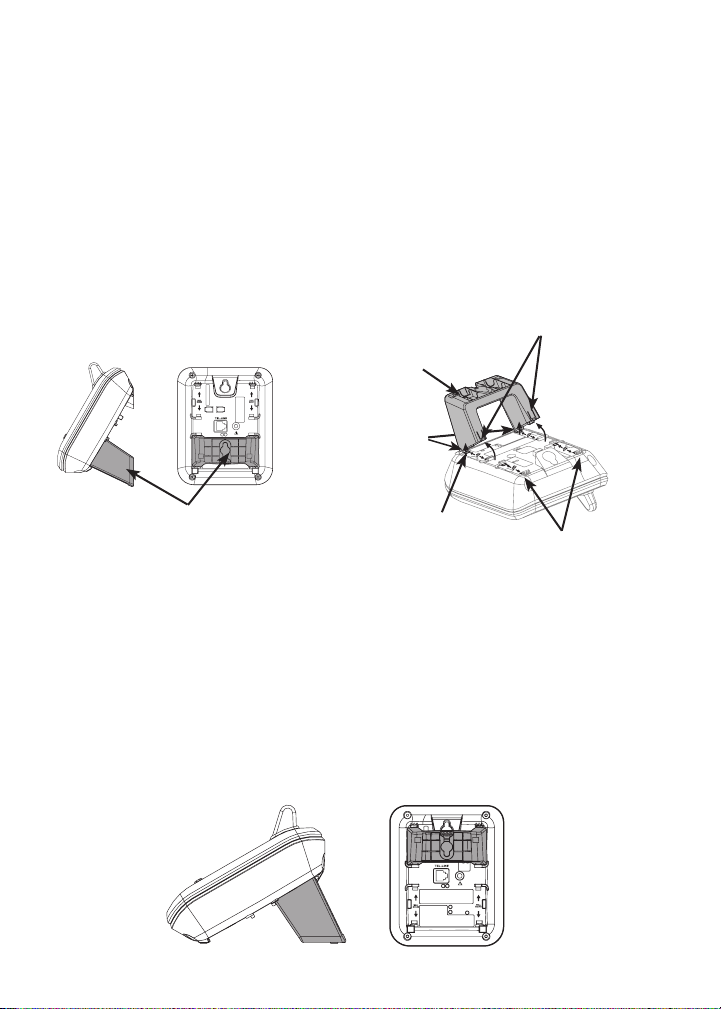
Wall bracket installation
Your telephone base comes with the wall bracket installed, ready for desktop
use. You may also mount your telephone onto a standard telephone wall plate.
Wall bracket installation:
To prepare the telephone base for wall mounting, you need to remove the
bracket if it is currently attached for desktop use. Press the tabs located on
the legs of the bracket to loosen, then lift the bracket up and away from the
telephone base.
3
Page 7
Getting started
AC 7.5V
AC 7.5V
Wall bracket installation (continued)
Wall bracket installation:
First, insert the lower portion tabs of the wall bracket into the lower grooves
1.
in the telephone base, then snap the upper portion tabs of the wall bracket
into place.
Mount the telephone base on the wall by positioning it so the mounting
2.
studs t into the holes on the telephone base and wall bracket. Slide the
telephone base down on the mounting studs until it locks into place.
To remove the bracket, press both upper portion tabs rmly and pull the
3.
bracket downward until it releases from the grooves.
upper portion tabs
Wall bracket
lower
portion
tabs
Wall bracket in wall
mount orientation
lower groove
upper grooves
Desktop/tabletop bracket installation:
Your telephone comes ready for table use. If you have repositioned the bracket
for wall mounting and now want to return to table use, follow these steps:
Insert the lower portion tabs of the wall bracket into the upper grooves of the
1.
telephone base.
Snap the upper portion tabs of the wall bracket into place.
2.
To remove the wall bracket, press both upper portion tabs rmly inward and
3.
pull the wall bracket upward until it is released from the grooves.
4
Page 8
Getting started
OP E R
DE F
JKL
P
QRS
W
X YZ
TU V
MNO
TON E
A BC
CHARGE
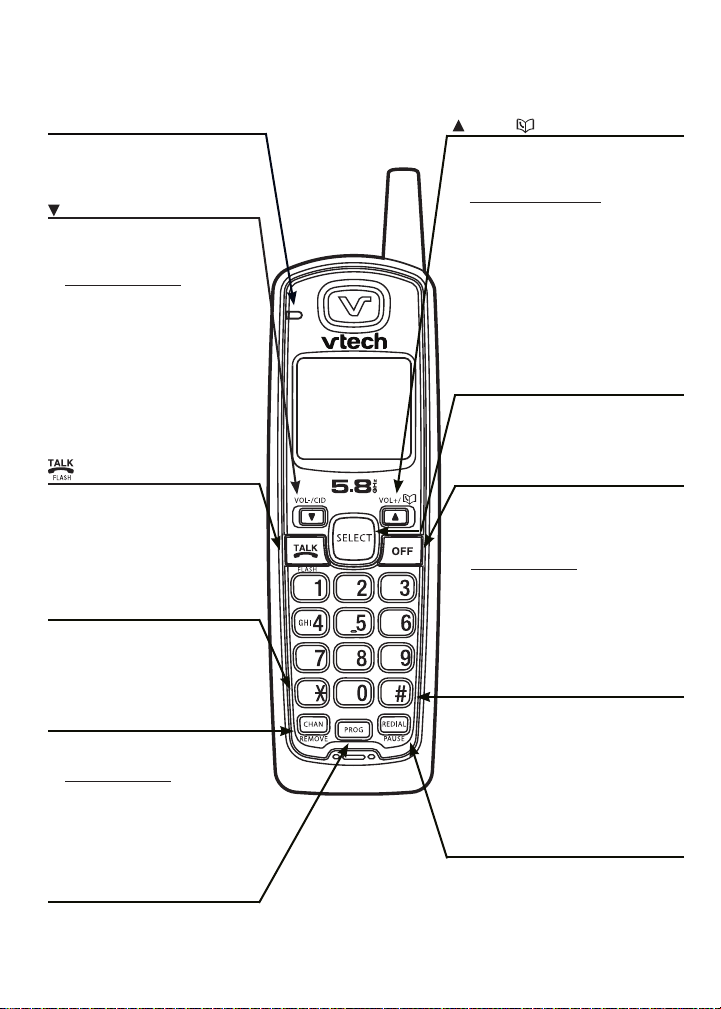
Handset layout
CHARGE light
• On when the handset is
charging in the telephone
base.
/VOL-/CID
• When the telephone is not
in use, press to review the
call log.
• Press and hold to adjust
the ringer volume when the
telephone is not in use.
• During a call, press to
lower the listening volume.
A double beep sounds at
the lowest setting.
• Press to scroll down while
in programming mode or
reviewing the redial list.
• Press to make or answer
a call.
• During a call, press to
receive an incoming call
when you receive a call
waiting alert.
TONE
*
• Press to switch to tone
dialing temporarily when
using the pulse service
(page 10).
CHAN/REMOVE
• Switch to a clearer channel
while on a call.
• Press and hold to delete all
records in the call log when
the phone is not in use.
When reviewing the call
•
log or redial list,
delete the desired record.
PROG
• Press to enter programming
mode while the telephone is
not in use.
press to
/VOL+/
• Press to display the director y
when the telephone is not in
use.
• P res s an d hold to adj ust
the ringer volume when the
telephone is not in use.
• During a call, press to increase
the listening volume. A double
be ep will sou nd wh en the
highest setting is reached.
Press to scroll up while
•
in programming mode
reviewing the redial list.
or
SELECT
• Press to store a programming
option or a directory entry.
OFF
• During a call, press to hang
up.
• While the handset is ringing,
press to silence the ringer.
• Press and hold for two
seconds when the telephone
is not in use to erase the
MISSED CALLS display.
• During programming, press to
exit without making changes.
#
• Press repeatedly to display other
dialing options when reviewing
the call log (page 18)
• Press to use the CLR
VOICEMAIL feature from the
main menu.
REDIAL/PAUSE
• Press repeatedly to review the
redial list.
• While dialing or entering
numbers into the directory,
press to insert a dialing
pause.
5
.
Page 9
Getting started
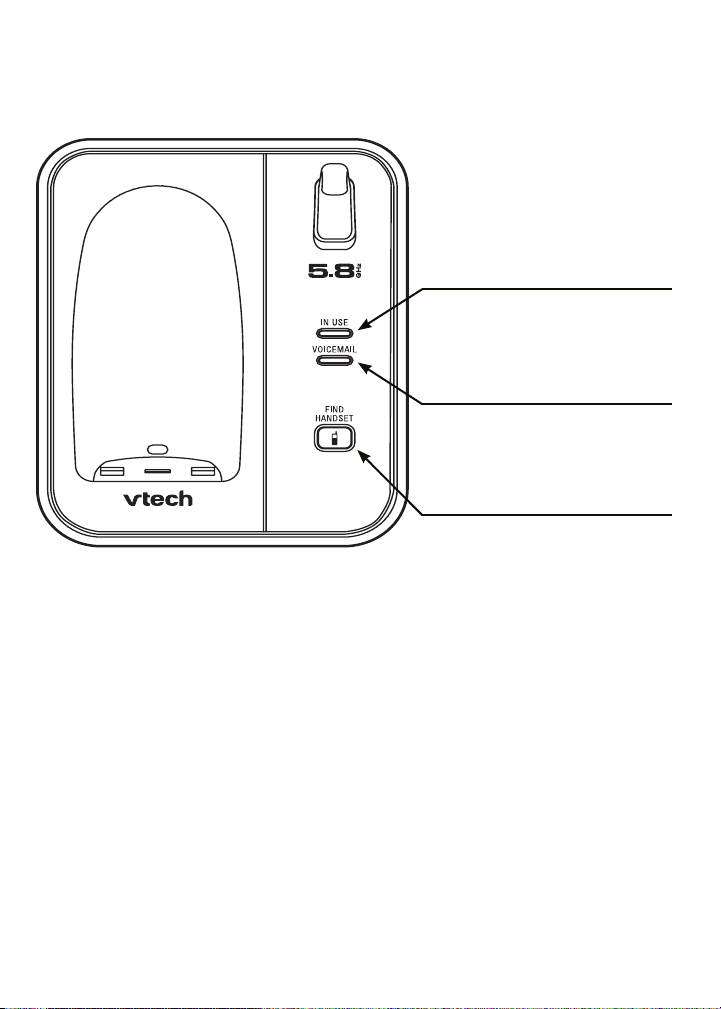
Telephone base layout
IN USE light
Flashes when there is an
•
incoming call.
On when the handset is in use.
•
VOICEMAIL light
Flashes when you have new
•
voicemail from your telephone
service provider.
FIND HANDSET
Press to page the handset.•
6
Page 10

Telephone settings
Date and time
If you subscribe to caller ID service, the date and time is set automatically with
the next incoming call. If you do not have caller ID service, you can set the
date and time manually.
Press PROG when the handset is not in use.
1.
Press or until DATE/TIME is displayed. Press SELECT.
2.
When the month is ashing, press or until the screen displays the
3.
correct month and then press SELECT.
When the date is ashing, press or until the screen displays the correct
4.
date and then press SELECT.
When the hour is ashing, press or until the screen displays the correct
5.
hour and then press SELECT.
When the minute is ashing, press or until the screen displays the
6.
correct minute and then press SELECT.
When AM or PM is ashing, press or to choose between AM or PM
7.
and then press SELECT. You will hear a conrmation tone.
When there is a power failure, the time may need to be reset.•
Ringer
You can select from different ringers.
Press PROG when the handset is not in use.
1.
Press or until the screen displays RINGER: and the current setting.
2.
Press SELECT. The current setting ashes, and you will hear a sample of the
3.
ringer.
Press or to select RINGER: 1, 2, 3, or 4. You will hear a sample of
4.
each ring tone.
Press SELECT to conrm your selection. You will hear a conrmation
5.
tone.
Ringer volume
You can change the ringer volume to a comfortable level or turn the ringer off.
Press PROG when the handset is not in use. Press or until the
1.
screen displays RINGER VOL: and the current setting.
Press SELECT. The current setting ashes, and you will hear a
2.
sample of the ringer volume.
Press or to select ringer volume from OFF, LOW or HI. You will
3.
hear a sample of the selected volume level.
7
Page 11
Telephone settings
Ringer volume (continued)
4. Press SELECT to conrm your selection. You will hear a conrmation tone.
-OR-
Press and hold or until the screen displays RINGER VOL: and the
1.
current setting when the handset is not in use. The current setting ashes
and you will hear a sample of the ringer volume.
Press or to select ringer volume from OFF, LOW or HI. You will hear a
2.
sample of the selected volume level.
Press SELECT to conrm your selection. You will hear a conrmation tone.
3.
If the ringer volume is set to OFF, RINGER OFF and are displayed.
•
Even if the ringer volume is set to OFF, the handset still rings when you
•
press FIND HANDSET.
Dial mode
If you have touch tone service, the telephone is ready for use as soon as the
battery is charged. If you have pulse (rotary) service, you need to change the
dial mode.
Press PROG when the handset is not in use.
1.
Press or until the screen displays DIAL MODE: and the current setting.
2.
Press SELECT. The current setting ashes.
3.
Press or to select TONE or PULSE.
4.
Press SELECT to conrm your selection and there is a conrmation tone.
5.
Home area code
If you dial your local calls using only seven digits (area code not required), you
can program your home area code, following the steps below. By programming
your home area code, when you receive a call within your local area, the
telephone number is automatically stored without the area code in the call log.
Press PROG when the handset is not in use.
1.
Press or until the screen displays HOME AREA CODE.
2.
Press SELECT. The stored area code is displayed with the rst digit
3.
ashing.
Use the dial key pad to enter the desired home area code.
4.
Press SELECT to conrm. You will hear a conrmation tone.
5.
If your telephone service provider requires you to dial the area code when
•
making a local call, or you want to cancel the home area code you have
already programmed, reprogram your home area code to 000.
Press CHAN/REMOVE when in the home area code menu to delete the
•
stored home area code. ___ is then displayed.
8
Page 12
Telephone settings
Language
Press PROG when the handset is not in use.
1.
Press or until LANGUAGE is displayed.
2.
Press SELECT. The current setting ashes.
3.
Press or until the screen displays the desired language (ENGLISH,
4.
ESPANOL or FRANCAIS).
Press SELECT to conrm your selection. You will hear a conrmation tone.
5.
Clear voicemail
If you subscribe to voicemail services provided by your telephone service
provider, NEW VOICEMAIL and are displayed on the handset and the
VOICEMAIL light on the telephone base ashes when you have a new
voicemail message.
To turn this indicator off:
Press PROG when the handset is not in use.
1.
Press or until the screen displays CLR VOICEMAIL.
2.
Press SELECT. The screen displays CLEAR? and YES ashes.
3.
Press SELECT to conrm your selection. You will hear a conrmation tone.
4.
The clear voicemail feature only turns off the displays NEW VOICEMAIL
•
and on the handset, and the VOICEMAIL light on the telephone base. It
does not delete your voicemail message(s).
9
Page 13

Telephone operation
Make calls
Press and then use the dial pad keys to dial a number.
•
-OR-
Enter the phone number rst. You can press to backspace and press
1.
CHAN/REMOVE to erase digits.
Press to dial.
2.
Answer calls
Press any dial pad keys (except /VOL-/CID, /VOL+/ and OFF) to answer
•
an incoming call.
End calls
Press OFF or put the handset back to the telephone base to end a call.
•
The call timer is activated during a call to show call duration.
•
The handset beeps if it is moved out of range while on a call.
•
Volume
Press / VOL-/CID or /VOL+/ to adjust the listening volume during a
•
conversation.
Channel
Press CHAN/REMOVE to switch to a clearer channel while on a call.
•
Call waiting
If you subscribe to call waiting service and you are on a call when a new
call comes in, you will hear a beep. The caller ID information is displayed if
you subscribe to combined caller ID with call waiting service from your local
telephone service provider.
Press on the handset to put the current call on hold and answer the
•
incoming call.
Press at anytime to alternate between calls.
•
Temporary tone dialing
If you have pulse (rotary) service, you can change from pulse to touch tone
dialing during a call by pressing TONE*. This is useful if you need to send
touch tone signals to access telephone banking or long distance services.
Once you have initiated your call by dialing the phone number in pulse (rotary),
press TONE*. Now, all subsequent key presses are sent as touch tone signals.
After you hang up, the phone returns to pulse (rotary) dialing for the next call.
10
Page 14

Telephone operation
Redial
The telephone stores the ve most recently dialed telephone numbers in the
•
redial list. When the list is full, the oldest entry is deleted to make room for
the new entry.
Press REDIAL/PAUSE, then press
•
review the redial list. Press CHAN/REMOVE to delete the displayed number.
Press , then press REDIAL/PAUSE to dial the last telephone number
•
dialed.
-OR-
Press REDIAL/PAUSE, then press
the desired entry displays, then press to dial the number.
Find handset
Press FIND HANDSET on the telephone base to locate the handset when
•
the telephone is not in use and the handset is not placed in the telephone
base. The handset rings and **PAGING** will be displayed on its screen.
Press FIND HANDSET again or put the handset back
•
on the telephone base to stop the paging tone.
-OR-
Press OFF on the handset.
Directory
The directory can store up to 20 entries (including nine speed dial entries).
Each entry may consist of a number up to 24 digits and a name up to 14
characters.
Store a directory entry
Press PROG when the handset is not in use. The screen displays DIRECTORY.
1.
Press SELECT. The screen displays ENTER NAME.
2.
Use the dial pad keys to enter the name. See the Character chart on page 12.
3.
Press to move the cursor to the left or to the right.
•
Press CHAN/REMOVE to erase a character.
•
When nished, press SELECT or PROG. The screen displays ENTER NUMBER.
4.
Use the dial pad keys to enter the telephone number.
5.
Press to move the cursor to the left or to the right.
•
Press CHAN/REMOVE to erase a digit.
•
Press REDIAL/PAUSE to insert a dialing pause (P is displayed).
•
Press SELECT or PROG. The screen displays DISTINCT RING? and the
6.
current setting.
Press or to choose Y (yes) if you wish to customize this entry or
7.
choose N (no) for a normal ringer. If you choose Y, a is displayed with the
directory entry.
Press SELECT or PROG to conrm and you hear a conrmation tone.
8.
, or REDIAL /PAUSE
, or REDIAL /PAUSE
11
repeatedly to
repeatedly until
Page 15

Telephone operation
Character chart
Use the dial pad keys and the chart below to enter a name (up to 14
characters). An error tone sounds if you try to enter more than 14 characters.
Each press of a particular key causes the characters to be displayed in the
following order:
Dial key
1 1
2 A B C 2
3 D E F 3
4 G H I 4
5 J K L 5
6 M N O 6
7 P Q R S 7
8 T U V 8
9 W X Y Z 9
0 0
*
# &
Review the directory
Press / VOL+/ when the handset is not in use. The screen displays
1.
DIRECTORY.
Press or to scroll through the entries stored in the directory alphabetically.
2.
-OR-
Press the dial pad key for the rst letter of the name you want to search. If
necessary, scroll
When you reach the end of the list in the director y, END OF LIST is shown
•
on the screen and there is an error tone.
If you press a dial pad key for alphabetical search while in the directory
•
and there are no entries starting with the letters of that key, NO DATA is
displayed on the screen.
Characte rs b y nu mber of key press es
1 2 3 4 5 6
*
,
, - . #
or to nd the desired entry.
Edit a directory entry
Press / VOL+/ when the handset is not in use. The screen displays
1.
DIRECTORY.
Press or to scroll through the entries stored in the directory
2.
alphabetically.
-OR-
Press the dial pad key for the rst letter of the entry you want to edit. If
necessary, scroll
or to nd the desired entry.
12
Page 16

Telephone operation
Edit a directory entry (continued)
When the screen displays the desired entry, press
3.
SELECT and EDIT ashes.
Press SELECT. The screen displays the name and
4.
number. The cursor appears at the beginning of the
name.
Use the dial pad keys to edit the name.
•
Press to move the cursor to the left or to the right.
•
Press CHAN/REMOVE to erase a character.
•
5. Press SELECT to move on to the phone number.
Use the dial pad keys to edit the number.
•
Press to move the cursor to the left or to the right.
•
Press CHAN/REMOVE to erase a digit.
•
Press REDIAL/PAUSE to insert a dialing pause (P will be displayed).
•
6. Press SELECT. The screen displays DISTINCT RING? and the current
setting.
7. Press or to choose Y (yes) to customize this entry, or choose N (no)
for a normal ringer. If you choose Y, a will be displayed with the directory
entry.
8. Press SELECT to conrm and you will hear a conrmation tone.
Delete a directory entry
Press / VOL+/ when the handset is not in use. The screen displays
1.
DIRECTORY.
Press or to scroll through the entries stored in the directory
2.
alphabetically.
-OR-
Press the dial pad key for the rst letter of the entry to delete. If necessary,
scroll or to nd the desired entry.
3. When the screen displays the desired entry, press
SELECT. Then press or until DEL (delete)
ashes.
4. Press SELECT. The screen displays
ERASE NO YES and the number. The current
choice ashes.
5. Press until YES ashes.
6. Press SELECT. You will hear a conrmation beep.
SPEED EDIT DEL
8005959511
SPEED EDIT DEL
8005959511
13
Page 17

Telephone operation
Copy a directory entry into speed dial
Press / VOL+/ when the handset is not in use. The screen displays
1.
DIRECTORY.
Press or to scroll through the entries stored in the directory
2.
alphabetically.
-OR-
Press the dial pad key for the rst letter of the entry to copy. If necessary,
scroll
3. When the screen displays the desired entry, press
SELECT. Then press or until SPEED ashes.
4. Press SELECT. The screen displays ENTER 1-9.
5. Press a key (1-9) to copy this entry from the
directory to the speed dial memory and assign the
memory location. You will hear a conrmation beep. A memory location
number (01 through 09) will be displayed with this entry.
Dial a number from the directory
Press / VOL+/ when the handset is not in use. The screen displays
1.
DIRECTORY.
Press or to scroll through the entries stored in the directory
2.
alphabetically.
-OR-
Press the dial pad key for the rst letter of the desired entry. If necessary,
scroll
3. When the screen displays the desired entry, press .
Speed dial
Your telephone can store up to nine telephone numbers with names (up to 14
characters and 24 digits in each location) in the speed dial memory locations
you assign in the handset.
or to nd the desired entry.
SPEED EDIT DEL
8005959511
or to nd the desired entry.
Store a speed dial entry
Press PROG when the handset is not in use and then press or until the
1.
screen displays SPEED DIAL.
Press SELECT. The screen displays ENTER 1-9.
2.
Press a key (1 through 9) to assign the speed dial location to store this
3.
number. The screen displays ENTER NAME.
Use the dial pad keys to enter the name (see the Character chart on page
4.
12) and then press SELECT or PROG.
Press to move the cursor to the left or to the right.
•
Press CHAN/REMOVE to erase a character.
•
14
Page 18

Telephone operation
Store a speed dial entry (continued)
The screen displays ENTER NUMBER.
5.
Use the dial pad keys to enter the telephone number, and then press
6.
SELECT or PROG.
Press to move the cursor to the left or to the right.
•
Press CHAN/REMOVE to erase a digit.
•
Press REDIAL/PAUSE to insert a dialing pause (P will be displayed).
•
The screen displays DISTINCT RING? and the current setting.
7.
8. Press or to choose Y (yes) to customize this entry, or choose N (no) for
a normal ringer. If you choose Y, a will be displayed with the entry.
9. Press SELECT or PROG to conrm. You will hear a conrmation tone.
The entries stored in the speed dial memory will be numbered 01 through
•
09 and share the memory in the directory.
Press OFF at any time to exit speed dial mode.
•
If the location is not empty, the new entry will replace the old entry and the
•
old entry will be moved to a directory location.
Edit a speed dial entry
Press and hold the speed dial location key (1-9) of the desired entry when
1.
the handset is not in use.
When the screen displays the entry to edit, press
2.
SELECT and EDIT ashes.
Press SELECT. The screen displays the name and
3.
number. The cursor appears at the beginning of the
name. Use the dial pad keys to edit the name.
Press to move the cursor to the left or to the right.
•
Press CHAN/REMOVE to erase a character.
•
Press SELECT to move on to the phone number. Use the dial pad keys to
4.
edit the number.
Press to move the cursor to the left or to the right.
•
Press CHAN/REMOVE to erase a digit.
•
Press REDIAL/PAUSE to insert a dialing pause (P will be displayed).
•
Press SELECT. The screen displays DISTINCT RING? and the current setting.
5.
6. Press or to choose Y (yes) to customize this entry, or choose N (no)
for a normal ringer. If you choose Y, a will be displayed with the directory
entry.
7. Press SELECT to conrm. You will hear a conrmation tone.
SPEED EDIT DEL
8005959511
01
15
Page 19

Telephone operation
Delete a speed dial entry
Press and hold the speed dial location key (1-9) of
1.
the desired entry when the handset is not in use.
When the screen displays the desired entry, press
2.
SELECT. Then press or until DEL (delete)
ashes.
Press SELECT. The screen displays ERASE NO YES and the number. The
3.
current choice ashes.
Press until YES ashes.
4.
Press SELECT. You will hear a conrmation beep.
5.
Dial a speed dial number
Press and hold
1.
handset is not in use.
Press to dial the displayed number.
2.
a speed dial location key (1-9) of the desired entry when the
Reassign speed dial locations
Press and hold the speed dial location key (1-9) of the desired entry when
1.
the handset is not in use.
When the screen displays the desired entry, press
2.
SELECT. Press or until SPEED ashes.
Press SELECT. The screen displays ENTER 1-9.
3.
Press a key (1-9) to reassign this entry into another
4.
memory location. You will hear a conrmation beep.
About caller ID
The caller ID with call waiting feature in this telephone lets you see the name
and telephone number of the caller before answering the call, even when
already on a call. These features require services provided by your local
telephone service provider.
Contact your telephone service provider if:
you have both caller ID and call waiting, but as separate services (you may
•
need combined service),
you have only caller ID service, or only call waiting service, or
•
you do not subscribe to any caller ID or call waiting services but wish to try
•
these services.
You can use this telephone with regular caller ID service, and you can use its
other features without subscribing to either caller ID or combined caller ID with
call waiting service. There may be fees for these services, and these services
may not be available in all areas.
The caller ID features will work only if both you and the caller are in areas
offering caller ID service, and if both telephone companies use compatible
equipment.
16
SPEED EDIT DEL
8005959511
01
SPEED EDIT DEL
8005959511
01
Page 20

Telephone operation
Call log
Caller’s name
Caller’s telephone
number
VTECH
800-595-9511
NEW05
AM
6:10
Time of call
08/17
Date of call
New call log indicator
and location in the
call log
If you subscribe to caller ID service, information about each caller will be
displayed after the rst or second ring.
The call log can store up to 45 entries.
•
When the call log is full, the earliest entry will be deleted to make room for
•
new incoming call information.
CID EMPTY will be displayed if there is no record in the call log.
•
If you answer a call before the information appears on the screen, it will not
•
be stored in the call log.
The time on the handset screen is automatically set and updated with
•
incoming caller ID information if you subscribe to this ser vice.
Due to regional service differences, the caller ID information may not be
•
available for every incoming call. In addition, the callers may intentionally
block their names and/or telephone numbers.
Review the call log
Press / VOL-/CID to view the call log.
1.
Press or to scroll through the entries.
2.
There will be an error tone at the end of the call log list and the screen will
display END OF LIST.
If you have programmed a home area code (page 8), only the last seven
•
digits of the incoming phone numbers from that area code will be displayed
while reviewing the call log. Press # repeatedly to display all possible
dialing options.
17
Page 21

Telephone operation
Make call log entries ready to dial
Although the call log entries received have 10 digits (the
area code plus the seven-digit number), in some areas,
you may dial only the seven digits, or a 1 plus the seven
digits, or a 1 plus the area code plus the seven digits.
You can change the number of digits that you dial from
or store in the call log.
While reviewing the call log, press # repeatedly to
display different dialing options for local and long
distance numbers before dialing or saving the
telephone number in the directory. See the example on
the right.
You may also press 1 repeatedly to add or remove a
1 in front of the telephone number before dialing or
saving it in the directory. See the examples on the right.
When the number displayed is in the correct format for
dialing, press to call the number.
If you have programmed a home area code (page 8), only the last seven
•
digits of the incoming phone numbers from that area code will be displayed
while reviewing the call log. Press # repeatedly to display all possible
dialing options.
Dial a call log number
Press / VOL-/CID to enter the call log when the telephone is not in use.
1.
Press or to select the desired entry, then press .
2.
-OR-
1. Press /VOL-/CID to enter the call log when the telephone is not in use.
2. Press or to select the desired entry.
3. Press SELECT, then DIAL ashes.
4. Press or SELECT.
800-595-9511
1-800-595-9511
595-9511
1-595-9511
800-595-9511
1-800-595-9511
595-9511
1-595-9511
Save a call log entry to the directory
Press / VOL-/CID to enter the call log when the
1.
telephone is not in use.
Press or to select the desired entry. If you
2.
wish to change how the number is saved, press #
repeatedly until the desired option displays. See
the Make call log entries ready to dial section on
page 18.
Press SELECT, then press or until
3.
PROGRAM ashes.
Press SELECT again.
4.
18
800-595-9511
NEW28
5:40PM 12/30
DIAL PROGRAM
800-595-9511
NEW28
5:40PM 12/30
Page 22

Telephone operation
Save a call log entry to the directory (continued)
5. Enter or edit the name if necessary. See the Character chart on page 12.
Press to move the cursor to the left or to the right.
•
Press CHAN/REMOVE to erase a character.
•
Press SELECT to move on to the phone number.
6. Edit the number if necessary.
Press to move the cursor to the left or to the right.
•
Press CHAN/REMOVE to erase a digit.
•
Press REDIAL/PAUSE to insert a dialing pause (P will be displayed).
•
Press SELECT to continue.
7. Press or to choose Y (yes) to customize this
entry, or choose N (no) for a normal ringer. If you
choose Y, a will be displayed with the directory
entry.
8. Press SELECT to conrm. You will hear a conrmation tone.
Delete from the call log
Delete an entry:
Press / VOL-/CID to enter the call log when the telephone is not in use.
1.
Press or to select the entry to be deleted.
2.
Press CHAN/REMOVE. You will hear a conrmation beep.
3.
Delete all entries:
Press and hold CHAN/REMOVE when the telephone is not in use. The
1.
screen displays ERASE ALL? N Y. The current choice ashes.
Press until Y (yes) ashes.
2.
Press SELECT. You will hear a conrmation beep.
3.
DISTINCT RING? N
8005959511
Call log display screen messages
Displays: When:
PRIVATE NAME
PRIVATE NUMBER
PRIVATE CALLER
UNKNOWN NAME
UNKNOWN NUMBER
UNKNOWN CALLER
The caller is blocking the name information.
The caller is blocking the telephone number
information.
The caller is blocking the name and number
information.
This caller’s name is unavailable.
This caller’s number is unavailable.
No call information is available about this caller.
19
Page 23

Appendix
Handset display screen messages
Displays: When:
LOW BATTERY
CID EMPTY
CONNECTING...
DIRECTORY EMPTY
MEMORY FULL
XX MISSED CALLS
NEW VOICEMAIL
**PAGING**
PHONE
**RINGING**
RINGER OFF
SCANNING...
The battery needs to be recharged.
There are no call log entries.
The cordless handset is searching for the
telephone base.
There are no directory entries.
The directory is full.
There are unreviewed calls in the call log.
There are new voicemail message(s) from
the local telephone service provider.
The cordless handset locator has been
activated.
The handset is in use.
There is an incoming call.
The handset ringer is turned off.
The telephone base is searching for another
available channel.
20
Page 24

Appendix
Battery
After the battery is fully charged for 16 hours, you can expect the following
performance:
Operation Operating time
While in use (talking) Five hours
While not in use (standby*) Six days
*Handset is off the telephone base but not in use.
The battery needs charging when:
A new battery is installed in the handset.
•
The handset beeps when taken off the telephone base.
•
LOW BATTERY is displayed and the battery icon on the handset screen is ashing.
•
CAUTION:
Use only the battery(ies) provided or equivalent. To order a replacement, visit our
•
website at ww w.vtechphones.com or call 1 (800) 595-9511. In Canada, go to www.
vtechcanada.com or call 1 (800) 267-7377.
Do not dispose of the battery(ies) in a re. Check with local waste management codes
•
for special disposal instructions.
Do not open or mutilate the battery(ies).
•
Exercise care in handling batteries in order not to create a short circuit with
•
conductive materials such as rings, bracelets, and keys. The battery and/or conductor
may overheat and cause burns.
Charge the battery(ies) provided with or identied for use with this product only in
•
accordance with the instructions and limitations specied in this manual.
WARNING:
TO PREVENT FIRE OR SHOCK HAZARD, DO NOT EXPOSE THIS PRODUCT TO
WATER OR ANY TYPE OF MOISTURE.
21
Page 25

Appendix
Important safety instructions
When usi ng your telep hone equipment, basic safety pr ecautions should al ways be followe d to reduce t he risk of re,
electric shock a nd injury, including the followin g:
Read, und erstand , and follow all warnings a nd instructions mar ked on the pro duct and in t his manual .
1.
Unplug t his product from the wa ll outlet before cleani ng. Do not use l iquid or aerosol cleaners. Use a damp cloth
2.
for cleaning.
Do not use t his product near water (for example, near a b athtub, kit chen sink, or swimming p ool). Never spill
3.
liquid o f any kind on th e product .
Do not place this product on an unstable table, shelf, st and or other unstable su rfaces.
4.
Slots an d openings in the back or b ottom of the telephone base and han dset are prov ided for vent ilation. To
5.
protec t them from overheating, t hese openings must no t be blocked by placing th e product o n a soft sur face
such as a bed, sofa or rug. This prod uct shoul d never be plac ed near or over a ra diator or heat r egister. This
product should no t be placed in any area where p roper venti lation is no t provided.
This pro duct shou ld be operat ed only from t he type of p ower source i ndicated on the marki ng label. If yo u are
6.
not sure of t he type of power supply i n your home, co nsult your de aler or local power company.
Do not allow anythin g to rest on the p ower cord. Do n ot install t his produ ct where the cord may be wal ked on.
7.
Never push objects of any kind into t his product through t he slots in t he telepho ne base or han dset as they may
8.
touch dangerous vo ltage points or create a short circ uit that could result in a risk of re or el ectric shock.
To reduce the r isk of elec tric shoc k, do not dis assembl e this product, but take it to an author ized serv ice facility.
9.
Opening or removin g parts of th e telephon e base or hand set other th an speci ed access doors may exp ose
you to dang erous volt ages or other risks. Inc orrect reassembli ng can caus e electri c shock when the produ ct is
subseq uently used, or if the product exhi bits a distinct change in performance.
Do not overload wall out lets and ext ension cords as this can result in the risk of re or electric shock.
10.
Unplug t his product from the wa ll outlet and refer serv icing to an au thorized service facility u nder the fol lowing
11.
conditions:
When the p ower supply cord or plug i s damaged or f rayed.
A.
If the pro duct has be en exposed t o rain or water, or if li quid has been spilled o nto the prod uct.
B.
If the pro duct does not operate normally by fo llowing th e operatin g instruc tions. Adjust only tho se contro ls
C.
that are co vered by the op eration instructions. Impro per adjust ment of other c ontrols may result in damage
and often requires ex tensive wo rk by an author ized techn ician to res tore the product to normal operati on.
If the pro duct has be en droppe d and the tele phone base and/or hand set has been damaged.
D.
Avoid usin g a telephon e (other than cordless) dur ing an elec trical st orm. There is a remote risk of electri c shock
13.
fro m lightnin g.
Do not use t he telepho ne to repor t a gas leak in t he vicinity of the leak.
14.
Only put t he handset of your teleph one next to your ear when it is i n normal ta lk mode.
15.
The power adapter is intended to be co rrectly o riented in a ve rtical o r oor mount p osition. The prongs are not
16.
des igned to hold the plug in p lace if it is plugged int o a ceiling or a n under-the -table/c abinet out let.
SAVE THESE INSTRUCTIONS
22
Page 26

Appendix
Troubleshooting
If you have difculty with your telephone, please try the suggestions below. For
Customer Ser vice, visit our website at www.vtechphones.com, or call 1 (800) 595-9511;
in Canada, call 1 (800) 267-7377.
My telephone does not work at all.
Make sure the battery is installed and charged correctly (page 3). For optimum daily
•
performance, return the handset to the telephone base after use.
Make sure the power adapter is securely plugged into an outlet not controlled by a
•
wall switch.
Make sure the telephone line cord is plugged rmly into the telephone base and the
•
wall jack.
Unplug the unit’s electrical power. Wait for approximately 15 seconds, then plug it
•
back in. Allow up to one minute for the handset and telephone base to synchronize.
Charge the battery in the handset for at least 16 hours.
•
Remove and re-insert the battery. If that still does not work, it may be necessary to
•
purchase a new battery.
Disconnect the telephone base from the jack and plug in a working telephone. If this
•
telephone does not work, call the local telephone service provider.
LOW BATTERY is displayed on screen.
Place the handset in the telephone base for recharging.
•
Remove and re-install the battery and use it normally until fully depleted, then
•
recharge the handset in the telephone base for 16 hours.
If the above measures do not correct the problem, the battery may need to be
•
replaced.
The battery does not charge in the handset or the handset battery does not
accept charge.
Make sure the handset is placed in the telephone base correctly and the handset
•
CHARGE light on the handset is on.
Remove the battery from the handset and then re-install it in the handset. Put the
•
handset back to the telephone base and charge for 16 hours.
If the handset is in the telephone base but the handset CHARGE light is not on, see
•
The CHARGE light is off in this section.
It may be necessary to purchase a new battery. Please see the Battery section of this
•
user’s manual (page 21).
The telephone might be malfunctioning. Please see the Warranty section of this
•
user’s manual (page 29) for further instruction.
The CHARGE light is off.
Clean the charging contacts on the handset(s) and telephone base each month using
•
a pencil eraser or a dry non-abrasive fabric.
Make sure the power adapter and telephone line cords are plugged in correctly and
•
securely.
Unplug the power adapter. Wait for 15 seconds before plugging it back in. Allow up to
•
one minute for the handset and telephone base to reset.
The telephone might be malfunctioning. Please see the Warranty section of this
•
user’s manual (page 29) for further instruction.
23
Page 27

Appendix
Troubleshooting
The talk time and standby time of my handset is noticeably shorter than before.
Completely charge and drain the battery two or three times consecutively every three
•
months instead of returning the handset to the telephone base or charger after each
use. If the performance does not improve, please buy a new battery.
There is no dial tone.
First, try all the above suggestions.
•
Move the handset closer to the telephone base. It might be out of range.
•
The telephone line cord might be malfunctioning. Try installing a new telephone line
•
cord.
Disconnect the telephone base from the telephone jack and connect a different
•
telephone. If there is no dial tone on the other telephone either, contact your local
telephone service provider.
My handset displays CONNECTING...
Move the handset closer to the telephone base. You might have moved out of range.
•
The telephone does not ring when there is an incoming call.
Make sure the ringer is on (page 7).
•
Make sure the telephone line cord and power adapter are plugged in properly (page
•
2).
The handset may be too far from the telephone base. Move it closer to the telephone
•
base.
There may be too many extension telephones on the telephone line to allow all of
•
them to ring simultaneously. Try unplugging some of them.
If the other telephones in your home are having the same problem, contact the local
•
telephone service provider (charges may apply).
Other electronic products can cause interference to your cordless telephone. Try
•
installing your telephone as far away as possible from the following electronic
devices: wireless routers, radios, radio towers, pager towers, cellular telephones,
digital telephones, intercoms, room monitors, televisions, VCRs, personal computers,
kitchen appliances, and other cordless telephones.
Test a working telephone at the telephone jack. If another telephone has the same
•
problem, contact your local telephone service provider (charges may apply).
The telephone line cord might be malfunctioning. Try installing a new telephone line
•
cord.
Remove and re-insert the battery and place the handset in the telephone base.
•
Wait for the handset to synchronize with the telephone base. Allow up to one minute
•
for this to take place.
24
Page 28

Appendix
Troubleshooting
I cannot dial out.
First, try all the above suggestions.
•
Make sure there is a dial tone before dialing. It is normal if the handset takes a second
•
or two to synchronize with the telephone base before producing a dial tone. Wait an
extra second before dialing.
Make sure the telephone is set to the correct dial type (pulse dial or tone dial) for the
•
service in your area. See Dial mode on page 8 to set the dial type.
If the other telephones in your home are having the same problem, contact your local
•
telephone service provider (charges may apply).
Eliminate any background noise. If you cannot eliminate the background noise, rst try
•
muting the handset before dialing, or dialing from another room in your home with less
background noise.
There is noise or interference during a telephone conversation.
My calls cut in and out when I am using the cordless handset.
The handset may be out of range. Move it closer to the telephone base.
•
Appliances or other cordless telephones plugged into the same circuit as the
•
telephone base can cause interference. Try moving the appliance or telephone base
to another outlet.
Other electronic products can cause interference to your cordless telephone. Try
•
installing your telephone as far away as possible from the following electronic
devices: wireless routers, radios, radio towers, pager towers, cellular telephones,
digital telephones, intercoms, room monitors, televisions, VCRs, personal computers,
kitchen appliances, and other cordless telephones.
If your telephone is plugged in with a modem or a surge protector, plug the telephone
•
(or modem/surge protector) into a different location. If this doesn’t solve the problem,
re-locate your telephone or modem farther apart from each other, or use a different
surge protector.
The layout of your home or ofce might be limiting the operating range. Try moving
•
the telephone base to another location, preferably a higher location for better
reception.
Disconnect the telephone base from the telephone jack and plug in a corded
•
telephone. If calls are still not clear, contact the local telephone service provider
(charges may apply).
If the other telephones in your home are having the same problem, contact the local
•
telephone service provider (charges may apply).
If you subscribe to high-speed Internet service (Digital Subscriber Line - DSL) through
•
your telephone lines, you must install a DSL lter between the telephone base and
the telephone wall jack to prevent noise and caller ID problems caused by DSL
interference. Please contact your DSL service provider for more information about
DSL lters.
I hear other calls when using the telephone.
Disconnect the telephone base from the telephone jack. Plug in a different telephone.
•
If there are still other calls, call your local telephone service provider.
Press CHAN/REMOVE to switch to a clearer channel when on a call.
•
25
Page 29

Appendix
Troubleshooting
I hear noise in the handset, and none of the keys or buttons work.
Make sure the telephone line cord is plugged in securely.
•
Remove and re-insert the battery.
•
My caller ID features are not working properly.
Caller ID is a subscription service. You must subscribe to this service from your local
•
telephone service provider for this feature to work on your telephone.
The caller may not be calling from an area which supports caller ID.
•
Both you and the caller’s telephone companies must use equipment which are
•
compatible with caller ID service.
If you subscribe to high-speed Internet service (Digital Subscriber Line - DSL) through
•
your telephone lines, you must install a DSL lter between the telephone base and
the telephone wall jack to prevent noise and caller ID problems caused by DSL
interference. Please contact your DSL service provider for more information about
DSL lters.
The system does not receive caller ID, or the system does not display caller ID
during call waiting.
Make sure you subscribe to caller ID with call waiting features provided by the local
•
telephone service provider.
The caller may not be calling from an area which supports caller ID.
•
Both you and the caller’s telephone companies must use equipment compatible with
•
caller ID ser vice.
If you subscribe to high-speed Internet service (Digital Subscriber Line - DSL) through
•
your telephone lines, you must install a DSL lter between the telephone base and
the telephone wall jack to prevent noise and caller ID problems caused by DSL
interference. Please contact your DSL service provider for more information about
DSL lters.
Caller ID entries do not match the numbers I need to dial.
Although the call log entries you receive have 10 digits, (the area code plus the
•
seven-digit number,) in some areas, you may need to dial only seven digits, or a 1
plus the seven digits, or a 1 plus the area code plus the seven digits. You can change
the number of digits that you dial or store from the call log.
While reviewing the call log, press # repeatedly to display these dialing options for
•
local and long distance numbers before dialing or saving the telephone number.
26
Page 30

Appendix
Troubleshooting
My cordless handset beeps and is not performing normally.
Make sure the power cord is securely plugged into the telephone base. Plug the unit
•
into a different working electrical outlet not controlled by a wall switch.
Move the handset closer to the telephone base. It may be out of range.
•
Reset the telephone base by unplugging the unit’s electrical power. Wait for 15
•
seconds and plug it back in again. Allow up to one minute for the handset and the
telephone base to synchronize.
Other electronic products can cause interference to your cordless telephone. Try
•
installing your telephone as far away from these electronic devices as possible:
wireless routers, radios, radio towers, pager towers, cellular telephones, intercoms,
room monitors, televisions, personal computers, kitchen appliances and other
cordless telephones.
An 1 icon and NEW VOICEMAIL shows on the handset and the
VOICEMAIL light is ashing on the telephone base and I don’t know why.
Your telephone has voicemail indication feature. If the 1 icon and NEW VOICEMAIL
appear on the handset and the VOICEMAIL light is ashing on the telephone base,
your telephone has received a signal from your telephone service provider that you
have a voicemail message waiting for you to retrieve from them. Contact your telephone
service provider for more information on how to access your voicemail.
I cannot retrieve voicemail messages.
If you subscribe to voicemail service from your telephone service provider (charges may
apply), contact your telephone service provider for more information on how to access
your voicemail.
Common cure for electronic equipment
If the unit is not responding normally, try putting the handset in the telephone base. If
•
it does not respond, try the following (in the order listed):
Disconnect the power to the telephone base.
•
Disconnect the battery on the handset.
•
Wait a few minutes before connecting the power to the telephone base.
•
Re-install the batter y and place the handset in the telephone base.
•
Wait for the handset to synchronize with the telephone base. Allow up to one minute
•
for this to take place.
27
Page 31

Appendix
Operating range
This cordless telephone operates with the maximum power allowed by the Federal Communications Commission (FCC).
Even so, this handset and telephone base can communicate over only a certain distance, which can vary with the
locations of the telephone base and handset, the weather, and the layout of your home or ofce.
When the handset is out of range, the handset will display CONNECTING...
If there is a call while the handset is out of range, it might not ring, or if it does ring, the call might not connect well when
you press . Move closer to the telephone base, then press to answer the call.
If the handset moves out of range during a telephone conversation, there might be interference.
To improve reception, move closer to the telephone base.
Maintenance
Your cordless telepho ne contains sophist icated ele ctronic p arts and mu st be treated w ith care.
Place the handset down gently. Save th e original p acking materials to protect your tel ephone if yo u ever need to
ship it.
Your telepho ne can be damaged if it get s wet. Do not use t he handset outdoors i n the rain, or handle it wit h wet
hands. D o not instal l the teleph one base near a sink, bathtub or shower.
Electr ical storms can somet imes cause p ower surges h armful to el ectroni c equipmen t. For your own safety, take
cautio n when using e lectrical appliances duri ng storms.
Your telepho ne has a durab le plastic casing tha t should ret ain its luster for many years. Clean it onl y with a soft cloth
slight ly dampened with water or a m ild soap. Do n ot use excess water or cleaning solvent s of any kind.
Remember that electrical appliances can cause serious injury if used when you are wet or standing in the water. If the
telephone base should fall into the water, DO NOT RETRIEVE IT UNTIL YOU UNPLUG THE POWER CORD AND
TELEPHONE LINE CORD FROM THE WALL. Then pull the unit out by the unplugged cords.
About cordless telephones
Privacy: T here is a possibilit y that the cor dless telephone conversation s could be in tercepted by radio receiving
•
equipm ent within r ange of the c ordless handset. You shou ld not think o f cordles s telephon e conversat ions as
being as p rivate as tho se on corde d telephon es.
Elect rical Powe r: The telep hone base of this cordless telephone must be c onnecte d to a working e lectric al
•
outlet n ot be contro lled by a wall switch.
Potent ial TV int erference: To minimize o r prevent inter ference from cordl ess telephones, do not place the
•
telephone base of th e cordles s telephon e near or on top of a TV or VCR. Movi ng the cord less telep hone farther
away from th e TV or VCR will of ten reduc e or eliminate the inter ference.
Recha rgeabl e batter ies: This pr oduct co ntains eit her nickel -cadmiu m or nickel- metal hydride rechar geable
•
batter ies. Exercise care in ha ndling bat teries in or der not to create a short ci rcuit with conduct ing material such
as rings, bracelet s, and keys. The b attery or conduct or may overheat a nd cause har m. Obser ve proper polarity
betwee n the batter y and the battery charger.
Nickel -cadmium rech argeable batte ries: Dispose of thes e batterie s in a safe manner. Do not burn or pun cture
•
the battery.
28
Page 32

Appendix
Warranty
What do es this limited warranty cover ?
The manu facturer of t his VTech Prod uct warrants to the hold er of a valid pro of of purchase (“Consumer” or “ you”)
that the Pr oduct and a ll access ories prov ided in the s ales package (“Product”) ar e free from defects in material and
workma nship, purs uant to the following ter ms and cond itions, wh en installed and used n ormally an d in accord ance
with the Product op erating instructions. This limited warranty extends only to the C onsumer for Products p urchase d
and used i n the United S tates of Amer ica and Can ada.
What wil l VTech do if th e Product i s not free fr om defec ts in mate rials and wo rkmanship during th e limited
warran ty perio d (“Mate rially De fective P roduct ”)?
During t he limited warranty pe riod, VTech’s authorized service representative will repair or repla ce at VTech’s
option, without ch arge, a Mater ially Defective Produ ct. If we repair the Produ ct, we may use new or refurbi shed
replac ement par ts. If we choo se to replac e the Produ ct, we may repl ace it with a new or refurbi shed Produ ct of
the same o r similar de sign. We will re tain defec tive part s, modules, or equipment. Repair or replacem ent of the
Produc t, at VTech’s option, is your exclu sive remed y. VTech will return the repaired or replac ement Produ cts to you
in worki ng condit ion. You should expect the re pair or repla cement to ta ke approxim ately 30 days.
How long i s the limited warranty period?
The limi ted warrant y period fo r the Produc t extends for ONE (1) YEAR from the d ate of purchase. If VTech rep airs
or replaces a Materially Defective Produc t under the terms of this limited warranty, this limited warranty also app lies
to the repaired or repl acement Product for a period of eit her (a) 90 days from t he date the re paired or replacement
Produc t is shippe d to you or (b) the tim e remaining on the origi nal one-ye ar warrant y; whicheve r is longer.
What is not covered by t his limited warrant y?
This lim ited warranty does not c over:
1. Produ ct that has been subjec ted to misuse, accident, shippin g or other phys ical damage, improper installation,
abnorm al operati on or handli ng, neglect, inundation, re, wate r or other liquid intrusion; or
Product that has been damaged du e to repair, alteration or modication by anyone other than an autho rized
service repres entative of V Tech; or
3. Produ ct to the exte nt that the pr oblem experienced i s caused by signal conditions, net work reli ability, or cable or
antenna systems; or
4. Produ ct to the exte nt that the pr oblem is caused by use with non-VTech ac cessori es; or
5. Produ ct whose war ranty/quality stickers, product serial number plates or elect ronic serial number s have been
removed, altered or rendered ill egible; or
6. Produ ct purcha sed, used, s erviced, or shipp ed for repair f rom outside the United States of Ame rica or Canada,
or used for commercial or institutional pu rposes (including but not limited to Produc ts used for re ntal purposes);
or
7. Produ ct returne d without a va lid proof of p urchase (see item 2 below); or
8. Charg es for insta llation or se t up, adjustm ent of customer contro ls, and inst allation or repair of syst ems outsid e
the unit .
How do you get warranty servi ce?
To obtain warranty service in the United State s of America, please call 1 (800) 595 -9511. In Canada, plea se call
1 (800) 267-7377. NOTE: Befor e calling fo r servic e, please rev iew the user ’s manual - a che ck of the Prod uct’s
contro ls and featur es may save you a ser vice call.
Except a s provided by applica ble law, you assu me the risk of loss or dama ge during tr ansit and tr anspor tation and
are responsible fo r deliver y or handling charges in curred in the transpo rt of the Pro duct(s) to the service lo cation.
VTech will return repaired or replaced Produc t under thi s limited war ranty to you, transpor tation, d elivery or handling
charge s prepaid. V Tech assumes n o risk for dam age or loss of t he Produc t in transit . If the Produ ct failure i s not
covered by t his limite d warranty, or pr oof of purch ase does not meet the term s of this limi ted warrant y, VTech will
notif y you and will re quest that yo u authorize t he cost of re pair prior to a ny further repair acti vity. You must pay
for the co st of repair an d return shi pping cos ts for the rep air of Produc ts that are not covered by thi s limited war ranty.
What must you return with the Product to ge t warrant y servic e?
Return the entire ori ginal pack age and contents including the Product to the VTech servi ce locati on along with a
1.
description of the malfunction or dif culty; and
Includ e “valid pr oof of purchase” (sales r eceipt) identifyi ng the Produ ct purcha sed (Product model) an d the date
2.
of purch ase or receipt; and
Provide your name, com plete and co rrect mailing addres s, and telep hone number.
3.
29
Page 33

Appendix
Warranty
Other Limitati ons
This warr anty is the complete and exclusive agreement between you an d VTech. It supersedes all o ther writ ten or
oral com municati ons related to this Produ ct. VTech provides no oth er warranti es for this Pro duct. The warranty
exclusi vely descr ibes all of V Tech’s responsi bilities r egarding the Produc t. There are n o other express warranti es.
No one is authorized to m ake modic ations to th is limited warranty and you should no t rely on any suc h modic ation.
State/ Provincia l Law Rights: This warran ty gives you s pecic legal right s, and you may also have other ri ghts, whic h
vary fro m state to state or province to province.
Limitations: Impl ied warrant ies, including thos e of tness for a partic ular purpo se and merchantability (an unwritten
warrant y that the Pro duct is t fo r ordinar y use) are limited to one year fro m the date of purchase. Some states/
provinces do not all ow limitati ons on how long an implied warranty l asts, so the above limitation may not ap ply
to you. In no eve nt shall VTech b e liable for any indirect, special, inciden tal, consequential, or similar d amages
(inclu ding, but no t limited to lo st prots or r evenue, inab ility to us e the Produc t or other associated e quipment , the
cost of su bstitute e quipment , and claims by third par ties) resulting from the u se of this Product. Som e states/
provinces do not all ow the exclusion or limit ation of inc idental or c onseque ntial damages, so the ab ove limitat ion or
exclusi on may not appl y to you.
Please retain your original sales receipt as proof of
purchase.
30
Page 34

Appendix
FCC, ACTA and IC regulations
FCC Par t 15
This equipment has been tested and found to comply with the requirements for a Class B digita l device under
Part 15 of the Federal Communication s Commission (FCC) rules. Thes e requirements are intended to provide
reason able protection against harmful i nterfere nce in a residential ins tallatio n. This equipment generates, uses and
can radiate radio frequen cy e nergy and, if not installed and used in ac cordanc e wi th t he instructions, may cause
harmful interferenc e to radio communicati ons. However, t here i s no guarantee that interfer ence will not occur in a
parti cular installat ion. If this equipment d oes cause har mful interference to radio or tel evision reception, which ca n
be determined by turning the equip ment of f and on, the u ser is e ncouraged to tr y to correct t he inter ference by on e by turning t he equip ment of f and o n, the u ser is e ncouraged to tr y to correct the interferen ce by on eby turn ing the equipme nt off and on, the user is encouraged to try to correct the interf erence b y one
or more of the followin g measures:
Reorie nt or relocate the recei ving anten na.
•
Increa se the separ ation between the equi pment and receiver.
•
Connect the equipment into an outlet on a cir cuit different from t hat to which the receiver is connec ted.
•
Consul t the dealer o r an experienced radio /TV technician f or help.
•
Change s or modic ations to th is equ ipment not ex pressly approved by the party responsible for compliance could
void the u ser’s author ity to operate the equi pment.
This devic e complies with Par t 15 of the FCC rules. Op eration is subje ct to the following two cond itions: (1) this device
may not cause har mful inter ference, and (2) this device must acc ept any interference rece ived, inclu ding inter ference
that may cause undesi red operation. Privacy o f communi cations may n ot be ensured when using t his teleph one.
To ensure safety of us ers, the FCC has es tablished cr iteria for the amount of radio frequency energy that can b e
safely ab sorbed by a user or bystander ac cording to the intended usage of the pro duct. This product has been tested
and found to comply with th e FCC criteria . The handset may be safely held aga inst the ear of the us er. The telephon e
base sha ll be instal led and used s uch that par ts of the user’s body othe r than the hands are mainta ined at a distance
of appr oximately 20 cm (8 in ches) or mo re. If you c hoose to use a clipping device, ple ase make s ure to onl y use the
suppli ed VTech belt clip.
This Cla ss B digita l apparatus c omplies w ith Canadi an ICES-0 03.
FCC Par t 68 and ACTA
This equipment complies with Part 68 of the FCC rules and wit h technical req uirement s adopted by the Adminis trative
Council for Terminal Attac hments (ACTA). Th e label on the ba ck or bottom of this equipment contains, among ot her
things , a product identi er in the format US:AA AEQ##TX XXX. This ide ntier must be provi ded to your local telep hone
company upon reque st.
The p lug and jack used to con nect t his equipment to prem ises wi ring an d the telepho ne network must comp ly with
applic able Part 6 8 rules and tec hnical req uirement s adopted by ACTA. A comp liant telephone cord an d modular plug
is prov ided wi th this product. It is designe d to be connected to a compatib le modu lar jack that is also co mpliant. An
RJ11 jack should normally be used for connecting to a s ingle line and an RJ14 jack for two lines. See Installation
Instru ctions in t he user’s manual.
The Ringer Equivalence Number (REN) is used to determi ne how many devices you may connect to your tele phone
line and still have t hem ring when you are called. The REN for t his produ ct is enc oded as t he 6th and 7th chara cters
followi ng the US: in the pro duct i dentier (e.g., if ## is 03, th e REN i s 0.3). In most, but not all areas, the sum of al l
RENs shou ld be ve (5.0) or le ss. For more in formation, please co ntact your l ocal telephone company.
This equipm ent may not be used with Par ty Lines. If yo u have specially wired alarm dialing equipment connected
to your telephone line, ensure th e conne ction of this e quipment does no t disable your alarm equ ipment. If you have
questi ons about what will disa ble alarm equipment , consult your telephone company or a q ualied installer.
If this eq uipment is m alfunct ioning, it m ust be unplu gged from t he modular j ack until th e problem has been
corrected. Repai rs to this tel ephone equipment ca n only be made by the manufac turer or its authorized a gents. For
repair pr ocedure s, follow the instructions outlined under t he Limited War ranty.
If this equipment is causing harm to the telephone network , the telephone company may temp orarily dis continue your
telephone ser vice. Th e teleph one com pany is required to notif y you before interrupting servic e. If adva nce noti ce is
not pract ical, you will be notied as soo n as possible. You will be given the oppo rtunit y to correct th e problem and the
telephone comp any is required to inform you of your r ight to le a com plaint wi th the FC C. Your teleph one company
may make changes in its facilitie s, equipmen t, operation, or procedure s that could affect the proper functioning of thi s
product. The tele phone com pany is required to notif y you if such c hanges are p lanned.
If this product is eq uipped wi th a corded o r cordles s handset, i t is hearing a id compati ble.
If this product has m emory di aling loc ations, you may choose to st ore emerge ncy teleph one number s (e.g., police,
re, medi cal) in these locatio ns. If you do store or test emer gency num bers, please:
Remain on the line and briey explain the reason for the cal l before hang ing up.
Perfor m such acti vities in of f-peak ho urs, such a s early morn ing or late evening.
31
Page 35

Appendix
FCC, ACTA and IC regulations
Indust ry Canada
Operation is subject to the followin g two c onditio ns: (1) this device may not c ause harmful interferen ce, and (2) this
device m ust accep t any interfe rence, inc luding interferen ce that may cau se undesir ed operati on.
The term ‘ ’IC: ‘’ before the certication /registration numb er only signies that the Industr y Canada technical
speci cations were met.
The Ring er Equivale nce Number (REN) for this terminal equ ipment is 0.1. The REN is an i ndicatio n of the maximum
number of devices al lowed to be connected to a te lephone i nterface. The termina tion on an inte rface may c onsist
of any combination of d evices subject only t o the requir ement that the sum of the RENs of all the devi ces does not
exceed ve.
This pro duct meet s the applicable Industry Canada techni cal specication s.
The RBRC® seal
The RBRC® seal on th e nickel- cadmium battery in dicates th at VTech Communication s,
Inc. is vol untarily p artici pating in an in dustry p rogram to co llect and r ecycle th ese batter ies
at the end of their usefu l lives, when taken out of service wi thin the Uni ted States an d
Canada.
The RBRC® progra m provides a c onvenient alternative t o placing us ed nickel-cadmiu m
batter ies into the trash or municipal waste, w hich may be il legal in your area.
VTech’s participation in RBRC® makes it ea sy for you to drop o ff the spe nt batter y at local
retailers parti cipating i n the RBRC® progra m or at authorized VTech product serv ice
center s. Please call 1-80 0-8 -BATTE RYTM for infor mation on Ni -Cd battery recyc ling and
disposal bans/restricti ons in your are a. VTech’s involve ment in this program is part of its
commitment to prote cting our e nvironment and conserving nat ural resources.
RBRC® is a regi stered t rademark of Recha rgeable Batter y Recycling Corporation.
32
Page 36

Appendix
Technical specications
Frequency control Crystal controlled PLL synthesizer
Transmit frequency Handset: 5857.20-5865.90 MHz
Channels 30
Nominal effective range Maximum power allowed by FCC and IC.
Size Handset: 7.32in X 2.01in X 1.57in (186.0mm X
Weight Handset: 5.14oz (145.6g) (including battery)
Telephone base: 912.75-917.10MHz
Actual operating range may vary according to
environmental conditions at the time of use.
51.0mm X 40.0mm)
Telephone base: 4.33in X 5.34in X 3.78in (110.0mm
X 135.6mm X 96.0mm)
Telephone base: 5.26oz (149g)
Power requirements Handset: 3.6V 400mAh Ni-Cd battery
Memory Handset directory: 20 memory locations (9 speed
Telephone base: 7.5V AC @ 200mA
dial inclusive); up to 24 digits and
14 characters
Handset call log: 45 memory locations; up to 11
digits and 15 characters
33
Page 37

Appendix
Index
A
About caller ID 16
About cordless telephones 28
Answer calls 10
Appendix 20
B
Battery 21
Battery installation and charging 3
C
Call log 17
Call log display screen messages 19
Call waiting 10
Channel 10
Character chart 12
Charging 3
Clear voicemail 9
Copy a directory entry into speed dial 14
D
Date and time 7
Delete a directory entry 13
Delete a speed dial entry 16
Delete from the call log 19
Dial a call log number 18
Dial a number from the directory 14
Dial a speed dial number 16
Dial mode 8
Director y 11
DSL lter 2
E
Edit a directory entry 12
Edit a speed dial entry 15
End calls 10
F
FCC, ACTA and IC regulations 31
Find handset 11
H
Handset display screen messages 20
Handset layout 5
Home area code 8
I
Important safety instructions 22
Index 34
L
Language 9
M
Maintenance 28
Make call log entries ready to dial 18
Make calls 10
O
Operating range 28
P
Parts checklist 1
R
Reassign speed dial locations 16
Redial 11
Review the call log 17
Review the directory 12
Ringer 7
Ringer volume 7
S
Save a call log entry to the directory 18
Speed dial 14
Store a directory entry 11
Store a speed dial entry 14
G
Getting started 1
34
Page 38

Appendix
Index
T
Technical specications 33
Telephone base installation 2
Telephone base layout 6
Telephone operation 10
Telephone settings 7
Temporary tone dialing 10
The RBRC® seal 32
Troubleshooting 23
V
Volume 10
W
Wall bracket installation 3
Warranty 29
35
Page 39

VTECH TELECOMMUNICATIONS LTD.
A member of THE VTECH GROUP OF COMPANIES.
Distributed in the U.S.A. by VTech Communications, Inc. Beaverton, Oregon
Distributed in Canada by VTech Technologies Canada, Ltd., Richmond, B.C.
Copyright ©2008 for VTECH TELECOMMUNICATIONS LTD.
Printed in China.
91-001433-080-100
 Loading...