

Page 1

Models: CS2111
CS2112
CS2111-11
User’s manual
w w w . v t e c h p h o n e s . c o m
Page 2

Congratulations
on purchasing your new VTech product.
Before using this telephone, please read the
Important safety instructions
on page 34 of this manual.
This manual has all the feature operations and troubleshooting necessary to install
and operate your new VTech telephone. Please review this manual thoroughly to
ensure proper installation and operation of this innovative and feature rich VTech
product. For support, shopping, and everything new at VTech, visit our website at
www.vtechphones.com. In Canada, please visit www.vtechcanada.com.
The ENERGY STAR® program (www.energystar.gov) recognizes and encourages the
use of products that save energy and help protect our environment. We are proud to
mark this product with the ENERGY STAR® label indicating it meets the latest energy
efficiency guidelines.
i
Page 3

Table of contents
Getting started . . . . . . . . . . . . . . . . . 1
Parts checklist . . . . . . . . . . . . . . . . . . 1
Telephone base installation. . . . . . . . . . . . 2
Battery installation and charging . . . . . . . . . 3
Wall mounting. . . . . . . . . . . . . . . . . . . 4
Handset layout . . . . . . . . . . . . . . . . . . 5
Telephone base layout . . . . . . . . . . . . . . 6
Telephone settings . . . . . . . . . . . . . . . 7
Date and time . . . . . . . . . . . . . . . . . . . 7
Ringer. . . . . . . . . . . . . . . . . . . . . . . 8
Ringer volume . . . . . . . . . . . . . . . . . . 8
Dial mode . . . . . . . . . . . . . . . . . . . . . 9
Home area code . . . . . . . . . . . . . . . . . 9
Language . . . . . . . . . . . . . . . . . . . . . 10
Clear voicemail . . . . . . . . . . . . . . . . . . 11
Telephone operation . . . . . . . . . . . . . . 12
Make calls . . . . . . . . . . . . . . . . . . . . 12
Answer calls . . . . . . . . . . . . . . . . . . . 12
End calls . . . . . . . . . . . . . . . . . . . . . 12
Volume . . . . . . . . . . . . . . . . . . . . . . 12
Channel . . . . . . . . . . . . . . . . . . . . . . 12
Call waiting . . . . . . . . . . . . . . . . . . . . 13
Temporary tone dialing . . . . . . . . . . . . . . 13
Redial . . . . . . . . . . . . . . . . . . . . . . . 14
Find handset . . . . . . . . . . . . . . . . . . . 14
Directory . . . . . . . . . . . . . . . . . . . . . 15
Store a directory entry . . . . . . . . . . . . . . 15
Character chart . . . . . . . . . . . . . . . . . . 16
Review the directory . . . . . . . . . . . . . . . 17
Edit a directory entry . . . . . . . . . . . . . . . 18
Delete a directory entry . . . . . . . . . . . . . . 19
Copy a directory entry into speed dial . . . . . . 20
www.vtechphones.com
ii
Page 4

Table of contents
Dial a number from the directory . . . . . . . . . 20
Speed dial . . . . . . . . . . . . . . . . . . . . 21
Store a speed dial entry . . . . . . . . . . . . . 21
Edit a speed dial entry . . . . . . . . . . . . . . 22
Delete a speed dial entry . . . . . . . . . . . . . 23
Dial a speed dial number . . . . . . . . . . . . . 23
Reassign speed dial locations . . . . . . . . . . 24
About caller ID . . . . . . . . . . . . . . . . . . 25
Call log . . . . . . . . . . . . . . . . . . . . . . 26
Review the call log . . . . . . . . . . . . . . . . 27
Make a call log entry ready to dial . . . . . . . . 27
Dial a call log number. . . . . . . . . . . . . . . 28
Save a call log entry to the directory . . . . . . . 29
Delete from the call log . . . . . . . . . . . . . . 30
Call log display screen messages . . . . . . . . 31
Appendix . . . . . . . . . . . . . . . . . . . . . 32
Handset display screen messages . . . . . . . . 32
Battery . . . . . . . . . . . . . . . . . . . . . . 33
Important safety instructions . . . . . . . . . . . 34
Troubleshooting. . . . . . . . . . . . . . . . . . 35
Operating range . . . . . . . . . . . . . . . . . 44
Maintenance . . . . . . . . . . . . . . . . . . . 44
About cordless telephones . . . . . . . . . . . . 45
Warranty . . . . . . . . . . . . . . . . . . . . . 45
FCC, ACTA and IC regulations . . . . . . . . . . 47
The RBRC® seal . . . . . . . . . . . . . . . . . 48
Technical specications . . . . . . . . . . . . . 49
Index . . . . . . . . . . . . . . . . . . . . . . . 50
www.vtechphones.com
iii
Page 5
Getting started
F
I
N
D
H
A
N
D
S
E
T
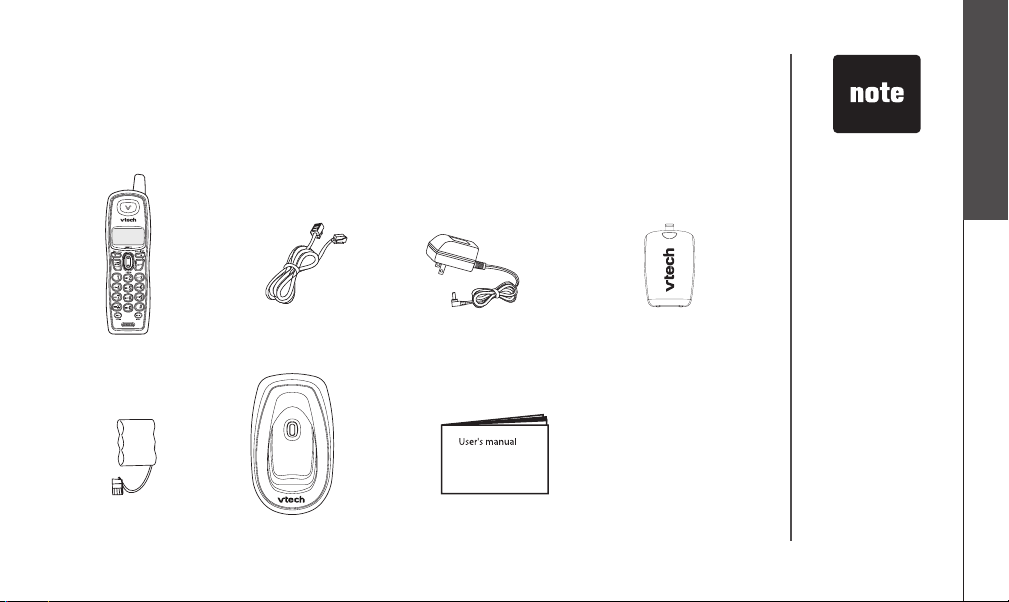
Parts checklist
Your telephone contains the following items. Save your sales receipt and original packaging
in case your telephone needs warranty service.
3. Telephone base
power adapter
7. User’s manual
www.vtechphones.com
4. Battery compartment
cover
1. Handset
5. Battery
2. Telephone line cord
6. Telephone base
To purchase
•
a replacement
battery or power
adapter, visit our
website at www.
vtechphones.
com or call
1 (800) 595-9511.
In Canada, go to
www.vtechcanada.
com or call 1 (800)
267-7377.
Getting started
1
Page 6
Getting started
Use only the power
•
adapter supplied with
this product. To order
a replacement, visit
our website at www.
vtechphones.com
or call 1 (800) 595-
9511. In Canada, go
to www.vtechcanada.
com or call 1 (800)
267-7377.
The power adapter
•
is intended to be
correctly oriented
in a vertical or oor
mount position.
The prongs are not
designed to hold the
plug in place if it is
plugged into a ceiling
or an under-thetable/cabinet outlet.
2
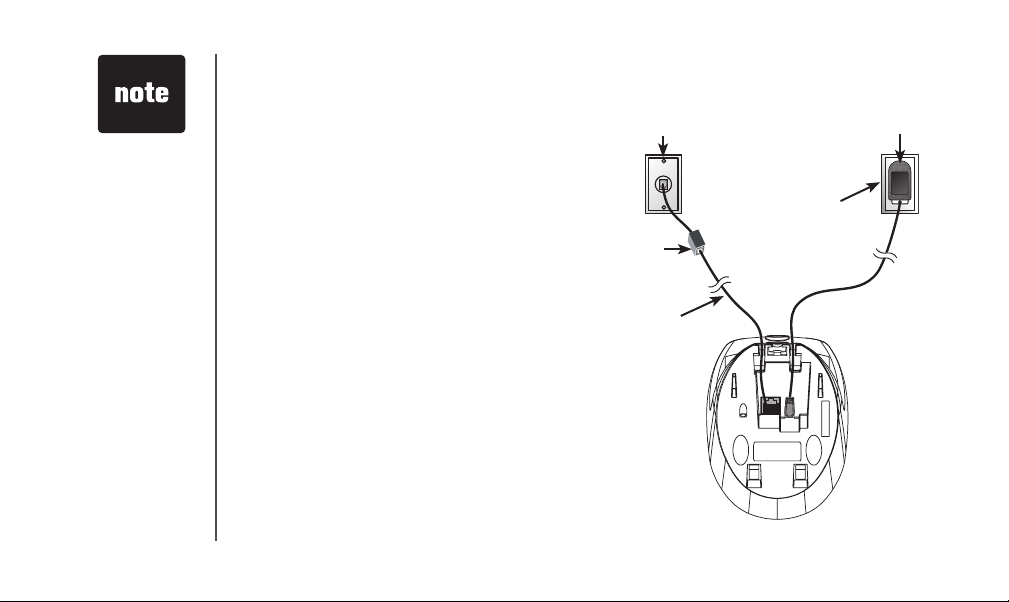
Telephone base installation
Install the telephone base as shown
below. Make sure that the electrical outlet
is not controlled by a wall switch. Also, if
you receive high speed internet through
your telephone line (commonly referred
to as DSL), you may need to install a DSL
lter to the telephone line between the
telephone base and the telephone wall
jack. Contact your DSL service provider
for more information about DSL lters.
www.vtechphones.com
Telephone
wall jack
DSL lter (not
included) for
DSL users
Telephone line
cord
Telephone base
power adapter
Electrical outlet
(not controlled by a
wall switch)
Telephone base
Page 7
Getting started
O
F
F
PRO
G
REDIAL
CHAN
DELETE
PAUSE
DEF
JKL
PQRS
WXYZ
OPER
TUV
MNO
TONE
ABC
V
O
L
/
C
I
D
S
E
L
E
C
T
VOL+
/
THIS SIDE UP
Battery Pack
BT-17233/BT-27233
3.6V 300mAh Ni-Cd
ARNING: DO NOT BURN OR
PUNCTURE BATTERIES
MADE IN CHINA
THIS SIDE UP
Battery Pack
BT-17233/BT-27233
3.6V 300mAh Ni-Cd
ARNING: DO NOT BURN OR
PUNCTURE BATTERIES
MADE IN CHINA
THIS SIDE UP
Battery Pack
BT-17233/BT-27233
3.6V 300mAh Ni-Cd
ARNING: DO NOT BURN OR
PUNCTURE BATTERIES
MADE IN CHINA
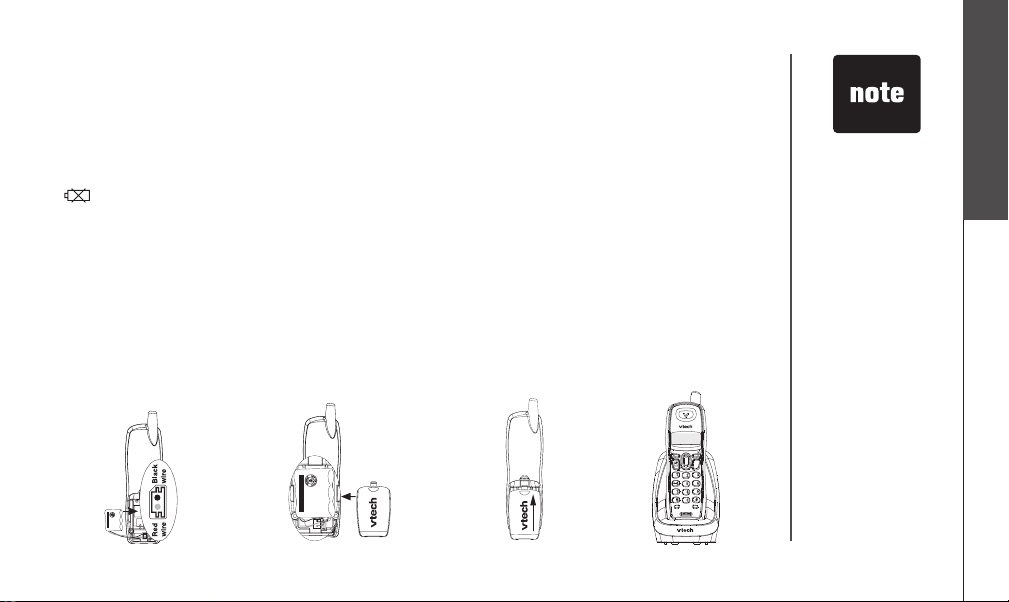
Battery installation and charging
Install the battery as shown below. The battery may have enough charge for short calls.
For best performance, charge the battery for at least 16 hours before use. When the
battery power is low, the handset will beep, LOW BATTERY and the low battery indicator
will be displayed on the handset screen. When fully charged, the handset battery
provides approximately three and a half hours of talk time or three and a half days of
standby time.
Insert the plug of the
1.
battery as indicated.
Make sure it is plugged
securely and matches
the color-coded label
insid e t h e b at tery
compartment.
Place the battery
2.
with the label THIS
SID E UP faci ng
up and the wires
inside the battery
compartment.
A l i g n t h e bat t e r y
3.
co mpa rtm ent c ov er
at against the battery
com par t men t , the n
slide it upwards until it
clicks into place.
www.vtechphones.com
Charg e the handset
4.
by pla cin g it in th e
telephone base and
CHARGING... wil l
be displaye d on t he
handset screen.
If the handset will
•
not be used for a
long period of time,
remove the battery
to prevent possible
leakage.
To purchase a
•
replacement battery,
visit our website at
www.vtechphones.
com or call
1 (800) 595-9511. In
Canada, go to w ww.
vtechcanada.com
or call 1 (800) 267-
7377.
Getting started
3
Page 8
Getting started
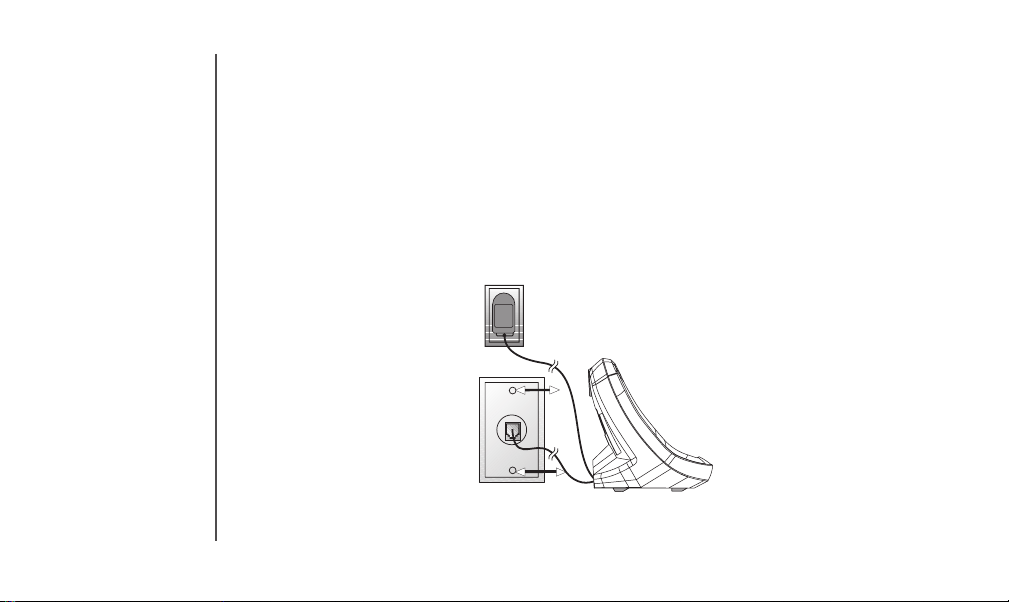
Wall mounting
Your telephone base is ready for desktop use. If you prefer to mount your telephone on
the wall (optional), it is designed to mount on a standard telephone wall plate.
You can mount the telephone base on the wall by positioning it so the mounting studs will
t into the corresponding holes on the telephone base. Slide the telephone base down
on the mounting studs until it locks into place.
4
www.vtechphones.com
Page 9
Getting started
Getting started
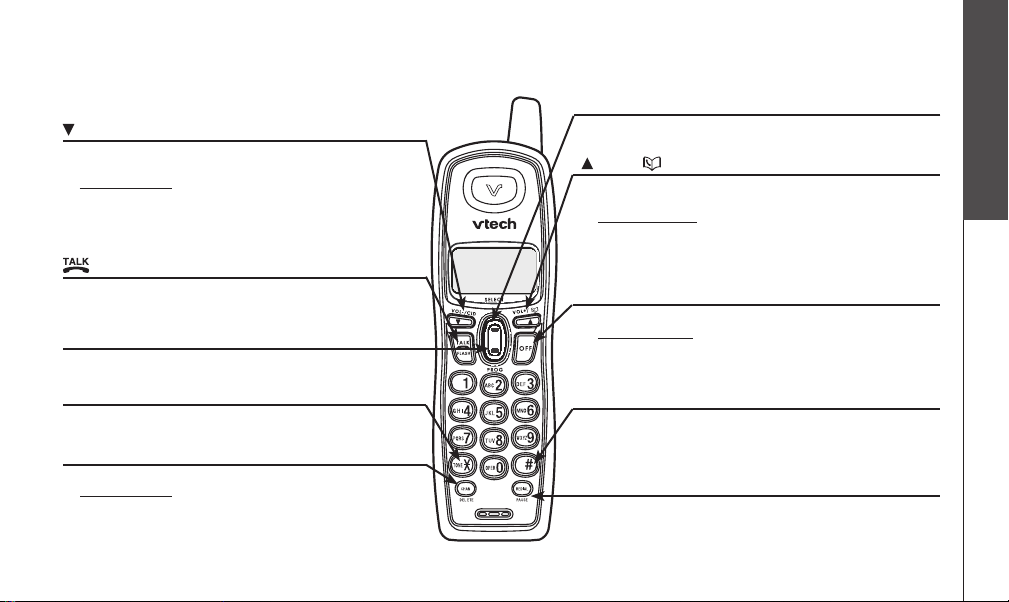
Handset layout
/VOL-/CID
• When the telephone is not in use, press to review the
call log.
• Press and hold to adjust the ringer volume when in idle
mode.
• During a call, press to decrease the listening volume.
A double beep will sound at the lowest setting.
• Press to scroll down while in programming mode.
/FLASH
• Press to make or answer a call.
• During a call, press to receive an incoming call when
you receive a call waiting alert.
PROG
• Press to enter programming mode while the telephone
is not in use.
TONE
*
• Press to switch to tone dialing temporarily when using
pulse (rotary) service (page 13).
CHAN/DELETE
• Switch to a clearer channel while on a call.
• Press and hold to delete all records in the call log when
in idle mode.
When reviewing the call log or redial list, press to
•
delete the displayed record.
www.vtechphones.com
SELECT
• Press to store a programming option or a directory
entry.
/VOL+/
• Press to display the directory when the telephone is
not in use.
• Press and hold to adjust the ringer volume when the
telephone is not in use.
• During a call, press to increase the listening volume.
A double beep will sound at the highest setting.
Press to scroll up while in programming mode.
•
OFF
• During a call, press to hang up.
• Press and hold for two seconds when the telephone is
not in use to erase the MISSED CALLS display.
• During programming, press to exit without making
changes.
#
• Press repeatedly to display other dialing options when
reviewing the call log (page 27).
• Press to enter the CLR VOICEMAIL submenu while in
the menu.
REDIAL/PAUSE
• Press repeatedly to review the redial list.
• While dialing or entering numbers into the directory,
press to insert a dialing pause.
5
Page 10
Getting started
F
I
N
D
H
A
N
D
S
E
T
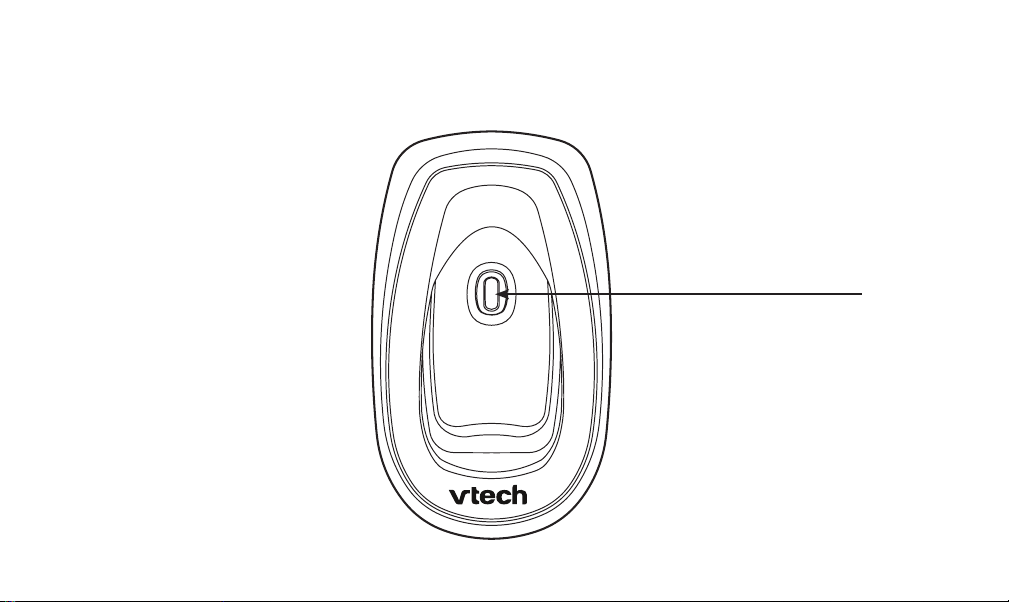
Telephone base layout
FIND HANDSET
Press to page the handset.
•
6
www.vtechphones.com
Page 11

Telephone settings
Date and time
If you subscribe to caller ID service, the date and time will be set automatically with the
next incoming call. If you do not have caller ID service, you can set the date and time
manually.
Press PROG when the handset is in idle mode.
1.
Press or until DATE/TIME is displayed. Press SELECT.
2.
When the hour is ashing, press or until the screen displays the correct hour and
3.
then press SELECT.
When the minute is ashing, press or until the screen displays the correct minute
4.
and then press SELECT.
When AM or PM is ashing, press or to choose AM or PM and then press
5.
SELECT.
When the month is ashing, press or until the screen displays the correct month
6.
and then press SELECT.
When the date is ashing, press or until the screen displays the correct date and
7.
then press SELECT.
You will hear a conrmation tone.
8.
www.vtechphones.com
In the event of a
•
power failure, the
time may need to be
reset.
Telephone settings
7
Page 12

If the ringer volume
•
is set to off,
RINGER OFF will be
displayed.
Even if the ringer
•
is set to off, the
handset will still ring
when you press
FIND HANDSET.
8
Telephone settings
Ringer
You can select from the different ringers.
Press PROG when the handset is in idle mode.
1.
Press or until the screen displays RINGER: and the current setting.
2.
Press SELECT. The current setting ashes, and you will hear a sample of the ringer.
3.
Press or to select RINGER: 1, 2, 3 or 4. You will hear a sample of each ringer.
4.
Press SELECT to conrm your selection. You will hear a conrmation tone.
5.
Ringer volume
You can change the ringer volume to a comfortable level or turn the ringer off.
Press and hold or until the screen displays RINGER VOL: and the current setting
1.
when the handset is in idle mode. You will hear a sample of the ringer volume.
-OR-
• Press PROG when the handset is in idle mode. Press or until the screen
displays RINGER VOL: and the current setting.
• PressPress SELECT. The current setting ashes, and you will hear a sample of the
ringer volume.
Press or to select ringer volume from OFF, LOW or HI. You will hear a sample of
2.
the selected volume level.
Press SELECT to conrm your selection. You will hear a conrmation tone.
3.
www.vtechphones.com
Page 13

Telephone settings
Dial mode
If you have touch tone service, the telephone is ready for use as soon as the battery is
charged. If you have pulse (rotary) service, you will need to change the dial mode.
Press PROG when the handset is in idle mode.
1.
Press or until the screen displays DIAL MODE: and the current setting.
2.
Press SELECT. The current setting ashes.
3.
Press or to select TONE or PULSE.
4.
Press SELECT to conrm your selection. You will hear a conrmation tone.
5.
Home area code
If you dial your local calls using only seven digits (no area code required), program your
home area code following the steps below. By programming your home area code, caller
ID will display only the phone number without area code when you receive calls from
callers in your local area.
Press PROG when the handset is in idle mode.
1.
Press or until the screen displays HOME AREA CODE.
2.
Press SELECT. The stored area code is displayed with the rst digit ashing.
3.
Use the dial key pad to enter the desired home area code.
4.
Press SELECT to conrm. You will hear a conrmation tone.
5.
www.vtechphones.com
If, in the future,
•
your phone ser vice
provider requires
you to dial the area
code when making
a local call, or you
want to cancel the
home area code
you have already
programmed,
reprogram your
home area code to
000.
Telephone settings
9
Page 14

Telephone settings
Language
Press PROG when the handset is in idle mode.
1.
Press or until LANGUAGE is displayed.
2.
Press SELECT. The current setting ashes.
3.
Press or until the screen displays the desired language (ENGLISH, ESPANOL
4.
or FRANCAIS).
Press SELECT to conrm your selection. You will hear a conrmation tone.
5.
10
www.vtechphones.com
Page 15

Telephone settings
Clear voicemail
If you subscrib e to voicemail services provi ded by your telephone company,
NEW VOICEMAIL will be displayed on the handset when you have new voicemail
messages. Please contact your local telephone company for more information about
voicemail service.
After reviewing all new messages, the NEW VOICEMAIL indicator will be turned off.
However, if the indicator remains on after you have listened to all new voicemail messages,
follow these steps to manually turn off the indicator:
Press PROG when the handset is in idle mode.
1.
Press or until the screen displays CLR VOICEMAIL, then press SELECT.
2.
- OR -
Press #.
The screen displays CLEAR? and the current setting ashes.
3.
Press or to select YES.
4.
Press SELECT to conrm your selection. You will hear a conrmation tone.
5.
www.vtechphones.com
The clear voicemail
•
feature only removes
the display
NEW VOICEMAIL
on the handset.
It does not delete
your voicemail
message(s).
Telephone settings
11
Page 16

The call timer will
•
be activated during
a call to show call
duration.
Telephone operation
Make calls
Press /FLASH and then use the dial pad keys to dial a number.
•
-OR-
Enter the phone number rst. Press to backspace and erase digits.
1.
Press /FLASH to dial.
2.
Answer calls
Press any dial pad keys (except /VOL-/CID, /VOL+/ and OFF) to answer an
•
incoming call.
End calls
Press OFF or put the handset back in the telephone base to end a call.
•
Volume
Press /VOL-/CID or /VOL+/ to adjust the listening volume during a conversation.
•
Channel
Press CHAN/DELETE to switch to a clearer channel while on a call.
•
12
www.vtechphones.com
Page 17

Telephone operation
Call waiting
If you subscribe to call waiting service and you are on a call when a new call comes in, you
will hear a beep. The caller ID information will be displayed if you subscribe to combined
caller ID with call waiting service from your local telephone company.
Press /FLASH on the handset to put the current call on hold and answer the
•
incoming call.
Press /FLASH at anytime to alternate between calls.
•
Temporary tone dialing
If you have pulse (rotary) service, you can change from pulse to touch tone dialing during
a call by pressing TONE*. This is useful if you need to send touch tone signals to access
telephone banking or long distance services.
Once you have initiated your call by dialing the phone number in pulse (rotary), press TONE*.
Now, all subsequent key presses will be sent as touch tone signals.
After you hang up, the phone will return to pulse (rotary) dialing for the next call.
Telephone operation
www.vtechphones.com
13
Page 18

F
I
N
D
H
A
N
D
S
E
T
F
I
N
D
H
A
N
D
S
E
T
14
Telephone operation
Redial
The telephone stores the ve most recently dialed telephone numbers on the redial list.
•
When the list is full, the oldest entry is deleted to make room for the new entry.
Press REDIAL/PAUSE repeatedly to review the redial list. Press CHAN/DELETE to
•
delete the displayed number.
Press /FLASH, then press REDIAL/PAUSE to dial the last telephone number
•
dialed.
-OR-
Press REDIAL/PAUSE repeatedly until the desired entry displays, then press /FLASH
to dial the number.
Find handset
Press FIND HANDSET on the telephone base to locate the handset when the telephone
•
is not in use. The handset will ring and **PAGING** will be displayed on its screen.
Press FIND HANDSET again or put the handset back in the telephone base to stop
•
the paging tone.
-OR-
Press OFF on the handset.
www.vtechphones.com
Page 19

Telephone operation
Directory
The directory can store up to 10 entries (including nine speed dial entries). Each entry
may consist of a number up to 24 digits and a name up to 14 characters.
Store a directory entry
Press PROG when in idle mode. The screen displays DIRECTORY.
1.
Press SELECT. The screen displays ENTER NAME.
2.
Use the dial pad keys to enter the name. See the Character chart on page 16.
3.
Press to backspace and erase.
•
Press to advance.
•
When nished, press SELECT or PROG. The screen displays ENTER NUMBER.
4.
Use the dial pad keys to enter the telephone number.
5.
Press to backspace and erase.
•
Press REDIAL/PAUSE to insert a dialing pause (P will be displayed).
•
Press SELECT or PROG. The screen displays DISTINCT RING? and the current
6.
setting.
Press or to choose Y (yes) if you wish to customize this entry or choose N (no) for
7.
a normal ringer. If you choose Y, a will be displayed with the directory entry.
Press SELECT or PROG to conrm and you will hear a conrmation tone.
8.
www.vtechphones.com
Telephone operation
15
Page 20

• When you reach the
end of the list in the
directory, END OF
LIST will be shown
on the screen and
there will be a double
beep.
• If you press a
dial pad key for
alphabetical search
while in the directory
and there are no
entries starting with
the letters of that
key, NO DATA will
be displayed on the
screen.
Telephone operation
Character chart
Use the dial pad keys and the chart below to enter a name (up to 14 characters). An error
tone will sound if you try to enter more than 14 characters. Each press of a particular key
causes the characters to be displayed in the following order:
Dial ke y
1 1
2 A B C 2
3 D E F 3
4 G H I 4
5 J K L 5
6 M N O 6
7 P Q R S 7
8 T U V 8
9 W X Y Z 9
0 0
*
# &
Charact ers by numb er of key p resses
1 2 3 4 5 6
*
,
, - . #
16
www.vtechphones.com
Page 21

Telephone operation
Review the directory
Press /VOL+/ when in idle mode. The screen displays DIRECTORY.
1.
Press or to scroll through the entries stored in the directory alphabetically.
2.
- OR -
Press the dial pad key for the rst letter of the name you want to search. If necessary,
scroll or to nd the desired entry.
Telephone operation
www.vtechphones.com
17
Page 22

18
Telephone operation
Edit a directory entry
Press /VOL+/ when in idle mode. The screen displays DIRECTORY.
1.
Press or to scroll through the entries stored in the directory alphabetically.
2.
- OR -
Press the dial pad key for the rst letter of the entry you want to edit. If necessary,
scroll or to nd the desired entry.
When the screen displays the desired entry, press SELECT.
3.
Then press or until EDIT ashes.
Press SELECT. The screen displays the name and number.
4.
The cursor appears at the end of the name.
• Use the dial pad keys to edit the name.
• Press to backspace and erase.
• Press to advance.
Press SELECT to move on to the phone number.
5.
• Use the dial pad keys to edit the number.
• Press to backspace and erase.
• Press REDIAL/PAUSE to insert a dialing pause (P will be displayed).
Press SELECT. The screen displays DISTINCT RING? and the current setting.
6.
Press or to choose Y (yes) if you wish to customize this entry, or choose N (no) for
7.
a normal ringer. If you choose Y, a will be displayed with the directory entry.
Press SELECT to conrm and you will hear a conrmation tone.
8.
www.vtechphones.com
SPEED EDIT DEL
8005959511
Page 23

Telephone operation
Delete a directory entry
Press /VOL+/ when in idle mode. The screen displays DIRECTORY.
1.
Press or to scroll through the entries stored in the directory alphabetically.
2.
- OR -
Press the dial pad key for the rst letter of the entry you want to delete. If necessary,
scroll or to nd the desired entry.
When the screen displays the desired entry, press SELECT. Then press or until
3.
DEL (delete) ashes.
Press SELECT. The screen displays ERASE NO YES and the
4.
number. The current choice ashes.
Press until YES ashes.
5.
Press SELECT. You will hear a conrmation beep.
6.
SPEED EDIT DEL
8005959511
Telephone operation
www.vtechphones.com
19
Page 24

20
Telephone operation
Copy a directory entry into speed dial
Press /VOL+/ when in idle mode. The screen displays DIRECTORY.
1.
Press or to scroll through the entries stored in the directory alphabetically.
2.
- OR -
Press the dial pad key for the rst letter of the entry you want to copy. If necessary,
scroll or to nd the desired entry.
When the screen displays the desired entry, press SELECT.
3.
Then press or until SPEED ashes.
Press SELECT. The screen displays ENTER 1-9.
4.
Press a key (1-9) to copy this entry from the directory to the speed dial memory and
5.
assign the memory location. You will hear a conrmation beep. A memory location
number (01 through 09) will be displayed with this entry.
Dial a number from the directory
Press /VOL+/ when in idle mode. The screen displays DIRECTORY.
1.
Press or to scroll through the entries stored in the directory alphabetically.
2.
- OR -
Press the dial pad key for the rst letter of the desired entry. If necessary, scroll or
to nd the desired entry.
When the screen displays the desired entry, press /FLASH.
3.
www.vtechphones.com
SPEED EDIT DEL
8005959511
Page 25

Telephone operation
Speed dial
Your telephone can store up to nine telephone numbers with names (up to 14 characters
and 24 digits in each location) in designated speed dial memory locations.
Store a speed dial entry
Press PROG when the handset is in idle mode and then press or until the screen
1.
displays SPEED DIAL.
Press SELECT. The screen displays ENTER 1-9.
2.
Press a key (1 through 9) to assign the speed dial location where this number will be
3.
stored. The screen displays ENTER NAME.
Use the dial pad keys to enter the name (see the Character chart on page 16) and
4.
then press SELECT or PROG .
Press to backspace and erase.
•
Press to advance.
•
The screen displays ENTER NUMBER.
5.
Use the dial pad keys to enter the telephone number, and then press SELECT or
6.
PROG.
Press to backspace and erase.
•
Press REDIAL/PAUSE to insert a dialing pause (P will be displayed).
•
The screen displays DISTINCT RING? and the current setting.
7.
www.vtechphones.com
The entries stored
•
in the speed dial
memory will be
numbered 01
through 09 and
share the memory
in the directory.
Press OFF at any
•
time to exit speed
dial mode.
If the location is
•
not empty, the new
entry will replace
the old entr y and
the old entr y will
be moved to a
director y location.
Telephone operation
21
Page 26

Telephone operation
Press or to choose Y (yes) if you wish to customize this entry, or choose N (no)
8.
for a normal ringer. If you choose Y, a will be displayed with the entry
Press SELECT or PROG to conrm. You will hear a conrmation tone.
9.
Edit a speed dial entry
Press and hold the speed dial location key (1-9) of the desired entry when the handset
1.
is in idle mode.
When the screen displays the entry you want to edit, press
2.
SELECT. Then press or until EDIT ashes.
Press SELECT. The screen displays the name and number.
3.
The cursor appears at the end of the name. Use the dial pad
keys to edit the name.
Press to backspace and erase.
•
Press to advance.
•
Press SELECT to move on to the phone number. Use the dial pad keys to edit
4.
the number.
Press to backspace and erase.
•
Press REDIAL/PAUSE to insert a dialing pause (P will be displayed).
•
Press SELECT. The screen displays DISTINCT RING? and the current setting.
5.
SPEED EDIT DEL
8005959511
01
22
www.vtechphones.com
Page 27

Telephone operation
Press or to choose Y (yes) if you wish to customize this entry, or choose N (no) for
6.
a normal ringer. If you choose Y, a will be displayed with the directory entry.
Press SELECT to conrm. You will hear a conrmation tone.
7.
Delete a speed dial entry
Press and hold the speed dial location key (1-9) of the desired entry when the handset
1.
is in idle mode.
When the screen displays the desired entry, press SELECT.
2.
Then press or until DEL (delete) ashes.
Press SELECT. The screen displays ERASE NO YES and the
3.
number. The current choice ashes.
Press until YES ashes.
4.
Press SELECT. You will hear a conrmation beep.
5.
Dial a speed dial number
Press and hold a speed dial location key (1-9) representing the desired entry when
1.
the handset is in idle mode.
Press /FLASH to dial the displayed number.
2.
SPEED EDIT DEL
8005959511
Telephone operation
01
www.vtechphones.com
23
Page 28

Telephone operation
Reassign speed dial locations
Press and hold the speed dial location key (1-9) of the desired entry when the handset
1.
is in idle mode.
When the screen displays the desired entry, press SELECT.
2.
Press or until SPEED ashes.
Press SELECT. The screen displays ENTER 1-9.
3.
Press a key (1-9) to reassign this entry into another speed
4.
dial location. You will hear a conrmation beep.
SPEED EDIT DEL
8005959511
01
24
www.vtechphones.com
Page 29

Telephone operation
About caller ID
The caller ID with call waiting feature in this telephone lets you see the name and telephone
number of the caller before answering the call, even while you are on a call. These features
require services provided by your local telephone company.
Contact your telephone company if:
you have both caller ID and call waiting, but as separate services (you may need
•
combined service),
you have only caller ID service, or only call waiting service, or
•
you do not subscribe to any caller ID or call waiting services but wish to try them.
•
You can use this telephone with regular caller ID service, and you can use its other features
without subscribing to either caller ID or combined caller ID with call waiting service. There
may be fees for these services, and they may not be available in all areas.
The caller ID features will work only if both you and the caller are in areas offering caller
ID service, and if both telephone companies use compatible equipment.
Telephone operation
www.vtechphones.com
25
Page 30

If you answer a call
•
before the information
appears on the
screen, it will not be
stored in the call log.
The time on the
•
handset screen is
automatically set and
updated with incoming
caller ID information if
you subscribe to this
service.
Due to regional
•
service differences,
the caller ID
information may not
be available for ever y
incoming call. In
addition, the callers
may intentionally block
their names and/or
telephone numbers.
26
Telephone operation
Call log
Caller’s name
If you subscribe to caller ID service, information about each caller will be displayed after
the rst or second ring.
The call log can store up to 30 entries.
•
When the call log is full, the earliest entry will be deleted to make room for new incoming
•
call information.
CID EMPTY will be displayed if there is no record in the call log.
•
VTECH
6:10
AM
08/17
Date of callTime of call
www.vtechphones.com
18005959511
NEW
05
Call e r ’s tele p h one
number
New call log indicator and
location in the call log
Page 31

Telephone operation
Review the call log
Press /VOL-/CID to view the call log when the handset is in idle mode.
1.
Press or to scroll through the entries.
2.
There will be an error tone when you reach the end of the call log list and the screen will
display END OF LIST.
Make a call log entry ready to dial
Although the call log entries received have 10 digits (the area code plus the seven-digit
number), in some areas, you may need to dial only seven digits, or a 1 plus the seven
digits, or a 1 plus the area code plus the seven digits. You can change the number of
digits that you dial or store from the call log.
While reviewing the call log, press # repeatedly to display these dialing options for local
and long distance numbers before dialing or saving the telephone number. See the
example on the right.
8005959511
18005959511
5959511
15959511
If you have
•
programmed a
home area code
(page 9), only the
last seven digits
of the incoming
phone numbers
from that area code
will be displayed
or dialed. Press #
repeatedly to display
all possible dialing
options.
Telephone operation
www.vtechphones.com
27
Page 32

Telephone operation
Dial a call log number
Press /VOL-/CID to enter the call log when the handset is in idle mode.
1.
Press or to select the desired entry, then press /FLASH.
2.
-OR-
Press /VOL-/CID to enter the call log when the handset is in idle mode.
1.
Press or to select the desired entry.
2.
Press SELECT. DIAL ashes.
3.
Press SELECT to dial.
4.
28
www.vtechphones.com
Page 33

Telephone operation
Save a call log entry to the directory
Press /VOL-/CID to enter the call log when the handset is in idle mode.
1.
Press or to select the desired entry. If you wish to change
2.
how the number is saved, press # repeatedly until the desired
option displays. See the Make a call log entry ready to dial
section on page 27.
Press SELECT, then press or until PROGRAM ashes.
3.
Press SELECT again.
4.
Enter or edit the name if necessary. See the Character chart
5.
on page 15.
Press to backspace and erase.
•
Press to advance.
•
Press SELECT to move on to the phone number.
Edit the number if necessary.
6.
Press to backspace and erase.
•
Press REDIAL/PAUSE to insert a dialing pause (P will be displayed).
•
Press SELECT to continue.
Press or to choose Y (yes) if you wish to customize this entry, or choose N (no) for
7.
a normal ringer. If you choose Y, a will be displayed with the directory entry.
Press SELECT to conrm. You will hear a conrmation tone.
8.
www.vtechphones.com
5:40PM 12/30
DIAL PROGRAM
5:40PM 12/30
DISTINCT RING? N
8005959511
8005959511
NEW
8005959511
NEW
28
Telephone operation
28
29
Page 34

Telephone operation
Delete from the call log
Delete an entry:
Press /VOL-/CID to enter the call log when the handset is in idle mode.
1.
Press or to select the entry to be deleted.
2.
Press CHAN/DELETE. You will hear a conrmation beep.
3.
Delete all entries:
Press and hold CHAN/DELETE when the handset is in idle mode. The screen displays
1.
ERASE ALL N Y. The current choice ashes.
Press until Y (yes) ashes.
2.
Press SELECT. You will hear a conrmation beep.
3.
30
www.vtechphones.com
Page 35

Telephone operation
Call log display screen messages
Displays: When
PRIVATE NAME
PRIVATE NUMBER
PRIVATE CALLER
UNKNOWN NAME
UNKNOWN NUMBER
UNKNOWN CALLER
The caller is blocking the name information.
The caller is blocking the telephone number information.
The caller is blocking the name and number information.
This caller’s name is unavailable
This caller’s number is unavailable.
No call information is available about this caller.
:
www.vtechphones.com
Telephone operation
.
31
Page 36

Handset display screen messages
Displays
LOW BATTERY
CHARGING...
CID EMPTY
CONNECTING...
DIRECTORY EMPTY
MEMORY FULL
XX MISSED CALLS
NEW VOICEMAIL
**PAGING**
PHONE
REDIAL EMPTY
**RINGING**
RINGER OFF
SCANNING...
:
32
When
:
The battery needs to be recharged.
The handset is in the telephone base and charging.
There are no call log entries.
The cordless handset is searching for the telephone base.
There are no directory entries.
The directory is full.
There are unreviewed calls in the call log.
There are new voice mail message(s) from the local telephone company.
The cordless handset locator has been activated.
The handset is in use.
There are no phone numbers in redial memory.
There is an incoming call.
The handset ringer is turned off.
The telephone base is searching for another available channel.
www.vtechphones.com
Page 37

Battery
After the battery is fully charged for 16 hours, you can expect the following performance:
Operation Operating time
While in use (talking) 3.5 hours
While not in use (standby*) 3.5 days
*Handset is off the telephone base but not in use.
The battery needs charging when:
A new battery is installed in the handset.
•
The handset beeps.
•
LOW BATTERY and the battery low indicator are displayed on the handset screen.
•
CAUTION:
To reduce the risk of re or injury, read and follow these instructions:
Use only the battery provided or equivalent. To order a replacement, visit our website at www.vtechphones.com or call 1 (800) 595-9511.
•
In Canada, go to www.vtechcanada.com or call 1 (800) 267-7377.
Do not dispose of the battery(ies) in a re. Check with local waste management codes for special disposal instructions.
•
Do not open or mutilate the battery(ies). Released electrolyte is corrosive and may cause burns or injury to the eyes or skin. The
•
electrolyte may be toxic if swallowed.
Exercise care in handling batteries in order not to create a short circuit with conductive materials such as rings, bracelets, and keys.
•
The battery and/or conductor may overheat and cause burns.
Charge the battery provided with or identied for use with this product only in accordance with the instructions and limitations specied
•
in this manual.
WARNING:
TO PREVENT FIRE OR SHOCK HAZARD, DO NOT EXPOSE THIS PRODUCT TO WATER OR ANY TYPE OF MOISTURE.
www.vtechphones.com
Appendix
33
Page 38

Important safety instructions
When usi ng your telep hone equipment, basic safety pr ecautions should al ways be followe d to reduce t he risk of re, e lectric shock and injury, inclu ding the following:
Read and un derstan d all instructions.
1.
Follow all warnings and instruc tions mar ked on the product.
2.
Unplug t his product from the wa ll outlet before cleani ng. Do not use l iquid or aerosol cleaners. Use a damp cloth for c leaning.
3.
Do not use t his product near water (for example, near a bathtub, kit chen sink, or swimming p ool).
4.
Do not place this product on an unstable table, shelf, st and or other unstable su rfaces.
5.
Slots and open ings in the back or bottom of the teleph one base and handset are provided for ventilati on. To pr otect them from overhe ating, these ope nings must not be
6.
blocke d by placing t he produc t on a soft sur face such as a bed, sofa or r ug. This product sho uld never be pl aced near or ove r a radiator or heat register. This produc t
should n ot be placed in any area wher e proper vent ilation is n ot provide d.
This produ ct should be operated only from the type of power sourc e indicated on the marking label. If you are not sure of the type of power supply in your home, con sult
7.
your deal er or local p ower company.
Do not allow anythin g to rest on the p ower cord. Do not install this produ ct where th e cord may be wal ked on.
8.
Never push objects of any kind into this product throu gh the slots in the telep hone base or hands et because they may touch dangerou s voltage points or create a short
9.
circui t. Never spil l liquid of any kind on the pr oduct.
To reduce th e risk of el ectric s hock, do not disassemble th is produc t, but take it to an auth orized ser vice facility. Ope ning or rem oving par ts of the te lephone b ase or
10.
handse t other tha n speci ed acces s doors may expose you to danger ous voltag es or other risks. In correct reassembling can cause ele ctric shock when t he produ ct
is subse quently used.
Do not overload wall out lets and ext ension cor ds.
11.
Unplug t his product from the wa ll outlet an d refer serv icing to an au thorized s ervice f acility u nder the fol lowing con ditions:
12.
When the p ower supply cord or plug i s damaged or f rayed.
A.
If liqui d has been spilled onto th e product.
B.
If the pro duct has be en exposed t o rain or water.
C.
If the produc t does not operate norm ally by following the operating inst ruction s. Adjust only thos e controls that are covered by the operation ins tructio ns. Improper
D.
adjust ment of other c ontrols m ay result in da mage and often require s extensive w ork by an autho rized tech nician to re store the product to nor mal operat ion.
If the pro duct has be en droppe d and the tele phone base and/or hand set has been damaged.
E.
If the pro duct exhib its a distinct chang e in perfor mance.
F.
Avoid usin g a telephon e (other than cordless) dur ing an elec trical st orm. There is a remote risk of electric shock from lightning.
13.
Do not use t he telepho ne to repor t a gas leak in t he vicinity of the leak.
14.
Only put t he handset of your teleph one next to your ear when it is i n normal ta lk mode.
15.
The power adapter is intended to be co rrectly o riented in a ve rtical o r oor mount p osition. The prongs are not designed to hold th e plug in plac e if it is plug ged into
16.
a ceiling or an under-the-t able/cab inet outlet.
SAVE THESE INSTRUCTIONS
34
www.vtechphones.com
Page 39

Troubleshooting
If you have difculty with your telephone, please try the suggestions below. For Customer Service, visit our
website at www.vtechphones.com, or call 1 (800) 595-9511; in Canada, call 1 (800) 267-7377.
Problem Suggestion
My tele phone does not
work at all.
LOW BATTERY is
displayed on screen.
Make sure the battery is installed and charged correctly (page 3). For optimum daily performance, return
•
the handset to the telephone base after use.
Make sure the power adapter is securely plugged into an outlet not controlled by a wall switch.
•
Make sure the telephone line cord is plugged rmly into the telephone base and the wall jack.
•
Unplug the unit’s electrical power. Wait for approximately 15 seconds, then plug it back in. Allow up to
•
one minute for the handset and telephone base to synchronize.
Charge the battery in the handset for at least 16 hours.
•
Remove and re-inser t the battery. If that still does not work, it may be necessary to purchase a new
•
battery.
Disconnect the telephone base from the jack and plug in a working telephone. If this telephone does not
•
work, the problem is probably in the wiring or the local service. Call the local telephone company.
Place the handset in the telephone base for recharging.
•
Remove and re-install the battery and use it normally until fully depleted, then recharge the handset in
•
the telephone base for 16 hours.
If the above measures do not correct the problem, the battery may need to be replaced.
•
Appendix
www.vtechphones.com
35
Page 40

Troubleshooting
Problem Suggestion
The battery does not
charge in the handset or
the handset battery does
not accept charge.
There is no dial tone. First, try all the above suggestions.
My ha n d s e t displ a y s
CONNECTING...
Make sure the handset is placed in the telephone base correctly.
•
Remove the battery from the handset and then re-install it in the handset. Put the handset back to the
•
telephone base and charge for 16 hours.
It may be necessary to purchase a new battery. Please see the Battery section of this user’s manual
•
(page 33).
The telephone might be malfunctioning. Please see the Warranty section of this user’s manual (page
•
45) for further instruction.
•
Move the handset closer to the telephone base. It might be out of range.
•
The telephone line cord might be malfunctioning. Try installing a new telephone line cord.
•
Disconnect the telephone base from the telephone jack and connect a different telephone. If there is no
•
dial tone on the other telephone either, the problem is in your wiring or local service. Contact your local
telephone company.
Move the handset closer to the telephone base. You might have moved out of range.
•
36
www.vtechphones.com
Page 41

Troubleshooting
Problem Suggestion
The telephone does not
ring when there is an
incoming call.
Make sure the ringer is on (page 8).
•
Make sure the telephone line cord and power adapter are plugged in properly (page 2).
•
The handset may be too far from the telephone base. Move it closer to the telephone base.
•
There may be too many ex tension telephones on the telephone line to allow all of them to ring
•
simultaneously. Tr y unplugging some of them.
If the other telephones in your home are having the same problem, the problem is in the wiring or local
•
service. Contact the local telephone company (charges may apply).
Other electronic products can cause interference to your cordless telephone. Try installing your telephone
•
as far away as possible from the following electronic devices: wireless routers, radios, radio towers, pager
towers, cellular telephones, digital telephones, intercoms, room monitors, televisions, VCRs, personal
computers, kitchen appliances, and other cordless telephones.
Test a working telephone at the telephone jack. If another telephone has the same problem, the problem
•
is in the telephone jack. Contact your local telephone company (charges may apply).
The telephone line cord might be malfunctioning. Try installing a new telephone line cord.
•
Remove and re-insert the battery and place the handset in the telephone base.
•
Wait for the handset to synchronize with the telephone base. Allow up to one minute for this to take
•
place.
Appendix
www.vtechphones.com
37
Page 42

Troubleshooting
Problem Suggestion
I cannot dial out.
First, try all the above suggestions.
•
Make sure there is a dial tone before dialing. It is normal if the handset takes a second or two to synchronize
•
with the telephone base before producing a dial tone. Wait an extra second before dialing.
Make sure the telephone is set to the correct dial type (pulse dial or tone dial) for the service in your area.
•
See Dial mode on page 9 to set the dial type.
If the other telephones in your home are having the same problem, the problem is in the wiring or local
•
service. Contact your local telephone company (charges may apply).
Eliminate any background noise. Noise from a television, radio, or other appliances may cause the
•
telephone not to dial out properly. If you cannot eliminate the background noise, rst try muting the handset
before dialing, or dialing from another room in your home with less background noise.
38
www.vtechphones.com
Page 43

Troubleshooting
Problem Suggestion
There is noise or
interference during a
telephone conversation.
My calls cut in and out
when I am using the
cordless handset.
The handset may be out of range. Move it closer to the telephone base.
•
Appliances or other cordless telephones plugged into the same circuit as the telephone base can cause
•
interference. Try moving the appliance or telephone base to another outlet.
Other electronic products can cause interference to your cordless telephone. Try installing your telephone
•
as far away as possible from the following electronic devices: wireless routers, radios, radio towers, pager
towers, cellular telephones, digital telephones, intercoms, room monitors, televisions, VCRs, personal
computers, kitchen appliances, and other cordless telephones.
If your telephone is plugged in with a modem or a surge protector, plug the telephone (or modem/surge
•
protector) into a different location. If this solves the problem, re-locate your telephone or modem farther
apart from each other, or use a different surge protector.
The layout of your home or ofce might be limiting the operating range. Try moving the telephone base
•
to another location, preferably a higher location for better reception.
Disconnect the telephone base from the telephone jack and plug in a corded telephone. If calls are still
•
not clear, the problem is probably in the wiring or local service. Contact the local telephone company
(charges may apply).
If the other telephones in your home are having the same problem, the problem is in the wiring or local
•
service. Contact the local telephone company (charges may apply).
Do you have DSL service? If yes, you need to have a DSL lter installed at every telephone jack that has
•
a telephone connected to it. Contact your DSL service provider for lter information.
Appendix
www.vtechphones.com
39
Page 44

Troubleshooting
Problem Suggestion
I hear other calls when
using the telephone.
I hear noise in the
handset, and none of the
keys or buttons work.
Disconnect the telephone base from the telephone jack. Plug in a different telephone. If there are still
•
other calls, the problem is probably in the wiring or local service. Call your local telephone company.
Press CHAN/DELETE to switch to a clearer channel when on a call.
•
•
Make sure the telephone line cord is plugged in securely.
Remove and re-insert the battery.
•
40
www.vtechphones.com
Page 45

Troubleshooting
Problem Suggestion
My caller ID features are
not working properly.
The system does not
receive caller ID, or the
system does not display
caller ID during call
waiting.
Caller ID is a subscription service. You must subscribe to this service from your local telephone company
•
for this feature to work on your telephone.
The caller may not be calling from an area which supports caller ID.
•
Both you and the caller’s telephone companies must use equipment which are compatible with caller
•
ID service.
If you subscribe to DSL service, install a DSL lter to the telephone line between the telephone base and
•
the telephone line jack. Contact your DSL ser vice provider for lter information.
Make sure you subscribe to caller ID with call waiting features provid ed by the local telephone
•
company.
The caller may not be calling from an area which supports caller ID.
•
Both you and the caller’s telephone companies must use equipment which are compatible with caller
•
ID service.
If you subscribe to DSL service, install a DSL lter to the telephone line between the telephone base and
•
the telephone line jack. Contact your DSL ser vice provider for lter information.
Appendix
www.vtechphones.com
41
Page 46

Troubleshooting
Problem Suggestion
Caller ID entries do not
match the numbers I need
to dial.
My cordless handset
beeps and is not
performing normally.
Although the call log entries you receive have 10 digits, (the area code plus the seven-digit number), in
•
some areas, you may need to dial only seven digits, or a 1 plus the seven digits, or a 1 plus the area code
plus the seven digits. You can change the number of digits that you dial or store from the call log.
While reviewing the call log, press # repeatedly to display these dialing options for local and long distance
•
numbers before dialing or saving the telephone number.
Make sure the power cord is securely plugged into the telephone base. Plug the unit into a different
•
working electrical outlet not controlled by a wall switch.
Move the handset closer to the telephone base. It may be out of range.
•
Remove and re-insert the battery.
•
Reset the telephone base by unplugging the unit’s electrical power. Wait for 15 seconds and plug it back
•
in again. Allow up to one minute for the handset and the telephone base to synchronize.
Other electronic products can cause interference to your cordless telephone. Try installing your telephone
•
as far away from these electronic devices as possible: wireless routers, radios, radio towers, pager towers,
cellular telephones, intercoms, room monitors, televisions, personal computers, kitchen appliances and
other cordless telephones.
42
www.vtechphones.com
Page 47

Troubleshooting
Problem Suggestion
Common cure for
electronic equipment
If the unit is not responding normally, try putting the handset in the telephone base. If it does not respond,
•
try the following (in the order listed):
Disconnect the power to the telephone base.
•
Disconnect the battery on the handset.
•
Wait a few minutes before connecting the power to the telephone base.
•
Re-install the batter y and place the handset in the telephone base.
•
Wait for the handset to synchronize with the telephone base. Allow up to one minute for this to take
•
place.
Appendix
www.vtechphones.com
43
Page 48

Operating range
This cordless telephone operates with the maximum power allowed by the Federal Communications Commission (FCC). Even so, this handset and telephone base can
communicate over only a certain distance - which can vary with the locations of the telephone base and handset, the weather, and the layout of your home or ofce.
When the handset is out of range, the handset will display CONNECTING...
If there is a call while the handset is out of range, it might not ring; or if it does ring, the call might not connect well when you press /FLASH. Move closer to the telephone
base, then press /FLASH to answer the call.
If the handset moves out of range during a telephone conversation, there might be interference.
To improve reception, move closer to the telephone base.
Maintenance
Taking car e of your tele phone
Your cordless telepho ne contains sophist icated ele ctronic p arts, so it must be treate d with care.
Avoid roug h treatm ent
Place the handset down gently. Save th e original p acking materials to protect your tel ephone if yo u ever need to ship it.
Avoid wate r
Your tele phone can be damaged if it g ets wet . Do not use the handset outdoors in the rain, or han dle it with wet hands. Do not install the telephone base ne ar a sink,
bathtub o r shower.
Elect rical sto rms
Electr ical storms can somet imes cause p ower surges h armful to electroni c equipmen t. For your own safety, take caut ion when usi ng electr ical appliances du ring storm s.
Clean ing your telephone
Your telepho ne has a dura ble plast ic casing that shoul d retain its luster for ma ny years. Cle an it only with a soft c loth slig htly dampened with water or a mild soap. Do not
use exces s water or cleaning solven ts of any kind.
Remember that electrical appliances can cause serious injury if used when you are wet or standing in the water. If the telephone base should fall into the water, DO NOT
RETRIEVE IT UNTIL YOU UNPLUG THE POWER CORD AND TELEPHONE LINE CORD FROM THE WALL. Then pull the unit out by the unplugged cords.
44
www.vtechphones.com
Page 49

About cordless telephones
Privacy: T he same features that make a c ordless telephone c onvenient create some l imitatio ns. Telephone c alls are transmitted between th e telephon e base and th e
•
cordless handset by radio waves , so there is a p ossibil ity that th e cordles s telepho ne convers ations cou ld be intercepted by rad io receiving equip ment within range of
the cordless hand set. For this reason, you s hould not th ink of cordless telep hone conver sations as being as pri vate as those o n corded te lephones .
Elect rical Power: The telephone base of t his cord less tele phone must be connected to a working electr ical out let. The electri cal outl et should not be co ntrolled by a
•
wall switch. Calls ca nnot be made from the cordless hand set if the tel ephone base is unplug ged or switc hed off, or if t he electr ical power i s interrupted.
Potent ial TV interference: Some c ordless telephones operate at frequencie s that may cause interference to te levision s and VCRs. To minimize or prevent such
•
interference, d o not plac e the telephone ba se of the cordles s telepho ne near or on top of a TV or VCR. If inter ference is experienced, moving the cordles s telepho ne
farth er away from the T V or VCR will of ten reduce or eliminate t he interference.
Recha rgeabl e batteries: This pro duct cont ains either nickel-c admium or nic kel-metal-hydride recharg eable batteries. Exercise care in handling batteries in order not
•
to create a short circuit w ith cond ucting material such as ring s, bracel ets, and key s. The bat tery or c onducto r may overheat and caus e harm. Ob serve proper pola rity
betwee n the batter y and the battery charger.
Nickel -cadmium rechargeabl e batter ies: Dispose of these bat teries in a safe manner. Do not bur n or puncture t he batter y. Like other batteries of this t ype, if burne d
•
or punct ured, they could relea se caustic material which could c ause injur y.
Warranty
What do es this limited warranty cover ?
The m anufactu rer of this VTech Prod uct warrants to the holder of a valid proof of pu rchase (“Consumer” or “yo u”) th at the Produc t and all ac cessories prov ided i n the
sales package (“Prod uct”) are free from defects in material and wor kmanshi p, pursu ant to the fol lowing terms an d cond itions, when i nstalled and u sed normally and in
accordance with t he Product o perating instructi ons. This lim ited warrant y extends only to the Consu mer for Products purcha sed and used in t he United States of Americ a
and Canad a.
What wil l VTech do if th e Product i s not free fr om defec ts in mate rials and wo rkmanship during th e limited warranty p eriod (“Materia lly Defe ctive Prod uct”)?
During the limited warr anty peri od, VTech’s author ized service representative wil l repair or replace at VTech’s option , without charge, a Materially Defecti ve Product. If we
repair the Product, we may use new or refurbish ed replacem ent parts. If we choose to replace the Product, we may replace it with a new or refurbishe d Product of the same
or similar desig n. We will retain defecti ve parts, modules , or e quipment . Repair or replacement of th e Product, at VTech’s option, is your exclusive remed y. VTech will retur n
the repa ired or replacement Pro ducts to you in working c ondition. You should expe ct the repai r or replace ment to take ap proximately 30 days.
How long i s the limited warranty period?
The limited warranty period for the Produc t extends for ONE (1) YEAR from the date of purchas e. If V Tech repairs or replaces a Materially Defective Produ ct under the terms
of this limited warranty, this lim ited warrant y also applies to the repaired or repla cement Product for a period of eith er (a) 90 days from the date the repaired or replaceme nt
Produc t is shippe d to you or (b) the tim e remaining on the origi nal one-ye ar warrant y; whicheve r is longer.
What is not covered by t his limited warrant y?
This lim ited warranty does not c over:
1. Pr oduct that has been su bjected to misu se, acci dent, s hipping or other physic al damag e, impro per inst allation, abnormal oper ation or handlin g, negl ect, in undation,
re, water or other liquid intrusio n; or
www.vtechphones.com
Appendix
45
Page 50

Warranty
2. Pr oduct that has been damaged due to re pair, alterati on or modi cation by anyo ne other tha n an authorized servi ce representative of V Tech; or
3. Pr oduct to th e extent that the proble m experien ced is caused by signal c onditions, network reliability, or cable or a ntenna syste ms; or
4. Pr oduct to th e extent that the proble m is caused by u se with non -VTech access ories; or
5. Pr oduct whose warrant y/qualit y stickers , product s erial numb er plates or el ectroni c serial num bers have bee n removed, al tered or rend ered illegible; or
6. Pr oduct purcha sed, used, serviced, or s hipped for repair from outside the United States of America or Canada, or used for commercial or institutional purposes (including
but not limited to Products used for rental pur poses); or
7. Pr oduct returned with out a valid proof of purch ase (see item 2 be low); or
8. C harges for installati on or set up, adjustment of customer co ntrols, an d installation or repair of systems ou tside the u nit.
How do you get warrant y servi ce?
To obtain warrant y service in the United States of America, plea se call 1 (800) 595- 9511. In Canada, please ca ll 1 (800) 267-7377. N OTE: Before calli ng for servic e, please
review th e user’s manual - a check of the Product ’s control s and feature s may save you a ser vice call .
Except as prov ided by the ap plicabl e law, you assume the ris k of lo ss or d amage du ring tr ansit an d trans portati on and are resp onsible for delivery or handling char ges
incurred in th e transport of the Product(s) to the servic e location. VTech will return the repaired or replaced Product under this limite d warranty to you, transpor tation, deliver y
or hand ling charges prep aid. VTech assumes n o risk fo r damage or loss o f the Product in t ransit. If the Pro duct failure is no t covered by this li mited warr anty, or pr oof of
purcha se does not meet the terms of this limited warra nty, VTech will noti fy you and will re quest that you au thorize the cost of repair pr ior to any furt her repair act ivity. You
must pay for t he cost of re pair and return shipping costs for t he repair of Pr oducts that are not cover ed by this limited warranty.
What must you return with the Product to ge t warrant y servic e?
1. Return the entire origi nal packag e and conten ts includ ing the Prod uct to the V Tech servic e location along with a d escript ion of the mal functio n or difc ulty; and
2. Inclu de a “valid p roof of purc hase” (sale s receipt) id entifying the Product purch ased (Produ ct model) a nd the date of purchase or r eceipt; an d
3. Provid e your name, co mplete and c orrect mailing addre ss, and tele phone number.
Other Limitati ons
This warranty is the co mplete and excl usive agreement betwee n you and V Tech. It superse des all other writt en or oral c ommunic ations related to thi s Produ ct. V Tech
provide s no other warranties for this Product. The warranty exclusive ly describes all of VTech’s responsi bilities regard ing the Product. There are no other express warranties.
No one is au thorized to m ake modic ations to th is limited warranty an d you should n ot rely on any su ch modication.
State/ Provincia l Law Rights: This warranty gives you s pecic legal right s, and you may also have other ri ghts, whic h vary from s tate to state or province to p rovince.
Limitations: Im plied warranties , inclu ding th ose of tness for a particul ar purpose and merchan tabilit y (an unwritten warranty that t he Produ ct is t for ordinar y use) are
limited to one year from the date of purchase. Some states/provinces do not allow limitation s on how long an implied warrant y lasts, so the above limitation may not apply to
you. In no event sha ll VTech be liable fo r any indirect, special, incident al, consequential, or similar damages (includi ng, but not limited to lost prot s or revenue, inab ility to
use the Product or other asso ciated equipment, the cos t of substitute equipment, and claims by third par ties) resulti ng from the use of this Product. Some st ates/provinces
do not all ow the exclusion or limit ation of inc idental or c onseque ntial dama ges, so the ab ove limitat ion or exclus ion may not app ly to you.
Please retain your original sales receipt as proof of purchase.
46
www.vtechphones.com
Page 51

FCC, ACTA and IC regulations
FCC Part 15
This equ ipment has been tested and found to c omply with the requirements fo r a Class B digital devi ce under Par t 15 of the Feder al Commun ications Commissi on (FCC)
rules. These requirem ents are intended to provide reaso nable protection agains t harmful inter ference in a residential inst allation. This equipmen t generates, use s and can
radiate rad io frequenc y energy and, if not ins talled and use d in accordan ce with the instr uctions, may cause harmful interferen ce to radio commu nication s. However, there
is no guarantee that interference will n ot occur i n a partic ular inst allation. If this equ ipment do es cause harmful interferenc e to radio or televisio n recepti on, which can be
determi ned by turning the equip ment off an d on, the user i s encourag ed to try to c orrect th e interference by one or m ore of the following measures: by turnin g the equipment off and on, the user is encourag ed to try to co rrect the i nterfere nce by one or mo re of the foll owing measures:by turnin g the equipment off and on, the user is encourag ed to try to co rrect the i nterfere nce by one or mo re of the foll owing measures:
Reorie nt or relocate the recei ving anten na.
•
Increa se the separ ation between the equipment and receiver.
•
Connect the equipment into an outlet on a cir cuit different from t hat to which the receiver is connec ted.
•
Consul t the dealer o r an experienced radio/TV technician for help.
•
Change s or modic ations to th is equipme nt not expres sly approved by the party respon sible for complianc e could void the user’s aut hority to operate the e quipment .
This d evice c omplies with Par t 15 of the FCC rules. O peration is subject to the following t wo cond itions: (1) this device may not cause harmful interference, and (2) this
device must acce pt any interference received, including interfere nce that may cause undesire d oper ation. Privacy of com municati ons may not be en sured w hen us ing
this telephone.
To ensure safet y of users, the FCC has establis hed crite ria for the a mount of radio freque ncy energ y that can be safely abs orbed by a user or bystan der according to th e
intended usage o f the product. Th is product has been tested a nd found t o comply with the FCC criter ia. The h andset may be safely held against the e ar of the u ser. The
telephone base shall be installed and us ed such that par ts of the user’s body other than the hand s are maintained at a distance of approximately 20 cm (8 inc hes) or more.
If you cho ose to use a cli pping device, please make sure to onl y use the supplied VTech be lt clip.
This Cla ss B digita l apparatus complies w ith Canadi an ICES-0 03.
FCC Part 68 and ACTA
This equi pment comp lies with Part 68 of the FCC rules and wit h technical requiremen ts adopted by the Administrat ive Council for Te rminal Attachments (ACTA). The label
on the back or bot tom of this equipm ent contain s, among other thi ngs, a produc t identier in the format US:AAAEQ##TXX XX. This id entier must be provided to your loc al
telephone company upon reque st.
The plug and jack us ed to c onnect this equipment to prem ises wiring and the te lephone network must c omply with ap plicabl e Part 68 rule s and t echnica l requirements
adopted by ACTA. A compliant telephone cord and modular plug is provid ed with this produc t. It is designed to be c onnecte d to a compat ible modular jack th at is also
compliant. An RJ11 jack should normal ly be used for c onnecting to a single line and an RJ14 jack fo r two lines. See Instal lation Inst ructions in the user ’s manual.
The Ring er Equivalence Number (REN) is used to determine how many devices you may connect to your telep hone line an d still have them ring when yo u are called . The
REN for this pro duct is enco ded as the 6th and 7t h character s following the US: in the product identier (e.g., if ## is 03 , the REN is 0.3). In most, but not all areas, the sum
of all RENs s hould be ve (5.0) or less. For mo re informat ion, pleas e contact your local telephone company.
This equipment may not be used with Party Lines. If you have specially wired alarm dialing equipment connected to your telepho ne line, ensure the connection of
this equipme nt doe s not disable your alarm equipme nt. If you have qu estions about what will disable alarm equ ipment, consult your teleph one co mpany o r a qualied
instal ler.
www.vtechphones.com
Appendix
47
Page 52

FCC, ACTA and IC regulations
If this equip ment is malfun ctioning, it must be unplugged from the mo dular jack unti l the problem has been corrected. R epairs to this telepho ne equi pment c an only be
made by the manufactu rer or its authorized age nts. For repair procedures, follow t he instru ctions ou tlined under the Limited Warranty.
If this equipment is causing harm to the telephone networ k, the telephone company may temporarily discontin ue your telephone servi ce. The telephone company is required
to notif y you before interrupting service. If advance not ice is not practical, you w ill be notied as soon as possible. You will be given the oppo rtunit y to correct the problem
and the tele phone company is require d to inform you of your ri ght to le a complaint with the FCC. Your tele phone comp any may make chang es in its facilities, equip ment,
operation, or proc edures that could affect the proper functi oning of thi s product. The telep hone company is requir ed to notify you if such ch anges are pl anned.
If this pr oduct is eq uipped wi th a corded o r cordles s handset, i t is hearing aid compatible.
If this p roduct h as memor y dialing location s, you may ch oose to sto re emergency telephone numbers (e.g., police, re, med ical) in these locations. If you do store o r test
emerge ncy number s, please:
Remain on the line and briey explain the reason for the cal l before hang ing up.
Perfor m such acti vities in of f-peak ho urs, such a s early morn ing or late even ing.
Indust ry Canada
Operation is subject to the following two condit ions: (1) this d evice may not cause harmful interference, and (2) this device must accept any interference, includ ing
interference that may cause und esired operation.
The term ‘ ’IC: ‘’ before the certication /registration numb er only signies that the Industr y Canada technical s pecications were met.
The Ringer Equivalence Number (REN) for this terminal equipment is 0.1. The REN is an indication of the ma ximum number of d evices allowed to be connec ted to a
telephone interface. The termination on an inte rface may consist of any com bination of devices subj ect only to the requirement that the sum of the RENs of all the devices
does not exceed ve.
This pro duct meet s the applicable Industry Canada techni cal specication s.
The RBRC® seal
The RBRC® seal on t he nickel -cadmium batter y indicates that VTech Communications, Inc . is voluntarily par ticipati ng in an indu stry pro gram to col lect
and recycle these batteries at t he end of thei r useful live s, when taken out of serv ice withi n the United S tates and Can ada.
The RBRC® progr am provides a conven ient alter native to p lacing us ed nickel -cadmi um batter ies into the trash or municip al waste, wh ich may be illegal
in your area.
VTech’s par ticipation in RBRC® makes it easy for you to drop off the spent bat tery at local retailers partici pating in the RBRC® progr am or at au thorized
VTech pro duct ser vice ce nters. Ple ase call 1-800 -8-BATTERYTM for inf ormation on Ni-Cd batter y recycli ng and dis posal bans/restrictions in your area .
VTech’s involvement in thi s program is p art of its commitment to protecti ng our environment and c onserving natural resources .
RBRC® is a regi stered t rademark of Recha rgeable Batter y Recycling Corporation.
48
www.vtechphones.com
Page 53

Technical specications
Frequency control Crystal controlled PLL synthesizer
Transmit frequency Handset: 912.75-917.10 MHz
Telephone base: 2410.20-2418.90MHz
Receive frequency Handset: 2410.20-2418.90 MHz
Telephone base: 912.75-917.10MHz
Channels 30
Nominal effective range Maximum power allowed by FCC and IC. Actual operating range may vary according to
environmental conditions at the time of use.
Size Handset: 7.25in X 2.04in X 1.48in (184.1mm X 51.8mm X 37.5mm)
Telephone base: 4.34in X 3.37in X 4.82in (110.2mm X 85.5mm X 122.4mm)
Weight Handset: 5.36oz (151.9 grams) (including battery)
Telephone base: 4.24oz (120.2 grams)
Power requirements Handset: 3.6V 300mAh Ni-Cd battery
Telephone base: 7.5V AC @ 200mA
Memory Handset directory: 10 memory locations (9 speed dial inclusive);
up to 24 digits and 14 characters
Handset call log: 30 memory locations; up to 11 digits and 15 characters
Appendix
www.vtechphones.com
49
Page 54

Index
A
About caller ID 25
About cordless telephones 45
Answer calls 12
B
Battery 3, 33
C
Call log 26
Call log display screen messages 31
Call waiting 13
Channel 12
Character chart 16
Charging 3
Clear voicemail 11
Copy a directory entry into speed dial 20
D
Date and time 7
Delete a directory entry 19
Delete a speed dial entry 23
Delete from the call log 30
Dial a call log number 28
Dial a number from the directory 20
Dial a speed dial number 23
Dial mode 9
Director y 15
DSL lter 2
E
Edit a directory entry 18
Edit a speed dial entry 22
End calls 12
F
FCC, ACTA and IC regulations 47
Find handset 14
H
Handset display screen messages 32
Home area code 9
I
Index 50
50
www.vtechphones.com
Page 55

Index
L
Language 10
M
Maintenance 44
Make a call log entry ready to dial 27
Make calls 12
Mounting bracket installation 4
O
Operating range 44
P
Parts checklist 1
Pause 15, 18
R
RBRC® seal 48
Reassign speed dial locations 24
Redial 14
Review the call log 27
Review the directory 17
Ringer 8
Ringer volume 8
S
Save a call log entry to the directory 29
Speed dial 21
Store a directory entry 15
Store a speed dial entry 21
T
Technical specications 49
Temporary tone dialing 13
Troubleshooting 35
V
Volume 8, 12
W
Wall mounting 4
Warranty 45
www.vtechphones.com
51
51
Appendix
Page 56

VTECH TELECOMMUNICATIONS LTD.
A member of THE VTECH GROUP OF COMPANIES.
Distributed in the U.S.A. by VTech Communications, Inc. Beaverton, Oregon
Distributed in Canada by VTech Technologies Canada, Ltd., Richmond, B.C.
Copyright ©2007 for VTECH TELECOMMUNICATIONS LTD.
Printed in China.
91-001545-050-100
 Loading...