

Page 1
1/2
2
This product has been manufactured according to strict specifications and voltage requirements that are applicable in the country
in which it is intended that this product should be used. If you have purchased this product via the internet, through mail order,
and/or via a telephone sale, you must verify that this product is intended to be used in the country in which you reside.
WARNING: Use of this product in any country other than that for which it is intended could be dangerous and could invalidate
the manufacturer’s or distributor’s warranty.
Please also retain your receipt as proof of purchase otherwise your product may be disqualified from the manufacturer’s or
distributor’s warranty.
Vox Amplification Ltd.
1 Harrison Close, Knowlhill, Milton Keynes, MK5 8PA. UK
© 2017 VOX AMPLIFICATION LTD.
IMPORTANT NOTICE TO CONSUMERS
www.voxamps.com
Published 03/2017 Printed in Vietnam
Page 2
Precautions
Location
Using the unit in the following locations can result in a malfunction.
• In direct sunlight
• Locations of extreme temperature or humidity
• Excessively dusty or dirty locations
• Locations of excessive vibration
• Close to magnetic fields
Power supply
Please connect the designated AC adapter to an AC outlet of the correct
voltage. Do not connect it to an AC outlet of voltage other than that for
which your unit is intended.
Interference with other electrical devices
Radios and televisions placed nearby may experience reception
interference. Operate this unit at a suitable distance from radios and
televisions.
Handling
To avoid breakage, do not apply excessive force to the switches or
controls.
Care
If the exterior becomes dirty, wipe it with a clean, dry cloth. Do not use
liquid cleaners such as benzene or thinner, or cleaning compounds or
flammable polishes.
Keep this manual
After reading this manual, please keep it for later reference.
Keeping foreign matter out of your equipment
Never set any container with liquid in it near this equipment. If liquid
gets into the equipment, it could cause a breakdown, fire, or electrical
shock.
Be careful not to let metal objects get into the equipment. If something
does slip into the equipment, unplug the AC adapter from the wall
outlet. Then contact your nearest VOX dealer or the store where the
equipment was purchased.
DECLARATION OF CONFORMITY (for USA)
Responsible Party : KORG USA INC.
Address :
Telephone : 1-631-390-6500
Equipment Type :
Model : Adio Air BS /Adio BS
This device complies with Part 15 of FCC Rules. Operation is subject
to the following two conditions:
(1) This device may not cause harmful interference,and (2) this
device must accept any interference received, including interference
that may cause undesired operation.
316 SOUTH SERVICE ROAD, MELVILLE, NY
MODELING BASS & AUDIO AMPLIFIER
En
NOTE: This equipment has been tested and found to comply with the
limits for a Class B digital device, pursuant to Part 15 of the FCC Rules.
These limits are designed to provide reasonable protection against
harmful interference in a residential installation. This equipment
generates, uses, and can radiate radio frequency energy and, if not
installed and used in accordance with the instructions, may cause
harmful interference to radio communications. However, there is no
guarantee that interference will not occur in a particular installation.
If this equipment does cause harmful interference to radio or television
reception, which can be determined by turning the equipment off and
on, the user is encouraged to try to correct the interference by one or
more of the following measures:
• Reorient or relocate the receiving antenna.
• Increase the separation between the equipment and receiver.
• Connect the equipment into an outlet on a circuit different from
that to which the receiver is connected.
• Consult the dealer or an experienced radio/TV technician for help.
If items such as cables are included with this equipment, you must
use those included items.
Unauthorized changes or modification to this system can void the
user’s authority to operate this equipment.
This transmitter must not be co-located or operated in conjunction
with any other antenna or transmitter.
This equipment complies with FCC radiation exposure limits set forth
for an uncontrolled environment and meets the FCC radio frequency
(RF) Exposure Guideline. This equipment has very low levels of RF
energy that it deemed to comply without maximum permissive exposure evaluation (MPE).
This device complies with Industry Canada licence - exempt RSS
standard(s). Operation is subject to the following two conditions: (1)
this device may not cause interference, and (2) this device must accept
any interference, including interference that may cause undesired
operation of the device.
This equipment complies with IC radiation exposure limits set forth
for an uncontrolled environment and meets RSS-102 of the IC radio
frequency (RF) Exposure rules. This equipment has very low levels
of RF energy that it deemed to comply without maximum permissive
exposure evaluation (MPE).
European Union Directives Conformance Statement
Korg Inc. hereby declares that the product meets the
requirements of Directive 1999/5/EC.
You can view the Declaration of Conformity (DoC) to
Directive 1999/5/EC in the Owner’s Manual of this
product posted on the Korg website (www.korg.com).
KBM-1, KBM-A1: Designed and engineered by Korg inc.
4015-2 Yanokuchi, Inagi-City, Tokyo 206-0812 Japan
THE FCC REGULATION WARNING (for USA)
2
Page 3
Notice regarding disposal (for EU)
When this “crossed-out wheeled bin” symbol is displayed
on the product, owner’s manual, battery, or battery pack
age, it signifies that when you wish to dispose of this
product, manual, package or battery you must do so in an
approved manner. Do not discard this product, manual,
package or battery along with ordinary household waste.
Disposing in the correct manner will prevent harm to hu
man health and potential damage to the environment. Since
the correct method of disposal will depend on the applicable laws and
regulations in your locality, please contact your local administrative
body for details. If the battery contains heavy metals in excess of the
regulated amount, a chemical symbol is displayed below the “crossedout wheeled bin” symbol on the battery or battery package.
* Bluetooth is a registered trademark of Bluetooth SIG, Inc.
* All product names and company names are the trademarks or
registered trademarks of their respective owners.
Précautions
Evitez toute intrusion d’objets ou de liquide
Ne placez jamais de récipient contenant du liquide près de
l’instrument. Si le liquide se renverse ou coule, il risque de provoquer
des dommages, un court-circuit ou une électrocution.
Veillez à ne pas laisser tomber des objets métalliques dans le boîtier
(trombones, par ex.). Si cela se produit, débranchez l’alimentation de la
prise de courant et contactez votre revendeur VOX le plus proche ou la
surface où vous avez acheté l’instrument.
-
Le présent appareil est conforme aux CNR d’Industrie Canada applicables aux appareils radio exempts de licence. L’exploitation est
autorisée aux deux conditions suivantes : (1) l’appareil ne doit pas
produire de brouillage, et (2) l’utilisateur de l'appareil doit accepter
tout brouillage radioélectrique subi, même si le brouillage est susceptible d’en compromettre le fonctionnement.
Cet équipement est conforme aux limites d’exposition aux rayonnements énoncées pour un environnement non contrôlé et respecte les
règles d’exposition aux fréquences radioélectriques (RF) CNR-102 de
l’IC. Cet équipement émet une énergie RF très faible qui est considérée
conforme sans évaluation de l’exposition maximale autorisée.
Fr
Emplacement
L’utilisation de cet instrument dans les endroits suivants peut en
entraîner le mauvais fonctionnement.
• En plein soleil
• Endroits très chauds ou très humides
• Endroits sales ou fort poussiéreux
• Endroits soumis à de fortes vibrations
• A proximité de champs magnétiques
Alimentation
Branchez l’adaptateur secteur mentionné à une prise secteur de tension
appropriée. Evitez de brancher l’adaptateur à une prise de courant
dont la tension ne correspond pas à celle pour laquelle l’appareil est
conçu.
Korg Inc. déclare par la présente que le produit est
conforme aux exigences de la directive 1999/5/CE.
Vous pouvez consulter la Déclaration de conformité
(DoC) à la directive 1999/5/CE dans le mode d’emploi
de ce produit, disponible sur le site Internet de Korg
(www.korg.com).
KBM-1, KBM-A1: Conçue et fabriquée en Korg inc.
4015-2 Yanokuchi, Inagi-City, Tokyo 206-0812 Japan
Interférences avec d’autres appareils électriques
Les postes de radio et de télévision situés à proximité peuvent par
conséquent souffrir d’interférences à la réception. Veuillez dès lors faire
fonctionner cet appareil à une distance raisonnable de postes de radio
et de télévision.
Maniement
Pour éviter de les endommager, manipulez les commandes et les
boutons de cet instrument avec soin.
Entretien
Lorsque l’instrument se salit, nettoyez-le avec un chiffon propre et sec.
Ne vous servez pas d’agents de nettoyage liquides tels que du benzène
ou du diluant, voire des produits inflammables.
d’élimination dépendra des lois et règlements applicables dans votre
localité, s’il vous plaît, contactez votre organisme administratif pour
plus de détails. Si la pile contient des métaux lourds au-delà du seuil
réglementé, un symbole chimique est affiché en dessous du symbole
de la poubelle barrée d’une croix sur la pile ou le pack de piles.
Conservez ce manuel
Après avoir lu ce manuel, veuillez le conserver soigneusement pour
toute référence ultérieure.
3
Déclaration de conformité aux directives de
l’Union européenne
Note concernant les dispositions (Seulement EU)
Quand un symbole avec une poubelle barrée d’une croix
apparait sur le produit, le mode d’emploi, les piles ou le
pack de piles, cela signifie que ce produit, manuel ou piles
doit être déposé chez un représentant compétent, et non
pas dans une poubelle ou toute autre déchetterie conventionnelle. Disposer de cette manière, de prévenir les
dommages pour la santé humaine et les dommages potentiels pour l’environnement. La bonne méthode
Page 4
REMARQUE IMPORTANTE POUR LES CLIENTS
Ce produit a été fabriqué suivant des spécifications sévères et des
besoins en tension applicables dans le pays où ce produit doit être
utilisé. Si vous avez acheté ce produit via l’internet, par vente par
correspondance ou/et vente par téléphone, vous devez vérifier que ce
produit est bien utilisable dans le pays où vous résidez.
ATTENTION: L’utilisation de ce produit dans un pays autre que celui
pour lequel il a été conçu peut être dangereuse et annulera la garan
tie du fabricant ou du distributeur. Conservez bien votre récépissé qui
est la preuve de votre achat, faute de quoi votre produit ne risque de
ne plus être couvert par la garantie du fabricant ou du distributeur.
* Bluetooth est une marque déposée de Bluetooth SIG, Inc.
* Tous les noms de produits et de sociétés sont des marques
commerciales ou déposées de leur détenteur respectif.
Precauciones
Ubicación
El uso de la unidad en las siguientes ubicaciones puede dar como
resultado un mal funcionamiento:
• Expuesto a la luz directa del sol
• Zonas de extremada temperatura o humedad
• Zonas con exceso de suciedad o polvo
• Zonas con excesiva vibración
• Cercano a campos magnéticos
Fuente de alimentación
Por favor, conecte el adaptador de corriente designado a una toma
de corriente con el voltaje adecuado. No lo conecte a una toma de
corriente con voltaje diferente al indicado.
Interferencias con otros aparatos
Las radios y televisores situados cerca pueden experimentar
interferencias en la recepción. Opere este dispositivo a una distancia
prudencial de radios y televisores.
Manejo
Para evitar una rotura, no aplique excesiva fuerza a los conmutadores
o controles.
Cuidado
Si exterior se ensucia, límpiese con un trapo seco. No use líquidos
limpiadores como disolvente, ni compuestos inflamables.
Guarde este manual
Después de leer este manual, guárdelo para futuras consultas.
Mantenga los elementos externos alejados del equipo
Nunca coloque ningún recipiente con líquido cerca de este equipo,
podría causar un cortocircuito, fuero o descarga eléctrica. Cuide de
que no caiga ningún objeto metálico dentro del equipo.
Si cae algo dentro del equipo, desenchufe el adaptador de CA
de la toma de corriente. A continuación, póngase en contacto
con el distribuidor VOX más cercano o con el establecimiento
donde compró el producto.
Nota respecto a residuos y deshechos (solo UE)
-
rá a evitar daños a su salud pública y posibles daños al
medioambiente. Cada país tiene una normativa específica
acerca de cómo verter productos potencialmente tóxicos, por
tanto le rogamos que se ponga en contacto con su oficina o
ministerio de medioambiente para más detalles. Si la batería
contiene metales pesados por encima del límite permitido,
Es
habrá un símbolo de un material químico, debajo del símbolo del cubo de basura tachado.
Declaración de Conformidad con las
Directivas de la Unión Europea
Por la presente, Korg Inc. declara que este producto cumple con los requisitos de la Directiva
1999/5/EC.
Puede consultar la Declaración de Conformidad
(DoC) con la Directiva 1999/5/EC en el Manual
del Usuario de este producto, disponible en el
sitio web de Korg (www.korg.com).
KBM-1, KBM-A1: Diseñado y desarrollado por Korg inc.
4015-2 Yanokuchi, Inagi-City, Tokyo 206-0812 Japan
NOTA IMPORTANTE PARA EL CONSUMIDOR
Este producto ha sido fabricado de acuerdo a estrictas especificaciones y requerimientos de voltaje aplicables en el país
para el cual está destinado. Si ha comprado este producto
por internet, a través de correo, y/o venta telefónica, debe
usted verificar que el uso de este producto está destinado al
país en el cual reside.
AVISO: El uso de este producto en un país distinto al cual
está destinado podría resultar peligroso y podría invalidar
la garantía del fabricante o distribuidor.
Por favor guarde su recibo como prueba de compra ya que
de otro modo el producto puede verse privado de la garantía
del fabricante o distribuidor.
*
Bluetooth es una marca registrada de Bluetooth SIG, Inc.
* Todos los nombres de productos y compañías son
marcas comerciales o marcas registradas de sus
respectivos propietarios.Instalar la baterí.
4
Cuando aparezca el símbolo del cubo de basura
tachado sobre un producto, su manual de usuario,
la batería, o el embalaje de cualquiera de éstos,
significa que cuando quiere tire dichos artículos
a la basura, ha de hacerlo en acuerdo con la normativa vigente de la Unión Europea. No debe
verter dichos artículos junto con la basura de casa.
Verter este producto de manera adecuada ayuda-
Page 5
保証規定(必ずお読
本保証書は、保証期間中に本製品を保証するもので、
付属品類(ヘッドホンなど)は保証の対象になりま
せん。保証期間内に本製品が故障した場合は、保証
規定によって無償修理いたします。
1. 本保証書の有効期間はお買い上げ日より 1 か年
です。
2.次の修理等は保証期間内であっても有償修理と
なります。
・消耗部品(電池、スピーカー、真空管、フェー
ダーなど)の交換。
・お取扱い方法が不適当のために生じた故障。
・天災(火災、浸水等)によって生じた故障。
・故障の原因が本製品以外の他の機器にある場
合。
・不当な改造、調整、部品交換などにより生じた
故障または損傷。
・保証書にお買い上げ日、販売店名が未記入の
場合、または字句が書き替えられている場合。
・本保証書の提示がない場合。
尚、当社が修理した部分が再度故障した場合は、
保証期間外であっても、修理した日より 3 か月
以内に限り無償修理いたします。
みください)
3. 本保証書は日本国内においてのみ有効です。
ThiswarrantyisvalidonlyinJapan.
4. お客様が保証期間中に移転された場合でも、保証は引き
続きお使いいただけます。詳しくは、お客様相談窓口ま
でお問い合わせください。
5. 修理、運送費用が製品の価格より高くなることがありま
すので、あらかじめお客様相談窓口へご相談ください。
発送にかかる費用は、お客様の負担とさせていただきま
す。
6. 修理中の代替品、商品の貸し出し等は、いかなる場合に
おいても一切行っておりません。
本製品の故障、または使用上生じたお客様の直接、間接の
損害につきましては、弊社は一切の責任を負いかねますの
でご了承ください。
本保証書は、保証規定により無償修理をお約束するための
もので、これよりお客様の法律上の権利を制限するもので
はありません。
お願い
1. 保証書に販売年月日等の記入がない場合は無効となりま
す。記入できないときは、お買い上げ年月日を証明でき
る領収書等と一緒に保管してください。
2. 保証書は再発行致しませんので、紛失しないように大切
に保管してください。
VOX Adio Air BS/Adio BS
保証書
本保証書は、保証規定により無償修理をお約束するものです。
お買い上げ日 年 月 日
販売店名
アフターサービス
修理および商品のお取り扱いについてのご質問、ご相談は、お客様相談窓口へお問い合わせください。
お客様相談窓口
PHS等一部の電話ではご利用できません。固定電話または携帯電話からおかけください。
受付時間:月曜~金曜10:00~17:00(祝祭日、窓口休業日を除く)
●サービス・センター :〒 168-0073東京都杉並区下高井戸 1-18-162F
輸入販売元 :KORGImportDivision
〒 206-0812東京都稲城市矢野口 4015-2
http://www.korg-kid.com/
5
Page 6
安全上のご注意
ご使用になる前に必ずお読みください
ここに記載した注意事項は、製品を安全に正しくご使用いただき、
あなたや他の方々への危害や損害を未然に防ぐためのものです。
注意事項は誤った取り扱いで生じる危害や損害の大きさ、または切
迫の程度によって、内容を「警告」、「注意」の 2 つに分けています。
これらは、あなたや他の方々の安全や機器の保全に関わる重要な内
容ですので、よく理解した上で必ずお守りください。
Ja
火災・感電・人身障害の危険を防止するには
以下の指示を守ってください
警告
この注意事項を無視した取り扱いをすると、
死亡や重傷を負う可能性があります。
・ AC アダプターのプラグは、必ず AC100V の電源コン
セントに差し込む。
・ AC アダプターのプラグにほこりが付着している場合
は、ほこりを拭き取る。
感電やショートの恐れがあります。
・ 本製品はコンセントの近くに設置し、A C アダプターの
プラグへ容易に手が届くようにする。
・ 次のような場合には、直ちに電源を切って A C アダプ
ターのプラグをコンセントから抜く。
○ AC アダプターが破 損したとき
○ 異物が内部に入ったとき
○ 製品に異常や故障が生じたとき
修理が必要なときは、お客様相談窓口へ依頼してくださ
い。
・ 本製品を分解したり改造したりしない。
・ 修理、部品の交換などで、取扱説明書に書かれているこ
と以外は絶対にしない。
・ A C アダプターのコードを無理に曲げたり、発熱する機
器に近づけない。また、AC アダプターのコードの上に
重いものをのせない。
コードが破損し、感電や火災の原因になります。
・ 大音量や不快な程度の音量で長時間使用しない。
大音量で長時間使用すると、難聴になる可能性がありま
す。万一、聴力低下や耳鳴りを感じたら、専門の医師に
相談してください。
・ 本製品に異物(燃えやすいもの、硬貨、針金など)を入
れない。
・ 温度が極端に高い場所(直射日光の当たる場所、暖房機
器の近く、発熱する機器の上など)で使用や保管をしな
い。
・ 振動の多い場所で使用や保管をしない。
・ ホコリの多い場所で使用や保管をしない。
・ 風呂場、シャワー室で使用や保管をしない。
・
雨天時の野外のように、湿気の多い場所や水滴のかかる場
所で、使用や保管をしない。
・ 本製品の上に、花瓶のような液体が入ったものを置かな
い。
・ 本製品に液体をこぼさない。
・ 濡れた手で本製品を使用しない。
6
この注意事項を無視した取り扱いをすると、傷害を負う可能性
または物理的損害が発生する可能性があります。
・ 正常な通気が妨げられない所に設置して使用する。
・
ラジオ、テレビ、電子機器などから十分に離して使用する。
ラジオやテレビ等に接近して使用すると、本製品が雑音
を受けて誤動作する場合があります。また、ラジオ、テ
レビ等に雑音が入ることがあります。本製品をテレビ等
の横に設置すると、本製品の磁場によってテレビ等の故
障の原因になることがあります。
・ 外装のお手入れは、乾いた柔らかい布を使って軽く拭く。
・ AC アダプターをコンセントから抜き差しするときは、
必ずプラグを持つ。
・ 長時間使用しないときは、電池の液漏れを防ぐために電
池を抜く。
・ 電池は幼児の手の届かないところへ保管する。
・ 長時間使用しないときは、AC アダプターをコンセント
から抜く。
・ 付属の AC アダプターは、他の電気機器で使用しない。
付属の AC アダプターは本製品専用です。他の機器では
使用できません。
・ 指定の AC アダプター以外は使用しない。
・
他の電気機器の電源コードと一緒にタコ足配線をしない。
本製品の定格消費電力に合ったコンセントに接続してください。
・ 電池を過度の熱源(日光、火など)にさらさない。
・ スイッチやツマミなどに必要以上の力を加えない。
故障の原因になります。
・ 外装のお手入れに、ベンジンやシンナー系の液体、コン
パウンド質、強燃性のポリッシャーを使用しない。
・ 不安定な場所に置かない。
本製品が落下してお客様がけがをしたり、本製品が破損
したりする恐れがあります。
・ 本製品の上に乗ったり、重いものをのせたりしない。
本製品が落下または損傷してお客様がけがをしたり、本
製品が破損したりする恐れがあります。
■ワイヤレス(無線)についての注意事項
本製品の使用周波数は 2.4GHz 帯です。この周波数帯では、電
子レンジなどの産業・科学・医療用機器のほか、工場の製造ラ
インなどで使用されている移動体識別用の構内無線局(免許を
要する無線局)や、特定小電力無線局(免許を要しない無線局)、
アマチュア無線局(免許を要する無線局)が運用されています。
(以下「他の無線局」と呼ぶ)
他の無線機器との電波干渉を防止するために
してご使用ください。
1. 本製品を使用する前に、近くで「他の無線局」が運用されて
いないことを確認してください。また重大な影響を及ぼす恐
れのある場所(医療機器のそば、航空機内など)では使用し
ないでください。
2. 万一、本製品と「他の無線局」の間で電波干渉の事例が発生
した場合には、速やかに使用を停止した上で、混信回避のた
めの処置(例えば使用場所の変更など)を行ってください。
3. 不明な点、その他お困りのことが起きたときは、弊社の「お
客様相談窓口」へお問い合わせください。
※ Bluetooth は BluetoothSIG,Inc. の登録商標です。
※ すべての製品名および会社名は、各社の商標または登録商標
です。
、下記事項に注意
注意
Page 7
Vorsichtsmaßnahmen
De
Aufstellungsort
Vermeiden Sie das Aufstellen des Geräts an Orten, an denen.
• es direkter Sonneneinstrahlung ausgesetzt ist;
• hohe Feuchtigkeit oder Extremtemperaturen auftreten können;
• Staub oder Schmutz in großen Mengen vorhanden sind;
• das Gerät Erschütterungen ausgesetzt sein kann.
• in der Nähe eines Magnetfeldes.
Stromversorgung
Schließen Sie das optionale Netzteil nur an eine geeignete
Steckdose an. Verbinden Sie es niemals mit einer Steckdose einer
anderen Spannung.
Störeinflüsse auf andere Elektrogeräte
Dieser kann bei in der Nähe aufgestellten Rund-funkempfängern
oder Fernsehgeräten Empfangsstörungen hervorrufen. Betreiben
Sie solche Geräte nur in einem geeigneten Abstand von diesem
Erzeugnis.
Bedienung
Vermeiden Sie bei der Bedienung von Schaltern und Reglern
unangemessenen Kraftaufwand.
Reinigung
Bei auftretender Verschmutzung können Sie das Gehäuse mit
einem trockenen, sauberen Tuch abwischen. Verwenden Sie
keinerlei Flüssigreiniger wie beispielsweise Reinigungsbenzin,
Verdünnungs- oder Spülmittel. Verwenden Sie niemals brennbare
Reiniger.
separates, gesetzlich festgelegtes Entsorgungssystem. Gebrauchte
elektrische und elektronische Geräte müssen separat entsorgt
werden, um ein umweltgerechtes Recycling sicherzustellen. Diese
Produkte müssen bei benannten Sammelstellen abgegeben
werden. Die Entsorgung ist für den Endverbraucher kostenfrei!
Bitte erkundigen Sie sich bei Ihrer zuständigen Behörde, wo Sie
diese Produkte zur fachgerechten Entsorgung abgeben können.
Falls Ihr Produkt mit Batterien oder Akkumulatoren ausgerüstet
ist, müssen Sie diese vor Abgabe des Produktes entfernen und
separat entsorgen (siehe oben). Die Abgabe dieses Produktes bei
einer zuständigen Stelle hilft Ihnen, dass das Produkt umwelt
gerecht entsorgt wird. Damit leisten Sie persönlich einen nicht
unerheblichen Beitrag zum Schutz der Umwelt und der men
schlichen Gesundheit vor möglichen negativen Effekten durch
unsachgemäße Entsorgung von Müll. Batterien oder Akkus, die
Schadstoffe enthalten, sind auch mit dem Symbol einer durch
gekreuzten Mülltonne gekennzeichnet. In der Nähe zum Mülltonnensymbol befindet sich die chemische Bezeichnung des Schadstoffes. Cd oder NiCd steht für Cadmium, Pb für Blei und Hg
für Quecksilber.
Bedienungsanleitung
Bewahren Sie diese Bedienungsanleitung gut auf, falls Sie sie
später noch einmal benötigen.
Flüssigkeiten und Fremdkörper
Stellen Sie niemals Behältnisse mit Flüssigkeiten in der Nähe des
Geräts auf. Wenn Flüssigkeit in das Gerät gelangt, können
Beschädigung des Geräts, Feuer oder ein elek-trischer Schlag die
Folge sein.
Beachten Sie, daß keinerlei Fremdkörper in das Gerät gelangen.
Sollte ein Fremdkörper in das Gerät gelangt sein, so trennen Sie es
sofort vom Netz. Wenden Sie sich dann an Ihren VOX-Fachhändler.
Entsprechungserklärung für die Richtlinien der
europäischen Union
Korg Inc. erklärt hiermit, dass dieses Gerät die Anforderungen der Richtlinie 1999/5/EC erfüllt.
Diese Entsprechungserklärung (DoC) für die 1999/5/
EC-Richtlinie finden Sie in der Bedienungsanleitung
dieses Geräts auf der Korg-Webpage (www.korg.com).
Dieses Produkt wurde unter strenger Beachtung von Spezifikationen und Spannungsanforderungen hergestellt, die im Bestimmungsland gelten. Wenn Sie dieses Produkt über das Internet,
per Postversand und/oder mit telefonischer Bestellung gekauft
haben, müssen Sie bestätigen, dass dieses Produkt für Ihr
Wohngebiet ausgelegt ist.
WARNUNG: Die Verwendung dieses Produkts in einem anderen
Land als dem Bestimmungsland kann gefährlich sein und die
Garantie des Herstellers oder Importeurs hinfällig lassen werden.
Bitte bewahren Sie diese Quittung als Kaufbeleg auf, da andern
falls das Produkt von der Garantie des Herstellers oder Importeurs ausgeschlossen werden kann.
* Bluetooth ist ein eingetragenes Markenzeichen der Bluetooth
SIG, Inc.
* Alle Produkt- und Firmennamen sind Warenzeichen oder ein-
getragene Warenzeichen der betreffenden Eigentümer.
Hinweis zur Entsorgung (Nur EU)
Wenn Sie das Symbol mit der „durchgekreuzten Mülltonne“ auf Ihrem Produkt, der dazugehörigen Bedienungsanleitung, der Batterie oder dem Batteriefach
sehen, müssen Sie das Produkt in der vorgeschriebenen
Art und Weise entsorgen. Dies bedeutet, dass dieses
Produkt mit elektrischen und elektronischen Kompo
nenten nicht mit dem normalen Hausmüll entsorgt
werden darf. Für Produkte dieser Art existiert ein
WICHTIGER HINWEIS FÜR KUNDEN
-
-
-
-
-
KBM-1, KBM-A1: Entworfen und entwickelt von Korg inc.
4015-2 Yanokuchi, Inagi-City, Tokyo 206-0812 Japan
7
Page 8

Contents/Sommaire/Contenido/ 目次/Inhalt
1/2 2/2
Owner’s Manual ........................................9
Main Features .............................................................................9
Specifications ..............................................................................9
Part names and functions........................................................10
Setup ..........................................................................................11
Selecting a program .................................................................12
Saving a program .....................................................................12
Using the tuner .........................................................................13
Restoring the factory default settings ...................................13
Connecting to a computer, tablet, etc. ...................................13
About amp models and effect types......................................15
Manuel d’utilisation ................................17
Principales fonctions ................................................................17
Fiche technique .........................................................................17
Noms des éléments et fonctions ............................................18
Préparatifs .................................................................................19
Sélectionner un programme ...................................................20
Sauvegarde d’un programme ................................................20
Utiliser l’accordeur ...................................................................21
Initialisation des réglages d’usine .........................................21
Connexion à un ordinateur, une tablette, etc. ......................21
À propos des modèles d’amplis et des types d’effets ......... 23
Manual de usuario ................................. 25
Características principales ......................................................25
Especificaciones ........................................................................25
Nombres y funciones de las partes ........................................26
Configuración ...........................................................................27
Seleccionar un programa ........................................................28
Guardar un programa .............................................................28
Uso del afinador .......................................................................28
Restablecer los ajustes predeterminados de fábrica............29
Conexión a un ordenador, a una tablet, etc. ........................29
Acerca de los modelos de amplificador y los tipos de efectos
....................................................................................................31
取扱説明書...................................... 33
おもな特長....................................................................... 33
仕様.................................................................................. 33
各部の名称と機能............................................................. 34
セットアップ ...................................................................... 35
プログラムを選 ぶ.............................................................. 36
プログラムを保 存する....................................................... 36
チューナーを使う.............................................................. 37
工場出荷時の状態に戻すには........................................... 37
コンピューターやタブレットなどを接続する...................... 37
アンプ・モデル、各種エフェクト・タイプについて................ 39
Bedienungsanleitung ............................. 41
Eigenschaften ............................................................................41
Technische Daten .....................................................................41
Bedienelemente und Funktionen ...........................................42
Einrichtung ...............................................................................43
Ein Programm auswählen ......................................................44
Speichern eines Programms ...................................................44
Verwendung der Stimmfunktion ...........................................45
Wiederherstellen der Werkseinstellungen ...........................45
Anschluss eines Computers, Tablets etc. ..............................45
Amp-Modelle und Effekttypen ..............................................47
8
Page 9

Owner’s Manual
En
Thank you for purchasing the VOX
Adio Air BS/Adio BS MODELING BASS & AUDIO
AMPLIFIER. To help you get the most out of your
new instrument, please read this manual carefully.
* Connection via Bluetooth is possible only
** Acoustage
Main Features
• The Adio Air BS/Adio BS is a high-end bass amp
with integrated active stereo speakers. Equipped
with an AUX IN jack, as well as USB & Bluetooh
(A2DP) audio functions, the
Adio Air BS/Adio BS allows you to connect a
variety of devices.
• Sophisticated modeling technology is used to provide
numerous amp models and high-quality effects.
• You can use up to three effects, including noise
reduction, simultaneously.
• Create a custom sound using the desired amp
and effect combination, and then easily save it as
one of eight programs (two banks × four programs). You can quickly switch saved programs
from the top panel during a performance.
• Manual mode lets you use the
Adio Air BS/Adio BS like a conventional bass
amp, where the actual setting positions of all
knobs are applied directly to the sound.
• The built-in auto tuner allows for easy tuning of
your bass guitar, connected to the INPUT jack.
• The Adio Air BS/Adio BS is equipped with MIDI
functionality and is compatible with USB and
Bluetooth*.
• Manage Adio Air BS/Adio BS programs by using the
Tone Room editor/librarian software on Windows,
Mac, iOS and Android. You can also use Tone Room to
apply customize and create your own amp models and
effects.
• Three USB audio routing modes for monaural/
stereo recording and a re-amp. (Can be set with
Tone Room)
• Acoustage** technology provides an expansive,
extra-wide listening experience.
Number of amp models:
Number of effects
Effects 1 types: 4
Effects 2 types: 4
Number of programs
User: 8 (two banks x four programs)
Input/output jacks: INPUT jack, AUX IN jack,
Wireless method (Adio Air BS only):
Power amp output: Maximum approx. 25 W x2 RMS
when using batteries: Maximum approx. 2.5 W x2
Speaker: 3", 8 ohms x2
Signal processing
Sample Rate: 44.1 kHz
A/D conversion: 24-bit
D/A conversion: 24-bit
Power supply: AA batteries (alkaline batteries
Current consumption 3.42A
when using batteries: 200mA
Battery life: Maximum 8 hours (when using
Dimensions (W x D x H):
Weight: 6.39 lb. / 2.9 kg (excluding
Included items: AC adapter, Power cord,
• Specifications and appearance are subject to change
(Virtual Surround Technology by KORG) is Korg’s
original, and revolutionary, virtual sound technology for creating
a unique personal acoustic space. Using only front stereo
speakers, this technology allows an unprecedented and unique
three-dimensional acoustic experience. The playback system itself
is acoustically analyzed, and optimizations are applied for that
specific system so that its full potential can be realized.
with Adio Air BS.
Specifications
11 (17 when using Tone
Room)
(11 when using Tone Room)
(8 when using Tone Room)
PHONES jack, USB (Type B) port
KBM-A1:
Bluetooth (A2DP Sink)
KBM-1: Bluetooth low energy
(MIDI)
@ 8 ohms
@ 8 ohms
or nickel hydride batteries):
8 batteries or the included AC
adapter (DC 19V )
alkaline batteries)
14.17" × 6.50" × 6.42" /
360 × 165 × 163 mm
batteries)
Owner’s Manual
without notice for improvement.
9
Page 10
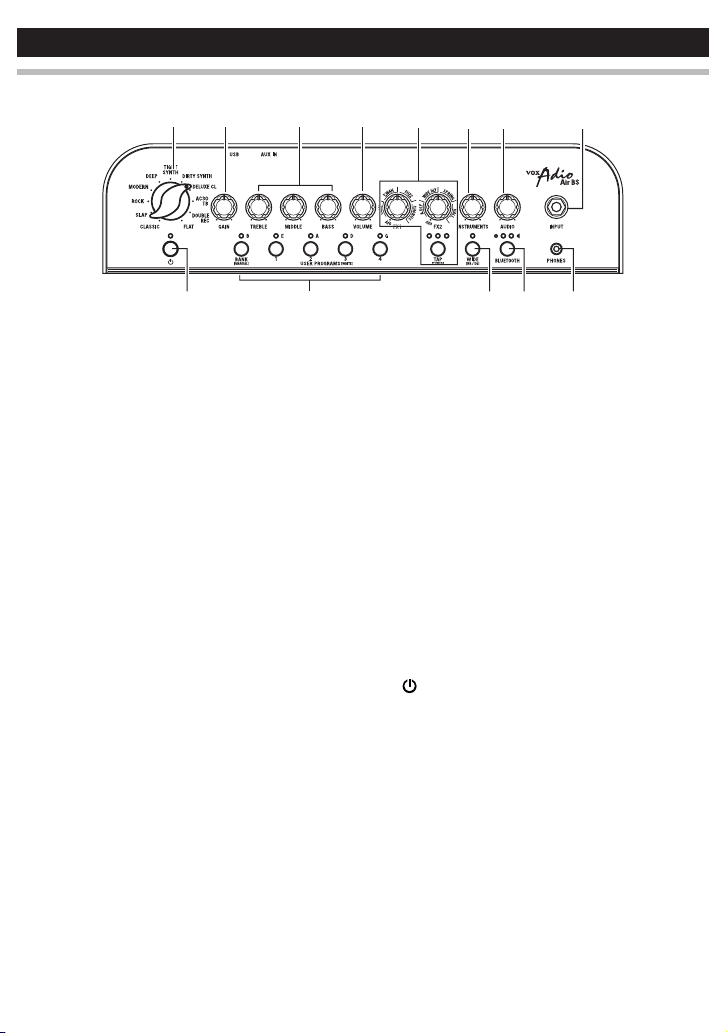
Top panel
a
b c d e
f
g
i
lk
m
j
Part names and functions
h
a. Amp models knob
This selects the amp model. The characteristics and
location of the gain and tone controls in the circuit, as well
as the cabinet response, will change according to the amp
model that is selected (except with bass synthesizer).
b. GAIN knob
This adjusts the pre-amp gain of the selected amp model.
This setting will alter the amount of pre-amp distortion.
c. TREBLE, MIDDLE and BASS knobs
These adjust the high-, mid-, and low-frequency ranges.
Tip The effects of the GAIN, TREBLE, MIDDLE and BASS knobs
change when the bass synthesizer is selected (→ “About
amp models and effect types”).
d. VOLUME knob
This adjusts the volume level of the selected amp model.
e. EFFECTS section
FX1 (effects 1) knob
Turn this knob select the effect type and adjust the effect
parameters. When this knob is fully turned to the left, all
effects are off.
Tip Effects 1 types COMP, T.WAH and FUZZ have no effect on
the bass synthesizer output.
FX2 (effects 2) knob
Turn this knob to select a type of delay/reverb effect. This
knob also controls the depth, or intensity, of the selected
effect. When this knob is fully turned to the left, all effects
are off.
Tip More detailed adjustments can be made to effects by using
Tone Room.
TAP button and TAP/TUNER LEDs
This sets the time for FX2 (delay/reverb effects). The
interval between two presses of the TAP button will be set
as the time. The green LED will blink in accordance with
10
the specified time.
Tip To set a precise time that matches the tempo of a song,
press the TAP button several times along with the beat of
the song.
Tip Hold down the TAP button for at least 1 second to bypass
effects 2 and turn on the tuner function (→ “Using the
tuner”).
f. INSTRUMENTS knob
This adjusts the final output level of the sound that has
passed through the selected amp model and effect.
Tip This knob cannot be used to adjust the output level to the
USB port.
g. AUDIO knob
This adjusts the output level of sound input from the AUX
IN jack, USB port or Bluetooth connection..
h. INPUT jack
This is where you plug in your bass guitar.
i. (Power) button, LED
Hold down this button to turn on or off the amp.
j. BANK/MANUAL button, BANK LED and USER PRO-
GRAMS (1 through 4) buttons/LEDs
Use the BANK/MANUAL button to select a program
bank, and then press a USER PROGRAMS button to select
the program within the bank. To switch to manual mode,
hold down the BANK/MANUAL button for at least 1
second; the BANK LED turns off. These buttons are also
used to save new programs (→ “Saving a program”).
When the tuner function has been turned on, these buttons
will display the tuning status (→ “Using the tuner”).
k. WIDE button/LED
Press this button to engage the wide function (LED lights
up). The wide function uses Acoustage technology to
provide an expansive, extra-wide sound field. Press this
Page 11
button again to turn off the function (LED turns off).
cba
Tip Holding down the WIDE button for at least 1 second
changes the noise reduction setting. Holding down the
WIDE button for at least 2 seconds changes the audio
equalizer setting.
The wide function does not affect the output from the
PHONES jack or USB port.
l. [Adio Air BS only] BLUETOOTH button, (Bluetooth
MIDI) LED and (Bluetooth audio) LED
Use when connecting other devices via Bluetooth (→
“Using as wireless speakers (Bluetooth audio)” and
“Using Tone Room via a wireless connection (Bluetooth
MIDI)”).
m. PHONES(Headphones) jack
Use this jack if you want to output directly to a mixer or
recording device, or when you want to use headphones.
When a device is connected to this jack, no sound will be
output from the internal speaker.
Be sure to connect a stereo plug to this jack.
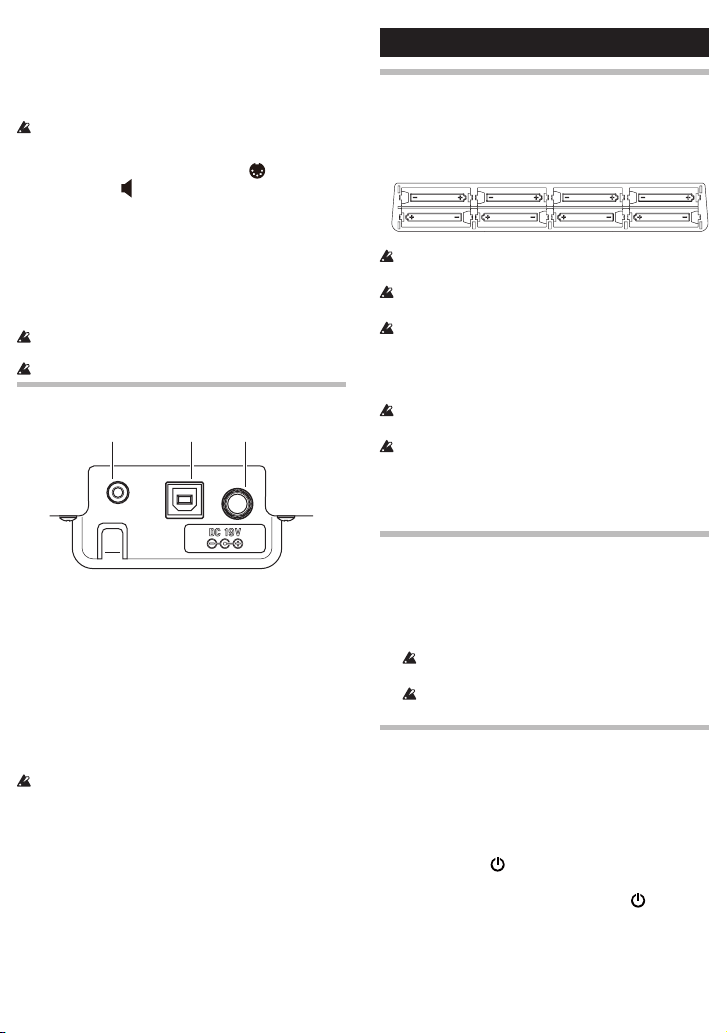
Rear panel
a. AUX IN jack
Connect the analog output of an audio device to this jack.
You can connect an audio player to this jack, then play
along on your bass guitar while listening to your favorite
songs.
b. USB port
Use a commercially available USB cable to connect a
computer or other USB-equipped device to this port.
c. DC 19V jack
Connect the included AC adapter here.
The AC adapter is designed specifically for the
Adio Air BS/Adio BS. Do not use any other adapter,
otherwise a malfunction may occur.
11
Setup
Installing the batteries
Remove the battery cover from the rear of the cabinet.
Insert eight AA batteries, either alkaline or nickel-metal
hydride, taking care that each battery is correctly oriented
according to the polarity as shown in the illustration.
Batteries are not included. You must purchase them
separately.
Make sure that each battery is correctly oriented according
to the polarity.
Do not mix partially used batteries with new ones, and do
not mix batteries of differing types.
Replacing the batteries
Replace the batteries when the power LED becomes dim.
As the batteries run low, the volume may become insuf-
ficient, or you may hear noise in the sound.
Depleted batteries should be removed immediately. If
depleted batteries are left installed in the unit, they may
leak, causing malfunctions. You should also remove the
batteries if you don’t plan to use the unit for an extended
length of time.
Connecting the AC adapter
1. Connect the power cord to the included AC adapter.
2. Insert the plug of the AC adapter into the DC 19V jack on
the amp.
3. Insert the plug of the power cord into an AC outlet.
Only use the specified AC adapter. Using any
other AC adapter may cause malfunctions.
In order to prevent electric shock or damage to
equipment, securely connect the ground.
Turning on the power
1. Turn the INSTRUMENTS and AUDIO knobs on the
amp counterclockwise to their minimum settings.
2. Plug the cable connected to your bass guitar or guitar
into the INPUT jack. If an audio player will be used,
connect it to the AUX IN jack.
3. Hold down the (Power) button until the Power
LED lights up and the amp turns on.
Tip To turn off the amp, hold down the (Power)
button until the Power LED turns off.
4. Slowly turn the INSTRUMENTS and AUDIO knobs to
adjust the volume.
Page 12
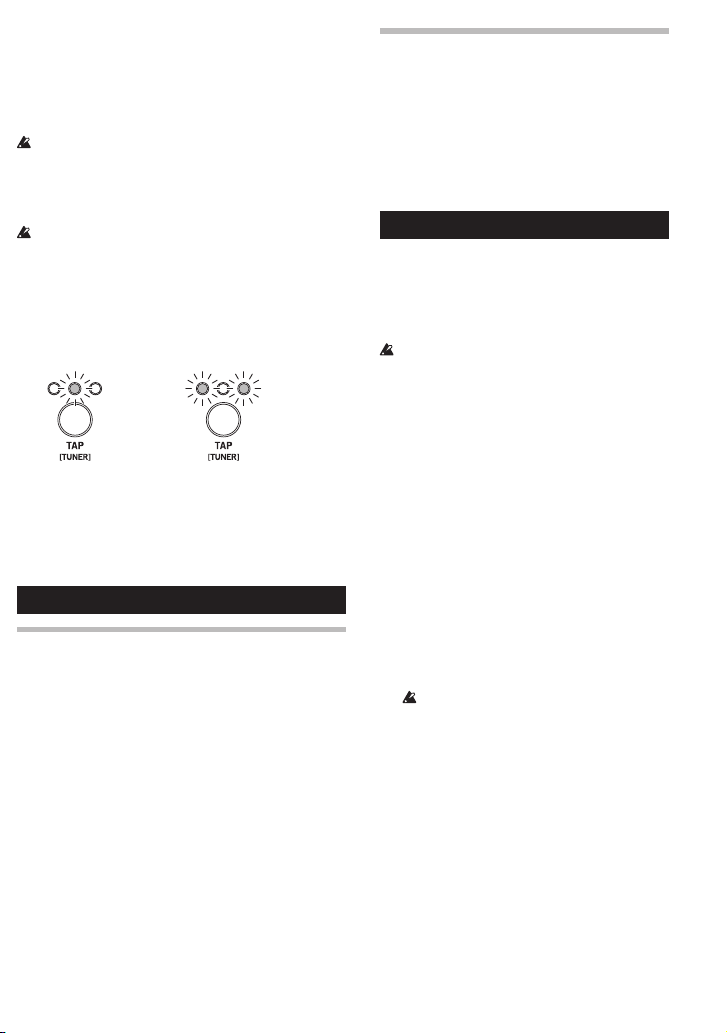
Auto power-off function
disabled
The amp has an auto power-off function. With this function, the amp automatically turns off if there is no operation for approximately 1 hour with no input from the
INPUT jack. When the amp turns off, even operating a
knob or button does not turn the amp back on.
When the input level is extremely low or there is very little
change in the sound, the auto power-off function may be
activated. In addition, depending on the settings and
environment, the amp may interpret noise as input, even if
the bass guitar is not being played.
The auto power-off function will not operate while the
amp is connected to another device via USB or Bluetooth.
Tip As the factory default setting, the auto power-off function
is enabled.
Enabling/disabling the auto power-off function
1. While holding down the TAP button, turn on the amp.
The TAP/TUNER LEDs indicate the current setting.
enabled
2. Press the TAP button to switch between enabling and
disabling the function.
3. Wait without performing any operation for a few
seconds. The setting is applied, and the amp automatically returns to normal operation.
Selecting a program
User program mode
The mode where you can select a program is called user
program mode.
Tip As the factory default, previously specified sounds are saved. By using
the various knobs, you can adjust the selected sound as desired.
Selecting a program in the same bank
Press the USER PROGRAMS button.
Selecting a program in a different bank
Press the BANK/MANUAL button. The BANK LED
changes color and blinks. Press the USER PROGRAMS
button.
Tip Pressing the BANK/MANUAL button again stops the
blinking of the LED and returns to the previous bank.
Manual mode
When the BANK/MANUAL button is held down
for at least 1 second, the BANK LED turns off, and
the amp enters
positions of all knobs are applied directly to the
sound.
In manual mode, all knobs are operated as on a
conventional bass amp, enabling you to create your
own sound.
manual mode, where the actual setting
Saving a program
After adjusting the various knobs and buttons to
create your desired sound, it can be saved as a user
program.
Tip When saving programs within the same bank, start
the procedure from step 2.
Programs are saved by overwriting. In other
words, a program selected in step 2 will be erased.
1. To save a program to a different bank or while
in manual mode, press the BANK/MANUAL
button to select the bank where the program
will be saved. (BANK LED blinks)
Tip To cancel the save operation, press the
TAP button. The BANK LED stops
blinking, and the amp returns to its
previous mode.
Tip In user program mode, pressing the
BANK/MANUAL button again returns to
the previous bank, and the LED stops
blinking.
2. Hold down the USER PROGRAMS button of
the save location until the LED changes from
blinking to lit (at least 2 seconds). The program
is saved to the selected location, and the bank
and program for the save location are selected.
If you switch to another program or
manual mode or turn off the amp before
saving the sound that you are creating, the
changes that you made will be lost.
12
Page 13
Using the tuner
The built-in tuner function allows you to easily
tune the bass guitar connected to the INPUT jack.
Tip A guitar can also be tuned.
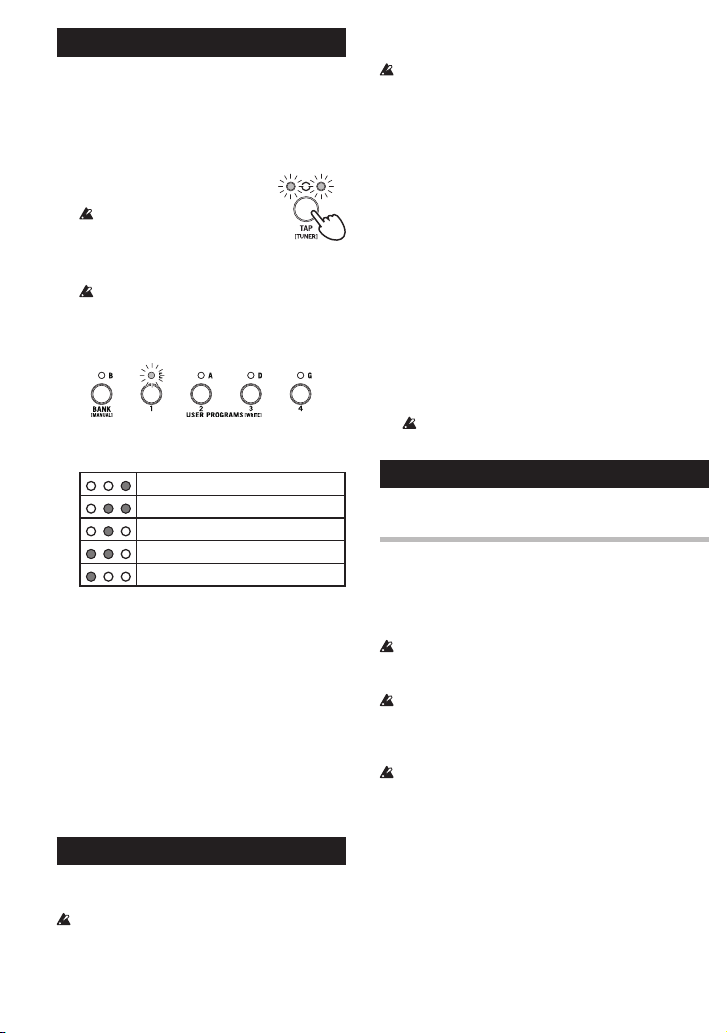
Regular tuning mode
1. Hold down the TAP button for about 1 second.
The tuner function turns on, and the
TAP/TUNER LEDs (red) light up.
When the tuner function has
been turned on, FX2 will be
bypassed.
2. Play any open string on the bass guitar.
Be careful not to play any of the other strings.
3. Roughly tune the string until the LED (BANK
or USER PROGRAMS 1 through 4) indicating
the string that was played lights up.
4. While checking the TAP/TUNER LEDs, cor-
rectly tune the bass guitar.
Sharp
Slightly sharp
In tune
Slightly flat
Flat
5. Press the TAP button to turn off the tuner function.
(LED turns off)
Half down tuning mode
When the tuning function has been turned on and
the TAP button is held down for at least 2 seconds,
the TAP/TUNER LEDs (red) blink, and the amp
enters half down tuning mode, where all strings
can be tuned one semitone lower.
In this mode, when the 5th through 1st strings are B
A♭, D♭ and G♭, they will appear to be in tune.
The operating procedure and LED indications are the
same as with the regular tuning mode.
♭
, E♭,
Restoring the factory default settings
The procedure for restoring the amp to its factory
default settings is described below.
When this operation is done, all programs saved as
USER PROGRAMS as well as all settings, such as
audio equalizer settings stored from Tone Room
13
and Bluetooth pairing information, will be reset to the
factory defaults.
After performing this operation, be sure to also delete this
amp’s information from the Bluetooth devices it was
paired with. In order to connect the amp and device again,
pairing must be performed again.
1. Turn off the amp.
2. While holding down the USER PROGRAMS 1 and
USER PROGRAMS 4 buttons, turn on the amp. After
the BANK and USER PROGRAMS LEDs blink, release
the pressed buttons.
Tip If you decide to cancel initialization at this point,
press the TAP button. Otherwise, if the next step is
not performed within about 15 seconds, the amp
will return to normal operation without initializing.
3. Hold down the BANK/MANUAL button until the
LEDs change from blinking to lit (at least 2 seconds).
Initialization begins, and the BANK and USER PROGRAMS LEDs change from blinking to lit. Initialization is completed after about 1 to 2 seconds, and the
amp returns to normal operation.
Never turn off the amp while initialization is in
progress.
Connecting to a computer, tablet, etc.
Tip Download the newest versions of each driver and software from
the VOX website (www.voxamps.com).
Connecting to external devices via USB
By connecting a computer, tablet, smartphone, etc., using a
commercially available USB cable, the amp can be used as a USB
audio interface or the editor/librarian software “Tone Room”
can be used to manage programs and customize amps/effects.
In order to connect to an iOS device (iPad or iPhone), a
commercially available adapter, such as the Apple Lightning to USB camera adapter, will be required.
In order to connect to an Android device, a commercially
available USB On-The-Go (OTG) connector will be required. In addition, the Android device must be running
Android 6.0 or later in order to use Tone Room.
The input to the AUX IN jack is not output to the USB port.
Tip Install the VOX USB-MIDI Driver in order to use Tone
Room on a Windows or Mac computer connected via USB.
Tip The USB audio function operates with the driver included
with the operating system; however, if the VOX 2ch Audio
Driver is installed and an ASIO-compatible application is
used, recording and playback may be slightly delayed.
Page 14

Using as wireless speakers (Bluetooth audio) [Adio Air BS only]
If a computer, tablet, smartphone, audio player, etc.,
compatible with Bluetooth audio is connected via Bluetooth, this amp can be used as wireless speakers.
Tip Multiple devices cannot be connected at the same time.
< Connecting a new device (pairing) >
When a new device is connected, “pairing” (mutually
registering connection information) must be performed.
Tip The information for up to eight paired devices can be stored.
When a ninth device is paired, the information for an existing
device is deleted so that the new information can be stored.
Even if pairing failed, the information for that device may be
stored on the amp. If the information for eight devices has
already been stored, the information for an existing device is
deleted.
In order to reconnect to the device whose information was
deleted, delete the amp’s information from that device, and
then perform pairing again.
1. Press the BLUETOOTH button on this amp. The amp
enters a waiting for pairing mode, and the (Bluetooth
Tip If the reconnection cannot be established from the amp, try
< Cutting the connection >
To cut a Bluetooth audio connection, press the BLUETOOTH button while the (Bluetooth audio) LED is lit.
The connection is cut, and the LED turns off.
Using Tone Room via a wireless connection (Bluetooth MIDI)
If the amp is connected to a Windows or Mac computer or
iOS or Android device compatible with Bluetooth MIDI
(MIDI over Bluetooth low energy), the editor/librarian
software “Tone Room” can be used via a wireless connection.
document included with Tone Room. For details on downloading, refer to http://www.voxamps.com/Toneroom.
Tip In order to use Tone Room via a Bluetooth MIDI connec-
audio) LED blinks.
2. Turn on the Bluetooth function for the device to be
connected to, and then select “Adio Air BS Speaker”
from the list of options on your device.
Tip In order to make a Bluetooth MIDI connection with a
3. When a message appears, requesting permission for
pairing, allow pairing. When a passkey is requested,
enter “0000”.
Tip The passkey may also be called a PIN code,
password, etc.
Tip Multiple devices cannot be connected at the same time.
Tip When a Bluetooth MIDI connection is made, the Bluetooth
4. If pairing is successful, the amp enters a connection ready
mode, and the (Bluetooth audio) LED changes to lit.
Tip If no connection is established within 1 minute,
the waiting for pairing mode is canceled (LED
turns off).
< Reconnecting to a paired device >
1. While the amp is in the waiting for pairing mode (
(Bluetooth audio) LED is blinking), press the BLUETOOTH button to try to reconnect with a previously
connected device (LED blinks quickly).
2. If the connection is established, the (Bluetooth audio)
LED changes to lit.
Tip If no connection is established within 10 seconds, the
reconnection is stopped (LED turns off).
Tip A reconnection can also be made by selecting “Adio Air BS
Speaker” in the Bluetooth settings screen on the device to
be connected to.
Tip If the reconnection is performed using operations on this
amp, a connection will be re-established automatically in
Troubleshooting a Bluetooth connection
Depending on the settings for the other device and timing
of the operations, a connection may fail to be established
several times, or the Bluetooth function on this amp may
become unstable. If either of these occur, check the settings
for the other device, and follow the procedure described
below to reset the Bluetooth function on this amp.
Tip When this procedure is performed, both the Bluetooth
Tip Even after this procedure is performed, information for other
1. Hold down the BLUETOOTH button for at least 3
2. After the (Bluetooth audio) and (Bluetooth MIDI)
3. When resetting is completed, the LEDs turn off.
14
the future simply by turning on the amp. To set the amp so
that it does not automatically reconnect, press the BLUETOOTH button while the LED is blinking quickly in step 1
to cancel automatic reconnection.
making the connection from the other device, or try
pairing again.
[Adio Air BS only]
For details on making the connection, refer to the
tion, a device compatible with Bluetooth 4.0 is required.
Compatible operating systems are Windows 8.1 or later, OS
X 10.10 or later, iOS 8 or later, and Android 6.0.1 or later.
Windows computer, the VOX BLE-MIDI Driver must be
installed. Refer to the document included with the VOX
BLE-MIDI Driver.
MIDI LED lights up.
MIDI and Bluetooth audio connections will be cut.
devices, which is stored on this amp, will not be deleted.
seconds.
LEDs begin to blink, release the BLUETOOTH button.
Tip If the problem is not resolved, even after resetting,
delete the connection information for this amp from
the other device, and then perform pairing again.
Page 15

About amp models and effect types
This section provides details on the amp models, the various effects 1 and effects 2 types, noise reduction and the audio
equalizer.
Tip Using Tone Room, you can select more amp models and effect types than those listed below and also store user programs.
Unnatural distortion may occur, depending on the amp and effect settings. If this occurs, adjust the amp and effect parameters.
If a parameter not available on the top panel is changed in Tone Room, the tone may become quite different from the original
amp model or effect type.
For input outside of the bass range (high-frequency range of guitars), it is not possible to obtain a normal effect with the bass
synthesizer.
Amp models
1. CLASSIC
This vintage tube amp head is famous for being able to flip
it and store it in the speaker cabinet. It’s warm sound is
ideal for finger picking styles
2. SLAP
This model produces bright highs and scooped mids to cut
through the mix, with a defined contour. Best used for slap
styles.
3. ROCK
This model is based on the world famous pre-amp in a
black case. It’s sound contains aggressive highs and upper
harmonic content. Best used for rock picking styles.
4. MODERN
This model is based on the ever popular tube amplifier
with it’s “ULTRA LOW” switch engaged. This produces
Hi-Fi rock sounds.
5. DEEP
This is the most aggressive bass sound that can be heard
from 2010 and later. The input signal is divided into
low-band with compression and high-band with distortion, best for heavy rock and prog metal.
6. TIGHT SYNTH (BASS SYNTHESIZER)
This model produces pop synth bass sounds that can be
heard in the 80’s and beyond. The solid sound is touchsensitive and very dynamic. Envelope Filter is included in
BASS SYNTHESIZER models.
TREBLE, MIDDLE and BASS knobs will be assigned to the
filter control parameters when this model is selected.
TREBLE: (FREQUENCY + RESONANCE) Adjusts the
center frequency and the amount of resonance.
MIDDLE: (DECAY) Adjusts the speed of response.
BASS : (DEPTH) Adjusts the depth of the filter.
7. DIRTY SYNTH (BASS SYNTHESIZER)
This synthesizer consists of multiple waves with distortion
and produces an aggressive dirty sound that can be heard
in alternative rock music. It’s distinctive sound can stand
out in a loud band.
Envelope Filter is included and TREBLE, MIDDLE and
BASS knobs will be assigned to the filter control parameters as with TIGHT SYNTH.
8. DELUXE CL
This models the Vibrato channel of a 22W blackface 60’s
designed amp. Using 6V6 power tubes and a tube-driven
spring reverb, this produces a big sound at a lower wattage.
9. AC30TB
This models an AC30 amp with the “top boost” circuit of
the 1964 AC30. It delivers a smooth and refined top end, a
majestically deep overdrive, and a rich, brilliant clean
sound.
10. DOUBLE REC
This models the modern high-gain channel from a wild
beast of an amp. Its deep and loose low-end, sparkling
highs, and monstrous gain are ideal for guitars tuned as
low as possible, or for metal acts wielding seven-string
guitars.
11. FLAT
This models is only a three-band tone control amplifier
that produces a pure,clean tone. Setting TREBLE, MIDDLE, and BASS to the center will produce flat response of
the preamp.
If the input level is too high the sound may become distort-
ed. To prevent this from happening reduce the gain in the
preamp.
15
Page 16

Effect types
Effects 1 types (
COMP
T.WAH
FUZZ
CHORUS
FX1 knob):
This models a compressor pedal that is popular for its percussive clean sound. It can also
produce a singing, mellow, sustain. Adjusts the sensitivity with the knob.
This models an auto-wah; a device that creates an automatic “wah” effect that varies with your
picking dynamics (i.e., how hard or soft you hit the strings) - a quirky, but useful effect. Adjusts
the sensitivity of response to the input volume with the knob.
This models a bass fuzz pedal. Adjust the gain with the knob.
This models a stereo chorus, which creates a rich and spacious sound. Adjust the modulation
speed with the knob.
Effects 2 types (
A.DLY
(ANALOG DELAY )
WIDE DLY
(WIDE DELAY)
SPRING
HALL
FX2 knob) : delay/reverb types
This models an analog delay that uses a Bucket Brigade Device (BBD). Its audio quality is lo-fi,
but it is popular for its warm sound. Adjust the mix amount of the delay sound with the knob.
Set the delay time with the TAP button. The maximum delay time is approximately 1 seconds.
This is a stereo delay effect that has slightly staggered notes from the right and left speakers. The
operation of the knob and button and the maximum delay time are the same as with A.DLY.
This simulates the spring reverb that’s built into many guitar amps. Adjust the mix amount of
the reverb sound with the knob. Set the reverb time with the TAP button.
This models the reverberation of a concert hall containing numerous echo components. The
operation of the knob and button is the same as with SPRING.
Noise reduction
This applies a noise-reducing effect.
As with amps and effects, noise reduction must be set for
each program. If, while changing settings in the user
program mode, you switch to another program or to
manual mode or turn off the amp before saving the
settings, the changes that you made will be lost.
1. Hold down the WIDE button for about 1 second. The
WIDE LED blinks, and the USER PROGRAMS LEDs
indicate the noise reduction setting (the BANK LED
lights up in orange).
2. Press the BANK/MANUAL button or a USER PRO-
GRAMS button to change the level of the noise reduction.
LEDs
Button
BANK/MANUAL
1
2
3
4
Setting
OFF
Low
|
|
High
3. Press the WIDE button. The BANK and USER PRO-
GRAMS LEDs return to their previous indications.
Audio equalizer
This adjusts the tone of the audio input from the
AUX IN jack or via a Bluetooth connection.
1. Hold down the WIDE button for about 2
seconds. The WIDE LED blinks slowly, and the
USER PROGRAMS LEDs indicate the current
equalizer setting (the BANK LED lights up in
orange).
2. Press the BANK/MANUAL button or a USER
PROGRAMS button to change the equalizer
setting.
LEDs
3. Press the WIDE button.
PROGRAMS LEDs return to their previous
indications.
Tip Using Tone Room, you can change the settings
specified for 1 through 4.
Button
BANK/MANUAL OFF
1
2 BASS BOOST
3 MID BOOST
4
Setting
LOUD
TREBLE BOOST
The BANK and USER
16
Page 17

Fr
*
**
Manuel d’utilisation
Merci d’avoir choisi L’AMPLI BASSE À MODÉLISATION
& AMPLI AUDIO Adio Air BS/Adio BS de VOX. Afin de
pouvoir exploiter au mieux toutes les possibilités offertes
par l’instrument, veuillez lire attentivement ce manuel.
La connexion Bluetooth est uniquement possible sur l’Adio Air BS.
Acoustage (désignant la technologie révolutionnaire de surround
virtuel signée KORG) permet de produire un environnement
acoustique à la fois personnel et unique. Sur base d’une simple
configuration stéréo avant, cette technologie offre une expérience
acoustique tridimensionnelle inédite et unique. Le système de lecture
même subit une analyse acoustique en vue d’optimaliser la lecture et
de garantir une exploitation du plein potentiel de l’instrument.
Principales fonctions
• L’Adio Air BS/Adio BS est un ampli de basse haut de
gamme à haut-parleurs stéréo actifs. Grâce à sa prise
AUX IN, ainsi qu’à ses fonctions audio USB &
Bluetooth* (A2DP), l’Adio Air BS/Adio BS permet la
connexion à un éventail de dispositifs.
• La haute technologie de modélisation intégrée permet
de recréer un incroyable éventail de modèles d’amplis
et d’effets, tous de qualité superbe.
• Possibilité d’aligner jusqu’à 3 effets simultanés, dont la
réduction de bruit.
• Créez un son perso en combinant l’ampli et les effets
voulus, et sauvegardez facilement votre création dans
une des 8 mémoires (2 banques × 4 programmes). Le
panneau avant de l’ampli permet de rappeler facilement les programmes mémorisés pendant le jeu.
• Le mode manuel permet d’utiliser
l’Adio Air BS/Adio BS comme un ampli de basse
conventionnel, ce qui veut dire que la position physique
de toutes les commandes façonne directement le son.
• L’accordeur automatique intégré permet d’accorder
facilement la basse connectée à la prise INPUT.
• L’Adio Air BS/Adio BS est compatible MIDI, USB et
Bluetooth*.
• Le logiciel d’édition/de librairie Tone Room (Windows,
Mac, iOS et Android) permet de gérer les programmes
de l’ Adio Air BS/Adio BS. Tone Room vous permet
aussi de personnaliser et de créer vos propres modélisations d’amplis et d’effets.
• Trois modes de routage audio USB pour l’enregistrement mono/stéréo et pour le reamping (configurables
avec Tone Room).
• La technologie Acoustage** produit une impression de
champ sonore extra-large.
Nombre de programmes :
Nombre d’effets
Nombre de programmes
Prises d’entrée/de sortie : Prises INPUT, prise AUX IN, prise
Méthode sans fil (Adio Air BS uniquement) :
Puissance de l’ampli : Max. environ 25 W x 2 RMS sous
Haut-parleur : 3", 8 ohms x 2
Traitement des signaux
Alimentation : Piles AA (alcalines ou au nickel-
Consommation électrique 3,42A
Autonomie des piles : Max. 8 heures (avec piles alcalines)
Dimensions (L x P x H)
Poids : 2,9 kg (sans les piles)
Accessoires inclus : Adaptateur secteur, Cordon
* Les caractéristiques et l’aspect du produit sont susceptibles d’être
Fiche technique
11 (17 avec le logiciel Tone
Room)
Types d’effets 1 : 4
Types d’effets 2 : 4
Utilisateur : 8 (2 banques x 4 programmes)
avec alimentation sur piles :
Max. environ 2,5 W x 2 sous 8 ohms
Fréquence d’échantillonnage: 44,1kHz
Conversion A/N : 24 bits
Conversion N/A : 24 bits
avec alimentation sur piles :
200mA
modifiés sans avis préalable en vue d’une amélioration.
(11 avec le logiciel Tone
Room)
(8 avec le logiciel Tone
Room)
PHONES, port USB (Type B)
KBM-A1: Bluetooth (A2DP Sink)
KBM-1: Bluetooth low energy (MIDI)
8 ohms
hydrure métallique ) : 8 piles ou
alimentation avec l’adaptateur
secteur fourni (CA 19V )
: 360 × 165 × 163 mm
d’alimentation, manuel d’utilisation
17
Page 18

Panneau supérieur
a
b c d e
f
g
i
lk
m
j
Noms des éléments et fonctions
h
a. Commande de modèle d’ampli
Cette commande permet de choisir un modèle d’ampli. Les caractéristiques et l’emplacement des commandes de gain et de timbre au
sein du circuit ainsi que la réponse de l’enceinte varient selon le
modèle d’ampli choisi ici. (sauf dans la cas de la basse synthé)
b. Commande GAIN
Cette commande règle le gain du préampli du modèle sélectionné.
Ce réglage détermine la quantité de distorsion du préampli.
c. Commandes TREBLE, MIDDLE et BASS
Ces commandes règlent le timbre en agissant sur le grave, le
médium et l’aigu.
Astuce L’effet des commandes GAIN, TREBLE, MIDDLE et BASS
change quand vous choisissez la basse synthé. (→ “À
propos des modèles d’amplis et des types d’effets”)
d. Commande VOLUME
Cette commande règle niveau de volume du modèle d’ampli
sélectionné.
e. Section d’effets
Commande FX1 (effet 1)
Cette commande permet de choisir le type d’effet voulu et de
régler les paramètres de l’effet. Pour couper tous les effets,
tournez cette commande à fond à gauche.
Astuce Les types d’effets 1 COMP, T.WAH et FUZZ n’ont aucun effet sur
le signal de basse synthé.
Commande FX2 (effet 2)
Cette commande permet de choisir un type d’effet de delay/
réverb. Elle règle aussi la profondeur -ou l’intensité- de l’effet
choisi. Pour couper tous les effets, tournez cette commande à fond
à gauche.
Astuce Le logiciel Tone Room permet d’effectuer des réglages d’effets
plus poussés.
Bouton TAP et témoin TAP/TUNER
Ce bouton permet de régler la vitesse/durée de l’effet FX2 (delay/
réverb.). L’intervalle entre deux pressions successives sur le
bouton TAP détermine la durée de l’effet. Le témoin vert clignote
au tempo défini avec le bouton.
Astuce Pour caler parfaitement le timing de l’effet sur le tempo d’un
morceau, appuyez plusieurs fois sur le bouton TAP en vous
basant sur le tempo de ce morceau.
Astuce Maintenez le bouton TAP enfoncé pendant au moins une
seconde pour contourner les effets 2 et activer l’accordeur (→
“Utiliser l’accordeur”).
f. Commande INSTRUMENTS
Cette commande règle le niveau de sortie final du signal de
l’instrument traité par le modèle d’ampli et l’effet choisis.
Astuce Cette commande ne permet pas de régler le niveau de
sortie au port USB.
g. Commande AUDIO
Cette commande règle le niveau de sortie du signal reçu à la prise
AUX IN, au port USB ou via la connexion Bluetooth.
h. Prise INPUT
C’est ici que vous branchez votre basse.
i. Bouton/témoin d’alimentation ( )
Maintenez ce bouton enfoncé pour mettre l’ampli sous tension et
hors tension.
j. Bouton BANK/MANUAL, témoin BANK et boutons/témoins
USER PROGRAMS (1 à 4)
Sélectionnez une banque de programmes avec le bouton BANK/
MANUAL, puis appuyez sur un bouton USER PROGRAMS pour
choisir un programme de cette banque. Pour passer en mode
manuel, maintenez le bouton BANK/MANUAL enfoncé pendant
au moins 1 seconde. Le témoin BANK s'éteint. Ces boutons
servent aussi à sauvegarder vos programmes (→ “Sauvegarde
d’un programme”). Quand la fonction accordeur est active, ces
boutons servent de guide d’accordage (→ “Utiliser l’accordeur”).
18
Page 19

k. Bouton/témoin WIDE
cba
Appuyez sur ce bouton pour activer la fonction d’élargissement
du champ sonore (le témoin s'allume). Grâce à la technologie
Acoustage, cette fonction produit un champ sonore extra-large,
pour une expérience d’écoute unique. Une nouvelle pression sur
ce bouton désactive la fonction (le témoin s'éteint).
Astuce Maintenez le bouton WIDE enfoncé pendant au moins 1 seconde
pour changer le réglage de réduction de bruit. Maintenez le
bouton WIDE enfoncé pendant au moins 2 secondes pour
changer le réglage de l’égaliseur audio.
La fonction d’élargissement du champ sonore ne traite pas le
signal transmis à la prise PHONES et au port USB.
l. [Adio Air BS uniquement] Bouton BLUETOOTH, témoin
(Bluetooth MIDI) et témoin (Bluetooth audio)
Ce bouton sert quand vous connectez d’autres dispositifs via
Bluetooth (→ Utilisation comme haut-parleurs sans fil (Bluetooth
audio) et Utiliser le logiciel Tone Room via une connexion sans fil
(Bluetooth MIDI)).
m. Prise PHONES(casque)
Permet de brancher l’ampli directement à une console de mixage
ou un enregistreur, ou encore de travailler au casque.
Quand une fiche est branchée à cette prise, les haut-parleurs
internes ne produisent aucun son.
Veillez à brancher une fiche stéréo à cette prise.
Panneau arrière
Mise en place des piles
Retirez le couvercle des piles à l’arrière de l’enceinte. Installez huit
piles de type AA, alcalines ou au nickel-hydrure métallique, en
veillant à orienter correctement chaque pile (conformément au
schéma de polarité illustré).
Les piles ne sont pas fournies. Procurez-vous des piles du type
approprié.
Vérifiez que chaque pile est orientée correctement, conformément
aux indications de polarité.
Ne mélangez pas des piles partiellement usées avec des neuves, et
ne mélangez pas des types différents de piles.
Remplacer les piles
Remplacez les piles quand la luminosité du témoin d’alimentation
faiblit.
Quand les piles s'épuisent, le volume pourrait baisser fortement,
ou le son pourrait comporter du bruit.
Retirez immédiatement les piles une fois qu'elles sont plates. Ne
laissez jamais des piles plates dans l’unité car elles risqueraient de
fuir et d’endommager l’instrument. De même, veillez toujours à
retirer les piles de l’unité si vous n'avez pas l’intention de l’utiliser
pendant une période prolongée.
Brancher l’adaptateur secteur
1. Branchez le cordon d’alimentation de l’adaptateur secteur fourni.
2. Branchez la fiche de l’adaptateur secteur à la prise DC 19V
de l’ampli.
3. Branchez la fiche du cordon d’alimentation à une prise de
courant de tension appropriée.
Utilisez uniquement le type d’adaptateur secteur spécifié.
a. Prise AUX IN
Branchez la sortie analogique d’une source audio à cette prise.
Vous pouvez y brancher un lecteur audio et accompagner vos
morceaux favoris à la guitare ou encore travailler des solos.
b. Port USB
Utilisez un câble USB disponible dans le commerce pour relier un
ordinateur ou autre dispositif USB à ce port.
c. Prise DC 19V
Branchez l’adaptateur secteur fourni à cette prise.
Cet adaptateur secteur est spécialement conçu pour alimenter
l’Adio Air BS/Adio BS. N’utilisez aucun autre adaptateur secteur,
car cela risquerait d’endommager l’ampli.
Pour éviter tout risque de décharge électrique ou de dommage
Mise sous tension
1. Tournez la commande INSTRUMENTS et la commande
AUDIO à fond à gauche.
2. Branchez le câble connecté à votre basse ou guitare à la prise
INPUT. Si vous souhaitez utiliser un lecteur audio, branchez-le
à la prise AUX IN.
3. Maintenez enfoncé le bouton d’alimentation ( ) jusqu’à ce que
le témoin d’alimentation s’allume, confirmant la mise sous
tension de l’ampli.
Astuce Pour mettre l’ampli hors tension, maintenez son bouton d’alimen-
4. Réglez le volume en tournant lentement la commande INSTRUMENTS et la commande AUDIO.
19
Préparatifs
L’utilisation de tout autre adaptateur secteur pourrait causer
des dysfonctionnements.
de l’appareil, reliez-le à la terre.
tation enfoncé jusqu’à ce que le témoin d’alimentation
s’éteigne.
( )
Page 20

Fonction de coupure automatique de l’alimentation
Désactivé
Cet ampli est doté d’une fonction de coupure automatique de
l’alimentation. Cette fonction met automatiquement l’ampli hors
tension quand il est resté environ 1 heure sans recevoir aucun
signal à sa prise INPUT. Une fois que l’alimentation de l’ampli est
coupée par cette fonction, l’ampli ne réagit plus aux manipulations de ses commandes et boutons.
En présence d’un signal d’entrée de niveau extrêmement bas ou
d’un son qui ne change pratiquement pas, la fonction de coupure
automatique de l’alimentation pourrait s’activer. En outre, selon
les réglages et les conditions de jeu, il se pourrait que l’ampli
identifie un bruit présent comme un signal d’entrée, même si vous
ne jouez pas sur votre basse.
La fonction de coupure automatique de l’alimentation est
désactivée quand l’ampli est connecté à un autre dispositif via
USB ou Bluetooth.
Astuce La fonction de coupure automatique de l’alimentation est activée à la
sortie d’usine.
Activer/désactiver la fonction de coupure automatique de
l’alimentation
1. Maintenez le bouton TAP enfoncé et mettez l’ampli sous
tension. Les témoins TAP/TUNER indiquent le statut de cette
fonction.
Mode manuel
Quand le bouton BANK/MANUAL est maintenu enfoncé
pendant 1 seconde ou plus, le témoin BANK s'éteint et
l’ampli passe en mode manuel. Dans ce mode, la position
“physique” de toutes les commandes détermine directement le son.
En mode manuel, toutes les commandes fonctionnent
comme sur un ampli de basse conventionnel. Utilisez-les
pour vous faire un son “perso”.
Une fois que vous avez trituré les commandes et boutons
pour obtenir le son voulu, mémorisez-le et faites-en un
programme utilisateur.
Astuce Pour mémoriser un programme au sein de la même
banque, démarrez la procédure à partir de l’étape 2.
Les programmes sont sauvegardés par écrasement. Ce
qui signifie que le programme sélectionné à l’étape 2 est
écrasé (remplacé par votre programme perso).
1. Pour sauvegarder un programme dans une banque
différente ou en mode manuel, appuyez sur le bouton
BANK/MANUAL pour choisir la banque de destination de sauvegarde. (Le témoin BANK clignote)
Astuce Pour annuler la sauvegarde, appuyez sur le bouton
Activé
Astuce En mode de programme utilisateur, une nouvelle
2. Appuyez sur le bouton TAP pour alterner entre le statut activé
et désactivé.
3. Attendez quelques secondes avant d’effectuer toute opération.
Le réglage est appliqué et l’ampli passe automatiquement en
mode de fonctionnement normal.
Sélectionner un programme
2. Maintenez enfoncé (au moins 2 secondes) le
bouton USER PROGRAMS de l’emplacement de
sauvegarde jusqu'à ce que le témoin cesse de
clignoter et reste allumé. Le programme est
sauvegardé dans la mémoire en question et la
banque ainsi que le programme de destination
sont sélectionnées.
Mode de programme utilisateur
Si vous choisissez un autre programme ou passez en
Le mode permettant de sélectionner les programmes s’appelle
“mode de programme utilisateur”.
Astuce Par défaut, ces programmes contiennent des sons programmés à
l’usine. Réglez le son choisi comme bon vous semble avec les
commandes de l’ampli.
Sélection d’un programme de la même banque
Appuyez sur le bouton USER PROGRAMS.
Sélection d’un programme d’une autre banque
Appuyez sur le bouton BANK/MANUAL. Le témoin BANK change
de couleur et clignote. Appuyez sur le bouton USER PROGRAMS.
Astuce Appuyez à nouveau sur le bouton BANK/MANUAL pour arrêter
le clignotement du témoin et retourner à la banque précédente.
20
Sauvegarde d’un programme
TAP. Le témoin BANK cesse de clignoter et l’ampli
active le mode précédent.
pression sur le bouton BANK/MANUAL rappelle la
banque précédente et arrête le clignotement du
témoin.
mode manuel, ou encore mettez l’ampli hors tension
avant la sauvegarde de votre nouveau son, vous
perdez tous vos changements.
Page 21

Utiliser l’accordeur
L’accordeur (alias la fonction “Tuner”) permet d’accorder
facilement la basse branchée à la prise INPUT.
Astuce Vous pouvez aussi accorder une guitare.
Mode d’accordage standard
1. Maintenez enfoncé le bouton TAP pendant 1 seconde.
La fonction d’accordeur est activée et les
témoins TAP/TUNER s'allument (en
rouge).
Quand vous activez la fonction
d’accordage, l’effet FX2 est contourné.
2. Jouez une corde à vide sur votre basse.
Veillez à ne toucher aucune autre corde.
3. Accordez approximativement la corde pour allumer le
témoin (BANK ou USER PROGRAMS 1 à 4) correspondant à la corde jouée.
4. Accordez la basse en vous aidant des témoins TAP/
TUNER.
Trop haut
Légèrement trop haut
Juste
Légèrement trop bas
Trop bas
5. Appuyez sur le bouton TAP pour désactiver la
fonction accordeur. (le témoin s’éteint)
Mode d’accordage “step down”
Quand la fonction accordeur est active et que vous
maintenez le bouton TAP enfoncé pendant au moins 2
secondes, les témoins TAP/TUNER clignotent (en rouge)
et l’ampli active le mode d’accordage “step down”, où
chaque corde est accordée un demi-ton plus bas que
l’accordage standard.
Avec ce mode d’accordage, quand les cordes de la 5e à la
1re correspondent à Si♭, Mi♭, La♭, Ré♭ et Sol♭, elles semblent
accordées.
L’utilisation de la fonction accordeur et le fonctionnement
des témoins sont identiques à ceux du mode d’accordage
standard.
La procédure d’initialisation des réglages de l’ampli est décrite
ci-dessous.
A l’issue de cette opération, tous les programmes sauvegardés
Après cette opération, veillez aussi à effacer les informations sur
1. Mettez l’ampli hors tension.
2. Mettez l’ampli sous tension en maintenant enfoncés ses
boutons USER PROGRAMS 1 et USER PROGRAMS 4. Une fois
que les témoins BANK et USER PROGRAMS clignotent,
relâchez les boutons.
Astuce Pour annuler l’initialisation à ce point, appuyez sur le bouton
3. Maintenez enfoncé (au moins 2 secondes) le bouton BANK/
MANUAL jusqu’à ce que les témoins cessent de clignoter et
restent allumés.
La procédure d’initialisation démarre et les témoins BANK et
USER PROGRAMS cessent de clignoter et restent allumés.
L’initialisation prend environ 1 ou 2 secondes, après quoi
l’ampli retourne en mode de fonctionnement normal.
Connexion à un ordinateur, une tablette, etc.
Astuce Vous trouverez la version la plus récente de chaque pilote et
Connexion à des dispositifs externes via USB
Moyennant la connexion à un ordinateur, une tablette, etc. via un
câble USB disponible dans le commerce, l’ampli peut servir
d’interface audio USB, ou le logiciel d’édition/de librairie “Tone
Room” peut être utilisé pour gérer les programmes et personnaliser les modèles d’amplis/effets.
Pour pouvoir relier un dispositif iOS (iPad ou iPhone), vous devez
Le signal reçu à la prise AUX IN n’est pas transmis au port USB.
Astuce Installez le pilote “VOX USB-MIDI” pour pouvoir utiliser le logiciel
Astuce La fonction audio USB est compatible avec le pilote inclus dans le
21
Initialisation des réglages d’usine
comme programmes utilisateur (USER PROGRAMS), ainsi que
tous les paramètres comme les réglages d’égaliseur audio
mémorisés via le logiciel Tone Room ainsi que les informations
d’appairage Bluetooth retrouvent leur valeur d’usine.
l’ampli via les dispositifs Bluetooth avec lesquels vous l’avez
appairé. Pour pouvoir connecter à nouveau l’ampli et un de ces
dispositifs, vous devez effectuer à nouveau l’appairage.
TAP. Sans cela, si vous n’effectuez pas l’étape suivante dans
les 15 secondes, l’ampli bascule en mode normal sans exécuter
l’initialisation.
Ne mettez jamais l’ampli hors tension durant le chargement
des données d’usine.
logiciel sur le site internet de VOX (www.voxamps.com).
vous procurer un adaptateur disponible dans le commerce,
comme l’adaptateur Lightning-appareil photo USB d’Apple.
Pour pouvoir relier un dispositif Android, vous devez vous procurer
un connecteur USB “On-The-Go” (OTG) disponible dans le commerce.
En outre, il faut que le dispositif Android dispose du système Android
6.0 ou d’une version plus récente pour pouvoir utiliser Tone Room.
Tone Room sur un ordinateur Windows ou Mac connecté via USB.
système d’exploitation. Toutefois, si le pilote “VOX 2ch Audio Driver”
est installé et que vous utilisez une application compatible ASIO,
l’enregistrement et la lecture pourraient comporter un léger retard.
Page 22

Utilisation comme haut-parleurs sans fil (Bluetooth
audio) [Adio Air BS uniquement]
Quand un ordinateur, une tablette, un smartphone ou lecteur
audio, etc. compabitle Bluetooth est connecté via Bluetooth,
cet ampli peut être utilisé comme haut-parleurs sans fil.
Astuce Vous ne pouvez pas connecter plusieurs dispositifs simultanément.
Connexion d’un nouveau dispositif (appairage)
Quand vous connectez un nouveau dispositif à l’ampli, vous
devez effectuer “l’appairage” (l’enregistrement mutuel des
informations de connexion).
Astuce Vous pouvez mémoriser les informations pour un nombre maximum
de huit dispositifs appairés. Quand vous appairez un neuvième
dispositif, les informations d’un dispositif appairé existant sont
écrasées et remplacées par celles de ce nouveau dispositif appairé.
Même en cas d’échec de l’appairage, il se pourrait que les
informations de l’appareil en question soient mémorisées sur
l’ampli. Si des informations sont déjà mémorisées pour huit
appareils, les données d’un de ces appareils sont écrasées.
Pour pouvoir vous reconnecter à un dispositif dont les informa-
tions ont été effacées, effacez les informations relatives à l’ampli
sur le dispositif en question, puis effectuez à nouveau l’appairage.
1. Appuyez sur le bouton BLUETOOTH de cet ampli. L’ampli
passe en attente d’appairage et son témoin (Bluetooth audio)
clignote.
2. Activez la fonction Bluetooth sur le dispositif auquel vous voulez
vous connecter, puis sélectionnez “Adio Air BS Speaker” dans la
liste d’options de ce dispositif.
3. Quand un message de demande de permission d’appairage
s’affiche, autorisez l’opération. Quand un message vous
demande la clé de sécurité, saisissez “0000”.
Astuce La clé de sécurité pourrait aussi être appelée “code PIN”,
“mot de passe”, etc.
4. Si l’appairage réussit, l’ampli passe en mode “prêt à connecter” et le
témoin (Bluetooth audio) cesse de clignoter et reste allumé.
Astuce Si aucune connexion n'est établie dans la minute, l’attente de
connexion est annulée (le témoin s'éteint).
< Reconnexion à un dispositif appairé >
1. Quand l’ampli est en attente d’appairage (son témoin
(Bluetooth audio) clignote), appuyez sur le bouton BLUE-
TOOTH pour tenter de reconnecter l’ampli à un dispositif déjà
connecté auparavant (le témoin clignote rapidement).
2. Si l’appairage réussit, le témoin (Bluetooth audio) cesse de
clignoter et reste allumé.
Astuce Si aucune connexion n'est établie dans les 10 secondes, la
reconnexion est annulée (le témoin s'éteint).
Astuce Vous pouvez aussi exécuter une reconnexion en choisissant
l’option “Adio Air BS Speaker” sur l’écran des réglages Bluetooth
du dispositif à reconnecter.
Astuce Une fois que la reconnexion a été effectuée via cet ampli, l’ampli
et le dispositif peuvent être reconnectés automatiquement par la
suite en mettant simplement l’ampli sous tension. Si vous ne
souhaitez pas cette reconnexion automatique, vous pouvez
l’annuler en appuyant sur le bouton BLUETOOTH quand le
témoin clignote rapidement à l’étape 1.
Astuce Si vous n’arrivez pas à effectuer la reconnexion depuis l’ampli,
essayez depuis l’autre dispositif, ou appairez à nouveau les appareils.
< Rompre la connexion >
Pour rompre une connexion audio Bluetooth, appuyez sur le
bouton BLUETOOTH quand le témoin (Bluetooth audio) est
allumé. La connexion est rompue et le témoin s'éteint.
Astuce Vous pouvez aussi rompre la connexion via l’écran des réglages
Bluetooth du dispositif appairé.
Utiliser le logiciel Tone Room via une connexion sans fil
(Bluetooth MIDI)
Si l’ampli est connecté à un ordinateur Windows ou Mac, ou à un
dispositif iOS ou Android compatible Bluetooth MIDI (MIDI over
Bluetooth low energy), le logiciel d’édition/de librairie “Tone
Room” peut être utilisé via une connexion sans fil. Pour des
détails sur la procédure de connexion, voyez la documentation
accompagnant le logiciel Tone Room. Pour des détails sur le
téléchargement, voyez http://www.voxamps.com/Toneroom.
Astuce Pour pouvoir utiliser Tone Room via une connexion Bluetooth
MIDI, il vous faut un dispositif compatible Bluetooth 4.0. Les
systèmes suivants sont compatibles : Windows 8.1 ou version
ultérieure, OS X 10.10 ou version ultérieure, iOS 8 ou version
ultérieure et Android 6.0.1 ou version ultérieure.
Astuce Pour pouvoir effectuer une connexion Bluetooth MIDI avec un
ordinateur Windows, vous devez installer le pilote “VOX
BLE-MIDI Driver”. Voyez le document fourni avec le pilote VOX
BLE-MIDI.
Astuce Vous ne pouvez pas connecter plusieurs dispositifs simultanément.
Astuce Quand une connexion Bluetooth MIDI est établie, la diode
Bluetooth MIDI s’allume.
Dépannage pour la connexion Bluetooth
Selon les réglages de l’autre appareil et selon le timing de la tentative, il
se peut que la connexion échoue plusieurs fois, ou que la fonction
Bluetooth de cet ampli devienne instable. Si vous rencontrez un de ces
problèmes, vérifiez les paramètres de l’autre appareil et suivez la
procédure ci-dessous pour initialiser la fonction Bluetooth de cet ampli.
Astuce Quand vous exécutez cette procédure, les connexions Bluetooth
MIDI et Bluetooth audio sont toutes deux rompues.
Astuce Même après l’exécution de cette procédure, les informations des
autres dispositifs mémorisées sur cet ampli ne sont pas effacées.
1. Maintenez enfoncé le bouton BLUETOOTH pendant au moins
3 secondes.
2. Quand les témoins (Bluetooth audio) et (Bluetooth MIDI)
se mettent à clignoter, relâchez le bouton BLUETOOTH.
3. Quand l’initialisation est terminée, les témoins s’éteignent.
Astuce Si le problème n’est pas résolu, même après l’initialisation,
effacez les informations de connexion pour cet ampli sur l’autre
appareil, puis effectuez à nouveau l’appairage.
22
[Adio Air BS uniquement]
Page 23

À propos des modèles d’amplis et des types d’effets
Cette section fournit des détails sur les modèles d’amplis, les divers types d’effets 1 et 2, le réducteur de bruit et l’égaliseur audio.
Astuce Le logiciel Tone Room permet de sélectionner davantage de modèles d’amplis et de types d’effets que ceux figurant ci-dessous, mais aussi de
mémoriser des programmes utilisateur.
Selon les réglages de l’ampli et des effets, il se pourrait que le son comporte de la distorsion indésirable (et non naturelle). Dans ce cas, réglez
l’ampli et les paramètres d’effets pour éliminer la distorsion.
Quand un paramètre non disponible en façade est modifié avec le logiciel Tone Room, il se peut que le son change fortement par rapport à
l’ampli ou au type d’effet modélisé.
Dans le cas d’un signal d’entrée hors de la plage grave (dans la plage de fréquences élevées des guitares), vous ne pourrez pas obtenir un effet
normal de la basse synthé.
Modèles d’ampli
7.
1.
CLASSIC
Cette tête d’ampli à lampes classique est célèbre pour sa capacité à
être retournée et rangée dans l’enceinte. Sa sonorité chaleureuse
convient parfaitement aux styles de doigté pincé.
2.
SLAP
Ce modèle produit un aigu brillant et atténue le médium pour un
son aux contours bien définis qui se démarque dans le mix. C'est
le modèle de choix pour jouer en slap.
3.
ROCK
Ce modèle s'inspire de ce préampli célèbre habillé dans un boîtier
noir. Il produit des aigus bien incisifs et un contenu harmonique
supérieur. Comme son nom l’indique, il convient parfaitement
pour le style rock joué à l’onglet.
4.
MODERN
Ce modèle trouve son inspiration dans un ampli à lampes très
recherché, avec son commutateur « ULTRA LOW » activé. Il
produit un son taillé sur mesure pour le rock.
5.
DEEP
Ce modèle vous offre ce son de basse extrêmement agressif qui a
fait son apparition dès 2010. Le signal d’entrée est séparé en
composants graves avec compression et composants aigus avec
distorsion, pour un son convenant parfaitement au heavy rock et
au métal prog.
6.
TIGHT SYNTH (BASS SYNTHESIZER)
Ce modèle reproduit ces sons de basse synthé typiques de la
musique pop des années 1980 et toujours dans le coup. Cela vous
donne un son corpulent, sensible au toucher et extrêmement
dynamique. Les modèles BASS SYNTHESIZER comportent une
enveloppe de filtre.
Avec ce modèle, les commandes TREBLE, MIDDLE et BASS sont
assignées aux paramètres de contrôle du filtre.
TREBLE: (FREQUENCY + RESONANCE) Règle la fréquence
centrale et le niveau de résonance.
MIDDLE: (DECAY) Règle la vitesse de réponse.
BASS: (DEPTH) Règle l’intensité du filtre.
DIRTY SYNTH (BASS SYNTHESIZER)
Ce synthétiseur génère plusieurs ondes saturées pour produire ce
son agressif et superbement sale en vogue dans le rock alternatif.
Le son caractéristique de ce modèle permet de se faire entendre
dans un groupe amateur de décibels.
Il comporte une enveloppe de filtre et les commandes TREBLE,
MIDDLE et BASS sont assignées aux paramètres de contrôle du
filtre, tout comme pour le modèle TIGHT SYNTH.
8.
DELUXE CL
Modélisation du canal Vibrato d’un « Blackface » de 22W conçu
dans les années 1960. Grâce à ses lampes de puissance 6V6 et à sa
réverbération à ressort à excitation à lampe, ce modèle produit un
son énorme avec peu de watts.
9.
AC30TB
Modélisation d’un ampli AC30 avec le circuit « Top Boost » inclus
d’office à partir de 1964. Elle délivre un aigu doux et raffiné, une
distorsion d’une majestueuse profondeur et un son clair riche et
brillant.
10.
DOUBLE REC
Modélisation du canal à gain élevé d’un ampli « high gain »
sauvage. Son grave profond, son aigu pétillant et son gain
monstrueux sont parfaits pour les guitares accordées aussi bas
que possible ou pour guitaristes metal jouant sur sept cordes.
11.
FL AT
Modélisation d’un simple amplificateur à trois commandes de
tonalité produisant un son clair et limpide. La position centrale
des commandes TREBLE, MIDDLE et BASS produit une réponse
linéaire du préampli.
Si le niveau d’entrée est trop élevé, le son pourrait comporter de la
distorsion. Réduisez le gain du préampli pour éviter ce problème.
23
Page 24

Types d’effets
Types d’effets 1 (
COMP
T.WAH
FUZZ
CHORUS
commande FX1) :
Ce modèle s'inspire d’une pédale de compresseur populaire, au son à la fois limpide et percussif. Ce modèle
permet aussi d’obtenir un sustain plein de douceur faisant chanter les notes. Réglez la sensibilité avec la
commande.
Ce modèle recrée un effet auto-wah, c.-à-d. un effet générant un “wah” automatique variant en fonction de
votre attaque sur les cordes - un effet un peu “space” mais bien utile. Réglez la sensibilité de réponse à votre
force de jeu avec la commande.
Ce modèle s'inspire d’une pédale Fuzz pour basse. Réglez le gain avec la commande.
Modélisation d’un chorus stéréo, produisant un son à la fois riche et ample. Réglez la vitesse de modulation
avec la commande.
Types d’effets 2 (
A.DLY
(ANALOG DELAY )
WIDE DLY
(WIDE DELAY)
SPRING
HALL
Réduction de bruit
Il s’agit d’un effet réduisant le niveau de bruit.
Comme les amplis et les effets, la réduction de bruit doit être
réglée pour chaque programme. Si, pendant la modification de
réglages en mode utilisateur, vous changez de programme, passez
en mode manuel ou mettez l’ampli hors tension avant d’avoir
sauvegardé les réglages en cours, vous perdez tous les changements effectués.
1. Maintenez enfoncé le bouton WIDE pendant 1 seconde. Le
témoin WIDE clignote et les témoins USER PROGRAMS
indiquent le réglage de réduction de bruit (le témoin BANK
s’allume ne orange).
2. Appuyez sur le bouton BANK/MANUAL ou un bouton USER
PROGRAMS pour changer le niveau de réduction de bruit.
Témoins Bouton Réglage
3. Appuyez sur le bouton WIDE. Les témoins BANK et USER
PROGRAMS retrouvent leur mode d’indication précédent.
commande FX2) : types delay/réverb.
Ce modèle recrée une ligne de delay analogique connue sous le nom de « Bucket Brigade ». Bien que la
qualité du son des répétitions ne soit pas de très haute fidélité, ce type d’effet est apprécié pour sa chaleur.
Réglez la quantité du son traité par le delay avec la commande. Réglez l’intervalle entre les répétitions avec
le bouton TAP. La durée de délai maximum entre les répétitions est d’environ 1 seconde.
Ce delay stéréo produit des notes légèrement vacillantes sur les canaux gauche et droit. Le fonctionnement de
la commande et du bouton, ainsi que le temps de délai maximum sont identiques à ceux du modèle A.DLY.
Cet effet simule la réverbération à ressorts équipant une foule d’amplis de guitare. Réglez la quantité du son
traité par la réverbération avec la commande. Réglez la durée de réverbération avec le bouton TAP.
Cet effet reproduit la réverbération naturelle d’une salle de concert aux nombreuses réflexions. Le fonctionnement de la commande et du bouton est pareil à celui du modèle SPRING.
Égaliseur audio
Cette fonction règle le timbre du signal audio reçu à la
prise AUX IN ou via la connexion Bluetooth.
1. Maintenez enfoncé le bouton WIDE ultra-large
pendant 2 secondes. Le témoin WIDE clignote lentement et les témoins USER PROGRAMS indiquent le
réglage d’égaliseur (le témoin BANK s’allume en
orange).
2. Appuyez sur le bouton BANK/MANUAL ou un
bouton USER PROGRAMS pour changer les réglages
d’égalisation.
BANK/MANUAL
1
2
3
4
OFF
Bas
|
|
Élevé
3. Appuyez sur le bouton WIDE. Les témoins BANK et
USER PROGRAMS retrouvent leur mode d’indication
précédent.
Astuce Le logiciel Tone Room permet de modifier les réglages
Témoins Bouton Réglage
BANK/MANUAL
définis pour les fonctions 1 à 4..
1
2
3
4
OFF
LOUD
BASS BOOST
MID BOOST
TREBLE BOOST
24
Page 25

Manual de usuario
Es
Gracias por comprar el Adio Air BS/Adio BS
AMPLIFICADOR DE AUDIO Y MODELADOR DE
BAJO de VOX. Por favor, lea este manual atentamente
y guárdelo para futuras consultas.
*
La conexión a través de Bluetooth es posible solamente con Adio Air BS.
** Acoustage (tecnología surround virtual de KORG) es una
revolucionaria tecnología de sonido virtual original de Korg
capaz de crear un espacio acústico personal exclusivo. Esta
tecnología permite un experiencia acústica tridimensional
exclusiva y sin precedentes con tan solo los altavoces estéreo
frontales. El propio sistema de reproducción se analiza
acústicamente y se aplican optimizaciones para ese sistema
específico con el fin de obtener todo su potencial.
Características principales
• El Adio Air BS/Adio BS es un amplificador de bajo
de alta gama con altavoces activos estéreo
integrados. Equipado con un jack auxiliar AUX IN
y también con funciones de audio por USB y
Bluetooh* (A2DP), el Adio Air BS/Adio BS permite
conectar diversos dispositivos.
• Sofisticada tecnología de modelado que
proporciona numerosos modelos de amplificador y
efectos de alta calidad.
• Se pueden utilizar simultáneamente hasta tres
efectos, incluida la reducción de ruido.
• Es posible crear sonidos personalizados utilizando
la combinación de amplificador y efectos deseada,
y luego guardar cada sonido de forma sencilla
como uno de los ocho programas posibles (dos
bancos × cuatro programas). Se puede cambiar
rápidamente de un programa guardado a otro
desde el panel superior durante una actuación.
• El modo manual permite utilizar el
Adio Air BS/Adio BS como un amplificador de bajo
convencional, en el cual las posiciones reales de
todos los mandos son las que se aplican
directamente al sonido.
• El afinador automático integrado permite afinar
fácilmente el bajo cuando está conectado al jack
INPUT.
• El Adio Air BS/Adio BS está equipado con función
MIDI y es compatible con USB y Bluetooth*.
• Los programas del Adio Air BS/Adio BS se pueden
gestionar mediante el software editor/librería Tone
Room para Windows, Mac, iOS y Android. También se
puede utilizar Tone Room para personalizar los
modelos de amplificador y los efectos, y para crear los
propios de cada usuario.
• Tres modos de envíos de audio por USB para
grabación mono/estéreo y reamplificación (pueden
configurarse con Tone Room).
• La tecnología Acoustage** proporciona una
experiencia de escucha expansiva y de gran amplitud.
Especificaciones
Modelos de amplificador: 11 (17 cuando se utiliza Tone
Efectos
Tipos de efectos 1: 4 (11 cuando se utiliza Tone
Tipos de efectos 2: 4 (8 cuando se utiliza Tone
Programas
Usuario: 8 (2 bancos x 4 programas)
Conectores de entrada/salida:
Sistema inalámbrico (Adio Air BS solo):
Potencia de salida: Máximo aprox. 25 W RMS x 2 a
Cuando se utilizan pilas:
Altavoz: 3" a 8 ohms x 2
Procesamiento de señal
Frecuencia de muestreo: 44,1 kHz
Conversión A/D: 24 bits
Conversión D/A: 24 bits
Alimentación: Pilas AA (alcalinas o de níquel
Consumo de corriente 3,42 A
Cuando se utilizan pilas:
Duración de las pilas: Máximo 8 horas (con pilas
Dimensiones (Ancho x Prof. x Alto):
360 × 165 × 163 mm
Peso: 2,9 kg (sin pilas)
Accesorios incluidos:
• Las especificaciones y el aspecto están sujetos a cambios
sin previo aviso por mejora.
25
Room)
Room)
Room)
jack INPUT, jack AUX IN, jack
PHONES, puerto USB (tipo B)
KBM-A1: Bluetooth (A2DP
Sink)
KBM-1: Bluetooth low energy
(MIDI)
8 ohms
Máximo aprox. 2,5 W x 2 a
8 ohms
hidruro) 8 pilas o el adaptador
de corriente incluido (DC 19V
)
200 mA
alcalinas)
Adaptador de corriente, Cable
de corriente, Manual de usuario
Page 26

Panel superior
a
b c d e
f
g
i
lk
m
j
Nombres y funciones de las partes
h
a. Selector de modelos de amplificador
Permite seleccionar el modelo de amplificador. Las
características de los controles de ganancia y de tono, su
ubicación en el circuito y la respuesta del bafle cambian según
el modelo de amplificador que se seleccione (excepto con el
sintetizador de bajo).
b. Mando GAIN
Ajusta la ganancia del preamplificador del modelo de
amplificador seleccionado. Este ajuste cambia la cantidad de
distorsión del preamplificador.
c. Mandos TREBLE, MIDDLE y BASS
Permiten ajustar los rangos de las frecuencias altas, medias y
bajas.
Nota El efecto de los mandos GAIN, TREBLE, MIDDLE y BASS
cambian cuando se selecciona el sintetizador de bajo (→
“Acerca de los modelos de amplificador y los tipos de
efectos”).
d. Mando VOLUME
Permite ajustar el nivel de volumen del modelo de
amplificador seleccionado.
e. Sección de efectos
Mando FX1 (efectos 1)
Gire este mando para seleccionar el tipo de efectos y ajustar
los parámetros de los efectos. Si se gira por completo hacia la
izquierda, se desactivan todos los efectos.
Nota Los tipos de efectos 1 COMP, T.WAH y FUZZ no afectan a la
salida del sintetizador de bajo.
Mando FX2 (efectos 2)
Gire este mando para seleccionar un efecto de delay (retardo)/
reverb (reverberación). Este mando también permite controlar
la profundidad (intensidad) del efecto seleccionado. Si se gira
por completo hacia la izquierda, se desactivan todos los
efectos.
Nota Es posible realizar ajustes más detallados de los efectos
mediante Tone Room.
Botón TAP y leds TAP/TUNER
Permite ajustar el tiempo de FX2 (efectos de delay/reverb). El
tiempo se especifica mediante el intervalo entre dos
pulsaciones del botón TAP. El led verde parpadeará al ritmo
del tiempo especificado.
Nota Para definir con precisión el tiempo y que coincida con el
Nota Mantenga pulsado el botón TAP durante al menos un segundo
f. Mando INSTRUMENTS
Permite ajustar el nivel de salida final del sonido que ha pasado
a través del modelo de amplificador y efecto seleccionados.
Nota Este mando no se puede utilizar para ajustar el nivel de salida
g. Mando AUDIO
Permite ajustar el nivel de salida del sonido que entra por el
jack AUX IN, el puerto USB o la conexión Bluetooth.
h. Jack INPUT
Aquí se conecta el bajo.
i. Botón/led (Power)
Mantenga pulsado este botón para encender o apagar el
amplificador.
j. Botón BANK/MANUAL, led BANK y botones/leds USER PROGRAMS (1 a 4)
Utilice el botón BANK/MANUAL para seleccionar un banco
de programas, y a continuación pulse uno de los botones
USER PROGRAMS para seleccionar el programa dentro del
banco. Para cambiar a modo manual, mantenga pulsado el
botón BANK/MANUAL durante al menos un segundo; el
led BANK se apagará. Estos botones también se utilizan para
guardar programas nuevos (→ “Guardar un programa”).
Cuando la función de afinador está activada, estos botones
muestran el estado de la afinación (→ “Uso del afinador”).
26
tempo de una canción, pulse el botón TAP varias veces al
ritmo de la canción.
para ignorar todos los efectos 2 (FX2) y activar la función de
afinador (→ “Uso del afinador”).
del puerto USB.
Page 27

k. Botón/led WIDE
cba
Pulse este botón para activar la función de amplitud (se iluminará el
led). La función de amplitud utiliza la tecnología Acoustage para
proporcionar un campo sonoro expansivo y de gran amplitud. Vuelva a
pulsar este botón otra vez para desactivar la función (se apagará el led).
Nota Si mantiene pulsado el botón WIDE durante al menos 1
segundo, cambiará el ajuste de reducción de ruido. Si
mantiene pulsado el botón WIDE durante al menos 2
segundos, cambiará el ajuste del ecualizador de audio.
La función de amplitud no afecta a la salida de sonido por el
jack PHONES ni por el puerto USB.
l. [Adio Air BS solo] Botón BLUETOOTH , led (Bluetooth MIDI) y led
(Bluetooth audio)
Se utiliza cuando se conectan otros dispositivos a través de
Bluetooth (→ “Uso como altavoces inalámbricos (Bluetooth
audio)” y “Uso de Tone Room a través de una conexión
inalámbrica (Bluetooth MIDI)”).
m. Jack PHONES
Utilice este jack para enviar señal de salida directamente a un
mezclador o a un dispositivo de grabación, o si desea usar
unos auriculares.
Cuando hay algún dispositivo conectado a este jack, por el
altavoz interno no sale sonido.
Asegúrese de que el conector introducido sea un jack estéreo.
Colocación de las pilas
Retire la tapa del compartimiento de las pilas situado en la
parte posterior de la unidad. Introduzca ocho pilas AA, ya
sean alcalinas o de níquel metal hidruro, con cuidado de que
todas estén orientadas según la polaridad que se muestra en la
ilustración.
Sustitución de las pilas
Sustituya las pilas cuando el led (Power) se oscurezca.
Panel posterior
Conexión del adaptador de corriente
1. Conecte el cable de corriente al adaptador de corriente
2. Inserte el conector del adaptador de corriente a la entrada
3. Enchufe el cable de corriente a una toma de electricidad.
a. Jack AUX IN
Aquí puede conectar la salida analógica de un dispositivo de
audio externo, como por ejemplo un reproductor de audio, y
tocar la guitarra acompañado de sus canciones favoritas.
b. Puerto USB
Utilice un cable USB de los disponibles en el mercado para
conectar a este puerto un ordenador u otro dispositivo
equipado con USB.
c. Entrada de alimentación DC 19V
Conecte aquí el adaptador de corriente incluido.
El adaptador de corriente está específicamente diseñado para
el Adio Air BS/Adio BS. No utilice ningún otro adaptador
porque se puede producir una avería.
Encendido
1. Gire completamente hacia la izquierda el mando AUDIO y
2. Inserte en el jack INPUT el cable conectado al bajo o a la
3. Mantenga pulsado el botón (Power) hasta que se ilumine
4. Gire lentamente el mando AUDIO y el mando INSTRU-
27
Configuración
Las pilas no están incluidas. Deben comprarse por separado.
Asegúrese de que todas las pilas están correctamente
orientadas según la polaridad indicada.
No mezcle pilas usadas con pilas nuevas, ni tampoco
diferentes tipos de pilas.
Cuando las pilas están bajas de carga, el volumen puede convertirse en insuficiente o puede escucharse el sonido con ruido.
Las pilas gastadas deben quitarse inmediatamente. Si se dejan
en la unidad, pueden sufrir un derrame de líquido y provocar
una avería. También debe extraer las pilas si no piensa utilizar
la unidad durante un periodo prolongado.
incluido.
de alimentación DC 19V del amplificador.
Utilice solo el adaptador de corriente especificado. Si utiliza
otro adaptador de corriente diferente puede causar una
avería.
Con objeto de evitar descargas eléctricas o daños en el
equipo, conecte de forma segura la conexión a tierra.
el mando INSTRUMENTS del amplificador para situarlos
en el mínimo.
guitarra. Si va a utilizar un reproductor de audio, conéctelo
al jack AUX IN.
el led (Power) y se encienda el amplificador.
Nota Para apagar el amplificador, mantenga pulsado el botón
POWER hasta que se apague el led (Power).
MENTS del amplificador para ajustar el volumen.
Page 28

Función de apagado automático
desactivada
El amplificador tiene una función de apagado automático. Con esta
función, el amplificador se apaga automáticamente si no se realiza
ninguna operación durante aproximadamente una hora y no se recibe
ninguna señal de entrada en el jack INPUT. Una vez apagado, el
amplificador no se volverá a encender ni aunque se gire un mando o se
pulse un botón.
Si el nivel de entrada es extremadamente bajo o apenas hay
cambios en el sonido, es posible que se active la función de
apagado automático. Además, dependiendo de los ajustes y el
entorno ambiental, el amplificador puede interpretar el ruido
como una entrada, aunque no se toque el bajo.
La función de apagado automático no funcionará mientras el
amplificador esté conectado a otro dispositivo a través de USB
o Bluetooth.
Nota Como ajuste predeterminado, la función de apagado
automático viene activada de fábrica.
Activación/desactivación de la función de apagado
automático
1. Mientras mantiene pulsado el botón TAP, encienda el
amplificador. Los leds TAP/TUNER indicarán el ajuste
actual.
activada
2. Pulse el botón TAP para activar y desactivar la función
alternativamente.
3. Espere sin ejecutar ninguna acción durante unos segundos.
De este modo se aplicará el ajuste y el amplificador volverá
automáticamente a su funcionamiento normal.
Seleccionar un programa
Modo de programas de usuario
El modo donde se pueden seleccionar programas se llama
“modo de programas de usuario”.
Nota Como ajuste predeterminado de fábrica, vienen guardados sonidos
previamente especificados. Puede ajustar el sonido seleccionado como
desee mediante los diversos mandos.
Seleccionar un programa del mismo banco
Pulse el correspondiente botón USER PROGRAMS.
Seleccionar un programa de un banco diferente
Pulse el botón BANK/MANUAL. El led BANK cambiará de
color y parpadeará. Pulse el correspondiente botón USER
PROGRAMS.
Nota Pulsando el botón BANK/MANUAL otra vez se detendrá el
parpadeo del led y se volverá a banco anterior.
Modo manual
Si mantiene pulsado el botón BANK/MANUAL
durante al menos un segundo, el led BANK se apagará
y el amplificador entrará en el modo manual, en el
cual se aplican directamente al sonido las posiciones
reales de todos los mandos.
En el modo manual, todos los mandos funcionan como
en un amplificador de bajo convencional, lo que le
permite crear su propio sonido personalizado.
Después de ajustar los diversos mandos y botones
para crear un sonido a su gusto, lo puede guardar
(grabar) como un programa de usuario.
Nota Para guardar programas dentro del mismo banco,
inicie el procedimiento desde el paso 2.
Los programas se guardan sobrescribiendo. En otras
palabras, el programa seleccionado en el paso 2 se
borrará.
1. Para guardar un programa en un banco diferente, o
si estamos en modo manual, pulse el botón BANK/
MANUAL para seleccionar el banco en el que desee
guardar el programa (el led BANK parpadeará).
Nota Para cancelar la operación de guardado, pulse el
botón TAP. El led BANK dejará de parpadear y el
amplificador volverá a su estado anterior.
Nota En el modo de programas de usuario, si pulsa otra
vez el botón BANK/MANUAL volverá al banco
anterior y el led dejará de parpadear.
2. Mantenga pulsado el botón USER PROGRAMS
correspondiente a la ubicación donde desea guardar
hasta que el led cambie de estar parpadeando a
iluminado fijo (al menos dos segundos). El
programa se guarda en la ubicación seleccionada, y
se seleccionan el banco y el programa correspondientes a la ubicación donde se ha guardado.
Si cambia a otro programa o al modo manual o
bien apaga el amplificador antes de guardar el
sonido que está creando, los cambios realizados se
perderán.
La función de afinador le permite afinar fácilmente el
bajo que esté conectado al jack INPUT.
Nota También se puede afinar una guitarra.
Modo de afinación estándar
1. Mantenga pulsado el botón TAP durante
aproximadamente un segundo.
Se activará la función de afinador y se
iluminarán (en rojo) los leds TAP/
TUNER.
28
Guardar un programa
Uso del afinador
Page 29

Cuando se activa la función de afinador, los
efectos FX2 son ignorados.
2. Toque al aire cualquier cuerda del bajo.
Tenga cuidado de no tocar ninguna otra cuerda.
3. Afine la cuerda de forma aproximada hasta que se
ilumine uno de los leds (BANK o USER PROGRAMS 1 a 4) indicando la cuerda que se ha tocado.
1. Apague el amplificador.
2. Mientras mantiene pulsados los botones USER PRO-
GRAMS 1 y USER PROGRAMS 4, encienda el amplificador. Cuando los leds BANK y USER PROGRAMS
parpadeen, suelte los botones.
Nota Si decide cancelar la inicialización en este punto, pulse el
3. Mantenga pulsado el botón BANK/MANUAL hasta que los
leds cambien de estar parpadeando a iluminados fijos (al
4. Atendiendo a las indicaciones de los leds TAP/
TUNER, afine correctamente el bajo.
Alto
Ligeramente alto
Afinado
Ligeramente bajo
Bajo
5. Pulse el botón TAP para desactivar la función de
afinador (se apagará el led).
Modo de afinación medio tono más bajo
Cuando la función de afinación ha sido activada y se
mantiene pulsado el botón TAP durante al menos dos
segundos, los leds (rojos) TAP/TUNER parpadean y el
amplificador entra en el modo de afinación medio tono
más bajo, en el cual todas las cuerdas pueden afinarse un
semitono más abajo.
En este modo, cuando las notas de las cuerdas 5ª a 1ª al
aire sean respectivamente B (Si)♭, E (Mi)♭, A (La)♭, D (Re)♭
y G (Sol)♭,aparecerán como afinadas.
El procedimiento operativo y las indicaciones de los leds
son las mismas que en el modo de afinación estándar.
Restablecer los ajustes predetermina-
dos de fábrica
A continuación se describe el procedimiento para
restablecer los ajustes predeterminados de fábrica en
el amplificador.
Una vez finalizada esta operación, todos los
programas guardados como PROGRAMAS DE
USARIO (USER PROGRAMS) y todos los ajustes,
como por ejemplo los ajustes del ecualizador de audio
almacenados desde Tone Room o la información de
emparejamientos Bluetooth, se restablecerán a los
ajustes predeterminados de fábrica.
Después de ejecutar esta operación, asegúrese de
borrar también la información de este amplificador
de los dispositivos Bluetooth con los que estaba
emparejado. Para conectar este amplificador y
cualquiera de dichos dispositivos otra vez, deberá
realizar el emparejamiento de nuevo.
menos dos segundos).
Comenzará la inicialización y los leds BANK y USER
PROGRAMS cambiarán de estar parpadeando a
iluminados fijos. La inicialización tarda entre uno y dos
segundos en completarse, y después el amplificador vuelve
a su funcionamiento normal.
Conexión a un ordenador, a una tablet, etc.
Nota Descargue las versiones más actualizadas de los controladores
Conexión a dispositivos externos a través de USB
Si conecta al amplificador un ordenador, una tablet, un
smartphone, etc., mediante un cable USB de los disponibles en
el mercado, el amplificador puede utilizarse como interfaz de
audio USB, y también puede utilizarse el software editor/
librería Tone Room para gestionar los programas y
personalizar los amplificadores/efectos.
Nota Instale el controlador VOX USB-MIDI Driver para utilizar Tone
Nota La función de audio USB funciona con el controlador incluido en el
Uso como altavoces inalámbricos (Bluetooth audio)
[Adio Air BS solo]
Si se conecta por Bluetooth a un ordenador, tablet,
smartphone, reproductor de audio, etc., compatible con
Bluetooth audio, este amplificador puede utilizarse como
sistema de altavoces inalámbricos.
Nota No es posible conectar varios dispositivos al mismo tiempo.
29
botón TAP. De lo contrario, si el próximo paso no se lleva
a cabo en los 15 segundos siguientes, el amplificador
volverá a su funcionamiento normal sin inicializarse.
Nunca apague el amplificador mientras se está llevando a
cabo la inicialización.
(en inglés llamados “drivers”) y del software desde el sitio web
de VOX (www.voxamps.com).
Para conectar esta unidad a un dispositivo iOS (iPad o iPhone), es
necesario un adaptador de los disponibles en el mercado, como por
ejemplo el adaptador de conector Lightning a USB para cámaras de Apple.
Para conectar esta unidad a un dispositivo Android, es necesario un conector
USB OTG (On-The-Go). Además, el dispositivo Android debe tener como
sistema operativo Android 6.0 o posterior para utilizar Tone Room.
La señal que entra por el jack AUX IN no se envía de salida al puerto USB.
Room en un ordenador Windows o Mac conectado a través de USB.
sistema operativo; sin embargo, si está instalado el controlador de
audio VOX 2ch Audio Driver y se utiliza una aplicación compatible con
ASIO, la grabación y la reproducción pueden tener un ligero retardo.
Page 30

Conexión de un nuevo dispositivo (emparejamiento).
Nota Si no se puede establecer la reconexión desde el amplificador,
Cuando se conecta un nuevo dispositivo, hay que llevar a cabo un
“emparejamiento” (registro mutuo de información de conexión).
Nota Se puede almacenar información de hasta ocho dispositivos
emparejados. Si se empareja un noveno dispositivo, se
eliminará la información de uno de los dispositivos ya
existentes para que pueda almacenarse la nueva información.
Aunque el emparejamiento no se realice, es posible que la
información de dicho dispositivo se almacene en el
amplificador. Si ya hay almacenada información de ocho
dispositivos, se eliminará la información de uno de los
dispositivos ya existentes.
Para volver a conectarse al dispositivo cuya información fue
eliminada, elimine la información acerca de este amplificador
que haya en dicho dispositivo y después realice el
emparejamiento de nuevo.
1. Pulse el botón BLUETOOTH de este amplificador. El
amplificador entrará en situación de “espera para
emparejamiento” y el led (Bluetooth audio) parpadeará.
2. Active la función Bluetooth en el dispositivo al que se va a
conectar esta unidad, y a continuación seleccione “Adio Air
< Cortar la conexión >
Para cortar una conexión de Bluetooth audio, pulse el botón
BLUETOOTH mientras está iluminado el led (Bluetooth
audio). La conexión se cortará y el led se apagará.
Uso de Tone Room a través de una conexión inalámbrica (Bluetooth
MIDI)
Si el amplificador está conectado a un ordenador Windows o
Mac, o a un dispositivo iOS o Android compatible con
Bluetooth MIDI (MIDI over Bluetooth low energy), se puede
utilizar el software editor/librería Tone Room a través de una
conexión inalámbrica. Para más información acerca de cómo
hacer la conexión, consulte la documentación incluida con
Tone Room. Para más información sobre la descarga, consulte
http://www.voxamps.com/Toneroom.
Nota Para utilizar Tone Room a través de una conexión Bluetooth
BS Speaker” en la lista de opciones de dicho dispositivo.
3. Cuando aparezca un mensaje solicitando permiso para el
emparejamiento, permítalo. Cuando se le solicite una clave,
introduzca “0000”.
Nota La clave también puede denominarse código PIN,
contraseña, etc.
4. Si el emparejamiento se produce correctamente, el
amplificador entrará en situación de “listo para la
Nota Para realizar una conexión Bluetooth MIDI con un ordenador Windows,
Nota No es posible conectar varios dispositivos al mismo tiempo.
Nota Cuando se hace una conexión Bluetooth MIDI, se ilumina el
conexión” y el led (Bluetooth audio) cambiará y
permanecerá iluminado fijo.
Nota Si no se establece la conexión en el transcurso de un
minuto, se cancelará la situación de “espera para
emparejamiento” (se apagará el led).
< Reconexión a un dispositivo emparejado >
1. Mientras el amplificador está en situación de “espera para
emparejamiento” (el led [Bluetooth audio] está
parpadeando), pulse el botón BLUETOOTH para intentar
reconectarlo con un dispositivo previamente conectado (el
led parpadeará rápidamente).
2. Si se establece la conexión, el led (Bluetooth audio)
Resolución de problemas con las conexiones Bluetooth
Dependiendo de los ajustes del otro dispositivo y del
momento de las operaciones, una conexión puede fallar en su
establecimiento varias veces, o la función Bluetooth de este
amplificador puede volverse inestable. Si ocurre alguna de
estas dos cosas, compruebe los ajustes del otro dispositivo y
siga el procedimiento descrito a continuación para restablecer
la función Bluetooth de este amplificador.
Nota Cuando se realiza este procedimiento, se corta tanto la conexión
Nota Incluso aunque se realice este procedimiento, no se eliminará
cambiará a iluminado fijo.
Nota Si no se establece la conexión en el transcurso de 10 segundos,
se cancelará la reconexión (se apagará el led).
Nota También se puede hacer una reconexión seleccionando “Adio
Air BS Speaker” en la pantalla de ajustes Bluetooth del
dispositivo al que esté conectado el amplificador.
Nota Si la reconexión se realiza desde este amplificador, la conexión
se restablecerá automáticamente en el futuro con simplemente
encender el amplificador. Para configurar el amplificador de
forma que no se produzca la reconexión automática, pulse el
botón BLUETOOTH mientras el led parpadea rápidamente en
el paso 1 para cancelar la reconexión automática.
1. Mantenga pulsado el botón BLUETOOTH durante al
menos 3 segundos.
2. Cuando los leds (Bluetooth audio) y (Bluetooth MIDI)
empiecen a parpadear, suelte el botón BLUETOOTH.
3. Los leds se apagarán cuando se haya completado el
restablecimiento.
Nota Si no se resuelve el problema, incluso después del
30
intente la conexión desde el otro dispositivo o intente de
nuevo el emparejamiento.
[Adio Air BS solo]
MIDI, hace falta un dispositivo compatible con Bluetooth 4.0.
Los sistemas operativos compatibles son Windows 8.1 o
posterior, OS X 10.10 o posterior, iOS 8 o posterior y Android
6.0.1 o posterior.
es necesario instalar el controlador VOX BLE-MIDI Driver. Consulte el
documento incluido con el controlador VOX BLE-MIDI Driver.
led Bluetooth MIDI.
Bluetooth MIDI como la conexión de Bluetooth audio.
la información de los otros dispositivos almacenada en este
amplificador.
restablecimiento, elimine la información de conexión
acerca de este amplificador guardada en el otro
dispositivo y vuelva a realizar el emparejamiento otra vez.
Page 31

Acerca de los modelos de amplificador y los tipos de efectos
Esta sección proporciona información sobre los modelos de amplificador, los diversos tipos de efectos 1 y efectos 2, la reducción de
ruido y el ecualizador de audio.
Nota Mediante Tone Room se pueden seleccionar más modelos de amplificador y tipos de efectos que los enumerados a continuación, y
también almacenar programas de usuario.
En función de los ajustes del amplificador y de los efectos, puede producirse una distorsión antinatural. Si es así, ajuste los parámetros
del amplificador y de los efectos.
Si un parámetro que no está disponible en el panel superior se cambia en Tone Room, el sonido puede diferir bastante del modelo de
amplificador o tipo de efecto originales.
Para señales de entrada que no estén en el rango de graves (rango de altas frecuencias de las guitarras), no es posible obtener un efecto
normal con el sintetizador de bajo.
Modelos de amplificador
7.
1.
CLASSIC
Este cabezal vintage de válvulas es famoso por poder darse la
vuelta y guardarse en el bafle del altavoz. Su sonido cálido es
perfecto para tocar con los dedos.
2.
SLAP
Este modelo se caracteriza por sus agudos brillantes y su
reducción de medios para así abrirse paso en la mezcla, con
un contorno muy definido. Idóneo para slap.
3.
ROCK
Este modelo está basado en el mundialmente famoso
preamplificador de la carcasa negra. Su sonido contiene
agudos enérgicos y armónicos de altas frecuencias. Idóneo
para tocar rock con púa.
4.
MODERN
Este modelo está basado en el siempre popular amplificador
de válvulas con su interruptor “ULTRA LOW” (ULTRAGRAVES) activado. Produce sonidos de rock hi-fi (alta fidelidad).
5.
DEEP
Este es el sonido de bajo más agresivo que se puede escuchar
desde 2010 en adelante. La señal de entrada se divide en
banda de graves con compresión y banda de agudos con
distorsión, ideal para rock duro, heavy y metal progresivo.
6.
TIGHT SYNTH (SINTETIZADOR DE BAJO)
Este modelo produce sonidos de bajo pop sintetizado típicos
de los años 80 y posteriores. Es un sonido sólido, sensible a la
pulsación y muy dinámico. Los modelos de SINTETIZADOR
DE BAJO incluyen filtro de la envolvente (Envelope Filter).
Cuando se selecciona este modelo, los mandos TREBLE,
MIDDLE y BASS se asignan a los parámetros de control del
filtro.
TREBLE: (FRECUENCIA + RESONANCIA) - Ajusta la
frecuencia central y la cantidad de resonancia.
MIDDLE: (EXTINCIÓN (DECAY)) - Ajusta la velocidad de
respuesta.
BASS : (PROFUNDIDAD)(- Ajusta la profundidad del filtro.
DIRTY SYNTH (SINTETIZADOR DE BAJO)
Este sintetizador consta de múltiples ondas con distorsión y
produce un sonido sucio y agresivo como el que se escucha en
el rock alternativo. Su sonido distintivo puede sobresalir en
una banda a gran volumen.
Incluye filtro de la envolvente y los parámetros de control del
filtro están asignados a los mandos TREBLE, MIDDLE y BASS
como en TIGHT SYNTH.
8.
DELUXE CL
Este modela el canal de vibrato de un amplificador diseñado
en los años 60 con frontal negro y 22 W. Utilizaba válvulas de
potencia 6V6 y una reverb de muelle accionada por válvulas
para producir un sonido grande con una potencia reducida.
9.
AC30TB
Es el modelado de un amplificador AC30 con el circuito “top
boost” del AC30 de 1964. Se caracteriza por unos agudos
suaves y refinados, una saturación impresionantemente
profunda y un sonido limpio y brillante de gran riqueza
tímbrica.
10.
DOUBLE REC
Modela el moderno canal de alta ganancia de un amplificador
que es una bestia salvaje. Sus graves son profundos y con gran
proyección, sus agudos brillantes y su ganancia monstruosa,
resultando ideal para guitarras con la afinación más baja
posible, o para tocar metal con una guitarra de siete cuerdas.
11.
FL AT
Este modelo es solo un amplificador con tres bandas de
control de tono que produce un sonido limpio y puro. Con
TREBLE, MIDDLE y BASS en su posición central, obtendremos una respuesta plana del preamplificador.
Si el nivel de entrada es demasiado alto, el sonido puede llegar
a distorsionar. Para evitar que esto ocurra, reduzca la ganancia
del preamplificador.
31
Page 32

Tipos de efectos
Tipos de efectos 1 (
COMP
T.WAH
FUZZ
CHORUS
mando FX1):
Modela un pedal compresor famoso por su sonido limpio y percusivo. También puede producir un
sustain suave y muy musical. Con el mando se ajusta la sensibilidad.
Modela un auto-wah, un dispositivo que crea un efecto de wah-wah automático que varía con la
dinámica de pulsación (es decir, según se golpeen las cuerdas más fuerte o más suave). Es un efecto
peculiar pero útil. Con el mando se ajusta la sensibilidad de respuesta al volumen de entrada.
Modela un pedal de fuzz para bajo. Con el mando se ajusta la ganancia.
Modela un chorus estéreo, creando un sonido espacioso y de gran riqueza. Con el mando se ajusta la
velocidad de modulación.
Tipos de efectos 2 (
A.DLY
(ANALOG DELAY )
WIDE DLY
(WIDE DELAY)
SPRING
HALL
mando FX2): efectos de delay (retardo)/reverb (reverberación)
Modela un delay analógico de dispositivo BBD (Bucket Brigade Device). Su calidad de audio es de
baja fidelidad, pero es popular por su sonido cálido. Con el mando se ajusta la cantidad de sonido con
retardo que se mezcla. Para ajustar el tiempo de retardo, utilice el botón TAP. El tiempo de retardo
máximo es aproximadamente un segundo.
Este es un delay estéreo con un efecto en el que las notas se escalonan ligeramente desde los altavoces derecho e
izquierdo. El funcionamiento del mando y el botón, así como el tiempo de retardo máximo, son iguales que con A.DLY.
Simula la reverberación de muelle que incorporan muchos amplificadores de guitarra. Con el mando se ajusta
la cantidad de sonido con reverb que se mezcla. Para ajustar el tiempo de reverberación, utilice el botón TAP.
Modela la reverberación de una sala de conciertos con numerosos componentes de eco. El
funcionamiento del mando y el botón es igual que con SPRING.
Reducción de ruido
Aplica un efecto de reducción de ruido.
Al igual que con los amplificadores y los efectos, la reducción
de ruido debe definirse para cada uno de los programas. Si, al
cambiar los ajustes en el modo de programas de usuario,
cambia a otro programa o al modo manual o bien apaga el
amplificador antes de guardar los ajustes, los cambios
realizados se perderán.
1. Mantenga pulsado el botón WIDE durante aproximada-
mente un segundo. El led WIDE parpadeará, y los leds
USER PROGRAMS indicarán el ajuste de reducción de
ruido (el led BANK se iluminará en naranja).
2. Pulse el botón BANK/MANUAL o un botón USER
PROGRAMS que correspondan para cambiar el nivel de
reducción de ruido.
Leds Botón Ajuste
BANK/MANUAL DESACTIVADA
1 Baja
2 |
3 |
4 Alta
3. Pulse el botón WIDE. Los leds BANK y USER PRO-
GRAMS volverán a sus indicaciones anteriores.
Ecualizador de audio
Permite ajustar el sonido de la entrada de audio
procedente del jack AUX IN o de la conexión
Bluetooth.
1. Mantenga pulsado el botón WIDE durante
aproximadamente dos segundos. El led WIDE
parpadeará, y los leds USER PROGRAMS indicarán
el ajuste actual del ecualizador (el led BANK se
iluminará en naranja).
2. Pulse el botón BANK/MANUAL o un botón USER
PROGRAMS para cambiar el ajuste del ecualizador.
Leds Botón Ajuste
BANK/MANUAL
3. Pulse el botón WIDE. Los leds BANK y USER
PROGRAMS volverán a sus indicaciones anteriores.
Nota Los ajustes 1 a 4 especificados pueden cambiarse
utilizando Tone Room.
DESACTIVADO
MÁS ALTO
1
REALCE DE GRAVES
2
REALCE DE MEDIOS
3
REALCE DE AGUDOS
4
32
Page 33

Ja
2
2/2
取扱説明書
このたびは、VOX モデリング・ベース& オ ー デ ィ オ・ア
ンプ AdioAirBS/AdioBS をお買い上げいただきま
して、まことにありがとうございます。本製品を末永
くご愛用いただくためにも、取 扱説明書をよくお読み
になって、正しい 方 法 でご使 用くださ い 。
おもな特長
AUXIN端子やUSB オーディオ、*Bluetoothオー
•
ディオ(A 2DP)機能を搭載。あらゆるデバイスか
ら接続できる高音質なアクティブ・ステレオ・スピー
カ ー と 、ハ イ ク オ リ テ ィ な ベ ー ス・ア ン プ が融合。
高 度 な モ デ リング・テクノ ロ ジ ー によ るア ンプ・モ デ
•
ル、ハイクオリティなエフェクトを多数内蔵。
ノイズ・リダクションを含め最大3 種のエフェクトを
•
同時に使用可能。
アンプやエフェクトを駆使したサウンドをプログラ
•
ムとして、8プログラム(2 バンク×4プログラム)
に保存が可能。保存したプログラムはトップ・パネ
ルのボタンで、演奏中にも簡単に切り替えが可能。
ノブが指示している物理的な位置が、そのままサウ
•
ンドに反映され、通常のベ ース・アン プ のように使
用 で き る マ ニ ュ ア ル・モ ー ド も 装 備 。
オート・チューナーを内蔵し、INPUT 端子に接続し
•
たベ ー ス・ギ タ ー のチュー ニングが 可 能 。
USB、*Bluetoothに対応した MIDI 接続機能を装
•
備。
Windows/Mac/iOS/Android 対応の専用エディ
•
ター /ライブラリアン・ソフトウェア「ToneRoom」
を使用して、本物のアンプ、エフェクトを作る感覚
で各 モデルの微細な パラメータ ーのカスタマイズ
やプログラムの 管 理 が可能。
US B オーディオのルーティングを3 モード搭載し、
•
モノラル / ステレオ・レコー ディング、リアンプに対
応( ToneRoomで設定可能)。
アコーステージ(**Acoustage)技術による広がり
•
のあるサウンドが得られるワイド機能を搭 載。
* Bluetoothによる接続はAdioAirBS のみ
** Acoustage(VirtualSurroundTechnologyby
KO RG) ユニークなパーソナル音響空間を創造できる画期
的なコルグ・オリジナルのバーチャル・サラウンド技術です。
フロント・ステレオ・スピーカーのみで、従来にないユニークな
立体音響体験を演出できます。再生システムを実際に音響
測定し、それぞれに最適化を施すため、最大限の効果を発揮
できます。
仕様
アンプ・モデル数 : 11(ToneRoom 使用時は17)
エ フ ェクト 数
エフェクト 1: 4(ToneRoom使用時 :11)
エフェクト 2: 4(ToneRoom使用時 :8)
プログラム 数
ユー ザー : 8( 2 バンク× 4 プログラム)
入出力端子 :
無線方式: (AdioAirBS の み )
パワーアンプ出 力
スピー カー : 3インチ(8Ω)x2
信号処理
サンプリン グ 周 波数 :
A/D 変換 : 24bit
D/A変換 : 24bit
電源: 単3 形電池(アルカリ乾電池またはニッケ
消費電流: ACアダプター使用時:3. 42A/
電池寿命: 最大 8 時間(アルカリ乾電池使用時)
外形寸法(幅×奥行き×高さ):
質量: 2.9kg(電池含まず)
付属品 : AC アダプター(D C 19 V )、
※ 仕様および外観は、改良のため予告無く変更することがあり
ます。
33
INPUT 端子、AUXIN 端子、PHONES 端
子、USB 端子(TypeB)
KB M - A 1:Bluetooth(A 2DPSink)
KBM- 1:Bluetoothlowenergy(MIDI)
: 最大約 25Wx2RMS(8Ω)
電池使用時:最大約 2.5Wx2(8Ω)
44. 1kHz
ル水素電池)×8 本、または付属ACアダ
プター(DC 19V )
電池使用時:200mA
360x165x163mm
電源コード、取扱説明書
Page 34

ト ッ プ・パ ネ ル
a
b c d e
f
g
i
各部の名称と機能
h
j
a. ア ン プ・モ デ ル・ノ ブ
ア ン プ・モ デ ル を 選 択 し ます 。 選 ん だ ア ン プ・モ デ ル に よっ て 、
ゲイン回路、トーン・コントロールの特性や回路上の配置、キャ
ビネットの特性が切り替わります( ベー ス・シ ン セ サ イ ザー は
除く)。
b. GAINノブ
選択したアンプ・モデルのゲインを調節します。この設定に
よ っ て 、歪 み 量 が 変 化 し ま す 。
c. TREBLE、MIDDLE、BASS ノブ
高音、中音、低音の音色を調節します。
Tip
ベース・シンセサイザーを選択したときはGAIN、TREBLE、
MIDDLE、 BASSノブの効果が変わります( →「アンプ・モデ
ル 、各 種 エ フ ェ クト・タ イ プ に つ い て 」) 。
d. VOLUMEノブ
選択したアンプ・モデルの音量(ボリューム)を調節します。
e. エ フ ェ クト・セ ク シ ョン
F X 1( エ フ ェ ク ト 1 )ノ ブ
ノ ブ の 位 置 に よ っ て 、エ フ ェ ク ト ・ タ イ プ の 切 り 替 え と 、エ フ ェ ク
ト・パラメーターの調節をします。左に回しきると、エフェクト
がオフに なりま す 。
Tip
ベース・シンセサイザーの出力にはエフェクト1の C O MP、
T.WAH、FUZZ の効果がかかりません。
F X 2 ( エ フ ェ ク ト 2 )ノ ブ
ノブの位置によって、残響系エフェクトのタイプの切り替えと、
効果 の深さなどを調 節します。左に回しきると、エフェクトが
オフに なりま す 。
Tip
TAPボタン、TAP/TUNER LED
FX 2(残響系エフェクト)のタイムを設定します。T A P ボタン
を 2 回押した間隔がタイムとして設定されます。 設 定したタ
イムに合わせて緑のLEDが点滅します。
ToneRoomを使うと、より詳細なエフェクトの設定ができ
ます。
lk
m
Tip
曲のテンポにあった正確なタイムを設定するには、曲の拍子
にあわせて TAPボタンを数回押してください。
Tip
TA P ボタンを1 秒以上 押し続けると、エフェクト 2 がバイパスされ、
チューナー機能がオンになります(→「チューナーを使う」)。
f. INSTRUMENTSノブ
アンプ・モデルやエフェクト を 通った 音 の 最終 の 出 力レベ ル を
調節します 。
Tip
USB端子への出力レベルは、このノブで調節できません。
g. AUD IOノブ
AUXIN端子、USB 端子、Bluetooth 接続で入力した音の出
力レベ ルを調 節します。
h. INPUT 端子
ベ ー ス・ギ タ ー ま た は ギターを接 続します。
i. (電源)ボタン、LED
長押しして電源を入れたり、切ったりします。
j. BANK/MANUAL ボタン、BANK LED、USER
PROGRAMSボタン(1 ~ 4)、LED
BANK/MANUALボタンでプログラム・バンクを選択し、
USERPROGRAMSボタンでバンク内のプログラムを選択
します。BANK/MANUALボタンを1秒以上長押しすると、
BANK/MANUALLEDが消灯し、マニュアル・モードとなりま
す。また、新しいプ ログラムを保存 するときにも使用します(→
「プログラムを保存する」)。チューナー機能がオンのときは、
チュー ニン グの 状 態 が 示され ま す( →「チュー ナ ー を 使 う」)。
k. WIDE ボタン、LED
ボタンを押すとワイド機能がオン(L EDが点灯)になります。
アコーステージ技術による広がりのあるサウンドが得られま
す。もう一度押すとオフ(LED が消灯)になります。
Tip
WIDE ボタンを1 秒以上押し続けると、ノイズ・リダクションの
設定、2 秒以上押し続けると、オーディオ用イコライザーの
設定が行えます ( →「ノイズ・リダクション」、「オーディオ用イ
34
Page 35

コ ラ イ ザ ー 」) 。
cba
アース端子付きコンセント
ワイド機能はPHONES端子、USB端子からの出力には効
果がありません。
l. (AdioAirBS のみ)BLUETOOTH ボタン、 (Bluetooth
MIDI)LED、 (Bluetoothオーディオ)LED
Bluetooth を使用して他の機器と接続する場合に使用します
(→「ワイヤレス・スピーカーとして使う(Bluetoothオーディオ)」、
「ワイヤレスでToneRoom を使用する(BluetoothMIDI)」)。
m. PHONES(ヘッドホン)端子
ミキサーやレコ ー ディング機器 などへ直接 出 力 するときや、ヘッ
ドホンを使用するときに、この端子に接続します。
この端子に接続すると、内蔵スピーカーから音は出ません。
PHONES 端子には、必ずステレオ・プラグを接続してください。
リ ア・パ ネ ル
a. AUX IN 端子
使用するオーディオ機器のアナログ音声出力を接続します。
オーディオ・プレイヤー などを接 続して 再生し、曲に合わせ て
演奏する場合に便利です。
b. USB端子
市販 の USB ケーブルでコンピューター などと接続します。
c. DC 19V 端子
付属 の AC アダプターを接 続します 。
AC アダプターは本機専用です。他の製品で使用すると故
障の原因となりますので、絶 対に使用しないでください。
セ ット ア ップ
電池の入れ方
キ ャビ ネ ット 裏 側 の 電 池 カ バ ー を 外 し ま す 。
8本の単 3 形アルカリ乾電池、またはニッケル水素電池を、図
に従って、電池の向きを間違えないように入れます。
電池は付属していません。別途お買い求めください。
電池の向きを間違えないように注意してください。
タイプの異なる電池や消耗度合いの異なる電池を混在させ
て使用し な い でくだ さ い 。
電池の交換について
電源 LED が暗 くなったら、電池を交 換し て ください。
電 池 容 量 が 少なくなると 、十 分 な 音 量 がでなくなったり、ノイ
ズが出る こと が ありま す 。
使えな くなった 電 池 は 、すぐに取り出して ください 。 その ま
まにしておくと、故障の原因(電 池の液もれ等)となります。
また、長時間使用しない場合も、電池を取り外してください。
AC アダプターの接続
1.
付属の AC アダプターに電源コードを接続します。
2.
ACアダプターのプラグを本機の DC19V 端子に接続します。
3.
電源コ ードの先端 のプラグをコンセントに接 続します。
A C アダプターは、必 ず指定 のものを使用してくだ
さい。指定以外のACアダプターを使用した場合、
故障 の 原 因となりま す 。
感電と機器の損傷を防ぐために、アース接続を確実
に行ってくだ さ い 。
アース端子付きコンセントに接続する場合は
ACアダプター用電
源 コ ードの プ ラグが
三芯 のためにコンセ
ントに 接 続 で きな い
場合は、2P-3P変換
器を 取り付 けます。
そ し て 、コ ン セ ント の
アース端子にアース
線 を 接 続 し 、2 P - 3 P
変換器のプラグを差し込みます。
警告:
アース接続は、コンセントにプラグを差し込む前に
行ってください。また、アース接続を外すときは、コンセ
ントからプラグを抜いてから行ってください 。
2P-3P変換器のアース線のU 字端子にカバーが付いて
い る 場 合 は 、カ バ ー を は ず し て く だ さ い 。
35
2P-3P変換器
アース線
電源コード
Page 36

電源の入れ方
無効
1.
本機のINSTRUMENTSノブとAUDIOノブを左に回し
て、最小レベルに設定します。
2.
ベ ー ス・ ギ タ ー ま た は ギターに接続したケーブルを
INPUT端子に接続します。オーディオ・プレーヤーを使
用する場合は、AUXIN端子に接続します。
3.
電源LED が点灯するまで ボ タン を 長 押 しし て 、電 源 を
入れます 。
Tip
電源を切るときは、電源 LED が消灯するまで ボ
タンを 長 押しします 。
4.
INSTRUMENTSノブとAUDIOノブをゆっくりと回し
て 、音 量 を 調 節 し ま す 。
オ ート・パ ワ ー・オ フ 機 能
本機には、オート・パワー・オフ機能が搭載されています。オー
ト・パワー・オフ機能は、INPUT 端子からの入力がない状態で、
約1時間操作しない状態が続くと、自動的に電源が切れる機
能です。いったん電源が切れると、ノブやボタンを操作して
も復帰しません。
入力音の音量や変化が極端に小さい場合は、オート ・ パワー
・オフ機能が動作する場合があります。また、設定や環境に
よってはベ ー ス・ギ タ ー ま た は ギターを弾いていなくても、ノ
イズによって、オート・ パワー ・オフ機能が動作しない場合
があります。
USBや Bluetoothで他の機器と接続しているときは、オー
ト・パ ワ ー・オ フ 機 能 は 動 作 し ま せ ん 。
Tip
工場出荷時は、オート・ パワー・オフ機能は有効に設定されて
います。
オート・ パワー ・オフ機能の有効、無効を設定する
1.
TAPボタンを押しながら電源を入れます。TAP/TUNER
LEDの点灯の仕方で現在の設定を表します。
有効
2.
TAP ボタンを押して、有効、無効を切り替えます。
3.
数秒間操作しないで待ちます。設定を終了し、自動的に
通常の動作に移ります。
プログラムを選ぶ
ユ ー ザ ー・プ ロ グ ラ ム・モ ード
プログラムを選択した状態をユーザ ー・プログラム・モ ードと呼
びます。
Tip
工場出荷時には、あらかじめ設定された音色が保存
されています。選んだ音色を各ノブを使って好みの
音色 に調節す ることが できます 。
同じバンク内 のプログラムを選 択 する
USERPROGRAMSボタンを押します。
別の バンクのプログラムを選 択する
BANK/MANUALボタンを押します。BANKLED
の色が 変 わり点 滅します 。
USERPROGRAMSボタンを押します。
Tip
再度BANK/MANUALボタンを押すと点滅が停止
し て 、元 の バ ン ク に 戻 り ま す 。
マ ニュ ア ル・モ ード
BANK/MANUALボタンを1秒以上長押しすると、
BANK LED が消灯し、すべてのノブの位置がそのま
まサウンドに反映されるマニュアル・モードとなります。
マニュアル・モードでは、通常のベ ー ス・ア ン プ と同様に
ノブを操作して、自由に音 色を作ることができます。
プログラムを保存する
ノブやボタンを操作してアンプ、エフェクトが好 みの音
色に仕 上がったら、ユーザ ー・プログラムとして保存し
ます。
Tip
同じバンク内のプログラムに保存 する場 合 は、手順 2
から操作を行な います 。
プログラムは上書き保存されます。手順 2で選んだ
プログラム は消去 され ます 。
1.
別のバンクに保存する場合、またはマニュアル・
モードで保存する場合は、BANK/MANUALボタ
ンを押して保存先のバンクを選びます。(BANK
LED点滅)
Tip
保存をキャンセルする場合は、ここでT AP
ボタンを押します。BANK LED の点滅が停
止 し 、元 の モ ー ド に 戻 り ま す 。
Tip
ユーザー・プログラム・モードの場合は、再度
BANK/MANUALボタンを押して元のバン
クに戻ると点滅が停止します。
2.
保存先のUSERPROGRAMSボタンをLED の
点滅が点灯に変わるまで(2 秒以上)押し続けま
す。プログラムが保存され、保存先のバンクとプ
ログラ ムに切り替 わります。
保存しないで他のプログラムやマニュアル・
モードに切り替 えたり、電源 を 切ると、音 作り
をしていた内容は消えてしまいます。
36
Page 37

チューナーを使う
内蔵のチューナー機能を使って、I NPUT端子に接続
したベ ース・ギ タ ー を チュー ニングす るこ とが できま
す。
Tip
ギタ ー を チュー ニングすることも可能 で す 。
レ ギ ュ ラ ー ・ チ ュ ー ニ ン グ・モ ー ド
1.
TAP ボタンを1秒程度押し続け
チューナー機能がオンに
ます。
なり、TAP/TUNERLED(赤)が
点灯します 。
チューナー機能がオンのときは、FX 2 がバ
イパスされます。
2.
ベ ー ス・ギ タ ー を単 音 で 鳴らします 。
他の弦が 鳴らないように注意して弾 いてくださ
い。
3.
BANK、USERPROGRAMSLED(1 ~ 4)の5
つのLEDの内、弾いた弦に対応するLEDが点灯
するように大まかにチューニングします。
4.
TAP/TUNERLED の表示を見ながらベー ス・ギ
ターを 正 確 にチュー ニングします 。
高い方にずれているとき
少し高い方にずれているとき
チュー ニン グが合って い るとき
少し低い方にずれているとき
低い方にずれているとき
5.
T A P ボタンを押 すと、チューナ ー 機 能 が オフに なりま
す。(LED消灯)
ハーフ・ダウン・チューニング・モード
チ ュ ー ナ ー 機 能 を オ ン に す る とき に 、T A P ボ タ ン を 2
秒以上押し続けると TAP/TUNER LED(赤)が点滅
し て ハ ー フ・ダ ウ ン ・チ ュ ー ニ ン グ・ モ ー ド と な り 、す べ て
の弦を標準より半音下げてチューニングすることがで
きます。
このモードでは、5 弦~ 1弦がそれぞれ B♭、E♭、A♭、D♭、
G♭のとき、チューニングが合っているものとして表示
されます。
その他の操作方法、表示方法は通常のチューナー機
能と同様 です。
工場出荷時の状態に戻すには
本機のすべての設定を工場出荷時の状態に初期化する方法
を説明します。
この操作を完了すると、USERPROGRAMSに保存して
あったプ ログ ラム や 、
用イコライザーの設定、ペアリングしたBluetooth 機器の情
報など、すべての設定が初期化されます。
この操作を行った場合は、ペアリング相手のBluetooth機器
側でも本機の情報を削除してください。再び接続するには
再度ペアリングを行う必要があります。
1.
電 源 を 切りま す 。
2.
USER PROGRAMS 1、USER PROGRAMS 4の 2
つのボタンを押しながら電源を入れます。B A NK LED
とUSERPROGRAMSLED が点滅し始めたら、押して
いた ボタン を離しま す。
Tip
初期化の作業を中止するときは、ここでTAP ボタン
を押すか、約15秒間、次の操作を行わないと初期
化せずに、通常の動作に切り替わります。
3.
BANK/MANUALボタンをLED の点滅が点灯に変わる
ま で( 2 秒 以 上 )押 し 続 け ま す 。
初期化が始まり、BANK LED とUSER PROGRAMS
LEDが点滅から点灯に変わります。1~ 2秒ほどで初期
化が完了し、通常の動作に切り替わります。
初期化中は、絶対に電源を切らないでください。
ToneRoom
から 登録 し た オー ディオ
コンピューターやタブレットなどを接続する
Tip
各ドライ バ ーや ソフトウェア は、VOXウェブ サ イト(www .
voxamps.com)から最新版をダウンロードしてお使いください。
USB で外部機器と接続する
市販のUSBケーブルでコンピューター、タブレット、スマート
フォンなどと接続して、本機を USB オーディオ・インターフェ
イ ス と し て 使 用 し た り 、エ デ ィ タ ー / ラ イ ブ ラ リ ア ン ・ソ フ ト ウ ェ
ア「ToneRoom」でプログラムの管理やアンプ / エフェクトの
詳細な調節をすることができます。
iOS機器(iPad、iPhone)と接続するには、Lightning-
USBカメラ・アダプター(Apple社製)等の市販のアダプ
ターが必 要です。
Android機器と接続するには、市販の USBOntheGo(OTG)
コネクターが必要となる場合があります。また、Android 機器で
ToneRoomを使用するにはAndroid6. 0以降が必要です。
AUXIN 端子への入力音は、USB端子には出力されません。
Tip
USBで接続した Windows/Mac で Tone Room を使用する
には、VOXUSB-MIDIDriverをインストールしてください。
Tip
US B オーディオ機能は各 O S の標準ドライバーで動作しま
すが、Windowsの場合は VOX 2ch AudioDriver をイン
ストールして A SIOドライバー対応のアプリケーションを使
用すると、遅延の少ない録音/ 再生が可能です。
37
Page 38

ワイヤレス・スピーカーとして使う(Bluetooth
オー ディオ )(
Bluetoothオーディオに対応したコンピューター、タブレット、
スマートフォン、音楽プレーヤーなどをBluetooth接続して、
本機をワイヤレス・スピーカーとして使用することができます。
Tip
<新しい機器と接続する(ペアリング)>
新しい機器と接続する場合は、接続相手の情報をお互いに登
録 す る「 ペ ア リ ン グ 」が 必 要 で す 。
Tip
ペアリングに失敗した場合でも、その機器の情報が本機に追
情報が削除された機器と再び接続する場合は、その機器側
1.
本機の BLUETOOTH ボタンを押します。
ペアリング待ちの状態になり、 (Bluetoothオーディオ)
LEDが点滅します。
2.
接続する機器のBluetooth機能をオンにし、設定画面のリ
ストに表示されるAdioAirBSSpeaker を選択します。
3.
ペアリングの許可を求めるメッセージが表示された場合
は、ペアリングを許可します。パスキーの入力を求めら
れた場合は「0000」を入力します。
Tip
4.
ペアリングが成功すると接続状態となり、本機の
(Bluetoothオーディオ )LED が点灯に変わります。
Tip
<ペアリング済みの機器と再接続する>
1.
ペ ア リ ン グ 待 ち( (Bluetoothオーディオ)LED点滅)の状
態で再度 BL U E T O O T H ボタンを押すと、前回接続されて
いた機器との再接続を試みます(LEDが素早く点滅)。
2.
接続が 成 功 すると (Bluetoothオーディオ)LEDが点灯
に変わります 。
Tip
(LED消灯)。
Tip
Tip
AdioAirBS のみ
同時 に複数 の 機 器と接 続 することはできません 。
ペアリングを行った接続相手の情報は8 台まで本機に保持さ
れます。9台めの機器とペアリングを実行すると、既存の 1
台の情報が削除され、新しく追加されます。
加されることがあります。すでに8 台の情報があった場合に
は、既存の 1 台の情報が削除されます。
で本機の 情報を削除してから、新 たにペアリングをやり直し
てください。
パ ス キ ー は 、P I N コ ード、パ ス ワ ード などと 呼 ばれ る場 合も あ
ります 。
1分以内に接続されなかった場合はペアリング待ちが解除さ
れます(LED 消灯)。
10秒以内に接続できなかった場合は再接続を中止します
接続する機器のBl uet oot h 設定画面にて、Adio AirBS
Speakerを選択して再接続することもできます。
本機の操作で再接続した場合は、次回以降は本機の電源を入
れるだけで自動的に再接続されるようになります。自動的に
)
再接続されないようにするには、手順 1 でLED が素早く点滅
している間にBL U E TOO T H ボタンを押して再接続をキャン
セルします。
<接 続を 切る>
Bluetoothオーディオの接続を切るには、 (Bluetoothオー
ディオ)LEDが点灯している状態でBLUETOOTHボタンを
押します。 接 続が切 れ て LED が消灯します。
ワイヤレスで Tone Room を使用する(Bluetooth
MIDI)
(AdioAirBS のみ)
BluetoothMIDI(MIDI over Bluetooth low energy)に対
応したWindows/Mac/iOS機器/Android 機器と接続する
と、エディター /ライブラリアン・ソフトウェア「ToneRoom」を
ワイヤレスで使 用することができます 。
接続方法等についてはTo ne Roo mに付属するドキュメント
を参照してください。ダウンロードについては、http://
www.voxamps.com/Toneroomを参照してください。
Tip
Tone Room を Bluetooth MIDIで接続して使用するには、
Bl uet o oth 4.0に対応した機器が必要です。対応 OS は、
Windows8.1以 降、OSX10.10以 降、iOS8以 降、
Android6. 0. 1 以降となります。
Tip
WindowsとBluetoothMIDI で接続するには、VOX BLEMIDI Driver をインストールする必要があります。詳しくは
VOX BLE-MIDI Driverに付属するドキュメントを参照
して ください。
Tip
同時 に複数 の 機 器と接 続 することはできません 。
Tip
BluetoothMIDIにより接続されているときは、Bluetooth
MIDILED が点灯します。
Bluetooth の接続に問題があるときは
相手機器の設定や動作タイミングによっては、何度も接続に失
敗したり、本機の Bluetooth 機能が不安定になる場合がありま
す 。 こ の よ う な と き は 、相 手 機 器 の 設 定 を 確 認 す る と 共 に 、下
記の手順で本機のBluetooth 機能をリセットしてください。
Tip
この操作を実行すると、Bluetooth MIDIとオーディオの両
方の接続が解 除されます。
Tip
この操作を実行しても本機に持つ相手機器の情報は削除さ
れません。
1.
BLUETOOTHボタンを 3 秒以上押し続けます。
2.
(Bluetoothオーディオ) (Bluetooth MIDI)
が点滅をし始めたらBLUETOOTHボタンを離します。
3.
リセットが終了すると LED が消灯します。
Tip
リセットを行っても問題が解決しない 場合は、相手 機器に保
存されている本機の接続情報を削除してから、再度ペアリン
グからやり直し てくだ さ い 。
38
の両LED
Page 39

ア ン プ・モ デ ル 、各 種 エ フ ェ クト・タ イ プ に つ い て
ここ で は、ア ン プ ・ モ デル 、そし てエ フェクト 1 、エ フェクト 2 の 各 種 エフェクト・タイ プ とノイ ズ・リダクション 、オ ー ディオ 用 イコライ
ザーについて説明します 。
Tip
ToneRoomを使用すると、下記よりも多くのアンプ・モデル、エフェクト・タイプから選択し、ユーザー・プログラムとして使用できます。
アンプやエフェクトの設定によって、不自然な歪みが発生する場合があります。その場合は、アンプやエフェクトのパラメーターを調節
して ください 。
ToneRoomからトップ・パネルには無いパラメーターを変更すると、元のアンプ・モデルやエフェクト・タイプとはかけ離れた音色にな
ること が ありま す 。
ベース音域外の入力(ギターの高音域)では、ベース・シンセサイザーの正常な効果を得ることはできません。
ア ン プ・モ デ ル
1.
CLASSIC
アンプがキャビネットに収納できることで有名な、15 インチ・
スピー カーを有 す るオ ー ル・チューブ のビン テ ージ・アンプに 基
づいています。エッジが強調されていない暖かいサウンドで
フィンガ ー・ピッキング に 適 し て い ま す 。
2.
SLAP
バ ンド・ミックス の 中 でも 際 立 つよ うな き ら びや か な 高域 と 、
カットされたミドルを持つ、輪郭のはっきりしたサウンドです。
スラップ 奏法 に 適し てい ます 。
3.
ROCK
世界中で支持されている、黒い筐体に入ったプリアンプのサ
ウンド で す。攻 撃 的 な 高 域 とカットさ れたトップ・エ ンドを 持ち 、
ピック 奏 法に 適 し てい ます 。
4.
MODERN
ベ ー ス・ア ンプ の ス タン ダ ード で あ るオ ー ル・チ ュー ブ・モ デ ル
の、ULTRA LOW スイッチをONにしたサウンドです。ハイ
ファイでモダン なロック・サウンドを生み出します。
5.
DEEP
2010年代に聞くことができる、最も攻撃的なサウンドです。
帯域を分け、低域にコンプレッション、高域に歪みをかけるこ
と で 再 現 さ れ て い ま す 。 ラ ウド・ロ ッ ク や プ ロ グ・メタ ル に 適 し
た サ ウンド で す 。
6.
TIGHT SYNTH
芯のしっかりした サウンドで、タッチのニュアンスをダイレクト
に伝 え ま す 。80 年 代 以降 の ポップス で 聞くこ とが で き る「あ
の」サウンドを 楽しむことが できます。 ベース・シンセサイザ ー
には入力に追従したフィルターが搭載されています。
このモデルを選択時は、TREBLE、MIDDLE、BASSノブの
機能が次 のように変わります。
TREBLE (FREQUENCY+RESONANCE): フィルター の
中 心 周波 数とレゾ ナ ン ス 量 を調 節 し ま す 。
MIDDLE (DECAY): フィルターの動く速さを調節します。
BASS (DEPTH): フィルターの効果の深さを調節します。
(ベース・シンセサイザー)
7.
DIRTY SYNTH
オル タ ナ ティブ・ロックで聞かれるような 、ダ ー ティで攻 撃 的 な
サウンドです。 複 数の波形に歪みを加えることで再 現してい
ます。バンド・サウンドの中でも埋もれない、存在感のあるサ
ウンド で す。
TIGHTSYNTHと同様に、入力に追従したフィルターが搭載
されており、TREBLE、MIDDLE、BASSノブの機能は
TIGHTSYNTHと同じです。
8.
DELUXE CL
60年代に発売以降、ブラック・フェイスの愛称で多くのギタリ
スト か ら 愛 さ れ て い る 、2 チ ャ ン ネ ル 、2 2 W の コン ボ・ ア ン プ
です。 パワー・アンプ部には 6V 6 を搭載し、チューブ・リバーブ
による温かみのある音色が特徴です。このアンプ・モデルで
は、“Vibrato”チャンネルをモデリングしました。
9.
AC30TB
1964年以降の「トップ・ブースト」回路を標準仕様として搭載
し た A C 3 0 の モ デリン グ で す 。 ス ムー ズ か つ 繊 細 なトッ プ・エ
ンドを持ち、威厳のある野太いオーバードライブや、豊かで華
やかなクリーン・サウンドを生み出します。
10.
DOUBLE REC
猛 獣 の ご と き ハ イ ゲ イ ン・ア ン プ の 、モ ダ ン・ハ イ ゲ イ ン・チ ャ ン
ネルをモ デリングしました 。 深 く、ルーズなローエンド、きら
めく高域、モンスターのようなゲインは、できるだけ低く
チューニングしたギターや 7 弦ギターを振るったメタル・アクト
に最適です。
11.
FLAT
純粋なクリーン・トーンを 得る、3 バンド・トーン・コントロール
のみのモデルです。TREBLE、MIDDLE、BASSを中央にす
ると、プリアンプはフラットな特 性となります。
入力レベルが大きいと音が歪む場合があります。GAIN コン
トロールでプリアンプへの入力レベルを調節してください。
39
(ベース・シンセサイザー)
Page 40

エ フェクト
© 2017 VOX AMPLIFICATION LTD.
Vox Amplification Ltd.
エ フ ェクト 1 タイ プ [
COMP
T.WAH
FUZZ ベース用のFuzz です。ノブでゲイン量を調節します。
CHORUS 豊かな広がりを持つステレオ・コーラスです。ノブでモジュレーションのスピードを調節します。
FX1ノブ]:
クリーンでパ ーカッシブ か つメロ ー な サ スティーンが得ら れるコン プレッサーのモデリングで す 。
ノブで感度を調節します。
ピッキングのダイナミクス、つまり弦を弾く強さに追従して自動的に効果のかかるオート・ワ
ウのモデリングです。ノブで入力音量に対する動作感度を調節します。
エ フ ェクト 2 タ イ プ [
A.DLY
(ANALOG DELAY)
WIDE DLY
(WIDE DELAY)
SPRING
HALL
FX 2ノブ ]: 残響 系(ディレイ、リバーブ)
バ ケット・ブリゲ ード・デ バ イス( B B D)を 使 用し たア ナログ・デ ィレイ の モ デリン グ です 。ノブ で
ディレ イ 音 の ミック ス 量 を 調 節し ま す 。T A P ボ タ ンで ディレ イ・タイ ム を 設 定し ます 。 最 長 ディレ
イ・タ イ ム は 約 1 秒 で す 。
ディレイ・タイムをずらした 2 タップのディレイを L/ R に振り分 け る、ステレオ・ディレイ です。ノ
ブ、ボタンの 使い 方や最 長ディレイ・タイムは A .DLY と同じです。
ギ タ ー・アン プ 内蔵 の スプ リン グ・リバ ーブ を再 現しまし た。 ノブ でリバ ー ブ音 の ミックス 量 を調
節します。TAP ボタンでリバーブ・タイムを設定します。
エコー成分を多く含むコンサート・ホールの残響をモデリングしています。ノブ、ボタンの使い
方はSPRINGと同じです。
ノ イ ズ・リ ダ ク シ ョ ン
ノイズを抑える効果を設定します。
アンプ や エフェクトと同様にノイズ・リダクションもプログラム
ごとに設定します。 ユーザ ー・プログラム・モ ードのとき、保存
しないで他のプログラムやマニュアル・モードに切り替えた
り、電源 を 切ると変更した 内 容 は消え てしまいます。
1.
WIDE ボタンを1 秒程押し続けると、WIDE LED が点滅
し、USER PROGRAMS LED に現在のノイズ・リダク
ションの設定が表示されます(BAN K LE D が橙色で点
灯 )。
2.
BANK/MANUALボタンまたは USER PROGRAMS
ボタンを押して、ノイズ・リダクションの強さを変更します。
LED
3.
WIDEボ タ ン を 押 し ま す。BANKLED、USER
PROGRAMSLEDが元の表示に戻ります。
ボタン
BANK/MANUAL
1 弱
2 |
3 ↓
4 強
設定
OFF
オー ディオ 用イコライザ ー
AUX IN 端子、Bluetooth接続を使用して入力された
オーディオの音色を調節します。
1.
WI D E ボタンを2 秒程押し続けると、W I D E LE D
がゆっくりと点滅し、USERPROGRAMS LED
に現在のイコライザーの設定が表示されます
(BANKLEDが橙色で点灯)。
2.
BANK/MANUALボ タ ン ま た はUSER
PROGRAMSボタンを押して、イコライザーの設
定を変更します。
LED
3.
WIDEボタン
PROGRAMSLEDが元の表示に戻ります。
Tip
ToneRoomを使用すると1~ 4を好みの設定にそ
れぞれ変更できます。
ボタン
BANK/MANUAL
を押します。BANKLED、USER
1
2
3
4
設定
OFF
LOUD
BASSBOOST
MIDBOOST
TREBLEBOOST
1 Harrison Close, Knowlhill, Milton Keynes, MK5 8PA. UK
www.voxamps.com
40
Page 41

Bedienungsanleitung
De
Vielen Dank, dass Sie sich für einen
Adio Air BS/Adio BS MODELING BASS- & AU-
DIOVERSTÄRKER von VOX entschieden haben.
Bitte lesen Sie sich diese Anleitung vollstädig
durch, um bei der Bedienung alles richtig zu ma-
chen.
Eigenschaften
• Der Adio Air BS/Adio BSverfügt über eine AUX
IN-Buchse sowie USB & Bluetooth* (A2DP) zum
Anschluss einer Vielfalt von Geräten.
Der Adio Air BS/Adio BS ist ein High-End-Bassverstärker mit eingebauten aktiven Stereolautsprechern.
• Dank aufwendiger Modeling-Verfahren verfügen Sie
über den Sound diverser Amp-Modelle samt hochwertiger Effekte.
• Sie können gleichzeitig bis zu drei Effekte inklusive
der Rauschunterdrückung verwenden.
• Erzeugen Sie Ihre eigenen Sounds mit der gewünschten Kombination aus Amp und Effekt und speichern
Sie diese in bis zu acht Programmen (zwei Bänke à
vier Programme). Während des Spielens können Sie
rasch zwischen diesen gespeicherten Programmen
umschalten.
• Im Manual-Modus können Sie den
Adio Air BS/Adio BS wie einen handelsüblichen
Bassverstärker betreiben, wobei die aktuellen
Reglerstellungen sich direkt auf den Sound auswirken.
• Ein eingebautes Stimmgerät ermöglicht ein einfaches
Stimmen Ihres an der INPUT-Buchse angeschlossenen
Basses.
• Der Adio Air BS/Adio BS verfügt über eine MIDI-Funktion und ist kompatibel mit USB und Bluetooth*.
• Mit der Tone Room Editor/Librarian-Software können
Sie die Programme des Adio Air BS/Adio BS in
Windows, Mac, iOS und Android verwalten. Zudem
können Sie mit Tone Room Ihren Amp personalisieren
sowie eigene Amp-Modelle und Effekte kreieren.
• Es stehen drei USB-Audiorouting-Modi für Aufnahmen
in Mono/Stereo sowie zum Re-Amping zur Verfügung
(einstellbar über Tone Room).
• Die Acoustage**-Technologie erzeugt ein räumlich
breites Stereobild für einen noch besseren Hörgenuss.
* Bluetooth-Verbindung nur für Modell Adio Air BS.
** Acoustage (Virtual Surround Technology by KORG) ist eine von
KORG entwickelte, revolutionäre virtuelle Sound-Technologie, die
quasi einen neuen „Hörraum“ schafft. Allein über die beiden
Stereo-Lautsprecher der Front erzeugt diese Technologie ein
einzigartiges dreidimensionales Hörerlebnis. Hierbei wird das
Wiedergabesystem akustisch analysiert und derart optimiert, dass
das volle Potential des jeweiligen Systems zur Verfügung steht.
Technische Daten
Anzahl der Amp-Modelle:
Anzahl der Effekte2
Effekttypen 1: 4
Effekttypen 2: 4
Anzahl der Programme
User: 8 (zwei Bänke x vier Kanäle)
Eingangs-/Ausgangsbuchsen:
Wireless-Funktion (nur Adio Air BS):
Ausgangsleistung der Endstufe:
Im Batteriebetrieb:
Lautsprecher: 3", 8 Ohm x2
Signalverarbeitung
Sampling-Frequenz: 44,1 kHz
A/D-Wandlung: 24 Bit
D/A-Wandlung: 24 Bit
Stromversorgung: AA-Batterien (Alkalibatterien oder
Stromverbrauch 3,42A
Im Batteriebetrieb: 200 mA
Batterielebensdauer: Maximal 8 Stunden (bei Verwendung
Abmessungen: (BxTxH):
Gewicht: 2,9 kg (ohne Batterien)
Lieferumfang:
* Änderungen der technischen Daten und des Designs ohne
vorherige Ankündigung vorbehalten.
41
11 (17 bei Verwendung von
Tone Room)
(11 bei Verwendung von Tone
Room)
(8 bei Verwendung von Tone
Room)
INPUT-Buchse, AUX IN-Buchse,
Kopfhörerbuchse, USB (Typ B)-Port
KBM-A1: Bluetooth (A2DP Sink)
KBM-1: Bluetooth low energy (MIDI)
Maximal ca. 25 W x 2 RMS @ 8 Ohm
Maximal ca. 2,5 W x 2 RMS @ 8 Ohm
Nickel-Metallhydrid-Akkus):
8 Batterien oder über Netzteil (im
Lieferumfang enthalten, DC 19 V
)
von Alkalibatterien)
360 × 165 × 163 mm
Netzteil, Netzkabel,
Bedienungsanleitung
Page 42

Oberseite
a
b c d e
f
g
i
lk
m
j
Bedienelemente und Funktionen
h
a. Amp-Model-Regler
Regler zur Auswahl des Amp-Modells. Die Eigenschaften
und Anordnung der Gain- und Tonregler im Schaltkreis
sowie die Ansprache der Lautsprecher werden entsprechend dem ausgewählten Amp-Modell umgeschaltet. (Außer beim Bass-Synthesizer)
b. GAIN-Regler
Hiermit kann die Vorverstärkung des gewählten AmpModells eingestellt werden. Diese Einstellung beeinflusst
den Verzerrungsgrad der Vorstufe.
c. TREBLE, MIDDLE und BASS-Regler
Zur Einstellung der hohen, mittleren und tiefen Frequenzanteile.
Tipp Beim Bass-Synthesizer erfüllen die Regler GAIN, TREBLE,
MIDDLE und BASS andere Funktionen. (→ „Amp-Modelle
und Effekttypen“)
d. VOLUME-Regler
Regelt die Lautstärke des gewählten Amp-Modells.
e. Effekt-Sektion
FX1 (Effekte 1)-Regler
Regler zur Auswahl des Effekttyps und zum Einstellen der
Effektparameter. Wird dieser Regler ganz nach links gedreht, sind alle Effekte deaktiviert.
Tipp Die Effekttypen 1 COMP, T.WAH und FUZZ wirken sich nicht auf
den Bass-Synthesizer Ausgang aus.
FX2 (Effekte 2)-Regler
Regler zur Auswahl eines Delay/Reverb-Effekts. Der Regler steuert zudem Tiefe bzw. Intensität des gewählten Effekts. Wird dieser Regler ganz nach links gedreht, sind alle
Effekte deaktiviert.
Tipp Mithilfe von Tone Room können Sie die Effekte detaillierter
einstellen.
42
TAP-Taste und TAP/TUNER LED
Taste zum Einstellen von Delayzeit bzw. Halldauer (FX2).
Das Intervall zwischen zwei Betätigungen der TAP-Taste
wird als Zeit festgelegt. Die grüne LED blinkt im Takt mit
der vorgegebenen Zeit.
Tipp Um die Zeit dem Tempo eines Songs anzupassen, drücken Sie die
TAP-Taste mehrmals im Takt des Songs.
Tipp Halten Sie die TAP-Taste mindestens 1 Sekunde lang gedrückt,
werden die Effekte 2 umgangen und die Stimmfunktion aktiviert
(→ „Verwendung der Stimmfunktion“).
f. INSTRUMENTS-Taste
Regelt den Ausgangspegel des Sounds nach im Amp-Modell erfolgter Verstärkung und Effekbearbeitung.
Tipp Dieser Regler wirkt sich nicht auf den Ausgangspegel des
USB-Ports aus.
g. AUDIO-Regler
Regelt den Pegel des Eingangssignals, das an der AUX
IN-Buchse, am USB-Port oder der Bluetooth Verbindung
anliegt.
h. INPUT-Buchse
Buchse zum Anschluss Ihres Basses.
i. (Power)-Taste/LED
Halten Sie diese Taste zum Ein- oder Ausschalten des Verstärkers gedrückt.
j. BANK/MANUAL-Taste, BANK LED und USER PROGRAMS (1 bis
4)-Tasten/LEDs
Wählen Sie mit der BANK/MANUAL-Taste eine Programmbank aus und wählen Sie anschließend mit einer USER
PROGRAMS-Taste das Programm aus. Zum Umschalten in
den Manual-Modus halten Sie die BANK/MANUAL-Taste
mindestens 1 Sekunde lang gedrückt, bis die BANK LED
erlischt. Diese Tasten dienen auch zum Speichern neuer Programme (→ „Speichern eines Programms“). Bei aktivierter
Stimmfunktion zeigen diese Tasten die Stimmung an (→
„Verwendung der Stimmfunk
tion“).
Page 43

k. WIDE-Taste/LED
cba
Taste zum Aktivieren der Wide-Funktion (LED leuchtet).
Mithilfe der Acoustage-Technologie erzeugt die Wide-Funktion ein räumliches, breites Stereobild. Drücken Sie die Taste erneut, um die Funktion zu deaktivieren (LED erlischt).
Tipp Wenn Sie die WIDE-Taste mindestens 1 Sekunde lang drücken,
ändern sich die Einstellung der Rauschunterdrückung Wenn Sie
die WIDE-Taste mindestens 2 Sekunden lang drücken, ändern sich
die Einstellung des Audio-Equalizers.
Die Wide-Funktion wirkt sich nicht auf die PHONES-
Buchse(Kopfhörerbuchse) oder den USB-Port aus.
l. [Nur Adio Air BS] BLUETOOTH-Taste, (Bluetooth MIDI)-LED
und (Bluetooth audio)-LED
Zum Anschluss anderer Geräte über Bluetooth (→ „Ve rwendung als Wireless-Lautsprecher (Bluetooth audio)“
und „Tone Room über Wireless-Verbindung betreiben
(Bluetooth MIDI)“).
m. PHONES-Buchse(Kopfhörerbuchse)
Über diese Buchse können Sie das Ausgangssignal entweder direkt an einen Mixer oder an ein Aufnahmegerät leiten oder mit Kopfhörern abhören.
Wenn an dieser Buchse ein Gerät angeschlossen ist, wird der
eingebaute Lautsprecher stumm geschaltet.
Schließen Sie an dieser Buchse unbedingt ein Stereokabel an.
Rückseite
a. AUX IN-Buchse
Diese Buchse können Sie mit dem analogen Ausgang eines
Audiogeräts verbinden. Sie können an dieser Buchse einen
Audioplayer anschließen und dann Ihre Lieblingssongs
auf der Gitarre begleiten.
b. USB-Port
Verbinden Sie diesen Port mithilfe eines handelsüblichen
USB-Kabels mit Ihrem Computer oder einem anderen
USB-Gerät.
c. DC 19V-Buchse
Schließen Sie hier das beigelegte Netzteil an.
Das Netzteil ist speziell auf den Adio Air BS/Adio BS ausgelegt.
Verwenden Sie kein anderes Netzteil, andernfalls könnten
Störungen auftreten.
43
Einrichtung
Batterien einlegen
Entfernen Sie den Batteriefachdeckel an der Gehäuserückseite. Legen Sie acht AA-Alkalibatterien oder AA-NickelMetallhydrid-Akkus ein und achten Sie dabei auf die richtige Polung (siehe Abbildung).
Batterien sind nicht im Lieferumfang enthalten. Sie müssen diese
separat kaufen.
Achten Sie darauf, dass jede Batterie bzw. jeder Akku in der
richtigen Polung eingelegt wird.
Mischen Sie niemals neue mit verbrauchten Batterien bzw. Akkus
und verwenden Sie stets Batterien bzw. Akkus desselben Typs.
Auswechseln der Batterien
Legen Sie neue Batterien ein, wenn die (Power)-LED
schwächer leuchtet.
Bei erschöpften Batterien kann die maximale Lautstärke sinken
oder ein Rauschen auftreten.
Entfernen Sie entladene Batterien umgehend. Die Batterien
könnten sonst auslaufen und das Gerät beschädigen. Entfernen
Sie die Batterien auch dann, wenn Sie das Gerät über längere Zeit
nicht verwenden.
Anschluss des Netzteils
1. Schließen Sie das Netzkabel am beigelegte Netzteil an.
2. Stecken Sie den Gleichstromstecker des Netzteils in die
DC 19V-Buchse auf der Rückseite.
3. Schließen Sie den Netzstecker das Netskabel an eine Steckdo-
se an.
Verwenden Sie ausschließlich das hierfür vorgesehene
Netzteil. Die Verwendung eines anderen Netzteils kann
Störungen verursachen.
Um Stromschläge oder Schäden an Ihren Geräten zu
vermeiden, sollten Sie für eine sichere Masseverbindung
(Erdung) sorgen.
Einschalten
1. Drehen Sie die INSTRUMENTS- und AUDIO-Regler des
Amps herunter bis zum Linksanschlag.
2. Schließen Sie Ihren Bass oder Ihre Gitarre mit einem Instru-
mentenkabel an der INPUT-Buchse an. Schließen Sie gegebenenfalls einen Audioplayer an der AUX IN-Buchse an.
3. Halten Sie die (Power)-Taste gedrückt, bis die
(Power)-LED leuchtet und der Verstärker eingeschaltet ist.
Tipp Halten Sie zum Ausschalten des Verstärkers die
(Power)-Taste gedrückt, bis die (Power)-LED
erlischt.
Page 44

4. Regeln Sie vorsichtig die Lautstärke mit den INSTRU-
t
MENTS- und AUDIO-Reglern.
Energiesparfunktion
Der Verstärker besitzt eine Energiesparfunktion. Diese
schaltet den Verstärker automatisch aus, wenn er etwa 1
Stunde lang nicht bedient wird und in dieser Zeit kein
Signal an der INPUT-Buchse anliegt. Nach Auslösen der
Energiesparfunktion bleibt jegliche Bedienung der Regler
und Tasten wirkungslos.
Bei extrem niedrigem Eingangspegel oder sehr geringen Ände-
rungen im Sound wird die Energiesparfunktion eventuell
aktiviert. Zudem kann – je nach Einstellung und Umgebung – der
Amp Rauschen als Eingangssignal interpretiert werden, auch
wenn kein Bass gespielt wird.
Die Energiesparfunktion wird nicht aktiviert, solange der
Verstärker über USB oder Bluetooth mit einem anderen Gerät
verbunden ist.
Tipp Die Energiesparfunktion ist ab Werk aktiviert.
Manual-Modus
Halten Sie die BANK/MANUAL-Taste mindestens
1 Sekunde lang gedrückt, erlischt die BANK-LED,
und der Verstärker fährt in den Manual-Modus,
wobei sich alle Reglerstellungen direkt auf den
Sound auswirken.
Im Manual-Modus funktionieren alle Regler wie
bei einem konventionellen Bassverstärker und ermöglichen Ihnen die Gestaltung Ihres eigenen
Sounds.
Nachdem Sie mit den Reglern und Tasten Ihren
Sound eingestellt haben, kann dieser als User-Programm gespeichert werden.
Tipp Wenn Sie Programme innerhalb derselben Bank spei-
Aktivieren/Deaktivieren der Energiesparfunktion
1. Halten Sie die TAP-Taste gedrückt und schalten Sie den
Verstärker ein. Nun zeigen die TAP/TUNER LEDs die
aktuelle Einstellung an.
aktiviert deaktivier
1. Um ein Programm in einer anderen Bank zu spei-
2. Drücken Sie die TAP-Taste, um die Funktion zu aktivieren
bzw. deaktivieren.
3. Führen Sie einige Sekunden lang keine Betätigung aus. Die
Einstellung wird zugewiesen, und der Verstärker kehrt in
den Normalbetrieb zurück.
2. Halten Sie die USER PROGRAMS-Taste des
Ein Programm auswählen
User-Program-Modus
Im User-Program-Modus können Sie ein Programm auswählen.
Tipp Werksseitig sind diverse Sounds bereits gespeichert. Sie können
diese Sounds mit den Reglern beliebig bearbeiten.
Programm aus derselben Bank auswählen
Drücken Sie die USER PROGRAMS-Taste.
Programm aus einer anderen Bank auswählen
Drücken Sie die BANK/MANUAL-Taste. Die BANK LED
wechselt die Farbe und blinkt. Drücken Sie die USER PROGRAMS-Taste.
Tipp Durch erneutes Drücken der BANK/MANUAL-Taste kehren Sie
zur vorherigen Bank zurück, und die LED blinkt nicht mehr.
44
Speichern eines Programms
chern wollen, beginnen Sie bei Schritt 2.
Die Programme werden durch Überschreiben gespei-
chert. Das heißt, das in Schritt 2 ausgewählte Programm
wird gelöscht.
chern oder wenn Sie sich noch im Manual-Modus
befinden, wählen Sie mit der BANK/MANUAL-Taste
die entsprechende Bank aus. (BANK-LED blinkt)
Tipp Drücken Sie die TAP-Taste, um den Speicher-
vorgang abzubrechen. Die BANK-LED hört zu
blinken auf und der Verstärker fährt in den
vorherigen Modus zurück.
Tipp Wenn Sie im User-Program-Modus die BANK/
MANUAL-Taste erneut drücken, wird die
vorherige Bank aufgerufen und die LED hört
zu blinken auf.
Speicherorts gedrückt, bis die blinkende LED
dauerhaft leuchtet (mindestens 2 Sekunden).
Das Programm wird im derart gewählten
Speicherort der entsprechenden Bank gespeichert.
Falls Sie ein anderes Programm oder den
Manual-Modus aufrufen oder den Verstärker vor
dem Speichern des neuen Sounds ausschalten,
gehen alle vorgenommenen Änderungen
verloren.
Page 45

Verwendung der Stimmfunktion
Die integrierte Stimmfunktion erlaubt das Stimmen
eines an der INPUT-Buchse angeschlossenen Basses.
Tipp Sie können damit natürlich auch eine Gitarre stimmen.
Konventioneller Stimm-Modus
1. Halten Sie die TAP-Taste mindestens eine Sekunde
lang gedrückt.
Die Stimmfunktion wird aktiviert und
die TAP/TUNER-LEDs (rot) leuchten.
Bei aktivierter Stimmfunktion wird
FX2 umgangen.
2. Schlagen Sie eine beliebige offene Saite Ihres Basses an.
Schlagen Sie dabei keine andere Saite an.
3. Stimmen Sie die Saite grob, bis die der gespielten
Saite entsprechende LED (BANK oder USER PROGRAM 1 bis 4) aufleuchtet.
4. Achten Sie nun auf die TAP/TUNER LEDs und
stimmen Sie Ihren Bass exakt.
Zu hoch
Etwas zu hoch
Richtig gestimmt
Etwas zu tief
Zu tief
5. Drücken Sie die TAP-Taste, um die Stimmfunktion
zu deaktivieren (LED erlischt).
Half Step Down-Stimm-Modus
Wenn nach Aktivierung der Stimmfunktion die
TAP-Taste mindestens 2 Sekunden lang gedrückt
gehalten wird, blinken die TAP/TUNER-LEDs (rot),
und es wird der Half Step Down-Stimm-Modus
aktiviert, mit dem Sie die Saiten einen Halbton tiefer stimmen können.
In diesem Modus wird die Stimmung für die 5. bis
1. Saite dann als korrekt angezeigt, wenn diese
jeweils B♭, E♭, A♭, D♭ bzw. G♭ beträgt.
Vorgehen und LED-Anzeige entsprechen dem konventionellen Stimm-Modus.
Wiederherstellen der Werkseinstellungen
Um die Werkeinstellungen wiederherzustellen,
gehen Sie wie folgt vor.
45
Hierbei werden alle als USER PROGRAMS gespeicherten
Programme sowie sämtliche Einstellungen – beispielsweise eigene
über Tone Room vorgenommene EQ-Einstellungen oder Bluetooth-Pairing-Informationen – auf die Werksteinstellungen
zurückgesetzt.
Nach dem Zurücksetzen sollten Sie auch die Informationen zu
diesem Verstärker aus allen Bluetooth Geräten löschen, die mit
ihm verbunden waren. Um den Verstärker erneut mit dem Gerät
zu verbinden, muss das Pairing wiederholt werden.
1. Schalten Sie den Verstärker aus.
2. Halten Sie die Tasten USER PROGRAMS 1 und USER
PROGRAMS 4 gedrückt und schalten Sie den Verstärker ein.
Sobald die BANK- und USER PROGRAMS-LEDs blinken,
lassen Sie die Tasten wieder los.
Tipp Falls Sie zu diesem Zeitpunkt die Initialisierung
abbrechen möchten, drücken Sie die TAP-Taste.
Andernfalls kehrt der Amp – sofern innerhalb von 15
Sekunden nicht der nächste Schritt erfolgt – ohne
Initialisierung in den normalen Betriebsmodus zurück.
3. Halten Sie die BANK/MANUAL-Taste gedrückt, bis die
blinkenden LEDs dauerhaft leuchten (mindestens 2 Sekunden).
Das Zurücksetzen beginnt, sobald die blinkenden BANKund USER PROGRAMS LEDs dauerhaft leuchten. Nach 1 bis
2 Sekunden sind die Werkseinstellungen wiederhergestellt,
und der Amp kann normal bedient werden.
Schalten Sie das Gerät niemals aus, solange die Wieder-
herstellung der Werksdaten noch läuft.
Anschluss eines Computers, Tablets etc.
Tipp Laden Sie die neuesten Treiber- sowie Software-Versionen von
der VOX Website (www.voxamps.com) herunter.
Anschluss eines Gerätes über USB
Durch Anschluss eines Computers, Tablets, Smartphones u.
ä. mit einem handelsüblichen USB-Kabel kann der Amp als
USB-Audioschnittstelle verwendet werden. Zudem können
Sie mithilfe der Editor/Librarian-Software „Tone Room“ Programme verwalten und Amps sowie Effekte personalisieren.
Um ein iOS-Gerät (iPad oder iPhone) anzuschließen, benötigen Sie
einen handelsüblichen Adapter, z. B. den Apple Lightning auf
USB Kamera-Adapter.
Um ein Android-Gerät anzuschließen, benötigen Sie einen
handelsüblichen USB On-The-Go (OTG) Adapter. Tone Room
funktioniert in Android Geräten ab Betriebssystem Android 6.0.
Das an der AUX IN-Buchse anliegende Signal wird nicht am
USB-Port ausgegeben.
Tipp Installieren Sie den VOX USB-MIDI-Treiber, um Tone Room auf einem
über USB angeschlossenen Windows- oder Mac-Computer zu verwenden.
Tipp Die USB-Audio-Funktion funktioniert auch mit dem Treiber Ihres
Betriebssystems, jedoch kann es zu leichten Latenzen bei Aufnahme
und Wiedergabe kommen, wenn eine ASIO-kompatible Anwendung bei installiertem VOX 2ch Audio-Treiber verwendet wird.
Page 46

Verwendung als Wireless-Lautsprecher (Bluetooth
audio) [nur Adio Air BS]
Verbinden Sie Ihr Bluetooth fähiges Gerät - ob Computer,
Tablet, Smartphone, Audioplayer usw. – über BluetoothAudio, um den Amp als Wireless-Lautsprecher zu verwenden.
Tipp Sie können nicht mehrere Geräte gleichzeitig verbinden.
Verbinden eines neuen Geräts (Pairing)
Soll ein neues Gerät verbunden werden, muss zuvor ein
Pairing (gegenseitige Registrierung der Verbindungsinformationen) durchgeführt werden.
Tipp Sie können Pairing-Informationen von bis zu acht Geräten speichern.
Wenn ein neuntes Gerät verbunden wird, werden die ältesten
Pairing-Informationen gelöscht, um Platz für die neuen zu schaffen.
Selbst wenn das Pairing misslungen ist, können die Informationen
für das Gerät im Amp gespeichert sein. Falls bereits die Informationen von acht Geräten gespeichert wurden, werden dadurch die
eines bereits existierenden gelöscht.
Um ein Gerät wieder anzuschließen, dessen Pairing-Informatio-
nen gelöscht wurden, müssen Sie in den Einstellungen des Geräts
die Pairing-Informationen des Amps löschen und das Pairing
erneut vornehmen.
1. Drücken Sie die BLUETOOTH-Taste am Amp, fährt dieser in
den Pairing-Modus, der durch blinken der (Bluetooth
audio)-LED angezeigt wird.
2. Schalten Sie nun die Bluetooth Funktion des zu verbindenden Geräts
ein und wählen Sie aus dessen Geräteliste „Adio Air BS Speaker“.
3. Falls eine Bestätigungsaufforderung erscheint, erlauben Sie
das Pairing. Wird ein Zugangsschlüssel angefordert, geben
Sie „0000“ ein.
Tipp Der Zugangsschlüssel kann auch PIN-Code, Passwort usw.
genannt werden.
4. Nach erfolgtem Pairing fährt der Amp in den Verbindungs-
modus und die (Bluetooth audio)-LED leuchtet.
Tipp Kommt innerhalb von einer Minute keine Verbindung zustande,
verlässt der Amp den Pairing-Modus (LED erlischt).
< Wiederverbindung mit einem gepairten Gerät >
1. Drücken Sie die
Pairing-Modus ist ( (Bluetooth audio)-LED blinkt), um ein schon
einmal verbundenes Gerät erneut zu verbinden, (LED blinkt
schnell).
2. Wenn die Verbindung steht, leuchtet die (Bluetooth
audio)-LED.
Tipp Kommt innerhalb von 10 Sekunden keine Verbindung zustande,
verlässt der Amp den Pairing-Modus (LED erlischt).
Tipp Eine erneute Verbindung kann auch über die Wahl von „Adio Air
BS Speaker” in den Bluetooth-Einstellungen des zu verbindenden
Geräts erfolgen.
Tipp Erfolgt die Wiederverbindung über die entsprechenden Funktio-
nen dieses Amps, wird bei jedem künftigen Einschalten des Amps
BLUETOOTH-Taste
solange der Amp im
die Verbindung erneut hergestellt. Um die automatische Wiederverbindung zu verhindern, drücken Sie die BLUETOOTH-Taste,
solange die LED schnell blinkt (Schritt 1).
Tipp Falls eine Wiederverbindung nicht über den Amp zustande
kommt, versuchen Sie es über das andere Gerät oder nehmen Sie
das Pairing erneut vor.
< Verbindung unterbrechen >
Zum Unterbrechen der Bluetooth audio-Verbindung drücken Sie die BLUETOOTH-Taste bei leuchtender (Bluetooth audio)-LED. Die Verbindung wird unterbrochen und
die LED erlischt.
Tone Room über Wireless-Verbindung betreiben (Bluetooth
MIDI)
Ist der Amp mit einem Bluetooth-MIDI-kompatiblen Windows- oder Mac-Computer oder einem iOS- oder Android-Gerät verbunden (MIDI over Bluetooth low energy),
können Sie die Editor/Librarian-Software „Tone Room“
über eine Wireless-Verbindung betreiben. Hinweise hierzu
finden Sie in dem entsprechenden Dokument, das dem
Tone Room beiliegt. Hinweise zu Downloads finden Sie
auf http://www.voxamps.com/Toneroom/.
Tipp Hierzu muss Ihr Gerät mit Bluetooth 4.0 kompatibel sein.
Kompatible Betriebssysteme: Windows ab 8.1, OS X ab 10.10 iOS
ab 8 und Android ab 6.0.1.
Tipp Zum Aufbau einer Bluetooth MIDI-Verbindung mit einem
Windows-Computer muss der VOX BLE-MIDI Treiber installiert
sein. Hinweise hierzu finden Sie im Dokument, das dem VOX
BLE-MIDI-Treiber beiliegt
Tipp Sie können nicht mehrere Geräte gleichzeitig verbinden.
Tipp Wenn eine Bluetooth-MIDI-Verbindung aufgebaut wird, leuchtet
die Bluetooth MIDI LED.
Fehlersuche bei Bluetooth-Verbindungsstörungen
Je nach Einstellungen am anderen Gerät und zeitlichem Ablauf kann
eine Bluetooth-Verbindung evtl. nicht neu aufgebaut werden oder es
kommt zu Störungen der Bluetooth-Funktion dieses Amps. Ist dies der
Fall, prüfen Sie die Einstellungen des anderen Geräts und gehen Sie
wie im folgenden beschrieben vor, um die Bluetooth-Funktion dieses
Amps zurückzusetzen.
Tipp Hierbei werden sowohl die Bluetooth-MIDI als auch die Blue-
tooth-Audio-Verbindungen unterbrochen.
Tipp Dabei werden allerdings die im Amp gespeicherten Informationen
über andere Geräte nicht gelöscht.
1. Halten Sie die BLUETOOTH-Taste mindestens 3 Sekunden
lang gedrückt.
2. Wenn die (Bluetooth audio) und (Bluetooth MIDI)-LEDs
blinken, lassen Sie die BLUETOOTH-Taste los.
3. Nach dem Zurücksetzen erlöschen diese LEDs.
Tipp Sollte das Problem nach dem Zurücksetzen weiterhin bestehen,
löschen Sie die Verbindungsinformationen dieses Amps im
anderen Gerät und nehmen Sie das Pairing erneut vor.
46
[nur Adio Air BS]
Page 47

Amp-Modelle und Effekttypen
In diesem Abschnitt finden Sie Beschreibungen der Amp-Modelle, der diversen Effekte von Typ 1 und 2, der Rauschunterdrückung und
des Audio- Equalizers.
Tipp Mit Tone Room können Sie neben den unten gelisteten weitere Amp-Modelle und Effekttypen auswählen und zusätzlich User-Programme
speichern.
Je nach Einstellung von Verstärker und Effekten kann es zu einer unnatürlich klingenden Verzerrung kommen. Regeln Sie in diesem Fall die
entsprechenden Parameter nach.
Falls Sie über Tone Room einen Parameter ändern, der nicht am Amp selbst zur Verfügung steht, kann der Klang stark vom Klang des originalen
Amp-Modells oder Effekts abweichen.
Für eingehende Signale außerhalb des Bass-Bereichs (Hochfrequente Gitarrensignale) ist es nicht möglich, mit dem Bass-Synthesizer einen
normalen Effekt zu erhalten.
Amp-Modelle
7.
1.
CLASSIC
Emulation eines Vintage Röhren Amps, der sich dank der
berühmten Flip-Top-Funktion im Lautsprechergehäuse
verstauen ließ. Mit seinem warmen Sound ideal für Fingerpickings.
2.
SLAP
Dieses Modell produziert klare Höhen und präsente Mitten, die sich definiert im Mix durchsetzen. Besonders fürs
Slappen geeignet.
3.
ROCK
Emulation des weltberühmten Vorverstärkers mit schwarzem Gehäuse. Sein Klang ist gekennzeichnet durch aggressive Höhen und einen hohen Obertonanteil. Ideal für alle
Rock-Pickings.
4.
MODERN
Dieses Modell orientiert sich an einem immer schon beliebten Röhrenverstärker mit aktiviertem „ULTRA LOW“
Schalter. Ideal für Rocksounds in Hi-Fi-Qualität.
5.
DEEP
Dieses Modell begeistert durch einen besonders aggressiven Bass-Sound, der seit 2010 beliebt ist. Das Eingangssignal wird gesplittet, wobei die tiefen Frequenzen komprimiert und die hohen verzerrt werden. So einsteht der ideale Sound für Heavy-Rock und Prog-Metal.
6.
TIGHT SYNTH (BASS SYNTHESIZER)
Dieses Modell erzeugt die typischen Synthie Bass Sounds
der 80er, die bis heute in der Pop-Musik ihren Platz haben.
Der solide Sound ist zudem äußerst anschlagsdynamisch.
Die BASS SYNTHESIZER Modelle verfügen über ein Hüllkurvenfilter. Bei der Auswahl dieser Modelle dienen die
Regler TREBLE, MIDDLE und BASS der Einstellung der
Filterparameter.
TREBLE: FREQUENCY + RESONANCE – Regelt die Zentralfrequenz und den Resonanzanteil.
MIDDLE: DECAY – Regelt das Ansprechtempo.
BASS: DEPTH – Regelt die Filtertiefe.
DIRTY SYNTH (BASS SYNTHESIZER)
Dieser Synthie erzeugt mehrere verzerrte Wellen für den
typisch aggressiven und dreckigen Sound des AlternativeRock. Dieser Sound setzt sich auch in lauten Bands durch.
Wie bei TIGHT SYNTH wird auch hier das Hüllkurvenfilter mit den Reglern TREBLE, MIDDLE und BASS eingestellt.
8.
DELUXE CL
Emulation des Vibratokanals eines 22W-Blackface aus den
Sixties, der dank 6V6 Endstufenröhren und röhrenbasiertem Federhall trotz zivilisierter Ausgangsleistung einen
fetten Sound erzeugte.
9.
AC30TB
Dieses Modell beruht auf einem AC30 mit „Top Boost“Schaltung, die ab 1964 serienmäßig eingebaut wurde. Daher die samtweichen und feinen Höhen, die fast majestätisch tiefe Übersteuerung und der glasklare „Clean“Sound.
10.
DOUBLE REC
Emulation des High-Gain-Kanals eines brutalen, modernen Metal-Amps. Der tiefe, offene Bass, die perlenden
Höhen und die brachiale Pegelanhebung eignen sich perfekt für tiefer gestimmte und siebensaitige Gitarren.
11.
FL AT
Emulation eines Amps mit Dreiband-Klangregelung für
einen reinen, sauberen Sound. Mit TREBLE, MIDDLE und
BASS auf mittlerer Position erzeugt der Vorverstärker einen linearen Frequenzgang.
Bei zu hohem Eingangspegel kann der Sound verzerrt sein.
Reduzieren Sie sicherheitshalber den Gain des Vorverstärkers.
47
Page 48

Effekttypen
Effekttypen 1 (
COMP
T.WAH
FUZZ
CHORUS
FX1-Regler):
Emulation eines wegen seines perkussiven und klaren Klangs beliebten Kompressorpedals. Sie
können hiermit auch ein singendes, weiches Sustain erzeugen. Die Empfindlichkeit wird mit
dem Regler eingestellt.
Emulation eines Auto-Wahs, das einen automatischen Wah-Wah-Effekt erzeugt, der sich mit ihrer Anschlagsdynamik ändert (also je nachdem, ob Sie die Seiten fest anschlagen oder leicht zupfen) - ein skurriler
aber gern genutzter Effekt. Mit dem Regler ändern Sie die Reaktionsempfindlichkeit auf Änderungen des
Eingangspegel.
Emulation eines Bass-Fuzz-Pedals. Der Gain wird mit dem Regler eingestellt.
Emulation eines Stereo-Chorus für einen vollen, räumlichen Klang. Das Modulationstempo
wird mit dem Regler eingestellt.
Effekttypen 2 (
A.DLY
(ANALOG DELAY )
WIDE DLY
(WIDE DELAY)
SPRING
HALL
FX2 Regler): Delay/Reverb-Typen
Emulation eines Analogdelays mit Eimerkettenspeicher. Trotz - oder vielleicht gerade wegen
- seines warmen Lo-Fi Sounds sehr beliebt. Der Anteil des Delay-Sounds im Mix wird mit dem
Regler eingestellt. Die Delayzeit wird mit der TAP-Taste eingestellt. Die maximale Delayzeit
liegt bei etwa 1 Sekunde.
Stereo-Delay mit zwischen rechtem und linkem Lautsprecher leicht zeitversetzten Noten. Die
Funktionsweise von Regler und Taste sowie die maximale Delayzeit entsprechen der bei A.DLY.
Emulation eines Federhalls, wie man ihn von zahlreichen Gitarren-Amps kennt. Der Anteil des
Hallsounds im Mix wird mit dem Regler eingestellt. Die Halldauer wird mit der TAP-Taste eingestellt
Emulation des Raumhalls eines Konzertsaals mit zahlreichen Echokomponenten. Die Funktionsweise von Regler und Taste entsprechen der bei SPRING.
Noise reduction
Effekt zur Unterdrückung von Rauschen.
Wie bei Amps und Effekten auch, muss die Rauschunterdrückung
für jedes Programm separat eingestellt werden. Falls Sie beim
Ändern von Einstellungen im User-Program-Modus ein anderes
Programm oder den Manual-Modus aufrufen, bzw. den Verstärker vor dem Speichern der Einstellungen ausschalten, gehen alle
vorgenommenen Änderungen verloren.
1. Halten Sie die WIDE-Taste mindestens 1 Sekunde lang
gedrückt. Die WIDE-LED blinkt und die USER PROGRAMSLEDs zeigen die Einstellung der Rauschunterdrückung an
(BANK-LED leuchtet orangefarben).
2. Drücken Sie die BANK/MANUAL-Taste oder eine USER
PROGRAMS-Taste, um den Pegel der Rauschunterdrückung
zu ändern.
LEDs Taste Einstellung
BANK/MANUAL
1
2
3
4
3. Drücken Sie die WIDE-Taste. Die BANK- und USER PRO-
GRAMS-LEDs kehren zu ihren ursprünglichen Anzeigen
zurück.
AUS
Niedrig
|
|
Hoch
48
Audio Equalizer
Regelt den Klang des Eingangssignals, das an der AUX
IN-Buchse oder der Bluetooth Verbindung anliegt.
1. Halten Sie die WIDE-Taste mindestens 2 Sekunden
lang gedrückt. Die WIDE-LED blinkt langsam und die
USER PROGRAMS-LEDs zeigen die aktuelle EQEinstellung an (BANK-LED leuchtet orangefarben).
2. Drücken Sie die BANK/MANUAL-Taste oder eine
USER PROGRAMS-Taste, um die EQ-Einstellung zu
ändern.
LEDs Taste Einstellung
BANK/MANUAL
1
2
3
4
3. Drücken Sie die WIDE-Taste.
USER PROGRAMS-LEDs kehren zu ihren ursprünglichen Anzeigen zurück.
Tipp Mit Tone Room können Sie die Einstellungen von 1 bis 4
ebenfalls vornehmen.
AUS
LAUT
BASS-BOOST
MITTEN-BOOST
HÖHEN-BOOST
Die BANK- und
Page 49

Page 50

HI■
籠
KORG INC.
4015‐ 2 Yanokuchi,lnagi― Clty,丁 okyo 206-0812 Japan
Date of issue: Septmber
2.
2016
Declaration
is issued
DoC
This
-
Manufacturer
Address
Brand Name
Device
Description
Model No.
Rating
Fulfils the essential requirements of the Directive 1 999/5/EC(R&丁
丁he fo‖
Spectrum〉
〈
EN 300 328 vl.9.1
EMC〉
〈
EN 301 489-l vl.9.2
EN 301 489-17v2.2.1
EN 55022:2010
EN 55024:2010
of
Power
/
owlng standards were applied:
Supply
KORG INC.
4015-2 Yanokuchi,Inagl―
KORG
Bluetooth Module
KBM-1
DC 3V
under
the
of Conformity
responsibility
sole
City,丁 okyo 206-0812」
of
manufacturer.
the
丁E).
-
apan.
Health &Safety〉
〈
EN 60950-1:2006+All:2009+Al:2010+A12:2011+A2:2013
EN 62479:2010
Remarks:
Authorized Representative
KORG(UK)Limited
l Harrison Close,Knowlhlll,Milton Keynes,MK5 8PA.UK
Signature:
Title:
Norio Sekiya
Senior
Engineer of Safety
Name:
Standard
Group
Quality
〔 ( affixed on 7/2015
Assurance Sec.
KORG
Inc.
 Loading...