

Page 1

DVR 988HD
WiFi Action Camera
Dual Lens 360° View
User Manual
Windows and the Windows logo are registered trademarks of Microsoft Corporation.
All other trademarks are the property of their respective companies.
© 2016 Sakar International, Inc. All rights reserved.
Page 2

1
CONTENTS
Introduction .................................................................................................................................. 2
What’s Included ............................................................................................................................ 4
Parts of the Camera ..................................................................................................................... 5
Initial Setup .................................................................................................................................. 6
CHARGING THE BATTERY ............................................................................................................................................................. 6
INSTALLING THE MICRO SD MEMORY CARD ..................................................................................................................................... 7
POWERING ON – OFF / POWER SAVE............................................................................................................................................. 8
USING THE CAMERA................................................................................................................................................................... 8
Main Camera Modes .................................................................................................................... 9
Camera Mounts and Accessories ............................................................................................... 10
WIRELESS REMOTE .................................................................................................................................................................. 10
ASSEMBLING THE BICYCLE MOUNT .............................................................................................................................................. 11
ASSEMBLING THE HELMET MOUNT .............................................................................................................................................. 11
USING THE TRIPOD .................................................................................................................................................................. 12
Using Your Action Camera ......................................................................................................... 13
POWERING ON YOUR CAMERA ................................................................................................................................................... 13
CHANGING CAMERA MODE ....................................................................................................................................................... 13
Vivitar Experience Image Manager Software ............................................................................. 14
COMPUTER SYSTEM REQUIREMENTS ............................................................................................................................................ 14
INSTALLING THE SOFTWARE – USING THE CD ROM ......................................................................................................................... 15
INSTALLING THE SOFTWARE – USING THE ONLINE LINK ..................................................................................................................... 16
CONNECTING THE CAMERA TO THE COMPUTER ............................................................................................................................... 17
GETTING VIDEOS FROM THE CAMERA TO THE COMPUTER .................................................................................................................. 18
GETTING STARTED! .................................................................................................................................................................. 19
TRANSFERRING IMAGES MANUALLY FROM THE CAMERA TO THE COMPUT ER........................................................................................... 19
Camera Maintenance ................................................................................................................. 21
MEMORY CARD MAINTENANCE .................................................................................................................................................. 21
DEVICE MAINTENANCE ............................................................................................................................................................. 22
Sakar Warranty Card .................................................................................................................. 23
Technical Support ....................................................................................................................... 24
Troubleshooting .......................................................................................................................... 24
Page 3

2
Introduction
Thank you for purchasing the Vivitar DVR 988D HD Wi-Fi Action Cam with Dual Lens 360° View.
Everything you need to take high definition digital videos and photos is included with your
camera.
This unique, ultraportable camera design is adapted specifically for this camera and can be used
to capture special moments in many different environments.
Vivitar makes capturing those special moments as easy as possible.
Page 4

3
Please read this manual carefully first in order to get the most out of your digital camera.
NOTE:
Your digital action camera supports a Class 6 or higher Micro SD card with a capacity
expansion up to 32GB.
In order to use your digital action camera normally, please insert the Micro SD Memory
card before use. Please format the Micro SD Memory Card before first use.
Micro SD Memory cards are not included and need to be purchased separately.
This camera is a plug and play device. You can download the pictures and videos without
the software by directly accessing the camera’s memory card from your computer. We
would however recommend that you install the Vivitar Experience Image Manager
software to enjoy the full Vivitar experience.
Page 5
4
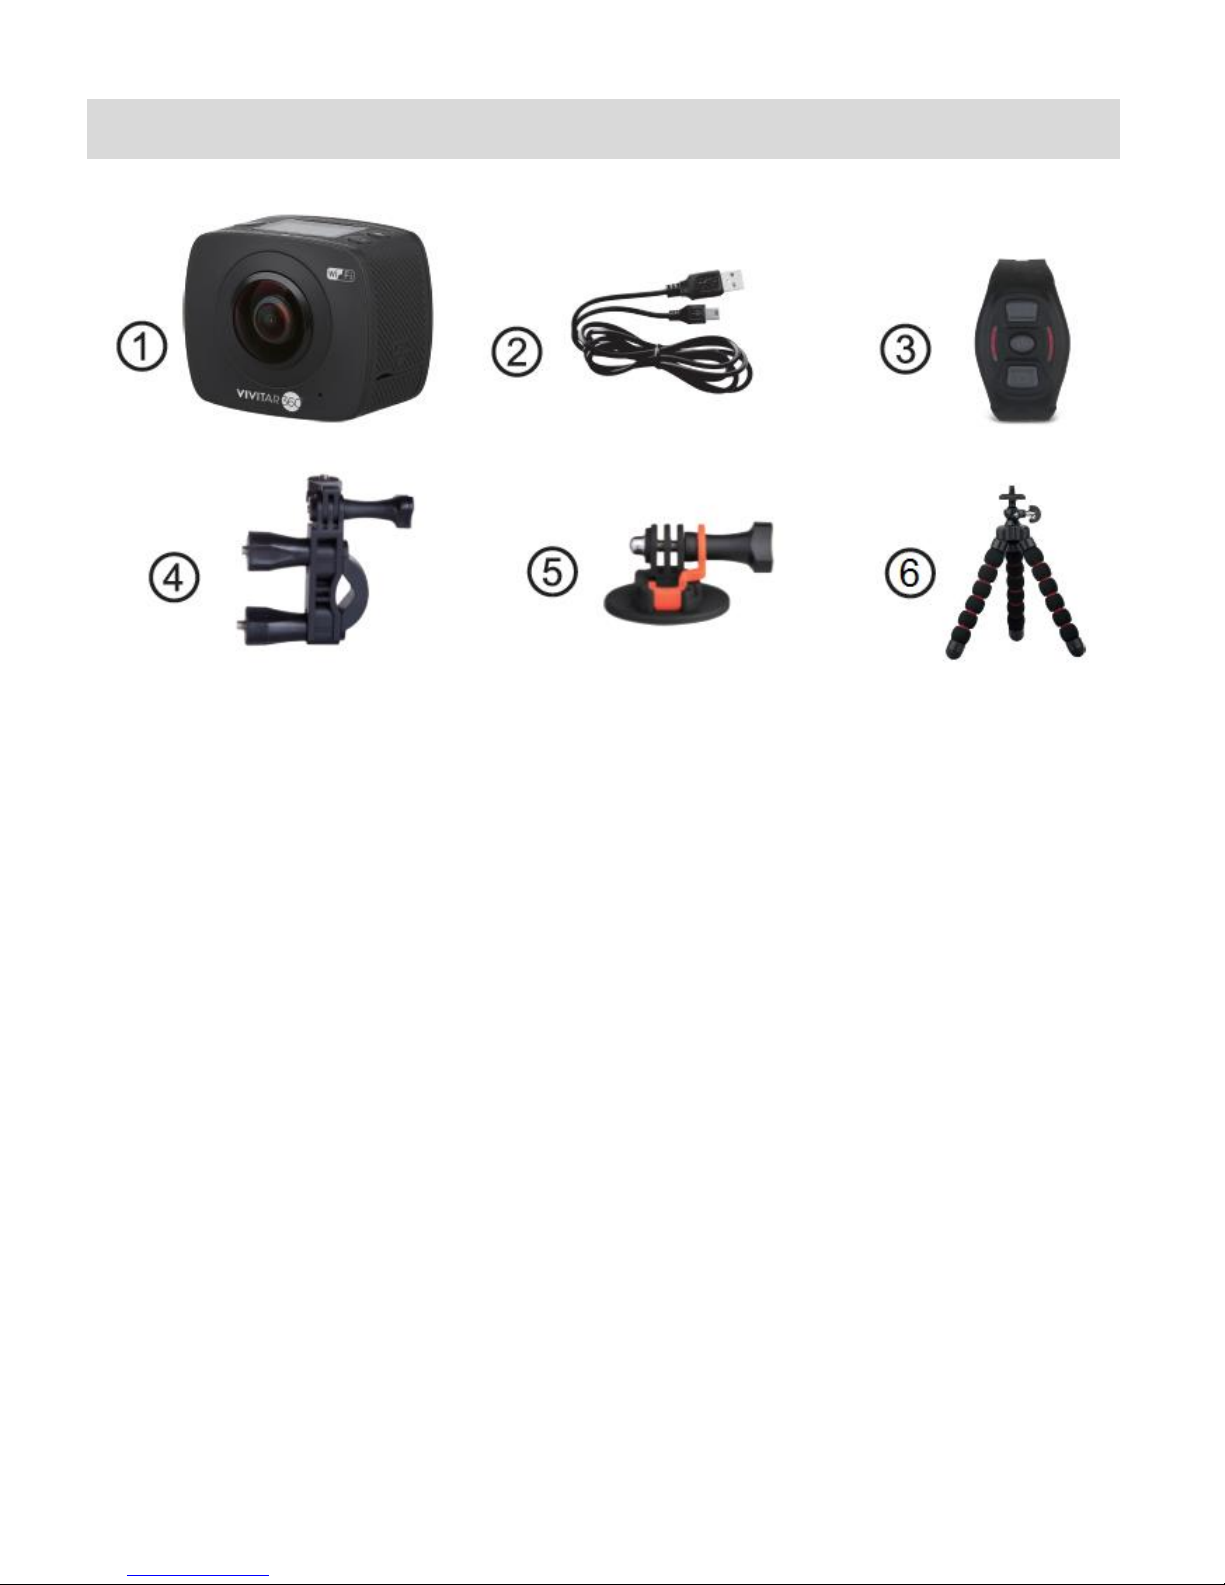
What’s Included
1. Wi-Fi Action Camera
2. USB Cable
3. Remote Control
4. Bicycle Mount
5. Helmet Mount with 3M Sticker
6. Tripod
NOTE:
Class 6- Class 10 Micro SD Memory Card (up to 32GB) needed for normal use.
Micro SD Memory Card not included.
Page 6
5
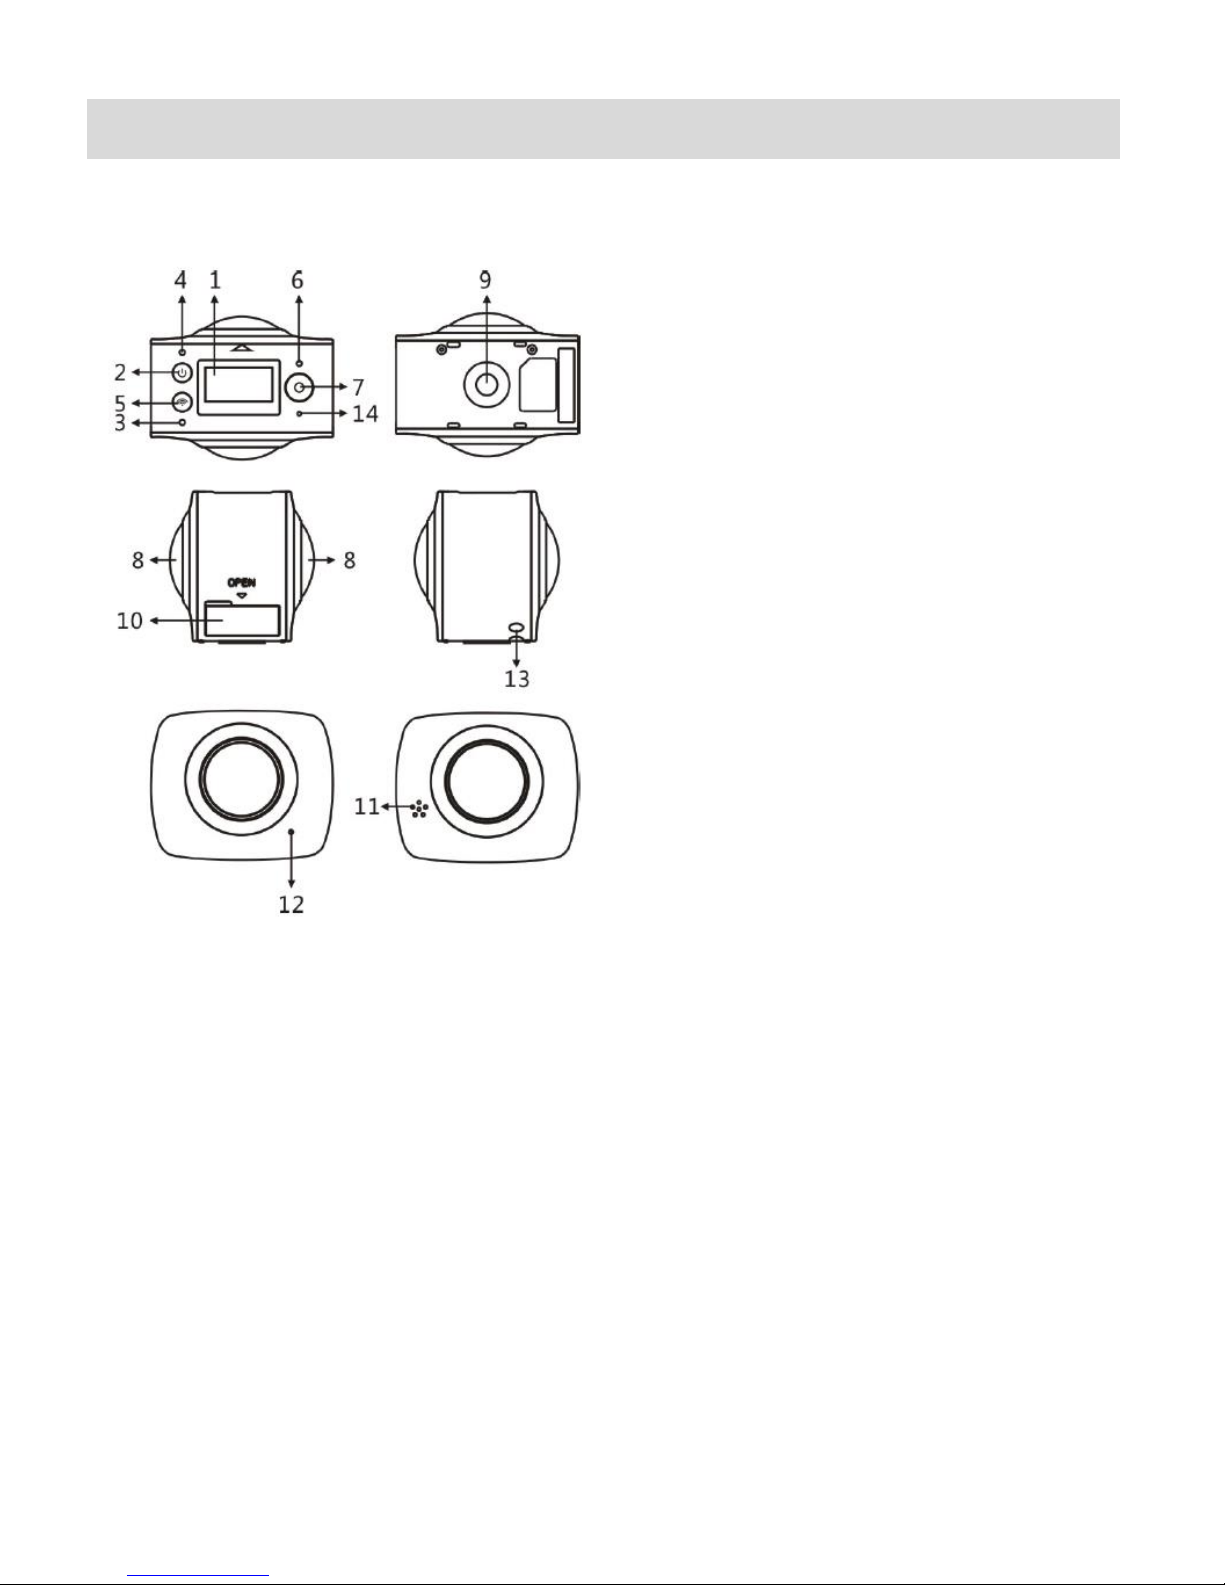
Parts of the Camera
1. LCD Display
2. Power / Mode Button
3. Wi-Fi Indicator (red)
4. Power Indicator (red) /
Charging Indicator (blue)
5. Wi-Fi / Menu Button
6. Busy Indicator (red)
7. Shutter / OK Button
8. Lens X2
9. Tripod Socket
10. Interface Cover (USB/TF)
11. Speaker
12. Microphone
13. Hand Strap Connector Hole
14. Reset Hole
Page 7
6
Initial Setup
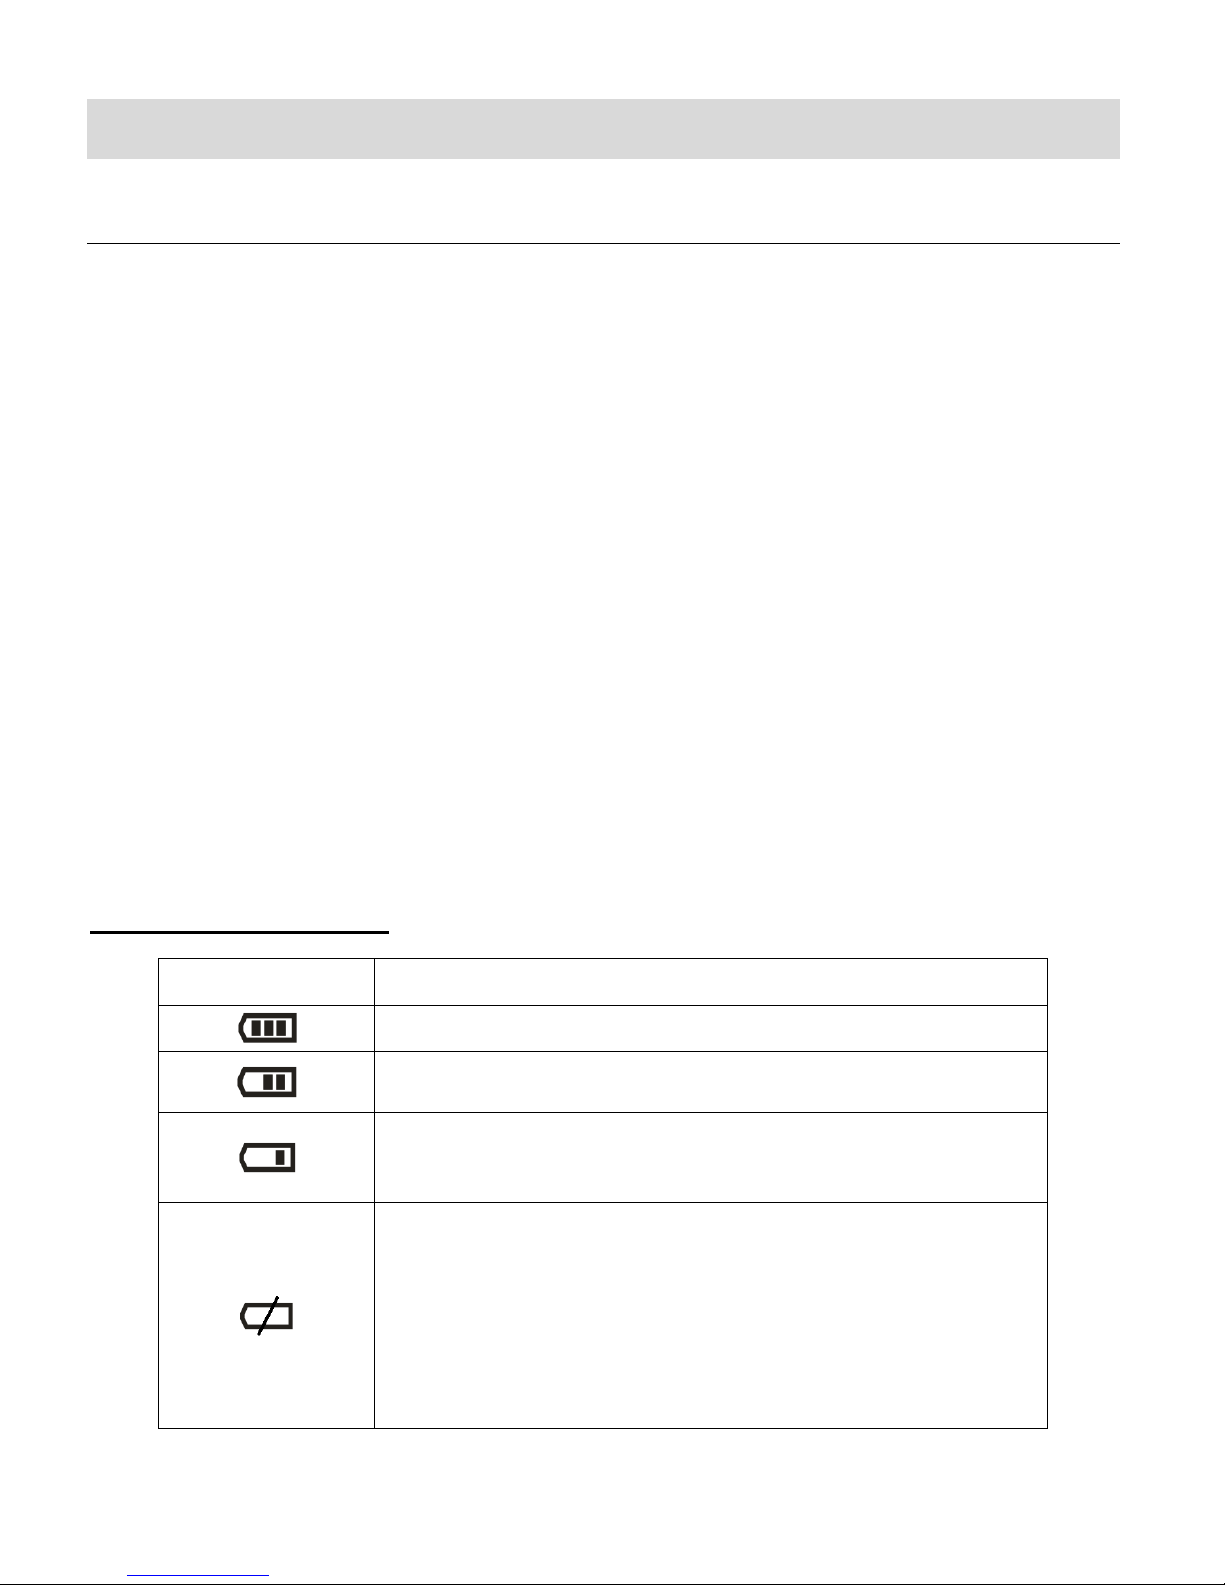
Battery Indicator
Description
The battery level is full.
The battery level is half.
The battery level is low, indicating to prepare for recharging
the built-in lithium battery.
The battery level is empty.
Once the empty battery icon flashes on the LCD, this
indicates that the battery level is completely exhausted and
the camera automatically turns off after approximately 30
seconds. Please fully recharge the battery.
CHARGING THE BATTERY
The camera includes a built-in lithium battery.
Use the supplied USB cable for camera charging.
Connect the USB cable from the camera to a power source, such as to the USB port of your
computer.
While charging, the indicator light appears blue and remains on.
Once the camera is fully charged, the indicator light turns off.
NOTE:
If using an adapter for charging, check the output power before use to ensure it is within
5V/0.5A ~ 5V/2.0A.
While the device is charging it cannot be used to capture images.
Make sure the camera is powered off when recharging.
BATTERY INDICATOR:
Page 8
7
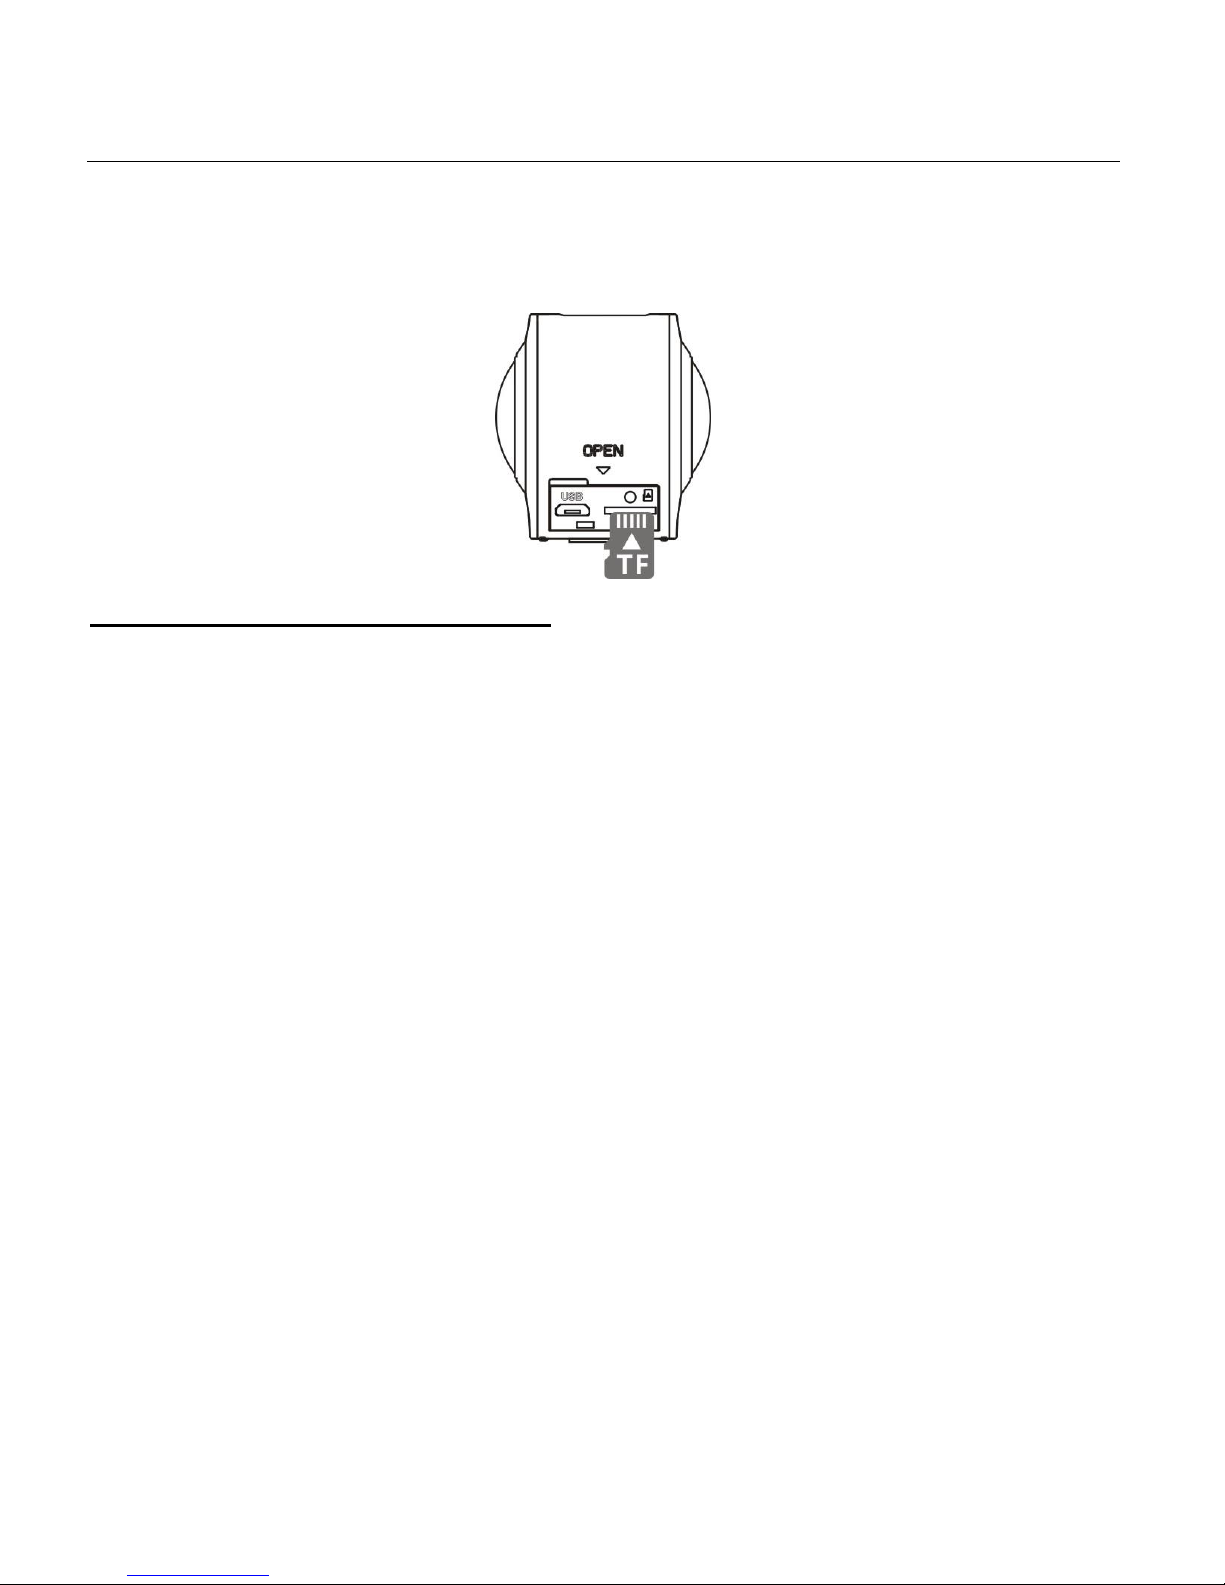
INSTALLING THE MICRO SD MEMORY CARD
Make sure to install a High Speed Class 6 or higher Micro SD Memory card.
A Micro SD Card must be inserted into the camera as shown below before use.
Micro SD Memory card not included.
INSTALLING THE MEMORY CARD:
To properly insert the Micro SD Card, follow the instructions below:
1. Power off the camera.
2. Insert the Micro SD Card into the Micro SD Card slot in the direction as shown above.
3. Gently press the Micro SD Card until you hear a slight clicking sound. This indicates the
memory card has been inserted correctly.
4. To remove the card, gently press on the edge of the card to release it and pull the card out.
IMPORTANT:
Please power the camera off before inserting or taking out the memory card.
If the card is inserted or removed while the camera's power is on, it may damage the card
and/or any recorded data. Always confirm that the power is off before inserting the card into
the camera.
Make sure there is room on the Micro SD Memory Card for additional images. If the Micro SD
Memory Card is full, additional images will not be added to the memory card.
Page 9

8
POWERING ON – OFF / POWER SAVE
Short press the
POWER/MODE button
to select the mode.
Long press the WiFi
button to open Settings.
Short press to activate
WiFi.
Press the Shutter
button to capture your
videos and photos.
TO POWER ON THE CAMERA:
Press and hold the Power button for about 2 seconds and release when a beep is heard
and the LCD screen turns on.
TO POWER OFF THE CAMERA:
1. Press and hold the Power button for about 3 seconds and release.
2. The LCD displays “GOODBYE” and turns off.
POWER SAVE:
Your camera also has an auto power off feature that automatically turns off your camera after a
specific period of time that your camera is left idle. The auto power off settings can be set from
the ‘Power Save’ Camera Settings menu.
USING THE CAMERA
Page 10

9
Main Camera Modes
Video Capture Mode
Use this mode to capture videos with your digital camera.
To record a video, please check that the camera is in Video Mode. If the video icon is
not displayed on the LCD screen, short press the Power/Mode button until it appears. To
start recording, press the Shutter/OK button. Press the Shutter/OK button again to stop
recording. The video is automatically saved to your camera’s memory card.
Photo Capture Mode
Use this mode to capture pictures with your camera.
To take a photo, please check that the camera is in Photo Mode. If the photo icon is
not displayed on the LCD screen, short press the Power/Mode button until it appears.
Press the Shutter/OK button to capture your photo. The picture is automatically saved to
your camera’s memory card.
Short press the Power/Mode button to toggle between the camera modes.
Page 11

10
Camera Mounts and Accessories
It is strongly recommended to use the supplied accessories. It helps to create a better product
experience and better shooting/recording effect.
WIRELESS REMOTE
1. Power Button
2. Photo Button
3. Video Button
4. Button Indicator (Red)
5. Strap
6. Buckle
The remote control allows you to power on/off the DV and to take photos or videos from 30M
away without operating on DV directly. Just press the button for the desired function.
Note: Press any button the indicator lamps at both sides will light in red at the same time.
Using the action camcorder by remote control:
1. Press and hold the Power Button until the indicator goes off, and the DV turns on.
2. Press the Video Button after the camcorder powers on. The recording starts
automatically. To stop the recording, press the Video Button again.
The video will be saved to the memory card automatically.
3. To take photos by remote control, just press the Photo Button. The photo will be saved to
the memory card automatically.
4. To turn off the camera, press the Power Button again.
Page 12

11
ASSEMBLING THE BICYCLE MOUNT
ASSEMBLING THE HELMET MOUNT
Page 13

12
USING THE TRIPOD
Screw the tripod nut attached into the tripod socket on the bottom of the camera.
It serves both as a hand-held or fixed device.
Fix to use tripod Hold to use tripod
Page 14

13
Using Your Action Camera
POWERING ON YOUR CAMERA
1. Press and hold the POWER button for about 2 seconds and then release the button
to turn on the camera.
The LCD screen briefly displays the ‘VIVITAR’ screen and opens to the Video Capture
Mode.
2. Press and hold the POWER button again for about 3 seconds to turn the power off.
The LCD screen briefly displays ‘Goodbye’ and then powers off.
CHANGING CAMERA MODE
CAMERA MODES
1. Video Capture Mode - Use this mode to capture videos with your camera.
2. Photo Capture Mode - Use this mode to capture photos with your camera.
SWITCHING MODES
After turning on the camera, short press the POWER/MODE button to switch between the
modes.
When in Video Capture Mode - This icon will display on the top-left corner of the LCD
display.
When in Photo Capture Mode, this icon will display on the top-left corner of the LCD
display.
In Video Capture Mode, press the SHUTTER button to start recording and press it
again to stop.
In Photo Capture Mode, press the SHUTTER button to take photo.
Page 15

14
Vivitar Experience Image Manager Software
COMPUTER SYSTEM REQUIREMENTS
To be able to download videos and photos to your computer using the ‘Vivitar Experience Image
Manager’ Software, you will need the following minimum configuration:
WINDOWS OS
MICROSOFT® Windows XP with Service Pack 3, Windows Vista with Service Pack 1 or
Windows 7
Pentium® 4 processor (or above)
1 GB RAM, 250 MB available hard disk space
16-bit Color monitor, 1024 X 768 recommended screen resolution
CD-ROM Drive
QuickTime® 6 or higher
MICROSOFT ® Internet Explorer 7 or higher
Windows Media Player 10 or higher
DirectX 9 or higher
Internet connection required
MACINTOSH OS
Intel processor running MACINTOSH OS X v10.5.x or later
1 GB RAM, 250 MB available hard disk space
Display: 1024 x 768 or higher-resolution monitor
QuickTime® 6 or higher
CD-ROM Drive
Internet connection required
NOTE: Make sure the latest compatible Adobe® Flash® Player is installed on your computer.
Page 16

15
INSTALLING THE SOFTWARE – USING THE CD ROM
You must be connected to the Internet to install and run the Vivitar Experience Image Manager
Software.
1. Insert the installation CD into your CD-ROM drive. The installation screen should
automatically open.
2. On WINDOWS OS: The Vivitar Experience Image Manager Installer window appears. If the
window does not appear, open the application’s CD/DVD drive and click on “Setup.exe” to
launch the installer.
3. On MACINTOSH OS: Click the icon that appears on the desktop to install the Vivitar
Experience Image Manager.
4. If you do not have internet access at the time of inserting the CD-ROM, connect to the
internet and then click the “Install Vivitar Experience Image Manager” button to begin the
installation.
NOTE: If you do not have internet access, you can still download media from the camera.
Click the “How to transfer photos and videos from my camera to my computer” button for
instructions.
Page 17

16
5. If you have internet access, the “Choose your language” window opens, choose your
language and click “Next” to open the next window.
6. Select your camera model from the list and click “Next” to open the next window.
7. Click “Next” to confirm your camera model selection and to install the application.
8. Please wait while the application is being installed on your computer.
9. Please review the license terms.
On WINDOWS OS and Macintosh: Click the “I accept the terms of this license agreement”
and then click “Next” to continue.
10. On WINDOWS OS only: Let the “Vivitar Experience Image Manager” installer create the
folder to where the program will be installed, and then click “Install”.
11. Please wait while the application continues the installation process on your computer.
On MACINTOSH OS: If needed, please follow instructions to install the Adobe® Flash®
Player. This requires Internet connection.
12. On WINDOWS OS: Click the “Close” button when the installation is complete.
Click the “Launch Vivitar Experience Image Manager” to open the application.
13. On MACINTOSH OS: Click the “Quit” button when the installation is complete.
Click the “Launch Vivitar Experience Image Manager” to open the application.
14. If you close the application you can run the Vivitar Experience Image Manager from the
Programs (PC) or Applications (Mac) menu on your computer.
INSTALLING THE SOFTWARE – USING THE ONLINE LINK
The Vivitar Experience Image Manager Software can also be downloaded and installed via the
following online links:
WINDOWS OS: http://tinyurl.com/viviwin
MAC OS: http://tinyurl.com/vivimac
1. Enter the appropriate URL (shown above) into a web browser on your computer.
2. The file for installing the software automatically begins to download to your computer.
Page 18

17
Please note that the web page appears empty, however the download automatically
begins.
3. Locate the downloaded application files on your computer’s ‘Downloads’ folder once the
download is complete:
On WINDOWS OS the file name is: vivitargeneric_win.exe
ON MAC OS in file name is: vivitargeneric_mac.pkg
4. Double click on the downloaded application file to install the Vivitar Experience Image
Manager Software.
5. Follow all instructions
6. Once installation is complete, the Vivitar Experience Image Manager opens automatically.
CONNECTING THE CAMERA TO THE COMPUTER
1. Use the supplied USB cable to connect your camera to your computer.
2. Power the camera ON.
3. The first time you connect the device to the computer you may have to wait a few seconds
until the computer recognizes the device.
Page 19

18
GETTING VIDEOS FROM THE CAMERA TO THE COMPUTER
The Micro SD Memory card needs to be inserted. Do not disconnect the cable during transfer.
Doing so will cancel the transfer of any files on their way to your computer.
1. Select the “Get Images” button from the Main menu.
2. The “Get media from device” window opens.
3. You can select to download videos.
4. Select your camera (removable disk) from the device window. If your camera is the only
USB device connected then it will be selected automatically.
5. Select a location on the computer where to place the new video files.
6. Add the new video files to albums if desired.
7. Select to remove the media files from the selected device (removable disk) after the
import.
8. Click the “Get Media” button to transfer the videos from your camera to your computer.
9. A media download progress bar appears on the bottom left showing the number of media
files downloading to your computer. A message appears when the download is complete.
10. The video files that you selected are now downloaded to your computer to the selected
folder ready for your use.
Page 20

19
GETTING STARTED!
Using the Vivitar Experience Image Manager you can:
Upload and manage videos to and from the most popular photo sharing and social networking
sites - Facebook, Flickr, Picasa, MySpace, Photobucket, Twitpic, Twitgoo and YouTube
Seamlessly transfer videos from one social network to another
Organize your images by creating offline and online albums
Edit images using automatic and manual tools
Use automatic “Geotagging” with built in Google Maps
For more details on how to use the Vivitar Experience Image Manager open the Help file or click
the “Take a Tour” button on the application’s Home screen.
TRANSFERRING IMAGES MANUALLY FROM THE CAMERA TO THE
COMPUTER
WINDOWS OS
1. Use the supplied USB cable to connect your camera to your computer’s USB port.
2. Power on the camera.
3. A window appears on your computer with a list of options, select “Open folder to view files”
and click ‘OK’.
4. Open the DCIM folder and the folder inside to view the media files.
5. Select the media and copy the files from this folder into your computer. Optionally, select
the files and choose ‘Copy’ from the Edit menu. Then select a folder and choose ‘Paste’
from the Edit menu.
6. We recommend that you copy the photos into the Pictures/My Pictures folder and the
videos into the Videos/My Videos folder.
7. Do not disconnect the cable during transfer. Doing so will cancel the transfer of any files on
their way to your computer.
Page 21

20
MACINTOSH OS
1. Use the supplied USB cable to connect your camera to your computer’s USB port.
2. Power on the camera.
3. The camera’s device icon appears on the desktop.
4. Click on the device icon and open the DCIM folder and the folder inside to view the media
files.
5. Select the files and drag them into your computer. Optionally, select the files and choose
‘Copy’ from the Finder’s Edit menu. Then select a folder and choose ‘Paste’ from the Edit
menu.
6. We recommend that you copy the photos into the Pictures folder and the videos into the
Movies folder.
7. Do not disconnect the cable during transfer. Doing so will cancel the transfer of any files on
their way to your computer.
TRANSFERRING PHOTOS AND VIDEOS: APPLE IPAD
NOTE: Please check your device packaging for compatibility with the iPad.
Apple iPad Camera Connection:
For models that are compatible with the iPad, photos and videos can be imported from your
digital camera to your iPad by following either one of the options below:
1. Connecting your digital camera to your iPad using an iPad Camera Connector:
2. Plug the Camera Connector into the dock connector port on your iPad, then attach your
digital camera using a USB cable (included) to the Camera Connector.
3. NOTE: iPad Camera Connector not included. This may be purchased separately.
4. Using an iPad SD Card Reader:
Connect the SD Card Reader to your iPad, then insert your digital camera's Micro SD Memory
card into the slot to import photos and videos directly from your camera's SD card.
NOTE: iPad SD Card Reader not included. This may be purchased separately.
After you make the connection, your iPad automatically opens the Photos application. This allows
you choose which photos and videos to import, then organizes them into albums.
Page 22

21
Camera Maintenance
Please read the information below carefully before using your camera for proper and safe
operation, so as to use the camera to its fullest and maintain its performance.
MEMORY CARD MAINTENANCE
For the first time of using a new memory card, or when there is unrecognized data for the
camera or images with other cameras in the memory card, please make sure to firstly format
the memory card.
Note: Please back up the data if the memory card inside has been previously used. After that,
format the memory card of this video camera.
Please power the camera off before plugging in or taking out the memory card.
Keep the memory card clean and prevent it from contacting liquid. In case of liquid contacted,
clean and dry it with a piece of soft cloth.
In case of idle use, please keep the memory card in a guard staple.
Please note that the memory card will get hot after long-term use. This is normal.
It is recommended to backup the important data from your memory card to other media such
as soft disk, hard disk or CD.
To ensure image quality, minimum Class 4 High-Speed card is needed.
The following situations may cause loss or damage of the data on your memory card:
1. Improper use of the memory card.
2. The memory card has been bent, dropped or collided.
3. The memory card has been placed under high temperature or moist environment or
expose to sunshine directly.
4. Electrostatic or electromagnetic field exists around the memory card.
5. The memory card has been taken out or the power supply interrupted while the camera or
computer is connected to the memory card (i.e. during reading, writing and formatting).
6. Taking out the memory card while powering off, while recording, deleting (formatting) or
reading.
7. Do not touch the metal contact surface of the memory card with fingers or metal materials.
8. The service life of the memory card has expired (please replace the memory card
regularly).
Page 23

22
DEVICE MAINTENANCE
Take good care of the video camera and prevent water or sand particles from entering the
video camera when it is used on the beach or near water. Please note that water, sand
particles, dust or component containing salt may damage the video camera.
Keep the video camera free of dust and chemical materials. Place it in a cool, dry and well
ventilated place. Do not place the video camera in a high temperature, moist or dusty place.
If dirt or stains accumulate on the video camera or on its lens, use a soft, clean and dry rag to
wipe it away gently. If the video camera or its lens is stained with sand particles, blow them
away gently. Do not use cloth to wipe arbitrarily. Otherwise, it may scratch the surface of video
camera or its lens.
Do not touch the lens surface with fingers.
If it is required to clean the camera surface, first blow away the sand dust accumulated on the
surface, and then wipe the camera gently with a rag or tissue appropriate for optical
equipment. Please use a cleaning agent specifically for a video camera when wiping if
necessary. Do not use organic solvent to clean the video camera.
The digital camera is a delicate device:
1. Please handle your camera with care to avoid damaging it.
2. Do not expose your camera to heat sources.
3. Do not use you camera in wet or moist conditions without the waterproof casing.
4. Use proper protective cover to avoid lens and display from being scratched.
Page 24

23
Sakar Warranty Card
Sakar US
Sakar International
Attention: Service Department
195 Carter Drive
Edison, NJ
08817
Sakar UK/Europe
Attention: Service Department
2D, Siskin Parkway East
4020 Middlemarch Business Park
Coventry, CV3 4SU
Sakar Australia
Return faulty camera to
the Refund Counter at
the store where
purchased
This warranty covers for the original consumer purchaser only and is not transferable. Products
that fail to function properly UNDER NORMAL USAGE, due to defects in material or
workmanship will be repaired at no charge for parts or labor for a period of one year from the time
of purchase.
What Is Not Covered By Warranty:
Damages or malfunctions not resulting from defects in material or workmanship and damages or
malfunctions from other than normal use, including but limited to, repair by unauthorized parties,
tampering, modification or accident.
What to Do When Service Is Required:
When returning your defective product (postage pre-paid) for service, your package should
include:
1. Copy of original bill of sale.
2. A detailed written description of the problem.
3. Your return address and telephone number (Daytime).
MAIL TO ADDRESS BELOW:
Page 25

24
Technical Support
For technical support issues please visit our website at www.vivitar.com. You can find manuals,
software and FAQ’s at the website. Can’t find what you are looking for? E-mail us at
support@vivitar.com and one of our technical support team members will answer your
questions. For phone support in the US please call 1-800-592-9541, in the UK call 0800 917 4831,
in Australia call 1800-006-614. If you would like to call from anywhere else, please visit
www.vivitar.com for your local toll free number.
Troubleshooting
Q: I have taken photos and selected the “Get Images” button. I get a message that the images
were successfully transferred but the photos do not appear on my computer. What do I do?
First ensure that you have in fact taken photos. Press the Shutter button to take some sample
photos or videos and then try downloading them again.
If the photos are saved to the SD memory card then all the photos should appear.
Q: How do I make sure I don't lose important pictures?
This camera requires a Micro SD card for normal use. If the camera powers off nothing will
happen to the images stored on the memory card. We recommend always downloading your
photos and videos to your computer as soon as possible to prevent unintentional data loss.
Q: I deleted images using the Vivitar Experience Image Manager. The images were also deleted
from my computer. How do I recover images that I accidently deleted?
All images deleted using the Vivitar Experience Image Manager are sent to your computer’s
Recycle or Trash Bin and can be retrieved from there.
DVR794SHD_1.0_111115-TA_FW1.00
 Loading...