

Page 1

АУДИО-ВИДЕО И
БЫТОВАЯ ТЕХНИКА
VT-4110 BK
DVD player
DVD плеер
Инструкция по эксплуатации
GB
Manual instruction
Инструкция по эксплуатации
RUS
Інструкція з експлуатації
UA
Пайдалану нұсқасы
KZ
Фойдаланиш қоидалари
UZ
2
12
22
32
42
www.vitek.ru
4110IM.indd 14110IM.indd 1 20.10.2009 11:08:0620.10.2009 11:08:06
Page 2

ENGLISH
DVD player
Model VT-4110
Operating manual
Please, read and understand this manual carefully before the startup,
use and setup of the player. Keep the manual for future references.
CAUTION
Risk of electric shock
DO NOT OPEN
WARNING: In order to reduce the risk of fire or electrical shock,
do not remove the device panels. Contact qualified personnel for
The lightning bolt in a triangle symbol indicates to the
user that there are dangerous voltages inside the device
that can result in electrical shock.
The exclamation point in a triangle symbol indicates to
the user important operating instructions and technical
service information in the accompanying literature.
CLASS 1
LASER PRODUCT
CAUTION! IN ORDER TO AVOID ELECTRICAL SHOCK, FIRST
CONNECT THE CORD TO THE PLAYER, AND THEN INSERT PLUG
INTO THE ELECTRICAL OUTLET.
CAUTION! This device contains a DVD player that uses a laser system.
Do not open the case in order to avoid exposure to laser radiation.
Invisible laser radiation is present when the case is open. DO NOT LOOK
AT THE LASER RAYS. Furthermore, use of the control system or making
adjustments or completing operations, other than those described in
these instructions, can lead to dangerous exposure to radiation.
We urge you to carefully study these operating instructions and save
them for future use. Contact a service center (if necessary) for service
and repairs.
CAUTION! DO NOT OPEN THE UPPER HOUSING OF THE DEVICE DUE
TO RISK OF ELECTRIC SHOCK. THERE ARE NO USER-SERVICEABLE
PARTS INSIDE. EMPLOY THE SERVICES OF QUALIFIED PERSONNEL.
ATTENTION
IN ORDER TO AVOID ELECTRICAL SHOCK, THE WIDE PRONG OF THE
PLUG SHOULD BE FIRMLY AND COMPLETELY INSERTED INTO THE
OUTLET. WATER MUST NOT SPILL INTO THE DEVICE. DO NOT PLACE
CONTAINERS OF LIQUIDS, LIKE VASES, ONTO THE DEVICE.
Safety Guards
Connecting power sources
This appliance is powered by AC mains: voltage 110-240V and frequency
50-60Hz. Ensure the mains voltage meets appliance’s operating voltage.
It is forbidden to immerse this appliance into water. Do not install
the appliance at the places with high humidity (in bath rooms, near
water basins, kitchen sins, washer machines, swimming pools, in wet
basements or cellars) in order to avoid fire and electric shock. Do not
allow drops and splashes falling on the appliance. Do not put any objects
filled with liquids (vases, for example) on the appliance. In order to avoid
condensation because of appliance transferring from warmer room to a
colder one and vice versa, do not switch the appliance on immediately,
but wail for about one hour.
Do not use extension cords not approved by the manufacturer, it may be
dangerous.
service and repairs.
Indicates a device using a laser. This symbol
must be located on the rear panel of a
device, indicating that the device contains a
Class 1 laser and that laser rays are in use.
The possibility of laser exposure does not
exist without opening the device.
so that it cannot become tangled. Do not put any objects on the power
cord.
Disconnect the appliance from a wall outlet to provide additional
protection during a lighting storm and when you are not going to use
the appliance for a long time. This measure is used to avoid appliance
failures because of lighting or mains voltage jumps.
Do not disconnect power cord when the power is on.
In order to disconnect power cord from a wall outlet hold the plug, not
pull the cord.
Do not open appliance housing on your own, doing so would cause
electric shock. Do not repair of modify the appliance. Any servicing
should be done by qualified professionals at service centers.
Special attention is required when the appliance is used by children of
invalids.
Keep at the places inaccessible by children.
Do no allow using this appliance as a toy.
Appliance Installation
Install the appliance at the places where sufficient ventilation is provided.
This appliance should not be installed inside any built-in furniture
(book shelves or built-in closets) where sufficient ventilation cannot be
provided.
Ensure the proper ventilation is provided in case of installing the
appliance on a bed, divan, sofa, carpet, or any other similar furniture.
Do not place the appliance near any heat sources, for example radiators,
electric heaters, ovens or any other heating appliances (including
amplifiers too). Do not install the appliance at the places where it would
be exposed to direct sun rays, excessive dust or mechanical impacts.
Do not put heavy articles on the appliance.
Do not place this appliance on a furniture with non-fixed wheels, on
unsteady bases, tripods, brackets, tables as the appliance would fall
down and cause children’s’ or adult’ injury, or appliance damage. Use
the bases, tripods, brackets, and tables delivered with the appliance or
recommended by the manufacturer. Follow manufacturer’s instructions
while installing the appliance on a base, use holders and fasteners
recommended by manufacturer only. Unit consisting of base and
appliance should be moved with special care. The appliance could
probably be thrown over in case of sudden stop, push or moving the
base on an uneven surface.
Foreign objects
Do not allow foreign objects falling inside appliance housing through any
openings. This may cause ignition and electric shock. In case of such
an accident disconnect the appliance from wall outlet and consult a
qualified professional before any further usage.
Damages to be repaired
In the situations described below it s necessary to unplug appliance and
apply to qualified professional for repair:
a) power cord or plug damage;
b) foreign object falling inside the appliance;
c) appliance was exposed to rain or the water was poured on the
appliance;
d) there are obvious changes in appliance operation;
e) appliance was fallen down or was damaged in any other way.
Appliance maintenance
Unplug from a wall outlet before cleaning. Use soft damp cloth for
cleaning the appliance. It is forbidden using liquid or aerosol detergents.
Do not allow sockets and extension cords become overloaded as doing
so may lead to fire or electric hock
Install the appliance thus to be able disconnecting power cord plug from
a wall outlet immediately in case of malfunction. Power cord should not
be tight near its exit out of the appliance. Power cord should be routed
2
4110IM.indd 24110IM.indd 2 20.10.2009 11:08:0720.10.2009 11:08:07
Page 3

ENGLISH
Taking care of disks
Do not use cracked or deformed disks as doing so may cause
appliance damage.
Hold the disc’s outer edges. Insert disk with label up. Do not touch
the disc surface. Dust, scratches or finger prints on disk’s operating
surface may cause t internal damage.
Do not expose disks to direct sunlight, heat radiation from heat
sources, high temperature and humidity.
Put disk into storage case after usage.
At regular intervals wipe disk’s operating surface with soft damp
cloth, from center to outer edges. Do not use casual detergents.
Using batteries
Battery leakage would cause injuries or remote control damage. In order
to avoid battery damage, follow the next instructions:
- Install batteries in correct way, following polarity according to the
mark on the appliance.
- Do not mix batteries of different types and batteries with different
time of service.
- Extract batteries in case you are not going to use the appliance for a
long time.
- Replace the batteries in proper time.
Careful usage measures
• Use the box and pack articles received along with appliance to
prepare it for transportation.
• After long period of operation appliance housing becomes heated,
this is normal.
• Do not move the appliance while playing back a disk as doing so
would cause reading device or disk damage.
Copyrights
This product incorporates copyright protection technology that is
protected by method claims of certain U.S. patents and other intellectual
property rights owned by Macrovision Corporation and other rights
owners Use of this copyright protection technology must be authorized
by Macrovision Corporation, and is intended for home and other
limited viewing uses only unless otherwise authorized by Macrovision
Corporation. Reverse engineering or disassembly is prohibited.
Manufactured under license from Dolby Laboratories. Dolby and the
double-D symbol are trademarks of Dolby Laboratories. Confidential
Unpublished Works. Copy right 1992-1997 Dolby Laboratories. All rights
reserved
СЕ: This appliance complies with Electromagnetic Compatibility
Directive and Low voltage appliance directive.
Vitek DVD player represents new generation of home appliances
providing high quality video and audio playback. This DVD player’s
characteristics surpass the capabilities of any other video player existed
before. This player is the best signal source for home theaters. The
maximal enjoyment is guarantied.
• Supported types of disks: DVD-R/-RW, DVD+R/+RW, CD-R/-RW
• Supported formats: DVD, MPEG4 (DivX), SVCD, VCD, CDDA, МРЗ,
WMA, Kodak Picture CD, JPEG
• Built-in decoders: Dolby Digital AC-3
• Connecting jacks: composite (VIDEO), S-Video, component (Y Cb/
Pb Cr/Pr), coaxial (COAXIAL), optical (OPTICAL), 5.1/Stereo
(5.1 CH AUDIO OUT), SCART
• USB slot
• Cardreader, SD, MS, MMC
• Karaoke
• On-screen menu in Russian or English
This unit can play the following types of discs:
Disk format symbols Contents
DVD
АС-3
МРЗ
Video-CD (VCD)
CDDA
Kodak Picture CD
MPEG4
Accessories
The next accessories are included into delivery set:
Operating Instructions
Remote control
Audio-video cable
2 batteries of ААА type, 1.5V
DVD and CD disks features
DVD 5 (single sided, single layer)
DVD 9 (single sided, double layer)
DVD 10 (double sided, single layer)
DVD 18 (double sided, double layer)
VCD 1.0/1.1/2.0
Picture CD
DVCD
CDDA
МРЗ
CD-R
CD-RW
Disk data
Type DVD VCD SVCD CD
Recording
format
Disk capacity single
Dimensions, cm 12/8 12 12 12/8
Horizontal
resolution
Subtitles Up to 32 types - 8 -
Language Up to 8 2 4 -
MPEG 2 MPEGI MPEG II DIGIT
sided,
single
layer 4,7
Gb – 2
hours
single
sided,
double
layer 8,5
Gb - 4
hours
> 500 lines >240 lines >350
double
sided,
single
layer
9,4 Gb
- 4,5
hours
double
sided,
double
layer
17 Gb 9 hours
650М 74
min
Audio + Video
Dolby Digital Audio
Audio
Audio + Video
Audio
Photo
Audio + Video
650M 45
min
lines
650M 74
min
-
Symbol
3
4110IM.indd 34110IM.indd 3 20.10.2009 11:08:0720.10.2009 11:08:07
Page 4

ENGLISH
DVD-disks by different manufacturers have different parameter marked
by the next symbols:
Regional code and video out system
Dolby digital surround
Number of audio tracks
Number of subtitles
Picture format
View restriction
View angle
5.1 audio channel
Hidden subtitles
2-channel stereo
Restriction
Terms concerning disks
Title
Usually video or music content of DVD disk is divided into several parts.
Each part is called as “title”.
Chapter (episode, fragment)
Minimal fragment of video or music content of DVD disk inside the title
is called ‘chapter’. Usually one title includes one or several chapters
(fragments) numerated in order to facilitate search procedure. Some
discs can include no any chapters.
Track
Part of video or audio content of SVCD, VCD or CD disk. All tracks are
numbered in order to facilitate search procedure.
Scene
VCD disks supporting playback control function and including dynamic
and static video content are divided into several parts called ‘scenes’.
Each scene is easy to be found by its number. One scene includes one
or several tracks.
РВС function (SVCD, VCD)
When SVCD or VCD playback content menu of disk is displayed on
screen, that function is called ‘playback control function’ or PBC
function.
Disk type Functions
VCD disks not supporting
PBC function (version 1.1)
SVCD/VCD disks supporting
PBC function (version 2.0)
Notice: If you record your disk using personal computer, even if the
format is matching there are cases when disk cannot be played back
because of incompatible disk burn software settings.
Video and music (audio) play back
VCD could use menu on-screen menu for
playback
4
4110IM.indd 44110IM.indd 4 20.10.2009 11:08:0720.10.2009 11:08:07
Page 5

Description
Front panel
1. The STANDBY/ON button
2. Power on indication
3. Disc tray
4. Joystick (player is controlled with its help):
(►)–PLAY
(║) –PAUSE
(▲) –OPEN/CLOSE
(■) –STOP
5. LED¬ display
6. Remote sensor
7. Card reader SD/MS/MMC
8. USB jack (USB Flash Drive)
ENGLISH
Side panels (right)
1. Microphones jack
2. Microphones volume control
3. Microphones echo level control
Rear panel
1. Power
2. Audio output 5.1СН
3. Coaxial output
4. Composite Video output
5. Component output (Y Cb/Pb Cr/Pr)
6. S¬Video output
7. OPTICAL output
8. SCART output
5
4110IM.indd 54110IM.indd 5 20.10.2009 11:08:0720.10.2009 11:08:07
Page 6

ENGLISH
Remote control
1. OPEN/CLOSE button
2. V. MODE button
3. OSD (On-screen display) button
4. POWER button
5. Digital buttons
6. PAL/NTSC button
7. CLEAR button
8. PROG button
9. (←↑→↓) button
10. ZOOM button
11. PREV button
12. NEXT button
13. STOP button
14. VOLUME +/- button
15. DVD/USB/CARD button
16. ANGLE button
17. MUTE button
18. STEP button
19. PAUSE button
20. F REV button
21. F FWD button
22. SLOW button
23. Playback ► button
24. SETUP button
25. A-B RPT button
26. REPEAT button
27. SEARCH button
28. TITLE/PBC button
29. SUBTITLE button
30. AUDIO language button
31. MENU button
Loading batteries into Remote control
• Load batteries into the battery compartment of remote control.
• Remove the batteries if the unit will not be used for a prolonged
period of time.
• Replace batteries in proper time.
6
4110IM.indd 64110IM.indd 6 20.10.2009 11:08:0720.10.2009 11:08:07
Page 7

ENGLISH
Connection
Attention: Before connecting DVD player to any other equipment, ensure power supply of player and other equipment is disconnected.
Connecting video cables
Choose the most appropriate type from the following types of connections according to capabilities of your TV-system.
(1) Composite video output
In order to display standard quality images, connect composite video output jack (VIDEO) of your DVD player to adequate input of your TV-set or
monitor using one audio-video cable (A/V) with yellow ending pins included into delivery set.
(2) S-Video output
In order to display high quality images connect S-VIDEO jack of your DVD player to adequate input of your TV-set or monitor using one S-Video cable
(not included into delivery set).
(3) Component video output
For exact color rendering and high quality picture view connect component video signal jacks Y Cb/Pb Cr/Pr (red/blue/green) to input jacks of your
TV-set using adequate cable (not included into delivery set).
(4) SCART output
Use 21-pins cable SCART (not included into delivery set) to connect SCART jack of your DVD player to the adequate jack of your TV-set.
Notes:
• Parallel connection using several video outputs effects quality of image negatively.
• Only correct system connection and setting provides clear picture.
Audio System Connection
Choose the most appropriate type from the following types of connections according to capabilities of your TV-system.
(1) 2 channel analog audio output
Use jacks FR and FL 5.1 CH of analog audio output (5.1 CH AUDIO OUT) to connect 2-channel analog audio output. Switch the mode of audio output
to 2-channel mode (see dynamics’ setup page).
(2) 5.1 СН analog audio output
Use 3 pair of AV cables to connect 5.1-channel audio output (FL, FR, SL, SR, CENTER, SUB WOOFER) of DVD player to an adequate input (5.1) of an
amplifier/receiver.
(3) Coaxial digital audio output
Use special coaxial cable to connect COAXIAL jack of your DVD player to an adequate input of an amplifier.
(4) Optical digital audio output
Use special fiber optical cable to connect OPTICAL jack of your DVD player to an adequate input of an amplifier.
Note: Setup parameters should meet the type of jack used to connect DVD player to external devices.
7
4110IM.indd 74110IM.indd 7 20.10.2009 11:08:0720.10.2009 11:08:07
Page 8
ENGLISH
SYSTEM SETTINGS
1. Switch on the TV-set and set in its Settings the corresponding type
of the input signal
To enter system settings menu press the SETUP button. To cancel
the menu, press the SETUP button again.
2. Use the navigation buttons (←→) to select one of the following
pages: General (settings), Sound, Dolby, Video, Preferences
(settings).
3. Press the (►) button to enter the selected page
4. Use the (↓↑) buttons to select the item you want to change.
5. Press the ► or → button to enter the list of settings changes. Use
the navigation (↓↑) buttons to select the desired value, press the ►
or ← button to confirm the entered value and return to the settings
list.
To return to the settings pages press the (←) button
Attention: Some menu items, corresponding to the preset modes, are in
grey and cannot be selected.
The entered values are stored after power is off as well.
General settings
TV DISPLAY
Standard/PS: When the DVD-player is connected to the usual TV, wide
screen picture will be full screen, but the part is cut off (4:3).
Standard /LB: When the DVD-player is connected to the usual TV, wide
screen picture will be displayed with black margins above and below the
picture (4:3).
Wide: Use this item if your home theater is connected to the wide screen
TV (16:9).
OSD LANGUGE
Selection of the ON-screen menu language.
ANGLE MARK
Some films on DVD discs can be recorded at different angles. More
detail information about such a possibility you can get from the
annotation to your DVD disc.
If the mode is on, while playback of a DVD disc, recorded at different
angles, camera symbol will be displayed on the screen.
CAPTIONS
This function does not work, if there are no subtitles on the disc. If the
subtitle function is off, press the SUBTITLE button on the remote control
to switch on the function.
SCREEN SAVER
If the function is on, the player is on, and the disc is not played back
for several minutes, a moving screen saver appears will appear on the
screen and some time later the player will be in the stand by mode.
HDCD
You can select 44.1 K, 88.2 K or OFF sampling rate. The higher is the
rate, the higher the sound quality is.
LAST MEMORY
If this function is on, the player will remember the moment the disc is
ejected at, and at the following loading of the same disc the playback will
start from this very moment.
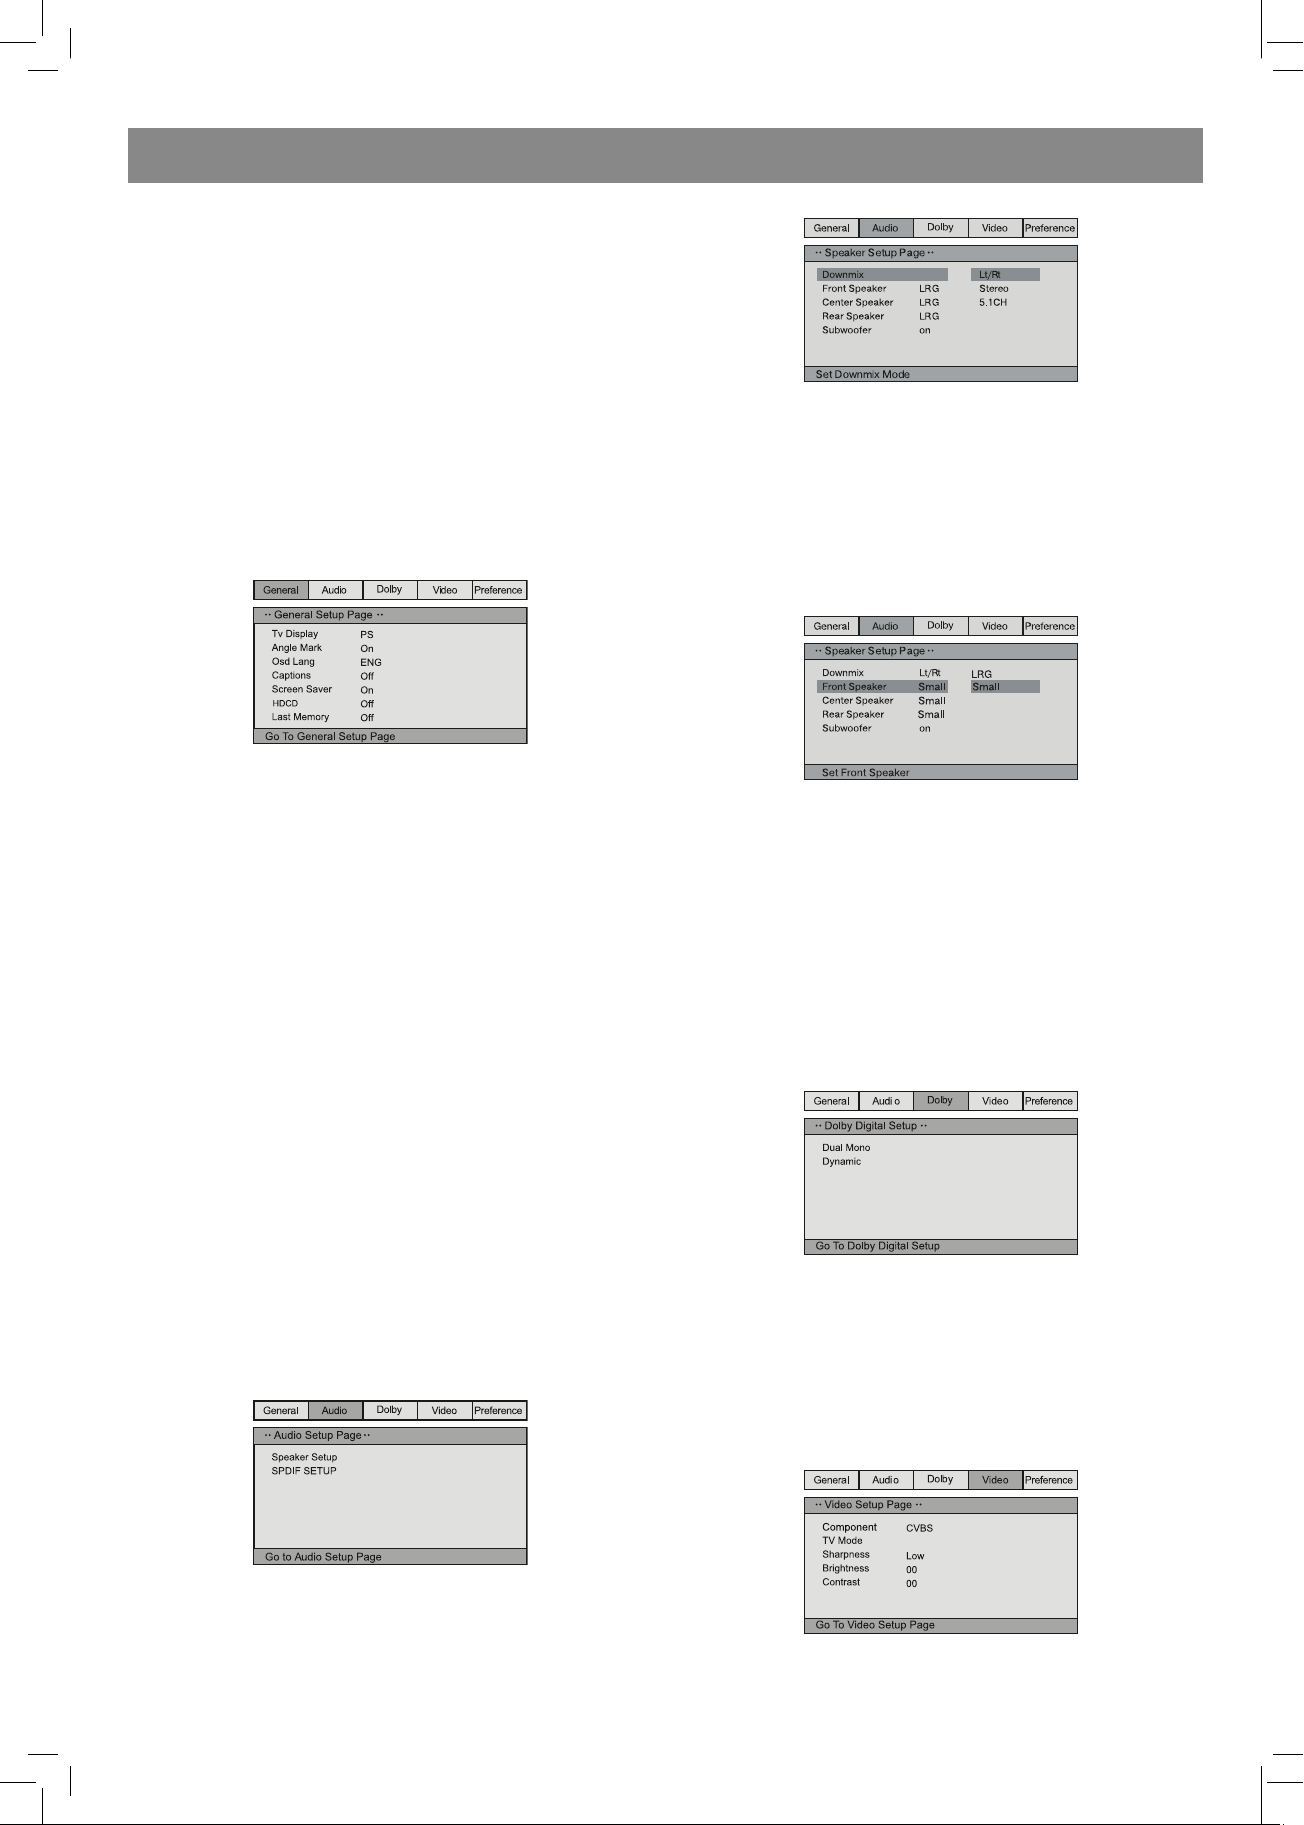
Sound settings
• SPEAKER SETUP
- Mix
Left/ Right: original sound of 5.1 CH format is transferred via left or right
channel.
Stereo: original sound of 5.1 CH format is transferred in the stereo
mode.
If the acoustic system includes the front speakers and subwoofer, to
activate the subwoofer you should set the menu items in the following
way:
In the “Front speakers” item set “small” value and in the subwoofer item
set “on “value.
5.1 СН: transfer of original sound in 5.1 CH sound format
- FRONT SPEAKERS, CENTRAL SPEAKERS, REAR SPEAKERS,
SUBWOOFER
If your acoustic system includes front, central and rear speakers and
subwoofer, you can set menu items according to the real configuration.
The function does not work, if mixing function is switched on (Left/Right,
Stereo).
• SPDIF SETUP
SPDIF/off: sound is given to the output of the unit only analogue (5.1 CH
AUDIO OUT).
SPDIF/RAW: digital output signal in original format, recorded on the disc.
SPDIF/PCM: digital output signal in decoded РСМ format.
Dolby Digital setting
DUAL MONO
If your amplifier/decoder has Dolby Digital output, you can select:
stereo, left-mono, right-mono, mixed mono
DYNAMIC RANGE
While viewing programs with large dynamic sound range this mode will
allow you to avoid sound level changes till optimal value and to preserve
quality and details of sound. It will allow you not to disturb other family
members (for instance, at night) and to preserve high quality of sound.
Video settings
• COMPONENT (Type of video output)
CVBS: setting of composite video signal.
8
4110IM.indd 84110IM.indd 8 20.10.2009 11:08:0720.10.2009 11:08:07
Page 9

ENGLISH
YUV: select this mode while connecting via Y Cb/Pb Cr/Pr jack to
component jack.
RGB: select this mode while connecting via SCART jack.
• TV MODE If you TV support progressive scan mode, you can switch
on and off progressive scan, if the YUV mode is selected
SHARPNESS, BRIGHTNESS, CONTRAST You can set the desired level
according to your preferences.
Preferences
Should be set before starting viewing
TV system
Your player suits for all TV systems. You can select PAL, NTSC and Auto
SOUND (Selection audio language), SUBTITLE, DISC MENU
These parameters can be set according to your preferences. If the
parameters set by you are supported by the disc, the play back will be
going with your settings. Otherwise, default settings of the disc will be
used.
PARENTAL CONTROL
This function is intended for parents to control disc content and protect
their children from watching some scenes. The disc which level is higher
than the level set by this function will not be played back
Note: While changing this item you should enter a password (default
password - 136900)
PASSWORD
You can change the password. Select PASSWORD => CHANGE => ►,
in the appeared window enter firstly the old password (or the default
password - 136900), then enter a new password, and enter the new
password once again. Press the ► button to store the new password.
RESET
Reset – return to factory settings.
BASIC FUNCTIONS
Noteе: The symbol
button, means, that the selected function is unavailable for this disc
POWER
• Press the STANDBY/ON button on the front panel of the player or the
POWER button on the remote control, to power on the player.
• Use the POWER button on the remote control to move to standby
mode.
OPEN/CLOSE
• Press the OPEN/CLOSE button on the front panel of the player or the
button on the remote control, the disc tray will open. Insert a disc
into the disc tray with its operating surface down (label down). Press
the OPEN/CLOSE button again, to close the disc tray and the play
back will start automatically. Auto playback function is not supported
by all discs.
VOLUME
• Use the VOLUME +/- buttons to increase or decrease the volume
level.
MUTE
• To mute press the MUTE button. To cancel the mute mode press the
MUTE button again or use volume control buttons.
PLAY
• Press the ► button on the remote control or on the front panel of the
player to start playback.
PAUSE
To pause playback, press PAUSE button on the remote control or on
the front panel of the player. To resume to normal playback press the
► button.
STOP
• While playback of DVD, SVCD, VCD, CD discs, press the STOP
button once – the player will remember the stop point. Press the ►
button on the remote control or on the front panel of the player to
continue. To completely stop the playback, press the STOP button
for the second time.
F.REV ◄◄ и F.FWD ►►
• Press the F.FWD ►► button to fast forward
, appearing on the screen while pressing the
• Press the F.REV ◄◄ button to fast rewind
To increase the speed, press the corresponding button for several times.
PREV I◄◄/ NEXT ►►I
• While playback of DVD discs, press the PREV (I◄◄) button on the
front panel or on the remote control to move to the previous episode.
• While playback of SVCD, VCD, CD discs press the PREV (I◄◄)
button to move to the previous track
• While playback of DVD discs press the NEXT (►►I) button on the
front panel or the remote control to move to the next episode.
• While playback of SVCD, VCD, CD discs press the NEXT (►►I)
button to move to the next track.
DVD/USB/CARD (medium selection)
The unit supports the following types of cards:
MS CARD: MEMORY STICK CARD
SD CARD: SD MEMORY CARD
MMC CARD: MULTI MEDIA CARD
Note: This function only available on state of no disc in the unit or
complete stop.
Please don’t pull out the USB or CARD when reading in order to
avoid damage.
• Switch on the player
• Insert a card (SD, MS, and MMC)
• Use the “DVD/USB/CARD” button to switch the DVD in the card
reading mode or in the USB reading mode. (If you have connected
to the DVD different external devices, use the “DVD/USB/CARD”
button to select between them).
If the loading is successful, the navigation menu will be reflected
automatically. Use the (↑↓) buttons to select the required folder, and
then press ► to confirm. In folders use the (↑↓) buttons to select the
required file, then press ► to playback. Use the ← button on this
page to return to the previous menu, and the (←→) buttons to move
to the previous or the next page.
• While playback of a disc the unit will stop.
• When the disc and the card or USB device are played back disc
playback has priority. In this case use the “DVD/USB/CARD” button
to select the corresponding medium.
• When the unit stops you can remove the device (card or USB).
• Firstly the DVD player will download a disc. Press “DVD/USB/CARD”
to select another mode.
• When a a card is read the mode is not displayed. You can press
“DVD/USB/CARD” to switch to the DVD mode.
Note
1. The manufacturer does not guarantee the support of all existing USB
devices with 1.1 and 2.0 interfaces.
2. DVD player has been tested for compatibility with the most
frequently used parameters of recording of multimedia files. But
due to the great amount of existing and appearing parameters and
specifications, used in creation of a multimedia file, some of them
can be played back incorrect or cannot be played back.
PROG
• If the disc contains two and more tracks, episodes or titles, by
means of this button you can set order of playback.
• To enter program mode press the PROG button, program menu
will appear on the screen. Press the digital buttons to set the track,
episode or title number. To enter 10 and more use the 10+ button.
(For instance to enter 26 press the following buttons: 10+, 10+, 6)
If there more than 10 tracks, press NEXT ►► I to continue program
table (up to 20 titles are possible). Use the (↓→←↑) buttons to move
the cursor. After finish of programming use the navigation buttons to
select “Start” and press the ►button to playback the programmed
sequence.
• For МРЗ, DiV X, MPEG 4 discs programming is impossible! Press the
PROG button once to open the file list. Use the navigation buttons;
you can select the desired file to review.
TITLE/PBC and MENU
The TITLE/PBC and MENU buttons are used to display content of the
disc.
If there several titles (films) on the disc, to display title list press the
TITLE/PBC button. To display content of the title press the MENU
button.
If the disc contains one title press the MENU button.
While playback of SVCD, VCD2.0 discs, press the TITLE/PBC button,
the disc menu will appear. In this mode you can select the track
number, by pressing the corresponding digital button. VCD1.1,
CDDA and МРЗ do not have РВС menu.
9
4110IM.indd 94110IM.indd 9 20.10.2009 11:08:0720.10.2009 11:08:07
Page 10

ENGLISH
SUBTITLE
• While playback of DVD with subtitles press the SUBTTITLE button to select the subtitle language.
ANGLE
• While playback of DVD with more than one angle press the ANGLE button to select the required angle.
STEP
• To step DVD, SVCD, VCD discs press the STEP button. To resume the playback press the ► button on the remote control or on the front panel of
the unit.
REPEAT
• Press the REPEAT button to repeatedly playback the track, episode, title or the whole disc.
А-В RPT
• While playback a disc you can set А-В fragment for repeat.
• Press the А-В RPT button to set the starting point (А).
• Press the А-В RPT button to set the end point (В). The selected part will be played back repeatedly.
• Press the А-В RPT button for the third time to cancel the repeat and resume to normal playback.
ZOOM
• To change the size, press the ZOOM button. When the picture is enlarged use the (↑←→↓) buttons to move it along the screen.
AUDIO
• While playback of a DVD with several audio language, press the AUDIO to select the required language.
SEARCH
• In the playback mode press the SEARCH once, the search line will appear on the screen. Use the digital buttons; select the desired part on the
disc.
OSD
• Press the OSD button, the information about the current state of the disc will appear on the screen.
SETUP
• Press the SETUP button, system setting menu will appear on the screen.
V-MODE
• Press the V-MODE button to select video output modes (CVBS, YUV, YUV-PSCAN, RGB etc.)
Digital buttons (1-9, 0, 10+)
• While playback of VCD 1.1, CD discs, after loading a disc to select a track and a chapter use the digital buttons. Digital buttons are needed when
the PROGRAM and MENU functions are on.
• To select a track with number 10 or more use the 10+ button and the digit corresponding to the track.
PAL/NTSC
• Press this button to select the color system: PAL, NTSC, MULTI.
CLEAR
• Press this button to clear the number.
SLOW
To slowly playback press the SLOW button on the remote control
Other functions
Karaoke
Karaoke disc – is a disc in DVD, VCD format with music and subtitles recorded, they show the user the moment to start singing or this or that song
fragment. You should use a microphone for singing (not supplied).
• Connect the microphone to the jack on the side panel of your DVD player.
• Set the volume level of the microphone using the volume control on the side panel of the player.
• Set the required microphone echo level using the control on the side panel.
• Inset a karaoke disc in a DVD player, the playback will start automatically.
• To prevent self-activation of the microphones:
– do not place it near the TV set or a speaker;
– Reduce the volume level of the TV set or the amplifier;
– Reduce the microphone volume.
МРЗ/CD discs playback
• To move along folder/file list use the (↓↑) buttons, to open/close the folder – the (►) button, to playback a file press the (►) button.
Viewing pictures and photos on the CD
• After loading a disc with pictures the file list will appear on the screen. To view files use the (↓↑) and ► buttons. The selected picture will appear
on the whole screen of your TV-set.
Buttons used to view pictures:
ZOOM – switching on the zoom mode.
F.FWD (►►) F.REV (◄◄) – to zoom out and zoom in
(↓↑→←) – moving of the enlarged picture
If the ZOOM function is on, use the (↓↑→←) buttons to turn the picture.
Troubleshooting
Malfunction symptom Malfunction cause Actions
No power Power cord is not connected to power source. Plug power cord in power source socket.
No picture Signal source in TV settings is selected in wring way. Select the setting according to type of player connection.
Setting does not correspond to type of current connection. Select the setting according to current type of player
Cable plug is inserted into input jack not tightly. Examine cable connection.
No sound Audio cable plug is inserted into input jack not tightly. Examine audio cable connection.
Devices are connected, but not switched on. Switch power of connected devices on.
connection.
10
4110IM.indd 104110IM.indd 10 20.10.2009 11:08:0720.10.2009 11:08:07
Page 11

Incorrect sound setup. Select adequate setup.
Sound distortion Volume is too high. Decrease volume
Unstable picture Wrong TV-set setting Adjust TV-set settings.
Cannot read disks Disk is not loaded Load disk
Disk is loaded with label down Examine position of disk in the tray (label should be up)
There is condensation inside player Leave DVD player without disk for one hour
ENGLISH
Microphone is not
working
Remote control is not
working
Some system functions
are not working
Specifications
Power 110-240 V, 50/60 Hz
Power consumption 12 W
Dimensions 362x220x41 mm
Weight 1540 g
Operating temperature from 5°С to 35 °С
Operating moisture from 5% to 90%
Color system NTSС / PAL
Data format Supported formats: DVD, DVCD, SVCD, VCD, CDDA, МРЗ, WMA, HDCD, JPEG, KODAK PICTURE CD
Playback of digital video in MPEG4 (DivX) format
Medium type DVD, DVD-R/-RW/+R/+RW, CD-R/-RW
Digital-analogue converter 192 kHz / 24-bit
Video output 1Vp-p (75 Ohm)
S-Video output: Y: 1Vp-p (75 Ohm) С: 0,286Vp-p (75 Ohm)
Audio output 2.0 V t 5.1 Channel
Digital output of audio signal 0,5Vp-p (75 Ohm)
Jacks CVBS, S-VIDEO, Y Cb/Pb, Cr/Pr, SCART
Frequency range CD: 20Hz-20kHz (EIAJ), DVD: 20Hz-44kHz (96 kHz PCM), 20Hz-22kHz (48kHz PCM)
Noise level ~-80dB
TDH <0,01%
Dynamic range ~80dB
Remote control
Transmitter Infrared radiation
Battery 2 batteries ААА
Microphone is switched off Connect a microphone and switch it on
Microphone volume is too low Adjust microphone volume level
Remote control is not directed to player Direct remote control to player
Distance between remote control and layer is more then 8
meters
Remote control batteries are dead Replace both batteries
Wrong sequence of buttons have been pressed Repeat operation once more according to recommendation
Make distance between remote control and layer shorter
contained in this manual.
The manufacturer reserves to itself the right to change the design and the technical characteristics of the unit without a prior notice.
.
The service life of the device is five years.
Guarantee
Details regarding guarantee conditions can be obtained from the dealer from whom the appliance was purchased. The bill of sale or receipt must be
produced when making any claim under the terms of this guarantee.
Recycling
“This product is marked by the symbol of the selective sorting, relating to the electrical and electronic component scrap. That means
that the product must be taken by a selective system of collection in accordance with European directive 2002/96/CE in order to
be able either to be recycled or to be dismount in order to reduce any environmental impact. Attention! The electronic products
not having been the subject of a selective sorting are potentially dangerous for the environment and human health because of the
potential presence of dangerous substances.”
The manufacturer reserves the right to make changes to the characteristics of the device without prior notice.
This product conforms to the EMC-Requirements as laid down by the Council Directive
89/336/EEC and to the Low Voltage Regulation (23/73 EEC)
11
4110IM.indd 114110IM.indd 11 20.10.2009 11:08:0720.10.2009 11:08:07
Page 12

РУССКИЙ
Инструкция по эксплуатации
DVD-плеер
Модель VT-4110
Уважаемый покупатель!
Перед подключением, использованием и настройкой устройства
внимательно прочитайте инструкцию. Необходимо соблюдать все
предупреждения и рекомендации по эксплуатации устройства,
приведенные в этом руководстве.
Сохраните руководство, используйте его в дальнейшем в качестве
справочного материала.
ВНИМАНИЕ!
Опасность удара
электрическим током! НЕ
ВСКРЫВАТЬ!
Предупреждение: во избежание возникновения пожара или
поражения электрическим током не подвергайте устройство
воздействию дождя или влаги.
Чтобы избежать удара электрическим током, не открывайте корпус
устройства самостоятельно.
Сервисное обслуживание должно осуществляться только
квалифицированными специалистами сервисных центров.
Значок молнии в равностороннем треугольнике
предупреждает пользователя о наличии опасного
напряжения внутри корпуса устройства, которое может
привести к поражению электрическим током.
Восклицательный знак в равностороннем треугольнике
указывает пользователю на наличие важных
рекомендаций по эксплуатации и настройке.
CLASS 1 LASER PRODUCT
Данный продукт классифицируется как ЛАЗЕРНОЕ УСТРОЙСТВО
КЛАССА 1. Соответствующая этикетка находится на задней
панели устройства и означает, что устройство использует
лазерные лучи. Возможность лазерного облучения отсутствует,
если прибор не вскрывать. ОБСЛУЖИВАНИЕ УСТРОЙСТВА
ДОЛЖНО ВЫПОЛНЯТЬСЯ ТОЛЬКО КВАЛИФИЦИРОВАННЫМИ
СПЕЦИАЛИСТАМИ СЕРВИСНОГО ЦЕНТРА.
МЕРЫ ПРЕДОСТОРОЖНОСТИ
Подключение к источникам питания
Данное устройство работает от сети переменного тока с
напряжением 110-240 В и частотой 50-60 Гц. Проверьте,
соответствует ли напряжение в электросети рабочему напряжению
устройства.
Запрещается погружать прибор в воду. Во избежание
возникновения пожара или поражения электрическим током не
размещайте это устройство в условиях повышенной влажности
(около ванн, тазов с водой, кухонных раковин, стиральных
машин, рядом с плавательным бассейном, в сырых подвалах и
т.д.). Не допускайте попадания на устройство капель или брызг.
Запрещается ставить на устройство заполненные жидкостью
емкости (например, вазы). Во избежание образования конденсата
(когда вы переносите плеер из более теплого помещения в более
холодное и наоборот) не включайте прибор сразу, подождите
приблизительно 1 час.
Не используйте сетевые удлинители, которые не разрешены
изготовителем устройства, так как это может быть опасным.
Не допускайте перегрузки розеток или удлинителей, так как это
может привести к пожару или поражению электрическим током.
Установите это устройство таким образом, чтобы в случае
неисправности вилку сетевого провода можно было немедленно
вынуть из розетки. Сетевой провод не должен быть натянут там, где
он выходит из устройства; его необходимо прокладывать так, чтобы
он не запутывался, не устанавливайте на него какие-либо предметы
обстановки.
Для дополнительной защиты устройства во время грозы, а также
в тех случаях, когда вы не собираетесь использовать его в течение
длительного времени, отключите его от розетки электросети. Это
исключит выход устройства из строя из-за ударов молнии или
скачков напряжения в электросети.
Не отсоединяйте сетевой шнур при включенном питании.
Для отсоединения сетевого шнура беритесь непосредственно за
вилку, ни в коем случае не тяните за провод.
Во избежание удара электрическим током не открывайте корпус
устройства самостоятельно. Не ремонтируйте прибор и не
вносите в него изменения. Сервисное обслуживание должно
осуществляться только квалифицированными специалистами
сервисных центров.
Будьте особенно внимательны, если прибором пользуются дети или
люди с ограниченными возможностями.
Храните прибор в недоступных для детей местах.
Не разрешайте детям использовать прибор в качестве игрушки.
Установка устройства
Устанавливайте устройство в местах с достаточной вентиляцией.
Это устройство не следует размещать во встроенной мебели (в
книжных полках или стенных шкафах), если в ней нельзя обеспечить
достаточной вентиляции.
При размещении устройства на кровати, диване, софе, ковре или
на других подобных предметах обстановки обеспечьте устройству
необходимую вентиляцию.
Не размещайте устройство вблизи источников тепла, например,
радиаторов, электрообогревателей, духовок, или рядом с другими
устройствами, являющимися источниками тепла (в том числе и
усилителей), а также в местах, подверженных воздействию прямых
солнечных лучей и чрезмерному запылению.
Не кладите на устройство тяжелые предметы.
Не размещайте это устройство на предметах мебели с
нефиксируемыми колесиками, на неустойчивых подставках,
треногах, кронштейнах, столах, так как изделие может упасть и
привести к травмам детей, взрослых, а также к неисправности
самого устройства. Используйте только те подставки, треноги,
кронштейны, столы, которые либо продаются вместе с
устройством, либо рекомендованы изготовителем устройства.
При установке устройства на подставке соблюдайте инструкции
изготовителя, применяйте только те крепежные изделия, которые
рекомендуются изготовителем. Подставку с установленным на
ней устройством следует перемещать с крайней осторожностью.
При резкой остановке, рывках или при перемещении подставки по
неровной поверхности весьма вероятно опрокидывание подставки
и падение устройства.
Посторонние предметы
Не допускайте попадания каких-либо предметов через отверстия
в корпусе устройства, это может повлечь за собой возгорание
устройства и поражение электрическим током. Если это всетаки произошло, отсоедините устройство от сети и обратитесь к
квалифицированным специалистам.
Повреждения, требующие ремонта
Если у вас возникли описанные ниже ситуации, необходимо
выключить устройство из розетки и обратиться к
квалифицированному специалисту для ремонта устройства:
a) Повреждение сетевого шнура или вилки.
b) В устройство попали какие-либо предметы.
c) Устройство попало под дождь или на него разлили воду.
d) Заметны явные изменения в работе устройства.
e) Устройство упало или было повреждено каким-либо другим
образом.
Уход за устройством
Перед чисткой выключите устройство из розетки. Для чистки
устройства пользуйтесь влажной мягкой тканью. Запрещается
использовать для этих целей жидкие или аэрозольные чистящие
средства.
12
4110IM.indd 124110IM.indd 12 20.10.2009 11:08:0820.10.2009 11:08:08
Page 13

РУССКИЙ
Уход за дисками
Не используйте треснутые или деформированные диски, это может
вызвать поломку устройства.
Берите диск только за края. Вставляйте диск надписью вверх. Не
прикасайтесь к рабочей поверхности диска. Пыль, царапины или
отпечатки пальцев на рабочей поверхности диска могут привести к
выходу его из строя.
Следите за тем, чтобы на диски не попадали прямые солнечные
лучи, чтобы они не находились рядом с источниками тепла и не
были подвержены воздействию высокой температуры и влажности.
После использования уберите диск в футляр на хранение.
Периодически протирайте рабочую поверхность диска мягкой
тканью от центра к краям. Не пользуйтесь обычными моющими
средствами.
Использование батареек
Протечка батареек может стать причиной травм или повреждения
пульта дистанционного управления. Чтобы избежать повреждения
батареек, следуйте приведенным ниже инструкциям:
- устанавливайте батарейки правильно, соблюдая полярность в
соответствии с обозначениями на устройстве;
- не используйте вместе разные батарейки (старые и новые, разных типов и т.п.);
- вынимайте батареи, если устройство не будет использоваться в
течение длительного времени;
- своевременно меняйте батарейки.
Меры по бережному обращению с устройством
• При транспортировке устройства используйте коробку и детали
упаковки, которые были получены вами при покупке устройства.
• Если плеер работал продолжительное время, то его корпус может быть слегка нагретым - это нормальное явление.
• Не перемещайте данное устройство во время воспроизведения
диска. В противном случае может быть повреждено считывающее устройство и диск.
АВТОРСКИЕ ПРАВА
В данном устройстве используется технология защиты
авторских прав, защищенная патентами США и другими
правами на интеллектуальную собственность, принадлежащими
компании Macrovision Corporation и другим правообладателям.
Использование технологии защиты авторских прав должно
быть разрешено компанией Macrovision Corporation, устройство
предназначено только для домашнего использования, если
обратное не разрешено компанией Macrovision Corporation.
Разборка изделия и копирование технологии запрещены.
Изготовлено по лицензии Dolby Laboratories. Название «Dolby» и
символ в виде двойной буквы «D» являются торговыми марками
компании Dolby Laboratories.
Данный плеер может воспроизводить следующие типы дисков:
Формат дисков Символы Содержимое
DVD
АС-3
МРЗ
Video-CD (VCD)
CDDA Аудио
Kodak Picture CD
MPEG4
Принадлежности
В комплект поставки входят следующие принадлежности:
Инструкция по эксплуатации
Пульт дистанционного управления
Аудио/видеокабель
2 батарейки, ААА 1.5 V
Особенности DVD и CD-дисков
DVD 5 (односторонний однослойный)
DVD 9 (односторонний двухслойный)
DVD 10 (двухсторонний однослойный)
DVD 18 (двухсторонний двухслойный)
VCD 1.0/1.1/2.0
CD с изображениями
DVCD
CDDA
МРЗ
CD-R
CD-RW
Аудио + Видео
Dolby Digital Аудио
Аудио
Аудио + Видео
Фото
Аудио + Видео
Примечание: данное устройство соответствует директиве по
электромагнитной совместимости и директиве для низковольтных
устройств.
DVD-плеер Vitek - это новое поколение домашних устройств,
обеспечивающих воспроизведение высококачественного
изображения и звука. Характеристики DVD-плеера значительно
превосходят характеристики любого существовавшего ранее
оборудования для воспроизведения видео. Он является наилучшим
источником сигнала для систем домашнего кинотеатра и обеспечит
вам максимальное удовольствие от просмотра.
• Воспроизводимые диски: DVD-R/-RW, DVD+R/+RW, CD-R/-RW.
• Поддерживаемые форматы: DVD, MPEG4 (DivX), SVCD, VCD,
CDDA, МРЗ, WMA, Kodak Picture CD, JPEG.
• Встроенные декодеры Dolby Digital AC-3
• Разъёмы для подключения: композитный (VIDEO), S-Video, компонентный (Y Cb/Pb Cr/Pr), коаксиальный (COAXIAL), оптический
(OPTICAL)
• Разъем USB.
Кардридер SD, MS, MMC.
• Караоке.
• Экранное меню на русском и английском языках.
, 5.1/стерео (5.1 CH AUDIO OUT), SCART.
13
4110IM.indd 134110IM.indd 13 20.10.2009 11:08:0820.10.2009 11:08:08
Page 14

РУССКИЙ
Информация о диске
ТИП DVD VCD SVCD CD
ФОРМАТ ЗАПИСИ MPEG 2 MPEGI MPEG II DIGIT
ОБЪЕМ ДИСКА Односторонний,
РАЗМЕР, см 12/8 12 12 12/8
ГОРИЗОНТАЛЬНОЕ
РАЗРЕШЕНИЕ
СУБТИТРЫ до 32 видов - 8 -
ЯЗЫК до 8 2 4 -
ОБОЗНАЧЕНИЕ
DVD-диски разных производителей имеют разные параметры, которые обозначаются следующими символами:
однослойный
4,7 Гб - 2 часа.
Двухслойный,
односторонний 8,5
Гб - 4 часа
>500 линий >240 линий >350 линий -
Двухсторонний,
однослойный
9,4 Гб - 4,5 часа.
Двухсторонний,
двухслойный
17 Гб - 9 часов
650М 74 мин. 650M 45 мин. 650M 74 мин.
Региональный код и система видеовыхода
Dolby digital surround
Количество аудиотреков
Количество субтитров
Формат изображения
Ограничение просмотра
Ракурсы просмотра
5.1-канал выхода звука
Скрытые субтитры
Двухканальное стерео
Ограничение
Термины, относящиеся к дискам
Заголовок
Обычно изображение или музыка, записанная на DVD-диске, делится на несколько частей, каждая из которых называется «заголовок».
Эпизод (фрагмент)
Минимальный фрагмент изображения или музыки на DVD-диске в пределах заголовка; обычно один заголовок состоит из одного и
более эпизодов (фрагментов), которые для облегчения поиска пронумерованы. Но на некоторых дисках эпизоды (фрагменты) могут
отсутствовать.
Трек
Часть изображения или музыки на диске SVCD, VCD или CD. Для облегчения поиска все треки пронумерованы.
Сцена
Диски VCD, поддерживающие функцию контроля воспроизведения и содержащие динамическое и статическое изображение, делятся на
части, называемые сценами. Каждая сцена может быть легко найдена по номеру и может быть отображена на экране. Одна сцена обычно
состоит из одного или нескольких треков.
Функция РВС (SVCD,VCD)
Во время воспроизведения диска SVCD или VCD на экране может быть отображено меню содержимого диска, которое называется
функцией контроля воспроизведения или функцией РВС.
14
4110IM.indd 144110IM.indd 14 20.10.2009 11:08:0820.10.2009 11:08:08
Page 15

Тип диска Функции
Диски VCD, не поддерживающие функцию РВС
(версия 1.1)
Воспроизведение как музыки (звука), так и изображения
РУССКИЙ
Диски SVCD/VCD, поддерживающие функцию РВС
(версия 2.0)
Примечание: если вы записываете диск, используя ПК, то даже если формат диска совместим, бывают случаи, когда диск не
воспроизводится из-за настроек программного обеспечения, которое использовалось при записи диска.
Для воспроизведения изображения с VCD может использоваться меню, которое
отображается на экране
Описание
Передняя панель
1. кнопка STANDBY/ON
2. индикатор включения
3. лоток для дисков
4. джойстик (при помощи которого происходит управление плейером):
(►)– воспроизведение (PLAY)
(║) – приостановка (PAUSE)
(▲) – открытие/закрытие лотка диска (OPEN/CLOSE)
(■) – остановка воспроизведения (STOP)
5. LED-дисплей (светодиодный дисплей)
6. местоположение фотоприемника сигналов от пульта ДУ
7. картридер SD/MS/MMC
8. разъем для подключения USB-носителя (USB Flash Drive)
Боковая панель (правая)
1. разъемы для подключения микрофонов
2. ручка регулировки уровня громкости микрофонов
3. ручка регулировки уровня эха микрофонов
Задняя панель
1. Питание
2 . Разъемы аудиовыхода 5.1СН
3. Разъем коаксиального аудиовыхода (Coaxial)
4. Разъем композитного видеовыхода (Video)
5. Разъемы компонентного видеовыхода (Y Cb/Pb Cr/Pr)
6. Разъем видеовыхода S-Video
7. Разъем оптического аудиовыхода (OPTICAL)
8. Разъем SCART
15
4110IM.indd 154110IM.indd 15 20.10.2009 11:08:0820.10.2009 11:08:08
Page 16

РУССКИЙ
Пульт дистанционного управления
1. кнопка открытия/закрытия лотка диска (OPEN/CLOSE)
2. кнопка переключения режимов видеовыхода (V. MODE)
3. кнопка OSD (информация о диске)
4. кнопка POWER
5. цифровые кнопки
6. кнопка переключения систем цветности (PAL/NTSC)
7. кнопка отмены ввода (CLEAR)
8. кнопка режима программирования (PROG)
9. кнопки навигации курсора(←↑→↓)
10. кнопка изменения масштаба (ZOOM)
11. кнопка перехода к предыдущему треку (PREV)
12. кнопка перехода к следующему треку (NEXT)
13. кнопка остановки воспроизведения (STOP)
14. кнопки регулировки уровня громкости (VOLUME +/-)
15. кнопка переключения типа носителя (DVD/USB/CARD)
16. кнопка включения ракурсов (ANGLE)
17. кнопка выключения звука (MUTE)
18. кнопка покадрового воспроизведения (STEP)
19. кнопка приостановки воспроизведения (PAUSE)
20. кнопка перемотки назад (F REV)
21. кнопка перемотки вперед (F FWD)
22. кнопка замедленного воспроизведения (SLOW)
23. кнопка воспроизведения/ввода (►)
24. кнопка входа в меню настроек (SETUP)
25. кнопка повтора фрагмента (A-B RPT)
26. кнопка выбора режимов повтора (REPEAT)
27. кнопка входа в меню поиск (SEARCH)
28. кнопка входа в меню содержимого диска (TITLE/PBC)
29. кнопка выбора субтитров (SUBTITLE)
30. кнопка выбора языка звукового сопровождения (AUDIO)
31. кнопка входа в меню (MENU)
Установка элементов питания в пульт дистанционного
управления
• Вставьте батарейки в соответствующий отсек пульта дистанционного управления.
• Извлеките батарейки, если вы не будете использовать пульт
длительное время.
• Своевременно заменяйте батарейки.
ПОДКЛЮЧЕНИЯ
Внимание! Перед началом подключения DVD-плеера к другому
оборудованию убедитесь, что электропитание DVD-плеера и
другого оборудования отключено.
16
4110IM.indd 164110IM.indd 16 20.10.2009 11:08:0820.10.2009 11:08:08
Page 17

РУССКИЙ
Подключение видеошнуров
Выберите наиболее подходящий из перечисленных ниже типов подключений, исходя из возможностей вашего телевизора.
(1) Композитный видеосигнал
Для просмотра изображений стандартного качества соедините разъем выхода композитного видеосигнала (VIDEO) вашего DVD-плеера
с соответствующим входом телевизора или монитора, используя один провод аудио/видеокабеля (A/V) с желтыми штекерами на концах,
входящего в комплект поставки.
(2) Разъем S-Video
Для просмотра изображений улучшенного качества соедините разъем S-VIDEO вашего DVD-плеера с соответствующим входным
разъемом на телевизоре или мониторе посредством кабеля S-Video (в комплект поставки не входит).
(3) Компонентный видеовыход
Для точной цветопередачи изображений высокого качества подключите разъемы выхода компонентного видеосигналаY Cb/Pb Cr/Pr
(красный/синий/зеленый) к входным разъемам на телевизоре или мониторе, используя соответствующий кабель (в комплект поставки не
входит).
(4) Разъем SCART
Для подключения разъема SCART DVD-плеера к такому же разъему на телевизоре или мониторе используется 21-контактный кабель
SCART (в комплект поставки не входит).
Примечание
• Одновременное подключение нескольких видеовыходов может ухудшить качество изображения.
• Хорошее изображение можно получить только при правильном подключении и корректной настройке системы.
Подключение аудиосистемы
Выберите наиболее подходящий из перечисленных ниже типов подключений, исходя из возможностей вашего телевизора
(1) Двухканальный аналоговый выход
Для подключения двухканального аналогового выхода используйте разъемы FR и FL 5.1 СН аналогового аудиовыхода (5.1 CH AUDIO OUT),
при этом переключите режим аудиовыхода в 2-канальный режим (см. «Страница настройки динамиков»).
(2) 5.1 СН Аналоговый аудиовыход
Для подключения пятиканального аудиовыхода (FL, FR, SL, SR, CENTER, SUB WOOFER) DVD-плеера к соответствующему пятиканальному
входу (5.1) усилителя мощности/ресивера используйте 3 пары AV-кабелей.
(3) Коаксиальный цифровой аудиовыход
Для подключения разъема COAXIAL вашего DVD-плеера к соответствующему разъему на усилителе мощности используется специальный
коаксиальный кабель.
(4) Оптический цифровой выход
Для подключения разъема OPTICAL вашего DVD-плеера к оптическому разъему на усилителе мощности используется специальный
волоконно-оптический кабель.
Примечание: параметры настройки должны соответствовать разъему, через который DVD-плеер подключается к внешним устройствам.
17
4110IM.indd 174110IM.indd 17 20.10.2009 11:08:0820.10.2009 11:08:08
Page 18

РУССКИЙ
НАСТРОЙКА СИСТЕМЫ
1. Включите телевизор и установите в его настройках соответствующий тип входного сигнала.
Для входа в меню настроек системы нажмите кнопку SETUP. Для
выхода из меню снова нажмите SETUP.
2. При помощи кнопок навигации (←→) выберите одну из следующих страниц: Общие (настройки), Звук, Dolby, Видео, Персональные (настройки).
3. Нажмите кнопку (►), чтобы войти в выбранную страницу.
4. При помощи кнопок (↓↑) выберите пункт, который вы хотите изменить.
5. Нажмите кнопку (►), чтобы войти в перечень изменений настроек. При помощи кнопок навигации (↓↑) выберите нужное
значение, нажмите (►) или (←), чтобы подтвердить введенное
значение и вернуться к списку настроек.
Для возврата к страницам настроек нажмите (←).
Внимание! Некоторые пункты меню, соответствующие
предустановленным режимам, отмечены серым и не могут быть
выбраны.
Введенные установки сохраняются и после выключения питания.
Общие установки
• НАСТРОЙКА КОЛОНОК
Смешивание
Передние колонки
Центральные колонки
Задние колонки
Сабвуфер
Установить смешивание
лев./прав.
больш.
больш.
больш.
вкл.
лев./прав.
Стерео
5.1 СН
- Смешивание
Лев/Прав: оригинальный звук формата 5.1 CH передается толь-
ко по левому и правому каналам.
Стерео: оригинальный звук формата 5.1 CH передается в режи-
ме стерео.
Если акустическая система включает только передние колонки и
сабвуфер, то для активации сабвуфера необходимо установить
пункты меню следующим образом:
в пункте меню “Передние колонки” установить значение “мален.”
(маленькие), а в пункте “Сабвуфер” установить значение “вкл.”.
Смешивание
Передние колонки
Центральные колонки
Задние колонки
Сабвуфер
Настройка передних колонок
Стерео
мален.
больш.
больш.
вкл.
больш.
мален.
ЭКРАН
Стандартный/PS: когда DVD-плеер подключен к обычному
телевизору, широкоэкранное изображение воспроизводится на
всем экране, но часть его обрезается (4:3).
Стандартный /LB: когда DVD-плеер подключен к обычному
телевизору, широкоэкранное изображение воспроизводится так,
что сверху и снизу появляются черные полосы (4:3).
Широкий (Wide): используйте этот пункт, если домашний кинотеатр
подключен к широкоэкранному телевизору (16:9).
РАКУРС
Некоторые фильмы на DVD-дисках могут быть записаны под
разными ракурсами. Более подробную информацию о такой
возможности можно почерпнуть из аннотации к вашему DVD-диску.
Если режим включен, при воспроизведении DVD-диска,
записанного под разными ракурсами, на экране отображается
символ камеры.
ЯЗЫК МЕНЮ
Выбор языка экранного меню.
СУБТИТРЫ
Эта функция не работает, если диск не имеет субтитров. Если
функция субтитров
выключена, нажмите кнопку SUBTITLE на пульте дистанционного
управления для включения функции.
ЗАСТАВКА ЭКРАНА
Если функция включена, плеер включен, но диск не
воспроизводится в течение нескольких минут, то на экране
появляется движущаяся заставка и через некоторое время плеер
переходит в режим ожидания.
ЗАПОМНИТЬ ПОСЛЕДНЮЮ УСТАНОВКУ
Если эта функция включена, плеер запоминает момент времени
извлечения диска, и при следующей загрузке того же диска
воспроизведение начнется с момента извлечения диска.
Настройка звука
5.1 СН: передача оригинального звука в формате 5.1 CH.
- ПЕРЕДНИЕ КОЛОНКИ, ЦЕНТРАЛЬНЫЕ КОЛОНКИ, ЗАДНИЕ КОЛОНКИ, САБВУФЕР
Если ваша акустическая система включает передние, централь-
ные, задние колонки, сабвуфер, то вы можете установить пункты
меню в соответствии с реальной конфигурацией. Функция не
работает, если включена функция микширования (Лев/Прав,
Стерео).
• НАСТРОЙКА SPDIF
SPDIF/Выкл.: звук подается на выход устройства только в анало-
говом виде (5.1 CH AUDIO OUT).
SPDIF/RAW: цифровой выходной сигнал в оригинальном фор-
мате, записанном на диске. SPDIF/PCM: цифровой выходной
сигнал в декодированном РСМ-формате.
• HDCD
Вы можете выбрать частоту дискретизации 44.1 К, 88.2 К или
«ВЫКЛ.». Чем выше частота дискретизации, тем выше качество
звука.
Настройка Dolby Digital
ДВОЙНОЕ МОНО
Если у вашего усилителя/декодера есть выход Dolby Digital, вы
можете выбрать : стерео, лев. моно, прав. моно, смеш. моно.
ДИНАМИЧЕСКИЙ ДИАПАЗОН
При просмотре программ с большим динамическим диапазоном
звука выбор этого режима позволит вам избежать резких
изменений уровня звука (например, в ночное время, чтобы не
беспокоить других членов семьи) и в то же время сохранить
качество и детали звукового сопровождения.
18
4110IM.indd 184110IM.indd 18 20.10.2009 11:08:0820.10.2009 11:08:08
Page 19

РУССКИЙ
Настройки видео
• ТВ режим
CVBS: установка композитного видеосигнала.
YUV: выберите этот режим при подключении через разъем Y Cb/
Pb Cr/Pr к компонентному разъему.
RGB: выберите этот режим при подключении через разъем
SCART.
• Развертка: если ваш телевизор поддерживает режим прогрессивной развертки, вы можете включить или выключить прогрессивную развертку, если выбран режим YUV.
• РЕЗКОСТЬ, ЯРКОСТЬ, КОНТРАСТНОСТЬ
Вы можете установить желаемый уровень в соответствии с ва-
шими предпочтениями.
Персональные настройки
Устанавливаются до начала просмотра.
ТВ-система
Ваш плеер подходит для всех разновидностей телевизионных
систем. Вы можете выбрать PAL, NTSC или Авто.
ЗВУК (Выбор языка звукового сопровождения), СУБТИТРЫ, МЕНЮ
ДИСКА
Эти параметры могут быть изначально установлены в соответствии
с вашими предпочтениями. Если установленные вами параметры
поддерживаются содержанием диска, то воспроизведение будет
происходить с учетом ваших настроек. Иначе, будут использоваться
установки диска, заданные по умолчанию.
ОГРАНИЧЕНИЕ ПРОСМОТРА ПО ВОЗРАСТУ
Эта функция предназначена для контроля родителями за
содержанием дисков при их воспроизведении, она дает
возможность блокировать просмотр нежелательных сцен вашими
детьми. Диск, уровень которого выше, чем установленный с
помощью данной функции, не будет воспроизведен.
Примечание: при изменении данного пункта вам необходимо
ввести пароль (пароль по умолчанию - 136900).
ПАРОЛЬ
Здесь вы можете изменять пароль. Выберите ПАРОЛЬ =>
ИЗМЕНИТЬ => (►), в появившемся окне сначала введите старый
пароль (или пароль по умолчанию - 136900), затем введите новый
пароль, и еще раз введите новый пароль. Нажмите кнопку (►) для
сохранения нового пароля.
ПО УМОЛЧАНИЮ
Сброс - возврат к заводским настройкам.
Основные функции
Примечание: символ , появляющийся на экране при нажатии
кнопки, означает, что выбранная функция недоступна для данного
диска.
POWER (ВКЛЮЧЕНИЕ ПИТАНИЯ)
• Нажмите кнопку STANDBY/ON на передней панели плеера или
кнопку POWER на пульте дистанционного управления, чтобы
включить питание плеера.
• Используйте кнопку POWER на пульте дистанционного управления, чтобы перейти к режиму ожидания.
OPEN/CLOSE (ОТКРЫТЬ/ЗАКРЫТЬ ЛОТОК ДИСКА)
• Нажмите кнопку OPEN/CLOSE на передней панели плеера или
кнопку на пульте дистанционного управления, лоток диска
откроется. Установите диск в лоток рабочей поверхностью вниз
(этикеткой вверх). Нажмите кнопку OPEN/CLOSE еще раз, чтобы
закрыть лоток и плеер автоматически начнет воспроизведение.
Функция автоматического воспроизведения поддерживается не
для всех дисков.
VOLUME (РЕГУЛИРОВКА УРОВНЯ ГРОМКОСТИ)
• Используйте кнопки VOLUME +/- для увеличения или уменьшения уровня громкости звука.
MUTE (ВЫКЛЮЧЕНИЕ ЗВУКА)
• Для выключения звука нажмите кнопку MUTE. Для включения
звука нажмите кнопку MUTE еще раз или используйте кнопки
регулировки громкости.
PLAY (ВОСПРОИЗВЕДЕНИЕ)
• Нажмите кнопку (►) на пульте дистанционного управления или
на передней панели плеера, чтобы начать воспроизведение.
PAUSE (ПРИОСТАНОВКА ВОСПРОИЗВЕДЕНИЯ)
Для приостановки воспроизведения нажмите кнопку PAUSE на
пульте дистанционного управления или на передней панели
плеера. Для возврата к нормальному воспроизведению нажмите кнопку (►).
STOP (ОСТАНОВКА ВОСПРОИЗВЕДЕНИЯ)
• При воспроизведении дисков DVD, SVCD, VCD, CD нажмите
STOP один раз - плеер запомнит точку остановки. Нажмите
кнопку (►) на пульте дистанционного управления или на передней панели плеера для продолжения. Для полной остановки
воспроизведения нажмите STOP второй раз.
F.REV (◄◄) и F.FWD (►►) (ПЕРЕМОТКА НАЗАД/ ВПЕРЕД)
• Нажмите кнопку F.FWD (►►) для ускоренной перемотки вперед.
• Нажмите кнопку F.REV (◄◄) для ускоренной перемотки назад.
Для увеличения скорости перемотки нажимайте соответствую-
щую кнопку несколько раз.
PREV (I◄◄)/NEXT (►►I) (ПЕРЕХОД К ПРЕДЫДУЩЕМУ/СЛЕДУЮ-
ЩЕМУ ТРЕКУ)
• При воспроизведении DVD-дисков нажмите кнопку PREV (I◄◄)
на панели или на пульте ДУ для перехода к предыдущему эпизоду (фрагменту).
• При воспроизведении SVCD, VCD, CD дисков нажмите кнопку
PREV (I◄◄) для перехода к предыдущему треку.
• При воспроизведении DVD дисков нажмите кнопку NEXT (►►I)
на панели или на пульте ДУ для перехода к следующему эпизоду
(фрагменту).
• При воспроизведении дисков SVCD, VCD, CD нажмите кнопку
NEXT (►►I) для перехода к следующему треку.
DVD/USB/CARD (ВЫБОР НОСИТЕЛЯ)
Устройство поддерживает следующие типы карт памяти:
MS CARD: MEMORY STICK CARD
SD CARD: SD MEMORY CARD
MMC CARD: MULTI MEDIA CARD
• Включите плеер
• Вставьте карту памяти (SD, MS, MMC)
• Используйте кнопку “DVD/USB/CARD” для переключения DVD в
режим считывания карты памяти или USB. (Если вы подключили к DVD различные внешние устройства памяти, используйте
кнопку “DVD/USB/CARD” для выбора между ними).
Если загрузка произошла успешно, меню навигации отобразит-
ся автоматически. При помощи кнопок навигации (↑↓) выберите
нужную папку, затем нажмите кнопку ► для подтверждения. В
папках при помощи кнопок (↑↓) выберите нужный файл, затем
нажмите кнопку ► для воспроизведения. На этой страничке используйте кнопку ← для вохврата к предыдущему меню, а кнопки (←→) для перехода к предыдущей или следующей страничке.
• При воспроизведении диска устройство сразу остановится.
• При работающем диске и одновременно загруженной карте
памяти или USB-устройстве воспроизведение диска имеет приоритет. В этом случае используйте кнопку “DVD/USB/CARD” для
выбора соответствующего носителя.
• Когда устройство остановлено, вы можете извлечь внешнее устройство (карту памяти или USB-носитель).
• Сначала DVD-плеер загрузит диск. Нажмите кнопку “DVD/USB/
CARD” для выбора другого режима.
• Когда считывается карта памяти, отображение режима не происходит. Вы можете нажать кнопку “DVD/USB/CARD” для переключения в DVD-режим.
Примечание
1. Производитель не гарантирует поддержку всех имеющихся на
рынке USB-устройств с интерфейсом 1.1 и 2.0.
2. DVD-плеер тестировался на совместимость с наиболее часто
19
4110IM.indd 194110IM.indd 19 20.10.2009 11:08:0820.10.2009 11:08:08
Page 20

РУССКИЙ
встречающимися параметрами записи мультимедийных файлов. Однако, из-за большого количества существующих и вновь
появляющихся параметров и спецификаций, использующихся
при создании мультимедийных файлов, возможно, что некоторые из них не будут воспроизводиться устройством или будут
воспроизводиться некорректно.
PROG (ПРОГРАММИРОВАНИЕ)
• Если диск содержит два и более трека, эпизода (фрагмента)
или заголовка, то с помощью этой кнопки вы можете задать порядок воспроизведения.
• Для входа в режим программирования нажмите кнопку PROG,
на экране появится меню программирования. Нажмите цифровые кнопки для задания номера трека, эпизода (фрагмента) или
заголовка. Для ввода трека с номером 10 и выше используйте
кнопку 10+ (например, чтобы ввести номер 26, нажмите следующую последовательность кнопок: 10+, 10+, 6). Если записей
более 10, нажмите NEXT (►► I) для продолжения таблицы
программирования (максимальное количество - 20 записей).
Используйте кнопки курсора (↓→←↑) для его перемещения. По
завершению программирования при помощи кнопок навигации
курсора выберите пункт «Старт» и нажмите кнопку (►) для воспроизведения запрограммированной последовательности.
• Для дисков МРЗ, DiV X, MPEG 4 программирование невозможно! Нажмите кнопку PROG один раз для открытия списка файлов. Используя кнопки навигации курсора, вы можете выбрать
желаемый файл для воспроизведения.
TITLE/PBC (ЗАГОЛОВКИ/КОНТРОЛЬ ВОСПРОИЗВЕДЕНИЯ) и
MENU (МЕНЮ)
Кнопки TITLE/PBC и MENU используются для отображения со-
держимого диска.
Если диск имеет несколько заголовков (фильмов), для отобра-
жения перечня заголовков нажмите кнопку TITLE/PBC. Для отображения содержимого заголовка нажмите кнопку MENU.
Если диск содержит один заголовок, нажмите кнопку MENU.
При воспроизведении дисков SVCD, VCD2.0 нажмите кнопку
TITLE/PBC, появится меню диска. ПВ этом режиме вы можете
выбрать номер трека, нажав на соответствующую цифровую
кнопку. VCD1.1, CDDA и МРЗ не имеют РВС-меню.
SUBTITLE (ВЫБОР СУБТИТРОВ)
• При воспроизведении DVD с субтитрами нажимайте кнопку
SUBTTITLE, чтобы выбрать язык субтитров.
ANGLE (РАКУРС)
• При воспроизведении DVD с более чем одним углом обзора
нажимайте на кнопку ANGLE для выбора требуемого угла.
STEP (ПОКАДРОВОЕ ВОСПРОИЗВЕДЕНИЕ)
• Для покадрового воспроизведения дисков DVD, SVCD, VCD
нажмите кнопку STEP. Для возобновления воспроизведения нажмите кнопку (►) на пульте дистанционного управления или на
передней панели плеера.
REPEAT (ПОВТОР)
• Нажмите кнопку REPEAT для повторного воспроизведения трека, эпизода (фрагмента), заголовка или всего диска.
А-В RPT (ПОВТОР ФРАГМЕНТА А-В)
• При воспроизведении диска вы можете задать фрагмент А-В
для повтора.
• Нажмите кнопку А-В RPT для установки начальной точки (А).
• Нажмите кнопку А-В RPT для установки конечной точки (В). Начнется повтор выбранного фрагмента.
• Нажмите кнопку А-В RPT в третий раз для отмены повтора и
возврата к обычному воспроизведению.
ZOOM (ИЗМЕНЕНИЕ МАСШТАБА)
• Для изменения масштаба нажмите кнопку ZOOM. При увеличенном изображении используйте кнопки (↑←→↓) для его перемещения по экрану.
SETUP (МЕНЮ НАСТРОЙКИ СИСТЕМЫ)
• Нажмите кнопку SETUP, на экране появится меню настроек системы.
V-MODE (ПЕРЕКЛЮЧЕНИЕ РЕЖИМОВ ВИДЕОВЫХОДА)
• Нажмите кнопку V-MODE для выбора режима видеовыхода
(CVBS, YUV, YUV-PSCAN, RGB и т.д.).
ЦИФРОВЫЕ КНОПКИ (1-9, 0, 10+)
• При воспроизведении дисков VCD 1.1, CD, после загрузки диска для выбора трека и главы, используйте цифровые кнопки.
Кнопки с цифрами нужны при включенных функциях PROGRAM
и MENU.
• Для выбора треков с номером 10 или выше используйте кнопку
10+ и цифру, соответствующую треку.
PAL/NTSC (ВЫБОР СИСТЕМЫ ЦВЕТНОСТИ)
• Нажимайте на эту кнопку для выбора системы цветности: PAL,
NTSC, MULTI.
CLEAR (ОТМЕНА ВВОДА)
• Нажмите эту кнопку, чтобы отменить ввод номера.
SLOW (ЗАМЕДЛЕННОЕ ВОСПРОИЗВЕДЕНИЕ)
Для замедленного воспроизведения нажмите кнопку SLOW на пуль-
те дистанционного управления.
Другие функции
Караоке
Караоке-диск - это диск в формате DVD, VCD, на котором запи-
сана музыка и субтитры, показывающие пользователю, в какой
момент нужно начинать петь тот или иной фрагмент песни. Для
пения необходимо использовать микрофон (не входит в стандартную комплектацию).
• Подключите микрофон в разъем, расположенный на боковой
панели вашего DVD-плеера.
• Установите уровень громкости микрофона при помощи регулятора, расположенного на боковой панели плеера.
• Установите требуемый уровень эха микрофона при помощи регулятора, расположенного на боковой панели прибора.
• Вставьте караоке-диск в DVD-плеер, воспроизведение начнется
автоматически.
• Для предотвращения самовозбуждения микрофона:
- не располагайте микрофон в непосредственной близости от
телевизора или громкоговорителя;
- уменьшите громкость телевизора или усилителя;
- уменьшите громкость микрофона.
Воспроизведение МРЗ/CD-дисков
• Для перемещения по списку папок/файлов используйте кнопки
(↓↑), для открытия/закрытия папки – кнопку (►), для воспроизведения файла нажмите кнопку (►).
Просмотр рисунков и фотографий на CD
• После загрузки диска с изображениями на экране появится
список файлов. Для просмотра файлов по списку используйте
кнопки (↓↑) и (►). Выбранное изображение появится на всем
экране вашего телевизора.
Кнопки, используемые при просмотре изображений:
ZOOM – включение режима изменения масштаба.
F.FWD (►►), F.REV (◄◄) – изменение масштаба изображения.
(↓↑→←) – перемещение увеличенного изображения.
Если функция ZOOM выключена, то с помощью кнопок (↓↑→←)
можно осуществлять поворот изображения.
AUDIO (ВЫБОР ЯЗЫКА ЗВУКОВОГО СОПРОВОЖДЕНИЯ)
• При воспроизведении DVD с несколькими языками аудио нажимайте кнопку AUDIO для выбора требуемого языка.
SEARCH (ПОИСК)
• В режиме воспроизведения нажмите кнопку SEARCH (ПОИСК)
один раз, на экране отобразится строка поиска. Используя цифровые кнопки, выберите желаемый фрагмент на диске.
OSD (ИНФОРМАЦИЯ О ДИСКЕ)
• Нажмите кнопку OSD, на экране появится информация о текущем состоянии диска.
20
4110IM.indd 204110IM.indd 20 20.10.2009 11:08:0820.10.2009 11:08:08
Page 21

РУССКИЙ
Поиск и устранение неисправностей
Признак неисправности Причина неисправности Действия по устранению неисправности
Нет электропитания Шнур питания не включен в розетку Включите шнур питания в розетку
Нет изображения Неправильный выбор источника входа в
настройках телевизора
Настройка не соответствует реальному
подключению
Разъем видеокабеля вставлен в гнездо
недостаточно плотно
Нет звука Разъем аудиокабеля вставлен в гнездо
недостаточно плотно
Подсоединенные устройства не включены Включите питание подсоединенных устройств
Неправильная настройка звука Выберете соответствующую настройку
Искажение звука Уровень громкости звука слишком высок Уменьшите уровень громкости звука
Нестабильное изображение Неправильная настройка телевизора Скорректируйте настройки телевизора
Диски не читаются Диск не вставлен Вставьте диск
Диск вставлен неправильно Проверьте правильность установки диска
Конденсат внутри плеера Оставьте DVD-плеер без диска на один час
Микрофон не работает Микрофон не подключен Подключите микрофон
Низкий уровень громкости звука микрофона Отрегулируйте уровень громкости звука микрофона
Выберите подходящую настройку в соответствии с
подключением плеера
Выберите настройку в соответствии с реальным
подключением
Проверьте подключение видеокабеля
Проверьте подключение аудиокабеля
(этикеткой вверх)
включенным
Не работает пульт
дистанционного управления
Некоторые функции системы не
работают
Пульт не направлен на плеер Направьте пульт на плеер
Расстояние от пульта дистанционного управления
до плеера превышает 8 метров
Разряжены батарейки пульта дистанционного
управления
Нажата неверная последовательность кнопок Повторите операцию еще раз в соответствии с
Сократите расстояние до плеера
Замените обе батарейки
руководством.
Технические характеристики
Питание 110-240 В, 50/60 Гц
Потребляемая мощность 12 Вт
Размеры 362х220х41 мм
Вес 1540 г
Рабочая температура от 5 до 35°С
Рабочая влажность от 5 до 90%
Система цветности NTSС / PAL
Формат данных Воспроизведение форматов: DVD, DVCD, SVCD, VCD, CDDA, МРЗ, WMA, HDCD,
Тип носителя DVD, DVD-R/-RW/+R/+RW, CD-R/-RW
Цифроаналоговый преобразователь 192 кГц / 24 бит
Видеовыход 1Vp-p (75 Ом)
Выход S-Video: Y: 1Vp-p (75 Ом), С: 0,286Vp-p (75 Ом)
Аудиовыход 2.0 Vt 5.1 Channel
Цифровой выход аудиосигнала 0,5 Vp-p (75 Ом)
Разъемы CVBS, S-VIDEO, Y Cb/Pb, Cr/Pr, SCART
Частотный диапазон CD: 20Гц-20кГц (EIAJ), DVD: 20Гц-44кГц (96кГц ИКМ), 20Гц-22кГц (48кГц ИКМ)
Уровень шума ~-80 дБ
Коэффициент искажений <0,01%
Динамический диапазон ~80 дБ
Дистанционное управление
Передатчик Инфракрасное излучение
Источник питания 2 элемента питания ААА
JPEG, KODAK PICTURE CD.
Воспроизведение цифрового видео, сжатого в формате MPEG4 (DivX)
Производитель сохраняет за собой право изменять дизайн и технические характеристики прибора без предварительного уведомления.
Срок службы прибора 5 лет.
Данное изделие соответствует всем требуемым европейским и российским стандартам безопасности и гигиены.
АНДЕР ПРОДАКТС ГмбХ, Австрия
Нойбаугюртель, 38/7А 1070, Вена, Австрия
21
4110IM.indd 214110IM.indd 21 20.10.2009 11:08:0820.10.2009 11:08:08
Page 22

УКРАЇНЬСКИЙ
Інструкція з експлуатації
DVD плеер
Модель VT-4110
Перед підключенням, використанням і настройкою програвача
уважно прочитайте інструкції, які знаходяться в цьому посібнику.
CAUTION!
RISK OF ELECTRIC
SHOCK
DO NOT OPEN!
ЗАСТЕРЕЖЕННЯ: Для зниження ризику загоряння або
поразки електричним струмом, не знімайте панелі пристрою.
Для сервісного обслуговування звертайтеся тільки до
кваліфікованого персоналу.
Значок блискавки в рівносторонньому трикутнику
вказує користувачу на наявність небезпечної напруги
усередині корпуса виробу, здатної призвести до поразки
електричним струмом.
Знак оклику в рівносторонньому трикутнику вказує
користувачу на наявність важливих інструкцій з
експлуатації і техобслуговування в супутньої виробу
літературі.
Позначення пристрою, що застосовує
лазер. Маркірування повинне
CLASS 1
LASER PRODUCT
Зберігайте посібник для користування в процесі експлуатації
пристрою.
Для правильної експлуатації даного пристрою уважно
прочитайте і збережіть керівництво для користувача.
ЯКЩО ПРИСТРІЙ ВИМАГАЄ ОБСЛУГОВУВАННЯ, ЗВЕРНІТЬСЯ ДО
ПРОДАВЦЯ АБО ПРОЧИТАЙТЕ РОЗДІЛ “УСУНЕННЯ НЕПОЛАДОК”.
знаходитися на задній панелі пристрою
та означає, що пристрій належить до
Класу 1 і використовує лазерні промені.
Можливість лазерного опромінення
відсутня без розкриття приладу.
Не використовуйте мережеві подовжувачі, які не дозволені
виробником пристрою, так як це може бути небезпечним.
Не допускайте перевантаження розеток або подовжувачів, так як це
може призвести до пожежі або ураженню електричним струмом.
Встановіть цей пристрій таким чином, щоб у випадку несправності
вилку мережевого проводу можна було негайно вийняти з розетки.
Провід мережевого адаптера не повинен бути натягнутий там, де
він виходить з пристрою; його необхідно прокладати так, щоб він не
заплутувався, не встановлюйте на нього будь-які предмети.
Для додаткового захисту пристрою під час грози, а також у тих
випадках, коли ви не збираєтесь використовувати його протягом
тривалого часу, відключіть його від розетки електромережі. Це
виключить вихід пристрою з ладу через удар блискавки або стрибки
напруги в електромережі.
Не від’єднуйте мережевий шнур при увімкненому живленні.
Для від’єднання мережевого шнуру беріться безпосередньо за
вилку, в жодному разі не тягніть за провід.
Задля уникнення ураження електричним струмом не відкривайте
корпус пристрою самостійно. Не ремонтуйте прилад і не вносьте в
нього змін. Сервісне обслуговування повинно здійснюватись тільки
кваліфікованими спеціалістами сервісних центрів.
Будьте особливо уважні, якщо прилад використовується дітьми або
людьми з обмеженими можливостями.
Зберігайте прилад у місцях, не доступних для дітей.
Не дозволяйте дітям використовувати прилад як іграшку
Встановлення пристрою
Встановлюйте пристрій у місцях з достатньою вентиляцією. Цей
пристрій не слід розміщувати у вбудованих меблях (на книжкових
полицях або стінних шафах), якщо в них не можна забезпечити
достатньої вентиляції.
При розміщенні пристрою на ліжку, дивані, софі, килимі або на інших
подібних предметах обстановки забезпечте пристрою необхідну
вентиляцію.
ЩОБ УНИКНУТИ ВЛУЧЕННЯ ПІД ЛАЗЕРНЕ ВИПРОМІНЮВАННЯ, НЕ
РОЗКРИВАЙТЕ КОРПУС. КОЛИ КОРПУС РОЗКРИТИЙ АБО ЗНЯТІ
ЗАГЛУШКИ, МОЖЕ ДІЯТИ ВИДИМЕ ЛАЗЕРНЕ ВИПРОМІНЮВАННЯ.
НЕ ДИВІТЬСЯ НА ОБ’ЄКТИВИ ЛАЗЕРНОЇ СИСТЕМИ.
УВАГА:
ВІДЕОПРОГРАВАЧ DVD ДИСКІВ Є ЛАЗЕРНИМ ПРИСТРОЄМ КЛАСУ
1. ВИКОРИСТАННЯ ОРГАНІВ КЕРУВАННЯ АБО РЕГУЛЮВАННЯ, НЕ
ЗАЗНАЧЕНИХ У ЦЬОМУ КЕРІВНИЦТВІ, ВИКОНАННЯ ПРОЦЕДУР,
ЩО У НЬОМУ НЕ ОПИСАНІ, МОЖЕ ПРИЗВЕСТИ ДО ВЛУЧЕННЯ ПІД
НЕБЕЗПЕЧНЕ ВИПРОМІНЮВАННЯ. ТОМУ ЩО ЛАЗЕРНИЙ ПРОМІНЬ,
ВИКОРИСТОВУВАНИЙ У ЦЬОМУ ВІДЕОПРОГРАВАЧІ DVD ДИСКІВ,
НЕБЕЗПЕЧНИЙ ДЛЯ ОЧЕЙ, НЕ НАМАГАЙТЕСЯ РОЗКРИТИ КОРПУС.
ОБСЛУГОВУВАННЯ ПРИСТРОЮ ПОВИННЕ ВИКОНУВАТИСЯ ТІЛЬКИ
КВАЛІФІКОВАНИМИ СПЕЦІАЛІСТАМИ СЕРВІСНОГО ЦЕНТРА.
ЗАХОДИ БЕЗПЕКИ
Підключення до джерел живлення
Цей пристрій працює від мережі змінного струму з напругою
110-240 В і частотою 50-60 Гц. Перевірте, чи відповідає напруга в
електромережі робочій напрузі пристрою.
Забороняється занурювати прилад у воду. Задля уникнення
виникнення пожежі або ураження електричним струмом не
розміщуйте цей пристрій в умовах підвищеної вологості (біля
ванн, тазів з водою, кухонних раковин, пральних машин, поряд
з плавальним басейном, в сирих підвалах і т.д.) Не допускайте
попадання на пристрій крапель або бризок. Забороняється ставити
на пристрій заповнені рідиною предмети (наприклад, вази). Задля
уникнення утворення конденсату, у випадку коли Ви переносите
плейер з більш теплого приміщення у більш холодне і навпаки, не
вмикайте прилад одразу, зачекайте приблизно близько 1 години.
Не розміщуйте пристрій поблизу джерел тепла, наприклад,
радіаторів, електрообігрівачів, духовок або інших пристроїв, що
є джерелами тепла (в тому числі й підсилювачі), а також у місцях,
що піддаються впливу прямих сонячних променів, надмірному
запиленню або механічним ударам.
Не кладіть на пристрій важкі предмети.
Не розміщайте цей пристрій на предметах меблів з коліщатами,
що не фіксуються, на нестійких підставках, триногах, кронштейнах,
столах, так як виріб може впасти і призвести до травмування
дітей, дорослих, а також до несправності самого пристрою.
Використовуйте тільки ті підставки, триноги, кронштейни, столи, які
або продаються разом з пристроєм, або рекомендовані виробником
пристрою. Під час установки пристрою на підставці дотримуйтесь
інструкції виробника, застосовуйте тільки кріпильні вироби, які
рекомендуються виробником. Підставку з встановленим на ній
пристроєм слід переміщати вкрай обережно. При різкій зупинці,
ривках або при переміщенні підставки по нерівній поверхні цілком
ймовірно перекидання підставки і падіння пристрою.
Сторонні предмети
Не допускайте попадання будь-яких сторонніх предметів через
отвори в корпусі пристрою, це може спричинити займання
пристрою і ураження електричним струмом. Якщо це сталось,
від’єднайте пристрій від мережі і для подальшого його використання
зверніться до кваліфікованих спеціалістів.
Пошкодження, що потребують ремонту
В описаних нижче ситуаціях необхідно вимкнути пристрій з розетки і
звернутися до кваліфікованого персоналу для ремонту пристрою:
a) Пошкодження мережевого шнуру або вилки
b) У пристрій попали сторонні предмети.
c) Пристрій попав під дощ або на нього розлили воду.
d) Помітні явні зміни в роботі пристрою
22
4110IM.indd 224110IM.indd 22 20.10.2009 11:08:0820.10.2009 11:08:08
Page 23

УКРАЇНЬСКИЙ
e) Пристрій впав або був пошкоджений будь-яким іншим чином.
Догляд за пристроєм
Перед чищенням вимкніть пристрій з розетки. Для чищення
пристрою використовуйте вологу м’яку тканину. Забороняється
використовувати для цих цілей рідкі або аерозольні чистильні
засоби
Догляд за дисками
Не використовуйте тріснуті або деформовані диски, це може
викликати поломку пристрою.
Беріть диск тільки за краї. Вставляйте диск написом догори. Не
торкайтесь до робочої поверхні диска. Пил, подряпини або відбитки
пальців на робочій поверхні диска можуть призвести до виходу його
з ладу.
Не піддавайте диски впливу прямих сонячних променів, джерел
тепла, високої температури і вологості.
Після використання приберіть диск у футляр на зберігання
Періодично протирайте робочу поверхню диска м’якою тканиною
від центру к країв. Не користуйтесь звичайними мийними засобами
Використання батарейок
Протікання батарейок може стати причиною травм або
пошкодження пульта дистанційного керування. Щоб уникнути
пошкодження батарейок, дотримуйтесь наведених нижче інструкцій:
- Встановлюйте батарейки правильно, дотримуючись полярності
відповідно до позначень на пристрої.
- Не використовуйте разом різні батарейки (старі та нові, різних
типів і т.п.).
- Виймайте батареї, якщо пристрій не буде використовуватись
протягом тривалого часу.
Заходи щодо дбайливого поводження з пристроєм
• При транспортуванні пристрою використовуйте коробку і деталі
упаковки, які були отримані вами при покупці пристрою.
• Якщо плейер працював тривалий час, то його корпус може бути
злегка нагрітим - це нормальне явище.
• Не переміщайте цей пристрій під час програвання диска. Інакше
може бути пошкоджений зчитувач і диск.
Цей плейер може програвати такі типи дисків:
Формат дисків Символи Вміст
DVD Аудіо + Відео
АС-3
МРЗ
Video-CD (VCD)
CDDA
Kodak Picture CD
MPEG4
Приладдя
До комплекту поставки входить таке приладдя:
Інструкція з експлуатації
Пульт дистанційного керування
Аудіо-відео кабель
2 батарейки, ААА 1.5V
Особливості DVD та CD дисків
DVD 5 (односторонній одношаровий)
DVD 9 (односторонній двошаровий)
DVD 10 (двосторонній одношаровий)
DVD 18 (двосторонній двошаровий)
VCD 1.0/1.1/2.0
CD із зображеннями
DVCD
CDDA
МРЗ
CD-R
CD-RW
Dolby Digital Аудіо
Аудіо
Аудіо + Відео
Аудіо
Фото
Аудіо + Відео
АВТОРСЬКІ ПРАВА
В цьому пристрої використовується технологія захисту
авторських прав, захищена патентами США та іншими правами
на інтелектуальну власність, що належать компанії Macrovision
Corporation та іншим правовласникам. Використання технології
захисту авторських прав повинно бути дозволене компанією
Macrovision Corporation і призначене тільки для домашнього
використання та інших задач з обмеженою кількістю глядачів, якщо
протилежне не дозволено компанією Macrovision Corporation.
Розбирання виробу і копіювання технології заборонені.
Виготовлено за ліцензією Dolby Laboratories. Назва “Dolby” і символ
у вигляді подвійної букви D є торговими марками компанії Dolby
Laboratories.
СЕ: Цей пристрій відповідає директиві щодо електромагнітної
сумісності та директиві для низьковольтних пристроїв.
DVD плейер Vitek - це нове покоління домашніх пристроїв, що
забезпечують програвання високоякісного зображення і звуку.
Характеристики DVD плейера значно перевершують характеристики
будь-якого існуючого раніше обладнання для програвання відео. Він
є найкращим джерелом сигналу для систем домашнього кінотеатру
і забезпечить Вам максимальне задоволення від перегляду.
• Диски, що програються: DVD-R/-RW, DVD+R/+RW, CD-R/-RW
• Підтримувані формати: DVD, MPEG4 (DivX), SVCD, VCD, CDDA,
МРЗ, WMA, Kodak Picture CD, JPEG
• Вбудовані декодери Dolby Digital AC-3
• Роз’єми для підключення: композитний (VIDEO), S-Video, компонентний (Y Cb/Pb Cr/Pr), коаксіальний (COAXIAL)
(OPTICAL), 5.1/стерео (5.1 CH AUDIO OUT), SCART.
• Роз’єм USB
• Кардридер SD, MS, MMC
• Караоке
• Екранне меню на російській та англійській мовах
, оптичний
23
4110IM.indd 234110IM.indd 23 20.10.2009 11:08:0920.10.2009 11:08:09
Page 24

УКРАЇНЬСКИЙ
Інформація про диск
Тип DVD VCD SVCD CD
ФОРМАТ ЗАПИСУ MPEG2 MPEGI MPEG II DIGIT
ОБ’ЄМ ДИСКА Односторонній,
РОЗМІР, см 12/8 12 12 12/8
ГОРИЗОНТАЛЬНЕ
РОЗШИРЕННЯ
Субтитри до 32 видів - 8 -
Мова до 8 2 4 -
ПОЗНАЧЕННЯ
DVD-диски різних виробників мають різні параметри, що позначаються наступними символами:
одношаровий 4,7 Гб - 2
години Двошаровий,
односторонній 8,5 Гб - 4
години
> 500 ліній >240 ліній >350 ліній -
Двосторонній,
одношаровий
9,4 Гб - 4,5 години
Двосторонній,
двошаровий
17 Гб - 9 годин
Регіональний код і система відеовиходу
Dolby digital surround
650М 74 хв 650M 45 хв 650M 74 хв
Кількість аудіотреків
Кількість субтитрів
Формат зображення
Обмеження перегляду
Ракурси перегляду
5.1 канал виходу звуку
Приховані субтитри
Двоканальне стерео
Обмеження
Терміни, що стосуються дисків
Заголовок
Зазвичай зображення або музика, записана на DVD-диску, ділиться на кілька частин, кожна з яких називається “заголовок”.
Епізод (фрагмент)
Мінімальний фрагмент зображення або музики на DVD-диску в межах заголовку зазвичай один заголовок складається з одного і більше
епізодів (фрагментів), які для полегшення пошуку пронумеровані. Але на деяких дисках епізоди (фрагменти) можуть бути відсутніми.
Трек
Частина зображення або музики на диску SVCD, VCD або CD. Для полегшення пошуку всі треки пронумеровані.
Сцена
Диски VCD, що підтримують функцію контролю програвання і містять динамічне і статичне зображення, діляться на частини, які називаються
сценами. Кожна сцена може бути легко знайдена за номером і може бути відображена на екрані. Одна сцена зазвичай складається з одного
або кількох треків.
24
4110IM.indd 244110IM.indd 24 20.10.2009 11:08:0920.10.2009 11:08:09
Page 25

УКРАЇНЬСКИЙ
Функція РВС (SVCD,VCD)
Під час програвання диску SVCD або VCD на екрані може бути відображено меню вмісту диска, яке називається функцією контролю
програвання або функцією РВС.
Тип диска Функції
Диски VCD, що не підтримують
функцію РВС (версія 1.1)
Диски SVCD/VCD, що
підтримують функцію РВС
(версія 2.0)
Примітки: Якщо ви записуєте диск, використовуючи ПК, то навіть якщо формат диска сумісний, бувають випадкі, коли диск не програється
через налаштування програмного забезпечення, яке використовувалось при записі диска.
Опис
Передня панель
Програвання як музики (звуку), так
і зображення.
Для відтворення зображення з VCD
може використовуватись меню, яке
відображається на екрані.
1. кнопка STANDBY/ON
2. індикатор ввімкнення
3. лоток для дисків
4. джойстик (за допомогою якого здійснюється керування плейером):
(►)– програвання (PLAY)
(║) – призупинення (PAUSE)
(▲) – відкриття/закриття лотка диска (OPEN/CLOSE)
(■) – зупинка програвання (STOP)
5. LED¬дисплей (світлодіодний дисплей)
6. місцезнаходження фотоприймача сигналів від пульта ДК
7. картрідер SD/MS/MMC
8. роз’єм для підключення USB¬носія (USB Flash Drive)
Бокова панель (права)
1. роз’єми для підключення мікрофонів
2. ручка регулювання рівня гучності мікрофонів
3. ручка регулювання рівня луни мікрофонів
Задня панель
1. Живлення
2. Роз’єми аудіовиходу 5.1СН
3. Роз’єм коаксіального аудіовиходу (Coaxial)
4. Роз’єм композитного відеовиходу (Video)
5. Роз’єми компонентного відеовиходу (Y Cb/Pb Cr/Pr)
6. Роз’єм відеовиходу S-Video
7. Роз’єм оптичного аудіовиходу (OPTICAL)
8. Роз’єм SCART
25
4110IM.indd 254110IM.indd 25 20.10.2009 11:08:0920.10.2009 11:08:09
Page 26

УКРАЇНЬСКИЙ
Пульт дистанційного керування (малюнок)
1. кнопка відкриття/закриття лотіка диска OPEN/CLOSE
2. кнопка перемикання режимів відеовиходу V. MODE
3. кнопка OSD (інформація про диск)
4. кнопка POWER
5. цифрові кнопки
6. кнопка перемикання систем кольоровості PAL/NTSC
7. кнопка скасування вводу CLEAR
8. кнопка режиму програмування PROG
9. кнопки навігації курсору(←↑→↓)
10. кнопка змінення масштабу ZOOM
11. кнопка переходу до попереднього треку PREV
12. кнопка переходу до наступного треку NEXT
13. кнопка зупинення програвання STOP
14. кнопки регулювання рівня гучності VOLUME +/-
15. кнопка перемикання типу носія DVD/USB/CARD
16. кнопка увімкнення ракурсів ANGLE
17. кнопка вимкнення звуку MUTE
18. кнопка покадрового програвання STEP
19. кнопка призупинення програвання PAUSE
20. кнопка перемотування назад F REV
21. кнопка перемотування вперед F FWD
22. кнопка уповільненого програвання SLOW
23. кнопка програвання/вводу ►
24. кнопка входу в меню налаштувань SETUP
25. кнопка повторення фрагменту A-B RPT
26. кнопка вибору режимів повторення REPEAT
27. кнопка входу в меню пошук SEARCH
28. кнопка входу в меню вмісту диску TITLE/PBC
29. кнопка вибору субтитрів SUBTITLE
30. кнопка вибору мови звукового супроводу AUDIO
31. кнопка входу в меню MENU
Встановлення елементів живлення в пульт дистанційного
керування
• Вставте батарейки у відповідний відсік пульта дистанційного
керування.
• Вийміть батарейки, якщо Ви маєте намір не використовувати
пульт тривалий час.
• Своєчасно заміняйте батарейки
26
4110IM.indd 264110IM.indd 26 20.10.2009 11:08:0920.10.2009 11:08:09
Page 27

УКРАЇНЬСКИЙ
ПІДКЛЮЧЕННЯ
Увага: Перед початком підключення DVD-плейера до іншого обладнання, переконайтесь, що електроживлення DVD-плейера та іншого
обладнання відключене.
Підключення відеошнурів
Виберіть найбільш підходящий з нижче перерахованих типів підключень виходячи з можливостей Вашого телевізора
(1) Композитний відеосигнал
Для перегляду зображень стандартної якості з’єднайте роз’єм виходу композитного відео сигналу (VIDEO) Вашого DVD-плейера з
відповідним входом телевізора або монітора, використовуючи один провід аудіо- відеокабеля (A/V) з жовтими штекерами на кінцях, що
входить до комплекту поставки
(2) Роз’єм S-Video
Для перегляду зображень покращеної якості з’єднайте роз’єм S-VIDEO Вашого DVD-плейера з відповідним вхідним роз’ємом на телевізорі
або моніторі, використовуючи кабель S-Video (до комплекту поставки не входить).
(3) Компонентний відеовихід
Для точної передачі кольору зображень високої якості підключіть роз’єми виходу компонентного відеосингалу Y Cb/Pb Cr/Pr (червоний/
синій/зелений) до вхідних роз’ємів на телевізорі або моніторі, використовуючи відповідний кабель (до комплекту поставки не входить).
(4) Роз’єм SCART
Для підключення роз’єму SCART DVD-плейера до такого ж роз’єму на телевізорі або моніторі використовується 21-контактний кабель
SCART (до комплекту поставки не входить).
Примітки:
• Одночасне підключення кількох відеовиходів може погіршити якість зображення.
• Гарне зображення можна отримати лише за правильного підключення і правильного налаштування системи.
Підключення аудіосистеми
Виберіть найбільш підходящий з нижче перерахованих типів підключень виходячи з можливостей Вашого телевізора
(1) Двоканальний аналоговий вихід
Для підключення двоканального аналогового виходу використовуйте роз’єми FR і FL 5.1 СН аналогового аудіовиходу (5.1 CH AUDIO OUT)
при цьому перемкніть режим аудіовиходу у 2-х канальний режим (див. сторінка налаштування динаміків)
(2) 5.1 СН Аналоговий аудіовихід
Для підключення п’ятиканального аудіовиходу (FL, FR, SL, SR, CENTER, SUB WOOFER) DVD-плейера до відповідного п’ятиканального входу
(5.1) посилювача потужності/ресівера використовуйте 3 пари AV кабелів.
(3) Коаксіальний цифровий аудіовихід
Для підключення роз’єму COAXIAL Вашого DVD-плейера до відповідного роз’єму на посилювачі потужності використовуйте спеціальний
коаксіальний кабель.
(4) Оптичний цифровий вихід
Для підключення роз’єму OPTICAL Вашого DVD-плейера до оптичного роз’єму на посилювачі потужності використовуйте спеціальний
волоконно-оптичний кабель.
Примітка: Параметри налаштування повинні відповідати роз’єму, через який DVD-плейер підключається до зовнішніх пристроїв.
27
4110IM.indd 274110IM.indd 27 20.10.2009 11:08:0920.10.2009 11:08:09
Page 28

УКРАЇНЬСКИЙ
НАСТРОЙКА СИСТЕМИ
1. Увімкніть телевізор і установіть у його настройках відповідний
тип вхідного сигналу
Для входу в меню налаштувань системи натисніть кнопку SETUP.
Для виходу з меню знову натисніть SETUP.
2. За допомогою кнопок навігації (←→) оберіть одну з наступних
сторінок: Загальні (налаштування), Звук, Dolby, Відео, Персональні (налаштування).
3. Натисніть кнопку (►), щоб увійти в обрану сторінку
4. За допомогою кнопок (↓↑) оберіть пункт, який ви бажаєте змінити.
5. Натисніть кнопку ► або →, щоб увійти в перелік змін налаштувань. За допомогою кнопок навігації (↓↑) оберіть потрібне значення, натисніть ► або ←, щоб підтвердити введене значення і
повернутись до списку налаштувань.
Для повернення до сторінок налаштувань натисніть (←)
Увага: Деякі пункти меню, які відповідають встановленим раніше
режимам, помічені сірим і не можуть бути обрані.
Введені установки зберігаються і після вимкнення живлення.
Загальні налаштування
ЕКРАН
Стандартний/PS: Коли DVD-плейер підключений до звичайного
телевізора, широкоекранне зображення відтворюється на весь
екран, але його частина обрізується (4:3).
Стандартний /LB: Коли DVD-плейер підключений до звичайного
телевізора, широкоекранне зображення відтворюється таким
чином, що згори та знизу з’являються чорні смуги (4:3).
Широкий (Wide): Використовуйте цей пункт, якщо домашній
кінотеатр підключений до широкоекранного телевізора (16:9).
Мова меню
Вибір мови екранного меню.
РАКУРС
Деякі фільми на DVD дисках можуть бути записані під різними
ракурсами. Більш детальну інформацію про таку можливість можна
отримати з анотації до Вашого DVD диску.
Якщо режим включений, при відтворенні DVD диска, записаного
під різними ракурсами, на екрані відображається символ камери.
СУБТИТРИ
Ця функція не працює, якщо диск не має субтитрів. Якщо функція
субтитрів вимкнена, натисніть кнопку
вимкнена, натисніть кнопку SUBTITLE на пульті дистанційного
керування для увімкнення функції.
ЗАСТАВКА ЕКРАНУ
Якщо функція увімкнена, плейер увімкнено, і диск не програється
протягом декількох хвилин, то на екрані з’являється рухома заставка
і через деякий час плейер переходить у режим очікування.
HDCD
Ви можете вибрати частоту дискретизації 44.1 К, 88.2 К або ВЫКЛ.
Чим вище частота дискретизації, тим вище якість звуку.
ЗАПАМ’ЯТАТИ ОСТАННЄ НАЛАШТУВАННЯ
Якщо ця функція увімкнена, плейер запам’ятовує момент часу
діставання диску, і під час наступного завантаження того ж диску
відтворення починається з моменту діставання диску.
Налаштування звуку
• НАЛАШТУВАННЯ КОЛОНОК
Смешивание
Передние колонки
Центральные колонки
Задние колонки
Сабвуфер
Установить смешивание
лев./прав.
больш.
больш.
больш.
вкл.
лев./прав.
Стерео
5.1 СН
- Змішування
Лів/ Прав: оригінальний звук формату 5.1 CH передається лише
по лівому та правому каналу.
Стерео: оригінальний звук формату 5.1 CH передається в ре-
жимі стерео.
Якщо акустична система вмикає тільки передні колонки і сабву-
фер, то для активації сабвуфера необхідно встановити пункти
меню наступним чином:
в пункті меню “Передние колонки” встановити значення “мален.”
(маленькі), а в пункті “Сабвуфер” встановити значення “вкл.”.
Смешивание
Передние колонки
Центральные колонки
Задние колонки
Сабвуфер
Настройка передних колонок
Стерео
мален.
больш.
больш.
вкл.
больш.
мален.
5.1 СН: передача оригінального звуку у форматі 5.1 CH
- ПЕРЕДНІ КОЛОНКИ, ЦЕНТРАЛЬНІ КОЛОНКИ, ЗАДНІ КОЛОНКИ,
САБВУФЕР
Якщо ваша акустична система включає передні, центральні,
задні колонки, сабвуфер, то Ви можете встановити пункти меню
відповідно до реальної конфігурації. Функція не працює, якщо
увімкнена функція мікшування (Лів/Прав, Стерео).
• НАЛАШТУВАННЯ SPDIF
SPDIF/вимк: звук подається через вихід пристрою лише в
аналоговому вигляді (5.1 CH AUDIO OUT).
SPDIF/RAW: цифровий вихідний сигнал в оригінальному форматі,
записаному на диску. SPDIF/PCM: цифровий вихідний сигнал у
декодованому РСМ форматі.
Налаштування Dolby Digital
ПОДВІЙНЕ МОНО
Якщо у Вашого підсилювача/декодера є вихід Dolby Digital, Ви
можете вибрати : стерео, лів-моно, прав-моно, зміш. моно
ДИНАМІЧНИЙ ДІАПАЗОН
При перегляді програм з великим динамічним діапазоном звуку
вибір цього режиму дозволить Вам уникнути різких змін рівня
гучності до оптимального значення і в той же час зберегти якість і
деталі звукового супроводу. Це дозволить Вам не турбувати інших
членів сім’ї (наприклад, в нічній час) і зберегти достатньо високу
якість звуку.
Налаштування відео
28
4110IM.indd 284110IM.indd 28 20.10.2009 11:08:0920.10.2009 11:08:09
Page 29

УКРАЇНЬСКИЙ
• ТВ РЕЖИМ
CVBS: встановлення композитного відеосигналу.
YUV: оберіть цей режим при підключенні через роз’єм Y Cb/Pb Cr/Pr
компонентному роз’єму.
RGB: оберіть цей режим при підключенні через роз’єм SCART.
• Развертка Якщо Ваш телевізор підтримує режим прогресивного
розгортання, Ви можете увімкнути або вимкнути прогресивне
розгортання, якщо вибрано режим YUV
• РІЗКІСТЬ, ЯСКРАВІСТЬ, КОНТРАСТНІСТЬ Ви можете встановити
бажаний рівень відповідно до Ваших вподобань.
Персональні налаштування
Встановлюються до початку перегляду
ТВ система
Ваш плейер підходить для всіх різновидів телевізійних систем. Ви
можете вибрати PAL, NTSC або Авто
ЗВУК (Вибір мови звукового супроводу), СУБТИТРИ, МЕНЮ ДИСКА
Ці параметри можуть вже бути встановлені відповідно до Ваших
побажань. Якщо встановлені Вами параметри підтримуються
змістом диску, то відтворення буде проходити з розрахунком на
Ваші налаштування. Інакше, будуть використовуватись установки
диска, задані за умовчанням.
ОБМЕЖЕННЯ ПЕРЕГЛЯДУ ЗА ВІКОМ
Ця функція призначена для контролю батьками змісту дисків при
їхньому відтворенні і захищає Ваших дітей від перегляду небажаних
сцен. Диск, рівень якого вище, ніж встановлений за допомогою
даної функції, не буде відтворюватись.
Примітка : При зміні даного пункту Вам необхідно ввести пароль
(пароль за умовчанням - 136900)
Пароль
Тут Ви можете змінювати пароль. Оберіть ПАРОЛЬ => ЗМІНИТИ =>
►, у вікні, що з’явилось, спочатку введіть старий пароль (або пароль
за умовчанням - 136900), потім введіть новий пароль, и ще раз
введіть новий пароль. Натисніть кнопку ► для збереження нового
паролю.
за умовчанням
Скидання - повернення до заводських налаштувань.
Основні функції
Примітки: Символ
кнопки, означає, що вибрана функція недоступна для даного
диску
POWER (ВВІМКНЕННЯ ЖИВЛЕННЯ)
• Натисніть кнопку STANDBY/ON на передній панелі плейера панелі або кнопку POWER на пульті дистанційного керування, щоб
увімкнути живлення плейера.
• Використовуйте кнопку POWER на пульті дистанційного керування, щоб перейти до режиму очікування.
OPEN/CLOSE (ВІДКРИТИ/ЗАКРИТИ ЛОТОК ДИСКУ)
• Натисніть кнопку OPEN/CLOSE передньої панелі плейера панелі
або кнопку
відкриється. Встановіть диск у лоток робочою поверхнею донизу
(етикеткою вгору). Натисніть кнопку OPEN/CLOSE ще раз, щоб
закрити лоток і плейер автоматично почне відтворення. Функція
автоматичного програвання підтримується не для всіх дисків.
VOLUME (РЕГУЛЮВАННЯ РІВНЯ ГУЧНОСТІ)
• Використовуйте кнопки VOLUME +/- для збільшення або зменшення рівня гучності звуку.
MUTE (ВИМКНЕННЯ ЗВУКУ)
• Для вимкнення звуку натисніть кнопку MUTE. Для ввімкнення
звуку натисніть кнопку MUTE ще раз або використайте кнопки
регулювання гучності.
PLAY (ПРОГРАВАННЯ)
• Натисніть кнопку ► на пульті дистанційного керування або на
передній панелі плейера, щоб розпочати відтворення.
PAUSE (ПРИЗУПИНЕННЯ ПРОГРАВАННЯ)
Для призупинення програвання натисніть кнопку PAUSE на пульті
, що з’являється на екрані при натисканні
на пульті дистанційного керування, лоток диску
дистанційного керування або на передній панелі плейера. Для
повернення до нормального відтворення натисніть кнопку ►.
STOP (ЗУПИНКА ВІДТВОРЕННЯ)
• При відтворенні DVD, SVCD, VCD, CD дисків, натисніть STOP
один раз - плеєр запам’ятає точку зупинки. Натисніть кнопку ►
на пульті дистанційного керування або на передній панелі плейера для продовження. Для повної зупинки відтворення натисніть
STOP другий раз.
F.REV ◄◄ и F.FWD ►► (ПЕРЕМОТКА НАЗАД/ ВПЕРЕД)
• Натисніть кнопку F.FWD ►► для прискореної перемотки вперед
• Натисніть кнопку F.REV ◄◄ для прискореної перемотки назад
Для збільшення швидкості перемотування натискайте відповідну
кнопку кілька разів.
PREV I◄◄/ NEXT ►►I (ПЕРЕХІД ДО ПОПЕРЕДНЬОГО/
НАСТУПНОГО ТРЕКУ)
• При відтворенні DVD дисків натисніть кнопку PREV (I◄◄) на
панелі або на пульті ДУ для переходу до попереднього епізоду
(фрагменту).
• При відтворенні SVCD, VCD, CD дисків натисніть кнопку PREV
(I◄◄) для переходу до попереднього треку.
• При програванні DVD дисків натисніть кнопку NEXT (►►I) на панелі
або на пульті ДУ для переходу до наступного епізоду (фрагменту).
• При відтворенні SVCD, VCD, CD дисків, натисніть кнопку NEXT
(►►I) для переходу до наступного треку.
DVD/USB/CARD (Вибір носія)
Пристрій підтримує такі типи карт пам’яті:
MS CARD: MEMORY STICK CARD
SD CARD: SD MEMORY CARD
MMC CARD: MULTI MEDIA CARD
• Ввімкніть плейер
• Вставте карту пам’яті (SD, MS, MMC)
• Використовуйте кнопку “DVD/USB/CARD” для перемикання DVD
в режим зчитування карти пам’яті абоUSB. (Якщо ви підключили
до DVD різні зовнішні пристрої пам’яті, використовуйте кнопку
“DVD/USB/CARD” для вибору між ними).
Якщо завантаження відбулось успішно, меню навігації відобра-
зиться автоматично. За допомогою кнопок навігації (↑↓) виберіть
потрібну папку, потім натисніть кнопку ► для підтвердження.
В папках за допомогою кнопок (↑↓) виберіть потрібний файл,
потім натисніть кнопку ► для програвання. На цій сторінці використовуйте кнопку ← для повернення до попереднього меню, а
кнопки (←→) для переходу до попередньої або наступної сторінки.
• При програванні диска пристрій одразу зупиниться.
• Коли працює диск і одноразово завантажена карта пам’яті або
USB¬пристрій програвання диска має пріоритет. В цьому випадку використовуйте кнопку “DVD/USB/CARD” для вибору відповідного носія.
• Коли пристрій зупинено, ви можете вилучити зовнішній пристрій
(карту пам’яті або USB¬носій).
• Спочатку DVD¬плейер завантажить диск. Натисніть кнопку “DVD/
USB/CARD” для вибору іншого режиму.
• Коли зчитується карта пам’яті, відображення режиму не відбувається. Ви можете натиснути кнопку “DVD/USB/CARD” для перемикання в DVD¬режим.
Примітка
1. Виробник не гарантує підтримку всіх наявних на ринку
USB¬пристроїв з інтерфейсом 1.1 і 2.0.
2. DVD¬плейер тестувався на сумісність з найбільш поширеними
параметрами запису мультимедійних файлів. Однак, внаслідок
великої кількості існуючих, а також нових параметрів і специфікацій, що використовуються при створенні мультимедійних файлів,
можливо, що деякі з них не будуть програватися пристроєм або
будуть програватись некоректно.
PROG (ПРОГРАМУВАННЯ)
• Якщо диск містить два і більше треки, епізоди (фрагменти) або
заголовки, то за допомогою цієї кнопки Ви можете задати порядок відтворення.
• Для входу у режим програмування натисніть кнопку PROG, на
екрані з’явиться меню програмування. Натисніть цифрові кнопки
для задавання номеру треку, епізоду (фрагменту) або заголовку.
Для введення треку із номером 10 і вище використовуйте кнопку
10+. (Наприклад, для введення номеру 26 натисніть наступну
послідовність кнопок: 10+, 10+, 6) Якщо записів більше ніж 10,
натисніть NEXT ►► I для продовження таблиці програмування
(максимально можливо 20 записів). Викориcтовуйте кнопки
29
4110IM.indd 294110IM.indd 29 20.10.2009 11:08:0920.10.2009 11:08:09
Page 30

УКРАЇНЬСКИЙ
курсора (↓→←↑) для його переміщення. По закінченню програмування за допомогою кнопок навігації курсору оберіть пункт «почати» і
натисніть кнопку ► для відтворення запрограмованої послідовності.
• Для МРЗ, DiV X, MPEG 4 дисків програмування неможливе! Натисніть кнопку PROG один раз для відкриття переліку файлів. Використовуючи кнопки навігації курсору, Ви можете обрати бажаний файл для відтворення.
TITLE/PBC (ЗАГОЛОВКИ/КОНТРОЛЬ ПРОГРАВАННЯ) і MENU (МЕНЮ)
Кнопки TITLE/PBC і MENU використовуються для відображення вмісту диска.
Якщо диск має кілька заголовків (фільмів), для відображення переліку заголовків натисніть кнопку TITLE/PBC. Для відображення вмісту
заголовку натисніть кнопку MENU.
Якщо диск містить один заголовок, натисніть кнопку MENU.
При програванні SVCD, VCD2.0 дисків, натисніть кнопку TITLE/PBC, з’явиться меню диска. У цьому режимі Ви можете обрати номер тре-
ку, натиснувши на відповідну цифрову кнопку. VCD1.1, CDDA та МРЗ не мають РВС меню.
SUBTITLE (ВИБІР СУБТИТРІВ)
• При відтворенні DVD із субтитрами натисніть кнопку SUBTTITLE, щоб обрати мову субтитрів.
ANGLE (Ракурс)
• При відтворенні DVD із більше ніж одним кутом огляду натисніть на кнопку ANGLE для вибору потрібного кута.
STEP (ПОКАДРОВЕ ВІДТВОРЕННЯ)
• Для покадрового програвання DVD, SVCD, VCD дисків натисніть кнопку STEP. Для відновлення відтворення натисніть кнопку на пульті
дистанційного керування або на передній панелі плейера.
REPEAT (ПОВТОР)
• Натисніть кнопку REPEAT для повторного відтворення треку, епізоду (фрагменту), заголовку або всього диску.
А-В RPT (ПОВТОР ФРАГМЕНТУ А-В)
• Під час програвання диску Ви можете задати фрагмент А-В для повторення.
• Натисніть кнопку А-В RPT для встановлення початкової точки (А).
• Натиснiть кнопку А-В RPT для встанoвлення кінцевої точки (В). Почнеться повтор обраного фрагменту.
• Натиснiть кнопку А-В RPT в третій раз для відміни повтору і повернення до звичайного відтворення.
ZOOM (ЗМІНА МАСШТАБУ)
• Для зміни масштабу натисніть кнопку ZOOM. При збільшеному зображенні використовуйте кнопки (↑←→↓) для його переміщення по
екрану.
AUDIO (ВИБІР МОВИ ЗВУКОВОГО СУПРОВОДУ)
• При відтворенні DVD з декількома мовами аудіо, натисніть кнопку AUDIO для вибору потрібної мови.
SEARCH (ПОШУК)
• В режимі програвання натисніть кнопку SEARCH (ПОШУК) один раз, на екрані відобразиться рядок пошуку. Використовуючи цифрові
кнопки, виберіть бажаний фрагмент на диску.
OSD (ІНФОРМАЦІЯ ПРО ДИСК)
• Натисніть кнопку OSD, на екрані з’явиться інформація про поточний стан диска.
SETUP (МЕНЮ НАСТРОЙКИ СИСТЕМИ)
• Натисніть кнопку SETUP, на екрані з’явиться меню налаштувань системи.
V-MODE (ПЕРЕМИКАННЯ РЕЖИМІВ ВІДЕОВИХОДУ)
• Натисніть кнопку V-MODE для вибору режиму відео виходу (CVBS, YUV, YUV-PSCAN, RGB і т.д.)
ЦИФРОВІ КНОПКИ (1-9, 0, 10+)
• При відтворенні VCD 1.1, CD дисків, після завантаження диску для вибору треку і глави використовуйте цифрові кнопки. Кнопки з цифрами потрібні при увімкнених функціях PROGRAM і MENU.
• Для вибору треків із номером 10 або вище використовуйте кнопку 10+ і цифру, яка відповідає треку.
PAL/NTSC (ВИБІР СИСТЕМИ КОЛЬОРОВОСТІ)
• Натисніть на цю кнопку для вибору системи кольоровості: PAL, NTSC, MULTI.
CLEAR (ВІДМІНА ВВЕДЕННЯ)
• Натиснiть цю кнопку, щоб відмінити введення номеру.
SLOW (УПОВІЛЬНЕНЕ ВІДТВОРЕННЯ)
Для уповільненого відтворення натисніть кнопку SLOW на пульті дистанційного керування
Інші функції
Караоке
Караоке диск - це диск у форматі DVD, VCD, на якому записана музика і субтитри, які показують користувачеві у який момент потрібно почи-
нати співати той чи інший фрагмент пісні. Для співу необхідно використовувати мікрофон (не входить до стандартної комплектації).
• Підключіть мікрофон у роз’єм, розташований на боковій панелі Вашого DVD плейера.
• Встановіть рівень гучності мікрофону за допомогою регулятора, розташованого на боковій панелі плейера.
• Встановіть потрібний рівень луни мікрофону за допомогою регулятора, розташованого на боковій панелі приладу.
• Вставте караоке-диск в DVD-плейер, програвання почнеться автоматично.
• Для запобігання самозбудженню мікрофону:
– не розташовуйте мікрофон в безпосередній близькості від телевізора або гучномовця;
– зменште гучність телевізора або підсилювача;
– зменште гучність мікрофону.
Програвання МРЗ/CD дисків
• Для переміщення по списку папок/файлів використовуйте кнопки (↓↑), для відкриття/закриття папки – кнопку (►), для програвання
файлу натисніть кнопку (►).
Перегляд малюнків і фотографій на CD
• Після завантаження диску із зображеннями на екрані з’явиться перелік файлів. Для перегляду файлів за переліком використовуйте
кнопки (↓↑) і ►. Обране зображення з’явиться на всьому екрані Вашого телевізора.
Кнопки, які використовуються при перегляді зображень:
ZOOM – увімкнення режиму зміни масштабу.
F.FWD (►►) F.REV (◄◄) - зміна масштабу зображення
(↓↑→←) – переміщення збільшеного зображення
Якщо функція ZOOM вимкнена, то за допомогою кнопок (↓↑→←) можна здійснити поворот зображення.
30
4110IM.indd 304110IM.indd 30 20.10.2009 11:08:0920.10.2009 11:08:09
Page 31

УКРАЇНЬСКИЙ
Пошук і усунення несправностей
Ознака несправності Причина несправності Дії для усунення несправності
Немає електроживлення Шнур живлення не увімкнено у рoзетку. Увімкніть шнур живлення у рoзетку.
Немає зображення Невірний вибір джерела входу у настройках
телевізора
Настройка не відповідає реальному підключенню Оберіть настройку відповідно до реального підключення
Оберіть підходяще налаштування відповідно до
підключення плейера.
Роз’єм відеокабеля вставлений у гніздо
недостатньо щільно.
немає звуку Роз’єм аудіокабеля вставлений у гніздо
Спотворення звуку Рівень гучності звуку занадто високий Зменшіть рівень гучності звуку
Нестабільне зображення Невірна настройка телевізора. Скорегуйте настройки телевізора
Диски не читаються Диск не вставлений. Вставте диск.
Мікрофон не працює Мікрофон не підключений. Підключіть мікрофон.
Не працює пульт
дистанційного керування
Деякі функції системи не
працюють
Технічні характеристики
Живлення 110-240 В, 50/60 Гц
Споживна потужність 12 Вт
Розміри 362x220x41 мм
Вага 1540 г
Робоча температура від 5°С до 35 °С
Робоча вологість від 5% до 90%
Система кольоровості NTSС / PAL
Формат даних Відтворення форматів: DVD, DVCD, SVCD, VCD, CDDA, МРЗ, WMA, HDCD, JPEG, KODAK
Тип носія DVD, DVD-R/-RW/+R/+RW, CD-R/-RW
Цифроаналоговий реформатор 192 кГц / 24-біт
Відеовихід 1Vp-p (75 Ом)
Вихід S-Video: Y: 1Vp-p (75 Ом) С: 0,286Vp-p (75 Ом)
Аудіовихід 2.0 Vt 5.1 Channel
Цифровий вихід аудіосигналу 0,5Vp-p (75 Ом)
Роз’єми CVBS, S-VIDEO, Y Cb/Pb, Cr/Pr, SCART
Частотний діапазон CD: 20Гц-20кГц (EIAJ), DVD: 20Гц-44кГц (96кГц ИКМ), 20Гц-22кГц (48кГц ИКМ)
Рівень шуму ~-80дБ
Коефіцієнт спотворень <0,01%
Динамічний діапазон ~80дБ
Дистанційне керування
Передавач Інфрачервоне випромінювання
Джерело живлення 2 елементи живлення ААА
Виробник зберігає за собою право змінювати дизайн і технічні характеристики приладу без попереднього повідомлення.
недостатньо щільно.
Приєднані пристрої не ввімкненні Увімкніть живлення приєднаних пристроїв.
Невірна настройка звуку. Оберіть відповідну настройку.
Диск вставлений не вірно. Перевірте правильність встановлення диску (етикеткою
Конденсат всередині плейера. Залишіть DVD-плейер без диску на одну годину
Низький рівень гучності звуку мікрофона. Відрегулюйте рівень гучності звуку мікрофона.
Пульт не спрямовано на плейер Спрямуйте пульт на плейер
Відстань від пульту дистанційного керування до
плейеру перевищує 8 метрів.
Розряджені батарейки пульту дистанційного
керування
Натиснута невірна послідовність кнопок. Повторіть операцію ще раз відповідно до інструкції.
PICTURE CD. Відтворення цифрового відео, стисненого у форматі MPEG4 (DivX)
Перевірте підключення відеокабеля
Перевірте підключення аудіокабеля.
вгору)
увімкненим.
Скоротіть відстань до плейера
Замініть обидві батарейки
Утилізація електронного і електричного обладнання (Застосовується у країнах Євросоюзу та інших країнах Європи, в яких існує
система розділення відходів)
Цей символ означає, що електричне і електронне обладнання повинно утилізуватись після закінчення терміну служіння окремо
від іншого побутового сміття. Правильна утилізація старого обладнання може запобігти шкідливому впливу на навколишнє
середовище.
Строк служби приладу 5 років.
Гарантія
Докладні умови гарантії можна отримати в дилера, що продав дану апаратуру. При пред’явленні будь-якої претензії протягом терміну дії
даної гарантії варто пред’явити чек або квитанцію про покупку.
Даний виріб відповідає вимогам до електромагнітної сумісності, що пред’являються директивою 89/336/ЄЕС Ради Європи й
розпорядженням 23/73 ЄЕС по низьковольтних апаратурах.
31
4110IM.indd 314110IM.indd 31 20.10.2009 11:08:0920.10.2009 11:08:09
Page 32

ҚАЗАҚ
Пайдалану нұсқау
DVD плеер
Модель VT-4110
Ойнатқышты қосудың, пайдаланудың жəне баптаудың алдында осы
нұсқаулықта мазмұндалған нұсқаулармен жете танысып шығыңыз.
Нұсқаулықты пайдалану кезінде қолдану үшін сақтап қойыңыз.
CAUTION
Risk of electric shock
DO NOT OPEN
САҚТАНДЫРЛЫҚ: Жану тəуекелдің төмендету ұшін немесе
электр ток ұрмау ұшін, қондырғыштың панелін шешпеңіз.
Сервис күту ұшін назар аударыңыз тек қана квалифицирылған
Найзағай белгісі тең жақ бұрыш ішінде қолданушыға
қүралдың ішінде қауыпты қүш салу бар екенін көрсетеді, ол
электр ток ұруға зейіндіекенін береді.
Леп белгісі тең жақ бұрыш ішінде қолданушыға қүралдың
ішінде маңызды колдану нұсқау жəне техникалық күту
əдибет шығармада бар екенін көрсетеді.
CLASS 1
LASER PRODUCT
ӨЗІҢІЗДІ ҚОРҒАҢЫЗ!
Төменге модельді жəне аспаптың сериялық нөмірін жазып қойыңыз,
əзірше олар жеңіл көрінгенше. Осы нөмірлер аспап корпустың артқы
жанында көрсетілген. Осы хабарды келешекте пайдалануыңызға сақтап
қойыңыз.
DVD ДИСКТАРДЫҢ БЕЙНЕПЛЕЕРІ 1 КЛАСС ЛАЗЕР ЖАБДЫҒЫСЫ
БОЛАДЫ.
БАСҚАРАУ НЕМЕСЕ РЕТТЕУ ОРГАНДАРДЫ ПАЙДАЛАНУЫ, ОСЫ
НҰСҚАУДА ЖАЗЫЛМАҒАН, ПРОЦЕДУРАЛАРДЫ ЖАСАУЫ, ОСЫ
НҰСҚАУДА КӨРСЕТІЛМЕГЕН, ҚАУІПТІ САУЛЕЛЕНУДІҢ АСТЫНА
ТҮСУ МҮМКІНДІГІНЕ КЕЛТІРЕДІ.
СЕБЕБІ ОСЫ ЛАЗЕР НҰРЫ, ОСЫ DVD ДИСКТАРДЫҢ
БЕЙНЕПЛЕЕРДЕ ПАЙДАЛАНАТЫН КӨЗДЕР ҰШІН ҚАУІПТІ,
КОРПУСТЫ АШУҒА ТЫРЫСПАҢЫЗ. ЖАБДЫҚТЫҢ КҮТУІН ТЕК ҚАНА
СЕРВИС ОРТАЛЫҚТЫҢ КВАЛИФИКАЦИЯЛЫҚ ҚЫЗМЕТШІЛЕРМЕН
ЖАСАЛҒАН БОЛУ КЕРЕК.
Ескерту: статикалық электр немесе басқа жəйттар аспап жұмысында
іркілістерге алып келуі мүмкін. Бұл жағдайда қорек сымын розеткадан
шығарыңыз, содан кейін қайта салыңыз. Аспап қайта жүктеледі. Егер
проблема шешілмесе, сервис орталығына хабарласыңыз.
ҚАУІПСІЗДІК ШАРАЛАРЫ
Қореқтендіру көздеріне қосу
Берілген құрылғы кернеуі 110-240 В жəне жиілігі 50-60 Гц айнымалы
тоқ желісінен жұмыс істейді. Электр желісіндегі кернеудің құрылғының
жұмыс істеу кернеуіне сəйкес келуін тексеріңіз
Аспапты суға салуға тыйым салынады. Өрттің пайда болуын немесе
электр тоғы соққысын болдырмау үшін бұл құрылғыны жоғары
ылғалды жерлерде орналастырмаңыз (жуынатын бөлмелердің, суы
бар шылапшындардың, асханалық бақалшақтардың, кір жуатын
машиналардың, жүзу хауыздарының қасында, дымқыл жертөлелерде
жəне т.с.с.) Құрылғыға тамшылардың немесе шашырандылардың
тиюін болдырмаңыз. Құрылғыға сұйықтармен толтырылған заттарды
(мысалы, құмыраларды) қоюға тыйым салынады. Сіз плеерді
анағұрлым жылы бөлмеден анағұрлым суыққа тасығанда жəне
керісінше жағдайда, конденсаттың пайда болуын болдырмау үшін
аспапты бірден қоспаңыз, 1 сағаттай күте тұрыңыз.
Шығарушымен рұқсат етілмеген желілік ұзартқыштарды
пайдаланбаңыз, себебі бұл қауіпті болуы мүмкін.
Розеткалар мен ұзартқыштарды шамадан тыс жүктемеңіз, себебі бұл
өртке немесе электр тоғымен зақымдануға соқтыруы мүмкін.
қызметшілерге.
Қондырғыштың белгісі лазер қолданатың.
Маркировкасы артқы панельде болуы
керек, оол белгілейді, қондырғыш 1 Классқа
жатады, жəне лазер нұрларың қолданады.
Лазер нұрлаулық мүмкіндігі жоқ егер қүралды
ашпаса.
Бұзылу жағдайында желілік баудың айыр тетігін розеткадан тез арада
ажыратуға мүмкін болатындай етіп бұл құрылғыны орналастырыңыз.
Желілік баудың бауы құрылғыдан шығатын жерінде керілмеуі керек,
оны шатаспайтындай етіп салу керек, оған қандай да бір заттарды
орналастырмаңыз.
Құрылғыны найзағай уақытында, сонымен қатар Сіз оны ұзақ уақыт
бойы пайдаланбайтын жағдайларда қосымша қорғау үшін, оны
электрқорегі розеткасынан ажыратыңыз. Бұл найзағай ұрғанда
немесе электр желісіндегі секірулерден құрылғының істен шығуын
болдырмайды.
Қореқтендіру қосулы кезде желілік бауды ажыратпаңыз.
Желілік бауды ажырату үшін тікелей айыр тетіктен ұстаңыз, ешбір
жағдайда баудан тартпаңыз.
Электр тоғы соққысын болдырмау үшін құрылғы қорабын өз бетіңізбен
ашпаңыз. Аспапты жөндемеңіз жəне оған өзгертулер енгізбеңіз.
Қызмет көрсету орталықтарының білікті мамандары ғана сервистік
қызмет көрсетуді жүзеге асыруы керек.
Егер аспапты балалар немесе мүмкіндіктері шектеулі адамдар
пайдаланса аса назар болыңыз.
Аспапты балалардың қолы жетпейтін жерде сақтаңыз.
Балаларға аспапты ойыншық ретінде пайдалануға рұқсат етпеңіз.
Құрылғыны орнату
Құрылғыны желдетісі жеткілікті жерде орналастырыңыз. Бұл
құрылғыны кірістірілген жиһазда (кітап сөрелерінде немесе қабырға
шкафында), егер онда жеткілікті желдетіс қамтамасыз етілмесе,
орналастырмаған жөн.
Құрылғыны кереуетте, диванда, софада, кілемде немесе басқа ұқсас
жасау заттарында орналастырғанда құрылғыға қажетті желдетісті
қамтамасыз етіңіз.
Құрылғыны жылу көздерінің, мысалы, радиаторлардың, электр
жылытқыштардың, духовкалардың жəне жылу көзі болып табылатын
басқа құрылғылардың (оның ішінде зорайтқыштардың) қасында,
сонымен қатар тікелей күн сəулелерінің əсеріне, шамадан тыс
шаңдануға немесе механикалық соққыларға ұшырайтын жерлерде
орналастырмаңыз.
Құрылғыға ауыр заттарды қоймаңыз.
Бұл құрылғыны бекітілмейтін дөңглекшелері бар жиһаз
бұйымдарында, тұрақсыз тіреуіштерде, үшаяқтарда, кронштейндерде,
үстелдерде орналастырмаңыз, себебі бұйым құлап балалардың,
ересектердің жарақаттануына, сонымен қатар құрылғының
бұзылуына əкелуі мүмкін. Құрылғымен бірге сатылатын, не құрылғы
шығарушымен ұсынылған тіреуіштерді, үшаяқтарды, кронштейндерді,
үстелдерді ғана пайдаланыңыз. Құрылғыны тіреуішке орнатқанда
шығарушы нұсқаулықтарын ұстаныңыз, жасаушы ұсынған бекіткіш
бұйымдарды ғана қолданыңыз. Құрылғы орнатылған тіреуішті аса
абайлықпен орын ауыстырған жөн. Кенет тоқтау, жұлқыныс кезінде
немесе тіреуішті жазық емес бет бойынша орын ауыстырған кезде
тіреуіштің төңкерілуі жəне құрылғының құлауы өте мүмкін.
Бөтен заттар
Құрылғы қорабындағы саңылаулар арқылы қандай да бір бөтен
заттардың түсуіне жол бермеңіз, бұл құрылғының өртенуіне жəне
электр тоғымен зақымдануға əкелуі мүмкін. Егер солай болған
жағдайда, құрылғыны желіден ажыратыңыз жəне келешекте оны
пайдалану үшін білікті мамандарға хабарласыңыз.
Жөндеуді қажет ететін бұзылулар
Төменде сипатталған жағдайларда құрылғыны розеткадан ажырату
жəне құрылғыны жөндеу үшін білікті қызмет көрсетушілерге хабарласу
қажет:
a) Желілік баудың немесе айыр тетіктің бұзылуы
b) Құрылғыға бөтен заттар түсуі.
c) Құрылғының жаңбырдың астына түсуі немесе оған су төгілуі.
d) Құрылғы жұмысында айқын өзгерістер байқалуы
e) Құрылғы құлауы немесе қандай да бір басқа жолмен бұзылуы.
32
4110IM.indd 324110IM.indd 32 20.10.2009 11:08:0920.10.2009 11:08:09
Page 33

ҚАЗАҚ
Құрылғының күтімі
Тазарту алдында құрылғыны розеткадан ажыратыңыз. Құрылғыны
тазалау үшін жұмсақ дымқыл шүберекті пайдаланыңыз. Бұл
мақсаттарға сұйық немесе аэрозолды тазартқыш заттарды
пайдалануға тыйым салынады.
Дискілер күтімі
Шытынаған немесе деформацияланған дискілерді пайдаланбаңыз,
бұл құрылғының бұзылуына əкелуі мүмкін.
Дискілерді тек шеттерінен ұстаңыз. Дискіні жазуын жоғары қаратып
салыңыз. Дискінің жұмыс бетіндегі шаң, сызат немесе саусақ іздері
оның істен шығуына əкелуі мүмкін.
Дискілерді тікелей күн сəулелерінің, жылу көздерінің, жоғары
температура мен ылғалдылықтың əсеріне ұшыратпаңыз.
Пайдаланғаннан кейін дискіні сауытқа салып сақтаңыз.
Дискінің жұмыс бетін жұмсақ шүберекпен ортасынан шетіне қарай
тұрақты сүртіп тұрыңыз. Дəстүрлі жуғыш заттарды пайдаланбаңыз.
Батарейкаларды пайдалану
Батарейкалардың ағып кетуі жарақаттардың немесе қашықтан
басқару пультінің бұзылуының себебі болуы мүмкін. Батарейкалардың
бұзылуын болдырмау үшін төменде келтірілген нұсқаулықтарды
ұстаныңыз:
- Құрылғыдағы белгілеулерге сəйкес полярлықты сақтай отырып,
батарейкаларды дұрыс орнатыңыз.
- Əртүрлі батарейкаларды (жаңа жəне ескі, əр түрлі жəне т.с.с.)
бірге пайдаланбаңыз.
- Егер құрылғы ұзақ уақыт бойы пайдаланылмайтын болса
батарейкаларды алып тастаңыз.
- Батарейкаларды уақытында айырбастап тұрыңыз.
ҚҰРЫЛҒЫҒА ҰҚЫПТЫ ҚАРАУ ШАРАЛАРЫ
- Құрылғыны тасымалдағанда оны сатып алғанда алынған қорапты
жəне орау бөлшектерін пайдаланыңыз.
- Егер плеер ұзақ уақыт бойы жұмыс істесе, онда оның қорабы сəл
қызуы мүмкін – бұл əдетті құбылыс.
- Дискіні жаңғырту уақытында бұл құрылғының орнын
ауыстырмаңыз. Кері жағдайда салыстырып оқитын құрал жəне
диск бұзылуы мүмкін.
• Караоке
• Орыс жəне ағылшын тілдеріндегі экрандық мəзір
Берілген плеер дискілердің келесі түрлерін жаңғырта алады:
Дискілер форматтары Таңбалары Мазмұны
DVD
АС-3
МРЗ
Video-CD (VCD)
CDDA
Kodak Picture CD
MPEG4
Жабдықтары
Жеткізілім жинағына келесі жабдықтар кіреді:
Пайдалану бойынша нұсқаулық
Қашықтан басқару пульті
Аудио-бейне кабель
2 батарейка, ААА 1.5V
DVD жəне CD дискілердің ерекшеліктері
DVD 5 (біржақты бірқабатты)
DVD 9 (біржақты екіқабатты)
DVD 10 (екіжақты бірқабатты)
DVD 18 (екіжақты екіқабатты)
VCD 1.0/1.1/2.0
Суреттері бар CD
DVCD
CDDA
МРЗ
CD-R
CD-RW
Аудио + Бейне
Dolby Digital Аудио
Аудио
Аудио + Бейне
Аудио
Фото
Аудио + Бейне
ТУЫНДЫГЕРЛІК ҚҰҚЫҚТАР
Берілген құрылғыда АҚШ патентерімен жəне Macrovision Corporation
компаниясы мен басқа құқық иелеріне тиесілі зерделік меншікке
құқықтармен қорғалған туындыгерлік құқықты қорғау технологиясы
қолданылады. Туындыгерлік құқықты қорғау технологиясын пайдалану
Macrovision Corporation компаниясымен рұқсат етілуі керек жəне үйде
пайдалану мен көрермен саны шектелген басқа мақсаттарға арналуы
керек, егер басқасы Macrovision Corporation компаниясымен рұқсат
етілмесе. Бұйымды бөлшектеуге жəне технологияны көшіруге тыйым
салынған.
Dolby Laboratories лицензиясы бойынша жасалған. “Dolby” атауы жəне
қосарланған D əрпі түріндегі таңба Dolby Laboratories компаниясының
сауда белгісі болып табылады.
CE: Берілген құрылғы электрмагниттік сəйкестілік бойынша
директиваға жəне төмен вольтті құрылғыларға арналған директиваға
сəйкес келеді.
Vitek DVD плеері – бұл жоғары сапалы сурет пен дыбысты
жаңғыртуды қамтамасыз ететін үй құрылғыларының жаңа буыны.
DVD плеердің сипаттамалары бейнені жаңғыртуға арналған
ертеректе жасалған кез-келген жабдықтардың сипаттамаларынан
асып түседі. Ол үй кинотеатры жүйелері үшін ең жақсы сигнал көзі
болып табылады жəне қараудан Сізге максималды лəззат алуды
қамтамасыз етеді.
• Жаңғыртылатын дискілер: DVD-R/-RW, DVD+R/+RW, CD-R/-RW
• Қолдалатын форматтар: DVD, MPEG4 (DivX), SVCD, VCD, CDDA,
МРЗ, WMA, Kodak Picture CD, JPEG
• Іштетілген декодерлер Dolby Digital AC-3
• Қосылуға арналған ағытпалар: композитті (VIDEO), S-Video,
компонентті (Y Cb/Pb Cr/Pr), коаксиалды (COAXIAL)
(OPTICAL)
• USB ағытпасы
• Кардридер SD, MS, MMC
, 5.1/стерео (5.1 CH AUDIO OUT), SCART
, оптикалық
33
4110IM.indd 334110IM.indd 33 20.10.2009 11:08:0920.10.2009 11:08:09
Page 34

ҚАЗАҚ
Диск туралы ақпарат
ТҮРІ DVD VCD SVCD CD
ЖАЗУ ФОРМАТЫ MPEG 2 MPEGI MPEG II DIGIT
ДИСК КӨЛЕМІ Біржақты,
АУМАҒЫ, см 12/8 12 12 12/8
КӨЛДЕНЕҢ ЖАЙМАЛАУ
СУБТИТРЛЕРІ 32 түрге дейін - 8 -
ТІЛІ 8 дейін 2 4 -
БЕЛГІЛЕНУІ
Əртүрлі шығарушылардың DVD-дискілерінің əртүрлі параметлері болады, олар келесі таңбалармен белгіленеді:
бірқабатты
4,7 Гб - 2 сағат
Екіжақты, екіқабатты
8,5 Гб - 4 сағат
> 500 жолақ >240 жолақ >350 жолақ -
Екіжақты, бірқабатты
9,4 Гб - 4,5 сағат
Екіжақты, екіқабатты
17 Гб - 9 сағат
650М 74 мин 650M 45 мин 650M 74 мин
Аймақтық код жəне бейнешығу жүйесі
Dolby digital surround
Аудиотректер саны
Субтитрлер саны
Бейне форматы
Қарауды шектеу
Қарау ракурстары
Дыбыстың шығу 5.1 арнасы
Жасырын субтитрлер
Екі арналы стерео
Шектеу
Дискілерге қатысты терминдер
Тақырып
Əдетте DVD-дискіге жазылған сурет пен əуен бірнеше бөлікке бөлінеді, олардың əрқайсысы “тақырып” деп аталады.
Эпизод (фрагмент)
DVD-дискідегі тақырып шегіндегі сурет жəне əуеннің минималды фрагменті. Əдетте бір тақырып бір немесе одан көп эпизодтардан
(фрагменттерден) тұрады, олар іздеуді жеңілдету үшін нөмірленген. Бірақ кейбір дискілерде эпизодтар (фрагменттер) болмаы мүмкін.
Трек
SVCD, VCD немесе CD дискідегі суреттің жəне əуеннің бөлігі. Іздеуді жеңілдету үшін барлық тректер нөмірленген.
Сахна
Жаңғыртуды бақылау қызметін қолдайтын жəне динамикалық жəне статикалық VCD дискілері сахна деп аталатын бөліктерге бөлінеді. Əрбір
сахна нөмірі бойынша жеңіл табыла алады жəне экранда көрсетіле алады. Бір сахна əдетте бір немесе бірнеше тректен тұрады.
РВС (SVCD,VCD) қызметі
SVCD немесе VCD дискісін жаңғырту уақытында экранда диск мазмұнының мəзірі көрсетілуі мүмкін, ол жаңғыртуды бақылау қызметі немесе
PBC деп аталады.
34
4110IM.indd 344110IM.indd 34 20.10.2009 11:08:0920.10.2009 11:08:09
Page 35

ҚАЗАҚ
Диск түрі Қызметтері
РВС қызметін қоладамайтын VCD дискілері (1.1 нұсқасы) Əуенді де (дыбысты), бейнені де жаңғырту.
РВС қызметін қолдайтын SVCD/VCD дискілер (2.0 нұқасы) VCD-ден бейнені жаңғырту үшін экранда көрсетілетін мəзір пайдаланылуы
Ескерту: Егер сіз жеке компьютерді пайдалана отырып дискіні жазсаңыз, онда дискінің форматы сəйкес келсе де, дискіні жазу кезінде
пайдаланылған бағдарламалық жасау баптаулары үшін диск жаңғыртылмайтын жағдайлар болады.
СИПАТТАМАСЫ
Алдыңғы панель
1. STANDBY/ON түймешесі
2. Қосылу индикаторы
3. Күйтабақ салынатын сөреше
4. джойстик (плейерді басқаруға арналған):
(►)– ойнату (PLAY)
(║) – кідірту (PAUSE)
(▲) – күйтабақ сөрешесін ашу/жабу (OPEN/CLOSE)
(■) – ойнатуды тоқтату (STOP)
5. LED¬дисплей (жарықдиодты дисплей)
6. АБ пульт белгілерінің фотоқабылдағыш орны
7. SD/MS/MMC картридері
8. USB¬ тасымалдағышты (USB Flash Drive) қосу айырғышы
мүмкін.
Шеткі панель (оң жақтағы)
1. микрофондарды қосу айырғыштары
2. микрофондардың дыбыс деңгейін реттейтін тұтқа
3. микрофондардың жаңғырық деңгейін реттейтін тұтқа
Артқы панель (сурет)
1. Қуаттану
2 . Аудиошығу 5.1СН айырғыштары
3. Коаксиальды аудиошығудың айырғышы (Coaxial)
4. Композитті видеошығудың айырғышы (Video)
5. Компонентті видеошығудың айырғышы (Y Cb/Pb Cr/Pr)
6. S¬Video видеошығудың айырғышы
7. Оптикалық аудиошығудың айырғышы (OPTICAL)
8. SCART айырғышы
35
4110IM.indd 354110IM.indd 35 20.10.2009 11:08:1020.10.2009 11:08:10
Page 36

ҚАЗАҚ
Қашықтан басқару пульті (сурет)
1. диск науасын ашу/жабу батырмасы OPEN/CLOSE
2. бейнешығу режимдерін айырып-қосу батырмасы V. MODE
3. OSD батырмасы (диск туралы ақпарат)
4. POWER батырмасы
5. сандық батырмалар
6. түстілік жүйесін айырып-қосу батырмасы PAL/NTSC
7. енгізуді жою батырмасы CLEAR
8. бағдарламалау режимі батырмасы PROG
9. меңзер навигациясы батырмасы(←↑→↓)
10. масштабты өзгерті батырмасы ZOOM
11. дейінгі трекке көшу батырмасы PREV
12. кейінгі трекке көшу батырмасы NEXT
13. жаңғыртуды тоқтату батырмасы STOP
14. дыбыс қаттылығы деңгейін реттеу батырмасы VOLUME +/-
15. таспа түрін ауыстырып-қосу батырмасы DVD/USB/CARD
16. ракурстарды қосу батырмасы ANGLE
17. дыбысты сөндіру батырмасы MUTE
18. кадр бойынша жаңғырту батырмасы STEP
19. жаңғыртуды тоқтата тұру батырмасы PAUSE
20. артқа айналдыру батырмасы F REV
21. алға айналдыру батырмасы F FWD
22. баяу жаңғырту батырмасы SLOW
23. енгізу/жаңғырту батырмасы ►
24. баптау мəзіріне кіру батырмасы SETUP
25. фрагментті қайталау батырмасы A-B RPT
26. қайталау режимдерін таңдау батырмасы REPEAT
27. іздеу мəзіріне кіру батырмасы SEARCH
28. диск мазмұнына кіру батырмасы TITLE/PBC
29. субтитрлерді таңдау батырмасы SUBTITLE
30. дыбыстық сүйемелдеу тілін таңдау батырмасы AUDIO
31. мəзірге кіру батырмасы MENU
Қашықтан басқару пультіне қореқтендіру элементтерін орнату
• Қашықтан басқару пультінің сəйкес бөлігіне батарейкаларды
салыңыз.
• Егер Сіз ұзақ уақыт бойы пультті пайдаланбайтын болсаңыз,
батарейкаларды шығарып қойыңыз.
• Уақытында батарейкаларды айырбастаңыз.
36
4110IM.indd 364110IM.indd 36 20.10.2009 11:08:1020.10.2009 11:08:10
Page 37

ҚАЗАҚ
ҚОСУ
Назар аударыңыз: DVD-плеерді басқа жабдыққа қосар алдында DVD-плеердің жəне басқа жабдықтың электрқорегі қосылмағанына көз
жеткізіңіз.
Бейнебауларды қосу
Сіздің теледидарыңыздың мүмкіндіктеріне қарай төменде аталған қосу түрлерінен неғұрлым сəйкесін таңдаңыз
(1) Композитті бейнесигнал
Стандартты сападағы суреттерді қарау үшін Сіздің DVD-плееріңіздің композитті бейне сигналы шығу ағытпасын (VIDEO) жеткізілім жинағына
кіретін ұштарында сары штекерлері бар аудио- бейнекабель бауларының (A/V) біреуін пайдалана отырып теледидардың немесе монитордың
сəйкес ену ұясына қосыңыз.
(2) S-Video ағытпасы
Жақсартылған сападағы суреттерді карау үшін Сіздің DVD-плееріңіздің S-VIDEO ағытпасын теледидардағы немесе монитордағы сəйкес ену
ағытпасына S-Video кабелі (жеткізілім жинағына кірмейді) арқылы қосыңыз.
(3) Компонентті бейнешығу ұясы
Жоғары сападағы суреттің тура түсін тарату үшін кмпонентті бейнесигнал шығу ағытпаларына Y Cb/Pb Cr/Pr (қызыл/көк/жасыл) теледидардағы
немесе монитордағы ену ағытпаларына сəйкес кабельді (жеткізілім жинағына кірмейді) пайдаланып қосыңыз.
(4) SCART ағытпасы
DVD-плеердегі SCART ағытпасын теледидардағы немесе монитордағы сəйкес ағытпаға қосу үшін 21-түйіспелі SCART кабелі (жеткізілім
жинағына кірмейді) пайдаланылады..
Ескерту:
• Бір уақытта бірнеше бейнешығуды қосқанда бейненің сапасы төмендеуі мүмкін.
• Жақсы бейнені жүйені дұрыс қосқанда жөнді баптау кезінде ғана көруге болады.
Аудиожүйені қосу
Сіздің теледидарыңыздың мүмкіндіктеріне қарай төменде аталған қосылулардың түрлерін неғұрлым сəйкесін таңдаңыз
(1) Екіарналы аналогтық шығу ұясы
Екіарналы аналогтық шығу ұясын қосу үшін 5.1 СН аналогтық аудиошығу ұясының (5.1 CH AUDIO OUT) FR и FL ағытпаларын пайдаланыңыз,
сонымен бірге аудиошығу режимін екіарналы режимге ауыстырыңыз (динамиктерді баптау бетін қар.)
(2) 5.1 СН Аналогтық аудиошығу ұясы
DVD-плеердің бесарналы аудиошығу ұясын (FL, FR, SL, SR, CENTER, SUB WOOFER) қуат зорайтқышының/ресивердің сəйкес бесарналы ену
ұясына (5.1) қосу үшін AV кабельдерінің 3 жұбын пайдаланыңыз.
(3) Коаксиалды сандық аудиошығу ұясы
Сіздің DVD-плееріңіздің COAXIAL ағытпасын қуат зорайтқышының сəйкес ағытпасына қосу үшін арнайы коаксиалды кабельді пайдаланыңыз.
(4) Оптикалық сандық шығу ұясы
Сіздің DVD-плееріңіздің OPTICAL ағытпасын қуат зорайтқышының оптикалық ағытпасына қосу үшін арнайы талшықтық-оптикалық кабельді
пайдаланыңыз.
Ескерту: DVD-плеердің сыртқы құрылғыларға қосылатын ағытпаларына баптау параметрлері сəйкес келуі керек.
37
4110IM.indd 374110IM.indd 37 20.10.2009 11:08:1020.10.2009 11:08:10
Page 38

ҚАЗАҚ
ЖҮЙЕНІ БАПТАУ
1. Теледидарды қосыңыз жəне оның баптауларында ену сигналының
сəйкес түрін белгілеңіз
Жүйенің баптау мəзіріне кіру үшін SETUP батырмасын басыңыз.
Мəзірден шығу үшін қайтадан SETUP батырмасын басыңыз.
2. (←→) навигация батырмалары көмегімен келесі беттердің бірін
таңдаңыз: страница основных настроек, страница установок
звука, страница настроек видео, страница индивидуальных
настроек, установка пароля..
3. Таңдалған бетке кіру үшін (↓)батырмасын басыңыз
4. (↓↑) батырмалары көмегімен сіз өзгерткіңіз келген тармақты
таңдаңыз.
5. Баптауды өзгерту тармақшасына кіру үшін ► немесе →
батырмасын басыңыз. (↓↑) навигация батырмалары көмегімен
қажетті мəнді таңдаңыз, енгізілген мəнді растау үшін жəне баптау
тізіміне оралу үшін ► немесе ← батырамаларын басыңыз.
Назар аударыңыз: Алдын-ала таңдалған режимдерге сəйкес
келетін мəзірдің кейбір тармақтары сұр түспен белгіленген жəне
таңдала алмайды.
Енгізілген белгеулер қореқтендіру сөндірілгеннен кейін де сақталады.
Жалпы баптаулар
ЭКРАН
Стандартный/PS: DVD-плеер дəстүрлі теледидарға қосылғанда
кең экранда бейне бүкіл экранда жаңғыртылады бірақ оның бір
бөлігі кесіледі (4:3).
Стандартный /LB: DVD-плеер дəстүрлі теледидарға қосылғанда
кеңэкранды бейне үстінен жəне астынан қара жолақтар пайда
болып жаңғыртылады (4:3).
Широкий (Wide): Үй кинотеатры кең экранды теледидарға қосылса
осы тармақты пайдаланыңыз (16:9).
РАК УРС
DVD дискілердегі кейбір фильмдер əртүрлі ракурстарда жазылуы
мүмкін. Мұндай мүмкіндік туралы ақпаратты Сіздің DVD дискіңізге
түсініктемеден білуге болады.
Егер режим қосылған болса əртүрлі ракурстарда жазылған DVD
дискіні жаңғыртқанда экранда камера таңбасы пайда болады.
ЯЗЫК МЕНЮ
Экрандық мəзір тілін таңдау.
СУБТИТРЫ
Егер дискіде субтитрлер болмаса бұл қызмет жұмыс істемейді.
Егер субтитрлер қызметі сөндірілген болса, бұл қызметті қосу үшін
қашықтан басқару пультінде SUBTITLE батырмасын басыңыз.
ЗАСТАВКА ЭКРАНА
Егер экрандық қыстырма қосылған плеер қосылған болса жəне
диск бірнеше минут жаңғыртылмаған болса, онда экранда
қозғалатын қыстырма пайда болады жəне 20 минуттан кейін
плеер күту режиміне көшеді. Күту режимінен шығу үшін Сіз
қашықтан басқару пультінде STANDBY батырмасын баса аласыз.
HDCD
Сіз 44.1 К, 88.2 К немесе ВЫКЛ. дискретизация жиілігін таңдай
аласыз. Неғұрлым дискретизация жиілігі жоғары болса, соғұрлым
дыбыс сапасы да жоғары
ЗАПОМНИТЬ ПОСЛЕДНЮЮ УСТАНОВКУ
Егер бұл қызмет қосылған болса плеер дискінің шығару сəтін
сақтап жəне сол дискіні қайта салғанда жаңғырту дискіні шығару
сəтінен басталады.
Дыбысты баптау
• НАСТРОЙКА КОЛОНОК
Смешивание
Передние колонки
Центральные колонки
Задние колонки
Сабвуфер
Установить смешивание
лев./прав.
больш.
больш.
больш.
вкл.
лев./прав.
Стерео
5.1 СН
- Смешивание
Лев/ Прав: 5.1 CH форматындағы төл дыбыс тек сол жəне оң
арналары бойынша беріледі.
Стерео: 5.1 CH форматындағы төл дыбыс стерео режимде
беріледі.
Объемн. звуч.:екі арна бойынша көлемді естілу эффектісі
жасалады.
Егер дыбыс жүйесінде тек алдыңғы колонкалар мен сабвуфер
ғана болса, онда сабвуферді активтеу үшін мəзір пункттерін
келесідей орнату керек:
Мəзірдегі «Алдыңғы колонкалар» пунктінде «кіші» деген
мағынаны орнату керек, ал «Сабвуфер» пунктінде “қосылу”
мағынасын орнату керек.
Смешивание
Передние колонки
Центральные колонки
Задние колонки
Сабвуфер
Настройка передних колонок
Стерео
мален.
больш.
больш.
вкл.
больш.
мален.
5.1 кан: 5.1 CH форматындағы төл дыбыс беріледі
- ПЕРЕДНИЙ, ЦЕНТРАЛЬНЫЙ, ТЫЛОВОЙ ДИНАМИКИ,
САБВУФЕР
Егер сіздің акустикалық жүйеңіздің алдыңғы, ортаңғы, артқы
колонкалары, сабвуферы болса, онда Сіз шын мəніндегі
конфигурацияға сəйкесмəзір тармақтарын белгілей аласыз. Егер
микшерлеу (Лев/Прав, Стерео, Объемн. звуч) қосылған болса,
қызмет жұмыс істемейді.
• SPDIF баптау
Выкл SPDIF: дыбыс құрылғының шығу ұясына тек аналогтық
түрінде беріледі (5.1 CH AUDIO OUT).
SPDIF/RAW: дискіге жазылған төл форматтағы сандық шығу сигналы
SPDIF/PCM: РСМ форматында декодталған сандық шығу сигналы.
Dolby Digital баптау
- ДВОЙНОЕ МОНО
Егер Сіздің зорайтқышыңызда/декодеріңізде Dolby Digital шығу
ұясы болса, Сіз: стерео, лев-моно, прав-моно, смеш. моно таңдай
аласыз
ДИНАМИЧНЫЙ ДИАПАЗОН
Жоғары динамикалық дыбыс диапазоны бар бағдарламаларды
көргенде бұл режимді таңдау Сізге дыбыс деңгейінің кенет
өзгеруінен оптималды мəнге дейін құтылуға жəне сонымен қатар
дыбыстық сүйемелдеудің сапасы мен детальдарын сақтауға
мүмкіндік береді. Бұл Сізге басқа отбасы мүшелерін мазаламауға
жəне дыбыстың жоғары сапасын сақтауға мүмкіндік береді.
38
4110IM.indd 384110IM.indd 38 20.10.2009 11:08:1020.10.2009 11:08:10
Page 39

ҚАЗАҚ
Бейнені баптаулар
• РЕЖИМ ТВ
CVBS: композитті бейнесигналды белгілеу.
YUV: Y Cb/Pb Cr/Pr ағытпасы арқылы компонентті ағытпаға қосу
кезінде осы режимді таңдаңыз.
RGB: SCART ағытпасы арқылы қосқанда осы режимді таңдаңыз.
• РАЗВЕРТКА: Егер Сіздің теледидарыңыз прогрессивті
жаймалауды қолдаса, YUV режимі таңдалған болса, Сіз
прогрессивті жаймалауды қоса немесе сөндіре аласыз
АЙҚЫНДЫЛЫҚТЫ, ЖАРЫҚТЫҚТЫ, КОНТРАСТЫЛЫҚТЫ Сіз
қажетті деңгейді Сіздің қалауларыңыз бойынша белгілей аласыз.
Жеке баптаулар
Қарау алдында белгіленеді
ТВ система
Сіздің плееріңіз теледидар жүйелерінің барлық түріне сəйкес келеді.
Сіз PAL, NTSC немесе Авто таңдай аласыз.
• ЗВУК (Дыбыстық сүйемелдеу тілін таңдау), СУБТИТРЫ, МЕНЮ
ДИСКА
Бұл параметрлер бастапқысынан Сіздің қалауыңызға сəйкес
белгілене алады. Егер Сіздің белгілеген параметрлер
дискінің мазмұнымен қолдау тапса, онда жаңғырту Сіздің
баптауларыңызды есепке ала отырып жасалады. Кері жағдайда
келісім бойынша берілген дискінің белгілеулері пайдаланылады.
ОГРАНИЧЕНИЕ ПРОСМОТРА ПО ВОЗРАСТУ
Бұл қызмет дискілерді жаңғырту кезінде олардың мазмұнын
ата-аналық бақылау үшін арналған жəне Сіздің балаларыңызды
қалаусыз сахналарды қараудан қорғайды. Берілген қызмет
көмегімен белгіленген деңгейден жоғары диск жаңғыртылмайды.
Ескерту: Берілген тармақты өзгерткенде Сізге парольді енгізу
қажет (келісім бойынша пароль – 136900
ПАРОЛЬ
Бұл жерде Сіз парольді өзгерте аласыз. ПАРОЛЬ => ИЗМЕНИТЬ
таңдаңыз, пайда болған терезеде əуелі ескі парольді (немесе
келісім бойынша парольді - 136900) енгізіңіз, кейін жаңа парольді
енгізіңіз жəне тағы да жаңа парольді енгізіңіз.Жаңа парольді
сақтау үшін PLAY батырмасын басыңыз.
ПО УМОЛЧАНИЮ
Зауыттық баптауларға оралу.
Негізгі қызметтер
Ескерту: Батырманы басқанда экранда пайда болатын
берілген диск үшін таңдалған қызмет мүмкін емес екенін білдіреді.
POWER (ҚОРЕҚТЕНДІРУДІ ҚОСУ)
• Плеердің қореқтендіруін қосу үшін, плеердің алдыңғы панеліндегі
STANDBY/ON батырмасын немесе қашықтан басқару пультіндегі
POWER батырмасын басыңыз.
• Күту режиміне өту үшін қашықтан басқару пультіндегі POWER
батырмасын пайдаланыңыз.
OPEN/CLOSE (ДИСК НАУАСЫН АШУ/ЖАБУ)
• Плеердің алдыңғы панеліндегі OPEN/CLOSE батырмасын
немесе қашықтан басқару пультіндегі батырмасын басыңыз,
диск науасы ашылады. Дискіні науаға жұмыс бетімен төмен
(жапсырмасын жоғары) орнатыңыз. Науаны жабу үшін OPEN/
CLOSE батырмасын қайта басыңыз жəне плеер жаңғыртуды
автоматты түрде бастайды . Автоматты жаңғырту қызметі барлық
дискілер үшін қолдалмайды.
таңбасы,
VOLUME (ДЫБЫС ҚАТТЫЛЫҒЫ ДЕҢГЕЙІН РЕТТЕУ)
• Дыбыс қаттылығы деңгейін жоғары немесе төмен ету үшін
VOLUME +/- батырмаларын пайдаланыңыз.
MUTE (Дыбысты сөндіру)
• Дыбысты сөндіру үшін MUTE батырмасын басыңыз. Дыбысты
қосу үшін MUTE батырмасын қайта басыңыз немесе дыбыс
қаттылығын реттеу батырмаларын пайдаланыңыз.
PLAY (ЖАҢҒЫРТУ)
• Жаңғыртуды бастау үшін қашықтан басқару пультіндегі немесе
плеердің алдыңғы панеліндегі ► батырмасын басыңыз.
• PAUSE (ЖАҢҒЫРТУДЫ ТОҚТАТА ТҰРУ) Жаңғыртуды тоқтата
тұру үшін қашықтан басқару пультіндегі немесе плеердің алдыңғы
панеліндегі PAUSE/STEP батырмасын басыңыз. Қалыпты
жағдайға оралу үшін ► батырмасын басыңыз.
STOP (ЖАҢҒЫРТУДЫ ТОҚТАТУ)
• DVD, SVCD, VCD, CD дискілерін жаңғырту кезінде STOP бір рет
басыңыз – плеер тоқтау нүктесін есіне сақтайды. Жалғастыру
үшін қашықтан басқару пультіндегі немесе плеердің алдыңғы
панеліндегі ► батырманы басыңыз. Жаңғыртуды толық тоқтату
үшін STOP екінші рет басыңыз.
F.REV ◄◄ жəне F.FWD ►► (АРТҚА/АЛҒА АЙНАЛДЫРУ)
• Жеделдетіп алға айналдыру үшін F.FWD ►► батырмасын
басыңыз
• Жеделдетіп артқа айналдыру үшін F.REV ◄◄ батырмасын
басыңыз
Айналдыру жылдамдығын жоғарылату үшін сəйкес батырманы
бірнеше рет басыңыз.
PREV I◄◄/ NEXT ►►I (ДЕЙІНГІ/КЕЙІНГІ ТРЕККЕ КӨШУ)
• DVD дискіні жаңғырту кезінде дейінгі эпизодтқа (фрагментке)
көшу үшін панельдегі немесе ҚБ пультіндегі PREV (I◄◄)
батырмасын басыңыз.
• SVCD, VCD, CD дискілерін жаңғырту кезінде дейінгі трекке көшу
үшін PREV (I◄◄) батырмасын басыңыз.
• DVD дискілерді жаңғырту кезінде кейінгі эпизодқа (фрагментке)
көшу үшін панельдегі немесе ҚБ пультіндегі NEXT (►►I)
батырмасын басыңыз.
• SVCD, VCD, CD дискілерін жаңғырту кезінде кейінгі трекке көшу
үшін NEXT (►►I) батырмасын басыңыз.
DVD/USB/CARD (ТАСЫМАЛДАҒЫШТЫ ТАҢДАУ)
Құрылғы жад карталарының келесі түрлерін қолдайды:
MS CARD: MEMORY STICK CARD
SD CARD: SD MEMORY CARD
MMC CARD: MULTI MEDIA CARD
• Плеерді қосыңыз
• Жад картасын салыңыз (SD, MS, MMC)
• DVD –ді USB немесе жад картасын оқу тəртібіне ауыстыру
үшін “DVD/USB/CARD” түймешесін қолданыңыз. (Егер
сіз DVD – ге əр түрлі сыртқы жад құрылғыларын қосатын
болсаңыз,оларды таңдау үшін “DVD/USB/CARD”түймешесін
басыңыз).
Егер жүктеу сəтті өтсе навигация мəзірі автоматты түрде
көрінеді. Навигацияның (↑↓) түймешелері арқылы қажетті
папканы таңдаңыз, растау үшін ► түймешесін басыңыз.
Папкалардың ішінен (↑↓) қажетті файлды таңдаңыз, содан
кейін ойнату үшін ► түймешесін басыңыз. Осы бетте
алдыңғы мəзірге оралу үшін ← түймешесін басыңыз, ал
келесі немесе оның алдындағы бетке оралу үшін (←→)
түймешесін басыңыз.
• Күйтабақ ойналған кезде құрылғы бірден тоқтайды.
• Іске қосылған күйтабақпен бірге USB құрылғы немесе жад
картасы жүктелген болсада күйтабақ ойнатылады.Мұндай
жағдайда “DVD/USB/CARD” түймешесін басып қажетті
тасымалдағышты таңдаңыз.
• Құрылғы жұмысын тоқтатқанда Сіз сыртқы құрылғыны (USB
құрылғы немесе жад картасы) шығара аласыз.
• Алдымен DVD ¬плеер табақшаны жүктейді. “DVD/USB/
CARD” түймешелерін басып өзге тəртіпті таңдаңыз.
• Жад картасы оқылғанда қандай тəртіпте тұрғаны
көрсетілмейді. DVD тəртібіне ауысу үшін Сіз “DVD/USB/
CARD” түймешесін басуыңыз керексіз.
Ескерту
1. Өндіруші нарықтағы интерфейсі 1.1 жəне 2.0 USB
¬құрылғылардың барлығын қолдауға кепілдік бермейді.
2. DVD¬плеер ең жиі кездесетін мультимедиялық файлдардың
параметрлеріне сəйкестікке сыналды. Дегенмен, мультимедиялық
файлдарды дайындау барысында қолданатын ерекшеліктердің
көптігінен немесе күннен күнге жаңарып жатқандығынан олардың
39
4110IM.indd 394110IM.indd 39 20.10.2009 11:08:1020.10.2009 11:08:10
Page 40

ҚАЗАҚ
кейбіреулерін құрылғы ойната алмауы мүмкін немесе қате
ойнатуы мүмкін.
PROG (БАҒДАРЛАМАЛАУ)
• Егер дискінің екі немесе одан да көп трегі, эпизоды (фрагменті)
немесе тақырыптары болса, онда бұл бұл батырманың көмегімен
Сіз жаңғырту ретін белгілей аласыз.
• Бағдарламалау режиміне кіру үшін PROG батырмасын басыңыз,
экранда бағдарламалау мəзірі пайда болады. Тректің, эпизодтың
(фрагменттің) немесе тақырыптың нөмірін белгілеу үшін сандық
батырмаларды басасыз. 10 жəне одан жоғары нөмірі бар тректі
енгізу үшін 10+ батырмасын падаланыңыз. (Мысалы, 26 нөмірін
енгізу үшін батырмалардың келесі ретін басыңыз: 10+, 10+, 6)
Егер жазбалардың саны 10 көп болса, бағдарламалау кестесін
жалғастыру үшін NEXT ►► I басыңыз (максималды мүмкін 20
жазба). Курсорды жылжыту үшін (↓→←↑) курсор батырмаларын
пайдаланыңыз. Бағдарламалауды аяқтағаннан кейін курсор
навигациясы батырмаларының көмегімен «начать» тармағын
таңдаңыз жəне бағдарламаланған ретті жаңғырту үшін ►
батырмасын басыңыз.
• МРЗ, DiV X, MPEG 4 дискілері үшін бағдарламалау мүмкін
емес! Файлдар тізімін ашу үшін PROG бір рет басыңыз. Курсор
навигациясының батырмаларын пайдалана отырып Сіз қалаулы
файлды жаңғырту үшін таңдай аласыз.
TITLE/PBC (ТАҚЫРЫПТАР/ЖАҢҒЫРТУДЫ БАҚЫЛАУ)
TITLE/PBC жəне MENU батырмалары дискінің мазмұнын көрсету
үшін пайдалынады.
Егер дискіде бірнеше тақырып (фильм) болса, Тақырыптар тізімін
көрсету үшін TITLE/PBC батырмасын басыңыз. Тақырыптың
мазмұнын көрсету үшін MENU батырмасын басыңыз.
Егер дискінің бір тақырыбы болса MENU батырмасын басыңыз.
SVCD, VCD2.0 дискілерін жаңғырту кезінде, TITLE/PBC
батырмасын басыңыз, диск мəзірі пайда болады. Бұл режимде
Сіз сəйкес сандық батырманы басып трек нөмірін таңдай аласыз.
VCD1.1, CDDA жəне МРЗ РВС мəзірі жоқ.
SUBTITLE (СУБТИТРЛЕРДІ ТАҢДАУ)
• Субтитрлері бар DVD жаңғырту кезінде субтитрлердің тілін
таңдау үшін SUBTTITLE батырмасын басыңыз.
ANGLE (Ракурс)
• Біреуден артық қарау бұрышы бар DVD жаңғырту кезінде қажетті
бұрышты таңдау үшін ANGLE батырмасын басыңыз
STEP (КАДР БОЙЫНША ЖАҢҒЫРТУ)
• DVD, SVCD, VCD дискілерді кадр бойынша жаңғырту үшін
STEP батырмасын басыңыз. Жаңғыртуды қайтадан бастау
үшін қашықтан басқару пультіндегі немесе плеердің алдыңғы
панеліндегі ► батырмасын басыңыз.
REPEAT (ҚАЙТАЛАУ)
• Тректі, эпизодты (фрагментті), тақырыпты немесе бүкіл дискіні
қайталап жаңғырту үшін REPEAT батырмасын басыңыз.
А-В RPT (A-B ФРАГМЕНТІН ҚАЙТАЛАУ)
• Дискіні жаңғырту кезінде Сіз А-В фрагменттерін қайталау үшін
белгілей аласыз.
• (А) бастапқы нүктені белгілеу үшін А-В RPT батырмасын басыңыз.
• (В) соңғы нүктені белгілеу үшін А-В RPT батырмасын басыңыз.
Таңдалған фрагменттің қайталануы басталады.
• Қайталауды болдырмау үшін жəне қалыпты жаңғыртуға оралу
үшін А-В RPT батырмасын үшінші рет басыңыз.
ZOOM (МАСШТАБТЫ ӨЗГЕРТУ)
• Масштабты өзгерту үшін ZOOM батырмасын басыңыз.
Үлкейтілген бейне кезінде оны экран бойынша жылжыту үшін
(↑←→↓) батырмаларын басыңыз.
AUDIO (ДЫБЫСТЫҚ СҮЙЕМЕЛДЕУДІҢ ТІЛІН ТАҢДАУ)
• Бірнеше тілді аудиосы бар DVD жаңғырту кезінде қажетті тілді
таңдау үшін AUDIO батырмасын басыңыз.
SEARCH (ІЗДЕУ)
• Жаңғырту режимінде SEARCH (ІЗДЕУ) батырмасын бір рет басып
экранда іздеу мəзірі пайда болады, батырманы екінші рет басып
мəзірді жабыңыз..Қажетті опцияны таңдау үшін іздеу мəзірінде (↑↓)
батырмаларын басыңыз. Растау үшін ► батырмасын басыңыз.
OSD (ДИСК ТУРАЛЫ АҚПАРАТ)
• OSD батырмасын басыңыз, экранда диск туралы ақпарат пайда
болады.
SETUP (ЖҮЙЕНІ БАПТАУ МƏЗІРІ)
• SETUP батырмасын басыңыз, экранда жүйені баптау мəзірі пайда
болады.
• Бейне шығу режимін (CVBS, YUV, YUV-PSCAN, RGB жəне т.б.)
таңдау үшін V-MODE батырмаларын басыңыз.
САНДЫҚ БАТЫРМАЛАР (1-9, 0, 10+)
• VCD 1.1, CD дискілерін жаңғырту кезінде дискіні жүктеуден
кейін, тректі немесе тарауды таңдау үшін сандық батырмаларды
пайдаланыңыз. Сандары бар батырмалар PROGRAM жəне MENU
қызметтері қосылған кезде қажет.
• 10 немесе одан жоғары нөмірі бар тректерді таңдау үшін 10+
батырмасын жəне трекке сəйкес санды пайдаланыңыз.
PAL/NTSC (ТҮСТІЛІК ЖҮЙЕСІН ТАҢДАУ )
• Бұл батырманы түстілік жүйесін таңдау үшін пайдаланыңыз: PAL,
NTSC, MULTI.
CLEAR (ЕНГІЗУДІ БОЛДЫРМАУ)
• Нөмірді енгізуді болдырмау үшін осы батырманы басыңыз.
SLOW (БАЯУ ЖАҢҒЫРТУ)
Баяу жаңғырту үшін қашықтан басқару пультінде SLOW батырмасын
басыңыз
Басқа қызметтер
Караоке
Караоке диск – бұл тұтынушыға қай уақытта өлең айту керек
екенін, өлеңнің белгілі бір фрагментін көрсететін əуені мен
субтитрлері жазылған DVD, VCD форматындағы диск. Өлеңді
айту үшін микрофонды пайдалану қажет.(Стандартты жинаққа
кірмейді).
• DVD-плееріңіздің жақтау панелінде орналасқан ағытпаға
микрофонды қосыңыз
• Плеердің жақтау панелінде орналасқан реттегіш көмегімен
микрофонның дыбыс қаттылығының деңгейін белгілеңіз.
• Құрылғының шеткі панелінде орналасқан реттегіштің көмегімен
микрофонның қажетті жаңғырық деңгейін орнатыңыз.
• Караоке табақшасын DVD¬плеерге салыңыз, ойнату автоматты
түрде басталады.
• Микрофонның өздігінен іске қосылуын алдын алу үшін:
– Микрофонды теледидардың немесе дыбыс ұлғайтқыштың жанына
қоймаңыз;
– Дыбыс ұлғайтқыштың немесе теледидар даусын бəсеңдетіңіз;
– Микрофон даусын бəсеңдетіңіз.
МРЗ/CD дискілерді жаңғырту
• Қапшықтар/файлдар тізімі бойынша жылжу үшін (↓
↑)батырмаларын, қапшықты ашу/жабу үшін ► батырмаларын
пайдаланыңыз, файлды жаңғырту үшін ►батырмасын басыңыз.
CD-дегі суреттер мен фотосуреттерді қарау
• Суреттері бар дискілерді жүктегеннен кейін экранда файлардың
тізімі пайда болады. Файлдарды тізім бойынша қарау үшін (↓↑)
жəне ► батырмаларын пайдаланыңыз.. Таңдалған сурет Сіздің
теледидарыңыздың толық экранында пайда болады.
Суреттерді қарау кезінде пайдаланылатын батырмалар:
ZOOM – масштабты өзгерту режимін қосу.
F.FWD (►►) F.REV (◄◄) – сурет масштабын өзгерту
(↓↑→←) – үлкейтілген суретті жылжыту
Егер ZOOM қызметі сөндірулі болса,онда (→←) батырмалары
көмегімен суретті айналдыруды жүзеге асыруға болады.
V-MODE (БЕЙНЕШЫҒУ РЕЖИМДЕРІН АУЫСТЫРЫП-ҚОСУ)
40
4110IM.indd 404110IM.indd 40 20.10.2009 11:08:1020.10.2009 11:08:10
Page 41

ҚАЗАҚ
Ақаулықтарды іздеу жəне жою
Ақаулық белгісі Ақаулық себебі Ақаулықты жою бойынша əрекет
Электрқорегі жоқ Қореқтендіру бауы розеткаға қосылмаған. Қореқтендіру бауын розеткаға қосыңыз
Бейне жоқ Теледидар баптауларындағы ену көзін қате таңдау Плеердің қосылуына сəйкес лайықты баптауды
Баптау шын мəніндеі қосылуға сəйкес келмейді Шын мəніндегі қосылуға сəйкес келетін баптауды
Бейнекабель ағытпасы ұяға жеткілікті тығыз салынбаған Бейнекабель қосылуын тексеріңіз
Дыбыс жоқ Аудиокабель ағытпасы ұяға жеткілікті тығыз салынбаған Аудиокабель қосылуын тексеріңіз
Қосылған құрылғылар қосымаған. Қосылған құрылғылардың қорегін қосыңыз
Дыбысты қате баптау. Сəйкес баптауды таңдаңыз.
Дыбыстың бұрмалануы Дыбыстың дыбыс қаттылығы деңгейі тым жоғары Дыбыстың дыбыс қаттылығы деңгейін азайтыңыз
Тұрақсыз бейне Теледидардың қате бапталуы. Теледидардың бапталуын жөндеңіз
Дискілер оқылмайды Диск салынбаған. Дискіні салыңыз.
Диск дұрыс салынбаған. Дискінің дұрыс орнатылғандығын тексеріңіз
Плеердің ішінде конденсат. DVD-плеер дискісіз бір сағатқа қосулы қалдырыңыз.
Микрофон жұмыс істемейді Микрофон қосылмаған. Микрофонды қосыңыз.
Микрофон дыбысының төмен дыбыс қаттылығы деңгейі. Микрофон дыбысының дыбыс қаттылығы деңгейін
Қашықтан басқару пульті
жұмыс істемейді
Жүйенің кейбір қызметтері
істемейді
Пульт плеерге бағытталмаған Пультті плеерге бағыттаңыз
Қашықтан басқару пультінен плеерге дейнгі қашықтық 8
.метрден асады
Қашықтан басқару пультінің батарейкалары таусылып
қалған
Батырмалардың қате реті басылған. Нұсқауға сəйкес операцияны қайталаңыз.
таңдаңыз
таңдаңыз
(жапсырмасы жоғары)
реттеңіз.
Плеерге дейінгі қашықтықты азайтыңыз
Екі батарейканы айырбастаңыз
Техникалық сипаттамалары
Қореқтендіру 110-240 В, 50/60 Гц
Тұтынатын қуаты 12 Вт
Пішіні 362x220x41мм
Салмағы 1,9 кг
Жұмыс температурасы 5°С-ден 35 °С-ге дейін
Жұмыс ылғалдылығы 5%-тен 90%-ке дейн
Түстілік жүйесі NTSС / PAL
Мəліметтер форматы Форматтарды жаңғырту: DVD, DVCD, SVCD, VCD, CDDA, МРЗ, WMA, HDCD, JPEG, KODAK PICTURE
Таспа түрі DVD, DVD-R/-RW/+R/+RW, CD-R/-RW
Сандыаналогтық түрлендіргіш 192 кГц / 24-бит
Бейне шығу 1Vp-p (75 Ом)
S-Video шығу: Y: 1Vp-p (75 Ом) С: 0,286 Vp-p (75 Ом)
Аудиовыход 2.0 Vt 5.1 Channel
Аудиосигналдың сандық шығуы 0,5 Vp-p (75 Ом)
Ағытпалар CVBS, S-VIDEO, Y Cb/Pb, Cr/Pr, SCART
Жиілік диапазон
Шу деңгейі ~-80дБ
Бұрмалану коэффициенті <0,01%
Динамикалық диапазон ~80дБ
Қашықтан басқару
Таратқыш Инфрақызыл сəуле
Қореқтендіру көзі 2 ААА қореқтендіру элементі
Шығарушы алдын-ала ескертусіз аспаптың əрленімін жəне техникалық сипаттамаларын өзгерту құқығын сақтайды.
Электрондық жəне электрлік құралдарды утилизациялау (Қоқыстарды бөлу жүйесі бар ЕуроОдақ елдерінде жəне Еуропаның басқа
елдерінде қолданылады)
Берілген таңба электрлік жəне электрондық құралдардың қызмет ету мерзімі өткеннен кейін басқа тұрмыстық қоқыстан жеке
утилизациялану керек екенін білдіреді
Ескі құралдардың дұрыс утилизациясы қоршаған ортаға зиянды əсерін алдын-алуы мүмкін.
CD. MPEG4 (DivX) форматында қысылған сандық бейнені жаңғырту
CD: 20Гц-20кГц (EIAJ), DVD: 20Гц-44кГц (96кГц ИКМ), 20Гц-22кГц (48кГц ИКМ)
Аспаптың жұмыс мерзімі 5 жылдан.
Гарантиялық мiндеттiлiгi
Гарантиялық жағдайдағы қаралып жатқан бөлшектер дилерден тек сатып алынған адамға ғана берiледi. Осы гарантиялық мiндеттiлiгiндегi
шағымдалған жағдайда төлеген чек немесе квитанциясын көрсетуi қажет.
Бұл тауар ЕМС – жағдайларға сəйкес келедi негiзгi Мiндеттемелер 89/336/EEC Дерективаның ережелерiне енгiзiлген
Төменгi Ережелердiң Реттелуi (73/23 EEC)
41
4110IM.indd 414110IM.indd 41 20.10.2009 11:08:1020.10.2009 11:08:10
Page 42

ЎЗБЕК
Фойдаланиш қоидалари
VT-4110
Ҳурматли харидор!
Жиҳозни электрга улашдан, ишлатишдан ва тўғрилашдан олдин ушбу
қўлланмани диққат билан ўқиб чиқинг. Қўлланмада айтилган ьарча
огоҳлантиришлар, жиҳозни ишлатиш борасидаги тавсияларга тўлиқ
амал қилиш лозим бўлади.
Кейинчалик бирор савол пайдо бўлганда ўқиш учун ушбу қўлланмани
сақлаб олиб қўйинг.
ВНИМАНИЕ!
Опасность удара
электрическим током!
НЕ ВСКРЫВАТЬ!
Огоҳлантириш: ёнғин чиқмаслиги ёки электр токи урмаслиги учун жиҳозни
ёмғирда ёки сув тегадиган жойда қолдирманг.
Электр токи урмаслиги учун жиҳоз корпусини ўзингиз очишга ҳаракат қилманг.
Жиҳозни фақат хизмат марказларида ишлайдиган малакали усталаргина
таъмирлашлари лозим
Томонлари тенг бўлган учбурчак ичига чизилган
чақмоқ сурати фойдаланувчига жиҳоз корпуси
ичида ток уришига сабаб бўлиши мумкин бўлган
электр кучи борлигини билдиради.
Томонлари тенг бўлган учбурчак ичидаги
ундов белгиси фойдаланувчига фойдаланиш
қўлланмасида ишлатиш ва техник хизмат борасида
айниқса муҳим бўлган кўрсатма ва тавсиялар
борлигини билдиради.
CLASS 1 LASER PRODUCT
Ушбу маҳсулот 1-ТОИФАДАГИ ЛАЗЕР ИШЛАТИЛАДИГАН ЖИҲОЗЛАР
сирасига киради. Ушбуни кўрсатувчи ёрлиқ жиҳознинг орқа панелига
қўйилган ва жиҳозда лазер нури ишлатилишини билдиради. Жиҳоз
очилмаса лазер нури таъсир қилмайди. Жиҳозни фақат хизмат
марказларида ишлайдиган малакали усталар таъмирлашлари, кўриб
чиқишлари лозим
Хафвсизлик қоидалари
Электр токига улаш
Ушбу жиҳоз ток кучланиши 110-240 В ҳамда частотаси 50-60 Гц
бўлган ўзгарувчан электр тармоғига уланиб ишлайди. Ишлатишдан
олдин электр тармоғидаги кучланиш жиҳоз ишлайдиган кучланишга
мос келишини текшириб кўринг.
Жиҳозни сувга солиш таъқиқланади. Электр токи урмаслиги ёки
ёнғин чиқмаслиги учун жиҳозни намлик даражаси баланд бўлган
жойларга (ванна,сув солинган тоғора, ошхонадаги идиш ювгич,
кир машиналари, сузиш хавзалари, зах ертўлалар ва шунга ўхшаш
бошқа жойларда) қўйманг. Жиҳозга томчи тушиши ёки сув сачрашига
йўл қўйманг. Жиҳознинг устига ичига бирор суюқлик солинган идиш
(мисол учун, гулдон) қўйиш таъқиқланади. Жиҳоз ичида томчи ҳосил
бўлмаслиги учун уни иссиқроқ хонадан совуқроқ хонага олиб ўтганда
ёки аксинча бўлганда, ишлатишдан олдин таҳминан 1 соат кутиб
туринг.
Ишлаб чиқарувчи тавсия қилмаган электр шнури узайтиргичларини
ишлатманг, бу ҳавфли бўлиши мумкин.
Электр узайтиргичлар ёки розеткаларга кўп куч тушишига йўл
қўйманг. Акс ҳолда бу ёнинга ёки электр токи уришига сабаб бўлиши
мумкин.
Жиҳозни шундай қилиб қўйингки, электр вилкаси носоз бўлганда уни
тез розеткадан чиқариб олиш мумкин бўлсин. Жиҳозга уланадиган
кабеллар уланиш жойида тортилиб қолмаслиги керак ва уларни
шундай қилиб ўтказиш лозимки, оёққа ўралиб қолмасин, устига бирор
нарса қўйилмаган бўлсин.
Шундай қилинганда чақмоқ чаққанда жиҳоз яшин ургандан ёки
электр тармоғида электр токи кўпайиб кетиши сабабли бузилишидан
сақланган бўлади.
Жиҳоз ўчирилмасдан олдин унинг розеткасини токдан суғуриб олманг.
Жиҳозни электрдан узганда вилкани ушлаб тортинг ва ҳеч қачон уни
шнуридан тортиб суғуриб олишга ҳаракат қилманг.
Жиҳознинг қўзғолувчан қисмларини мойламанг.
Электр токи урмаслиги учун жиҳоз корпусини ўзингиз очишга ҳаракат
қилманг. Жиҳозни таъмирламанг ва уни ўзгартиришга уринманг.
Жиҳозни таъмирлаш фақат хизмат марказларининг малакали
усталари томонидан амалга оширилиши керак.
Жиҳозни болалар ва имконияти чегараланган шахслар ишлатганда
айниқса эътиборли бўлинг.
Жиҳозни болаларнинг қўли етмайдиган жойда сақланг
Болалар жиҳозни ўйинчоқ қилиб ўйнашларига руҳсат берманг.
Жиҳозни ўрнатиш
Жиҳозни шамол тегиб турадиган, ҳаво яхши айланадиган жойга
қўйинг. Агар ҳаво етарли даражада айланмайдиган бўлса ушбу
жиҳозни йиғма мебел (китоб жовонлари ёки девор шкафлари) ичига
қўйиш мумкин эмас.
Жиҳоз кроват, диван, софа, гиламнинг устига ёки шунга ўхшаш
бошқа жойларга қўйилганда унинг ҳаво кирадиган йўллари беркилиб
қолмаслигига қараб туринг.
Жиҳозни иссиқ чиқарадиган буюмлар, масалан, радиаторлар, электр
иситгичлар, духовка ва шунга ўхшаш бошқа нарсаларнинг (шу
жумладан овоз кучайтиргичларнинг ҳам) яқинига қўйманг. Бундан
ташқари уни қуёш нури тўғри тушиб турадиган, чанг кўп бўлган ёки
тушиб кетиши, урилиши мумкин бўлган жойларга ҳам қўйманг.
Жиҳознинг устига оғир буюмларни қўйманг.
Жиҳозни ғилдираги қотиб турмайдиган мебел, қўзғолувчан қўйгич,
уч оёқ, кронштейн, стол ва шу каби жиҳоз тушиб кетиб болалар ва
катталарни шикастлантириши ҳамда ўзи бузилиши мумкин бўлган
жойларга қўйманг. Фақат жиҳоз билан қўшиб сотиладиган ёки ишлаб
чиқарувчи тавсия қилган қўйгич, уч оёқ, кронштейн ва столларни
ишлатинг. Жиҳозни қўйгич устига қўйганда ишлаб чиқарувчининг
атвсияларига амал қилинг ва ишлаб чиқарувчи тавсия қилган қотириш
буюмларинигина ишлатинг. Устида жиҳоз турган қўйгични эҳтиёт
бўлиб кўтириш лозим бўлади. Бирдан тўхтаганда, тез юрганда ёки
қийшайганда қўйгич устидаги жиҳоз тушиб кетиши мумкин.
Ёт жисмлар
Жиҳоздаги тешикларда корпус ичига бирор ёт жисм тушмаслигига
қараб туринг. Акс ҳолда бу жиҳознинг ёниб кетишига ёки электр токи
уришига сабаб бўлиши мумкин. Мободо агар шундай ҳол юз берса
жиҳозни тез электрдан узинг ва уни яна ишлатишдан олдин хизмат
марказига олиб бориб кўрсатинг.
Таъмирлатиш лозим бўлган ҳоллар
Қуйида айтилган ҳолларнинг бирортаси юз берса жиҳозни электрдан
узиб тузаттириш учун малакали усталарга мурожаат қилинг:
a) Электр шнури ёки вилка шикатланганда;
b) Жиҳознинг ичига бирор ёт жисм тушиб қолганда;
c) Жиҳоз ёмғирда қолганда ёки устига сув тўкилиб кетганда;
d) Жиҳоз қандайдир носозлик борлиги сезилганда.
e) Жиҳоз тушиб кетганда ёки бирор бошқа усулда шикастланганда;
Жиҳозни тозалаш
Жиҳозни тозалашдан олдин уни электр токидан узиб қўйинг. Жиҳозни
нам мато билан тозаланг. Тозалаш учун суюқ ёки пуркаладиган
тозалаш воситаларини ишлатиш таъқиқланади.
Чақмоқ чақаётган вақтда жиҳозни қўшимча химоя қилиш учун ҳамда
кўп вақт ишлатилмаганда вилкасини розеткадан чиқариб қўйинг.
42
4110IM.indd 424110IM.indd 42 20.10.2009 11:08:1020.10.2009 11:08:10
Page 43

ЎЗБЕК
Дискни тўғри тутиш ва тозалаш
Дарз кетган ёки қийшайган дискларни ишлатманг, акс ҳолда бу жиҳоз
бузилишига сабаб бўлиши мумкин.
Дискни фақат четидан тутиб ушланг. Дискни ёзувини юқорига
қилиб қўйиш лозим. Дискнинг ишлаш юзасига қўл теккизманг. Диск
юзасидаги бармоқ изи, чанг, тирналган жой уни ишдан чиқишига
сабаб бўлиши мумкин.
Дискка қуёш нури туширманг, иссиқ жойлар яқинига қўйманг, ҳарорат
баланд бўладиган жойларда, намлик баланд жойларда сақламанг.
Ишлатиб бўлгандан сўнг дискни ғилофига солиб олиб қўйинг.
Вақти-вақти билан диск юзасини ўртасидан четига қараб юмшоқ мато
билан артиб туринг. Тозалаш учун одатдаги ювиш воситаларини
ишлатманг.
Батареяларни ишлатиш
Батареялар оқиб кетиб жиҳоз бузилиши ёки шикастланиши мумкин.
Шундай бўлмаслиги учун қуйида айтилган кўрсатмаларга амал қилиб
ишланг:
− Батареяларни жиҳозда кўрсатилган манфий ва мусбат томонларга
тўғрилаб жойланг;
− Батареяларни аралаштириб (эски билан янгисини, турли хилини
бирга ва ҳокозо) ишлатманг.
− Агар кўп вақт ишлатмасангиз батареяларни бўлмадан олиб
қўйинг.
− Батареяларни вақтида алмаштириб туринг
Жиҳозни эҳтиёт қилиб ишлатиш ва тутиш чоралари
− Жиҳозни бошқа жойга олиб бориш лозим бўлганда жиҳоз билан
қўшиб сотилган қути ва қути ичидаги тутқичларни ишлатинг.
− Жиҳоз кўп ишлатилганда корпуси сал қизиши мумкин ва бу табиий
ҳолдир.
− Жиҳозни диск ўқилаётган вақтда жойидан олманг. Акс ҳолда диск
ва ўқиш мосламаси бузилиши мумкин.
Муаллифлик ҳуқуқлари
Ушбу жиҳозда Macrovision Corporation ва бошқа ҳуқуқ эгаларининг
АҚШ патентлари ва ақлий мулк ҳуқуқи борасидаги бошқа патентлар
билан химоя қилинган муаллифлик ҳуқуқларини химоя қилиш
технологияси ишлатилган. Муаллифлик ҳуқуқини химоя қилиш
технологиясини ишлатишга Macrovision Corporation компаниясининг
рухсати олинган бўлиши ҳамда фақат уй шароитида ишлатишга
ва томошабинлар сони чегараланган бошқа мақсадлар учун
мўлжалланган бўлиши лозим. Жиҳозни қисмларга бўлиш ва
технологиядан нусҳа олиш таъқиқланади.
Dolby Laboratories лицензияси билан тайёрланган. “Dolby” номи
ва иккита D харфидан иборат бўлган логотип Dolby Laboratories
компаниясининг савдо ёрлиғи ҳисобланади.
СЕ: ушбу жиҳоз электр магнит мувофиқлиги ва паст волтли жиҳозлар
борасидаги кўрсатмаларга мос қилиб ишланган.
Ушбу плеер қуйидаги диск турларини ўқийди:
Диск форматлари Белгиси Ёзув
DVD
АС-3
МРЗ
Video-CD (VCD)
CDDA Аудио
Kodak Picture CD
MPEG4
Жиҳоз билан қуйидагилар қўшиб берилади:
Фойдаланиш қоидалари
Олисдан бошқариш пулти
Аудио-видео кабели
ААА 1.5V туридаги 2 дона батарея
DVD ва CD дискларнинг хусусиятлари
DVD 5 (бир томонли ва бир қатламли)
DVD 9 (бир томонли ва икки қатламли)
DVD 10 (икки томонли ва бир қатламли)
DVD 18 (икки томонли ва икки қатламли)
VCD 1.0/1.1/2.0
CD тасвир ёзилган
DVCD
CDDA
МРЗ
CD-R
CD-RW
Аудио + Видео
Dolby Digital Аудио
Аудио
Аудио + Видео
Фото сурат
Аудио + Видео
Vitek DVD плеери юқори сифатли овоз ва тасвир бериш имкониятини
берадиган уйда ишлатиладиган воситаларнинг янги авлоди
ҳисобланади. DVD плеернинг хусусиятлари олдин мавжуд бўлган
ва видеони кўрсатишга мўлжалланган ҳар қанда жиҳознинг
хусусиятларидан анча устун туради. Ушбу жиҳоз уй кинотеатри
тизими учун айниқса мос сигнал манбаи ҳисобланади ва томошо
қилиш қулайлигини анча оширади.
• Ўқиладиган дисклар: DVD-R/-RW, DVD+R/+RW, CD-R/-RW
• Ўқиладиган форматлар: DVD, MPEG4 (DivX), SVCD, VCD, CDDA,
МРЗ, WMA, Kodak Picture CD, JPEG
• Ички декордерлари Dolby Digital AC-3
• Улаш ўринлари: композитли (VIDEO), S-Video, компонентли (Y
Cb/Pb Cr/Pr), коаксиал (COAXIAL)
(5.1 CH AUDIO OUT), SCART
• USB улаш ўрни
• Караоке
• Кардридер SD, MS, MMC
• Экран менюси рус ва инглиз тилларида берилган
, оптик (OPTICAL), 5.1/стерео
43
4110IM.indd 434110IM.indd 43 20.10.2009 11:08:1020.10.2009 11:08:10
Page 44

ЎЗБЕК
Диск ҳақидаги маълумот
ТУРИ DVD VCD SVCD CD
ЁЗИШ ФОРМАТИ MPEG 2 MPEGI MPEG II DIGIT
Бир томонли ва бир
ДИСК ҲАЖМИ
ЎЛЧАМИ, см 12/8 12 12 12/8
ГОРИЗОНТАЛ ТИ
ТИҒИЗЛИГИ
СУБТИТРЛАР 32 хилгача - 8 -
ТИЛИ 8 тагача 2 4 -
АЛОМАТИ
Турли ишлаб чиқарувчилар чиқарадиган DVD дисклар турлича хусусиятга эга бўлади ва қуйидаги аломатлар билан белгиланади:
қатламли 4,7 Гб - 2 соат
Икка қатламли ва бир
томонли 8,5 Гб - 4 соат
> 500 сатр >240 сатр >350 сатр -
Ҳудуд коди ва видео чиқиши тизими
Dolby digital surround
Аудио треклар сони
Икки томонли бир
қатламли
9,4 Гб - 4,5 соат
Икки томонли икки
қатламли
17 Гб - 9 соат
650М 74 мин 650M 45 мин 650M 74 мин
Субтитрлар сони
Тасвир формати
Кўриш чегараланган
Кўриш бурчаклари
5.1 каналли овоз чиқиши
Яширин субтитрлар мавжуд
Икки каналли стерео
Чеклов мавжуд
Дискларга оид атамалар
Сарлавҳа
Одатда DVD дискка ёзилган тасвир ёки мусиқа бир неча қисмларга бўлинади ва бу қисмлар «сарлавҳа» деб номланади.
Парча (қисм)
DVD дискдаги тасвир ёки мусиқанинг бир сарлавҳа доирасидаги кичик парчалари (қисмлари) ва уларга, топиш осон бўлиши учун, рақам
қўйилган бўлади. Баъзи дискларда парчалар (қисмлар) бўлмайди.
Трек
SVCD, VCD ёки CD даги тасвир ёки мусиқанинг бир қисми. Топиш осон бўиши учун трекларга рақам қўйилган бўлади.
Саҳна
Тасвирни назорат қилиш функцияли ва динамик ҳамда статтик тасвир ёзилган VCD дисклар саҳна деб ёзилган қисмларга бўлинган бўлади.
Ҳар бир саҳна рақамига қараб осон топилади ва экранда осон тасвир этилади. Саҳна кўпинча бир ёки бир қанча трекдан иборат бўлади.
РВС (SVCD,VCD) функцияси
SVCD ёки VCD дисклар ўқилган вақтда экранда дискдаги меню кўриниши мумкин ва у тасвирни назорат қилиш функцияси ёки РВС деб
аталади.
44
4110IM.indd 444110IM.indd 44 20.10.2009 11:08:1020.10.2009 11:08:10
Page 45

Диск тури Функцияси
РВС функцияси мавжуд бўлмаган VCD дисклар (1.1 тури) Мусиқа (овоз) ва тасвирни чиқаради
ЎЗБЕК
РВС функцияси мавжуд бўлган SVCD/VCD дисклар ( 2.0 тури) VCDга ёзилган тасвирни кўриш учун экранда кўринадиган менюдан
Эслатма: диск компьютерда ёзилган ҳолатларда, дискнинг формати тўғри келгани билан, диск ёзилган дастур мос бўлмагани учун диск
ўқилмаслиги мумкин.
фойдаланиш мумкин
ТАВСИФИ
Олд панел
1. STANDBY/ON tugmasi
2. yoqish indikatori
3. disklar uchun lotok
4. joystik (uning yordamida pleyer boshqariladi):
(►)– qayta tinglash, video ko’rish (PLAY)
(║) – to’xtatib turish (PAUSE)
(▲) – disk uchun lotokni ochish/yopish (OPEN/CLOSE)
(■) – qayta tinglashni (videoni ko’rishni) to’xtatish (STOP)
5. LED¬ displey (yorug’lik diodli displey)
6. Masofadan boshqarish pultidan signallarni fotoqabul qilish moslamasining o’rni
7. kartrider SD/MS/MMC
8. USB tashuvchini ulash uchun uya (USB Flash Drive)
Yon tomondagi panel (o’ng panel)
1. mikrofonlarni ulash uchun uya
2. mikrofonlar ovoz balandligi darajasini sozlash dastasi
3. mikrofonlar aks-sadosi darajasini sozlash dastasi
Орқа панел
1. Ta’minot
2 . Audiochiqish uyalari 5.1SN
3. Koaksial audiochiqish uyasi (Coaxial)
4. Kompozitli videochiqish uyasi (Video)
5. Komponentli videochiqish uyalari (Y Cb/Pb Cr/Pr)
6. Videochiqish uyasi S¬-Video
7. Optik audiochiqish uyasi (OPTICAL)
8. SCART uyasi
45
4110IM.indd 454110IM.indd 45 20.10.2009 11:08:1120.10.2009 11:08:11
Page 46

ЎЗБЕК
Олисдан бошқариш пулти
1. диск лаппагини очиш/ёпиш тугмаси OPEN/CLOSE
2. видео чиқиш ўрнини ўзгартириш тугмаси V. MODE
3. OSD тугмаси (диск ҳақидаги маълумот)
4. POWER тугмаси
5. рақамли тугмалар
6. ранг тизимини ўзгартириш тугмаси PAL/NTSC
7. буйруқни бекор қилиш тугмаст CLEAR
8. дастурлаш режими тугмаси PROG
9. ўтиш тугмалари (←↑→↓)
10. тасвир ўлчамини ўзгартириш тугмаси ZOOM
11. олдинги трекка ўтиш тугмаси PREV
12. кейинги трекка ўтиш тугмаси NEXT
13. диск ўқилишини тўхтатиш тугмаси STOP
14. овоз баландлигини ўзгартириш тугмаси VOLUME +/-
15. манбаани ўзгартириш тугмаси DVD/USB/CARD
16. ракурсни ўзгартириш тугмаси ANGLE
17. овозни ўчириш тугмаси MUTE
18. кадрма-кадр кўриш тугмаси STEP
19. диск ўқилишини тўхтатиб туриш тугмаси PAUSE
20. тез орқага ўтказиш тугмаси F REV
21. тез олдинга ўтказиш тугмаси F FWD
22. секинлатиб кўрсатиш тугмаси SLOW
23. кўрсатиш/киритиш тугмаси ►
24. ўзгартириш менюсига ўтиш тугмаси SETUP
25. парчани қайтариб кўрсатиш тугмаси A-B RPT
26. қайтариш режимини танлаш тугмаси REPEAT
27. қидириш менюсига кириш тугмаси SEARCH
28. дискдаги ёзувлар менюсига кириш тугмаси TITLE/PBC
29. субтитрларни танлаш тугмаси SUBTITLE
30. тил ва овозни танлаш тугмаси AUDIO
31. менюга кириш тугмаси MENU
Олисдан бошқариш пултига батарея қўйиш тартиби
• Олисдан бошқариш пултининг батарея солинадиган бўлмасига
батарея қўйинг
• Агар кўп вақт ишлатмасангиз олисдан бошқариш пултидан
батареяларни олиб қўйинг
• Батареяларни вақтида алмаштириб туринг
46
4110IM.indd 464110IM.indd 46 20.10.2009 11:08:1120.10.2009 11:08:11
Page 47

ЎЗБЕК
улаш
Диққат: DVD плеерни бошқа жиҳозга улашдан олдин бошқа жиҳознинг электр қуввати ва DVD плеернинг электр қуввати ўчирилганлигини
текшириб кўринг
Видео шнурларни улаш
Телевозорингизнинг имкониятларига қараб қуйида кўрсатилган шнур турларидан бирини танланг.
(1) Композитли видеосигнал
Стандарт сифатдаги тасвирни кўриш учун DVD плеердаги композитли видео сигнал (VIDEO) чиқиш жойини телевизор ёки мониторга уланг ва
бунда жиҳозга қўшиб бериладиган ва сариқ учли аудио-видое кабел (A/V)ни ишлатинг.
2) S-Video улаш ўрни
Сифати яхшироқ тасвир ёзилган дискларни кўриш учун DVD плеердаги S-VIDEO улаш ўрнини телевизор ёки монитордаги тегишли улаш ўрнига
S-VIDEO кабели билан уланг. (жиҳозга қўшиб берилмайди)
3) Компонентли видео чиқиш
Юқори сифатли тасвирлардаги рангларни аниқ бериш учун компонентли Y Cb/Pb Cr/Pr видео улаш ўрнини (қизил, кўк, яшил) телевизор ёки
мониторга тегишли кабелни ишлатиб уланг (жиҳозга қўшиб берилмайди)
(4) SCART улаш ўрни
DVD плеердаги SCART улаш ўрнини телевизор ёки мониторга улаш учун 21 контактли SCART кабели ишлатилади (жиҳозга қўшиб берилмайди)
Эслатма:
• Бир неча видео чиқишларни бир вақтда уланиши тасвир сифатини бузиши мумкин.
• Фақат тўғри уланганда ва тизим тўғри белгиланганда тасвир сифати яхши бўлиши мумкин.
Аудио тизимни улаш
Телевизорингиз имкониятларидан келиб чиқиб қуйидаг кўрсатилган улаш турларидан бирини танланг.
(1) Икки канналли аналогли чиқиш
Икки каналли аналогли чиқишни улаш учун FR ва FL 5.1 СН аналогли аудио чиқишларини ишлатинг (5.1 CH AUDIO OUT) ва шундай ҳолатда
аудио чиқиш режимини 2 каналли режимга ўтказинг (динамикларни тўғрилаш қоидаларида кўрсатилган)
(2) 5.1 СН Аналогли аудио чиқиш
Беш каналли аудио чиқишни ишлатиш учун (FL, FR, SL, SR, CENTER, SUB WOOFER) DVD плеернинг шундай чиқиш ўрнини кабел билалн овоз
кучайтиргичнинг беш каналли чиқиш ўрнига (5.1) улаш лозим бўлади 3 жуфт AV кабели билан улаш лозим бўлади.
3) Коаксиалли рақамли аудио чиқиш
DVD плеерингиздаги COAXIAL чиқиш ўрнини овоз кучайтиргичдаги тегишли ўринга улаш учун махсус коаксиал кабелни ишлатинг.
4) Оптик рақамли чиқиш
DVD плеерингиздаги OPTICAL улаш ўрнини динамикдаги оптик улаш ўрнига улаш учун махсус шиша толали кабел ишлатилади.
Эслатма: уланиш усули белгиланиши параметрлари DVD-плеер ташқи жиҳозларга уланадиган улаш усулига мос бўлиши керак.
47
4110IM.indd 474110IM.indd 47 20.10.2009 11:08:1120.10.2009 11:08:11
Page 48

ЎЗБЕК
ТИЗИМНИ ТЎҒРИЛАШ
1. Телевизорни ишлатинг ва уни кирадиган сигналга мос қилиб
тўғриланг.
Белгилаш менюсига кириш учун SETUP тугмасини босинг.
Менюдан чиқиш учун SETUP тугмасини яна бир марта босинг.
2. Ўтказиш тугмаларини ишлатиб (←→) қуйидаги саҳифалардан
бирини ишлатинг: асосий белгилашлар саҳифаси, овозни
белгилаш саҳифаси, Dolby, видеони белгилаш саҳифаси, алоҳида
белгилашлар саҳифаси.
3. Керакли саҳифага ўтиш учун (►) тугмасини босинг.
4. (↓↑) тугмаларини босиб ўзгартирмоқчи бўлган бандга ўтинг.
5. Белгилашларни ўзгартириш ички саҳифасига кириш учун ► ёки
→ тугмасини босинг. Ўтказиш тугмалари ёрдамида (↓↑) керакли
амални танланг ва ► ёки ← тугмалари билан танланган амални
тасдиқланг ёки орқага қайтинг.
Белгилаш саҳифасига қайтиш учун (←) тугмасини босинг
Диққат: Менюнинг баъзи кўрсатгичлари олдиндан белгиланган
бўлади ва улар кулранг билан кўрсатилиб уларни танлаш ва
ўзгартириш мумкин бўлмайди.
Киритилган белгилашлар жиҳоз электрдан узилганда ҳам
сақланиб қолади.
Умумий белгилашлар
ЭКРАН
Стандарт/PS: DVD плеер оддий телевизорга уланганда кенг
экранли тасвир экранда тўлиқ кўрсатилади, бироқ унинг бир қисми
кўрсатилмайди (4:3)
Стандарт/LB: DVD-плеер одатдаги телевизорга уланганда кенг
экранли тасвир юқориси ва пастида қора йўл қолиб кўрсатилади (4:3).
Кенг экран(Wide): Уй кинотеатри кенг экранли телевизорга уланганда
ушбуни танланг(16:9).
МЕНЮ ТИЛИ
Экран менюси тилини танлаш
РАК УРС
DVD дискдаги баъзи филмлар турли ракурсларда ёзилган бўлиши
мумкин. Бу ҳақдаги батафсил маълумот DVD дискда кўрсатилган
бўлади.
Агар ушбу режим ишлатилаётган бўлса турли бурчаклардан олиб
ёзилган DVD диск ўқилаётган вақтда экранда камеранинг сурати
кўрсатилади.
СУБТИТРЛАР
Агар дискда субтитрлар ёзилмаган бўлса ушбу функция ишламайди.
Агар субтитрлар функцияси ўчирилган бўлса олисдан бошқариш
пултидаги SUBTITLE тугмасини босинг.
ЭКРАН ТАСВИРИ
Агар плеер ишлатилиб диск ўқилмаётган бўлса экранда ҳаракат
қилаётган тасвир пайдо бўлади ва бир неча дақиқадан сўнг плеер
кутиш режимига ўтади.
HDCD
Дискретизация оралиғини 44.1 К, 88.2 К ёки ВЫКЛ (ўчирилган) деб
танлашингиз мумкин. Дискретизация оралиғи қанча баланд бўлса
овоз сифати ҳам шунча юқори бўлади.
Овозни белгилаш саҳифаси
• КОЛОНКАЛАРНИ БЕЛГИЛАШ
Смешивание
Передние колонки
Центральные колонки
Задние колонки
Сабвуфер
Установить смешивание
лев./прав.
больш.
больш.
больш.
вкл.
лев./прав.
Стерео
5.1 СН
• Аралаштириш
Чап/Ўнг: 5.1 CH форматидаги оригинал овоз фақат чап ёки ўнг
каналдан узатилади.
Стерео: 5.1 CH форматидаги оригинал овоз стерео режимида
узатилади.
Agar akustik tizimda faqat oldingi kolonkalar va sabvuferlar yoqilib,
ovoz chiqsa, u holda sabvuferni to’liq ishlatish uchun menyuning
bandlarini quyidagicha belgilash lozim:
Menyuning «Oldingi kolonkalar» bandida «kichik» (kichik kolonkalar),
«Sabvufer» bandida esa «yoqilgan» degan qiymatni belgilab, ishlatish
kerak.
Смешивание
Передние колонки
Центральные колонки
Задние колонки
Сабвуфер
Настройка передних колонок
Стерео
мален.
больш.
больш.
вкл.
больш.
мален.
5.1 кан.: 5.1 CH форматдаги оригинал овоз узатилади.
• ОЛДИНГИ, МАРКАЗИЙ, ОРТКИ КОЛОНКАЛАР ВА САБВУФЕР
Агар акустик тизимингизда олдинги, марказий, ортки колонкалар
ва сабвуфер бўлса, ҳақиқий конфигурациядан келиб чиқиб
тегишли белгилашни бажаришингиз мумкин. Агар микширлаш
ишлаётган бўлса ушбу функция ишламайди. (Чап/Ўнг, Стерео).
• SPDIF БЕЛГИЛАШ
SPDIF ўчирилган: овоз жиҳозга фақат аналогли кўринишда
чиқади (5.1 CH AUDIO OUT).
SPDIF/RAW: ракамли чиқиш сигнали дискка ёзилган оригинал
форматда бўлади.
SPDIF/PCM: рақамли чиқиш сигнали декодирланган РСМ
форматида бўлади.
Dolby Digital тизимини белгилаш
ОХИРГИ САҲНАНИ ЭСЛАБ ҚОЛИШ
Агар ушбу функция ишлаётган бўлса диск чиқариб олинганда плеер
унда охирги марта кўрсатилган саҳнани эслаб қолади ва кейинги
сафар диск қўйилганда уни хотирасида сақлаб қолган жойидан
кўрсата бошлайди.
ИККИ КАРРАЛИ МОНО
Агар овоз кучайтиргичингизда/декодерингизда Dolby Digital
чиқиши бўлса стерео, чап-моно, ўнг-моно, аралаш монони
танлашингиз мумкин.
ДИНАМИК ДИАПАЗОН
Юқори динамик диапазонли овозли дастурлар эшитилганда ушбу
режимни танлаш овоз оптимал даражада кескин ўзгаришига
йўл қўймайди ва шу билан бирга овоз сифатини ва аниқлигини
сақлаб қолиш имкониятини беради. Бу имконият овоз сифатини
юқорида даражада сақлаб қолган ҳолда оила аъзоларингизни
(масалан кечаси) безовта қилмаслик имконини беради.
48
4110IM.indd 484110IM.indd 48 20.10.2009 11:08:1120.10.2009 11:08:11
Page 49

ЎЗБЕК
Видеони белгилаш
• ТВ РЕЖИМ
CVBS: композитли видеосигналга ўтиш
YUV: Y Cb/Pb Cr/Pr улаш ўрни компонентли улаш ўрнига
уланганда ушбу режимни танланг.
RGB: SCART улаш ўрни билан уланганда ушбу режимни танланг.
• РАЗВЕРТКА: Агар телевизорингиз прогрессив тасвир усулида
ишлаши мумкин бўлса YUV режими танласангиз прогрессив
кўрсатиш усулини ишлатишингиз ёки ўчириб қўйишишнгиз мумкин
бўлади.
АНИҚЛИК,ЁРҚИНЛИК, ТИНИҚЛИК Ушбуларнинг керакли
даражасини истагингизга қараб ўзгартиришингиз мумкин.
Алоҳида белгилашлар
• Овоз баландлигини кўтариш ёки тушириш учун VOLUME +/тугмасини босинг.
MUTE (овозни ўчириш)
• Овони ўчириш учун MUTE тугмасини босинг. Овозни яна
чиқариш учун MUTE тугмасини яна бир марта босасиз ёки овоз
баландлигини ўзгартириш тугмасини босасиз.
PLAY (дискни ўқиш)
• Диск ўқилиши учун плеер олд панелидаги ёки олисдан бошқариш
пултидаги ► тугмасини босинг.
PAUSE (диск ўқилишини тўхтатиб туриш)
• Диск ўқилишини тўхтатиб туриш учун плеер олд панелидаги ёки
олисдан бошқариш пултидаги PAUSE тугмасини босинг. Одатдаги
усулда кўрсатишга ўтиш учун ► тугмасини босинг.
STOP (диск ўқилишини тўхтатиш)
• DVD, SVCD, VCD, CD дисклар ўқилганда STOP тугмасини бир
марта боссангиз плеер диск ўқишдан тўхтаган жойни эслаб
қолади. Яна давом эттириш учун олисдан бошқариш пултидаги
ёки плеер олд панелидаги ► тугмасини босинг. Диск ўқилишини
тўла тўхтатиш учун STOP тугмасини иккинча марта босинг.
F.REV ◄◄ F.FWD ►► (олдинга/орқага тез ўтказиш)
• Олдинга тез ўтказиш учун F.FWD ►► тугмасини босинг.
• Орқага тез ўтказиш учун F.REV ◄◄ тугмасини босинг
PREV I◄◄/ NEXT ►►I (олдинги/кейинги трекка ўтиш)
• DVD дисклар ўқилаётган вақтда олдинга парчага ўтиш учун
панелдаги ёки олисдан бошқариш пултидаги PREV (I◄◄)
тугмасини босинг.
• SVCD, VCD, CD дисклар ўқилаётган вақтда олдинги трекка ўтиш
учун PREV (I◄◄) тугмасини босинг.
• DVD дисклар ўқилаётган вақтда кейинги парчага ўтиш учун
панелдаги ёки олисдан бошқариш пултидаги NEXT (►►I)
тугмасини босинг.
• SVCD, VCD, CD дисклар ўқилаётган вақтда кейинги трекка ўтиш
учун NEXT (►►I) тугмасини босинг.
Кўришдан олдин белгиланади
ТВ тури
Телевизорингиз турли телевидение тизимларига мос келади. PAL,
NTSC ёки АВТО дан исталган бирини танлашингиз мумкин.
ОВОЗ (овоз тилини танлаш), СУБТИТРЛАР, ДИСК МЕНЮСИ
Ушбу параметрларни хохишингизга қараб олдиндан ўзгартиришингиз
мумкин. Агар сиз киритган ўзгартиришлар дискдаги ёзувга тўғри келса
диск сизнинг хохишингизга қараб ўқилади. Акс ҳолда диск олдиндан
белгиланган қоидаларга кўра ўқилади.
ЁШГА ҚАРАБ КЎРИШНИ ЧЕКЛАШ
Ушбу функция ота-оналарга фарзандлари кўришлари мумкин
бўлмаган дискларни химоя қилиш имконини беради. Ушбу функция
билан химоя қилинган даражадан юқори бўлган диск кўрсатилмайди.
Эслатма: Ушбу ўринни ўзгартирганда сизга янги парол керак бўлади
(олдиндан қўйилган парол рақами – 136900)
ПАРОЛ
Бу саҳифада паролни ўзгартиришингиз мумкин бўлади. Менюда
кўринган ойнада ПАРОЛЬ => ИЗМЕНИТЬ=>►ни танланг. Олдин эски
паролни киритинг (олдиндан белгиланган парол 136900), шундан
сўнг янги паролни киритинг ва яна бир марта паролни киритиб уни
тасдиқланг. Янги паролни сақлаш учун ► тугмасини босинг.
ОЛДИНДАН БЕЛГИЛАНГАНИ
Заводда қўйилган белгилашларга қайтилади
Асосий функциялари
Эслатма: тугма босилганда экранда кўринган аломати дискда ушбу
функция ишламаслигини билдиради
POWER (ишлатиш)
• Плеернинг олд панелидаги STANDBY/ON тугмасини ёки олисдан
бошқариш пултидаги POWER тугмасини босиб плеерни ишлатинг.
• Кутиш режимига ўтиш учун олисдан бошқариш пултидаги POWER
тугмасини босинг.
OPEN/CLOSE (диск қўйиш лаппагини очиш/ёпиш)
• Диск қўйиладиган лаппакни очиш учун плеер олд панелидаги
OPEN/CLOSE тугмасини ёки олисдан бошқариш пултидаги
POWER тугмасини босинг. Дискни лаппакка ишлаш томонини
пастга қилиб (ёрлиқ томонини юқорига қилиб) қўйинг. Лаппакни
ёпиш учун OPEN/CLOSE тугмасини яна бир марта босинг ва
плеер автоматик равишда дискни ўқий бошлайди. Ҳамма дисклар
ҳам автоматик равишда ўқилмайди
VOLUME (овоз баландлигини ўзгартириш)
DVD/USB/CARD (TASHUVChINI TANLASH)
Buyum quyidagi xotira kartalarining turlarini tutib turadi:
MS CARD: MEMORY STICK CARD
SD CARD: SD MEMORY CARD
MMC CARD: MULTI MEDIA CARD
• Pleyerni yoqing
• Xotira kartasini kiriting (SD, MS, MMC)
• DVD pleyerni xotira kartasini o’qish yoki USB dan o’qish rejimiga
o’tkaziщ uchun “DVD/USB/CARD” tugmasidan foydalaning. (Agar Siz
DVD pleyerga har xil tashqi xotira moslamalarini ulagan bo’lsangiz,
ularning ichidan tanlash uchun “DVD/USB/CARD” tugmasidan
foydalaning).
Agar xotira moslamasini yuklash muvaffaqiyatli o’tgan bo’lsa,
avtomatik ravishda navigatsiya menyusi aks etadi. Navigatsiya
tugmalari (↑↓) yordamida kerakli papkani tanlang, keyin tasdiqlash
uchun ► tugmasini bosing. Papkalarda (↑↓) tugmalari yordamida
kerakli faylni tanlang, keyin uni qayta tinglash yoki ko’rish uchun
► tugmasini bosing. Ushbu betdaavvalgi menyuga qaytish uchun
← tugmasidan, keyingi yoki avvalgi betga o’tish uchun (←→)
tugmalaridan foydalaning.
• Diskni qayta tinglash yoki ko’rish paytida xotira moslamasi darhol
to’xtaydi.
• Disk ishlaganda va ayni paytda yuklanayotgan xotira kartasi yoki
USB moslamasi bo’lganda diskni qayta tinglash yoki ko’rish ustuvor
ahamiyatga ega bo’ladi. Bu holda tegishli tashuvchini tanlash uchun
“DVD/USB/CARD” tugmasidan foydalaning.
• Moslama to’xtatilgan paytda Siz uning ichidan tashqi moslamasini
(xotira kartasini yoki USB tashuvchini) olishingiz mumkin.
• Avval DVD ¬pleer diskni yuklaydi. Boshqa rejimni tanlash uchun
“DVD/USB/CARD” tugmasini bosing.
• Xotira kartasi o’qilganda rejim aks ettirilmaydi. Siz DVD-rejimga o’tish
uchun “DVD/USB/CARD” tugmasini bosishingiz mumkin.
Izoh
1. Ishlab chiqaruvchi bozorda mavjud bo’lgan 1.1 va 2.0 interfeysli
barcha USB moslamalar tutib turilishini kafolatlamaydi.
2. DVD-¬pleer multimedia fayllari yozilishining eng ko’p uchraydigan
parametrlariga mosligi yuzasidan tekshirilgan. Lekin multimedia
fayllarini yaratishda ishlatiladigan mavjud bo’lgan va yangi paydo
bo’layotgan nihoyatda ko’p sonli parametrlar va xususiyatlar tufayli
ularning ba’zilarini buyum qayta eshittirmasligi, ko’rsatmasligi yoki
to’gri ko’rsatmasligi mumkin.
49
4110IM.indd 494110IM.indd 49 20.10.2009 11:08:1120.10.2009 11:08:11
Page 50

ЎЗБЕК
PROG (дастурлаш)
• Агар дискда иккита ёки ундан кўп трек, парча ёки сарлавҳа бўлса ушбу тугмани ишлатиб уларни кўриш ёки эшитиш тартибини белгишингиз
мумкин.
• Дастурлаш режимига кириш учун PROG тугмасини босинг ва экранда дастурлаш менюси кўринади. Трекнинг, парчанинг ёки сарлавҳанинг
рақамини киритиш учун рақамли тугмаларини босинг. 10 ва ундан ортиқ рақамли трек рақамини киритиш учун 10+ тугмасини ишлатинг.
( мисол учун, 26 рақамини киритиш учун тугмаларни қуйидаги тартиб билан босиш керак бўлади: 10+,10+,6). Агар ёзувлар 10 тадан кўп
бўлса дастурлаш жадвалини давом эттитириш учун NEXT ►► I тугмасини босинг (кўпи билан 20 ёзувни киритиш мумкин). Ўтиш учун
ўтказиш тугмаларини (↓→←↑) босинг. Дастурлаш тугагандан сўнг ўтказиш тугмалари ёрдамида «старт» (бошлаш) ёзувини танланг ва
дастурланган тартибда ўқилиши учун ► тугмасини босинг.
• МРЗ, DiV X дискларини дастурлаб бўлмайди! Файллар рўйхатини очиш учун PROG тугмасини бир марта босинг. Ўтказиш тугмасини босиб
керакли файлни танлаб олишингиз мумкин.
TITLE/PBC (сарлавҳалар/тасвирни назорат қилиш) ва MENU (меню)
TITLE/PBC ва MENU тугмалари дискдаги ёзувлар рўйхатини чиқариш учун ишлатилади. Агар дискда сарлавлаҳалар (филмалар) кўп бўлса
уларнинг рўйхатини чиқариш учун TITLE/PBC тугмасини босинг. Сарлавҳанинг ичидаги рўйхатни кўриш учун MENU тугмасини босинг
Агар дискда фақат битта сарлавҳа бўлса MENU тугмасини босинг
SVCD, VCD2.0 дисклар ўқилган вақтда диск менюсига чиқиш учун TITLE/PBC тугмасини босинг. Ушбу режимда сиз тегишли рақамли тугмани
босиб трекнинг рақамини танлашингиз мумкин. VCD1.1, CDDA ва МРЗ дискларда РВС менюси бўлмайди.
SUBTITLE (субтитрларни танлаш)
• DVD дисклар ўқилаётган вақтда SUBTTITLE тугмсини босиб субтитр тилини танлайсиз.
ANGLE (ракурс)
• DVD дисклар ўқилаётган вақтда ANGLE тугмасини босиб керакли тасвир бурчагини танланг.
STEP (кадрма-кадр кўрсатиш)
• DVD, SVCD, VCD дискларни кадрма-кадр кўриш учун STEP тугмасини босинг. Одатдаги тартибда кўришга ўтиш учун олисдан бошқариш
пултидаги ёки плеер олд панелидаги ► тугмасини босинг.
REPEAT (қайтариш)
• Трек, парча, сарлавҳа ёки бутун дискни қайта кўриш учун REPEAT тугмасини босинг.
А-В RPT (А-В парчасини қайтариш)
• Диск ўқилганда А-В тугмасини босиб парчани қайтаришингиз мумкин.
• Парчанинг бошланиш (А) қисмини белгилаш учун А-В RPT тугмасини босинг.
• Парчанинг тугаш қисмини (В) белгилаш учун А-В RPT тугмасини яна бир марта босинг. Танланган парча қайтариб кўрсатила бошлайди.
• Қайтаришни бекор қилиш ва одатдаги усулда кўрсатишга ўтиш учун А-В RPT тугмасини яна бир марта босинг.
ZOOM (тасвир ўлчамини ўзгартириш)
• Тасвир ўлчамини ўзгартириш учун ZOOM тугмасини босинг. Тасвир катта бўлганда уни экраннинг турли қисмига ўтказиш учун (↑←→↓)
тугмаларини босинг.
AUDIO (тилни танлаш)
• Бир неча аудио тили мавжуд DVD диск ўқилаётган вақтда тилни ўзгартириш учун AUDIO тугмасини босинг.
SEARCH (қидириш)
• Диск ўқилаётган вақтда SEARCH тугмасини бир марта босинг ва экранда қидириш сатри кўринади. Рақамли тугмаларни босиб керакли
парчани танлайсиз.
OSD (диск ҳақидаги маълумот)
• OSD тугмасини боссангиз экранда диск ҳақидаги маълумот кўринади
SETUP (тизимни белгилаш менюси)
• SETUP тугмасини боссангиз экранда тизимни белгилаш менюси кўринади
V-MODE (видео чиқиш режимини ўзгартириш)
• Видео чиқиш режимини ўзгартириш учун V-MODE тугмасини босинг (CVBS, YUV, YUV-PSCAN, RGB ва ҳк.)
РАҚАМЛИ ТУГМАЛАР (1-9, 0, 10+)
• VCD 1.1, CD дисклар қўйилганда трекнинг, бобнинг рақамини танлаш учун рақамли тугмалар босилади. PROGRAM ва MENU функциялари
ишлаётган вақтда ҳам рақамли тугмалардан фойдаланилади.
• 10 ва ундан ошиқ треклар рақамини киритиш учун 10+ тугмасини ишлатинг.
PAL/NTSC (ранг тизимини белгилаш
• Ранг тизимини белгилаш учун ушбу тугмани босасиз: PAL, NTSC, MULTI.
CLEAR (бекор қилиш)
• Киритилган рақамни бекор қилиш учун ушбу тугмани босинг
SLOW (секинлаштириб кўрсатиш)
• Тасвир секинлаштириб кўрсатилиши учун олисдан бошқариш пултидаги SLOW тугмасини босинг.
Бошқа функциялар
Караоке
Караоке DVD, VCD форматидаги дискка ёзилган мусиқа ва субтитр бўлиб у фойдаланувчига қўшиқни қачон айтиш кераклигини кўрсатади.
Қўшиқ айтиш учун микрафон керак бўлади (жиҳозга қўшиб берилмайди)
• Микрафоннни DVD плеер чап томонидаги улаш ўрнига уланг
• Buyumning yon panelida joylashgan sozlash dastasi yordamida mikrofon aks-sadosining talab etiladigan darajasini belgilang.
• DVD-pleerga karaoke diskni qo’ying, u avtomatik qayta eshittiriladi.
• Mikrofonning o’z-o’ziga shovqin bermasligi uchun:
– Mikrofonni televizor yoki baland ovozli moslamaga bevosita yaqin qo’ymang;
– Televizor yoki kuchaytirgichning ovozini pasaytiring;
– Mikrofon ovoz balandligini kamaytiring.
МРЗ/CD дискларни ўқиш
• Бир файл/папкадан бошқасига ўтиш учун (↓↑) тугмасини босинг. Папкани очиш/ёпиш учун ► тугмасини босасиз ва файлни эшитиш учун ►
тугмаси босилади.
CDда расм ва суратларни кўриш
• Суратли диск қўйилганда экранда файларнинг рўйхати кўринади. Рўйхатдаги файлларни кўриш учун (↓↑) и ► тугмаларини ишлатинг.
Танланган сурат экранда кўринади.
Суратларни кўришда ишлатиладиган тугмалар
ZOOM – ўлчамни ўзгартириш режимига ўтиш
50
4110IM.indd 504110IM.indd 50 20.10.2009 11:08:1120.10.2009 11:08:11
Page 51

ЎЗБЕК
F.FWD (►►) F.REV (◄◄) – сурат ўлчамини ўзгартириш
(↓↑→←) – катталаштирилган суратни жойидан қўзғотиш
Агар ZOOM функцияси ишлатилаётган бўлса (↓↑→←) тугмаларини босиб суратни айлантириш мумкин.
НОСОЗЛИКЛАРНИ ТОПИШ ВА ТУЗАТИШ
Носозлик аломати Носозлик сабаби Тузатиш йўли
Электр йўқ Электр шнури уланмаган. Электр шнурини розеткага уланг
Тасвир кўринмаяпти Телевизорда кириш манбааси нотўғри кўрсатилган Плеернинг уланишига мос белгилашни танланг
Белгилаш реал улашга мос эмас Белгилашнши реал улашга мосланг
Видео кабел улаш ўрнига мустаҳкам жойланмаган Видеокабелнинг уланишини текшириб кўринг
Овоз йўқ Аудио кабел яхши жойланмаган Аудио кабелнинг уланишини текшириб кўринг
Уланган жиҳозлар ишлашга туширилмаган Уланган жиҳозларни ишлатинг
Овоз белгиланиши нотўғри Тегишли белгилашни танланг
Овоз бузилиб чиқаяпти Овоз жуда баланд қўйилган Овоз баландлигини пасайтиринг
Тасвир титраяпти Телевизор белгиланиши нотўғри Телевизорнинг белгиланишини тўғриланг
Диск ўқилмаяпти Диск қўйилмаган Диск қўйинг
Диск нотўғри қўйилган Диск тўғри қўйилганини текшириб кўринг (ёрлиқ
Плеер ичига томчи йиғилган DVD-плеерни дисксиз бир соат ўчириб қўйинг
Микрафон ишламаяти Микрафон уланмаган Микрафонни уланг
Микрафон овози паст қўйилган Микрафон овозини кўтаринг
томони юқорида бўлиши керак)
Олисдан бошқариш пулти
ишламаяпти
Тизимнинг баъзи функциялари
ишламаяпти
Пулт плеерга тўғриланмаган Пултни плеерга тўғриланг
Пулт билан плеер ўртасидаг масофа 8 метрдан
ортиқ
Олисдан бошқариш пултининг батареяси
кучсизланган
Тугмалар нотўғри босилган Қўлланмаган қараб ҳаракатни яна бир марта
Плеер билан плеер ўртасидаги масофани
камайтиринг
Иккала батареяни ҳам айлантиринг
такрорланг
Техник хусусиятлари
Ишлаши учун лозим бўладиган электр қуввати 110-240 В, 50/60 Гц
Электр истеъмоли 12 Вт
Ўлчами 362x220x41мм
Оғирлиги 1540 г
Ишлаш ҳарорати 5°С дан 35 °С гача
Ишлаш шароити намлиги 5% дан 90% гача
Ранг тизими NTSС / PAL
Маълумотлар формати Ўқиладиган форматлар: DVD, DVCD, SVCD, VCD, CDDA, МРЗ, WMA, HDCD, JPEG,
Манбаа тури DVD, DVD-R/-RW/+R/+RW, CD-R/-RW
Рақамли аналогли ўзгартирувчи 192 кГц / 24-бит
Виде чиқиш 1Vp-p (75 Оум)
S-Video чиқиши: Y: 1Vp-p (75 Оум) С: 0,286Vp-p (75 Оум)
Аудио чиқиши 2.0 Vt 5.1 Channel
Рақамли аудио сигнал чиқиши 0,5Vp-p (75 Оум)
Улаш ўринлари CVBS, S-VIDEO, Y Cb/Pb, Cr/Pr, SCART
Частота доираси
Шовқин нисбати ~-80дБ
Бузилиш коэффициенти <0,01%
Динамик диапазони ~80дБ
Олисдан бошқариш пулти
Узатиш усули Инфра қизил нур
Қувват манбати ААА туридаги 2 дона батарея
KODAK PICTURE CD
MPEG4 (DivX) форматидаги сиқилган видеони кўрсатиш
CD: 20Гц-20кГц (EIAJ), DVD: 20Гц-44кГц (96кГц ИКМ), 20Гц-22кГц (48кГц ИКМ)
Дизайни ва хусусиятлари олдиндан огоҳлантирилмасдан туриб ўзгартирилиши мумкин
Ушбу маҳсулот 89/336/ЕЕС Кўрсатмасидаги ва 73/23 ЕЕС Қароридаги паст кучланиш талабларига мувофиқ келади.
Жиҳознинг ишлаш муддати 5 йилдан
Кафолат шартлари
Ушбу жиҳозга кафолат бериш масаласида худудий дилер ёки ушбу жиҳоз харид қилинган компанияга мурожаат қилинг. Касса чеки ёки харидни
тасдиқловчи бошқа бир молиявий ҳужжат кафолат хизматини бериш шарти ҳисобланади.
Ушбу жиҳоз 89/336/ЯЕC Кўрсатмаси асосида белгиланган ва Қувват кучини белгилаш Қонунида (73/23 ЕЭС) айтилган
ЯХС талабларига мувофиқ келади.
51
4110IM.indd 514110IM.indd 51 20.10.2009 11:08:1120.10.2009 11:08:11
Page 52

GB
A production date of the item is indicated in the serial number on the technical data plate. A serial number is an eleven-unit number, with the first four
figures indicating the production date. For example, serial number 0606ххххххх means that the item was manufactured in June (the sixth month)
2006.
RUS
Дата производства изделия указана в серийном номере на табличке с техническими данными. Серийный номер представляет собой
одиннадцатизначное число, первые четыре цифры которого обозначают дату производства. Например, серийный номер 0606ххххххх
означает, что изделие было произведено в июне (шестой месяц) 2006 года.
KZ
Бұйымның шығарылған мерзімі техникалық деректері бар кестедегі сериялық нөмірде көрсетілген. Сериялық нөмір он бір саннан тұрады, оның
бірінші төрт саны шығару мерзімін білдіреді. Мысалы, сериялық нөмір 0606ххххххх болса, бұл бұйым 2006 жылдың маусым айында (алтыншы
ай) жасалғанын білдіреді.
UA
Дата виробництва виробу вказана в серійному номері на табличці з технічними даними. Серійний номер представляє собою одинадцятизначне
число, перші чотири цифри якого означають дату виробництва. Наприклад, серійний номер 0606ххххххх означає, що виріб був виготовлений
в червні (шостий місяць) 2006 року.
UZ
Жиҳоз ишлаб чиқарилган муддат техник хусусиятлар кўрсатилган лавҳачадаги серия рақамида кўрсатилган. Серия рақами ўн битта сондан
иборат бўлиб уларнинг биринчи тўрттаси ишлаб чиқарилган вақтни ифода этади. Мисол учун 0606ххххххх серия рақами жиҳоз 2006 йилнинг
июн ойида (олтинчи ойда) ишлаб чиқарилганлигини билдиради.
4110IM.indd 524110IM.indd 52 20.10.2009 11:08:1120.10.2009 11:08:11
 Loading...