

ViewSonic VS17425, VX3211-4K-mhd User Manual

VX3211-4K-mhd
LCD Monitor
User Guide
Model No. VS17425
P/N: VX3211-4K-MHD
IMPORTANT: Please read this User Guide to obtain important information on installing and using your product in
a safe manner, as well as registering your product for future service. Warranty information contained in this User
Guide will describe your limited coverage from ViewSonic® Corporation, which is also found on our web site at
http://www.viewsonic.com in English, or in specific languages using the Regional selection box in the upper right
corner of our website. “Antes de operar su equipo lea cu idadosamente las instrucciones en este manual”

2
Thank you for choosing ViewSonic®
As a world-leading provider of visual solutions, ViewSonic® is dedicated to exceeding
the world’s expectations for technological evolution, innovation, and simplicity.
At ViewSonic®, we believe that our products have the potential to make a positive
impact in the world, and we are confident that the ViewSonic® product you have
chosen will serve you well.
Once again, thank you for choosing ViewSonic®!

3
Safety Precautions
Please read the following Safety Precautions before you start using the device.
• Keep this user guide in a safe place for later reference.
• Read all warnings and follow all instructions.
• Sit at least 18" (45 cm) away from the device.
• Allow at least 4" (10 cm) clearance around the device to ensure proper
ventilation.
• Place the device in a well-ventilated area. Do not place anything on the device
that prevents heat dissipation.
• Do not use the device near water. To reduce the risk of fire or electric shock, do
not expose the device to moisture.
• Avoid exposing the device to direct sunlight or other sources of sustained heat.
• Do not install near any heat sources such as radiators, heat registers, stoves, or
other devices (including amplifiers) that may increase the temperature of the
device to dangerous levels.
• Use a soft, dry cloth to clean the external housing. For more information, refer
to the "Maintenance" section on page 51.
• Oil may collect on the screen as you touch it. To clean the greasy spots on the
screen, refer to the "Maintenance" section on page 51.
• Do not touch the screen surface with sharp or hard objects, as it may cause
damage to the screen.
• When moving the device, be careful not to drop or bump the device on
anything.
• Do not place the device on an uneven or unstable surface. The device may fall
over resulting in an injury or a malfunction.
• Do not place any heavy objects on the device or connection cables.
• If smoke, an abnormal noise, or a strange odor is present, immediately turn the
device off and call your dealer or ViewSonic®. It is dangerous to continue using
the device.
• Do not attempt to circumvent the safety provisions of the polarized or
grounding-type plug. A polarized plug has two blades with one wider than the
other. A grounding-type plug has two blades and a third grounding prong. The
wide blade and the third prong are provided for your safety. If the plug does not
fit into your outlet, obtain an adapter and do not attempt to force the plug into
the outlet.

4
• When connecting to a power outlet, DO NOT remove the grounding
prong. Please ensure grounding prongs are NEVER REMOVED.
• Protect the power cord from being treaded upon or pinched,
particularly at the plug, and at the point where it emerges from
the equipment. Ensure that the power outlet is located near the
equipment so that it is easily accessible.
• Only use attachments/accessories specified by the manufacturer.
• When a cart is used, use with caution when moving the cart/equipment
combination to avoid injury from tipping over.
• Disconnect the power plug from the AC outlet if the device is not being used for
a long period of time.
• Refer all servicing to qualified service personnel. Service will be
required when the unit has been damaged in any way, such as:
if the power supply cord or plug is damaged
if liquid is spilled onto or objects fall in the unit
if the unit is exposed to moisture
if the unit does not operate normally or has been dropped.
• NOTICE: LISTENING THROUGH EAR-/HEADPHONES AT A HIGH VOLUME FOR
EXTENDED PERIODS CAN CAUSE HEARING DAMAGE/HEARING LOSS. When using
ear-/headphones, adjust the volume to appropriate levels, or hearing damage
may result.
• NOTICE: THE MONITOR MAY OVERHEAT AND SHUTDOWN! If the device shuts
down automatically, please turn on your monitor again. After rebooting, change
your monitor's resolution and refresh rate. For details, please refer to the
graphics card's user guide.

5
Contents
Safety Precauons ...........................................................................3
Introducon ....................................................................................7
Package Contents........................................................................................................... 7
Product Overview ..........................................................................................................8
Inial Setup ..................................................................................... 9
Wall Mounng ...............................................................................................................9
Using the Security Slot ................................................................................................... 9
Making Connecons ...................................................................... 10
Connecng to Power ....................................................................................................10
Connecng External Devices ........................................................................................11
HDMI Connecon .................................................................................................. 11
DisplayPort Connecon .........................................................................................12
Audio Connecon .................................................................................................. 13
Using the Monitor .........................................................................14
Adjusng the Viewing Angle ........................................................................................ 14
Tilt Angle Adjustment ............................................................................................ 14
Turning the Device On/O ........................................................................................... 15
Using the Control Panel Keys .......................................................................................16
Quick Menu ........................................................................................................... 16
Hot Keys .................................................................................................................18
Conguring the Sengs ...............................................................................................20
General Operaons ............................................................................................... 20
On-Screen Display (OSD) Menu Tree ..................................................................... 23
Menu Opons ........................................................................................................ 28
Advanced Features and Sengs .................................................... 37
HDR10 (High-Dynamic-Range) ..................................................................................... 37
Mul-picture ................................................................................................................ 39
PIP (Picture-in-Picture) ..........................................................................................39

6
Appendix .......................................................................................41
Specicaons ............................................................................................................... 41
Glossary ....................................................................................................................... 44
Troubleshoong ........................................................................................................... 49
Maintenance ................................................................................................................ 51
General Precauons ..............................................................................................51
Cleaning the Screen ............................................................................................... 51
Cleaning the Case .................................................................................................. 51
Disclaimer .............................................................................................................. 51
Regulatory and Service Informaon ...............................................52
Compliance Informaon ..............................................................................................52
FCC Compliance Statement ...................................................................................52
Industry Canada Statement ................................................................................... 52
CE Conformity for European Countries.................................................................. 52
Declaraon of RoHS2 Compliance ......................................................................... 53
Indian Restricon of Hazardous Substances .......................................................... 54
Product Disposal at End of Product Life ................................................................54
Copyright Informaon ..................................................................................................55
Customer Service ...................................................................................................56
Limited Warranty ................................................................................................... 57
Mexico Limited Warranty ...................................................................................... 60

7
Introduction
Package Contents
• Monitor
• Power cord
• Video cable
• Quick start guide
NOTE: The power cord and video cables included in your package may vary
depending on your country. Please contact your local reseller for more
information.
8
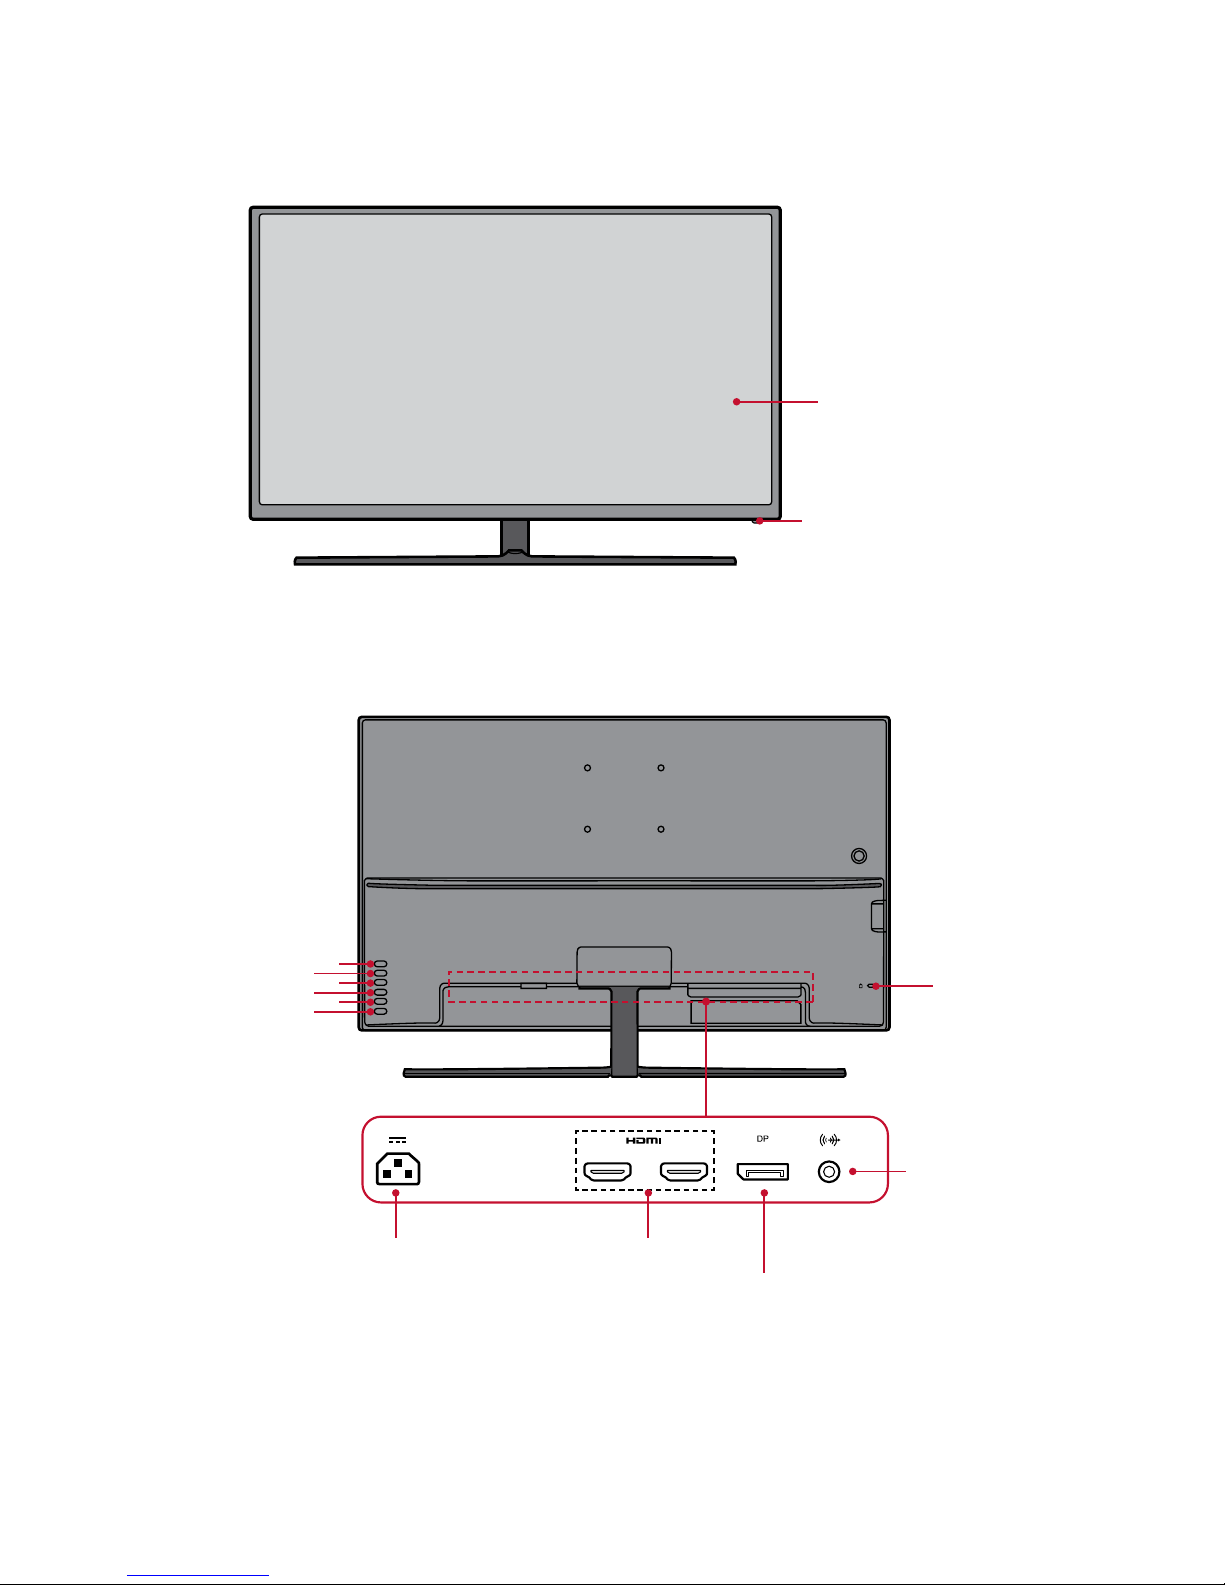
Product Overview
Front View
Display screen
Power LED
Rear View
1
(Shortcut)
3
5
4
2
Security Slot
Power button
Audio Out port
DisplayPort
AC IN jack
HDMI port
NOTE: For more information about the 1(Shortcut)/2/3/4/5 key and its
functions, refer to page 18.
9
Initial Setup
This section provides instructions for setting up your monitor.
Wall Mounting
Refer to the table below for the standard dimensions for wall mount kits.
Maximum
Loading
Hole pattern
(W x H)
Interface Pad
(W x H x D)
Pad
Hole
Screw Specification &
Quantity
14 kg 100 x 100 mm 115 x 115 x 2.6 mm Ø 5 mm
M4 x 10mm
4 pieces
NOTE: Wall mount kits are sold separately.
IMPORTANT! Due to the design of the monitor, it is recommended the user does
not mount the monitor themselves. Please contact customer service for support.
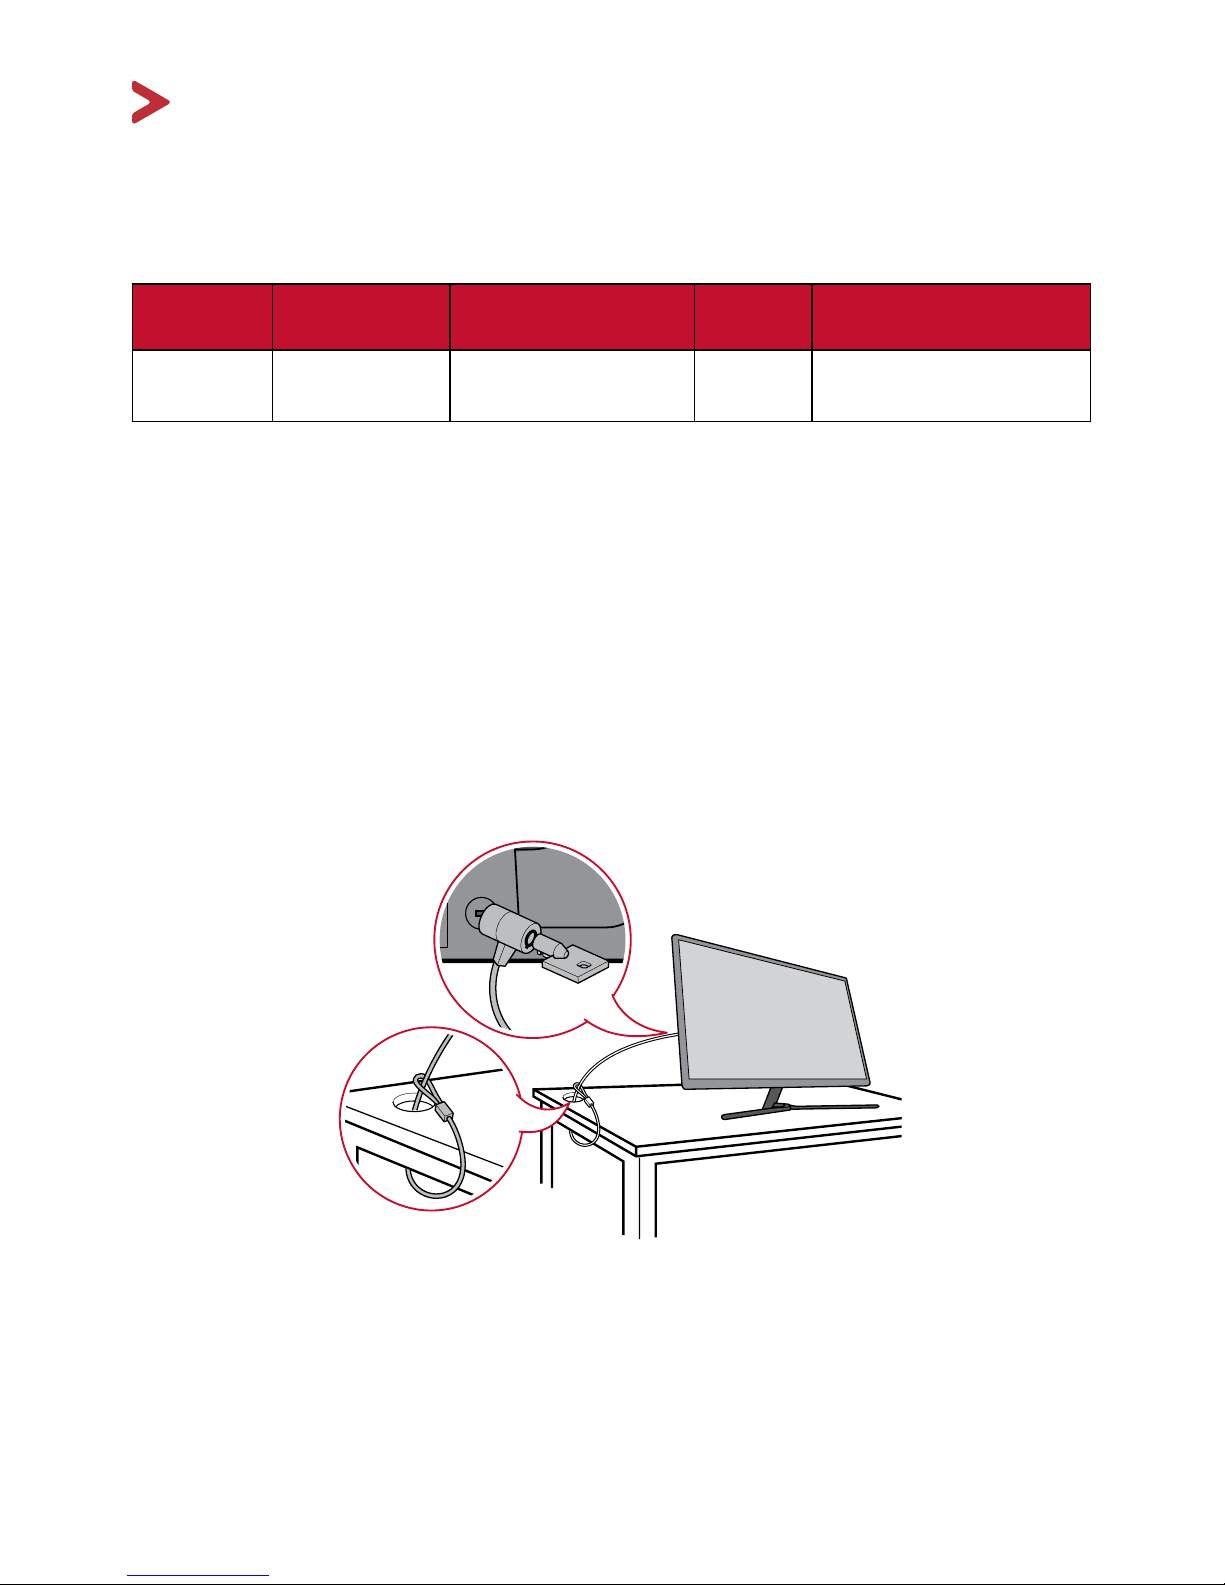
Using the Security Slot
To help prevent the monitor from being stolen, use a security slot locking device to
secure the monitor to a fixed object.
Below is an example of setting up a security slot locking device on a table.
10
Making Connections
This section guides you on how to connect the monitor with other equipment.
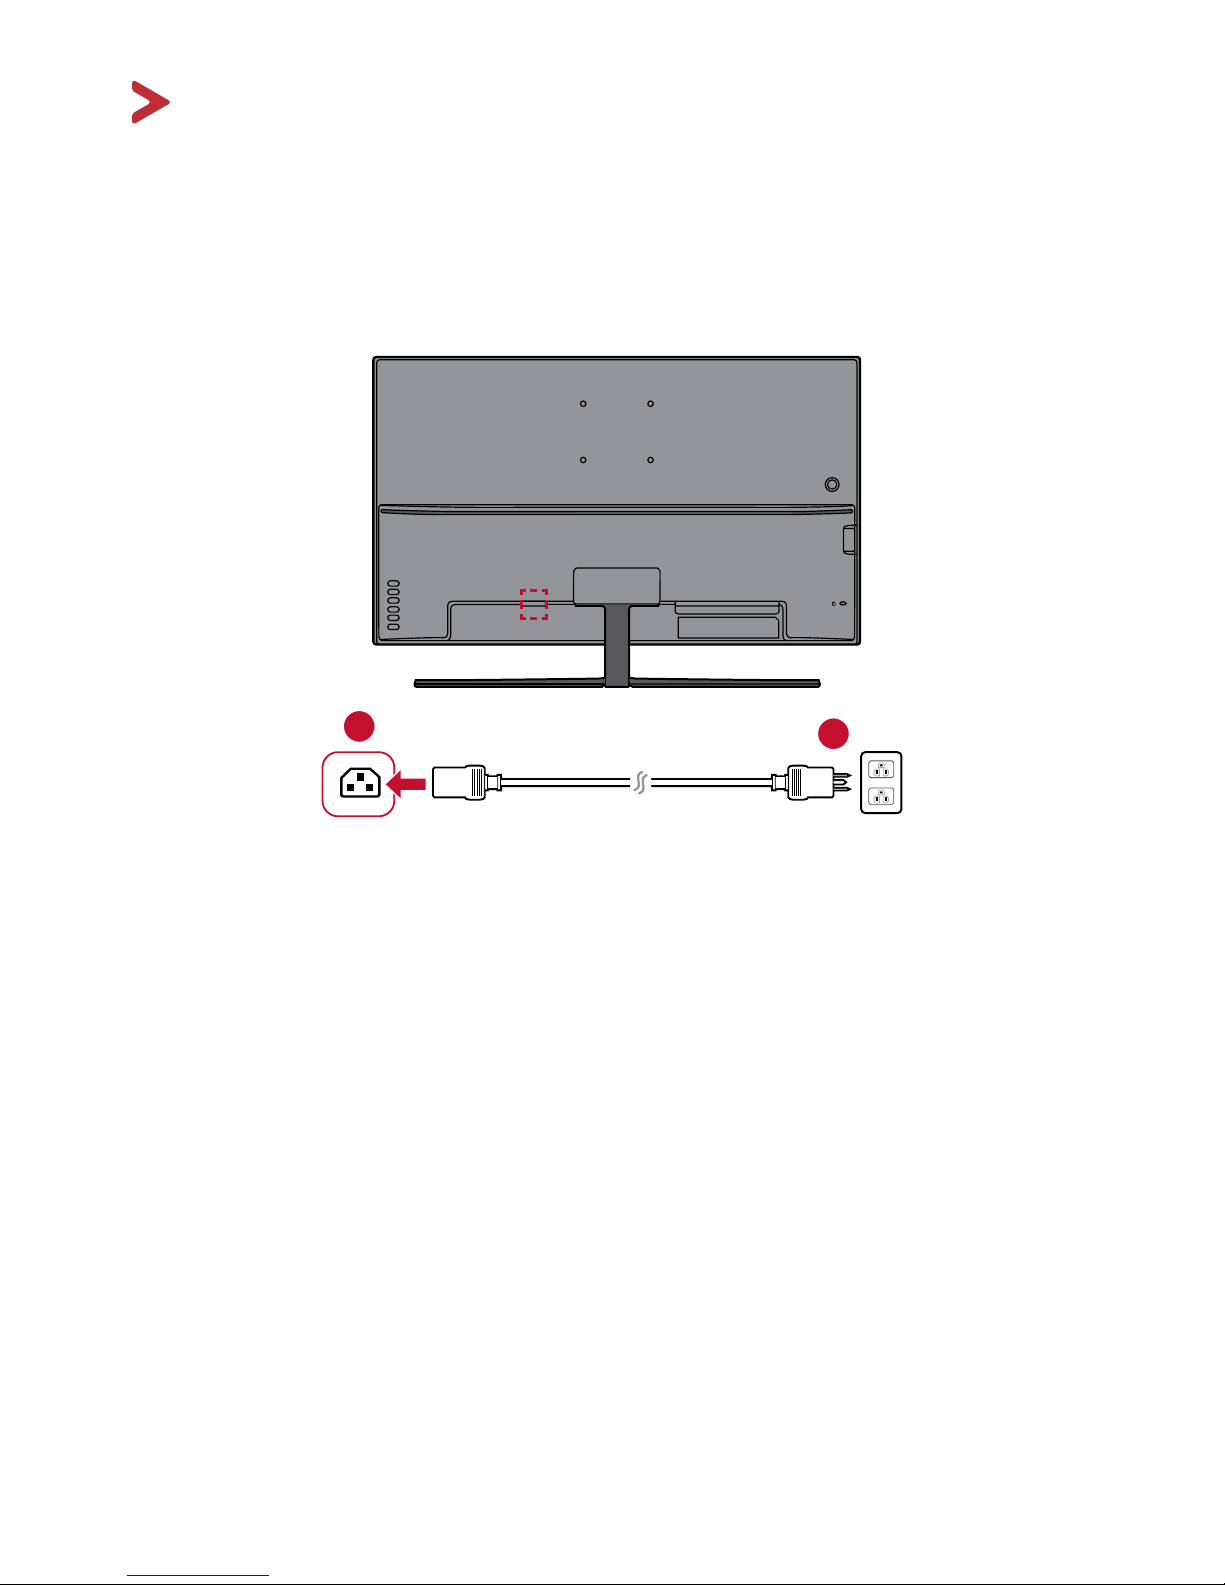
Connecting to Power
1. Connect the power cord to the AC IN jack at the rear of the device.
2. Connect the power cord plug to a power outlet.
1
2
11
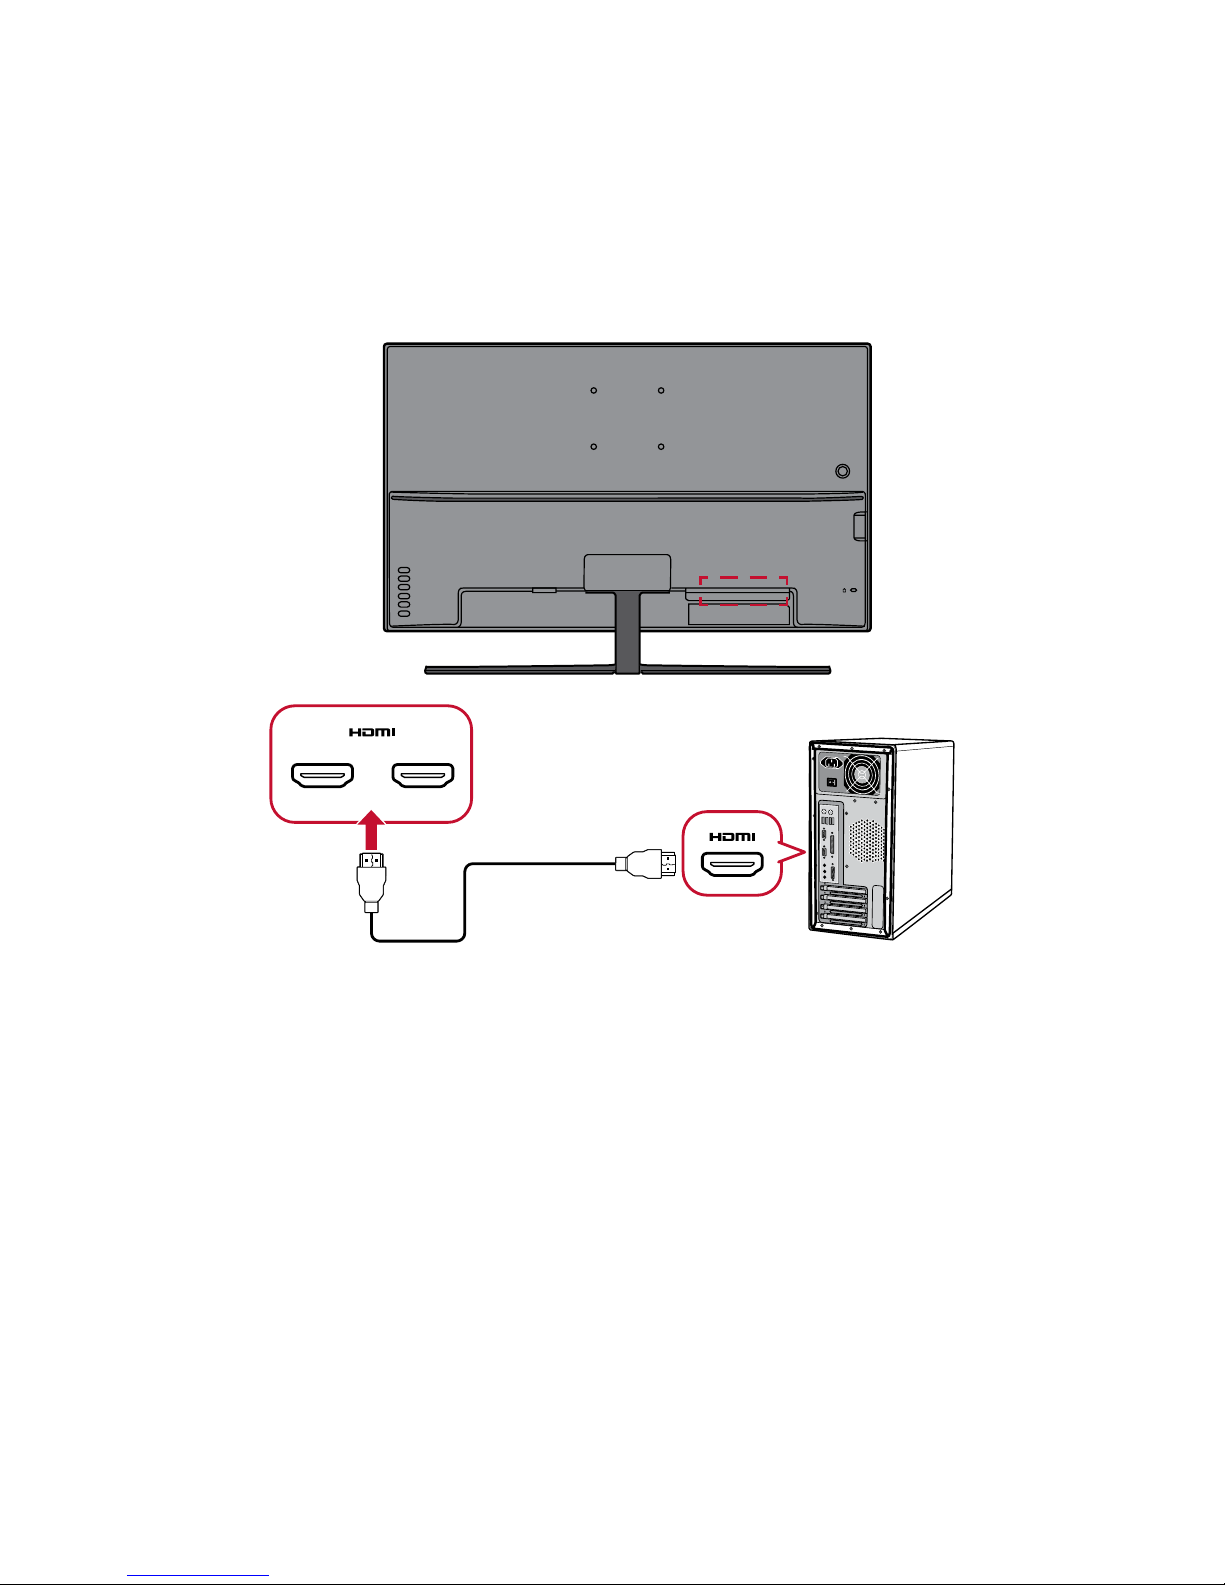
Connecting External Devices
HDMI Connection
Connect one end of an HDMI cable to the HDMI port of your monitor. Then connect
the other end of the cable to the HDMI port of your computer.
NOTE: The monitor is equipped with two HDMI 2.0 ports.
21
12
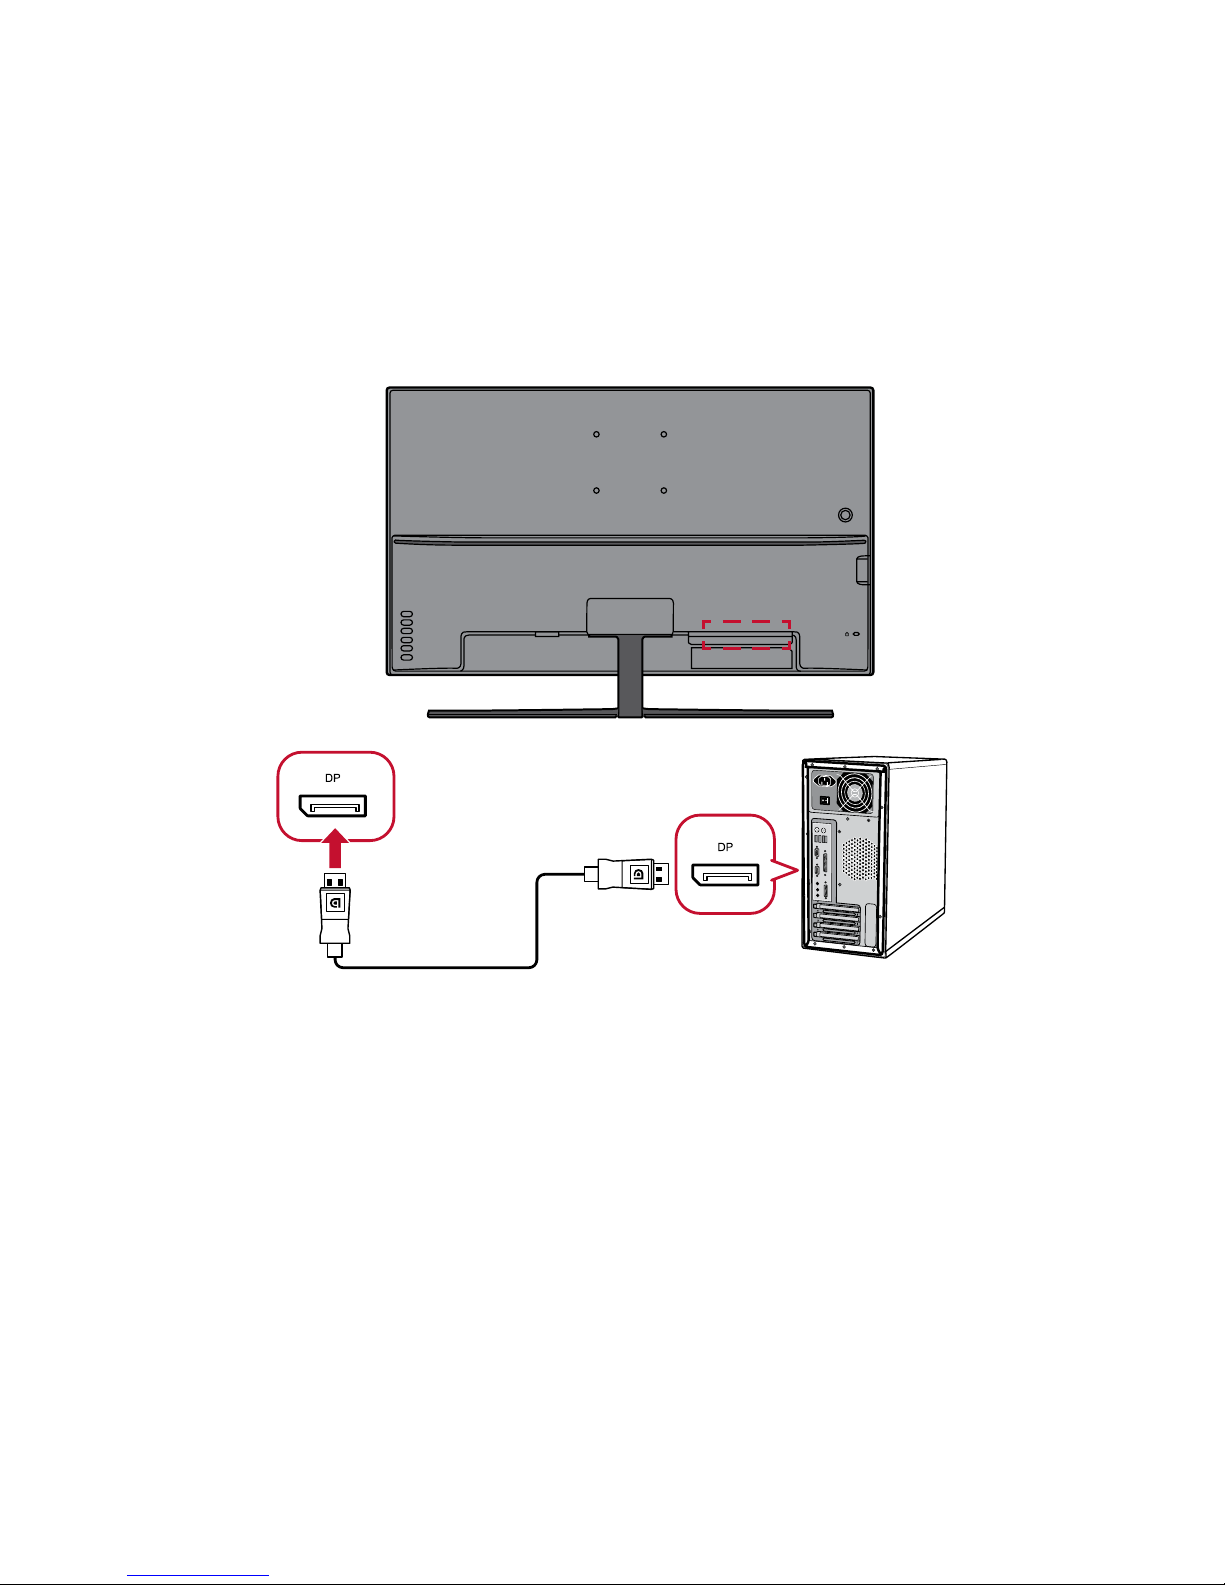
DisplayPort Connection
Connect one end of a DisplayPort cable to the DisplayPort port. Then connect the
other end of the cable to the DisplayPort or mini DP port of your computer.
NOTE: To connect the monitor to the Thunderbolt port (v. 1&2) on you Mac,
connect the mini DP end of the “mini DP to DisplayPort cable” to the
Thunderbolt output of your Mac. Then connect the other end of the
cable to the DisplayPort port of the monitor.
13
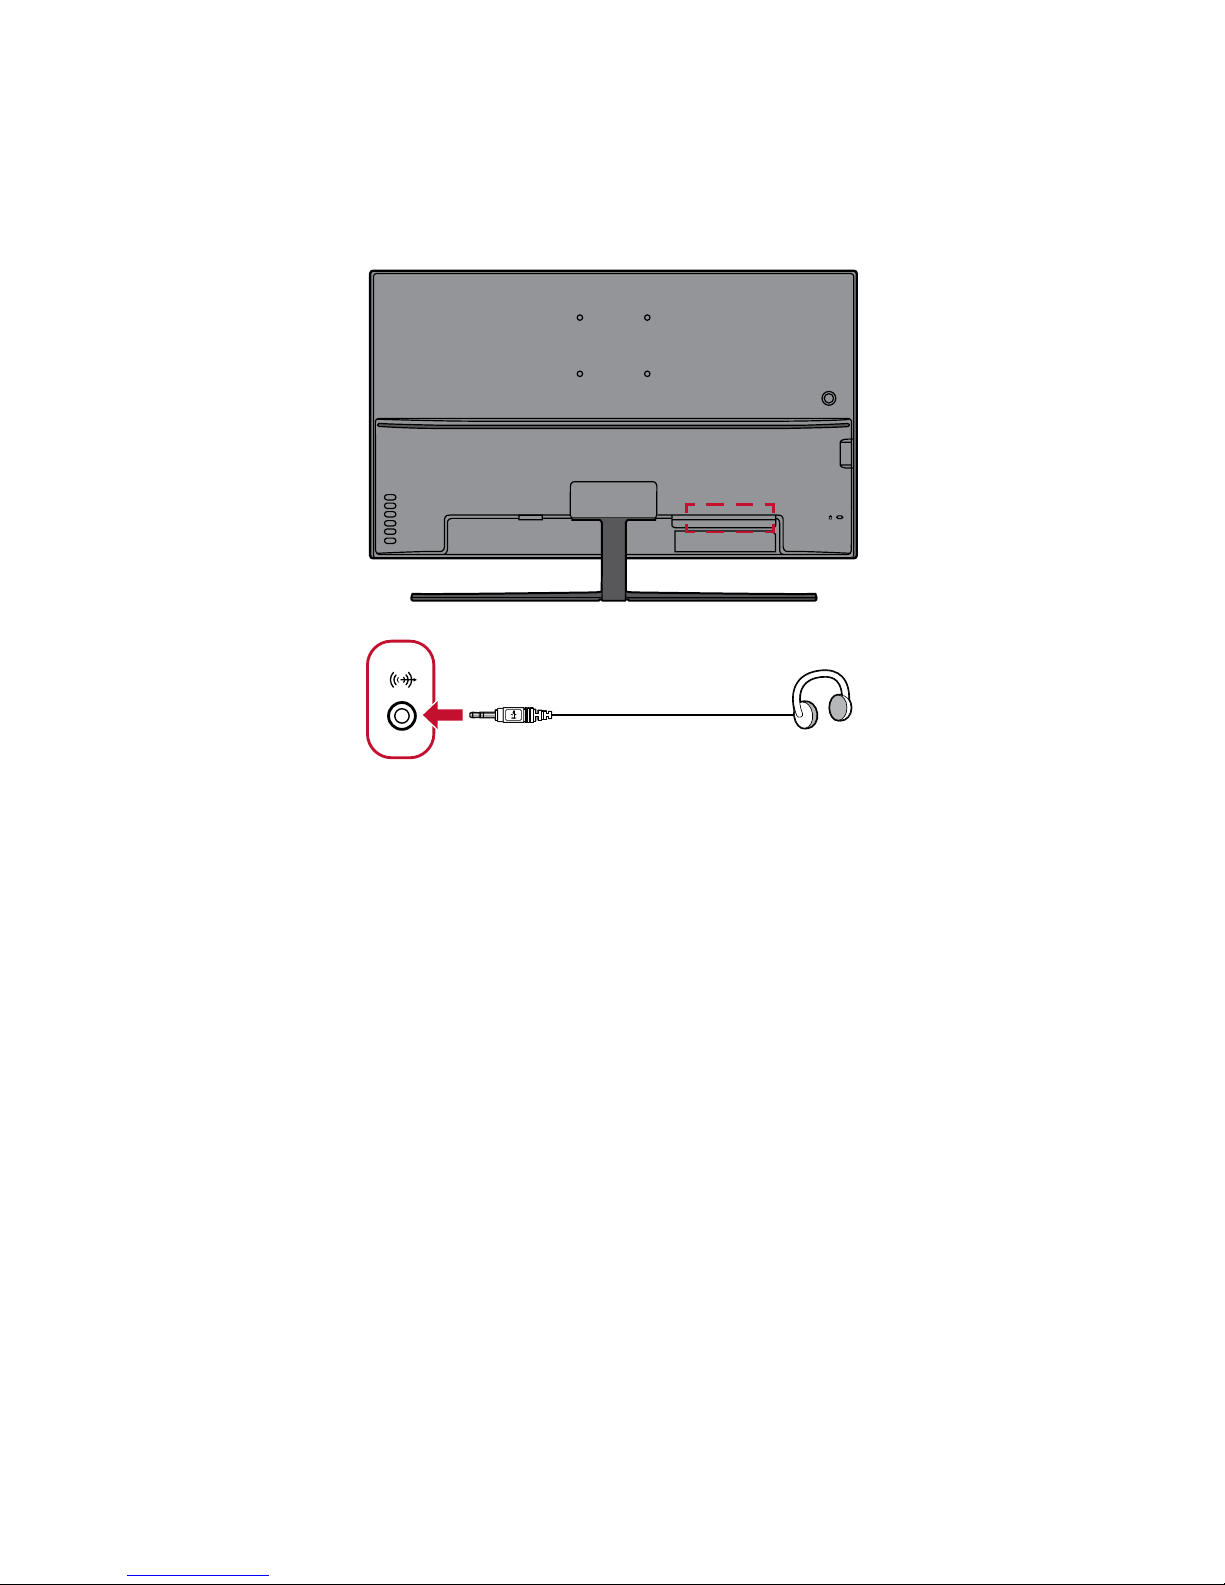
Audio Connection
Plug the audio jack of the ear-/headphones into the Audio Out port of the monitor.
Additionally, you can connect the monitor to a sound bar using an audio cable.
NOTE: The monitor is also equipped with dual speakers.
14
Using the Monitor
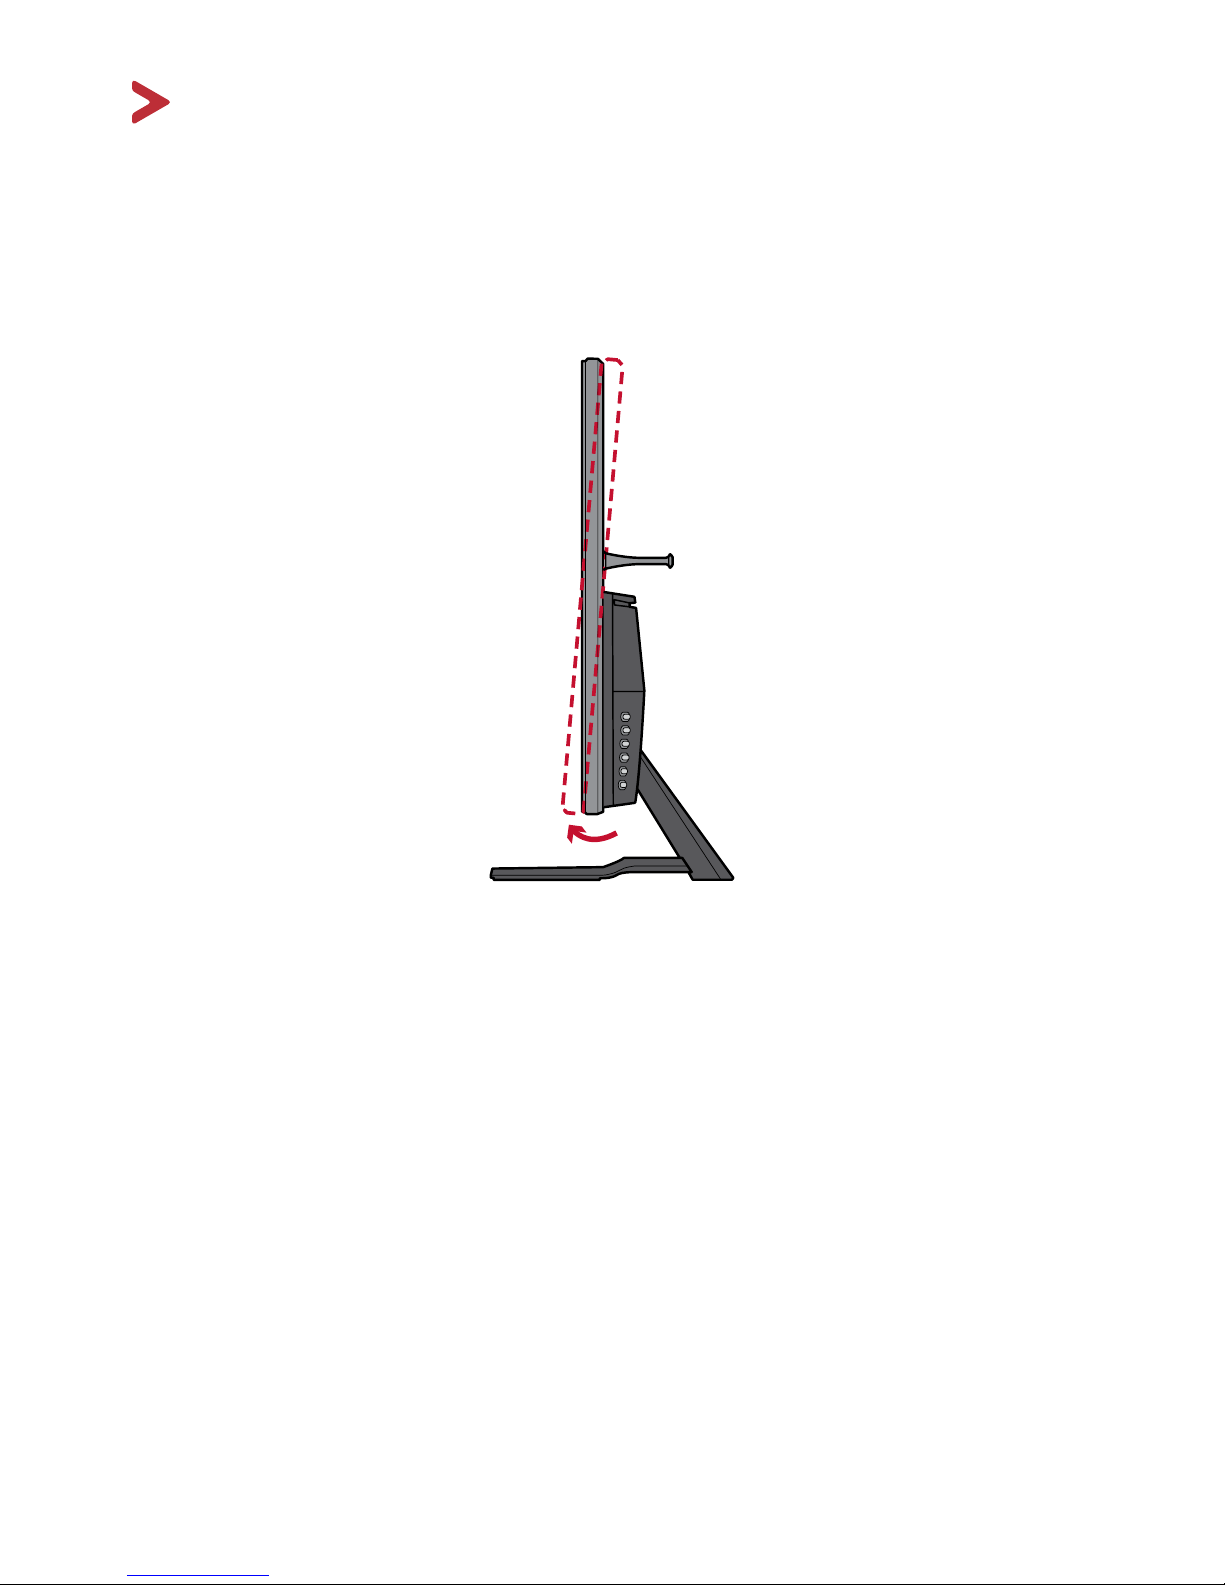
Adjusting the Viewing Angle
For optimal viewing, you can adjust the viewing angle using the following method:
Tilt Angle Adjustment
Tilt the monitor forwards or backwards to the desired viewing angle (-5˚ to 13˚).
NOTE: When making adjustments, support the stand firmly with one hand while
tilting the monitor forwards or backwards with the other hand.
15
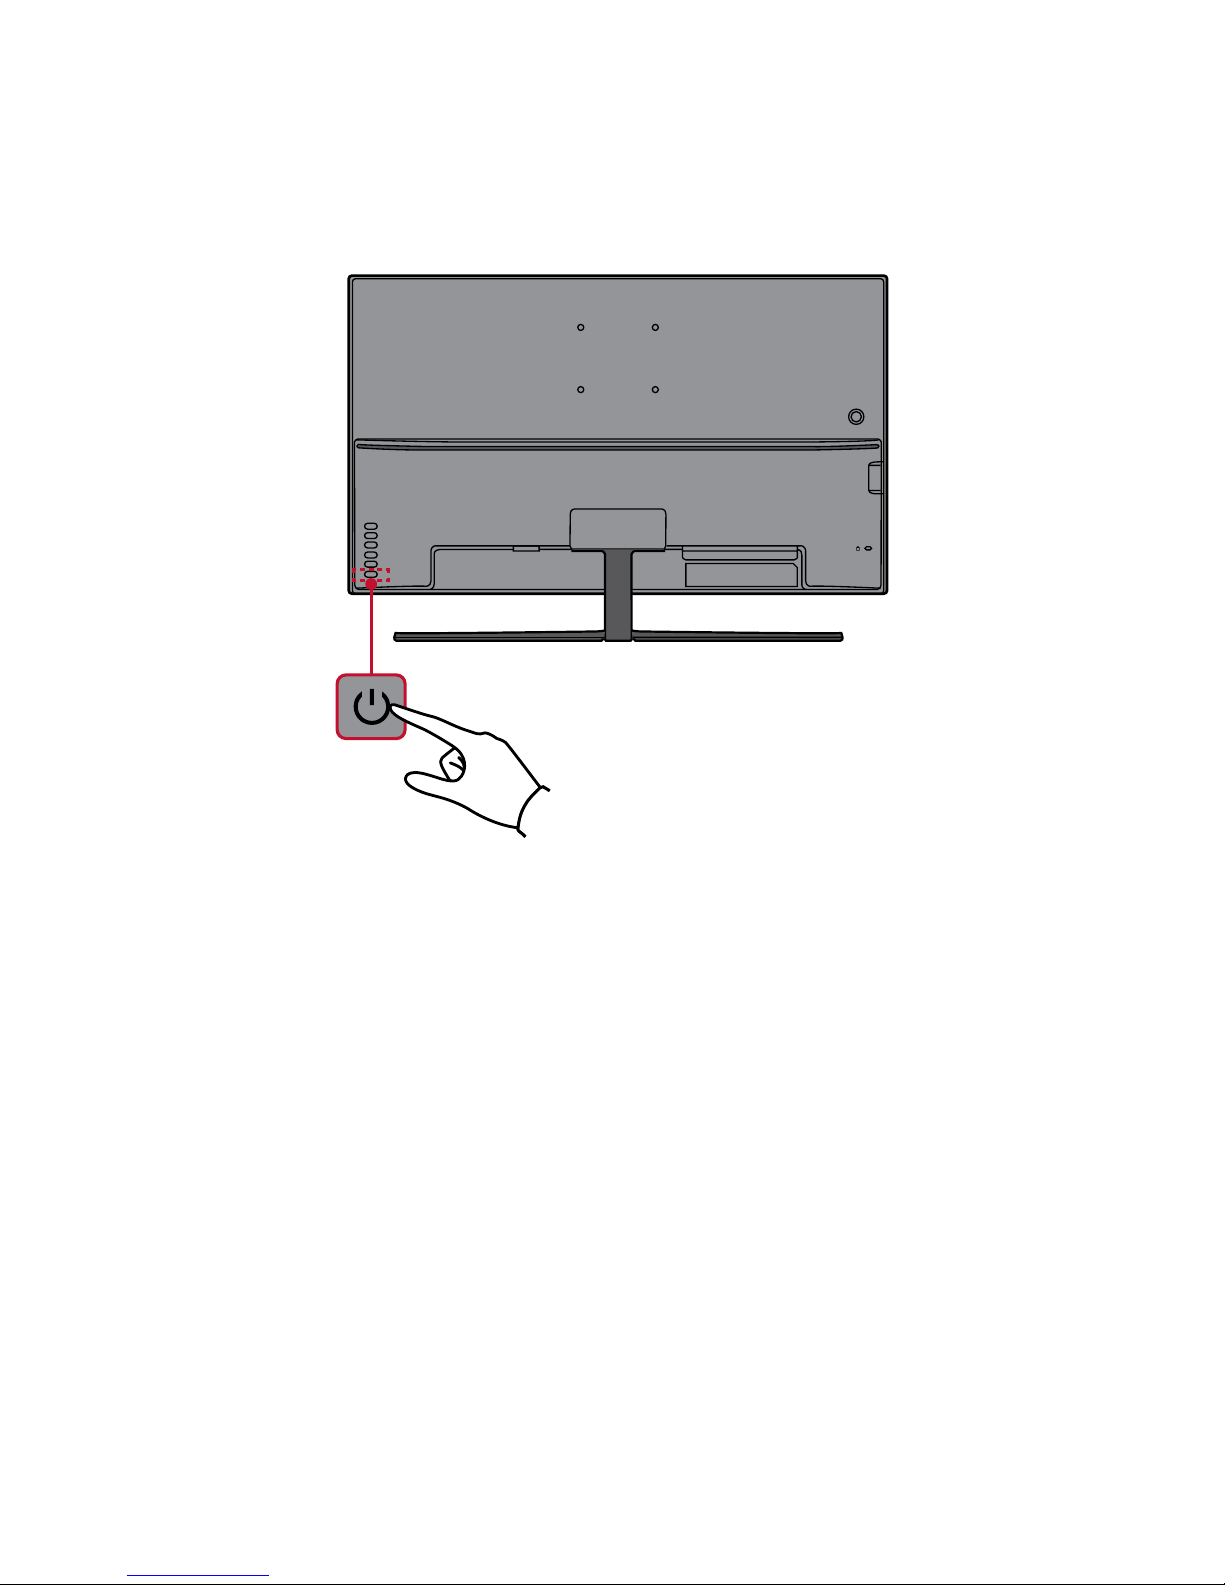
Turning the Device On/Off
1. Plug the power cord into a power outlet.
2. Press the Power button to turn on the monitor.
3. To turn the monitor off, press the Power button again.
NOTE: The monitor will still consume some power as long as the power cord
is connected to the power outlet. If the monitor is not being used for a
long period of time, please disconnect the power plug from the power
outlet.

16
Using the Control Panel Keys
Use the control panel keys to access the Quick Menu, activate Hot Keys, navigate
the On-Screen Display (OSD) Menu, and change the settings.
1
(Shortcut)
2
4
3
5
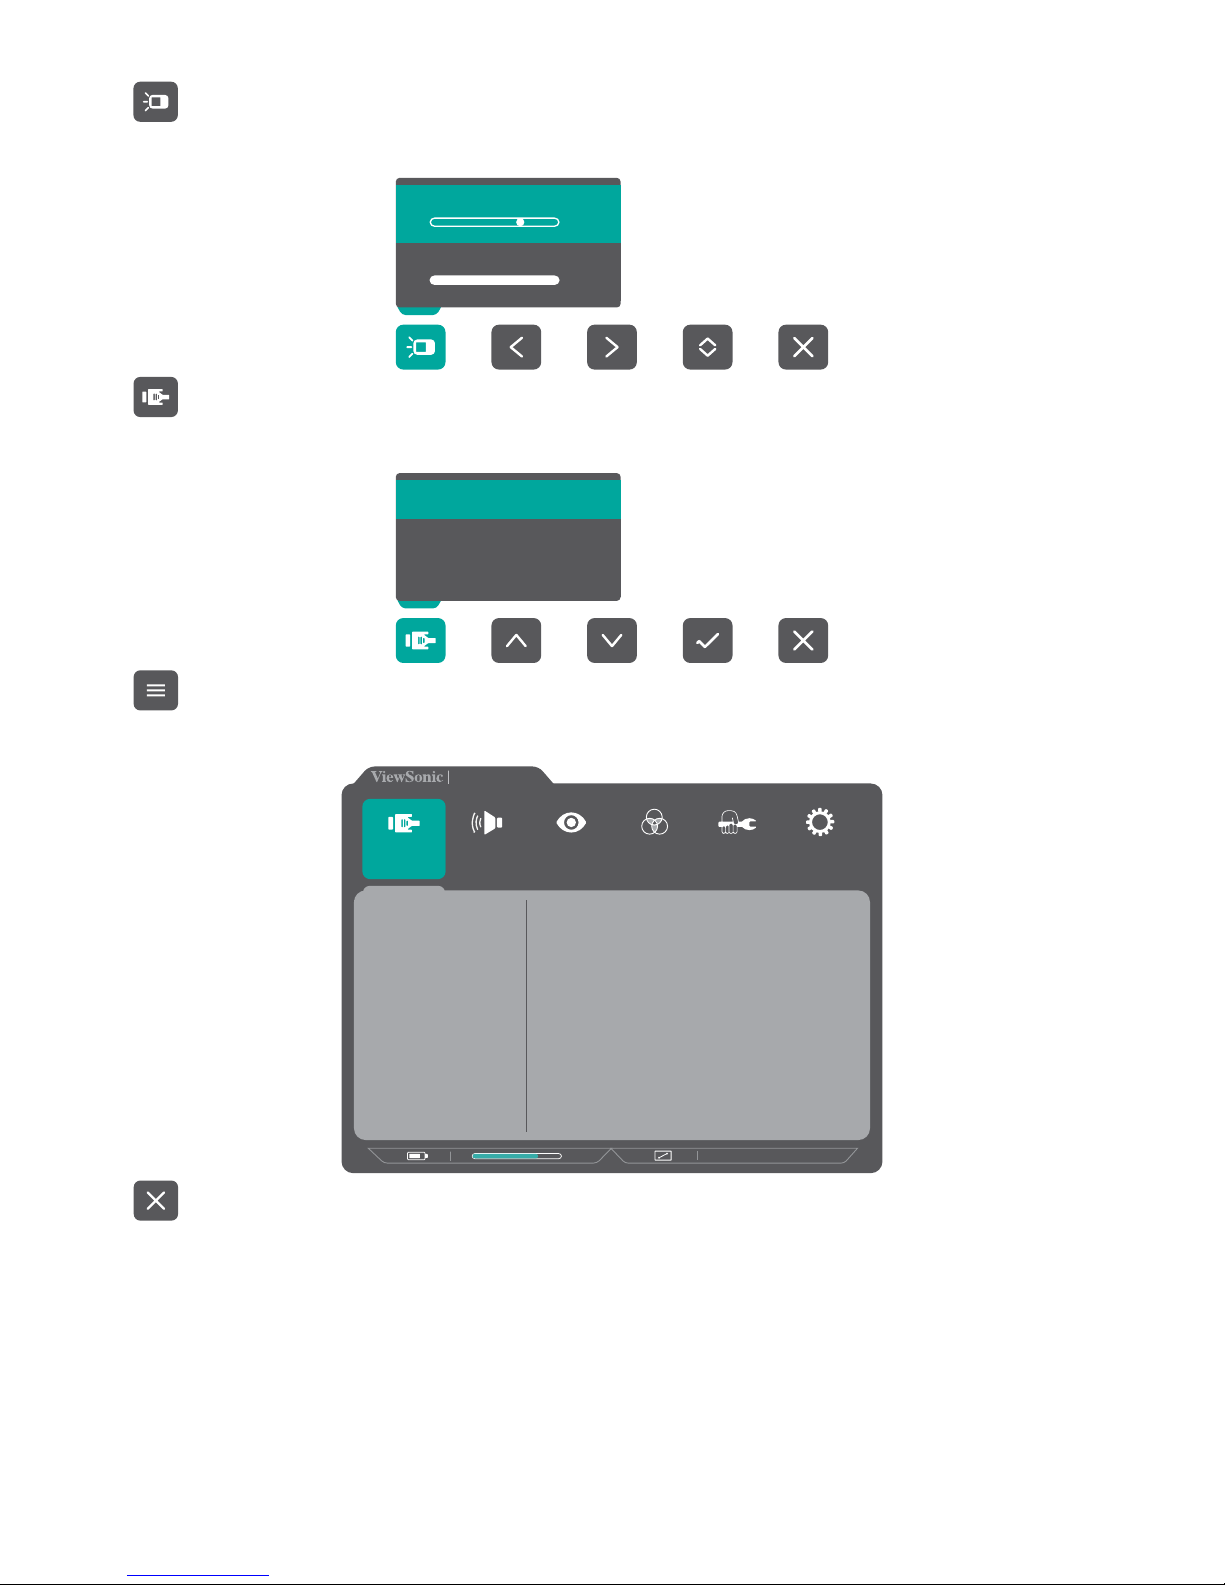
Quick Menu
Press the 2/3/4/5 key to activate the Quick Menu.
Viewmode
Contrast/Brightness
Input Select
Main Menu
Exit
NOTE: Follow the key guide that appears on the bottom of the screen to select
the option or make adjustments.
Viewmode
Contrast/Brightness
Input Select
Main Menu
Exit
ViewMode
Select one of the preset color settings.
Standard
Game
Movie
Web
Text
MAC
Mono
NOTE: The 1(Shortcut) key can be assigned to give you quick access to a
preferred menu. For more information, see page 18
17
Contrast/Brightness
Adjust the contrast or brightness level.
Contrast
70
Brightness
100
Input Select
Select the input source.
HDMI 1
HDMI 2
DisplayPort
Main Menu
Enter the On-Screen Display (OSD) Menu.
VX3211-4K-mhd
3840 x 2160 @ 60Hz
75%
Setup Menu
Color Adjust ViewMode
Manual Image
Adjust
Input
Select
Audio Adjust
HDMI 1
HDMI 2
DisplayPort
Exit
Exit the Quick Menu.
NOTE: Use the 5 key to exit the Quick Menu.
18
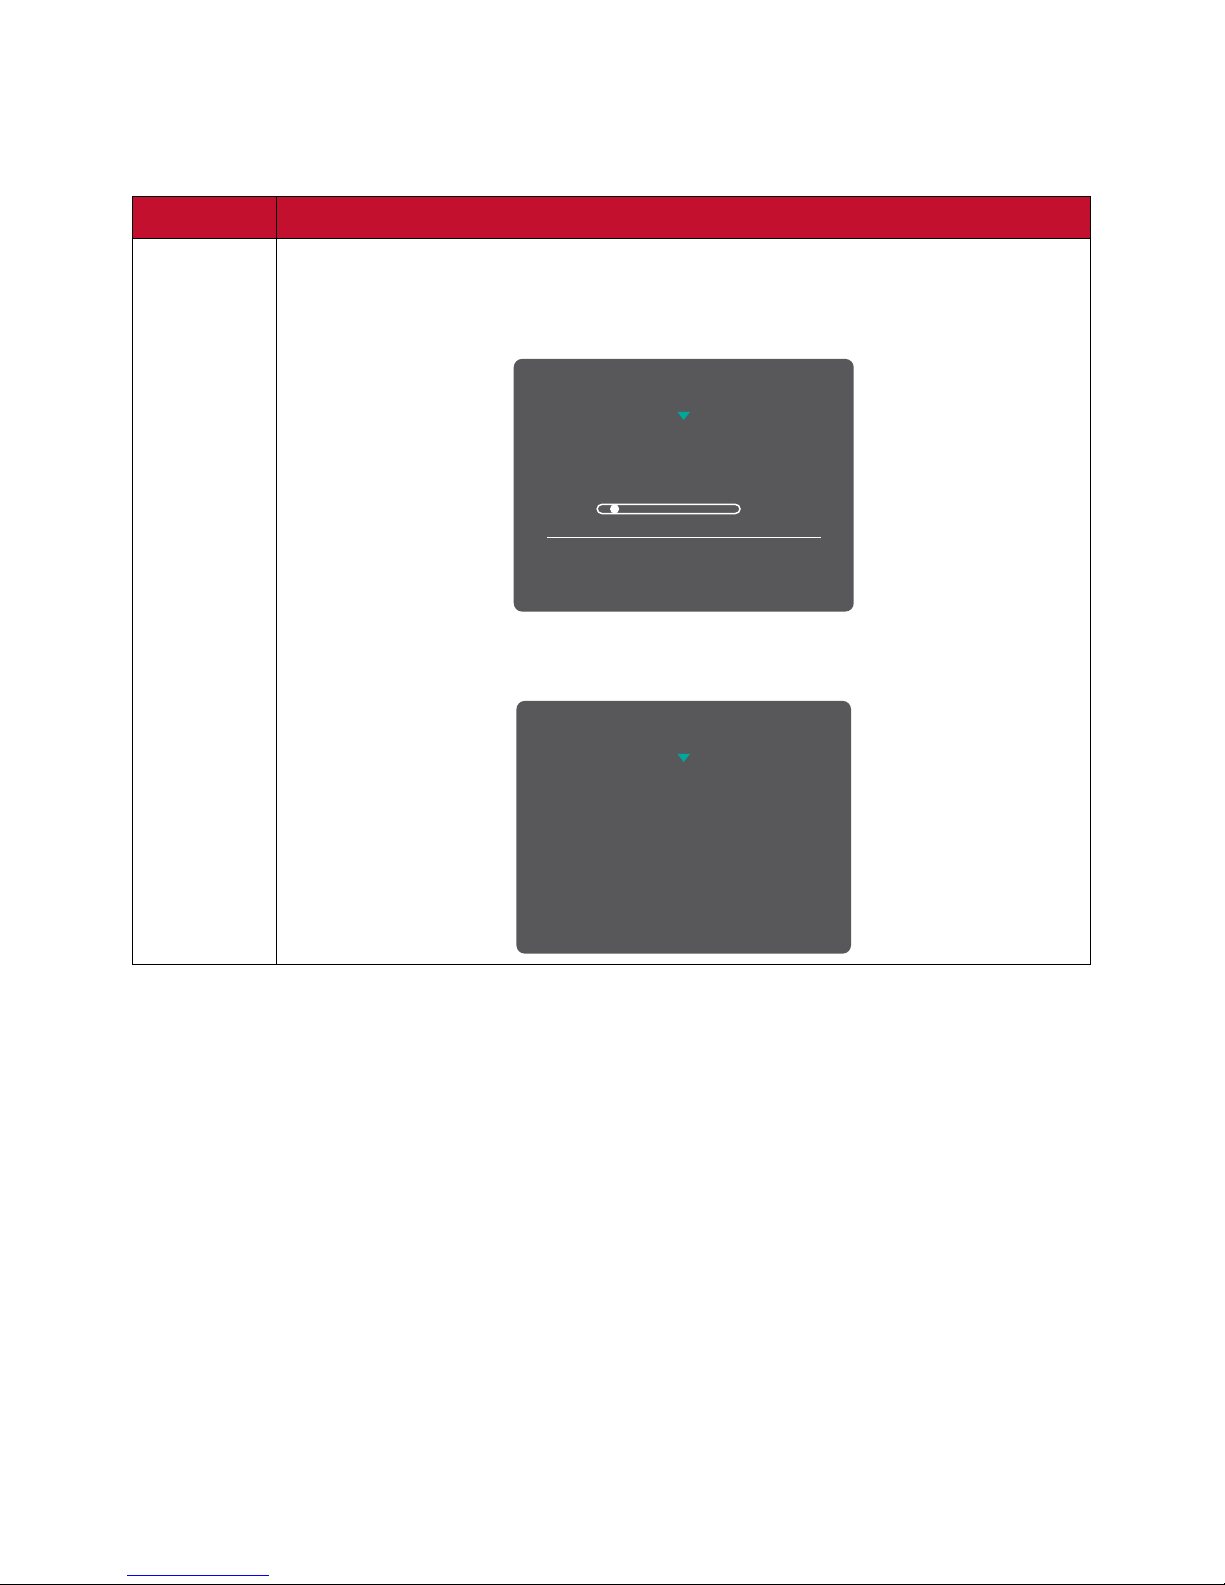
Hot Keys
When the On-Screen Display (OSD) Menu is off, you can quickly access special
functions by using the control panel keys.
Key Description
2 + 3 Press and hold the keys to lock/unlock the OSD Menu.
When the menu appears on the screen, continue holding both keys
for 10 seconds to lock/unlock the OSD Menu.
1
OSD Lock/Unlock
Locking OSD
Press and hold for 10s
to lock OSD
If the OSD Menu is locked, the below message will appear on the
screen:
OSD Lock/Unlock
OSD Locked

19
Key Description
2 + 4 Press and hold the keys to lock/unlock the Power button.
When the menu appears on the screen, continue holding both keys
for 10 seconds to lock/unlock the Power button.
3
Power Lock/Unlock
Locking Power Button
Press and hold for 10s
to lock power
If the Power button is locked, the below message will appear on the
screen:
Power Lock/Unlock
Power Button Locked
3 + 5 Press the keys to display/hide the boot up screen when the device is
turned on.
Boot Up Screen On/Off
Off
Press to turn on
1
(Shortcut)
Press and hold the key for 5 seconds to reassign your preferred menu
shortcut.
Users can choose from: Volume, Blue Light Filter, Game Mode, Aspect
Ratio, or Color Temperature.
 Loading...