

Page 1

5U000219C0A REV.00
User Guide
Guía del Usuario
USER GUIDE
OM8030VW
RAZZLE
Page 2

Table of Contents
1
Contents
CHAPTER 1. BEFORE USING
BEFORE USING ................................................................................ 5
INSIDE THE PACKAGE .................................................................... 5
HANDSET DESCRIPTIONS .............................................................. 6
KEYS DESCRIPTIONS ..................................................................... 7
DISPLAY INDICATORS .................................................................... 9
INSTALL BATTERY ....................................................................... 11
REMOVE BATTERY ...................................................................... 12
CHARGING YOUR BATTERY .......................................................... 12
BATTERY HANDLING INFORMATION ............................................. 13
SWIVELING THE KEYPAD ............................................................. 14
REMOVING THE microSD CARD .................................................... 14
CHAPTER 2. BASIC OPERATION
BASIC OPERATION ......................................................................... 16
TURNING THE PHONE ON/OFF ..................................................... 16
ACCESSING THE MENU ................................................................ 16
USING THE TASK BAR .................................................................. 17
QUICK SWITCHING BETWEEN THE MAIN MENUS ........................... 17
MENU SUMMARY ....................................................................... 18
MAKING A CALL ......................................................................... 20
ANSWERING CALLS .................................................................... 20
MISSED CALL NOTIFICATION ........................................................ 21
WAIT/PAUSE FEATURE ................................................................ 21
ANSWERING A CALL ................................................................... 22
MAKING AN INTERNATIONAL CALL .............................................. 22
3-WAY CALLING ......................................................................... 22
CALL WAITING FUNCTION ........................................................... 22
CALLING A NUMBER FROM CONTACTS .......................................... 23
ADJUSTING VOLUME ................................................................... 23
CALLER ID FUNCTION ................................................................. 23
VIBRATE ON/OFF MODE .............................................................. 23
SPEAKERPHONE MODE .............................................................. 24
USING AUTO KEYPAD LOCK FUNCTION.......................................... 24
AVAILABLE OPTIONS DURING A CALL ........................................... 24
MAKING AN EMERGENCY CALL .................................................... 25
DIALING LETTERS ....................................................................... 25
CHAPTER 3. MEMORY FUNCTION
MEMORY FUNCTION ...................................................................... 28
STORING A PHONE NUMBER ....................................................... 28
ENTERING LETTERS, NUMBERS & SYMBOLS ................................. 33
ONE, TWO, THREE-TOUCH DIALING .............................................. 34
Page 3

2
Table of Contents
Contents
CHAPTER 4. MENU FUNCTION
CONTACTS ..................................................................................... 36
NEW CONTACT ........................................................................... 36
CONTACT LIST ............................................................................ 36
GROUPS .................................................................................... 37
SPEED DIALS .............................................................................. 39
IN CASE OF EMERGENCY ............................................................. 40
MY NAME CARD ......................................................................... 42
RECENT CALLS............................................................................... 44
RECENT CALLS............................................................................ 44
MISSED ..................................................................................... 44
RECEIVED .................................................................................. 45
DIALED ...................................................................................... 45
ALL ........................................................................................... 46
BLOCKED ................................................................................... 46
VIEW TIMERS ............................................................................. 47
SETTINGS ...................................................................................... 47
BLUETOOTH ............................................................................... 47
SOUNDS SETTINGS ..................................................................... 50
DISPLAY SETTINGS ..................................................................... 54
PHONE SETTINGS ....................................................................... 57
CALL SETTINGS .......................................................................... 62
MEMORY ................................................................................... 64
USB MODE ................................................................................. 67
PHONE INFO .............................................................................. 67
SET UP WIZARD.......................................................................... 68
TOOLS ........................................................................................... 70
VOICE COMMANDS ..................................................................... 70
CALCULATOR .............................................................................. 74
TIP CALCULATOR ........................................................................ 75
CALENDAR ................................................................................. 75
E-DIARY..................................................................................... 77
ALARM CLOCK ............................................................................ 78
STOP WATCH .............................................................................. 80
WORLD CLOCK ........................................................................... 81
NOTEPAD ................................................................................... 81
USB MASS STORAGE ................................................................... 82
MY VERIZON ................................................................................. 83
MY VERIZON .............................................................................. 83
CHAPTER 5. MEDIA CENTER
microSD ....................................................................................... 85
Page 4

Table of Contents
3
Contents
USING THE microSD CARD ........................................................... 85
MEDIA CENTER .............................................................................. 85
MUSIC & TONES.......................................................................... 85
PICTURES .................................................................................. 90
GAMES ...................................................................................... 91
MOBILE WEB ............................................................................. 92
BROWSE & DOWNLOAD .............................................................. 93
EXTRAS ..................................................................................... 93
MEDIA CENTER INFO ................................................................... 94
CHAPTER 6. MESSAGING MENU
MESSAGING .................................................................................. 96
WHEN A NEW MESSAGE ARRIVES ................................................ 96
NEW MESSAGE ........................................................................... 96
INBOX ....................................................................................... 98
SENT ......................................................................................... 99
MESSAGES ................................................................................. 99
DRAFTS ....................................................................................100
VOICEMAIL ...............................................................................101
MOBILE IM ...............................................................................101
EMAIL ......................................................................................101
CHAT ........................................................................................102
ERASE ALL ................................................................................102
SETTINGS .................................................................................102
CHAPTER 7. SAFETY AND WARRANTY
SAFETY ........................................................................................106
SAFETY INFORMATION FOR WIRELESS HANDHELD PHONES ..........106
SAFETY INFORMATION FOR FCC RF EXPOSURE .............................109
SAR INFORMATION ....................................................................109
HEARING AID COMPATIBILITY (HAC) FOR WIRELESS
TELECOMMUNICATIONS DEVICES ................................................110
FDA CONSUMER UPDATE ............................................................112
AVOID POTENTIAL HEARING LOSS. ..............................................116
FCC COMPLIANCE INFORMATION ................................................118
WARRANTY ..................................................................................119
12 MONTH LIMITED WARRANTY .................................................119
Page 5

CHAPTER 1
BEFORE USING
This chapter provides important information about using the
Razzle
TM
including:
Inside the package
Handset descriptions
Key descriptions
Display indicators
Install battery
Remove battery
Charging your battery
Battery handling information
Swiveling the keypad
Removing the microSD card
BEFORE USING
Page 6
Before Using
Before Using − Chapter 1
5
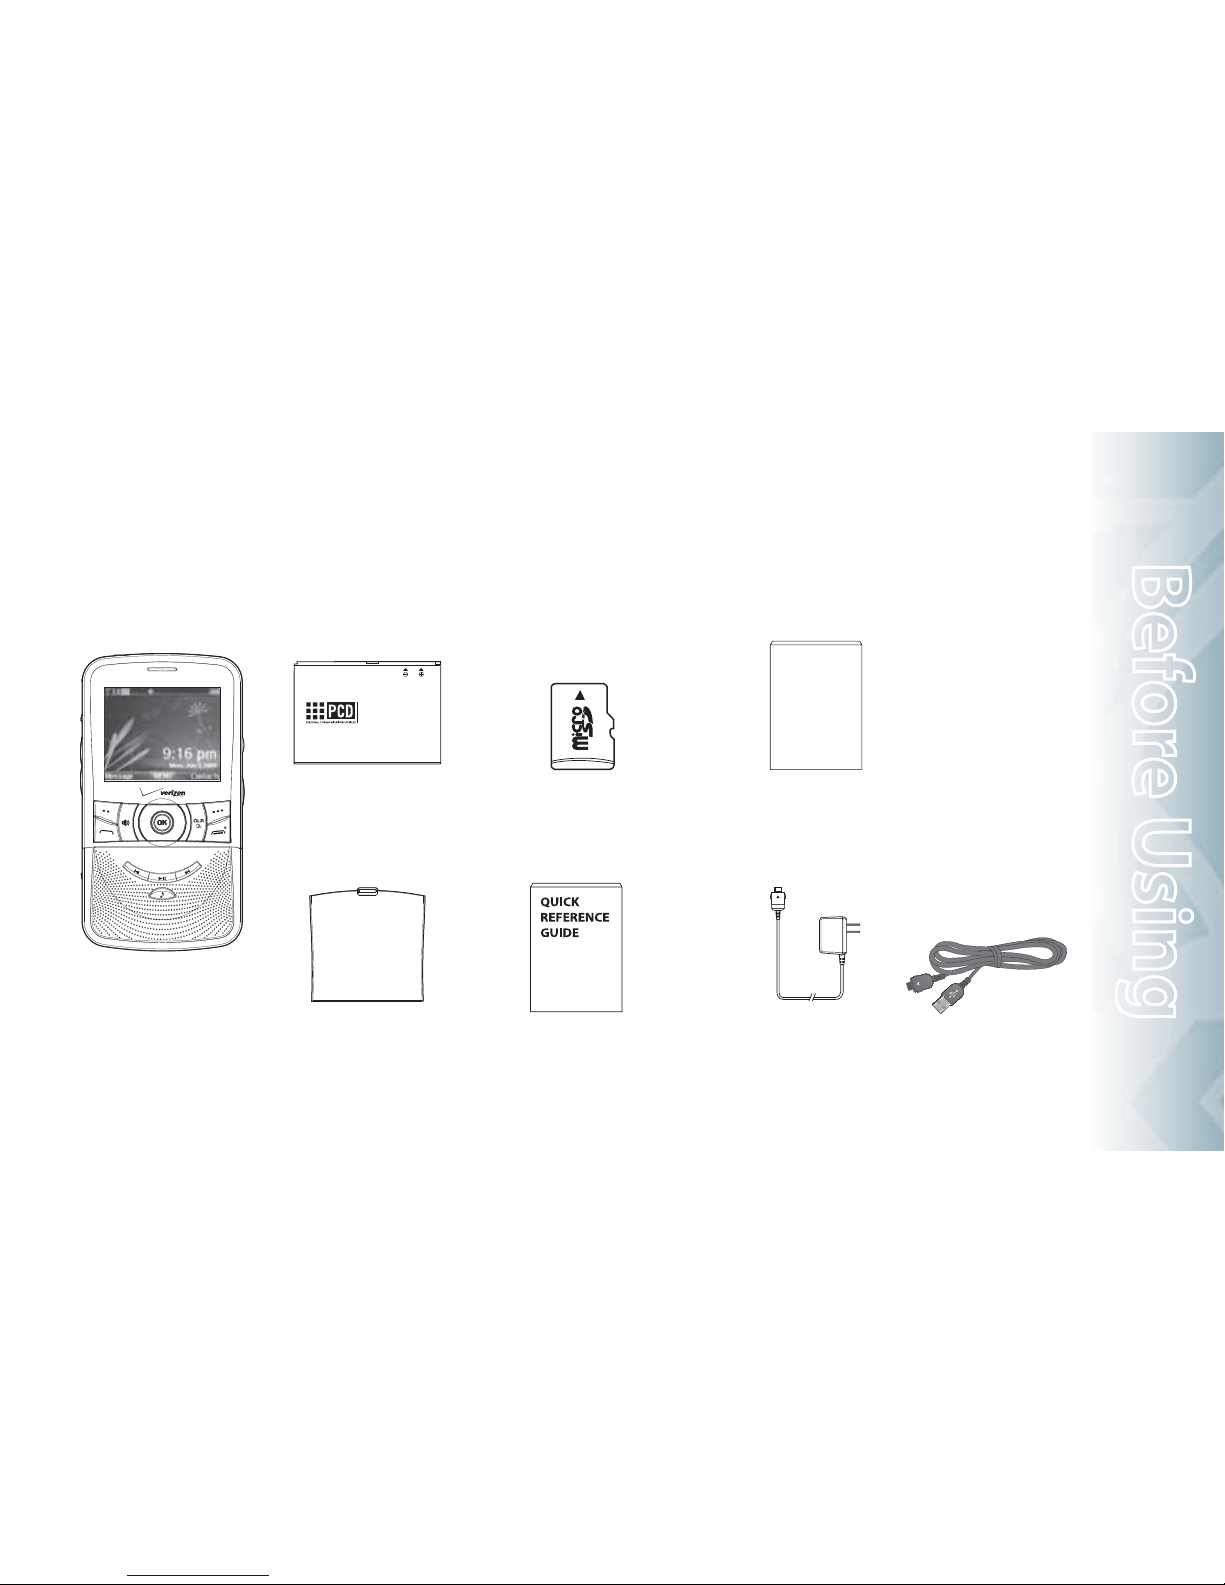
INSIDE THE PACKAGE
This package should include all items pictured below. If any are missing or different, immediately contact
the retailer where you purchased the phone.
Handset
BTR8030B
3.7V 920mAh 3.4Wh Li-ion Battery
Battery Manufactured by Pantech&Curitel
Cell Manufactured in Korea
Battery Manufactured in Korea
Wall Charger
1GB pre-installed
microSD Card
Product Safety &
Warranty Guide
1GB
QRG (Quick Reference Guide)
PRODUCT SAFETY
& WARRANTY
GUIDE
Battery Cover
Standard Battery
USB Cable
Page 7
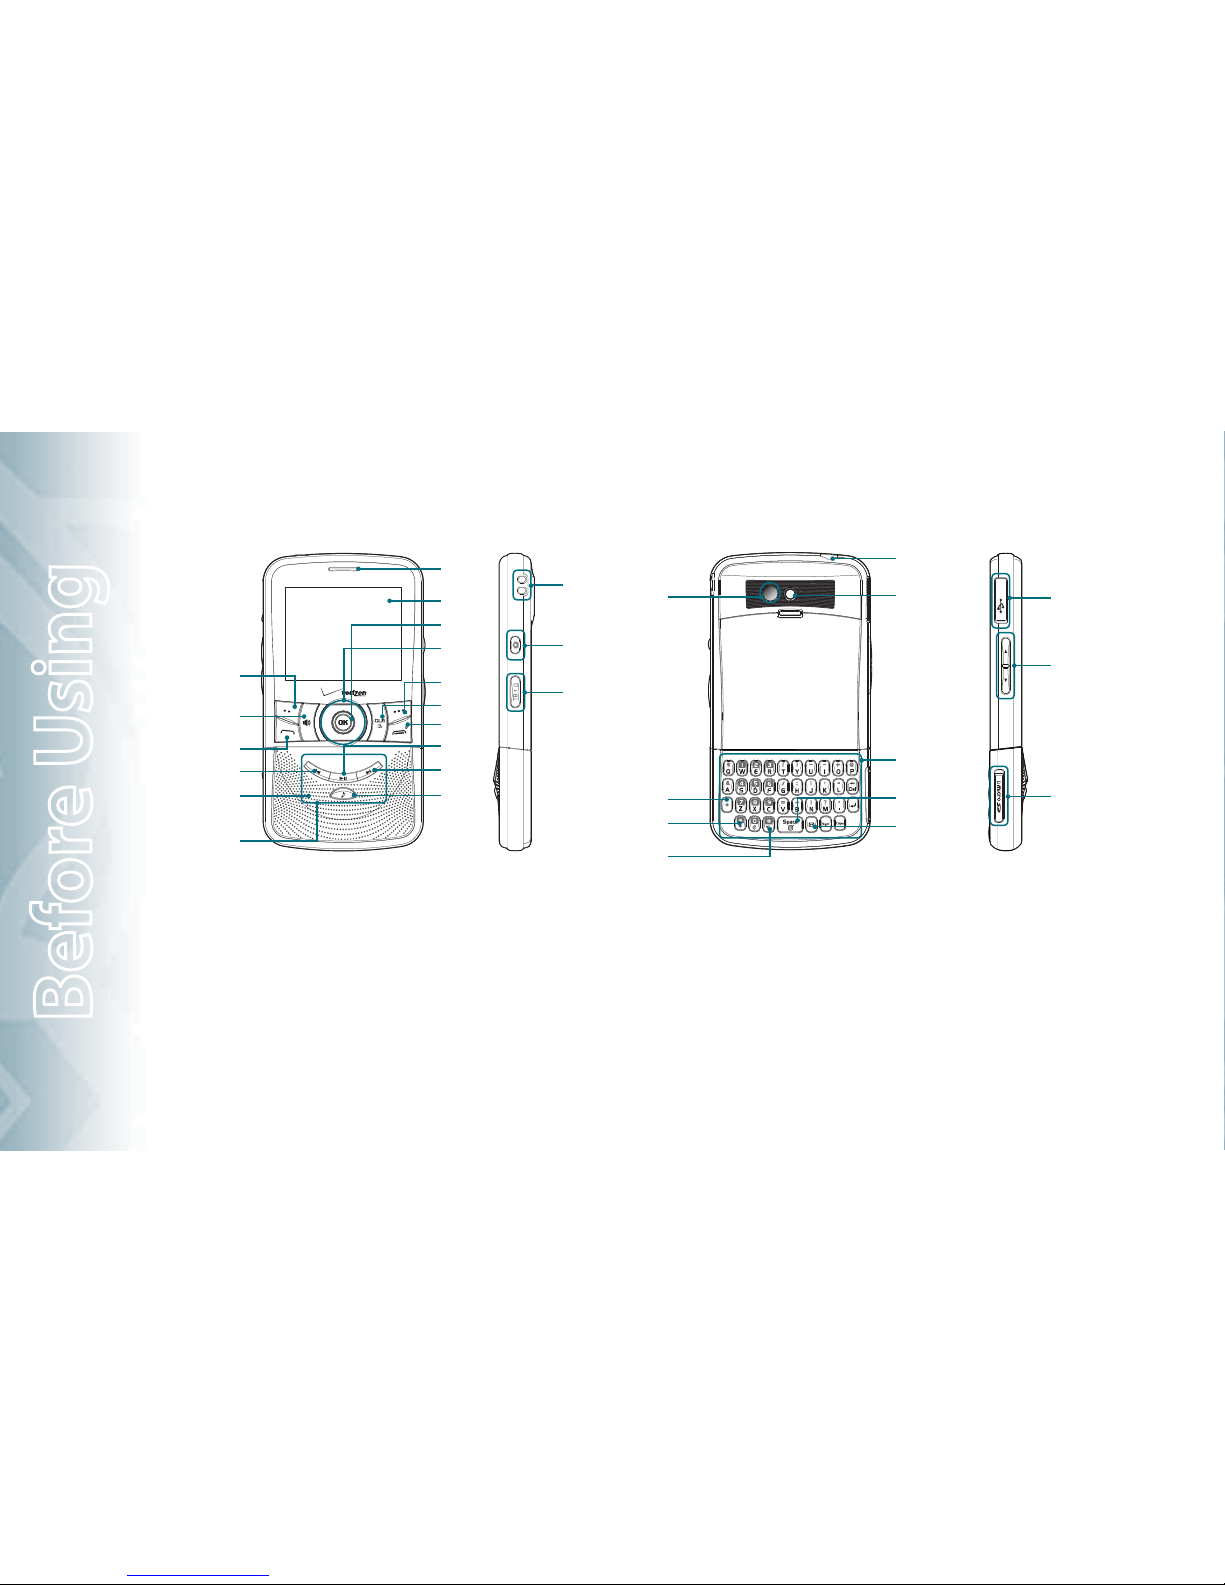
HANDSET DESCRIPTIONS
1. Left Soft Key
2. Speakerphone Key
3. SEND Key
4. Rewind Key
5. External Speaker
6. Music Keypad
7. Music Key
8. Fast-forward Key
9. Play/Pause Key
10. END Key
11. CLR/AVC Key
12. Right Soft Key
13. Directional Key
14. OK Key
15. Display Screen
16. Earpiece
17. Wrist Strap Eyelet
18. Camera Key
19. Task Bar/Lock Key
20. Shift Key
21. International Dial Key
22. Vibration Key
23. TXT Composer Key
24. Quick Note Key
25. QWERTY Keypad
26. Camera Lens
27. Self-Portrait Mirror
28. Headset Jack
29. Charging/Data Jack
30. Volume Keys
31. microSD Card Slot
2
27
21
20
22
3
4
5
6
7
8
9
10
11
12
13
14
15
16
17
23
25
26
28
29
30
31
24
18
19
1
6
Chapter 1 − Before Using
Before Using
Page 8

Before Using − Chapter 1
7
Before Using
KEY DESCRIPTIONS
The following list correlates to the previous page’s phone illustration.
1. [ ] Left Soft Key: From idle mode, press to display the
Message menu or access the function
listed above the key.
2. [
] Speakerphone Key: Press to turn Speakerphone On
or Off.
3. [
] SEND Key: Press to make or receive a call. From idle
mode, press to access the ALL CALLS list.
4. [
] Rewind Key: From the music player or while music is
playing in the background, press to skip
back one complete song or press and hold
to rewind a song.
5. External Speaker: Music, Ringtones and Sounds are played
through the speaker.
6. Music Keypad: Press to activate the music player or play, pause,
fast forward, rewind, and skip music.
7. [
] Music Key: Press to activate the music player or switch
between the music player and My Music.
8. [
] Fast-forward Key: From the music player or while music
is playing in the background, press
to skip forward one complete song
or press and hold to fast forward
through a song.
9. [
] Play/Pause Key: From the music player or while music
is playing in the background, press to
play or pause a song.
10. [
] END Key: Press and hold to turn the phone on/off or
press to end a call or browser session, and/or
return to idle mode.
11. [
] CLR/AVC Key: Press to clear a character from the
display. Press and hold to clear all
characters. Within a menu, press to
return to the previous menu. From idle
mode, press and hold to access the VOICE
COMMANDS menu.
12. [
] Right Soft Key: From idle mode, press to display
Contacts or to access the function
listed above the key.
13. Directional Key: Allows you to scroll through phone menu
options and provides a shortcut to phone
functions from idle mode.
14. [
] OK Key: Press to access the MENU from idle mode. It
Page 9

8
Chapter 1 − Before Using
Before Using
also allows you to accept choices when navigating through a menu.
15. Display Screen: Displays incoming calls, messages, signal, bat-
tery strength, time and date.
16. Earpiece: The earpiece allows you to hear the other caller.
17. Wrist Strap Eyelet: Accessory eyelet (optional straps and lan-
yards - purchased separately).
18. Camera Key: Press to access the built-in camera.
19. [
] Task Bar/Lock Key: Press to activate the Task Bar menu
or press and hold to lock/unlock
the keypad.
20. Shift Key: In text entry mode, press to change the character
input type.
21. International Dial Key: Press to enter an asterisk (*) character
for calling features. Press and hold to
display the plus sign (+) for international dialing.
22. Vibration Key: Press and hold to place your device in Vibrate
Mode.
23. TXT Composer Key: Press to access the New TXT Message
menu.
24. Quick Note Key: Press to access the Quick Note menu or to add
a space between characters.
25. QWERTY Keypad: Press to enter numbers, letters, and charac-
ters using a full QWERTY keypad interface.
26. Camera Lens: The lens of your built-in camera.
27. Self-Portrait Mirror: Displays your reflection when taking
pictures.
28. Headset Jack: Allows you to plug in an optional headset for
convenient, hands-free conversations.
29. [
] Charging/Data Jack: Allows you to plug in an optional
headset for convenient, handsfree conversations.
30. [
/ ] Volume Keys: Press to adjust the master volume
in idle mode, adjust the voice volume during a call or adjust music
volume when playing music.
31. [
] microSD Card Slot: A pre-installed microSD Card - 1GB
is inserted here.
Page 10
Before Using − Chapter 1
9
Before Using
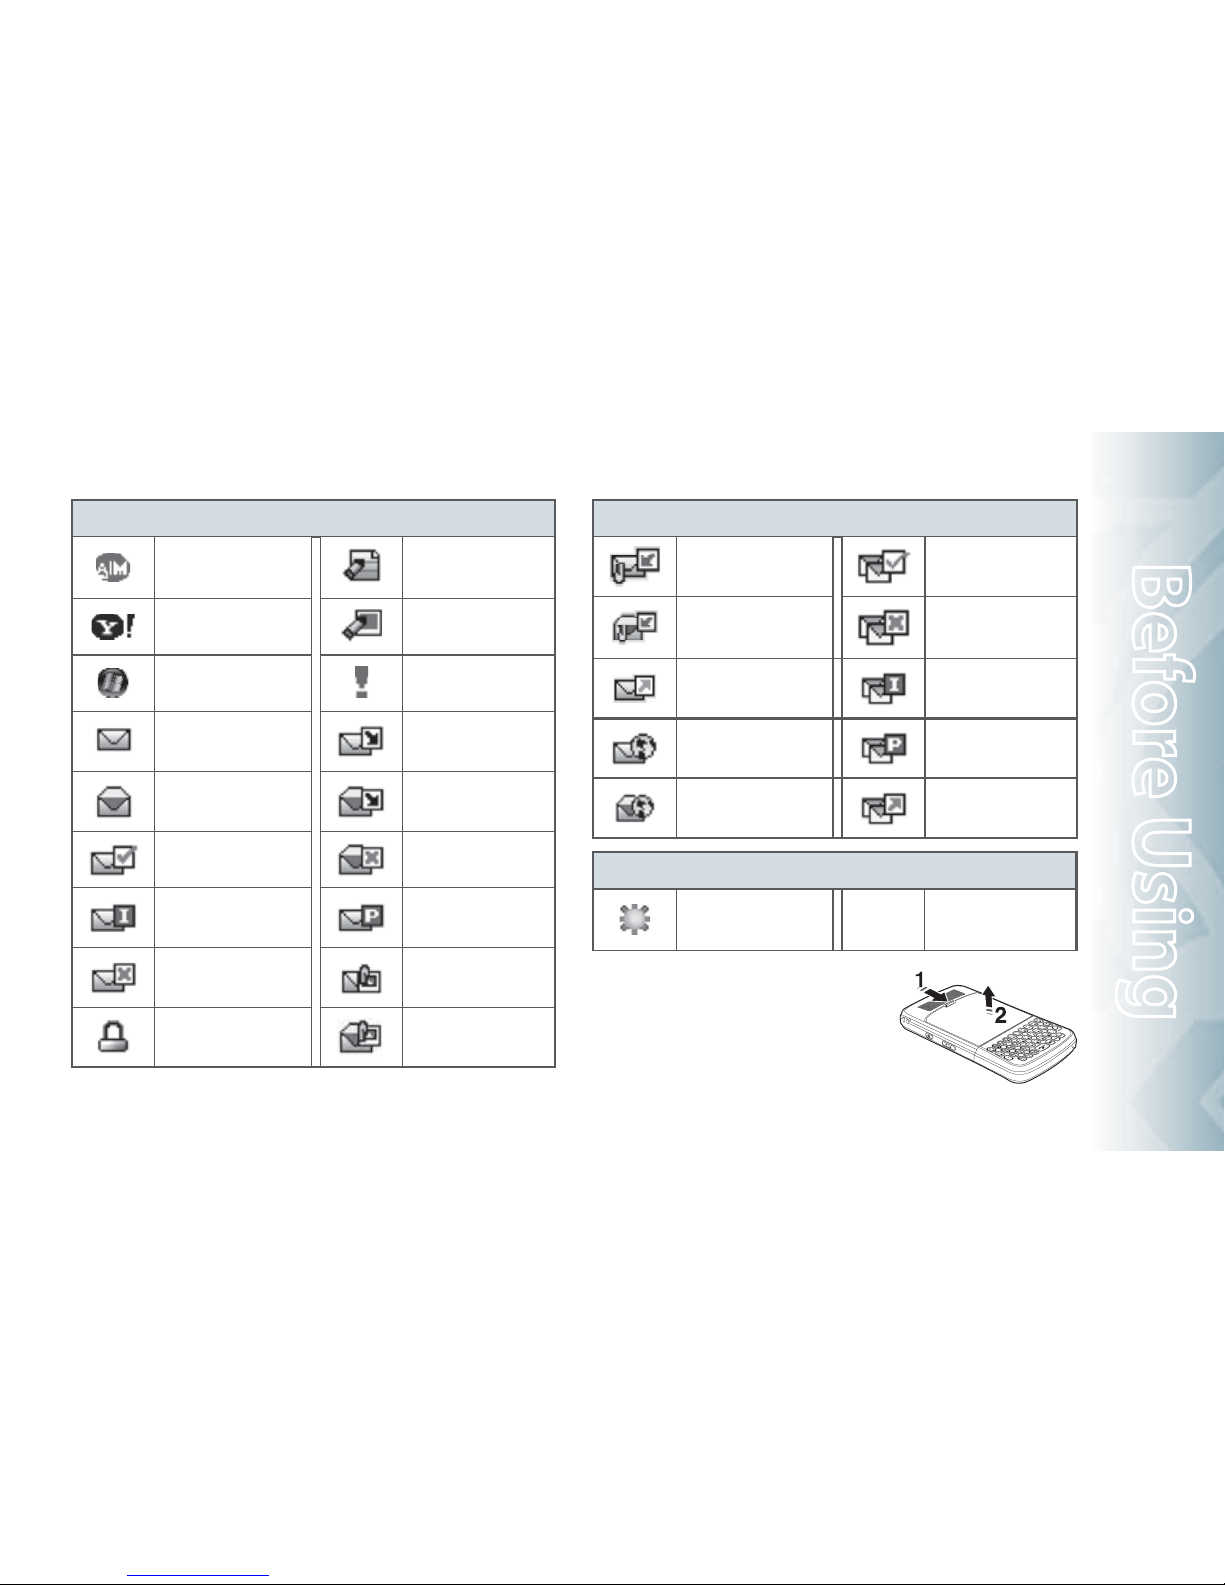
DISPLAY INDICATORS
Icon Icon Descriptions
D Signal Strength: CDMA IS 95 service available.
1X Signal Strength: 1X service is available.
Airplane Mode: Transmitting and receiving information is restricted.
Roaming: The phone is outside of the home service area.
SSL (Secured Socket Layer): Indicates that secure communication
between client and server has been established during data
communication using encryption.
Voice Privacy: Indicates Voice Privacy mode is active.
Data Call: Indicates Data Session in progress
Dormant: Indicates phone is in a dormant state during a data call.
Phone reverts to Dormant mode when there hasn't been activity on a
page for some time — the connection is still active and you can make
and receive calls.
No Service: Phone cannot receive a signal from the system.
Icon Icon Descriptions
TTY: TTY mode is active.
Voice Call: A call is in progress.
* No icon indicates the phone is in idle mode.
E911: Global Positioning Service (GPS) for 911 is set to On for
emergency calls only.
Location On: Global Positioning Service is set to On for
Location Service and 911 calls.
Keypad Lock: Indicates the keypad and external keys are locked.
Bluetooth: Indicates Bluetooth mode.
Bluetooth Active: Indicates Bluetooth Active mode.
Bluetooth Connected: Indicates Bluetooth Device is connected.
Playing Music: Indicates that music is playing.
Pause Music: Indicates that music playback has been paused.
Numeric Entry Mode: Enter numbers by pressing the
corresponding key on the keypad.
Alphabetical Entry Mode: Enter characters by pressing the
key with the desired characters.
Battery Level: Battery charging level-the more blocks, the stronger
the charge.
Page 11
10
Chapter 1 − Before Using
Before Using
Icon Icon Descriptions
AVR Active: AVR mode is active.
AVR Listening: Indicates AVR listening.
All Sounds Off: All sounds are set to off.
Alarm Only: Phone will alert you only with an alarm tone.
Vibrate Only: Phone will vibrate only when call is received.
Speakerphone: Speakerphone mode is active.
Missed Calls: Indicates you have missed calls.
Message: Indicates you have new message.
Calendar Appointment: Event Alarm is active.
Voicemail: Indicates you have voicemail message.
Alarm On: Appears when an alarm is set.
Recent Calls Icons
Dialed Call Missed Call
Received Call
Contact Icons
Mobile1 Picture
Mobile2 Ringtone
Home Fax
Work Speed Dial
E-mail 1 IM Screen Name
E-mail 2 Address
Group
Page 12
Before Using − Chapter 1
11
Before Using
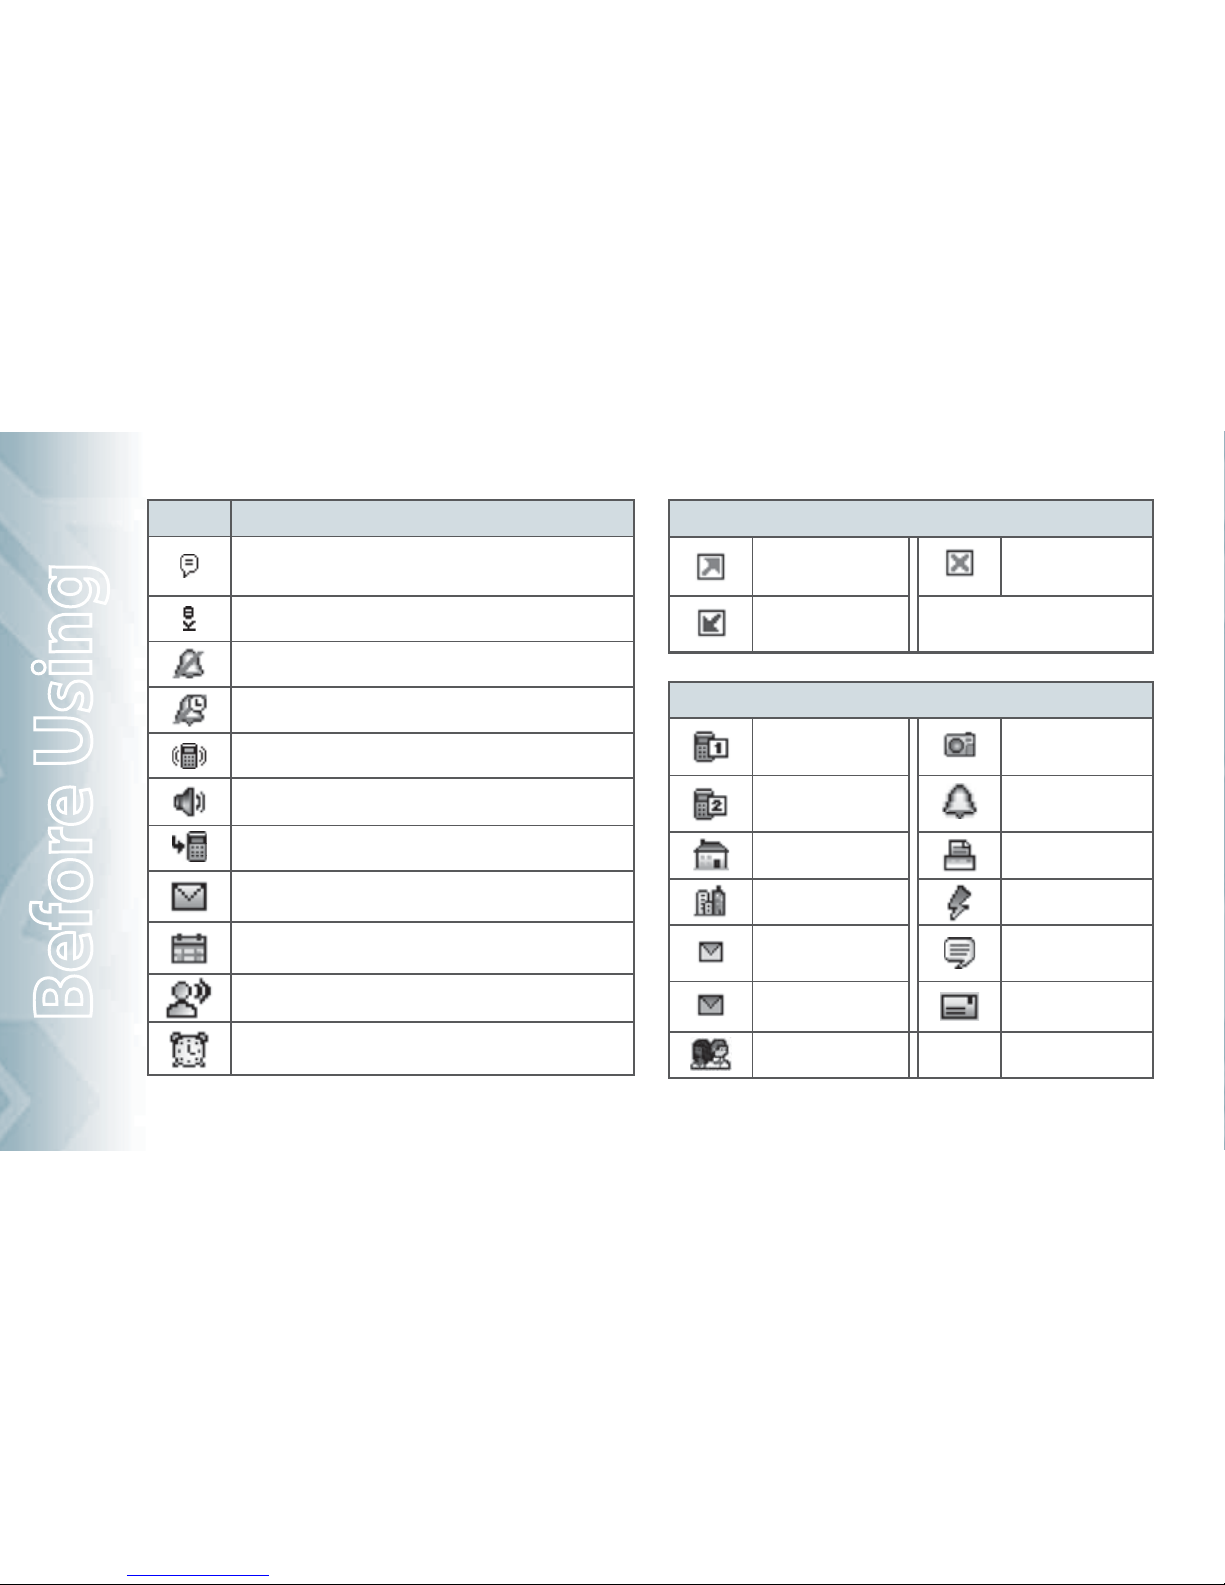
Message Icons
AIM Text Message Draft
Yahoo! Picture Message Draft
WL Messenger Priority level, Urgent
New/Unread Message
Unopened MMS
Notification
Opened/Read Message
Opened MMS
Notification
Message Delivered Corrupt Message
Incomplete Delivery
Pending Message
Send
Sent Message,
Delivery Failed
Unread MMS
Message Locked Read MMS
Message Icons
Unread EMS
Multiple Message
Delivered
Read EMS
Multiple Message
Failed
Sent Message
Multiple Message
Incomplete
Unread WAP Push
Multiple Message
Pending
Read WAP Push
Multiple Message
Sent
Other Icon
DST (Daylight Saving
Time)
INSTALL BATTERY
1. Push down (1) the battery door release
latch with your finger tip and pull off
(2) the battery cover.
Page 13
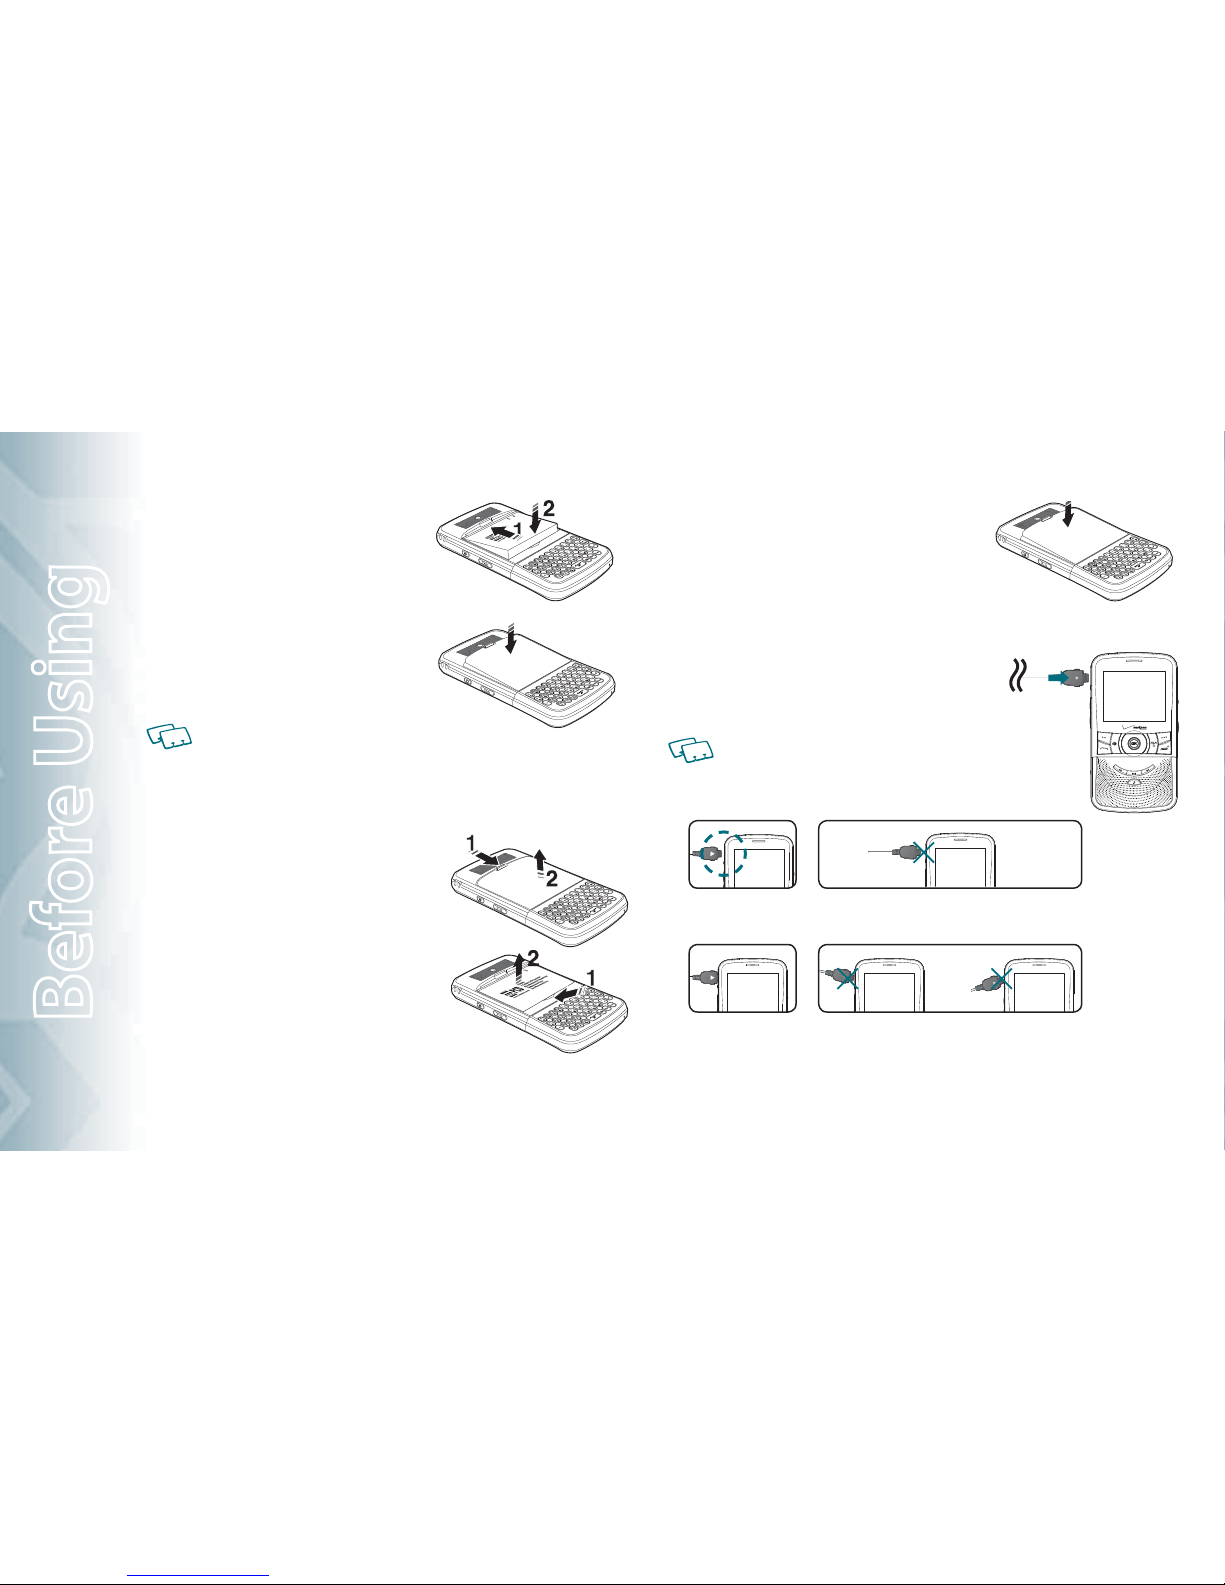
2. Slide (1) the battery into the slot by
aligning the contacts and press (2)
until you hear the "click".
3. Align the cover tabs with the slots on
the back of the device and press the
battery cover onto the unit until it
snaps into place.
If the battery is not correctly placed in the
compartment, the handset will not turn on and/or the battery may detach during use.
REMOVE BATTERY
1. To remove the battery cover, push down
(1) battery door release latch with your
finger tip and pull off (2) the battery
cover.
2. Push the bottom of the battery upwards
while inserting your finger into the slot
(1) and remove (2) the battery.
3. Align the cover tabs with the slots on the
back of the device and press the battery cover
onto the unit until it snaps into place.
CHARGING YOUR BATTERY
1. To charge, open the Charging/Data Jack cover
and connect the Wall Charger. Make sure you
align the connector as it appears in the image.
If the battery connector is not properly aligned, damage
could occur to the charging connector and the phone
may not charge.
CORRECT INCORRECT
CORRECT INCORRECT
12
Chapter 1 − Before Using
Before Using
Page 14
Before Using − Chapter 1
13
Before Using
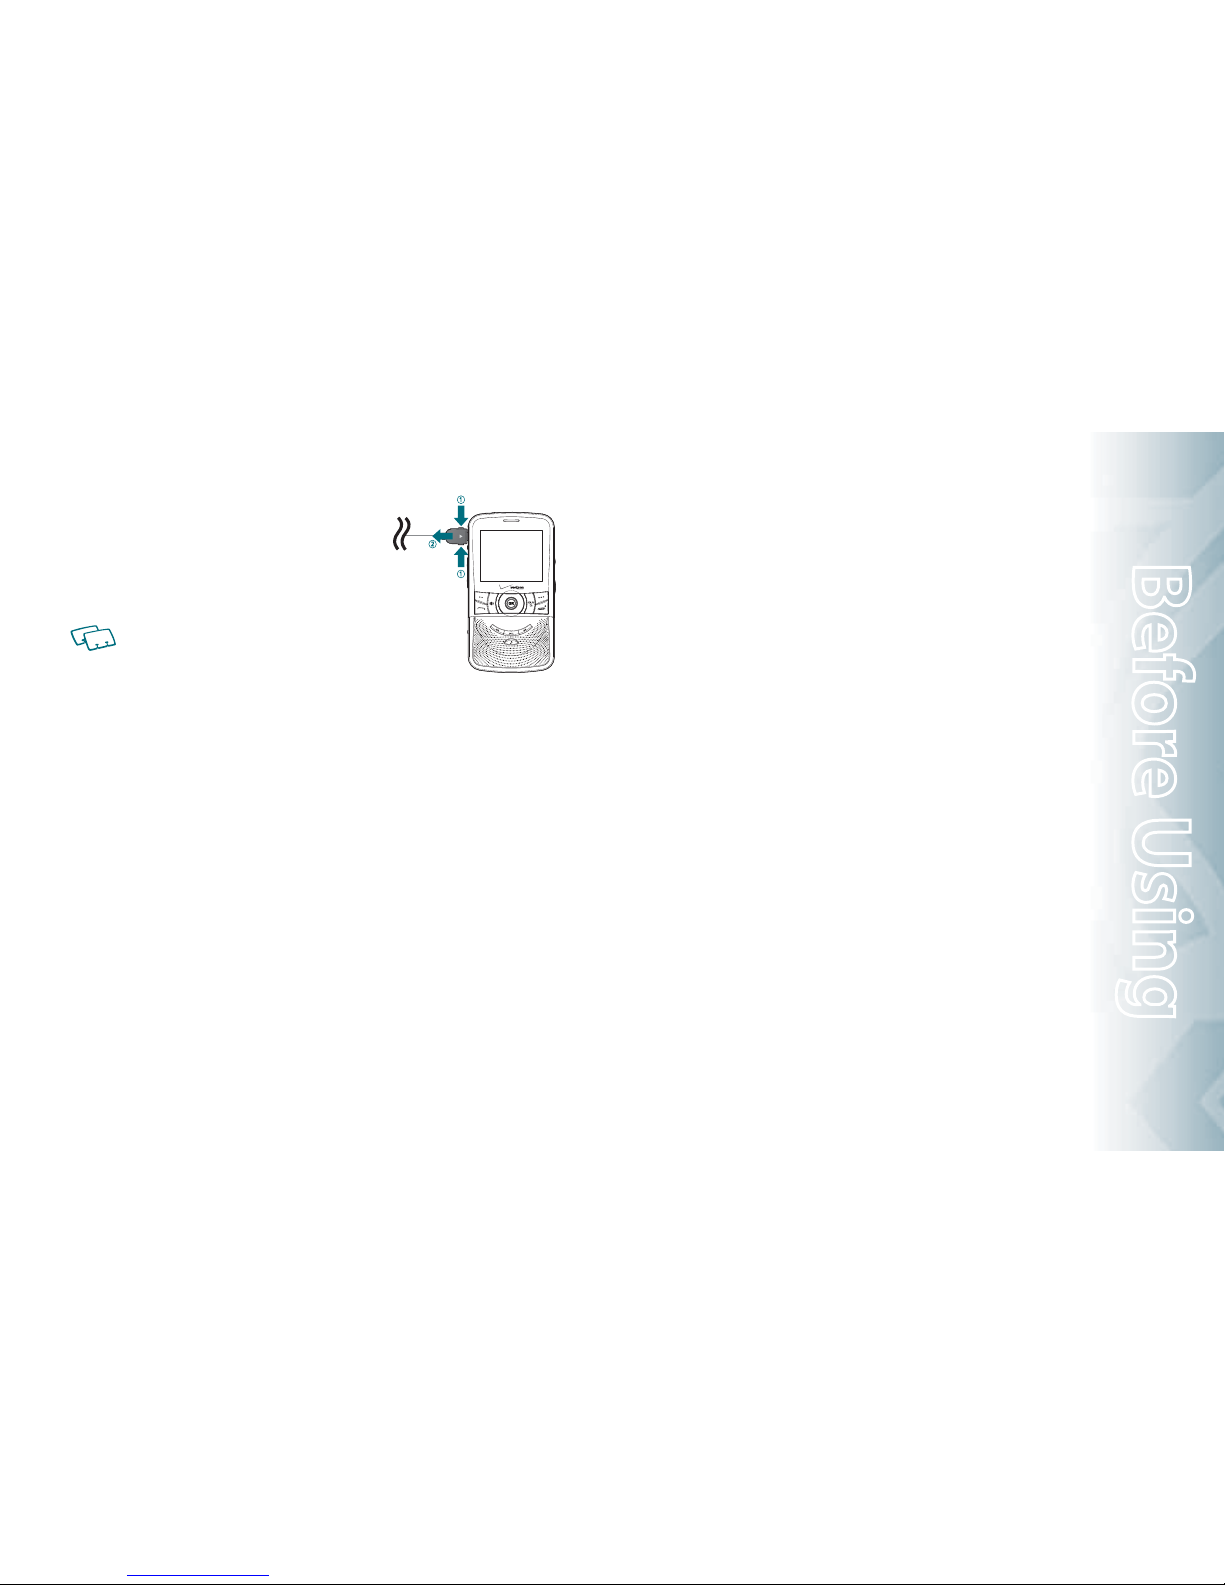
2. Plug the other end into a standard outlet.
3. To remove the Wall Charger, squeeze the
adapter’s side buttons (1) and pull the
charger from the device (2).
t When you charge the battery with the handset
powered off you will see a charging status screen.
After the charging has completed, the Charge
Complete message appears. You cannot operate the phone until it is powered on.
t
The battery is not fully charged at the time of purchase. Fully charge the battery
before use.
t
It is more efficient to charge the battery with the handset powered off.
t
Battery operating time gradually decreases over time.
t
If the battery fails to perform normally, you may need to replace the battery.
BATTERY HANDLING INFORMATION
DO’S
t
Only use the battery and charger approved for use with the RazzleTM.
t
Only use the battery for its original purpose.
t
Try to keep batteries in a temperature between 41°F (5°C) and 95°F (35°C). If the
battery is stored in temperatures above or below the recommended range, give it
time to warm up or cool down before using.
t
Store the discharged battery in a cool, dark, and dry place.
t
Purchase a new battery when its operating time gradually decreases after fully
charging.
t
Properly dispose of the battery according to local laws.
DON’TS
t
Don’t attempt to disassemble the battery – it is a sealed unit with no service-
able parts.
t
Don’t accidentally short circuit the battery by carrying it in your pocket or purse
with other metallic objects such as coins, clips and pens. This may critically damage the battery.
t
Don’t leave the battery in extremely hot or cold temperatures. Otherwise, it could
significantly reduce the capacity and lifetime of the battery.
t
Don’t dispose of the battery by placing into a fire.
Page 15
14
Chapter 1 − Before Using
Before Using
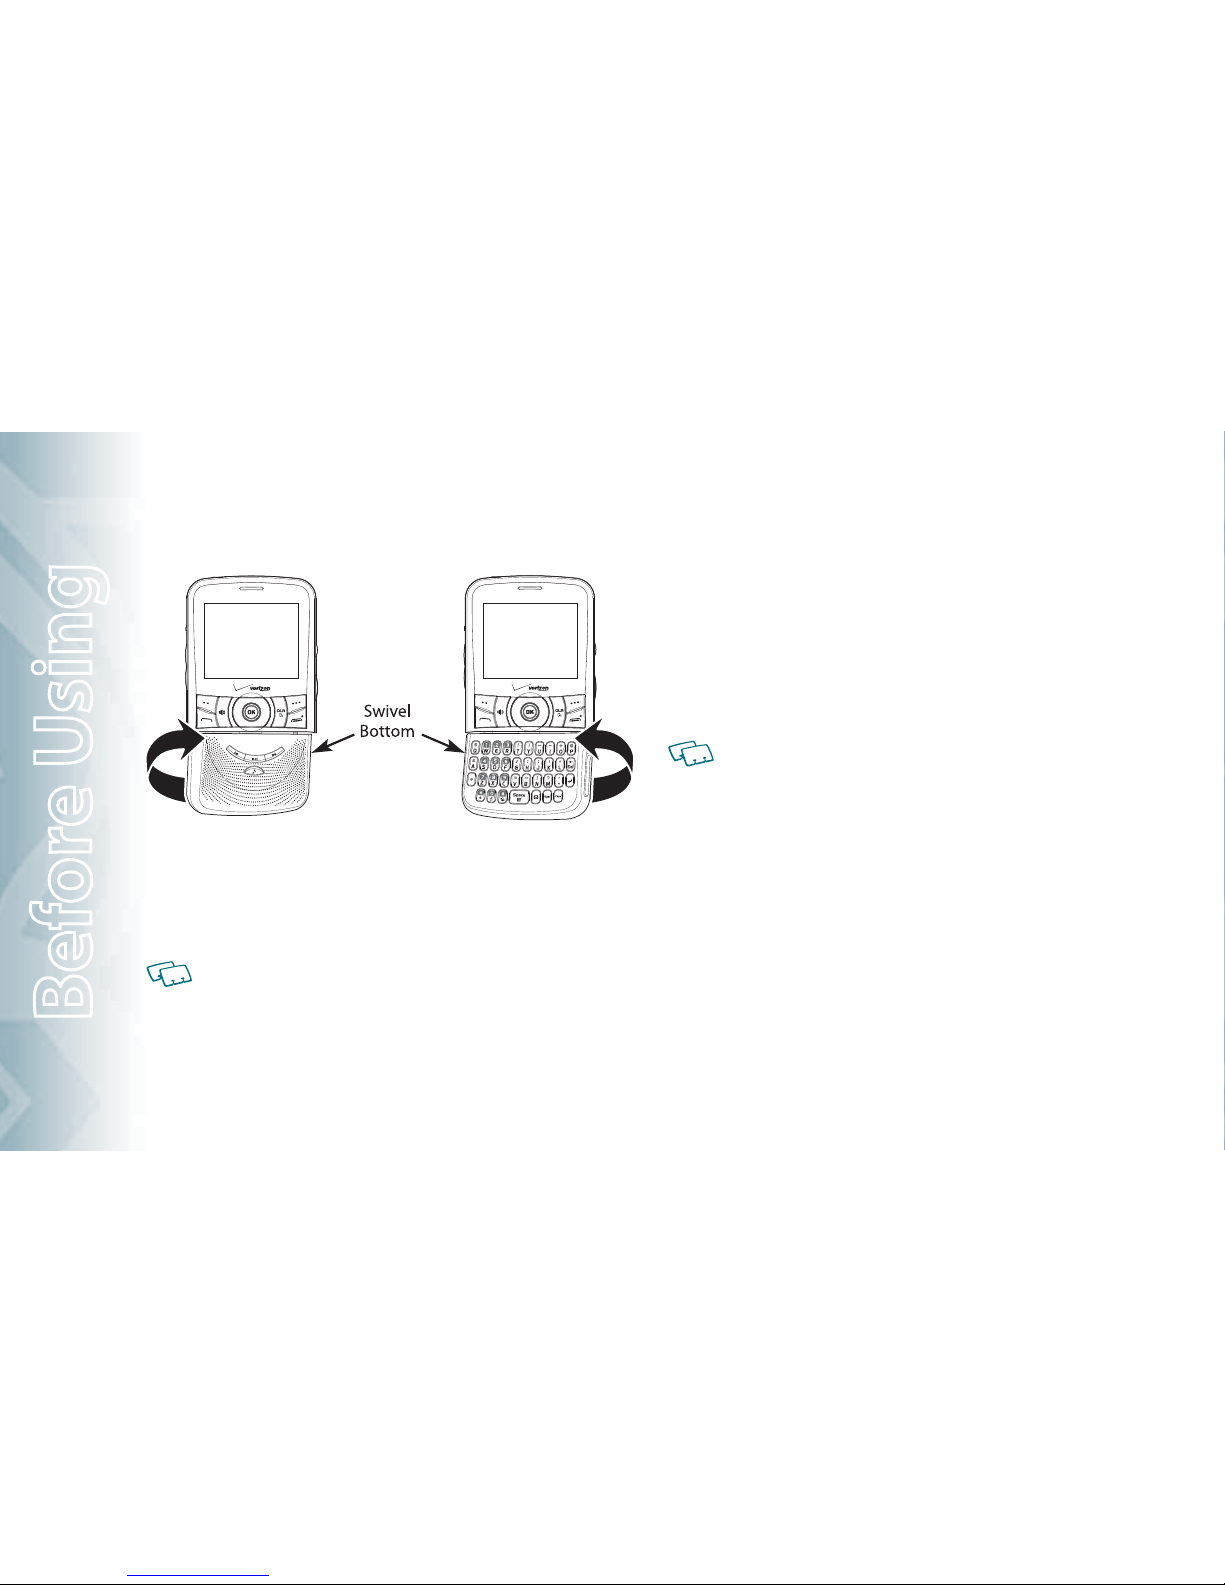
SWIVELING THE KEYPAD
To avoid breakage, turn the device in the direction indicated.
1. Rotate the swivel bottom of the phone to the right, as shown above.
2. The swivel bottom must be rotated to the left in order to bring it back
to the original position.
Important: To prevent breakage, do not rotate the swivel bottom 360 degrees.
REMOVING THE microSD CARD
This device comes with a 1GB pre-installed microSD Card.
1. Open the microSD Card cover, and use your thumb to press and release
the microSD Card.
2. Press the memory card inward, gently, until it pops out. Remove the
microSD Card.
3. Close the microSD Card cover.
To prevent possible damages, please keep the microSD Card cover closed at all times
regardless of whether the microSD Card is inserted or not.
Page 16

BASIC OPERATION
CHAPTER 2
BASIC OPERATION
This chapter addresses and explains the basic features for
Razzle
TM
including:
Turning the phone on/off
Accessing the menu
Using the task bar
Quick switching between the main menus
Menu summary
Making a call
Answering calls
Missed call notification
Wait/Pause feature
Answering a call
Making an international call
3-way calling
Call waiting function
Calling a number from contacts
Adjusting volume
Caller ID function
Vibrate on/off mode
Speakerphone mode
Using auto keypad lock function Available
options during a call
Making an emergency call
Dialing Letters
Page 17

TURNING THE PHONE ON/OFF
TURNING THE PHONE ON
1. Press and hold the END Key until your display turns on.
t If “Enter Lock Code” appears on the display, press the OK Key to unlock the keypad
and enter your 4-digit lock code and press the OK Key.
t
The default lock code is the last 4 digits of your Mobile Telephone Number.
TURNING THE PHONE OFF
1. Press the OK Key to unlock the keypad, then press and hold the END
Key until your display turns off.
t Immediately change or recharge the battery when “BATTERY LOW” appears on the
display. Memory may possibly be damaged if the phone turns off due to the battery
completely draining.
t Turn the phone off before removing or replacing the battery. If the phone is on,
unsaved data may be lost.
ACCESSING THE MENU
Your phone can be customized via the menu. Each function can be accessed
by scrolling with the Directional Key or by pressing the number that corresponds with the menu item.
1. To access the main menu from idle mode, press the OK Key to unlock
the keypad, then press the OK Key [MENU].
2. To scroll through the menu, press the Directional Key
up or down
or press the number that corresponds to the desired menu item.
3. To return to the previous page, press the CLR Key
. To exit the cur-
rent menu and return to idle mode, press the END Key .
4. From idle mode, press the OK Key to unlock the keypad, then press the
Left Soft Key
[Message] to open the Messaging menu. Or, press
the Right Soft Key [Contacts] to open your Contact List.
This manual assumes that Main Menu Settings is set to List and Messaging, and Display
Themes is set to Foliate, which are the default settings.
16
Chapter 2 − Basic Operation
Basic Operation
Page 18

USING THE TASK BAR
The Task Bar is an alternative way to cycle through menus, requiring fewer key
presses. Toggle between the following menus:
Dialing, Recent Calls, Messaging, VZW Services, My Music, My Pictures,
Contacts, Tools
1. From idle mode, press the OK Key to unlock the keypad, then press the
Task Bar Key .
2. Press the Directional Key
left or right to scroll through Task Bar
menus.
3. Select the desired task and press the OK Key.
t Task Bar is not available for certain circumstances such as receiving an incoming call
or message, displaying a notification message or displaying the main menu.
t Once a menu is selected, it is dimmed and not selectable from the Task Bar.
QUICK SWITCHING BETWEEN THE MAIN MENUS
While a menu is being accessed, you can quickly switch between the other
menu options.
1. From idle mode, press the OK Key to unlock the keypad, press the OK
Key [MENU], then select a desired menu from the following main
menus:
Media Center, Messaging, Contacts, Email, Mobile IM, My Ringtones,
Recent Calls, VZ Navigator, Settings & Tools
2. Press the OK Key.
3. Once a menu is selected, press the Directional Key
left or right to
switch between the menus.
Basic Operation − Chapter 2
17
Basic Operation
Page 19

MENU SUMMARY
Main Menu 2ND DEPTH 3RD DEPTH
1. MEDIA CENTER 1. Music & Tones
2. Pictures
3. Games
4. Mobile Web
5. Browse & Download
6. Extras
1. Get New Ringtones
2. My Ringtones
3. My Music
4. My Sounds
5. Sync Music
1. Get New Pictures
2. My Pictures
3. Take Picture
4. Online Album
1. Get New Applications
1. Get New Applications
Backup Assistant
Mobile Email
VZ Navigator
1. Get New Applications
2. MESSAGING 1. New Message 1. TXT Message
2. Picture Message
3. Voice Message
Main Menu 2ND DEPTH 3RD DEPTH
2. MESSAGING 2. Messages
3. Drafts
4. Voicemail
5. Mobile IM
6. Email
7. Chat
1. Mobile Email
2. Mobile Web Mail
3. CONTACTS 1. New Contact
2. Contact List
3. Backup Assistant
4. Groups
5. Speed Dials
6. In Case of Emergency
7. My Name Card
4. EMAIL 1. Mobile Email
2. Mobile Web Mail
5. MOBILE IM 1. Get New Applications
18
Chapter 2 − Basic Operation
Basic Operation
Page 20

Main Menu 2ND DEPTH 3RD DEPTH
6. MY
RINGTONES
1. Get New Ringtones
7. RECENT CALLS
1. Missed
2. Received
3. Dialed
4. All
5. View Timers
8. VZ NAVIGATOR
9. SETTINGS &
TOOLS
1. My Verizon
2. Tools 1. Voice Commands
2. Calculator
3. Tip Calculator
4. Calendar
5. E-Diary
6. Alarm Clock
7. Stop Watch
8. World Clock
9. Notepad
0. USB Mass Storage
Main Menu 2ND DEPTH 3RD DEPTH
9. SETTINGS &
TOOLS
3. Bluetooth
4. Sounds Settings
5. Display Settings
6. Phone Settings
1. Add New Device
1. Easy Set-up
2. Call Sounds
3. Alert Sounds
4. Keypad Sounds
5. Keypad Volume
6. Digit Dial Readout
7. Service Alerts
8. Device Connect
9. Power On/Off
0. Swivel Sounds
1. Easy Set-up
2. Banner
3. Backlight
4. Wallpaper
5. Display Themes
6. Main Menu Settings
7. Dial Fonts
8. Menu Font Size
9. Clock Format
1. Airplane Mode
2. Set Shortcuts
Basic Operation − Chapter 2
19
Basic Operation
Page 21

Main Menu 2ND DEPTH 3RD DEPTH
9. SETTINGS &
TOOLS
6. Phone Settings
7.Call Settings
8. Memory
9. USB Mode
0. Phone Info
*. Set-up Wizard
3. Voice Commands Settings
4. Language
5. Location
6. Current Country
7. Security
8. System Select
9. NAM Selection
1. Answer Options
2. Auto Retry
3. TTY Mode
4. One Touch Dial
5. Voice Privacy
6. DTMF Tones
7. Assisted Dialing
1. Save Options
2. Phone Memory
3. Card Memory
1. Media Sync Mode
2. Modem Mode
1. My Number
2. SW/HW Version
3. Icon Glossary
4.Software Update
MAKING A CALL
1. From idle mode, press the OK Key to unlock the keypad, swivel to the
QWERTY keypad and enter the phone number (include the area code
if needed).
t To erase one digit at a time, press the CLR Key .
t To erase the entire number, press and hold the CLR Key .
t When you place or receive a call from phone numbers stored in your Contact List with
a contact name, the name will be displayed.
2. Press the SEND Key .
3. To end a call, press the END Key
.
t If you activate the AUTO RETRY function, the phone will automatically re-dial the
number (Refer to page 63).
t You can also place calls using Voice-Activated Dialing. Please refer to page 70 for
more details.
ANSWERING CALLS
1. When your phone rings or vibrates, press the SEND Key to
answer the incoming call. (Depending on your phone’s settings, you
may also answer incoming calls by pressing any key.)
2. To ignore incoming calls, press the Right Soft Key
[Ignore].
3. To end a call, press the END Key
.
20
Chapter 2 − Basic Operation
Basic Operation
Page 22

In “Auto w/ Hands-free” a call is automatically answered after a preset number of ring
tones (Refer to page 63).
MISSED CALL NOTIFICATION
When an incoming call is not answered, the Missed Call logo appears on the
display.
TO DISPLAY THE MISSED CALL ENTRY FROM THE
NOTIFICATION SCREEN:
1. Highlight View Now and press the OK Key.
2. Press the OK Key [OPEN] to view the call details.
TO DISPLAY A MISSED CALL ENTRY FROM IDLE MODE:
1. From idle mode, press the OK Key to unlock the keypad, swivel to the
QWERTY keypad and press the OK Key [MENU], select Recent Calls,
then press the OK Key.
2. Press 1. Missed.
3. Highlight the entry you wish to view, then press the OK Key [OPEN].
4. To dial the phone number, press the SEND Key
.
WAIT/PAUSE FEATURE
Pauses are used for automated systems (i.e., voice mail or calling cards). Insert
a pause after a phone number and then enter another group of numbers. The
second set of numbers is dialed automatically after the pause. This feature is
useful for dialing into systems that require a code.
Wait (W)
The phone stops dialing until you press the SEND Key
to advance to the
next number.
2-Sec Pause
The phone waits 2 seconds before sending the next string of digits automatically.
1. From idle mode, press the OK Key to unlock the keypad, swivel to the
QWERTY keypad and enter the phone number.
2. Press the Right Soft Key
[Options].
3. Select Add 2-Sec Pause, then press the OK Key.
4. Enter additional number(s) (pin number or credit card number).
5. Press the SEND Key
to dial or the Left Soft Key [Save].
Basic Operation − Chapter 2
21
Basic Operation
Page 23

ANSWERING A CALL
1. If your phone is set to Any Key for Answer Options, simply press any
key to answer a call. If your phone is set to Auto w/ Hands-free for
Answer Options, calls are answered automatically with a 5 second
delay. (Auto w/ Hands-free is available only when connected to a
headset or hands-free device.) For information on how to set your
Answer Options, see page 67.
2. To end the call, press the END Key
.
Any Key is the default setting for this device.
MAKING AN INTERNATIONAL CALL
1. Press the OK Key to unlock the keypad, swivel to the QWERTY keypad
and then press and hold the * Key . The + required for international calls will be displayed.
2. Enter the country code, area code, and phone number then press the
SEND Key
.
3. To end the call, press the END Key
.
3WAY CALLING
With 3-Way Calling, you can talk to two people at the same time. When using
this feature, the normal airtime rates will be applied for each of the two calls.
1. Press the OK Key to unlock the keypad, swivel to the QWERTY keypad,
enter the phone number you wish to call and then press the SEND
Key .
2. Once you have established the connection, enter the second phone
number you wish to call and then press the SEND Key
again.
3. When you’re connected to the second party, press the SEND Key
again to begin your 3-Way call.
If one of the people you called hangs up during your call, you and the remaining caller
stay connected. If you initiated the call and are the first to hang up, all three calls are
disconnected.
CALL WAITING FUNCTION
If you are on a call and you receive another incoming call, you will hear a beep
and the caller’s phone number will appear on the display. With Call Waiting,
you may put the active call on hold while you answer the other incoming call.
To use Call Waiting:
1. To answer another call while on the phone, press the SEND Key .
22
Chapter 2 − Basic Operation
Basic Operation
Page 24

This places the first call on hold. To switch back to the first caller, press
the SEND Key again.
CALLING A NUMBER FROM CONTACTS
1. From idle mode, press the OK Key to unlock the keypad, then press the
Right Soft Key
[Contacts].
2. Select the Contact entry and press the OK Key [VIEW], then select the
desired phone number.
3. Press the SEND Key
to place the call.
Selecting the Contact entry and then pressing the Send Key will dial the Default
Number of the Contact entry automatically. If multiple numbers are saved in the
Contact List, select the Contact entry, then select the phone number you want to dial.
Then press the Send Key .
ADJUSTING VOLUME
To adjust the master volume:
1. From idle mode, press the OK Key to unlock the keypad, then press the
Volume Keys / up or down.
2. Select one of the following options and press the OK Key [SET] to
save it.
t All Sounds Off
t Alarm Only
t Vibrate Only
t
Low / Medium Low / Medium / Medium High / High
t Press the Volume Keys / up or down to adjust Earpiece volume during
a call.
t To play a ringtone, press the Left Soft Key [Play].
CALLER ID FUNCTION
Caller ID displays the number of the person calling when your phone
rings. If the caller’s identity is stored in Contacts, the name appears on the
screen. The caller ID is stored in the Recent Calls Menu.
VIBRATE ON/OFF MODE
Vibrate Mode mutes key tones and alerts for an incoming call or message. To
activate Vibrate Mode:
1. From idle mode, press the OK Key to unlock the keypad, swivel to the
QWERTY keypad, then press and hold the # Key . "VIBRATE MODE
ENABLED" appears on the display.
2. To disable Vibrate, press and hold the # Key
again. "VIBRATE
MODE DISABLED" appears on the display.
Basic Operation − Chapter 2
23
Basic Operation
Page 25

SPEAKERPHONE MODE
The Speakerphone feature lets you hear audio through the speaker and talk
without holding the phone.
1. To activate press the OK Key to unlock the keypad, then press the
Speakerphone Key . To deactivate, press the Speakerphone Key
again.
USING AUTO KEYPAD LOCK FUNCTION
When the backlight of the display is turned off, the Side Keys and the
Directional Key are locked. To unlock them, press any key, “PRESS OK TO
UNLOCK KEYPAD” displays, then press the OK Key.
You can press and hold the Task Bar/Lock Key [ ] to lock or unlock the keypad.
AVAILABLE OPTIONS DURING A CALL
During a phone call, you can access the following features by pressing the
Right Soft Key [Options]:
NEW MESSAGE
To access the Messaging Menu during a call:
1. Press the Right Soft Key [Options], with New Message high-
lighted, press the OK Key.
CONTACT LIST
To view your Contact List during a call:
1. Press the Right Soft Key [Options], select Contact List and press
the OK Key.
RECENT CALLS
To view your Recent Calls list during a call:
1. Press the Right Soft Key [Options], select Recent Calls and press
the OK Key.
BLUETOOTH
To access the Bluetooth Menu during a call:
1. Press the Right Soft Key [Options], select Bluetooth and press
the OK Key.
If an Audio device is connected, Audio To Phone / Audio To Device is displayed in the
options menu instead of Bluetooth.
MAIN MENU
To access the Main Menu during a call:
24
Chapter 2 − Basic Operation
Basic Operation
Page 26

1. Press the Right Soft Key [Options], select Main Menu and press
the OK Key.
NOTEPAD
To compose notes during a call:
1. Press the Right Soft Key [Options], select Notepad and press
the OK Key.
VOICE PRIVACY
To turn the voice privacy feature On or Off:
1. Press the Right Soft Key [Options], select Voice Privacy and press
the OK Key.
MAKING AN EMERGENCY CALL
The 911 feature automatically places the phone in Emergency Call Mode when
you dial the preprogrammed emergency number, 911. It also operates in Lock
Mode and out of the service area.
911 IN LOCK MODE
To make an emergency call in Lock Mode:
1. Press the OK Key to unlock the keypad, swivel to the QWERTY keypad,
enter “911”, and then press the SEND Key .
2. The call connects.
3. The phone maintains Emergency Mode for 5 minutes. When the call
ends, the phone returns to Lock Mode.
911 USING ANY AVAILABLE SYSTEM
To make an Emergency Call using any available system:
1. Press the OK Key to unlock the keypad, swivel to the QWERTY keypad,
enter “911”, and then press the SEND Key
.
2. The call connects.
3. The phone will stay in Emergency Mode for 5 minutes. While the
phone is in the Emergency Mode for 5 minutes, the phone can receive
an incoming call from any available system or you can make outgoing
calls even in the Emergency Callback Mode.
DIALING LETTERS
Allows you to dial the number associated with a specific word.
For example, to call “1-800-FLOWERS”:
1. Press the OK Key to unlock the keypad, swivel to the QWERTY keypad,
enter “1-800”, then press the Mode Change Key .
Basic Operation − Chapter 2
25
Basic Operation
Page 27

2. Enter “FLOWERS” with the QWERTY Keypad and press the SEND Key
to connect.
t If Alphabetical Entry Mode icon is turned on, only capital letters will be appeared.
t
Pressing the Mode Change Key changes between the Numeric Entry Mode and
Alphabetical Entry Mode.
26
Chapter 2 − Basic Operation
Basic Operation
Page 28

MEMORY FUNCTION
CHAPTER 3
MEMORY FUNCTION
This chapter addresses memory functions including:
Storing a phone number
Entering letters, numbers & symbols
One, Two, Three-touch dialing
Page 29

STORING A PHONE NUMBER
The Contact List stores up to 1000 entries.
ADDING A NEW CONTACT
1. From idle mode, press the OK Key to unlock the keypad, swivel to the
QWERTY keypad, then enter the phone number you want to save.
2. Press the Left Soft Key
[Save].
3. Select Add New Contact, and press the OK Key.
4. Press the Directional Key
up or down to select the type of phone
number you want to save, then press the OK Key.
Mobile 1/Mobile 2/Home/Work/Fax
Use Update Existing to add another phone number to a contact already stored in
memory.
5. Enter a name for the phone number (up to 32 characters), then press
the OK Key [SAVE].
6. “CONTACT SAVED” displays, then the phone number reappears on the
screen. Press the End Key
to exit, or press the Send Key to
call the number.
OPTIONS TO CUSTOMIZE YOUR CONTACTS
Once the basic phone number and name information is stored in your Contacts, you
can edit and/or customize the entries.
1. From idle mode, press the OK Key to unlock the keypad, press the
Right Soft Key [Contacts], then highlight the Contact entry you
want to edit.
2. Press the Left Soft Key
[Edit] to access the Edit Contact screen.
3. Select the information field you want to customize. Additional fields
include:
Name / Mobile 1 / Home / Work / E-mail 1 / Group / Picture /
Ringtone / Mobile 2 / IM Screen Name / Fax / E-mail 2 / Street / City /
State / Zip Code / Country
4. Swivel to the QWERTY keypad, change the data as necessary, then
press the OK Key [SAVE] to update the contact entry.
ADDING OR CHANGING GROUPS
To organize your Contacts into groups:
1. From idle mode, press the OK Key to unlock the keypad, press the
Right Soft Key [Contacts], then highlight the desired Contact
entry.
28
Chapter 3 − Memory Function
Memory Function
Page 30

2. Press the Left Soft Key [Edit].
3. Highlight Group and press the Left Soft Key
[Set].
4. Select Family or Work, then press the OK Key [MARK]. To create
a new group, press the Right Soft Key
[New], swivel to the
QWERTY keypad and enter the new group name, then press the
OK Key [SAVE].
5. Press the Left Soft Key
[Done] to set the group.
6. Press the OK Key [SAVE] to update the contact entry.
CHANGING THE CALL RINGTONE
To identify who is calling by setting different ringtones for different phone numbers
in your Contacts:
1. From idle mode, press the OK Key to unlock the keypad, press the
Right Soft Key [Contacts], then highlight the desired entry.
2. Press the Left Soft Key
[Edit].
3. Highlight Ringtone, then press the Left Soft Key
[Set].
4. Select the new ringtone, then press the OK Key.
Press the Left Soft Key [Play] to listen to a highlighted ringtone before you
press the OK Key.
5. Press the OK Key [SAVE] to update the contact entry.
ADDING OR CHANGING THE PICTURE ID
To select a picture or graphic to assign to a Caller ID:
1. From idle mode, press the OK Key to unlock the keypad, press the
Right Soft Key [Contacts], then highlight the desired entry.
2. Press the Left Soft Key
[Edit].
3. Highlight Picture, and press the Left Soft Key
[Set].
4. Press the Directional Key
up, down, left or right to select a
picture, then press the OK Key.
5. When completed, press the OK Key [SAVE] to update the contact
entry.
ADDING OR CHANGING AN EMAIL ADDRESS
To enter or add an Email address to a Contact entry:
1. From idle mode, press the OK Key to unlock the keypad, press the
Right Soft Key [Contacts], then press highlight the desired
entry.
2. Press the Left Soft Key
[Edit].
Memory Function − Chapter 3
29
Memory Function
Page 31

3. Highlight E-mail 1 or E-mail 2.
4. Swivel to the QWERTY keypad, enter an Email address, then press
the OK Key [SAVE] to update the contact entry.
ADDING A SPEED DIAL ENTRY
To add an entry to Speed Dial:
1. From idle mode, press the OK Key to unlock the keypad, press the
Right Soft Key [Contacts], then highlight a desired entry.
2. Press the Left Soft Key
[Edit].
3. Highlight the phone number you want to add to Speed Dial, then
press the Right Soft Key
[Options].
4. Select 1. Set Speed Dial, then press the OK Key.
5. Select a Speed Dial location, then press the OK Key [SET].
6. Select Yes and press the OK key.
7. Press the OK Key [SAVE] to update the contact entry.
EDITING CONTACT ENTRIES
ADDING A PHONE NUMBER FROM IDLE MODE
1. From idle mode, press the OK Key to unlock the keypad, swivel to
the QWERTY keypad, and then enter the phone number you want
to save (up to 32 digits).
2. Press the Left Soft Key
[Save].
3. Highlight Update Existing, then press the OK Key.
4. Highlight the existing Contact entry, then press the OK Key.
5. Highlight the following phone number type, then press the OK Key.
Mobile 1/Mobile 2/Home/Work/Fax
6. If a phone number is already assigned to the item you selected,
select Yes or No to overwrite the existing entry, then press the
OK Key.
7. “CONTACT UPDATED” displays, then the phone number reappears
on the screen. Press the End Key
to exit, or press the Send Key
to call the number.
ADDING A PHONE NUMBER FROM THE CONTACT LIST SCREEN
1. From idle mode, press the OK Key to unlock the keypad, then press
the Right Soft Key [Contacts]. Your Contacts are displayed
alphabetically.
30
Chapter 3 − Memory Function
Memory Function
Page 32

2. Highlight the Contact entry you want to edit, then press the Left
Soft Key [Edit].
3. Highlight the phone number field you want to add, swivel to the
QWERTY keypad, enter the number, then press the OK Key [SAVE] to
update the contact entry. A confirmation message appears.
DEFAULT NUMBERS
The phone number saved when a Contact is created is the Default
Number. If more than one number is saved in a Contact entry, another
number can be set as the Default Number.
The Default Number cannot be deleted. The entire Contact entry can be deleted or
another number can be assigned as the Default Number allowing you to delete the
original number and keep the Contact entry.
CHANGING THE DEFAULT NUMBER
1. From idle mode, press the OK Key to unlock the keypad, then press
the Right Soft Key
[Contacts]. Your Contacts are displayed
alphabetically.
2. Highlight the Contact entry you want to edit, then press the Left
Soft Key
[Edit].
3. Highlight the phone number you want to assign as the Default
Number, then press the Right Soft Key
[Options].
4. Select 2. Set As Default, then press the OK Key.
5. Select Yes and press the OK Key. A confirmation message appears.
6. Press the OK Key [SAVE] to update the contact entry.
EDITING STORED PHONE NUMBERS
1. From idle mode, press the OK Key to unlock the keypad, then press
the Right Soft Key
[Contacts]. Your Contacts are displayed
alphabetically.
2. Highlight the Contact entry you want to edit, then press the Left
Soft Key
[Edit].
3. Select the phone number you want to edit.
4. Swivel to the QWERTY keypad, edit the phone number as necessary,
then press the OK Key [
SAVE] to update the contact entry.
EDITING STORED NAMES
1. From idle mode, press the OK Key to unlock the keypad, then press
the Right Soft Key
[Contacts]. Your Contacts are displayed
alphabetically.
Memory Function − Chapter 3
31
Memory Function
Page 33

2. Highlight the Contact entry you want to edit, then press the Left
Soft Key [Edit].
3. Swivel to the QWERTY keypad, edit the name as necessary, then
press the OK Key [SAVE] to update the contact entry.
DELETING
DELETING A PHONE NUMBER FROM A CONTACT
1. From idle mode, press the OK Key to unlock the keypad, then press
the Right Soft Key
[Contacts].
2. Highlight the Contact entry, then press the Left Soft Key
[Edit].
3. Select the desired phone number to be deleted.
4. Press and hold the Clear Key
to delete the number.
5. Press the OK Key [SAVE] to update the contact entry. A confirmation
message appears.
DELETING A CONTACT ENTRY
1. From idle mode, press the OK Key to unlock the keypad, then press
the Right Soft Key
[Contacts].
2. Select the desired Contact entry to be deleted.
3. Press the Right Soft Key
[Options], select 2. Erase and press
the OK Key.
4. Select Yes and press the OK Key. A confirmation message appears.
DELETING A SPEED DIAL
1. From idle mode, press the OK Key to unlock the keypad, then press
the Right Soft Key
[Contacts].
2. Highlight the entry that has a speed dial to be deleted.
3. Press the Left Soft Key
[Edit].
4. Highlight the phone number that has a speed dial to be deleted.
5. Press the Right Soft Key
[Options], select 1. Remove Speed
Dial and press the OK Key. Select Yes and press the OK Key. A confir-
mation message appears.
6. Press the OK Key [SAVE] to update the contact entry.
32
Chapter 3 − Memory Function
Memory Function
Page 34

ENTERING LETTERS, NUMBERS & SYMBOLS
Your device has a QWERTY keypad that provides a superior typing experience on a small handheld device for easy and comfortable input.
1. [
] Mode Change Key:
t
When in Numeric entry mode
- Press to change between entering numbers and letters that
appear on the same key or to lock in numeric or text entry mode.
t
When in Text entry mode
- Press to change between entering numbers and letters that
appear on the same key.
- Press and hold to lock in numeric or text entry mode.
2. [
] Word Change Key: When in text entry mode, press to select
the next matching word.
3. [ ] Space Key: Press to accept a word and add a space while
entering letters. From idle mode, press to access
the Quick Note menu.
4. [ ] Symbols Key: Press to open the symbols list.
5. [ ] Caps Key: Press to select a letter case for the standard text
[Abc] input mode. [Abc], [ABC] and [abc] indicate
the standard text input.
6. [ ] Enter Key: Press to insert a carriage return.
7. [ ] Del Key: When in a Text entry field and in entry mode, press
to delete the character to the left of the cursor. Press
and hold to delete the entire word or character
Memory Function − Chapter 3
33
Memory Function
1
6
7
2345
8
Page 35

string that was just entered.
8. [ ] CLR/AVR Key: When in a Text entry field and in entry mode,
press to delete the character to the left of the
cursor. Press and hold to delete the entire
word or character string that was just entered.
For best performance in low-light environments, your handset includes a backlight
feature that can illuminate both the display and the keypad so you can keep reading
and typing. (Please refer to page 55 for more details on Backlight.)
ONE, TWO, THREETOUCH DIALING
Ideal for frequently dialed numbers, this feature allows contact entries to be
dialed via the keypad with only one, two, or three key presses.
ONETOUCH DIALING:
1-9: Press the OK Key to unlock keypad, swivel to the QWERTY keypad,
and then press and hold the number you wish to connect to for more
than 1 second.
TWOTOUCH DIALING:
10-21 : Press the OK Key to unlock keypad, swivel to the QWERTY keypad,
and then press the first digit and press and hold the second digit
of the number to dial.
95, 96, 97, 98 and 99 : Speed Dial entries 95(#Warranty Center),
96(#DATA), 97(#BAL), 98(#MIN) and 99(#PMT)
are already assigned to Verizon Wireless Account
Information.
t
#Warranty Center is a VZW Customer Service VRU number (Free call) that provides technical
support about the Total Equipment Coverage program or the Extended Warranty program.
t
#DATA is a VZW Customer Service VRU number (Free call) that provides customers information
about their Verizon Wireless text message and data usage.
t
#BAL is a VZW Customer Service VRU number (Free call) that provides customers information
about their Verizon Wireless billing balance.
t
#MIN is a VZW Customer Service VRU number (Free call) that provides customers information
about their Verizon Wireless usage.
t
#PMT is a VZW Customer Service VRU number (Free call) that allows a user to make a bill
payment, either with a payment option they have already set up, or using a new, one time
payment option.
THREETOUCH DIALING:
Press the OK Key to unlock keypad, swivel to the QWERTY keypad, press
the first and second digits, then press and hold the third digit of the
number to dial.
411 : Speed Dial entry 411 (Directory Assistance) is already assigned.
t
Directory Assistance is a VZW Wireless Directory Assistance service that provides directory
listing database information.
34
Chapter 3 − Memory Function
Memory Function
Page 36

MENU FUNCTIONS
CHAPTER 4
MENU FUNCTION
This chapter addresses accessing the menu and using its functions
and features to customize your Razzle
TM
.
CONTACTS
New contact
Contact list
Groups
Speed dials
In Case of Emergency
My Name Card
RECENT CALLS
Recent calls
Missed
Received
Dialed
All
Blocked
View timers
SETTINGS
Bluetooth
Sounds settings
Display settings
Phone settings
Call settings
Memory
USB Mode
Phone Info
Set-up Wizard
TOOLS
Voice Commands
Calculator
Tip Calculator
Calendar
E-Diary
Alarm Clock
Stop Watch
World Clock
Notepad
USB Mass Storage
MY VERIZON
My Verizon
Page 37

NEW CONTACT
To add a new number to your Contact List:
Using this submenu, the number is saved as a new Contact.
To save the number into an existing Contact, edit the Contact entry.
1. From idle mode, press the OK Key to unlock the keypad, press the OK
Key [MENU], swivel to the QWERTY keypad, then press 3. Contacts,
1. New Contact.
To change the input mode, press the Left Soft Key [Abc], select the desired option,
and press the OK Key.
2. Press the Directional Key down to enter information in other
fields for the contact. Fields include:
Mobile 1 / Home / Work / E-mail 1 / Group / Picture / Ringtone /
Mobile 2 / IM Screen Name / Fax / E-mail 2 / Street / City / State / Zip
Code / Country
3. Press the OK Key [SAVE] to create the contact entry.
CONTACT LIST
You can review all the entries stored in your Contact List or quickly find an
entry by entering a name or its character string.
1. From idle mode, press the OK Key to unlock the keypad, press the OK
Key [MENU], swivel to the QWERTY keypad, then press 3. Contacts,
2. Contact List.
Press the Right Soft Key [Contacts]. The list of names in your contacts is displayed
alphabetically.
2. Enter a name or part of a name in the Go To Field at the bottom of the
screen or press the Directional Key up or down to scroll through
your Contact List.
3. To edit the entry, press the Left Soft Key
[Edit]. To view contact
details, press the OK Key [VIEW].
t
By pressing the Right Soft Key [Options], you can choose from the following:
1. New Contact: To add a new contact.
2. Erase: To delete a contact.
3. New TXT Message: To create a TXT message.
4. New Picture Message: To create a Picture message.
5. New Voice Message: To create a Voice message.
6. Set As ICE Contact: To set as an in case of emergency number.
7. Call: Dial the contact.
8. Manage Contacts: To erase, lock, unlock or copy to card.
9. Send Name Card: To send a name card.
4. To dial the selected number, press the Right Soft Key [Options]
and then press 7. Call or press the SEND Key .
36
Chapter 4 − Menu Function
Contacts
Page 38

GROUPS
Groups allow you to classify phone entries into groups with up to 10 members
in each group. The default groups include Family and Work and they cannot
be erased or renamed.
TO ADD NEW GROUP
1. From idle mode, press the OK Key to unlock the keypad, press the OK
Key [MENU], swivel to the QWERTY keypad, press 3. Contacts then
press
4. Groups.
2. Press the Left Soft Key
[New].
3. Enter a new group name and press the OK Key [SAVE].
TO ASSIGN PHONE NUMBER TO GROUP
1. From idle mode, press the OK Key to unlock the keypad, press the OK
Key [MENU], swivel to the QWERTY keypad, press 3. Contacts then
press 4. Groups.
2. Select the group where you want to add the contact, and then press
the Right Soft Key
[Options].
3. Select
Add and press the OK Key.
4. Your contact entries will be displayed in alphabetical order. Select the
contact you want to add then press the OK Key [
MARK].
5. Press the Left Soft Key
[Done]. “MEMBER LIST UPDATED” will
be displayed.
TO CHANGE GROUP NAME
1. From idle mode, press the OK Key to unlock the keypad, press the OK
Key [MENU], swivel to the QWERTY keypad, press 3. Contacts then
press 4. Groups.
2. Select the group you want to rename then press the Right Soft Key
[Options].
3. Select Rename and press the OK Key.
4. Enter the new group name, then press the OK Key [SAVE].
ERASE GROUP
1. From idle mode, press the OK Key to unlock the keypad, press the OK
Key [MENU], swivel to the QWERTY keypad, press 3. Contacts then
press 4. Groups.
2. Select the existing group name that you want to erase, and then press
Menu Function − Chapter 4
37
Contacts
Page 39

the Right Soft Key [Options].
3. Select Erase Group and press the OK Key. “ERASE GROUP?” will appear
on the screen.
4. Select Ye s and press the OK Key. A confirmation message appears.
TO SEND A TXT MESSAGE TO A GROUP
1. From idle mode, press the OK Key to unlock the keypad, press the OK
Key [
MENU], swivel to the QWERTY keypad, press 3. Contacts then
press 4. Groups.
2. Select the group you want to send a message to then press the Right
Soft Key
[Options].
3. Press 1. New TXT Message.
4. Input your message in the Text Field and then press the Right Soft Key
[Options] to select Insert Quick Text, Save As Draft, Add, Format
Tex t , Priority Level or Cancel Message.
5. To send the TXT message, press the OK Key [SEND] or press the SEND
Key
.
TO SEND A PICTURE MESSAGE TO A GROUP
1. From idle mode, press the OK Key to unlock the keypad, press the OK
Key [MENU], swivel to the QWERTY keypad, press 3. Contacts then
press 4. Groups.
2. Select the group you want to send a message to then press the Right
Soft Key
[Options].
3. Press 2. New Picture Message.
4. Under Tex t, input your message and then press the Directional Key
down.
5. Under Picture, press the Left Soft Key
[My Pics], select the
picture you would like to send then press the OK Key. Press the
Directional Key down.
6. Under Sound, press the Left Soft Key
[Sounds], select the sound
you would like to send then press the OK Key. Press the Directional
Key down.
7. Under Subject, input a subject and then press the Directional Key
down.
8. Under Name Card, press the Left Soft Key
[Add], select 1. My
Name Card or 2. Contacts then press the OK Key. Select the desired
card then press the OK Key.
38
Chapter 4 − Menu Function
Contacts
Page 40

9. Press the Right Soft Key [Options] to select Preview, Save As
Draft, Add Quick Text, Add Slide, Priority Level, Remove Picture,
Remove Slide, Remove Sound, Remove Name Card or Cancel Message.
These options will vary depending on the message contents chosen.
10. To send the Picture Message, press the OK Key [SEND] or press the
SEND Key
.
TO SEND A VOICE MESSAGE TO A GROUP
1. From idle mode, press the OK Key to unlock the keypad, press the OK
Key [MENU], swivel to the QWERTY keypad, press 3. Contacts then
press 4. Groups.
2. Select the group you want to send a voice message to then press the
Right Soft Key
[Options].
3. Press 3. New Voice Message.
4. To record a new Voice Memo, press the OK Key to start recording, then
press the OK Key [STOP] to finish recording and save the voice memo.
5. Under Voice, your recorded file name will appear. Press the Directional
Key
down.
6. Under Tex t, input your message then press the Directional Key
down.
7. Under
Subject, input a subject then press the Directional Key
down.
8. Under Name Card, press the Left Soft Key
[Add], select 1. My
Name Card or 2. Contacts then press the OK Key. Select the card you’d
like to send then press the OK Key.
9. Press the Right Soft Key
[Options] to select Review, Save As
Draft
, Add Quick Text, Priority Level, Remove Recording, Remove Name
Card or Cancel Message.
These options will vary depending on the message contents chosen.
10. To send the Voice Message, press the OK Key [SEND] or press the
SEND Key .
SPEED DIALS
From idle mode, calls can be placed to numbers stored in speed dial by swiveling to the QWERTY keypad, and pressing & holding the location number on
the keypad.
1. From idle mode, press the OK Key to unlock the keypad, press the OK
Key [
MENU], swivel to the QWERTY keypad, press 3. Contacts then
Menu Function − Chapter 4
39
Contacts
Page 41

press 5. Speed Dials.
2. Highlight the desired Speed Dial position, or enter the Speed Dial
digit, then press the OK Key [SET].
3. Select the desired Contact entry, then press the OK Key.
4. Highlight the number you wish to set to speed dial then press the
OK Key.
5. "
ASSIGN SPEED DIAL TO CONTACT?" appears on the screen. Select Yes
and press the OK Key. A confirmation message appears.
“Unassigned” appears if the location is available.
TO ERASE A SAVED SPEED DIAL
1. From idle mode, press the OK Key to unlock the keypad, press the OK
Key [MENU], swivel to the QWERTY keypad, press 3. Contacts then
press 5. Speed Dials.
2. Select the Speed Dial entry you want to erase.
3. Press the Right Soft Key
[Remove].
4. "
REMOVE SPEED DIALS" appears on the screen. Select Yes and press
the OK Key. A confirmation message appears.
IN CASE OF EMERGENCY
Your phone has a special menu to organize your emergency contacts and
personal information.
TO ASSIGN EMERGENCY CONTACTS
Follow the procedures below to register a Contact to be contacted in case of emergency, or to register a medical record number or other personal info. To register up
to three different Contacts to ICE:
1. From idle mode, press the OK Key to unlock the keypad, press the OK
Key [MENU], swivel to the QWERTY keypad, press 3. Contacts then
press 6. In Case of Emergency.
2. Select Contact 1, Contact 2 or Contact 3, then press the OK Key [ADD].
3. To select a contact from the Contacts List, press 1. From Contacts,
select the Contact entry, and then press the OK Key. To add a new
contact as an ICE CONTACT, press 2. New Contact, enter the info, and
then press the OK Key [SAVE].
4. The Contact name will be displayed in the place of Contact 1, Contact
2 or Contact 3.
40
Chapter 4 − Menu Function
Contacts
Page 42

TO REASSIGN EMERGENCY CONTACTS
1. From idle mode, press the OK Key to unlock the keypad, press the OK
Key [MENU], swivel to the QWERTY keypad, press 3. Contacts then
press 6. In Case of Emergency.
2. Select the contact you want to re-assign then press the Right Soft Key
[Options].
3. To select a contact from the Contacts List, press 1. Re-assign then 1.
From Contacts
, select the Contact entry, then press the OK Key. To reassign a new contact as an ICE CONTACT, press 2. New Contact, enter
the info then press the OK Key [SAVE].
4. A confirmation message appears.
TO ERASE ASSIGNED EMERGENCY CONTACTS
1. From idle mode, press the OK Key to unlock the keypad, press the OK
Key [MENU], swivel to the QWERTY keypad, press 3. Contacts then
press 6. In Case of Emergency.
2. Select the contact you want to erase, then press the Right Soft Key
[Options].
3. Press
2. Unassign.
4. A confirmation message appears.
TO CALL AN ASSIGNED EMERGENCY CONTACT
1. From idle mode, press the OK Key to unlock the keypad, press the OK
Key [MENU], swivel to the QWERTY keypad, press 3. Contacts then
press 6. In Case of Emergency.
2. Select the contact you want to call and then press the Left Soft Key
[Call] or press the SEND Key .
TO ADD PERSONAL INFO
To store a Medical Record Number or other information that may be useful in case
of an emergency:
1. From idle mode, press the OK Key to unlock the keypad, press the OK
Key [MENU], swivel to the QWERTY keypad, press 3. Contacts then
press 6. In Case of Emergency.
2. Select Personal Info and then press the OK Key [VIEW].
3. Select Note 1, Note 2 or Note 3 and then press the OK Key [ADD].
4. Enter the information and then press the OK Key [SAVE].
5. The entered information now appears in the place of Note 1, Note 2
Menu Function − Chapter 4
41
Contacts
Page 43

42
Chapter 4 − Menu Function
Contacts
or Note 3.
TO EDIT SAVED PERSONAL INFO
1. From idle mode, press the OK Key to unlock the keypad, press the OK
Key [MENU], swivel to the QWERTY keypad, press 3. Contacts then
press 6. In Case of Emergency.
2. Select Personal Info then press the OK Key [VIEW].
3. Select the Note you want to edit then press the OK Key [
EDIT].
4. Edit the Note, then press the OK Key [SAVE].
TO ERASE SAVED PERSONAL INFO
1. From idle mode, press the OK Key to unlock the keypad, press the OK
Key [MENU], swivel to the QWERTY keypad, press 3. Contacts then
press 6. In Case of Emergency.
2. Select Personal Info then press the OK Key [VIEW].
3. Select the Note you want to erase then press the Right Soft Key
[Erase].
4. "ERASE NOTE" will be displayed on the screen. Select Yes and then
press the OK Key. A confirmation message appears.
MY NAME CARD
A Name Card with the handset’s mobile number automatically appears.
EDIT MY NAME CARD
1. From idle mode, press the OK Key to unlock the keypad, press the OK
Key [MENU], swivel to the QWERTY keypad, press 3. Contacts then
press 7. My Name Card.
2. Press the Left Soft Key
[Edit].
3. Edit My Name Card options and then press the OK Key [SAVE] to save
your changes.
SEND MY NAME CARD
1. From idle mode, press the OK Key to unlock the keypad, press the OK
Key [MENU], swivel to the QWERTY keypad, press 3. Contacts then
press 7. My Name Card.
2. Press the Right Soft Key
[Send].
3. Press 1. TXT Message, 2. Picture Message, 3. Voice Message or 4. Via
Bluetooth.
t
TXT Message: Allows you to send TXT messages with the Name Card as an attachment.
Page 44

1. Enter the recipient’s contact information and press the OK Key.
2. Enter your message in the Text field and then press the OK Key [SEND].
t
Picture Message: Allows you to send picture messages with the Name Card as an
attachment.
1. Enter the recipient’s contact information and press the OK Key.
2. Compose your Picture Message and then press the OK Key [SEND]. Please refer to page
97 for more details on Picture Message.
t
Voice Message: Allows you to send voice messages with the Name Card as an attach-
ment.
1. Press the OK Key to start recording a voice memo and press the OK Key [STOP] to finish
recording and save the voice memo.
2. Compose your Voice Message and then press the OK Key [SEND]. Please refer to page 97
for more details on Voice Message.
t
Via Bluetooth: Allows you to send Name Card to another Bluetooth device.
1. Press 1. Add New Device. If the Bluetooth® power is switched off, the following
message will appear on the screen: "TURN BLUETOOTH POWER ON?". Press the OK
Key to select Yes.
2. When "PLACE DEVICE YOU ARE CONNECTING TO IN DISCOVERABLE MODE" appears, press
the OK Key to start searching Bluetooth devices.
3. Press the Directional Key up or down to select a desired device and press the OK
Key [PAIR]. Please refer to page 47 for more details on Bluetooth.
4. The handset may prompt you for the passkey. Consult the Bluetooth® accessory (sold
separately) instructions for the appropriate passkey (typically “0000”—4 zeroes). Enter
the passkey, then press the OK Key.
5. "Before Connecting To [Device Name]" will appear on the screen. Select Always Ask or
Always Connect and press the OK Key.
Menu Function − Chapter 4
43
Contacts
Page 45

44
Chapter 4 − Menu Function
Recent Calls
RECENT CALLS
The Recent Calls menu is a list of the last phone numbers or Contact entries
for calls you placed, accepted, missed, or blocked. It is continually updated as
new numbers are added to the beginning of the list and the oldest entries are
removed from the bottom of the list.
ACCESS AND OPTIONS
1. From idle mode, press the OK Key to unlock the keypad, press the OK
Key [
MENU], swivel to the QWERTY keypad, select 7. Recent Calls,
then press the OK Key.
2. Select a submenu.
1. Missed
2. Received
3. Dialed
4. All
5. View Timers
MISSED
Displays information about the 90 most recently missed calls. Place a call to a
missed call by simply pressing the SEND Key
.
1. From idle mode, press the OK Key to unlock the keypad, press the
OK Key [MENU], swivel to the QWERTY keypad, then press 7. Recent
Calls, 1. Missed.
2. Highlight an entry and do one of the following options:
t
Press the OK Key [OPEN] to view the entry.
t
Press the Send Key to place a call to the number.
t
Press the Right Soft Key [Options] to select:
Save to Contacts: To store the phone number in your Contacts.
Erase: To erase a call listing.
Lock/Unlock: To lock or unlock a call listing.
Erase All: To erase all Missed Call entries.
View Timers: To display usage time
t
Press the Left Soft Key [Message] to select:
TXT Message: To send a TXT message to the contact.
Picture Message: To send a Picture message to the contact.
Voice Message: To send a Voice message to the contact.
After 90 missed calls, the oldest call will automatically be erased from the history.
Page 46

RECEIVED
Displays information about the 90 most recently received calls. Place a call to a
received call by simply pressing the SEND Key
.
1. From idle mode, press the OK Key to unlock the keypad, press the OK
Key [MENU], swivel to the QWERTY keypad, then press 7. Recent Calls,
2. Received.
2. Highlight an entry and do one of the following options:
t
Press the OK Key [OPEN] to view the entry.
t
Press the Send Key to place a call to the number.
t
Press the Right Soft Key [Options] to select:
Save to Contacts: To store the phone number in your Contacts.
Erase: To erase a call listing.
Lock/Unlock: To lock or unlock a call listing.
Erase All: To erase all Received Call entries.
View Timers: To display usage time
t
Press the Left Soft Key [Message] to select:
TXT Message: To send a TXT message to the contact.
Picture Message: To send a Picture message to the contact.
Voice Message: To send a Voice message to the contact.
After 90 received calls, the oldest call will automatically be erased from the history.
DIALED
Displays information about the 90 most recently dialed numbers. Place a call
to a dialed call by simply pressing the SEND Key
.
1. From idle mode, press the OK Key to unlock the keypad, press the
OK Key [MENU], swivel to the QWERTY keypad, then press 7. Recent
Calls, 3. Dialed.
2. Highlight an entry and do one of the following options:
t
Press the OK Key [OPEN] to view the entry.
t
Press the Send Key to place a call to the number.
t
Press the Right Soft Key [Options] to select:
Save to Contacts: To store the phone number in your Contacts.
Erase: To erase a call listing.
Lock/Unlock: To lock or unlock a call listing.
Erase All: To erase all Dialed Call entries.
View Timers: To display usage time
t
Press the Left Soft Key [Message] to select:
TXT Message: To send a TXT message to the contact.
Picture Message: To send a Picture message to the contact.
Voice Message: To send a Voice message to the contact.
After 90 dialed calls, the oldest call will automatically be erased from the history.
Menu Function − Chapter 4
45
Recent Calls
Page 47

46
Chapter 4 − Menu Function
Recent Calls
ALL
Displays information about the most recently received, dialed and missed calls.
1. From idle mode, press the OK Key to unlock the keypad, press the
OK Key [MENU], swivel to the QWERTY keypad, then press 7. Recent
Calls, 4. All.
2. Highlight an entry and do one of the following options:
t
Press the OK Key [OPEN] to view the entry.
t
Press the Send Key to place a call to the number.
t
Press the Right Soft Key [Options] to select:
Save to Contacts: To store the phone number in your Contacts.
Erase: To erase a call listing.
Lock/Unlock: To lock or unlock a call listing.
Erase All: To erase all Call entries.
View Timers: To display usage time
t
Press the Left Soft Key [Message] to select:
TXT Message: To send a TXT message to the contact.
Picture Message: To send a Picture message to the contact.
Voice Message: To send a Voice message to the contact.
After the 270 received, dialed or missed calls, the oldest call will automatically be
erased from the history.
Shortcut: To view a quick list of all your calls, press the Send Key from idle mode.
BLOCKED
This menu appears only when Incoming Call Restriction is set.
1. From idle mode, press the OK Key to unlock the keypad, press the OK
Key [MENU], swivel to the QWERTY keypad, then press 7. Recent Calls,
then Blocked Calls.
2. Highlight an entry and do one of the following options:
t
Press the OK Key [OPEN] to view the entry.
t
Press the Send Key to place a call to the number.
t
Press the Right Soft Key [Options] to select:
Erase: To erase a call listing.
Lock/Unlock: To lock or unlock a call listing.
Erase All: To erase all Blocked Call entries.
View Timers: To display usage time
t
Press the Left Soft Key [Message] to select:
TXT Message: To send a TXT message to the contact.
Picture Message: To send a Picture message to the contact.
Voice Message: To send a Voice message to the contact.
t After 90 blocked calls, the oldest call will automatically be erased from the history.
t
Please refer to page 60 for more details on Restrictions.
Page 48

VIEW TIMERS
Checks the usage time and manages your calls within the limit you set. The 11
timers include (Last Call, All Calls, Received Calls, Dialed Calls, Roaming Calls,
Transmit Data, Received Data, Total Data, Last Reset, Lifetime Calls, Lifetime
Data Counter):
1. From idle mode, press the OK Key to unlock the keypad, press the OK
Key [MENU], swivel to the QWERTY keypad, then press 7. Recent Calls,
then 5. View Timers.
2. Highlight a call list. Call timers include:
Last Call/All Calls/Received Calls/Dialed Calls/Roaming Calls/
Transmit Data/Received Data/Total Data/Last Reset/Lifetime Calls/
Lifetime Data Counter
t
Press the Left Soft Key [Reset] to reset highlighted timer.
t
Press the Right Soft Key [Reset All] to reset all timers.
BLUETOOTH
Bluetooth technology connectivity enables wireless connections between
electronic devices. If connected with a Bluetooth Handsfree device, you can
use your phone more freely. Since devices with Bluetooth connectivity communicate using radio waves, your phone and the other device do not need to
be in direct line-of-sight. The two devices only need to be within 10 meters
(30 feet) of each other. The connection can be subject to interference from
obstructions such as walls or other electronic devices. This device is compliant
with Bluetooth specification 2.0, supporting the following profiles: Headset,
Handsfree, Stereo, Phonebook Access, and Object Push for vCard. To ensure
interoperability between other devices supporting Bluetooth technology,
use approved enhancements for this model. Check with the manufacturers
of other devices to determine their compatibility with this phone. There may
be restrictions on using Bluetooth technology in some locations. Check with
your local authorities or Verizon Wireless. If you want more information on this
function, visit the Bluetooth Technology organization Web site: https://www.
bluetooth.org/.
Important: Features using Bluetooth technology, or allowing such features to run in
the background while using other features, increase the demand on battery power and reduce the battery life.
Menu Function − Chapter 4
47
Settings
Page 49

BLUETOOTH ON/OFF
To toggle Bluetooth® power On/Off:
1. From idle mode, press the OK Key to unlock the keypad, press the OK
Key [MENU], swivel to the QWERTY keypad and press 9. Settings &
Tools, 3. Bluetooth.
2. Press the Left Soft Key
[Turn On/Turn Off]. A confirmation
window appears.
ADD NEW DEVICE
Pairing is the process that allows the handset to locate, establish and register a
1-to-1 connection with the target device.
1. From idle mode, press the OK Key to unlock the keypad, press the OK
Key [MENU], swivel to the QWERTY keypad and press 9. Settings &
Tools, 3. Bluetooth, 1. Add New Device.
2. If the Bluetooth® power is switched off, the following message will
appear on the LCD screen: “TURN BLUETOOTH POWER ON?” Select Yes
and press the OK Key.
3. The handset will prompt you with the following message on the LCD
screen: “PLACE DEVICE YOU ARE CONNECTING TO IN DISCOVERABLE
MODE.
” Press the OK Key.
4. The device will appear in the ADD NEW DEVICE menu. Select the
device you wish to pair to, then press the OK Key [PAIR].
5. The handset may prompt you for the passkey. Consult the Bluetooth®
accessory (sold separately) instructions for the appropriate passkey
(typically “0000”—4 zeroes). Enter the passkey, then press the OK
Key.
You do not need to input the passkey for pairing when the passkey of the Bluetooth®
Headset or hands-free kit is 0000.
6. The handset will prompt you with the following message on the
LCD screen: BEFORE CONNECTING [Device Name]. If you would like to
always confirm before connecting to the Bluetooth® device, select
Always Ask, then press the OK Key. Then the handset will prompt you
with the message Connect to [Device Name]? Select Yes and press the
OK Key. If you do not wish to confirm every time before connecting to
the Bluetooth® device, select Always Connect, then press the OK Key.
7. Once connected, you will see the device listed in the Bluetooth menu
and the Bluetooth® device connected icon will appear at the top of
the screen when connected to the Bluetooth® device.
48
Chapter 4 − Menu Function
Settings
Page 50

t In the Bluetooth menu, you can disconnect the connected device with an icon by
pressing the OK Key [Drop]. Conversely, you can reconnect by pressing the OK Key
again.
t
When an audio device is connected, you can select another device and the connection
is automatically transferred from that audio device to the other one.
t
If multiple devices are displayed, select the device you want to connect to.
OPTIONS
1. From idle mode, press the OK Key to unlock the keypad, press the OK
Key [
MENU], swivel to the QWERTY keypad and press 9. Settings &
Tools, 3. Bluetooth.
2. Select the paired device.
3. Press the Right Soft Key
[Options].
4. Select one of the following options, then press the OK Key.
t
Remove Device: Removes a device from the pairing list.
t
Rename Device: Renames a paired device.
t
Incoming Security: Sets permissions for connecting an incoming device.
t
Service Discovery: To search for the services that the selected device supports.
t
Device Info: Displays device information.
5. Or, press the OK Key to access 1. Send Name Card, 2. Get Name Card
or 3. Send Picture. Select the desired option and press the OK Key to
access the following:
t
Send Name Card: Send name cards stored in Contacts to a selected device.
1. Press the Directional Key up or down to highlight a desired contact or contacts,
then press the OK Key [MARK]. If you want to change your selections, press the OK Key
[UNMARK] to deselect your selections.
2. Press the Left Soft Key
[Done]. If you want to send all the name cards, press the
Right Soft Key [Send All].
t
Get Name Card: Get name cards from the selected device.
t
Send Picture: Send photos to a selected device.
1. Press the Directional Key up, down, left or right to highlight a desired photo or
photos, then press the OK Key [MARK]. If you want to change your selections, press the
OK Key [UNMARK] to deselect your selections.
2. Press the Left Soft Key
[Done]. If you want to send all the photos, press the Right
Soft Key [Send All].
SETTINGS
MY PHONE NAME
To edit the Bluetooth® name of your phone:
1. From idle mode, press the OK Key to unlock the keypad, press the
OK Key [MENU], swivel to the QWERTY keypad and press 9. Settings
& Tools, 3. Bluetooth.
2. Press the Right Soft Key
[Options].
3. Press 1. My Phone Name.
Menu Function − Chapter 4
49
Settings
Page 51

4. Use the numeric keypad to enter a new custom name.
5. Press the OK Key [SET] to save and exit.
DISCOVERY MODE
To set whether your device is able to be searched for by other Bluetooth® devices in
the area:
1. From idle mode, press the OK Key to unlock the keypad, press the
OK Key [MENU], swivel to the QWERTY keypad and press 9. Settings
& Tools
, 3. Bluetooth.
2. Press the Right Soft Key
[Options].
3. Press 2. Discovery Mode.
If Bluetooth power is not on, it will be turned on automatically.
4. Select On or Off, then press the OK Key [SET].
SUPPORTED PROFILES
To view brief descriptions of the profiles supported by the phone:
1. From idle mode, press the OK Key to unlock the keypad, press the
OK Key [MENU], swivel to the QWERTY keypad and press 9. Settings
& Tools, 3. Bluetooth.
2. Press the Right Soft Key
[Options].
3. Press 3. Supported Profiles.
4. Select one of the following profiles, and then press the OK Key
[VIEW].
Headset / Handsfree / Stereo / Phonebook Access / Object Push
AUTO PAIR HANDSFREE
To set Auto Pair Handsfree On/Off:
1. From idle mode, press the OK Key to unlock the keypad, press the
OK Key [MENU], swivel to the QWERTY keypad and press 9. Settings
& Tools, 3. Bluetooth.
2. Press the Right Soft Key
[Options].
3. Press 4. Auto Pair Handsfree.
4. Select On or Off, then press the OK Key [SET].
SOUNDS SETTINGS
EASY SETUP
Easy Set-up menu allows you to set five stages for Sounds Settings with simple
operation.
50
Chapter 4 − Menu Function
Settings
Page 52

1. From idle mode, press the OK Key to unlock the keypad, press the OK
Key [MENU], swivel to the QWERTY keypad and press 9. Settings &
Tools, 4. Sound Settings, 1. Easy Set-up.
t
CALL SOUNDS: Select Ring Only, Vibrate Only, Ring&Vibrate or Be Silent then press the
OK Key[SET] to save the setting or press the Right Soft Key [Skip]
to go to the next setting.
t
KEYPAD VOLUME: Adjust the volume by pressing the Directional Key up or down,
then press the OK Key [SET] to save the setting or press the Right Soft
Key [Skip] to go to the next setting.
t
TEXT MESSAGE ALERTS: Select Ring Only, Vibrate Only, Ring&Vibrate or Be Silent then
press the OK Key [SET] to save the setting or press the Right Soft
Key
[Skip] to go to the next setting.
t
MULTIMEDIA MSG ALERTS: Select Ring Only, Vibrate Only, Ring&Vibrate or Be Silent
then press the OK Key [SET] to save the setting or press the
Right Soft Key [Skip] to go to the next setting.
t
VOICEMAIL MSG ALERTS: Select Ring Only, Vibrate Only, Ring&Vibrate or Be Silent then
press the OK Key [SET] to save the setting or press the Right
Soft Key [Skip] to complete set-up.
CALL SOUNDS
To set ringtones for types of incoming calls:
CALL RINGTONE
1. From idle mode, press the OK Key to unlock the keypad, press the
OK Key [MENU], swivel to the QWERTY keypad and press 9. Settings
& Tools
, 4. Sound Settings, 2. Call Sounds, 1. Call Ringtone.
2. Select a ringtone, then press the OK Key [SET]. To play the ringtone,
press the Left Soft Key
[Play].
CALL VIBRATE
1. From idle mode, press the OK Key to unlock the keypad, press the
OK Key [MENU], swivel to the QWERTY keypad and press 9. Settings
& Tools, 4. Sound Settings, 2. Call Sounds, 2. Call Vibrate.
2. Select
On or Off, then press the OK Key [SET].
CALLER ID READOUT
1. From idle mode, press the OK Key to unlock the keypad, press the
OK Key [MENU], swivel to the QWERTY keypad and press 9. Settings
& Tools, 4. Sound Settings, 2. Call Sounds, 3. Caller ID Readout.
2. Select Ring Only, Caller ID + Ring or Name Repeat, then press the
OK Key [SET].
ALERT SOUNDS
To select the alert type for a new message:
1. From idle mode, press the OK Key to unlock the keypad, press the OK
Menu Function − Chapter 4
51
Settings
Page 53

Key [MENU], swivel to the QWERTY keypad and press 9. Settings &
Tools, 4. Sounds Settings, 3. Alert Sounds.
2. Select 1. TXT Message, 2. Pic- Voice Message or 3. Voicemail then press
the OK Key.
3. Select Tone, Vibrate or Reminder, then press the OK Key.
t
Tone: Press the Directional Key up or down to select a ringer, then press the OK Key
[SET]. To play the alert tone, press the Left Soft Key [Play].
t
Vibrate: Press the Directional Key up or down to select On or Off, then press the
OK Key [SET].
t
Reminder: Press the Directional Key up or down to select Once, Every 2 Minutes,
Every 15 Minutes or Off, then press the OK Key [SET].
EMERGENCY TONE
1. From idle mode, press the OK Key to unlock the keypad, press the
OK Key [MENU], swivel to the QWERTY keypad and press 9. Settings
& Tools, 4. Sounds Settings, 3. Alert Sounds, 4. Emergency Tone.
2. Select Alert, Vibrate or Off then press the OK Key [SET].
MISSED CALL
To select alert type for missed calls:
1. From idle mode, press the OK Key to unlock the keypad, press the
OK Key [
MENU], swivel to the QWERTY keypad and press 9. Settings
& Tools, 4. Sounds Settings, 3. Alert Sounds, 5. Missed Call.
2. Select Tone, Vibrate or Reminder, then press the OK Key.
t
Tone: Press the Directional Key up or down to select a ringer, then press the OK Key
[SET]. To play the alert tone, press the Left Soft Key [Play].
t
Vibrate: Press the Directional Key up or down to select On or Off, then press the
OK Key [SET].
t
Reminder: Press the Directional key up or down to select Once, Every 2 Minutes,
Every 15 Minutes or Off, then press the OK Key [SET].
KEYPAD SOUNDS
To select keypad sounds for pressing keypad:
1. From idle mode, press the OK Key to unlock the keypad, press the OK
Key [MENU], swivel to the QWERTY keypad and press 9. Settings &
Tools, 4. Sounds Settings, 4. Keypad Sounds.
2. Select DTMF, Cloud or Simple, then press the OK Key [SET].
DTMF is the default setting for this device.
52
Chapter 4 − Menu Function
Settings
Page 54

KEYPAD VOLUME
To set the keypad volume:
1. From idle mode, press the OK Key to unlock the keypad, press the OK
Key [MENU], swivel to the QWERTY keypad and press 9. Settings &
Tools, 4. Sounds Settings, 5. Keypad Volume.
2. Adjust the volume by pressing the Directional Key
up or down,
then press the OK Key [SET] to save the setting.
DIGIT DIAL READOUT
The Digit Dial Readout setting controls if digits are read out when you enter a phone
number with the keypad.
1. From idle mode, press the OK Key to unlock the keypad, press the OK
Key [MENU], swivel to the QWERTY keypad and press 9. Settings &
Tools, 4. Sounds Settings, 6. Digital Dial Readout.
2. Select On or Off, then press the OK Key [SET].
SERVICE ALERTS
To set any of the three Alert options to either On or Off:
1. From idle mode, press the OK Key to unlock the keypad, press the OK
Key [MENU], swivel to the QWERTY keypad and press 9. Settings &
Tools
, 4. Sounds Settings, 7. Service Alerts.
2. Select one of the following options, then press the OK Key.
t
ERI: The Enhanced Roaming Indicator (ERI) feature displays a text banner on the display
screen informing the handset user of which systems the wireless device is using
as compared to the service plan they purchased. The ERI Banner text changes to
tell a customer if they are using the Verizon Wireless Network, Extended Network
or Roaming.
t
Minute Beep: Alerts you every minute during a call.
t
Call Connect: Alerts you when the call is connected.
3. Select On or Off, then press the OK Key [SET].
DEVICE CONNECT
Allows you to turn the Device Connect On or Off:
1. From idle mode, press the OK Key to unlock the keypad, press the OK
Key [MENU], swivel to the QWERTY keypad and press 9. Settings &
Tools, 4. Sounds Settings, 8. Device Connect.
2. Select On or Off, then press the OK Key [SET].
POWER ON/OFF
To set the phone to sound a tone when the phone is powered on or off:
1. From idle mode, press the OK Key to unlock the keypad, press the OK
Menu Function − Chapter 4
53
Settings
Page 55

Key [MENU], swivel to the QWERTY keypad and press 9. Settings &
Tools, 4. Sounds Settings, 9. Power On/Off.
2. Press 1. Power On or 2. Power Off.
3. Select On or Off, then press the OK Key [SET].
SWIVEL SOUNDS
To set the phone to sound a tone when swiveling to Music/QWERTY keypad:
1. From idle mode, press the OK Key to unlock the keypad, press the OK
Key [MENU], swivel to the QWERTY keypad and press 9. Settings &
Tools, 4. Sounds Settings, 0. Swivel Sounds.
2. Select On or Off, then press the OK Key [SET].
DISPLAY SETTINGS
Allows you to customize the display.
EASY SETUP
Easy Set-up menu allows you to set nine stages for Display Settings with simple
operation.
1. From idle mode, press the OK Key to unlock the keypad, press the OK
Key [
MENU], swivel to the QWERTY keypad and press 9. Settings &
Tools
, 5. Display Settings, 1. Easy Set-up.
t
PERSONAL BANNER: Enter the banner text (up to 16 characters) to be displayed on the
main screen then press the OK Key [SET] or press the Right Soft
Key [Skip] to go to the next setting.
t
DISPLAY BACKLIGHT: Selec t 7 Seconds, 15 Seconds, 30 Seconds or Always On, then press
the OK Key [SET] or press the Right Soft Key [Skip] to go to
the next setting.
t
KEYPAD BACKLIGHT: Select 7 Seconds, 15 Seconds, 30 Seconds or Always On, then press
the OK Key [SET] or press the Right Soft Key [Skip] to go to
the next setting.
t
WALLPAPER: Select a desired screen, then press the OK Key [SET]. To view the image,
press the Left Soft Key [Preview] or press the Right Soft Key
[Skip] to go to the next setting.
t
DISPLAY THEMES: Select Foliate, Transparent, Urban or White, then press the OK Key
[SET]. To preview the display theme, press the Left Soft Key
[Preview] or press the Right Soft Key [Skip] to go to the
next setting.
t
MENU LAYOUT: Select Tab , List or Grid, then press the OK Key [SET]. To preview the Main
Menu layout, press the Left Soft Key [Preview] or press the Right
Soft Key [Skip] to go to the next setting.
t
MENU T YPE: Selec t Messaging or Personalizing, then press OK Key [SET]. To view the Help
for each type, select the type then press the Left Soft Key [Help] or
press the Right Soft Key [Skip] to go to the next setting.
t
DIAL FONTS: Select Normal or Large, then press OK Key [SET]. To preview the font size,
press the Left Soft Key [Preview] or press the Right Soft Key
[Skip] to go to the next setting.
54
Chapter 4 − Menu Function
Settings
Page 56

t
CLOCK FORMAT: Select Analog, Large Analog, Digital 12, Large Digital 12, Digital 24,
Large Digital 24 or Off, then press the OK Key [SET]. To preview the clock
format, press the Left Soft Key [Preview or press the Right Soft
Key [Skip] to complete set-up.
This guide gives navigation instructions according to the defaults, Main Menu Settings
are set to List and Messaging, and Display Themes is set to Foliate. If other settings are
set, navigating the phone's menus may be different.
BANNER
To set your Personal or ERI banner:
PERSONAL BANNER
The Personal Banner can be up to 16 characters and is displayed on your phone’s screen
from idle mode.
1. From idle mode, press the OK Key to unlock the keypad, press the
OK Key [MENU], swivel to the QWERTY keypad and press 9. Settings
& Tools, 5. Display Settings, 2. Banner, 1. Personal Banner.
2. Enter the banner text (up to 16 characters), select a desired font
color, then press the OK Key [SET].
ERI BANNER
If you use ERI Service, ERI Text is shown on the sub banner.
1. From idle mode, press the OK Key to unlock the keypad, press the
OK Key [MENU], swivel to the QWERTY keypad and press 9. Settings
& Tools, 5. Display Settings, 2. Banner, 2. ERI Banner.
2. Select On or Off, then press the OK Key [SET].
BACKLIGHT
To set the duration for backlight illumination of the Main Screen and Keypad:
1. From idle mode, press the OK Key to unlock the keypad, press the OK
Key [
MENU], swivel to the QWERTY keypad and press 9. Settings &
Tools, 5. Display Settings, 3. Backlight.
2. Press 1. Display or 2. Keypad.
3. Select 7 Seconds, 15 Seconds, 30 Seconds or Always On, then press
the OK Key [SET].
Even if Always On is selected for the Backlight setting, the backlight will turn off when
the phone is powered off.
WALLPAPER
To choose the kind of background to be displayed on the phone:
1. From idle mode, press the OK Key to unlock the keypad, press the OK
Key [
MENU], swivel to the QWERTY keypad and press 9. Settings &
Menu Function − Chapter 4
55
Settings
Page 57

Tools, 5. Display Settings, 4. Wallpaper.
2. Select a desired screen then press the OK Key [SET]. To view the
image, press the Left Soft Key
[View].
3. To download other available selections, press the Right Soft Key
[Get New], then 1. Get New Applications. Follow the on-screen
prompts.
DISPLAY THEMES
To choose the background screen:
1. From idle mode, press the OK Key to unlock the keypad, press the OK
Key [MENU], swivel to the QWERTY keypad and press 9. Settings &
Tools, 5. Display Settings, 5. Display Themes.
2. Select Foliate, Transparent, Urban, or White, then press the OK Key
[SET]. To preview the display theme, press the Left Soft Key
[Preview].
3. To view the Help for the Display Theme, press the Right Soft Key
[Help].
Foliate is the default setting for this device.
MAIN MENU SETTINGS
To change Main Menu layout and type:
1. From idle mode, press the OK Key to unlock the keypad, press the OK
Key [MENU], swivel to the QWERTY keypad and press 9. Settings &
Tools, 5. Display Settings, 6. Main Menu Settings.
t
Menu Layout: Select Tab, List or Grid, then press the OK Key [SET]. To preview the Main
Menu layout, press the Left Soft Key [Preview]. If you selected List
or Grid, the Menu Type selection screen appears. Select Messaging or
Personalizing, then press the OK Key [SET].
This guide gives navigation instructions according to the defaults, Main Menu Settings
are set to List and Messaging, and Display Themes is set to Foliate. If other settings are
set, navigating the phone's menus may be different.
t
Replace Menu Items: Allows you to replace the Main Menu with desired menus.
1. Select the menu you want to replace then press the OK Key [EDIT].
2. Select a menu in the list to replace it and then press the OK Key [SET].
3. To return to Menu Settings, press the Left Soft Key
[Done] or to view the Help for
Replace Menu Items, press the Right Soft Key
[Help].
t
Position Menu Items: Allows you to move the position of Main Menu to a desired
position.
1. Select the menu you want to move then press the OK Key [MOVE].
2. Press the Directional Key
up or down to place the menu in a desired position and
then press the OK Key [SET].
3. To return to Menu Settings, press the Left Soft Key
[Done] or to view the Help for
Position Menu Items, press the Right Soft Key [Help].
56
Chapter 4 − Menu Function
Settings
Page 58

t
Reset Menu Settings: Allows you to reset Main Menu Settings.
1. Select Menu Layout, Menu Items, Item Positions, or All and then press the OK Key.
2. To return to Menu Settings, press the Left Soft Key [Done] or to view the Help for
Reset Menu Settings, press the Right Soft Key [Help].
- Menu Layout: Reset Menu Layout to the initial Menu Layout.
- Menu Items: Reset Menu Items to the initial content of the Main Menu.
- Item Positions: Reset Menu Items to the initial order of Main Menu.
- All: Reset all Main Menu Settings to the initial Main Menu Settings.
DIAL FONTS
To set the font size:
1. From idle mode, press the OK Key to unlock the keypad, press the OK
Key [MENU], swivel to the QWERTY keypad and press 9. Settings &
Tools, 5. Display Settings, 7. Dial Fonts.
2. Select Normal or Large, then press the OK Key [SET].
MENU FONT SIZE
To set the menu font size:
1. From idle mode, press the OK Key to unlock the keypad, press the OK
Key [MENU], swivel to the QWERTY keypad and press 9. Settings &
Tools, 5. Display Settings, 8. Menu Font Size.
2. Select Normal or Large, then press the OK Key [SET].
CLOCK FORMAT
To choose the kind of clock to be displayed on the LCD screen:
1. From idle mode, press the OK Key to unlock the keypad, press the OK
Key [MENU], swivel to the QWERTY keypad and press 9. Settings &
Tools, 5. Display Settings, 9. Clock Format.
2. Press the Directional Key
left or right to select Analog, Large
Analog, Digital 12, Large Digital 12, Digital 24, Large Digital 24 or Off,
select a desired font color, then press the OK Key [
SET].
Large Digital 12 is the default setting for this device.
PHONE SETTINGS
AIRPLANE MODE
In Airplane Mode, all menu functions can be accessed except making calls, receiving calls, data connection and Bluetooth®. Activating Airplane Mode will disable
all wireless communications. Services that support Location On functions like
Chaperone are temporarily disabled.
1. From idle mode, press the OK Key to unlock the keypad, press the OK
Key [MENU], swivel to the QWERTY keypad and press 9. Settings &
Tools, 6. Phone Settings, 1. Airplane Mode.
Menu Function − Chapter 4
57
Settings
Page 59

2. Select On or Off, then press the OK Key [SET].
SET SHORTCUTS
Your phone offers you the option of assigning a shortcut key (Directional Key left,
right, up, and down) to a favorite or often-used function.
From idle mode, press the Directional Key right to access the MY SHORTCUTS menu
and press the Left Soft Key [Settings].
1. From idle mode, press the OK Key to unlock the keypad, press the OK
Key [
MENU], swivel to the QWERTY keypad and press 9. Settings &
Tools, 6. Phone Settings, 2. Set Shortcuts, 1. Set My Shortcuts.
2. Select Shortcut 1, Shortcut 2, Shortcut 3 or Shortcut 4, then press the
OK Key [SET].
3. Select the desired option, then press the OK Key [SET].
From idle mode, pressing the Directional Key right will display the MY SHORTCUTS
screen. On the MY SHORTCUTS screen, you can select a function and then press the OK
Key to access the function. On the MY SHORTCUTS screen, you can relocate a function by
pressing the Right Soft Key [Move], pressing the Directional Key up or down,
and then pressing the OK Key [SAVE]. Or you can press the Left Soft Key [Settings]
to access Set My Shortcuts or Set Directional Keys.
RESETTING MY SHORTCUTS
To reset My Shortcuts to their original defaults:
1. From idle mode, press the OK Key to unlock the keypad, press the
OK Key [MENU], swivel to the QWERTY keypad and press 9. Settings
& Tools, 6. Phone Settings, 2. Set Shortcuts, 1. Set My Shortcuts.
2. Select Shortcut 1, Shortcut 2, Shortcut 3 or Shortcut 4, and then
press the Right Soft Key
[Options].
3. Press 1. Reset Shortcut (1, 2, 3 or 4) or 2. Reset My Shortcuts.
4. Select Yes and press the OK Key.
SET DIRECTIONAL KEYS
From idle mode, you can specify the function that is accessed when you press the
Directional Key up, down or left.
1. From idle mode, press the OK Key to unlock the keypad, press the
OK Key [MENU], swivel to the QWERTY keypad and press 9. Settings
& Tools, 6. Phone Settings, 2. Set Shortcuts, 2. Set Directional Keys.
2. Select UP Directional Key, LEFT Directional Key or DOWN Directional
Key, and then press the OK Key [SET].
3. Select the desired option, and then press the OK Key [SET].
RESETTING THE DIRECTIONAL KEY SETTINGS
Use the following procedure to specify the default Directional Key settings.
58
Chapter 4 − Menu Function
Settings
Page 60

1. From idle mode, press the OK Key to unlock the keypad, press the
OK Key [MENU], swivel to the QWERTY keypad and press 9. Settings
& Tools, 6. Phone Settings, 2. Set Shortcuts, 2. Set Directional Keys.
2. Select UP Directional Key, LEFT Directional Key or DOWN Directional
Key, and then press the Right Soft Key
[Options].
3. Press 1. Reset (UP, LEFT or DOWN) Key or 2. Reset Directional Keys.
4. Select Yes and press the OK Key.
LANGUAGE
To set the bilingual feature to either English or Español:
1. From idle mode, press the OK Key to unlock the keypad, press the OK
Key [MENU], swivel to the QWERTY keypad and press 9. Settings &
Tools, 6. Phone Settings, 4. Language.
2. Select either English or Español, then press the OK Key [SET].
LOCATION
1. From idle mode, press the OK Key to unlock the keypad, press the OK
Key [MENU], swivel to the QWERTY keypad and press 9. Settings &
Tools, 6. Phone Settings, 5. Location.
2. Select one of the following settings, then press the OK Key [
SET].
t
Location On: Your location is now available to the network.
t
E911 Only: Your location will be hidden from the network and applications, except
for 911.
When Lock Setting is selected for Location Setting under Restrictions on the Security
Menu, you will need to enter a lock code. The default Lock Code is the last 4 digits of
your mobile number.
CURRENT COUNTRY
Allows you to set the country of your current location so that your phone works
properly while you travel.
1. From idle mode, press the OK Key to unlock the keypad, press the OK
Key [MENU], swivel to the QWERTY keypad and press 9. Settings &
Tools, 6. Phone Settings, 6. Current Country.
2. Press the Directional Key
up or down or input the country name
in the Go To field to select the desired country, then press the OK
Key [SET]. To view help for Current Country, press the Right Soft Key
[Help].
SECURITY
The Security menu allows you to electronically secure the phone.
Menu Function − Chapter 4
59
Settings
Page 61

The default lock code is the last 4 digits of your mobile number.
EDIT CODES
To set a new lock code:
1. From idle mode, press the OK Key to unlock the keypad, press the
OK Key [MENU], swivel to the QWERTY keypad and press 9. Settings
& Tools, 6. Phone Settings, 7. Security.
2. Enter the four-digit lock code, then press the OK Key.
3. Press
1. Edit Codes.
4. Select one of the following settings, then press the OK Key.
t
Phone Only: Allows you to edit the lock code for Security. (The default lock code is
the last 4 digits of your mobile number.)
t
Calls & Services: Allows you to edit the lock code for Restrictions. (The default lock
code is the last 4 digits of your mobile number.)
5. If Phone Only is selected, enter the new four-digit code in the Enter
New Code field. Enter the new four-digit code again in the Re-enter
New Code field to confirm your input.
6. If Calls & Services is selected, enter the current lock code in the
Enter Current Code field. Enter the new four-digit code in the Enter
New Code field. Enter the new four-digit code again in the Re-enter
New Code field.
7. Press the OK Key [SET].
RESTRICTIONS
Use the following procedure to configure Location Setting, Calls and Messages
restrictions.
1. From idle mode, press the OK Key to unlock the keypad, press the
OK Key [MENU], swivel to the QWERTY keypad and press 9. Settings
& Tools
, 6. Phone Settings, 7. Security.
2. Enter the four-digit lock code, then press the OK Key. The default
lock code is the last 4 digits of your mobile number.
3. Press 2. Restrictions.
4. Enter the four-digit lock code again, then press the OK Key.
5. Select one of the following settings:
t
Location Setting: Unlock Setting/Lock Setting.
t
Calls: Incoming Calls/Outgoing Calls.
For Incoming Calls, set Allow All, Contacts Only or Block All.
For Outgoing Calls, set Allow All, Contacts Only or Block All.
t
Messages: Incoming Messages/Outgoing Messages.
For Incoming Messages, set Allow All or Block All.
For Outgoing Messages, set Allow All or Block All.
60
Chapter 4 − Menu Function
Settings
Page 62

6. Press the OK Key [SET].
PHONE LOCK SETTING
This setting specifies whether the phone should be locked whenever it is turned on.
Lock Mode prevents the unauthorized use of your phone. Once the phone is locked, it is
in restricted mode until the lock code is entered. You can still make emergency calls.
1. From idle mode, press the OK Key to unlock the keypad, press the
OK Key [MENU], swivel to the QWERTY keypad and press 9. Settings
& Tools, 6. Phone Settings, 7. Security.
2. Enter the four-digit lock code, then press the OK Key. The default
lock code is the last 4 digits of your mobile number.
3. Press
3. Phone Lock Setting.
4. Select one of the following settings, then press the OK Key [SET].
t
Unlocked: Phone is unlocked.
t
On Power Up: Phone will lock when it is turned on.
LOCK PHONE NOW
Lock the phone now.
1. From idle mode, press the OK Key to unlock the keypad, press the
OK Key [
MENU], swivel to the QWERTY keypad and press 9. Settings
& Tools, 6. Phone Settings, 7. Security.
2. Enter the four-digit lock code, then press the OK Key. The default
lock code is the last 4 digits of your mobile number.
3. Press
4. Lock Phone Now.
4. To unlock the phone from idle mode, press the OK Key to unlock the
keypad, then press the Right Soft Key
[Unlock] and enter the
four-digit lock code, then press the OK Key.
RESTORE PHONE
To delete all User Data and restore all settings to their initial defaults:
1. From idle mode, press the OK Key to unlock the keypad, press the
OK Key [MENU], swivel to the QWERTY keypad and press 9. Settings
& Tools, 6. Phone Settings, 7. Security.
2. Enter the four-digit lock code, then press the OK Key.
3. Press 5. Restore Phone.
4. A confirmation message appears in the display, select Yes , and then
press the OK Key.
5. After reading the message that appears, press the OK Key.
6. Enter the four-digit lock code, then press the OK Key.
The phone will turn off and then back on again automatically.
Menu Function − Chapter 4
61
Settings
Page 63

SYSTEM SELECT
You can set your phone to search or roam on another network when you are not in
your home area. Leave this setting as default unless you want to alter the system
selection as instructed by your service provider.
1. From idle mode, press the OK Key to unlock the keypad, press the OK
Key [MENU], swivel to the QWERTY keypad and press 9. Settings &
Tools, 6. Phone Settings, 8. System Select.
2. Select one of the following settings, then press the OK Key [SET].
t
Automatic: Scan radio channels based on the Automatic setting.
t
Home Only: Only within your home area or home affiliated area.
Automatic setting can be displayed as Automatic B and Automatic A depending on PRL.
NAM SELECTION
Enables Auto NAM (Number Assignment Modules) or manually selects a NAM.
AUTO NAM
Automatically switches the phone to proper NAM when you have multiple NAM
registrations.
1. From idle mode, press the OK Key to unlock the keypad, press the
OK Key [MENU], swivel to the QWERTY keypad and press 9. Settings
& Tools, 6. Phone Settings, 9. NAM Selection.
2. Select
1. Auto NAM, then press the OK Key.
3. Select On or Off, then press the OK Key [SET].
CHANGE NAM
1. From idle mode, press the OK Key to unlock the keypad, press the
OK Key [MENU], swivel to the QWERTY keypad and press 9. Settings
& Tools, 6. Phone Settings, 9. NAM Selection.
2. Select
2. Change NAM, then press the OK Key.
3. Select NAM 1 or NAM 2, then press the OK Key [SET].
CALL SETTINGS
ANSWER OPTIONS
To determine how to handle an answered call:
1. From idle mode, press the OK Key to unlock the keypad, press the OK
Key [MENU], swivel to the QWERTY keypad and press 9. Settings &
Tools, 7. Call Settings, 1. Answer Options.
2. Select Any Key or Auto w/ Hands-free, then press the OK Key [MARK].
Any Key is the default setting for this device.
62
Chapter 4 − Menu Function
Settings
Page 64

3. Press the Left Soft Key [Done].
t When the phone is closed, the Auto w/ Hands-free Mode will not function,
except when a headset is connected.
t
The Auto w/ Hands-free will function after about five seconds.
t
Auto w/ Hands-free is available only when a headset or hands-free device is con-
nected.
t
The two functions can be used at the same time.
t
To answer all incoming calls, press the SEND Key .
AUTO RETRY
To set the length of time the phone waits before automatically redialing a number
when the attempted call fails:
1. From idle mode, press the OK Key to unlock the keypad, press the OK
Key [MENU],swivel to the QWERTY keypad and press 9. Settings &
Tools, 7. Call Settings, 2. Auto Retry.
2. Select one of the following settings, then press the OK Key [SET].
10 Seconds/30 Seconds/60 Seconds/Off.
TTY MODE
You can attach a TTY device to your phone enabling you to communicate with
parties also using a TTY device. A phone with TTY support is able to translate typed
characters to voice. Voice can also be translated into characters and then displayed
on the TTY.
1. From idle mode, press the OK Key to unlock the keypad, press the OK
Key [MENU], swivel to the QWERTY keypad and press 9. Settings &
Tools, 7. Call Settings, 3. TTY Mode.
2. Select one of the following settings, then press the OK Key [SET].
TTY Full/TTY + Talk/TTY + Hear/TTY Off.
ONE TOUCH DIAL
To initiate a speed dial call by holding down the speed dial digit:
1. From idle mode, press the OK Key to unlock the keypad, press the OK
Key [MENU], swivel to the QWERTY keypad and press 9. Settings &
Tools, 7. Call Settings, 4. One Touch Dial.
2. Select
On or Off, then press the OK Key [SET].
If One Touch Dial is disabled, Speed Dial numbers designated in your Contacts will
not function.
VOICE PRIVACY
To turn the voice privacy feature On or Off:
1. From idle mode, press the OK Key to unlock the keypad, press the OK
Key [MENU], swivel to the QWERTY keypad and press 9. Settings &
Tools, 7. Call Settings, 5. Voice Privacy.
Menu Function − Chapter 4
63
Settings
Page 65

2. Select On or Off, then press the OK Key [SET].
DTMF TONES
To set the Key Tone length and touch tone playback speed:
1. From idle mode, press the OK Key to unlock the keypad, press the OK
Key [MENU], swivel to the QWERTY keypad and press 9. Settings &
Tools, 7. Call Settings, 6. DTMF Tones.
2. Select one of the following settings, then press the OK Key [SET].
t
Normal: Sends out a tone for a fixed period of time even if you continue to press the key.
t
Long: Sends out a continuous tone for the duration the key is pressed and held.
ASSISTED DIALING
To set Assisted Dialing feature On or Off:
1. From idle mode, press the OK Key to unlock the keypad, press the OK
Key [MENU], swivel to the QWERTY keypad and press 9. Settings &
Tools, 7. Call Settings, 7. Assisted Dialing.
2. Press the Directional Key
left or right to select On or Off. To view
help for Assisted Dialing, press the Right Soft Key [Help].
3. When you set Assisted Dialing to On, press the Directional Key
down and then press the Left Soft Key [Set] to edit Reference
Country
.
4. Select the desired Country and press the OK key.
5. Press the OK Key to set Assisted Dialing.
MEMORY
SAVE OPTIONS
To select whether to save to Phone Memory or to Card Memory when saving files:
1. From idle mode, press the OK Key to unlock the keypad, press the OK
Key [MENU], swivel to the QWERTY keypad and press 9. Settings &
Tools, 8. Memory, 1. Save Options.
2. Select 1. Pictures or 2. Sounds, and then press the OK Key.
3. Select Phone Memory or Card Memory, and then press the OK Key
[SET].
PHONE MEMORY
Select Phone Memory option to display Phone Memory information or to delete or
move files saved in Phone Memory.
PHONE MEMORY USAGE
To check the available Phone Memory capacity, used capacity and total capacity:
64
Chapter 4 − Menu Function
Settings
Page 66

1. From idle mode, press the OK Key to unlock the keypad, press the
OK Key [MENU], swivel to the QWERTY keypad and press 9. Settings
& Tools, 8. Memory, 2. Phone Memory.
2. Press 1. Phone Memory Usage.
3. Press the OK Key to return to the previous screen.
DELETING AND MOVING FILES
To delete files stored in Phone Memory or to move files from Phone Memory to Card
Memory:
1. From idle mode, press the OK Key to unlock the keypad, press the
OK Key [MENU], swivel to the QWERTY keypad and press 9. Settings
& Tools, 8. Memory, 2. Phone Memory.
2. Select My Pictures, My Ringtones, My Sounds or My Contacts and
then press the OK Key.
3. Press the Right Soft Key
[Options].
4. Select 1. Erase if you want to delete a file or 2. Move if you want to
move a file to Card Memory, and then press the OK Key.
If you have selected My Contacts, you can select 1. View, 2. Copy or 3. Erase after
pressing the Right Soft Key [Options]. Once you have selected 2. Copy or 3. Erase,
press the OK Key. If you want to move the contacts, press the Left Soft Key
[Move].
5. Select a file, press the OK Key [MARK] or the Right Soft Key
[Mark All], and then press the Left Soft Key [Done].
6. Select Yes and press the OK Key.
MOVING ALL FILES
To move all files saved in Phone Memory to Card Memory:
1. From idle mode, press the OK Key to unlock the keypad, press the
OK Key [MENU], swivel to the QWERTY keypad and press 9. Settings
& Tools
, 8. Memory, 2. Phone Memory.
2. Select Move All to Card and then press the OK Key.
3. Select Yes and press the OK Key.
Do not remove the memory card from the phone while a file or files are being moved
to the Card Memory.
CARD MEMORY
Select this option to display Card Memory information or to delete or move files
saved in Card Memory. The memory card must be inserted into the phone to perform these functions. A 1GB microSD Card is pre-installed in the device.
CARD MEMORY USAGE
To check the available Card Memory capacity, used capacity and total capacity:
Menu Function − Chapter 4
65
Settings
Page 67

1. From idle mode, press the OK Key to unlock the keypad, press the
OK Key [MENU], swivel to the QWERTY keypad and press 9. Settings
& Tools, 8. Memory, 3. Card Memory.
2. Press 1. Card Memory Usage.
3. Press the OK Key to return to the previous screen.
FORMAT CARD
To format the card inserted:
1. From idle mode, press the OK Key to unlock the keypad, press the
OK Key [MENU], swivel to the QWERTY keypad and press 9. Settings
& Tools, 8. Memory, 3. Card Memory.
2. Press 1. Card Memory Usage and the Right Soft Key
[Options].
3. Press 1. Format Card, enter your 4-digit lock code and then press
the OK Key.
4. Select Yes and press the OK Key.
DELETING AND MOVING FILES
To delete files stored in Card Memory or to move files from Card Memory to Phone
Memory:
1. From idle mode, press the OK Key to unlock the keypad, press the
OK Key [
MENU], swivel to the QWERTY keypad and press 9. Settings
& Tools, 8. Memory, 3. Card Memory.
2. Press the Directional Key
up or down to select My Pictures, My
Ringtones, My Music, My Sounds or My Contacts and then press the
OK Key.
3. Press the Right Soft Key
[Options].
4. Select 1. Erase if you want to delete a file or 2. Move if you want to
move a file to Phone Memory, and then press the OK Key.
If you have selected My Contacts, you can select 1. Copy or 2. Erase after pressing the
Right Soft Key [Options]. Once you have selected 1. Copy or 2. Erase, press the OK
Key. If you want to move the contacts, press the Left Soft Key [Move].
5. Select a file, press the OK Key [MARK] or the Right Soft Key
[Mark All], and then press the Left Soft Key [Done].
6. Select Yes and press the OK Key.
MOVING ALL FILES
To move all files saved in Card Memory to Phone Memory:
1. From idle mode, press the OK Key to unlock the keypad, press the
OK Key [MENU], swivel to the QWERTY keypad and press 9. Settings
& Tools, 8. Memory, 3. Card Memory.
66
Chapter 4 − Menu Function
Settings
Page 68

2. Select Move All to Phone and then press the OK Key.
3. Select Yes and press the OK Key.
Do not remove the memory card from the phone while a file or files are being moved
to Card Memory.
USB MODE
You can use the USB data cable to transfer data between the device and a compatible PC.
Impor tant: To activate your device for data transfer, select USB Mode before connect-
ing the USB data cable.
1. From idle mode, press the OK Key to unlock the keypad, press the OK
Key [MENU], swivel to the QWERTY keypad and press 9. Settings &
Tools, 9. USB Mode.
2. Select Media Sync Mode or Modem Mode and then press the OK Key
[SET].
t
Media Sync Mode: Allows you to sync your device music files with PC's Windows Media
Player via USB data cable.
t
Modem Mode: Allows you to use your phone as a modem for your computer when con-
necting with a USB data cable.
To use End User Upgrade Tool, select Modem Mode for USB Mode.
PHONE INFO
MY NUMBER
To view your phone number:
1. From idle mode, press the OK Key to unlock the keypad, press the OK
Key [MENU], swivel to the QWERTY keypad and press 9. Settings &
Tools, 0. Phone Info, 1. My Number.
2. The following information appears:
Mobile Device Number (MDN)/Mobile Identifications Number (MIN)/
Other device information
SW/HW VERSION
To view your device HW/SW information:
1. From idle mode, press the OK Key to unlock the keypad, press the OK
Key [MENU], swivel to the QWERTY keypad and press 9. Settings &
Tools, 0. Phone Info, 2. SW/HW Version.
2. Software Version / PRL Version / ERI Version / Browser Version / Media
Center Version / MSUI Version / HW Version / MEID are displayed.
3. Press the OK Key to return to the previous screen.
Menu Function − Chapter 4
67
Settings
Page 69

ICON GLOSSARY
To view all the icons and their meanings:
1. From idle mode, press the OK Key to unlock the keypad, press the OK
Key [MENU], swivel to the QWERTY keypad and press 9. Settings &
Tools, 0. Phone Info, 3. Icon Glossary.
2. Press the OK Key to return to the previous screen.
Please refer to page 9 Display Indicators for more details about the icons.
SOFTWARE UPDATE
The update phone firmware (software) option allows you to download and update
the software in your phone automatically. Only the internal software is updated; no
Contacts entries or other information saved to your phone will be deleted.
STATUS
Check the latest Software Download/Update status.
1. From idle mode, press the OK Key to unlock the keypad, press the
OK Key [MENU], swivel to the QWERTY keypad and press 9. Settings
& Tools, 0. Phone Info, 4. Software Update.
2. Press 1. Status.
CHECK NEW
To check Download Server for new Software updates:
1. From idle mode, press the OK Key to unlock the keypad, press the
OK Key [MENU], swivel to the QWERTY keypad and press 9. Settings
& Tools, 0. Phone Info, 4. Software Update.
2. Press 2. Check New.
SETUP WIZARD
Set-up Wizard menu allows you to set following five menus for Settings & Tools with
simple operation.
1. From idle mode, press the OK Key to unlock the keypad, press the OK
Key [MENU], swivel to the QWERTY keypad and press 9. Settings &
Tools, *. Set-up Wizard.
t
CALL SOUNDS: Select Ring Only, Vibrate Only, Ring&Vibrate or Be Silent then press
the OK Key [SET]. If you select Ring Only or Ring&Vibrate, the ringtone
selection screen will be displayed. Select a desired ringtone and then
press the OK Key [SET]. To play the selected ringtone, press the Left Soft
Key [Play].
t
DISPLAY THEMES: Select Foliate, Transparent, Urban or White, then press the OK Key
[SET]. To preview the selected display theme, press the Left Soft Key
[Preview].
68
Chapter 4 − Menu Function
Settings
Page 70

t
MENU LAYOUT: Selec t Tab, List and Grid, then press the OK Key [SET]. To preview the
Main Menu layout, press the Left Soft Key [Preview].
t
MENU TYPE: Select Messaging or Personalizing, then press OK Key [SET]. To view the Help
for each type, select the type then press the Left Soft Key [Help].
t
CLOCK FORMAT: Select Analog, Large Analog, Digital 12, Large Digital 12, Digital 24,
Large Digital 24 or Off, and then press the OK Key [SET]. To preview the
format of the main clock, press the Left Soft Key [Preview].
To skip setting each menu, press the Right Soft Key [Skip].
Menu Function − Chapter 4
69
Settings
Page 71

VOICE COMMANDS
Your phone is equipped with an Advanced Voice Command (AVC) feature. This
feature allows you to make calls or use the phone’s functions by simply using
your voice. All you have to do is talk into the phone and then the phone will
recognize your voice and complete tasks by itself.
1. To access Voice Commands from idle mode, press the OK Key to unlock
the keypad, press the OK Key [MENU], swivel to the QWERTY keypad
and press 9. Settings & Tools, 2. Tools, 1. Voice Commands.
Shortcut: From idle mode, press and hold the CLR Key to access the Voice
Commands menu.
2. The phone displays the Voice Commands menu and prompts you to
say the name of the command you want to use. To complete your task,
simply follow the voice prompts. You can speak the name of the command after you hear a beep.
3. Select one of the following options, then press the OK Key.
Call <Name or #> / Send <MSG Type> / Go To <Shortcut> / Check
<Item> / Contact <Name> / Redial / Play <Playlist> / My Verizon /Help
To view information about each option, press the Left Soft Key [Info]. Press the
Right Soft Key [Options] to access Voice Commands Settings. Please refer to page
73 for more details on Voice Commands Settings.
4. When it recognizes one of these commands, the phone launches the
associated application. If the phone does not hear a command within
approximately eight seconds, AVC mode will turn itself off.
CALL <NAME OR #>
Use the Call command to voice dial a name from your Contact List or a phone
number. When dialing a number, pronounce each digit, but do not pause noticeably
between the digits.
1. You will hear Please say a command and the Voice Commands menu
will be displayed.
2. If calling a contact from your Contact List, say Call <Name>. Your
phone will ask you to confirm the name you said. Say “Yes “ if it was
repeated correctly. That phone number will be dialed. If there is more
than one number saved for that contact, you will be asked to confirm
which number to dial.
Examples: - Call Tom Smith, - Call 617 555-1212,
- Call Bob Carson’s mobile, - Call Dee Harper at Home.
70
Chapter 4 − Menu Function
Tools
Page 72

SEND <MSG TYPE>
Use the Send command to send a text or other type of message to a specified name
or number.
1. You will hear Please say a command and the Voice Commands menu
will be displayed.
2. Say “Send“ followed immediately by Text, Picture or Voice.
Examples: - Send Picture to Dee Harper’s Mobile,
- Send Text Tom Smith.
GO TO <SHORTCUT>
Use the Go To command to open an application on your phone. You can say “Go To”
by itself and be prompted to say the application name, or you can skip the prompt
by saying ”Go To” followed by the application name.
1. You will hear Please say a command and the Voice Commands menu
will be displayed.
2. Say “Go To” followed immediately by one of the following items:
Airplane Mode / Alarm / Alert Sounds / All Calls / Answer Options / Auto
Retry / Backlight / Banner / Bluetooth / Calculator / Calendar / Call
Connect / Call Ringtone / Call Settings / Call Sounds / Call Vibrate / Card
Memory / Clock Format / Contact List / Contacts / Dial Fonts / Dialed Calls
/ Display Settings / Display Themes / Drafts / ERI / ERI Banner / Groups /
Icon Glossary / In Case of Emergency / Inbox / Keypad Backlight / Keypad
Volume / Language / Location / Master Volume / Media Center / Memory
/ Message Settings / Messaging / Minute Beep / Missed Calls / Music &
Tones / My Name Card / My Number / My Pictures / My Ringtones / My
Sounds / My Verizon / New Contact / New Message / New Picture Message
/ New TXT Message / Notepad / One Touch Dial / Personal Banner / Phone
Info / Phone Memory / Phone Settings / Power On/Off / Received Calls
/ Recent Calls / Save Options / Sent / Service Alerts / Set Shortcut Keys /
Settings & Tools / Sounds Settings / Speed Dials / Stop Watch / SW/HW
Version / Take Picture / Tip Calculator / Tools / TTY mode / View Timers /
Voice Privacy / Voicemail / Wallpaper / World Clock
CHECK <ITEM>
The Check command lets you check status information for your phone. You can say
“Check” or “Check Status” to see and hear all status information.
1. You will hear Please say a command and the Voice Commands menu
will be displayed.
2. Say “Check” followed immediately by one of the following items:
Status / Voicemail / Messages / Missed Calls / Time / Signal Strength /
Battery Level / Volume / Balance / Minutes / Payment / My Number
Menu Function − Chapter 4
71
Tools
Page 73

CONTACTS <NAME>
Use the Contact command to retrieve and display information for any name stored
in your Contact List.
1. You will hear Please say a command and the Voice Commands menu
will be displayed.
2. Say “Contact <Name>”.
Examples: - Contact Tom Jones.
3. The
Say a Command menu will be displayed for that contact name.
Follow the voice prompts.
REDIAL
Use the Redial command to make a call to the last number you dialed.
1. You will hear Please say a command and the Voice Commands menu
will be displayed.
2. Say “Redial”.
3. Your phone will make a call to the last number you dialed.
PLAY <PLAYLIST>
Use the Play command to play back one of the playlists. Say “PLAY” followed by a
playlist and then your phone will play back the recognized playlist for you.
1. You will hear Please say a command and the Voice Commands menu
will be displayed.
2. Say “Play <Playlist>” to play back individual playlist or say “Play All
Songs” to play back all songs saved in your phone.
MY VERIZON
Use the My Verizon command to access information about your Verizon account.
1. You will hear Please say a command and the Voice Commands menu
will be displayed.
2. Say “My Verizon”.
3. Your phone will make a web connection.
HELP
Use the Help command to view how to use the Voice Commands.
1. You will hear Please say a command and the Voice Commands menu
will be displayed.
2. Say “Help”.
3. The Help guide will be displayed on your phone.
72
Chapter 4 − Menu Function
Tools
Page 74

VOICE COMMANDS SETTINGS
CONFIRM CHOICES
When the phone does not recognize your voice command, it will ask you to repeat your
voice command. If it does not recognize the name or number, it will display a list of up
to three choices and speak each one in turn. You can control how often the phone asks
you to confirm the recognized name or number.
1. From idle mode, press the OK Key to unlock the keypad, press the
OK Key [
MENU], swivel to the QWERTY keypad and press 9. Settings
& Tools, 2. Tools, 1. Voice Commands.
2. Press the Right Soft Key
[Settings] and 1. Confirm Choices.
You can also access Voice Commands Settings from idle mode, by pressing the OK Key to
unlock the keypad, press the OK Key [MENU], swivel to the QWERTY keypad and press 9.
Settings & Tools, 6. Phone Settings, 3. Voice Commands Settings, 1. Confirm Choices.
3. Select Automatic, Always Confirm or Never Confirm, then press the
OK Key [SET].
SENSITIVITY
The Sensitivity setting allows you to adjust the sensitivity monitoring of voice tones.
If you frequently experience the messages “Please try again” or “COMMAND NOT
RECOGNIZED Try again?”, adjust the sensitivity toward Less Sensitive. If you frequently
experience false activations (when the phone recognizes a name you didn’t say), adjust
the sensitivity toward More Sensitive.
1. From idle mode, press the OK Key to unlock the keypad, press the
OK Key [MENU], swivel to the QWERTY keypad and press 9. Settings
& Tools, 2. Tools, 1. Voice Commands.
2. Press the Right Soft Key
[Settings], 2. Sensitivity.
3. Select More Sensitive, Automatic or Less Sensitive, then press the
OK Key [SET].
ADAPT VOICE
Voice Command is speaker independent, which means that no training or adaptation
is required. Some users with heavy accents or unusual voice characteristics may find
difficulty in achieving high accuracy with speaker independent Voice Command, so
the Adapt Voice feature allows users to dramatically improve the recognition accuracy
after adapting their voices. Users who get acceptable recognition accuracy will find no
additional benefit to performing the Adapt Voice.
1. From idle mode, press the OK Key to unlock the keypad, press the
OK Key [MENU], swivel to the QWERTY keypad and press 9. Settings
& Tools, 2. Tools, 1. Voice Commands.
2. Press the Right Soft Key
[Settings], 3. Adapt Voice.
3. Select 1. Train Voice or 2. Reset Voice, then press the OK Key.
Menu Function − Chapter 4
73
Tools
Page 75

t
Train Voice: Requires that you make recordings of your voice to customize the voice
recognitions system. It will take a few minutes.
t
Reset Voice: Once you finish the adaptation process, you can reset the adaptation
to factory default. Reset Voice option only appears after you finish the
Train Voice process.
4. "Adaptation will take a couple of minutes to complete. Adapt in a
quiet room. Press OK to begin." will appear on the screen. Press the
OK Key. Wait for the beep, and then repeat the sentences using a
normal tone of voice.
5. When you are finished with a full session, you will reach a screen
that reads “
Adaptation Complete”.
PROMPTS
Allows you to select the voice command system characteristics.
1. From idle mode, press the OK Key to unlock the keypad, press the
OK Key [MENU], swivel to the QWERTY keypad and press 9. Settings
& Tools, 2. Tools, 1. Voice Commands.
2. Press the Right Soft Key
[Settings], 4. Prompts.
3. Select 1. Mode or 2. Audio playback, then press the OK Key.
t
Mode: Select the voice command system mode from the following:
- Prompts: For handset to prompt for required information.
- Readout+Alerts: For handset to prompt for required information and readout the
contents of the screen and phone alerts.
- Readout: For handset to prompt for required information and readout the contents
of the screen.
- Tones Only: For handset to provide beeps only for audio guidance.
t
Audio playback: Allows audio playback to play through the speakerphone or ear-
piece. Select Automatic, Speakerphone or Earpiece.
4. Press the OK Key [SET].
ABOUT
1. From idle mode, press the OK Key to unlock the keypad, press the
OK Key [
MENU], swivel to the QWERTY keypad and press 9. Settings
& Tools, 2. Tools, 1. Voice Commands.
2. Press the Right Soft Key
[Settings], 5. About.
3. The Nuance VSuite 3.2 version appears.
4. To return to the previous screen, then press the OK Key.
CALCULATOR
The Calculator allows you to perform simple mathematical calculations. To
access the calculator:
74
Chapter 4 − Menu Function
Tools
Page 76

1. From idle mode, press the OK Key to unlock the keypad, press the OK
Key [MENU], swivel to the QWERTY keypad and press 9. Settings &
Tools, 2. Tools, 2. Calculator.
2. Follow the instructions below to calculate 8×6÷4-2.5=9.5
t
Input 8 and then press the Directional Key right.
t
Input 6 and then press the Directional Key left.
t
Input 4 and then press the Directional Key down.
t
Input 2 and then press the to input (.).
t
Press 5.
t
Then press the OK Key and then you will see the answer (9.5).
3. To reset, press the Left Soft Key [Clear].
t Directional Key right : X, Directional Key down : -, Directional Key left : ÷,
Directional Key up : +, * Key : ., Left Soft Key : Clear, OK Key : =.
t
To change the displayed number from positive (+) to negative (-) and vice versa,
press # Key .
t
Press the Right Soft Key [Operator] to use parenthesis 1. (, 2. ) and 3. Exponent.
TIP CALCULATOR
Allows you to calculate the tip and determine how much each person should
pay for the bill.
1. From idle mode, press the OK Key to unlock the keypad, press the OK
Key [MENU], swivel to the QWERTY keypad and press 9. Settings &
Tools
, 2. Tools, 3. Tip Calculator.
2. Input the amount in the Total Bill field and press the Directional Key
down.
3. Select the percentage of tip in the Tip(%) field by pressing the
Directional Key
left or right. The amount of a tip will be dis-
played in the Tip($) field. Press the Directional Key down.
4. Input the number of persons by pressing the Directional Key
left
or right. The tip amount and cost per person is shown.
5. Press the Left Soft Key
[Reset] to clear the fields. Press the Right
Soft Key [Close] to return to the previous menu.
CALENDAR
The Calendar tool provides easy and convenient access to your schedule.
Simply store your appointments and then your phone will alert you to them.
1. From idle mode, press the OK Key to unlock the keypad, press the OK
Key [MENU], swivel to the QWERTY keypad and press 9. Settings &
Tools, 2. Tools, 4. Calendar.
Shortcut: From idle mode, press the Directional Key down to access the Calendar.
2. Highlight the scheduled day.
Menu Function − Chapter 4
75
Tools
Page 77

76
Chapter 4 − Menu Function
Tools
3. Press the Left Soft Key [Add].
4. The Appointment field is highlighted. Enter the name of the event.
Press the Directional Key
down to set the other fields for the
event:
APPOINTMENT
Use the keypad to enter an appointment in your schedule.
START TIME
Use the keypad to set a start time and press the Left Soft Key
for am/pm.
END TIME
Use the keypad to set a end time and press the Left Soft Key
for am/pm.
START DATE
Use the keypad to change or enter the start date.
RECURRENCE
Press the Directional Key
left or right to set the recurrence of
the event (Once, Daily, Weekly, Monthly, Yearly).
END DATE
Use the keypad to change or enter the end date.
ALERT
Press the Left Soft Key
[Set] to select a new ringtone. Highlight
a desired ringtone then press the OK Key. Press the Left Soft Key
[Play] to play a ringtone.
VIBRATE
Press the Directional Key
left or right to set On or Off.
REMINDER
Press the Directional Key
left or right to select a reminder
before the event from the following:
Once / Every 2 Minutes / Every 15 Minutes / Off
ALERT TIME
Press the Directional Key
left or right to select the alert time
before the event takes place from the following:
On time / 5 minutes before / 10 minutes before / 15 minutes
before / 30 minutes before / 1 hour before / 3 hours before /
5 hours before / 1 Day Before
Page 78

Menu Function − Chapter 4
77
Tools
1. Press the OK Key [SAVE] to save it. The date of the event will be
marked on your calendar.
VIEW SAVED EVENT
1. From idle mode, press the OK Key to unlock the keypad, press the OK
Key [MENU], swivel to the QWERTY keypad and press 9. Settings &
Tools, 2. Tools, 4. Calendar.
2. Choose the event then press the OK Key [VIEW].
ERASE SAVED EVENT
1. From idle mode, press the OK Key to unlock the keypad, press the OK
Key [MENU], swivel to the QWERTY keypad and press 9. Settings &
Tools, 2. Tools, 4. Calendar.
2. Choose the event then press the OK Key [
VIEW].
3. Press the Left Soft Key
[Erase], select Yes , then press the OK Key.
ERASE ALL PASSED EVENTS
1. From idle mode, press the OK Key to unlock the keypad, press the OK
Key [MENU], swivel to the QWERTY keypad and press 9. Settings &
Tools
, 2. Tools, 4. Calendar.
2. Choose the event then press the OK Key [VIEW].
3. Press the Right Soft Key
[Options], press 7. Erase Passed, select
Ye s, then press the OK Key.
EDIARY
E-Diary is a simple diary application designed to be easy to understand and
convenient for everyday use.
1. From idle mode, press the OK Key to unlock the keypad, press the OK
Key [MENU], swivel to the QWERTY keypad and press 9. Settings &
Tools, 2. Tools, 5. E-Diary.
2. Press the Left Soft Key
[New].
3. In the Weather & Feeling field, press the Left Soft Key
[Set], then
select an icon and press the OK Key.
4. Press the Directional Key
down to set the other fields for the
E-diary:
Title
Enter the title of the diary.
Picture
Page 79

78
Chapter 4 − Menu Function
Tools
Press the Left Soft Key [Set] to select an image stored in My Pictures. Please refer
to page 90 for more details on PICTURES.
Tex t
Enter the message for the diary.
Background
Press the Directional Key left or right to selec t one of the following backgrounds:
Blackboard / Essay / Sky / Letter
5. In each field, press the Right Soft Key [Options] then press 1.
Preview to preview the setting you selected or 2. Cancel E-Diary to
discard your new E-diary.
6. Press the OK Key [
Save] to save your E-diary.
SEND AN EDIARY
1. From idle mode, press the OK Key to unlock the keypad, press the OK
Key [
MENU], swivel to the QWERTY keypad and press 9. Settings &
Tools
, 2. Tools, 5. E-Diary.
2. Press the Directional Key
up or down to highlight an entry, then
press the Right Soft Key [Options].
3. Select Send and press the OK Key, then compose a Picture Message
and press the OK Key [SEND]. Please refer to page 97 for more details
on Picture Message.
EDIT AN EDIARY
1. From idle mode, press the OK Key to unlock the keypad, press the OK
Key [MENU], swivel to the QWERTY keypad and press 9. Settings &
Tools, 2. Tools, 5. E-Diary.
2. Highlight an E-diary, then press the Right Soft Key
[Options].
3. Select Edit and press the OK Key, then modify the E-diary.
4. Press the OK Key [SAVE] to save your modifications.
ERASE EDIARY
1. From idle mode, press the OK Key to unlock the keypad, press the OK
Key [MENU], swivel to the QWERTY keypad and press 9. Settings &
Tools, 2. Tools, 5. E-Diary.
2. Highlight an E-diary, then press the Right Soft Key
[Options].
3. Select Erase to erase an E-diary or Erase all to erase all the E-diary
entries, then press the OK Key.
4. Select Yes and press the OK Key.
ALARM CLOCK
The Alarm Clock tool allows you to set up to three alarms. When you set an
Page 80

Menu Function − Chapter 4
79
Tools
alarm, the current time is displayed at the top of the screen. When the alarm
goes off, Alarm 1 (2 or 3, as applicable) will be displayed on the LCD screen
and the alarm will sound.
1. From idle mode, press the OK Key to unlock the keypad, press the OK
Key [MENU], swivel to the QWERTY keypad and press 9. Settings &
Tools, 2. Tools, 6. Alarm Clock.
2. Highlight an Alarm (1, 2 or 3), then press the OK Key.
3. Press the Directional Key
down to set the fields for the alarm:
ALARM
Press the Directional Key
left or right to select On or Off.
TIME
Use the keypad to set a time for the alarm and press the Left Soft Key
to set am or pm.
FREQUENCY
Press the Directional Key
left or right to select a setting for the
alarm (Once, Daily, Mon - Fri, Weekends).
RINGTONE
Press the Left Soft Key
[Set] then press 1. Get New Ringtones
or select the alert tone you wish to set. Press the Left Soft Key
[Play] to play a ringtone. Press the OK Key [SET] to make your
selection.
4. Press the OK Key [SAVE] to set the alarm.
TURN ON/OFF THE ALARM SETTING
1. From idle mode, press the OK Key to unlock the keypad, press the OK
Key [MENU], swivel to the QWERTY keypad and press 9. Settings &
Tools
, 2. Tools, 6. Alarm Clock.
2. Highlight an Alarm (1, 2 or 3), then press the Right Soft Key
[Options].
3. Select Turn On or Turn Off then press the OK Key.
RESET THE ALARM SETTING
1. From idle mode, press the OK Key to unlock the keypad, press the OK
Key [MENU], swivel to the QWERTY keypad and press 9. Settings &
Tools, 2. Tools, 6. Alarm Clock.
2. Highlight an Alarm (1, 2 or 3), then press the Right Soft Key
[Options].
Page 81

80
Chapter 4 − Menu Function
Tools
3. Select Reset Alarm, then press the OK Key.
4. "RESET ALARM?" will appear on the screen. Select Yes and press the
OK Key.
RESET ALL ALARM SETTINGS
1. From idle mode, press the OK Key to unlock the keypad, press the OK
Key [MENU], swivel to the QWERTY keypad and press 9. Settings &
Tools, 2. Tools, 6. Alarm Clock.
2. Highlight an
Alarm (1, 2 or 3), then press the Right Soft Key
[Options].
3. Select Reset All, then press the OK Key.
4. "RESET ALL ALARMS?" will appear on the screen. Select Yes and press
the OK Key.
STOP WATCH
Simultaneously times up to eight different events. To operate the stop watch:
1. From idle mode, press the OK Key to unlock the keypad, press the OK
Key [MENU], swivel to the QWERTY keypad and press 9. Settings &
Tools, 2. Tools, 7. Stop Watch.
TO MEASURE A TIME PERIOD
1. To start the stop watch, press the OK Key [START].
2. To pause it, press the OK Key [STOP].
3. To resume it, press the OK Key [START].
4. To reset it, press the Right Soft Key
[Reset].
TO TIME UP TO EIGHT EVENTS AT ONCE
1. To start the stop watch, press the OK Key [START].
2. To stop a time period and continue measuring another one, press the
Left Soft Key
[Lap].
3. To stop the second and continue measuring a third one, press the Left
Soft Key
[Lap].
4. To measure up to eight time periods, repeat the above steps.
5. To stop the stop watch, press the OK Key [STOP].
6. To review the results, press the Left Soft Key
[View].
7. To return to the stop watch, press the OK Key.
8. To reset it, press the Right Soft Key
[Reset].
Page 82

Menu Function − Chapter 4
81
Tools
WORLD CLOCK
To display the time and date in pre-programmed cities:
1. From idle mode, press the OK Key to unlock the keypad, press the OK
Key [MENU], swivel to the QWERTY keypad and press 9. Settings &
Tools, 2. Tools, 8. World Clock.
2. Press the Left Soft Key
[Cities] to access the CITIES LIST. Select
the desired city, then press the OK Key. Or, press the Directional Key
up, down, left, or right to select your city using the world map.
3. The world map appears with the city, its date and time.
DAYLIGHT SAVING TIME DST SETTING
1. From idle mode, press the OK Key to unlock the keypad, press the OK
Key [MENU], swivel to the QWERTY keypad and press 9. Settings &
Tools, 2. Tools, 8. World Clock.
2. Press the Right Soft Key
[DST].
3. Press the Directional Key
left or right to select a city. Press the
Directional Key down.
4. Under DST, press the Directional Key
left or right to turn Daylight
Savings Time (DST)
On or Off. Press the Directional Key
down.
5. Under Start Date, use the keypad to change or enter the start date
and then press the Directional Key
down.
6. Under Start Time, use the keypad to set a start time and press the
Left Soft Key
to select am or pm and then press the Directional
Key
down.
7. Under End Date, use the keypad to change or enter the end date and
then press the Directional Key
down.
8. Under End Time, use the keypad to set an end time and press the Left
Soft Key
to select am or pm.
9. To save a DST setting, press the OK Key [SAVE].
NOTEPAD
Your phone includes an internal notepad that can be used to compose and
store reminders and notes. To create a note:
1. From idle mode, press the OK Key to unlock the keypad, press the OK
Key [MENU], swivel to the QWERTY keypad and press 9. Settings &
Tools, 2. Tools, 9. Notepad.
Page 83

82
Chapter 4 − Menu Function
Tools
2. Press the Left Soft Key [New] to write a new note. When you are
done, press the OK Key [SAVE].
VIEW SAVED MEMO
To view a saved memo:
1. From idle mode, press the OK Key to unlock the keypad, press the OK
Key [MENU], swivel to the QWERTY keypad and press 9. Settings &
Tools, 2. Tools, 9. Notepad.
2. Select a note, then press the OK Key [
VIEW].
ERASE SAVED MEMO
To erase a saved memo:
1. From idle mode, press the OK Key to unlock the keypad, press the OK
Key [MENU], swivel to the QWERTY keypad and press 9. Settings &
Tools, 2. Tools, 9. Notepad.
2. Select a note, press the Right Soft Key
[Options] then select
Erase and press the OK Key.
3. Select Yes and press the OK Key.
ERASE ALL SAVED MEMOS
To erase all saved memos:
1. From idle mode, press the OK Key to unlock the keypad, press the OK
Key [MENU], swivel to the QWERTY keypad and press 9. Settings &
Tools, 2. Tools, 9. Notepad.
2. Press the Right Soft Key
[Options], then select Erase All and
press the OK Key.
3. Select
Yes and press the OK Key.
USB MASS STORAGE
The USB Mass Storage allows you to transfer files to or from your PC. In order
to use this option, you must insert a microSD memory card and connect to PC
with the USB cable. The RazzleTM comes with a 1GB pre-installed microSD Card.
1. From idle mode, press the OK Key to unlock the keypad, press the OK
Key [MENU], swivel to the QWERTY keypad and press 9. Settings &
Tools, 2. Tools, 0. USB Mass Storage.
Page 84

Menu Function − Chapter 4
83
My Verizon
MY VERIZON
MY VERIZON
To access your Verizon account information:
1. From idle mode, press the OK Key to unlock the keypad, press the OK
Key [MENU], swivel to the QWERTY keypad and press 9. Settings &
Tools, 1. My Verizon.
Shortcut: From idle mode, press the Directional Key left to access My Verizon.
Page 85

MEDIA CENTER
CHAPTER 5
MEDIA CENTER
Your phone provides a unique feature - Media Center - that enables
you to download ringtones, wallpapers, games and more from your
network to your phone. Please contact your service provider for the
availability of these services.
Using the microSD Card
Music & Tones
Pictures
Games
Mobile Web
Browse & Download
Extras
Media Center Info
Page 86

Media Center − Chapter 5
85
microSD
USING THE microSD CARD
The microSD Card stores sounds, images, photos, music and other files.
The Razzle
TM
comes with a 1GB pre-installed microSD Card.
INSTALLING THE microSD CARD
To install your microSD Card:
1. Open the microSD Card cover, and insert the
microSD Card into the slot with the gold contacts facing down.
2. Press the microSD Card until you hear the 'click' and close the microSD
Card cover. Then, “
CARD INSERTED. PICTURE & SOUND WILL BE SAVED
TO CARD MEMORY. CONTINUE?” will appear on the display.
3. Select Yes and press the OK Key.
t To prevent possible damages, please keep the microSD Card slot closed at all times
regardless of whether the microSD Card is inserted or not.
REMOVING THE microSD CARD
To remove the microSD Card:
1. Open the microSD Card cover, and use your thumb to press and release
the microSD Card. Press the memory card inward, gently, until it
pops out.
2. Remove the microSD Card and close the
microSD Card cover.
t
Do not remove the microSD Card while reading or writing files. Otherwise it could be
damaged.
To ensure the proper function of removable memory, please use a microSD Card.
MUSIC & TONES
To access the Music & Tones menu:
GET NEW RINGTONES
To connect to Media Center and download various ringtones:
1. From idle mode, press the OK Key to unlock the keypad. Press the
OK Key [MENU], select Media Center and press the OK Key, then
swivel to the QWERTY keypad and press 1. Music & Tones, 1. Get New
Ringtones.
2. If you have not downloaded any ringtones or ringtone applications
previously, press 1. Get New Applications and follow the prompts.
Page 87

86
Chapter 5 − Media Center
Media Center
MY RINGTONES
TO PLAY DOWNLOADED TUNES OR TONES:
1. From idle mode, press the OK Key to unlock the keypad. Press the
OK Key [MENU], select Media Center and press the OK Key, then
swivel to the QWERTY keypad and press 1. Music & Tones, 2. My
Ringtones.
2. Select the tune or tone you want to play then press the OK Key
[
PLAY].
3. To stop, press the OK Key [STOP].
TO ERASE DOWNLOADED TUNES OR TONES:
1. From idle mode, press the OK Key to unlock the keypad. Press the
OK Key [MENU], select Media Center and press the OK Key, swivel to
the QWERTY keypad, then press 1. Music & Tones, 2. My Ringtones.
2. Select the tune or tone you want to erase then press the Right Soft
Key
[Options].
3. Press 1. Erase, then select Yes and press the OK Key.
t
If a Downloaded Ringtone is selected, press the Right Soft Key [Options] to
choose from the following:
1. Erase: Erase the current ringtone from your phone.
2. Rename: To edit the ringtone’s title.
3. Lock/Unlock: Lock/Unlock the ringtone.
4. Erase All: To erase all the ringtones in your phone.
5. File Info: Displays information on the selected ringtone.
TO ASSIGN DOWNLOADED TUNES OR TONES:
To select a desired ringtone, or download a new ringtone:
1. From idle mode, press the OK Key to unlock the keypad. Press
the OK Key [MENU], select Media Center and press the OK Key,
swivel to the QWERTY keypad, then press
1. Music & Tones, 2. My
Ringtones.
2. Highlight the desired ringtone, press the Left Soft Key
[Set
As], then select one of the following and press the OK Key.
t
1. Ringtone: A confirmation message appears.
t
2. Contact ID: The Set As Contact ID screen appears. Select the Contact you want to
assign the ringtone to, then press the OK Key.
t
3. Alert Sounds: Press the corresponding number key to set the ringtone for one
of the following:
- All Messages / TXT Message / Pic-Voice Message / Voicemail
3. Press the Right Soft Key [Options] to access the following
options:
t
Erase: Erase the current ringtone from your phone.
t
Rename: To edit the ringtone’s title.
Page 88

Media Center − Chapter 5
87
Media Center
Album jacket image
Volume indicator
Shuffle / Repeat
Visual Guide
Elapsed time / Total Time
Progress Bar
Skin & File info
Playing Icon
t
Lock/Unlock: Lock or unlock the current ringtone in your phone.
t
Erase All: To erase all the ringtones in your phone.
t
File Info: Displays information on the selected ringtone.
MY MUSIC
To playback and manage music stored in your phone’s memory and on a memory card:
NATIVE MUSIC PLAYER
Icon Name Descriptions
Volume Indicates current music volume
Previous/Next
Short Press: Previous, Next
Long Press: Rewind, Fast Forward
Pause/Play Indicates Player’s status
Repeat
Repeat All
Repeat One
Off
Shuffle
On
Off
1. From idle mode, press the OK Key to unlock the keypad, press the
Music Key or the OK Key [MENU], select Media Center and press
the OK Key, swivel to the QWERTY keypad, then press 1. Music &
Tones
, 3. My Music.
2. The Music Library screen appears.
3. Select All Songs, press the OK Key, then select the desired song and
press the OK Key [PLAY].
4. Press the Left Soft Key
[Mute] to mute. Press the Right Soft Key
[Options] to select from the following options:
Exit Player/Music Only Mode/Song Info/Home Screen/Repeat/Shuffle
/ Sound Effects
5. Press the Directional Key left to start the song over again. Press
the Directional Key right to skip to the next song if there are
other songs to be played. Press the OK Key to pause or play the song.
If you press and hold the Directional Key left, the song rewinds
Page 89

or press and hold the Directional Key right, the song will fast
forward.
MY SOUNDS
To select a desired sound or record a new sound:
1. From idle mode, press the OK Key to unlock the keypad, press the OK
Key [MENU], select Media Center and press the OK Key, swivel to the
QWERTY keypad, then press 1. Music & Tones, 4. My Sounds.
2. Highlight the desired sound, then press the OK Key [
PLAY] to hear the
sound. Press the OK Key [STOP] to stop playing the sound.
3. Press the Right Soft Key
[Options] to access the following
options:
t DOWNLOADED or RECORDED SOUND:
Send: To send the sound.
To Online Album: Upload the selected tone to the online server.
Rename: To edit the sound’s title.
Move: To move the selected sound to the memory card.
This option only appears if a memory card is inserted.
Lock/Unlock: Lock or unlock the selected sound in your phone.
Erase: To erase the sound.
Erase All: To erase all the sounds in your phone.
The preloaded sounds cannot be erased.
File Info: Displays information on the selected sound.
t PRELOADED SOUND:
Send: To send a sound.
To Online Album: To upload selected sound to picture server.
File Info: Displays information on the selected sound.
RECORDING NEW SOUNDS
To record a new sound:
1. From idle mode, press the OK Key to unlock the keypad, press the
OK Key [
MENU], select Media Center and press the OK Key, swivel to
the QWERTY keypad and press 1. Music & Tones, 4. My Sounds.
2. Press 1. Record New.
3. Press the OK Key to begin recording. When done, press the OK Key
[STOP] to finish recording. The recording is automatically saved to
your My Sounds list.
4. Your recording is saved with a number. To rename your recording,
scroll to it with the Directional Key
in the My Sounds menu,
then press the Right Soft Key [Options].
5. Press 3. Rename.
6. Enter the new name for your recording, then press the OK Key.
88
Chapter 5 − Media Center
Media Center
Page 90

Media Center − Chapter 5
89
Media Center
TO SET A SOUND:
1. From idle mode, press the OK Key to unlock the keypad, press the
OK Key [MENU], select Media Center and press the OK Key, swivel to
the QWERTY keypad and press 1. Music & Tones, 4. My Sounds.
2. Select the sound you want to set, press the Left Soft Key
[Set
As], then select one of the following and press the OK Key.
t
1. Ringtone: A confirmation message appears.
t
2. Contact ID: The Set As Contact ID screen appears. Select the Contact you want to
assign the ringtone to, then press the OK Key.
t
3. Alert Sounds: Press the corresponding number key to set the ringtone for one
of the following:
- All Messages / TXT Message / Pic-Voice Message / Voicemail
SYNC MUSIC
SYNC YOUR MUSIC FROM YOUR PC TO YOUR V CAST MUSIC WITH
RHAPSODY® CAPABLE PHONE
This option allows you to transfer music files from your PC. In order to use this
option, you must install V CAST Music with Rhapsody on your PC.
1. Open V CAST Music with Rhapsody software. Don’t have V CAST
MUSIC with Rhapsody software? Download it for free at
www.
verizonwireless.com/music
.
2. Plug in the USB cable (included inbox) to your phone and connect it
to a USB port on your PC.
3. From the main screen on your phone, the SYNC MUSIC V CAST
MOBILE PHONE display appears. Your phone should display the
message:
Connected
4. Drag and drop the song(s) you want to sync from My Library, to
your V CAST Music with Rhapsody mobile phone, listed under the
Sources tab. Once synchronization is complete, press the END/CLR
key and disconnect the USB cable (included inbox).
5. Under the
Music & Tones menu, open My Music to view and play
your music.
t A compatible USB cable is required for synchronizing.
t
V CAST Over The Air Music downloads are not available. Music can be purchased and
downloaded via V CAST Music with Rhapsody through your PC. V CAST Music with
Rhapsody will work with Windows Vista, XP, or 2000 (Only 32-bit versions of Windows
are supported.). Not available for Mac or Linux.
Page 91

90
Chapter 5 − Media Center
Media Center
PICTURES
GET NEW PICTURES
To connect to Media Center and download a variety of Pictures (images):
1. From idle mode, press the OK Key to unlock the keypad, press the OK
Key [MENU], select Media Center and press the OK Key, swivel to the
QWERTY keypad, then press 2. Pictures, 1. Get New Pictures.
2. Press
1. Get New Applications. Follow the on-screen prompts.
The downloaded application will be included in the list displayed when you access:
Get New Pictures > 1. Get New Applications.
MY PICTURES
In My Pictures you can view all the pictures you have taken, store selected images in
your phone, send pictures to the Online Album, delete images and access additional
picture options.
1. From idle mode, press the OK Key to unlock the keypad, press the OK
Key [MENU], select Media Center and press the OK Key, swivel to the
QWERTY keypad, then press 2. Pictures, 2. My Pictures.
2. Select the desired picture, then press the Right Soft Key
[Options].
3. Select one of the following options:
t
Send: To send a picture message.
t
Set As: Assigns the selected picture to display for specific tasks. (Wallpaper/Picture ID)
t
Take Picture: Take a new picture.
t
Get New Picture: Download various pictures.
t
Manage Pictures: Erase, Lock, Unlock, Move to Phone or Move to Card.
t
Rename: Rename the selected picture.
t
File Info: Displays information about the selected picture. (File Name/Date/Time/
Resolution/Size)
TO ERASE A PICTURE:
1. From idle mode, press the OK Key to unlock the keypad, press the
OK Key [
MENU], select Media Center and press the OK Key, swivel to
the QWERTY keypad, then press 2. Pictures, 2. My Pictures.
2. Select the picture you want to erase, then press the Left Soft Key
[Erase]. “ERASE PICTURE?” will appear on your display.
3. Select Yes and press the OK Key. A confirmation message appears.
TAKE PICTURE
1. To access the camera, press the Camera Key .
If the keypad is locked, unlock the keypad by pressing the OK Key. Press the Camera Key
to access the camera viewfinder.
Page 92

Media Center − Chapter 5
91
Media Center
2. Point the camera lens at your subject. You can check the picture framing through the display screen.
t
Press the Directional Key left/right: Zoom Down/Up.
(Except 1280X960, 960X1280 mode).
t
Pressing the Right Soft Key [Options], you can choose from the following:
1. Resolution: To select a resolution for a picture.
- Landscape: 1280x960 / 640x480 / 320x240 / 160x120
- Portrait: 960x1280 / 480x640 / 240x320 / 120x160
2. Self Timer: To activate the camera’s timer function.
(Off/3 Seconds/5 Seconds/10 Seconds)
3. Brightness: To brightness up/down( -2, -1, 0, +1, +2).
4. White Balance: To select white balance.
(Auto / Sunny / Cloudy / Tungsten / Fluorescent / Darkness)
5. Shutter Sound: To select a shutter sound. (Shutter/Silent/Say “Cheez”/Ready! 123)
6. Color Effects: To select color effect.
(Normal/Antique/Black and White/Negative)
7. Capture Mode: To select Capture mode. (Landscape / Portrait)
To view captured images, press the Left Soft Key [My Pics].
3. Press the Camera Key or press the OK Key [TAKE] to take the
picture.
4. After taking the picture, it will be displayed. To save the picture, press
the Left Soft Key
[Save]. To take another picture without saving
the picture you just took, press the Right Soft Key [Erase].
To send the picture to someone, press the OK Key [
SEND].
ONLINE ALBUM
To access Online Album:
1. From idle mode, press the OK Key to unlock the keypad, press the OK
Key [MENU], select Media Center and press the OK Key, swivel to the
QWERTY keypad, then press 2. Pictures, 4. Online Album. The browser
launches and the Online Album sign-on screen appears.
2. Follow the on-screen prompts.
GAMES
DOWNLOADING NEW GAMES
To download games and applications from the Media Center server:
1. From idle mode, press the OK Key to unlock the keypad, press the OK
Key [MENU], select Media Center and press the OK Key, swivel to the
QWERTY keypad, then press 3. Games.
2. Press the OK Key to select 1. Get New Applications.
3. Follow the on-screen prompts.
Page 93

92
Chapter 5 − Media Center
Media Center
PLAYING DOWNLOADED GAMES
1. To play the game you downloaded, from the Games menu, select the
game then press the OK Key [PLAY] to run the application.
MOBILE WEB
Now you can access news, sports, weather and Email from your phone. Mobile
Web keeps you updated by providing access to up-to-date information such as
news, sports, weather and stock quotes when you subscribe to Internet service
with your service provider. Please contact your service provider for a list of
available websites and service details.
1. To start your Internet browser and access websites through your wireless handset, press the Directional Key up.
BROWSER MENU
The browser menu lists the actions necessary to operate the browser. To access,
press the Directional Key up to launch Mobile Web and then press the Right
Soft Key [Menu].
VZW HOME
Returns the user to the home page.
ADD FAVORITE
Takes user to the VZW Add Favorite page.
For favorites, page name and URL need to auto-populate.
SEARCH
Takes user to the VZW Search page.
GO TO URL
Takes user to the VZW Search > Go to Site page.
SHOW URL
Displays the current URL.
BACK
Returns to the previously viewed page.
MANAGE MEMORY
Displays the following list of options:
t
Clear Cache: Clears the cache.
t
Clear History: Clears the list of recently visited URLs.
t
Clear Cookies: Clears saved cookies.
t
Autofill: Automatically fills in character for browser recognized words.
SETTINGS
t
Downloads: Selecting the Downloads item allows the user to enable/disable downloading
images, background sounds and object downloads when a URL is accessed.
Page 94

Media Center − Chapter 5
93
Media Center
t
Restart Browser: Selecting Restart Browser causes the history and cache to be cleared and
returns the user to the homepage.
t
Scroll Mode: Selecting Scroll Mode from the Settings menu allows the user to select the
way text scrolls and the scroll speed.
t
Send Referrer: When the Send Referrer item is selected from the Settings menu, the
browser allows the user to turn on or off sending the referrer URL.
t
Key Press Time Out: When the Key Press Time out item is selected from the Settings
menu, the browser allows the user to set the key press timeout as
fast, medium, slow or OFF. Medium is 1.5 seconds, slow 2 seconds
and fast is 1 second. The key press timeout is the period of time after
which the cursor auto-advances to the next entry position. In most
cases, a single key can be used to enter more than one character.
Each time the key is pressed the last character of the line is replaced
by the next choice for that key. As long as the same key is repressed
within key press timeout, the last character cycles between all the
choices for the key.
t
Connection Time Out: When the Connection Timeout is selected from the Settings menu,
the browser allows the user to set the connection timeout. The
connection timeout determines how long the browser will wait for
a response from the network for a network request: 30 Seconds
or 60 Seconds.
ADVANCED
t
About: Displays the name of the supplier of the Browser and the Browser SW version.
t
Refresh: Allows the user to reload the current URL.
t
History: Displays the previous 20 visited URLs.
t
Encryption: Displays the following list of options:
1. Authentication: Gives the option to turn Authentication Caching ON or OFF.
2. Root Certificate: Shows the root security keys for TLS.
3. Current Certificate: Shows the current site security key for TLS (if applicable).
2. Press the END Key to exit out of the browser and return to idle
mode.
BROWSE & DOWNLOAD
DOWNLOADING NEW APPLICATIONS
To download Tools that can help you navigate to entertainment spots, restaurants,
and provide you with up-to-date weather information:
1. From idle mode, press the OK Key to unlock the keypad, press the OK
Key [MENU], select Media Center and press the OK Key, swivel to the
QWERTY keypad, then press 5. Browse & Download.
2. Select Backup Assistant, Mobile Email or VZ Navigator, then press the
OK Key. Follow the on-screen prompts.
EXTRAS
DOWNLOADING NEW APPLICATIONS
To download Applications:
1. From standby mode, press the OK Key to unlock the keypad, press the
Page 95

94
Chapter 5 − Media Center
Media Center
OK Key [MENU], select Media Center and press the OK Key, swivel to
the QWERTY keypad, then press 6. Extras.
2. Press 1. Get New Applications and follow the on-screen prompts.
MEDIA CENTER INFO
To view Application Memory, Phone Memory, View Log and Help information:
1. From idle mode, press the OK Key to unlock the keypad, then press
the OK Key [
MENU].
2. Select Media Center and press the OK Key.
3. Press the Right Soft Key
[Info].
4. Select one of the following settings and then press the OK Key.
App. Memory / Phone Memory / View Log / Help
Page 96

MESSAGING MENU
CHAPTER 6
MESSAGING MENU
This chapter addresses Voicemail, TXT, Picture, Voice Messaging
functions including:
When a new message arrives
New Message
Inbox
Sent
Messages
Drafts
Voicemail
Mobile IM
Email
Chat
Erase All
Settings
Page 97

WHEN A NEW MESSAGE ARRIVES
1. The following display appears when a new message arrives.
2. To display the message, select View Now and
then press the OK Key.
NEW MESSAGE
TXT MESSAGE
1. From idle mode, press the OK Key to unlock the keypad, press the Left
Soft Key [Message], swivel to the QWERTY keypad, then press
1. New Message.
2. Press 1. TXT Message.
Shortcut: From idle mode, press the TXT Composer Key .
3. Under To, input the phone number and then press the OK Key.
t
By pressing the Right Soft Key [Add], you can choose from the following:
1. From Contacts: Search for a phone number which is stored in the Contact List.
2. Recent Calls: Search for a phone number which is stored in the Add Recent Calls
menu.
3. Groups: Search the groups stored in the Add Groups menu.
4. To Contacts: Save the number or email you’ve entered to the Contact List, when you
enter the number.
4. Under Tex t, input your message. When completed, press the OK Key
[SEND].
t
By pressing the Right Soft Key [Add], you can choose from the following:
1. Insert Quick Text: Inserts written sentences in the TXT message.
2. Save As Draft: To save the TXT message to Drafts.
3. Add: To attach Graphic, Sound, Name Card.
t
Graphic: Inserts simple graphic images.
t
Sound: Inserts a selected Sound.
t
Name Card: Inserts a selected Name Card.
4. Format Text: Allows you to edit the Alignment, Font Size, Font Style, Font Color and
Background Color.
t
Alignment: Select Left, Center or Right by pressing the Directional Key left
or right.
t
Font Size: Select Normal, Large or Small by pressing the Directional Key
left or right.
t
Font Style: Select Regular, Bold, Italic, Underline or Strikethrough by pressing the
Directional Key left or right.
t
Font Color: Select a font color.
t
Background Color: Select a background color.
5. Priority Level: Select High or Normal and then press the OK Key.
6. Cancel Message: To cancel message.
5. To send the TXT Message, press the OK Key [SEND].
96
Chapter 6 − Messaging Menu
Messaging
Page 98

PICTURE MESSAGE
1. From idle mode, press the OK Key to unlock the keypad, press the Left
Soft Key [Message], swivel to the QWERTY keypad, then press
1. New Message.
2. Press 2. Picture Message.
3. Under To, input the phone number and then press the OK Key.
t
By pressing the Right Soft Key [Add], you can choose from the following:
1. From Contacts: Search for a phone number which is stored in the Contact List.
2. Recent Calls: Search for a phone number which is stored in the Add Recent Calls
menu.
3. Groups: Search the groups stored in the Add Groups menu.
4. To Online Album: Send the picture message to your Online Album.
5. To Contacts: Save the number or email you’ve entered to the Contact List, when you
enter the number.
4. Under Tex t, input your message and then press the Directional Key
down.
5. Under Picture, press the Left Soft Key
[My Pics] to select the
picture you would like to send then press the OK Key. Press the
Directional Key down.
6. Under Sound, press the Left Soft Key
[Sounds] to select the
sound you would like to send then press the OK Key. Press the
Directional Key
down.
7. Under Subject, input the message subject and then press the
Directional Key
down.
8. Under Name Card, press the Left Soft Key
[Add] select 1. My
Name Card or 2. Contacts then press the OK Key. Select the desired
card then press the OK Key.
9. Press the Right Soft Key
[Options] to access the following:
t
Preview: To preview a written Picture Message.
t
Save As Draft: To save the Picture Message to Drafts.
t
Add Quick Text: Inserts written sentences in the Picture Message.
t
Add Slide: To add another message.
t
Priority Level: Select High or Normal and then press the OK Key.
t
Remove Picture: To remove an inserted picture in Picture field.
t
Remove Slide: To remove an inserted Slide Message.
t
Remove Sound: To remove an inserted sound in Sound field.
t
Remove Name Card: To remove an inserted name card in Name Card field.
t
Cancel Message: To cancel the picture message.
10. To send the Picture Message, press the OK Key [SEND].
VOICE MESSAGE
1. From idle mode, press the OK Key to unlock the keypad, press the Left
Soft Key [Message], swivel to the QWERTY keypad, then press
Messaging Menu − Chapter 6
97
Messaging
Page 99

1. New Message.
2. Press 3. Voice Message.
3. To record a new Voice Memo, press the OK Key to start recording a
voice memo. Press the OK Key [STOP] to finish recording and insert the
voice memo into the voice message.
4. Under To, input the phone number and then press the OK Key.
t
By pressing the Right Soft Key [Add], you can choose from the following:
1. From Contacts: Search for a phone number which is stored in the Contact List
2. Recent Calls: Search for a phone number which is stored in the Add Recent Calls
menu.
3. Groups: Search the groups stored in the Add Groups menu.
4. To Contacts: Save the number or email you’ve entered to the Contact List, when you
enter the number.
5. Using the Directional Key , scroll down to the Tex t field.
6. Under Tex t, input your message and then press the Directional Key
down.
7. Under Subject, input the voice message subject and then press the
Directional Key
down.
8. Under Name Card, press the Left Soft Key
[Add], select 1. My
Name Card
or 2. Contacts then press the OK Key. Select the desired
card then press the OK Key.
9. Press the Right Soft Key
[Options] to access the following:
t
Review: To preview a written Voice Message.
t
Save As Draft: To save the Voice Message to Drafts.
t
Add Quick Text: Inserts written sentences in the Voice Message.
t
Priority Level: Select High or Normal and then press the OK Key.
t
Remove Recording: To remove an inserted recorded voice memo in Voice field.
t
Remove Name Card: To remove an inserted name card in Name Card field.
t
Cancel Message: To cancel the voice message.
10. To send the Voice Message, press the OK Key [SEND].
INBOX
The Inbox manages received TXT, Picture, Voice, Web Alert messages. To access:
1. From idle mode, press the OK Key to unlock the keypad, press the
Left Soft Key [Message], swivel to the QWERTY keypad, then
press 2. Inbox.
2. Select a message and then press the OK Key [OPEN]. The message is
displayed. To delete a message, press the Left Soft Key
[Erase],
then select Yes and press the OK Key.
3. Press the Right Soft Key
[Options] to access the following:
98
Chapter 6 − Messaging Menu
Messaging
Page 100

t
Play Again: To play a received Picture/Voice message.
t
Forward: Select to forward the message.
t
Erase: To delete a message.
t
Replay w. Copy: Select to reply with the original message included.
t
Save Graphic: Select to save the graphic to the My Pictures folder.
t
Save Sound: Select to save the sound to the My Sounds folder.
t
Save Picture: Select to save the picture to the My Pictures folder.
t
Save As Ringtone: Select to save the tone to the My Ringtones folder.
t
Save Name Card: Select to save the name card to the Contact List.
t
Save Quick Text: Select to save the received text to Quick Text.
t
Add To Contacts: Select to save the number to the Contact List.
t
Extract Addresses: To extract all phone numbers, email addresses and URLs from the
received message.
t
Message Info: Select to view received message information.
t
Manage Inbox: Manage messages with following options:
Erase: To delete a message.
Lock: To lock a message.
Unlock: To unlock a message.
t
Sort By Sender: To view messages sorted by sender.
t
Sort By Size: To view messages sorted by size.
t
View By Contacts: To view messages sorted by contacts.
This feature is displayed when the Messages View is set to By Time.
SENT
Manage messages already sent or waiting to be sent.
1. From idle mode, press the OK Key to unlock the keypad, press the
Left Soft Key [Message], swivel to the QWERTY keypad, then
press 3. Sent.
2. Select a message and then press the OK Key [OPEN]. The message is
displayed. To delete a message, press the Left Soft Key
[Erase],
then select Yes and press the OK Key.
3. With the message open, press the Right Soft Key
[Options] to
access the following:
t
Forward: Select to forward the message.
t
Resend: Select to resend the message.
t
Erase: To delete a sent message.
t
Lock/Unlock: Select to lock or unlock the message.
t
Save Quick Text: Select to save sent text to Quick Text.
t
Add To Contacts: Select to save the number to the Contact List
t
View Name Card: To view the included Name Card.
t
Message Info: Select to view sent message information.
This feature is displayed when the Messages View is set to By Time.
MESSAGES
This feature can be seen when the Messages View setting value is set to By Contacts.
With Message View By Contacts, all received and sent messages are stored under
Messages by contact name.
Messaging Menu − Chapter 6
99
Messaging
 Loading...