


residential
WIRELESS THERMOSTAT
Digital |
T1100RF |
|
Thermostat |
||
|
|
7-DAY |
|
|
PROGRAMMABLE |
|
|
up to 2-heat |
|
|
& 2-cool |
|
|
HEAT |
HEAT |
|
COOL |
|
|
PUMP |
|
|
|
|
|
Dual Setpoint w/ Adjustable Deadband |
|
|
‘O’ or ‘B’ Terminal |
|
Control up to 2 Heat & 2 Cool Stages |
Optional Power Supply (ACC0800) |
|
Unique Features |
|
|
Full Range of Compatibility for Use on |
Non-Volatile Memory |
|
Gas/Electric, HP, Electri and Hydronic Heat |
Wireless: Transmits up to 500 feet, |
|
7-Day Programmable |
through walls and floors - 418 MHZ |
|
4 Settings/Day |
will not interfere with other systems |
|
Auto Changeover |
Receiver capable of listening to up |
|
5 minute Built-In Compressor Protection |
to 4 thermostats |
|
Self-Prompting Programming w/ Copy |
Thermostat capable of transmitting |
|
Full Electronic |
to multiple receivers |
|
Display Either F or C |
Applications |
|
Back-Lit Display |
No wires to run |
|
Keypad Lockout |
Ideal for century old homes |
|
Large Easy-to-Read Display |
Ideal for keeping the baby’s room |
|
Programmable Fan |
the perfect temperature |
|
 Use with most Air Conditioning & Heating Systems including: 1 or 2 Stage Electric Cooling & 2 Stage Gas Heating, Heat Pump, Electric or Hydronic Heat.
OWNER’S
MANUAL
 Venstar Inc. 08/07

Table Of Contents
FRONT PANEL |
2 |
DISPLAY |
3 |
QUICK START Set the clock and go |
5 |
SELECTING THE HEAT |
6 |
OR COOL MODE |
|
BASIC OPERATION |
7 |
PROGRAMMING A DAILY |
8 |
SCHEDULE |
|
ADVANCED SETUP |
12 |
ABOUT ADVANCED FEATURES |
16 |
& OPERATION |
|
WARRANTY |
20 |
|
|
CAUTION Follow Installation Instructions carefully. |
|
DISCONNECT POWER TO THE HEATER - |
|
AIR CONDITIONER BEFORE REMOVING |
WARNING |
THE OLD THERMOSTAT AND INSTALLING |
|
THE NEW THERMOSTAT. |
|
|
|
This device complies with Part 15 of the FCC Rules. Operation is subject to the following two conditions: (1) this device may not cause harmful interference, and (2) this device must accept any interference received, including interference that may cause undesired operation.
P/N T1100RF
FCc T1100RF
FCC ID MUH-T10013
 Venstar Inc. 08/07
Page 1
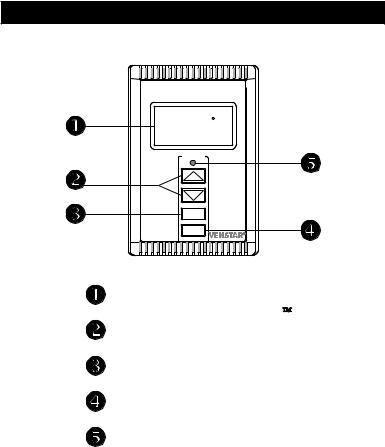
Front Panel
Su |
|
70 |
|
6:03 Am |
|
o |
|
|
68 67 |
||
|
|
|
|
AUTO |
|
COOL |
|
|
HEAT o |
||
|
|
||
MODE |
FAN |
Liquid Crystal Display
with Thermoglow
Up/Down Buttons
Mode Button
Fan Button
Transmission Indicator
Blinking Green = Communicating
with the Receiver
Page 2
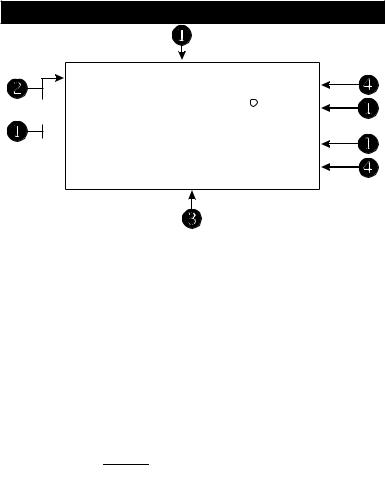
Display
I8:8888Am ProgramOn Setup88o
Pm Locked
 SuMTuWThFSa
COOL
 AUTO
AUTO
 OFFNight 88HEAT o
MorningDay
Evening
Fan On
 Mode Indicators - Page 6
Selects the operational mode of the equipment. HEAT - Indicates the heating mode.
COOL - Indicates the air conditioning mode. AUTO - Indicates the system will automatically
changeover between heat and cool modes as the temperature varies.
PROGRAM ON - Indicates the time period program is enabled to run.
OFF - Indicates heating and cooling are turned off.
 Clock with Day of the Week - Page 5
Indicates the current time and day. This clock is also used to program the time period schedules.
 Room Temperature Display
Indicates current room temperature.
 Desired Set Temperature - Page 7
Indicates desired room temperature(s).
Page 3

Display
I8:8888Am ProgramOn Setup88o
Pm Locked
SuMTuWThFSa
COOL
AUTO
OFFNight 88HEAT o
MorningDay
 Evening
Fan On
 Morning, Day, Evening & Night icons - Pages 8-10
Indicates the day part of the time period program.
 Setup icon - Pages 12-14
Indicates the thermostat is in the setup mode.
 Fan On icon - Page 7
Indicates constant, continuous fan operation. When Fan On is not lit - indicates the fan will only operate when necessary to heat or cool.
 Locked icon - Page 18
Indicates the keypad has been locked.
Page 4

Quick Start Set the Clock and Go
Press the MODE button. MODE While holding MODE, press the FAN button for FAN two seconds to enter Setup
screens.
Setting the Clock |
|
|
|
|
I2:00Am |
Setup |
i |
|
|
|
|
Tip: To change hours quickly, press and hold the FAN button, then press the UP or DOWN button.
Setting the Day
Setup 2
M
During Setup & Programming:
Pressing the UP or DOWN b u t t o n w i l l m o d i f y t h e flashing selection.
To adjust the
Clock or Day use
buttons.
Press
MODE
Press |
the MODE |
button. |
|
While |
holding |
MODE, |
MODE |
press the FAN button for |
|
||
two seconds to enter Setup |
FAN |
||
screens. |
|
|
|
The thermostat is preprogrammed from the factory to operate one or two stage equipment* without the need for further programming. To optimize the installation of this thermostat, follow the instructions in the Advanced Setup section.
*The thermostat is not preprogrammed from the factory to operate electric heat or heat pump systems. To control these systems, follow the instructions in the Receiver manual.
Page 5

Selecting the Heat or Cool Mode
Select Mode by Pressing the MODE Button
Heating Only |
|
|
70 |
68 |
|
|
I2 :00Pm |
|
|
||||
The HEAT setting indicates the |
M |
|
|
|
|
|
|
|
|
|
|
||
temperature the room has to |
|
|
|
HEAT o |
||
reach before the furnace will |
|
|
|
|||
turn on to heat the room. |
|
|
|
|
|
|
|
|
|
|
|
|
|
|
|
|
|
|
|
|
Cooling Only |
M |
|
70 |
76 |
o |
|
|
|
|
||||
|
|
|
|
|||
I2 :00Pm |
|
|
||||
The COOL setting indicates the |
|
|
|
COOL |
|
|
temperature the room has to |
|
|
|
|
|
|
reach before the air conditioner |
|
|
|
|
|
|
will turn on to cool the room. |
|
|
|
|
|
|
|
|
|
|
|
||
|
|
|
|
|
||
|
|
I2 :00Pm |
|
o |
||
Heating or Cooling |
|
|
70 |
68 |
|
|
M |
|
|
76 |
|
||
AUTO will automatically select |
AUTO |
|
COOL |
|
||
|
|
|
||||
heat or cool based on room |
|
|
|
HEAT o |
||
temperature demand. |
|
|
|
|||
|
|
|
|
|
||
Time Schedule for |
|
|
|
|
|
|
|
|
|
|
|
||
Heating or Cooling |
|
I2 :00Pm ProgramOn |
76 |
o |
||
|
|
|||||
The Program On setting will |
|
M |
|
|
|
|
activate the time period |
|
|
|
|
COOL |
|
programming for the cooling |
|
|
Day |
HEAT o |
||
or heating setpoint ONLY |
|
|
||||
|
|
|
|
|||
(Morning, Day, Evening |
|
|
|
70 68 |
|
|
& Night Periods). |
|
|
|
|
||
|
|
|
|
|
||
Off
OFF indicates both heating and air conditioning systems are turned off.
I2 :00
OFF
M 70Pm
Page 6
Press
MODE
Press
MODE
Press
MODE
Press
MODE
 Loading...