


 Loading...
residential
THERMOSTAT
Digital T0130
Thermostat
NON-
PROGRAMMABLE
up to 1-heat
& 1-cool
HEAT
COOL HEAT
PUMP
 Stages: 1-Heat, 1-Cool
 Heat Pump Compatible
 Battery or System Powered
 Fahrenheit or Celsius
 Fully Electronic
 Bi-Color LED (when system powered)
 Use with most Air Conditioning & Heating Systems including: 1 Stage Electric Cooling & 1 Stage Gas Heating, Heat Pump, Electric or Hydronic Heat.
OWNER’S
MANUAL
 Venstar Inc. 05/08
OWNER'S MANUAL |
T0130 |
Contents
Page #
Safety Warnings 
 Front Panel
 Display
 Normal Operation
 Fahrenheit or Celsius
 Preparation
 Remove Old Thermostat
 Battery Replacement
 Wire Connections
 Jumper Configuration
 Test Operation
 Troubleshooting
 Warranty

Page 2
OWNER'S MANUAL |
T0130 |
Safety Warnings
P/N T0130
CAUTION Follow Installation Instructions carefully.
DISCONNECT POWER TO THE HEATER -
AIR CONDITIONER BEFORE REMOVING
THE OLD THERMOSTAT AND INSTALLING WARNING
THE NEW THERMOSTAT.
 CAUTION
The two Alkaline “AA” batteries must be replaced at least once every 12 months to ensure proper operation. The “Low Battery” icon will appear on the thermostat display when it is time to replace the batteries. If the thermostat is connected to 24v power, the batteries should still be installed, but are not required.
When “Low Battery” is displayed the batteries must be replaced immediately. The manufacturer cannot be liable for improper operation of the thermostat if the batteries are not immediately replaced.
Annual battery replacement is especially critical in locations subject to freezing temperatures. The thermostat will be unable to turn on the heating system if the batteries are exhausted.
Page 3

OWNER'S MANUAL |
T0130 |
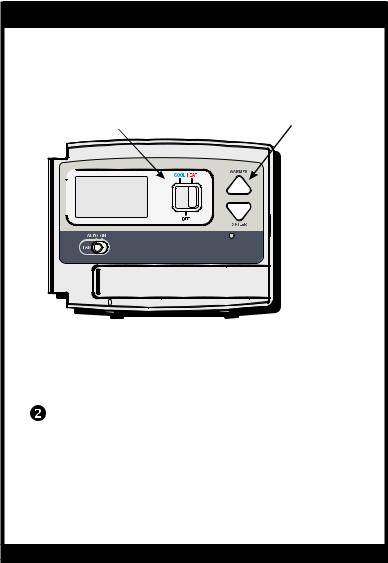
Location of Controls
DISPLAY |
MODE SWITCH |
|
|
Cool, Off or Heat |
|
70 |
COOLER & |
|
WA R M E R |
||
|
||
|
BUTTONS |
|
|
BI-COLOR LED |
|
|
Heat or Cool demand |
|
|
indicator when system |
|
|
powered: Red = Heat |
|
|
Green = Cool |
|
FAN SWITCH |
BATTERY |
|
On or Auto |
DOOR |
Page 4
OWNER'S MANUAL |
T0130 |
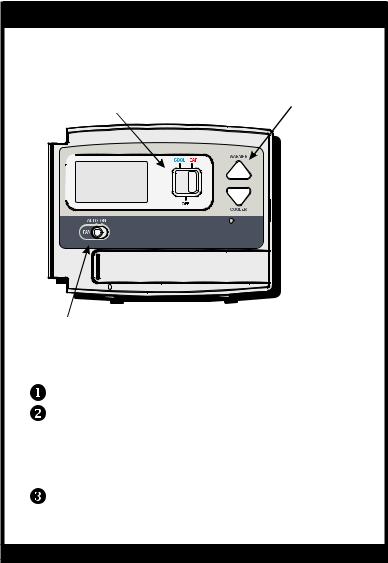
Display
SET TEMP88
HEAT
COOL
LOW
BATTERY
Heat and Cool indicators.
In normal operation, Heat or Cool appears, depending on the Mode Switch position. When heat or cool is energized, the Heat or Cool indicator will flash. If the thermostat is system powered the bi-color LED will also illuminate (red for heating and green for cooling).
Current room or set temperature.
Desired set temperature indicator.
When this indicator is on, the large numbers represent the desired room temperature. Pressing the
COOLER or WARMER button during normal operation will cause the large numbers to switch from the current room temperature to the desired set temperature.
Indicates battery life is low; it is recommended to replace the batteries at this time.
Page 5
|
OWNER'S MANUAL |
T0130 |
||
|
|
|
||
|
|
Normal Operation |
||
|
|
|
|
|
|
|
MODE SWITCH |
COOLER & |
|
|
|
Cool, Off or Heat |
WA R M E R |
|
|
|
|
BUTTONS |
|
 HEAT 70
FAN SWITCH
On or Auto
Operation
Select Cool or Heat with the Mode Switch.
Normally leave the fan switched to Auto.
In Fan Auto, the fan will turn on only with a heat or cool demand. When Fan On is selected, the fan will run continuously.
Adjust the desired set temperature with the
COOLER or WARMER buttons.
Page 6
|
OWNER'S MANUAL |
T0130 |
||
|
|
|
|
|
|
|
Fahrenheit or Celsius |
||
|
|
|
|
|
|
|
MODE SWITCH |
COOLER & |
|
|
|
Cool, Off or Heat |
WA R M E R |
|
BUTTONS
 HEAT 70
Operation
 Select Off with the Mode Switch.
Press and hold the COOLER and WARMER buttons at the same time until the temperature is displayed in degrees Celsius.
 Repeat this process to display the temperature in degrees Fahrenheit.
Page 7

OWNER'S MANUAL |
T0130 |
Preparation


 70
70


 70
70
Proper installation of the thermostat will be accomplished by following these step
by step instructions. If you are unsure about any of these steps, call a qualified technician for assistance.
These tools will be required:
Flat Blade |
Wire cutter |
Screwdriver |
& Stripper |


 70
70


 70
70


 70
70
Make sure your Heater/Air Conditioner is working properly before beginning installation of the thermostat.
Carefully unpack the thermostat. Save the screws and instructions.
Turn off the power to the Heating/Air Conditioning system at the main fuse panel. Most residential systems have a separate breaker for disconnecting power to the furnace.
Page 8
Loading...