

Page 1
USER MANUAL
SW1
STOPWATCH
CHRONOMETER
CHRONOMÈTRE
CRONÓMETRO
STOPPUHR
GEBRUIKERSHANDLEIDING
NOTICE D’EMPLOI
MANUAL DEL USUARIO
BEDIENUNGSANLEITUNG
Page 2

2
SW1 VELLEMAN
Page 3
3
SW1 – STOPWATCH
1. Introduction
To all residents of the European Union
Important environmental information about this product
This symbol on the device or the package indicates that disposal of the device after its lifecycle could harm
the environment.
Do not dispose of the unit (or batteries) as unsorted municipal waste; it should be taken to a specialized
company for recycling.
This device should be returned to your distributor or to a local recycling service.
Respect the local environmental rules.
If in doubt, contact your local waste disposal authorities.
Thank you for buying a Velleman product! Please read the manual thoroughly before bringing this device into service. If
the device was damaged in transit, don't install or use it and contact your dealer.
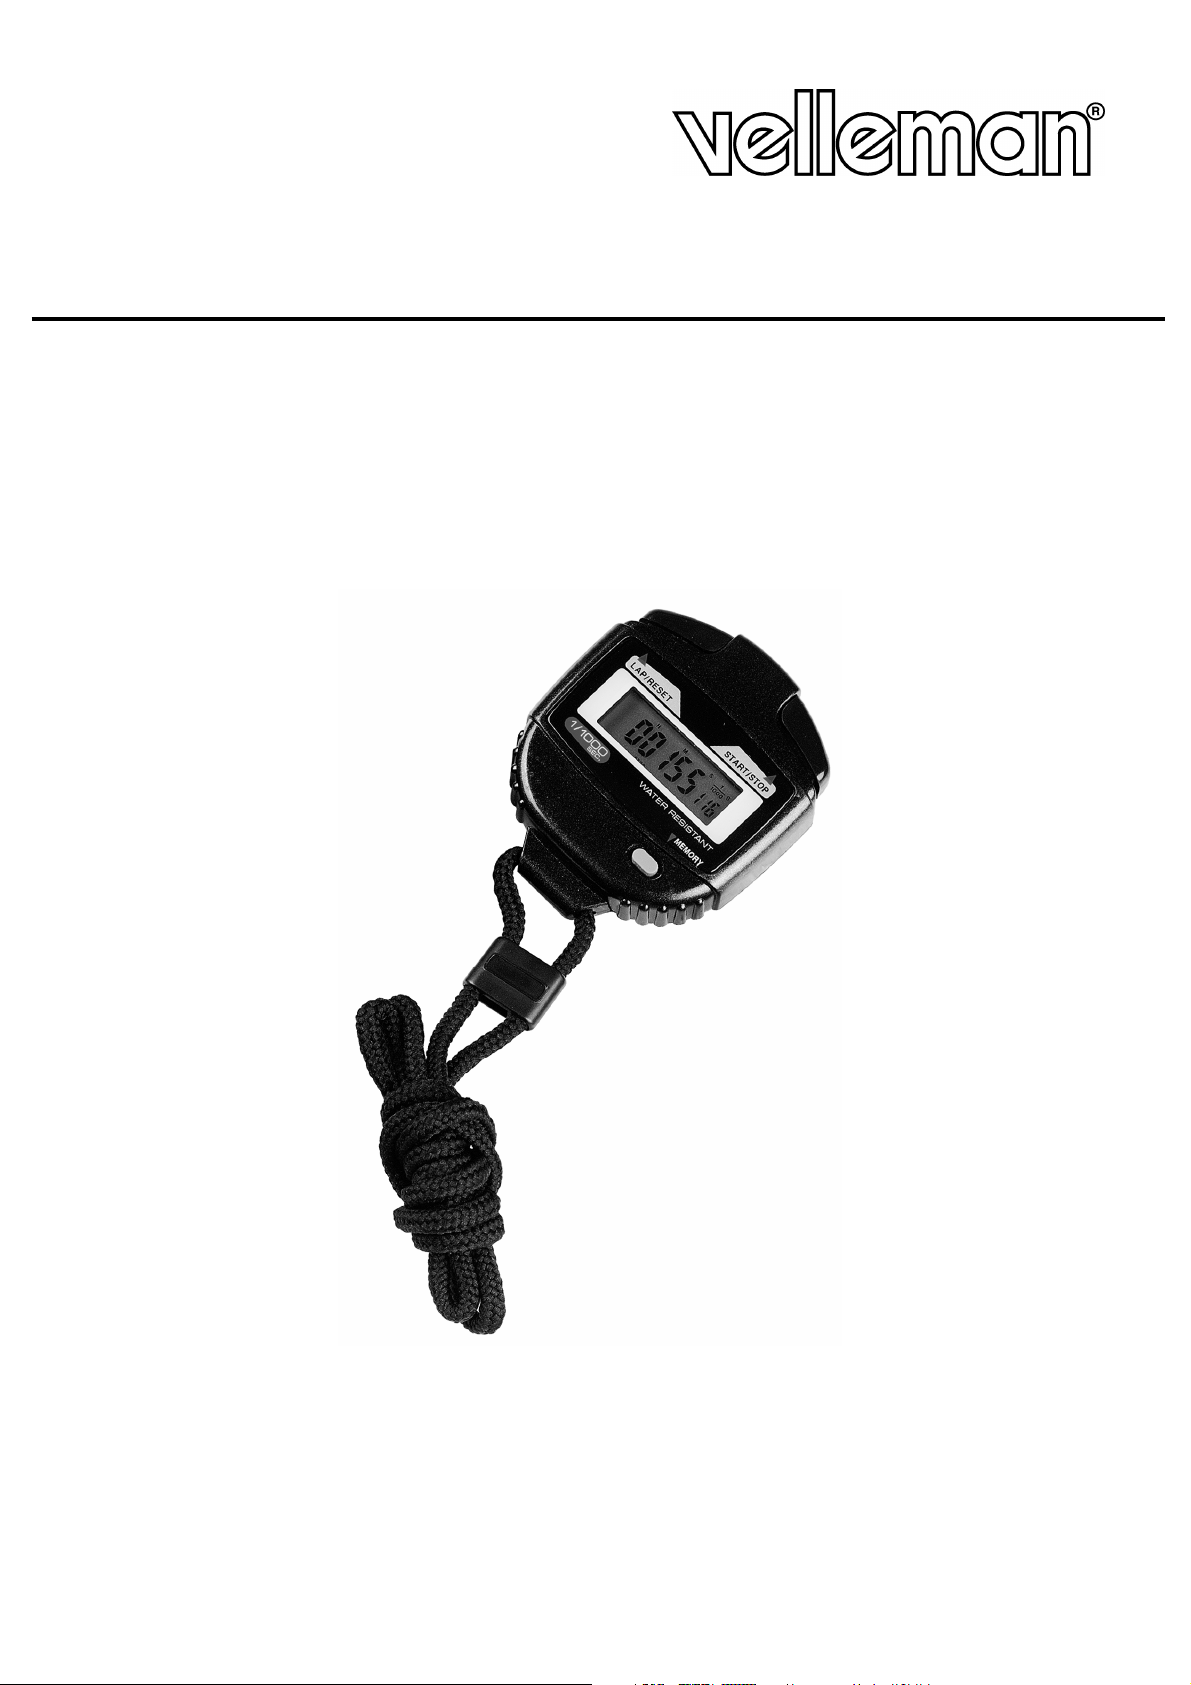
2. Features & Specifications
• high-precision stopwatch: accurate to within 1/1000 of a second
• water-resistant
• split display and reset function
• memory function: 3 best times can be recorded
• timing range: 9 hours 59 minutes 59.999 seconds
• resolution: one thousandth of a second
• accuracy: 99.99923% or max. ± 1/100 of a second
• operating temperature: from –10°C to +50°C
• battery: use 1 x LR44 or an equivalent
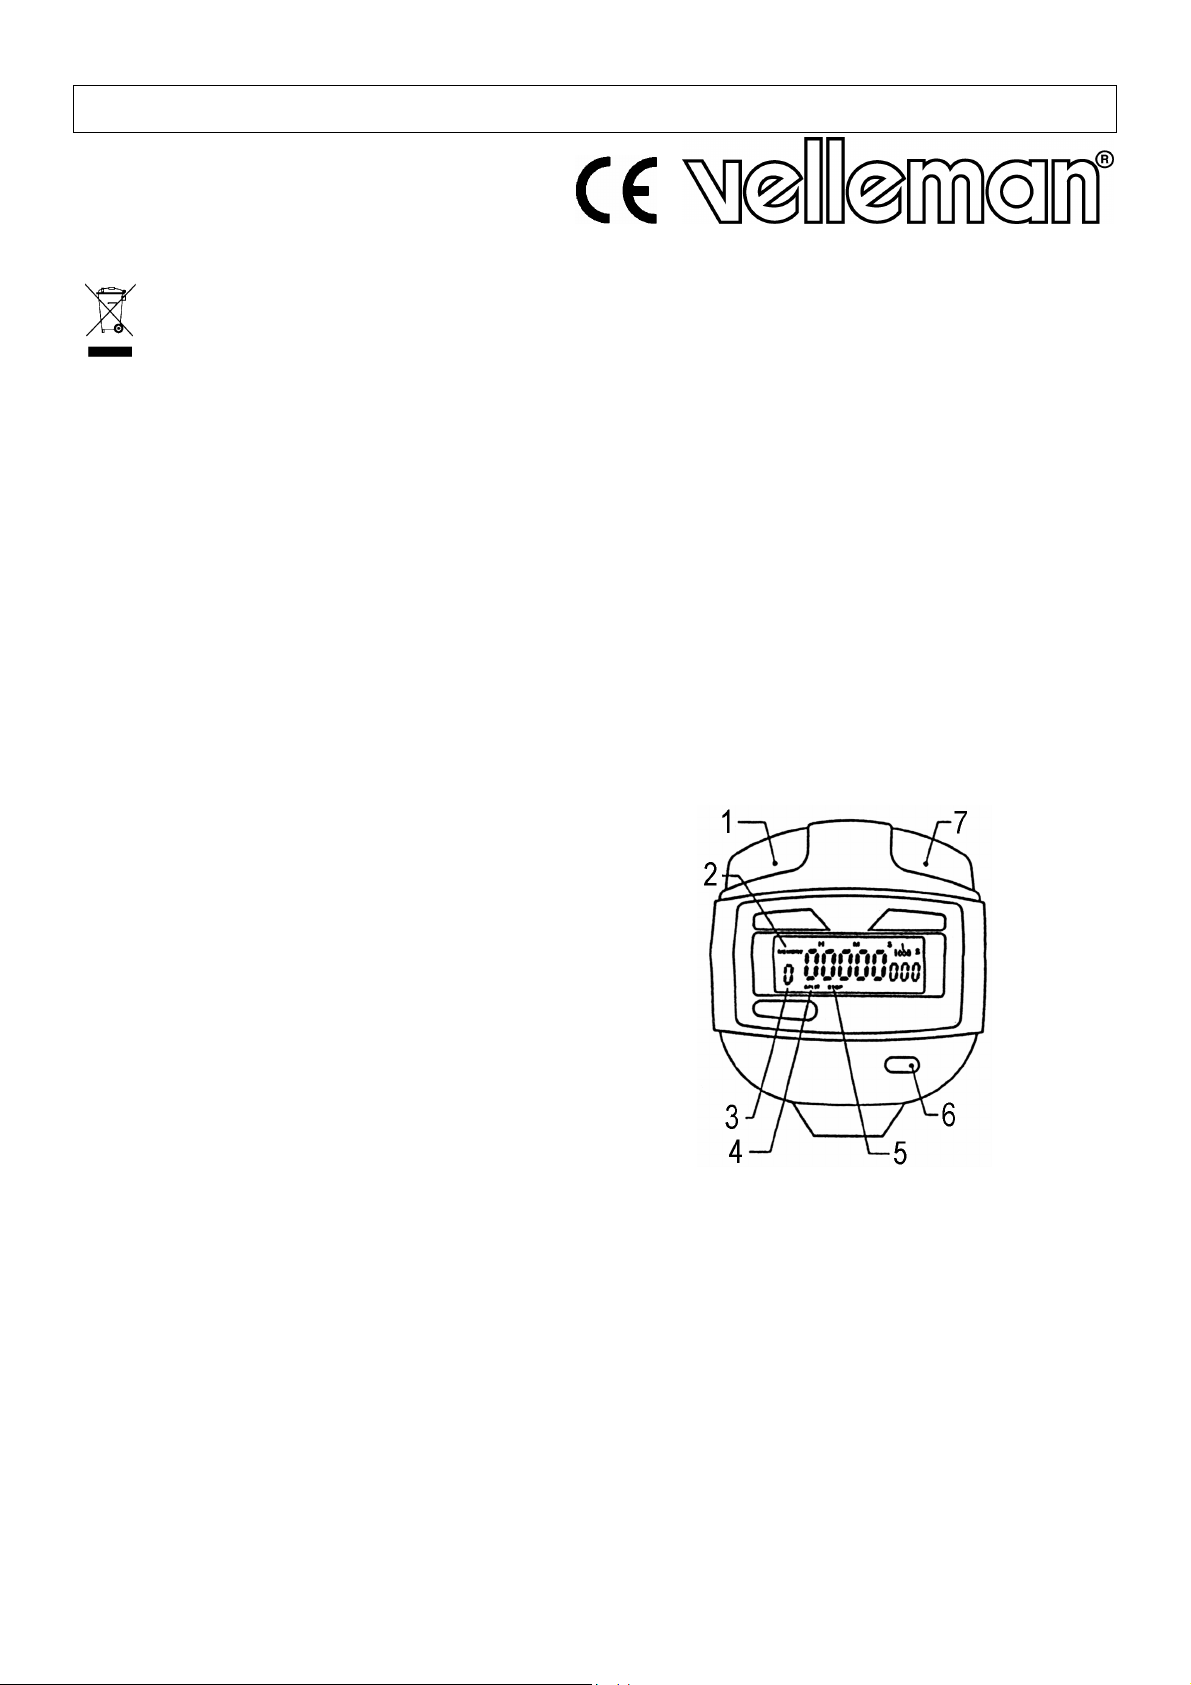
1. LAP/RESET button
2. MEMORY mark
3. memory number
4. SPLIT mark
5. STOP mark
6. memory button
7. START/STOP button
3. Installing the Battery
The unit comes with a battery insulator to prevent the battery from running down during storage. The battery
compartment is situated at the back of the unit. Use a small coin to remove the cover of the battery compartment as
indicated by the arrow. Remove the battery insulator and reinsert the battery. Make sure that the positive pole is
face-up and close the battery compartment firmly.
The unit will display a full screen of numbers (
procedure performed by the unit's small processor. After ± 2 seconds, the display will switch to zeros (
88888
888
) when the battery is first installed. This is a self-test
00000
000
).
4. Using the Stopwatch
Press the "LAP/RESET" button once to clear the screen. Press the "START/STOP" button once and the stopwatch
will start running.
SW1 VELLEMAN
Page 4

4
There are two operation modes:
1. Start/stop operation: Press the "START/STOP" button to stop the SW1 and the screen will display both the
"STOP" mark and the elapsed time. Press the "START/STOP" button to continue the count or press the
"LAP/RESET" button to reset the stopwatch.
2. Split operation: Both the elapsed time and the "SPLIT" mark will be displayed when the user presses the
"LAP/RESET" button while the stopwatch is running. Although it is not visible at this time, the stopwatch is still
running off-screen. Press the "LAP/RESET" button again to make the "SPLIT" mark disappear and the running
elapsed time reappear.
The time will stop running if the "START/STOP" button is pressed after the "SPLIT" mark has appeared. The
stopwatch is now no longer running off-screen and the "STOP" mark will appear next to the "SPLIT" mark.
3. Memory function: The stopwatch is equipped with a memory that allows the user to store his top three times. The
user can also store his most recent time.
Push the "MEMORY" button when a new time has been recorded: the most recently recorded time will be
displayed. Press the "START/STOP" button to automatically compare this latest time with the fastest times
recorded so far. Your latest result will automatically be added to the top three if it is better than your third best
time. If not, the new time will be rejected. Your all-time best will be stored in memory location n° 1, your second
time in memory location n° 2 and the third in location n° 3.
The stopwatch has to be in the stop mode for the user to view these best times. The most recently recorded time
will be displayed as "memory 0" by pressing the "MEMORY" button.
Press the "MEMORY" button again to display your 2nd fastest time as "memory 1".
Press the "MEMORY" button again to display your 2nd fastest time as "memory 2".
Press the "MEMORY" button again to display your 3rd fastest time as "memory 3".
Hold the "MEMORY" button for more than two seconds in order to erase the memory.
The stopwatch will not run as long as the memory function is being used. Push the "LAP/RESET" button to
reinstall the normal stopwatch mode.
5. Important Applications
1. In sports: to record the time needed to complete a run (use START/STOP button).
2. During practice runs: to record and evaluate lap times (START/STOP & MEMORY buttons).
3. In racing: to record the time of the winner and the runner-up (START/LAP/STOP buttons).
4. In organisations: to time a team of employees in order to determine the three fastest times in completing a
particular assignment (START/STOP/MEMORY).
5. To measure the idle time in between machine cycles.
6. To measure the machine's cycle time and idle time before the start of the next cycle (START/LAP/STOP).
For more info concerning this product, please visit our website www.velleman.eu.
The information in this manual is subject to change without prior notice.
SW1 – CHRONOMETER
1. Inleiding
Aan alle ingezetenen van de Europese Unie
Belangrijke milieu-informatie betreffende dit product
Dit symbool op het toestel of de verpakking geeft aan dat, als het na zijn levenscyclus wordt weggeworpen,
dit toestel schade kan toebrengen aan het milieu.
Gooi dit toestel (en eventuele batterijen) niet bij het gewone huishoudelijke afval; het moet bij een
gespecialiseerd bedrijf terechtkomen voor recyclage.
U moet dit toestel naar uw verdeler of naar een lokaal recyclagepunt brengen.
Respecteer de plaatselijke milieuwetgeving.
Hebt u vragen, contacteer dan de plaatselijke autoriteiten inzake verwijdering.
SW1 VELLEMAN
Page 5

5
Dank u voor uw aankoop! Lees deze handleiding grondig voor u het toestel in gebruik neemt. Werd het toestel
beschadigd tijdens het transport, installeer het dan niet en raadpleeg uw dealer.
2. Kenmerken en specificaties (zie fig.)
• chronometer met zeer hoge precisie: nauwkeurig tot op 1/1000 van een seconde
• waterdicht
• resetfunctie en uitlezing van tussentijden
• geheugen functie: 3 beste tijden kunnen worden opgeslagen
• bereik: 9u 59min. 59,999sec.
• resolutie: 1/1000 van een seconde
• nauwkeurigheid: 99.99923% of max. ± 1/100 van een seconde
• werktemperatuur: van –10°C tot +50°C
• batterij: gebruik 1 x LR44 of een equivalent
1. LAP/RESET
2. MEMORY
3. geheugennummer
4. SPLIT
5. STOP
6. geheugentoets
7. START/STOP
3. Installeren van de batterij
De SW1 is uitgerust met een batterijisolator om te voorkomen dat de batterij zou leeglopen wanneer u het toestel niet
gebruikt. Gebruik een muntstuk om het batterijdeksel aan de achterkant van de SW1 los te schroeven. Volg hierbij
de richting van de pijl. Verwijder de isolator en breng de batterij opnieuw in. Zorg er voor dat de positieve pool zich
aan de bovenkant bevindt en draai het deksel dan stevig dicht.
Wanneer u een nieuwe batterij aanbrengt, zal het uitleesvenster volledig gevuld zijn met achten (
88888
888
), d.w.z.
dat de kleine processor van de SW1 een zelftest aan het uitvoeren is. Na zowat 2 seconden zal het uitleesvenster
overschakelen op (
00000
000
).
4. Bediening van de chronometer
Druk 1 x op "LAP/RESET" ("rondetijd/terugzetten op 0") om het scherm vrij te maken en druk 1 x op "START/STOP"
om de chronometer te doen lopen.
Er zijn twee bedieningsmodi:
1. Start/stop bediening: Druk op "START/STOP" om de SW1 te stoppen. Op het scherm ziet u nu de verstreken tijd
en de "STOP" aanduiding. Druk op "START/STOP" om de tijdopneming voort te zetten of druk op "LAP/RESET"
om de chronometer weer op
2. Tussentijd bediening: Wanneer u op "LAP/RESET" drukt terwijl de chronometer aan het lopen is, verschijnt behalve de
verstreken tijd ook de "SPLIT" ("tussentijd") aanduiding op uw scherm. Hoewel u dit niet ziet, gaat de chronometer intern
gewoon verder met de tijdopneming. Druk opnieuw op "LAP/RESET" zodat de "SPLIT" aanduiding verdwijnt en de
lopende tijd opnieuw verschijnt.
De SW1 stopt de tijdopneming indien u op "START/STOP" drukt nadat de "SPLIT" aanduiding is verschenen. De
SW1 telt nu zelfs intern niet meer verder en de "STOP" aanduiding verschijnt nu naast de "SPLIT" aanduiding.
3. Geheugen functie: De gebruiker kan zijn drie beste tijden en zijn recentste chronotijd opslaan in het geheugen.
Druk op "MEMORY" ("geheugen") wanneer u een nieuwe tijdopneming heeft gemaakt: de recentste chronotijd
verschijnt op uw scherm. Druk op "START/STOP" om deze tijd automatisch te vergelijken met de top drie in het
00000
000
te zetten.
SW1 VELLEMAN
Page 6
6
geheugen. Uw recentste chronotijd wordt automatisch aan deze top drie toegevoegd indien hij beter is dan de derde
tijd uit het geheugen, anders wordt de chronotijd geweigerd. Uw persoonlijk record bevindt zich op plaats 1 in het
geheugen, uw tweede beste chronotijd op plaats 2 en uw derde tijd op plaats 3.
U kunt deze besttijden enkel bekijken indien de chronometer zich in de stop mode bevindt. Druk op "MEMORY"
om de recentste tijdopneming op het scherm te doen verschijnen als "memory 0".
Druk opnieuw op "MEMORY" om uw persoonlijk record te tonen als "memory 1".
Druk opnieuw op "MEMORY" om uw tweede beste tijd te tonen als "memory 2".
Druk opnieuw op "MEMORY" om uw derde beste tijd te tonen als "memory 3".
Houd de "MEMORY" drukknop langer dan twee seconden ingedrukt om het geheugen te wissen.
De chronometer kan niet lopen zolang de geheugenfunctie wordt gebruikt. Druk op "LAP/RESET" om terug te
keren naar de normale bedieningsmode.
5. Belangrijke toepassingen
1. Atletiek: om de tijd te meten die nodig is om een parcours af te leggen (gebruik de START/STOP drukknop).
2. Tijdens de training: om rondetijden te meten en te evalueren (START/STOP & MEMORY).
3. Tijdens wedstrijden: om de tijd van de winnaar en de tweede te meten (START/LAP/STOP).
4. In professionele organisaties: om een groep werknemers te timen. U kunt de drie snelste tijden meten bij het
vervullen van een welbepaalde opdracht. (START/STOP/MEMORY).
5. Om de rusttijd van een machine tussen twee cycli te meten.
6. Meten van de cyclustijd en van de rusttijd van een machine vóór het begin van de volgende cyclus
(START/LAP/STOP).
Voor meer informatie omtrent dit product, zie www.velleman.eu.
De informatie in deze handleiding kan te allen tijde worden gewijzigd zonder voorafgaande kennisgeving.
SW1 – CHRONOMÈTRE
1. Introduction
Aux résidents de l'Union européenne
Des informations environnementales importantes concernant ce produit
Ce symbole sur l'appareil ou l'emballage indique que l’élimination d’un appareil en fin de vie peut polluer
l'environnement.
Ne pas jeter un appareil électrique ou électronique (et des piles éventuelles) parmi les déchets municipaux
non sujets au tri sélectif ; une déchèterie traitera l’appareil en question.
Renvoyer les équipements usagés à votre fournisseur ou à un service de recyclage local.
Il convient de respecter la réglementation locale relative à la protection de l’environnement.
En cas de questions, contacter les autorités locales pour élimination.
Nous vous remercions de votre achat ! Lire la présente notice attentivement avant la mise en service de l’appareil. Si
l’appareil a été endommagé pendant le transport, ne pas l’installer et consulter votre revendeur.
2. Caractéristiques et spécifications (voir ill.)
• chronomètre haute précision : jusqu'à 1/1000 d'une seconde
• étanche
• remise à zéro et affichage de temps partiels
• fonction mémoire : les 3 meilleurs chronos peuvent être mémorisés
• plage : 9h59m, 59,999s
• résolution : 1/1000 d'une seconde
• précision : 99.99923% ou max. ± 1/100 d'une seconde
• température d'opération : de –10°C à +50°C
• pile : 1 x LR44 ou un équivalent.
SW1 VELLEMAN
Page 7

7
1. LAP/RESET
2. MEMORY
3. numéro de mémoire
4. SPLIT
5. STOP
6. touche de mémoire
7. START/STOP
3. Installation de pile
Le SW1 est équipé d'un isolateur de batterie afin d'empêcher la batterie de l'appareil de se vider lorsqu’il est inutilisé.
Retirer le couvercle du compartiment de la batterie avec une pièce de monnaie en faisant attention à la direction des
flèches. Retirer l'isolateur, réinsérer la pile avec le pôle négatif par vers le bas et refermer le compartiment de la pile.
L'appareil affichera une série de huit (
88888
888
) dès l’insertion d’une nouvelle pile. Il s'agit d'un essai automatique
exécuté par le processeur du SW1. Les huit seront remplacés par des zéros (
00000
000
) après environ 2 secondes.
4. Emploi du chronomètre
Enfoncer « LAP/RESET » pour remettre l'écran à zéro et enfoncer le bouton « START/STOP » pour mettre le
chronomètre en marche.
Il y a deux modes d'opération :
1. Mode marche/arrêt : Enfoncer « START/STOP » pour arrêter le SW1. L'afficheur montre le temps qui s'est écoule
et la marque « STOP » ("arrêt). Enfoncer « START/STOP » pour continuer le chronométrage, ou « LAP/RESET »
afin de remettre le chronomètre à zéro (
2. Opération SPLIT : Si vous enfoncez « LAP/RESET » pendant le chronométrage, le temps partiel et la marque
« SPLIT » (« temps partiel ») seront affichés. Bien que les chiffres de l'afficheur s'arrêtent, l'appareil continue le
chronométrage intérieurement. Renfoncez « LAP/RESET » : la marque « SPLIT » disparaît et le chronométrage
réapparaît sur l'afficheur.
Le SW1 arrête le chronométrage lorsque vous enfoncez « START/STOP » après l'apparition de la marque
« SPLIT ». Le chronométrage interne s'arrête également et la marque « STOP » apparaît à côté de la marque
« SPLIT ».
3. Fonction mémoire : L'utilisateur peut introduire en mémoire ses 3 meilleurs chronos et son dernier chrono.
Enfoncez « MEMORY » (« mémoire ») quand vous avez chronométré une course ou un entraînement : le dernier
chrono sera affiché. Quand vous enfoncez « START/STOP », le dernier chrono sera automatiquement comparé avec
les chronos dans la mémoire. Votre dernier chrono est ajouté à la liste s'il est meilleur que le troisième chrono, sinon il
est rejeté. Votre record personnel occupe la première place de la mémoire ; vous trouverez votre deuxième chrono à la
deuxième place et votre troisième chrono à la troisième place.
Vos meilleurs chronos sont uniquement consultables quand l'appareil se trouve en mode arrêt. Pressez
« MEMORY » afin d'afficher le dernier chrono en tant que « memory 0 ».
Renfoncez pour afficher votre record personnel en tant que « memory 1 ».
Renfoncez pour afficher votre 2ième chrono en tant que « memory 2 ».
Renfoncez pour afficher votre 3ième chrono en tant que « memory 3 ».
Gardez le bouton-poussoir « MEMORY » enfoncé pendant plus de 2 secondes afin d'effacer la mémoire de l'appareil.
Le chronométrage ne marchera pas tant que la fonction mémoire est utilisée. Enfoncez « LAP/RESET » pour
réinstaller le mode d'opération normal.
00000
000
).
5. Applications importantes
1. Athlétisme : chronométrage du temps pour compléter un parcours (opération START/STOP).
2. Pendant l'entraînement : chronométrage et évaluation des résultats (START/STOP & MEMORY).
3. Pendant une course : chronométrage du vainqueur et du deuxième (START/LAP/STOP).
SW1 VELLEMAN
Page 8

8
4. Organisations professionnelles : chronométrage d'un groupe d'employés. Vous pouvez chronométrer le temps pour
accomplir une mission spécifique et introduire les 3 meilleurs chronos en mémoire. (START/STOP/MEMORY).
5. Chronométrage du repos d'une machine entre deux cycles.
6. Chronométrage du cycle d'une machine et du repos avant le commencement du prochain cycle (START/LAP/STOP).
Pour plus d’information concernant cet article, visitez notre site web www.velleman.eu.
Toutes les informations présentées dans cette notice peuvent être modifiées sans notification préalable.
SW1 – CRONÓMETRO
1. Introducción
A los ciudadanos de la Unión Europea
Importantes informaciones sobre el medio ambiente concerniente este producto
Este símbolo en este aparato o el embalaje indica que, si tira las muestras inservibles, podrían dañar el
medio ambiente.
No tire este aparato (ni las pilas eventuales) en la basura doméstica; debe ir a una empresa especializada
en reciclaje. Devuelva este aparato a su distribuidor o a la unidad de reciclaje local.
Respete las leyes locales en relación con el medio ambiente.
Si tiene dudas, contacte con las autoridades locales para residuos.
¡Gracias por haber comprado el SW1! Lea cuidadosamente las instrucciones del manual antes de usarlo. Si el
aparato ha sufrido algún daño en el transporte no lo instale y póngase en contacto con su distribuidor.
2. Características y especificaciones (véase fig.)
• cronómetro muy preciso: hasta 1/1000 de un segundo
• resistente al agua
• reinicialización y visualización del tiempo parcial
• función de memoria: es posible guardar los 3 mejores cronometrajes
• alcance: 9 horas 59 minutos 59 segundos
• resolución: 1/1000 de un segundo
• precisión 99.99923% o máx. ± 1/100 de un segundo
• temperatura de funcionamiento: de –10°C à +50°C
• pila: 1 x LR44 o equivalente.
1. LAP/RESET
2. MEMORY
3. número de memoria
4. SPLIT
5. STOP
6. tecla de memoria
7. START/STOP
3. Introducir la pila
El SW1 está equipado con un aislador de batería para evitar que la pila se agote si no la utiliza. Saque la tapa del
compartimiento de pilas con una pieza de moneda. Siga las flechas. Quite el aislador, vuelva a introducir la pila.
Asegúrese de que el polo positivo esté en la parte superior y vuelva a cerrar el compartimiento de pilas.
El aparato visualizará una serie de ochos (88888. 888) tan pronto como el usuario haya introducido una nueva pila.
Esto quiere decir que el procesador del SW1 está realizando un control automático. Los “8” se reemplazarán por “0”
(0000 000) después de aproximadamente 2 segundos.
SW1 VELLEMAN
Page 9

9
4. Utilizar el cronómetro
Pulse LAP/RESET 1 vez para reinicializar la pantalla y pulse el botón START/STOP para hacer comenzar el
cronómetro.
Hay dos modos de operación:
1. Pulse START/STOP para parar el SW1. La pantalla visualiza el tiempo transcurrido y la indicación STOP
(parada). Pulse START/STOP para continuar el cronometraje o LAP/RESET para reinicializar el cronómetro
(
0000
000).
2. Al pulsar LAP/RESET durante el cronometraje, se visualizarán el tiempo transcurrido y la indicación SPLIT (el
tiempo parcial). Aunque las cifras del la pantalla se paran, el aparato continúa el cronometraje interno. Vuelva a
pulsar LAP/RESET: la indicación « SPLIT » desaparecerá y el cronometraje volverá a aparecer en la pantalla.
El SW1 para el cronometraje al pulsar START/STOP después de la aparición de la indicación « SPLIT ». El
cronometraje interno se para también y la indicación "STOP" aparece al lado de la indicación « SPLIT ».
3. Función memoria: Es posible introducir los tres mejores cronometrajes y el último cronometraje en la memoria.
Pulse MEMORY (memoria) si tiene un nuevo cronometraje: se visualizará el último cronometraje. Al pulsar
START/STOP, se comparará el último cronometraje automáticamente con los cronometrajes de la memoria. El último
cronometraje se añade automáticamente a la lista si es mejor que el tercer cronometraje, si no, se ignora. Su récord
personal se guarda en primer lugar, el segundo cronometraje en segundo lugar y el tercer cronometraje en tercer lugar.
Sólo es posible visualizar los mejores cronometrajes si el aparato está en el modo de parada. Pulse MEMORY para
visualizar el último cronometraje como « memory 0 ».
Vuelva a pulsar para visualizar su récord personal como « memory 1 ».
Vuelva a pulsar para visualizar el segundo cronometraje como « memory 2 ».
Vuelva a pulsar para visualizar el tercero cronometraje como « memory 3 ».
Mantenga pulsado el pulsador MEMORY durante más de 2 seg. para borrar la memoria del aparato.
5. Aplicaciones importantes
1. Atletismo: el cronometraje del tiempo para completar un recorrido (operación START/STOP).
2. Mientras el entrenamiento: cronometraje y evaluación de los resultados (START/STOP & MEMORY).
3. Mientras un recorrido: el cronometraje del ganador y del segundo (START/LAP/STOP).
4. Organizaciones profesionales: el cronometraje de un grupo de usuarios. Es posible cronometrar el tiempo para
cumplir una tarea específica e introducir los 3 mejores cronos en la memoria. (START/STOP/MEMORY).
5. Cronometraje del tiempo de parada de una máquina entre dos ciclos.
6. Cronometraje del ciclo de una máquina y del tiempo de parada antes del comienzo del segundo ciclo
(START/LAP/STOP).
Para más información sobre este producto, visite nuestra página web www.velleman.eu.
Se pueden modificar las especificaciones y el contenido de este manual sin previo aviso.
SW1 –
STOPPUHR
1. Einführung
An alle Einwohner der Europäischen Union
Wichtige Umweltinformationen über dieses Produkt
Dieses Symbol auf dem Produkt oder der Verpackung zeigt an, dass die Entsorgung dieses Produktes nach
seinem Lebenszyklus der Umwelt Schaden zufügen kann.
Entsorgen Sie die Einheit (oder verwendeten Batterien) nicht als unsortiertes Hausmüll; die Einheit oder
verwendeten Batterien müssen von einer spezialisierten Firma zwecks Recycling entsorgt werden.
Diese Einheit muss an den Händler oder ein örtliches Recycling-Unternehmen retourniert werden.
Respektieren Sie die örtlichen Umweltvorschriften.
Falls Zweifel bestehen, wenden Sie sich für Entsorgungsrichtlinien an Ihre örtliche Behörde.
SW1 VELLEMAN
Page 10

10
Wir bedanken uns für den Kauf der SW1! Lesen Sie diese Bedienungsanleitung vor Inbetriebnahme sorgfältig durch.
Überprüfen Sie, ob Transportschäden vorliegen. Sollte dies der Fall sein, verwenden Sie das Gerät nicht und
wenden Sie sich an Ihren Händler.
2. Eigenschaften und technische Daten (siehe Abb.)
• sehr präzise Stoppuhr: nauwkeurig tot op 1/1000 van een seconde
• wasserfest
• Rückstellfunktion und
• Speicherfunktion: Speicher für die 3 besten Stoppzeiten
• Bereich: 9 Std. 59 Min. 59,999 Sek.
• Auflösung: bis auf die 1/1000tel Sek.
• Genauigkeit: 99.99923% oder max. ± 1/100tel Sek.
• Betriebstemperatur: von –10°C bis +50°C
• Batterie: 1 x LR44 oder äquivalent
1. LAP/RESET
2. MEMORY
3. Speichernnummer
4. SPLIT
5. STOP
6. Speichertaste
7. START/STOP
Zwischenzeitanzeige
3. Die Batterie einlegen
Die SW1 verfügt über einen Batterie-Isolator, um zu verhindern, dass die Batterie leer läuft wenn Sie das Gerät nicht
verwenden. Verwenden Sie eine Münze, um das Batteriefach auf der Rückseite zu öffnen. Folgen Sie hierbei dem
Pfeil. Entfernen Sie den Isolator und legen Sie die Batterei polungsrichtig ein (positiver Pol oben). Schrauben Sie den
Deckel wieder gut fest.
Wenn Sie eine neue Batterie einlegen, im ganzen Display erscheinen die Ziffern Acht (
kleine Pprozessor der SW1 einen Selbsttest durchführt. Nach etwa 2 Sekunden zeigt das Display (
88888
888
), d.h., dass der
00000
000
).
4. Die Stoppuhr bedienen
Drücken Sie 1 x "LAP/RESET" ("Rundenzeit/Rückstellung auf 0"), um das Display freizumachen und drücken Sie 1 x
"START/STOP", um die Stoppuhr zu starten.
Es gibt zwei Betriebssmodi:
1. Start/Stop-Bedienung: Drücken Sie "START/STOP", um die Stoppuhr zu stoppen. Im Display erscheinen jetzt die
abgelaufene Zeit und die "STOP"-Anzeige. Drücken Sie "START/STOP" um die Zeitnahme weiterzuführen oder
drücken Sie "LAP/RESET", um die Stoppuhr wieder auf
2. Zwischenzeit-Bedienung: Wenn Sie "LAP/RESET" drücken während die Stoppuhr funktioniert, erscheint außer der
abgelaufenen Zeit ach die "SPLIT"-Anzeige ("Zwischenzeit ") im Display. Obwohl Sie dies nicht sehen, zählt die Stoppuhr
intern weiter. Drücken Sie "LAP/RESET" wieder damit die "SPLIT"-Anzeige verschwindet und die laufende Zeit erscheint
wieder.
Die SW1 beendet die Zeitnahme wenn Sie "START/STOP" drücken nachdem die "SPLIT"-Anzeige erschienen ist.
Die SW1 zählt nun selbst intern nicht mehr weiter und die "STOP"-Anzeige erscheint nun neben der "SPLIT"Anzeige.
00000
000
zurückzusetzen.
SW1 VELLEMAN
Page 11

11
3. Speicherfunktion: Die drei besten Zeiten und die aktuellste Zeit können gespeichert werden
Drücken Sie "MEMORY" (Speicher) wenn Sie die neuste Zeitnahme gemacht haben: die rezenteste Zeit erscheint im
Display. Drücken Sie "START/STOP", um diese Zeit automatisch mit den 3 besten gespeicherten Zeiten zu
vergleichen. Die rezenteste Zeit wird automatisch dieser Liste der 3 besten hinzugefügt wenn sie besser ist als die
dritte Zeit im Speicher, sonst wird diese Zeit verworfen. Ihr persönlicher Rekord steht auf 1 im Speicher, die zweite Zeit
auf 2 und die dritte Zeit auf 3.
Sie können sich diese Zeiten nur ansehen wenn die Stoppuhr sich im STOP-Modus befindet. Drücken Sie
"MEMORY", um die meist rezente Zeitnahme im Display als "memory 0" erscheinen zu lassen.
Drücken Sie "MEMORY" aufs Neue, um Ihren persönlichen Rekord als "memory 1" anzuzeigen.
Drücken Sie "MEMORY" aufs Neue, um die zweite Zeit als "memory 2" anzuzeigen.
Drücken Sie "MEMORY" aufs Neue, um die dritte Zeit als "memory 3" anzuzeigen.
Halten Sie "MEMORY" länger als zwei Sekunden gedrück, um den Speicher zu löschen.
Die Stoppuhr kann nicht laufen solange die Speicherfunktion verwendet wird. Drücken Sie "LAP/RESET", um
zum normalen Bedienungsmodus zurückzukehren.
5. Wichtige Anwendungen
1. Leichtathletik: um die Zeit zu messen, die notwendig ist, um eine Strecke zurückzulegen (verwenden Sie den
START/STOP-Schalter).
2. Während des Trainings: um die Rundenzeiten zu messen und zu evaluieren (START/STOP & MEMORY).
3. Während Wettkämpfe: um die Zeit des Gewinners und des Zweiten zu messen (START/LAP/STOP).
4. In professionellen Organisationen: um eine Gruppe Arbeitnehmer zu timen. Sie können die drei schnellsten
Zeiten messen. (START/STOP/MEMORY).
5. Um die Ruhezeit einer Maschine zwischen zwei Zyklen zu messen.
6. Messen der Zykluszeit und Ruhezeit einer Maschine vor dem Anfang eines neuen Zyklus (START/LAP/STOP).
Für mehr Informationen zu diesem Produkt, siehe www.velleman.eu.
Alle Änderungen ohne vorherige Ankündigung vorbehalten.
SW1 VELLEMAN
 Loading...