

Page 1
SSE017
ELECTRONIC SAFE
ELEKTRONISCHE KLUIS
COFFRE-FORT ÉLECTRONIQUE
CAJA FUERTE ELECTRÓNICA
ELEKTRONISCHER SAFE
COFRE ELECTRÓNICO
USER MANUAL 3
GEBRUIKERSHANDLEIDING 5
MODE D'EMPLOI 7
MANUAL DEL USUARIO 9
BEDIENUNGSANLEITUNG 11
MANUAL DO UTILIZADOR 13
Page 2
SSE017
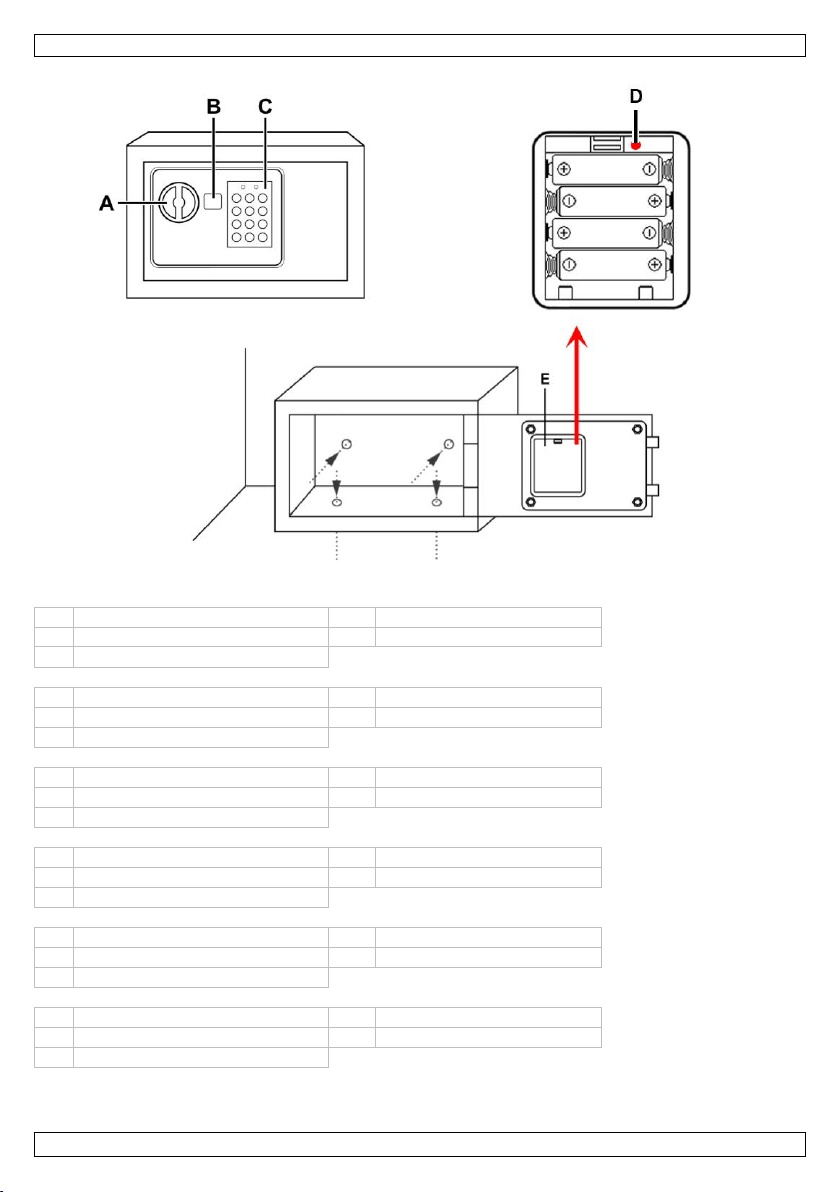
A
rotary knob
D
reset button
B
keyhole cover
E
battery cover
C
keypad
A
draaiknop
D
resetknop
B
afdekplaatje sleutelgat
E
batterijklep
C
klavier
A
verrou
D
bouton de réinitialisation
B
coiffe de la serrure
E
compartiment à piles
C
clavier
A
botón giratorio
D
botón de reinicialización
B
tapa para el ojo de la cerradura
E
compartimiento de pilas
C
teclado
A
Drehknopf
D
Reset-Taste
B
Abdeckplatte Schlüsselloch
E
Batteriedeckel
C
Tastatur
A
botão giratório
D
botão de reinicialização
B
tampa da fechadura
E
compartimento das pilhas
C
teclado
V. 05 – 19/12/2013 2 ©Velleman nv
Page 3
SSE017
Warning: Do not puncture batteries or throw them in fire as they may explode. Do not
attempt to recharge non-rechargeable batteries. Dispose of batteries in accordance with local
regulations. Keep batteries away from children.
USER MANUAL
1. Introduction
To all residents of the European Union
Important environmental information about this product
Thank you for choosing Perel! Please read the manual thoroughly before bringing this device into service.
If the device was damaged in transit, don't install or use it and contact your dealer.
2. Safety Instructions
3. General Guidelines
Refer to the Velleman® Service and Quality Warranty on the last pages of this manual.
Familiarise yourself with the functions of the device before actually using it.
All modifications of the device are forbidden for safety reasons. Damage caused by user modifications
Only use the device for its intended purpose. Using the device in an unauthorised way will void the
Damage caused by disregard of certain guidelines in this manual is not covered by the warranty and
Keep this manual for future reference.
4. Features
electronic lock: simple to operate and programmable with codes of 3 to 8 digits
override key included
solid steel construction
inside: pre-drilled for fixation (fixing bolts included).
5. Overview
Refer to the illustrations on page 2 of this manual.
6. Operation
Mounting the Safe
To reduce the risk of theft, the safe can be secured to the floor, wall, or in a cupboard using the predrilled holes.
There are 4 mounting holes (Ø 8 mm), 2 in the back plate and 2 in the bottom of the safe. Use the
included screws to secure the safe.
Caution: The safe is heavy and shall therefore only be mounted on a solid surface or wall that is strong
enough to hold its weight. Install the safe in a horizontal position.
Opening the Safe for the First Time
1. Remove the keyhole cover [B] and insert the override key.
2. Turn it counter-clockwise and at the same time turn the rotary knob [A] clockwise and pull to open
Important: do not keep the override keys in the safe.
This symbol on the device or the package indicates that disposal of the device after its lifecycle
could harm the environment. Do not dispose of the unit (or batteries) as unsorted municipal
waste; it should be taken to a specialized company for recycling. This device should be
returned to your distributor or to a local recycling service. Respect the local environmental
rules.
If in doubt, contact your local waste disposal authorities.
to the device is not covered by the warranty.
warranty.
the dealer will not accept responsibility for any ensuing defects or problems.
the safe.
V. 05 – 19/12/2013 3 ©Velleman nv
Page 4
SSE017
power supply
4 x 1.5 V AA battery (incl.)
dimensions
external
170 x 230 x 170 mm
internal
160 x 220 x 120 mm
packing
200 x 250 x 190 mm
weight
gross
4000 g
net
3415 g
Installing/Replacing Batteries When batteries are low, the red LED (left) on the keypad [C] lights up.
Note: To test the batteries at any time, enter your personal code. When battery condition is poor, the
red LED lights up. The LED does not light up if the batteries are in good order.
The safe requires 4 x AA batteries (type LR6); alkaline batteries are recommended. To replace the
batteries, proceed as follows:
1. The battery compartment is located on the inside of the door. Open the battery cover [E].
2. Insert 4 new 1.5 V type AA batteries (LR6), following the polarity markings inside the battery
compartment.
Note: Replacing the batteries clears the personal code. It is strongly advised to set a new personal code
immediately.
Programming the Personal Code
1. Press the reset button [D] which is located under the battery cover [E] inside the safe. The lock
beeps twice.
2. Enter a new user code consisting of 3 to 8 digits. Press button B on the keypad [C] to confirm.
If B is not pressed within 15 seconds the procedure is cancelled.
3. Close the battery compartment, close the safe, and test the new code.
Opening the Safe
1. Enter the personal code and confirm by pressing A on the keypad [C].
The lock beeps once and the green LED (right) on the keypad [C] lights up.
2. Turn the rotary knob [A] clockwise and pull within 5 seconds to open the door.
Alarm Handling
If you enter a wrong code, the safe does not open.
After consecutively entering 3 wrong codes, the electronic lock is blocked for ± 20 s. During this time
it is not possible to enter any codes.
After 3 more wrong attempts, the lock is blocked for ± 5 minutes.
Note: It is always possible to use the override key to open the safe.
7. Technical Specifications
Use this device with original accessories only. Velleman nv cannot be held responsible in the
event of damage or injury resulting from (incorrect) use of this device.
For more info concerning this product and the latest version of this manual, please visit our
website www.perel.eu.
The information in this manual is subject to change without prior notice.
© COPYRIGHT NOTICE
The copyright to this manual is owned by Velleman nv. All worldwide rights reserved. No part
of this manual may be copied, reproduced, translated or reduced to any electronic medium or otherwise
without the prior written consent of the copyright holder.
V. 05 – 19/12/2013 4 ©Velleman nv
Page 5
SSE017
Waarschuwing: U mag batterijen nooit doorboren of in het vuur gooien (explosiegevaar).
Herlaad geen alkalinebatterijen. Gooi batterijen weg volgens de plaatselijke milieuwetgeving.
Houd batterijen uit het bereik van kinderen.
GEBRUIKERSHANDLEIDING
1. Inleiding
Aan alle ingezetenen van de Europese Unie
Belangrijke milieu-informatie betreffende dit product
verwijdering.
Dank u voor uw aankoop! Lees deze handleiding grondig voor u het toestel in gebruik neemt. Werd het
toestel beschadigd tijdens het transport, installeer het dan niet en raadpleeg uw dealer.
2. Veiligheidsinstructies
3. Algemene richtlijnen
Raadpleeg de Velleman® service- en kwaliteitsgarantie achteraan deze handleiding.
Leer eerst de functies van het toestel kennen voor u het gaat gebruiken.
Om veiligheidsredenen mag u geen wijzigingen aanbrengen aan het toestel. Schade door wijzigingen
Gebruik het toestel enkel waarvoor het gemaakt is. De garantie vervalt automatisch bij ongeoorloofd
De garantie geldt niet voor schade door het negeren van bepaalde richtlijnen in deze handleiding en
Bewaar deze handleiding voor verdere raadpleging.
4. Eigenschappen
elektronisch slot: eenvoudig te bedienen en programmeerbaar met codes van 3 tot 8 cijfers
noodsleutel meegeleverd
constructie in hard staal
binnenkant is voorgeboord voor montage (bevestigingsbouten meegeleverd).
5. Omschrijving
Raadpleeg de afbeeldingen op pagina 2 van deze handleiding.
6. Gebruik
De kluis installeren
Om diefstal te voorkomen kan de kluis aan de grond, de muur of in een kast bevestigd worden via de
voorgeboorde gaten.
Er zijn 4 gaten (Ø 8 mm), 2 aan de achterkant en 2 aan de onderkant van de kluis. Gebruik de
meegeleverde schroeven om de kluis te bevestigen.
Opgelet: De kluis is zwaar en mag daarom alleen bevestigd worden aan structuren die sterk genoeg zijn
om het gewicht ervan te dragen. Installeer de kluis in een horizontale positie.
De kluis voor de eerste keer openen
1. Verwijder het afdekplaatje [B] en steek de noodsleutel in het sleutelgat.
2. Draai de sleutel in tegenwijzerzin; draai tegelijk de draaiknop [A] in wijzerzin en trek om de kluis te
Belangrijk: Bewaar de noodsleutels niet in de kluis.
Dit symbool op het toestel of de verpakking geeft aan dat, als het na zijn levenscyclus wordt
weggeworpen, dit toestel schade kan toebrengen aan het milieu. Gooi dit toestel (en eventuele
batterijen) niet bij het gewone huishoudelijke afval; het moet bij een gespecialiseerd bedrijf
terechtkomen voor recyclage. U moet dit toestel naar uw verdeler of naar een lokaal
recyclagepunt brengen. Respecteer de plaatselijke milieuwetgeving.
Hebt u vragen, contacteer dan de plaatselijke autoriteiten betreffende de
die de gebruiker heeft aangebracht aan het toestel, valt niet onder de garantie.
gebruik.
uw dealer zal de verantwoordelijkheid afwijzen voor defecten of problemen die hier rechtstreeks
verband mee houden.
openen.
V. 05 – 19/12/2013 5 ©Velleman nv
Page 6

SSE017
voeding
4 x 1,5 V AA-batterij (meegelev.)
afmetingen
buitenkant
170 x 230 x 170 mm
binnenkant
160 x 220 x 120 mm
verpakking
200 x 250 x 190 mm
gewicht
bruto
4000 g
netto
3415 g
Batterijen plaatsen/vervangen Wanneer de batterijen leeg zijn, brandt de rode led (links) op het klavier [C].
Opmerking: Om de batterijen te testen op elk ogenblik, geef uw persoonlijke code in. Wanneer de
batterijen zwak zijn, licht de rode led op. Zijn de batterijen in orde, dan brandt de rode led niet.
De kluis werkt op 4 AA-batterijen (type LR6); alkalinebatterijen zijn aanbevolen. Om de batterijen te
vervangen, gaat u als volgt te werk:
1. Het batterijvak bevindt zich aan de binnenkant van de deur. Open het batterijdeksel [E].
2. Plaats 4 nieuwe 1,5 V AA-batterijen (LR6), respecteer daarbij de polariteit.
Opmerking: Het vervangen van de batterijen wist de persoonlijke code. Het is sterk aanbevolen om
onmiddellijk een nieuwe persoonlijke code in te stellen.
De persoonlijke code instellen
1. Druk op de resetknop [D] die zich onder het batterijdeksel [E] bevindt aan de binnenkant van de
kluis. U hoort 2 pieptonen.
2. Geef een nieuwe persoonlijke code in die bestaat uit 3 tot 8 cijfers. Druk op toets B op het
klavier [C] om te bevestigen. Wanneer toets B niet ingedrukt wordt binnen de 15 seconden, dan
wordt de procedure afgebroken.
3. Sluit het batterijvak, sluit de kluis en test de nieuwe code.
De kluis openen
1. Geef de persoonlijke code in en bevestig door A in te drukken op het klavier [C].
U hoort 1 pieptoon en de groene led (rechts) op het klavier [C] licht op.
2. Draai de draaiknop [A] in wijzerzin en open de kluis binnen de 5 seconden.
Alarm
Als u een foutieve code ingeeft, kunt u de kluis niet openen.
Geeft u 3 keer na elkaar een foutieve code in, dan blokkeert het slot ± 20 seconden. In deze periode
kunt u geen codes ingeven.
Als u opnieuw 3 foutieve codes ingeeft, blokkeert het slot ± 5 minuten.
Opmerking: Het is altijd mogelijk om de kluis te openen met de noodsleutel.
7. Technische specificaties
Gebruik dit toestel enkel met originele accessoires. Velleman nv is niet aansprakelijk voor
schade of kwetsuren bij (verkeerd) gebruik van dit toestel.
Voor meer informatie over dit product en de laatste versie van deze handleiding, zie
www.perel.eu.
De informatie in deze handleiding kan te allen tijde worden gewijzigd zonder voorafgaande
kennisgeving.
© AUTEURSRECHT
Velleman nv heeft het auteursrecht voor deze handleiding. Alle wereldwijde rechten
voorbehouden. Het is niet toegestaan om deze handleiding of gedeelten ervan over te nemen, te
kopiëren, te vertalen, te bewerken en op te slaan op een elektronisch medium zonder voorafgaande
schriftelijke toestemming van de rechthebbende.
V. 05 – 19/12/2013 6 ©Velleman nv
Page 7

SSE017
Avertissement : Ne jamais perforer les piles et ne pas les jeter au feu (danger d’explosion).
Ne jamais recharger des piles alcalines. Se débarrasser des piles en respectant la
réglementation locale relative à la protection de l’environnement. Garder les piles hors de la
portée des enfants.
MODE D'EMPLOI
1. Introduction
Aux résidents de l'Union européenne
Informations environnementales importantes concernant ce produit
En cas de questions, contacter les autorités locales pour élimination.
Nous vous remercions de votre achat ! Lire attentivement le présent mode d'emploi avant la mise en
service de l’appareil. Si l’appareil a été endommagé pendant le transport, ne pas l’installer et consulter
votre revendeur.
2. Consignes de sécurité
3. Directives générales
Se référer à la garantie de service et de qualité Velleman® en fin du mode d'emploi.
Se familiariser avec le fonctionnement de l'appareil avant de l'utiliser.
Toute modification est interdite pour des raisons de sécurité. Les dommages occasionnés par des
N’utiliser l'appareil qu’à sa fonction prévue. Un usage impropre annule d'office la garantie.
La garantie ne s’applique pas aux dommages survenus en négligeant certaines directives de ce mode
Garder ce mode d'emploi pour toute référence ultérieure.
4. Caractéristiques
serrure électronique : opération facile et programmation avec codes de 3 à 8 chiffres
fourni avec clé de secours
construction en acier
la partie intérieure est prépercée pour fixation (vis de fixation incl.).
5. Description
Se référer aux illustrations en page 2 de ce mode d'emploi.
6. Emploi
Installer le coffre-fort
Pour éviter les vols, vous pourrez fixer le coffre-fort au sol, au mur ou dans une étagère utilisant les
trous prépercés.
Le coffre-fort est muni de 4 trous de montage (Ø 8 mm), 2 dans la plaque arrière et 2 dans la partie
inférieure du coffre-fort. Utiliser les vis livrées pour fixer le coffre-fort.
Attention : Le coffre-fort est très lourd et ne peut être fixé que sur une surface solide capable de
supporter le poids total de l'installation. Installer le coffre-fort dans uns position horizontale.
Première ouverture du coffre-fort
1. Retirer la coiffe [B] et insérer la clé de secours.
2. Tourner la clé dans le sens inverse des aiguilles d'une montre ; tourner le verrou [A] dans le sens
Important : Ne conservez pas vos clés de secours dans le coffre-fort.
V. 05 – 19/12/2013 7 ©Velleman nv
Ce symbole sur l'appareil ou l'emballage indique que l’élimination d’un appareil en fin de vie
peut polluer l'environnement. Ne pas jeter un appareil électrique ou électronique (et des piles
éventuelles) parmi les déchets municipaux non sujets au tri sélectif ; une déchèterie traitera
l’appareil en question. Renvoyer cet appareil à votre fournisseur ou à un service de recyclage
local. Il convient de respecter la réglementation locale relative à la protection de
l’environnement.
modifications par le client ne tombent pas sous la garantie.
d'emploi et votre revendeur déclinera toute responsabilité pour les problèmes et les défauts qui en
résultent.
des aiguilles d'une montre et tirer pour ouvrir le coffre-fort.
Page 8

SSE017
alimentation
4 x pile de 1,5 V type LR6 (incl.)
dimensions
extérieur
170 x 230 x 170 mm
intérieur
160 x 220 x 120 mm
emballage
200 x 250 x 190 mm
poids
brut
4000 g
net
3415 g
Insérer/remplacer les piles Lorsque les piles sont faibles, la LED rouge (gauche) sur le clavier [C] s'allume.
Remarque : Pour tester les piles à tout moment, introduire votre code personnel. Lorsque l'état des piles
est faible, la LED rouge s'allume. La LED ne s’allume pas si les piles sont dans un bon état.
Le coffre-fort est alimenté par 4 piles du type LR6 ; il est conseillé d'utiliser des piles alcalines. Pour
remplacer les piles, procéder comme suit :
1. Le compartiment à piles est situé à l'intérieur de la porte. Ouvrir le compartiment à piles [E].
2. Insérer 4 nouvelles piles de 1,5 V du type LR6, respecter la polarité.
Remarque : Le code personnel s'efface lors du remplacement des piles. Il est conseillé d'introduire
immédiatement un nouveau code personnel.
Programmer le code personnel
1. Appuyer sur le bouton de réinitialisation [D] situé à l'intérieur du compartiment à piles [E]. Deux
bips sont émis.
2. Introduire un nouveau code composé de 3 à 8 chiffres. Pour confirmer, appuyer sur la touche B sur
le clavier [C]. Si la touche B n'est pas appuyée dans les 15 secondes, l'opération s'annulera.
3. Fermer le compartiment à piles, fermer le coffre-fort et tester le nouveau code.
Ouvrir le coffre-fort
1. Introduire le code personnel et confirmer en appuyant sur la touche A sur le clavier [C].
Un bip s'émet et la LED verte (droite) sur le clavier [C] s'allume.
2. Tourner le verrou [A] dans le sens des aiguilles d'une montre et tirer dans les 5 secondes pour
ouvrir la porte.
En cas d'alarme
Si le code saisi est erroné, le coffre-fort ne s'ouvre pas.
Si le code erroné est saisi 3 fois de suite, la serrure électronique se bloque pendant ± 20 secondes.
Pendant ce temps, il n’est pas possible d'introduire un nouveau code.
Après 3 nouvelles tentatives erronées, la serrure est bloquée pendant ± 5 minutes.
Remarque : Il est toujours possible d'utiliser la clé de secours pour ouvrir le coffre-fort.
7. Spécifications techniques
N’employer cet appareil qu’avec des accessoires d’origine. La SA Velleman ne peut, dans la
mesure conforme au droit applicable être tenue responsable des dommages ou lésions
(directs ou indirects) pouvant résulter de l’utilisation de cet appareil.
Pour plus d’information concernant cet article et la dernière version de cette notice, visiter
notre site web www.perel.eu.
Toutes les informations présentées dans cette notice peuvent être modifiées sans notification
préalable.
© DROITS D’AUTEUR
SA Velleman est l’ayant droit des droits d’auteur pour ce mode d'emploi. Tous droits mondiaux
réservés. Toute reproduction, traduction, copie ou diffusion, intégrale ou partielle, du contenu de cette
notice par quelque procédé ou sur tout support électronique que ce soit est interdite sans l’accord
préalable écrit de l’ayant droit.
V. 05 – 19/12/2013 8 ©Velleman nv
Page 9

SSE017
Advertencia: Nunca perfore las pilas y no las eche al fuego (peligro de explosión). Nunca
intente recargar pilas no recargables. Respete las leyes locales en relación con el medio
ambiente al tirar las pilas. Mantenga las pilas lejos del alcance de niños.
MANUAL DEL USUARIO
1. Introducción
A los ciudadanos de la Unión Europea
Importantes informaciones sobre el medio ambiente concerniente a este producto
¡Gracias por elegir Perel! Lea atentamente las instrucciones del manual antes de usar el aparato. Si ha
sufrido algún daño en el transporte no lo instale y póngase en contacto con su distribuidor.
2. Instrucciones de seguridad
3. Normas generales
Véase la Garantía de servicio y calidad Velleman® al final de este manual del usuario.
Familiarícese con el funcionamiento del aparato antes de utilizarlo.
Por razones de seguridad, las modificaciones no autorizadas del aparato están prohibidas. Los daños
Utilice sólo el aparato para las aplicaciones descritas en este manual. Su uso incorrecto anula la
Los daños causados por descuido de las instrucciones de seguridad de este manual invalidarán su
Guarde este manual del usuario para cuando necesite consultarlo.
4. Características
cerradura electrónica: fácil manejo y es posible programar códigos de 3 a 8 cifras
con llave de emergencia
construcción de acero
interior: pretaladrado para fijación (tornillos incl.).
5. Descripción
Véase las figuras en la página 2 de este manual del usuario.
6. Funcionamiento
Instalar la caja fuerte
Para evitar robos, podría fijar la caja fuerte al suelo, a la pared o en un armario (agujeros pretaladrados).
Esta caja fuerte está equipada con 4 agujeros de Ø 8 mm (2 en la parte trasera y 2 en la parte inferior).
Fije la caja fuerte con los tornillos incluidos.
Advertencia: Esta caja fuerte es muy pesada y sólo puede es posible fijarla a una superficie sólida capaz
de soportar el peso total de la instalación. Instale la caja fuerte en una posición horizontal.
Primera abertura de la caja fuerte
1. Saque la tapa [B] para localizar la cerradura. Introduzca la llave de emergencia.
2. Gire la llave en sentido contrario a las agujas del reloj y gire el botón giratorio [A] en el sentido de
Importante: No guarde las llaves de emergencia en el interior de la caja fuerte.
Este símbolo en este aparato o el embalaje indica que, si tira las muestras inservibles, podrían
dañar el medio ambiente. No tire este aparato (ni las pilas, si las hubiera) en la basura
doméstica; debe ir a una empresa especializada en reciclaje. Devuelva este aparato a su
distribuidor o a la unidad de reciclaje local. Respete las leyes locales en relación con el medio
ambiente.
Si tiene dudas, contacte con las autoridades locales para residuos.
causados por modificaciones no autorizadas, no están cubiertos por la garantía.
garantía completamente.
garantía y su distribuidor no será responsable de ningún daño u otros problemas resultantes.
las agujas del reloj. Abra la caja fuerte.
V. 05 – 19/12/2013 9 ©Velleman nv
Page 10

SSE017
alimentación
4 x pila AA de 1,5 V (incl.)
dimensiones
exterior
170 x 230 x 170 mm
interior
160 x 220 x 120 mm
embalaje
200 x 250 x 190 mm
peso
bruto
4000 g
neto
3415 g
Introducir/reemplazar las pilas El LED rojo del teclado [C] se ilumina si las pilas están agotadas.
Observación: Introduzca su código personal para probar el estado de las pilas. El LED rojo se ilumina si
las pilas están agotadas. El LED no se iluminará si las pilas están buenas.
La caja fuerte funciona con 4 pilas AA. Utilice pilas alcalinas. Para reemplazar las pilas, proceda de la
forma siguiente:
1. El compartimiento de pilas está en el interior de la puerta. Abra el compartimiento de pilas [E].
2. Introduzca 4 nuevas pilas AA. Controle la polaridad.
Observación: El código personal se borra al reemplazar las pilas. Vuelva a introducir inmediatamente un
nuevo código personal.
Programar un código personal
1. Pulse el botón de reinicialización [D] de la parte interior del compartimiento de pilas [E]. La caja
fuerte emite dos señales sonoras.
2. Introduzca el nuevo código personal (código de 3 a 8 cifras) y confirme dentro de los 15 segundos
con la tecla B del teclado [C]. El procedimiento se anula después de estos 15 segundos.
3. Vuelva a cerrar el compartimiento de pilas y la caja fuerte. Pruebe el nuevo código.
Abrir la caja fuerte
1. Introduzca su código y confirme con la tecla A del teclado [C].
La caja fuerte emite un tono y el LED verde del teclado [C] se ilumina.
2. Gire y tire del botón giratorio [A] dentro de los 5 segundos para abrir la caja fuerte.
En caso de alarma
La caja fuerte no se abre al introducir un código incorrecto.
La cerradura electrónica se bloquee durante ± 20 segundos después de haber introducido 3 códigos
incorrectos. No es posible introducir un nuevo código mientras la cerradura esté bloqueada.
La cerradura electrónica se bloquee durante ± 5 minutos de haber introducido 3 códigos incorrectos
después de los otros 3 códigos incorrectos.
Observación: Es posible abrir la caja fuerte al utilizar la llave de emergencia.
7. Especificaciones
Utilice este aparato sólo con los accesorios originales. Velleman NV no será responsable de
daños ni lesiones causados por un uso (indebido) de este aparato.
Para más información sobre este producto y la versión más reciente de este manual del
usuario, visite nuestra página www.perel.eu.
Se pueden modificar las especificaciones y el contenido de este manual sin previo aviso.
© DERECHOS DE AUTOR
Velleman NV dispone de los derechos de autor para este manual del usuario. Todos los
derechos mundiales reservados. Está estrictamente prohibido reproducir, traducir, copiar, editar y
guardar este manual del usuario o partes de ello sin previo permiso escrito del derecho habiente.
V. 05 – 19/12/2013 10 ©Velleman nv
Page 11

SSE017
Warnung: Durchbohren Sie nie die Batterien und werfen Sie diese nicht ins Feuer
(Explosionsgefahr). Versuchen Sie nie nicht aufladbare Batterien aufzuladen. Respektieren Sie
die örtlichen Umweltvorschriften beim Entsorgen der Batterien. Halten Sie die Batterien von
Kindern fern.
BEDIENUNGSANLEITUNG
1. Einführung
An alle Einwohner der Europäischen Union
Wichtige Umweltinformationen über dieses Produkt
Falls Zweifel bestehen, wenden Sie sich für Entsorgungsrichtlinien an Ihre örtliche Behörde.
Vielen Dank, dass Sie sich für Perel entschieden haben! Lesen Sie diese Bedienungsanleitung vor
Inbetriebnahme sorgfältig durch. Überprüfen Sie, ob Transportschäden vorliegen. Sollte dies der Fall
sein, verwenden Sie das Gerät nicht und wenden Sie sich an Ihren Händler.
2. Sicherheitshinweise
3. Allgemeine Richtlinien
Siehe Velleman® Service- und Qualitätsgarantie am Ende dieser Bedienungsanleitung.
Nehmen Sie das Gerät erst in Betrieb, nachdem Sie sich mit seinen Funktionen vertraut gemacht
Eigenmächtige Veränderungen sind aus Sicherheitsgründen verboten. Bei Schäden verursacht durch
Verwenden Sie das Gerät nur für Anwendungen beschrieben in dieser Bedienungsanleitung sons t
Bei Schäden, die durch Nichtbeachtung der Bedienungsanleitung verursacht werden, erlischt der
Bewahren Sie diese Bedienungsanleitung für künftige Einsichtnahme auf.
4. Eigenschaften
elektronisches Schloss: einfache Bedienung und Möglichkeit zum Programmieren von persönlichen
Hand-Notbetätigung mit Schlüssel
massive Stahlkonstruktion
vorgebohrt zur Montage (Befestigungsbolzen mitgeliefert)
5. Umschreibung
Siehe Abbildungen, Seite 2 dieser Bedienungsanleitung.
6. Anwendung
Den Safe installieren
Um Diebstahl zu vermeiden, kann der Safe am Boden, an der Wand oder in einem Schrank befestigt
werden (vorgebohrte Löcher).
Es gibt 4 Löcher (Ø 8 mm), 2 auf der Rückseite und 2 auf der Unterseite des Safes. Verwenden Sie die
mitgelieferten Schrauben.
Achtung: Der Safe ist schwer und darf, um das Gewicht zu tragen, nur an Strukturen, die stark
genügend sind, befestigt werden. Installieren Sie den Safe horizontal.
Dieses Symbol auf dem Produkt oder der Verpackung zeigt an, dass die Entsorgung dieses
Produktes nach seinem Lebenszyklus der Umwelt Schaden zufügen kann. Entsorgen Sie die
Einheit (oder verwendeten Batterien) nicht als unsortiertes Hausmüll; die Einheit oder
verwendeten Batterien müssen von einer spezialisierten Firma zwecks Recycling entsorgt
werden. Diese Einheit muss an den Händler oder ein örtliches Recycling-Unternehmen
retourniert werden. Respektieren Sie die örtlichen Umweltvorschriften.
haben.
eigenmächtige Änderungen erlischt der Garantieanspruch.
kann dies zu Schäden am Produkt führen und erlischt der Garantieanspruch.
Garantieanspruch. Für daraus resultierende Folgeschäden übernimmt der Hersteller keine Haftung.
Codes von 3 bis 8 Ziffern
V. 05 – 19/12/2013 11 ©Velleman nv
Page 12

SSE017
Stromversorgung
4 x 1,5 V AA-Batterie (incl.)
Abmessungen
Außenseite
170 x 230 x 170 mm
Innenseite
160 x 220 x 120 mm
Verpackung
200 x 250 x 190 mm
Gewicht
brutto
4000 g
netto
3415 g
Der Safe zum ersten Mal öffnen
1. Entfernen Sie die Abdeckplatte [B] und stecken Sie den Notschlüssel in das Schlüsselloch.
2. Drehen Sie den Schlüssel gegen den Uhrzeigersinn; drehen Sie gleichzeitig den Drehknopf [A] im
Uhrzeigersinn und ziehen Sie daran, um den Safe zu öffnen.
Wichtig: Bewahren Sie den Schlüssel für die Hand-Notbetätigung nicht im Safe auf.
Die Batterien installieren/ersetzen Die rote LED der Tastatur [C] leuchtet wenn die Batterien leer sind.
Bemerkung: Testen Sie die Batterien, indem Sie Ihren Code eingeben. Sind die Batterien schwach, dann
leuchtet die rote LED. Die LED wird nicht aufleuchten wenn die Batterien in Ordnung sind.
Der Safe funktioniert mit 4 AA-Batterien (LR6). Verwenden Sie Alkali-Batterien. Um die Batterien zu
ersetzen gehen Sie wie folgt vor:
1. Das Batteriefach befindet sich an der Innenseite der Tür. Öffnen Sie den Batteriedeckel [E].
2. Legen Sie 4 neue 1,5 V AA-Batterien (LR6) ein. Beachten Sie die Polarität.
Bemerkung: Wenn Sie einen Batteriewechsel durchführen wird der persönliche Code gelöscht. Geben
Sie sofort einen neuen persönlichen Code ein.
Den persönlichen Code einstellen
1. Drücken Sie die Reset-Taste [D] die sich unter dem Batteriedeckel [E] innen im Safe befindet. Es
ertönen 2 Tone.
2. Geben Sie einen neuen persönlichen Code von 3 bis 8 Ziffern ein. Drücken Sie Taste B der
Tastatur [C] um zu bestätigen. Wenn B nicht innerhalb von 15 Sekunden gedrückt wird, dann wird
das Verfahren unterbrochen.
3. Schließen Sie den Batteriedeckel, schließen Sie den Safe und testen Sie den neuen Code.
Den Safe öffnen
1. Geben Sie den persönlichen Code ein und bestätigen Sie indem Sie die A-Taste der Tastatur [C]
drücken.
Es ertönt einen Ton und die grüne LED (rechts) der Tastatur [C] leuchtet.
2. Drehen Sie den Drehknopf [A] Uhrzeigersinn und öffnen Sie den Safe innerhalb von 5 Sekunden.
Alarm
Wenn Sie einen falschen Code eingeben, können Sie den Safe nicht öffnen.
Geben Sie 3 Mal nach einander einen falschen Code ein, dann blockiert das Schloss ± 20 Sekunden.
Während dieser Zeit ist es nicht möglich, irgendwelche Codes einzugeben.
Nach nochmals 3 falschen Codes blockiert das Schloss ± 5 Minuten.
Bemerkung: Es ist immer möglich, den Safe mit dem Notschlüssel zu öffnen.
7. Technische Daten
Verwenden Sie dieses Gerät nur mit originellen Zubehörteilen. Velleman NV übernimmt keine
Haftung für Schaden oder Verletzungen bei (falscher) Anwendung dieses Gerätes. Für mehr
Informationen zu diesem Produkt und die neueste Version dieser Bedienungsanleitung, siehe
www.perel.eu. Alle Änderungen ohne vorherige Ankündigung vorbehalten.
© URHEBERRECHT
Velleman NV besitzt das Urheberrecht für diese Bedienungsanleitung. Alle weltweiten Rechte
vorbehalten. Ohne vorherige schriftliche Genehmigung des Urhebers ist es nicht gestattet, diese
Bedienungsanleitung ganz oder in Teilen zu reproduzieren, zu kopieren, zu übersetzen, zu bearbeiten
oder zu speichern.
V. 05 – 19/12/2013 12 ©Velleman nv
Page 13

SSE017
Advertência: Nunca perfure as pilhas nem jogá-las no fogo, pois elas podem explodir. Não
tente recarregar pilhas não recarregáveis. Descarte as baterias de acordo com as
regulamentações locais. Mantenha as pilhas fora do alcance das crianças.
MANUAL DO UTILIZADOR
1. Introdução
Aos cidadãos da União Europeia
Importantes informações sobre o meio ambiente no que respeita a este produto
Agradecemos o facto de ter escolhido a Perel! Leia atentamente as instruções do manual antes de usar o
aparelho. Caso o aparelho tenha sofrido algum dano durante o transporte não o instale e entre em
contacto com o seu distribuidor.
2. Instruções de segurança
3. Normas gerais
Consulte a Garantia de serviço e qualidade Velleman® na parte final deste manual do utilizador.
Familiarize-se com o funcionamento do aparelho antes de o utilizar.
Por razões de segurança, estão proibidas quaisquer modificações do aparelho desde que não
Utilize o aparelho apenas para as aplicações descritas neste manual. Uma utilização incorrecta anula
Danos causados pelo não cumprimento das normas de segurança referidas neste manual anulam a
Guarde este manual para que o possa consultar sempre que necessário.
4. Características
fechadura electrónica: operação fácil e com programação de códigos de 3 à 8 dígitos
com chave de emergência
estrutura em aço
interior pré equipado para fixação. (parafusos incluídos)
5. Descrição
Ver as figuras da página 2 deste manual do utilizador.
6. Utilização
Instalação do cofre
Para reduzir o risco de roubo, o cofre deve ser fixado ao chão e à parede usando a furação já preparada
para o efeito.
Este cofre tem 4 pontos de fixação de Ø 8 mm (2 parte traseira e 2 em baixo). Utilize unicamente os
parafusos fornecidos.
Atenção: Este cofre é pesado deve fixa-lo numa superfície sólida capaz de suportar o peso total da
instalação. Instalar o cofre numa posição horizontal.
Primeira abertura do cofre
1. Retirar a tampa [B] para visualizar a fechadura. Inserir a chave de segurança.
2. Girar a chave no sentido contrário dos ponteiros do relógio e girar o botão [A] no sentido dos
Importante: Não guarde as chaves de emergência dentro do cofre.
V. 05 – 19/12/2013 13 ©Velleman nv
Este símbolo no aparelho ou na embalagem indica que, enquanto desperdícios, poderão causar
danos no meio ambiente. Não deite o aparelho (nem as pilhas, se as houver) no lixo
doméstico; dirija-se a uma empresa especializada em reciclagem. Devolva o aparelho ao seu
distribuidor ou ao posto de reciclagem local. Respeite a legislação local relativa ao meio
ambiente.
Em caso de dúvidas, contacte com as autoridades locais para os resíduos.
autorizadas. Os danos provocados por modificações não autorizadas, não estão cobertos pela
garantia.
a garantia completamente.
garantia e o seu distribuidor não será responsável por qualquer danos ou outros problemas daí
resultantes.
ponteiros do relógio. Abrir o cofre.
Page 14

SSE017
alimentação
4 pilhas LR6 de 1,5 V (incl.)
dimensões
exteriores
170 x 230 x 170 mm
interiores
160 x 220 x 120 mm
embalagem
200 x 250 x 190 mm
peso
bruto
4000 g
líquido
3415 g
Colocar/substituir as pilhas O lede vermelho acende no teclado [C] quando as pilhas estão fracas.
Observação: Digite o seu código pessoal para testar a condição das pilhas. Quando as pilhas começam a
ficar fracas, o LED vermelho acende. O LED não acende se as pilhas estiverem em bom estado.
Este cofre é alimentado por 4 pilhas LR6. Aconselha-mos o uso de pilhas alcalinas. Para substituir as
pilhas proceda da seguinte forma:
1. O compartimento das pilhas fica do lado de dentro da porta. Abrir o compartimento das pilhas [E].
2. Introduza 4 novas pilhas de 1,5 V do tipo AA (LR6), respeitando as marcas de polaridade no interior
do compartimento.
Observação: Substituir as baterias limpa o código pessoal. Aconselha-mos que programe um novo
código imediatamente.
Programar um código pessoal
1. Carregar no botão de reinicialização [D] situado no interior do compartimento das pilhas [E].
O cofre emite duas tonalidades.
2. Digite o novo código (código de 3 à 8 números). Pressione o botão B do teclado [C] para confirmar.
Se B não for pressionado num espaço de 15 segundos o procedimento é cancelado.
3. Fechar o compartimento das pilhas e o cofre. Faça um teste com o novo código.
Abertura do cofre
1. Introduza o código pessoal e confirme pressionando A no teclado [C].
O cofre emite um tom e o lede verde acende no teclado [C].
2. Girar e puxar o botão [A] num prazo de 5 segundos para abrir o cofre.
Em caso de alarme
O cofre não abre se o código estiver errado.
O fecho electrónico bloqueia durante ± 20 segundos depois de introduzir 3 códigos errados. Não é
possível introduzir um novo código enquanto a fechadura está bloqueada.
Após mais 3 tentativas falhadas a fechadura ficará bloqueada durante ± 5 minutos.
Observação: O cofre pode ser aberto com a chave de segurança.
7. Especificações
Utilize este aparelho apenas com acessórios originais. A Velleman NV não será responsável
por quaisquer danos ou lesões causados pelo uso (indevido) do aparelho.
Para mais informação sobre este produto e para aceder à versão mais recente deste manual
do utilizador, visite a nossa página www.perel.eu.
Podem alterar-se as especificações e o conteúdo deste manual sem aviso prévio.
© DIREITOS DE AUTOR
A Velleman NV detém os direitos de autor deste manual do utilizador. Todos os direitos
mundiais reservados. É estritamente proibido reproduzir, traduzir, copiar, editar e gravar este manual
do utilizador ou partes deste sem prévia autorização escrita por parte da detentora dos direitos.
V. 05 – 19/12/2013 14 ©Velleman nv
Page 15

Velleman® Service and Quality Warranty
Since its foundation in 1972, Velleman® acquired extensive experience in the
electronics world and currently distributes its products in over 85 countries.
All our products fulfil strict quality requirements and legal stipulations in the EU. In
order to ensure the quality, our products regularly go through an extra quality
check, both by an internal quality department and by specialized external
organisations. If, all precautionary measures notwithstanding, problems should
occur, please make appeal to our warranty (see guarantee conditions).
General Warranty Conditions Concerning Consumer Products (for EU):
• All consumer products are subject to a 24-month warranty on production flaws
and defective material as from the original date of purchase.
• Velleman® can decide to replace an article with an equivalent article, or to refund
the retail value totally or partially when the complaint is valid and a free repair or
replacement of the article is impossible, or if the expenses are out of proportion.
You will be delivered a replacing article or a refund at the value of 100% of the
purchase price in case of a flaw occurred in the first year after the date of purchase
and delivery, or a replacing article at 50% of the purchase price or a refund at the
value of 50% of the retail value in case of a flaw occurred in the second year after
the date of purchase and delivery.
• Not covered by warranty:
- all direct or indirect damage caused after delivery to the article (e.g. by oxidation,
shocks, falls, dust, dirt, humidity...), and by the article, as well as its contents (e.g.
data loss), compensation for loss of profits;
- consumable goods, parts or accessories that are subject to an aging process
during normal use, such as batteries (rechargeable, non-rechargeable, built-in or
replaceable), lamps, rubber parts, drive belts... (unlimited list);
- flaws resulting from fire, water damage, lightning, accident, natural disaster,
etc.…;
- flaws caused deliberately, negligently or resulting from improper handling,
negligent maintenance, abusive use or use contrary to the manufacturer’s
instructions;
- damage caused by a commercial, professional or collective use of the article (the
warranty validity will be reduced to six (6) months when the article is used
professionally);
- damage resulting from an inappropriate packing and shipping of the article;
- all damage caused by modification, repair or alteration performed by a third party
without written permission by Velleman®.
• Articles to be repaired must be delivered to your Velleman® dealer, solidly
packed (preferably in the original packaging), and be completed with the original
receipt of purchase and a clear flaw description.
• Hint: In order to save on cost and time, please reread the manual and check if the
flaw is caused by obvious causes prior to presenting the article for repair. Note that
returning a non-defective article can also involve handling costs.
• Repairs occurring after warranty expiration are subject to shipping costs.
• The above conditions are without prejudice to all commercial warranties.
The above enumeration is subject to modification according to the article
(see article’s manual).
Velleman® service- en kwaliteitsgarantie
Velleman® heeft sinds zijn oprichting in 1972 een ruime ervaring opgebouwd in de
elektronicawereld en verdeelt op dit moment producten in meer dan 85 landen. Al
onze producten beantwoorden aan strikte kwaliteitseisen en aan de wettelijke
bepalingen geldig in de EU. Om de kwaliteit te waarborgen, ondergaan onze
producten op regelmatige tijdstippen een extra kwaliteitscontrole, zowel door onze
eigen kwaliteitsafdeling als door externe gespecialiseerde organisaties. Mocht er
ondanks deze voorzorgen toch een probleem optreden, dan kunt u steeds een
beroep doen op onze waarborg (zie waarborgvoorwaarden).
Algemene waarborgvoorwaarden consumentengoederen (voor Europese
Unie):
• Op alle consumentengoederen geldt een garantieperiode van 24 maanden op
productie- en materiaalfouten en dit vanaf de oorspronkelijke aankoopdatum.
• Indien de klacht gegrond is en een gratis reparatie of vervanging van een artikel
onmogelijk is of indien de kosten hiervoor buiten verhouding zijn, kan Velleman®
beslissen het desbetreffende artikel te vervangen door een gelijkwaardig artikel of
de aankoopsom van het artikel gedeeltelijk of volledig terug te betalen. In dat geval
krijgt u een vervangend product of terugbetaling ter waarde van 100% van de
aankoopsom bij ontdekking van een gebrek tot één jaar na aankoop en levering, of
een vervangend product tegen 50% van de kostprijs of terugbetaling van 50 % bij
ontdekking na één jaar tot 2 jaar.
• Valt niet onder waarborg:
- alle rechtstreekse of onrechtstreekse schade na de levering veroorzaakt aan het
toestel (bv. door oxidatie, schokken, val, stof, vuil, vocht...), en door het toestel,
alsook zijn inhoud (bv. verlies van data), vergoeding voor eventuele winstderving.
- verbruiksgoederen, onderdelen of hulpstukken die onderhevig zijn aan
veroudering door normaal gebruik zoals bv. batterijen (zowel oplaadbare als nietoplaadbare, ingebouwd of vervangbaar), lampen, rubberen onderdelen,
aandrijfriemen... (onbeperkte lijst).
- defecten ten gevolge van brand, waterschade, bliksem, ongevallen,
natuurrampen, enz.
- defecten veroorzaakt door opzet, nalatigheid of door een onoordeelkundige
behandeling, slecht onderhoud of abnormaal gebruik of gebruik van het toestel
strijdig met de voorschriften van de fabrikant.
- schade ten gevolge van een commercieel, professioneel of collectief gebruik van
het apparaat (bij professioneel gebruik wordt de garantieperiode herleid tot 6
maand).
- schade veroorzaakt door onvoldoende bescherming bij transport van het
apparaat.
- alle schade door wijzigingen, reparaties of modificaties uitgevoerd door derden
zonder toestemming van Velleman®.
• Toestellen dienen ter reparatie aangeboden te worden bij uw Velleman®verdeler. Het toestel dient vergezeld te zijn van het oorspronkelijke aankoopbewijs.
Zorg voor een degelijke verpakking (bij voorkeur de originele verpakking) en voeg
een duidelijke foutomschrijving bij.
• Tip: alvorens het toestel voor reparatie aan te bieden, kijk nog eens na of er geen
voor de hand liggende reden is waarom het toestel niet naar behoren werkt (zie
handleiding). Op deze wijze kunt u kosten en tijd besparen. Denk eraan dat er ook
voor niet-defecte toestellen een kost voor controle aangerekend kan worden.
• Bij reparaties buiten de waarborgperiode zullen transportkosten aangerekend
worden.
• Elke commerciële garantie laat deze rechten onverminderd.
Bovenstaande opsomming kan eventueel aangepast worden naargelang de
aard van het product (zie handleiding van het betreffende product).
Garantie de service et de qualité Velleman®
Depuis 1972, Velleman® a gagné une vaste expérience dans le secteur de
l’électronique et est actuellement distributeur dans plus de 85 pays.
Tous nos produits répondent à des exigences de qualité rigoureuses et à des
dispositions légales en vigueur dans l’UE. Afin de garantir la qualité, nous
soumettons régulièrement nos produits à des contrôles de qualité supplémentaires,
tant par notre propre service qualité que par un service qualité externe. Dans le
cas improbable d’un défaut malgré toutes les précautions, il est possible d’invoquer
notre garantie (voir les conditions de garantie).
Conditions générales concernant la garantie sur les produits grand public
(pour l’UE) :
• tout produit grand public est garanti 24 mois contre tout vice de production ou de
matériaux à dater du jour d’acquisition effective ;
• si la plainte est justifiée et que la réparation ou le remplacement d’un article est
jugé impossible, ou lorsque les coûts s’avèrent disproportionnés, Velleman®
s’autorise à remplacer ledit article par un article équivalent ou à rembourser la
totalité ou une partie du prix d’achat. Le cas échéant, il vous sera consenti un
article de remplacement ou le remboursement complet du prix d’achat lors d’un
défaut dans un délai de 1 an après l’achat et la livraison, ou un article de
remplacement moyennant 50% du prix d’achat ou le remboursement de 50% du
prix d’achat lors d’un défaut après 1 à 2 ans.
• sont par conséquent exclus :
- tout dommage direct ou indirect survenu à l’article après livraison (p.ex.
dommage lié à l’oxydation, choc, chute, poussière, sable, impureté…) et provoqué
par l’appareil, ainsi que son contenu (p.ex. perte de données) et une indemnisation
éventuelle pour perte de revenus ;
- toute pièce ou accessoire nécessitant un remplacement causé par un usage
normal comme p.ex. piles (rechargeables comme non rechargeables, intégrées ou
remplaçables), ampoules, pièces en caoutchouc, courroies… (liste illimitée) ;
- tout dommage qui résulte d’un incendie, de la foudre, d’un accident, d’une
catastrophe naturelle, etc. ;
- out dommage provoqué par une négligence, volontaire ou non, une utilisation ou
un entretien incorrect, ou une utilisation de l’appareil contraire aux prescriptions du
fabricant ;
- tout dommage à cause d’une utilisation commerciale, professionnelle ou
collective de l’appareil (la période de garantie sera réduite à 6 mois lors d’une
utilisation professionnelle) ;
- tout dommage à l’appareil qui résulte d’une utilisation incorrecte ou différente que
celle pour laquelle il a été initialement prévu comme décrit dans la notice ;
- tout dommage engendré par un retour de l’appareil emballé dans un
conditionnement non ou insuffisamment protégé.
- toute réparation ou modification effectuée par une tierce personne sans
l’autorisation explicite de SA Velleman® ; - frais de transport de et vers Velleman®
si l’appareil n’est plus couvert sous la garantie.
• toute réparation sera fournie par l’endroit de l’achat. L’appareil doit
nécessairement être accompagné du bon d’achat d’origine et être dûment
conditionné (de préférence dans l’emballage d’origine avec mention du défaut) ;
• tuyau : il est conseillé de consulter la notice et de contrôler câbles, piles, etc.
avant de retourner l’appareil. Un appareil retourné jugé défectueux qui s’avère en
bon état de marche pourra faire l’objet d’une note de frais à charge du
consommateur ;
• une réparation effectuée en-dehors de la période de garantie fera l’objet de frais
de transport ;
• toute garantie commerciale ne porte pas atteinte aux conditions susmentionnées.
La liste susmentionnée peut être sujette à une complémentation selon le type
de l’article et être mentionnée dans la notice d’emploi.
Garantía de servicio y calidad Velleman®
Desde su fundación en 1972 Velleman® ha adquirido una amplia experiencia
como distribuidor en el sector de la electrónica en más de 85 países. Todos
nuestros productos responden a normas de calidad rigurosas y disposiciones
legales vigentes en la UE. Para garantizar la calidad, sometemos nuestros
productos regularmente a controles de calidad adicionales, tanto a través de
nuestro propio servicio de calidad como de un servicio de calidad externo. En el
caso improbable de que surgieran problemas a pesar de todas las precauciones,
es posible recurrir a nuestra garantía (véase las condiciones de garantía).
Condiciones generales referentes a la garantía sobre productos de venta al
público (para la Unión Europea):
• Todos los productos de venta al público tienen un perìodo de garantìa de 24
meses contra errores de producción o errores en materiales desde la adquisición
original;
• Si la queja está fundada y si la reparación o sustitución de un artìculo no es
posible, o si los gastos son desproporcionados, Velleman® autoriza reemplazar el
artículo por un artículo equivalente o reembolsar la totalidad o una parte del precio
de compra. En este caso, usted recibirá un artículo de recambio o el reembolso
Page 16

completo del precio de compra si encuentra algún fallo hasta un año después de la
compra y entrega, o un artículo de recambio al 50% del precio de compra o el
reembolso del 50% del precio de compra si encuentra un fallo después de 1 año y
hasta los 2 años después de la compra y entrega.
Por consiguiente, están excluidos entre otras cosas:
- todos los daños causados directa o indirectamente al aparato (p.ej. por oxidación,
choques, caída,...) y a su contenido (p.ej. pérdida de datos) después de la entrega
y causados por el aparato, y cualquier indemnización por posible pérdida de
ganancias;
- partes o accesorios, que estén expuestos al desgaste causado por un uso
normal, como por ejemplo baterías (tanto recargables como no recargables,
incorporadas o reemplazables), bombillas, partes de goma, etc. (lista ilimitada);
- defectos causados por un incendio, daños causados por el agua, rayos,
accidentes, catástrofes naturales, etc.;
- defectos causados a conciencia, descuido o por malos tratos, un mantenimiento
inapropiado o un uso anormal del aparato contrario a las instrucciones del
fabricante;
- daños causados por un uso comercial, profesional o colectivo del aparato (el
período de garantía se reducirá a 6 meses con uso profesional);
- daños causados por un uso incorrecto o un uso ajeno al que está previsto el
producto inicialmente como está descrito en el manual del usuario;
- daños causados por una protección insuficiente al transportar el aparato.
- daños causados por reparaciones o modificaciones efectuadas por una tercera
persona sin la autorización explícita de Velleman®;
- se calcula gastos de transporte de y a Velleman® si el aparato ya no está
cubierto por la garantía.
• Cualquier artìculo que tenga que ser reparado tendrá que ser devuelto a su
distribuidor Velleman®. Devuelva el aparato con la factura de compra original y
transpórtelo en un embalaje sólido (preferentemente el embalaje original). Incluya
también una buena descripción del fallo;
• Consejo: Lea el manual del usuario y controle los cables, las pilas, etc. antes de
devolver el aparato. Si no se encuentra un defecto en el artículo los gastos podrían
correr a cargo del cliente;
• Los gastos de transporte correrán a carga del cliente para una reparación
efectuada fuera del período de garantía.
• Cualquier gesto comercial no disminuye estos derechos.
La lista previamente mencionada puede ser adaptada según el tipo de
artículo (véase el manual del usuario del artículo en cuestión).
Velleman® Service- und Qualitätsgarantie
Seit der Gründung in 1972 hat Velleman® sehr viel Erfahrung als Verteiler in der
Elektronikwelt in über 85 Ländern aufgebaut.
Alle Produkte entsprechen den strengen Qualitätsforderungen und gesetzlichen
Anforderungen in der EU. Um die Qualität zu gewährleisten werden unsere
Produkte regelmäßig einer zusätzlichen Qualitätskontrolle unterworfen, sowohl von
unserer eigenen Qualitätsabteilung als auch von externen spezialisierten
Organisationen. Sollten, trotz aller Vorsichtsmaßnahmen, Probleme auftreten,
nehmen Sie bitte die Garantie in Anspruch (siehe Garantiebedingungen).
Allgemeine Garantiebedingungen in Bezug auf Konsumgüter (für die
Europäische Union):
• Alle Produkte haben für Material- oder Herstellungsfehler eine Garantieperiode
von 24 Monaten ab Verkaufsdatum.
• Wenn die Klage berechtigt ist und falls eine kostenlose Reparatur oder ein
Austausch des Gerätes unmöglich ist, oder wenn die Kosten dafür
unverhältnismäßig sind, kann Velleman® sich darüber entscheiden, dieses Produkt
durch ein gleiches Produkt zu ersetzen oder die Kaufsumme ganz oder teilweise
zurückzuzahlen. In diesem Fall erhalten Sie ein Ersatzprodukt oder eine
Rückzahlung im Werte von 100% der Kaufsumme im Falle eines Defektes bis zu 1
Jahr nach Kauf oder Lieferung, oder Sie bekommen ein Ersatzprodukt im Werte
von 50% der Kaufsumme oder eine Rückzahlung im Werte von 50 % im Falle
eines Defektes im zweiten Jahr.
• Von der Garantie ausgeschlossen sind:
- alle direkten oder indirekten Schäden, die nach Lieferung am Gerät und durch
das Gerät verursacht werden (z.B. Oxidation, Stöße, Fall, Staub, Schmutz,
Feuchtigkeit, ...), sowie auch der Inhalt (z.B. Datenverlust), Entschädigung für
eventuellen Gewinnausfall.
- Verbrauchsgüter, Teile oder Zubehörteile, die durch normalen Gebrauch dem
Verschleiß ausgesetzt sind, wie z.B. Batterien (nicht nur aufladbare, sondern auch
nicht aufladbare, eingebaute oder ersetzbare), Lampen, Gummiteile, Treibriemen,
usw. (unbeschränkte Liste).
- Schäden verursacht durch Brandschaden, Wasserschaden, Blitz, Unfälle,
Naturkatastrophen, usw.
- Schäden verursacht durch absichtliche, nachlässige oder unsachgemäße
Anwendung, schlechte Wartung, zweckentfremdete Anwendung oder
Nichtbeachtung von Benutzerhinweisen in der Bedienungsanleitung.
- Schäden infolge einer kommerziellen, professionellen oder kollektiven
Anwendung des Gerätes (bei gewerblicher Anwendung wird die Garantieperiode
auf 6 Monate zurückgeführt).
- Schäden verursacht durch eine unsachgemäße Verpackung und
unsachgemäßen Transport des Gerätes.
- alle Schäden verursacht durch unautorisierte Änderungen, Reparaturen oder
Modifikationen, die von einem Dritten ohne Erlaubnis von Velleman®
vorgenommen werden.
• Im Fall einer Reparatur, wenden Sie sich an Ihren Velleman®-Verteiler. Legen
Sie das Produkt ordnungsgemäß verpackt (vorzugsweise die Originalverpackung)
und mit dem Original-Kaufbeleg vor. Fügen Sie eine deutliche Fehlerbeschreibung
hinzu.
• Hinweis: Um Kosten und Zeit zu sparen, lesen Sie die Bedienungsanleitung
nochmals und überprüfen Sie, ob es keinen auf de Hand liegenden Grund gibt, ehe
Sie das Gerät zur Reparatur zurückschicken. Stellt sich bei der Überprüfung des
Gerätes heraus, dass kein Geräteschaden vorliegt, könnte dem Kunden eine
Untersuchungspauschale berechnet.
• Für Reparaturen nach Ablauf der Garantiefrist werden Transportkosten
berechnet.
• Jede kommerzielle Garantie lässt diese Rechte unberührt.
Die oben stehende Aufzählung kann eventuell angepasst werden gemäß der
Art des Produktes (siehe Bedienungsanleitung des Gerätes).
Garantia de serviço e de qualidade Velleman®
Desde a sua fundação em 1972 Velleman® tem adquirido uma amplia experiencia
no sector da eletrónica com uma distribuição em mais de 85 países.
Todos os nossos produtos respondem a exigências rigorosas e a disposições
legais em vigor na UE. Para garantir a qualidade, submetemos regularmente os
nossos produtos a controles de qualidade suplementares, com o nosso próprio
serviço qualidade como um serviço de qualidade externo. No caso improvável de
um defeito mesmo com as nossas precauções, é possível invocar a nossa
garantia. (ver as condições de garantia).
Condições gerais com respeito a garantia sobre os produtos grande público
(para a UE):
• qualquer produto grande público é garantido 24 mês contra qualquer vício de
produção ou materiais a partir da data de aquisição efectiva;
• no caso da reclamação ser justificada e que a reparação ou substituição de um
artigo é impossível, ou quando os custo são desproporcionados, Velleman®
autoriza-se a substituir o dito artigo por um artigo equivalente ou a devolver a
totalidade ou parte do preço de compra. Em outro caso, será consentido um artigo
de substituição ou devolução completa do preço de compra no caso de um defeito
no prazo de 1 ano depois da data de compra e entrega, ou um artigo de
substituição pagando o valor de 50% do preço de compra ou devolução de 50% do
preço de compra para defeitos depois de 1 a 2 anos.
• estão por consequência excluídos:
- todos os danos directos ou indirectos depois da entrega do artigo (p.ex. danos
ligados a oxidação, choques, quedas, poeiras, areias, impurezas…) e provocado
pelo aparelho, como o seu conteúdo (p.ex. perca de dados) e uma indemnização
eventual por perca de receitas;
- consumíveis, peças ou acessórios sujeitos a desgaste causado por um uso
normal, como p.ex. pilhas (recarregáveis, não recarregáveis, incorporadas ou
substituìveis), lâmpadas, peças em borracha correias… (lista ilimitada);
- todos os danos que resultem de um incêndio, raios, de um acidente, de una
catastrophe natural, etc.;
- danos provocados por negligencia, voluntária ou não, uma utilização ou
manutenção incorrecta, ou uma utilização do aparelho contrária as prescrições do
fabricante ;
- todos os danos por causa de uma utilização comercial, profissional ou colectiva
do aparelho ( o período de garantia será reduzido a 6 meses para uma utilização
profissional);
- todos os danos no aparelho resultando de uma utilização incorrecta ou diferente
daquela inicialmente prevista e descrita no manual de utilização;
- todos os danos depois de uma devolução não embalada ou mal protegida ao
nível do acondicionamento.
- todas as reparações ou modificações efectuadas por terceiros sem a autorização
de SA Velleman®;
- despesas de transporte de e para Velleman® se o aparelho não estiver coberto
pela garantia.
• qualquer reparação será fornecida pelo local de compra. O aparelho será
obrigatoriamente acompanhado do talão ou factura de origem e bem
acondicionado (de preferência dentro da embalagem de origem com indicação do
defeito ou avaria);
• dica: aconselha-mos a consulta do manual e controlar cabos, pilhas, etc. antes
de devolver o aparelho. Um aparelho devolvido que estiver em bom estado será
cobrado despesas a cargo do consumidor;
• uma reparação efectuada fora da garantia, será cobrado despesas de transporte;
• qualquer garantia comercial não prevalece as condições aqui mencionadas.
A lista pode ser sujeita a um complemento conforme o tipo de artigo e estar
mencionada no manual de utilização.
Imported for PEREL by Velleman nv
Legen Heirweg 33, 9890 Gavere, Belgium
Made in PRC
www.perel.eu
 Loading...