

Page 1
SOL9
SOLAR SHED LIGHT
TUINHUISVERLICHTING OP ZONNE-ENERGIE
LAMPE D'ENTRÉE À PANNEAU SOLAIRE
ILUMINACIÓN CON PLACA SOLAR
SOLARBELEUCHTUNG
ILUMINAÇÃO POR PAINEL SOLAR
USER MANUAL
GEBRUIKERSHANDLEIDING
NOTICE D’EMPLOI
MANUAL DEL USUARIO
BEDIENUNGSHANDLEITUNG
MANUAL DO UTILIZADOR
Page 2
SOL9 – SOLAR SHED LIGHT
1. Introduction
To all residents of the European Union
Important environmental information about this product
This symbol on the device or the package indicates that disposal of the device after its lifecycle could harm the
environment.
Do not dispose of the unit (or batteries) as unsorted municipal waste; it should be taken to a specialized company
for recycling.
This device should be returned to your distributor or to a local recycling service.
Respect the local environmental rules.
If in doubt, contact your local waste disposal authorities.
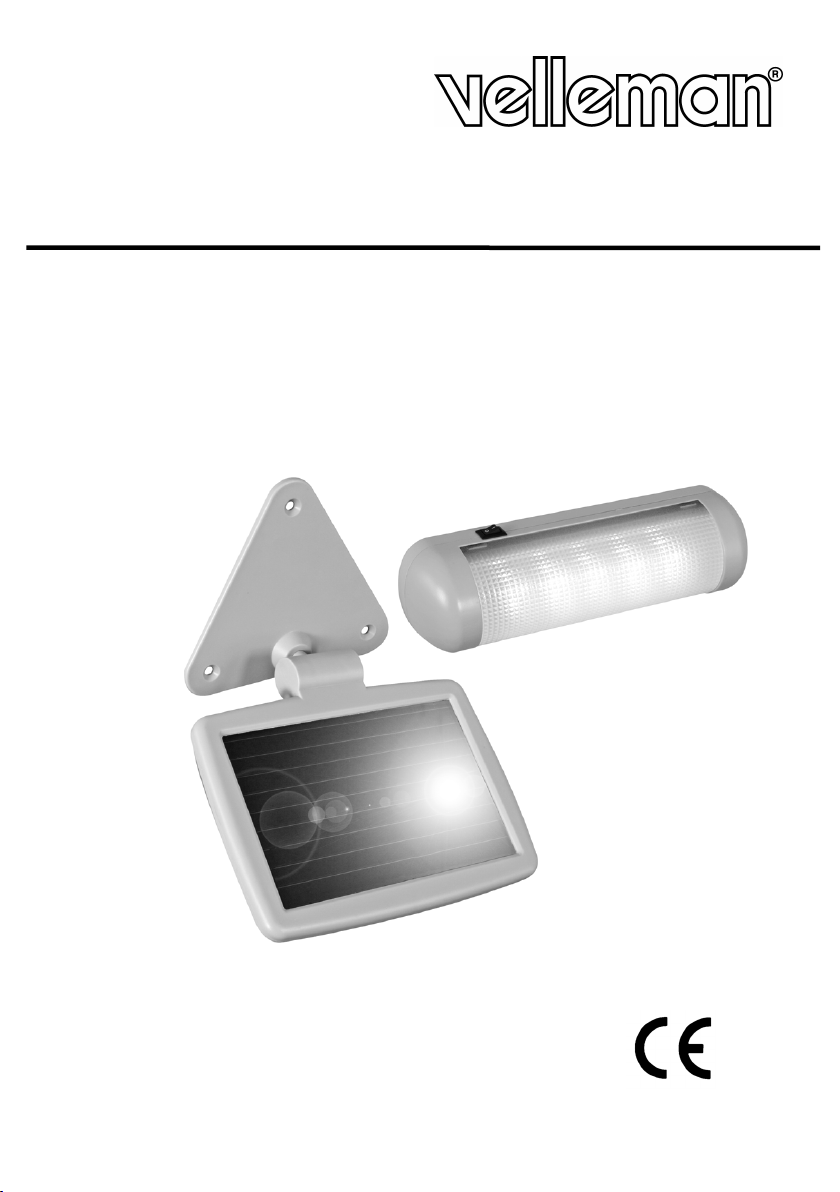
Thank you for choosing Velleman! Please read the manual thoroughly before bringing this device into service. If the device was
damaged in transit, don't install or use it and contact your dealer. Contents: 1 x solar panel, 1 x LED lamp, 5 x mounting screws
(M4 x 20) and this manual.
Add light to your shed, gazebo, greenhouse or anywhere else without electrical outlets! No wiring required.
2. Safety Instructions
• Damage caused by disregard of certain guidelines in this manual is not covered by the warranty and the dealer will not
accept responsibility for any ensuing defects or problems.
• Wipe the device regularly with a moist, lint-free cloth. Do not use alcohol or solvents.
• The base of the lamp is equipped with magnets and should never be placed close to monitors, credit cards, etc.
• Note that damage caused by user modifications to the device is not covered by the warranty.
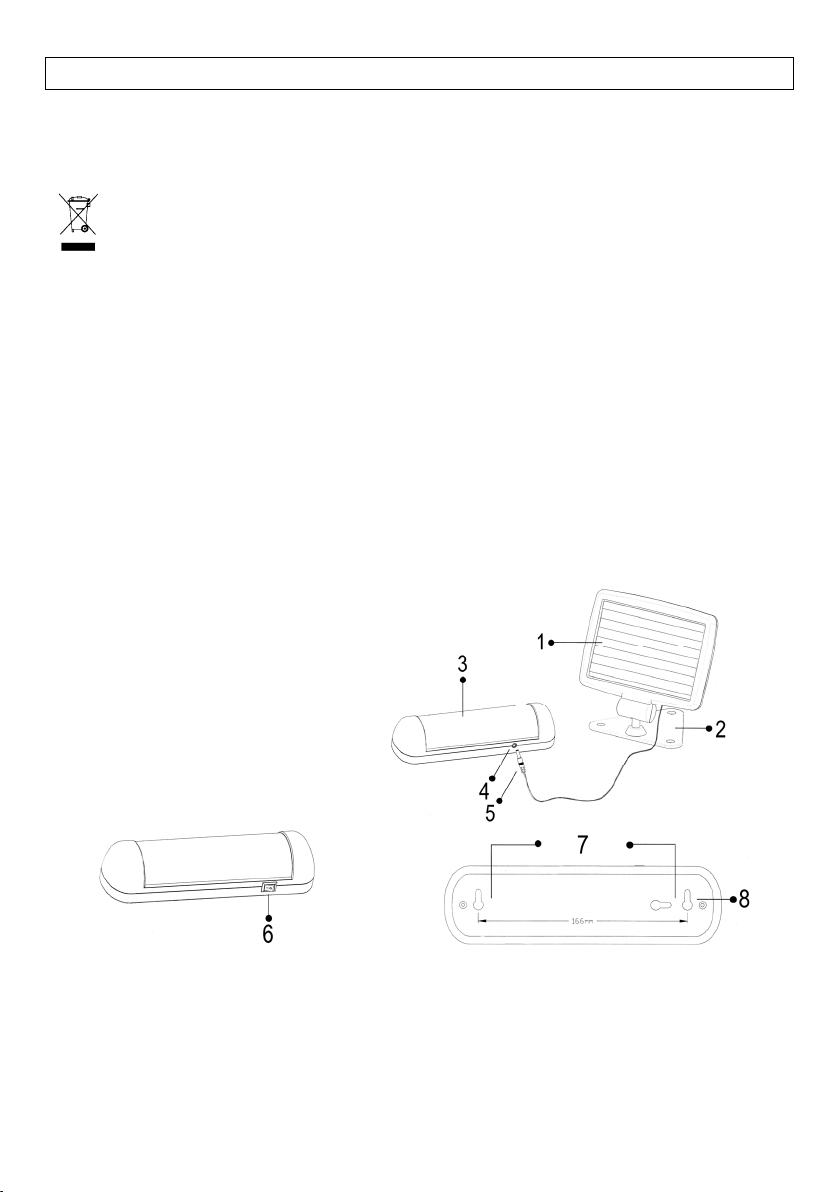
3. Description
1. solar panel
2. solar panel mount
3. LED lamp
4. power input
5. power supply plug
6. on/off switch
7. built-in magnets
8. mounting slots
SOL9 VELLEMAN
2
Page 3
4. Mounting
a. Solar Panel
• Choose a sunlit mounting area. Fix the panel to the surface with the included screws. Use an appropriate screwdriver.
• The panel can be rotated over 360° and tilted to maximize its sun exposure.
b. Lamp
• Choose an appropriate mounting area. Measure the distance between the screw slots. Mark the distance onto the
mounting surface.
• Drill holes using an appropriate power drill and insert a screw into each hole. Insert a nylon plug (not incl.) if
necessary.
• Secure the lamp to the screws.
• The lamp can also be fixed to a metal surface without using the screws thanks to the magnetic base.
Attention: Remember to mount the panel and the lamp within each other’s reach, i.e. the length of the cable (± 2.5m).
5. Operation
• Insert the power supply plug into the power input.
• Charge the lamp for a period of 14 hours prior to the first use.
• Turn the lamp on or off by means of the on/off switch. The lamp has an operation span of four hours with fully-charged
batteries.
6. Technical Specifications
Cable Length ± 2.5m
Solar Panel Dimensions 145 x 95mm
Total Weight 550g
For more info concerning this product, please visit our website www.velleman.eu.
The information in this manual is subject to change without prior notice.
SOL9 – TUINHUISVERLICHTING OP ZONNE-ENERGIE
1. Inleiding
Aan alle ingezetenen van de Europese Unie
Belangrijke milieu-informatie betreffende dit product
Dit symbool op het toestel of de verpakking geeft aan dat, als het na zijn levenscyclus wordt weggeworpen, dit
toestel schade kan toebrengen aan het milieu.
Gooi dit toestel (en eventuele batterijen) niet bij het gewone huishoudelijke afval; het moet bij een gespecialiseerd
bedrijf terechtkomen voor recyclage.
U moet dit toestel naar uw verdeler of naar een lokaal recyclagepunt brengen.
Respecteer de plaatselijke milieuwetgeving.
Hebt u vragen, contacteer dan de plaatselijke autoriteiten inzake verwijdering.
Dank u voor uw aankoop! Lees deze handleiding grondig voor u het toestel in gebruik neemt. Werd het toestel beschadigd
tijdens het transport, installeer het dan niet en raadpleeg uw dealer. Inhoud: 1 x zonnepaneel, 1 x ledlamp, 5 x schroeven
(M4 x 20) en deze handleiding.
Verlicht uw tuinhuisje, serre of daar waar geen stopcontact voorhanden is! Geen bekabeling vereist.
SOL9 VELLEMAN
3
Page 4
2. Veiligheidsinstructies
• De garantie geldt niet voor schade door het negeren van bepaalde richtlijnen in deze handleiding en uw dealer zal de
verantwoordelijkheid afwijzen voor defecten of problemen die hier rechtstreeks verband mee houden.
• Maak het toestel geregeld schoon met een vochtige, niet pluizende doek. Gebruik geen alcohol of solvent.
• De lampvoet is uitgerust met magneten. Houd deze voet uit de buurt van monitors, kredietkaarten, enz.
• Schade door wijzigingen die de gebruiker heeft aangebracht aan het toestel vallen niet onder de garantie.
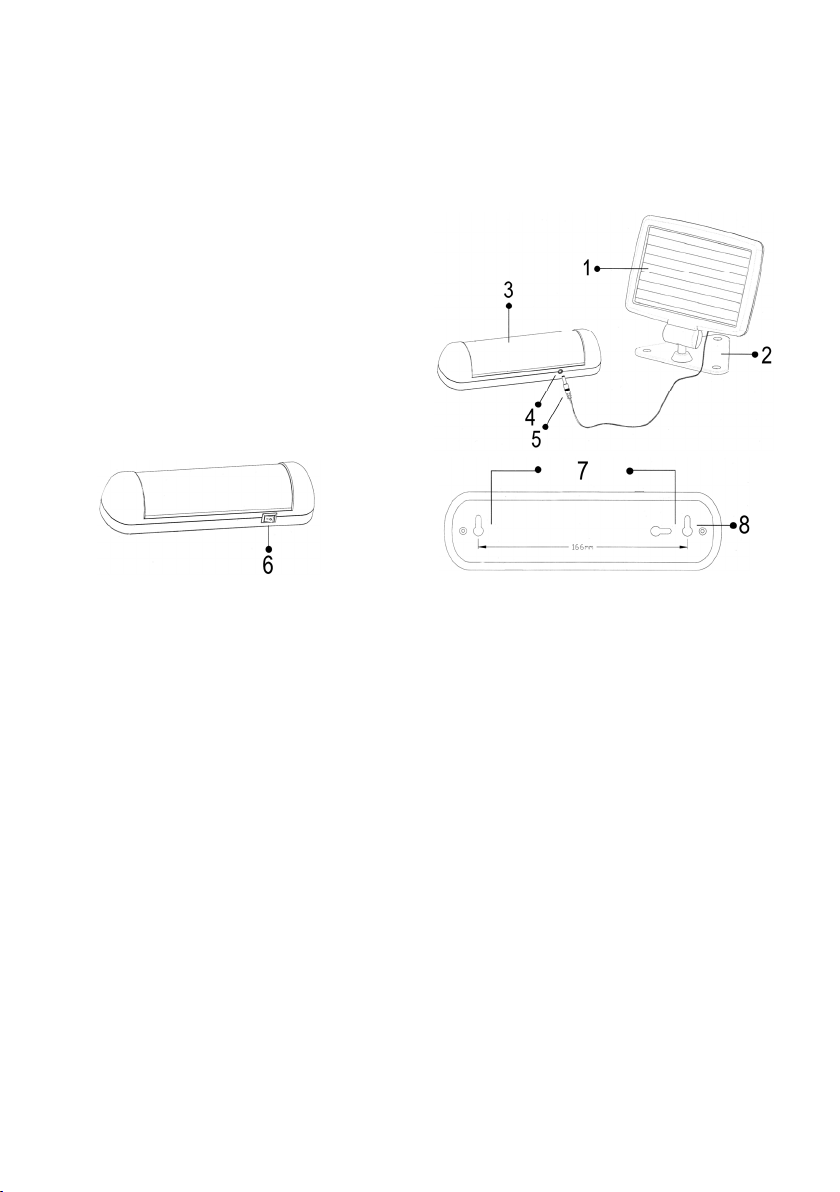
3. Omschrijving
1. zonnepaneel
2. montagevoet zonnepaneel
3. ledlamp
4. voedingsingang
5. voedingsplug
6. aan-uitschakelaar
7. magnetische lampvoet
8. schroefgaten
4. Montage
a. Zonnepaneel
• Kies een montageplaats goed door de zon verlicht. Maak het paneel aan het oppervlak vast met behulp van een
geschikte schroevendraaier en de meegeleverde schroeven
• Het paneel is over 360° roteerbaar. Roteer het paneel naar de zon toe.
b. Lamp
• Kies een geschikte montageplaats. Meet de afstand tussen de schroefgaten achteraan de lamp. Markeer de afstand
op het oppervlak.
• Boor de gaten met behulp van een geschikte boormachine. Plaats de schroeven. Plaats eerst een nylon plug (niet
meegelev.) indien nodig.
• Monteer de lamp.
• De lamp kan ook aan een metalen oppervlak gemonteerd worden dankzij de magnetische voet.
Opgelet: Monteer het paneel en de lamp binnen het bereik van de voedingskabel (± 2.5m).
5. Gebruik
• Steek de voedingsplug in de voedingsingang.
• Laad de lamp gedurende 14 uur vóór het eerste gebruik.
• Schakel de lamp in en uit via de aan-uitschakelaar. De lamp heeft een gebruiksduur van vier uur met volledig geladen
batterijen.
SOL9 VELLEMAN
4
Page 5

6. Technische specificaties
Kabellengte ± 2.5m
Afmetingen zonnepaneel 145 x 95mm
Gewicht 550g
Voor meer informatie omtrent dit product, zie www.velleman.eu.
De informatie in deze handleiding kan te allen tijde worden gewijzigd zonder voorafgaande kennisgeving.
SOL9 – LAMPE D'ENTRÉE À PANNEAU SOLAIRE
1. Introduction
Aux résidents de l'Union européenne
Des informations environnementales importantes concernant ce produit
Ce symbole sur l'appareil ou l'emballage indique que l’élimination d’un appareil en fin de vie peut polluer
l'environnement.
Ne pas jeter un appareil électrique ou électronique (et des piles éventuelles) parmi les déchets municipaux non
sujets au tri sélectif ; une déchèterie traitera l’appareil en question.
Renvoyer les équipements usagés à votre fournisseur ou à un service de recyclage local.
Il convient de respecter la réglementation locale relative à la protection de l’environnement.
En cas de questions, contacter les autorités locales pour élimination.
Nous vous remercions de votre achat ! Lire la présente notice attentivement avant la mise en service de l’appareil. Si
l’appareil a été endommagé pendant le transport, ne pas l’installer et consulter votre revendeur. Contenu : 1 x panneau
solaire, 1 x lampe LED, 5 x vis de montage (M4 x 20) et cette notice.
Éclairez vos espaces d’extérieur comme les abris de jardin, pavillons et serres ou toute pièce sans prise électrique ! Ne
nécessite aucun câblage.
2. Prescriptions de sécurité
• La garantie ne s’applique pas aux dommages survenus en négligeant certaines directives de cette notice et votre
revendeur déclinera toute responsabilité pour les problèmes et les défauts qui en résultent.
• Essuyer l’appareil régulièrement avec un chiffon humide non pelucheux. Éviter l’usage d’alcool et de solvants.
• Le socle de la lampe est équipé d’aimants. Tenir la lampe à l’écart de moniteurs, cartes de crédit, etc.
• Garder votre SOL9 hors de la portée de personnes non qualifiées et de jeunes enfants.
3. Description
1. panneau solaire
2. socle du panneau solaire
3. lampe LED
4. prose d’entrée d’alimentation
5. fiche d’alimentation
6. interrupteur marche/arrêt
7. aimants intégrés
8. trous de montage
SOL9 VELLEMAN
5
Page 6

4. Montage
a. Panneau solaire
• Choisir un endroit de montage jouissant d’un bon ensoleillement. Fixer le panneau solaire à l’aide d’un tournevis
approprié et les vis incluses.
• Le panneau est tournante sur 360° ce qui permet de diriger les cellules voltaïques face au soleil.
b. Lampe
• Choisir un endroit de montage approprié. Mesurer la distance entre les trous à l’arrière de la lampe. Marquer
l’emplacement des trous sur la surface de montage.
• Percer les trous à l’aide d’une perceuse et insérer une vis dans chaque trou. Insérer d’abord une cheville en nylon
(non incl.) si nécessaire.
• Fixer la lampe.
• La lampe peut également être fixée sur une surface métallique grâce à son socle aimanté.
Attention : Veiller à monter le panneau et la lampe à une distance ne pas excédant la longueur du câble (± 2.5m).
5. Emploi
• Insérer la fiche d’alimentation dans la prise d’entrée de la lampe.
• Charger la lampe pendant une période de 14 heures avant le premier usage.
• Allumer et éteindre la lampe à l’aide de l’interrupteur marche/arrêt. La lampe a une autonomie de quatre heures à partir
d’un accu complètement chargé.
6. Spécifications techniques
Longueur du câble ± 2.5m
Dimensions du panneau solaire 145 x 95mm
Poids 550g
N’employer cet appareil qu’avec des accessoires d’origine. SA Velleman ne sera aucunement responsable de
dommages ou lésions survenus à un usage (incorrect) de cet appareil.
Pour plus d’information concernant cet article, visitez notre site web www.velleman.eu.
Toutes les informations présentées dans cette notice peuvent être modifiées sans notification préalable.
SOL9 VELLEMAN
6
Page 7

SOL9 – ILUMINACIÓN CON PLACA SOLAR
1. Introducción
A los ciudadanos de la Unión Europea
Importantes informaciones sobre el medio ambiente concerniente este producto
Este símbolo en este aparato o el embalaje indica que, si tira las muestras inservibles, podrían dañar el medio
ambiente.
No tire este aparato (ni las pilas eventuales) en la basura doméstica; debe ir a una empresa especializada en
reciclaje. Devuelva este aparato a su distribuidor o a la unidad de reciclaje local.
Respete las leyes locales en relación con el medio ambiente.
Si tiene dudas, contacte con las autoridades locales para residuos.
¡Gracias por haber comprado la SOL9! Lea atentamente las instrucciones del manual antes de usar el aparato. Si el aparato
ha sufrido algún daño en el transporte no lo instale y póngase en contacto con su distribuidor. Incluye: 1 x placa solar,
1 x lámpara LED, 5 x tornillos de montaje (M4 x 20) y este manual del usuario.
¡Ilumine los lugares fuera de casa como p.ej. la glorieta, el invernadero o cualquier otro lugar sin enchufe! ¡No necesita
ningún cableado adicional!
2. Instrucciones de seguridad
• Daños causados por descuido de las instrucciones de seguridad de este manual invalidarán su garantía y su distribuidor
no será responsable de ningún daño u otros problemas resultantes.
• Limpie el aparato regularmente con un paño húmedo sin pelusas. Evite el uso de alcohol y de disolventes.
• El pie de la lámpara está equipado con imanes. Mantenga la lámpara lejos del alcance de monitores, tarjetas de crédito, etc.
• Los daños causados por modificaciones no autorizadas, no están cubiertos por la garantía.
3. Descripción
1. placa solar
2. pie de la placa solar
3. lámpara LED
4. entrada de alimentación
5. conector de alimentación
6. interruptor ON/OFF
7. imanes incorporados
8. agujeros de montaje
4. Montaje
a. Placa solar
• Seleccione un lugar de montaje expuesto al sol. Fije la placa solar con un destornillador adecuado y los tornillos
incluidos.
• La placa puede girar 360° lo que permite dirigirla hacia el sol.
SOL9 VELLEMAN
7
Page 8

b. Lámpara
• Seleccione un lugar de montaje adecuado. Mida la distancia entre los agujeros de la parte trasera de la lámpara.
Marque el emplazamiento de los agujeros en la superficie de montaje.
• Taladre los agujeros con un taladro e introduzca un tornillo en cada agujero. Primero, introduzca un taco de nylon (no
incl.) si fuera necesario.
• Fije la lámpara.
• También es posible fijar la lámpara en una superficie de metal gracias al pie magnético.
¡Ojo!: Monte la placa y la lámpara dentro del alcance del cable de alimentación (± 2.5m).
5. Uso
• Introduzca el conector de alimentación en la entrada de la lámpara.
• Cargue la lámpara durante un período de 14 horas antes del primer uso.
• Encienda y apague la lámpara con el interruptor ON/OFF. La lámpara tiene una autonomía de cuatro horas con una
batería completamente cargada.
6. Especificaciones
Longitud del cable ± 2.5m
Dimensiones de la placa solar 145 x 95mm
Peso 550g
Utilice este aparato sólo con los accesorios originales. Velleman SA no será responsable de daños ni lesiones
causados por un uso (indebido) de este aparato.
Para más información sobre este producto, visite nuestra página web www.velleman.eu.
Se pueden modificar las especificaciones y el contenido de este manual sin previo aviso.
SOL9 – SOLARBELEUCHTUNG
1. Einführung
An alle Einwohner der Europäischen Union
Wichtige Umweltinformationen über dieses Produkt
Dieses Symbol auf dem Produkt oder der Verpackung zeigt an, dass die Entsorgung dieses Produktes nach
seinem Lebenszyklus der Umwelt Schaden zufügen kann.
Entsorgen Sie die Einheit (oder verwendeten Batterien) nicht als unsortiertes Hausmüll; die Einheit oder
verwendeten Batterien müssen von einer spezialisierten Firma zwecks Recycling entsorgt werden.
Diese Einheit muss an den Händler oder ein örtliches Recycling-Unternehmen retourniert werden.
Respektieren Sie die örtlichen Umweltvorschriften.
Falls Zweifel bestehen, wenden Sie sich für Entsorgungsrichtlinien an Ihre örtliche Behörde.
Wir bedanken uns für den Kauf der SOL9! Lesen Sie diese Bedienungsanleitung vor Inbetriebnahme sorgfältig durch.
Überprüfen Sie, ob Transportschäden vorliegen. Sollte dies der Fall sein, verwenden Sie das Gerät nicht und wenden Sie
sich an Ihren Händler. Lieferumfang: 1 x Solarzellenplatte, 1 x LED-Lampe, 5 x Schrauben (M4 x 20) und diese
Bedienungsanleitung.
Beleuchten Sie das Gartenhaus, das Gartenzimmer oder die Räume, wo es keine Steckdose gibt! Benötigt keine zusätzliche
Verdrahtung.
SOL9 VELLEMAN
8
Page 9

2. Sicherheitshinweise
• Bei Schäden, die durch Nichtbeachtung der Bedienungsanleitung verursacht werden, erlischt der Garantieanspruch. Für
daraus resultierende Folgeschäden übernimmt der Hersteller keine Haftung.
• Verwenden Sie zur Reinigung ein feuchtes, fusselfreies Tuch. Verwenden Sie auf keinen Fall Alkohol oder irgendwelche
Lösungsmittel.
• Der Lampenfuß ist mit Magneten ausgerüstet. Halten Sie diesen Fuß von Monitoren, Kreditkarten, usw. fern.
• Bei Schäden verursacht durch eigenmächtige Änderungen erlischt der Garantieanspruch.
3. Umschreibung
1. Solarzellenplatte
2. Montagefuß der Solarzellenplatte
3. LED-Lampe
4. Netzeingang
5. Netzstecker
6. EIN/AUS-Schalter
7. magnetischer Lampenfuß
8. Schraubenlöcher
4. Montage
a. Solarzellenplatte
• Wählen Sie einen sonnenbestrahlten Montageort aus. Befestigen Sie die Solarzellenplatte mit einem geeigneten
Schraubendreher und den mitgelieferten Schrauben an der Oberfläche.
• Die Solarzellenplatte kann 360° gedreht werden. Rotieren Sie die Solarzellenplatte in die Richtung der Sonne.
b. Lampe
• Wählen Sie einen Montageort aus. Messen Sie den Abstand zwischen den Schraubenlöchern auf der Rückseite der
Lampe. Markieren Sie diesen Abstand.
• Bohren Sie die Löcher mit einer geeigneten Bohrmaschine. Schrauben Sie die Schrauben fest. Verwenden Sie zuerst
einen Nylondübel (nicht mitgeliefert) wenn nötig.
• Montieren Sie die Lampe.
• Die Lampe kann dank des magnetischen Fußes auch an einer Metalloberfläche befestigt werden.
Achtung: Montieren Sie die Solarzellenplatte und die Lampe im Bereich des Netzkabels (± 2.5m).
SOL9 VELLEMAN
9
Page 10

5. Anwendung
• Stecken Sie den Netzstecker in den Netzeingang.
• Laden Sie die Lampe vor dem ersten Gebrauch während 14 Stunden.
• Schalten Sie die Lampe über den EIN/AUS-Schalter ein und aus. Die Lampe hat mit völlig geladenen Batterien eine
Anwendungsdauer von vier Stunden.
6. Technische Daten
Kabellänge ± 2.5m
Abmessungen Solarzellenplatte 145 x 95mm
Gewicht 550g
Für mehr Informationen zu diesem Produkt, siehe www.velleman.eu.
Alle Änderungen ohne vorherige Ankündigung vorbehalten.
SOL9 – ILUMINAÇÃO POR PAINEL SOLAR
1. Introdução
Aos cidadãos da União Europeia
Importantes informações sobre o ambiente no que respeita a este produto
Este símbolo no aparelho ou na embalagem indica que, enquanto desperdícios, podem causar danos no meio
ambiente. Não deite o aparelho (nem as pilhas se as houver) no lixo doméstico; dirija-se a una empresa
especializada em reciclagem. Devolva o aparelho ao seu distribuidor ou ao posto de reciclagem local.
Respeite as leis locais relativas ao meio ambiente.
Em caso de dúvidas, contacte as autoridades locais para os resíduos.
Obrigada por ter adquirido o SOL9! Leia atentamente as instruções deste manual antes de usar o aparelho. Caso o
aparelho tenha sofrido algum dano durante o transporte não o instale e entre em contacto com o seu distribuidor. Inclui: 1 x
painel solar, 1 x lâmpada LED, 5 x parafusos de montagem (M4 x 20) e este manual do utilizador.
Ilumine os locais fora de casa como como por ex. o alpendre, a estufa ou qualquer outro lugar sem ficha! Não necessita de
cablagem adicional!
2. Instruções de segurança
• Danos causados por descuido relativamente às instruções de segurança referidas neste manual anulam a garantia e o
seu distribuidor não será responsável por quaisquer danos ou outros problemas resultantes.
• Limpe o aparelho regularmente com um pano húmido sem pêlo. Evite o uso de alcool e dissolventes.
• O pé da lâmpada está equipado com ímanes. Mantenha a lâmpada afastada de monitores, cartões de crédito, etc.
• Os danos causados por modificações não autorizadas, não estão cobertos pela garantia.
SOL9 VELLEMAN
10
Page 11

3. Descrição
1. painel solar
2. pé do painel solar
3. lâmpada LED
4. entrada de alimentação
5. conector de alimentação
6. interruptor ON/OFF
7. ímanes incorporados
8. furos de montagem
4. Montagem
a. Painel solar
• Seleccione um local de montagem exposto so sol. Fixe o painel solar com uma ferramenta adequada e usando os
parafusos incluídos.
• O painel pode girar 360° o que permite virá-lo na direcção do sol.
b. Lâmpada
• Seleccione um local de montagem apropriado. Meça a distância entre os furos na parte traseira da lâmpada. Marque
a posição dos furos no local de montagem.
• Faça os furos e introduza um parafuso em cada um. Meta uma bucha de nylon (não incl.) caso seja necessário.
• Fixe a lâmpada.
• Também é possível fixar a lâmpada a uma superficie metálica graças ao pé magnético.
Atenção!: Monte o painel e a lâmpada tendo em conta o comprimento do cabo de alimentação (± 2.5m).
5. Utilização
• Introduza o conector de alimentação na entrada da lâmpada.
• Carregue a lâmpada por um período de 14 horas antes da primeira utilização.
• Acenda e apague a lâmpada através do interruptor ON/OFF. A lâmpada tem uma autonomía de quatro horas com a
bateria completamente carregada.
6. Especificações
Comprimento do cabo ± 2.5m
Dimensões do painel solar 145 x 95mm
Peso 550g
Utilize este aparelho apenas com acessórios originais. A Velleman SA não será responsável por quaisquer danos
ou lesões causados pelo (indevido) deste aparelho. Para mais informações acerca deste produto, visite a nossa
página web www.velleman.eu. Podem alterar-se as especificações e o conteúdo deste manual sem aviso prévio.
SOL9 VELLEMAN
11
Page 12

Velleman® Service and Quality Warrant y
Velleman® has over 35 years of exper ience in the electronics world and dis tributes its products in more than 85 countr ies.
All our products fulfil strict qual ity requirements and legal stipu lations in the EU. In order to ensure t he quality, our products regularl y go through an extra quality
check, both by an internal qualit y department and by specialized external organisations. If, all precautionar y measures notwithstanding, problem s should occur,
please make appeal to our warrant y (see guarantee conditions).
General Warranty Conditions Concerning Consumer Products (for EU):
• All consumer products are subject to a 24- month warranty on production fla ws and defective material as from the origin al date of purchase.
• Velleman® can decide to replace an article with an equivalent article, or to refund the retail value total ly or partially when the complaint is valid and a free repair or
replacement of the article is impos sible, or if the expenses are out of proport ion.
You will be delivered a replacing artic le or a refund at the value of 100% of th e purchase price in case of a flaw occurred in the first year after the date of purchase
and delivery, or a replacing article at 50% of the purchase price or a refund at t he value of 50% of the retail value i n case of a flaw occurred in the second year after
the date of purchase and delivery.
• Not covered by warranty:
- all direct or indirect damage caus ed after delivery to the article (e.g. by oxidation, shocks, falls, dust, dir t, humidity...), and by the article, as wel l as its contents
(e.g. data loss), compensation for loss of profits;
- frequently replaced consumable goods, par ts or accessories such as batteries, lam ps, rubber parts, drive belts... (unlimited list);
- flaws resulting from fire, water damage, lightning, accident, natural disaster, etc . …;
- flaws caused deliberately, negligent ly or resulting from improper handling, n egligent maintenance, abusive use or us e contrary to the manufacturer’s instructions;
- damage caused by a commercial, profes sional or collective use of the article ( the warranty validity will be reduced to s ix (6) months when the article is used
professionally);
- damage resulting from an inappropr iate packing and shipping of the article ;
- all damage caused by modification, re pair or alteration performed by a third party without written permission by Vell eman®.
• Articles to be repaired must be del ivered to your Velleman® dealer, solid ly packed (preferably in the origina l packaging), and be completed with th e original receipt
of purchase and a clear flaw description.
• Hint: In order to save on cost and time, ple ase reread the manual and check if the flaw is caused by obvious causes pr ior to presenting the article for repair. N ote
that returning a non-defective article can also involve handling costs.
• Repairs occurring after warranty expira tion are subject to shipping costs.
• The above conditions are without prej udice to all commercial warranties.
The above enumeration is subject to modification according to the art icle (see article’s manual).
Velleman® service- en kwaliteitsgarantie
Velleman® heeft ruim 35 jaar ervaring in de elektronicawereld en verdeelt in meer dan 85 landen.
Al onze producten beantwoorden aan str ikte kwaliteitseisen en aan de wettelijke bepalingen geldig in de EU. Om de kwaliteit te waarborgen,
ondergaan onze producten op regelm atige tijdstippen een extra kwaliteits controle, zowel door onze eigen kwalit eitsafdeling als door externe gespecialiseerde
organisaties. Mocht er ondanks deze voor zorgen toch een probleem optreden, dan kunt u steeds een beroep doen op o nze waarborg (zie waarborgvoorwaarden).
Algemene waarborgvoorwaarden consumentengoederen (voor Europese Unie):
• Op alle consumentengoederen geldt een garantieperiode van 24 maanden op productie- en materiaalfouten en dit vanaf de oorspronkelijke aankoopda tum.
• Indien de klacht gegrond is en een grat is reparatie of vervanging van een ar tikel onmogelijk is of indien de k osten hiervoor buiten verhouding zijn, kan Velleman®
beslissen het desbetreffende artikel te vervangen door een gelijkwaardig artikel of de aankoopsom van het art ikel gedeeltelijk of volledig terug te betalen. In dat
geval krijgt u een vervangend product of terugbetaling ter waarde van 100% van de aankoopsom bij ontdekking van een gebrek tot één jaar na aankoop en
levering, of een vervangend product teg en 50% van de kostprijs of terugbetaling van 50 % bij ontdekking na één j aar tot 2 jaar.
• Valt niet onder waarborg:
- alle rechtstreekse of onrechtstreek se schade na de levering veroorzaakt aan het toestel (bv. door oxidatie, sc hokken, val, stof, vuil, vocht...), en door het toestel,
alsook zijn inhoud (bv. verlies van da ta), vergoeding voor eventuele winstd erving.
- verbruiksgoederen, onderdelen of hu lpstukken die regelmatig dienen te worden vervangen, zoals bv. batter ijen, lampen, rubberen onderdelen, a andrijfriemen...
(onbeperkte lijst).
- defecten ten gevolge van brand, watersc hade, bliksem, ongevallen, natuurr ampen, enz.
- defecten veroorzaakt door opzet, na latigheid of door een onoordeelkundig e behandeling, slecht onderhoud of abnormaal gebruik of gebruik van het t oestel strijdig
met de voorschriften van de fabrik ant.
- schade ten gevolge van een comm ercieel, professioneel of collectief gebruik van het apparaat (bij prof essioneel gebruik wordt de garantie periode herleid tot 6
maand).
- schade veroorzaakt door onvoldoende bes cherming bij transport van het appara at.
- alle schade door wijzigingen, reparat ies of modificaties uitgevoerd door derden zonder toestemming van Vell eman®.
• Toestellen dienen ter reparatie aan geboden te worden bij uw Velleman®-ver deler. Het toestel dient vergezeld te zijn van het oorspronkelijke aank oopbewijs. Zorg
voor een degelijke verpakking (bij voorkeur de originele verpakking) en voeg een duidelijke foutoms chrijving bij.
• Tip: alvorens het toestel voor repara tie aan te bieden, kijk nog eens na of er geen voor de hand liggende reden is waarom het toestel niet naar behoren werkt (zie
handleiding). Op deze wijze kunt u k osten en tijd besparen. Denk eraan dat er ook voor niet-defecte toestellen een k ost voor controle aangerekend kan worden.
• Bij reparaties buiten de waarborgper iode zullen transportkosten aangerek end worden.
• Elke commerciële garantie laat d eze rechten onverminderd.
Bovenstaande opsomming kan eventueel aangepast worden naargelang de aard van het product (zie handleiding van het betreffende product).
Garantie de service et de qualité Velleman®
Velleman® jouit d’une expérience de p lus de 35 ans dans le monde de l’él ectronique avec une distribution dans pl us de 85 pays.
Tous nos produits répondent à des exigenc es de qualité rigoureuses et à des dis positions légales en vigueur dans l’UE. Afin de garantir la qualité, nous s oumettons
régulièrement nos produits à des con trôles de qualité supplémentaires, t ant par notre propre service qualité q ue par un service qualité externe. Dans le cas
improbable d’un défaut malgré toutes l es précautions, il est possible d’invoqu er notre garantie (voir les conditions de gar antie).
Conditions générales concernant la garantie sur les produits grand public (pour l’UE) :
• tout produit grand public est garanti 2 4 mois contre tout vice de production o u de matériaux à dater du jour d’acquis ition effective ;
• si la plainte est justifiée et que la ré paration ou le remplacement d’un article est jugé impossible, ou lors que les coûts s’avèrent disproportionnés , Velleman®
s’autorise à remplacer ledit article par u n article équivalent ou à rembourser la totalité ou une partie du prix d’achat. Le cas échéant, il vous sera consenti un article
de remplacement ou le remboursement c omplet du prix d’achat lors d’un défaut dans un délai de 1 an après l’achat e t la livraison, ou un article de rem placement
moyennant 50% du prix d’achat ou le rem boursement de 50% du prix d’achat lors d’un défaut après 1 à 2 ans.
• sont par conséquent exclus :
- tout dommage direct ou indirect surv enu à l’article après livraison ( p.ex. dommage lié à l’oxydation, c hoc, chute, poussière, sable, impureté…) et provoqué par
l’appareil, ainsi que son contenu (p.ex . perte de données) et une indem nisation éventuelle pour perte de revenus ;
- tout bien de consommation ou access oire, ou pièce qui nécessite un remplacem ent régulier comme p.ex. piles, ampoules , pièces en caoutchouc, courroies…
(liste illimitée) ;
- tout dommage qui résulte d’un incendie, de la foudre, d’un accident, d’une catastrophe naturelle, etc. ;
SOL9 VELLEMAN
12
Page 13

- out dommage provoqué par une négli gence, volontaire ou non, une utilisati on ou un entretien incorrects, ou un e utilisation de l’appareil contraire aux prescriptions
du fabricant ;
- tout dommage à cause d’une utilisat ion commerciale, professionnelle o u collective de l’appareil (la pér iode de garantie sera réduite à 6 mois lors d’une utilisation
professionnelle) ;
- tout dommage à l’appareil qui résult e d’une utilisation incorrecte ou différente que celle pour laquelle il a été initialement prévu comm e décrit dans la notice ;
- tout dommage engendré par un retour de l’appareil emballé dans un conditi onnement non ou insuffisamment prot égé.
- toute réparation ou modification ef fectuée par une tierce personne sans l’au torisation explicite de SA Vell eman® ; - frais de transport de et vers Velleman® si
l’appareil n’est plus couvert sous la garantie.
• toute réparation sera fournie par l’endro it de l’achat. L’appareil doit nécess airement être accompagné du bon d’achat d’origine et être dûment conditionné (d e
préférence dans l’emballage d’orig ine avec mention du défaut) ;
• tuyau : il est conseillé de consulter la notice et de contrôler câbles, piles, etc. avant de retourner l’appareil. Un appareil retourné jugé défectueux qu i s’avère en
bon état de marche pourra faire l’objet d ’une note de frais à charge du consomm ateur ;
• une réparation effectuée en-dehors de la période de garantie fera l’objet de frais de transport ;
• toute garantie commerciale ne porte pas atteinte aux conditions susmentio nnées.
La liste susmentionnée peut être sujette à une complémentation selon le type de l’article et être mentionnée dans la notice d’emploi.
Velleman® Service- und Qualitätsgarantie
Velleman® hat gut 35 Jahre Erfahrung in der Elektronikwelt und vertreibt s eine Produkte in über 85 Ländern.
Alle Produkte entsprechen den strengen Qualitätsf orderungen und gesetzlichen Anforderungen in der EU. Um die Qualität zu gewährleisten werden unsere
Produkte regelmäßig einer zusätzlic hen Qualitätskontrolle unterworf en, sowohl von unserer eigenen Qualität sabteilung als auch von externen spezialisierten
Organisationen. Sollten, trotz aller V orsichtsmaßnahmen, Probleme auf treten, nehmen Sie bitte die Garantie in Anspruch (siehe Garantiebedingun gen).
Allgemeine Garantiebedingungen in Bezug auf Konsumgüter (für die Europäische Union):
• Alle Produkte haben für Material- o der Herstellungsfehler eine Garantieper iode von 24 Monaten ab Verkaufsdatum .
• Wenn die Klage berechtigt ist und f alls eine kostenlose Reparatur oder ein Austausch des Gerätes unmöglic ht ist, oder wenn die Kosten dafür un verhältnismäßig
sind, kann Velleman® sich darüber entsche iden, dieses Produkt durch ein gleiche s Produkt zu ersetzen oder die Kauf summe ganz oder teilweise zurückzuzahlen.
In diesem Fall erhalten Sie ein Ers atzprodukt oder eine Rückzahlung im Werte von 100% der Kaufsumm e im Falle eines Defektes bis zu 1 Jahr nach Kauf oder
Lieferung, oder Sie bekommen ein Ersat zprodukt im Werte von 50% der Kauf summe oder eine Rückzahlung im Werte von 50 % im Falle eines Defektes im zweiten
Jahr.
• Von der Garantie ausgeschlossen sind:
- alle direkten oder indirekten Schäde n, die nach Lieferung am Gerät und durc h das Gerät verursacht werden ( z.B. Oxidation, Stöße, Fall, Staub, Schm utz,
Feuchtigkeit, ...), sowie auch der Inhalt ( z.B. Datenverlust), Entschädigung für eve ntuellen Gewinnausfall.
- Verbrauchsgüter, Teile oder Zubehör teile, die regelmäßig ausgewechsel t werden, wie z.B. Batterien, Lam pen, Gummiteile, Treibriemen, usw. (u nbeschränkte
Liste).
- Schäden verursacht durch Brandschaden, Wassers chaden, Blitz, Unfälle, Naturkatastrophen, usw.
- Schäden verursacht durch absichtlic he, nachlässige oder unsachgemäße Anwe ndung, schlechte Wartung, zweckentfr emdete Anwendung oder Nichtbeachtung
von Benutzerhinweisen in der Be dienungsanleitung.
- Schäden infolge einer komme rziellen, professionellen oder k ollektiven Anwendung des Gerätes (be i gewerblicher Anwendung wird d ie Garantieperiode auf 6
Monate zurückgeführt).
- Schäden verursacht durch eine unsachg emäße Verpackung und unsachgemäß en Transport des Gerätes.
- alle Schäden verursacht durch unautor isierte Änderungen, Reparaturen oder Modifikationen, die von einem Dritten ohne Erlaubnis von Velleman® vor genommen
werden.
• Im Fall einer Reparatur, wenden Sie sic h an Ihren Velleman®-Verteiler. Legen S ie das Produkt ordnungsgemäß ver packt (vorzugsweise die Originalverpac kung)
und mit dem Original-Kaufbeleg vor. F ügen Sie eine deutliche Fehlerum schreibung hinzu.
• Hinweis: Um Kosten und Zeit zu spar en, lesen Sie die Bedienungsanleitu ng nochmals und überprüfen Sie, ob es k einen auf de Hand liegenden Grund gibt, ehe
Sie das Gerät zur Reparatur zurücks chicken. Stellt sich bei der Überprüfung des Geräts heraus, dass kein Gerätesc haden vorliegt, könnte dem Kunden eine
Untersuchungspauschale berechnet.
• Für Reparaturen nach Ablauf der Garantief rist werden Transportkosten berechn et.
• Jede kommerzielle Garantie lässt dies e Rechte unberührt.
Die oben stehende Aufzählung kann eventuell angepasst werden gemäß der Art des Produktes (siehe Bedienungsanleitung des Gerät es).
Garantía de servicio y calidad Velleman®
Velleman® disfruta de una experiencia de más de 35 años en el mundo de la ele ctrónica con una distribución en m ás de 85 países.
Todos nuestros productos responden a norm as de calidad rigurosas y disposiciones legales vigentes en la UE. Para garant izar la calidad, sometimos nuestros
productos regularmente a controles de ca lidad adicionales, tanto por nuestr o propio servicio de calidad com o por un servicio de calidad externo. En el caso
improbable de que surgieran problem as a pesar de todas las precauciones, es posible apelar a nuestra garantía ( véase las condiciones de garantía).
Condiciones generales referentes a la garantía sobre productos de venta al público (para la Unión Europea):
• Todos los productos de venta al público tienen un período de garantía de 24 m eses contra errores de producción o errores en materiales desde la adquisició n
original;
• Si la queja está fundada y si la reparac ión o la sustitución de un artículo es imposible, o si los gastos son desproporcionados, Velleman® autor iza reemplazar el
artículo por un artículo equivalente o re embolsar la totalidad o una parte de l precio de compra. En este caso, recibirá un artículo de recambio o el reembolso
completo del precio de compra al descubr ir un defecto hasta un año después de la compra y la entrega, o un artículo de r ecambio al 50% del precio de compra o la
sustitución de un 50% del precio de c ompra al descubrir un defecto después d e 1 a 2 años.
• Por consiguiente, están excluidos entre o tras cosas:
- todos los daños causados directamente o indirectamente al aparato y su con tenido después de la entrega (p.ej. por oxidación, choques, caída,...) y causados por
el aparato, al igual que el contenido (p.ej. pérdida de datos) y una indemni zación eventual para falta de ganancias;
- partes o accesorios que deban ser reem plazados regularmente, como por ejemplo baterías, lámparas, partes de goma, ... (lis ta ilimitada)
- defectos causados por un incendio, daños c ausados por el agua, rayos, acciden tes, catástrofes naturales, etc. ;
- defectos causados a conciencia , desc uido o por malos tratos, un mantenim iento inapropiado o un uso anormal del aparato contrario a las instrucciones del
fabricante;
- daños causados por un uso com ercial, profesional o colectivo del aparato ( el período de garantía se reducirá a 6 meses con uso profesional) ;
- daños causados por un uso incorrecto o un uso ajeno al que est está previsto el producto inicialmente como está d escrito en el manual del usuario ;
- daños causados por una protección insuf iciente al transportar el aparato.
- daños causados por reparaciones o m odificaciones efectuadas por una tercera persona sin la autorización explic ita de SA Velleman® ;
- se calcula gastos de transporte de y a Velleman® si el aparato ya no está cu bierto por la garantía.
• Cualquier reparación se efectuará por e l lugar de compra. Devuelva el aparato c on la factura de compra original y transpórt elo en un embalaje sólido
(preferentemente el embalaje origin al). Incluya también una buena descr ipción del defecto ;
• Consejo: Lea el manual del usuario y co ntrole los cables, las pilas, etc. antes d e devolver el aparato. Si no se encuentra un defecto en el artículo los gastos
podrían correr a cargo del cliente;
• Los gastos de transporte correrán a car ga del cliente para una reparación efectuada fuera del periode de garantía.
• Cualquier gesto comercial no dism inuye estos derechos.
La lista previamente mencionada puede ser adaptada según el tipo de artículo (véase el manual del usuario del artículo en cuestión)
SOL9 VELLEMAN
13
Page 14

Garantia de serviço e de qualidade Vell eman®
Velleman® tem uma experiência de m ais de 35 anos no mundo da electrónica c om uma distribuição em mais de 85 países.
Todos os nossos produtos respondem a exigências rigorosas e a disposiç ões legais em vigor na UE. Para g arantir a qualidade, submetemos regularmente os
nossos produtos a controles de qualida de suplementares, com o nosso próprio serviço qualidade como um serviço de qualidade externo. No caso im provável de
um defeito mesmo com as nossas precauç ões, é possível invocar a nossa gara ntia. (ver as condições de garantia).
Condições gerais com respeito a garantia sobre os produtos grande público (para a UE):
• qualquer produto grande público é gara ntido 24 mês contra qualquer vício d e produção ou materiais a partir da data d e aquisição efectiva;
• no caso da reclamação ser justific ada e que a reparação ou substituição d e um artigo é impossível, ou quando os custo são desproporcionados, Vellem an®
autoriza-se a substituir o dito artigo p or um artigo equivalente ou a devolv er a totalidade ou parte do preço de compra. Em outro caso, será consentido um artigo de
substituição ou devolução completa do pr eço de compra no caso de um defeito no prazo de 1 ano depois da data de c ompra e entrega, ou um artigo de
substituição pagando o valor de 50% d o preço de compra ou devolução de 50% do preço de compra para defeitos depois de 1 a 2 anos.
• estão por consequência excluídos :
- todos os danos directos ou indirectos depois da entrega do artigo (p.ex. dan os ligados a oxidação, choques, quedas , poeiras, areias, impurezas…) e provocad o
pelo aparelho, como o seu conteúdo (p.ex . perca de dados) e uma indemnização eventual por perca de receitas ;
- todos os bens de consumo ou acessór ios, ou peças que necessitam uma s ubstituição regular e normal como p.ex. pilh as, lâmpadas, peças em borracha,
correias… (lista ilimitada) ;
- todos os danos que resultem de um incêndio, raios, de um acidente, de una cat astrophe natural, etc. ;
- danos provocados por negligencia, vo luntária ou não, uma utilização ou m anutenção incorrecta, ou uma utilização do aparelho contrária as prescrições do
fabricante ;
- todos os danos por causa de uma utilizaçã o comercial, profissional ou colecti va do aparelho ( o período de garantia ser á reduzido a 6 meses para uma utili zação
profissional);
- todos os danos no aparelho resultando d e uma utilização incorrecta ou diferente daquela inicialmente previs ta e descrita no manual de utilização ;
- todos os danos depois de uma devo lução não embalada ou mal protegida a o nível do acondicionamento.
- todas as reparações ou modificações efec tuadas por terceiros sem a autorização de SA Velleman® ;
- despesas de transporte de e para Vellem an® se o aparelho não estiver coberto pela garantia.
• qualquer reparação será fornecid a pelo local de compra. O aparelho ser á
obrigatoriamente acompanhado do talão ou factura de origem e bem acondicion ado (de
preferência dentro da embalagem de or igem com indicação do defeito ou a varia) ;
• dica : aconselha-mos a consulta do m anual e controlar cabos, pilhas, etc. antes de
devolver o aparelho. Um aparelho devolv ido que estiver em bom estado será cobr ado despesas a cargo do consumidor ;
• uma reparação efectuada fora da garant ia, será cobrado despesas de transport e ;
• qualquer garantia comercial não prevalece as condições aqui menc ionadas.
A lista pode ser sujeita a um complemento conforme o tipo de artigo e estar mencionada no manual de utilização.
SOL9 VELLEMAN
14
 Loading...