

Page 1
USER MANUAL
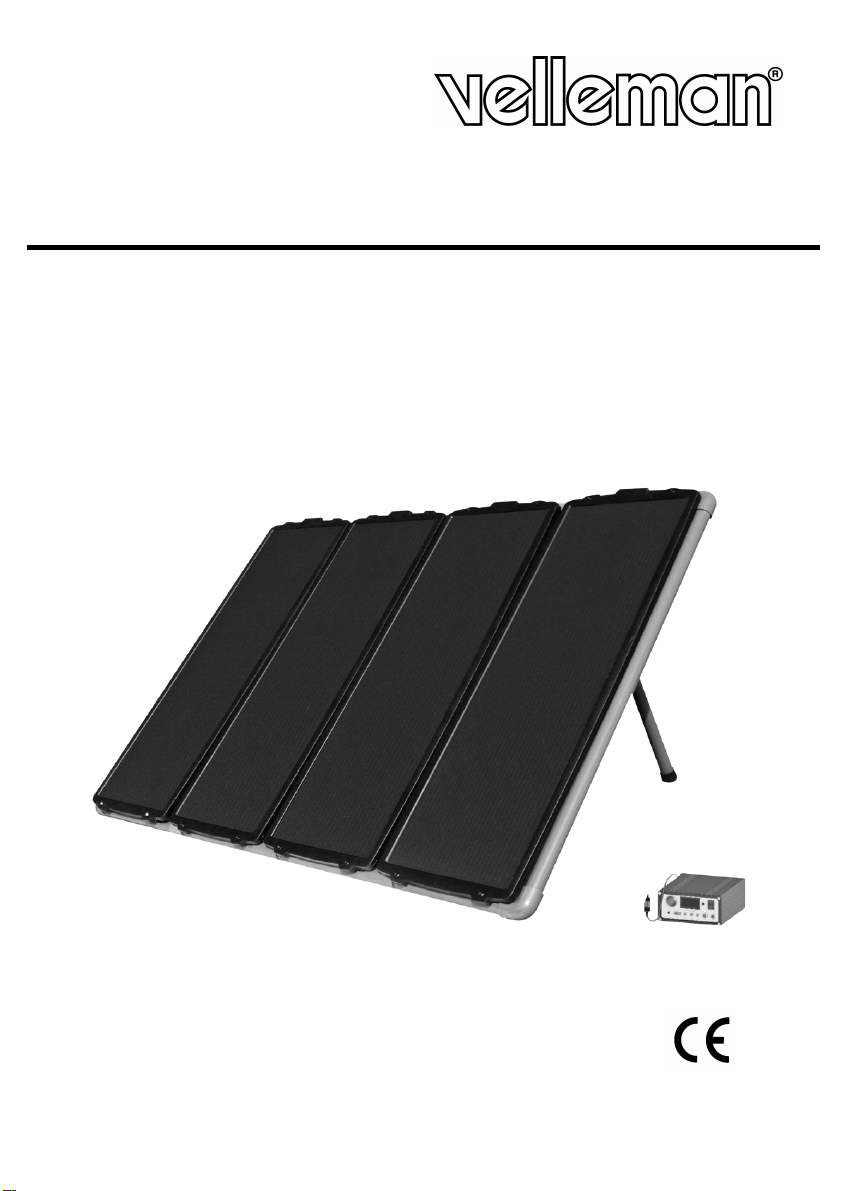
SOL14
AMORPHOUS SILICON SOLAR PANEL - 60W
ZONNEPANEEL IN AMORF SILICIUM - 60 W
PANNEAU SOLAIRE EN SILICIUM AMORPHE - 60 W
PLACA SOLAR DE SILICIO AMORFA - 60 W
SOLARZELLENPLATTE AUS AMORPHEM SILIZIUM - 60 W
GEBRUIKERSHANDLEIDING
NOTICE D’EMPLOI
MANUAL DEL USUARIO
BEDIENUNGSHANDLEITUNG
Page 2

2
SOL14 – AMORPHOUS SILICON SOLAR PANEL - 60W
1. Introduction
To all residents of the European Union
Important environmental information about this product
This symbol on the device or the package indicates that disposal of the device after its lifecycle could harm the
environment. Do not dispose of the unit (or batteries) as unsorted municipal waste; it should be taken to a
specialized company for recycling. This device should be returned to your distributor or to a local recycling service.
Respect the local environmental rules.
If in doubt, contact your local waste disposal authorities.
Thank you for choosing Velleman! Please read the manual thoroughly before bringing this device into service. If the device was
damaged in transit, do not install or use it and contact your dealer.
2. Parts List
P1 - Amorphous Silicon Panel P2 - Screw Set (M5x45.M5x55.M5) P3 - Charge Regulator (5A)
Qty Qty Qty
4
P4 - Fuse (5A) P5 - Extension Cable P6 - 4-Pin Connector
Qty Qty Qty
P7 - Adapter Cable P8 - Male CLA Adapter Cable P9 - Battery Clamp Adapter Cable
2
Qty Qty Qty
2
28
1
1
1
1
1
3. Safety Instructions
• Damage caused by disregard of certain guidelines in this manual is not covered by the warranty and the dealer will not
accept responsibility for any ensuing defects or problems.
• Switch off the power before connecting or disconnecting the application.
• Never reverse the polarity of the load, the solar panel and the battery.
• Do not connect any other power supplies or chargers to this unit.
SOL14_v3 VELLEMAN
Page 3
3
• The safety devices will only work when the charge regulator is switched on.
• Place the charge regulator at a cool and well-ventilated place. Avoid contact with water.
• Charge the battery for 3 hours before first operation.
• Regularly clean the surface of the solar panel with a soft cloth. Avoid use of acids and alkali.
• Note that damage caused by user modifications to the device is not covered by the warranty.
• Keep the device away from children and unauthorised users.
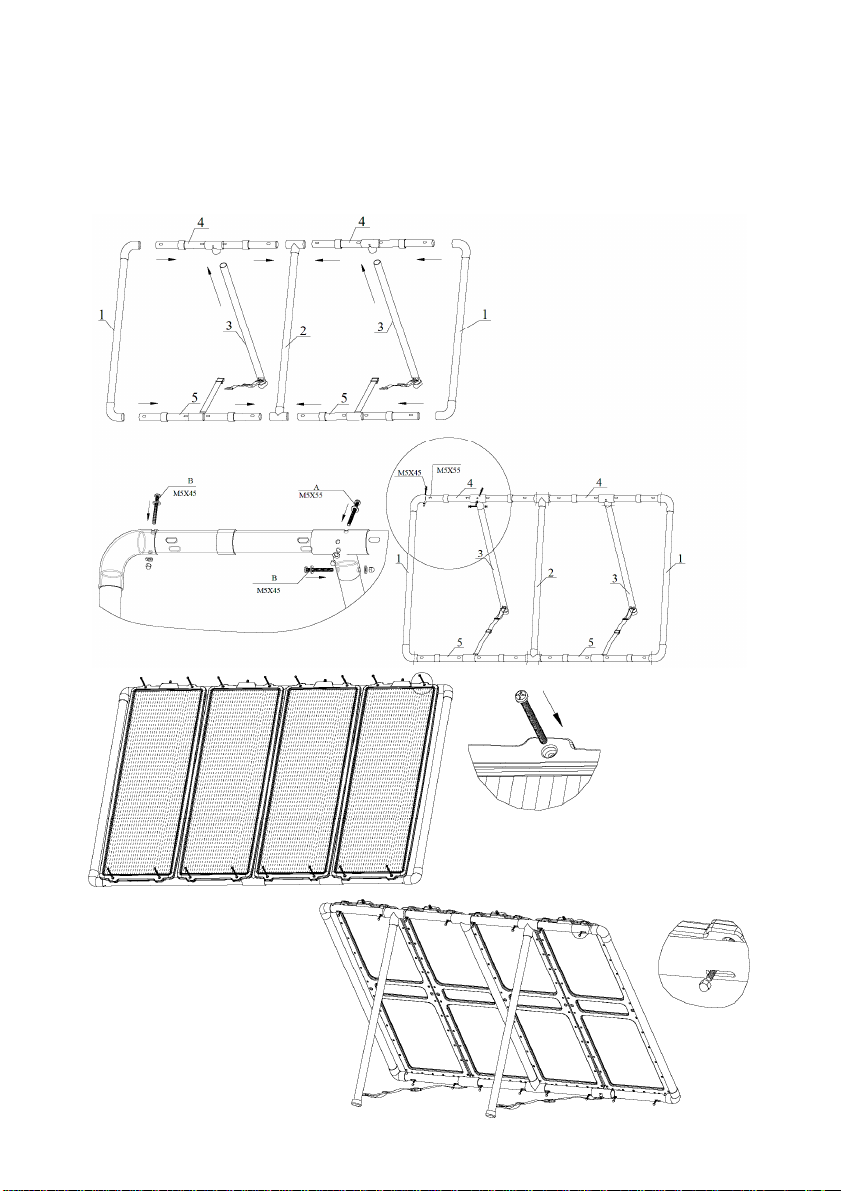
4. Assembly
SOL14_v3 VELLEMAN
Page 4

4
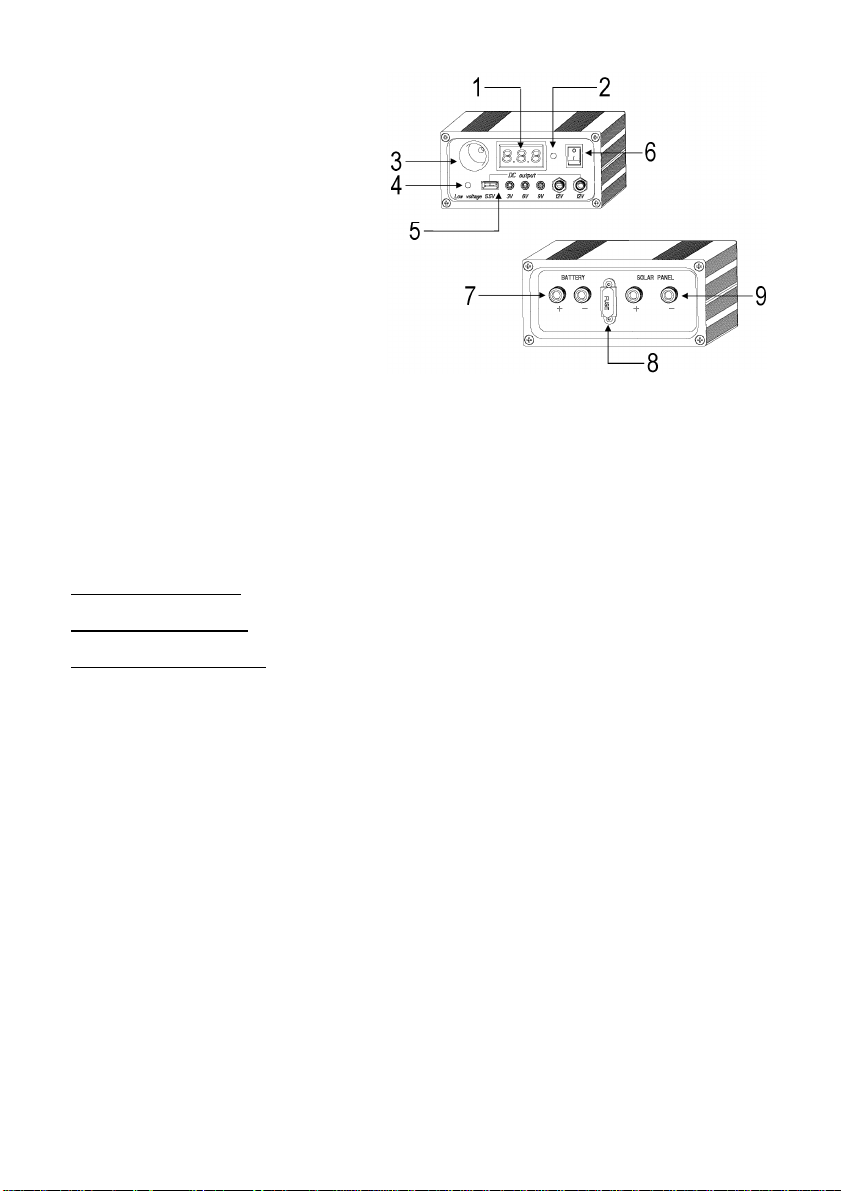
5. The Charge Regulator - Description
• Front
1. digital voltage meter
2. meter on/off switch
3. 12V female CLA output
4. low-voltage indicator
5. USB output
6. on/off switch
• Rear
7. connection to battery
8. 5A fuse
9. connection to solar panel
Outputs:
1 x 12V female CLA
1 x 5.5V USB output (tolerance ± 0.5V)
3V, 6V, 9V, 12V DC outputs (tolerance ± 0.5V)
Digital Voltage Meter:
The digital meter will show the real-time battery voltage. Switch the meter on and off using the meter on/off switch. Switch
on the digital meter only when needed in order to save power. Do not leave the digital meter switched on permanently.
Safety System:
The charge regulator features following safety protections:
Over-discharge protection: When the battery level goes below 10.5V, the controller will automatically shut off the power
output to prevent the battery from overdraining. The LED indicator will blink. Please disconnect the application and fully
recharge the battery.
Over-charge protection: When the battery level goes over 14.5V, the controller will automatically shut off the power output
to prevent the battery from damaging. Please disconnect the solar panel from the charge regulator.
Overload protection: The fuse will melt if the output power is too high. Replace the fuse with an identical fuse.
6. Operation
• Solar Panel Installation
o Assemble the solar panel according to the illustration under chapter “4. Assembly”. Double-check that all screws are
tight.
o Place the panel facing the sun and tilt it to the appropriate angle so that it can receive maximum sunlight.
o Connect one end of the 4-pin connector cable (P6) to the solar panel and insert the other end into the SOLAR PANEL
connection at the back of the charge regulator. Use an extension cable (P5) if necessary. Make sure to respect the
polarity and that the charge regulator is switched off before connecting.
• Charge Regulator Installation (see final page)
o Connect the adapter cable (P7) to the BATTERY terminals at the back of the charge regulator.
o To charge a 12V battery, connect the battery clamp adapter cable (P9) to the adapter cable (P7) first. Connect the
clamps from the battery clamp adapter cable (P9) to the battery. Respect the polarity (red = positive, black = negative).
Do not short-circuit when connecting.
o For other uses, connect the male CLA adapter (P8) to the adapter cable (P7) first. Insert the male CLA adapter into the
appliance or the car’s female CLA. Disconnect the solar panel from the CLA or battery when starting the engine or when
driving. Electrical surges may damage the solar panel.
o A power inverter can be used to power AC appliances. Make sure the total power of the connected appliances does not
exceed the rated power of the inverter. Connect the inverter to the battery and not directly to the charge regulator.
SOL14_v3 VELLEMAN
Page 5

5
7. Technical Specifications
Power 60W
Open-Circuit Voltage (Voc) 22V
Short-Circuit Current (Isc) 3.4A
Input Voltage 17.5V
Cable Length ± 1.8m
Operation Temperature -40°C ~ 85°C
Storage Temperature -40°C ~ 85°C
Dielectric Withstanding Voltage Dimensions
Panel 315 x 925mm
Mounted 1420 x 950mm
Weight 28.4kg
Use this device with original accessories only. Velleman nv cannot be held responsible in the event of damage or
injury resulted from (incorrect) use of this device.
For more info concerning this product, please visit our website www.velleman.eu.
The information in this manual is subject to change without prior notice.
SOL14_v3 VELLEMAN
Page 6
6
SOL14 – ZONNEPANEEL IN AMORF SILICIUM – 60 W
1. Inleiding
Aan alle ingezetenen van de Europese Unie
Belangrijke milieu-informatie betreffende dit product
Dit symbool op het toestel of de verpakking geeft aan dat, als het na zijn levenscyclus wordt weggeworpen, dit
toestel schade kan toebrengen aan het milieu. Gooi dit toestel (en eventuele batterijen) niet bij het gewone
huishoudelijke afval; het moet bij een gespecialiseerd bedrijf terechtkomen voor recyclage. U moet dit toestel naar
uw verdeler of naar een lokaal recyclagepunt brengen. Respecteer de plaatselijke milieuwetgeving.
Hebt u vragen, contacteer dan de plaatselijke autoriteiten inzake verwijdering.
Dank u voor uw aankoop! Lees deze handleiding grondig voor u het toestel in gebruik neemt. Werd het toestel beschadigd
tijdens het transport, installeer het dan niet en raadpleeg uw dealer.
2. Onderdelen
P1 – Paneel in amorfe siliconen P2 – Schroevenset (M5x45.M5x55.M5) P3 – Laadregelaar (5A)
Hoev. Hoev. Hoev.
4
P4 – Zekering (5A) P5 – Verlengkabel P6 – 4-pin aansluiting
Hoev. Hoev. Hoev.
P7 – Adapterkabel P8 – Mannelijke CLA-kabel P9 – Accuadapterkabel
2
Hoev. Hoev. Hoev.
2
28
1
1
1
1
1
3. Veiligheidsinstructies
• De garantie geldt niet voor schade door het negeren van bepaalde richtlijnen in deze handleiding en uw dealer zal de
verantwoordelijkheid afwijzen voor defecten of problemen die hier rechtstreeks verband mee houden.
• Schakel de laadregelaar uit alvorens te ontkoppelen/koppelen.
• Draai nooit de polariteit om van de last, het zonnepaneel of de accu.
• Koppel geen andere voeding of laders aan dit toestel.
SOL14_v3 VELLEMAN
Page 7

7
• De veiligheidssystemen functioneren enkel wanneer de laadregelaar is ingeschakeld.
• Plaats de laadregelaar op een koele en goed geventileerde plaats. Houd hem weg van water en vochtigheid.
• Laad de batterij gedurende 3 uur voor het eerste gebruik.
• Maak het oppervlak van het zonnepaneel schoon met een zachte doek. Gebruik geen zuur of basen.
• Schade door wijzigingen die de gebruiker heeft aangebracht aan het toestel vallen niet onder de garantie.
• Houd dit toestel uit de buurt van kinderen en onbevoegden.
4. Assemblage
SOL14_v3 VELLEMAN
Page 8
8
5. De laadregelaar - omschrijving
• Voor
1. digitale spanningsmeter
2. aan-uitschakelaar spanningsmeter
3. vrouwelijke uitgang 12 V-sigarettenplug
4. aanduiding lage spanning
5. usb-uitgang
6. aan-uitschakelaar
• Achter
7. aansluiting naar de batterij
8. 5 A-zekering
9. aansluiting naar het zonnepaneel
Uitgangen:
1 x vrouwelijke 12 V-sigarettenplug
1 x 5,5 V usb-uitgang (tolerantie ± 0,5 V)
3 V, 6 V, 9 V, 12 V DC-uitgang (tolerantie ± 0,5 V)
Digitale spanningsmeter:
De digitale spanningsmeter geeft de spanning van de batterij weer. Schakel de spanningsmeter in en uit via de aanuitschakelaar. Let op: laat de spanningsmeter niet ingeschakeld om energie te besparen – gebruik de meter enkel indien nodig.
Veiligheid:
De laadregelaar is uitgerust met volgende veiligheidssystemen:
Bescherming tegen ontlading: De controller schakelt automatisch de uitgang uit indien het batterijniveau onder 10,5 V
daalt om onderspanning te vermijden. De led knippert. Ontkoppel het toestel en herlaad de batterij volledig.
Bescherming tegen overlading: De controller schakelt automatisch de uitgang uit indien het batterijniveau boven 14,5 V
stijgt om overspanning te vermijden. Ontkoppel het zonnepaneel van de laadregelaar.
Bescherming tegen overbelasting: De zekering smelt door indien het uitgangsvermogen te hoog is. Vervang de zekering
door een identiek exemplaar.
6. Gebruik
• Het zonnepaneel plaatsen
o Assembleer het zonnepaneel volgens de figuur onder ‘4. Assemblage’. Span alle schroeven goed aan.
o Plaats het paneel tegenover de zon en richt zodat het panel maximaal zonlicht krijgt.
o Koppel een eind van de 4-pin aansluitingkabel (P6) aan het zonnepaneel en koppel het andere eind aan de terminals
gemarkeerd ‘SOLAR PANEL’ achteraan de regelaar. Gebruik een verlengkabel (P5) indien nodig. Respecteer de
polariteit en schakel de regelaar uit alvorens aan te sluiten.
• De laadregelaar plaatsen (zie laatste pagina’s)
o Koppel de adapterkabel (P7) aan de terminals gemarkeerd BATTERY’ achteraan de regelaar.
o Laden van een 12 V-batterij: Koppel eerst de accuadapterkabel (P9) aan de adapterkabel (P7). Koppel de klemmen aan
de terminals van de batterij. Respecteer de polariteit (rood = positief, zwart = negatief). Veroorzaak geen kortsluiting bij
het koppelen.
o Ander gebruik: Koppel eerst de mannelijke CLA-kabel (P8) aan de adapterkabel (P7). Steek de mannelijke plug in het
toestel of in de vrouwelijke aansluiting van het voertuig. Ontkoppel het zonnepaneel van de plug of van de batterij wanneer u
de motor van het voertuig start of tijdens het rijden. Elektrische pieken kunnen het paneel ernstig beschadigen.
o U kunt een voedingsinverter gebruiken voor het voeden van toestellen op gelijkstroom. Het totale vermogen van de
toestellen mag het vermogen van de inverter echter niet overschrijden. Koppel de inverter aan de batterij en niet
rechtstreeks aan de laadregelaar.
SOL14_v3 VELLEMAN
Page 9

9
7. Technische specificaties
Vermogen 60 W
Nullastspanning (Voc) 22 V
Kortsluitstroom (Isc) 3,4 A
Ingangsspanning 17,5 V
Kabellengte ± 1,8 m
Werktemperatuur -40° C ~ 85° C
Opslagtemperatuur -40° C ~ 85° C
Diëlektrische weerstand Afmetingen
Paneel 315 x 925 mm
Gemonteerd 1420 x 950 mm
Gewicht 28,4 kg
Gebruik dit toestel enkel met originele accessoires. Velleman nv is niet aansprakelijk voor schade of kwetsuren bij
(verkeerd) gebruik van dit toestel.
Voor meer informatie omtrent dit product, zie www.velleman.eu.
De informatie in deze handleiding kan te allen tijde worden gewijzigd zonder voorafgaande kennisgeving.
SOL14_v3 VELLEMAN
Page 10

10
SOL14 – PANNEAU SOLAIRE EN SILICIUM AMORPHE - 60 W
1. Introduction
Aux résidents de l'Union européenne
Des informations environnementales importantes concernant ce produit
En cas de questions, contacter les autorités locales pour élimination.
Nous vous remercions de votre achat ! Lire la présente notice attentivement avant la mise en service de l’appareil. Si
l’appareil a été endommagé pendant le transport, ne pas l’installer et consulter votre revendeur.
2. Pièces
P1 – Panneau en silicone amorphe P2 – Jeu de vis (M5x45.M5x55.M5) P3 – Régulateur de charge (5A)
Ce symbole sur l'appareil ou l'emballage indique que l’élimination d’un appareil en fin de vie peut polluer
l'environnement. Ne pas jeter un appareil électrique ou électronique (et des piles éventuelles) parmi les déchets
municipaux non sujets au tri sélectif ; une déchèterie traitera l’appareil en question. Renvoyer les équipements
usagés à votre fournisseur ou à un service de recyclage local. Il convient de respecter la réglementation locale
relative à la protection de l’environnement.
Qté Qté Qté
4
28
1
P4 – Fusible (5A) P5 – Rallonge P6 – Distributeur
Qté Qté Qté
2
1
1
P7 – Adaptateur P8 – Fiche allume-cigares P9 – Pinces pour accu
Qté Qté Qté
2
1
1
3. Prescriptions de sécurité
• La garantie ne s’applique pas aux dommages survenus en négligeant certaines directives de cette notice et votre
revendeur déclinera toute responsabilité pour les problèmes et les défauts qui en résultent.
• Couper l’alimentation avant de (dé)connecter l’appareil.
• Ne jamais inverser la polarité de la charge, du panneau solaire ou de l’accu.
• Ne pas connecter d’alimentation ni de chargeur au panneau solaire.
SOL14_v3 VELLEMAN
Page 11

11
• Les dispositifs de sécurité ne fonctionnent que lorsque le régulateur de charge est allumé.
• Placer le régulateur de charge dans un endroit frais et bien ventilé. Le tenir à l’écart de l’eau et de l’humidité.
• Charger l’accu pendant un délai de 3 heures avant le premier emploi.
• Nettoyer la surface du panneau à l’aide d’un chiffon doux. Éviter les acides et les bases.
• Les dommages occasionnés par des modifications à l’appareil par le client, ne tombent pas sous la garantie.
• Garder votre SOL14 hors de la portée de personnes non qualifiées et de jeunes enfants.
4. Assemblage
SOL14_v3 VELLEMAN
Page 12

12
5. Description du régulateur de charge
• Vue de face
1. tensiomètre numérique
2. interrupteur marche/arrêt tensiomètre
3. prise de sortie allume-cigares 12 V
4. voyant de basse tension
5. sortie USB
6. interrupteur marche/arrêt
• Vue arrière
7. connexion vers l’accu
8. fusible 5 A
9. connexion vers le panneau solaire
Sorties :
1 x sortie allume-cigares 12 V
1 x sortie USB 5,5 V (tolérance ± 0,5 V)
sorties 3 V, 6 V, 9 V, 12 V CC (tolérance ± 0,5 V)
Tensiomètre numérique :
Le tensiomètre numérique indique la tension de l’accu en temps réel. Allumer/éteindre le tensiomètre à l’aide de
l’interrupteur marche/arrêt. N’allumer le tensiomètre numérique que lorsque nécessaire afin d’économiser de l’énergie. Ne
pas laisser le tensiomètre numérique allumé en permanence.
Dispositifs de sécurité :
Le régulateur de charge intègre les dispositifs de sécurité suivants :
Protection contre les décharges excessives : Le contrôleur déconnecte automatiquement l’alimentation lorsque la tension
de l’accu descend en-dessous des 10,5 V. Le voyant LED clignote. Déconnecter l’appareil et recharger l’accu.
Protection contre les charges excessives : Le contrôleur déconnecte automatiquement l’alimentation lorsque la tension de
l’accu monte au-dessus des 14,5 V. Déconnecter le panneau solaire du régulateur de charge.
Protection contre les surcharges : Le fusible grille lorsque la tension de sortie est trop élevée. Remplacer le fusible par un
exemplaire identique.
6. Emploi
• Installation du panneau solaire
o Assembler le panneau comme illustré dans le chapitre « 4. Assemblage ». Bien serrer les vis.
o Placer le panneau en face du soleil dans un angle où l’exposition est maximale.
o Connecter le panneau au régulateur de charge à l’aide du distributeur (P6) et de l’adaptateur, lui-même connecté aux
bornes marquées SOLAR PANEL. Utiliser une rallonge (P5) si nécessaire. Respecter la polarité et s’assurer que le
régulateur de charge soit éteint avant la connexion.
• Installation du régulateur de charge (voir les dernières pages)
o Connecter l’adaptateur (P7) aux bornes marquées BATTERY situées à l’arrière du régulateur de charge.
o Recharge d’un accu 12 V : Connecter d’abord les pinces (P9) à l’adaptateur (P7). Ensuite, connecter les pinces (P9)
aux bornes de l’accu en respectant la polarité (rouge = positif, noir = négatif). Ne pas court-circuiter lors de la connexion.
o Tout autre emploi : Connecter d’abord la fiche allume-cigares (P8) à l’adaptateur (P7). Insérer la fiche allume-cigares
dans l’appareil ou dans la prise allume-cigares du véhicule. Déconnecter le panneau solaire avant de démarrer le
moteur ou lors de la conduite : des charges de crête peuvent endommager le panneau.
o Il est possible d’utiliser un convertisseur de courant afin d’alimenter un appareil nécessitant un courant alternatif. Veiller
à ce que la puissance totale de l’appareil connecté ne dépasse pas la puissance du convertisseur de courant.
Connecter le convertisseur de courant à l’accu et non pas directement au régulateur de charge.
SOL14_v3 VELLEMAN
Page 13

13
7. Spécifications techniques
Puissance 60 W
Tension circuit ouvert (Voc) 22 V
Courant de court-circuit (Isc) 3,4 A
Tension d’entrée 17,5 V
Longueur du câble ± 1,8 m
Température de service -40° C ~ 85° C
Température de stockage -40° C ~ 85° C
Rigidité diélectrique Dimensions
Panneau 315 x 925 mm
Panneau monté 1420 x 950 mm
Poids 28,4 kg
N’employer cet appareil qu’avec des accessoires d’origine. SA Velleman ne sera aucunement responsable de
dommages ou lésions survenus à un usage (incorrect) de cet appareil.
Pour plus d’information concernant cet article, visitez notre site web www.velleman.eu.
Toutes les informations présentées dans cette notice peuvent être modifiées sans notification préalable.
SOL14_v3 VELLEMAN
Page 14

14
SOL14 – PLACA SOLAR DE SILICIO AMORFA - 60W
1. Introducción
A los ciudadanos de la Unión Europea
Importantes informaciones sobre el medio ambiente concerniente a este producto
Si tiene dudas, contacte con las autoridades locales para residuos.
¡Gracias por haber comprado la SOL14! Lea atentamente las instrucciones del manual antes de usarla. Si el aparato ha
sufrido algún daño en el transporte no lo instale y póngase en contacto con su distribuidor.
2. Piezas
P1 – Placa solar de silicona amorfa P2 – Juego de tornillos (M5x45.M5x55.M5) P3 – Regulador de carga (5A)
Este símbolo en este aparato o el embalaje indica que, si tira las muestras inservibles, podrían dañar el medio
ambiente. No tire este aparato (ni las pilas, si las hubiera) en la basura doméstica; debe ir a una empresa
especializada en reciclaje. Devuelva este aparato a su distribuidor o a la unidad de reciclaje local.
Respete las leyes locales en relación con el medio ambiente.
cantidad cantidad cantidad
4
P4 – Fusible (5A) P5 – Cable prolongador P6 – Conector de 4 polos
cantidad cantidad cantidad
P7 – Adaptador P8 – Conector mechero P9 – Pinzas para batería
2
cantidad cantidad cantidad
2
28
1
1
1
1
1
3. Instrucciones de seguridad
• Daños causados por descuido de las instrucciones de seguridad de este manual invalidarán su garantía y su distribuidor
no será responsable de ningún daño u otros problemas resultantes.
• Desactive la alimentación antes de (des)conectar el aparato.
• Nunca invierte la polaridad de la carga, el panel solar o la batería.
• No conecte una otra alimentación ni otro cargador al panel solar.
SOL14_v3 VELLEMAN
Page 15

15
• Los sistemas de seguridad funcionan sólo funcionan si el regulador de carga está activado.
• Ponga el regulador de carga en un lugar fresco y bien aireado. No lo exponga a agua ni humedad.
• Cargue la batería durante 3 horas antes del primer uso.
• Limpie la superficie del panel con un paño suave. No utilice ácidos ni bases.
• Los daños causados por modificaciones no autorizadas, no están cubiertos por la garantía.
• Mantenga la SOL14 lejos del alcance de personas no capacitadas y niños.
4. Montaje
SOL14_v3 VELLEMAN
Page 16

16
5. Descripción del regulador de carga
• vista frontal
1. tensímetro digital
2. interruptor ON/OFF tensímetro
3. salida conector mechero de 12 V
4. indicador de baja tensión
5. salida USB
6. interruptor ON/OFF
• vista posterior
7. conexión a la batería
8. fusible 5 A
9. conexión a la placa solar
Salidas:
1 x salida conector mechero de 12 V
1 x salida USB 5,5 V (tolerancia ± 0,5 V)
Salidas 3 V, 6 V, 9 V, 12 V CC (tolerancia ± 0,5 V)
Tensímetro digital:
El tensímetro digital indica la tensión de la batería en tiempo real. Active/desactive el tensímetro con el interruptor
ON/OFF. Active el tensímetro digital sólo si es necesario para ahorrar la energía. No deje activado el tensímetro digital de
manera continua.
Sistemas de seguridad:
El regulador de carga incluye los siguientes sistemas de seguridad:
Protección contra las descargas excesivas: el controlador desconecte automáticamente la alimentación si la tensión de la
batería disminuya por debajo de 10,5V. El indicador LED parpadea. Desconecte el aparato y vuelva a cargar la batería.
Protección contra las cargas excesivas : el controlador desconecte automáticamente la alimentación si la tensión de la
batería aumenta por encima de 14,5V. Desconecte la placa solar del regulador de carga.
Protección contra las sobrecargas: El fusible funda si la tensión de salida es demasiado alta. Reemplace el fusible por por
otro del mismo tipo.
6. Uso
• Instalar la placa solar
o Monte la placa (véase « 4. Montaje ». Apriete bien los tornillos.
o Ponga la placa enfrente del sol en un ángulo dónde la exposición es máxima.
o Conecte la placa al regulador de carga con el conector de 4 polos (P6) y el adaptador, conectado a los bornes
marcados SOLAR PANEL. Utilice un cable prolongador (P5) si fuera necesario. Respete la polaridad y asegúrese de
que el regulador de carga esté desactivado antes de la conexión.
• Instalar el regulador de carga (véase las últimas páginas)
o Conecte el adaptador (P7) a los bornes marcados con BATTERY de la parte trasera del regulador de carga.
o Recargue una batería de 12V: Primero, conecte las pinzas (P9) al adaptador (P7). Luego, conecte las pinzas (P9) a los
bornes de la batería. Respete la polaridad (rojo = positivo, negro = negativo). No cortocircuite durante la conexión.
o Cualquier otro uso: Primero, conecte el conector mechero (P8) al adaptador (P7). Introduzca el conector mechero en el
aparato o en la toma para conector mechero del vehículo. Desconecte le placa solar antes de arrancar el motor o
mientras está conduciendo: cargas de cresta podrían dañar el panel.
o Es posible utilizar un convertidor de corriente para alimentar un aparato que necesita una corriente alternativa.
Asegúrese de que la potencia total del aparato conectado no sobrepase la potencia del convertidor de corriente.
Conecte el convertidor de corriente a la batería y no directamente al regulador de carga.
SOL14_v3 VELLEMAN
Page 17

17
7. Especificaciones
Potencia 60 W
Tensión circuito abierto (Voc) 22 V
Corriente de cortocircuito (Isc) 3,4 A
Tensión de entrada 17,5 V
Longitud del cable ± 1,8 m
Temperatura de funcionamiento -40° C ~ 85° C
Temperatura de almacenamiento -40° C ~ 85° C
Rigidez dieléctrica Dimensiones
Placa 315 x 925mm
Placa montada 1420 x 950mm
Peso 28,4kg
Utilice este aparato sólo con los accesorios originales. Velleman Spain SL no será responsable de daños ni
lesiones causados por un uso (indebido) de este aparato.
Para más información sobre este producto, visite nuestra página web www.velleman.eu.
Se pueden modificar las especificaciones y el contenido de este manual sin previo aviso.
SOL14_v3 VELLEMAN
Page 18

18
SOL14 – SOLARZELLENPLATTE AUS AMORPHEM SILIZIUM - 60W
1. Einführung
An alle Einwohner der Europäischen Union
Wichtige Umweltinformationen über dieses Produkt
Falls Zweifel bestehen, wenden Sie sich für Entsorgungsrichtlinien an Ihre örtliche Behörde.
Wir bedanken uns für den Kauf der SOL14! Lesen Sie diese Bedienungsanleitung vor Inbetriebnahme sorgfältig durch.
Überprüfen Sie, ob Transportschäden vorliegen. Sollte dies der Fall sein, verwenden Sie das Gerät nicht und wenden Sie
sich an Ihren Händler.
2. Zubehörteile
Dieses Symbol auf dem Produkt oder der Verpackung zeigt an, dass die Entsorgung dieses Produktes nach
seinem Lebenszyklus der Umwelt Schaden zufügen kann. Entsorgen Sie die Einheit (oder verwendeten Batterien)
nicht als unsortiertes Hausmüll; die Einheit oder verwendeten Batterien müssen von einer spezialisierten Firma
zwecks Recycling entsorgt werden. Diese Einheit muss an den Händler oder ein örtliches RecyclingUnternehmen retourniert werden. Respektieren Sie die örtlichen Umweltvorschriften.
P1 – Solarzellenplatte aus
Amorphem Silikon
P2 – Schraubensatz
(M5x45.M5x55.M5)
P3 – Laderegler (5A)
Menge Menge Menge
4
28
1
P4 – Sicherung (5A) P5 – Verlängerungskabel P6 – 4-pol. Anschluss
Menge Menge Menge
2
1
1
P7 – Adapterkabel P8 – CLA-Kabel mit Stecker P9 – Akkuadapterkabel
Menge Menge Menge
3. Sicherheitshinweise
2
1
1
• Bei Schäden, die durch Nichtbeachtung der Bedienungsanleitung verursacht werden, erlischt der Garantieanspruch. Für
daraus resultierende Folgeschäden übernimmt der Hersteller keine Haftung.
• Schalten Sie den Laderegler aus, ehe Sie verbinden/trennen.
• Drehen Sie die Polarität der Last, der Solarzellenplatte oder des Akkus nie um.
SOL14_v3 VELLEMAN
Page 19

19
• Verbinden Sie keine andere Stromversorgung oder Ladegeräte mit dem Gerät.
• Die Sicherheitssysteme funktionieren nur wenn der Laderegler eingeschaltet ist.
• Bewahren Sie den Laderegler auf einem kühlen und gut gelüfteten Platz auf. Setzen Sie keinem Wasser und keiner Feuchte aus.
• Laden Sie die Batterie 3 Stunden vor der ersten Inbetriebnahme.
• Reinigen Sie die Oberfläche der Solarzellenplatte mit einem sanften Tuch. Verwenden Sie keine Säure oder Basen.
• Bei Schäden verursacht durch eigenmächtige Änderungen erlischt der Garantieanspruch.
• Halten Sie Kinder und Unbefugte vom Gerät fern.
4. Montage
SOL14_v3 VELLEMAN
Page 20

20
5. Der Laderegler - Umschreibung
• Vorderansicht
1. digitaler Spannungsmesser
2. EIN/AUS-Schalter Spannungsmesser Ausgang
für 12 V-Zigarettenanzünderstecker
3. Anzeige niedrige Spannung
4. USB-Ausgang
5. EIN/AUS-Schalter
• Rückansicht
6. Anschluss der Batterie
7. 5 A-Sicherung
8. Anschluss an die Solarzellenplatte
Ausgänge:
1 x 12V-Zigarettenanzünderbuchse
1 x 5,5 V USB-Ausgang (Toleranz ± 0,5 V)
3 V, 6 V, 9 V, 12 V DC-Ausgang (Toleranz ± 0,5 V)
Digitaler Spannungsmesser:
Der digitale Spannungsmesser zeigt die Spannung der Batterie an. Schalten Sie den Spannungsmesser über den EIN/AUSSchalter ein und aus. Achtung: lassen Sie den Spannungsmesser nicht eingeschaltet um Energie zu sparen – Verwenden Sie
den Spannungsmesser nur wenn nötig.
Sicherheit:
Der Laderegler verfügt über nachfolgende Sicherheitssysteme:
Schutz vor Entladung: Der Controller schaltet den Ausgang automatisch aus wenn das Batterieniveau unter 10,5 V senkt
um Unterspannung zu vermeiden. Die LED blinkt. Trennen Sie das Gerät vom Netz und laden Sie die Batterie wieder
völlig auf.
Schutz vor Überladung: Der Controller schaltet den Ausgang automatisch aus wenn das Batterieniveau mehr als 14,5 V
steigt um Überspannung zu vermeiden. Trennen Sie die Solarzellenplatte vom Laderegler.
Schutz vor Überlast: Der Sicherung schmelzt wenn die Ausgangsleistung zu hoch ist. Ersetzen Sie die Sicherung durch
eine Sicherung desselben Typs und derselben Leistung.
6. Anwendung
• Die Solarzellenplatte installieren
o Installieren Sie die Solarzellenplatte (Siehe Abbildung unter ‘4. Montage’). Spannen Sie alle Schrauben fest an.
o Installieren Sie die solarzellenplatte gegenüber der Sonne und richten Sie so dass die solarzellenplatte max.
Sonnenlicht bekommt.
o Verbinden Sie das 4-pol. Anschlusskabel (P6) mit der Solarzellenplatte und mit den ‘SOLAR PANEL’-Anschlüssen auf
der Rückseite des Reglers. Verwenden Sie ein Verlängerungskabel (P5) wenn nötig. Beachten Sie die Polarität und
schalten Sie den Regler aus ehe Sie ihn anschließen.
• Der Laderegler installieren (siehe letzten Seiten)
o Verbinden Sie das Adapterkabel (P7) mit den BATTERY’-Anschlüssen auf der Rückseite des Reglers.
o Eine 12 V-Batterie laden: Verbinden Sie zuerst das Akkuadapterkabel (P9) mit dem Adapterkabel (P7). Verbinden Sie
Klemmen mit den Batterieanschlüssen. Beachten Sie die Polarität (rot = positiv, schwarz = negativ). Verursachen Sie
keinen Kurzschluss bei der Verbindung.
o Andere Anwendung: Verbinden Sie zuerst das CLA-kabel (P8) mit dem Adapterkabel (P7). Stecken Sie den Stecker in das
Gerät oder die Buchse des Fahrzeuges. Trennen Sie die Solarzellenplatte vom Anschluss oder der Batterie wenn Sie den
Motor vom Fahrzeug starten oder während Sie fahren of. Elektrische Spitzen können die Platte ernsthaft beschädigen.
SOL14_v3 VELLEMAN
Page 21

21
o Sie können einen Wechselrichter für die Stromversorgung von Gleichstromgeräten verwenden. Beachten Sie, dass die
gesamte Leistung der Geräte die Leistung des Wechselrichters nicht überschreiten darf. Verbinden Sie den
Wechselrichter mit der Batterie und nicht direkt mit dem Laderegler.
7. Technische Daten
Leistung 60 W
Leerlaufspannung (Voc) 22 V
Kurzschlussstrom (Isc) 3,4 A
Eingangsspannung 17,5 V
Kabellänge ± 1,8 m
Betriebstemperatur -40° C ~ 85° C
Lagertemperatur -40° C ~ 85° C
Durchschlagsfestigkeit Abmessungen
Platte 315 x 925 mm
Montiert 1420 x 950 mm
Gewicht 28,4 kg
Verwenden Sie dieses Gerät nur mit originellen Zubehörteilen. Velleman NV übernimmt keine Haftung für Schaden
oder Verletzungen bei (falscher) Anwendung dieses Gerätes.
Für mehr Informationen zu diesem Produkt, siehe www.velleman.eu.
Alle Änderungen ohne vorherige Ankündigung vorbehalten.
SOL14_v3 VELLEMAN
Page 22

22
o DC Applications – Gelijkstroom – Courant continu – Corriente continua – Gleichstrom
SOL14_v3 VELLEMAN
Page 23

23
o AC Applications – Wisselstroom – Courant alternatif – Corriente alterna – Wechselstrom
SOL14_v3 VELLEMAN
Page 24

 Loading...