

Page 1
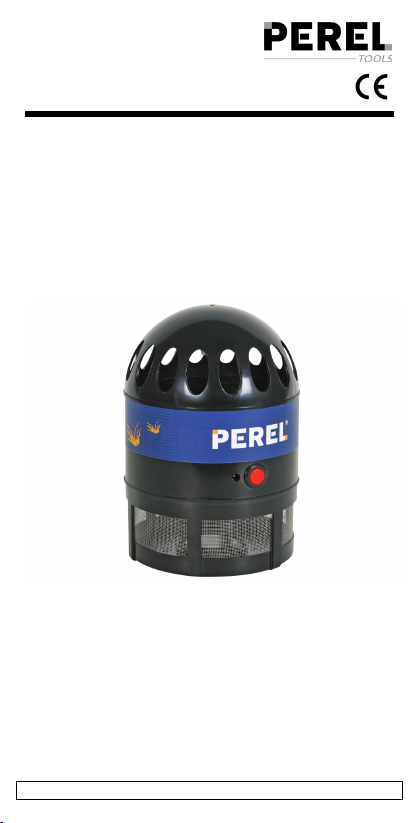
GMK2LAMP
UV TUBE FOR GMK1 – 1W
TUBE UV POUR GMK1 – 1 W
UV-LAMP VOOR GMK1 – 1 W
TUBO UV PARA GMK1 – 1 W
UV-LAMPE FÜR GMK1 – 1 W
LÂMPADA UV PARA GMK1 – 1 W
USER MANUAL 3
NOTICE D’EMPLOI 4
GEBRUIKERSHANDLEIDING 5
MANUAL DEL USUARIO 6
BEDIENUNGSANLEITUNG 7
MANUAL DE UTILIZAÇÃO 8
00 (13/08/2008)
1
Page 2
GMK2LAMP
00 (13/08/2008)
2
Page 3

GMK2LAMP
USER MANUAL
1. Introduction
To all residents of the European Union
Important environmental information about this product
This symbol on the device or the package indicates that
disposal of the device after its lifecycle could harm the
environment. Do not dispose of the unit (or batteries) as
unsorted municipal waste; it should be taken to a
specialized company for recycling. This device should be
returned to your distributor or to a local recycling service.
Respect the local environmental rules.
If in doubt, contact your local waste disposal authorities.
Thank you for choosing Perel! Please read the manual thoroughly before
bringing this device into service. If the device was damaged in transit,
don't install or use it and contact your dealer.
2. Safety Instructions
Do not use any liquids when cleaning the traps’ internal
parts. Only use the brush that came with the mosquito trap.
Do not stare at the light from the UV-lamp. Permanent eye
damage may occur.
Keep this device away from rain and moisture.
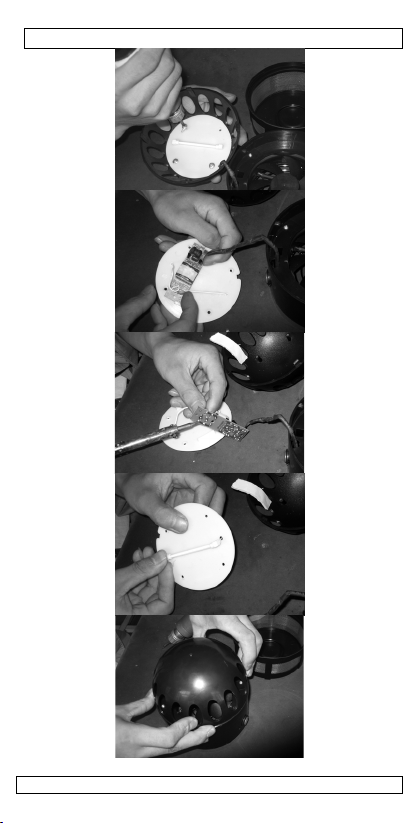
3. Replacing the UV-lamp
Refer to the pictures of this manual.
• Switch off the lamp and disconnect from the mains.
• Remove the collecting container by twisting the container counter
clockwise and pull. Now, twist the lamp holder section and pull from
the fan section.
• Gently unstick the electrical wire. Remove the 4 screws to uncover
the PCB. Now, slide the PCB out of the notches.
• Unsolder the connections of the lamp to the PCB. Remove the lamp
and replace with a new one. Solder the connections to the PCB.
Slide the PCB back into the notches.
• Screw the PCB holder back into the lamp holder section with the 4
screws.
• Reassemble by repositioning the lamp holder section back onto the
fan section and by twisting the container back onto the assembly.
For more info concerning this product, please visit our website
www.velleman.eu. The information in this manual is subject to
change without prior notice.
00 (13/08/2008)
3
Page 4

GMK2LAMP
NOTICE D’EMPLOI
1. Introduction
Aux résidents de l'Union européenne : des informations
environnementales importantes concernant ce produit
Ce symbole sur l'appareil ou l'emballage indique que l’élimination d’un
appareil en fin de vie peut polluer l'environnement. Ne pas jeter un
appareil électrique ou électronique (et des piles
éventuelles) parmi les déchets municipaux non sujets au tri
sélectif ; une déchèterie traitera l’appareil en question.
Renvoyer les équipements usagés à votre fournisseur ou à
un service de recyclage local. Il convient de respecter la
réglementation locale relative à la protection de l’environnement.
En cas de questions, contacter les autorités locales pour
élimination.
Nous vous remercions de votre achat ! Lire la présente notice
attentivement avant la mise en service de l’appareil. Si l’appareil a été
endommagé pendant le transport, ne pas l’installer et consulter votre
revendeur.
2. Prescriptions de sécurité
Éviter les liquides et n’utiliser que la brosse incluse pour
nettoyer les composantes internes du piège à moustiques. Ne
pas regarder dans la lumière UV afin d’éviter les lésions
oculaires permanentes.
Protéger les lampes contre la pluie et l’humidité.
3. Remplacement de la lampe UV
Consulter les illustrations dans cette notice.
• Éteindre le piège et déconnecter du réseau électrique.
• Retirer le conteneur en le tournant dans le sens inverse des aiguilles
d’une montre. Tirer pour détacher. Ensuite, détacher la partie
contenant le tube UV du ventilateur.
• Décoller le fil électrique. Desserrer les 4 vis et retourner le CI.
Ensuite, glisser le CI hors d e son support.
• Dessouder les connexions du tube UV sur le CI. Retirer le tube UV
et remplacer avec un nouveau. Souder les fils au CI et glisser le CI
dans son support.
• Visser le support avec le CI et le tube UV à l’aide des 4 vis.
• Assembler le piège en fixant la partie contenant le tube UV sur le
ventilateur et en fixant le conteneur sous cet ensemble.
Pour plus d’information concernant cet article, visitez notre site
web www.perel.eu. Toutes les informations présentées dans
cette notice peuvent être modifiées sans notification préalable.
00 (13/08/2008)
4
Page 5

GMK2LAMP
GEBRUIKERSHANDLEIDING
1. Inleiding
Aan alle ingezetenen van de Europese Unie
Belangrijke milieu-informatie betreffende dit product
Dit symbool op het toestel of de verpakking geeft aan dat,
als het na zijn levenscyclus wordt weggeworpen, dit toestel
schade kan toebrengen aan het milieu. Gooi dit toestel (en
eventuele batterijen) niet bij het gewone huishoudelijke
afval; het moet bij een gespecialiseerd bedrijf
terechtkomen voor recyclage. U moet dit toestel naar uw verdeler of
naar een lokaal recyclagepunt brengen. Respecteer de plaatselijke
milieuwetgeving.
Hebt u vragen, contacteer dan de plaatselijke autoriteiten
inzake verwijdering.
Dank u voor uw aankoop! Lees deze handleiding grondig voor u het
toestel in gebruik neemt. Werd het toestel beschadigd tijdens het
transport, installeer het dan niet en raadpleeg uw dealer.
2. Veiligheidsinstructies
Maak de onderdelen van de muggenval enkel schoon met het
meegeleverde borsteltje. Gebruik NOOIT vloeistoffen. Kijk
niet in de UV-lamp om permanente oogletsels te vermijden.
Bescherm dit toestel tegen regen en vochtigheid.
3. De UV-lamp vervangen
Raadpleeg de figuren in deze handleiding.
• Schakel de muggenval uit en ontkoppel van het lichtnet.
• Verwijder de collector. Draai de collector tegen de wijzers van de
klok in en trek. Draai nu de lamphouder en trek los van de
ventilator.
• Trek voorzichtig de kabel los. Maak de 4 schroeven los en draai de
printplaathouder om. Schuif de printplaat uit de houder.
• Soldeer de aansluitingen van de lamp op de printplaat los.
Verwijder de lamp en vervang door een nieuwe. Soldeer de
aansluitingen opnieuw op de printplaat en glijd de printplaat terug
in de houder.
• Schroef de printplaathouder vast met behulp van de 4 schroeven.
• Assembleer het geheel door de lamphouder op de ventilator vast te
duwen en de container onder dit geheel vast te draaien.
Voor meer informatie over dit product, zie www.perel.eu. De
informatie in deze handleiding kan te allen tijde worden
gewijzigd zonder voorafgaande kennisgeving.
00 (13/08/2008)
5
Page 6

GMK2LAMP
MANUAL DEL USUARIO
1. Introducción
A los ciudadanos de la Unión Europea
Importantes informaciones sobre el medio ambiente
concerniente a este producto
Este símbolo en este aparato o el embalaje indica que, si tira
las muestras inservibles, podrían dañar el medio ambiente.
No tire este aparato (ni las pilas, si las hubiera) en la basura
doméstica; debe ir a una empresa especializada en reciclaje.
Devuelva este aparato a su distribuidor o a la unidad de
reciclaje local.
Respete las leyes locales en relación con el medio ambiente.
Si tiene dudas, contacte con las autoridades locales para
residuos.
¡Gracias por haber comprado el GMK1LAMP! Lea atentamente las
instrucciones del manual antes de usarlo. Si el aparato ha sufrido algún
daño en el transporte no lo instale y póngase en contacto con su
distribuidor.
2. Instrucciones de seguridad
NO utilice líquidos y limpie los componentes internos del
aparato sólo con el cepillo incluido. No mire a la luz UV para
evitar lesiones oculares permanentes.
No exponga los tubos a lluvia ni humedad.
3. Reemplazar el tubo UV
Consulte las figuras de este manual del usuario.
• Desactive la trampa para mosquitos y desconéctela de la red
eléctrica.
• Saque el depósito, gírelo en sentido contrario a las agujas del reloj
y tire de el. Luego, saque la parte con el tubo UV del ventilador.
• Saque cuidadosamente el cable. Desatornille los 4 tornillos y dé la
vuelta al placa de circuito impreso. Luego, deslice la placa de
circuito impreso fuera del soporte.
• Desuelde las conexiones del tubo UV en la placa de circuito
impreso. Quite el tubo y reemplácelo por un nuevo. Vuelva a soldar
las conexiones a la placa de circuito impreso y deslice la placa de
circuito impreso en el soporte.
• Atornille el soporte con la placa de circuito impreso y el tubo UV con
los 4 tornillos.
• Monte la trampa al fijar la parte con el tubo UV al ventilador y al
fijar el depósito debajo del conjunto.
Para más información sobre este producto, visite nuestra
página web www.perel.eu. Se pueden modificar las
especificaciones y el contenido de este manual sin previo aviso.
00 (13/08/2008)
6
Page 7

GMK2LAMP
BEDIENUNGSANLEITUNG
1. Einführung
An alle Einwohner der Europäischen Union
Wichtige Umweltinformationen über dieses Produkt
Dieses Symbol auf dem Produkt oder der Verpackung zeigt an, dass die
Entsorgung dieses Produktes nach seinem Lebenszyklus der
Umwelt Schaden zufügen kann. Entsorgen Sie die Einheit
(oder verwendeten Batterien) nicht als unsortiertes
Hausmüll; die Einheit oder verwendeten Batterien müssen
von einer spezialisierten Firma zwecks Recycling entsorgt
werden. Diese Einheit muss an den Händler oder ein
örtliches Recycling-Unternehmen retourniert werden. Respektieren Sie
die örtlichen Umweltvorschriften.
Falls Zweifel bestehen, wenden Sie sich für
Entsorgungsrichtlinien an Ihre örtliche Behörde.
Wir bedanken uns für den Kauf der GMK1LAMP! Lesen Sie diese
Bedienungsanleitung vor Inbetriebnahme sorgfältig durch. Überprüfen
Sie, ob Transportschäden vorliegen. Sollte dies der Fall sein,
verwenden Sie das Gerät nicht und wenden Sie sich an Ihren Händler.
2. Sicherheitshinweise
Reinigen Sie die Zubehörteile des Mückenvertreibers nur mit
der mitgelieferten Reinigungsbürste. Verwenden Sie NIE
Flüssigkeiten. Blicken Sie nicht in die UV-Lampe, um
permanente Augenschäden zu vermeiden.
Schützen Sie das Gerät vor Regen und Feuchte.
3. Die UV-Lampe ersetzen
Beachten Sie die Abbildungen dieser Bedienungsanleitung.
• Schalten Sie den Mückenvertreiber aus und trennen Sie ihn vom
Netz.
• Entfernen Sie den Behälter. Drehen Sie den Behälter gegen den
Uhrzeigersinn und ziehen Sie. Drehen Sie nun den Lampenhalter
und ziehen Sie heraus vom Lüfter.
• Ziehen Sie das Kabel vorsichtig heraus. Machen Sie die 4 Schrauben
los und drehen Sie den Leiterplattenhalter um. Schieben Sie die
Leiterplatte aus dem Halter.
• Löten Sie die Anschlüsse der Lampe der Leiterplatte los. Entfernen
Sie die Lampe und ersetzen Sie diese durch eine neue. Löten Sie die
Anschlüsse wieder und schi eben Sie die Leiterplatte wieder in den
Halter.
• Schrauben Sie den Leiterplattenhalter mit den 4 Schrauben fest.
• Montieren Sie das Ganze indem Sie den Lampenhalter am Lüfter
befestigen und den Behälter unter diesem Ganzen festdrehen.
Für mehr Informationen zu diesem Produkt, siehe
www.perel.eu. Alle Änderungen ohne vorherige Ankündigung
vorbehalten.
00 (13/08/2008)
7
Page 8

GMK2LAMP
MANUAL DE UTILIZAÇÃO
1. Introdução
Aos residentes da União Europeia
Informações importantes sobre o meio ambiente com respeito a
este produto.
Este símbolo no aparelho ou na embalagem indica que a eliminação de
um aparelho em fim de vida pode poluir o meio ambiente. Não deite
Em caso de dúvidas, contactar as autoridades locais para
eliminação.
Obrigado por ter comprado este conjunto! Leia as instruções deste
manual antes de instalar este produto. Verifique o estado do aparelho.
Consulte o seu revendedor se o aparelho estiver danificado durante o
transporte, não o instale ou utilize.
2. Prescrições de segurança
3. Substituir a lâmpada UV
Consulte as ilustrações neste manual.
• Desligar a armadilha de rede eléctrica e da tomada.
• Retirar a tampa girando no sentido inverso dos ponteiros do relógio.
• Descolar o fio eléctrico. Desapertar os 4 parafusos com a peça.
• Dessoldar as ligações do tubo UV sobre a peça. Retirar o tubo UV e
• Aparafusar a peça com o tubo UV com os 4 parafusos.
• Montar a armadilha com a parte do tubo UV no ventilador e montar
Para mais informações sobre este artigo, consulte o nosso site
web www.perel.eu.
Todas as informações presentes neste manual podem ser
modificadas sem notificação prévia.
um aparelho eléctrico ou electrónico (e pilhas eventuais)
no lixo doméstico sem escolha selectiva ; deve ir a uma
empresa especializada em reciclagem. Devolva os
aparelhos ao seu fornecedor ou um serviço de reciclagem
local. Convém respeitar as regras locais relativas a
protecção do meio ambiente.
Evitar os líquidos não utilize a escova incluída para limpar os
componentes internos do aparelho. Não olhar directamente
para a luz UV para evitar lesões oculares permanentes.
Proteger as lâmpadas contra a chuva e humidade.
Puxar para retirar. Depois, retirar a parte que contem o tubo UV do
ventilador.
Depois, retirar a peça do suporte.
substituir o tubo. Soldar os fios e colocar a peça do tubo no suporte.
a tampa.
00 (13/08/2008)
8
 Loading...