

Page 1

FM
9
I
I
O
M
V
S
S
I
U
C
E
R
O
U
D
D
C
D
I
U
E
T
H
I
I
O
D
O
P
A
M
M
R
R
M
M
I
L
L
A
G
A
R
R
R
DOCK
DOCK
STATI
ALAR
ALTA
LAUT
LAUT
STACJ
BUDZ
NG SPEAK
NG SPEAK
N D'ACC
E
OZ PARA I
PRECHER
PRECHER
A DOKUJĄ
KIEM
ER FOR IP
ER VOOR I
EIL POUR
PHONE/IP
OCK FÜR
OCK FÜR
A DLA iP
ONE/IPO
PHONE/IP
IPHONE/I
OD CON R
PHONE/IP
PHONE/IP
D-a/iPhon
WITH F
D MET F
OD AVEC
DIO FM,
OD MIT F
OD MIT F
e-a Z RAD
RADIO, C
RADIO, K
ADIO FM,
ELOJ & AL
-RADIO, U
-RADIO, U
EM FM, ZE
OCK & AL
OK & ALA
HORLOGE
RMA
HR & ALA
HR & ALA
AREM I
RM
M
&
M
M
USER
MANUAL
IKERSHAN
E D’EMPLO
AL DEL US
NUNGSANL
UKCJA UŻY
GEBR
NOTI
MANU
BEDI
INST
LEIDING
ARIO
ITUNG
KOWNIKA
11
14
18
22
4
7
Page 2
FM9
08.07.2011 ©Velleman nv
2
Page 3

FM9
“Made for iPod,” and “Made for iPhone,” mean that an electronic accessory has been designed to connect specifically to
iPod or iPhone, respectively, and has been certified by the developer to meet Apple performance standards. Apple is not
responsible for the operation of this device or its compliance with safety and regulatory standards.
Please note that the use of this accessory with iPod, iPhone, or iPad may affect wireless performance.
iPhone, iPod, iPod classic, iPod nano, and iPod touch are trademarks of Apple Inc., registered in the U.S. and other
countries.
“Made for iPod,” en “Made for iPhone,” wil zeggen dat een elektronisch accessoir ontworpen werd specifiek om te
koppelen respectievelijk aan een iPod of iPhone, en gecertificeerd werd door de ontwikkelaar als zijnde in
overeenstemming met de Apple performantieregels. Apple is niet verantwoordelijk voor de werking van dit toestel of de
overeenstemming met veiligheids- en anderen regelgevende standaarden.
Merk op dat het gebruik van dit accessoir met iPod, iPhone, of iPad de draadloze performantie kan beïnvloeden.
iPhone, iPod, iPod classic, iPod nano, en iPod touch zijn handelsmerken van Apple Inc., geregistreerd in de V.S. en
andere landen.
« Made for iPod » et « Made for iPhone » indiquent qu’un accessoire électronique a été conçu spécifiquement pour être
connecté à un iPod ou un iPhone respectivement et que le développeur certifie qu’il est conforme aux normes de
performance d’Apple. Apple n’est pas responsable du fonctionnement de cet accessoire ni de sa conformité aux normes
réglementaires et de sécurité. Veuillez noter que l’emploi de cet accessoire peut affecter les performances sans fil de
l’iPod, l’iPhone, ou l’iPad.
iPhone, iPod, iPod classic, iPod nano, et iPod touch sont des marques déposées d’Apple Inc. enregistrées aux Etats
Unis et dans d’autres pays.
« Made for iPod » y « Made for iPhone » significa que un accesorio electrónico ha sido diseñado específicamente para ser
conectado a un iPod o iPhone, y que su desarrollador certifica que cumple con las normas rendimiento de Apple. Apple
no se hace responsable del funcionamiento de este dispositivo ni de su conformidad con las normas de regulación y
seguridad.
Tenga en cuenta que el uso de este accesorio con iPod, iPhone o iPad pueda afectar el funcionamiento inalámbrico.
iPhone, iPod, iPod classic, iPod nano y iPod touch son marcas comerciales de Apple Inc., registradas en EE.UU. y
otros países.
« Made for iPod » und « Made for iPhone » bedeutet, dass ein elektronisches Zusatzgerät speziell für den Anschluss an
das iPod oder iPhone konstruiert ist und vom Entwickler dahingehend zertifiziert wurde, dass es den AppleLeistungsnormen entspricht. Apple übernimmt keine Haftung für das Funktionieren des Geräts oder die Konformität mit
Sicherheitsnormen.
Beachten Sie, das die Nutzung von diesem Zusatzgerät mit iPod, iPhone o iPad das drahtlose Funktionieren beeinflussen
kann.
iPhone, iPod, iPod classic, iPod nano y iPod touch sind Marken von Apple Inc., registriert in den USA und anderen
Ländern.
08.07.2011 ©Velleman nv
3
Page 4

0
t
e
a
o
I
b
f
t
m
a
a
d
p
V
e
u
d
c
a
F
m
c
w
o
e
d
u
o
a
n
l
c
o
n
e
s
e
t
®
e
h
t
c
a
d
c
r
a
o
e
o
u
m
m
c
D
c
a
t
u
o
e
e
d
ser
Q
t
s
o
s
o
f
c
d
r
c
b
n
e
o
v
a
u
p
9
i
o
m
i
p
a
n
t
u
e
s
v
o
e
Q
a
t
e
f
g
s
n
s
n
c
w
o
o
b
l
e
e
y
a
f
e
t
o
t
f
a
a
i
r
a
o
c
e
m
n
u
b
t
d
m
n
e
a
b
d
b
r
o
r
m
c
s
a
u
i
n
n
v
a
t
t
e
v
FM
1. In
To all r
Import
Thank y
service.
For mor
our we
2. Sa
3. Ge
Refer to
•
•
•
•
•
•
•
4. Fe
• Multi
• 1" t
• rem
• iPod
08.07.2
Fami
All
to th
Only
warr
Dam
the
Kee
Nor
indir
prod
Avoi
devi
o
o
o
roduction
sidents of th
nt environme
This symbol on
could harm the
waste; it shoul
to your distrib
If in doubt, c
u for choosing
f the device w
e info concer
site www.vel
ety Instru
Keep the devic
Risk of electr
electroshocks.
personnel.
Always discon
activities are p
There are no u
and/or spare p
neral Guid
he Velleman
Indoor u
liquids. N
Keep this
Protect t
liarise yourself
odifications of
e device is not
use the device
nty.
ge caused by
ealer will not a
this manual fo
elleman nv no
ct) – of any n
ct.
damage from
e is not used f
tures
functional
M radio: 20 pr
usic player: iP
for iPod/iPh
for other m
lock: with alar
eeter + 2.5"
te control
docking conne
11
European Un
ntal informati
the device or t
environment.
be taken to a
tor or to a loca
ntact your lo
HQ-power! Ple
s damaged in
ing this prod
eman.eu.
tions
e away from ch
shock when
Do not open th
ect mains pow
rformed. Han
-serviceable
arts.
lines
Service and
se only. Keep
ver put object
device away fr
is device from
with the functi
he device are
overed by the
for its intende
isregard of ce
cept responsi
r future referen
its dealers ca
ture (financial,
leaking batteri
r a longer peri
sets
od/AUX/FM
ne (not incl):
sic players: vi
and snooze f
id-low woofer
tor integrated
User m
ion
on about this
he package ind
o not dispose
specialized co
l recycling serv
al waste dis
se read the m
ransit, do not i
ct and the la
ildren and una
pening the cov
housing your
r when the de
le the power c
parts inside th
uality Warr
his device awa
filled with liqu
m dust and ex
hocks and abu
ns of the devic
orbidden for sa
warranty.
purpose. Usin
tain guidelines
ility for any en
ce.
be held respo
physical…) ari
s by removing
d of time.
ia docking con
3.5mm jack (
nction
er channel (2
anual
product
cates that disp
f the unit (or
pany for recyc
ce. Respect th
osal authoriti
nual thoroughl
stall or use it
est version o
thorised users.
r. Touching liv
elf. Have the d
ice is not in us
rd by the plug
device. Refer
nty on the last
y form rain, m
id on top.
treme tempera
se. Avoid brute
before actuall
ety reasons. D
the device in
in this manual
uing defects o
sible for any d
ing from the p
them from the
ector
able incl.)
ay)
4
sal of the devi
atteries) as un
ing. This devic
local environ
s.
before bringin
nd contact you
this user ma
e wires can ca
evice repaired
or when servi
only.
o an authorize
pages of this
isture, splashi
ures.
force when op
y using it.
mage caused
n unauthorise
s not covered
problems.
mage (extrao
ssession, use
battery compa
e after its lifec
orted municip
should be ret
ental rules.
g this device in
r dealer.
ual, please v
se life-threate
y qualified
cing or mainte
dealer for ser
anual.
g and dripping
rating the devi
y user modific
way will void
y the warranty
dinary, inciden
r failure of this
tment when th
©Velle
ycle
l
rned
to
sit
ing
ance
ice
ce.
tions
he
and
al or
an nv
Page 5
FM9
r
K
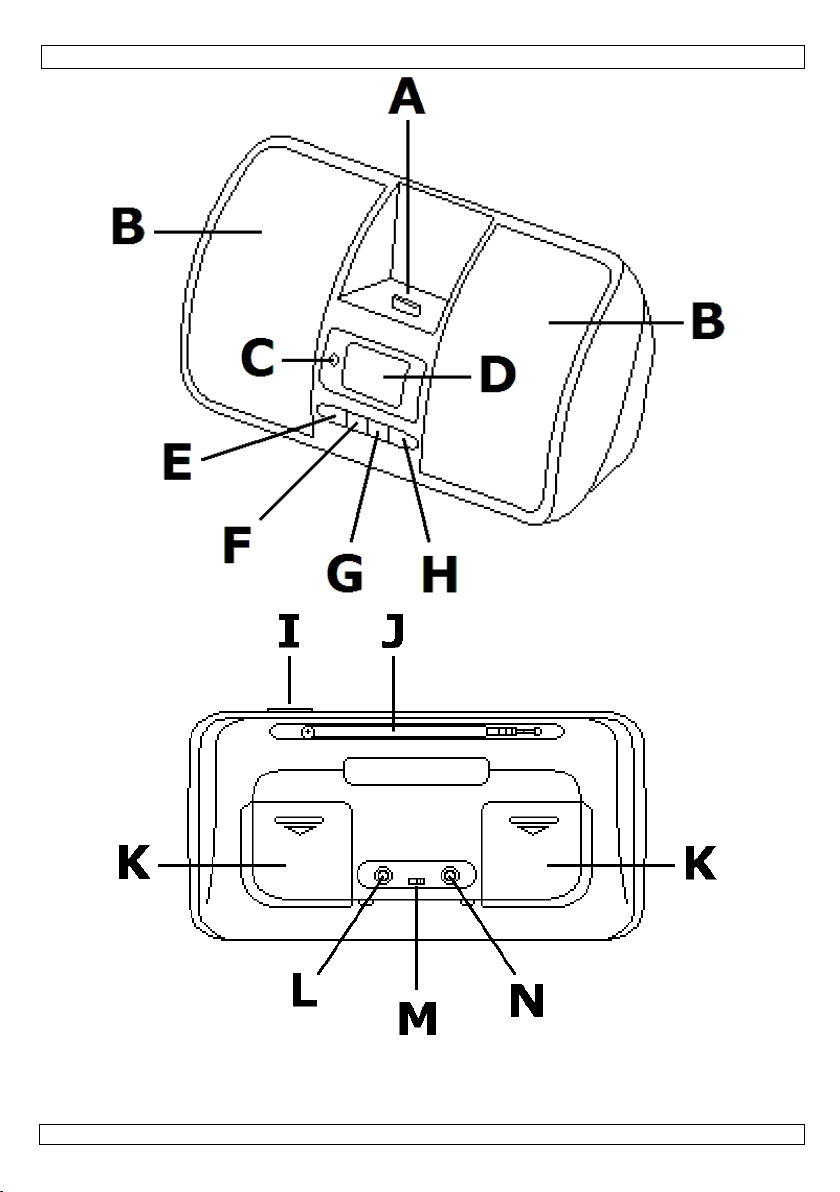
5. Overview
Refer to the illustrations on page 2 of this manual.
A docking connecto
B speaker (2x) I snooze button (SNOOZE)
C power LED J FM antenna
D display
E source button (SOURCE) L external input (AUX)
F volume down button (VOL-) M power switch
G volume up button (VOL+) N DC input (7.5V)
H standby button (STANDBY)
battery compartment (2x)
6. Use
Refer to the illustrations on pages 2 and 3 of this manual.
• The FM9 can receive power either via batteries (not incl.) or via the mains (adaptor included).
Note: when using batteries, the connected iPhone/iPod will not be charged.
o Mains: plug the connector of the included mains adaptor into the DC input [N]. Make sure the
power switch [M] is in the OFF position and plug the adaptor into a suitable mains outlet.
o Batteries: make sure the power switch [M] is in the OFF position and insert batteries in the
battery compartments [K] (refer to §7 for battery handling instructions).
• Set the power switch [M] to the ON-position. The power LED [C] lights up.
General
• Most functions are only available through the remote control; only a limited number are available on
the device itself.
• Remove the plastic tab from the remote control prior to first use.
• Press the TONE button to set the Volume, Bass and Treble. Use the volume up and down buttons (on
remote: VOLUME ; on station: VOL- [F] / VOL+ [G]) to change the settings.
o Press once to set the volume (0~40), the display indicates Volume.
o Press twice to set the bass (-8 ~ +8, step 2); the display indicates Bass.
o Press three times to set the Treble (-8 ~ +8, step 2); the display indicates Treble.
Note: the output volume can also be set directly using the volume up and down buttons (on remote:
VOLUME ; on station: VOL- [F] / VOL+ [G]).
Setting the time
• Press the TIME button; the hour indication starts to flash.
• Change the hour using the volume up and down buttons (on remote: VOLUME ; on station:
VOL- [F] / VOL+ [G]).
• Press the TIME button again to confirm and move to the minutes setting.
• Set the minutes with the volume buttons. When finished, wait ±7s for the seconds to stop flashing.
iPhone/iPod
• Gently place your iPhone/iPod (not included) on the docking connector [A].
Press the power button on the remote control ( ) or the STANDBY button [H] on the station; the
•
display [D] lights up blue.
• Press the SOURCE button [E] until the display indicates iPod.
• Press the MENU button to go to the iPod menu.
• Use the and buttons (next to the SELECT button) to scroll through the menu; press SELECT to
choose an item.
• Press the play/pause button ( ) to play or pause music.
• Shortly press the previous ( ) or next ( ) button to skip to the previous or next music track.
• Press and hold the previous ( ) or next ( ) button to fast forward or reverse within the track.
Notes:
• An incoming phone call on your iPhone will mute the music being played.
• It is possible to leave your iPhone in the docking station to answer the call.
FM radio
• Press the SOURCE button [E] until the display indicates FM.
• Extend the antenna [J] for better reception.
• Shortly press the previous ( ) or next ( ) button to adjust radio frequency by 0.1MHz. Press
and hold for ±3s for auto-scan.
• To store a radio channel (preset), press the SELECT button. Choose a preset location (01~20) with
the and buttons next to the SELECT button to store.
• To retrieve a preset channel, press the or button next to the SELECT button.
08.07.2011 ©Velleman nv
5
Page 6
0
n
n
s
t
e
e
s
n
-
e
s
t
t
c
o
e
f
n
e
f
o
r
t
g
t
n
r
m
m
e
t
r
r
r
h
o
b
l
o
i
G
e
h
m
n
w
f
u
o
h
w
e
v
t
o
u
e
x
r
i
o
e
i
c
o
u
u
h
t
n
s
h
F
K
o
n
t
r
t
u
a
e
c
o
p
b
b
w
t
c
w
v
f
9
M
i
e
u
f
s
b
e
a
t
d
m
t
e
o
s
e
b
n
e
e
o
m
A
o
V
o
e
e
s
u
f
d
5
t
l
c
l
1
m
c
c
s
n
d
v
w
e
e
u
E
n
N
s
w
c
p
o
e
e
o
m
r
:
e
d
w
m
n
k
t
a
Externa
• Con
Con
• Pres
• Star
Not
Alarm
• Mak
• Pres
flash
• Cha
VOL
Not
• Pres
• Set
• Set
• Sele
radi
Not
Snooze
• Whe
Not
in of
• In n
expi
7. Ba
Dockin
• Set
• Ope
• Inse
not
cad
• Slid
Remote
Refer to
• The
• To (
• Inse
the
8. Tr
power
no sou
sound
l input
ect an external
ector 3.5mm.
the SOURCE
the external p
: in this mode
sure the FM9
the ALARM bu
ing.
ge the hour us
[F] / VOL+ [
: if the indicat
the ALARM bu
he minutes wit
he sound volu
t the desired a
will start playi
: alarm stops
unction
the alarm sou
: the snooze f
mode (LCD n
rmal operating
es, the FM9 sw
teries
station
he power switc
the battery co
t 3 new AA bat
ix old and ne
ium, nickel-m
the battery co
control
he illustration
emote control
e)place the bat
t the battery w
ousing of the r
WARNING:
Handle batt
Do not rech
they may e
Keep batte
ubleshoot
symptom
LED [C] is not
nd from speak
is disturbed
media player (
utton [E] until
ayer.
nly the output
is in off mode (
tton until the d
ng the volume
]).
d time is corre
tton again to c
the volume b
e with the vol
larm sound wit
g when the se
hen any butto
nds, press the
nction must be
t lit) to set the
mode, press t
itches off.
[M] to the O
mpartments [
teries in each c
batteries. Do
tal hydride) ba
ers back in pla
n page 3 of th
ses one batte
tery, press on
ith the right po
mote control
eries with care,
arge non-rech
plode. Dispos
ies away from
not incl., e.g.
the display ind
volume can be
LCD is not lit).
splay shows th
up and down b
t, simply wait
nfirm and mov
ttons and pres
me buttons.
the SOURCE
time is reach
is pressed or
nooze button
activated. To
total snooze-ti
e SNOOZE but
F position.
] by sliding th
ot mix alkalin
teries.
ce.
is manual
y type 3V lithiu
he side of the
larity and close
ntil it snaps int
observe warni
rgeable batteri
of batteries in
hildren.
ng
n check
rs [B] check
check
check
check
check
check
check
check
osition of pow
attery polarity
attery conditi
he output volu
onnections of
olume level an
ile format, WA
FM
mpartment re
hether power
hether the pr
P3-player, CD-
cates AUX.
controlled.
alarm icon (
ttons (on rem
or ±7s until th
e to the minut
the ALARM b
utton: when th
d; otherwise a
utomatically a
o postpone the
o this, repeate
e to 15, 30, 4
on to set the s
covers down.
pecting the po
, standard (zin
m CR2025 (inc
attery cover [
the battery co
o place.
gs on battery
s. Do not pun
accordance wit
possible
r switch [M]
and correct if
n and replace
is OK (see abo
e; make sure
UX device [L]
blem remains
d decrease wh
and MID files
player...) to th
) and the ho
te: VOLUM
flashing stops
s setting.
tton to confirm
e radio icon (
beeping sound
ter 30 minutes
alarm for 9 mi
ly press the S
or 60 minute
andby time –
arity indicated
-carbon) or re
uded).
] and pull [2]
partment by
asing.
ture or throw b
h local regulati
olution
ecessary
epleted batteri
e)
sound is not m
and docking co
hen using oth
n necessary
are often of po
AUX input [L]
r indication sta
; on station
.
.
) is shown th
will be produce
.
utes.
OOZE button
or OFF.
hen the set ti
inside the casi
hargeable (nic
o slide it open.
ushing it back i
atteries in fire
ns.
s
uted
nnector [A]
r input source
r quality
.
ts
.
hen
e
g. Do
el-
nto
s
08.07.2
11
6
©Velle
an nv
Page 7
0
c
S
rfdapdw
s
f
R
r
w
e
w
t
v
v
e
e
e
i
g
e
e
o
n
c
n
a
v
f
w
d
t
v
b
c
p
e
n
s
e
d
c
k
t
d
r
h
n
h
n
m
m
s
u
y
r
d
U
v
e
e
d
d
d
c
a
t
u
k
h
c
e
c
k
e
e
.
e
e
9
W
0
8
m
5
a
5
x
e
.
d
A
o
e
g
e
t
d
e
b
e
d
e
e
a
b
r
t
%
a
0
V
n
s
n
A
D
e
s
t
g
r
o
a
r
e
d
n
m
s
c
e
n
u
s
v
e
c
e
k
l
h
e
t
d
r
i
t
p
m
t
w
d
u
f
o
a
f
9. Te
Use thi
event o
manual
© COPY
The copy
No part of
the prior
hnical sp
t
otal power
/N ratio
adio frequency
requency respo
rivers
daptor (incl.)
ower supply
imensions
eight
device with
damage or i
is subject to
IGHT NOTICE
ight to this ma
this manual or m
ritten consent of
cifications
RMS
peak
band
nse
tweeter
mid-low woo
main station
remote contr
riginal acces
jury resulted
hange witho
ual is owned b
y be copied, rep
the copyright hol
FM
6W (2x 3
12W
>= 83dB
87.5 ~ 1
80Hz ~ 1
1" (25.4
fer 2.5" (63.
100-240V
adaptor (i
ol 1x CR202
276 x 85
1345g
ories only. V
from (incorre
t prior notice
Velleman nv. Al
oduced, translate
er.
) @ 1KHz (10
8MHz
kHz
m)
mm)
c / 50-60Hz 5
ncl.) or 6x 1.5
(incl.)
140mm
lleman nv ca
ct) use of thi
l worldwide rights
or reduced to a
THD)
0mA to 7.5Vd
AA battery (,
not be held r
device. The i
reserved.
y electronic medi
2A
not incl.)
sponsible in
formation in
m or otherwise
he
this
ithout
1. Inl
Aan all
Belangr
Hebt u
Dank u
toestel b
Voor m
www.v
2. Ve
3. Al
Raadple
08.07.2
eiding
ingezetenen
ijke milieu-in
Dit symbool op
eggeworpen,
batterijen) niet
erechtkomen
recyclagepunt
ragen, conta
oor uw aankoo
schadigd tijde
er informatie
lleman.eu.
ligheidsin
Houd buiten
Elektrocuti
staan om do
over aan ges
Trek de stek
als u het nie
Er zijn geen
reserveonde
emene ric
g de Vellema
Gebruik
opspatte
Bescher
Bescher
11
GEBR
an de Europ
ormatie betr
het toestel of
it toestel scha
bij het gewone
oor recyclage.
rengen. Respe
teer dan de p
! Lees deze h
s het transpor
over dit prod
tructies
het bereik van
gevaar bij het
elijke elektros
hoold persone
er uit het stop
gebruikt.
oor de gebrui
delen, contact
tlijnen
®
service- en
et toestel enk
de vloeistoffen
tegen stof en
tegen schokk
IKERSH
se Unie
ffende dit pr
e verpakking g
e kan toebren
huishoudelijke
U moet dit toes
teer de plaats
laatselijke au
ndleiding gron
, installeer het
ct en de me
inderen en on
openen van h
ocks te vermij
l.
ontact (trek ni
er vervangbar
er uw dealer.
kwaliteitsgar
l binnenshuis
Plaats geen o
xtreme tempe
n. Vermijd bru
NDLEI
duct
eft aan dat, al
en aan het mil
afval; het moe
tel naar uw ver
lijke milieuwet
oriteiten bet
ig voor u het t
dan niet en ra
st recente ve
evoegden.
t toestel. Raak
en. Open de b
t aan de kabel
onderdelen in
ntie achteraa
. Bescherm teg
jecten gevuld
aturen.
e kracht tijden
7
ING
het na zijn le
ieu. Gooi dit to
bij een gespe
deler of naar e
eving.
effende de ve
estel in gebrui
dpleeg uw dea
sie van deze
geen kabels aa
huizing niet z
!) voordat u he
it toestel. Voo
deze handleid
en regen, voch
et vloeistof o
de bediening.
enscyclus wor
stel (en event
ialiseerd bedrij
n lokaal
rwijdering.
neemt. Werd
er.
andleiding, z
n die onder str
lf en laat repar
toestel reinigt
onderhoud of
ng.
igheid en
het toestel.
©Velle
t
ele
het
ie
om
ties
en
an nv
Page 8
FM9
r
K
• Leer eerst de functies van het toestel kennen voor u het gaat gebruiken.
• Om veiligheidsredenen mag u geen wijzigingen aanbrengen. Schade door wijzigingen die de gebruiker
heeft aangebracht valt niet onder de garantie.
• Gebruik het toestel enkel waarvoor het gemaakt is. Bij onoordeelkundig gebruik vervalt de garantie.
• De garantie geldt niet voor schade door het negeren van bepaalde richtlijnen in deze handleiding en
uw dealer zal de verantwoordelijkheid afwijzen voor defecten of problemen die hier rechtstreeks
verband mee houden.
• Bewaar deze handleiding voor verdere raadpleging.
• Noch Velleman nv noch zijn verdelers kunnen aansprakelijk gesteld worden voor schade
(buitengewoon, incidenteel of onrechtstreeks) – van welke aard dan ook (financieel, fysisch…)
voortvloeiend uit het bezit, gebruik of falen van dit product.
• Vermijd schade door lekkende batterijen door ze uit het batterijvak te verwijderen wanneer het toestel
voor een langere tijd niet gebruikt wordt.
4. Eigenschappen
• multifunctioneel
o FM radio: 20 presets
o muziekspeler: iPod/AUX/FM
voor iPod/iPhone (niet meegeleverd) : via dock connector
voor andere muziekspelers : via 3.5mm jack (kabel meegeleverd)
o klok: met alarm- en snoozefunctie
• 1" tweeter + 2.5" mid-low woofer per kanaal (2-weg)
• afstandsbediening
• ingebouwde dock connector voor iPOD
5. Overzicht
Raadpleeg de figuren op pagina 2 van deze handleiding.
A dock connecto
H stand-by knop (STANDBY)
B luidspreker (2x) I snooze knop (SNOOZE)
C spanningsled J FM antenne
D display
batterijvak (2x)
E bronknop (SOURCE) L externe ingang (AUX)
F volume lager knop VOL-) M spanningsschakelaar
G volume hoger knop (VOL+) N DC ingang (7.5V)
6. Gebruik
Raadpleeg de figuren op pagina’s 2 en 3 van deze handleiding.
• De FM9 kan gevoed worden via batterijen (niet meegelev.) of via het lichtnet (adapter meegelev.).
Opmerking: bij gebruik van batterijen zal de verbonden iPhone/iPod niet opladen
o Lichtnet: sluit de plug van de meegeleverde lichtnetadapter aan op de DC ingang [N]. Zorg
ervoor dat de spanningsschakelaar [M] in de uit-stand staat en plaats de adapter in een geschikt
stopcontact.
o Batterijen: zorg ervoor dat de spanningsschakelaar [M] in de uit-stand staat en plaats de
batterijen in de batterijvakken [K] (zie §7 voor instructies ivm batterijen).
• Zet de spanningsschakelaar [M] in de aan-stand. De spanningsled [C] licht op.
Algemeen
• De meeste functies zijn enkel beschikbaar via de afstandsbediening; enkel een beperkt aantal zijn
beschikbaar op het toestel zelf.
• Verwijder het plastieken strookje uit de afstandsbediening alvorens deze te gebruiken.
• Druk op de TONE knop om Volume, Bass en Treble in te stellen. Gebruik de volumeknoppen (op
afstandsbediening: VOLUME ; op toestel: VOL- [F] / VOL+ [G]) om de instellingen te wijzigen.
o Druk 1x om het volume (0~40) in te stellen, de display toont Volume.
o Druk 2x om de lage tonen (bass) in te stellen (-8 ~ +8, step 2); de display toont Bass.
o Druk 3x om de hoge tonen (Treble) in te stellen (-8 ~ +8, step 2); de display toont Treble.
Opmerking: het volume kan ook rechtstreeks ingesteld worden via de volumeknoppen (op
afstandsbediening: VOLUME ; op toestel: VOL- [F] / VOL+ [G]).
De tijd instellen
• Druk op de TIME knop; de uuraanduiding begint te knipperen.
• Wijzig het uur met de volumeknoppen (op afstandsbediening: VOLUME ; op toestel: VOL- [F] /
VOL+ [G]).
08.07.2011 ©Velleman nv
8
Page 9

FM9
• Druk opnieuw op de TIME knop om te bevestigen en naar de minutenaanduiding te gaan.
• Stel de minuten in met de volumeknoppen. Indien klaar, wacht ±7s tot de aanduiding stopt met
knipperen.
iPhone/iPod
• Plaats voorzichtig uw iPhone/iPod (niet meegelev.) op de dock connector [A].
• Druk op de spanningsknop op de afstandsbediening ( ) of op de STANDBY knop [H] op het toestel;
de display [D] licht blauw op.
• Druk op de SOURCE knop [E] tot iPod in de display verschijnt.
• Druk op de MENU knop om naar het iPod menu te gaan.
• Gebruik de en knoppen (naast de SELECT knop) om door het menu te scrollen; druk SELECT
om een item te selecteren.
• Druk de afspeel/pauze knop ( ) om het afspelen te starten of te onderbreken.
• Druk kort op de “vorige” ( ) of “volgende” ( ) knop om naar de vorige of volgende
muziektrack te springen.
• Houd de “vorige” ( ) of “volgende” ( ) knop ingedrukt om snel achterwaarts of voorwaarts
door de muziektrack te gaan.
Opmerkingen:
• Bij een inkomend gesprek op uw iPhone zal de muziek gedempt worden.
• Het is mogelijk uw iPhone in de dock speaker te laten zitten om een gesprek te beantwoorden
(handenvrij functie).
FM radio
• Druk op de SOURCE knop [E] tot FM in de display verschijnt
• Schuif de antenne [J] zo ver mogelijk uit om een betere ontvangst te krijgen.
• Druk kort op de “vorige” ( ) of “volgende” ( ) knop om de radiofrequentie met 0.1MHz te
verlagen/verhogen. Houd ingedrukt voor ±3s om automatisch scannen te starten
• Om een radiozender op te slaan (preset), druk op de SELECT knop. Kies een geheugenlocatie
(01~20) met de en knoppen naast de SELECT knop om op te slaan.
• Om een opgeslagen radiozender terug op te roepen, druk op de of knop naast de SELECT
knop.
Externe ingang
• Verbind een externe mediaspeler (niet meegelev., bv. MP3-speler, cd-speler…) met de AUX ingang
[L]. Stekker 3.5mm.
• Druk op de SOURCE knop [E] tot de display AUX toont.
• Start de externe mediaspeler.
Opmerking: in deze modus kan enkel het volume geregeld worden.
Alarm
• Zorg dat de FM9 niet aan staat (LCD is donker).
• Druk op de ALARM knop tot de display het alarmicoontje ( ) toont en de uuraanduiding knippert.
• Wijzig het uur met de volumeknoppen (op afstandsbediening: VOLUME ; op toestel: VOL- [F] /
VOL+ [G]).
Opmerking: indien het uur reeds juist staat, wacht ±7s tot het knipperen stopt.
• Druk opnieuw op de ALARM knop om te bevestigen en de minuten in te stellen.
• Stel de minuten in met de volume knoppen en druk op de ALARM knop om te bevestigen
• Stel het geluidsvolume in met de volumeknoppen
• Selecteer het gewenste alarmgeluid met de SOURCE knop: wanneer het radio-icoontje ( ) getoond
wordt dat zal de radio beginnen spelen op het ingestelde tijdstip, anders zal een beep-geluid
weerklinken.
Opmerking: het alarm stopt wanneer een knop ingedrukt wordt of automatisch na 30 minuten.
Snooze-functie
• Druk op de SNOOZE knop wanneer het alarm afgaat om het alarm uit te stellen voor 9 minuten.
Opmerking: de snooze-functie moet hiervoor wel geactiveerd zijn. Druk herhaaldelijk op de
SNOOZE knop wanneer het toestel uit staat (display niet verlicht) om de totale snooze-functie in te
stellen op 15, 30, 45 of 60 minuten of uit (geen SNOOZE functie).
• Druk tijdens de normale werking op de SNOOZE knop om de stand-by tijd in te stellen – wanneer
deze tijd verstreken is zal de FM9 automatisch uitschakelen.
08.07.2011 ©Velleman nv
9
Page 10

0
t
a
d
n
a
g
k
s
e
f
k
t
o
n
c
S
uvvag
o
a
R
n
e
h
A
k
p
f
n
h
t
U
a
e
i
e
o
p
n
k
n
r
b
d
t
m
e
r
a
d
d
r
t
o
o
c
s
s
k
d
e
n
)
t
a
9
b
a
t
e
a
g
g
t
a
1
4
3
0
n
0
5
e
d
a
g
m
t
u
o
a
y
p
H
i
o
s
i
v
d
1
r
e
n
g
t
d
e
a
o
y
m
d
g
k
]
e
g
[
n
V
V
h
t
w
m
i
a
r
r
d
t
7. Ba
Dock st
• Zet
• Ope
• Inst
Men
(nik
• Schu
Afstand
Raadple
• De a
• Dru
• Plaa
afsta
8. Pr
spanni
geen g
luidspr
geluid
9. Te
Gebruik
schade
kan te
© AUTEU
Velleman
toegestaa
op een el
terijen
tion
e spanningssc
de batterijvak
lleer 3 nieuwe
geen oude en
elcadmium, ni
if de deksels te
bediening
g de figuren o
standsbedieni
op de batterij
s de nieuwe ba
ndsbediening.
WAARSCH
Behandel b
U mag batt
Gooi batter
van kinder
bleemopl
symptoom
gsled [C] is ui
eluid uit de
ekers [B]
is verstoord
hnische s
t
otaal vermoge
/R verhouding
f
requentieberei
f
requentierespo
l
idsprekers
oedingsadapte
oeding
fmetingen
ewicht
dit toestel en
f kwetsuren
llen tijde wor
SRECHT
nv heeft het au
om deze handlei
ktronisch mediu
akelaar [M] in
ken [K] door d
A batterijen in
nieuwe batterij
kel-metaalhyd
rug op hun pla
pagina 3 van
g wordt gevoe
ouder [1] en t
terij (let op de
WING:
tterijen met z
rijen nooit do
jen weg volgen
n.
ssing
t control
control
control
control
control
gedem
control
conne
control
geluid
control
control
bestan
ecificatie
rms
piekverbrui
s
tweeter
mid-low woo
(meegelev.)
hoofdeenhei
afstandsbedi
kel met origi
ij (verkeerd
en gewijzigd
eursrecht voor
ding of gedeelten
zonder voorafga
FM
de uit-stand.
deksels naar
elk vak volgen
en, meng geen
ide) batterijen.
ts.
eze handleidin
door een 3 V l
ek uit [2].
polariteit) en d
rg, lees de wa
rboren of in he
s de plaatselijk
eer de stand v
eer de polaritei
eer de staat va
eer de spannin
eer het uitgan
pt (mute) is
eer de verbindi
tor [A]
eer of het prob
bronnen
eer het volume
eer het formaa
den hebben va
6W (2x
12W
>= 83d
87.5 ~
80Hz ~
1" (25.
fer 2.5" (6
100-24
adaptor
(LR6C,
ning 1x CR2
276 x 8
1345g
ele accessoir
gebruik van
zonder voor
deze handleidin
ervan over te ne
nde schriftelijke
eneden te sch
s de polariteit
alkaline, stand
g.
ithiumbatterij t
uw de batterijh
rschuwingen o
vuur gooien.
milieuwetgev
mogelijke
n de spanning
t van de batter
n de batterijen
(zie boven)
svolume; zorg
ngen met het e
leem zich ook
en verminder i
van het gelui
k een bedenke
3W) @ 1KHz (
B
08MHz
18kHz
mm)
.5mm)
Vac / 50-60Hz
(meegeleverd)
iet meegeleve
25 (meegelev
x 140mm
s. Velleman
it toestel. De
fgaande kenn
. Alle wereldwijd
en, te kopiëren,
oestemming van
iven.
pgegeven binn
ard (zinkcarb
pe CR2025 (
ouder terug in
de verpakkin
erlaad geen al
ng. Houd batte
plossing
schakelaar [M
jen en corrigee
en vervang leg
ervoor dat het
xterne toestel
oordoet met a
ndien nodig
sbestand; WA
lijke kwaliteit
0%THD)
500mA tot 7.5
of 6x 1.5V AA
d)
rd)
v is niet aans
informatie in
isgeving.
e rechten voorbe
e vertalen, te be
e rechthebbende
n in de behuiz
n) of herlaadb
eegeleverd).
e
.
alinebatterijen
rijen uit het be
r indien nodig
batterijen
eluid niet
L] en dock
dere
en MID
dc 2A
batterij
prakelijk voo
deze handlei
ouden. Het is nie
erken en op te sl
.
ng.
re
.
eik
ing
aan
08.07.2
11
10
©Velle
an nv
Page 11

0
t
i
o
u
l
u
u
n
n
G Rcp
D
l I
é
r
e
a
e
a
c
e
p
é
e
r
i
r
e
h
w
i
i
r
e
a
u
n
o
t
t
p
n
e
e
n
c
c
e
n
p
n
e
é
s
e
t
u
é
q
P
m
O
n
e
s
y
g
t
a
n
d
e
m
s
e
u
e
U
d
r
t
o
F
)
p
9
s
q
n
o
e
g
t
e
e
u
t
t
o
v
e
p
g
p
e
a
e
e
s
c
p
e
e
e
I
c
r
v
c
o
v
s
p
u
h
e
e
e
r
o
d
g
f
e
p
s
e
m
a
n
é
c
a
p
o
u
e
c
a
é
d
a
s
m
r
c
m
r
c
a
o
e
,
i
r
é
t
n
e
,
N
FM
TICE D
’EMPLO
1. In
Aux rés
Des inf
Nous vo
l’apparei
revende
Pour pl
visiter
2. Co
3. Di
Se référ
•
•
•
•
•
•
•
4. Ca
• mult
• 1" t
• téléc
• conn
08.07.2
roduction
dents de l'Un
rmations env
Ce symbole su
peut polluer l'
éventuelles) p
l’appareil en q
recyclage local
l’environneme
s remercions d
. Si l’appareil a
r.
s d’informati
otre site web
auser des élec
our toute répa
'appareil ; non
l n’y a aucune
ventuelles che
ectives gé
r à la garanti
Se f
miliariser avec
Tout
modification
modi
fications par le
N’uti
liser qu’à sa fo
La g
rantie ne s’ap
noti
e et votre reve
résul
tent.
er cette notice
Gard
Ni V
lleman nv ni s
exce
tionnels, impr
caus
s par la posse
Evit
r tout risque d’
l’app
areil n’a plus é
actéristiq
fonctionnel
o
adio FM: 20 pr
o l
cteur de musi
pour iPod/i
pour autres
o
orloge: avec al
eeter + 2.5"
ommande
ecteur Dock int
11
signes de
arder hors de
isque d’élec
ébrancher l’a
Utiliser c
projectio
Protéger
Protéger
on européen
ronnemental
l'appareil ou l'
nvironnement.
rmi les déchet
estion. Renvo
. Il convient de
t. En cas de q
e votre achat !
été endomma
n concernan
www.vellem
sécurité
la portée des e
rocution lors
rochocs mortel
ration.
pareil s’il n’est
pas le câble.
pièce maintena
z votre revend
érales
de service et
t appareil uniq
s d’eau. Ne ja
ontre la poussi
ontre les choc
le fonctionnem
st interdite po
client ne tomb
ction prévue.
lique pas aux
deur déclinera
pour toute réfé
s distributeurs
vus ou indirec
sion, l’utilisati
ndommageme
é utilisé depuis
es
sélections
ue: iPod/AUX/
hone (pas livré
lecteurs de mu
arme et fonctio
id-low woofer
égré pour iPod
e
s importante
emballage indi
Ne pas jeter u
municipaux n
er les équipem
respecter la ré
uestions, con
Lire la présent
é pendant le tr
cet article et
n.eu.
fants et des p
e l’ouverture d
s. Ne pas ouvri
pas utilisé ou p
ble par l’utilisa
ur.
de qualité Ve
uement à l'in
ais placer d’ob
ère. Protéger c
et le traiter a
nt avant l’em
r des raisons d
nt pas sous la
n usage impro
ommages surv
toute respons
ence ultérieur
ne peuvent êtr
s, quelles que
n ou le dysfon
nt par fuite de
un certain tem
M
: par connect
sique : par fich
n Snooze
ar canal (2 voi
11
concernant
ue que l’élimin
appareil élect
n sujets au tri
nts usagés à
lementation lo
acter les aut
notice attenti
ansport, ne pa
la version la
rsonnes non a
boîtier. Touc
r pas le boîtier
our le nettoyer.
eur. Command
lleman® à la fi
érieur. Protég
jet contenant u
ntre la chaleu
ec circonspecti
loi.
e sécurité. Les
arantie.
re annule d'of
nus en néglig
bilité pour les
.
tenus respon
oient la nature
tionnement de
iles en les enl
ps.
ur dock
jack de 3.5m
s)
e produit
ation d’un app
ique ou électro
sélectif ; une d
otre fournisseu
ale relative à l
rités locales
ement avant la
l’installer et c
lus récente d
torisées.
er un câble so
t consulter un
Tirer la fiche p
r des pièces d
n de cette noti
r de la pluie, d
n liquide sur l’
extrême.
n pendant l’op
ommages occ
ice la garantie.
ant certaines d
roblèmes et le
ables des dom
(financière, co
ce produit.
vant du compa
(câble pas in
reil en fin de vi
ique (et des pi
chèterie traite
r ou à un servi
protection de
our éliminati
mise en servic
nsulter votre
e cette notice
s tension peut
personnel qual
our débranche
rechange
e.
e l’humidité et
ppareil.
ration.
sionnés par de
irectives de cet
défauts qui e
ages
porelle, etc.),
rtiment à piles
lus)
©Velle
e
les
a
e de
n.
de
fié
des
s
e
si
an nv
Page 12

FM9
k
K
5. Description
Se référer aux illustrations à la page 2 de cette notice.
A connecteur Doc
B enceinte (2x) I touche Snooze (SNOOZE)
C LED de statut J antenne FM
D afficheur
E touche source (SOURCE) L entrée auxiliaire (AUX)
F touche volume bas (VOL-) M interrupteur de puissance
G touche volume haut (VOL+) N entrée CC (7.5V)
H touche mode veille (STANDBY)
compartiment à piles (2x)
6. Installation
Voir illustrations à la page 2 de cette notice.
• Le FM9 peut être alimenté par des piles (pas livrées) ou par le réseau (bloc secteur inclus).
Remarque: en cas d’utilisation de piles, l’iPhone/iPod connecté ne sera pas rechargé.
o Réseau: connecter le chargeur du bloc secteur inclus à l’entrée CC [N]. S’assurer que
l’interrupteur de puissance [M] est mis en position OFF et brancher le bloc secteur à une prise
secteur adaptée.
o Piles: s’assurer que l’interrupteur de puissance [M] est mis en position OFF et insérer les piles
dans le compartiment à piles [K] (voir §7 pour les instructions relatives aux piles).
• Mettre l’interrupteur de puissance [M] en position ON. La LED de puissance [C] clignote.
Général
• La plupart des fonctions est accessible directement depuis la télécommande ; seulement un nombre
limité est accessible depuis l’appareil-même.
• Avant la première utilisation, retirer la languette de protection en plastique de la télécommande.
• Appuyer sur la touche TONE pour régler le volume, basses et aigus. Utiliser les touches de volume
haut et bas (sur la télécommande : VOLUME ; sur la station: VOL- [F] / VOL+ [G]) pour
modifier le paramétrage.
o Presser une fois pour régler le volume (0~40), l’afficheur indique Volume.
o Presser deux fois pour régler les basses (-8 ~ +8, étape 2); l’afficheur indique Bass.
o Presser trois fois pour régler les aigus (-8 ~ +8, étape 2); l’afficheur indique Treble.
Remarque: le volume de sortie peut également être réglé directement en utilisant les touches de
volume haut et bas (sur la télécommande: VOLUME ; sur la station: VOL- [F] / VOL+ [G]).
Configurer le temps
• Presser la touche TIME; l’indication d’heure se met à clignoter.
• Modifier l’heure en utilisant les touches de volume haut et bas (sur la télécommande: VOLUME ;
sur la station: VOL- [F] / VOL+ [G]).
• Presser de nouveau sur la touche TIME pour valider et passer à la configuration de minutes.
• Configurer les minutes en utilisant les touches de volume. Dès la configuration, patienter ±7s pour
que les secondes s’arrêtent de clignoter.
iPhone/iPod
• Placez votre iPod ou iPhone (pas livré) prudemment sur le connecteur Dock [A]
• Appuyer sur la touche marche/arrêt de la télécommande ( ) ou la touche STANDBY [H] sur la
station; l’afficheur [D] s’illumine bleu.
• Appuyer sur la touche SOURCE [E] jusqu’à ce que l’afficheur indique iPod.
• Presser la touche MENU pour naviguer vers le menu d’iPod.
• Utiliser les touches et (près de la touche SELECT) pour défiler dans le menu; appuyer sur
SELECT pour sélectionner un item.
• Presser sur la touche Lecture/Pause ( ) pour lire la musique ou pour la mettre en pause.
• Appuyer brièvement sur la touche Précédente ( ) ou Suivante ( ) pour omettre le morceau de
musique précédent ou suivant.
• Presser et maintenir enfoncé la touché Précédente ( ) ou Suivante ( ) pour avancer ou
rembobiner rapidement dans le morceau de musique.
Remarques:
• Un appel téléphonique sur votre iPhone fera baisser la musique lors de lecture.
• Il est possible de laisser votre iPhone dans le connecteur Dock pour répondre à l’appel.
Radio FM
• Appuyer sur la touche SOURCE [E] jusqu’à ce que l’afficheur indique FM.
• Rallonger l’antenne [J] pour une meilleure réception.
08.07.2011 ©Velleman nv
12
.
Page 13

0
s
o
m
umém
u
e
n
u
aRem
s
u
f
aRem
ê
s
i
e
c
cRem
m
n
p
oRem
O
e
m
e
s
o
r
r
r
m
o
o
e
é
p
r
r
h
e
h
m
h
s
f
u
t
n
o
m
t
e
t
c
r
r
o
n
s
f
e
l
p
u
r
e
0
x
u
t
c
t
A
o
d
s
n
t
F
t
e
[
h
t
m
c
r
e
e
t
c
9
s
E
é
’
o
c
u
n
d
e
m
o
o
e
P
D
m
n
c
n
h
o
p
e
(
r
o
q
e
a
c
a
t
r
n
e
t
r
c
s
e
s
a
p
o
m
e
t
s
T
u
o
D
e
e
n
R
e
t
s
m
u
k
t
é
n
e
a
t
a
m
c
o
n
é
e
r
(
n
c
e
s
t
t
• Pres
radi
auto
• Pour
fréq
• App
Entrée
• Con
auxil
• App
• Initi
Alarme
• S’as
• App
l’indi
• Modi
sur l
s’arr
• Pres
• Conf
• Régl
• Séle
la le
30
Fonctio
• En a
péri
SNO
total
• En
veill
7. Le
La stati
• Mett
• Ouv
• Insé
indiq
pas
• Rep
La téléc
Se référ
• La t
• Rem
• Insé
téléc
er brièvement
par 0.1MHz. P
atique.
mémoriser la s
ence à toutes l
oriser.
yer sur la touc
xterne
ecter un lecteu
iaire [L]. Conn
yer sur la touc
liser le lecteur
arque: le volu
urer que le FM
yer sur la touc
cation d’heure
ier l’heure en
station: VOL-
arque: Si le te
te.
er de nouveau
gurer les minu
r le volume de
tionner la son
ture de radio c
arque : L’alar
inutes.
snooze
puyant sur la
de de 9 minut
arque: la fonc
ZE si le FM9 e
de la fonction
ode normal de
– si le temps
piles
n Dock
e l’interrupteu
ir le compartim
er 3 nouvelles
uée à l’intérieu
élanger des pi
sitionner les co
mmande
r à l’illustratio
lécommande e
lacement : en
er la pile tout
ommande en g
AVERTISSE
Traiter les
recharger d
car elles pe
piles à l’éca
sur la touche P
esser et maint
tation radio (pr
es mémoires (
e ou près
r multimédia e
cteur 3.5mm.
e SOURCE [E]
externe.
e de sortie ne
9 est en mode
e ALARM jusq
e met à cligno
tilisant les tou
[F] / VOL+ [G
mps indiqué es
sur la touche
es avec les tou
son avec les t
erie d’alarme
mmencera dè
e s’arrêtera e
ouche Snooze l
s.
ion Snooze doi
st en mode OF
snooze sur 15,
fonctionnemen
onfiguré expir
de puissance
ent à piles [K]
piles AA dans c
du compartim
les alcalines, s
uvercles du co
en page 3 de
t alimentée pa
oncer la langu
n respectant la
issant les couv
MENT:
iles avec atten
es piles non-re
vent exploser.
rt des enfants.
FM
écédente (
nir enfoncé pe
ésélectionnée),
1~20) avec le
de la touche S
terne (pas livr
jusqu’à ce que
peut qu
OFF (l’afficheur
er.
hes volume ha
]).
LARM pour vali
ches de volum
uches de volu
ésirée par la t
orsque l’alarm
(l’afficheur LC
30, 45 ou 60
, le FM9 s’étei
M] en position
en glissant les
ent. Ne pas mé
andard (carbo
tte de protecti
polarité appro
ion et respecte
Jeter les piles
être c
’à ce que l’affi
correct, patie
la configurati
appuyant sur
être activée.
, appuyer sur l
aque comparti
partiment à pi
ette notice.
une pile au lit
rcles jusqu’à c
hargeables. N
) ou Suivante
ndant ±3s pou
appuyer sur la
touches et
LECT pour retr
, p.ex. lecteur
l’afficheur indi
ntrôlé en mod
LCD n’est pas
heur montre l’i
t et bas (sur l
ter simplemen
er et passer à
et appuyer su
e.
uche SOURCE:
n de temps; si
une touche qu
sonne, la fonc
our l’activer, p
n’est pas allu
inutes ou OFF.
a touche SNOO
dra.
OFF.
ouvercles ver
ment tout en r
langer des pile
e-zinc) ou rech
les en les gliss
ium de 3 V ty
n [1] et tirer [
riée et fermer
e qu'ils se verr
r les avertisse
pas perforer l
tout en respec
) pour aju
activer la prog
touche SELEC
près de la to
uver une stati
MP3, lecteur C
ue AUX.
AUX.
llumé).
ône d’alarme (
télécommand
±7s jusqu’à c
la configuratio
la touche ALA
après affichag
on un bip sera
lconque ou au
ion Snooze est
esser plusieur
mé) pour para
ZE pour config
le bas.
spectant la pol
usées avec de
argeables (nic
nt avec précau
e CR2025 (livr
2] pour ouvrir
le compartime
uillent en plac
ents sur l’emb
s piles ni les je
ant les lois loc
ter la fréquen
rammation
. Attribuer la
che SELECT p
n présélection
, etc.) à l’entr
) et que
: VOLUME
que le clignot
de minutes.
M pour valide
d’icône radio
émis.
omatiquement
activée penda
fois sur la tou
étrer la durée
rer le temps d
arité comme
piles neuves.
el-cadmium).
ion.
e).
le couvercle.
t à piles de la
.
llage. Ne pas
er dans le feu
les. Maintenir l
e de
ur
ée.
e
;
ment
.
),
après
t une
he
Ne
es
08.07.2
11
13
©Velle
an nv
Page 14

0
o
m
u
é
prprdbadp
o
r
l
S
m
o
t
u
a
h
á
,
s
M
R
t
a
o
m
s
e
n
u
e
m
e
d
p
u
a
c
n
o
b
a
i
p
n
n
a
s
a
c
c
r
t
e
d
e
n
e
d
n
r
N
e
e
o
t
e
o
L
r
w
d
a
c
c
r
9
e
e
d
c
e
m
e
v
W
0
8
m
5
c
5
x
u
t
L
e
e
n
o
a
e
s
e
n
e
.
o
c
o
s
g
m
c
x
e
%
c
0
e
V
c
o
d
R
e
a
o
s
.
s
n
e
c
t
r
s
M
e
s
n
m
e
p
s
t
n
é
o
e
a
e
a
o
e
m
e
e
c
r
t
e
u
u
d
e
o
r
8. Pr
la LED
s’allu
les ha
pas de
Le son
9. Sp
N’empl
respons
les info
préalab
© DROIT
SA Velle
reproducti
tout supp
blèmes/S
symptom
de statut [C] n
e pas
t-parleurs n’é
son [B]
est perturbé
cification
uissance total
apport S/N
lage de fréque
éponse en fréq
rivers
loc secteur (liv
limentation
imensions
oids
yer cet appar
able de dom
mations prés
e.
D’AUTEUR
an est l’ayant
on, traduction, co
rt électronique q
lutions
e contrôl
contrôl
contrôl
ettent contrôl
contrôl
positio
contrôl
[A]
contrôl
contrôl
contrôl
WAV e
techniqu
RMS
puissance de
crête
ce
ence
tweeter
mid-low woo
ré)
station princi
télécomman
il qu’avec de
ages ou lésio
ntées dans c
roit des droits
ie ou diffusion, i
e se soit est inte
FM
er la position d
er la polarité d
er la condition
er si la puissan
er le volume d
n mute
er les connexio
er si le problè
er le volume et
er le format d’
MID sont sou
s
6W (2x 3
12W
>= 83dB
87.5 ~ 1
80Hz ~ 1
1" (25.4
fer 2.5" (63.
100-240V
pale bloc secte
e 1x CR202
276 x 85
1345g
s accessoires
s survenus à
tte notice pe
’auteur pour ce
tégrale ou partiel
dite sans l’accord
possible
l’interrupteur
s piles et corri
es piles et re
e est OK (voir
sortie ; s’assu
ns d’entrée au
e persiste en u
baisser si néc
nregistrement,
ent d’une quali
) @ 1KHz (10
8MHz
kHz
m)
mm)
a / 50-60Hz 5
ur (livré) ou pil
(livrée)
140mm
d’origine. SA
un usage (in
vent être m
te notice. Tous
le, du contenu de
préalable écrit de
olution
de puissance [
er si nécessair
placer des pile
ci-dessus)
rer que le son
iliaire [L] et le
tilisant une aut
ssaire
les enregistre
té inférieure
THD)
0mA à 7.5Vcc
6x 1.5V AA (
elleman ne
orrect) de ce
difiées sans
roits mondiaux r
cette notice par q
l’ayant droit.
]
affaiblies
a pas été mis
connecteur Do
e source d’ent
ents au forma
2A
as livrées)
era aucunem
appareil. To
otification
servés. Toute
uelque procédé o
n
k
ée
nt
tes
sur
1. In
A los ci
Import
¡Gracias
aparato
Para m
usuario
2. In
08.07.2
roducción
dadanos de l
ntes informa
Este símbolo e
dañar el medi
doméstica; de
distribuidor o
ambiente. Si t
por haber com
a sufrido algú
s informació
visite nuestr
truccione
antenga el ap
iesgo de des
ocar un cable
parato por pe
11
MA
Unión Europ
iones sobre
este aparato
ambiente. No
e ir a una emp
la unidad de r
ene dudas, c
rado el FM9!
daño en el tra
sobre este p
página ww
de seguri
rato lejos del
argas eléctri
onectado a la
sonal titulado.
UAL DE
a
l medio ambi
el embalaje i
ire este aparat
resa especializ
ciclaje local. R
ntacte con la
ea atentament
nsporte no lo i
oducto y la v
.velleman.eu
ad
lcance de pers
as al abrir la
ed eléctrica. N
USUA
nte concerni
dica que, si tir
(ni las pilas,
da en reciclaje
spete las leye
autoridades
las instruccio
stale y póngas
rsión más re
nas no capaci
aja Puede sufri
abra la caja u
14
IO
nte a este pr
las muestras i
i las hubiera)
Devuelva este
locales en rel
locales para r
es del manual
en contacto c
iente de este
adas y niños.
una peligrosa
ted mismo y d
ducto
nservibles, pod
n la basura
aparato a su
ción con el me
siduos.
ntes de usarlo
n su distribuid
manual del
descarga eléct
je reparar el
©Velle
rían
io
. Si el
r.
ica al
an nv
Page 15

0
D
l E
s
a
z
d
t
e
c
t
r
a
r
r
r
d
s
s
e
D
ó
ó
ó
s
s
o
eo Pdeo P
p
m
a
a
r
e
a
p
e
u
a
n
d
e
d
s
e
e
a
n
n
m
e
w
p
s
p
e
p
r
e
u
ú
r
h
r
.
e
n
r
e
d
c
c
e
a
s
a
s
U
:
e
n
p
e
L
-
+
M
i
9
r
o
e
®
p
e
á
c
s
e
t
b
e
a
d
o
s
s
S
S
K
r
a
p
a
e
t
o
o
s
N
a
e
a
r
a
e
t
o
m
o
c
d
t
p
o
o
t
e
d
e
u
v
e
n
s
)
a
d
D
a
F
u
m
s
u
ñ
r
l
a
o
e
3. No
Véase la
•
Famili
•
Por ra
causa
•
Utilice
garan
•
Daños
y su d
•
Guard
•
Ni Vell
indire
este p
•
Para e
apara
4. Ca
• apar
o
o
o
• twee
• man
• cone
5. De
Véase la
A con
B alta
C LE
D pan
E bot
F bot
G bot
6. In
Véase la
• Es p
Obs
• Pong
esconecte sie
impiarlo. Tire s
l usuario no h
i necesita piez
rmas gene
Garantía de s
Utilice el
ningún ti
No expon
No agite
rícese con el f
ones de seguri
os por modific
sólo el aparato
ía completame
causados por
istribuidor no s
este manual
eman nv ni su
tos, sea cual s
roducto.
vitar daños cau
o durante un p
acterístic
to multifunció
adio FM: 20 ca
eproductor de
para iPod/iP
para otros r
eloj: con alarm
ter 1" + mid-lo
o a distancia
ctor dock incor
cripción
figuras en la
ctor dock
voz (2x)
de potencia
talla
n SOURCE (fu
n para bajar el
n para subir el
talación
figuras en la
sible alimenta
rvación: No s
or la red: intro
e que el interr
léctrica.
or pilas: Aseg
ilas en los com
a el interrupto
pre el aparato
iempre del enc
brá de efectua
s de recambio
ales
rvicio y calid
parato sólo e
o de salpicadu
ga este equipo
l aparato. Evit
ncionamiento
dad, las modifi
ciones no auto
para las aplica
te.
escuido de las
rá responsabl
el usuario par
distribuidores
a la índole (fin
sados por fuga
ríodo prolonga
s
ales preprogra
úsica: iPod/A
hone (no incl.)
productores d
a y función « s
woofer 2.5"
orado para iPo
ágina 2 de est
nte)
volumen (VO
volumen (VOL
ágina 2 y 3 de
el aparato con
recarga el iPh
duzca el conect
ptor ON/OFF [
rese de que el
partimentos de
ON/OFF [M] e
FM
si no va a usa
ufe para desc
el mantenimi
ad Velleman
interiores. N
a o goteo.
a polvo. No ex
usar excesiva
el aparato ant
aciones no aut
rizadas, no est
iones descrita
instrucciones d
de ningún dañ
cuando necesi
erán responsa
nciera, física,
, saque las pil
do.
mados
X/FM
por conector
música: por c
ooze »
or canal (2 vía
d
manual del u
H botón
I botón
J antena
compa
L entrad
) M interru
) N entrad
este manual d
pilas (no incl.)
one/iPod conec
or del adaptad
] esté en la p
nterruptor ON/
pilas [K] (véa
n la posición O
lo durante un l
nectar el cable
nto de ninguna
al final de est
o exponga este
onga este equi
fuerza durante
s de utilizarlo.
orizadas del ap
n cubiertos po
en este manu
seguridad de
o u otros probl
e consultarlo.
les de los dañ
tc.), causados
s del comparti
ock
nector jack de
)
uario.
TANDBY (mod
NOOZE (repeti
FM
timento de pila
AUX (entrada
tor ON/OFF
DC (7.5V)
l usuario.
o por la red (a
ado al utilizar
r de red (incl.)
sición OFF y c
OFF [M] esté e
e §7).
. El LED de po
rgo período d
de red, nunca
pieza. Contact
manual del us
equipo a lluvia
po a temperatu
el manejo y la
rato están pro
la garantía.
l. Su uso incor
este manual in
mas resultant
s extraordinari
por la posesió
ento de pilas
3.5mm (cable
de espera)
ión de alarma
s (2x)
de señal para
aptador de re
ilas.
en la entrada
necte el adapt
n la posición O
encia [C] se il
tiempo o ante
el propio cable
con su distrib
ario.
, humedad ni a
ras extremas.
instalación.
hibidas. Los da
recto anula la
alidarán su ga
s.
os, ocasionales
, el uso o el fal
i no va a utiliz
no incl.)
paratos extern
incl.).
C [N]. Asegúr
dor a la red
F e introduzca
mina.
de
.
idor
os
antía
o
o de
r el
s)
se
las
08.07.2
11
15
©Velle
an nv
Page 16

FM9
General
• La mayoría de las funciones solo está disponible con el mando a distancia are. Es posible controlar
sólo algunas funciones desde la unidad principal.
• Saque la pestaña de plástico del mando a distancia antes del primer uso.
• Pulse el botón TONE para ajustar el volumen, los graves (bass) y los agudos (treble). Utilice el botón
para bajar o subir el volumen (mando a distancia: VOLUME ; unidad principal: VOL- [F] / VOL+
[G]) para modificar los ajustes.
o Pulse una vez para ajustar el volumen (0~40), la pantalla visualiza Volume.
o Pulse dos veces para ajustar los graves (-8 ~ +8, paso 2); la pantalla visualiza Bass.
o Pulse tres veces para ajustar los agudos (-8 ~ +8, paso 2); la pantalla visualiza Treble.
Observación: también es posible ajustar el volumen directamente con el botón para bajar o subir el
volumen (mando a distancia: VOLUME ; unidad principal: VOL- [F] / VOL+ [G]).
Ajustar la hora
• Pulse el botón TIME; la indicación de las horas empieza a parpadear.
• Modifique la hora al utilizar el botón para bajar o subir el volumen (mando a distancia: VOLUME
; unidad principal: VOL- [F] / VOL+ [G]).
• Vuelva a pulsar el botón TIME para confirmar y para ir al ajuste de los minutos.
• Ajuste los minutes con el botón para bajar o subir el volumen. Después de haberlos introducido,
espere ±7 segundos hasta que se pare el parpadeo de los segundos.
iPhone/iPod
• Ponga el iPhone/iPod (no incl.) cuidadosamente en el conector dock [A].
• Pulse el interruptor ON/OFF del mando a distancia ( ) o el botón STANDBY [H] de la unidad
principal. La pantalla [D] se ilumina (azul).
• Pulse el botón SOURCE [E] hasta que la pantalla visualice iPod.
• Pulse el botón MENU para ir al menú iPod.
• Utilice los botones y (al lado del botón SELECT) para desplazarse por el menú. Pulse el botón
SELECT para seleccionar un ítem.
• Pulse el botón para reproducir la música o hacer una pausa.
• Pulse el botón o para ir a la pista anterior o la pista siguiente.
• Mantenga pulsado el botón o para avanzar o retroceder en la pista.
Observaciones:
• Se silencia el volumen de la música en cuanto reciba una llamada en el iPhone.
• Es posible dejar el iPhone en la unidad principal al contestar.
FM radio
• Pulse el botón SOURCE [E] hasta que la pantalla visualice FM.
• Extienda la antena [J] para una mejor recepción.
• Pulse el botón « anterior » ( ) o el botón « siguiente » ( ) para ajustar la frecuencia de la
radio con 0.1MHz. Mantenga pulsado el botón ±3s para una exploración automática (auto-scan).
• Para almacenar un canal de radio (preprogramado), pulse el botón SELECT. Seleccione una ubicación
preprogramada (01~20) con el botón y al lado del botón SELECT para guardarla.
• Para recuperar un canal preprogramado, pulse el botón y al lado del botón SELECT.
Entrada auxiliar
• Conecte un reproductor multimedia (no incl., p.ej. reproductor MP3, reproductor de CD, etc.) a la
entrada AUX [L]. Conector de 3.5mm.
• Pulse el botón SOURCE [E] hasta que la pantalla visualice AUX.
• Inicialice el reproductor.
Observación: En este modo sólo es posible controlar el volumen de salida.
Alarma
• Asegúrese de que el aparato está en la posición (la pantalla LCD no está iluminada).
• Pulse el botón ALARM hasta que la pantalla visualice el icono de la alarma ( ) y que la indicación
de las horas empiece a parpadear.
• Cambie las horas al utilizar el botón para bajar o subir el volumen (mando a distancia: VOLUME
; unidad principal: VOL- [F] / VOL+ [G]).
Observación: Si es correcta la hora visualizada, espere sólo ±7 segundos hasta que se pare el
parpadeo.
• Vuelva a pulsar el botón ALARM para confirmar y para ir al ajuste de los minutos.
• Ajuste los minutos con el botón para bajar o subir el volumen y pulse el botón ALARM para confirmar.
• Ajuste el volumen con el botón para bajar o subir el volumen.
• Seleccione el sonido de alarma deseado con el botón SOURCE: se visualiza el icono de la radio ( ).
La radio se activa si se ha transcurrido el tiempo instaurado; si no, el aparato emite una señal
08.07.2011 ©Velleman nv
16
Page 17

0
t
e
m
e
t
s
a
o
c
d
v
a
a
o
c
l
á
a
t
p
c
ó
a
e
o
a
n
n
a
e
e
m
h
r
n
A
a
g
a
n
a
C
p
e
d
e
n
c
Mpotcre
e
c
ima
«
o
e
]
A
n
m
o
a
a
m
g
n
t
9
a
a
o
«
F
a
n
a
g
a
e
p
e
e
d
d
a
A
e
o
e
z
5
e
c
0
a
a
o
5
n
p
N
e
s
u
o
o
a
D
A
a
O
m
y
m
r
m
e
c
o
a
V
m
t
y
t
a
c
.
e
A
t
acús
Obs
auto
Función
• Si su
Obs
snoo
ajus
En el mo
FM9 se d
7. La
La unid
• Pong
• Abra
• Intr
mez
hídri
• Vuel
Mando
Véase la
• El m
• Para
de la
• Intr
desli
8. So
no est
potenc
los alt
un son
hay in
9. Es
poten
relaci
band
respu
altav
adapt
alime
dime
peso
08.07.2
ica.
rvación: la al
áticamente d
« snooze »
ena la alarma,
rvación: aseg
ze » varias vec
ar la función «
do de funciona
esactiva si se
baterías
d principal
a el interrupto
el compartime
duzca 3 pilas A
le pilas alcalin
o).
a a poner la ta
distancia
figura en la pá
ndo a distanci
reemplazar o i
caja.
duzca la pila al
e la tapa hast
ADVERTEN
Maneje las
No recargu
Respete las
pilas lejos
ución de p
problema
iluminado el L
ia [C]
voces [B] no
ido
erferencias
ecificacio
ia total
n señal / ruido
de frecuencia
sta en frecuen
ces
dor de red (in
tación
siones
11
rma se desacti
spués de 30 m
pulse el botón
úrese de que la
s si el aparato
snooze ». Es p
iento normal,
a transcurrido
ON/OFF [M] e
to de pilas [K
nuevas en ca
s, estándar (zi
pa.
ina 3 de este
se alimenta p
troducir las pil
respetar la pol
que oiga un cl
IA:
ilas cuidadosa
pilas no recar
leyes locales e
el alcance de n
roblemas
ED de control
miten control
es
R
S
encia de
sta
cia
eter
tw
mi
d-low woofer
l.)
un
dad principal
ndo a
dis
tancia
va al pulsar cu
inutos.
función « sno
pulse el botón
n la posición O
da compartime
ic.
iños.
e la posición d
control
e la polaridad
control
e la condición
e si está bien l
control
e el volumen.
control
e las conexion
control
e si se solucion
control
e el nivel del v
control
e el formato d
menor calidad.
son de
FM
snooze » par
está en el mod
sible elegir ent
l tiempo.
al deslizar la t
c-carbón) o ba
anual del usu
r una pila de li
s, pulse la len
ridad. Vuelva
ente y respet
ables. Nunca
relación con
6W (2x 3W) @
12W
>= 83dB
87.5 ~ 108MH
80Hz ~ 18kHz
1" (25.4mm)
2.5" (63.5mm)
100-240Vac /
adaptador de r
1x CR2025 (in
276 x 85 x 14
1345g
17
lquier botón o
aplazarla 9 mi
ze » esté activ
o OFF (la panta
re 15, 30, 45 ó
snooze » par
F.
pa hacia abaj
to. No mezcle
terías recargab
rio
tio tipo CR202
üeta [1] y tire
introducir el p
las advertenci
erfore las pilas
l medio ambie
solución
l interruptor O
e las pilas y co
e las pilas y re
potencia (véa
segúrese de q
s de la entrada
a el problema
lumen y bájel
l fichero. Much
1KHz (10%TH
0-60Hz 500m
d (incl.) o 6 x
l.)
mm
la alarma se de
nutos.
da. Para activ
lla LCD no está
60 minutos u
ajustar el tie
.
pilas agotadas
les (níquel-cad
de 3V (incl.).
[2] de ella pa
ortapilas en el
as del embalaj
. Nunca eche la
te al tirar las p
osible
/OFF [M]
rrija si fuera ne
mplace pilas a
e arriba)
e no esté silen
AUX [L] y el c
no al utilizar o
si fuera neces
s veces, los fic
)
a 7.5Vdc 2A
pila AA de 1.5
sactiva
rla, pulse el bo
iluminada) par
FF (desactivad
po de espera –
pilas nuevas.
io, níquel-me
a sacar el port
ando a distan
.
s pilas al fuego
ilas. Mantenga
cesario
gotadas
iada el volum
nector dock [
tro periférico
rio
heros WAV y M
(no incl.)
©Velle
ón «
a
o).
el
No
al
pilas
ia y
las
n
]
ID
an nv
Page 18

0
e
c
H
s
e
n
E
e
w
g
h
u
c
g
e
m
e
n
n
w
S
a
e
n
e
S
ó
s
c
l
n
t
r
r
h
e
r
n
e
n
n
,
n
n
g
e
d
k
i
v
e
S
g
r
e
G
e
F
f
m
a
m
c
u
e
r
t
b
E
n
e
k
s
t
n
n
r
9
a
n
v
Ö
d
i
f
T
i
t
v
e
n
f
t
e
e
s
m
9
n
)
i
u
p
w
s
z
o
c
o
9
e
.
d
t
ä
h
s
u
i
a
n
ü
s
n
e
n
s
d
w
o
a
a
U
a
u
H
z
m
n
a
t
e
ü
c
e
n
E
t
B
e
e
e
o
e
e
v
m
m
h
e
e
r
r
s
n
c
t
ö
a
n
s
f
p
h
e
t
e
S
e
d
e
s
d
e
e
m
d
r
e
d
n
S
u
u
e
s
r
n
ä
d
Utilice
daños n
especifi
© DEREC
Velleman
reservado
ello sin pr
ste aparato s
i lesiones cau
aciones y el
OS DE AUTOR
NV dispone de
. Está estrictame
vio permiso escri
lo con los ac
ados por un
ontenido de
os derechos de
te prohibido rep
o del derecho ha
esorios origi
FM
so (indebido
ste manual s
autor para este
oducir, traducir, c
iente.
ales. Vellema
de este apar
n previo avis
manual del usu
opiar, editar y gu
n NV no será
ato. Se puede
.
rio. Todos los de
rdar este manua
esponsable
n modificar la
echos mundiales
l del usuario o pa
e
s
tes de
1. Ei
An alle
Wichtig
Falls Z
Wir beda
sorgfälti
das Gerä
Für me
Bedien
2. Si
3. All
Siehe V
• Neh
hab
• Eige
eige
• Ver
kann
• Bei
Gara
• Bew
• Wed
irge
werd
• Entf
um
führung
inwohner de
Umweltinfo
Dieses Symbol
Produktes nac
Einheit (oder v
verwendeten B
werden. Diese
retourniert we
eifel bestehe
nken uns für d
durch. Überpr
t nicht und we
r Informatio
ngsanleitung
herheitshi
Halten Sie Ki
Stromschla
stehenden L
das Gehäuse
Trennen Sie
den Netzstec
Es gibt keine
emeine R
lleman® Ser
Verwend
Feuchte.
Schützen
Vermeide
Bedienun
en Sie das Ge
n.
mächtige Verä
mächtige Änd
enden Sie das
dies zu Schäd
chäden, die du
ntieanspruch.
hren Sie diese
r Velleman nv
dwelcher Art (
en, haftbar ge
rnen Sie die B
chäden zu ver
BEDI
Europäische
mationen üb
auf dem Produ
seinem Leben
rwendeten Ba
atterien müsse
Einheit muss a
den. Respektie
, wenden Sie
n Kauf des FM
üfen Sie, ob Tr
den Sie sich a
en zu diesem
siehe www.
weise
der und Unbef
gefahr beim
itungen könnte
nicht selber un
as Gerät bei N
er an der Griff
zu wartenden
chtlinien
ice- und Qual
n Sie das Gerä
etzen Sie das
Sie das Gerät
n Sie Erschütte
des Gerätes.
ät erst in Betri
nderungen sind
rungen erlischt
erät nur für A
n am Produkt
rch Nichtbeach
ür daraus resul
Bedienungsanl
noch die Händl
inanziell, physi
acht werden.
tterien aus de
eiden.
NUNGS
Union
r dieses Prod
t oder der Ver
zyklus der Um
terien) nicht al
von einer spe
den Händler
en Sie die örtli
sich für Ents
! Lesen Sie di
nsportschäden
Ihren Händler
Produkt und
elleman.eu.
ugte vom Gerä
ffnen des Geh
zu lebensgefä
lassen Sie da
chtbenutzung
läche an und z
eile. Bestellen
tätsgarantie
nur im Inne
Gerät keiner Fl
or Staub. Schü
rungen. Vermei
b, nachdem Si
aus Sicherheit
der Garantiea
wendungen b
ühren und erlis
ung der Bedie
tierende Folge
itung für künft
r können für a
ch, usw.), die
Batteriefach
ANLEIT
kt
ackung zeigt
elt Schaden z
unsortiertes
ialisierten Fir
der ein örtliche
hen Umweltvo
rgungsrichtli
se Bedienungs
vorliegen. Soll
ie neueste V
fern.
uses. Das Ber
rlichen elektris
Gerät nur von
nd vor jeder R
ehen Sie nie a
Sie eventuelle
m Ende dieser
bereich. Schü
ssigkeit wie z.
tzen Sie das G
den Sie rohe G
e sich mit sein
gründen verb
spruch.
schrieben in di
cht der Garanti
ungsanleitung
chäden überni
ige Einsichtnah
ußergewöhnlic
urch Besitz, G
enn Sie das G
NG
n, dass die Ent
fügen kann. E
ausmüll; die Ei
a zwecks Recy
s Recycling-Un
rschriften.
ien an Ihre
nleitung vor I
e dies der Fall
rsion dieser
hren von unter
hen Schlägen
Fachleuten re
inigung vom N
der Netzleitun
rsatzteile bei I
Bedienungsanl
zen Sie das G
. Tropf- oder
rät vor extrem
walt während
n Funktionen v
ten. Bei Schäd
ser Bedienung
anspruch.
erursacht wer
mt der Herstel
e auf.
e, zufällige od
brauch oder D
rät längere Zei
orgung dieses
tsorgen Sie di
nheit oder
ling entsorgt
ernehmen
rtliche Behör
betriebnahme
ein, verwende
Spannung
ühren. Öffnen
arieren.
etz. Fassen Sie
g.
rem Fachhänd
itung.
rät vor Regen
pritzwasser, a
n Temperatur
er Installation
ertraut gemach
n verursacht d
anleitung son
en, erlischt de
ler keine Haftu
r indirekte Sch
fekt verursach
t nicht verwen
e.
Sie
ie
dazu
ler.
nd
s.
n.
und
t
urch
t
g.
den
t
en,
08.07.2
11
18
©Velle
an nv
Page 19

FM9
r
K
4. Eigenschaften
• multifunktionales Gerät
o FM-Radio: 20 vorprogrammierte Kanäle
o Musikspieler: iPod/AUX/FM
für iPod/iPhone (nicht mitgeliefert): über Dock-Stecker
für andere Musikspieler: über 3.5mm-Klinkenstecker (Kabel mitgeliefert)
o Uhr: mit Alarm und Snooze-Funktion
• 1" Tweeter + 2.5" Mid-Low Woofer pro Kanal (2-Wege)
• Fernbedienung
• eingebauter Dock-Anschluss für iPod
5. Umschreibung
Siehe Abbildungen, Seite 2 dieser Bedienungsanleitung.
A Dock-Stecke
B Lautsprecher (2x) I SNOOZE-Taste (Schlummertaste)
C Leistungs-LED J FM-Antenne
D Display
E SOURCE-Taste (Quelle) L AUX-Eingang (Signaleingang für externe Geräte)
F Taste zum Verringern der Lautstärke (VOL-) M EIN/AUS-Schalter
G Taste zum Erhöhen der Lautstärke (VOL+) N DC-Eingang (7.5V)
H STANDBY-Taste
Batteriefach (2x)
6. Installation
Siehe Abbildungen, Seite 2 und 3 dieser Bedienungsanleitung.
• Das Gerät wird entweder über Batterien (nicht mitgeliefert) oder über das Netz (Netzteil mitgeliefert)
versorgt.
Bemerkung: Verwenden Sie Batterien, dann wird das angeschlossene iPhone/iPod nicht aufgeladen.
o Netz: stecken Sie den Stecker des mitgelieferten Netzteils in den DC-Eingang [N]. Beachten Sie,
dass der EIN/AUS-Schalter [M] sich in der OFF-Position befindet und verbinden Sie das Netzteil
mit dem Netz.
o Batterien: Beachten Sie, dass der EIN/AUS-Schalter [M] sich in der OFF-Position befindet und
legen Sie die Batterien in die Batteriefächer [K] ein (Siehe §7).
• Stellen Sie den EIN/AUS-Schalter [M] auf ON. Die Leistungs-LED [C] leuchet.
Allgemein
• Die meisten Funktionen sind nur über die Fernbedienung zu bedienen. Es können nur einige
Funktionen über die Haupteinheit bedient werden.
• Entfernen Sie den Plastikteil von der Fernbedienung vor der ersten Inbetriebnahme.
• Drücken Sie die TONE-Taste, um die Lautstärke, Bass und Treble zu regeln. Verwenden Sie die Taste
zum Verringern oder Erhöhen der Lautstärke (Fernbedienung: VOLUME ; Haupteinheit: VOL[F] / VOL+ [G]) um die Einstellungen zu ändern.
o Drücken Sie einmal, um die Lautstärke zu regeln (0~40), das Display zeigt Volume an.
o Drücken Sie zweimal um den Bass zu regeln (-8 ~ +8, Schritt 2); das Display zeigt Bass an.
o Drücken Sie dreimal, um die Höhen (Treble) zu regeln (-8 ~ +8, Schritt 2); das Display zeigt
Treble an.
Bemerkung: die Lautstärke kann auch direkt geregelt werden, indem Sie die Taste zum Verringern
oder Erhöhen der Lautstärke verwenden (Fernbedienung: VOLUME ; Haupteinheit: VOL- [F]
/ VOL+ [G]).
Die Uhrzeit einstellen
• Drücken Sie die TIME-Taste. Die Stunden-Anzeige fängt an, zu blinken.
• Ändern Sie die Stunden, indem Sie die Taste zum Verringern oder Erhöhen der Lautstärke verwenden
(Fernbedienung: VOLUME ; Haupteinheit: VOL- [F] / VOL+ [G]).
• Drücken Sie die TIME -Taste wieder, um zu bestätigen und gehen Sie zur Einstellung der Minuten.
• Stellen Sie die Minuten mit den Lautstärke-Tasten ein. Haben Sie die Minuten eingegeben, so warten
Sie ±7 Sekunden bis diese aufhören, zu blinken.
iPhone/iPod
• Setzen Sie das iPhone/iPod (nicht mitgeliefert) vorsichtig auf den Dock-Stecker [A].
• Drücken Sie die EIN/AUS-Taste der Fernbedienung ( ) oder die STANDBY-Taste [H] der
Haupteinheit. Das Display [D] leuchtet blau.
• Drücken Sie die SOURCE-Taste [E] bis das Display iPod anzeigt.
• Drücken Sie die MENU-Taste um in den iPod-Menü zu gelangen.
08.07.2011 ©Velleman nv
19
Page 20

FM9
• Verwenden Sie die und -Taste (neben der SELECT-Taste) um durch das Menü zu scrollen;
Drücken Sie SELECT um einen Punkt auszuwählen.
• Drücken Sie die -Taste, um die Musik abzuspielen oder zu pausieren.
• Drücken Sie die - oder –Taste, um zum vorigen oder zum nächsten Titel zu gehen.
• Halten Sie die - oder -Taste kurz gedrückt um in einem Titel vor- oder zurückzuspulen.
Bemerkungen:
• Bei einem eingehenden Gespräch wird das iPhone stumm geschalten.
• Sie können das iPhone im Gerät stecken lassen wenn Sie ein Gespräch entgegennehmen.
FM radio
• Drücken Sie die SOURCE-Taste [E] bis das Display FM anzeigt.
• Für einen besseren Empfang ziehen Sie die Antenne [J] aus.
• Drücken Sie kurz die - oder -Taste um die Radiofrequenz mit 0.1MHz zu regeln. Halten Sie
±3 Sekunden gedrückt, um eine automatische Abtastung durchzuführen.
• Um einen (vorprogrammierten) Kanal zu speichern, drücken Sie die SELECT-Taste. Zum Speichern,
wählen Sie eine vorprogrammierte Stelle (01~20) mit der und -Taste neben der SELECT-Taste
aus.
• Um einen vorprogrammierten Kanal abzurufen, drücken Sie die oder -Taste neben der SELECT-
Taste.
AUX-Eingang
• Verbinden Sie einen externen Spieler (nicht mitgeliefert, z.B. MP3-Player, CD-Spieler, usw.) mit dem
AUX-Eingang [L]. 3.5mm-Anschluss.
• Drücken Sie die SOURCE-Taste [E] bis das Display AUX anzeigt.
• Starten Sie den externen Spieler.
Bemerkung: in diesem Modus kann nur die Lautstärke geregelt werden.
Alarm
• Beachten Sie, dass das Gerät sich im OFF-Modus befindet (das LCD-Display leuchtet nicht).
• Drücken Sie die ALARM-Taste bis die Alarm-Ikone ( ) angezeigt wird und die Stunden-Anzeige
anfängt, zu blinken.
• Ändern Sie die Stunden, indem Sie die Taste zum Verringern oder Erhöhen der Lautstärke verwenden
(Fernbedienung: VOLUME ; Haupteinheit: VOL- [F] / VOL+ [G]).
Bemerkung: Ist die angezeigte Uhrzeit korrekt, so warten Sie einfach ±7 Sekunden bis das Blinken
aufhört.
• Drücken Sie die ALARM-Taste wieder, um zu bestätigen und gehen Sie zur Einstellung der Minuten.
• Stellen Sie die Minuten mit den Lautstärke-Tasten ein und drücken Sie die ALARM-Taste um zu
bestätigen.
• Regeln Sie die Lautstärke mit den Lautstärke-Tasten.
Wählen Sie den gewünschten Alarmton mit der SOURCE-Taste aus: wird die Radio-Ikone ( )
•
angezeigt, so schaltet die Radio ein, wenn die eingestellte Zeit vergangen ist; sonst ertönt ein Beep.
Bemerkung: der Alarm wird ausgeschaltet, indem Sie eine Taste drücken oder der Alarm schaltet
automatisch nach 30 Minuten aus.
Snooze-Funktion
• Ertönt der Alarm, dann drücken Sie die Snooze-Taste um den Alarm 9 Minuten zu unterbrechen.
Bemerkung: Beachtn Sie, dass die Snooze-Funktion eingeschaltet ist. Um diese Funktion
einzuschalten, drücken Sie die SNOOZE -Taste mehrmals, wenn das Gerät sich im OFF-Modus
befindet (das LCD-Display leuchtet nicht) um die Snooze-Zeit einzustellen: 15, 30, 45 oder 60
Minuten oder OFF (ausgeschaltet).
Im normalen Betriebsmodus, drücken Sie die SNOOZE-Taste, um die Standby-Zeit einzustellen – ist die
eingestellte Zeit vergangen, dann schaltet das Gerät aus.
7. Die Batterien
Haupteinheit
• Stellen Sie den EIN/AUS-Schalter [M] auf OFF.
• Öffnen Sie das Batteriefach [K] indem Sie den Deckel nach unten verschieben.
• Legen Sie 3 neue AA-Batterien in jedem Batteriefach ein. Beachten Sie die Polarität. Mischen Sie
keine alten (gebrauchten) und neuen Batterien oder Batterien unterschiedlicher Typen (Alkalisch,
Standard (Zink-Karbon) oder wiederaufladbar (Nickel-Kadmium, Nickel-Metall Hydride)).
• Schließen Sie den Deckel wieder.
08.07.2011 ©Velleman nv
20
Page 21

0
d
F
d
e
o
n
c
c
a
u
u
s
t
m
e
d
n
e
f
:
S
g
d
n
a
MSp
a
T
w
t
HaFe
s
o
r
U
s
e
2
n
n
e
S
m
n
g
t
n
d
r
b
u
9
s
t
n
g
d
s
s
u
u
U
s
a
a
@
H
z
m
e
m
t
Z
c
h
n
e
z
2
e
r
A
e
d
t
u
V
H
x
e
d
l
n
a
p
M
e
z
t
S
e
A
e
e
m
r
d
.
o
e
c
ö
e
h
e
Fernbe
Siehe Ab
• Die
• Um
zieh
• Lege
8. Pr
Leistu
einges
kein Kl
[B]
Interfe
9. Te
Gesa
Sign
Freq
Freq
Laut
Netz
Stro
Abm
Gewi
Verwen
Haftung
Änderu
© URHEB
Velleman
vorherige
reproduzi
ienung
bildung Seite 3
ernbedienung
ie Batterien zu
n Sie ihn aus d
n Sie die (neue
WARNUNG
Behandeln
Verpackun
Sie die Batt
vermeiden.
Halten Sie
blemlösu
Problem
gs-LED [C] ist
haltet
ang aus Lautsp
renzen
hnische D
mtleistung
l-/Rauschabst
enzband
enzgang
precher
eil (mitgeliefer
versorgung
ssungen
cht
en Sie diese
für Schaden
gen ohne vo
ERRECHT
NV besitzt das
schriftliche Geneh
ren, zu kopieren,
der Bedienung
unktioniert 1 x
ersetzen oder
em Gehäuse [
) Batterie polu
ie die Batterie
. Versuchen Si
erien nicht und
Respektieren
ie Batterien vo
g
nicht überpr
überpr
überpr
Batteri
recher überpr
überpr
stum
überpr
überpr
verwe
überpr
überpr
keine
ten
S
R
itzenleistung
nd
eeter
M
id-Low Woofer
)
upteinheit
rnbedienung
Gerät nur mi
der Verletzu
herige Ankün
rheberrecht fü
migung des Urhe
zu übersetzen, z
FM
anleitung
3V-LithiumBat
inzulegen, drü
].
gsrichtig ein u
sehr vorsichti
nie, nicht wie
werfen Sie die
ie die örtlichen
n Kindern fern.
üfen Sie die Po
üfen Sie die Pol
üfen Sie den Z
en
üfen Sie ob die
üfen Sie die La
geschaltet ist.
üfen Sie den A
üfen Sie ob da
den
üfen Sie den L
üfen Sie das D
ute Qualität
6W (2x 3W)
12W
>= 83dB
87.5 ~ 108M
80Hz ~ 18kH
1" (25.4mm)
2.5" (63.5m
100-240Vac /
Netzteil (mitg
mitgeliefert)
1x CR2025 (
276 x 85 x 14
1345g
originellen
gen bei (fals
igung vorbe
diese Bedienu
ers ist es nicht g
bearbeiten oder
erie, Typ CR20
cken Sie die Se
d schieben Sie
und beachten
eraufladbare B
e nicht ins Feu
Umweltvorsch
mögliche
ition der EIN/
arität und, wen
stand der Batt
Leistung in Or
tstärke. Beach
X-Eingang [L]
Problem bleibt
utstärkepegel
teiformat, WA
1KHz (10%T
z
)
50-60Hz 500m
liefert) oder 6
itgeliefert)
0mm
ubehörteilen.
her) Anwend
alten.
gsanleitung. All
stattet, diese Be
u speichern.
5 (mitgeliefert
ite des Batterie
den Batterieha
Sie die Warnu
atterien aufzul
r, um eine Ex
iften beim Ents
Lösung
US-Schalter [
n nötig, korrigi
rien und erset
nung ist (siehe
en Sie, dass di
und den Dock-
wenn Sie eine
nd verringern
- und MID-Dat
D)
A bis 7.5Vdc 2
1.5V AA-Batt
Velleman NV
ung dieses G
weltweiten Rech
ienungsanleitung
).
s [1] un
halte
ter wieder rein
gen der
den. Durchboh
losion zu
rgen der Batt
]
ren Sie
en Sie alte
oben)
e Lautstärke ni
Stecker [A]
andere Quelle
ie ihn wenn n
ien haben oft
ie (nicht
übernimmt k
rätes. Alle
te vorbehalten. O
ganz oder in Teil
ren
rie.
ht
tig
ine
ne
n zu
08.07.2
11
21
©Velle
an nv
Page 22

0
s
a
m
y
k
k
j
i
o
w
m
w
w
e
r
i
e
n
u
a
o
Fo o
z
n
e
t
m
d
z
c
c
r
ą
z
d
n
w
d
a
n
t
y
g
e
n
u
j
ń
z
w
o
a
r
N
y
a
j
a
z
m
r
i
w
r
w
c
s
e
ą
w
y
w
d
l
y
w
S
w
a
)
e
j
p
o
p
t
z
z
o
o
r
m
i
d
9
ż
j
u
o
c
z
m
m
o
o
y
e
a
i
g
n
i
w
a
u
r
a
m
n
t
z
o
o
p
a
y
r
n
u
e
a
y
t
m
t
e
a
t
z
a
w
a
w
n
e
n
z
a
r
s
z
z
t
ć
s
d
e
t
a
ę
z
ą
e
k
e
u
m
w
m
c
z
e
a
e
t
Inst
ukcja U
FM
ytkow
ika
1. W
Przezna
Ważne i
Jeśli m
Dziękuje
przed uż
i skonta
2. Ins
3. Ws
Zapozna
instrukcj
• Zap
• Ze
obej
• Uży
spo
• Wsz
gwa
•
Zach
•
Ani f
jakie
mat
• Unik
gdy
4. Fe
• Wiel
o
o
•
1 "gł
•
zdal
• zinte
tęp
czona dla mi
nformacje do
Ten symbol u
może być szko
tylko do specja
skontaktuj się
firmie zajmują
środowiska.
sz wątpliwoś
y za wybór p
ciem. Jeśli urz
towanie się ze
trukcje be
Chronić przed
Ryzyko poraże
może powodo
naprawiany je
Zawsze odłącz
Przy obsłudze
Urządzenie jes
do wymiany pr
W celu napraw
azówki o
się z gwarancj
.
Wyłączni
innym ko
Chronić p
nie kłaść
Chroń to
znaj się z ninie
zględów bezpie
uje uszkodze
aj urządzenie
oduje utratę g
lkie szkody sp
ancją a sprzed
owaj daną inst
rma Velleman
kolwiek szkody
rialnych ...) w
aj uszkodzeni
rządzenie nie
tures
funkcyjność
M radio: 20 st
dtwarzacz mu
egar z alarme
ośnik wysokoto
e sterowanie
growane złącze
szkańców Un
yczące środo
ieszczony na u
liwe dla środo
lnie przeznaczo
firmą zajmują
ej się recykling
i skontaktuj
oduktu firmy V
dzenie zostało
sprzedawcą.
pieczeńst
ziećmi oraz uż
ia prądem pod
ać urazy zagra
ynie przez upo
j zasilanie, kie
ie dotykaj kab
bezobsługowe
zez użytkownik
zgłoś się do s
ólne
a Velleman®
do użytku we
taktem z ciecz
rzed kurzem or
na grzejniku,…
rządzenie prz
szą instrukcją
czeństwa zabr
spowodowany
godnie z jego
arancji.
wodowane uży
wca nie ponosi
ukcję na przys
V ani jej dystr
(niezwykłe, pr
nikających z p
sprzętu z pow
est używane p
cji
yczny: dla iPod
i funkcją drze
nowy + 2.5" m
dokowania iPo
i Europejskie
iska.
ządzeniu bądź
iska. Nie wyrz
nych do tego p
ą się recykling
iem. Postępuj
ię z firmą zaj
lleman! Prosi
uszkodzone p
a, środki
tkownikami ni
czas otwierani
żające życiu. N
ażnione do te
y urządzenie
a zasilającego
. Wewnątrz nie
a.
ojego sprzed
ervice and Q
nętrznego. Ch
ami.
z przegrzanie
.
d wstrząsami i
rzed używanie
nione są jakiek
ch nieuprawnio
rzeznaczeniem
kowaniem nie
odpowiedzialn
łość.
ybutorzy nie m
ypadkowe lub
siadania, używ
dy wyciekając
zez dłuższy ok
/ iPhone (brak
ki
d-low woofer n
.
opakowaniu ws
caj urządzenia
jemników na
iem. Urządzeni
godnie z zasad
ującą się ut
y o dokładne z
dczas transpor
strożnośc
autoryzowany
obudowy. Kon
e zdjemuj sam
o osoby.
ie jest używan
naczej niż prze
ma części zap
wcy.
ality Warran
onić przed des
(np. nie wyst
uderzeniami, z
m urządzenia.
olwiek modyfik
ą ingerencją
. Użytkowanie
godnym z nini
ści za te szkod
że być pociąg
ośrednie – ws
nia lub uszkod
ch baterii pop
es czasu.
w zestawie)
a kanał (2 spo
kazuje, że wyr
lub baterii do
rządzenia elek
możesz odda
mi bezpieczeń
lizacją odpa
apoznanie się z
u prosimy o ni
i.
i.
akt z przewod
obudowy. Sprz
lub przy obsłu
z wtyczkę.
sowych, ani cz
y, którą znajd
czem, wilgoci
wiać na promi
łaszcza w tra
cje urządzenia
urządzenie.
iezgodne z prz
jszą instrukcją
y.
ięty do odpowi
elkiego rodzaj
zenia produktu
zez ich usunięc
oby)
ucenie produkt
biorczego śmie
roniczne lub
dystrybutoro
twa dotyczący
ów.
instrukcją obsł
korzystanie z
mi elektryczny
ęt może być
dze i konserwa
ści nadających
iecie na końcu
, oblaniem ora
niowanie słon
cie użytkowani
. Gwarancja ni
eznaczeniem
nie są objęte
dzialności za
(finansowych,
.
ie z komory ba
u
tnika,
i lub
i
ugi
niego
mi
ji.
się
czne,
.
erii,
08.07.2
11
22
©Velle
an nv
Page 23

FM9
K
5. Ogólny opis
Oznaczenia zgodne z ilustracją na 2 stronie instrukcji.
A złącze dokowania H Przycisk gotowości (STANDBY)
B głośnik (2x) I Przycisk drzemki (SNOOZE)
C Dioda LED / zasilanie J Antenna FM
D wyświetlacz
E przycisk źródła (SOURCE) L Wejście zewnętrzne (AUX)
F Przycisk sciszania dźwięku (VOL-) M wyłącznik zasilania
G Przycisk zgłaśniania dźwięku (VOL+) N wejście DC (7.5V)
Gniazdo baterii (2x)
6. Ogólny opis
Oznaczenia zgodne z ilustracją na 2 i 3 stronie instrukcji.
• FM9 może być zasilana zarówno przez baterie (brak w zestawie) lub za pośrednictwem sieci (zasilacz
w komplecie).
Uwaga: podczas korzystania z baterii, podłączony iPhone / iPod nie będzie ładowany.
o Zasilanie: podłącz wtyczkę dołączonego zasilacza do wejścia DC [N]. Upewnij się, że wyłącznik
zasilania [M] jest w pozycji OFF, a następnie podłącz zasilacz do gniazda sieci elektrycznej.
o Baterie: upewnij się, że wyłącznik zasilania [M] jest w pozycji OFF i włóż baterie do gniazda [K]
(zob. § 7 dot.wymiany baterii).
• Ustaw przełącznik zasilania [M] do pozycji ON. Dioda LED [C] zaświeci się.
Ogólne
• Większość funkcji jest dostępna tylko za pośrednictwem pilota, tylko ograniczona liczba funkcji jest
dostępna na samym urzą
• Usunąć plastikową kartę z pilota przed pierwszym użyciem.
• Naciśnij przycisk TONE, aby ustawić głośność, tony niskie i wysokie. Użyj regulacji dźwięku (na
pilocie: VOLUME, na stacji: VOL-[F] / VOL + [G]), aby zmienić ustawienia.
o Naciśnij raz, aby ustawić głośność (0 ~ 40), na wyświetlaczu pojawi się Volume.
o Naciśnij dwukrotnie, aby ustawić basy (-8 ~ +8, etap 2), na wyświetlaczu pojawi się Bass.
o Naciśnij trzy razy, aby ustawić treble (-8 ~ +8, etap 2), na wyświetlaczu pojawi się Treble.
Uwaga: poziom głośności można również ustawić bezpośrednio za pomocą regulacji g
i w dół (na pilocie: VOLUME, na stacji: VOL-[F] / VOL + [G]).
Ustawianie czasu
• Naciśnij przycisk TIME, wyświetlana godzina zacznie migać.
• Zmień godzinę używając przycisków regulacji głośności (na pilocie: VOLUME ; na stacji: VOL-
[F] / VOL + [G]).
• Naciśnij przycisk TIME, aby potwierdzić i przejść do ustawienia minut.
• Ustaw minuty za pomocą przycisków głośności. Po zakończeniu czekaj około 7s aż sekundy przestaną
migać.
iPhone/iPod
• Delikatnie umieść iPhone / iPod (brak w zestawie) w złączu dokowania [A].
• Naciśnij przycisk zasilania na pilocie zdalnego sterowania ( ) lub przycisk STANDBY [H] na stacji,
wyświetlacz LED [D] zaś
• Naciśnij przycisk SOURCE [E], aż na wyświetlaczu pojawi się iPod.
• Naciśnij przycisk MENU, aby przejść do menu iPoda.
• Użyj przycisków oraz (obok przycisku SELECT), aby przewijać menu, naciśnij przycisk SELECT,
aby wybrać pozycję.
• Naciśnij przycisk Play / Pause ( ), aby rozpocząć lub zatrzymać odtwarzanie muzyki.
• Krótko naciśnij przycisk ‘poprzedni’ ( ) lub ‘następny’ ( ), aby przejść do poprzedniego lub
następnego utworu muzycznego.
• Naciśnij i przytrzymaj przycisk ‘poprzedni’ ( ) lub ‘następny’ ( ), aby przewinąć do przodu lub
do tyłu w ramach utworu.
Uwagi:
• połączenie przychodzące spowoduje wyciszenie muzyki odtwarzanej z iPhone’a.
• Możliwe jest zostawienie iPhone w stacji dokującej, aby odebrać połączenie.
Radio FM
Naciśnij przycisk SOURCE [E], aż na wy
•
wysuń antenę [J] dla lepszego odbioru.
•
Krótko naciśnij przycisk ‘poprzedni’ ( ) lub ‘następny’ ( ), aby dopasować częstotliwość
•
radiową do 0,1 MHz. Naciśnij i przytrzymaj przez około 3 sekundy do automatycznego skanowania.
08.07.2011 ©Velleman nv
dzeniu.
łośności w górę
wieci się na niebiesko.
świetlaczu pojawi się FM.
23
Page 24

0
z
o
o
p
ą
c
ś
w
ś
n
e
/
ś
w
w
o
u
z
u
o
w
ó
d
o
ń
s
w
d
a
k
w
ą
O
d
j
A
w
o
A
m
p
g
a
z
z
e
a
e
b
w
i
ę
w
ż
t
e
a
n
o
ł
ś
w
o
w
w
k
a
s
e
j
p
]
w
k
o
0
t
ś
a
t
j
ę
d
9
a
w
n
z
w
a
a
c
A
s
O
j
e
e
y
j
c
a
t
a
n
t
r
j
a
s
o
n
X
r
e
ż
e
A
g
r
y
m
a
g
o
j
c
z
ń
o
m
b
r
a
p
m
a
d
e
p
b
d
m
a
o
O
o
0
O
n
w
z
Aby
•
zapr
zach
Aby
•
Wejście
• podł
wejś
• Naci
• Włąc
Uwa
Budzik
• Upe
• Naci
zacz
• Zmi
[F]
Uwa
• Naci
• Usta
• Usta
• Wybi
radi
Uwa
min
Funkcja
• Gdy
Uwa
podc
min
• W n
czas
7. Bat
stacja d
• Usta
• Otw
• Włóż
obu
węgl
• Wsu
zdalne
Odwołaj
• Pilot
• aby
• Włóż
obu
apisać kanał r
gramowaną lo
wać stację.
rzejść do usta
zewnętrzne
cz zewnętrzny
ia AUX [L]. Zł
nij przycisk S
z zewnętrzny o
ga: w tym tryb
nij się, że stac
nij przycisk AL
ie migać.
ń godzinę uży
VOL + [G]).
ga: jeśli określ
nij przycisk AL
minuty za po
głośność za
erz pożądany d
zacznie grać,
ga: Alarm zost
tach.
drzemki
abrzmi alarm,
ga: funkcja dr
zas pracy w try
t lub OFF.
rmalnym trybi
upłynie, FM9 w
erie
okująca
przełącznik z
rz pokrywę gni
3 nowe bateri
owy. Nie miesz
wych) lub aku
obudowę gnia
terowanie
się do ilustracji
używa jednej
ymienić bateri
baterię (zacho
owy pilota zdal
Ostrzeżen
Obchodź si
Nie dziura
baterii nale
Trzymaj ba
diowy (ustawi
alizację (01 ~
ionej stacji, n
odtwarzacz mu
cze 3,5 mm.
URCE [E], aż
twarzacz.
ie można kontr
a FM9 jest wy
RM, aż na wy
ając przyciskó
ny czas jest p
RM w celu pot
ocą przyciskó
omocą przycis
źwięk alarmu z
dy nadejdzie u
nie przerwany
naciśnij przyci
emki musi być
bie off (LCD ni
pracy, naciśni
yłącza się.
silania [M] w
azda baterii [K
AA w każdym
aj starych i no
mulatorków (ni
zda baterii z p
na stronie 3 ni
aterii typu CR2
ę, naciśnij po s
aj biegunowo
nego sterowani
e:
ostrożnie z ba
ani nie wrzuca
y pozbywać si
erie z dala od
nie fabryczne),
FM
20) za pomocą
ciśnij przycisk
ltimedialny (br
a wyświetlaczu
lować tylko po
ączona (LCD ni
wietlaczu poja
regulacji głoś
prawny, pocze
ierdzenia i pr
głośności i n
ów głośności.
pomocą przy
stawiony czas,
po naciśnięciu
k drzemki, aby
aktywowana.
świeci), aby u
przycisk SNO
ozycji OFF.
, przesuwając
przedziale, prz
ych baterii. Ni
lowo-kadmow
wrotem na mie
niejszej instruk
25 3V (w zest
ronie pokrywy
ć) i zamknij ko
, aż zaskoczy
eriami, przest
baterii do ogn
zgodnie z lok
zieci.
naciśnij przyci
przycisków
lub obok
k w zestawie,
pojawi się AU
ziom głośności.
e świeci).
i się ikona ala
ości (na piloci
kaj około 7s, a
ejdź do ustawi
ciśnij przycisk
isku SOURCE:
w przeciwnym
dowolnego prz
przełożyć alar
by to zrobić, n
tawić drzemkę
ZE, aby ustawi
ą w dół.
strzegając bie
mieszaj alkaic
ch, niklowo-w
sce.
ji.
wie).
baterii [1] i po
morę baterii pr
a miejsce.
zegaj ostrzeże
ia, ponieważ m
lnymi przepisa
k SELECT. Wy
raz obok p
przycisku
p. odtwarzacz
.
mu ( ) i wsk
: VOLUME
miganie ustan
nia minut.
LARM w celu
dy ikona radia
azie pojawi się
cisku lub auto
o 9 minut.
ciskaj przycisk
w czasie do 15
ć czas czuwani
unowości poda
znych, standar
dorkowych).
iągnij [2] i prz
esuwając ją z
na obudowie
gą one eksplo
i.
ierz
zycisk SELECT
MP3, CD ...) d
zanie godzin
; na stacji: V
ie.
otwierdzenia.
() pojawi s
sygnał dźwięk
atycznie po 3
drzemki (SNO
, 30, 45 lub 60
- gdy ustawio
nej wewnątrz
owych (cynko
suń aby otwor
owrotem do
aterii.
ować. Zużytyc
by
ię
wy.
ZE)
y
o-
yć.
h
-
08.07.2
11
24
©Velle
an nv
Page 25

FM9
8. Problemy
Dioda LED [C] nie świeci się sprawdź położenie włącznika [M]
Brak dźwięku z głośników [B] sprawdź czy zasilanie jest OK (patrz wyżej)
Zakłócenia dźwięku sprawdź poziom głośności i scisz w razie potrzeby
Symptom Możliwe rozwiązania
jeśli to konieczne - sprawdź polaryzację baterii
sprawdź stan baterii i wymień wyczerpane baterie
sprawdź poziom głośności, upewnij się, że dźwięk nie jest wyciszony
sprawdź połączenia urządzenia AUX [L] i złącze dokowania [A]
sprawdź, czy problem nadal występuje przy innych źródłach sygnału
sprawdź format pliku WAV i MID - pliki są często niskiej jakości
9. Specyfikacja techniczna
moc
całkowita
stosunek S / N >= 83dB
pasmo częstotliwości radiowej 87.5 ~ 108MHz
częstotliwości 80Hz ~ 18kHz
wyjścia
adapter (w zestawie) 100-240V AC / 50-60Hz 500mA, wyjscie 7.5V DC 2A
zasilanie
wymiary
waga
Używaj tylko oryginalnych akcesoriów. Velleman N.V. nie ponosi odpowiedzialności za
uszkodzenie urządzenia lub zranienie spowodowane złym korzystaniem z urządzenia.
Właścicielem niniejszej instrukcji jest firma Velleman N.V. Wszelkie prawa autorskie
zastrzeżone.
Jeśli chcesz uzyskać więcej informacji o tym produkcie oraz najnowszą wersję instrukcji
obsługi, wejdź na stronę: www.velleman.eu
Informacje zawarte w niniejszej instrukcji obsługi mogą ulec zmianie bez wcześniejszego
powiadomienia.
© INFORMACJA O PRAWACH WŁASNOŚCI
Instrukcja ta jest własnością firmy Velleman NV i jest chroniona prawami autorskimi. Wszystkie prawa są
zastrzeżone na całym świecie. Żadna część tej instrukcji nie może być kopiowana, przedrukowywana,
tłumaczona lub konwertowana na wszelkie nośniki elektronicznych lub w inny sposób, bez uprzedniej
pisemnej zgody właściciela praw autorskich.
RMS 6W (2x 3W) @ 1KHz (10%THD)
Maksimum 12W
głośnik wysokotonowy 1" (25.4mm)
głośnik niskośredniotonowy
główna stacja
pilot 1x CR2025 (w zestawie)
2.5" (63.5mm)
adaptor (w zestawie) lub baterie 6x 1.5V AA (brak w
zestawie)
276 x 85 x 140mm
1345g
.
08.07.2011 ©Velleman nv
25
Page 26

Velleman® Service and Quality Warranty
Velleman® has over 35 years of experience in the electronics world
and distributes its products in more than 85 countries.
All our products fulfil strict quality requirements and legal
stipulations in the EU. In order to ensure the quality, our products
regularly go through an extra quality check, both by an internal
quality department and by specialized external organisations. If, all
precautionary measures notwithstanding, problems should occur,
please make appeal to our warranty (see guarantee conditions).
General Warranty Conditions Concerning Consumer Products
(for EU):
• All consumer products are subject to a 24-month warranty on
production flaws and defective material as from the original date of
purchase.
• Velleman® can decide to replace an article with an equivalent
article, or to refund the retail value totally or partially when the
complaint is valid and a free repair or replacement of the article is
impossible, or if the expenses are out of proportion.
You will be delivered a replacing article or a refund at the value of
100% of the purchase price in case of a flaw occurred in the first
year after the date of purchase and delivery, or a replacing article at
50% of the purchase price or a refund at the value of 50% of the
retail value in case of a flaw occurred in the second year after the
date of purchase and delivery.
• Not covered by warranty:
- all direct or indirect damage caused after delivery to the article
(e.g. by oxidation, shocks, falls, dust, dirt, humidity...), and by the
article, as well as its contents (e.g. data loss), compensation for loss
of profits;
- frequently replaced consumable goods, parts or accessories such as
batteries, lamps, rubber parts, drive belts... (unlimited list);
- flaws resulting from fire, water damage, lightning, accident, natural
disaster, etc. …;
- flaws caused deliberately, negligently or resulting from improper
handling, negligent maintenance, abusive use or use contrary to the
manufacturer’s instructions;
- damage caused by a commercial, professional or collective use of
the article (the warranty validity will be reduced to six (6) months
when the article is used professionally);
- damage resulting from an inappropriate packing and shipping of
the article;
- all damage caused by modification, repair or alteration performed
by a third party without written permission by Velleman®.
• Articles to be repaired must be delivered to your Velleman®
dealer, solidly packed (preferably in the original packaging), and be
completed with the original receipt of purchase and a clear flaw
description.
• Hint: In order to save on cost and time, please reread the manual
and check if the flaw is caused by obvious causes prior to presenting
the article for repair. Note that returning a non-defective article can
also involve handling costs.
• Repairs occurring after warranty expiration are subject to shipping
costs.
• The above conditions are without prejudice to all commercial
warranties.
The above enumeration is subject to modification accord ing
to the article (see article’s manual).
Velleman® service- en kwaliteitsgarantie
Velleman® heeft ruim 35 jaar ervaring in de elektronicawereld en
verdeelt in meer dan 85 landen.
Al onze producten beantwoorden aan strikte kwaliteitseisen en aan
de wettelijke bepalingen geldig in de EU. Om de kwaliteit te
waarborgen,
ondergaan onze producten op regelmatige tijdstippen een extra
kwaliteitscontrole, zowel door onze eige n kwaliteitsa fdeling als door
externe gespecialiseerde organisaties. Mocht er ondanks deze
voorzorgen toch een probleem optreden, dan kunt u steeds een
beroep doen op onze waarborg (zie waarborgvoorwaarden).
Algemene waarborgvoorwaarden consumentengoederen
(voor Europese Unie):
• Op alle consumentengoederen geldt een garantieperiode van 24
maanden op productie- en materiaalfouten en dit vanaf de
oorspronkelijke aankoopdatum.
• Indien de klacht gegrond is en een gratis reparatie of vervanging
van een artikel onmogelijk is of indien de kosten hiervoor buiten
verhouding zijn, kan Velleman® beslissen het desbetreffende artikel
te vervangen door een gelijkwaardig artikel of de aankoopsom van
het artikel gedeeltelijk of volledig terug te betalen. In dat geval krijgt
u een vervangend product of terugbetaling ter waarde van 100% van
de aankoopsom bij ontdekking van een gebrek tot één jaar na
aankoop en levering, of een vervangend product tegen 50% van de
kostprijs of terugbetaling van 50 % bij ontdekking na één jaar tot 2
jaar.
• Valt niet onder waarborg:
- alle rechtstreekse of onrechtstreekse schade na de levering
veroorzaakt aan het toestel (bv. door oxidatie, schokken, val, stof,
vuil, vocht...), en door het toestel, alsook zijn inhoud (bv. verlies van
data), vergoeding voor eventuele winstderving.
- verbruiksgoederen, onderdelen of hulpstukken die regelmatig
dienen te worden vervangen, zoals bv. batterijen, lampen, rubberen
onderdelen, aandrijfriemen... (onbeperkte lijst).
- defecten ten gevolge van brand, waterschade, bliksem, ongevallen,
natuurrampen, enz.
- defecten veroorzaakt door opzet, nalatigheid of door een
onoordeelkundige behandeling, slecht onderhoud of abnormaal
gebruik of gebruik van het toestel strijdig met de voorschriften van
de fabrikant.
- schade ten gevolge van een commercieel, professioneel of collectief
gebruik van het apparaat (bij professioneel gebruik wordt de
garantieperiode herleid tot 6 maand).
- schade veroorzaakt door onvoldoende bescherming bij transport
van het apparaat.
- alle schade door wijzigingen, reparaties of modificaties uitgevoerd
door derden zonder toestemming van Velleman®.
• Toestellen dienen ter reparatie aangeboden te worden bij uw
Velleman®-verdeler. Het toestel dient vergezeld te zijn van het
oorspronkelijke aankoopbewijs. Zorg voor een degelijke verpakking
(bij voorkeur de originele verpakking) en voeg een duidelijke
foutomschrijving bij.
• Tip: alvorens het toestel voor reparatie aan te bieden, kijk nog
eens na of er geen voor de hand liggende reden is waarom het
toestel niet naar behoren werkt (zie handleiding). Op deze wijze kunt
u kosten en tijd besparen. Denk eraan dat er ook voor niet-defecte
toestellen een kost voor controle aangerekend kan worden.
• Bij reparaties buiten de waarborgperiode zullen transportkosten
aangerekend worden.
• Elke commerciële garantie laat deze rechten onverminderd.
Bovenstaande opsomming kan eventueel aangep ast worden
naargelang de aard van het product (zie handleiding van het
betreffende product).
Garantie de service et de qualité Velleman®
Velleman® jouit d’une expérience de plus de 35 ans dans le monde
de l’électronique avec une distribution dans plus de 85 pays.
Tous nos produits répondent à des exigences de qualité rigoureuses
et à des dispositions légales en vigueur dans l’UE. Afin de garantir la
qualité, nous soumettons régulièrement nos produits à des contrôles
de qualité supplémentaires, tant par notre propre service qualité que
par un service qualité externe. Dans le cas improbable d’un défaut
malgré toutes les précautions, il est possible d’invoquer notre
garantie (voir les conditions de garantie).
Conditions générales concernant la garantie sur les produits
grand public (pour l’UE) :
• tout produit grand public est garanti 24 mois contre tout vice de
production ou de matériaux à dater du jour d’acquisition effective ;
• si la plainte est justifiée et que la ré paration ou le remplacement
d’un article est jugé impossible, ou lorsque les coûts s’avèrent
disproportionnés, Velleman® s’autorise à remplacer ledit article par
un article équivalent ou à rembourser la totalité ou une partie du prix
d’achat. Le cas échéant, il vous sera consenti un article de
remplacement ou le remboursement complet du prix d’achat lors
d’un défaut dans un délai de 1 an après l’achat et la livraison, ou un
article de remplacement moyennant 50% du prix d’achat ou le
remboursement de 50% du prix d’achat lors d’un défaut après 1 à 2
ans.
• sont par conséquent exclus :
- tout dommage direct ou indirect survenu à l’article après livraison
(p.ex. dommage lié à l’oxydation, choc, chute, poussière, sable,
impureté…) et provoqué par l’appareil, ainsi que son contenu (p.ex.
perte de données) et une indemnisation éventuelle pour perte de
revenus ;
- tout bien de consommation ou accessoire, ou pièce qui nécessite un
remplacement régulier comme p.ex. piles, ampoules, pièces en
caoutchouc, courroies… (liste illimitée) ;
- tout dommage qui résulte d’un incendie, de la foudre, d’un
accident, d’une catastrophe naturelle, etc. ;
- out dommage provoqué par une négligence, volontaire ou non, une
utilisation ou un entretien incorrect, ou une utilisation de l’appareil
contraire aux prescriptions du fabricant ;
- tout dommage à cause d’une utilisation commerciale,
professionnelle ou collective de l’appareil (la période de garantie sera
réduite à 6 mois lors d’une utilisation professionnelle) ;
Page 27

- tout dommage à l’appareil qui résulte d’une utilisation incorrecte ou
différente que celle pour laquelle il a été initialement prévu comme
décrit dans la notice ;
- tout dommage engendré par un retour de l’appareil emballé dans
un conditionnement non ou insuffisamment protégé.
- toute réparation ou modification effectuée par une tierce personne
sans l’autorisation explicite de SA Velleman® ; - frais de transport
de et vers Velleman® si l’appareil n’est plus couvert sous la garantie.
• toute réparation sera fournie par l’endroit de l’achat. L’appareil doit
nécessairement être accompagné du bon d’achat d’origine et être
dûment conditionné (de préférence dans l’emballage d’origine avec
mention du défaut) ;
• tuyau : il est conseillé de consulter la notice et de contrôler câbles,
piles, etc. avant de retourner l’appareil. Un appareil retourné jugé
défectueux qui s’avère en bon état de marche pourra faire l’objet
d’une note de frais à charge du consommateur ;
• une réparation effectuée en-dehors de la période de garantie fera
l’objet de frais de transport ;
• toute garantie commerciale ne porte pas atteinte aux conditions
susmentionnées.
La liste susmentionnée peut être sujette à une
complémentation selon le type de l’article et être mentionnée
dans la notice d’emploi.
Garantía de servicio y calidad Velleman®
Velleman® disfruta de una experiencia de más de 35 años en el
mundo de la electrónica con una distribución en más de 85 países.
Todos nuestros productos responden a normas de calidad rigurosas y
disposiciones legales vig entes en la UE. Para garantizar la calidad,
sometemos nuestros productos regularmente a controles de calidad
adicionales, tanto a través de nuestro propio servicio de calidad
como de un servicio de calidad externo. En el caso improbable de
que surgieran problemas a pesar de todas las precauciones, es
posible recurrir a nuestra garantía (véase las condiciones de
garantía).
Condiciones generales referentes a la garantía sobre
productos de venta al público (para la Unión Europea):
• Todos los productos de venta al público tienen un período de
garantía de 24 meses contra errores de producción o errores en
materiales desde la adquisición original;
• Si la queja está fundada y si la reparación o sustitución de un
artículo no es posible, o si los gastos son desproporcionados,
Velleman® autoriza reemplazar el artículo por un artículo
equivalente o reembolsar la totalidad o una parte del precio de
compra. En este caso, usted recibirá un artículo de recambio o el
reembolso completo del precio de compra si encuentra algún fallo
hasta un año después de la compra y entrega, o un artículo de
recambio al 50% del precio de compra o el reembolso del 5 0% del
precio de compra si encuentra un fallo después de 1 año y hasta los
2 años después de la compra y entrega.
Por consiguiente, están excluidos entre otras cosas:
- todos los daños causados directa o indirectamente al aparato (p.ej.
por oxidación, choques, caída,...) y a su contenido (p.ej. pérdida de
datos) después de la entrega y causados por el aparato, y cualquier
indemnización por posible pérdida de ganancias;
- partes o accesorios que deban ser reemplazados regularmente,
como por ejemplo baterías, lámparas, partes de goma, etc. (lista
ilimitada)
- defectos causados por un incendio, daños causados por el agua,
rayos, accidentes, catástrofes naturales, etc.;
- defectos causados a conciencia, descuido o por malos tratos, un
mantenimiento inapropiado o un uso anormal del aparato contrario a
las instrucciones del fabricante;
- daños causados por un uso comercial, profesional o colectivo del
aparato (el período de garantía se reducirá a 6 meses con uso
profesional);
- daños causados por un uso incorrecto o un uso ajeno al que está
previsto el producto inicialmente como está descrito en el manual del
usuario;
- daños causados por una protección insuficiente al transportar el
aparato.
- daños causados por reparaciones o modificaciones efectuadas por
una tercera persona sin la autorización explícita de Velleman®;
- se calcula gastos de transporte de y a Velleman® si el aparato ya
no está cubierto por la garantía.
• Cualquier artículo que tenga que ser reparado tendrá que ser
devuelto a su distribuidor Velleman®. Devuelva el aparato con la
factura de compra original y transpórtelo en un embalaje sólido
(preferentemente el embalaje original). Incluya también una buena
descripción del fallo;
• Consejo: Lea el manual del usuario y controle los cables, las pilas,
etc. antes de devolver el aparato. Si no se encuentra un defecto en
el artículo los gastos podrían correr a cargo del cliente;
• Los gastos de transporte correrán a carga del cliente para una
reparación efectuada fuera del período de garantía.
• Cualquier gesto comercial no disminuye estos derechos.
La lista previamente mencionada puede ser adaptada segú n el
tipo de artículo (véase el manual del usuario del artí cu lo en
cuestión).
Velleman® Service- und Qualitätsgarantie
Velleman® hat gut 35 Jahre Erfahrung in der Elektronikwelt und
vertreibt seine Produkte in über 85 Ländern.
Alle Produkte entsprechen den strengen Qualitätsforderunge n und
gesetzlichen Anforderungen in der EU. Um die Qualität zu
gewährleisten werden unsere Produkte regelmäßig einer zusätzlichen
Qualitätskontrolle unterworfen, sowohl von unserer eigenen
Qualitätsabteilung als auch von externen spezialisierten
Organisationen. Sollten, trotz aller Vorsichtsmaßnahmen, Probleme
auftreten, nehmen Sie bitte die Garantie in Anspruch (siehe
Garantiebedingungen).
Allgemeine Garantiebedingungen in Bezug auf Ko nsumgüter
(für die Europäische Union):
• Alle Produkte haben für Material- oder Herstellungsfehler eine
Garantieperiode von 24 Monaten ab Verkaufsdatum.
• Wenn die Klage berechtigt ist und falls eine kostenlose Reparatur
oder ein Austausch des Gerätes unmöglich ist, oder wenn die Kosten
dafür unverhältnismäßig sind, kann Velleman® sich darüber
entscheiden, dieses Produkt durch ein gleiches Produkt zu ersetzen
oder die Kaufsumme ganz oder teilweise zurückzuzahlen. In diesem
Fall erhalten Sie ein Ersatzprodukt oder eine Rückzahlung im Werte
von 100% der Kaufsumme im Falle eines Defektes bis zu 1 Jahr nach
Kauf oder Lieferung, oder Sie bekommen ein Ersatzprodukt im Werte
von 50% der Kaufsumme oder eine Rückzahlung im Werte von 50 %
im Falle eines Defektes im zweiten Jahr.
• Von der Garantie ausgeschlossen sind:
- alle direkten oder indirekten Schäden, die nach Lieferung am Gerät
und durch das Gerät verursacht werden (z.B. Oxidation, Stöße, Fall,
Staub, Schmutz, Feuchtigkeit, ...), sowie auch der Inhalt (z.B.
Datenverlust), Entschädigung für eventuellen Gewinnausfall.
- Verbrauchsgüter, Teile oder Zubehörteile, die regelmäßig
ausgewechselt werden, wie z.B. Batterien, Lampen, Gummiteile,
Treibriemen, usw. (unbeschränkte Liste).
- Schäden verursacht durch Brandschaden, Wasserschaden, Blitz,
Unfälle, Naturkatastrophen, usw.
- Schäden verursacht durch absichtliche, nachlässige oder
unsachgemäße Anwendung, schlechte Wartung, zweckentfremdete
Anwendung oder Nichtbeachtung von Benutzerhinweisen in der
Bedienungsanleitung.
- Schäden infolge einer kommerziellen, professionellen oder
kollektiven Anwendung des Gerätes (bei gewerblicher Anwendung
wird die Garantieperiode auf 6 Monate zurückgeführt).
- Schäden verursacht durch eine unsachgemäße Verpackung und
unsachgemäßen Transport des Gerätes.
- alle Schäden verursacht durch unautorisierte Änderungen,
Reparaturen oder Modifikationen, die von einem Dritten ohne
Erlaubnis von Velleman® vorgenommen werden.
• Im Fall einer Reparatur, wenden Sie sich an Ihren Velleman®Verteiler. Legen Sie das Produkt ordnungsgemäß verpackt
(vorzugsweise die Originalverpackung) und mit dem OriginalKaufbeleg vor. Fügen Sie eine deutliche Fehlerbeschreibung hinzu.
• Hinweis: Um Kosten und Zeit zu sparen, lesen Sie die
Bedienungsanleitung nochmals und überprüfen Sie, ob es keinen auf
de Hand liegenden Grund gibt, ehe Sie das Gerät zur Reparatur
zurückschicken. Stellt sich bei der Überprüfung des Gerätes heraus,
dass kein Geräteschaden vorliegt, könnte dem Kunden eine
Untersuchungspauschale berechnet.
• Für Reparaturen nach Ablauf der Garantiefrist werden
Transportkosten berechnet.
• Jede kommerzielle Garantie lässt diese Rechte unberührt.
Die oben stehende Aufzählung kann eventuell angepasst
werden gemäß der Art des Produktes (siehe
Bedienungsanleitung des Gerätes).
Page 28

Velleman ® usługi i gwarancja jakości
Velleman ® ma ponad 35-letnie doświadczenie w świecie
elektroniki. Dystrybuujem y swoje produkty do ponad 85 krajów.
Wszystkie nasze produkty spełni ają surowe wymagania jakościowe
oraz wypełniają normy i dyrektywy obowiązujące w krajach UE. W
celu zapewnienia najwyższej jakości naszych produktów, przechodzą
one regularne oraz dod atkowo wyrywkowe badania kontroli jakości,
zarówno naszego wewnętrznego działu jakości jak również
wyspecjalizowanych firm zewnętrznych. Pomimo dołożenia wszelkich
starań czasem mogą pojawić się problemy techniczne, prosimy
odwołać się do gwarancji (patrz warunki gwarancji).
Ogólne Warunki dotyczące gwarancji:
Wszystkie produkty konsumenckie podlegają 24-miesięcznej
gwarancji na wady produkcyjne i materiałowe od daty zakupu.
W przypadku, gdy usterka jest niemożliwa do usunięcia lub koszt
usunięcia jest nadmiernie wysoki Velleman ® m oże zdecydować o
wymianie artykułu na nowy, wolny od wad lub zwrócić zapłaconą
kwotę. Zwrot gotówki może jednak nastąpić z uwzględnieniem
poniższych warunków:
zwrot 100% ceny zakupu w przypadku, gdy wada wystąpiła w ciągu
pierwszego roku od daty zakupu i dostawy
wymiana wadliwego artykułu na nowy, wolny od wad z odpłatnością
50% ceny detalicznej lub zwrot 50% kwoty ceny nabycia w
przypadku gdy wada wystąpiła w drugim roku od daty zakupu i
dostawy.
Produkt nie podlega naprawie gwarancyjnej:
- gdy wszystkie bezpośrednie lub pośrednie szkody spowodowane są
działaniem czynników środowiskowych lub losowych (np. przez
utlenianie, wstrząsy, upadki, kurz, brud, ...), wilgotności;
- gwarant nie ponosi odpowiedzialności za szkody wynikających z
utraty danych;
- utrata zysków z tytułu niesprawności produktu; z gwarancji
wyłaczone są matriały eksploatacyjne: baterie, żarówki, paski
napędowe, gumowe elementy napędowe... (nieograniczona li sta);
- usterka wynika z działania pożaru, zalania wszelkimi cieczami,
uderzenia pioruna, upadku lub klęski żywiołowej, itp.;
- usterka wynika z zaniedbań eksploatacyjnych tj. umyślne bądź
nieumyślne zaniechanie czyszczenia, konserwacji, wymiany
materiałów ekspolatacyjnych, niedbalstwa lub z niewłaściwego
obchodzenia się lub niezgodnego użytkowania z instrukcją
producenta;
- szkody wynikające z nadmiernego użytkowania gdy nie jest do tego
celu przeznaczony tj. działalność komerycjna, zawodowa lub wspólne
użytkowanie przez wiele osób - okres obowiązywania gwarancji
zostanie obniżony do 6 (sześć) miesięcy;
- Szkody wynikające ze źle zabezpieczonej wysyłki produktu;
- Wszelkie szkody spowodowan e przez nieautoryzowaną naprawę,
modyfikację, przeróbkę produktu przez osoby trzecie jak również bez
pisemnej zgody firmy Velleman ®.
• Uszkodzony produkt musi zostać dostarczony do sprzedawcy ®
Velleman, solidnie zapakowany (najlepiej w oryginalnym
opakowaniu), wraz z wyposażeniem z jakim produkt został
sprzedany. W przypadku wysyłki towaru w opakowaniu innym niż
oryginalnym ryzyko usterki produktu oraz tego skutki przechodzą na
właściciela produktu. Wraz z niesprawnym produktem należy
dołączyć jasny i szczegółowy opis jego usterki, wady;
• Wskazówka: Aby zaoszczędzić na kosztach i czasie, proszę
szczegółowo zapoznać si
są okoliczności techniczne czy też wynikaja wyłącznie z
nieznajomości obsługi produktu. W przypadku wysyłki sprawnego
produktu do serwisu nabywca może zostać obciążony kosztmi obsługi
oraz transportu.
• W przypadku napraw pogwarancyjnych lub odpłatnych klient ponosi
dodatkowo koszt wysyłki produktu do i z serwisu.
wymienione wyżej warunki są bez uszczerbku dla wszystkich
komercyjnych gwarancji.
Powyższe postanowienia mogą podlegać modyfikacji w
zależności od wyrobu (patrz art obsługi).
ę z instrukcja obsługi; czy przyczyną wady
 Loading...