

Page 1
Supple
mentary instructions
Emitter loading and exchange
VEGASOU
RCE 31 35
Document ID:
39155
Radiat
ion-based
Page 2
ø 6,4 mm
(0.25")
ø 4 mm
(0.16")
16 mm
(0.63")
7 mm
(0.28")
17,6 mm
(0.69")
7 mm
(0.28")
19 mm
(0.75")
12 mm
(0.47")
ø 4 mm
(0.16")
ø 4 mm
(0.16")
M4 M4
M4
ø 6,4 mm
(0.25")
ø 8 mm
(0.32")
ø 8 mm
(0.32")
ø 6,4 mm
(0.25" )
ø 6,4 mm
(0.25")
A1
A2
B1
B2
C1
D1
1 Safety
instructions
iation protection
Rad
1 Safety
instructions
These supplementary instructions describe the loading and exchanging of the emitter for source containers VEGASOURCE 31 and 35.
Carefully read this supplementary instructions and the corresponding
operating instructions of the source container and carry out the work
only after you have completely understood all instructions.
It is absolutely necessary that you take note of all safety instruments,
particularly of the instructions concerning radiation safety.
Check if the source capsule fits the existing source holder of the
source container. Compare the data in the shipping papers of the
source capsule with the data of the source container.
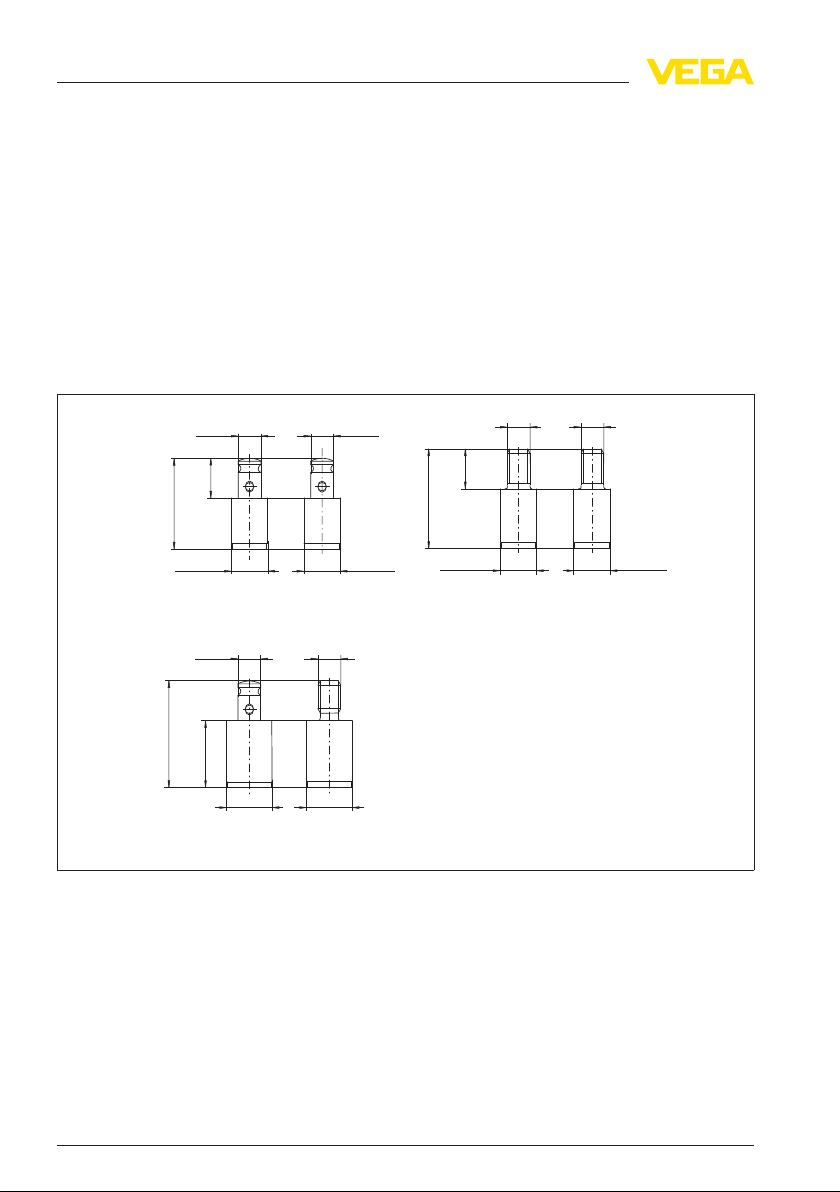
fferent versions of source capsules
Fig. 1: Di
A1 Nipple d = 6.4 x 16 mm, capsule VZ-79-001 (Cs-137)
A2 Nipple d = 6.4 x 16 mm, capsule VZ-64-001 (Co-60)
B1 Thread M4 d = 6.4 x 17.6 mm, capsule VZ-1508-001 (Cs-137)
B2 Thread M4 d = 6.4 x 17.6 mm, capsule VZ-1486-001 (Co-60)
C1 Nipple d = 8 x 19 mm, capsule VZ-357-001 (Cs-137)
D1 Thread M4 d = 8 x 19 mm, capsule VZ-3579-001 (Cs-137)
2 Emitter
loading and exchange • VEGASOURCE 31 35
39155-EN-110210
Page 3

fety instructions
1 Sa
Saf
ety instructions
Sco
pe of delivery
Labelling
l All maintenance work such as dismounting or exchanging the
radioactive source must only be carried out by authorized,
qualified personnel monitored for radiation exposure according to
the local legislation or the handling permit. Take note of the
specifications of the present handling permit. All conditions on site
must be taken into account.
l All work must only be carried out from a protected location
(shielding). Avoid risk to other persons through suitable measures
(e.g. safety fence, etc.).
l Make all necessary preparations for exchanging the source to
ensure that the work is carried out as fast as possible. Get all
required tools and accessories ready before you start work.
l Before starting the work, get a suitable, shielded vessel ready for
holding the exchanged emitter.
l Observe all the instructions of this supplementary instructons
manual for emitter exchange.
l Never touch the source capsule directly, but use a suitable
gripping device or a manipulator. Keep a distance of at least 10 cm
(4 in).
l Check all O-rings and seals when exchanging the emitter and
replace them, if necessary.
l Check the function of the switching facility of the source container
before installing or exchanging a source capsule (ON/OFFswitching).
l When system inspections are carried out, always set the source
container to position OFF and secure this position with a lock
against inadvertent switching on.
l If possible, practice this procedure, especially the handling with
the gripping device or suitable manipulator, in advance.
l Pre-printed type label, stainless steel 107 x 17 mm (4.21 x 0.67 in)
l Pre-printed type label, stainless steel 55 x 45 mm (2.17 x 1.77 in)
l Pre-printed adhesive type label, 48 x 30 mm (1.89 x 1.18 in)
l 4 grooved pins
l Sealing wire and seal
l Adhesive label "Radioactive"
When loading a source container or exchanging a source, the
corresponding type labels of the source must be permanently lettered,
e.g. with punch-type letters.
With sources exceeding a certain level of activity, the warning "Highly
radioactive source" must be stated on the type label.
This is the case for Co-60 with an activity ≥ 4 GBq (108 mCi) or for
Cs-137 with an activity ≥ 20 GBq (540 mCi).
39155-EN-110210
Emitter
loading and exchange • VEGASOURCE 31 35 3
Page 4
11 4
5 31 2
2
B
A
C
6
8
7
9
3
6
7
10
8
9
2
10
1 Safety
instructions
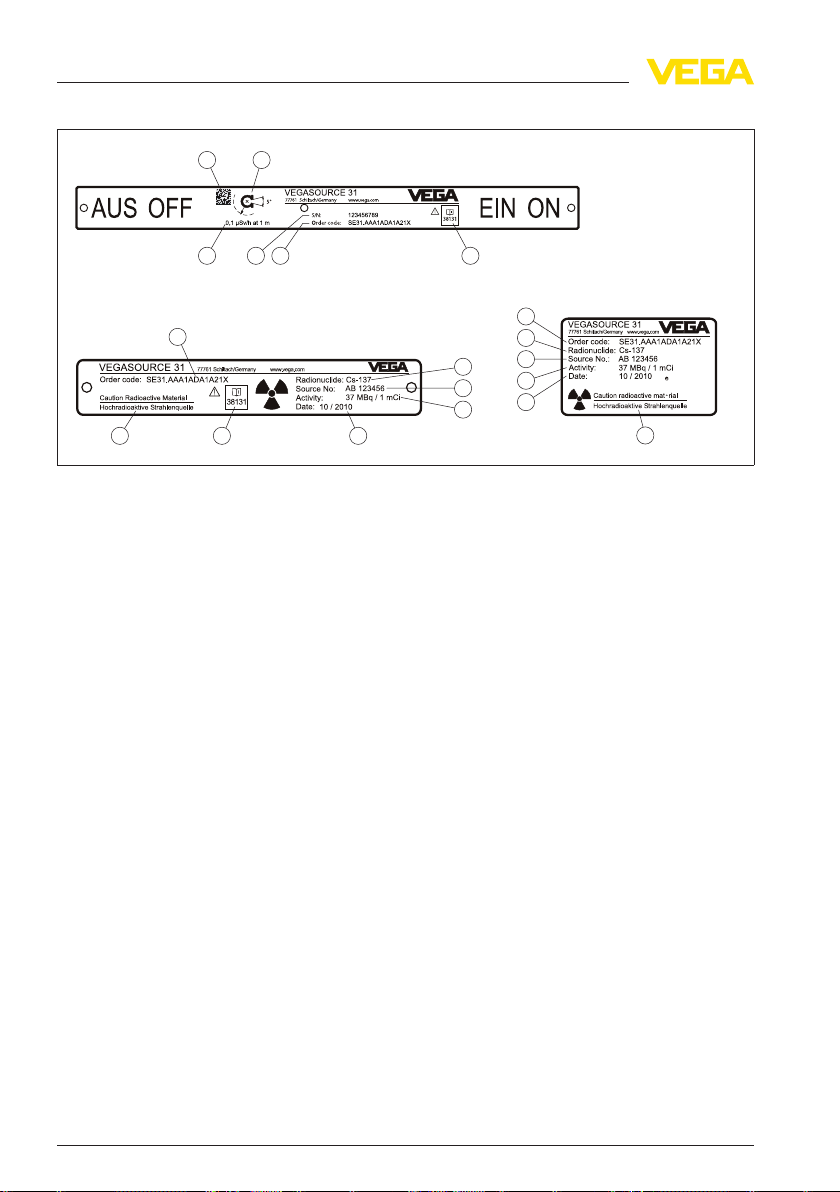
Fig. 2: Type
A Type label - Source holder
B Type label - Source
C Adhesive type label - Source
1 Serial number - Source holder
2 Order code - Source holder
3 Number of the corresponding operating instructions
4 Exit angle
5 Local dose rate at defined distance from the surface
6 Note: "Highly radioactive source" (if necessary)
7 Radionuclide: Cs-137 or Co-60
8 Serial number of the source capsule (for traceability of the source)
9 Activity of the source in MBq or GBq
10 Date (mm/yyyy)
11 Data-Matrix-Code
Tools
labels - Example (version A)
and accessories
Make sure that the necessary accessories and tools are available and
in technically perfect condition.
Make sure that the key for the lock/locks is available with the source
container.
Load the source holder or exchange the source capsule with utmost
care.
Use a suitable gripping device or a manipulator when inserting or
exchanging the source capsule.
To increase the distance to the source capsule, you can make and
implement an extension rod according to the following illustration.
4 Emitter
39155-EN-110210
loading and exchange • VEGASOURCE 31 35
Page 5
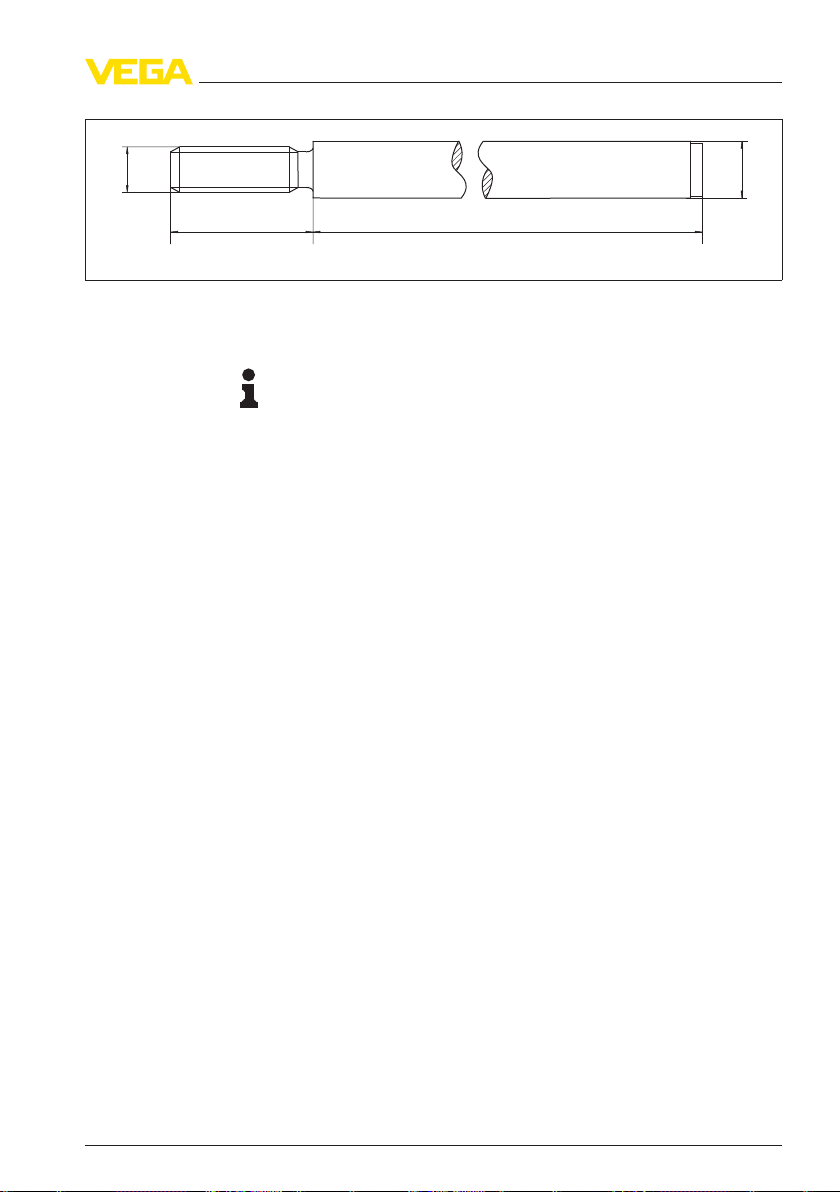
d
ø 10 mm
(0.39")
500 - 1000 mm
(19.69 - 39.37")
25 mm
(0.98")
fety instructions
1 Sa
Fig. 3: Auxiliary
d Version A, B, C, K, L = thread M8
Version D, M, N = thread M6
tool extension rod
Note:
To
containers must not be used more than once.
Contact our specialists before carrying out such work.
carry out the exchange, you need a new type A container. These
39155-EN-110210
Emitter
loading and exchange • VEGASOURCE 31 35 5
Page 6
1
8
7
9
6
5 4
2
3
ing or emitter exchange
2 Load
2 Loading
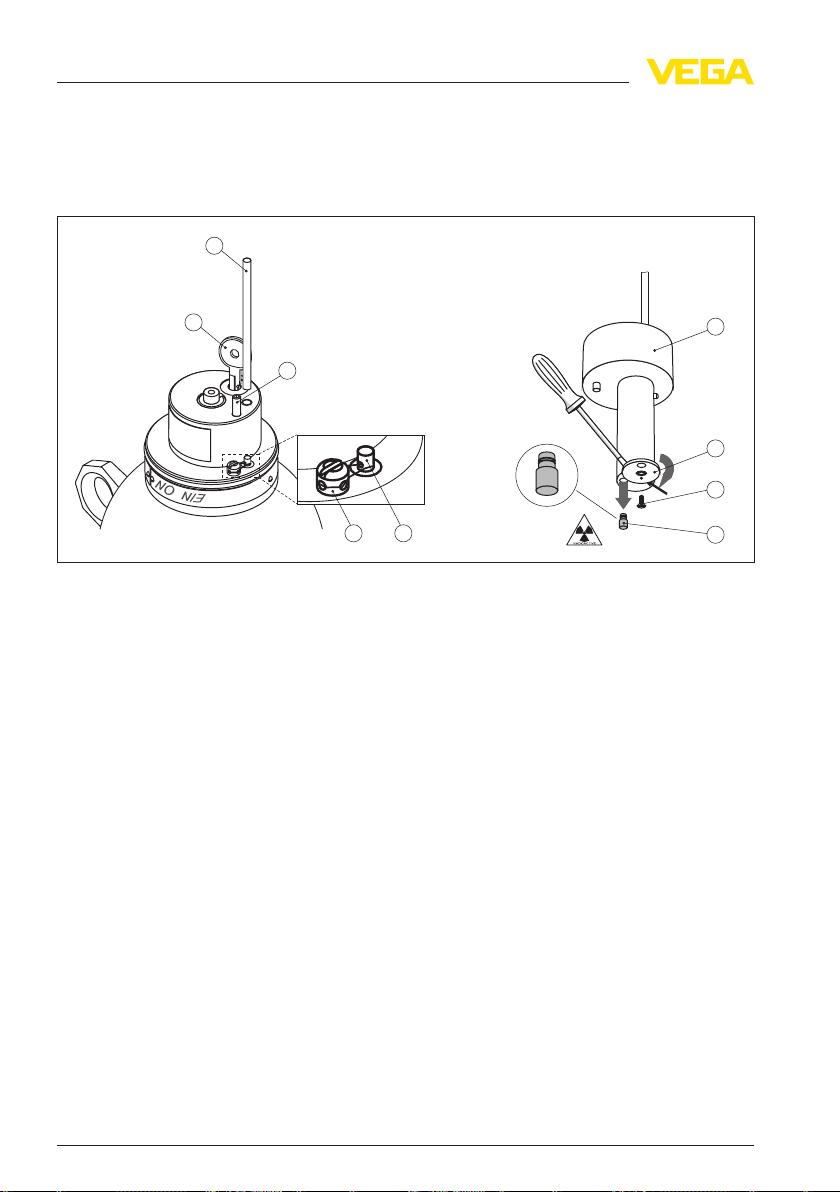
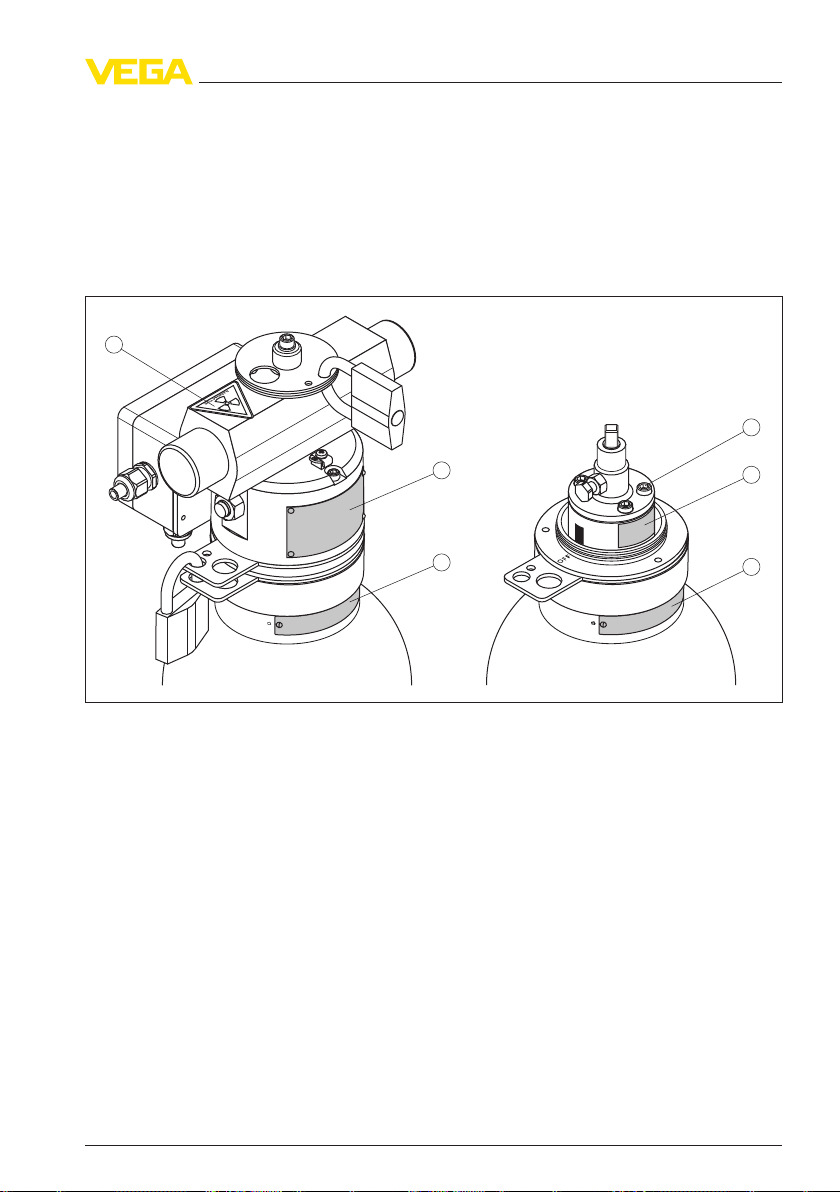
2.1 Version A
Fig. 4: Emitter
1 Extension rod (M8), optional
2 Key lock with key
3 Pin
4 Holding pin
5 Capstan screw (sealable)
6 Safety bolt - Source capsule (optional)
7 Cover plate
8 Source capsule
9 Source holder
exchange - VEGASOURCE version A
or emitter exchange
ired tools
Requ
You need the following tools when exchanging the emitter on version
A:
l Key for key lock
l Hexagon spanner size 5
Remove source holder
l Allen key size 2.5 (optional)
l Flat-headed screwdriver size 1.5 x 10
l Side cutters
l Gripper tool or manipulator for source capsule
l Possibly extension rod M8
l Remove the cover - see operating instructions of the source holder
l If necessary, screw an extension rod (1) with thread M8 into the
socket of the source holder. With this extension you can increase
the distance to the emitter
l Unlock key lock (2) with key
l With the version with density modification: Loosen pin (3) with an
Allen key size 5
6 Emitter
39155-EN-110210
loading and exchange • VEGASOURCE 31 35
Page 7
1
1
3
2
2
4
ing or emitter exchange
2 Load
or exchange emit-
Insert
ter
Insert source holder
Attach or replace the
type
labels
l Remo
ve the seal between holding pin (4) and capstan screw (5)
with side cutting pliers and pull out the seal wire
l Unscrew the capstan screw (5) with a flat headed screwdriver,
size 1.5 x 10
l Push in the holding pin (4) and move the source holder (9) over the
pin until the arrow mark points to the holding pin (4)
l Pull out the source holder (9)
l Place the cover on the source container to protect against pollution
until reinstallation of the source holder
l If available, remove safety bolt (6) Allen key size 2.5
l Swivel the cover (7) in front on the thin cylinder of the source
holder (9) to the side. To do this, lift the cover (7) slightly with a
small slotted screwdriver
l Only when exchanging the emitter: Allow the source capsule (8) to
fall out downwards into a shielded vessel
l Insert new source capsule (8) and close cover (7). For insertion
use a suitable gripping device or a manipulator
l Screw in the safety bolt (6) (optional)
l Completely insert the source holder (9) into the source container
and turn it until the holding pin (4) pops out
l Continue turning the source holder (9) up to position OFF
l Insert the key lock (2) with key and lock. Detach the key
l If necessary, remove extension rod (1)
l Screw in capstan screw (5) and secure together with the retaining
pin (4) with new seal
l Remove existing type labels (when exchanging the emitter)
l Unpack the type label set and letter it respectively. You can find
further information in chapter "Safety instructions - Labelling"
Fig. 5: Fasten
1 Type label - source container (already on the source container)
2 Type label - Source (107 x 17 mm)
3 Adhesive type label - Source (48 x 30 mm)
4 Adhesive label "Radioactive"
39155-EN-110210
Emitter
type label
l Letter the adhesive type label (48 x 30 mm)n. Clean the surface
provided on the source holder and attach the adhesive type label
l Letter the type label (107 x 17 mm) and fasten it with two grooved
pins to the neck of the source container
loading and exchange • VEGASOURCE 31 35 7
Page 8
4
6
1
3
2
5
9
8
7
10
11
ing or emitter exchange
2 Load
ch the adhesive label "Radioactive" to the cover of the source
l Atta
container (if not already present)
l Place the cover back on
l Insertion or exchange of the source is finished
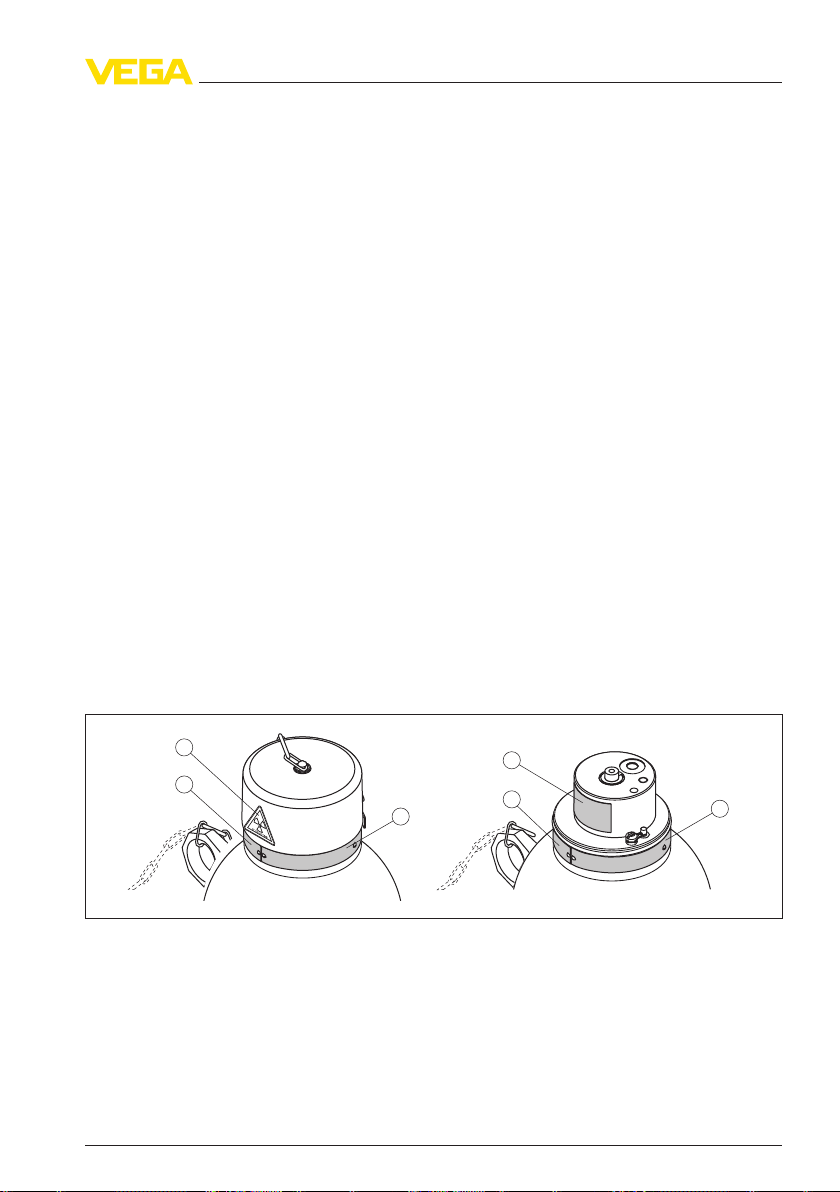
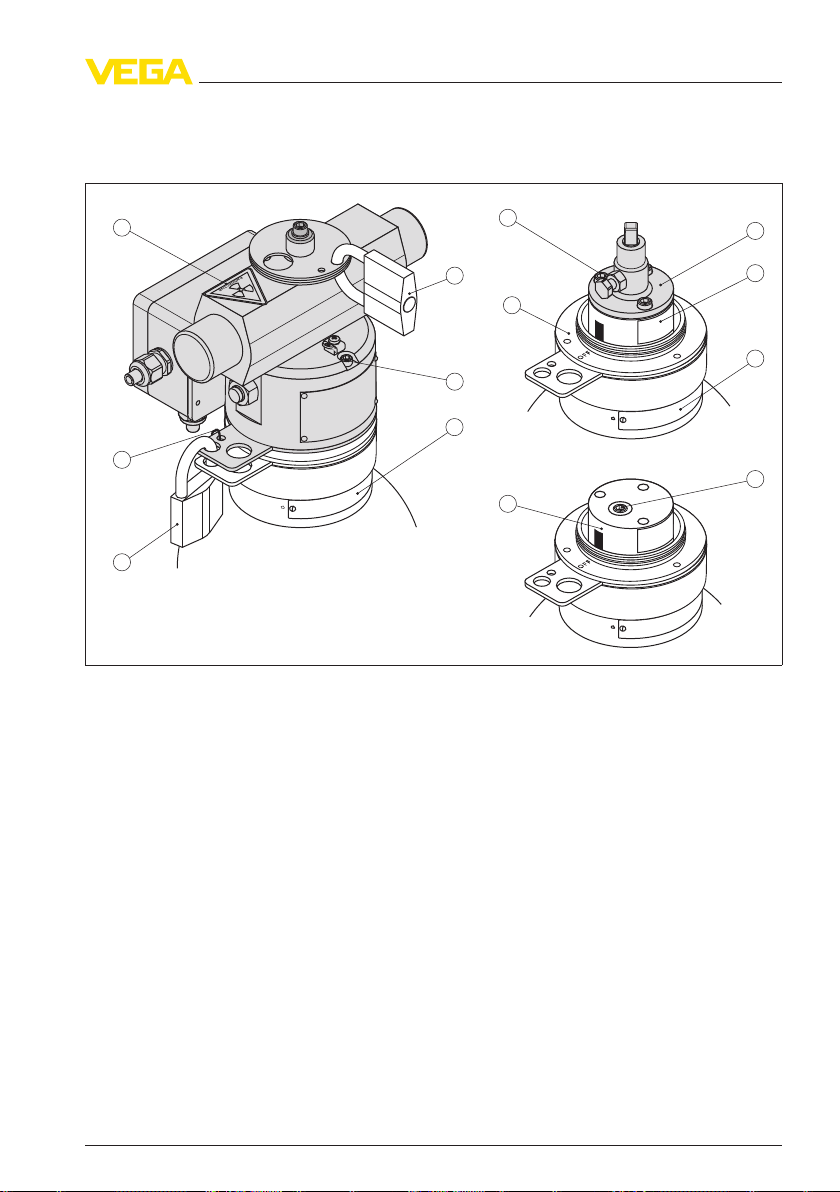
2.2 Version B
Fig. 6: Emitter
1 Padlock
2 Locking screw
3 Fixing pin
4 Securing strap
5 Holding pin
6 Capstan screw
7 Safety bolt - Source capsule (optional)
8 Cover plate
9 Source capsule
10 Source holder
11 Extension rod (M8), optional
Requ
exchange - VEGASOURCE version B
ired tools
You need the following tools when exchanging the emitter on version
B:
8 Emitter
l Key for padlock
l Hexagon spanner size 5
l Allen key size 2.5 (optional)
l Flat-headed screwdriver size 1.5 x 10
loading and exchange • VEGASOURCE 31 35
39155-EN-110210
Page 9
ing or emitter exchange
2 Load
Remo
ve source holder
l Side
l Gripper tool or manipulator for source capsule
l Possibly extension rod M8
l Remove padlock (1)
l Loosen locking screw (2) with a flat head screwdriver 1.5 x 10
l Pull out fixing pin (3)
l Remove safety catch (4)
l Remove the seal between holding pin (5) and capstan screw (6)
cutters
with side cutting pliers and pull out the seal wire
l Unscrew the capstan screw (5) with a flat headed screwdriver,
size 1.5 x 10
l Insert the holding pin (5) and move with the stirrup over the pin
l Bring the stirrup to the extraction position
Fig. 7: VEGASOURCE - version B in
Insert
or exchange emit-
ter
Insert source holder
39155-EN-110210
loading and exchange • VEGASOURCE 31 35 9
Emitter
extraction position
l If necessary, screw an extension rod (11) with thread M8 into the
socket of the source holder (10). With this extension you can
increase the distance to the emitter
l Pull out the source holder (10)
l If it is present, remove the safety bolt (7), Allen key size 2.5
l Swivel the cover (8) in front on the thin cylinder of the source
holder (10) to the side. To do this, lift the cover (8) slightly with a
small slotted screwdriver
l Only when exchanging the emitter: Allow the source capsule (9) to
fall out downwards into a shielded vessel
l Insert new source capsule (9) and close cover (8). For insertion
use a suitable gripping device or a manipulator
l Screw in the safety bolt (7) (optional)
l Completely insert the source holder (10) into the source container
and turn it until the holding pin (5) pops out
l If necessary, remove extension rod (11)
l Continue turning the source holder (10) up to position OFF
Page 10

2
1
3
ing or emitter exchange
2 Load
or replace the
Attach
labels
type
the padlock (1) and lock
l Fit
l Let the fixing pin (3) snap in
l Tighten locking screw (2)
l Screw in capstan screw (6) and secure together with the retaining
pin (5) with new seal
l Attach safety catch (4)
l Remove existing type labels (when exchanging the emitter)
l Unpack the type label set and letter it respectively. You can find
further information in chapter "Safety instructions - Labelling"
Fig. 8: Fasten
1 Adhesive label "Radioactive"
2 Type label - Source
3 Type label - source container (already on the source container)
type label
l Letter the type label (55 x 45 mm) and fasten with four grooved
pins to the source holder
l Attach the adhesive label "Radioactive" to the source container (if
not already present)
l Insertion or exchange of the source is hence finished
10 Emitter
39155-EN-110210
loading and exchange • VEGASOURCE 31 35
Page 11

1
8
4
2
3
7
6
8
9
5
ing or emitter exchange
2 Load
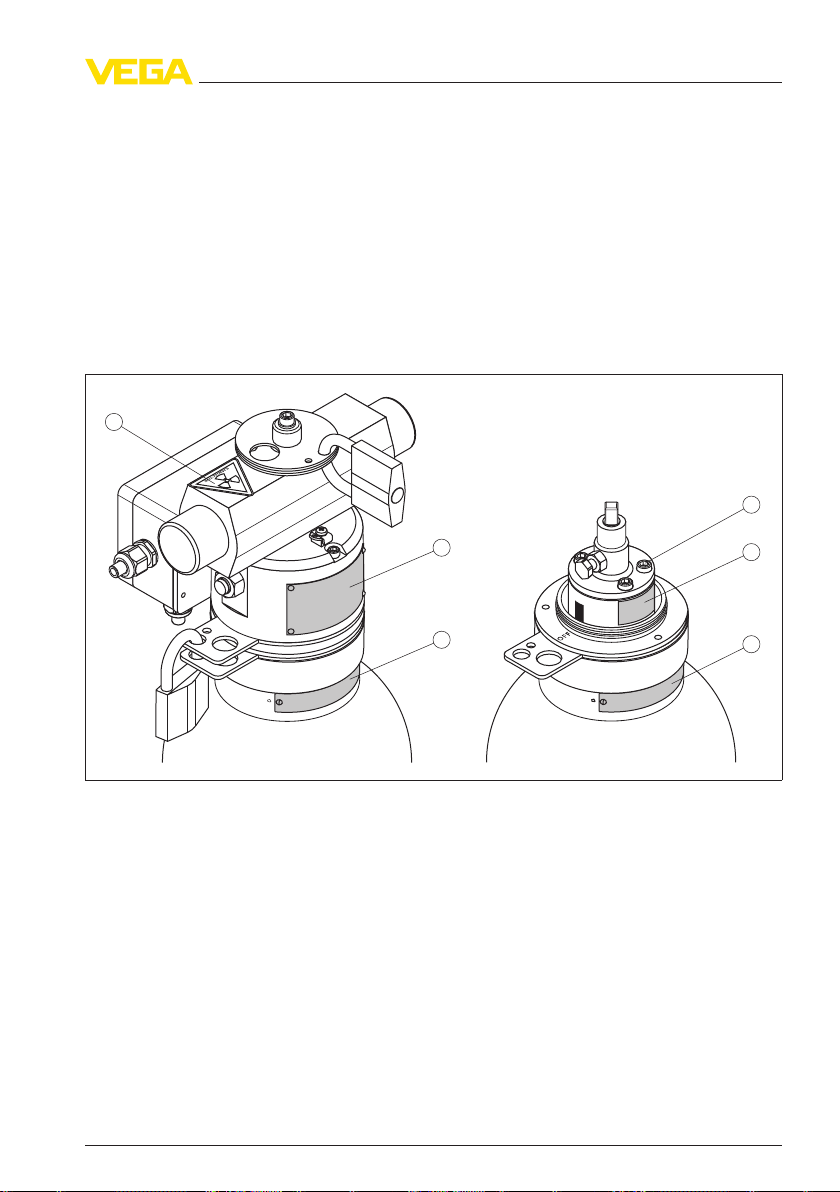
2.3 Versi
Fig. 9: Emitter
1 Padlock
2 Locking screw
3 Holding pin
4 Capstan screw
5 Safety bolt - Source capsule (optional)
6 Cover plate
7 Source capsule
8 Source holder
9 Extension rod (M8), optional
exchange - VEGASOURCE version C
on C
Requ
Remo
39155-EN-110210
Emitter
ired tools
ve source holder
You need the following tools when exchanging the emitter on version
C:
l Key for padlock
l Hexagon spanner size 5
l Allen key size 2.5 (optional)
l Flat-headed screwdriver size 1.5 x 10
l Side cutters
l Gripper tool or manipulator for source capsule
l Possibly extension rod M8
l Remove padlock (1)
l Loosen locking screw (2) with a flat head screwdriver 1.5 x 10
l Remove the seal between holding pin (3) and capstan screw (4)
with side cutting pliers and pull out the seal wire
loading and exchange • VEGASOURCE 31 35 11
Page 12

ing or emitter exchange
2 Load
crew the capstan screw (4) with a flat headed screwdriver,
l Uns
size 1.5 x 10
l Insert the holding pin (3) and slide the stirrup over the pin
l Bring the stirrup to the extraction position
Fig. 10: VEGASOURCE - version C in
l If necessary, screw an extension rod (9) with thread M8 into the
l Pull out the source holder (8)
Insert
or exchange emit-
ter
Insert source holder
Attach or replace the
type labels
l If it is present, remove the safety bolt (5), Allen key size 2.5
l Swivel the cover (6) in front on the thin cylinder of the source
l Only when exchanging the emitter: Allow the source capsule (9) to
l Insert new source capsule (7) and close cover (6). For insertion
l Screw in the safety bolt (5) (optional)
l Completely insert the source holder (8) into the source container
l If necessary, remove extension rod (9)
l Continue turning the source holder (8) up to position OFF
l Fit the padlock (1) and lock
l Tighten locking screw (2)
l Screw in capstan screw (4) and secure together with the retaining
l Remove existing type labels (when exchanging the emitter)
l Unpack the type label set and letter it respectively. You can find
extraction position
socket of the source holder (8). With this extension you can
increase the distance to the emitter
holder (8) to the side. To do this, lift the cover (6) slightly with a
small slotted screwdriver
fall out downwards into a shielded vessel
use a suitable gripping device or a manipulator
and turn it until the holding pin (3) pops out
pin (3) with new seal
39155-EN-110210
further information in chapter "Safety instructions - Labelling"
12 Emitter
loading and exchange • VEGASOURCE 31 35
Page 13

2
1
3
ing or emitter exchange
2 Load
Fig. 11: Fasten
1 Adhesive label "Radioactive"
2 Type label - Source
3 Type label - source container (already on the source container)
type label
l Letter the type label (55 x 45 mm) and fasten with four grooved
pins to the source holder
l Attach the a dhesive label "Radioactive" to the specified position of
the source container (if not already present)
l Insertion or exchange of the source is hence finished
39155-EN-110210
Emitter
loading and exchange • VEGASOURCE 31 35 13
Page 14

EIN
ON
AUS
OFF
AUS
OFF
EIN
ON
AUS
OFF
AUS
OFF
3
6
7
9
5
8
7
5
4
1
2
ing or emitter exchange
2 Load
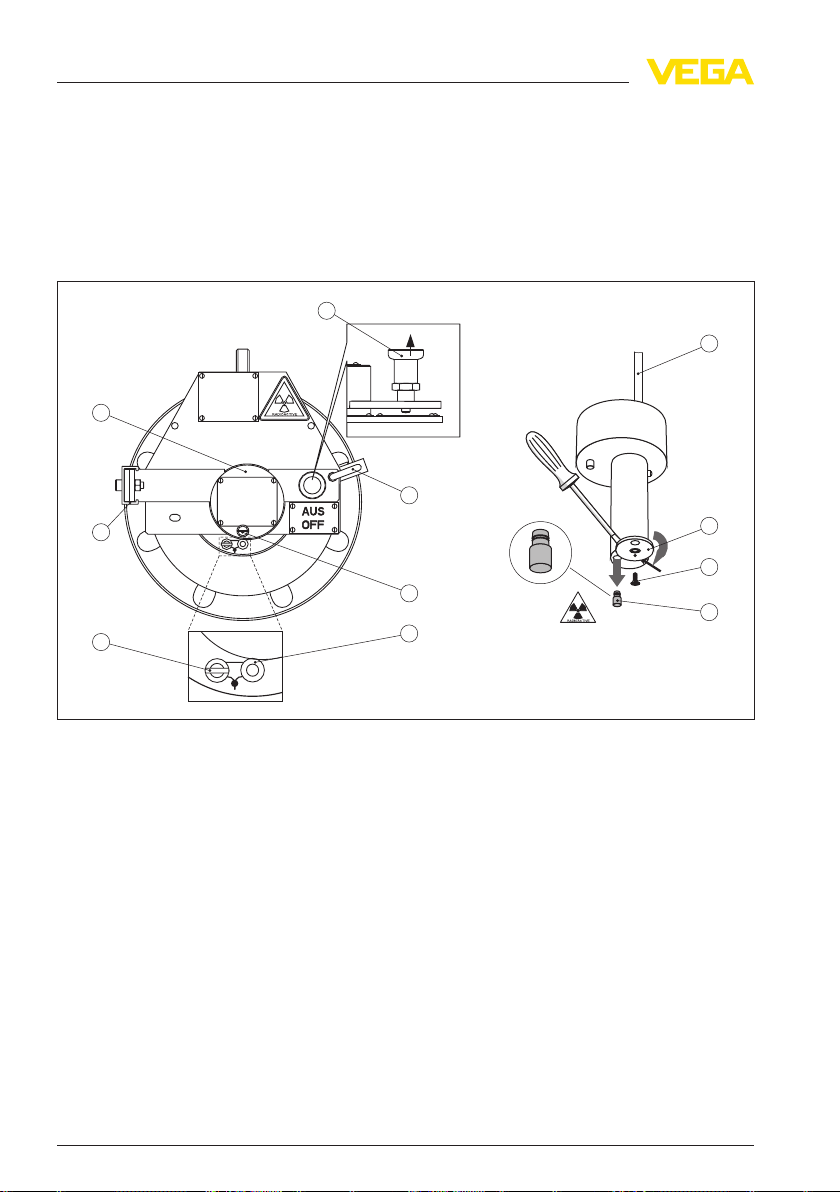
2.4 Versi
on D
Fig. 12: Emitter
1 Padlock
2 Locking screw
3 Capstan screw
4 Fixing strap
5 Source holder
6 Slot
7 Source capsule
8 Spring ring
9 Extension rod (M6), optional
exchange - VEGASOURCE version D
Required tools
14 Emitter
You need the following tools when exchanging the emitter on version
D:
l Key for padlock
l Fork wrench, wrench size 13
l Hexagon spanner size 5
loading and exchange • VEGASOURCE 31 35
39155-EN-110210
Page 15

ing or emitter exchange
2 Load
ve source holder
Remo
l Allen
l Flat-headed screwdriver size 1.5 x 10
l Flat-headed screwdriver size 4 mm
l Side cutters
l Gripper tool or manipulator for source capsule
l Possibly extension rod M6
l Remove padlock (1)
l Loosen locking screw (2) with a flat head screwdriver 1.5 x 10
l Remove the seal of the capstan screw (3) with the side cutting
key size 2.5 (optional)
pliers and pull out the seal wire
l Unscrew the capstan screw (3) until the fixing strap (4) can be
folded up
l Fold up the fixing strap (4)
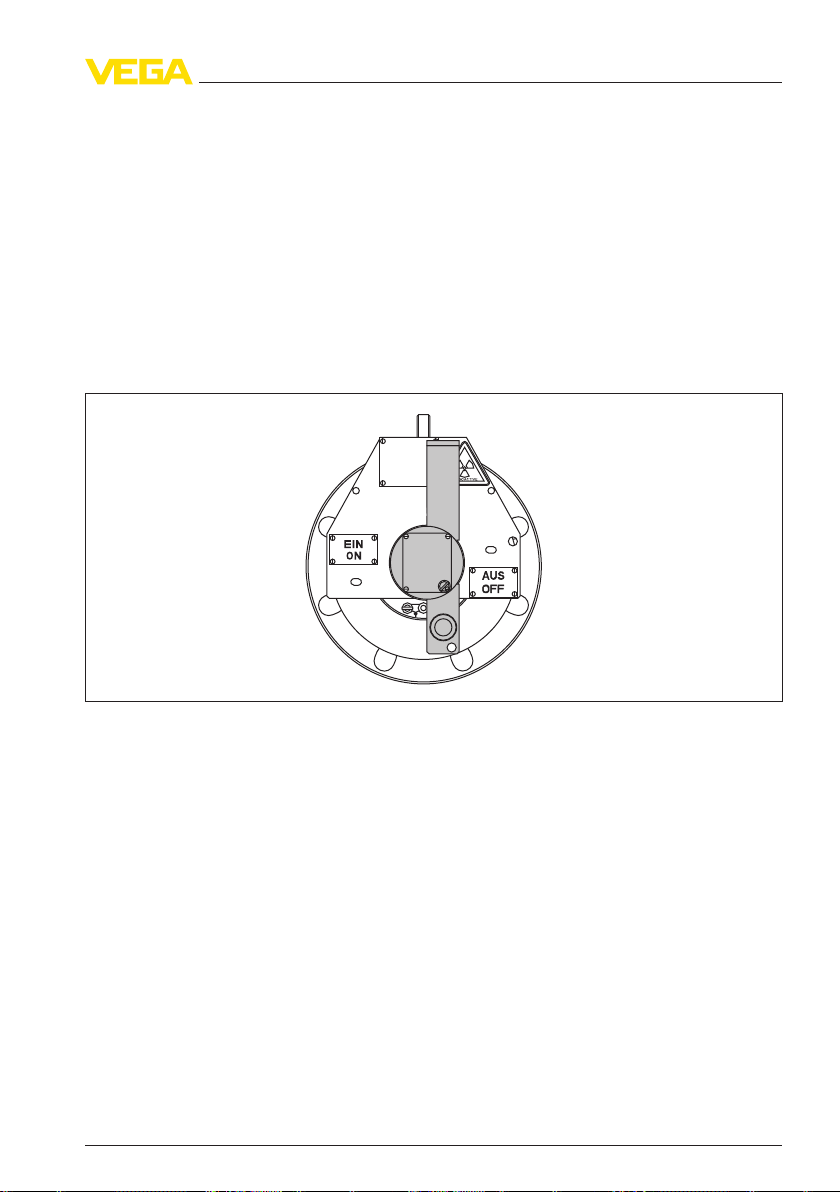
Fig. 13: VEGASOURCE - version D in
Insert
or exchange emit-
ter
39155-EN-110210
loading and exchange • VEGASOURCE 31 35 15
Emitter
extraction position
l If necessary, screw an extension rod (9) with thread M6 into the
thread of the source holder (5). With this extension you can
increase the distance to the emitter
l Unscrew source holder (5) with spanner (size 13) and pull it out of
the source container
l Only when exchanging the emitted: Insert the blade of a
screwdriver (4 mm) into the slot (6) on the source holder (5) and
press out the source capsule (7) or unscrew the source capsule
with a screwdriver (2 mm). Let the source capsule (7) fall into a
shielded vessel
Page 16

2
1
3
ing or emitter exchange
2 Load
source holder
Insert
Attach or replace the
type
labels
l Insert
the new source capsule (7) into the source holder (5) until it
snaps in or insert the spring ringe (8) with the threaded version and
screw the source capsule into the source holder (5) (torque 2
±0.5 Nm). Use a suitable gripping device or a manipulator for
inserting
l Insert the source holder (5) completely into the source container
and screw in with a spanner (size 13)
l Tighten the source holder (5)
l If necessary, remove extension rod (9)
l Fold down the fixing strap (4)
l Screw in the capstan screw (3) and tighten it
l Fit the padlock (1) and lock
l Tighten locking screw (2)
l Secure capstan screw (3) with new seal
l Remove existing type labels (when exchanging the emitter)
l Unpack the type label set and letter it respectively. You can find
further information in chapter "Safety instructions - Labelling"
Fig. 14: Fasten
1 Adhesive label "Radioactive"
2 Type label - Source
3 Type label - source container (already on the source container)
16 Emitter
type label
l Letter the type label (55 x 45 mm) and fasten it on the fixing strap
with four grooved pins
l Attach the a dhesive label "Radioactive" to the specified position of
the source container (if not already present)
l Insertion or exchange of the source is hence finished
39155-EN-110210
loading and exchange • VEGASOURCE 31 35
Page 17

11
3
1
7
6
5
9
8
10
11
2
9
4
ing or emitter exchange
2 Load
on K, L
2.5 Versi
Fig. 15: Emitter
1 Padlock - Switching function
2 Fixing screws - Drive unit
3 Padlock
4 Seal
5 Clamping screws
6 Source holder
7 Adapter disc
8 Safety bolt
9 Type label - Source holder
10 Adhesive type label - Source
11 Squared adapters with flange
A Arrow mark
exchange - VEGASOURCE version K, L
Required tools
You need the following tools when exchanging the emitter on version K
and L:
l Key for padlocks
l Hexagon spanner size 4
l Allen key size 2.5 (optional)
l Flat-headed screwdriver size 4 mm
l Side cutters
l Gripper tool or manipulator for source capsule
39155-EN-110210
Emitter
loading and exchange • VEGASOURCE 31 35 17
Page 18

14
13
6
12
ing or emitter exchange
2 Load
unt drive unit and
Dismo
squa
red adapter
l Switch off compressed air and remove the feed lines. The source
container must now be in position OFF
l Off position of the drive unit with padlock - secure switching
function (1)
l Remove padlock (3)
l Remove the seal (4) from the strap with side cutting pliers and pull
out the seal wire
l Loosen fixing screws - drive unit (2) (3 pcs, hexagon size 4) and
remove them. The screws have different lengths
l Lift up the complete drive unit upward
l Only loosen (4 pieces) the terminal screws (5) - do not unscrew
the screws
l Detach the squared adaters with flange (11) upward
Fig. 16: Emitter
6 Source holder
12 Safety bolt - Source capsule (optional)
13 Cover plate
14 Source capsule
A Arrow mark
exchange - source holder VEGASOURCE version K, L
Insert
or exchange emit-
ter
l Loosen securing screw (8) with an Allen key size 4
l Turn source holder (6) ¼ turn anticlockwise and pull it out of the
source container. The arrow mark (A) is above the OFF mark of
the adapter disc (7)
l If it is present, remove the safety bolt (12) with Allen key size 2.5
l Swivel the cover (13) in front on the thin cylinder of the source
holder to the side. To do this, lift the cover (13) slightly with a small
slotted screwdriver
l Only when exchanging the emitter: Allow the source capsule (14)
to fall out downwards into a shielded vessel
l Insert new source capsule (14) and close cover (13). For insertion
use a suitable gripping device or a manipulator
l Screw in the safety bolt (12) (optional)
18 Emitter
39155-EN-110210
loading and exchange • VEGASOURCE 31 35
Page 19
2
1
4
3
5
2
ing or emitter exchange
2 Load
source holder
Insert
Attach or replace the
type
labels
l Insert the source holder (6) completely into the source container
l Turn the source holder until the arrow mark (A) is above the OFF
mark of the adapter disc (7)
l Screw in the safety bolt (8) and tighten it
l Remove existing type labels (when exchanging the emitter)
l Unpack the type label set and letter it respectively. You can find
further information in chapter "Safety instructions - Labelling"
Fig. 17: Fasten
1 Type label - Source container
2 Type label - Source
3 Adhesive type label - Source
4 Adhesive label "Radioactive"
5 Clamping screws
A Arrow mark
B Straps must line up
type label
l Letter the adhesive type label (48 x 30 mm) and attach it to the
source holder
l Letter the type label (107 x 17 mm) and fasten it to the neck of the
Mount squared adapters
drive unit
and
source container with two grooved pins
l Attach the a dhesive label "Radioactive" to the specified position of
the source container (if not already present)
l Fasten the square adapters with flange (11) with the four clamping
screws (5). The arrow mark (A) of the source holder (6) is above
the OFF mark of the adapter disc (7)
l Tighten the terminal screws (5)
39155-EN-110210
Emitter
loading and exchange • VEGASOURCE 31 35 19
Page 20

ing or emitter exchange
2 Load
l Check
if the source container is in position OFF. The arrow mark
(A) of the source holder (6) must be above the OFF mark of the
adapter washer (7)
l Attach the complete drive unit from above - when attaching make
sure that the two straps of the adapter disc and the drive unit are
on top of the other (B)
l Fasten drive unit with the three fixing screws - drive unit (2)
l Fit the padlock (3) and lock, to protect the source capsule against
unauthorized access
l Attach new seal (4)
l Connect the pneumatic and feeding lines - the pneumatic lines
must be unpressurized. See operating instructions of the source
container
l Remove padlock - Switching function (1)
l Insertion or exchange of the source is hence finished
20 Emitter
39155-EN-110210
loading and exchange • VEGASOURCE 31 35
Page 21
10
3
1
7
6
5
9
8
10
11
2
8
4
ing or emitter exchange
2 Load
on M, N
Fig. 18: Emitter
1 Padlock - Switching function
2 Fixing screws - Drive unit
3 Padlock
4 Seal
5 Fixing screw
6 Reception of the source holder
7 Adapter disc
8 Source holder
9 Type label - Source container
10 Adhesive type label - Source
11 Squared adapters with flange
A Arrow mark
exchange - VEGASOURCE version M, N
2.6 Versi
Required tools
You need the following tools when exchanging the emitter on version
M and N:
l Key for padlocks
l Hexagon spanner size 4
l Allen key size 2.5 (optional)
l Flat-headed screwdriver size 4 mm
l Side cutters
l Gripper tool or manipulator for source capsule
39155-EN-110210
Emitter
loading and exchange • VEGASOURCE 31 35 21
Page 22

12
13
8
14
13
ing or emitter exchange
2 Load
unt drive unit and
Dismo
squa
red adapter
l Switch off compressed air and remove the feed lines. The source
container must now be in position OFF
l Off position of the drive unit with padlock - secure switching
function (1)
l Remove padlock (3)
l Remove the seal (4) from the strap with side cutting pliers and pull
out the seal wire
l Loosen fixing screws (2) (3 pieces)
l Lift up the complete drive unit upward
l Loosen fixing screws (5) (3 pieces)
l Detach the squared adaters with flange (11) upward
Fig. 19: Emitter
8 Source holder
12 Slot
13 Source capsule
14 Spring ring
Insert
ter
exchange - source holder VEGASOURCE version M, N
or exchange emit-
l Unscrew source holder (8) with spanner (size 13) and pull it out of
the source container
l Only when exchanging the emitter: Insert the blade of a
screwdriver (4 mm) into the slot (12) on the source holder (8) and
press out the source capsule (13) or unscrew the source capsule
with a screwdriver (2 mm). Let the source capsule (13) fall into a
shielded vessel
22 Emitter
39155-EN-110210
loading and exchange • VEGASOURCE 31 35
Page 23
2
1
4
3
5
2
ing or emitter exchange
2 Load
source holder
Insert
Attach or replace the
type
labels
l Insert
the new source capsule (13) into the source holder (8) until it
snaps in or insert the spring ring (14) with the threaded version and
screw the source capsule into the source holder (8) (torque 2
±0.5 Nm). Use a suitable gripping device or a manipulator for
insertion
l Insert the source holder (8) completely into the source container
and screw in with a spanner (size 13)
l Tighten the source holder (8)
l Remove existing type labels (when exchanging the emitter)
l Unpack the type label set and letter it respectively. You can find
further information in chapter "Safety instructions - Labelling"
Fig. 20: Fasten
1 Type label - Source holder
2 Type label - Source
3 Adhesive type label - Source
4 Adhesive label "Radioactive"
A Arrow mark
B Straps must line up
type label
l Letter the adhesive type label (48 x 30 mm) and attach it to the
source holder
l Letter the type label (107 x 17 mm) and fasten it to the neck of the
source container with two grooved pins
l Attach the a dhesive label "Radioactive" to the specified position of
the source container (if not already present)
Mount
squared adapters
drive unit
and
l Fasten the square adapters with flange (11) with the three fixing
screws (5). The arrow mark (A) of the source holder is above the
OFF mark of the adapter disc (7)
39155-EN-110210
loading and exchange • VEGASOURCE 31 35 23
Emitter
Page 24

ing or emitter exchange
2 Load
l Tighten fixi
l Check if the source holder is in position OFF
l Attach the complete drive unit from above - when attaching make
ng screws (5)
sure that the two straps of the adapter disc and the drive unit are
on top of the other (B)
l Fasten drive unit with the three fixing screws - drive unit (2)
l Fit the padlock (3) and lock, to protect the source capsule against
unauthorized access
l Attach new seal (4)
l Connect pneumatic and feed lines - see operating instructions of
the source container
l Remove padlock - Switching function (1)
l Insertion or exchange of the source is hence finished
24 Emitter
39155-EN-110210
loading and exchange • VEGASOURCE 31 35
Page 25
3 Sup
plement
3 Supp
lement
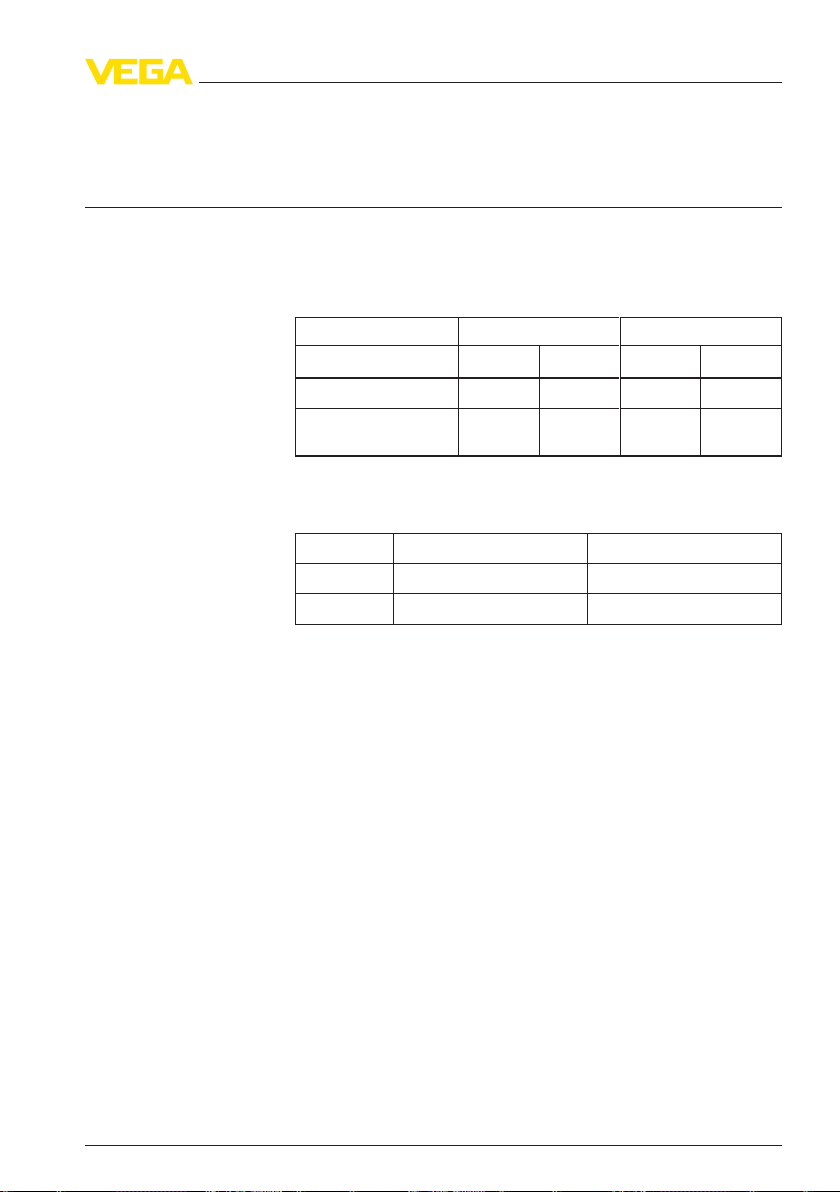
3.1 Technical data
Source
Take note of the specifications in the operating instructions of the source container
VEGASOURCE.
Attenuation factor and half value layers
VEGASOURCE 31 VEGASOURCE 35
Source
factor 37
Tab. 1: Attenuation
factor
and half value layers
Attenuation
Number of the half-value
layers
Max. activity of the source
VEGASOURCE 31 VEGASOURCE 35
Co-60 max. 0.74 GBq (20 mCi
Cs-137 max. 22.2 GBq (600 mCi) max. 111.0 GBq (3000 mCi)
Tab. 2: Maximum activity
of the source
Product-related fluctuations of the source activity and tolerances of the measuring instruments are
not taken into account for the above data.
Co-60 Cs-137 Co-60 Cs-137
294 181 3100
5.2 8.2 7.5 11.6
) max. 3.7 GBq (100 mCi)
39155-EN-110210
Emitter
loading and exchange • VEGASOURCE 31 35 25
Page 26

3 Suppl
ement
26 Emitter
39155-EN-110210
loading and exchange • VEGASOURCE 31 35
Page 27

3 Sup
plement
39155-EN-110210
Emitter
loading and exchange • VEGASOURCE 31 35 27
Page 28

VEGA Grieshaber KG
ISO 9001
Am Hohenstein 113
77761 Schiltach
Germany
Phone +49 7836 50-0
Fax +49 7836 50-201
E-mail: info@de.vega.com
www.vega.com
Printing date:
statements concerning scope of delivery, application,
All
practical use and operating conditions of the sensors and
processing systems correspond to the information avail-
able at the time of printing.
© VEGA Grieshaber KG, Schiltach/Germany 2011
Subject to change without prior notice 39155-EN-110210
 Loading...