

Page 1

USER'S GUIDE
Vaisala vNet PoE Network Interface
M211700EN-A
Page 2

PUBLISHED BY
Vaisala Oyj
P.O. Box 26
FI-00421 Helsinki
Finland
Phone (int.): +358 9 8949 1
Fax: +358 9 8949 2227
Visit our Internet pages at www.vaisala.com.
© Vaisala 2014
No part of this manual may be reproduced, published or publicly
displayed in any form or by any means, electronic or mechanical
(including photocopying), nor may its contents be modified, translated,
adapted, sold or disclosed to a third party without prior written
permission of the copyright holder. Translated manuals and translated
portions of multilingual documents are based on the original English
versions. In ambiguous cases, the English versions are applicable, not the
translations.
The contents of this manual are subject to change without prior notice.
This manual does not create any legally binding obligations for Vaisala
towards customers or end users. All legally binding obligations and
agreements are included exclusively in the applicable supply contract or
the General Conditions of Sale and General Conditions of Service of
Vaisala.
Page 3

Contents
About this Manual . . . . . . . . . . . . . . . . . . . . . . . iii
Vaisala vNet PoE Network Device . . . . . . . . . . . .1
Setting Up a vNet Device . . . . . . . . . . . . . . . . . . .1
Configuring vNet Devices . . . . . . . . . . . . . . . . . . .9
viewLinc Aware Service . . . . . . . . . . . . . . . . . . .18
Managing Connections and Network Statistics. .19
vNet Device Utilities . . . . . . . . . . . . . . . . . . . . . .23
Getting Help . . . . . . . . . . . . . . . . . . . . . . . . . . . .31
Who this Manual is for . . . . . . . . . . . . . . . . . . . . . .iii
Conventions Used in this Document . . . . . . . . . . .iii
Related Documentation and Software . . . . . . . . . .iii
viewLinc Aware Service . . . . . . . . . . . . . . . . . . . .1
Installing Drivers . . . . . . . . . . . . . . . . . . . . . . . . . .3
Discover Devices . . . . . . . . . . . . . . . . . . . . . . . . . .8
Network Configuration Settings . . . . . . . . . . . . . .11
IP Settings . . . . . . . . . . . . . . . . . . . . . . . . . . . . . .11
Ethernet Settings . . . . . . . . . . . . . . . . . . . . . . . . .13
Serial Port Settings . . . . . . . . . . . . . . . . . . . . . . .13
Device Information . . . . . . . . . . . . . . . . . . . . . . .16
Administrator Password . . . . . . . . . . . . . . . . . . .16
Session Timeout Period . . . . . . . . . . . . . . . . . . .17
Connections . . . . . . . . . . . . . . . . . . . . . . . . . . . .20
Power Settings . . . . . . . . . . . . . . . . . . . . . . . . . .21
Backup/Restore . . . . . . . . . . . . . . . . . . . . . . . . . .23
Updating Software . . . . . . . . . . . . . . . . . . . . . . . .26
Factory Default Settings . . . . . . . . . . . . . . . . . . .27
Restarting the vNet Device . . . . . . . . . . . . . . . . .29
vNet User’s Guide i
Page 4

ii VAISALA
Page 5

About this Manual
The Vaisala vNet Power over Ethernet Device User Guide
includes the information you need to install, configure and
operate your vNet Device with a Vaisala Veriteq Logger.
Who this Manual is for
This manual is for administrators who will install and configure
vNet Devices for use with a Vaisala Veriteq Logger, and Vaisala
Veriteq viewLinc or Vaisla Veriteq vLog software.
Learn how to:
• Configure IP and Ethernet
information.
Set administrator passwords.
•
• View PCs connected to your vNet Device
Back up and restore vNet Device configuration informati o n .
•
• Update or restart a vNet Device.
Conventions Used in this Document
This document uses the following conventions:
• A sequence of actions is indicated by a list sepa
vertical lin
“From the vNet Configuration and Management interface,
choose
• Menu selections, items you select, the names of
tabs
e. For example:
Configuration | Network | IP Settings”
are shown in
bold.
settings, and vNet Device
.
rated by a
buttons and
Related Documentation and Software
For a quick overview of vNet Device installation steps, refer to the
vNet Quick Start Guide (included with your vNet Device).
vNet User’s Guide iii
Page 6

To set up individual Loggers, refer to your Logger-specific User
Guide, or Vaisala Veriteq vLog and Spectrum software online
Help and User Guides.
Once your Loggers and vNets are installed and configured, refer
to the Vaisala Veriteq viewLinc User Guide or online Help to
learn more about:
• Viewing Logger data
• Setting and acknowledging alarms
•Graphing Logger data
• Generating Reports
iv VAISALA
Page 7

Vaisala vNet PoE Network Device
Welcome to the Vaisala vNet User’s Guide. This guide provides
you with the information you need to install, configure and
operate a vNet Device.
The vNet PoE (Power over Ethernet) Network Interface is part of
the Vaisala Veriteq Continuous Monitoring System, which is
made up of both software components (including Vaisala Veriteq
viewLinc and vLog), and hardware components (Vaisala Veriteq
Loggers, a PC with a supported Web browser, vNet Devices).
After you install and configure your vNet Device(s), refer to the
viewLinc and vLog User’s Guides for information about how to
start monitoring data.
viewLinc Aware Service
To save time installing and configuring your vNet Devices, enable
the viewLinc Aware Service, available in viewLinc 4.3 and higher.
The viewLinc Aware Service allows you to automatically install
drivers and set configuration parameters for vNet Device models
with serial number 1411xxxx or Firmware 1.4, and higher.
Refer to the viewLinc User’s Guide for more information.
Setting Up a vNet Device
There are three stages involved in setting up a vNet Device on
your network: connecting your Logger to a vNet Device, installing
vNet Device Drivers, and identifying vNet Devices on your
network.
Before connecting a Vaisala Veriteq Logger to a vNet Device:
• If you are mounting a vNet Device on a wall to hold a built-in
fan logger model, ensure the vNet Device is in the upright
position (the arrow on the vNet Device bed pointing up ^).
• Use the wall anchors and screws provide d for use with t he vNet
Device mounting brackets.
vNet User’s Guide 1
Page 8

Important: Do not drop the Device as the impact may dam-
age it.
To connect a Logger to a vNet Device:
1
Remove protective label on the bottom or back of the Logger.
2 Slide the Logger as far right as possible towards the two tabs
before pushing down into the vNet Device bed (you should
hear a ‘click’).
Note: If your Logger has an internal temperature channel, it
must be connected to a vNet Device with a built-in
fan mechanism.
Figure 1: Connecting a Logger to a vNet Device
3
Insert the power supply, if required (if your network supports
Power over Ethernet, you do not need to connect to an
external power supply). To ensure a secure connection, insert
2 VAISALA
Page 9

the power supply barrel-end connector into the Device and
turn 1/4 to the right (Figure 2).
Figure 2: Connecting to an external power supply
• When power is supplied to the vNet Device, the red
power LED will blink for 7-8 seconds, then stay on.
• When a network connection is made, the LNK LED will
light up and stay on, and the ACT LED will blink
intermittently.
Installing Drivers
Device drivers are required on each PC to which a vNet Device is
connected. This allows Vaisala Veriteq software (viewLinc and
vLog) to communicate with the Loggers attached to the vNet
Devices on your network.
Your vNet installation CD provides you with two device drivers: a
device driver for vNet Devices which are installed on the same
subnet as your PC, and a device driver for vNet Devices on a
different subnet. If your PC is on a different subnet than the vNet
Device, see page 6.
Note: If you use viewLinc 4.3 or higher, and are installing
vNet devices with serial number 1411xxxx or
Firmware 1.4, or higher, enabling the viewLinc Aware
Service ensures device drivers are installed
automati-cally. Refer to the viewLinc User’s Guide to
learn how to enable the viewLinc Aware Service.
vNet User’s Guide 3
Page 10

Before you start:
• Obtain an IP address for each vNet Device from your IT
department. They should either be reserved IP
addresses
supplied by DHCP, or static IP addresses (recommended). If
the IP addresses are reserved, the DHCP server must be
updated before you proceed with the installation.
• Write down the MAC address of the vNet Device (addre
ss is
found on the side of the vNet Device above the serial number).
• Modify Firewall settings:
•Allow the dgrunwiz.exe and dgcfgwiz.exe programs
receive incomi
•U
nblock UDP port 2362
224
.0.5.128, as these are used by device discovery.
To install drivers for vNet Devices on the same subnet:
Note: vNet Devices are installed with Digi Driver software
(all Setup Wizard screens refer to Digi Drivers).
1 Insert the Vaisala vNet and Digi Device Drivers CD into the
ng network connec
and multi-cast address
tions.
PC.
If the Software Installation menu does not display automati-
cally, click
D:\setup.exe (replace ‘D’ with the drive letter of your CD-
ROM drive), then click
Start on the Taskbar, then select Run. Type
OK. The Software Installation window
displays.
2 To check for the most recent updates to the software
installation, click
Readme
3 In the Software Installation window, click Device Setup
Wizard
.
, then connect the vNet Device to your network.
Documentation Index, then click vNet PoE
If the vNet Device and your network both support Power over
Ethernet, an external power supply is not needed. Otherwise,
connect the power supply barrel plug into the vNet Device
(see Figure 2 on page 3), and plug the power supply into a
wall outlet.
4 When the Welcome to the Digi Device Setup Wizard screen
displays, click
Next.
to
4 VAISALA
Page 11

On the Discover Device window, scroll down the device list
5
until you find the MAC address of the vNet Device you are
installing (on the side of the vNet Device above the serial
number). If the vNet Device does not appear in the list, wait a
few seconds, then click
Next.
click
6 On the Configure Network Settings screen, specify the IP
Refresh. Select the vNet Device, then
settings:
• If DHCP will be used to supply a reserved or dynamic IP
address, select
DHCP
, then click Next.
• If a static IP address will be assigned to the vNet
select
Use the following IP settings, enter the desired IP
Obtain IP settings automatically using
Device,
address, Subnet Mask, and Default Gateway, then click
Next.
7 From the Select Scenario List, select RealPort (COM Port
Redirection)
, then click Next. Select Custom Configuration if
you want to manually set all parameters using the vNet
Configuration web interface (not recommended).
8 Ensure the Install Digi RealPort on this computer checkbox is
checked, click
Next, then click Next on the summary screen.
Wait for the new settings to be saved to the vNet Device. This
may take up to 3 minutes, depending on the Device.
9 Optional: Enter a description for the vNet Device, then click
Next.
10 If required, enter the system username (root) and the default
password (
dbps). You can change the device password later.
After a short delay, a list of all installed vNet Devices that use
the RealPort driver, displays in the Command Prompt window. Record the COM port number(s) of the vNet Device(s)
you installed (you will refer to these numbers when using
Vaisala software). You can close the Command Prompt window by selecting the title bar, then pressing any key on the
keyboard, or click the X in the top right corner.
Refer to, “Configuring vNet Devices” on page 9, for further
instructions on opening the web-based interface to change the
password or other settings.
vNet User’s Guide 5
Page 12

To install drivers for Devices on a different subnet:
Note: vNet Devices are installed with Digi Driver software
(all Setup Wizard screens refer to Digi Drivers).
1 Insert the Vaisala vNet and Digi Device Drivers CD into the
PC where the drivers are to be installed.
If the Software Installation menu does not display automati-
cally, click
D:\setup.exe (replace ‘D’ with the drive letter of your CD-
ROM drive), then click
2 To check for most recent updates to the software installation,
click
•
•
3 On the Software Installation window, click vNet RealPort
Setup
Start on the Taskbar, then select Run. Type
OK.
Documentation Index.
vNet PoE Readme - review for updates to information in
he User’s Guide.
t
Digi Documentation Index - select the desired document
for the Digi
Device you are using.
.
• If the Welcome screen asks you to ensure that the vNet
Device is powered up and connected to the network,
disregard the message and click
•If the
4 On the Select Device window, scroll to the bottom of the
Add a New Device option is displayed, select it, then
cl
Next.
ick
Next.
device list, wait until “Searching...” is no longer displayed,
<Device not listed>, then click Next.
select
5 On the Describe Device window, enter the Device Model
Name (this name is on the serial number label, for example,
CDL-VNET-P).
6 In the Network Settings area complete the following:
•Enter the
et
•S
•Set
Setup Wizard di
IP Address obtained from your IT Department.
No. Ports to 1.
Starting COM to the lowest COM port number that the
splays.
6 VAISALA
Page 13

Note: After the Device is installed, use the Windows Device
Manager to change assigned COM port number(s).
• Select the option, Wait for COM open request.
• Accept all other options at default settings.
7 Click Finish. If your vNet Device is not yet connected to the
network, or is not yet configured with the IP address you
entered in step 6, a message indicates that no vNet Device
could be located. Click
8 Repeat steps 4 through 7 for any additional vNet Devices you
Yes to proceed.
want to install. Do not continue with step 9 until all vNet
Devices are installed.
9 Wait for the Setup Wizard to finish (this could take up to
3 minutes), then click
Finish.
After a short delay, a list of all installed vNet Devices that use
the RealPort driver displays in the Command Prompt window. Record the COM port number(s) of the vNet Device(s)
you installed (you will refer to these numbers when using
Vaisala software).
10 Close the Command Prompt window.
If any of the vNet Devices you installed drivers for are not yet
connected to the network, connect them to an open Ethernet port
on the desired subnet of your network. If the vNet Device and
your network both support Power over Ethernet, you do not need
an external power supply. Otherwise, connect the power supply
barrel plug into the vNet Device (see Figure 2, “Connecting to an
external power supply” on page 3) and plug the power supply into
a wall outlet.
If all of the vNet Devices you installed are using IP addresses
reserved with DHCP, go to the “Configuring vNet Devices” on
page 9 for further instructions on opening the web-based
interface to change the password or other settings. However, if
one or more of the vNet Devices are to have static IP addresses
assigned, repeat steps 3 to 10.
vNet User’s Guide 7
Page 14

Discover Devices
The Device Discovery function ensures that all vNet Devices
connected to your network are identified by viewLinc or vLog
software with a reserved or static IP address.
Note: If you use viewLinc 4.3 or higher, and are installing
vNet Devices with serial number 1411xxxx or
Firmware 1.4 or higher, the viewLinc Aware Service
ensures vNet Devices are discovered automatically
(see “viewLinc Aware Service” on page 1). Refer to the
viewLinc User’s Guide to learn how to enable the
viewLinc Aware Service.
Before you start, ensure your firewall software settings are
adjusted, as described in the section, “Connecting to an external
power supply” on page 3.
To complete device discovery:
Insert the Vaisala vNet and Digi Device Drivers CD into a PC
1
on the same subnet as the Device(s) you installed.
If the Software Installation menu does not display automati-
cally, click
D:\setup.exe (replace ‘D’ with the drive letter of your CD-
ROM drive), then click
2 On the Software Installation menu click Device Discovery
Install
3 On the Destination Location window, select the destination
for the discovery program to install, click
again, and then click
4 From your desktop select Start | Programs | Digi | Digi Device
Discovery
vNet Devices found on this subnet.
5 Scroll down the device list until you find the MAC address of
your vNet Device (MAC address is found on the side of the
vNet Device above the serial number, or on the bottom of the
Digi Device).
Start on the Taskbar, then select Run. Type
OK.
, on the Welcome window, click Next.
Next, click Next
Finish.
. The Device Discovery program displays a list of all
8 VAISALA
Page 15

If the vNet Device does not appear in the list, wait a few seconds, then click
Device Tasks area, click Configure network settings.
6 To change network settings, on the Configure Network
Settings
window, select Manually configure network settings,
Refresh view. Select the Device, then, in the
then enter the IP Address, Subnet Mask, and Default
Gateway values for this vNet Device. Click
7 On the Device Tasks menu click Restart device, then click
Restart. Wait until the vNet Device restarts and the device list
updates.
8 Repeat steps 5 through 7 for each additional vNet Device.
Configuring vNet Devices
The vNet Device has a web-based vNet Configuration and
Management interface which allows you to make configuration
changes, restore default settings, and more. It is recommended
that you log in to this interface to change the default password.
If you have enabled the viewLinc Aware Service in viewLinc,
for vNet devices with serial number 1411xxxx or Firmware 1.4,
or higher:
• Configuration is completed automatically for all vNet Devices
on the same subnet as the viewLinc Server.
• For vNet Devices on a different subnet from the viewLinc
Server, you are only required to configure one vNet Device.
Additional vNet Devices are configured automatically.
T o launc h the vNet Conf igurati on and Ma nagement int erface from a
Web browser:
In a Web browser, enter the IP address of your vNet Device
1
(obtained from your IT administrator) or enter the NetBIOS
name. The default NetBIOS name is VERITEQXXXXXXXX
(X denotes the 8-digit serial number of the vNet Device). If
the vNet Device is configured with a TCP port for HTTP other
than the default value of 80, enter the port number after the
IP address or NetBIOS name, separated with a colon.
Save.
vNet User’s Guide 9
Page 16

For example:
http://192.168.1.58
http://VERITEQ09075101
http://192.168.1.58:8000
2 At the login screen, enter the user name: root.
3 Enter the default password: dbps. You can change this
password later (see “Administrator Password” on page 16).
4 Click OK. The vNet Configuration and Management screen
displays:
To launch the vNet Configuration and Management interface using
Digi Device Discovery:
Note: If the vNet Device is configured with a TCP port for
HTTP other than the default value of 80, you need to
launch the interface from a web browser.
1 From the Start menu select Digi | Digi Device Discovery | Digi
Device Discovery
2 Locate your vNet Device’s MAC address (found on the side of
.
your vNet Device) in the MAC address list, and double-click
on it to open the login screen.
3 Enter the user name: root.
4 Enter the default password: dbps. You can change this
password later (see “Administrator Password” on page 16).
10 VAISALA
Page 17
Click OK. The vNet Configuration and Management screen
5
displays.
Network Configuration Settings
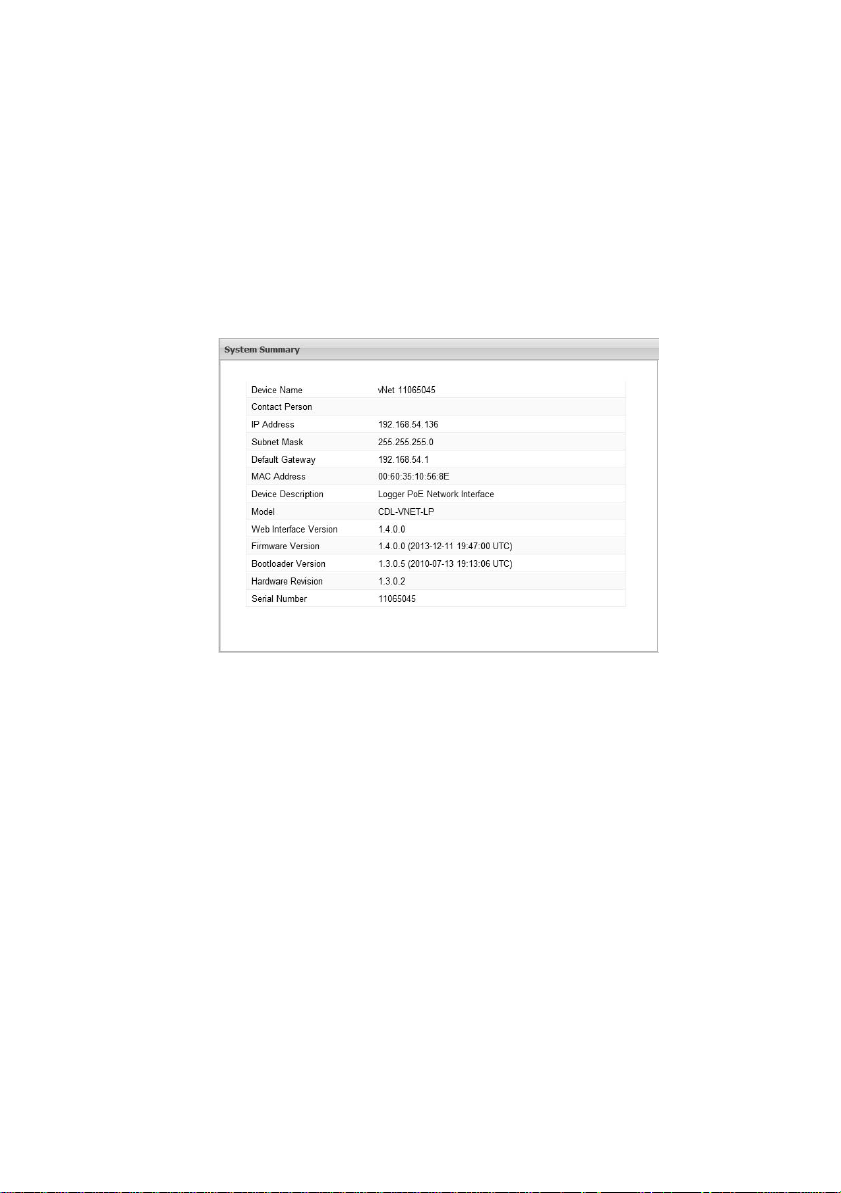
To view vNet Device IP settings:
Launch the vNet Configuration and Management interface.
1
2
The window displays the System Summary.
Note: This summary includes all the important information
about your vNet Device, such as Device name, contact
person, current IP address, MAC address, model
name, and firmware version.
IP Settings
There are three methods you can use to assign an IP address to a
vNet Device:
1 Configure a DHCP server to reserve a specific IP address (by
MAC address) and automatically assign it to the vNet Device.
2 Manually assign a static IP address to the vNet Device.
3 Allow a DHCP server to automatically assign any available IP
address to the vNet Device.
vNet User’s Guide 11
Page 18

Note: The vNet Device has DHCP enabled by default. If
your network does not have a DHCP server, manually
assign a static IP address.
To manually configure IP settings for your vNet Device:
From the vNet Configuration and Management interface,
1
choose
2 Select the option, Manually configure the IP Settings using
static values
Configuration | Network | IP Settings.
, then enter the IP Address, Subnet Mask, and
Default Gateway supplied by your IT administrator.
3 Click Apply. When prompted, click the here link to restart the
vNet Device.
NetBIOS Name
A NetBIOS name provides an easy way to connect to your vNet
Device through a Web browser, without having to remember the
assigned IP address.
To access a vNet Device using the NETBIOS name, simply enter
the name in the address line of your Web browser:
http://NetBIOSname
12 VAISALA
Page 19

The factory default NetBIOS name is VERITEQXXXXXXXX
(X denotes the 8-digit serial number of the vNet device).
T o change the NetBIOS name:
From the vNet Configuration and Management interface,
1
choose
2 In the NetBIOS name field you can enter up to 15 characters
Configuration | Network | IP Settings.
(using letters, numbers, and underscores). To avoid a
network conflict, do not assign the same name to another
vNet Device.
3 Click Apply. When prompted, click the here link to restart the
vNet Device.
Ethernet Settings
Depending on the network hub or switch the vNet Device is
connected to, you may want to change the Ethernet mode from
the default setting, half-duplex, to full-duplex.
To change the Ethernet settings for your vNet Device:
From the vNet Configuration and Management interface,
1
choose
2 Choose the desired Duplex Mode (Half or Full).
3 Click Apply. When prompted, click the here link to restart the
vNet Device.
Note: The speed setting is fixed at 10Mbit and cannot be
Configuration | Network | Ethernet Settings.
changed.
Serial Port Settings
The vNet Device communicates with the Vaisala Veriteq Logger
through a serial port; however, communication between the PC
and the vNet is through TCP ports.
Because TCP port numbers can change, use the Serial Port
Settings screen to configure the vNet Device to continue to use
vNet User’s Guide 13
Page 20

the same TCP port as the serial port (managed by serial port
redirector software).
Loopback Test Mode
Enable the Loopback Test Mode option when you want to
perform diagnostic tests to solve vNet communication problems.
When the Loopback Test Mode is enabled, the vNet enters a
diagnostic mode - data is received from the PC and transmitted
back to the PC, but not to the Logger. In diagnostic mode, you can
determine if a communication problem is a Logger issue, a vNet
Device issue, or an issue with the device driver on the PC. A
change to the Loopback Test Mode setting only takes effect when
the port is closed, then reopened.
Note: The Loopback Test Mode checkbox clears automati-
cally when the vNet Device restarts, or if more than
1 hour has elapsed since it was enabled (checked).
RealPort
The serial port on the vNet Device is accessed using the Digi
RealPort protocol. If a RealPort driver is installed on a PC, it can
be configured to access the serial port using the RealPort TCP
port number. The factory default setting is 771.
It is important to note:
• Only one RealPort client can connect to the vNet Device
me. Install the RealPort driver using a Vaisala vNet Device
ti
14 VAISALA
at a
Page 21

Driver installation disk (this ensures that the PC only connects
to the vNet device when trying to open the serial port).
• When the serial port is closed, the TCP connection is also
closed, allowing another client PC to connect to the vNet
Device.
• If the driver is installed from the Digi RealPort Setup option,
the RealPort driver on one client PC connects to the vNet
Device when the PC starts, and keeps the TCP connection
open. No other PC will have access to the vNet Device.
Raw TCP
You can also access the serial port on a vNet Device using generic
third-party Ethernet-to-serial port redirector software. These
applications can send and receive data using the Raw TCP port
number. The factory default setting is 9761.
When using the serial port in Raw mode, the client PC can only
send and receive data. There is no access to serial port settings
such as baud rate or control lines (the serial port is automatically
set to 19200 bps, 8 data bits, no parity bit, 1 stop bit).
To set the Serial Port settings for your vNet Device:
From the vNet Configuration and Management interface,
1
choose
2 Enter new port numbers.
3 Click Apply. When prompted, click the here link to restart the
Configuration | Network | Serial Port Settings.
vNet Device.
T o allow multi-user RealPort access to a vNet Device:
Open the Windows Control Panel and double-click System.
1
2 On the System Properties screen, select the Hardware tab,
then click
3 On the Device Manager screen, open Multi-port serial adapters
Device Manager.
to find your adaptor.
4 Right-click on your adaptor name, then select Properties.
5 Select the Advanced tab, then click Properties.
6 Select the Network tab, then click Connection Settings.
vNet User’s Guide 15
Page 22

Check the Wait for COM open request before connecting to
7
device
checkbox, then click OK and close all open dialogs.
8 Repeat these steps for all client PCs that have this vNet
Device connected.
Note: With this option selected, you can access the data log-
ger connected to your vNet Device from multiple client PCs.
Device Information
The Device Information settings screen allows you to:
• Identify a contact person who will provide assistance in case of
a problem connecting with the web interface. Note that the
contact person information is stored in the vNet Device for
reference purposes only.
• Specify a name for your vNet Device to make it easy to locate
on your network. This name displays in the Name column of
the Digi Device Discovery screen (
Discovery
Hint: The default device name is VeriteqXXXXXXXX
To set the device information for your vNet Device:
From the vNet Configuration and Management interface,
1
choose
2 Enter the contact person for your vNet Device (name, phone
).
(X denotes the 8-digit serial number of the vNet
device).
Configuration | Network | Device Information.
number and/or email address, maximum 63 characters).
3 To change the vNet Device name, enter a description
(maximum 63 characters).
4 Click Apply.
Start | Digi | Digi Device
Administrator Password
For security purposes, you can change the administrator
password for your vNet Device. The password is case-sensitive,
16 VAISALA
Page 23

and must be 4 to 16 characters long. The default administrator
password is
Note: The administrator name, root, cannot be changed.
T o change the administrator password:
From the vNet Configuration and Management interface,
1
choose
2 In the Security Settings screen, enter and confirm your new
dbps.
Configuration | Security.
administrator password.
3 Click Apply. When prompted, click the here link to restart the
vNet Device.
The new password takes effect after the restart completes.
Session Timeout Period
In addition to passwords, another security feature you can apply
is a timeout period for the web interface session. The timeout
period specifies when the session will automatically close,
protecting you from others altering your vNet Device
configuration settings if you accidentally leave the Web session
open.
You can also specify the HTTP TCP port number used by Web
browsers to display the vNet Device’s Web interface. In most
circumstances you will not need to change the default HTTP TCP
port number (80), unless port 80 is blocked.
T o set the timeout period and HTTP port:
1
From the vNet Configuration and Management interface,
choose
2 In the Web Interface screen, choose to either select
(recommended) or deselect the option
timeout
3 Enter the session timeout period in minutes.
4 Enter the HTTP port you want to use (change the default, 80,
only if it is blocked).
Configuration | Web Interface.
End session after
.
vNet User’s Guide 17
Page 24

Click Apply. If the TCP port number was changed, a message
5
appears stating that the vNet Device needs to be restarted.
Click the
here link to restart the Device.
viewLinc Aware Service
If you have installed viewLinc 4.3 or higher, use the viewLinc
Aware Service page to automatically set the communication
parameters used to identify your vNet Device.
Note: To activate viewLinc Aware Service, you also need to
set the option in viewLinc. Refer to the viewLinc
User’s Guide to learn how to enable this option.
When installing vNets on the same subnet as viewLinc, enabling
the viewLinc Aware service ensures that drivers are installed
automatically.
When installing vNets on a different subnet from viewLinc,
simply configure one vNet and ensure the viewLinc Aware
Service is enabled. Each time an additional vNet is added, the
viewLinc IP address is passed to the new vNet, and drivers are
installed automatically.
To enable the viewLinc Aware Service for a vNet Device:
1
From the vNet Configuration and Management interface,
choose
Enable viewLinc Aware Service checkbox (enabled by
default).
2 Enter communication transmission intervals:
•
•
Note: If communication is interrupted, the vNet Device will
Configuration | viewLinc Aware Service then select the
Lookup Interval: Enter a time period, in seconds, the vNet
Device will use to initiate communications with viewLinc
(enter a number between 1 and 600; default is 120).
Followup Interval: Enter a time period, in seconds, the vNet
Device will use to maintain communications with viewLinc
(enter a number between 1 and 3600; default 600).
attempt to reinstate communications with viewLinc
18 VAISALA
Page 25

using the Lookup Interval and Followup Interval, on
an on-going cycle.
3
Specify communication channel and address:
•
viewLinc UDP Port: Accept the default port number, 9065,
unless viewLinc uses a different port number. This number
may change during regular operation.
•
viewLinc IP Address: Enter the viewLinc server IP address.
This number may change during regular operation.
4 Click Apply to save your changes. The vNet Device uses the
new settings immediately.
Managing Connections and Network Statistics
The vNet Configuration and Management interface includes a
Connections table that shows which computers are, or have been,
connected to this vNet Device.
The Connections screen also includes a Network Statistics table
that monitors network activity.
vNet User’s Guide 19
Page 26

Connections
To see the Connections and Network Statistics tables:
From the vNet Configuration and Management interface,
1
choose
Network Statistics tables appear:
2 Click one of the Refresh buttons to update the list to show the
current status.
Connections Table
Use the Connections table to find out if a PC is holding the serial
port on the vNet Device open too long, how many PCs are
accessing the serial port, or if the Web interface is being accessed
from another computer.
Only the six most recent connections are shown. Restarting the
vNet Device clears the list.
Management | Connections. The Connections and
20 VAISALA
Page 27

Network Statistics Table
Use the Network Statistics table to monitor the network activity:
•
Accepted Rx Packets: The number of received Ethernet packets
that were accepted for further processing.
•
Rejected Rx Packets: The number of received Ethernet packets
that were rejected for various reasons, such as protocol not
supported, multicast address not supported, or packet errors.
•
Rx Overrun Errors: The number of times a receive overrun was
detected, i.e., one or more packets were dropped because the
receive buffer was already full with previously received packets
that had not yet been processed.
•
Transmitted Packets: The number of Ethernet packets that
were transmitted by the vNet Device.
•
Stale Connections: The number of times a TCP connection for
RealPort or Raw TCP was closed because it was “stale” or “halfopen”.
•
Last Restart Date: The date/time when the vNet Device was last
restarted.
Note: Restarting the vNet Device will reset the network sta-
tistics counters to zero, and update the last restart
date.
Power Settings
To view current settings such as fan speed and power supply
voltage, from the vNet Configuration and Management Interface,
choose
Management | Power.
Current settings display. You may be able to change some of these
settings, depending on the vNet Device model.
If the power supply input voltage and fan speed are displayed,
click
Refresh to update the values.
vNet User’s Guide 21
Page 28

Setting the System Fan
Some vNet Devices are equipped with an internal fan. This fan is
provided to cool the internal electronics so th ey do not affect dat a
logger measurements. If the Logger connected to your vNet
Device does not include any internal measurement Channels, you
may be able to turn the fan off if this option is supported by the
vNet Device model (if available, this option displays on the Power
Settings screen). By default, the fan is turned ON.
Note: If your vNet Device is powered using Power over
Ethernet, the fan must be turne d ON. The P ower over
Ethernet (PoE) standard requires that a minimum
amount of load current be drawn from the supply; the
fan provides this minimum load.
To turn the system fan on or off:
From the vNet Configuration and Management interface,
1
choose
2 In the Power Settings screen, use the drop-down list to select
On or Off for the Fan Setting option.
3 Click Apply.
Management | Power.
15V Loop Power Excitation
The vNet Device may include a 15V loop power output, which
allows you to provide power to a sensor or transducer connected
to a Vaisala Veriteq Logger recording 4-20 mA currents or DC
voltage signals.
If your vNet device is equipped with this feature, the option to
enable or disable loop power displays on your screen.
To enable or disable 15V Loop Power Excitation:
From the vNet Configuration and Management interface,
1
choose
2 In the Power Settings screen, check or uncheck the Enable
15V Loop Power Excitation
Management | Power.
checkbox to enable or disable loop
power.
3 Click Apply.
22 VAISALA
Page 29

vNet Device Utilities
Backup/Restore
It is recommended that you save your current vNet Device
configuration settings to a backup file, so they can be restored at a
later time. You can also use this backup file to save time when
configuring other vNet Devices (see page 25).
When restoring vNet Device settings using a configuration
backup file that was created by a different vNet Device, consider
the following:
• The configuration backup file is a plain text file that can be
edited.
• You can remove items from the configuration backup file if you
do not want to change specific settings (such as NetBIOS
name).
• There are vNet Device-specific items in the configuration
backup file that are for informational purposes only and do not
get applied when the file is restored (such as serial number,
MAC address, model name and description).
Item Configuration
UseDhcp • When UseDhcp = true, DHCP is enabled and the
IpAddr The IP address used if UseDhcp = false.
Subnet-
Mask
Gateway-
Addr
Table 1: Configuration Backup File
vNet User’s Guide 23
vNet Device tries to automatically acquire IP settings.
• When UseDhcp = false, the vNet Device uses the
user-defined IP address, Subnet mask and Gateway
items in the configuration file.
The Subnet mask used if UseDhcp = false.
The Gateway address used if UseDhcp = false.
Page 30

Item Configuration
NetBiosName
EthDuplex The Ethernet mode the vNet Device uses on the net-
CloseTimeout
IdleTimeout The timeout value in minutes (1 to 120) used if the Clos-
HttpPort The TCP port number the vNet Device uses to display
DeviceName
Contact An informational description saved in the vNet Device.
RealPort The TCP port number the RealPort driver uses to
RawPort The TCP port number the Raw TCP driver uses to
The NetBIOS name used to access the vNet Device.
The name must be 1 to 15 characters long (you can use
any alphanumeric combination and the underscore
character, _ ).
work on which it is installed. Valid duplex values are
Half or Full.
The control setting to enable or disable the web interface idle timeout. Valid values are true or false.
eTimeout = true.
the web interface.
The vNet Device name displayed in the Digi Device Dis-
covery software. The name can be up to 63 characters
in length.
The description can be up to 63 characters in length.
access the serial port on the vNet Device.
access the serial port on the vNet Device.
EnableFan The control setting for the vNet Device fan. V alid values
Enable15V The control setting to enable or disable the 15V loop
are on or off.
power supply output. Valid values are true or false.
Table 1: Configuration Backup File
To save configuration settings:
From the vNet Configuration and Management interface,
1
choose
Utilities | Backup/Restore.
2 Select the Backup tab and click Backup.
24 VAISALA
Page 31

At the File Download prompt, click Save.
3
4 Choose a location where you want to save the file and specify
a file name. The default file name is
vNetConfigBackupXXXXXXXX (X denotes the 8-digit serial
number of the vNet device).
5 At the Download Complete prompt, click Close.
T o restore settings from a previously saved configuration backup
file:
From the vNet Configuration and Management interface,
1
choose
2 On the Restore tab, click Browse to locate the configuration
file to restore, then click
3 Click Apply.
Utilities | Backup/Restore.
Open.
• If a message appears stating that the vNet Device needs to
be restarted, click the
here link to restart the Device.
• If you do not need to restart the Device, click the browser’s
Refresh button to update the Web interface with the new
values.
T o configure another vNet Device from a backup file:
Open the configuration backup file in a text editor (such as
1
Notepad or Wordpad).
2 Edit the file by modifying lines or deleting lines (refer to
Table 1, “Configuration Backup File” on page23, for a list of
editable lines).
3 Save the modified file with a different name but the same file
extension (.txt)
4 Locate the new vNet Device on your netwo rk (St art | Digi | Digi
Device Discovery | Digi Device Discovery
5 Select the Device, then click Open web interface to open the
).
vNet Configuration and Management interface.
6 Choose Utilities | Backup/Restore.
7 On the Restore tab, click Browse to locate and select the
modified configuration file, then click
Open.
vNet User’s Guide 25
Page 32

Click Apply.
8
• If a message appears stating that the vNet Device need
be restar
ted, click the
here link to restart the Device.
• If you do not need to restart the Device, click the brow
Refresh button to update the Web interface with the new
s to
ser’s
values.
Updating Software
You may need to update the vNet Device application software if a
problem is identified, or if ne w features are available. You can
update the application Firmware, the Boot Loader, or the Web
interface.
Important: Only update the vNet Device when instructed to
do so by a Vaisala representative, and ensure the
update is complete before unplugging any cables.
Communication with the Logger attached to the
vNet Device is disrupted during the update.
To update the vNet Device:
From the vNet Configuration and Management interface,
1
choose
2 In the Update screen, from the drop-down list, select Boot
Loader
3 Click Browse to locate and select the update file provided by a
Vaisala representative, then click
4 Click Apply. Updating the Boot Loader or Firmware
completes in about 1 minute.
The vNet Device restarts automatically, and the Web inter-
face reloads (it takes about 1 minute for a Web interface
update to complete and the new Web interface to load).
Utilities | Update Firmware.
, Firmware or Web Interface.
Open.
26 VAISALA
Page 33

Factory Default Settings
You may need to restore the vNet Device configuration to factory
default settings if you:
• Forgot the administrator password.
• Changed the TCP port for HTTP but don’t remember what it is.
• Want to remove all custom configuration changes.
Before restoring factory default settings, you must choose
whether or not you want to keep the IP settings and administrator
password you have already set (recommended).
Important: If you do not check the option to keep the current
IP settings, DHCP is automatically enabled. This
could result in the vNet Device acquiring a new IP
address if it had previously been configured with a
static IP address. If this happens, you will need to
rediscover the vNet Device using the Digi Device
Discovery software (Start | Digi | Digi Device
Discovery).
You can restore default settings on the vNet Device using the web
interface or from the vNet Device itself using the restart button.
To restore factory default settings using the Web interface:
1
From the vNet Configuration and Management interface,
choose
2 To keep the IP address settings and administrator password
but reset all other settings to the factory defaults, select the
option,
3 If you do not want to keep IP address settings, clear the
checkbox.
Note: If you do not keep IP address settings and password,
Click Apply.
4
Restoring factory default settings takes about 45 seconds to
complete. The vNet Device restarts automatically and the web
interface reloads.
Utilities | Factory Default Settings.
Keep IP Settings and Administrator Password.
the IP settings will revert to DHCP, and the administrator password will revert to ‘dbps’.
vNet User’s Guide 27
Page 34

To manually restore factory default settings:
On the vNet Device itself, press and hold the restart button
for at least five (5) seconds (see Figure 3, “Restart button on
vNet Device,” on page 30).
Important: There is no warning before the factory default set-
tings are restored.
List of Factory Default Settings
For an explanation of each setting shown below, refer to Table 1,
“Configuration Backup File” on page 23.
These configuration settings are returned to factory default
settings if the
Keep IP Settings and Administrator P assword option
is checked:
Item Setting
RealPort 771
RawPort 9761
IdleTimeout 5
CloseTimeout True
DeviceName vNet XXXXXXXX, where “X” is the 8-
digit serial number of the vNet Device
Contact (blank)
Enable15V Off (if installed)
EnableFan On (if installed)
viewLinc Aware Enabled True
viewLinc Aware Lookup
Interval
viewLinc Aware Reinstate
interval
120 seconds
600 seconds
Table 2: Factory Default Settings not including IP Settings and
Administrator Password
28 VAISALA
Page 35

Item Setting
viewLinc Aware Out Port 9065
viewLinc Aware IP Address 0
Table 2: Factory Default Settings not including IP Settings and
Administrator Password
If the Keep IP Settings and Administrator Password option is
unchecked, these additional items are reset to their factory
default settings:
Item Setting
UseDhcp True
IpAddr 0.0.0.0
HttpPort 80
SubnetMask 255.255.255.0
GatewayAddr 0.0.0.0
NetBiosName VERITEQXXXXXXXX, where “X” is the
EthDuplex Half
Password dbps
8-digit serial number of the vNet Device
Table 3: Factory Default IP Settings and Administrator Password
Restarting the vNet Device
Sometimes it is necessary to restart the vNet Device for new
configuration settings to take effect. If restarting is necessary, you
are prompted to restart using the link appearing at the top of your
Web browser.
vNet User’s Guide 29
Page 36

The restart process takes approximately 15 seconds to complete.
During this time the vNet Device is unavailable. The vNet
Configuration and Management interface takes about 1 minute to
reload after restarting.
Important: Restarting the vNet Device will disconnect all con-
nected clients and close their sessions. Closing a
connection to a client disrupts communication
between the client and the Logger that is attached
to the vNet Device.
You can restart the vNet Device from the vNet Configuration and
Management interface or from the vNet Device itself.
To restart the vNet Device using the Web interface:
From the vNet Configuration and Management interface,
1
choose
2 From the Restart Device screen, click Restart.
3 At the Restart prompt, click Yes.
To manually restart the vNet Device:
Utilities | Restart Device.
On the vNet Device itself, press and immediately release the
restart button (refer to Figure 3, “Restart button on vNet
Device”.)
Important: Do not press the restart button for more than one
(1) second, or you might restore all settings to
their factory default values.
Figure 3: Restart button on vNet Device
30 VAISALA
Page 37

Getting Help
If you need help, technical support is available from
Vaisala, 8 am-4 pm PST Monday through Friday.
In North America, please call 1-888-VAISALA.
For all other locations, please send an email or visit us
online:
Email: helpdesk@vaisala.com.
Web: www.vaisala.com.
vNet User’s Guide 31
Page 38

www.vaisala.com
 Loading...