

Page 1
USER'S GUIDE
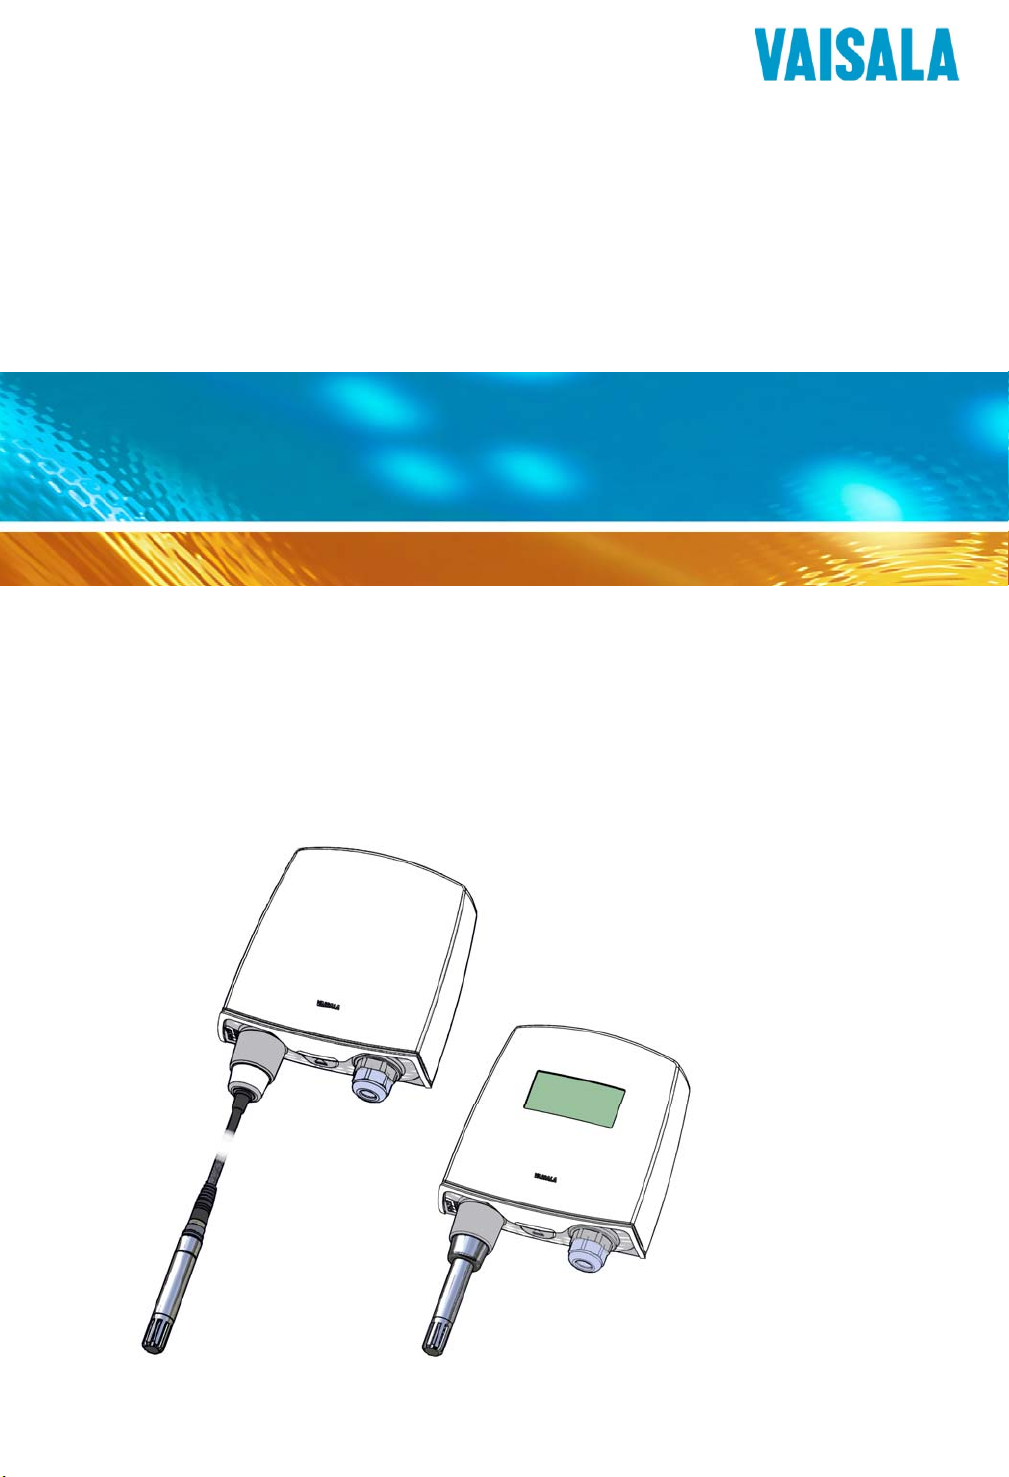
Vaisala HUMICAP® Humidity and
Temperature Transmitter
HMT140
English
Deutsch
Français
日本語
中文
M211488EN-C
Page 2

Page 3

Copyright
Copyright 2013 Vaisala Oyj. All rights reserved.
Trademarks
Vaisala Oyj, and Vaisala HUMICAP® Humidity and Temperature Transmitter HMT140 are trademarks of Vaisala Oyj.
Windows is a registered trademark of Microsoft Corporation.
All other trademarks referred to are the property of their respec-
tive owners.
Disclaimer and Limitation of Liability
Vaisala Oyj and its subsidiaries assume no responsibility for any
damage or loss resulting from the use of this manual.
Vaisala Oyj and its subsidiaries assume no responsibility for any
loss or claims by third parties which may arise through the use of
this software. Vaisala Oyj and its subsidiaries assume no responsibility for any damage or loss caused by deletion of data as a
result of hardware malfunction. Be sure to make backup copies of
all important data to protect against data loss.
Vaisala Oyj makes no warranties, either expressed or implied,
regarding Vaisala data loggers or software, its merchantability, or
its fitness for any particular purpose. The exclusion of implied
warranties is not permitted by some states. As such, the exclusion
may not apply.
The Vaisala HUMICAP® Humidity and Temperature Transmitter HMT140 has been tested using a variety of network systems.
However, the large number of possible hardware and network
configurations makes testing under every circumstance impossible. If you have trouble using any Vaisala software or hardware,
contact Vaisala Oyj.
Technical Support
For technical support in North America, please call 1-866-8613388, or for customers outside North America, see “Getting Help”
on page 2.
Email: helpdesk@vaisala.com
Page 4

Document part number: M211488EN-C
Release date: August 2013
No copying, distribution, publication, modification, or incorporation of this document, in whole or part, is permitted for commercial purposes without the express written permission of Vaisala
Oyj.
Page 5

Contents
CHAPTER 1
GENERAL INFORMATION . . . . . . . . . . . . . . . . . . . . . . . . . . . . . . . . . . 1
CHAPTER 2
PRODUCT OVERVIEW . . . . . . . . . . . . . . . . . . . . . . . . . . . . . . . . . . . . . 7
CHAPTER 3
INSTALLATION . . . . . . . . . . . . . . . . . . . . . . . . . . . . . . . . . . . . . . . . . . 13
About this Manual . . . . . . . . . . . . . . . . . . . . . . . . . . . . . . . . 1
Getting Help . . . . . . . . . . . . . . . . . . . . . . . . . . . . . . . . . . . . . 2
Safety . . . . . . . . . . . . . . . . . . . . . . . . . . . . . . . . . . . . . . . . . . 3
License Agreement . . . . . . . . . . . . . . . . . . . . . . . . . . . . . . . 4
Warranty . . . . . . . . . . . . . . . . . . . . . . . . . . . . . . . . . . . . . . . 4
Regulatory Compliances . . . . . . . . . . . . . . . . . . . . . . . . . . . 5
HMT140 Configuration Cable . . . . . . . . . . . . . . . . 5
Introduction to the HMT140 . . . . . . . . . . . . . . . . . . . . . . . . . 8
Models . . . . . . . . . . . . . . . . . . . . . . . . . . . . . . . . . . 8
Options and Accessories . . . . . . . . . . . . . . . . . . .8
Transmitter Components . . . . . . . . . . . . . . . . . . . 10
Installation Kit . . . . . . . . . . . . . . . . . . . . . . . . . . . 11
HMT140 Utility and Configuration Cable . . . . . . . 11
Mounting . . . . . . . . . . . . . . . . . . . . . . . . . . . . . . . . . . . . . . 14
Wall Mounting . . . . . . . . . . . . . . . . . . . . . . . . . . .14
Duct Installation . . . . . . . . . . . . . . . . . . . . . . . . . . 15
Optional Mounting Accessories . . . . . . . . . . . . . . 18
Wiring Diagrams . . . . . . . . . . . . . . . . . . . . . . . . . . . . . . . . 19
CHAPTER 4
SETUP AND OPERATION . . . . . . . . . . . . . . . . . . . . . . . . . . . . . . . . . . 23
Connecting to your Network . . . . . . . . . . . . . . . . . . . . . . . 24
Install the HMT140 Utility Software . . . . . . . . . . .24
Set up the HMT140 . . . . . . . . . . . . . . . . . . . . . . .25
Configure the HMT140 to your Network . . . . . . . 25
Custom Settings . . . . . . . . . . . . . . . . . . . . . . . . . . . . . . . . 28
Modify Transmitter Settings . . . . . . . . . . . . . . . . .28
Modify HMT140 Description . . . . . . . . . . . . . . . . 31
Check Transmission Status . . . . . . . . . . . . . . . . .31
M211488EN-C i
Page 6

HMT140 Function Modes . . . . . . . . . . . . . . . . . . . . . . . . . 33
Operating Modes . . . . . . . . . . . . . . . . . . . . . . . . .33
Transmission of Data . . . . . . . . . . . . . . . . . . . . .34
Transmit Attempts . . . . . . . . . . . . . . . . . . . . . . . . 34
Alarm-triggered Transmission . . . . . . . . . . . . . . . 35
Additional Settings . . . . . . . . . . . . . . . . . . . . . . . . . . . . . . 35
Change Input/Output Scale . . . . . . . . . . . . . . . . . 35
Save and Recall Settings . . . . . . . . . . . . . . . . . .36
Delete Saved Settings . . . . . . . . . . . . . . . . . . . . .36
Restart the HMT140 . . . . . . . . . . . . . . . . . . . . . . 36
Get General Information . . . . . . . . . . . . . . . . . . .36
Battery Usage . . . . . . . . . . . . . . . . . . . . . . . . . . . . . . . . . . 36
Viewing Battery Life Remaining . . . . . . . . . . . . .37
Units and Temperature . . . . . . . . . . . . . . . . . . . .37
Connection Performance . . . . . . . . . . . . . . . . . . .38
Advanced Options . . . . . . . . . . . . . . . . . . . . . . . . . . . . . . . 39
Passwords . . . . . . . . . . . . . . . . . . . . . . . . . . . . . .41
Set Up a New Channel . . . . . . . . . . . . . . . . . . . .42
Find Additional Networks . . . . . . . . . . . . . . . . . . .42
Test Network Connectivity . . . . . . . . . . . . . . . . . .43
Additional Program Parameters . . . . . . . . . . . . . . . . . . . . 44
CHAPTER 5
MAINTENANCE . . . . . . . . . . . . . . . . . . . . . . . . . . . . . . . . . . . . . . . . . . 45
Replacing the HUMICAP® RH Sensor . . . . . . . . . . . . . . . 46
Fixed and Remote Probe Models . . . . . . . . . . . .46
Removing and Fastening the Probe . . . . . . . . . . . . . . . . . 46
Fixed Probe Model . . . . . . . . . . . . . . . . . . . . . . .46
Remote Probe Model . . . . . . . . . . . . . . . . . . . . .47
Calibration and Adjustment . . . . . . . . . . . . . . . . . . . . . . . . 48
Battery Replacement . . . . . . . . . . . . . . . . . . . . . . . . . . . . . 49
APPENDIX
SPECIFICATIONS AND TROUBLESHOOTING . . . . . . . . . . . . . . . . . 51
Specifications . . . . . . . . . . . . . . . . . . . . . . . . . . . . . . . . . . 51
Transmitter Dimensions (Fixed Probe) . . . . . . .54
Transmitter Dimensions (Remote Probe) . . . . . . 55
ii VAISALA
Page 7

Troubleshooting . . . . . . . . . . . . . . . . . . . . . . . . . . . . . . . . . 58
HMT140 Operation Mode . . . . . . . . . . . . . . . . . . 58
INDEX . . . . . . . . . . . . . . . . . . . . . . . . . . . . . . . . . . . . . . . . . . . . . . . . . . 65
M211488EN-C iii
Page 8

iv VAISALA
Page 9

CHAPTER 1
GENERAL INFORMATION
Thank you for choosing the Vaisala HUMICAP® Humidity and
Temperature Transmitter HMT140.
About this Manual
This manual provides information for installing, operating, and
maintaining the Vaisala HUMICAP® Humidity and Temperature
Transmitter HMT140. It also details the operation of the HMT140
Utility software.
Contents of this Manual
• Chapter 1: General Information, provides safety and
regulatory information for the HMT140 series of transmitters.
• Chapter 2: Product Overview, provides inform ation about the
HMT140 features, models and accessories.
• Chapter 3: Installation, describes how to mount the HMT140
to a wall or duct, and illustrates different wiring options.
• Chapter 4: Setup and Operation, contains the information you
need to install and connect an HMT140 to your network using
the HMT140 Utility software and an HMT140 Configuration
Cable, and instructions on how to operate the HMT140
transmitter.
• Chapter 5: Maintenance, provides information required for
basic maintenance of the product.
• Appendix: Specifications and Troubleshooting, provides
additional technical data.
M211488EN-C 1
Page 10

Getting Help
Related Documentation and Software
For help setting up the HMT140 with basic configuration
requirements, consult the Vaisala HUMICAP® Humidity and
Temperature Transmitter HMT140 Quick Guide.
For help configuring the HMT140 with Vaisala Veriteq viewLinc,
consult the Vaisala Veriteq viewLinc Administrator’s Guide.
Getting Help
North America
Contact Vaisala Canada Inc, 8am - 4pm PST monday to Friday, 1866-861-3388 (or 605-273-6850) or email helpdesk@vaisala.com.
See also http://www.vaisala.com/en/lifescience.
For sales, pricing, quotations, or general information, please call 1800-273-8374 (or 604-273-6850).
Vaisala Headquarters (Finland)
Vanha Nurmijärventie 21
01670 Va ntaa
FINLAND
Industrial Instruments
Phone: +358 9 8949 2658
Fax: +358 9 8949 2295
Japan Service Center
42 Kagurazaka 6-Chome
Shinjuku-ku
Tokyo 162-0825
JAPAN
Phone: +81 3 3266 9611
Fax: +81 3 3266 9610
2 VAISALA
Page 11
Safety
Safety
China Service Center
Floor 2, EAS Building
No. 21, Xiao Yun Road, Dongsanhuan Beilu
Chaoyang District
Beijing 100027
CHINA
Phone: +86 10 5827 4100
Fax: +86 10 8526 1155
The Vaisala HUMICAP® Humidity and Temperature Transmitter
HMT140 delivered to you has been tested for safety and approved as
shipped from the factory.
Do not modify the unit. Improper modification can damage the
product or lead to malfunction.
Batteries
Remove batteries before shipping.
ESD Protection
Electrostatic Discharge (ESD) can cause immediate or latent damage
to electronic circuits. Vaisala products are adequately protected
against ESD for their intended use. However, it is possible to damage
the product by delivering electrostatic discharges when touching,
removing or inserting any objects inside the equipment housing.
M211488EN-C 3
Page 12

License Agreement
To make sure you are not delivering high static voltages:
• Handle ESD sensitive components on a properly grounded and
protected ESD workbench.
• When this is not possible, ground yourself to the equipment
chassis before touching the boards, or ground yourself with a
wrist strap and a resistive connection cord.
• When neither of the above is possible, touch a conductive part of
the equipment chassis with your other hand before touching the
boards.
• Always hold the boards by the edges and avoid touching the
component contacts.
Recycling
Recycle all applicable material. Dispose of batteries and the unit
according to statutory regulations. Do not dispose with regular
household refuse.
License Agreement
All rights to any software are held by Vaisala or third parties. the
customer is allowed to use the software only to the extent that is
provided by the applicable supply contract or Software License
Agreement.
Warranty
Visit our Internet pages for information about our standard
warranty terms and conditions: http://www.vaisala.com/en/
services/maintenance/Pages/warranty.aspx.
Please observe that any such warranty may not be valid in case of
damage due to normal wear and tear, exceptional operating
conditions, negligent handling or installation, or unauthorized
modifications. Please see the applicable supply contract or
Conditions of Sale for details of the warranty for each product.
4 VAISALA
Page 13
Regulatory Compliances
The Vaisala HUMICAP® Humidity and Temperature Transmitter
HMT140 is in conformity with the provisions of the following
directives/standards:
• FCC: U30-G2M5477 (FCC Part 15 SubpartB: 2008 Class B,
FCC CRF Title 47 Part 15 Subpart C)
• IC: 8169A-G2M5477 (IC RSS-210)
• CE: EU ID # 0681 (ETSI EN301 489-1 V1.8.1, 489-17 V2.1.1,
ETSI EN300 328 V1.7.1, EN55022 Class B, EN61000 4-2, 4-3,
4-6, 4-8, EN60950-1:2001+A11:2004)
• CAN ICES-3(B)/NMB-3(B)
• Wi-Fi Certified: WFA7649
• FCC 47 CRF Part 15-2011 Subpart B
• IC ICES-003:2004
• EN61326-1:2006
• EN61326-2-3:2006
• EN61000-3-2:2006+A1:2009+A2:2009
• EN61000-3-3:2008
• EN61326-1:2006
• MIC R 201-125765
• CMIIT ID: 2013DJ7129
Regulatory Compliances
HMT140 Configuration Cable
The HMT140 Configuration Cable complies with part 15 of the
FCC Rules. Operation is subject to the following two conditions:
• This device may not cause harmful interference.
• This device must accept any interference received, including
interference that may cause undesired operation.
M211488EN-C 5
Page 14

Regulatory Compliances
6 VAISALA
Page 15

CHAPTER 2
PRODUCT OVERVIEW
The Vaisala range of relative humidity measurement
instruments covers all the applications from ventilation to
process control in demanding conditions. For more
information about other Vaisala relative humidity
instruments, please contact your Vaisala representative or
visit www.vaisala.com.
This chapter provides general information about the
HMT140, including:
•Features
•Models
• Options and accessories
• Transmitter components
M211488EN-C 7
Page 16

Introduction to the HMT140
Introduction to the HMT140
The Vaisala HUMICAP® Humidity and Temperature
Transmitter HMT140 measures relative humidity and
temperature using the connected probe and analog signals –
RTD, Voltage, Current Loops and Boolean Contacts. It is
powered with three 3.6 volt DC batteries (or an optional 930VDC power supply), outputs data via wireless transmitter
and comes with or without an optional LCD display.
The HMT140 transmitter supports several different signal
measurements (channels), which are monitored in viewLinc:
• Relative Humidity (RH)
• Temperature (T)
•Switch Contact
• Voltage and Current.
Channel types are set at the factory during time of order.
Other wireless parameters can be changed at a later date
using an HMT140 Configuration Cable and HMT140 Utility
software.
Models
The following HMT140 models and options are available:
• HMT141: Vaisala Humicap Humidity and Temp Probe
(RH/T)
• HMT143: Dual RTD Temperature Inputs w/5M Probes
(-90C to 90C)
• HMT144: Voltage Inputs (0-5 VDC)
• HMT145: Voltage inputs (0-10 VDC)
• HMT146: Current Inputs (0-20 mA)
• HMT147: Boolean Inputs
• HMT148: RTD Temperature Input w/5M Probe &
Boolean Input
Options and Accessories
Humidity & temperature probe HMP110*
Humidity & temperature replacement probe HMP110R*
8 VAISALA
Page 17

Introduction to the HMT140
Humidity sensor HUMICAP180R
HMP110 Probe mounting flange 226061
HMP110 Probe mounting clamps, 10 pcs 226067
HMP110 Probe cable 3 m HMT140Z300
HMP110 Probe cable 5 mHMT140Z500
HMP110 Probe cable 10 m HMT140Z1000
Duct installation kit215619
Probe mounting flange226061
Boolean Switch Kit with Door Contact236319
Thermal Dampener Blocks236310SP
Replacement Batteries (Pack of 3)236318SP
External Power Supply 236081SP
HMP110 sensor protectioM211488EN-CM211488EN-Cn
Plastic grid filter DRW010522SP
Plastic grid with membrane filter DRW010525
Stainless steel sintered filter HM46670SP
*Separate order form required. Contact Vaisala sales at:
http://www.vaisala.com/en/contact/sales/Pages/
default.aspx
Fixed or Remote Probe
The HMT140 is available either with a fixed probe directly
attached to the transmitter housing or a remote probe with
different (3/5/10 m) cable lengths. Extension cables can be
easily cascaded in order to obtain longer reach, to a
maximum length of 10 m.
Interchangeable Probe
The HMP110 HUMICAP® relative humidity probe used in
the HMT140 transmitter is fully interchangeable. You can
easily remove the probe and replace it with a new one
without having to adjust the transmitter. You have the
following options when purchasing a new probe from
Vaisala:
• Order a new probe and keep your current one.
• Order a new probe and return the old one to Vaisala
(replacement probe).
M211488EN-C 9
Page 18
Introduction to the HMT140
Note:
Only probes that have a compatible digital output (VDIGI mode) can be used with the HMT140
transmitter. Compatible probes have the letter
"V" as the first letter in their order code. The
order code is written on the probe.
Optional Display
The HMT140 is also available with an optional graphical
128x64 pixel resolution LCD display. The display shows the
measurement results of selected parameters in selected units
(defined at the time of ordering). The parameters are
displayed simultaneously as two separate rows on the
display.
Transmitter Components
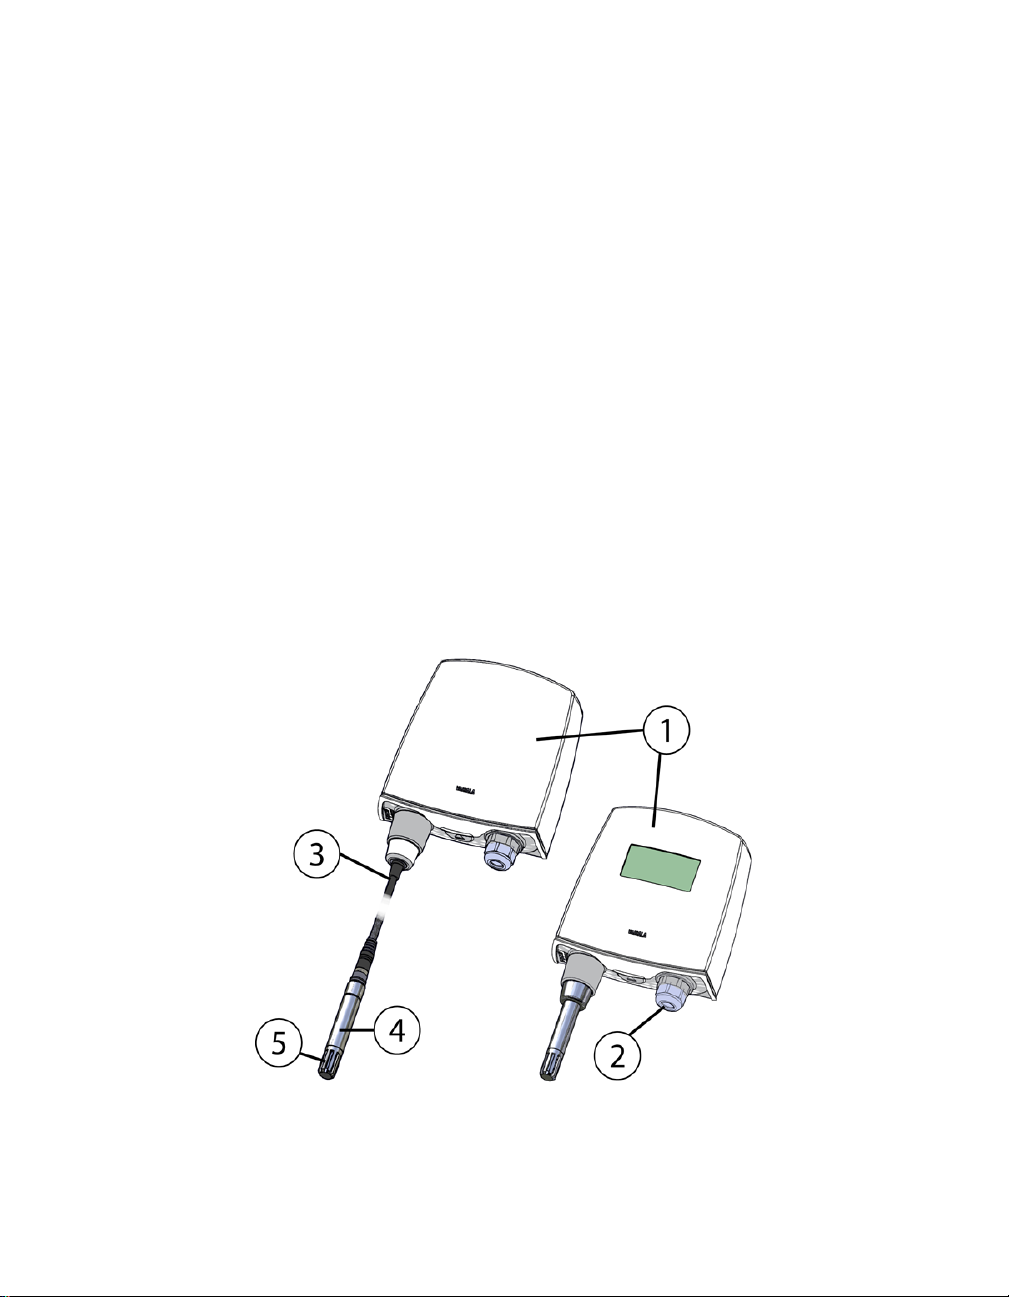
Figure 1 illustrates the main features of the HMT140. On the
left is a remote probe model without display, and on the right
is a fixed probe model with the optional display. The
numbers and arrows indicate the main components of the
transmitters.
Figure 1: HMT140 Features
10 VAISALA
Page 19

Introduction to the HMT140
The following numbers refer to Figure 1:
1
Transmitter enclosure
2 Cable bushing: cable gland.
3 Probe cable
4 HMP110 probe
5 Plastic grid filter
Installation Kit
The device is typically installed mounted on the wall with up
to four screws (not included). See Figure 2 on page 15.
For duct mounting, Duct Installation Kits are available as
accessories. See Options and Accessories, on page 8.
To help you position the screws correctly, use the Drilling
Template, available inside the back cover of the Quick Guide.
HMT140 Utility and Configuration Cable
To connect an HMT140 device to your network, you will need
to install the HMT140 Utility software and connect the device
to your PC with the configuration cable (see, Connecting to
your Network, on page 24).
M211488EN-C 11
Page 20

Introduction to the HMT140
12 VAISALA
Page 21

CHAPTER 3
INSTALLATION
This chapter provides the information you need to:
• Mount the HMT140 on a wall or duct
•Connect the HMT140 to your network
• Review optional mounting accessories
M21488EN-C 13
Page 22

Mounting
Mounting
Depending on your installation requirements, you may wish
to complete the network configuration and setup prior to
mounting (see, Chapter 4 Setup and Operation). Note that
you can complete the configuration and setup procedures
after mounting with a portable PC.
Note: To connect the HMT140 to your network
Wall Mounting
To mount the HMT140 on a wall:
Note: If mounting against a metal surface, be sure to
Open the HMT140 cover. Use your thumb to press and
1
hold the release tab located between the two glands (see
Figure 9 on page 19), then pull the cover out and up with
your other hand.
2 Make sure that the HMT140 is correctly aligned and
attach it directly to the wall with up to four screws (not
included in the package).
and view HMT140 data using viewLinc, you
require HMT140 Utility software and an
HMT140 Configuration Cable (shipped with
viewLinc).
keep a minimum of 2 mm between the metal and
the back of the device to ensure an uninterrupted
radio signal.
• Select the size and type of the fastening screws
according to the wall material (for example, wood or
stone). The diameter of the fastening screws is
typically between 3.5 and 4 mm.
14 VAISALA
Page 23
Mounting
Figure 2: Mounting Diagram
Note: It is strongly recommended that you use all four
screws; however, the HMT140 enclosure fastening holes are initially covered with a thin plastic
membrane, so less than four screws could be also
be used without sacrificing the ingress protection
(IP) class of the enclosure.
Duct Installation
The duct installation kit includes a plastic pipe with a flange
(Vaisala part#: 215619).
To install the HMP110 probe with the duct installation kit,
drill a hole into the duct wall, assemble the probe to the duct
installation kit, slide the probe head through the hole, and
attach the flange to the duct wall with four screws.
M21488EN-C 15
Page 24

Mounting
24
L
1
2
1
3
See “Probe Assembly with Duct Installation Kit” on page 16
for details.
Figure 3: Probe Installation
The following numbers refer to Figure 3:
1 Tension screw
Distance L can be adjusted and locked in place with the
tension screw.
Probe Assembly with Duct Installation Kit
Figure 4: Probe Assembly with Duct Installation Kit
16 VAISALA
Page 25

The following numbers refer to Figure 4:
4
2
1
2
3
Ø2
4
Ø3
.2
1 Probe (HMP110)
2 Duct installation kit
3 Probe cable
To assemble the probe:
Pass the probe cable through the plastic pipe of the duct
1
installation kit.
2 Connect the probe cable to the HMP110.
Mounting
Figure 5: Drilling Instructions
The following numbers refer to Figure 5:
1 Mounting screw
2 Tension screw
3 HMP110 assembled in duct installation kit plastic pipe
To attach the probe assembly to the duct:
Drill the holes for the duct installation kit as follows:
1
• Use a 24-mm drill bit to drill a hole in the wall.
• Use a 3.2-mm drill bit to make four holes for the
2 Mount the probe holder using the screws.
3 Adjust the depth of the plastic pipe and tighten the screw
installation screws (four ST4.2×16-C-Z DIN 7981
screws). The holes should be arranged in a square
around the 24 mm hole, at a distance of 42 mm from
each other.
to lock the probe in place.
M21488EN-C 17
Page 26

Mounting
Figure 6: Drilling specifications
Optional Mounting Accessories
Probe Mounting Flange
The probe mounting flange (Vaisala order code: 226061) is a
general purpose mounting flange for 12 mm diameter probes.
It can be used to hold the HMP110 probe in a through-wall
installation.
Note: The coaxial silicone plug that is delivered with
the flange is not suitable for use with the probe
cable of the HMT140.
Figure 7: Optional Probe Mounting Flange
Probe Mounting Clamp
The optional mounting clamp (Vaisala part #: 226067)
makes it easy to install the probe on the wall of the
measurement environment. The probe can be detached for
calibration simply by loosening the lower screw.
18 VAISALA
Page 27

Installing the entire probe in the measurement environment
prevents heat conduction to the sensor, and is the
recommended installation method.
Figure 8: Optional Probe Mounting Clamp
CAUTION: Attaching the probe mounting clamp to a con-
ductive wall material should be avoided, since
the potential galvanic connection to the power
supplies and uncontrolled earth current loops
could cause measurement errors or even dam-
age to an HMT140 transmitter (not the HMT141).
Wiring Diagrams
Wiring Diagrams
The following figures outline the components, wiring and
connections of the HMT140.
Figure 9: HMT140 Components Diagram
M21488EN-C 19
Page 28

Wiring Diagrams
Figure 10: RTD Wiring Diagram
Figure 11: RTD and Boolean Wiring Diagram
Figure 12: Boolean Wiring Diagram
20 VAISALA
Page 29

Figure 13: Voltage Wiring Diagram
Wiring Diagrams
Figure 14: Current Wiring Diagram
Figure 15: Power Supply Wiring Diagram
M21488EN-C 21
Page 30

Wiring Diagrams
22 VAISALA
Page 31

CHAPTER 4
SETUP AND OPERATION
This chapter will guide you during the setup of your HMT140 with
your network parameters. Here you will find the information you
need to:
•Configure the HMT140
• Operate the HMT140
• Customize the HMT140 for your network
M211488EN-C 23
Page 32

Connecting to your Network
Connecting to your Network
The HMT140 Configuration Cable allows you to connect an
HMT140 device to your PC. You can then configure the
device with your network settings using the HMT140 Utility
software (software and cable shipped with viewLinc).
Install the HMT140 Utility Software
The HMT140 Utility software configures and reads the
settings in the HMT140 that use 802.11b and 80211g wireless
networks. The address of the destination host, the wireless
network parameters, transmit period, and other important
network functions of the HMT140 are specified using the
HMT140 Utility. The HMT140 Utility also provides you with
access to tools for diagnosing connection problems.
Before you configure the HMT140, the HMT140 Utility
software must be installed on the PC. The driver is
compatible with Windows 2000, Windows XP, Windows 7,
and Windows Server 2003.
To install the HMT140 Utility:
Disconnect the HMT140 Configuration Cable if it is
1
already connected to your PC.
2 Insert the CD that came with the HMT140 Configuration
Cable, or download the software from www.vaisala.com.
3 Run the HMT140 Utility installation program
(HMT140UtilitySetup.exe).
4 Accept the license agreement terms, then click Next to
accept the installation default settings. The installation of
the driver may take several minutes.
5 After the software is installed, connect the HMT140
Configuration Cable to a USB port on your PC to
complete the installation. You are now ready to set up
and configure your device.
If you wish to remove the HMT140 Utility software at a later
date, use the uninstall function on your Windows Control
Panel.
24 VAISALA
Page 33

Connecting to your Network
Set up the HMT140
Once the HMT140 Utility software is successfully installed,
you can set up your data monitoring device.
To set up the HMT140 for the first time:
Ensure the HMT140 configuration Cable is not
1
connected to the PC.
2 Open the HMT140 case. Use your thumb to press and
hold the release tab located between the two glands (see
Figure 9 on page 19), then pull the cover out and up with
your other hand. Pry the case open with a slot
screwdriver if you are unable to open the case by hand.
3 Ensure the power switch on the device is in the OFF
position.
4 Install three lithium batteries (use only Vaisala 3.6V
Lithium Thionyl Chloride batteries, part#: 236318SP).
5 Ensure that the HMT140 Configuration Cable is not
connected to the HMT140.
6 Turn the power switch on the device to the ON position,
and wait for the setup process to complete (about five
seconds). LED light turns on, then off.
Configure the HMT140 to your Network
After you install the HMT140 Utility software and set up the
HMT140, use the HMT140 Configuration Cable to connect
and configure the HMT140 to your network.
Important:Do not connect the Configuration Cable to the
HMT140 configuration port unless the Configuration Cable is connected to a computer USB
port, the batteries are installed, and the power
switch is in the ON position.
The following steps provide you with standard network
settings. You can also set specific settings depending on your
network configuration. See “Custom Settings” on page 28.
To configure the HMT140 for your network with standard settings:
Ensure the case is open and the correct batteries are
1
installed (Vaisala part#: 236318S).
2 Turn on the HMT140 and wait five seconds to ensure the
startup process completes.
M211488EN-C 25
Page 34

Connecting to your Network
3 Plug the USB connector on the HMT140 Configuration
Cable to the computer, if it is not already connected.
4 From the start menu, open the HMT140 Utility.
5 Connect the end of the Configuration Cable labelled USB
Wi-Fi Programmer, to the 4-pin HMT140 CONFIG
header.
6 On the HMT140 Setup tab, click Retrieve to identify
the HMT140. The bottom left status bar will initially
read, Looking for sensor or USB programmer,
then, once the HMT140 is identified, the status bar will
read, Found USB Programmer.
7 Click Retrieve again to force retrieval of current settings
Note: The connected Transmitter type is identified in
the upper right corner of the Setup tab window.
The status bar is located at the bottom of the HMT140
Utility window. It contains the following panels:
Left panel: Displays the Configuration Cable status:
Found USB Programmer or Looking for USB Programmer.
26 VAISALA
Page 35

Connecting to your Network
Middle panel: Displays progress messages of the different actions: Update, Retrieve, Status, and Info.
Right panel: Displays a message when the parameters
on the Setup page have been modified and require saving.
8 If the IP address is static, uncheck the IP Address
Dynamically Assigned option and enter the network
parameters. Otherwise leave this checkbox checked.
Note: For additional IP address settings information
see, Check Transmission status on page 31.
9 Enter the parameters for the WLAN (wireless LAN
router settings).
10 Enter the Destination IP address/name and port
number of the host (these are the Vaisala viewLinc server
settings) to which the HMT140 will send information.
Note: If you do not know what information to enter for
steps 6-9, please request these parameters from
your network administrator.
Click the Sensor tab and select a Transmit Period
11
Time and number of Tries, or accept the default
settings.
12 Click Update.
13 Click the Status tab to check that the settings appear as
configured. Click Get if the settings do not appear
automatically.
14 Disconnect the HMT140 Configuration Cable from the
HMT140 and wait for eight seconds.
15 Press the SERVICE button inside the HMT140.
Optional: Enter a name for the saved settings on the
Setup tab in the Saved Settings field, then click the
disk icon to save. To configure custom settings for the
HMT140, refer to page 28. To configure additional
HMT140 devices, refer to the Vaisala viewLinc Administrator Guide.
Setup Consideration
If DHCP or DNS is being used, it is best to use local DHCP
and DNS servers rather than a DNS server on the internet.
The local servers will give better response times compared to
M211488EN-C 27
Page 36

Custom Settings
the remote servers and, as a result, help to conserve battery
life.
Custom Settings
Use the HMT140 Utility to make additional changes to a
device’s network configuration settings.
Modify Transmitter Settings
To modify Transmitter settings:
Ensure the case is open and the correct batteries are
1
installed. (Vaisala part#: 236318SP).
2 Turn on the HMT140 and wait five seconds to ensure the
startup process completes.
3 Plug the USB connector on the HMT140 configuration
Cable to the computer, if it is not already connected.
4 From the Start menu, open the HMT140 Utility.
5 Connect the end of the HMT140 Configuration Cable
labelled USB Wi-Fi Programmer, to the 4-pin
HMT140 CONFIG header.
6 On the HMT140 Utility Setup tab, click Retrieve to
identify the device.
7 On the Sensor tab, select from the following options:
Transmit Period: Select how frequently the HMT140
transmits data.
Tries: Select the number of transmission attempts per-
mitted for the specified Transmit Period.
Note: An active alarm overrides a specified Transmit
Period.
28 VAISALA
Page 37

Custom Settings
For example, if you select 15 minutes for the Transmit
Period, and 3 for the number of Tries, the device will
attempt to transmit every 15 minutes. If it cannot transmit, it will make 3 transmission attempts, then will go
into ‘sleep’ mode until the next scheduled transmit
period.
Logging Period: Specify how often the HMT140 will log
I/O into the log buffer.
Note: When setting up a new HMT140, you can click
Retrieve, to view current device settings.
Enable Beeper: Select the option to enable or disable the
button control of the Beeper (whether you want to be
able to turn the Beeper on or off with the push button on
the device). It is also possible to turn the Beeper on and
off by holding down the SERVICE button for approximately five seconds.
Note: The Beeper is enabled by default. There is no
external Beeper status indicator. It must be
enabled/disabled with the SERVICE button.
M211488EN-C 29
Page 38

Custom Settings
Enable Proximity Attention Sensor: Select this option
to enable or disable the proximity attention sensor. The
sensor is used to wake up the HMT140 and to cause the
HMT140 to send a data packet to the host.
Display On Time: Select the length of time the display
stays on when the HMT140 is battery-powered (choose a
minimum length of time to save battery power).
HMP110 Polltime: If your device uses an HMP110
Probe, select how frequently the HMT140 polls the
HMPT110 probe (leave at the default setting, two minutes).
Low Battery Alert: Specify at what percentage of battery
life remaining you want the Low Battery indicator to display and notify the host software. For more information
see, Viewing Battery Life Remaining on page 37.
Stop Xmit at Battery Remaining: Specify at what per-
centage of battery life remaining you want the HMT140
to stop transmitting data to the host (to save battery
power). Once this threshold is reached, the HMT140
functions normally except it will not transmit data using
the Wifi radio.
8 Use the Display Contrast interactive control to set the
HMT140 display contrast. When the Up, Down or Set
buttons are clicked, the HMT140 Utility will attempt to
set the contrast.
Note: The contrast value can only be set when you click
Set. The value is not set with the Update or
Retrieve buttons.
Click Update. The HMT140 Utility will send these
9
settings to the HMT140 and then reboot. After the
settings are successfully configured, a dialog displays
Configured! If there was an error sending the settings,
the HMT140 Utility will display the error in a popup
dialog window. The center panel in the bottom status bar
will display the update status.
10 Select the Status tab to check that the settings appear as
configured. Click Get if they do not appear
automatically.
11 Disconnect the HMT140 Configuration Cable from the
HMT140 and wait eight seconds.
30 VAISALA
Page 39

Custom Settings
12 Press the SERVICE button on the HMT140.
Optional: Enter a name for the saved settings on the
Set up tab in the Saved Settings field and click the
disk icon to save. If the HMT140 is used with more than
one wireless network, enter a name in the Saved Net-
work Settings field and click Save. Other network settings files can be saved and recalled from the Saved
Settings field.
Modify HMT140 Description
If you want to make it easier to identify specific transmission
devices, enter custom names. By default, each device is
identified using the model name and channel type.
Note: Check with your network administrator before
making changes.
To modify your device and Channel descriptions:
1 Complete steps 1 to 6 in the procedure, Modify
Transmitter Settings, on page 28.
2 Select the Description tab and enter a device name, and/
or Channel descriptions. You can view these descriptions
in Vaisala viewLinc, and make changes in viewLinc if
required.
Check Transmission status
The Status page displays the current state of the IP settings,
connection status, signal strength, and battery life
parameters, as applied using the Update button on the
Network tab.
To monitor the transmission status:
1
On the Status tab, click Get to update the HMT140
Utility window with the latest status information: IP
settings, WLAN and Sensor battery. If successful, the
HMT140 Utility displays the information on the Status
page.
M211488EN-C 31
Page 40

Custom Settings
2 Read IP Settings status:
DHCP:
•
Off – static IP address information is being used
•
On – the IP settings have been successfully assigned;
•
Cache – the IP settings have been successfully
assigned and the HMT140 will cache this IP address
Failed – the HMT140 could not obtain the IP settings.
•
IP Address: Current IP address. If “0.0.0.0”, then no IP
address has been assigned.
Subnet Mask: Current assigned subnet mask.
Gateway: Current assigned gateway address.
DNS: Current assigned Name Server address.
Resolved Destination: Appears if the hostname is given
for the Destination.
32 VAISALA
Page 41

HMT140 Function Modes
3 Read WLAN status:
Connection:
•
Failed: The HMT140 has failed to connect to a
wireless network.
Associated - Not Connected: The HMT140 has
•
associated with the network but has not connected.
Authenticated - Not Connected: Security settings
•
have been authenticated but has not connected.
Assoc/Authen - Connected: The HMT140 has
•
associated and authenticated to the network and
connected successfully to the network.
Signal Strength: Signal strength of the last communica-
tions. The signal strength can vary from reading to reading. Multiple samples should be taken to determine the
signal strength.
Channel: This is the channel found during the Channel
Auto Find feature or the channel set in the Setup page. If
the HMT140 cannot find a channel when in Auto Find
mode, the utility will display “none”.
4 Check HMT140 battery status:
Est. Life: Estimated percentage remaining of the battery.
Est. Expired: Estimated date when the battery should be
changed (dependant on the Transmit Period and the
number of alarms). For more information see, Viewing
Battery Life Remaining on page 37.
HMT140 Function Modes
Operating Modes
The HMT140 operates in two modes: Config mode and
Transmitter mode.
Config Mode
When the HMT140 is powered on, and the HMT140
Configuration Cable is connected to it, the HMT140 connects
to the network for about two seconds and then goes to sleep.
M211488EN-C 33
Page 42

HMT140 Function Modes
When new activity occurs, the HMT140 will wake again,
connect then go back to sleep after five seconds.
Transmitter Mode
When the HMT140 is powered on and the HMT140
Configuration Cable is not plugged into it, data is transmitted
according to the transmit settings.
in Transmitter mode, the HMT140 spends most of its time in
a very low power state (sleep). When a transmit period is due,
it powers up the radio, attempts to link to the specified
wireless network, transmits its data and then goes back to
sleep. The HMT140 transmits based on the configured
transmit period or when it is entering an alarm state.
Transmission of Data
The HMT140 will go through the following steps in order to
connect to a network and deliver data:
1 Associates with the network.
2 HMT140 authenticated by the network (depends on the
type of security).
3 Requests IP from DHCP Server (if set to dynamic IP)
4 HMT140 receives request from Name Server IP address
of hostname (if a hostname is used for the Destination
address and DNS Server specified).
5 Sends data.
6 viewLinc returns acknowledgement.
Transmit Attempts
The HMT140 will initiate a Transmit Attempt repeatedly
(typically every 30 seconds) until either an acknowledgement
is received from the host, or the number of tries has been
exhausted. It follows this transmission mechanism both
when the transmit period arrives and for alarm attempts.
34 VAISALA
Page 43

Alarm-triggered Transmission
The HMT140 has the ability to initiate a Transmit Attempt
based on an alarm, if this functionality is configured in
Vaisala viewLinc.
An alarm can be triggered either when the measured value
exceeds a high threshold or goes below a low threshold for a
period of time, as configured in viewLinc.
The HMT140 can also be configured to initiate a Transmit
Attempt when it exits an alarm state. Refer to the Vaisala
Veriteq viewLinc Administrator Guide for information about
alarm settings.
Additional Settings
Change Input/Output Scale
If you want your device to provide more meaningful output
measurement units, you can modify the output settings (if
you are not sure if your network requires/supports this
option, contact Vaisala Canada for assistance).
To modify input/output values:
From the Setup tab, select the I/O Definition tab.
1
Additional Settings
2 Enter the device’s input range values.
3 Enter required Display Units, the number of decimal
places you want recorded, the high/low output values
and desired measurement units.
M211488EN-C 35
Page 44

Battery Usage
Save and Recall Settings
Your setup parameters can be saved and associated with a
name on the Setup tab, in the Saved Settings field. These
setup parameters can then be recalled by that name, saving
you time reentering the settings.
The network parameters can also be saved separately and
associated with a name on the Network tab, in the Saved
Network Settings field. The network setup parameters can
then be recalled by that name.
Delete Saved Settings
Both the Saved Settings and the Saved Network Settings can
be deleted, to help keep the list of saved settings easier to
view and/or manage.
On the File menu, select Delete Sensor Setup or
Delete Network Setup, then choose the correct set-
tings name to delete.
Restart the HMT140
You may want to reboot your HMT140 to reconnect to the
network and re-acquire status information.
On the Status tab, click Restart.
Get General Information
To gather general information about the HMT140, select the
Info tab and then click Get. The HMT140 Utility will
retrieve the following information:
•MAC address
• Firmware version
•HMT140 serial number
• HMP110 serial number (if using)
Battery Usage
The HMT140 has a built-in battery meter. This meter is
based on a count of its transmissions. To determine battery
36 VAISALA
Page 45

Battery Usage
life remaining, the meter records the amount of power used
during transmission relative to the power remaining.
Viewing Battery Life Remaining
The HMT140 Utility displays the estimated battery
expiration and the estimated battery life percentages on the
Status page.
Note: The shorter the transmit period, the shorter the
battery life.
CAUTION:When replacing batteries, the meter must be
reset to recognize the new battery status.
To view battery life remaining:
On the Status tab, view the batter meter status in the
Est. Life field.
To reset the battery meter after installing new batteries:
Note: To install new batteries, see Battery Replace-
ment on page 49.
1 Turn off the HMT140. Make sure the configuration Cable
is disconnected from the device.
2 Press and hold the SERVICE button.
• Turn the HMT140 on while the SERVICE button is
engaged.
• Wait four seconds. You will hear eight beeps from the
beeper.
3 Release the SERVICE button to complete the battery
meter reset.
4 Confirm that the battery meter is reset. Reconnect the
Configuration Cable to the HMT140 and view the
estimated battery life in the Status tab (it should
indicate 100%).
Units and Temperature
Use the Options menu to set the measurement units you
want to display on screen.
To change display units:
On the Options tab, select Units.
M211488EN-C 37
Page 46

Battery Usage
Connection Performance
Consistent connection performance is essential for longevity
of battery life. The HMT140 Utility can perform a test to
indicate how well the HMT140 connects to the network,
which provides an indication about the expected battery life.
To perform the test, see page 43.
Note: If the average connection time is more than five
seconds, the HMT140 may not connect consistently and the battery may be exhausted before
the battery meter indicates.
Connect Times
The following are the components of the connect time:
802.11g
Description Option
HMT140 Startup No 2 0.1
802.11 b
(sec)
(sec)
Cache/
Noncache
Auto Find Channel Yes 1 0.1
Associate/
Authentication
DHCP lookup Yes < 1 < 1
DNS lookup Yes < 1 < 1
No < 1 < 1
Determining Connection Problems
In some networks, one of the optional components of the
connect time may take too long to perform on a consistent
basis. If the average connection time is too long it is
important to try isolate the cause.
To isolate a connection problem:
1
Open the HMT140 Utility and connect the Configuration
Cable to the device and your PC.
38 VAISALA
Page 47

Advanced Options
2 Temporarily turn off one of the connection options and
then measure the average connection time:
•Try setting the dynamically assigned IP address as the
static address temporarily, or,
• Try using a Destination IP address instead of the
hostname address temporarily.
3 Select the Tools tab. In the Test Connect Time area,
click Start. The HMT140 Utility will repeatedly attempt
to connect to the network with one second between
connection attempts. You can then view:
• Number of connection attempts.
• Last connect time.
• Average, minimum and maximum connect times.
• History of connect attempts displayed as a bar graph
(each bar graph is the number of seconds for the
attempt).
• Failed connection attempts displayed as a grey bar.
Failed connection attempts are not factored in the
statistics.
4 To change the Connect Window time, on the Options
menu select Advanced Options, and then select the
desired Connect Window time.
Advanced Options
These advanced parameters (Options > Advanced
Options) are applied each time an Update function is
performed. These parameters may have an impact on
transmitter performance.
Extended Transmit Period: Adds 30 sec., 1 min., and 2
min. as additional options for the Transmit Period in the
Sensor tab.
Important: These additional periods are meant to be used for test-
ing, evaluation and demonstration of the HMT140 and,
if used, can have a severe impact on battery life.
Log Conversations: When this option is selected, the
HMT140 Utility will capture the conversation between
the utility and the HMT140 and place it in a file called
M211488EN-C 39
Page 48

Advanced Options
OutputLog.txt. To locate the file, go to the Help menu,
select Utility Folder Paths, and then Explore Data.
DHCP Caching: When this option is selected, the
HMT140 will cache its IP address assigned from the
DHCP server until the DHCP lease time has expired or
the HMT140 is power cycled. If not selected, the
HMT140 will request an IP address each time it attempts
to contact the host.
ARP Caching: When this option is selected, the HMT140
will store and keep a list of IP/MAC relationships. If not
selected, the HMT140 will rebuild the IP/MAC relationships with every attempt to contact the host.
DNS Caching: When this option is selected, the HMT140
will cache the IP address that results from the DNS
lookup of the Destination hostname. The HMT140 will
keep the destination IP address until either the DHCP
lease time expires or the HMT140 is powered cycled. If
not selected, the HMT140 will request a DNS lookup of
the Destination hostname each time it attempts to contact the host.
Connect Window: Set the amount of time in seconds
(three to eight seconds) that the HMT140 will attempt to
associate and authenticate to an access point or a wireless router (this includes the time to obtain an IP address
from a DHCP server). The default rate is 5 seconds.
Data Rate: The default data rate is 1 Mbit/sec. and can be
set from one to 54 Mbit/sec. The lower the data rate the
longer range the HMT140 will have. The 802.11b data
rates are: 1, 2, 5.5 and 11. All other data rates are 802.11g
data rates.
Note: An access point or wireless router may be config-
ured to exclude 802.11b data rates.
Override Destination Port: Leave blank to not use this
feature. If a number (1 to 65535) is placed in this field,
the utility will force the Destination Port to use this
entered number. Use this feature to force the Destination
Port to another value other than the default 6767.
40 VAISALA
Page 49

Advanced Options
Passwords
To improve security, you can require that a user log in to
make changes to HMT140 parameters. If Passwords are
enabled, a password prompt appears when a user clicks
Update on the Setup tab. No other HMT140 functions will
require a login password.
To set, change or remove an HMT140 password:
Open the HMT140 Utility.
1
2 Connect the HMT140 to your computer.
3 From the Options menu, select Advanced Options.
4 On the Advanced Options window, check Enable use
of passwords in HMT140, then click OK.
5 To set the password for the first time:
• Leave the Current Password field blank.
•Check the Change Password option.
• Enter the new password in the New Password and
New Password Again fields.
•Click Update.
6 To change an existing password:
• Enter the current password
•Check the Change Password option.
• Enter the new password in the New Password and
New Password Again fields.
•Click Update.
7 To clear a password:
• Enter the current password.
•Check the Change Password option, and leave the
New Password and New Password Again fields
blank.
•Click Update.
CAUTION:Record the password in a safe location for safe-
keeping; the HMT140 does not save the password. If the password is forgotten, contact Vaisala Technical Support.
M211488EN-C 41
Page 50

Advanced Options
Set Up a New Channel
On the Network tab, you can select a specific Channel to
view, using the Channel field.
To select multiple Channels for the HMT140 to search when
connecting to an access point or a wireless router, select
Auto Find.
For Wifi 802.11b radio mode, do not set the Channel Auto
Find search channels to more than 3 channels. This will have
an effect on the HMT140’s range and battery life.
For Wifi 802.11g radio mode, the HMT140 can search all
channels with minimal effect on battery life and range.
Find Additional Networks
To locate additional networks:
1
Note: The Channel Auto Find feature defaults to search
for Channels 1 through 11. These Channels are
set in the HMT140 Utility’s .INI file. See Additional Program Parameters on page 44 for more
information.
On the Setup tab, on the Network page, click the Find
Networks button to scan for all available wireless
networks. The HMT140 Utility displays details about the
currently available networks:
SSID: SSID of the access point or router (wireless chan-
nel).
MAC: MAC address of the access point or router.
Channel: Channel of the access point or router.
Security: Security setting of the access point or router.
Note that some security settings will not work with the
HMT140.
RSSI: Current signal strength.
42 VAISALA
Page 51

Advanced Options
2 To select a network, click on the row in the Available
Networks window, then click OK. The HMT140 Utility
automatically places the network settings information in
the appropriate fields in the Setup tab.
Note: During the Find Networks operation, the
HMT140 is disconnected from the current network. To reconnect, either click Update on the
Setup tab or click Restart on the Status tab.
Test Network Connectivity
Ping from Sensor
When the Ping From Sensor button is clicked, the
HMT140 will use either the IP address in the IP Address field
or the current address in the Destination IP field in the Setup
tab and ping that specified address. Once the ping operation
is complete, the utility will either indicated failed or success
and specify the IP address in the Result field.
Ping from This PC
When the Ping From This PC button is clicked, the
HMT140 will use either the IP address in the IP Address field
or the current address in the Destination IP field in the Setup
tab and ping that specified address from the local PC. Once
the ping operation is complete, the utility will either
indicated failed or success and specify the IP address in the
Result field.
M211488EN-C 43
Page 52

Additional Program Parameters
Contact Destination Host
The HMT140 Utility will instruct the HMT140 to send a
transmission (data packet) to the Destination Address. If the
Destination responds with an acknowledgement, the Utility
will indicate success, otherwise the Utility will display
“Failed” in the Result field. Use the Contact Destination Host
function to confirm that the HMT140 is sending packets to
the Destination.
Note: The Destination must be capable of responding
with an acknowledgement for this function to
work.
Additional Program Parameters
The HMT140 Utility stores all program information in an INI
text file, HMT140Utility.INI. You can use this file for
reference, and, if you are updating several devices, save time
by making edits to the file directly.
To modify the HMT140Utility.INI file:
Go to the Help menu, select Utility Folder Paths, and
1
then select Explore Setup.
2 Double-click the file, HMT140Utility.INI. It will open
in a text editor.
3 To set the maximum number of tries (updates the Tries
field, default maximum is 5):
[Settings]
MaxNumTries=5
4 To modify the default UDP port (default is 6767):
[Settings]
DefaultPort=6767
5 To specify the auto find channels:
[Settings]
ChannelMask=1,2,3,4,5,6,7,8,9,10,11
6 Restart the HMT140 Utility to apply the changes.
44 VAISALA
Page 53

CHAPTER 5
MAINTENANCE
This chapter provides information to help you provide basic inhouse maintenance of the HMT140, including:
Instructions for replacing the HUMICAP
• Instructions for removing and fastening probes
• Calibration and adjustment information
• Battery replacement instructions
® RH sensor
M211488EN-C 45
Page 54

Replacing the HUMICAP® RH Sensor
Replacing the HUMICAP® RH Sensor
Replace a dirty filter to ensure maximum operating life and a
fast sensor response time. Do not attempt to clean the filter.
Fixed and Remote Probe Models
To replace the RH sensor:
Remove the filter (plastic grid or sintered stainless steel).
1
2 Remove the damaged sensor and insert a new one.
3 If required, recalibrate the probe (see Calibration and
Adjustment on page 48).
Removing and Fastening the Probe
Fixed Probe Model
To remove and replace a fixed probe:
Loosen the metal locking bushing by carefully turning it
1
counter clockwise.
2 Remove the probe from the transmitter by pulling it
gently outwards.
3 Attach the new probe to the 4-pin M8 panel connector at
the transmitter (only one position possible).
4 Tighten the locking bushing to the M8 panel connector
by turning it clockwise.
46 VAISALA
Page 55

Removing and Fastening the Probe
1
3
2
1
3
2
Figure 16: Fixed Probe Model
The following numbers refer to Figure 16:
1 Locking bushing
2 Holder bushing (attached permanently to the probe)
3 HMP110 probe
Remote Probe Model
To remove and replace a remote probe:
Unscrew the small sleeve at the end of the probe cable
1
M211488EN-C 47
that secures the probe in place, and pull out the probe.
2 Replace the probe and screw the small sleeve back on,
securing the probe tightly in place.
Page 56

Calibration and Adjustment
1
2 3
1
2 3
Figure 17: Remote Probe Model
The following numbers refer to Figure 17
1 Probe cable
2 Sleeve securing the probe to the cable
3 HMP110 probe
Calibration and Adjustment
HMT140 parameters are calibrated and adjusted using
viewLinc.
To view calibration status:
On the Info tab, click Get. This page will display calibra-
tion information including calibration date, calibrator,
and next calibration due date.
Please refer to the viewLinc administrator’s guide for further
information, or visit www.vaisala.com.
48 VAISALA
Page 57

For calibration of HMP110 probes, refer to the supporting
documentation available on the Vaisala website.
Battery Replacement
To replace the batteries and reset the battery meter of the
HMT140:
Open the case. Use your thumb to press and hold the
1
release tab, located between the two glands, then pull the
cover out and up with your fingers. See HMT140
Components Diagram on page 19 for location of release
tab.
2 Turn the power switch off.
3 Remove the batteries by pulling them up firmly. If the
battery does not come out easily, gently pull back on one
of the battery holder tabs first.
Note: Use only Vaisala supplied batteries,
part #: 236318SP Vaisala 3.6V Lithium
Thionyl Chloride batteries.
4 After replacing the batteries, press and hold the
SERVICE button and turn the power switch on. The LED
light will flash and the device will beep eight times.
5 Release the SERVICE button. At this point, the battery
meter is also reset.
CAUTION:Remove batteries before shipping
Battery Replacement
M211488EN-C 49
Page 58

Battery Replacement
50 VAISALA
Page 59

APPENDIX
SPECIFICATIONS AND
TROUBLESHOOTING
Specifications
Table 1: Humicap Relative Humidity Measurement Specifications
(with HMP110)
Property Description/Value
Measurement range 0 ... 100% RH
Accuracy (including non-linearity, hysteresis, and repeatability):
at 0 ... +40 °C (+32 ... +104 °F)
at -40 ... 0 °C and +40 ... +80 °C
(-40 ... +32 °F and +104 ... +176 °F)
±1.7 %RH (0 ...90 %RH)
±2.5 %RH (90 ... 100 %RH)
±3.0 %RH (0 ...90 %RH)
±4.0 %RH (90 ... 100 %RH)
Factory calibration uncertainty at 20 °C
(+68 °F)
Humidity sensor HUMICAP 180R
Stability
±1.5 %RH
±2 %RH over 2 years
Table 2: Humicap Temperature Measurement Specifications
(with HMP110)
Property Description / Value
Measurement range
Accuracy over temperature range:
at +15 ... +25 °C (+59 ... +77 °F)
at 0 ... +15 °C and +25 ... +40 °C
(+32 ... +59 °F and +77 ... +104 °F)
HMT140 User’s Guide 51
-40 ... +80
±0.2 °C (±0.36 °F)
±0.25 °C (±0.45 °F)
°C (-40 ... +176 °F)
Page 60

Appendix Specifications and Troubleshooting
Table 2: Humicap Temperature Measurement Specifications
(with HMP110)
Property Description / Value
Accuracy over temperature range continued:
at -40 ... 0 °C and +40 ... +80 °C
(-40 ... +32 °F and +104 ... +176 °F)
Temperature sensor Pt1000 RTD 1/3 Class B IEC 751
±0.4 °C (±0.72 °F)
Table 3: Analog Inputs
Property Description / Value
Current input signals 0-22 mA
Resolution: 0.67 µA
Accuracy:
Input Impedance: 62 Ohms
Overload Protection: 40 mA max.
±0.15 % F.S. at +25 °C
Voltage input signals 0-5 V, 0-10 V
Boolean Contact input signals Open/Closed with magnetic reed switch
Isolation One common per logger
Resistive Temperature input signal Pt 100 RTD / 4 wire
RTD Measurement range -196 °C to +90 °C
RTD Accuracy over temperature range
Resolution: 0.0034% F.S.
Accuracy:
Input Impedance: 37K Ohms
Overload Protection: 50 volts max.
cable connections (Dry Contact)
Class A IEC 751
Input Impedance: 5.1K Ohms
-196 to -90 +/- 2.5
-90 to -30 +/- 0.75
-30 to 0 +/- 0.5
0 to 50 +/- 0.25
50 to 90 +/- 0.75
±0.15 % F.S. at +25
°C
°C
°C
°C
°C
52 VAISALA
Page 61

Table 4: Humicap Operating Environment Specifications
Property Description / Value
Operating temperature range
Transmitter body, no display
Transmitter body, with display
HMP100 probe
Storage temperature range -50 ...+70 °C (-58 ...+158 °F)
-40 ... +60 °C (-40 ... +140 °F)
-20 ... +60 °C (-4 ... +140 °F)
-40 ... +80 °C (-40 ... +176 °F)
Electomagnetic compatibility EN 61326-1:2006 Electrical equipment for
measurement, control and laboratory use EMC requirements - Basic immunity test
requirements
EN 55022:2006 + Am 1:2007
Information technology equipment - Radio
disturbance characteristics - Limits and
methods of measurement. Class B.
HMT140 User’s Guide 53
Page 62

Appendix Specifications and Troubleshooting
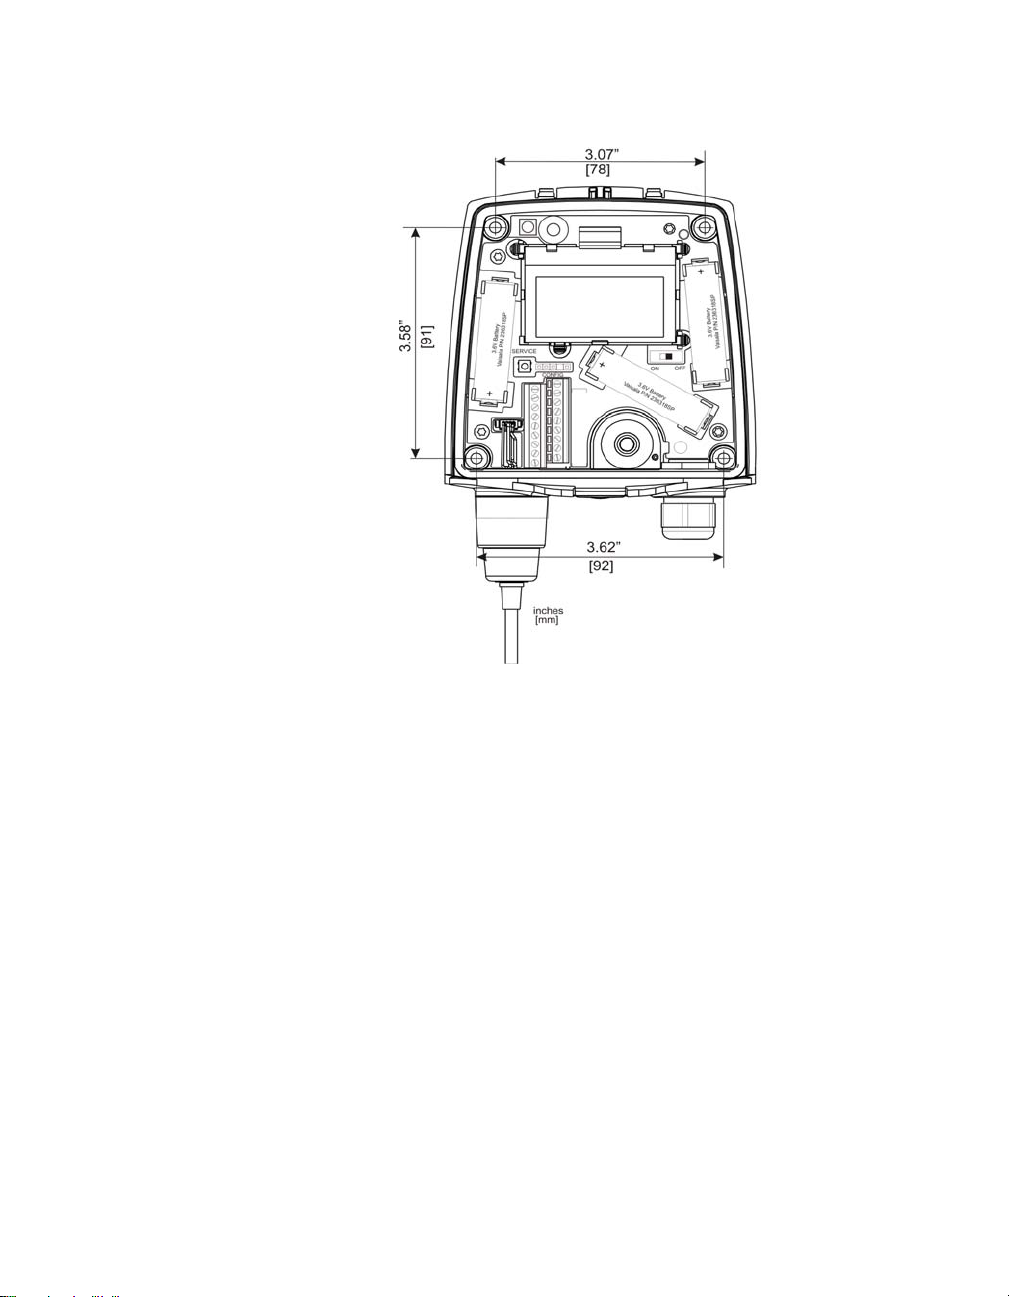
Transmitter Dimensions (Fixed Probe)
54 VAISALA
Page 63

Transmitter Dimensions (Remote Probe)
HMT140 User’s Guide 55
Page 64

Appendix Specifications and Troubleshooting
Table 5: Mechanics Specifications
Property Description / Value
Operating Temperature Range
Transmitter body, no display
Transmitter body, with display
Material
Transmitter housing
display window
Probe body
Probe grid filter
Housing classification IP65 (NEMA 4)
Connections
Screw terminals
HMP100 Probe interface
HMP110 Probe cable lengths 3 m, 5 m, cables can be cascaded up to
RTD Temperature Sensor
Sensor tip material
Sensor tip lenegth
Sensor tip diameter
Cable length
-40 C ... +60 °C
-20 C ... +60 °C
PBT plastic
PC plastic
Stainless steel (AISI 316)
Chrome coated ABS plastic
26 AWG ... 20 AWG
4-pin M8 female panel connector
maximum of 10 m
Stainless steel (AISI 316)
50.8 mm
4.76 mm
5 m
Hermetic Door Switch Sensor
Cable length 7.6 m
Display (optional) 128 x 64 resolution full graphics
B&W display without backlight
Weight (Wall model, including probe) 300g
Table 6: Wireless Specifications
Property Description / Value
Networking Standards IEEE 802.11 b/g
Frequency Band 2412 ~ 2480MHz
56 VAISALA
Page 65

Table 6: Wireless Specifications
Property Description / Value
Modulation 802.11b compatibility: DSSS(CCK-11,
CCK-5.5, DQPSK-2, DBPSK-1)
802.11g:OFDM (default)
Channel intervals 5MHz
Channels 1-14
Wi-Fi Security WEP (128-bit), WPA, WPA2 (Personal)
Output Power +18dBm (63mW)
Receiver Sensitivity -85dBm (63mW)
Antenna Onboard Whip
Data Rates 802.11b: 1,2,5.5,11 Mbps 802.11g:
Certifications FCC: U30-G2M5477 (FCC Part 15 Sub-
6,9,12,18,24,36,48,54 Mbps
part B:2008 Class B, FCC CRF Title 47
Part 15 Subpart C).
IC: 8169A-G2M5477 (IC RSS-210).
CE: EU ID# 0681 (ETSI EN301 489-1
V1.8.1, 489-17 V2.1.1, ETSI EN300 328
V1.7.1, EN55022 Class B, ENG1000 4-2,
4-3, 4-6, 4-8, EN60950-1:2001+A11:2004)
Wi-Fi Certified: WFA7649
FCC 47 CFR Part 15-2011 Subpart B
IC ICES-003:2004,
EN61326-1:2006
EN61326-2-3:2006
EN61000-3-2:2006+A1:2009+A2:2009
EN61000-3-3:2008
EN61326-1:2006
MIC R 201-125765
CMIIT ID: 2013DJ7129
HMT140 User’s Guide 57
Page 66

Appendix Specifications and Troubleshooting
Table 7: External Power Supply Options
Property Description/ Value
External source 9V DC to 28V DC
Current rating 1.7A to /.5A DC
Power 15 Watt
Troubleshooting
Use HMT140 Utility to help troubleshoot issues that may
occur while connecting the HMT140 to a wireless network.
HMT140 Operation Mode
When the Configuration Cable is connected to the HMT140,
it enters “Config mode”. In this mode, the HMT140
continuously attempts to connect to the wireless network and
stays connected until the Configuration Cable is disconnected
or the setup has changed.
The HMT140 is in “Transmitter mode” when the
Configuration Cable is not connected, and the HMT140
power switch is turned on. When in Transmitter mode, the
HMT140 remains in a low power state, but will turn on,
connect, transmit a UDP packet, and then go back to the low
power state when it is ready to transmit.
Signal Strength
The HMT140 works best with signal strengths above -63 dbm
(for 802.11b mode) and -75dbm (for 802.11g mode). If the
signal strength is less, the HMT140 may work marginally or
not at all. Stronger signal strength improves transmission
performance.
Since the signal strength will vary from sample to sample,
you should take multiple samples to determine the signal
strength. View signal strength on the Status tab and in the
Available Networks window (click the Find Networks
button on the Setup tab).
58 VAISALA
Page 67

Indicator Lights
The red LED on the main board (Center, or below LCD)
indicates that a transmit attempt has just started. The LED
on the radio module indicates that radio module is connected
to the network. When in Transmitter mode the LED will flash
when a connection is made. When in Config mode (the
programming cable is connected to the HMT140) the LED
will remain on continuously when a connection is
established.
Access Points
Some access points have a mode called Auto Channel mode
where it will move between up to 11 channels. If the access
point is using this feature the HMT140 may work properly in
“Config mode” but could fail or work very marginally in
“Transmitter mode”. If the access point is using Auto
Channel mode, make sure the HMT140 has “Auto Find” for
the channel and the right channels have been selected for
“Auto Find” channels.
Some access points will move between three channels
(typically 1, 6 and 11). The HMT140 Utility will work with
these access points with the Channel AutoFind feature but
the channels that are used must match the channels the
HMT140 is configured for.
Transmitter Cycle
In Transmitter mode, it can take up to five seconds for the
transmit cycle to complete. Transmit time is calculated from
when the SERVICE button is pressed to when the
acknowledgement is received from the host.
Is the connect time too long?
If the connect time to the network is consistently long (over
five seconds), the HMT140 may not be able to connect to the
network. If you suspect the connect time to the network is
long:
1 Use the Test Connect Time tool (see Determining
Connection Problems on page 38), or,
2 Use a PC to connect to the network and then measure the
time it takes to connect.
HMT140 User’s Guide 59
Page 68

Appendix Specifications and Troubleshooting
3 If the network consistently takes longer than five seconds
to connect, you may need to adjust the settings:
• Set the connect time window to a longer value (use the
Connect Time tool to help determine this value) or,
• Change a connection component like channel AutoFind
or DHCP.
Note: Extending the connect time may decrease bat-
tery life. The battery meter may need to be
reconfigured (contact Vaisala Technical Support).
Cannot connect to the wireless network
Verify that the network exists.
1
2 Verify signal strength. Use the built-in signal strength
meter. Determine if adequate signal strength exists at
that location.
3 Verify your network settings.
4 Make sure the router or Access Point accepts connections
of 1 Mbps. Some access points may be set up to exclude
certain WLAN data rates. You may have to change the
WLAN data rate setting in the HMT140.
5 If the HMT140 was previously connected at one location,
but will not connect at the new location, temporarily
move it to the previous location and verify operation. It is
also possible that a setting on the network has changed.
Can connect to the network, but cannot obtain a dynamic IP
address
Verify your network settings.
1
2 Verify that you are connected to the right network.
3 Use the Ping from Sensor function in the HMT140
Utility to ping an address that should be available from
the network (verify that the address is ping-able).
4 Use the Ping from PC function in the HMT140 Utility
to see if your PC can ping an address on that network
(your PC must be connected to that network).
5 Use the Ping from PC function in the HMT140 Utility
(if this PC is connected) and see if you can ping the
HMT140 when it is in Config mode. Go to the Status tab
to determine the IP address.
60 VAISALA
Page 69

6 Use a static IP address temporarily and connect to the
network to determine if HMT140 transmissions are
being received by the host.
7 Make sure the DHCP Server has not exhausted the
number of assignable IP addresses.
8 Check if the DHCP Server needs to be configured to
accept this type of device (it is possible the DHCP Server
is taking too long to respond to the request).
Can connect to the network, but host is not receiving UDP
packets
Verify your network settings.
1
2 Verify that you are connected to the right network.
3 Verify that the Destination IP address is correct.
4 If using the broadcast address, verify that the network
can support broadcasts. Most routers by default will not
route broadcast traffic.
5 If the host will respond to ping requests, use the Ping
from Sensor function in the utility to have the HMT140
ping the host. Use the Ping from PC feature if this PC
is connected or a PC on the network and ping the host.
Also try pinging the HMT140 when it is in Config mode.
6 Check the following:
• Is the host is ready to receive the transmit packets?
• Is the host configured to listen for the UDP packets?
• Is the host software running?
• Is firewall software installed at the host that would
prevent the UDP traffic?
• Is there anything on the network that would restrict
packets from being routed (like MAC filtering)?
7 Perform a destination test (use the Contact
Destination Host function from the Tools tab).
8 If using a hostname for the destination address:
a Make sure the DNS address is correct (whether set as
static or obtained through the DHCP server).
HMT140 User’s Guide 61
Page 70

Appendix Specifications and Troubleshooting
9 Check if the hostname is being resolved in Config mode
(go to the HMT140 Utility Status tab and examine the
Resolved Destination field).
Can connect to the network and Contact Destination using the
utility, but host is not receiving UDP packets in Transmitter
mode
Verify your network settings.
1
2 Check if the access point using Auto Channel mode is
switching between channels. The access point may have
switched to a different channel than is set up in the
HMT140.
3 Use the Connect Time tool in the utility to verify how
long the HMT140 takes to connect to the network.
• If the network consistently takes longer than five
seconds to connect to the network, you may need to
make adjustments to the settings. Set the connect time
window to a longer value (use the Connect Time tool to
help determine this value) or change a connection
component like channel AutoFind or DHCP.
Note: Extending the Connect Window may cause the
battery to be exhausted more quickly. The battery meter may need to be de-rated.
4 Verify the signal strength where the HMT140 is located.
Also check how the HMT140 is mounted and oriented at
this location with respect to the access point. For
example, the HMT140 is mounted at the back of a
refrigerator but may work better being mounted near the
top of the refrigerator.
5 Change batteries.
Battery Meter indicates a lower battery life than expected
Confirm whether the battery meter was reset when the
1
batteries were last changed. (See Battery Usage on
page 36.)
2 Set a longer transmit period.
3 Check the HMT140. Was the SERVICE button pressed
frequently?
4 Check alarm history. Were there a large number of
alarms initiating more frequent transmission attempts?
62 VAISALA
Page 71

5 Check transmission attempts. Is the setting for number
of tries too high?
6 Check network quality. Is the connect time for the
HMT140 greater than five seconds? Use the “Test
Connect Time” tool in the HMT140 Utility.
7 Check the signal strength.
HMT140 Utility cannot find the HMT140
Make sure the HMT140 Configuration Cable is connected
1
to the HMT140.
2 Disconnect the cable, power the HMT140 off, power back
on, wait 5 seconds, connect the cable and try again.
• Does the red LED in the programming cable flash when
doing an operation?
3 Disconnect the cable from the HMT140 and connect
again.
4 Disconnect the cable from the HMT140 and then
disconnect the cable from the PC. Wait 30 seconds.
Insert cable back into PC and into the HMT140.
5 Reboot your computer.
6 Use an externally powered USB Hub. Your computer
may not be supplying enough power through the USB
port.
HMT140 Utility Network Compatibility Issue - Data Is Not
Reaching Destination In Transmitter mode
While in Config mode, the HMT140 can connect (associate/
authenticate) to the network and Contact Destination is
successful but while in Transmitter mode, the data never
reaches the destination. The UDP data packet from the
HMT140 is not forwarded by the router.
The following routers have been confirmed to have this
problem:
• Linksys WRT610N
• Linksys WRT310N V2
•Belkin F5D7234-4BC V1
• NetGear WNDR3400
HMT140 User’s Guide 63
Page 72

Appendix Specifications and Troubleshooting
Workaround:
Use Dynamic IP and have DCHP Caching turned off. If
1
the IP address is static or the DHCP Caching is enabled,
these routers will not forward the HMT140’s UDP data
packet.
2 Replace the router (contact Vaisala Technical Support).
64 VAISALA
Page 73

Index
Index
Symbols
.INI file 44
A
accessories 8
advanced options 39
advanced settings 35
alarming 35
analog inputs 51
Auto Find Channels 42
B
batteries, safety 3
connection performance 38
replacing 49
battery life 39
checking 33
extending 42
preserving 30
battery meter 36
reading status 36
resetting 49
Boolean Wiring Diagram 20
C
calibration 48
viewing status 48
changing
input/output scale
Channels
Auto Find
checking battery life 33
Config (setup) mode 33
configuration cable 24
connecting
HMT140 to your network
HMT140 to your PC 24
connection performance 38
Current Wiring Diagram 21
42
35
35
D
deleting settings 36
diagrams
Boolean wiring
Current wiring 21
HMT140 19
RTD and Boolean wiring 20
RTD wiring 20
Voltage wiring 21
Duct Installation Kit 15
20
E
ESD, safety 3
extending
battery life
transmit period 39
42
F
fixed probe
removing and fastening
G
Get general information 36
H
HMP110 probe 30
HMT140
connecting to a PC
deleting settings 36
Fixed Probe Model 46
getting information 36
models 9
modes 33
mounting 14
optional display 10
overview 7
Remote Probe Model 47
restarting 36
24
46
HMT140 User’s Guide 65
Page 74

Index
HMT140 Components diagram 19
HMT140 Configuration Cable 24
HMT140 connecting to network 35
HMT140 Utility 25
HMT140Utility.INI file 44
HUMICAP® Sensor 46
replacing 46
I
I/O scale 35
input/output scale 35
Interchangeable Probe 9
L
Log conversations 39
M
modes 33
modifying .INI file 44
monitoring battery life 33
mounting
in a duct
on a wall 14
mounting a device 14
15
N
network
connecting devices
network settings
deleting
retrieving 36
saving 31
36
35
P
passwords
recording
passwords, about 44
Power Supply Wiring Diagram
diagrams
41
power supply wiring
21
Probe
removing/fastening
Probe Assembly with Duct Installation Kit
Probe Mounting Clamp 18
16
46, 47
R
recording passwords 41
removing/fastening
fixed probe
remote probe 47
replacing
batteries
HUMICAP sensor 46
resetting battery meter 49
restarting a device 36
retrieving
network settings
settings 36
RTD and Boolean Wiring Diagram
46
49
31
20
RTD Wiring diagram 20
S
safety information 3
Save/Recall Settings 36
saving
battery power
network settings 31
sensor, replacing 46
settings
advanced
deleting 36
30
35
T
technical support i
transmission of data 34
transmit attempts 34
transmitter components 10
Transmitter mode 34
66 VAISALA
Page 75

transmitter type, viewing 26
U
USB cable 24
V
viewing
calibration status
transmitter type 26
Voltage Wiring Diagram 21
48
W
wall mounting 14
wiring
boolean diagram
current diagram 21
power supply diagram 21
RTD and Boolean diagrams 20
RTD diagram 20
voltage diagram 21
20
Index
HMT140 User’s Guide 67
Page 76

www.vaisala.com
*M211488EN*
 Loading...