

Page 1
T
ECH SPEC &
NSTALL GUIDE
I
S
S
N
VVIIEEWW™
HHEELLF
F
P
RROODDUUCCTTIIOON
P
S
LLIIDDIINNGG
S
P/N: 998-5000-200: ProductionVIEW Rack Enclosure
P/N: 998-5000-210: ProductionVIEW Sliding Shelf
Fits Models ProductionVIEW FX, ProductionVIEW HD,
ProductionVIEW HD-SDI, ProductionVIEW HD MV,
ProductionVIEW HD-SDI MV and ProductionVIEW Super
Joystick.
P/N: 998-5000-211: ProductionVIEW Precision Camera
Controller Sliding Shelf
Overview:
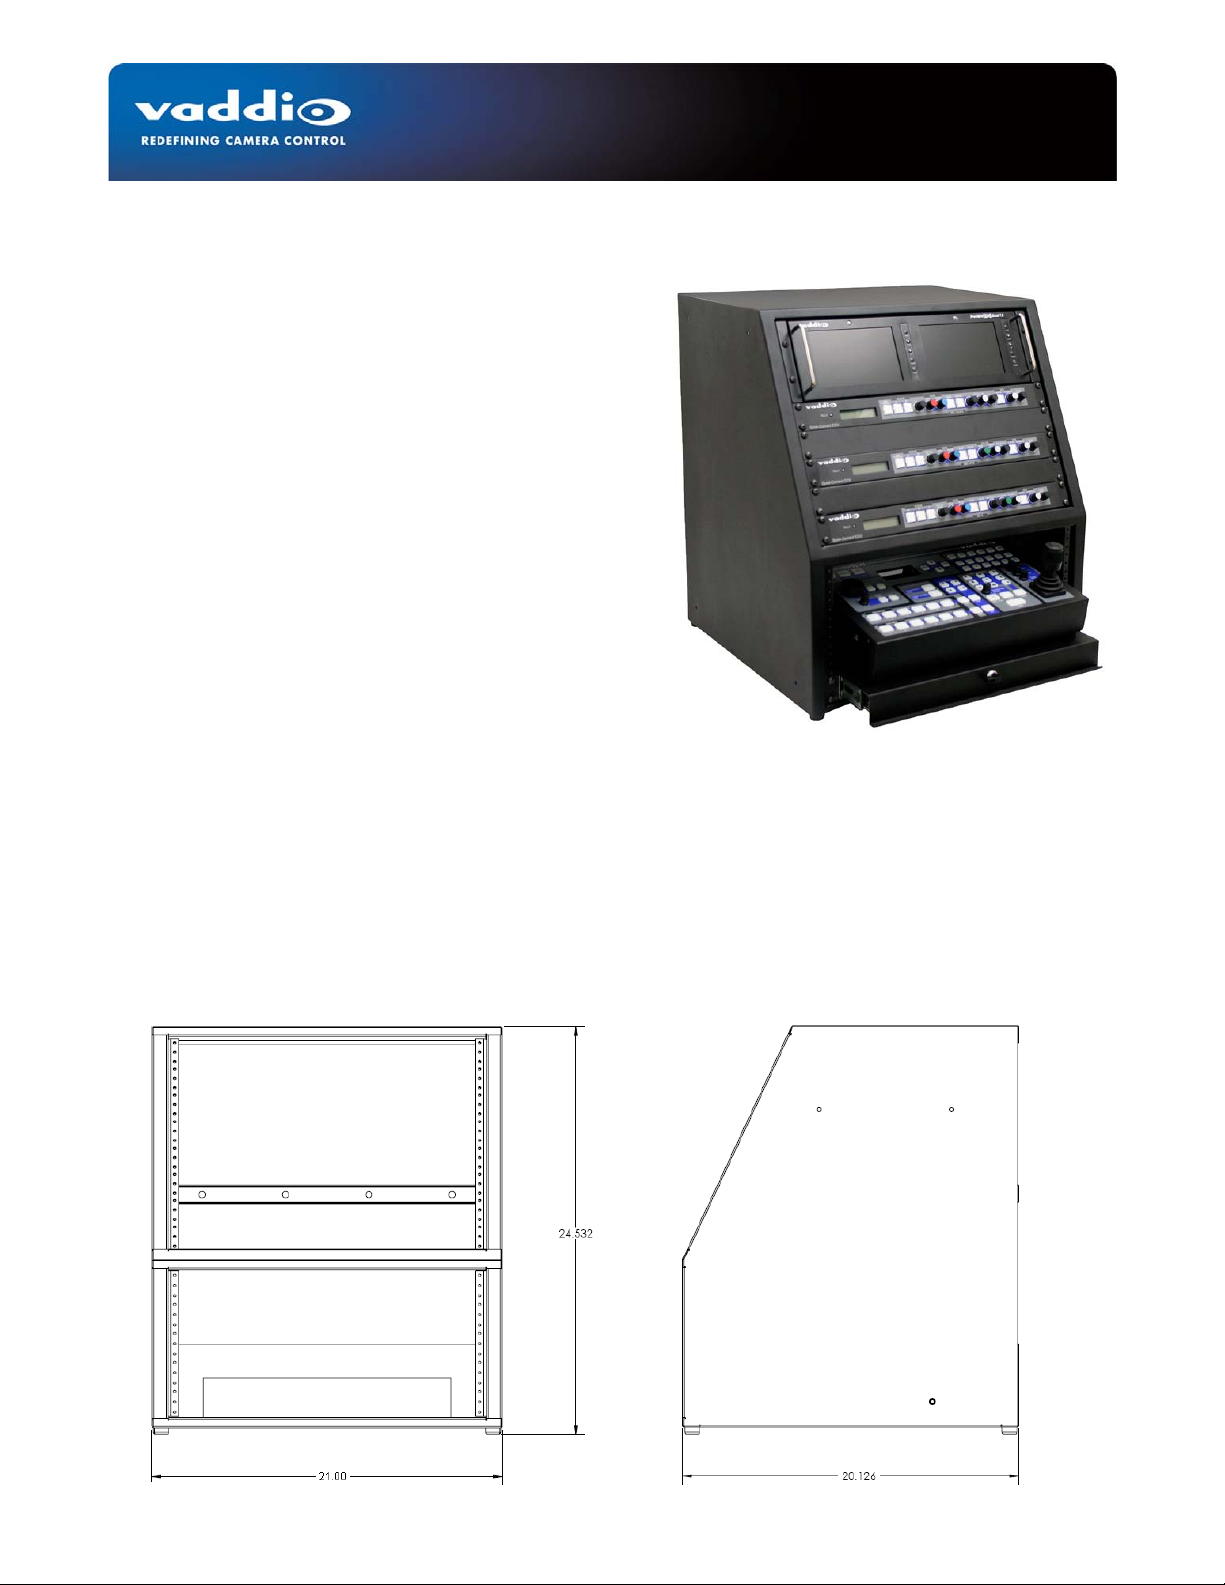
The Vaddio™ ProductionVIEW Rack Enclosure is a dual
bay rack mounting system with an 8 RU upper bay, and a 5
RU lower bay. It is designed to install a variety of rackmountable equipment.
With the optional ProductionVIEW Sliding Shelf system, a
ProductionVIEW controller can easily be stored out of the
way when not in use. Made of light weight, yet strong
aluminum, the back panel has wire tie slots, and holes for
mounting the enclosure to a tabletop. The black powder
coat finish is durable and long lasting. Two Rack Bays can
be bolted together as an option.
ProductionVIEW Rack Enclosure Features:
Dual Rack Bay Design (upper and lower)
8-RU Upper Rack Bay (14”/35.56cm) and 5-RU Lower Rack Bay (8.75”/22.23cm)
Aluminum construction with attractive black powder coat finish
25 Slant on upper bay for optimal viewing of the front panels
Dimensions:
Front View of Rack Enclosure
™
R
R
AACCKK
E
NNCCLLOOSSUURREE
E
&
P
&
ProductionVIEW Rack Enclosure (998-5000-200)
with ProductionVIEW Sliding Shelf (9980500-0-210)
Vaddio Equipment Not Included
Side View of Rack Enclosure
RROODDUUCCTTIIOON
P
N
VVIIEEW
W
©2008 Vaddio - All Rights Reserved. ProductionVIEW Rack Enclosure - Document Number 341-722 Rev B
Page 2
ProductionVIEW Rack Enclosure
ProductionVIEW Rack Enclosure Sliding Shelves
P/N: 998-5000-210 ProductionVIEW Sliding Shelf
Fits Models ProductionVIEW FX, ProductionVIEW HD,
ProductionVIEW HD-SDI, ProductionVIEW HD MV,
ProductionVIEW HD-SDI MV & ProductionVIEW Super Joystick
P/N: 998-5000-211 ProductionVIEW Precision
Camera Controller Sliding Shelf
ProductionVIEW Sliding Shelf Includes:
One (1) Sliding Shelf
Two (2) Angle Brackets (left and right) for mounting the ProductionVIEW or Precision Camera Controller
Four (4) 8-32 x 3/8” screws
Eight (8) 10-32 x .313” black oxide screws
Two (2) 8-32 x 3/8” flat head screws
Two (2) ¼” flat washers
Six (6) 8-32 Keps nuts
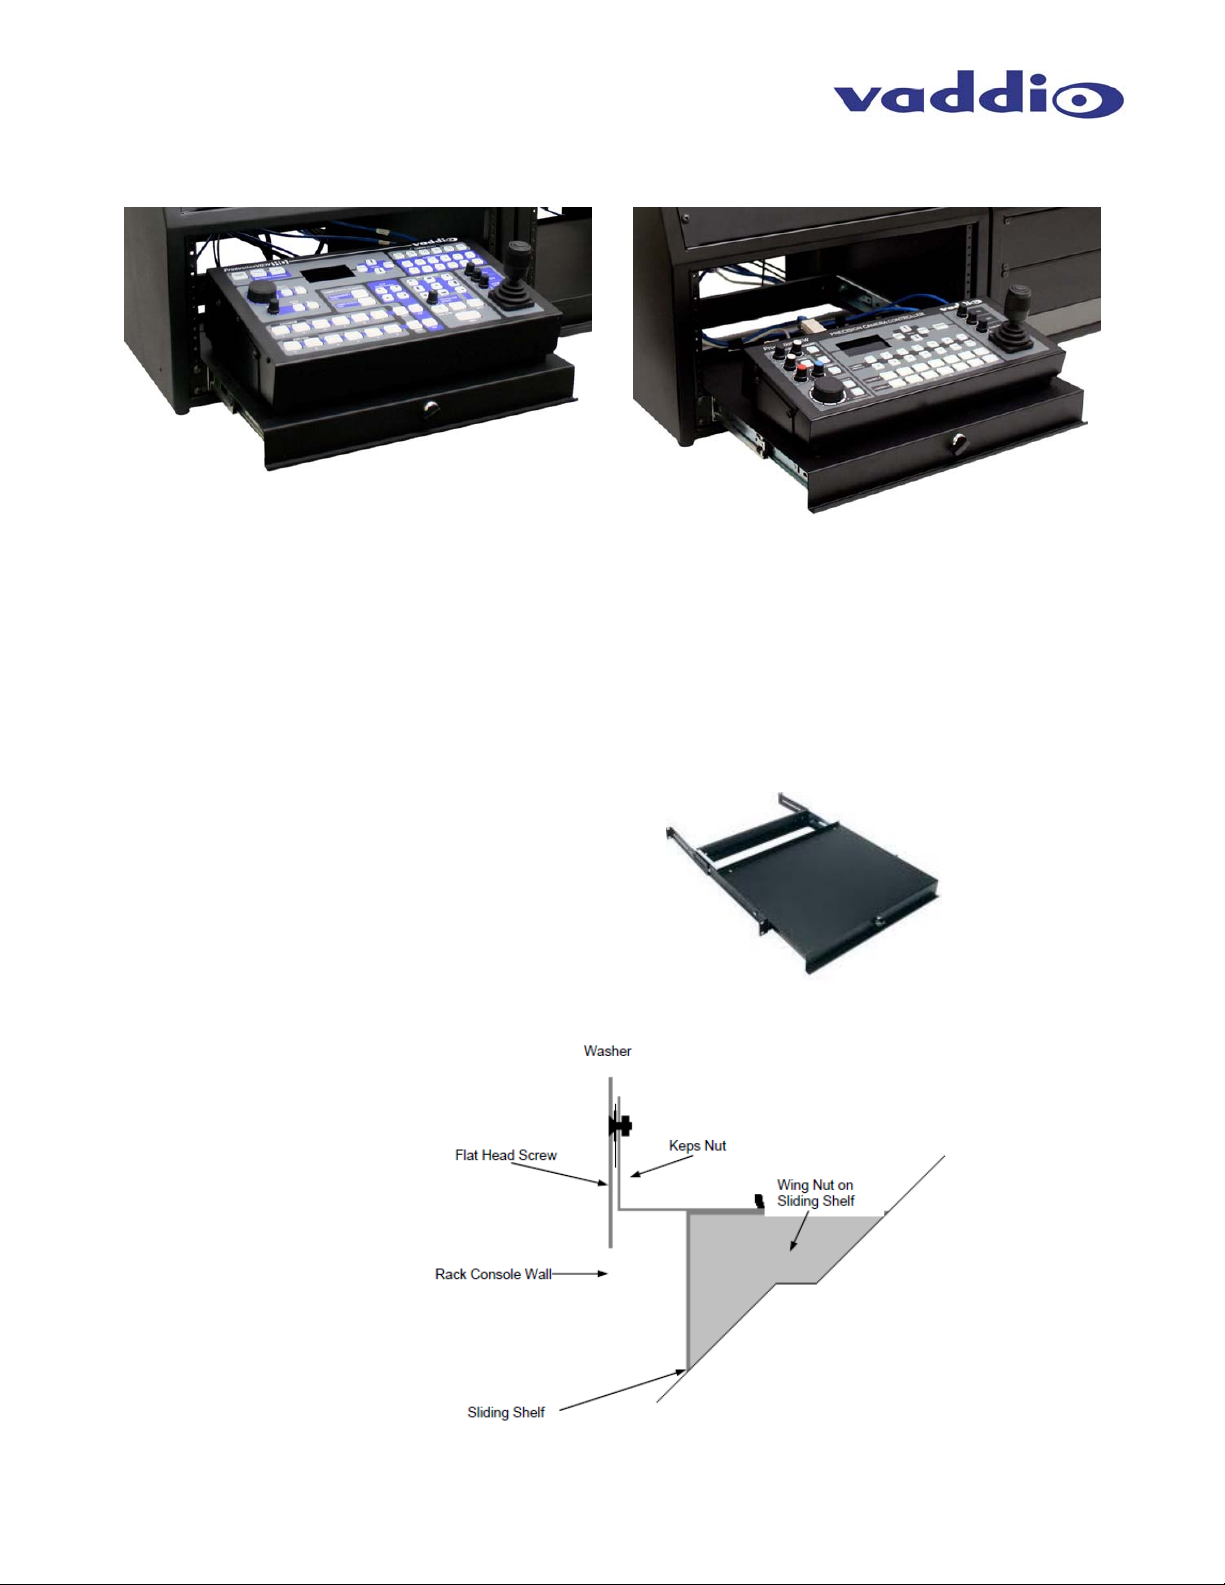
Sliding Shelf
Installing the Sliding Shelf
1. Locate the two (2) 8-32 flat head screws, two (2) flat
washers, and two (2) Keps nuts.
2. Loosen wing nuts on the “L” brackets of the sliding shelf.
3. Lay sliding shelf into bottom of enclosure.
4. Slide flat head screw into one hole on the back side of the rack console.
5. Place a washer in between the rack enclosure side panel and the L bracket (see below).
6. Slide the L-shaped tab attached to the wing nut onto the flat head screw, and then tighten the Keps nut onto
Diagram showing the back of the
Sliding Shelf installation (top view)
the flat head screw.
ProductionVIEW Rack Enclosure - Document 341-722 Rev. B Page 2 of 4
Page 3

ProductionVIEW Rack Enclosure
Installation (continued)
7. Repeat the process for the other side of the shelf.
8. Fasten the front of the sliding shelf to the Enclosure using four (4) 10-32 rack screws (see below).
Rack screws not provided
9. Test the shelf to confirm that it slides in and out smoothly, and then tighten all of the screws down.
10. Slide the Shelf out, and match the holes in the shelf with the angle brackets for the ProductionVIEW console.
Slide the four (4) 8-32 x 3/8” screws through the holes.
11. From the bottom of the Shelf, connect the remaining four (4) Keps nuts to the screws, and hand-tighten only.
12. Slide the ProductionVIEW console on for proper fit. Carefully remove the ProductionVIEW console, so as not
to move the angle brackets, and then tighten the screws down.
13. Place the ProductionVIEW console back onto the sliding shelf. Line up
the holes on the sides of the angle brackets with the holes in the
ProductionVIEW console. Use the remaining four (4) 10-32 x .313”
screws to mount the ProductionVIEW to the Mounting Tabs (see picture
to the right).
Example: Two (2) Rack Enclosures Bolted Together.
ProductionVIEW Rack Enclosure - Document 341-722 Rev. B Page 3 of 4
Page 4

ProductionVIEW Rack Enclosure
WARRANTY INFORMATION
Hardware* Warranty - One year limited warranty on all parts. Vaddio warrants this product against defects in materials and
workmanship for a period of one year from the day of purchase from Vaddio. If Vaddio receives notice of such defects during
the warranty period, they will, at their option, repair or replace products that prove to be defective.
Exclusions - The above warranty shall not apply to defects resulting from: improper or inadequate maintenance by the
customer, customer applied software or interfacing, unauthorized modifications or misuse, operation outside the normal
environmental specifications for the product, use of the incorrect power supply, improper extensio n of the power supply cable
or improper site operation and maintenance.
Vaddio Customer service – Vaddio will test, repair, or replace the product or products without charge if the unit is under
warranty and is found to be defective. If the product is out of warranty, Vaddio will test then repair the product or products. The
cost of parts and labor charge will be estimated by a technician and confirmed by the customer prior to repair. All components
must be returned for testing as a complete unit. Vaddio will not accept responsibility for shipment after it has left the premises.
Vaddio Technical support - Vaddio technicians will determine and discuss with the customer the criteria for repair costs
and/or replacement. Vaddio Technical Support can be contacted through one of the following resources: e-mail support at
support@vaddio.com or online at www.vaddio.com.
Return Material Authorization (RMA) number - Before returning a product for repair or replacement, request an RMA from
Vaddio’s technical support. Provide a technician with a return phone number, e-mail address, shipping address, and product
serial numbers and describe the reason for repairs or returns as well as the date of purchase and proof of purchase. Include
your assigned RMA number in all correspondence with Vaddio. W rite your assigned RMA numb er on the shippi ng label of the
box when returning the product. Please see Vaddio’s website for current RMA policies and procedures.
Voided warranty – The warranty does not apply if the original ser ial number has been removed or if the product has been
disassembled or damaged through misuse, accident, modifications, or unauthoriz ed repai r. Cutting the po wer supply cabl e on
the secondary side (low voltage side) to extend the power to the device (camera or controller) voids the warranty for that
device.
Shipping and handling - Vaddio will not pay for inbound shipping transportation or insurance charges or accept any
responsibility for laws and ordinances from inbound transit. Vaddio will pay for outbound shipping, transportation, and
insurance charges for all items under warranty but will not assume responsibility for loss and/or da mage by the outbound
freight carrier. If the return shipment appears damaged, retain the original boxes a nd packing material for inspection by the
carrier. Contact your carrier immediately.
Products not under warranty - Payment arrangements are required before outbound shipment for all out of warranty
products.
*Vaddio manufactures its hardware products from parts and components that are new or equiva lent to new in accordance with
industry standard practices.
Toll Free: 800-572-2011
www.vaddio.com
©2011 Vaddio - All Rights Reserved. Reproduction in whole or in part without written permission is prohibited. Specifications and pricing are
subject to change without notice. Vaddio, ProductionVIEW, PreVIEW and Quick-Connect are registered trademarks of Vaddio. All other
trademarks are property of their respective owners. Document Number 341-722 Rev B.
ProductionVIEW Rack Enclosure - Document 341-722 Rev. B Page 4 of 4
 Loading...