

Page 1

Life Science Software
Installation and User Guide
• Doc-It®LS Image Acquisition Software
• Doc-It®LS Image Acquisition and Analysis Software
• VisionWorks®LS Image Acquisition Software
• VisionWorks®LS Image Acquisition and Analysis Software
UVP, LLC Ultra-Violet Products Ltd.
2066 W. 11th Street Unit 1, Trinity Hall Farm Est., Nuffield Rd.
Upland, CA 91786 USA Cambridge CB4 1TG UK
(800) 452-6788 | (909) 946-3197 +44(0)1223-420022
Fax: (909) 946-3597 Fax: +44(0)1223-420561
Email: info@uvp.com Email: uvp@uvp.co.uk
Web site: UVP.com
81-0254-01 Rev L
Page 2

Page 3

Table of Contents
Welcome ....................................................................................................................................................... 1
Welcome to LS Software Guide .................................................................................................................... 1
What's New in Version 8 ........................................................................................................................... 1
Getting Started .......................................................................................................................................... 1
Capturing Images ................................................................................................................................. 2
Performing Analysis Functions on Images ....................................................................................... 2
Minimum System Requirements ................................................................................................................... 3
Operating System Requirements .............................................................................................................. 3
Registering the Software ............................................................................................................................... 4
Overview .................................................................................................................................................... 4
Types of Registration ................................................................................................................................. 4
On the Fly Activation .............................................................................................................................. 4
Already Have an Activation ID ............................................................................................................... 5
Offline Activation .................................................................................................................................... 5
Single-User License ...................................................................................................................................... 7
Network-User License ................................................................................................................................... 8
Additional Network Users ........................................................................................................................ 12
User Administration ..................................................................................................................................... 14
About Secure User Accounts .................................................................................................................. 14
Enable Secure User Accounts .......................................................................................................... 14
Definitions of the User Administration Columns ........................................................................... 15
Users Rights ............................................................................................................................................ 16
Configure User Accounts ............................................................................................................................ 17
User Names and Passwords ................................................................................................................... 17
Add a New User ...................................................................................................................................... 18
Edit a User ............................................................................................................................................... 18
Change a Password or Other Settings .................................................................................................... 19
Deactivate/Reactivate a User .................................................................................................................. 19
View the Login History of a User ............................................................................................................. 20
T
echnical Support ....................................................................................................................................... 21
License Agreement ..................................................................................................................................... 22
End User License Agreement ................................................................................................................. 22
VisionWorks®LS and Doc-It®LS Software ............................................................................................. 22
License ................................................................................................................................................ 22
Restrictions ........................................................................................................................................ 22
Termination ........................................................................................................................................ 22
Limited Warranty and Disclaimer ..................................................................................................... 23
Limitation of Liability ......................................................................................................................... 23
Governing Law and Severability ...................................................................................................... 23
Navigate the Software ................................................................................................................................. 24
Navigating the Software .............................................................................................................................. 24
Main Window ........................................................................................................................................... 24
ii
Page 4

Table of Contents
Action Tabs .............................................................................................................................................. 24
Image Windows ........................................................................................................................................... 26
Organize Image Windows ....................................................................................................................... 26
Information Provided by the Image Window ............................................................................................ 26
Show the Image in Actual Size ................................................................................................................ 27
Fit the Image to the Window .................................................................................................................... 27
Context Menu Commands ....................................................................................................................... 27
Status Bar ................................................................................................................................................ 27
Obtain Image Information ............................................................................................................................ 28
Overview .................................................................................................................................................. 28
Display Image Information ....................................................................................................................... 28
Enter Notes .............................................................................................................................................. 28
Calibrate Image Scale ............................................................................................................................. 28
Menu Buttons .......................................................................................................................................... 30
Menus and Action Tabs Overview .............................................................................................................. 30
Main Menu Buttons .................................................................................................................................. 30
Action Menu Tabs .................................................................................................................................... 30
Acquisition Action Tab and Menu Buttons ..................................................................................... 30
Image Action Tab and Menu Buttons .................................................................................................. 30
1D Analysis Action Tab and Menu Buttons ......................................................................................... 30
Area Density Action Tab and Menu Buttons ........................................................................................ 31
Colony Counting Action Tab and Menu Buttons .................................................................................. 31
File Menu Button .................................................................................................................................. 32
File Menu Overview .................................................................................................................................... 32
Open and Save Images .............................................................................................................................. 33
Open Images ........................................................................................................................................... 33
Open a Previously Saved Image ...................................................................................................... 33
Open a Demo Image .......................................................................................................................... 33
Save Images ............................................................................................................................................ 33
Save Using a Different File Folder, Name or Type ......................................................................... 34
I
mage File Types ..................................................................................................................................... 34
Print ............................................................................................................................................................. 35
FTP Transfer ............................................................................................................................................... 36
Edit Menu Button ................................................................................................................................. 38
Edit Menu Button Overview......................................................................................................................... 38
Copy ............................................................................................................................................................ 39
Copy an Entire Image .............................................................................................................................. 39
Copy a Selected Region Within an Image ............................................................................................... 39
Paste ........................................................................................................................................................... 40
Paste an Image ....................................................................................................................................... 40
Paste Special ........................................................................................................................................... 40
Undo and Redo ........................................................................................................................................... 42
Region of Interest (ROI) .............................................................................................................................. 43
About the Selection Tools........................................................................................................................ 43
iii
Page 5

LS Software User Guide
Select a Region ....................................................................................................................................... 44
Adjust a Region ....................................................................................................................................... 44
Cancel a Region ...................................................................................................................................... 44
Image Enhancement Filters ........................................................................................................................ 45
Blur .............................................................................................................................................................. 46
Sharpen ....................................................................................................................................................... 47
Emboss ....................................................................................................................................................... 48
Remove Noise ............................................................................................................................................. 49
Adjust the Image ......................................................................................................................................... 50
Rotate Function ........................................................................................................................................... 51
Rotate an Image ...................................................................................................................................... 51
Rotate an Image by an Exact Number of Degrees ................................................................................. 51
Align the Image ........................................................................................................................................... 53
Flip Image.................................................................................................................................................... 54
Flip Horizontally ....................................................................................................................................... 54
Flip Vertically ........................................................................................................................................... 54
Resize Image .............................................................................................................................................. 56
Reduce Image to Monochrome ................................................................................................................... 57
Change Image Depth .................................................................................................................................. 58
Advanced Menu Button........................................................................................................................ 59
Advanced Menu Overview .......................................................................................................................... 59
Log Viewer .................................................................................................................................................. 60
Configure User Accounts ............................................................................................................................ 61
User Names and Passwords ................................................................................................................... 61
Add a New User ...................................................................................................................................... 62
Edit a User ............................................................................................................................................... 62
Change a Password or Other Settings .................................................................................................... 63
Deactivate/Reactivate a User .................................................................................................................. 63
View the Login History of a User ............................................................................................................. 64
D
isplay Loaded Modules ............................................................................................................................. 65
Configure Application .................................................................................................................................. 66
Rulers .......................................................................................................................................................... 67
Show or Hide the Rulers .......................................................................................................................... 67
Using Macros .............................................................................................................................................. 68
Overview .................................................................................................................................................. 68
Macros Navigation ................................................................................................................................... 68
Record Macros ........................................................................................................................................ 68
Edit Macros .............................................................................................................................................. 69
Play a User-Defined Macro ..................................................................................................................... 69
Help Menu Button ................................................................................................................................ 70
Help Menu Overview ................................................................................................................................... 70
Display Help Topics .................................................................................................................................... 71
Application Information ................................................................................................................................ 72
Acquire Images ........................................................................................................................................... 73
iv
Page 6

Table of Contents
Acquisition Action Tab Overview ................................................................................................................ 73
Image Acquisition ........................................................................................................................................ 75
Capture an Image .................................................................................................................................... 75
Using the iBox Explorer Imaging Microscope ............................................................................................. 77
Emission Filters ....................................................................................................................................... 77
Magnification ........................................................................................................................................... 78
Fine Focus ............................................................................................................................................... 79
Bookmarks ............................................................................................................................................... 79
New ...................................................................................................................................................... 79
Update ................................................................................................................................................. 79
Delete ................................................................................................................................................... 80
Clear..................................................................................................................................................... 80
Lighting/Darkroom/Lens .......................................................................................................................... 81
BioLite MultiSpectral Light Source .............................................................................................................. 81
Using the BioLite Functions ..................................................................................................................... 81
Darkroom Control ........................................................................................................................................ 83
Hardware Settings Selection ................................................................................................................... 83
Tray Height .............................................................................................................................................. 83
Lens Control ................................................................................................................................................ 85
Lens Control ............................................................................................................................................ 85
Camera .................................................................................................................................................... 86
Camera Functions ....................................................................................................................................... 86
Integration ................................................................................................................................................ 86
Exposure Time ........................................................................................................................................ 87
Gain ......................................................................................................................................................... 87
Post Processing ....................................................................................................................................... 88
Binning ..................................................................................................................................................... 88
Saturation Preview .................................................................................................................................. 88
Preferences ............................................................................................................................................. 88
C
CD Temperature ................................................................................................................................... 89
Camera Integration ..................................................................................................................................... 90
On Chip Integration ................................................................................................................................. 90
Sequential Integration .............................................................................................................................. 90
Dynamic Integration ................................................................................................................................. 92
Binning Modes ............................................................................................................................................ 93
Perform 1D Analysis ................................................................................................................................... 94
1D Analysis Action Tab Overview ............................................................................................................... 94
Lanes and Bands ..................................................................................................................................... 97
Finding Lanes and Bands ........................................................................................................................... 97
Define Region of Interest (ROI) ............................................................................................................... 97
Perform Automatic Finding of Lanes and Bands ..................................................................................... 97
Adjust Lanes and Bands Search Parameters ......................................................................................... 98
Lane and Band Information ....................................................................................................................... 100
Lane and Band Properties ..................................................................................................................... 100
v
Page 7

LS Software User Guide
View and Use Lane Properties ....................................................................................................... 100
View and Use Band Properties ....................................................................................................... 101
Information Found in the 1D Analysis Image Window .......................................................................... 101
Add Lanes and Bands ............................................................................................................................... 103
Add Lanes Method No. 1: From the Find Lanes and Bands Window ................................................... 103
Add Bands Method No. 1: From the Find Lanes and Bands Dialog Window ....................................... 103
Add Lanes Method No. 2: From the Image Window ............................................................................. 103
Add Bands Method No. 2: From the Image Window ............................................................................. 104
Delete Lanes and Bands ........................................................................................................................... 106
Delete Lanes ......................................................................................................................................... 106
Delete Bands ......................................................................................................................................... 106
Edit Lanes and Bands ............................................................................................................................... 107
Move Lanes and Bands ......................................................................................................................... 107
Resize Band Extents ............................................................................................................................. 107
Place Bands Exactly .............................................................................................................................. 108
Lane Profile ........................................................................................................................................... 110
Lane Profile Overview ............................................................................................................................... 110
Molecular Weight ............................................................................................................................... 112
Perform Molecular Weight Calibrations .................................................................................................... 112
Overview ................................................................................................................................................ 112
Apply a Molecular Weight Standard to a Lane.......................................................................................... 113
Calibrate a Lane .................................................................................................................................... 113
Stretch Factor ........................................................................................................................................ 114
Manual Placement of Weights ............................................................................................................... 115
Exact Placement of Bands .................................................................................................................... 115
Changing Molecular Weight Settings ........................................................................................................ 116
Add Molecular Weight Standard to the Library...................................................................................... 116
Edit Molecular Weight Standard in the Library ...................................................................................... 117
Remove Molecular Weight Standard in the Library ............................................................................... 117
Copy Molecular Weight Standard in the Library .................................................................................... 117
Background Correction ............................................................................................................................. 118
B
ackground Correction Options ............................................................................................................ 118
No Background Correction ............................................................................................................. 118
Straight Line ..................................................................................................................................... 118
Joined Valleys .................................................................................................................................. 119
Rolling Disc ...................................................................................................................................... 120
Area Between Lanes ........................................................................................................................ 120
Concentration ..................................................................................................................................... 122
Lane Profile Graph .................................................................................................................................... 122
Use the Lane Profile Graph ................................................................................................................... 122
Display Lane(s) ...................................................................................................................................... 122
Axis Options .......................................................................................................................................... 123
Change Axis Units ........................................................................................................................... 123
Display Options ..................................................................................................................................... 123
vi
Page 8

Table of Contents
Display Options for Details ............................................................................................................. 124
Selecting Background Color .......................................................................................................... 124
Change the Color of the Graph's Axes .......................................................................................... 124
Background Correction Options .................................................................................................... 124
Move Bands Using the Lane Profile Graph ........................................................................................... 124
Resize Bands Using the Lane Profile Graph ......................................................................................... 125
Concentration Calibration .......................................................................................................................... 126
Change Unit Type .................................................................................................................................. 127
Select Unit Type .................................................................................................................................... 127
Add, Edit or Delete a Unit Type ............................................................................................................. 127
Add Unit Type ................................................................................................................................... 127
Edit Unit Type ................................................................................................................................... 128
Delete Unit Type ............................................................................................................................... 128
Select Data Points ................................................................................................................................. 128
Edit Data Points ............................................................................................................................... 129
Delete Data Points ........................................................................................................................... 129
Select Curve Type ................................................................................................................................. 129
Remove Concentration Calibration ....................................................................................................... 130
Retardation factor (Rf) Lines ..................................................................................................................... 131
Automatic Rf Line Determination ........................................................................................................... 131
Adjust an Automatic Rf Line .................................................................................................................. 131
Add Rf Lines Manually ........................................................................................................................... 132
Move Rf Lines ........................................................................................................................................ 132
Delete Rf Lines ...................................................................................................................................... 132
Delete One Rf Line ........................................................................................................................... 132
Remove All Rf Lines ........................................................................................................................ 133
Dendrogram Analysis ............................................................................................................................ 134
Performing Dendrogram Analysis ............................................................................................................. 134
Overview ................................................................................................................................................ 134
Generate Dendrogram Graphs .............................................................................................................. 134
G
enerate Multi-Image Dendrogram Graphs .................................................................................. 135
Modify Dendrogram Graphs .................................................................................................................. 135
Dendrogram Standards ......................................................................................................................... 135
Matching bands ................................................................................................................................ 135
Similarity and distance between lanes .......................................................................................... 136
Create Clusters ...................................................................................................................................... 136
Linkage Rules ........................................................................................................................................... 137
1D Analysis Settings ................................................................................................................................. 139
Results ................................................................................................................................................... 141
Viewing and Printing 1D Gel Analysis ....................................................................................................... 141
Overview ................................................................................................................................................ 141
Results Data Explorer ............................................................................................................................... 142
Filtering Data ......................................................................................................................................... 142
Printing Data Explorer Tabular Reports .................................................................................................... 143
vii
Page 9

LS Software User Guide
Print Data Explorer Reports................................................................................................................... 143
Page Setup ........................................................................................................................................ 143
Print Reports .................................................................................................................................... 143
Export Data Explorer Reports ............................................................................................................... 143
Report Types ......................................................................................................................................... 144
Fixed Image and Analysis Reports ........................................................................................................ 144
Fixed Standard Reports .................................................................................................................. 144
Clear ...................................................................................................................................................... 146
Clear Lane and Band Information ............................................................................................................. 146
Perform Area Density Analysis ................................................................................................................. 147
Area Density Action Tab Overview ........................................................................................................... 147
Perform Area Density ................................................................................................................................ 149
Overview ................................................................................................................................................ 149
Perform Area Density Analysis .............................................................................................................. 149
Define the Region ............................................................................................................................ 149
Use Magic Wand to Define ROI ............................................................................................................ 150
Select Multiple Bands and Regions in the Image .................................................................................. 151
Modify Regions in the Image ................................................................................................................. 151
Area Density Settings ................................................................................................................................ 153
Define Area Density Background .............................................................................................................. 154
Define Background ................................................................................................................................ 154
Delete Background Region.................................................................................................................... 155
Modify an Existing Background Region ................................................................................................. 155
Estimate Region Volume ........................................................................................................................... 156
Calibration Curves ..................................................................................................................................... 158
About Intensity Calibration Curves ........................................................................................................ 158
Optical Density ...................................................................................................................................... 158
Grey Levels ........................................................................................................................................... 158
Types of Calibration Curves .................................................................................................................. 159
Apply Pre-Defined Intensity Calibration Curve ...................................................................................... 159
A
dd New Intensity Calibration Curve ..................................................................................................... 159
Set Amount Calibration Curve ............................................................................................................... 160
Change Calibration Curve Graph .......................................................................................................... 161
Reporting and Printing Area Density Results ............................................................................................ 163
Area Density Results and Data ............................................................................................................. 163
Save the Results ................................................................................................................................... 164
Print the Results .................................................................................................................................... 164
Export the Results ................................................................................................................................. 164
Perform Colony Counting .......................................................................................................................... 165
Colony Count Action Tab Overview .......................................................................................................... 165
Colony Counting Settings .......................................................................................................................... 167
Label Type ............................................................................................................................................. 167
Colony Marking ...................................................................................................................................... 168
Label Color ............................................................................................................................................ 168
viii
Page 10

Table of Contents
Circle Radius ......................................................................................................................................... 168
Count Colonies ...................................................................................................................................... 169
Counting Colonies - Options ..................................................................................................................... 169
Automatic Counting ................................................................................................................................... 170
Click and Add Counting ............................................................................................................................. 172
Set-Up Colony Counting Templates ......................................................................................................... 174
Counting Using a Predefined Template .................................................................................................... 178
Edit Colonies ...................................................................................................................................... 179
Add Colonies ............................................................................................................................................. 179
Delete Colonies ......................................................................................................................................... 180
Split Colonies ............................................................................................................................................ 181
Manual Split Colonies ............................................................................................................................ 181
Auto Split Colonies ................................................................................................................................ 182
Merging Colonies ...................................................................................................................................... 183
Identify by Color Counting ................................................................................................................. 184
Identify by Color Counting ......................................................................................................................... 184
Identify by Color Counting Step 1: Select Classes ................................................................................... 186
Define the Counting Region .................................................................................................................. 186
Select Classes ....................................................................................................................................... 186
Identify by Color Counting Step 2: Finish .................................................................................................. 189
Spiral Counting .......................................................................................................................................... 191
Perform Spiral Count ............................................................................................................................. 191
Adjust Grid Size and Volume................................................................................................................. 192
View, Save and Print Spiral Plate Results ............................................................................................. 193
User Tips ............................................................................................................................................... 194
Zone Analysis ............................................................................................................................................ 195
Colony Counting Results ....................................................................................................................... 196
Colony Counting Reports .......................................................................................................................... 196
Export and Print Colony Results ............................................................................................................... 197
E
xporting to Excel .................................................................................................................................. 197
Printing Colony Results ......................................................................................................................... 197
Reporting Colony Class Information ......................................................................................................... 198
Reporting General Colony Information ..................................................................................................... 200
Reporting Colony Statistical Information ................................................................................................... 201
Reporting Colony Distribution Information ................................................................................................ 203
Modify Images ........................................................................................................................................... 204
Image Action Tab Overview ...................................................................................................................... 204
Display Control ...................................................................................................................................... 205
Image Corrections ..................................................................................................................................... 205
Corrections ............................................................................................................................................ 205
Change Brightness, Contrast, Gamma Or Invert .................................................................................. 206
Change Brightness .......................................................................................................................... 206
Change Contrast .............................................................................................................................. 206
Change Gamma ................................................................................................................................ 207
ix
Page 11

LS Software User Guide
Invert Image ...................................................................................................................................... 207
Histogram Controls ................................................................................................................................... 208
Apply a Histogram ................................................................................................................................. 208
Pseudocolor .............................................................................................................................................. 210
Pseudocolor Spectrums ........................................................................................................................ 210
Apply or Remove a Pseudocolor ........................................................................................................... 211
3D Plots ..................................................................................................................................................... 212
Using the 3D Plot Function .................................................................................................................... 212
Viewpoint Tab ........................................................................................................................................ 213
Rotation Controls ............................................................................................................................. 213
Zoom Controls ................................................................................................................................. 213
Output Tab ............................................................................................................................................. 213
Annotations ............................................................................................................................................ 215
Annotations ............................................................................................................................................... 215
Overview ................................................................................................................................................ 215
Annotation Navigation ........................................................................................................................... 215
Types Of Annotation .............................................................................................................................. 215
Annotation Tools .................................................................................................................................... 216
Create Annotations ................................................................................................................................... 217
Create a Text Annotation....................................................................................................................... 217
Create Line Annotations ............................................................................................................................ 219
Create Shape and Highlight Annotations .................................................................................................. 220
Create a Rectangle, Ellipse, Highlighter Annotation ............................................................................. 220
View or Hide Annotations .......................................................................................................................... 221
Modify Annotations .................................................................................................................................... 222
Select Annotations ................................................................................................................................. 222
Edit Text Annotation .............................................................................................................................. 222
Move and Resize Annotations ............................................................................................................... 222
Move an Annotation ......................................................................................................................... 223
Change the
Resize an Existing Rectangle, Ellipse, Highlighter or Area Measure Annotation ..................... 223
Rotate Text Annotations ........................................................................................................................ 223
Format Annotations ............................................................................................................................... 223
Delete Annotations ................................................................................................................................ 224
Synchronize Annotations .......................................................................................................................... 225
Measurement Tools .................................................................................................................................. 226
Line Measure ......................................................................................................................................... 226
Area Measure ........................................................................................................................................ 226
Angle Measure ...................................................................................................................................... 227
Layer Actions ............................................................................................................................................ 228
Multi Image Actions ............................................................................................................................... 229
Multi-Image Actions ................................................................................................................................... 229
Background Filters ................................................................................................................................. 229
Background Correction .......................................................................................................................... 229
Points of an Existing Line, Length Measure or Angle Measure Annotation ......... 223
x
Page 12

Table of Contents
Background Subtraction ........................................................................................................................ 229
Image Compositing ................................................................................................................................... 230
Create a Composite Image.................................................................................................................... 230
Player (Image Sequences)........................................................................................................................ 231
Purpose of the Player ............................................................................................................................ 231
Using the Player .................................................................................................................................... 231
Merge Functions .................................................................................................................................... 232
Player Features ..................................................................................................................................... 233
Player Options ....................................................................................................................................... 233
Extract or Delete individual Image files (frames) ................................................................................... 234
Saving .AVI Files ................................................................................................................................... 235
Create Templates ...................................................................................................................................... 236
Set-Up Hardware Master Templates ........................................................................................................ 236
Create a New Template ......................................................................................................................... 236
Edit, Synchronize and Delete Templates .................................................................................................. 238
Edit a Template ..................................................................................................................................... 238
Synchronize a Template ........................................................................................................................ 238
Delete a Template ................................................................................................................................. 238
Open and Save Images ............................................................................................................................ 239
Open and Save Images ............................................................................................................................ 239
Open Images ......................................................................................................................................... 239
Open a Previously Saved Image .................................................................................................... 239
Open a Demo Image ........................................................................................................................ 239
Save Images .......................................................................................................................................... 239
Save Using a Different File Folder, Name or Type ....................................................................... 240
Image File Types ................................................................................................................................... 240
Print Reports ............................................................................................................................................. 242
Print ........................................................................................................................................................... 242
File Print Command .................................................................................................................................. 243
Print Image History ................................
Reports .................................................................................................................................................. 244
Preview and Print a Report.................................................................................................................... 244
Print an Image ....................................................................................................................................... 245
Support 21 CFR Part 11 Compliance ....................................................................................................... 246
Supporting 21 CFR Part 11 Compliance ................................................................................................... 246
Purpose ................................................................................................................................................. 246
Features................................................................................................................................................. 246
Usage .................................................................................................................................................... 246
View an Image History Audit Trail .................................................................................................. 246
Print an Audit Trail (History) ........................................................................................................... 247
Image History ............................................................................................................................................ 249
View Image History ................................................................................................................................ 249
Add Notes in the Image History ............................................................................................................. 249
Glossary .................................................................................................................................................... 250
.................................................................................................... 244
xi
Page 13

LS Software User Guide
Glossary .................................................................................................................................................... 250
Index .......................................................................................................................................................... 253
xii
Page 14

Page 15

Welcome
Welcome to LS Software Guide
UVP's Life Science (LS) software allows users to acquire, enhance, analyze and document images in a
simple and efficient way. Plus generate extensive reports and export them to Excel.
Life Science software is available as four unique configurations:
• VisionWorks®LS Acquisition
• VisionWorks®LS Acquisition and Analysis (includes 1D, Area Density and Colony Counting
Analysis)
• Doc-It®LS Acquisition
• Doc-It®LS Acquisition and Analysis (includes 1D and Colony Counting Analysis)
If a software function is grayed out, the function is not available with the version of software loaded on the
user’s computer.
The LS software is designed to image electrophoresis gels (DNA, RNA, Protein), blots, membranes,
plates, plants, and animals. Once an image has been captured with an application-specific camera, it can
be saved for documentation and presentations, manipulated for analysis, and annotated to point out key
features in the image.
What's New in Version 8
LS software release 8 new features include:
• New master template interface
• Updated workflow user interface
• Windows 7 and 8 compatibility
• Image interpolation for increased resolution
• Enhanced auto exposure capabilities
• Automatic histogram adjustment
• Automatic noise subtraction
• Automatic dark frame subtraction
Getting Started
• Minimum System Requirements
• Registering the Software
• User Administration
• Configure User Accounts
1
Page 16

LS Software User Guide
Capturing Images
• Acquisition
Performing Analysis Functions on Images
• 1D Analysis
• Area Density
• Counting Colonies
2
Page 17

Minimum System Requirements
Operating System Requirements
• Windows XP Professional with Service Pack 2 or higher, Windows 7, 8 and Vista
• Internet Explorer 8 or higher [To determine the version of Internet Explorer, open Internet
Explorer and click on Help > About]
• Intel Pentium Processor or equivalent, 1.6 GHz or higher
• 2 GB of RAM or greater (4 GB recommended)
• 200 MB of available hard disk space for the program, more for data
• To avail the functionality of 21 CFR Part 11 support, the disk partition must be formatted with
NTFS.
• CD-ROM drive
• Color monitor, supporting at least 1024 x 768 resolution and 16-bit or better colors; 24-bit or 32-
bit color is recommended
Welcome
• Computer equipped with minimum of three USB ports; additional ports required for peripheral
equipment (mouse, keyboard, etc.)
Note: Firewalls may impede successful installation and use of LS software, specifically for networked
applications. Contact your organization’s IT or network administrator to determine if a firewall or other
protection needs to be modified prior to installation of the software.
3
Page 18

LS Software User Guide
Registering the Software
• Overview
• Types of Registration
• On the Fly Activation
• Already Have an Activation ID
• Register Offline
• Single-user license
• Network-user license
• User Administration
Overview
The software is activated by entering an activation code provided by UVP in order to gain full access
rights to the software.
Once the software is installed, it will operate in full-feature trial mode for 14 days. Within the 14-day trial
mode, the software must be registered with UVP. Otherwise the software will only operate in
demonstration mode after the 14-day trail period. The demonstration mode limits the software to only
open and use the demonstration images provided by UVP. There are three ways to retrieve an activation
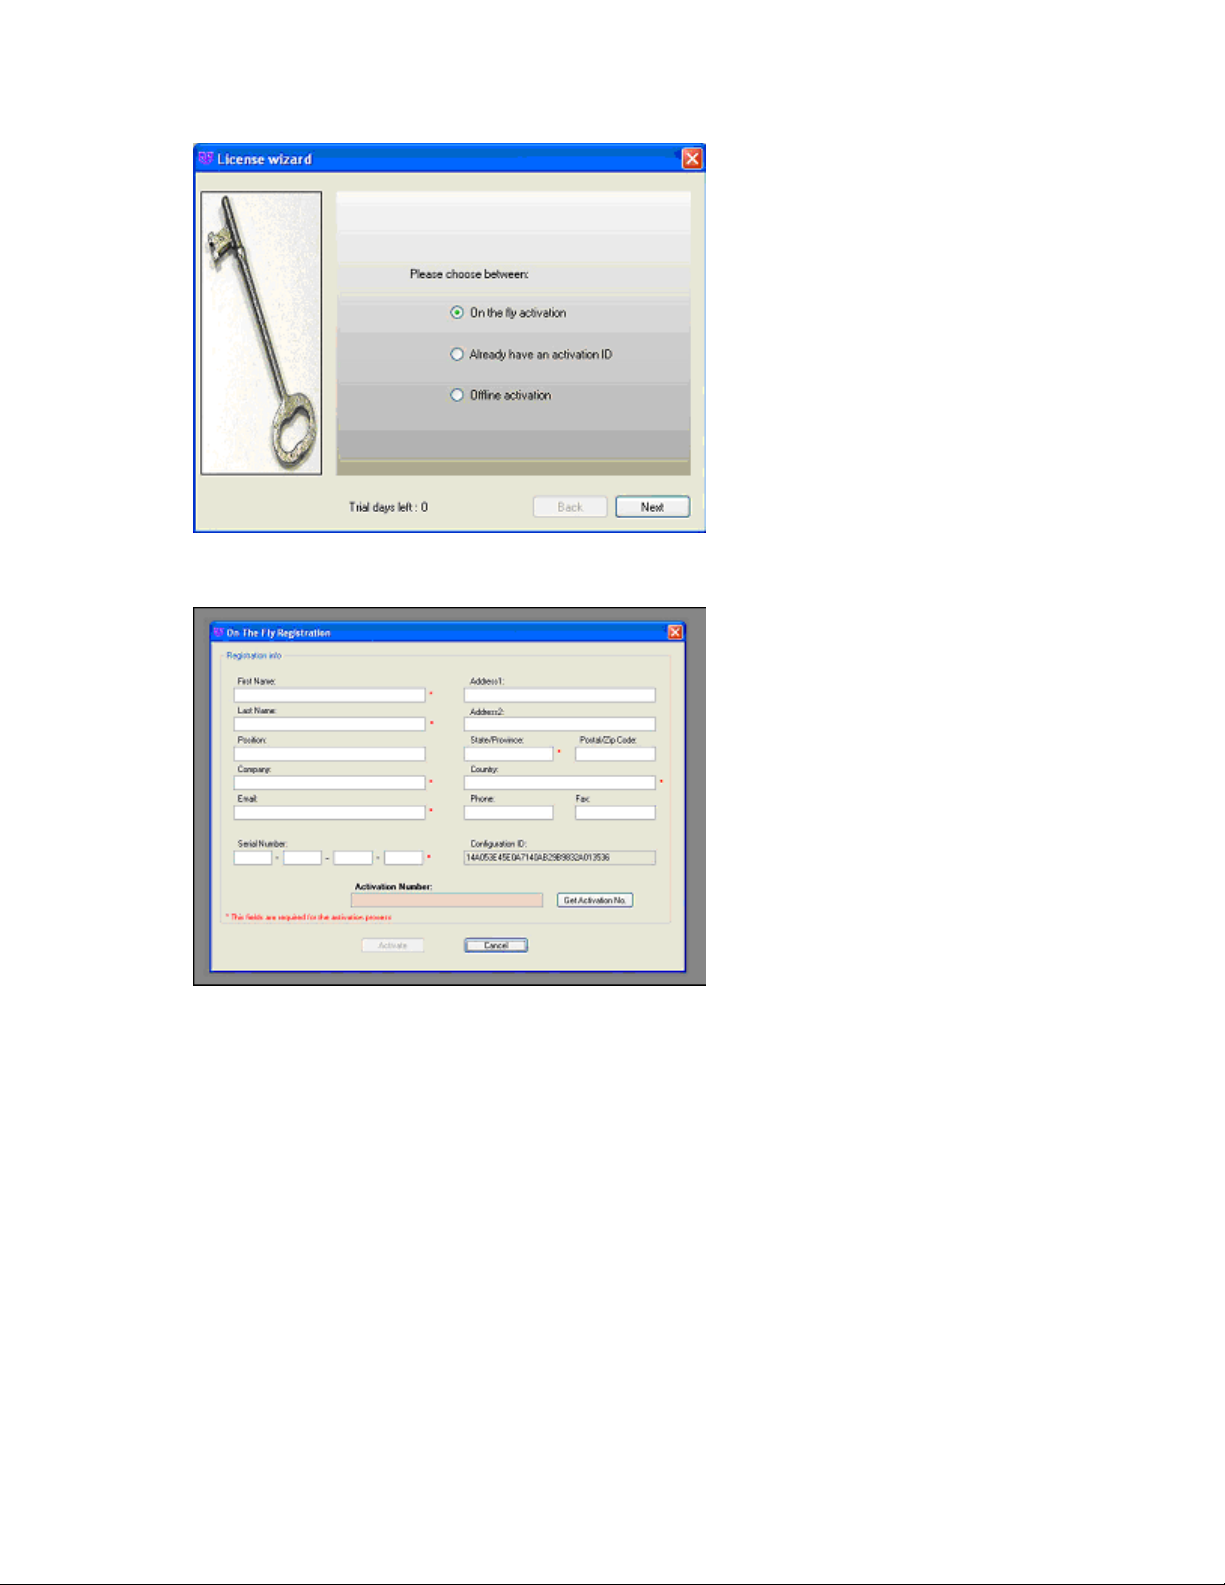
code: phone, email or Internet. All three methods are accessed via the License Wizard window.
• On the Fly Activation: Choose this option to activate the software immediately through the
Internet.
• Already Have an Activation ID: This option is useful when reloading (or upgrading) the software
after receiving an initial activation code.
• Offline Activation: This option is used if the computer is not connected to the Internet. This
allows the user to obtain the activation code and enter it at another time
Types of Registration
On the Fly Activation
To immediately activate the software through the Internet:
• Choose On the fly activation. If the computer is not connected to the Internet, follow the
instructions for Offline activation or call UVP to register the software.
• Click Next to continue.
4
Page 19
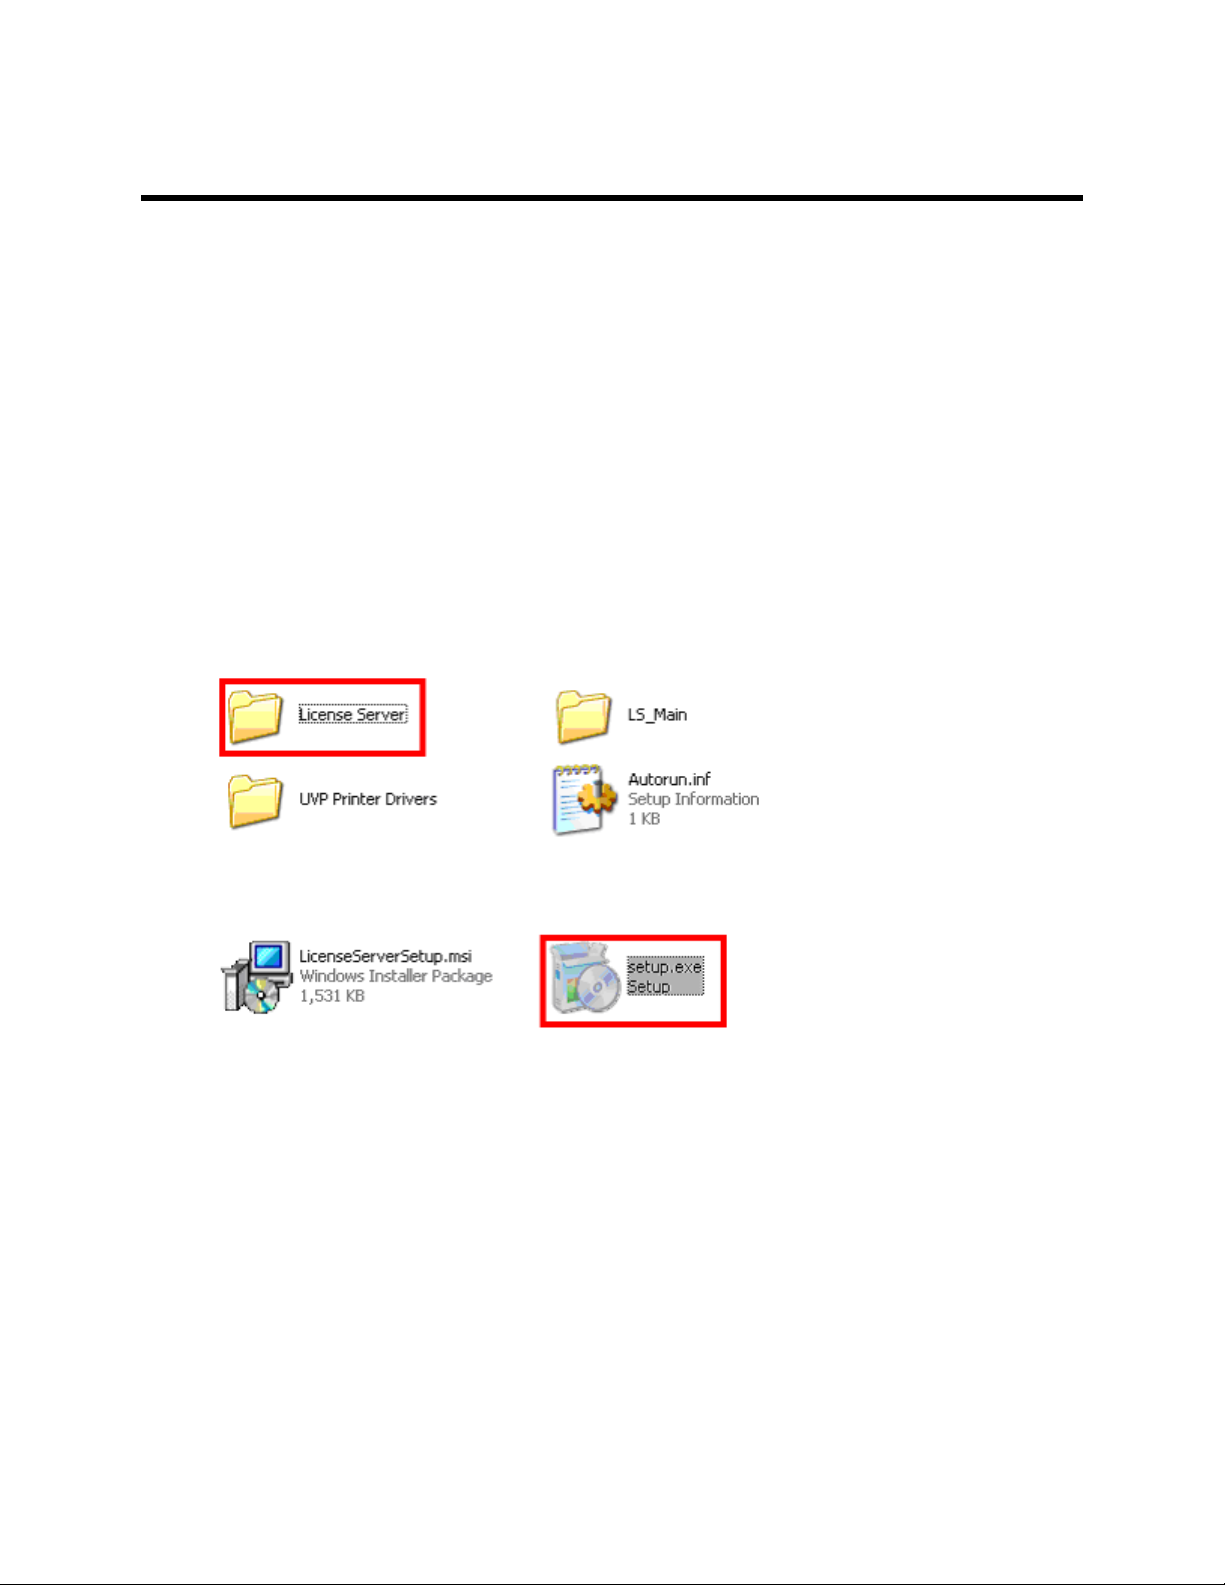
• A new form will appear. Complete all required information on the form.
Welcome
• Fill out the Serial Number located on the CD. The number should be four sets of six numbers.
• Click the Get Activation No. button and then click onto Activate when the Activation Number
appears in the box.
Already Have an Activation ID
• Select Already have an activation ID from the buttons. This activation function is useful when
reloading the software after receiving an initial activation code.
• Click Next to continue.
• Click the link provided and complete the form to obtain instructions.
• Click Finish.
Offline Activation
• Select Offline Activation if the computer is not connected to the Internet. This allows the user to
obtain the activation code and enter it at another time.
5
Page 20

LS Software User Guide
• Click Next to continue.
• Click the link provided and complete the form to obtain instructions.
• Click Finish.
Next: Single-User License or Network-User License
6
Page 21

Welcome
Single-User License
Once the software is registered, define the single-user license which allows the software to be used on a
single computer.
A Welcome to the Licensing Wizard window will appear.
• Select the Single client access license option.
• Select Next.
Next: If interested in 21 CFR Part 11 Compliance please set up login names and passwords by clicking
here (User Administration).
Related topics:
• Registering the software
7
Page 22
LS Software User Guide
Network-User License
A network-user license is only available for VisionWorks software. Once the software is registered, define
the network-user license which allows five users to operate the software. All licenses must run on the
same network. For additional licenses, contact UVP.
Note: Firewalls may impede successful installation and use of LS software, specifically for
networked applications. Contact your organization’s IT or network administrator to determine if a
firewall or other protection needs to be modified prior to installation of the software.
Follow these steps to install and use the network license:
• Ensure that a computer administrator is available to support the installation of the network
license. The administrator must provide an administrative login for each local PC installing
VisionWorks.
• Identify one computer running a minimum of Windows XP (SP2) on the network to hold the
network license. This computer will be called the "Server".
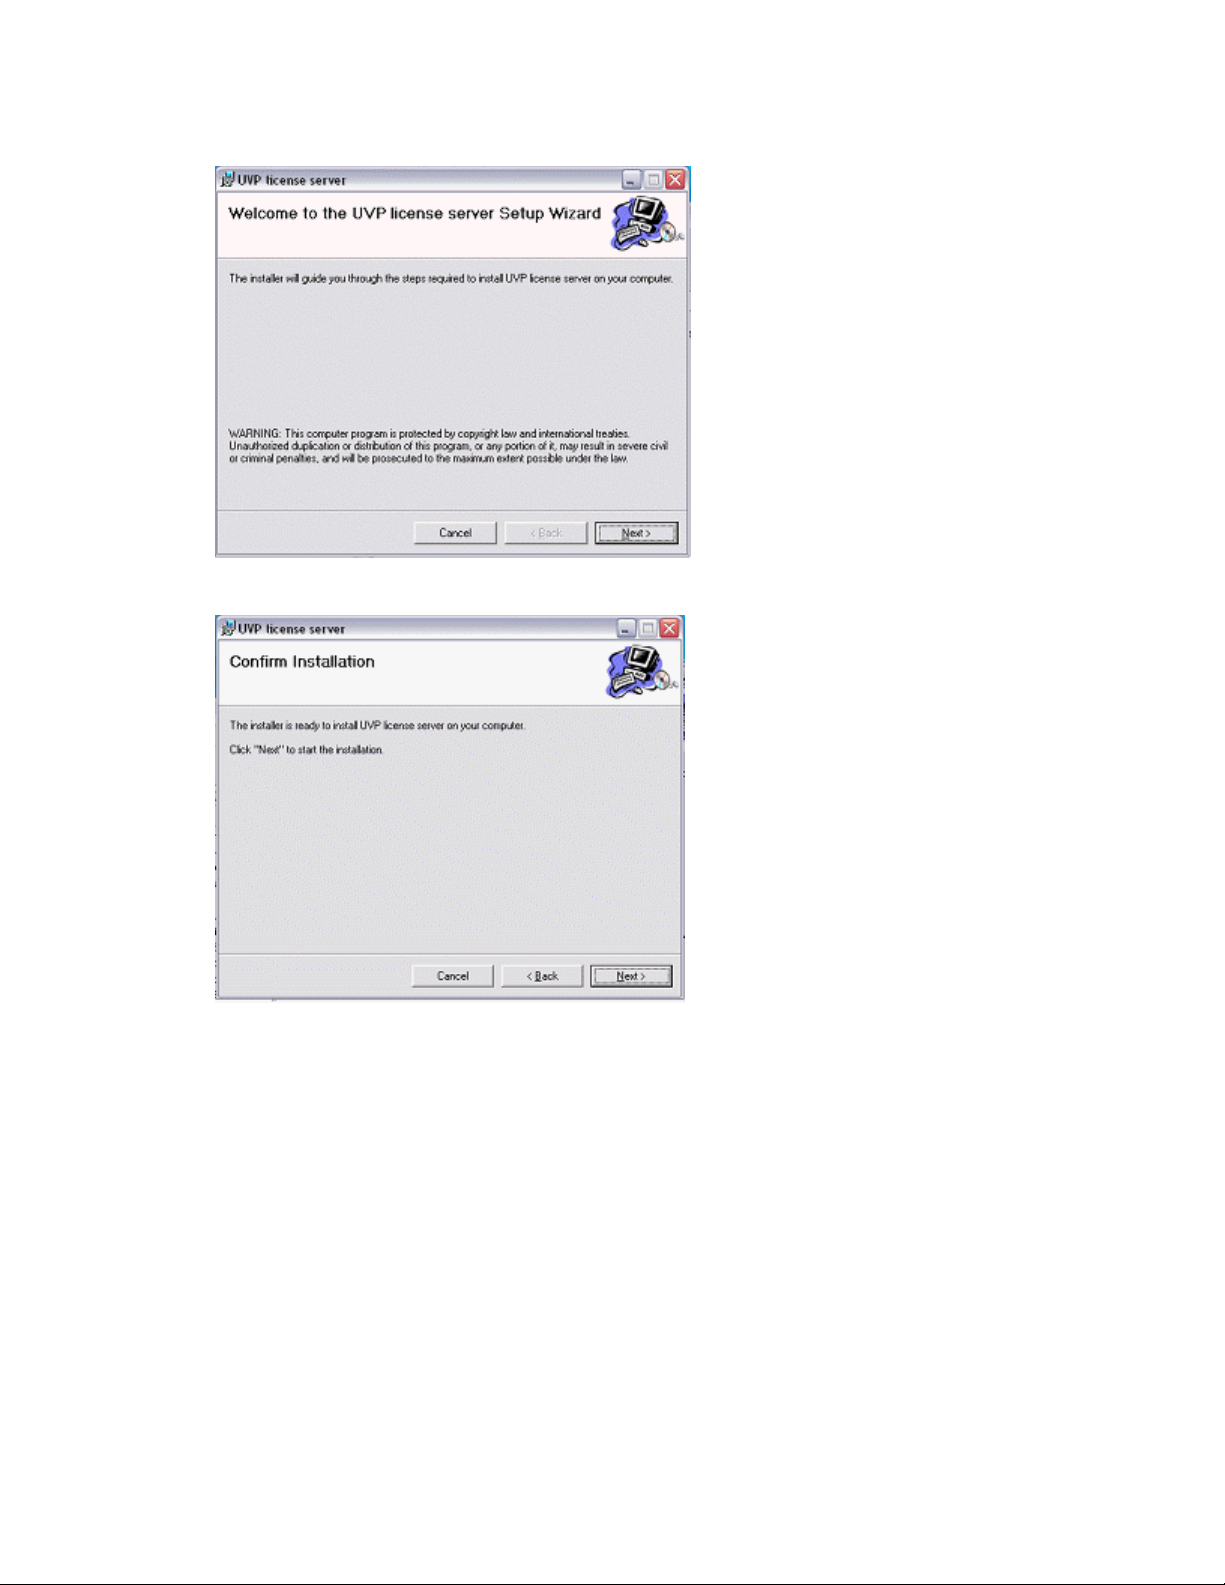
• From the VisionWorksLS software Disk 1, navigate to the License Server folder.
• In the License Server folder, select the Setup.exe to begin the Network License configuration.
• After selecting the Setup.exe, a UVP license server window will enable an Installation Wizard to
assist with the installation process. Select Next to continue.
8
Page 23
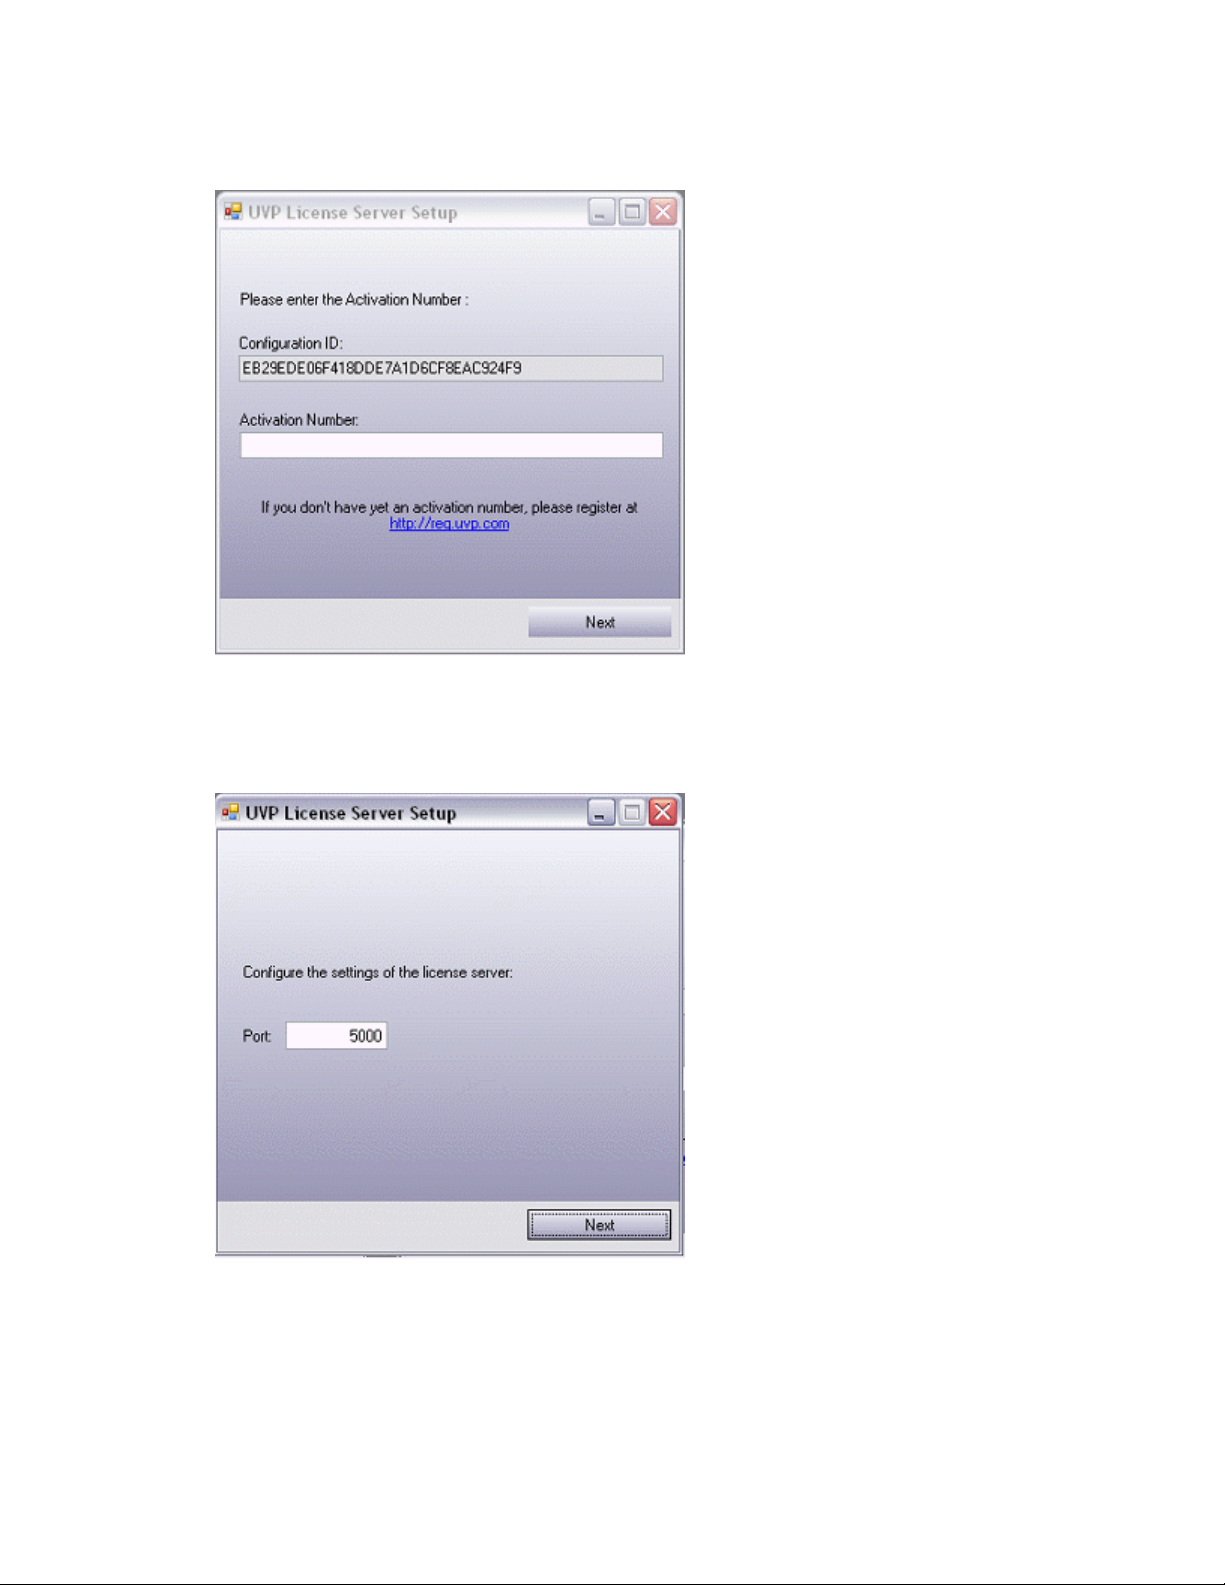
• Click Next to confirm the installation of the License Server.
Welcome
• The next screen will require the user to enter an Activation Number. To get an activation number,
register at http://reg.uvp.com or call technical support at (800) 452-6788 (inside USA) or (909)
946-3197 . Enter the provided Activation Number.
9
Page 24
LS Software User Guide
• Click Next.
• The next screen will verify the "Port" number to be used. It will be necessary to note this port
number, as this is the port that the other/client PC’s will use to access the software license.
Generally, the port number is automatically provided and will not need to be altered.
• Click Next after noting the Port number being used.
NOTE: Administrative IT support will need to ensure that the port chosen is not blocked on the
network. If the network has a restrictive network use policy (blocked websites, no IM clients) port
blocking is likely to be implemented.
• The next screen will display the configuration status as it is applied. When the configuration is
complete, the text at the bottom portion of the window will read "Configuration complete." Click
Finish when this message appears.
10
Page 25
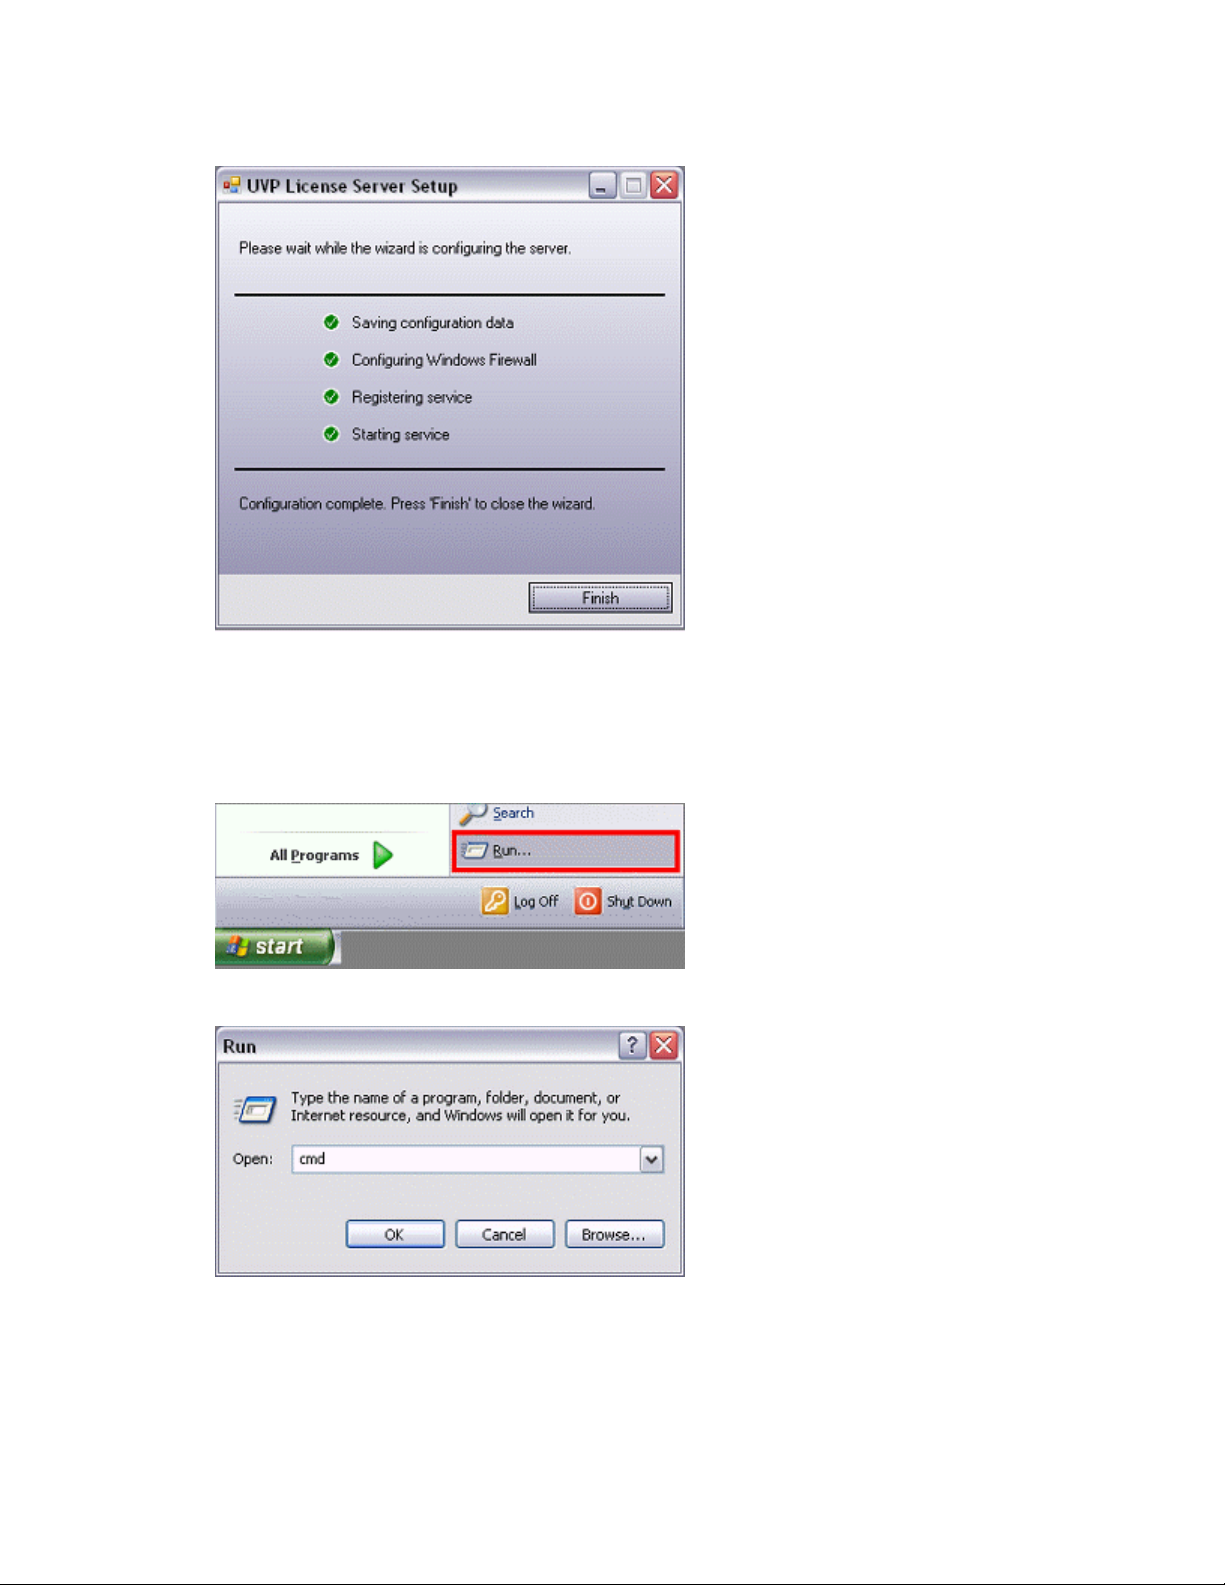
Welcome
• Next it will be necessary to obtain the "Server" computer’s IP Address. This address will be used
to set-up the other "client" computers, so that they will know where to locate the VisionWorks LS
Network License. Click the Windows Start button and select the Run option.
NOTE: "Client" computers are computers within the network that will run VisionWorksLS;
therefore a "Server" computer may also be a "Client" computer.
• In the Run dialog box, type cmd (as pictured). Then click OK.
• Type the command to display the IP Address of this PC. Type "ipconfig" (as pictured), and click
Enter.
11
Page 26
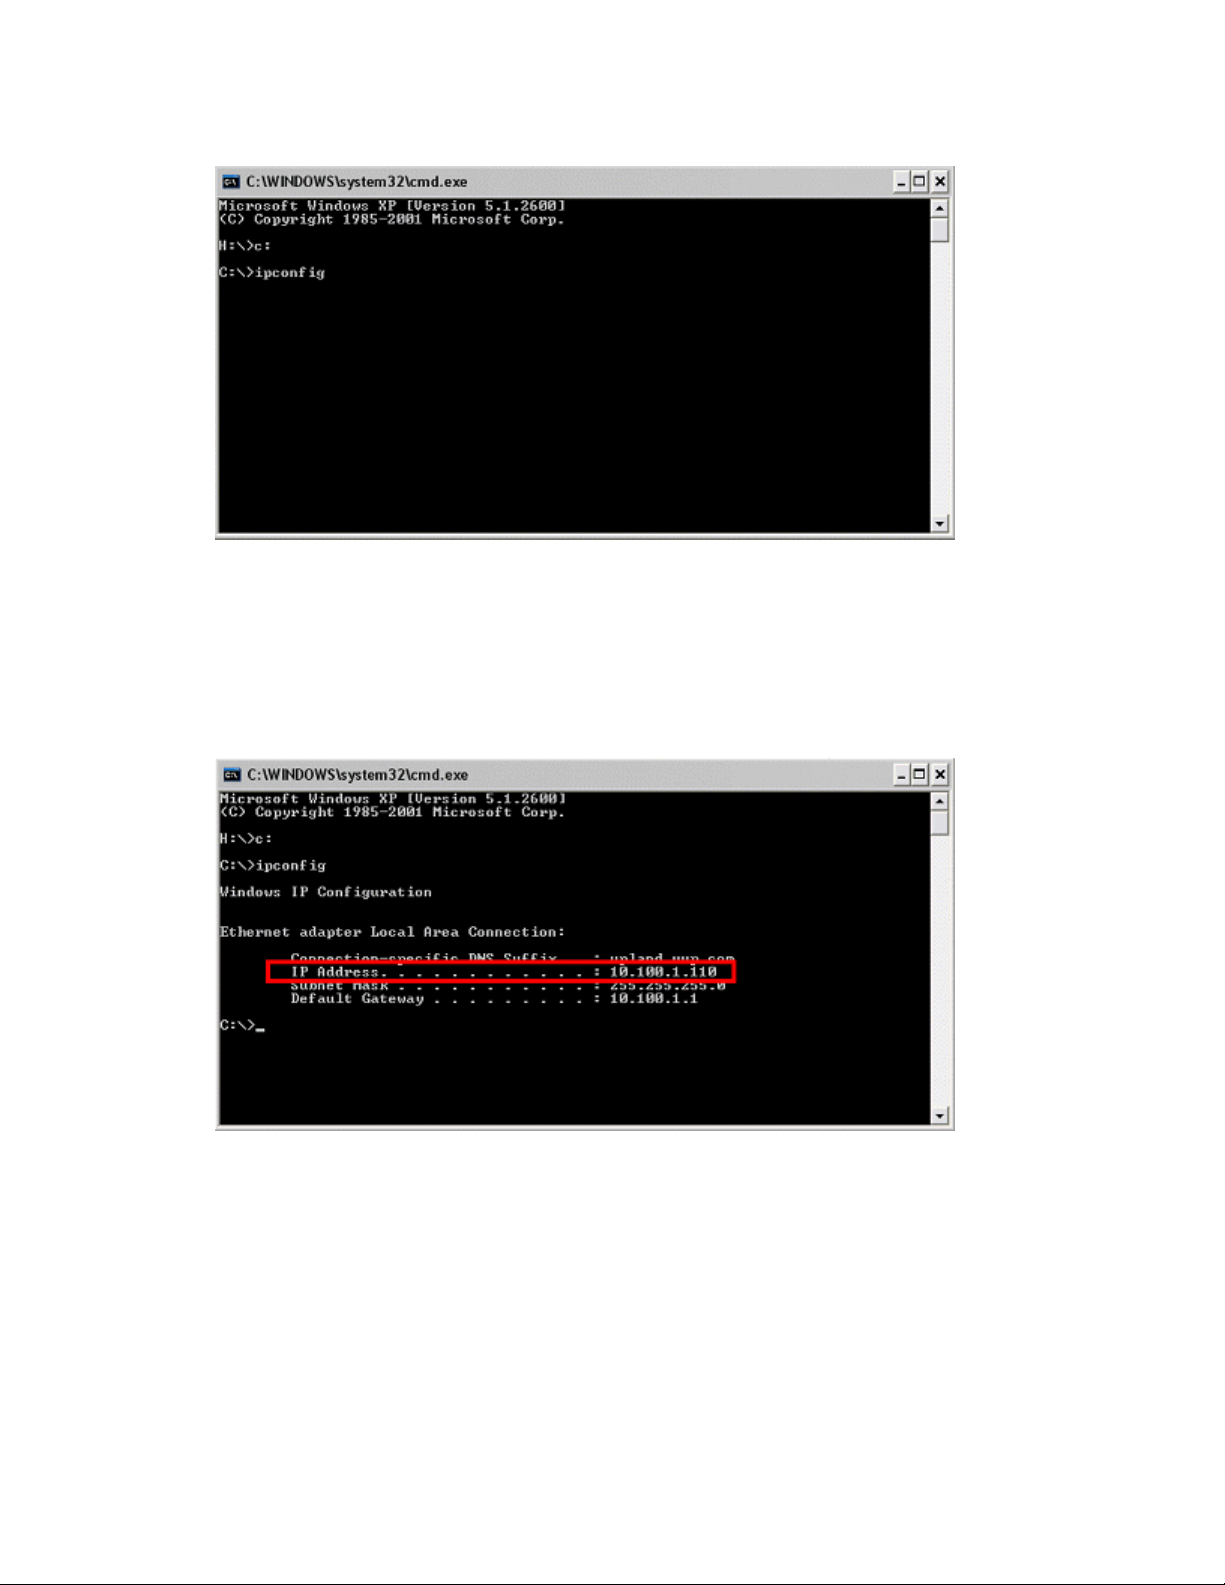
LS Software User Guide
• The IP Address is listed and should be noted, as it will be used with every "client" computer’s
License Manager setup. After noting the IP Address, close the Command Dialog.
NOTE: In some cases users will notice a list of multiple IP addresses. If the shipped system
includes an OptiChemi 600 camera, for example, users will see more than one IP address. To
ensure that the correct IP address is recorded, check with the IT Administrator before proceeding.
The IT Administrator must verify that the selected IP address corresponds to the network adapter
with access to the domain.
Additional Network Users
Repeat the following steps for each client computer.
• Open VisionWorksLS on the client computer. A Welcome to the Licensing Wizard window will
appear. Select the Server based licensing option, and select Next.
NOTE: VisionWorksLS will not authenticate across network segments so the IT Administrator
must
• Ensure that all client PC’s are on the same subnet/segment before installing VisionWorks on
each PC.
12
Page 27

Welcome
• Enter the previously noted IP Address and Port Number form the ”r;Server” computer. Click
Finish once the two values have been entered.
• UVP window will appear if the License Server installation/ configuration was successful. Click OK,
and close any other dialogs still open.
NOTE: During the installation process, a Systems Settings Change window may appear that asks
the user to restart the computer. This is not an error. Click No to continue with installation.
NOTE: The Hardware Installation window suggests that the camera drivers have not passed the
Windows Logo Testing suggested by Microsoft, which is not a problem. Click Continue Anyway.
• DO NOT SELECT STOP Installation. Doing so may render the cameras inoperable.
Next: If interested in 21 CFR Part 11 Compliance please set up login names and passwords by clicking
here (User Administration).
13
Page 28
LS Software User Guide
User Administration
• About Secure User Accounts
• User Rights
• Configure User Accounts
About Secure User Accounts
The concept of User Accounts for individual users is central to the software by providing security of user’s
data from being tampered with by other users, accidentally or otherwise.
• LS system of usernames and passwords is not to be confused with the login required to open the
computer. LS users must provide a separate login and password to enter the LS software.
• Setting up user accounts is mandatory if support for CFR 21 Part 11 is required from the
software.
• If individual accounts are not required, create just one account for all users and give full
permissions to that account.
Enable Secure User Accounts
• Request a System Administrator to log into the Windows computer.
• Navigate to C:\Documents and Settings\All Users
• Locate the Application Data folder.
• If the Application Data folder is not present in the All Users window, go to the Tools menu and
select Folder Options. (If the Application Data is present, skip the next step.)
• A Folder Options window appears. On the View tab, select Show hidden files and folders.
Select Apply then OK.
14
Page 29
Welcome
Column Heading
Description
Date Created
Date the user name was created.
Last Login
Date of last login.
Login Count
Number of times the user has logged in.
Idle Time Lock
Indicates the maximum idle time. To change the idle time, click Tasks
View
Enables user to view images. To change this setting, click Tasks >
• Go to the UVPSettings folder inside the Application Data folder.
• Have the System Administrator select Allow for all permissions listed for each user or group for
either the UVPSettings folder, or for each file within the folder (depending on the Network
Security Policy where the LS software will reside).
Definitions of the User Administration Columns
User Name Unique Identification name for a particular user. This could be a name
or a word that makes it easier to identify the user.
> Set Idle Time. Zero means no idle time.
Password
Expiration Date
Date the password expires.
Edit Rights. Click or unclick the View option.
15
Page 30

LS Software User Guide
Change
Enables user to change images. To change this setting, click Tasks >
Has Admin.
Gives user administration permissions. To change this setting, click
Login Privileges
Rights
Install
Un-
Open
and Run
User
Use the
Standard/Power
Edit Rights. Click or unclick the Change option.
Rights
Tasks > Edit Rights. Click or unclick the Has Administration Rights
option.
Users Rights
Depending on the privileges for the user that has logged onto windows, the following rights are available
to that user for the software:
Install
Restricted X* X
X* X
Admin X X X X X
X = Supported rights.
Note that even though a user may be able to do things with the
software which are outside of this matrix, UVP neither recommends
it, nor supports it. For example, the user may try (successfully or
otherwise) to uninstall the software as a Power User, but UVP does
not provide support for problems arising during or due to that
action.
Related Topics:
Configure User Accounts
Administration
Camera
16
Page 31

Configure User Accounts
• User Names and Passwords
• Add a User
• Edit a User
• Change a Password or Other Settings
• Deactivative/Reactivate a User
• View the Login History of a User
Welcome
User Names and Passwords
• Start the software. It will bring up a Login window.
• The administrator user name will show.
• Click Login.
• A Reset password window appears. Enter the new password. Confirm the new password.
17
Page 32

LS Software User Guide
• Click OK.
Add a New User
• From the menus, click the Advanced menu button then select Configure user accounts to open
the User Administration window.
• Click the New User button.
• Type in the new user name and password. Note: Each time the new user logs in, use that new
user name and password.
• Click OK.
Edit a User
• Highlight the user name in the User Administration window.
• Click the Tasks > Edit Rights and select from the Define User Permissions screen to allow
users to view images, modify images, change templates, or assign administrative rights.
• Click OK when changes to the user are complete. Note: The Administrator's rights cannot be
edited.
18
Page 33

Change a Password or Other Settings
Welcome
• To change a password, click the Advanced menu button then select Configure user accounts
to open the User Administration window.
• Click on the appropriate user to change.
• Select the Tasks > Reset Password and enter the new password. Enter the password again to
confirm the change.
• Click OK. The change in password will be noted in the User Administration > History box.
Deactivate/Reactivate a User
• To deactivate/reactivate a user, click the Advanced menu button then select Configure user
accounts to open the User Administration window.
19
Page 34

LS Software User Guide
• Select that user name and click Tasks > Deactivate. A red X will indicate the user is deactivated.
To reactivate, click Tasks > Activate.
• Click OK to close.
NOTE: Never disable the Administration Account.
View the Login History of a User
• Select a user name in the User Administration table. The lower half of the window displays the
login history associated with the selected user.
• Click OK to close the window.
20
Page 35

Welcome
Technical Support
UVP offers expert technical support on all of our products. If there are questions about the product’s use,
operation or repair, please contact our offices at the locations below.
If located in North America, South America, East Asia or Australia:
• Call (800) 452-6788 or (909) 946-3197, and ask for Technical Support during regular business
days, between 7:00 am and 5:00 pm, PST.
• E-mail your message to: techsupport@uvp.com or info@uvp.com
• Fax Technical Support at (909) 946-3597
• Write to: UVP, LLC 2066 W. 11th Street, Upland, CA 91786 USA
If located in Europe, Africa, the Middle East or Western Asia:
• Call +44(0) 1223-420022, and ask for Customer Service during regular business days between
8:30 am and 5:30 pm.
• E-mail your message to: uvp@uvp.co.uk
• Fax Customer Service at +44(0) 1223-420561
• Write to: Ultra-Violet Products Ltd. Unit 1, Trinity Hall Farm Estate, Nuffield Road, Cambridge
CB4 1TG UK
21
Page 36

LS Software User Guide
License Agreement
End User License Agreement
PLEASE READ THE FOLLOWING AGREEMENT CAREFULLY
This Agreement is between UVP, LLC of 2066 West 11th Street, Upland, California 91786 (hereinafter
"Licensor") and the end user of UVP software (hereinafter "Licensee").
Licensor has developed and offers to Licensee on a non-exclusive basis pursuant to the terms and
conditions set forth hereinafter, the following software, including related copyrighted instructional
materials, (collectively referred to hereafter as "The Software"):
VisionWorks®LS and Doc-It®LS Software
The terms of this Agreement apply without regard for the method by which the Software is acquired by
Licensee. While the most common medium for acquiring the Software from Licensor is by CD-ROM, the
Software may, in some instances, be acquired by download; from a Licensor thumb drive acquired from
Licensor; from a CD ROM acquired from Licensor from a network location; or may be pre-installed on the
Licensee’s computer.
By using the Software, you are agreeing to be bound by all terms of this License. If you do not agree to
the terms of the License, you are not authorized to use the Software in any manner.
License
In consideration of payment of the License fee, which is a portion of the price you paid, the
software, including any images incorporated in or generated by the software, and data
accompanying this License and related documentation are licensed (not sold) to you by Licensor.
Licensor does not transfer title to the Software to you; this License shall not be considered a "sale"
of the software and Licensor retains full and complete title to the Software and all intellectual and
industrial property rights therein. It is to be understood that this non-exclusive and personal License
only gives you the right to use and display the software. You must treat the software like any other
copyrighted material. You may not copy the Software or the written material accompanying the
software without the express written consent of Licensor.
Restrictions
The Software contains copyrighted materials, trade secrets, and other proprietary material. You may
not re-sell, decompile, reverse engineer, disassemble or otherwise reduce the Software to a humanperceivable form. Except as provided for in this License, you may not copy, modify, network, rent,
lease, or otherwise distribute the Software; nor can you make the Software available by "bulletin
boards", on-line services, remote dial-in, or network or telecommunications links of any kind; nor
can you create derivative works or any other works that are based upon or derived from the
Software in whole or in part. You may not transfer the license rights to the Software to another
party.
Termination
This License is effective until terminated by either party. You may terminate this License at any time
by returning the Software to Licensor or destroying any permanent form of the software and all
related documentation and all copies and installations thereof, whether made under the terms of this
22
Page 37

License or otherwise. This License will terminate immediately without notice from Licensor if you fail
to comply with any provision of this License. Upon termination, you must destroy or return to
Licensor any permanent form of the software and related documentation.
Limited Warranty and Disclaimer
Licensor warrants the software and related documentation to be free from defects in materials and
workmanship, under normal use for a period of ninety (90) days from the date of purchase as
evidenced by a copy of the sales receipt or packing slip. Licensor’s entire liability and licensee’s
exclusive remedy will be replacement of the defective software and related documentation or refund
of the purchase price (at licensor’s election) upon return of the software and related documentation
to licensor with a copy of proof of purchase. This warranty gives you specific legal rights and you
may also have other rights which vary from jurisdiction to jurisdiction. You expressly acknowledge
and agree that use of the software is at your sole risk after the ninety (90) days. The software and
related documentation are provided without warranties and/or conditions of any kind either express
or implied, except as provided above. Licensor expressly disclaims all other warranties and/or
conditions, express or implied, with respect to software and related documentation including, but not
limited to, the implied warranties and/or conditions of merchantability and fitness for a particular
purpose. Licensor does not warrant that the functions contained in the software will be uninterrupted
or error-free, or that defects in the software will be corrected after the ninety (90) days. Furthermore,
after the ninety (90) days, licensor does not warrant or make any representation regarding the use
or the results of the use of the software and related documentation in terms of their correctness,
accuracy, reliability, or otherwise. The limitations of liabilities described in this section also apply to
the third party suppliers of materials used in the software. No oral or written information or advice by
licensor or by representatives of licensor shall create warranties, and/or conditions, or in any way
increase the scope of this limited warranty. Licensee assumes the entire cost of all necessary
servicing, repair or correction after the ninety (90) days. Some jurisdictions do not allow the
exclusion of implied warranties, so the above exclusion may not apply to you.
Welcome
Limitation of Liability
Under no circumstances, including negligence, shall licensor be liable for any special or
consequential damages that result from the use of, or the inability to use, the software or related
documentation, even if licensor or authorized representative of licensor has been advised of the
possibility of such damages. Some jurisdictions do not allow the limitation or exclusion or liability or
consequential damages, so the above limitations or exclusion may not apply to you. In no event
shall licensor’s total liability to you for all damages, losses, and causes of action (whether in
contract, tort (including negligence) or otherwise) exceed the amount paid by you for the software.
Governing Law and Severability
This License shall be governed by and construed in accordance with the laws of the State of
California, without giving effect to any principles of conflicts of law. Any actions, suits or proceedings
instituted in connection with this License, the Software and/or related documentation shall be
instituted and maintained exclusively in the Superior Court for the State of California, County of Los
Angeles, or in the United States District Court for the Central District of California. By entering this
License you hereby consent to the venue and jurisdiction of the aforesaid courts. If any provision of
this license shall be unlawful, void, or for any reason unenforceable, then that provision shall be
deemed severable from this License and shall not affect the validity and enforceability of any
remaining provision. This is the entire agreement between the parties relating to the subject matter
herein and shall not be modified except in writing, signed by both parties.
23
Page 38

Navigate the Software
Navigating the Software
• Main Window
• Action Tabs
• Menu Buttons
Main Window
After the software is opened, the menu bar will look similar to the one shown below. The main window
contains the Action Tabs, Menu Buttons and modules (not shown) down the left side. Action tabs are
shown across the top row and are for functions used the most. Below each Action Tab is a set of
corresponding menu buttons. When a specific menu button is clicked, a module will display in the left
column (not shown) with additional function options. The example below shows Acquisitions Action Tab
> Camera module.
The File and Edit menus always display on the screen. To the far right, Advanced menu and Help menus
(not pictured here) are available.
Action Tabs
The purpose of the Action Tabs is to enable quick selection of major tasks.
• Acquisition: Functions to capture images and change camera, darkroom, lens etc. settings
• Image: Functions to apply image filters, brightness & contrast, pseudocolors, annotations, and
other tools to apply to an image
• 1D Analysis: Functions to perform 1D Analysis on a captured image
• Area Density: Functions to perform Area Density on a captured image
• Colony Counting: Functions to perform Colony Counting on a captured image
Action tabs are shown in the top row. Each Action tab has a unique set of menu buttons with the
corresponding menu buttons displayed in the row below. The example below shows the Acquisition
Action Tab highlighted with yellow and its corresponding menu buttons. When selected menu buttons are
clicked, modules will open to provide function options.
24
Page 39

Navigate the Software
Note: For users with an iBox Explorer2 Imaging Microscope, the menu buttons display differently.
Learn more about capturing images using the iBox Explorer, go to http://www.uvp.com/iboxexplorer2.html
25
Page 40

LS Software User Guide
Image Windows
Each open image in the software workspace will appear in a separate Image Window. Several Image
Windows can be opened at one time. The window below shows several images open, layered with tabs
for selection of images.
• Organize Image Window
• Information Provided in Image Window
• Show the Image in Actual Size
• Fit the Image to Window
• Context Menu Commands
• Status Bar
Organize Image Windows
Images can be visible in the workspace area with either tabbed layout, shown above, or cascaded
images.
• To change from tabbed layout to cascaded layout, on the menu, go to Advanced > Configure
Application > Main Settings and uncheck the Tabbed Interface checkbox.
• To bring an Image window to the forefront, click on the image's title bar above the image.
• To close an image window, click onto the X in the image title bar.
• To resize a Cascaded Image window, drag the lower right corner (or an edge) to the desired size.
Information Provided by the Image Window
Besides displaying an image, the Image tab includes the filename of the image. A caption of "Untitled"
means that the image has not been saved.
26
Page 41

Navigate the Software
Show the Image in Actual Size
To show the image in actual size (no scaling), right click on the image and select View Original Size.
Images taken at high resolution will look large on the screen.
Fit the Image to the Window
To show the entire image in the window (scaled up or down as required to make it fit), right click on the
image and select View Best Fit.
Context Menu Commands
A context (shortcut) menu appears when the user clicks on the image itself with the right mouse button. It
is a shortcut menu that lets the user sidestep the menu buttons. Once brought up, treat it as a regular
menu by selecting features from the list. Click on the image with the right mouse button, a menu with the
following commands opens:
• Undo
• Redo
• Copy
• Paste
• Paste Special
• View Best Fit
• View Original Size
• Print
• Image Information
Status Bar
The Status Bar, located at the bottom of the software, shows:
• The current pointer position in an image
• The intensity of the image at the pointer position
• Status messages during operations
• Zoom and magnification options
The mouse position (POS) is displayed in pixels (X and Y). The Intensity is displayed as a single value if
the image is monochrome and has three values (Red, Green and Blue) if the image is colored. In both
cases, the value is reported as a percentage value of the maximum intensity. The ROI (Region of
Interest) is also reported.
27
Page 42

LS Software User Guide
Obtain Image Information
• Overview
• Display Image Information
• Enter Notes
• Calibrating Image Scale
• Image History
Overview
The software maintains information about an image. Access the image information by right clicking on the
open image and left clicking Image Information. This Image Information includes:
• Overall Sample Width: Described as the number of metric units in the image's width, this
information is used to calibrate Rulers and Measurement Annotations. Image Scale is also
described under Spatial Calibration.
• Resolution: The width and height of the image in pixels.
• Bit Depth: The number of bits used to represent intensity. LS Software supports 8-bit, 12-bit and
16-bit image depth.
• Background: Indicates the color of the image background.
• Notes: Enter notes about an image.
• File Properties: Shows the file name, path, create date and size. All fields will be "N/A" if the
image has not yet been saved.
• Image History: The Image History tab provides a list of material changes to the image, when
they occurred and any notes to add about why or how the change was made are shown in the
Image History window.
The Image Information window is organized into two tabs. All information except History is on the first tab
Properties; image History is on the second tab.
Display Image Information
• Right click onto the image to obtain its image information. A shortcut menu will appear.
• Click onto Image Information at the bottom of the shortcut menu. The Image Information window
will appear.
• To switch between Properties and History, click the appropriate tab at the top of the window.
Enter Notes
• Display the Image Information window as described above.
• In the Properties tab, type information into the Notes text box.
• Click OK.
Calibrate Image Scale
28
Page 43

Navigate the Software
Note:
An uncalibrated image will have "Pixels" as the unit type. If the unit type is Pixels, the number of
Each image in LS software has a scale associated with it. Scaling information is used to display rulers,
measure length and measure area annotations. Refer to Spatial Calibration for information on using this
tool.
Images scanned into the system from a scanner or imported from another program are not calibrated. In
these two cases, therefore, the image's scale should be set.
units is the number of pixels in the image width and cannot be changed.
Related Topics:
• Spatial Calibration
• Image History
29
Page 44

LS Software User Guide
Menu Buttons
Menus and Action Tabs Overview
Main Menu Buttons
There are four menu buttons that are always available (not dependent on what Action Tab is selected)
these are:
• File Menu: Contains commands to open, save, and print files. Also contains a FTP (file transfer
protocol) window to assist in using the file transfer function.
• Edit Menu: Contains the following functions: Copy/Paste, Undo/Redo, Define Region, Filters,
and Adjust (such as rotate, align and crop).
• Advanced Menu: Contains option for saving and playing Macros, displaying the log file,
configuring user accounts and viewing options.
• Help Menu: Contains access to the software help guides, information on the software version,
contact numbers and a link to the registration process.
Action Menu Tabs
Each Action Tab has an associated menu for providing software functionality. In many cases, the Action
Tab must be selected before the menu buttons under the Action Tab can be opened. The software is
organized with five Action Tabs:
• Acquisition Action Tab
• Image Action Tab
• 1D Analysis Action Tab
• Area Density Action Tab
• Colony Counting Action Tab
Acquisition Action Tab and Menu Buttons
Image Action Tab and Menu Buttons
1D Analysis Action Tab and Menu Buttons
30
Page 45

Area Density Action Tab and Menu Buttons
Colony Counting Action Tab and Menu Buttons
Navigate the Software
31
Page 46

LS Software User Guide
File Menu Button
File Menu Overview
File menu options are available at any time. The File menu does not need to be accessed through any
specific Action Tab.
Select from common file actions:
• Open image from file
• Open demo image
• Save
• Save as
• Close image
Select from printing options:
• Print preview
• Print
• Print a report
Access FTP (file transfer protocol) functionality.
32
Page 47
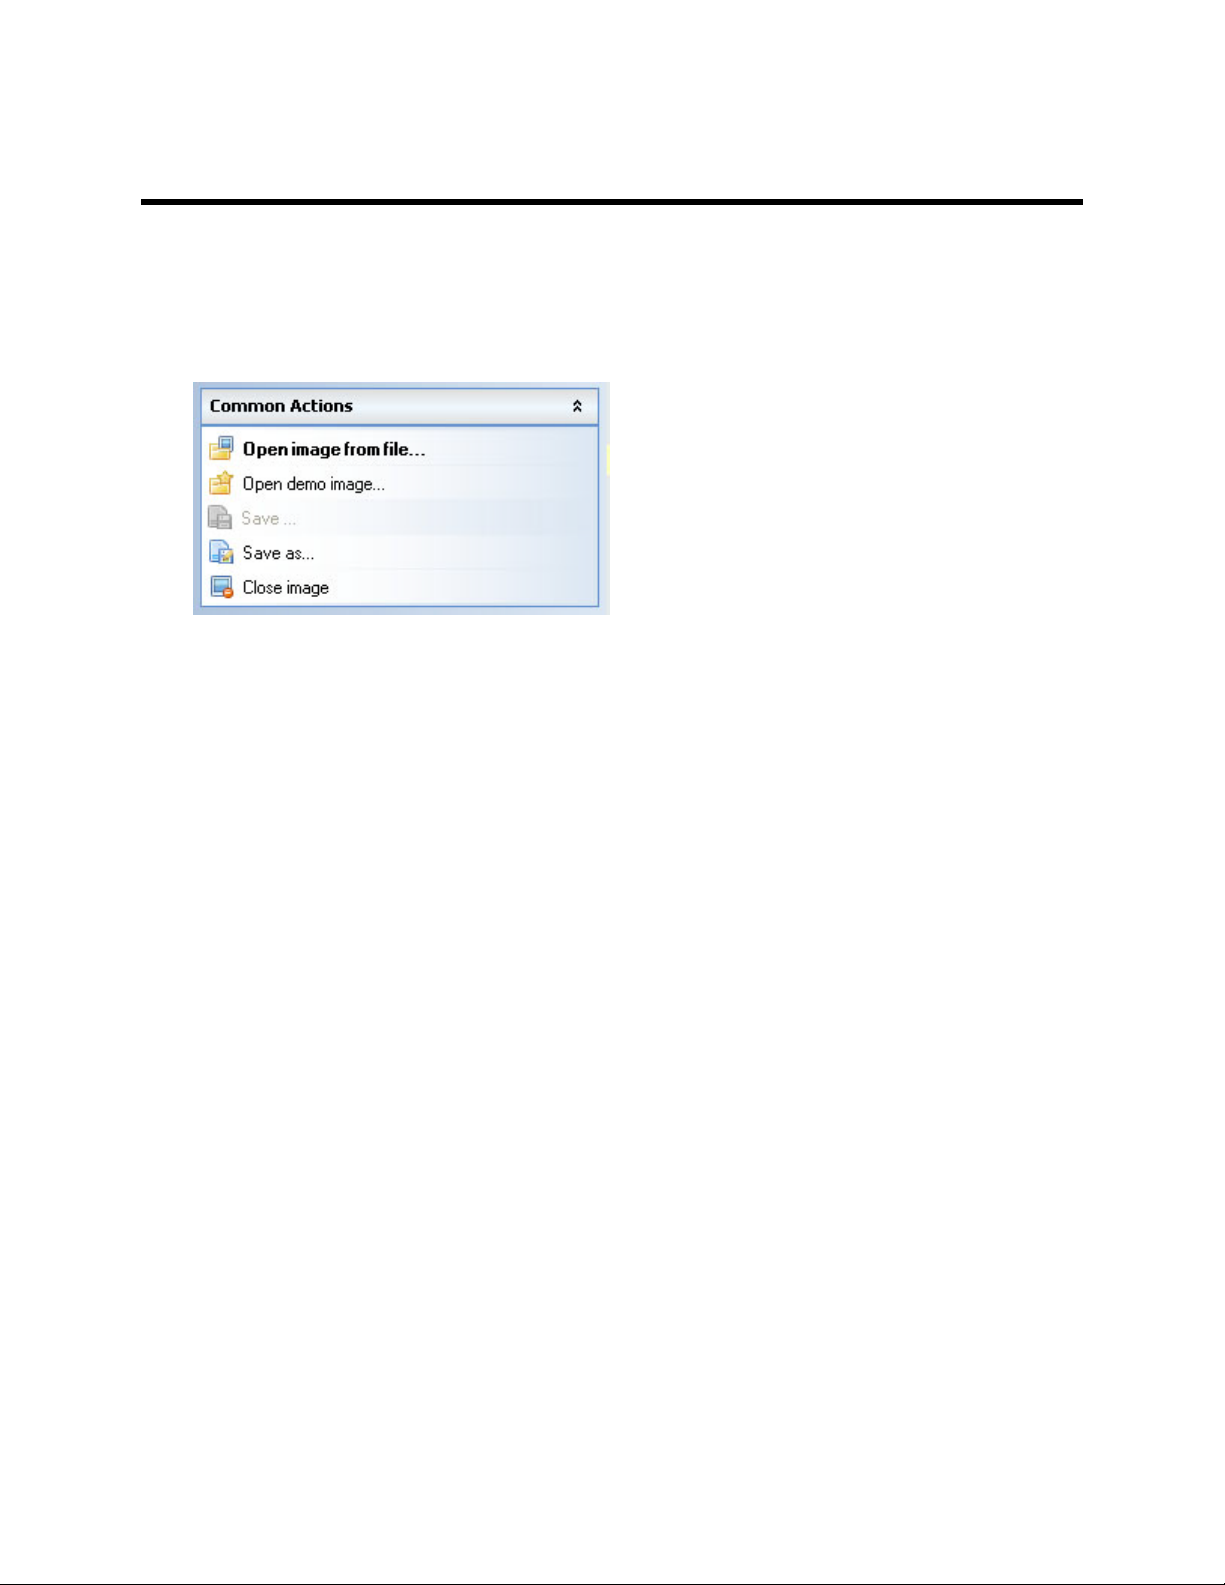
Open and Save Images
• Open Images
• Save Images
• Image File Types
Open Images
Navigate the Software
The software will open images in standard file formats including JPEG, TIFF, GIF, PNG, TGA and BMP.
Video files can be saved as AVI and SQV. If the image was previously saved using this software, then
other image details such as the image's scale, history and annotations will be loaded as well. Many demo
images are included with this software to increase user familiarity with the software.
Open a Previously Saved Image
• From the File menu, choose Open image from file.
• Select the type of file to open. If unsure of the file type, select "All Supported Formats."
• Navigate through the drives to the file folder in which the image is stored.
• Select the desired image file.
• Click Open. An Image window containing the desired image will appear.
Open a Demo Image
• Go to File menu and click on Open Demo Image. The software keeps a folder "Images" that
shows by default where the demo images are stored.
• Select the desired demo image file from the list of available files.
• Click Open.
Save Images
Save images acquired in the software so they can be used in later sessions. To save a new image:
• Click on the File menu and select Save or Save As. The Save window will appear.
• Select the file type to use from the drop-down list. TIFF is the default file type. It is ideal to save
images in the TIFF format to maintain the most image data for analysis purposes.
• Navigate through the drive, folder or network structure to the desired location to save the image.
33
Page 48

LS Software User Guide
• Enter a filename for the image.
• Click Save.
NOTE: If analysis, annotation, etc. is performed on an original image, the file must be opened with
LS software to view or modify this information. To view the analysis/annotation in a different
program, use the Flatten Layer tool and save the image as a NEW file. Once the flatten layer tool is
applied, the analysis cannot be modified in the new image.
Save Using a Different File Folder, Name or Type
• From the File menu choose Save As. The Save window will appear.
• Select the file type to use from the drop-down list near the bottom of the window.
• Navigate through the drive, folder and network structure to the location to save the image.
• Enter a filename for the image.
• Click Save.
NOTE: UVP imaging systems and software support network connectivity for saving and sharing
image files.
Image File Types
The software supports the following formats:
• TIFF: Tagged Image File Format, a common image format. Depending on settings, TIFF can be
either a lossy or a lossless compression format. In the software, it is used in the lossless mode to
reduce image file size without losing integrity. TIFF files generally have TIF or TIFF extensions.
• JPEG: Joint Photographic Experts Group. A common lossy compression image format used to
store images on disk. JPEG files generally have JPG or JPEG extensions.
• TGA: Truevision Targa image format. TGA is a lossless compression format that reduces file size
somewhat. TGA files generally have a TGA extension.
• BMP: Microsoft Bitmap image file format. BMP is a lossless format which provides some
compression to reduce file size. BMP files generally have a BMP extension.
• PNG: Portable Network Graphics, a common image format. PNG is a lossy compression format
that results in very small files. Files stored in PNG usually have a PNG extension.
• GIF: Graphic Interchange Format, a proprietary Xerox image compression format. GIF is a lossy
compression format that results in very small files. Files stored in GIF usually have a GIF
extension.
JPEG, PNG and GIF are lossy compression formats. TIFF, TGA and BMP are lossless compression
formats (at least, as used by this software; TIFF can actually be either lossy or lossless). Lossy
compression makes small, usually non-visible changes to an image in order to make the file size
smaller. Typically, formats that use lossy compression store in much less space than lossless
compression formats. By comparison, a lossless format does not store as compactly, but also does
not change the image in any way.
34
Page 49

Print
• Printing Image History
• File Print Command
• Printing Colony Count Results
• Viewing and Printing 1D Gel Analysis
• Reporting and Printing Area Density Results
Navigate the Software
35
Page 50

LS Software User Guide
FTP Transfer
The FTP Transfer function allows the user to transfer files from one computer to another.
NOTE: The computers must be connected to a network to use the FTP transfer functionality.
• Click on File menu button > FTP Transfer. This will bring up a separate window that shows the
FTP Transfer plug-in.
• Click the Preferences button to open the Preferences FTP Transfer window.
• Enter the IP address of the system acquiring the image and the username and password. Click
Apply and OK.
• Start the software and take pictures.
• Press the Connect button on the FTP module.
36
Page 51

Navigate the Software
37
Page 52

LS Software User Guide
Edit Menu Button
Edit Menu Button Overview
Edit options are available at any time. The Edit menu does not need to be accessed through any
particular Action Tab.
Copy / Paste
• Copy
• Paste, Paste Special and Paste Special Options
Undo and Redo
ROI Tools (Region of Interest)
• New
• Rectangle
• Ellipse
• Polygon
• Freeform
• MagicWand
Filters
• Sharpen
• Blur
• Emboss
• Remove Noise
Adjust
• Rotate
• Align
• Flip Horizontally
• Flip Vertically
• Crop
• Resize
• Reduce to Monochrome
• Change Image Depth
38
Page 53

Navigate the Software
Note:
Copy can also be used on text, in which case it acts in the standard Windows fashion. Copied
Copy
Used on an image, the Copy command copies all or part of the image to the clipboard.
Copy an Entire Image
• Click Copy to copy the entire image. If a Region of Interest (ROI) is present on the image, adjust
the ROI to select the desired copy area.
• Choose Copy from the Edit menu button.
Copy a Selected Region Within an Image
• Select a Region of Interest (ROI) on the image using one of the selection tools.
• Choose Copy from the Edit menu.
images or sections of images will include annotations if the annotations were displayed when Copy
was used. If annotations were used, image must be flattened or they will not be included.
Related Topics:
• Paste
• Region of Interest (ROI)
• Layer Actions - Flatten Layers
39
Page 54
LS Software User Guide
Note:
Paste can also be used on text, in which case it acts in the standard Windows fashion.
Paste
This command takes an image from the clipboard and imports it into the software, displaying it in a new
Image window.
Paste an Image
• From the Edit menu button choose Paste. The image will be displayed in a new Image window.
Note: Paste is only available if there is an image on the clipboard.
Paste Special
This command allows an image on the clipboard to be merged into the current image. It is useful for
adding comparison or reference information into an image, for making composite images and for testing
two images against one another for motion.
• To modify the Paste Special options, go to Edit > Paste Special Options
Preview Frame Only functions shows where the Paste Special image will display. and Apply with blend
check boxes.
The following three merge modes (Blend, Add, Subtract) are available the Software:
• Blend: mixes the incoming image with the current image in a selected proportion. Click the Apply
with Blend check box to apply this function. If the Source proportion (Src%) is set to 100%,
pixels in the incoming image replace those in the existing image without mixing (i.e. the incoming
image is copied entirely over the existing image wherever it lands). Blend is used primarily to
place comparison information into an existing image, especially when using high proportions.
• Add: adds pixels in the incoming image to those in the existing image up to maximum intensity.
Add is used primarily to build composite images with little or no overlap. This feature requires no
additional settings.
40
Page 55

Navigate the Software
• Subtract: subtracts pixels in the incoming image from those in the existing image. Subtract is
used primarily to test for differences in or motion between two otherwise similar images. This
feature requires no additional settings.
Related Topics:
• Copy
41
Page 56

LS Software User Guide
Undo and Redo
The Undo command will undo the last material change made to an image. Material changes include all
manipulations and the Paste Special command. The Redo command reverses the last Undo. To see what
the last material change did in detail, alternate between Undo and Redo. Changes made through the
modules do not permanently change the image.
Related Topics:
• Paste Special
42
Page 57

Region of Interest (ROI)
View Rectangular ROI
View Elliptical ROI selects
• About the Selection Tools
• Select a Region
• Adjust a Region
• Cancel a Region
About the Selection Tools
Select the Define region tools from the Edit button.
Navigate the Software
These tools allow users to mark part of the image for use in other operations. LS software provides
several Region of Interest (ROI) selection tools:
selects rectangular regions.
elliptical (oval) regions.
43
Page 58

LS Software User Guide
View Polygon ROI selects
View FreeForm ROI selects
Polygonal regions.
irregular regions.
Select a Region
• Choose the desired selection tool from the Edit menu button.
• Rectangular and Elliptical ROI: To define a rectangular or elliptical type of ROI, start with the
upper-left corner of the desired region and drag the mouse downward and to the right until the
desired area is marked.
• Polygonal ROI: To define a polygonal ROI, click the left mouse button in the upper left area of
the desired ROI, then continue clicking the left mouse button to encompass the remainder of the
desired ROI. When the area is defined, right mouse click anywhere on the image to join the first
and last points and close the ROI.
• FreeForm ROI: To define a ROI with the mouse pointer, keep the left mouse button pressed and
draw around the region of interest. Lift the mouse button to automatically complete and enclose
the area.
• Magic Wand ROI: To mark the ROI automatically on the image, click once inside the region of
interest and the software marks that area by identifying the edges. Zoom in on the image to get a
better outline of the ROI. The Magic Wand slider allows adjustment of the sensitivity of the area
defined by the Magic Wand.
Apart from Analysis features, Copy also uses the region of interest tool. Copy will copy the selected
region to the clipboard. If there is no selected region, the entire image will be copied.
Adjust a Region
If the selection is not quite right, move or resize it without having to start over:
• To change height or width: drag any of the white corner markers to the desired size.
• To move the selection: click on and drag the interior of the ROI to the new location.
Cancel a Region
• Click once anywhere on the image outside of the current ROI. The selection markers will
disappear. Once a region has been cancelled it cannot be undone.
Related Topics:
• Copy
44
Page 59

Navigate the Software
Image Enhancement Filters
Image enhancement tools allow users to highlight important features and remove unwanted signal in the
image.
• Sharpen
• Blur
• Emboss
• Remove Noise
These functions are accessed from the Edit menu > Filter module.
45
Page 60

LS Software User Guide
Blur
This filter blurs edges in an image, making them less prominent. Gross (large-scale) detail is more easily
observed after the edges have been blurred because details that may have been obscuring it are
removed.
• Click onto Blur from the Edit menu button.
• Blurring a large image may take a few seconds.
Image before Blur applied
Image after Blur applied
46
Page 61

Navigate the Software
Sharpen
This filter enhances edges in an image, making them more visible. It is easier to see fine detail after an
image has been sharpened.
• Click onto Sharpen from the Edit menu button.
• Sharpening a large image may take a few seconds.
Image before Sharpen applied
Image after Sharpen applied
47
Page 62

LS Software User Guide
Tip:
Use the arrow keys to cycle through all eight directions while watching the preview
Emboss
This filter gives an image a "chiseled in stone" look. Edges take on a three-dimensional (3D) appearance,
making them stand out vividly.
Emboss can be performed from any of eight cardinal directions. Conventionally, these are referred to as
North (up), Northeast, East (right), Southeast, South (down), Southwest, West (left) and Northwest.
The easiest way to think of the "direction" of the embossment is as the location of a strong light source
around the image. For example, if North is selected, the image will appear as if it is illuminated with a
strong light from the top. Therefore, horizontal edges will be strongly lighted on the top edge and
shadowed on the bottom, and vertical edges will tend to disappear. Diagonal edges will be shadowed in
direct proportion to how closely they are horizontal. Alternatively, if East is selected, vertical lines will be
shadowed on the left side and lighted on the right side. Horizontal lines would become harder to
distinguish.
• Click onto Emboss from the Edit menu button. The Emboss window will appear.
• Select the desired Emboss Direction. The preview window will show a thumbnail sample of what
the image would look like embossed from the selected direction.
screen.
• Click OK to set the desired emboss direction.
48
Page 63

Navigate the Software
Remove Noise
This filter removes periodic (patterned) noise from an image. Patterned noise is removed by creating a
frequency-space mapping (Fourier transform) of an image and removing frequency spikes away from the
graph's origin.
There are two issues to be aware of with noise removal. First, if the image has actual (desired) pattern
information, the operation will not be able discern these from actual noise and it will remove them.
Second, the mathematics of the operation can cause some edges to be identified as patterns, resulting in
blurring on some images.
Remove noise is also referred to as Starfield Subtraction. The Image History indicates the noise removal
as Starfield Subtraction.
• Click onto Remove noise from the Edit menu button.
• Removing noise in a large image may take ten or fifteen seconds.
49
Page 64

LS Software User Guide
Adjust the Image
• Rotate: Rotates the image around its center, useful for aligning images taken with a crooked gel.
• Align: Aligns the image to an adjustable grid.
• Flip horizontally: Mirrors the image right for left, correcting for an upside-down gel.
• Flip vertically: Mirrors the image top for bottom, also correcting for upside-down gels in the other
direction.
• Crop: Use the crop tool to select the part of the image you want to keep.
• Resize: Enlarges or reduces the image in size, uses less space and memory, and enables the
image to be seen on the entire screen.
• Reduce to monochrome
• Change image depth
These functions are accessed from the Edit menu > Adjust module.
50
Page 65

Navigate the Software
Rotate Function
Rotate an image by an arbitrary number of degrees. Rotate is helpful to correct for a misaligned gel.
Graphically select the degree to align the image based on an internal image feature.
Rotate an Image
• Click onto Rotate from the Edit menu.
• The Rotate window will appear and a grid will be overlaid on the image.
• Drag the grid so the yellow arrow moves in the direction you would like the image rotated.
• Once the grid is oriented to the desired position, click OK on the Rotate window.
Rotate an Image by an Exact Number of Degrees
• Rotate the image by an exact number of degrees. For example, correct for an upside-down gel by
rotating it by 180 degrees.
• Click onto Rotate from the Edit menu. The Rotate window will appear and a grid will be overlaid
on the image. For this operation, you will ignore the grid.
• On the Rotate window, type the desired number of degrees into the Angle text box.
51
Page 66

LS Software User Guide
Tip:
• Click OK.
Rotations by 90, 180 or 270 degrees do not degrade the image. These
operations can be completely reversed by a rotation of the same amount in
the opposite direction.
52
Page 67

Navigate the Software
Align the Image
Align the image to a grid by clicking onto the Edit Menu then select Align from the Adjust category of
functions.
An Align Window will appear that will allow manual entry for moving the grid. As an entry is entered the
grid moves into position in real time.
Select OK.
The image will align to the grid.
53
Page 68

LS Software User Guide
Flip Image
Flip Horizontally
This filter provides a right to left mirror-image. Two clicks of the flip button will return the image to its
starting orientation.
Click onto Flip horizontally from the Edit menu.
Image before Flip Horizontally
Image after applying Flip Horizontally
Flip Vertically
This image filter mirror-images an image, top for bottom. Unlike most image filters, it does not degrade
the image and may be used repeatedly with no ill effect. Two uses of the filter will return the image to its
starting orientation.
Click onto Flip vertically from the Edit menu.
54
Page 69

Image before Flip Vertically
Navigate the Software
Image after applying Flip Vertically
55
Page 70

LS Software User Guide
Tip:
Note:
To distort the image, clear the Maintain Aspect Ratio check box and type the new width and
Resize Image
The Resize filter allows the image to be changed in size. It replicates or merges pixels as appropriate to
arrive at the new size. Resize most commonly would be used to create a smaller version of a very large
image to allow users to increase response time when applying filters or to import the image into another
software package that does not accept large images.
There is little point to increasing an image's size, although the filter does support it. Such an image
would have more physical pixels after the operation, but it does not gain any new information content.
• Click onto Resize from the Edit menu. The Resize window will appear.
• Select the desired new size from the drop-down list of suggested sizes.
OR
• Select the Enter custom size option and type either the desired new width or the desired new
height.
height. This should be used only to reverse a similar distortion created in the image capture
process.
• Click OK. Resizing a large image may take a few seconds.
56
Page 71

Navigate the Software
Reduce Image to Monochrome
The Reduce to Monochrome filter reduces a color image to monochrome. This is primarily useful when
colors in an image are distracting rather than informative. For example, if light strikes certain surfaces
from some angles, a "rainbow effect" (prism) will appear. Another use is to adapt for some software
packages and techniques that require monochrome images or which are less reliable on color images.
The Reduce To Monochrome function uses a weighted mix of colors to arrive at each pixel's
monochrome intensity. Green is very heavily weighted while blue is almost disregarded.
• Click onto Reduce to monochrome from the Edit menu button.
• Reducing a large image to monochrome may take a few seconds.
57
Page 72

LS Software User Guide
Change Image Depth
The Change Image Depth adjustment converts an image bit and color depth when needed.
• Click onto the Edit menu button and click onto Change Image Depth. Reducing a large image to
monochrome may take a few seconds.
• Click onto the new depth desired from the drop down menu and select OK.
58
Page 73

Advanced Menu Button
Advanced Menu Overview
The Advanced menu button contains additional software functions:
Navigate the Software
• Advanced Options
• Show Log File
• Configure User Accounts
• Display Loaded Modules
• Configure Application
• Macros
• Macros
• Record
• Edit
• View Options
• View Annotations: In the View Options menu, click to show or hide annotations on the screen.
Click here for more details on using Annotations.
• View Rulers: In the View Options menu, click to show or hide rulers on the screen.
Click here for more details on using Rulers.
59
Page 74

LS Software User Guide
Log Viewer
The Log Viewer displays a log of user actions and presents the action list to the user in a log box.
• To access the Log Viewer, go to the Advanced menu button and click on Show log file.
60
Page 75

Configure User Accounts
• User Names and Passwords
• Add a User
• Edit a User
• Change a Password or Other Settings
• Deactivative/Reactivate a User
• View the Login History of a User
Navigate the Software
User Names and Passwords
• Start the software. It will bring up a Login window.
• The administrator user name will show.
• Click Login.
• A Reset password window appears. Enter the new password. Confirm the new password.
61
Page 76

LS Software User Guide
• Click OK.
Add a New User
• From the menus, click the Advanced menu button then select Configure user accounts to open
the User Administration window.
• Click the New User button.
• Type in the new user name and password. Note: Each time the new user logs in, use that new
user name and password.
• Click OK.
Edit a User
• Highlight the user name in the User Administration window.
• Click the Tasks > Edit Rights and select from the Define User Permissions screen to allow
users to view images, modify images, change templates, or assign administrative rights.
• Click OK when changes to the user are complete. Note: The Administrator's rights cannot be
edited.
62
Page 77
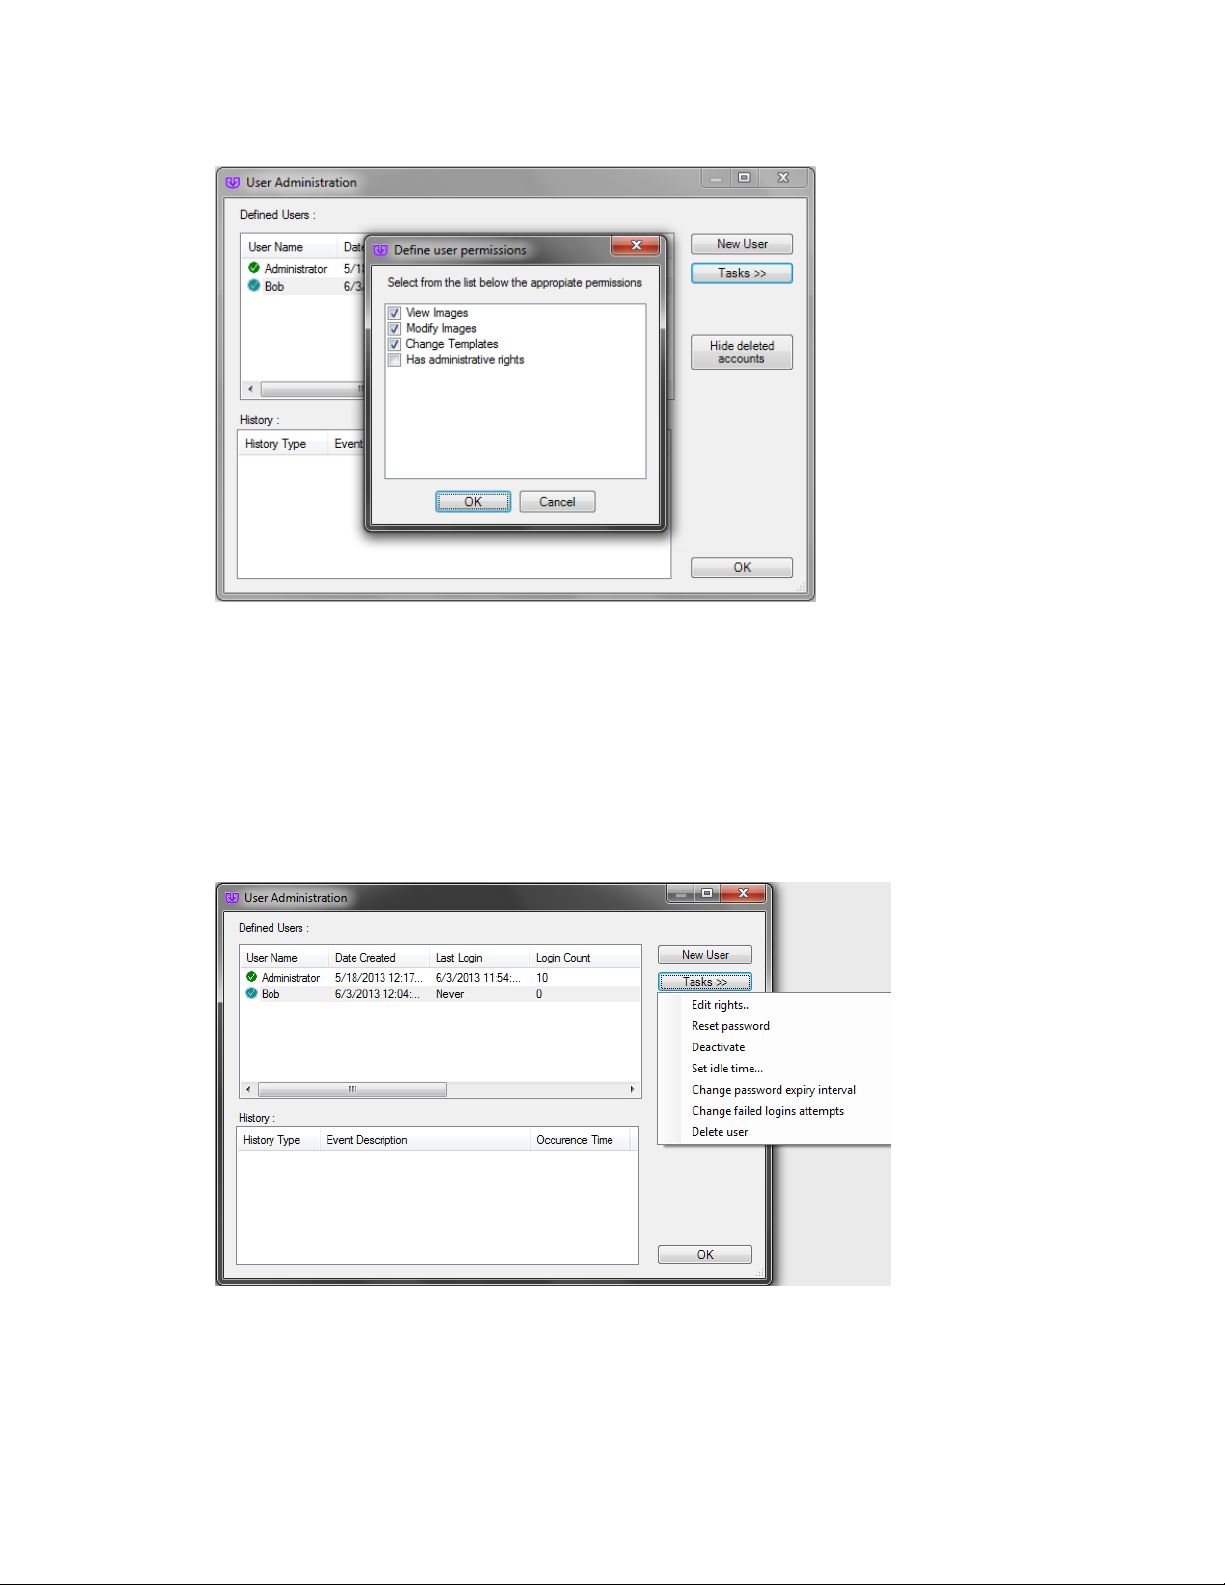
Change a Password or Other Settings
Navigate the Software
• To change a password, click the Advanced menu button then select Configure user accounts
to open the User Administration window.
• Click on the appropriate user to change.
• Select the Tasks > Reset Password and enter the new password. Enter the password again to
confirm the change.
• Click OK. The change in password will be noted in the User Administration > History box.
Deactivate/Reactivate a User
• To deactivate/reactivate a user, click the Advanced menu button then select Configure user
accounts to open the User Administration window.
63
Page 78
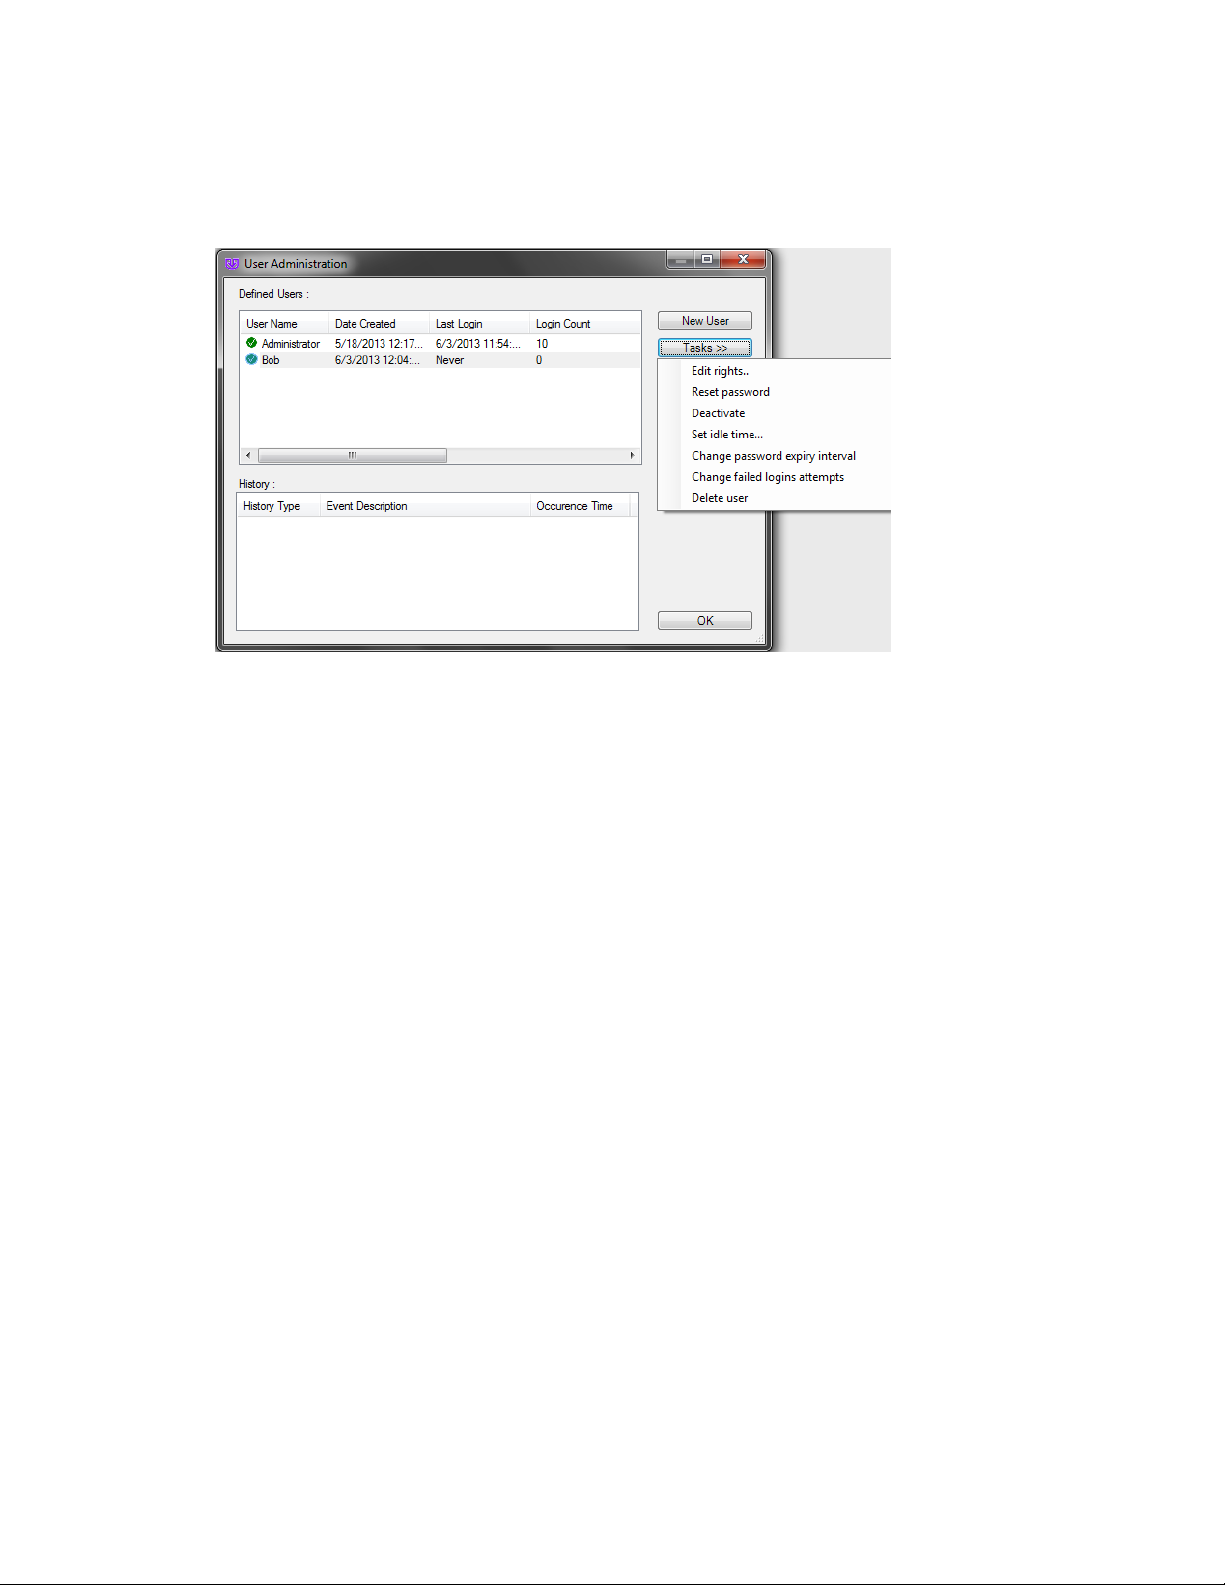
LS Software User Guide
• Select that user name and click Tasks > Deactivate. A red X will indicate the user is deactivated.
To reactivate, click Tasks > Activate.
• Click OK to close.
NOTE: Never disable the Administration Account.
View the Login History of a User
• Select a user name in the User Administration table. The lower half of the window displays the
login history associated with the selected user.
• Click OK to close the window.
64
Page 79

Navigate the Software
Display Loaded Modules
This window is typically used for technical support. UVP's technical support department can view this
window and diagnose and prevent future system failures.
• To access, click onto the Advanced menu button and select Display Loaded Plugins (Modules).
65
Page 80

LS Software User Guide
Configure Application
The function Configure Application shows global application default settings (Preferences). A
Preferences - Main Settings window will pop up with the following settings:
• Switching between tabbed/windowed interface for images
• Setting the number of recently-opened images to show in the "open" dialog.
• Examine/modify the analysis/hardware settings.
To access, click onto the Advanced Menu Button and select Configure Application.
The Preferences window allows users to set functions for various analysis, camera and hardware as well
as other settings. Click each category in the left column to see the respective settings. After adjusting
settings, click Apply and OK to save the settings.
Note: Changes made to the preference settings apply only to the current user logged in and not applied
globally.
66
Page 81

Navigate the Software
Note:
The scale information used by the rulers also is used by measurement annotations. Length
Rulers
Rulers are located at the top and left of each Image window.
The rulers show the width and height of the visible portion of the image either in metric units (if calibrated)
or in pixels (if un-calibrated). When zooming in and out of the image the software updates the rulers to
show the actual size and position of the visible portion of the image. As the user moves the mouse over
the image, markers show the position on each ruler.
The units are shown in the upper-left corner. Pixels (uncalibrated) are abbreviated "px;" all other values
use standard abbreviations. When the rulers are calibrated to a standard measure, they may change
units as zoom is applied to the image detail. For example, an image calibrated in centimeters may switch
to millimeters when zoom is used. The measurements are still completely accurate; the rulers switch units
because they are designed to show a useful number of units at every point.
measure annotations can be used to see the length of a feature that is not square to the rulers.
Show or Hide the Rulers
• Rulers may be hidden or shown individually for each Image window. Hiding the rulers provides
slightly more space in which to view the image.
• From the Advanced menu click onto View Rulers.
67
Page 82

LS Software User Guide
Macros
Using Macros
• Overview
• Macros Navigation
• Record Macros
• Edit Macros
• Play a User-Created Macro
Overview
Macros are user-defined functions that group a series of commands into a single command. Macros allow
users to replicate image capturing conditions or image analysis functions which require multiple steps.
Typically a macro is created by recording steps the first time the user performs a series of actions. Details
can be edited or added to the recorded script, saved, and stored to be recalled and executed at a later
time.
Macros Navigation
There are three main options: Macros, Record, Edit. To access these functions, click the Advanced
menu button. The Macros option allows users to manage all the information about the created macros.
The location of the file containing the macro scripts can be changed and loaded here. The created
macros are listed here and can be run, deleted, renamed or edited by accessing the macros script file.
The recently ran scripts will be listed under the macros options. As discussed later, the Record option
allows users to create macros and Edit allows users to modify a created macro.
Record Macros
• To record a macro, click onto Record from the Advanced menu.
• A Record Macro window appears.
• Provide a Macro Name and Shortcut Key. NOTE: The macro name must begin with an alpha
character.
68
Page 83

Navigate the Software
• Select a Shortcut Key to execute the macro and provide a Description of the macro, if
necessary.
• Click onto OK.
• A Recording window appears. Select Template Mode or Show Recording. To ensure the
creation of the macro, click onto Show Recording to display the software code of the macro as it
is formulated.
• Click onto any available command from the main screen or menu buttons to be saved into the
macro.
• Select Stop Recording when finished recording the macro.
NOTE: Template Mode allows variable user input from dialog boxes. For example, a user may want to
perform analysis on several different captured images. To do this, an image from the "Open" dialog box
must be selected by the user. The macro will wait for the user to provide input on which image to open in
the "Open" dialog box before continuing to the next step.
Edit Macros
• To edit a macro previously created, select Edit from the Advanced menu.
• A default.mro window appears with macro programming script. All the macros created will be
listed in this window and can be edited manually.
• To edit the script code, click and type the new information into the code.
Play a User-Defined Macro
To playback a macro, select Macros from the Advanced menu then move the cursor down to the
desired macro and click on the macro name.
69
Page 84
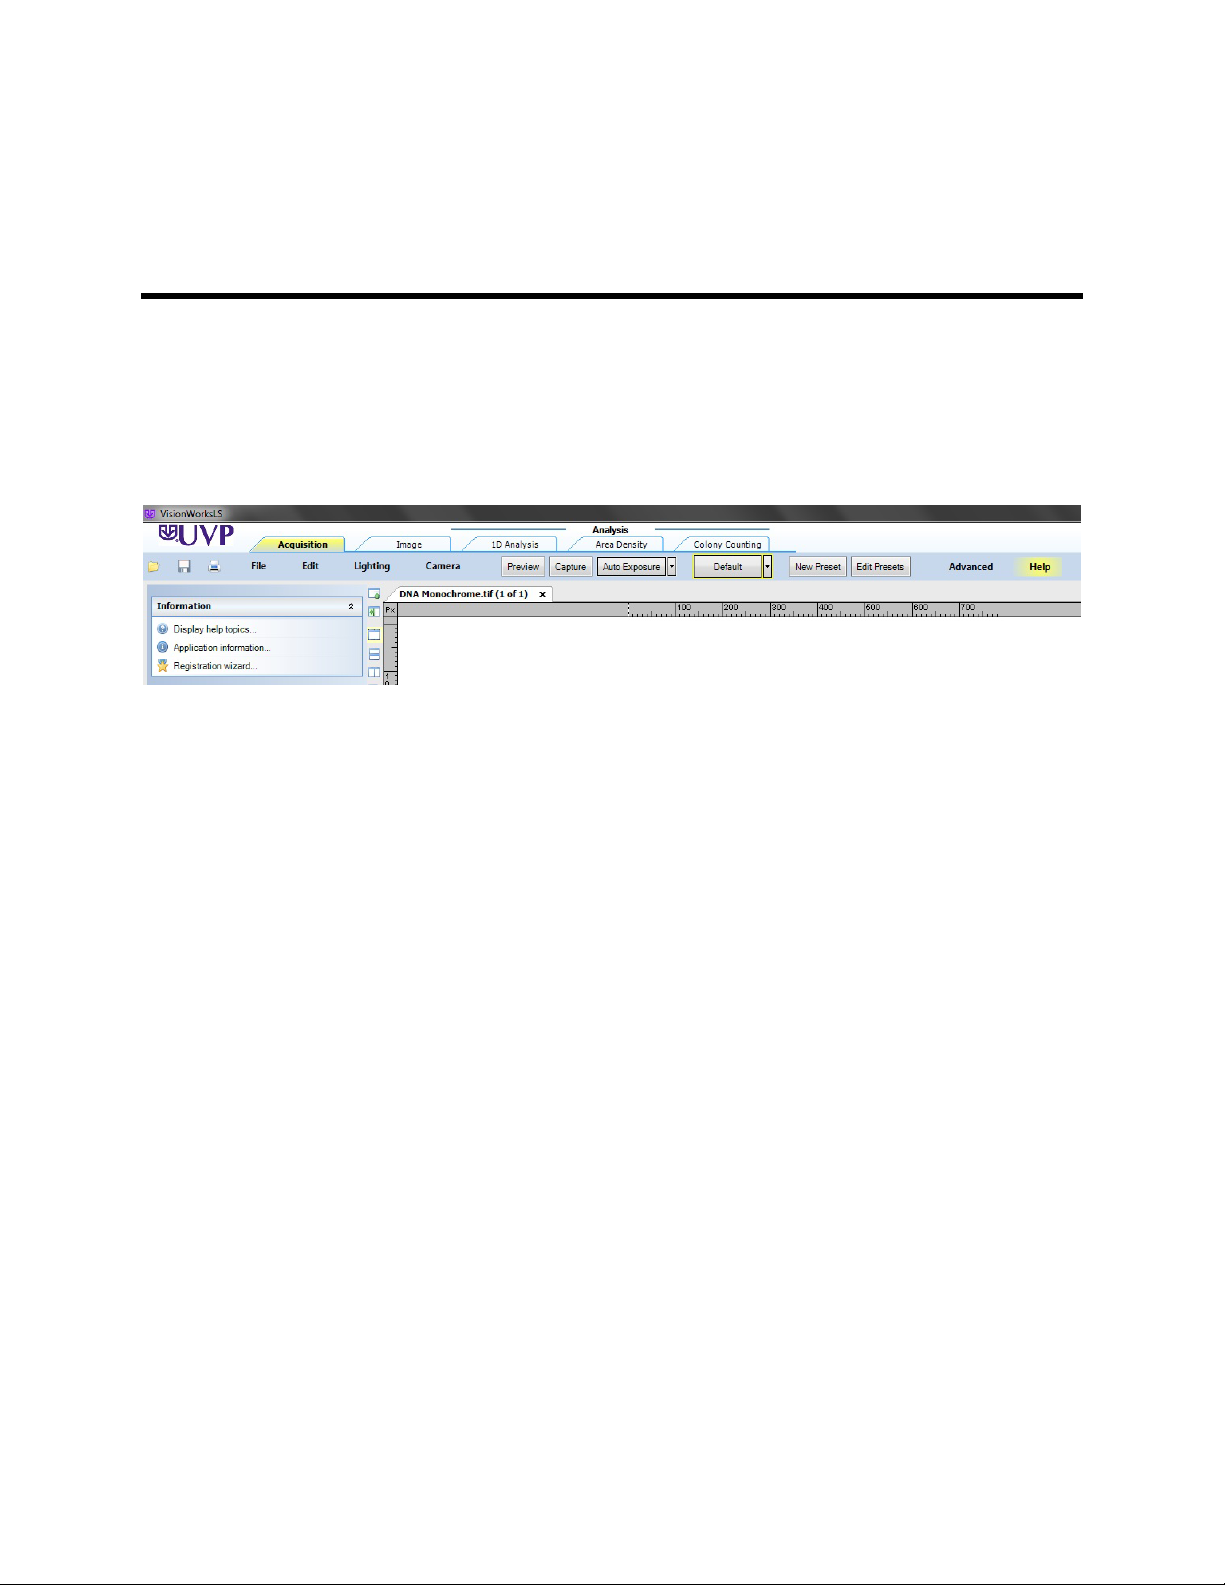
LS Software User Guide
Help Menu Button
Help Menu Overview
The Help menu contains the following features:
• Display help topics
• Application information
• Registration wizard
70
Page 85

Navigate the Software
Display Help Topics
These are some of the help topics available. Simply click through the help topics or search for a word for
assistance using the help files.
To access, go to the Help Menu Button and select Display Help Topics.
71
Page 86

LS Software User Guide
Application Information
The Application Information function brings up a window which describes the:
• Name of the software
• UVP's contact information
• Version of software (useful when calling UVP's technical services department) and
• Links to activate the software
To access, click onto the Help Menu button and select Application Information.
72
Page 87

Acquire Images
Acquisition Action Tab Overview
The Acquisition Action Tab provides the menus to capture images with a UVP imaging system. The
Acquisition Action Tab > Camera menu is shown below.
Menu buttons contained in the Acquisition Action Tab are:
• Lighting and Other Hardware
• Lens Controls
• Lighting and Filters
• Tray Height
• Preferences
• BioLite
• Microscope (for use with iBox Explorer only)
• Camera
• Integration
• Exposure Time
• Gain
• Post Processing (some cameras will have this feature)
• Binning
• Saturation Preview
73
Page 88

LS Software User Guide
• Preferences
• CCD Temperature (for cooled cameras)
• Preview, Capture and AutoExposure buttons
• Template Presets (initial button name says default)
• Close all Devices - Click this button to disconnect all hardware from the software. To reconnect
devices, click the Scan for Devices button.
Getting Started: Capture an Image
74
Page 89

Image Acquisition
To access the preview and capture buttons, click the Acquisition action tab.
Capture an Image
To capture an image:
• Place the gel, blot, plate (sample to be captured) into the darkroom.
• Click the Preview button in the Acquisition action tab to see a preview of the sample. The
Preview function is useful to ensure that the camera sees the sample clearly before taking the
actual picture. A Preview window will appear. Note: The Preview button now reads Stop
Preview.
Acquire Images
• Set the optimal hardware settings (for the lens, camera, BioLite (optional), darkroom) from the
Lighting and Camera modules. Ensure that the Saturation Preview check box is selected in the
Preview window.
• When the optimal settings have been selected, click the Capture button.
• Auto Exposure drop down button, located in the menu buttons, can be used for automatic
exposure settings. Select from:
75
Page 90

LS Software User Guide
• Best (longer exposure): Exposes the image to the maximum value of the histogram
(65,000 gray levels).
• Better: Exposes to fill the histogram 50% so the brightest portion image is at 32,000 gray
levels.
• Good: Exposes to fill the histogram to 25% or 16,000 gray levels.
• Minimum (fast exposure): Exposes to fill the histogram to 10% over background.
Minimum and Good settings are particularly useful for chemiluminescent imaging applications
and allow for quicker image capture overall.
Note: If the captured image is black, increase the exposure time and/or check the Compensate
exposure for binning check box under Camera > Binning.
Note: If using an iBox Explorer Imaging Microscope, to select the hardware setting via the software go to:
Microscope
Related Topics:
• Set-Up Templates (also described as Presets): Save and reuse settings for repeat experiments.
• Set Standard Preference Settings
76
Page 91

Acquire Images
Using the iBox Explorer Imaging Microscope
The Microscope menu will appear when the software connected to an iBox® Explorer Imaging
Microscope. The functions in the menu control emission filters, magnification and location bookmarks.
This section discusses:
• Selecting emission filters
• Setting magnification levels including fine focus settings
• Setting location bookmarks
Emission Filters
Emission filter names are pre-set at the UVP factory. The names indicate the emission filter wavelength
and position in the filter tray.
To select an emission filter:
• Click a button in the Emission Filter menu. The selected button will be bordered in red.
To change the name of a filter or filter set:
• Click the double right arrow above the emission filter buttons. A pop up window will open.
77
Page 92

LS Software User Guide
• Click the Edit button. A Filter Set Edit Form window will open.
• Change the Filter Name(s) in any of the four positions.
• To modify the color of the button, make the selection from the Color drop down menu for each
filter. The Preview button will show the selected color.
• The default name for a filter set is "Standard." To change the filter set name, type in a new name
in the Name field.
• Click OK to save.
If using more than one filter set, it is possible to create a customized buttons for each set. To add a new
filter set:
• Click the double right arrow above the emission filter buttons. A pop up window will open.
• Click the Add new set button. A Filter Set Edit Form window will open.
• Enter the Filter Name(s) in the four positions.
• To select a color for the button, make the selection from the Color drop down menu for each filter.
The Preview button will show the selected color.
• Enter a new filter set name in the Name field.
• Click OK to save.
To select a filter set:
• Click the double right arrow above the emission filter buttons. A pop up window will open.
• Click on the name of the filter set to be displayed in the Emission Filter module.
Magnification
78
Page 93

Acquire Images
To select a desired magnification level, click the radio button next to one of the settings. For further
discussion on using the magnification settings, refer to the iBox Explorer
manual.
2
Imaging Microscope product
Fine Focus
The Fine Focus plus and minus buttons are used for minor vertical adjustments of the platform allowing
for detailed focus adjustments.
• Click the minus button to move the platform down.
• Click the plus button to move the platform up.
Bookmarks
It is possible to temporarily store various platform positions by using the Bookmark tool. This allows the
user to return to a saved bookmark position within an experiment. The Location Map displays the current
XYZ position of platform.
New
• Once the imaging platform is in the desired bookmark location (as indicated by the + on the
Location Map), click the New button. A new location ID will be created.
• To change the name of the bookmark label, click on the label name ("new bookmark") and enter
the new name.
Note: After the imaging platform has been moved, double click on an ID number to return the
imaging platform to a bookmarked position.
Update
It is possible to change the location of an existing bookmark.
79
Page 94

LS Software User Guide
• Move the imaging platform to a new position. This is displayed as a + on the Location Map.
• Click the ID number of the bookmark to be updated.
• Click the Update button to modify the bookmark to the new position.
Delete
To delete an existing bookmark:
• Click the ID number of the bookmark to be deleted.
• Click the Delete button to remove the bookmark from the list.
Clear
To clear all bookmarks, click the Clear button.
Note: Once the software is closed, all bookmarks will be deleted.
Related Topics:
• Set-Up Templates to save and reuse settings for repeat experiments.
• Using the BioLite Multispectral Light Source
80
Page 95

Acquire Images
Lighting/Darkroom/Lens
BioLite MultiSpectral Light Source
The automated BioLiteTM MultiSpectral Light Source is an added accessory to some systems. The
Automated BioLite has a fiber optic cable that threads into the darkroom and strictly controls the
wavelength of light shining inside the darkroom.
In the Acquisition Action Tab in the Lighting menu is a list of functions for the BioLite. These are:
• Filter: Drop down list consists of a variety of filters defined by the user.
• Light Engine: Turn the BioLite On and Off.
• Template: A template is a group of BioLite settings, which can be saved under a common name.
Select the Template for the sample, to apply from the drop-down box.
• Intensity: Provides the range for light intensity. The intensity ranges from 0 to 100%.
• Light Table: Turns the light on for the Transillumination light or for the Epi Illumination light.
• Connect: Connects the Automated BioLite device from the software.
Using the BioLite Functions
For additional information on using the automated BioLite MultiSpectral Light Source, refer to the user
instruction manual for this unit.
• Turn on the Light Engine in the software.
• Set the Intensity of the BioLite. Select the highest intensity then move to a lower threshold if
desired.
81
Page 96

LS Software User Guide
Tip:
• Turn on the Light Table to Trans or Epi. Use the Trans option if the light source is below the
sample. Use the Epi option if the light source is above and shining down on the sample.
Changes made to the BioLite through the mechanical buttons on the device will NOT be reflected in
the software. Please double check settings periodically to ensure that the software settings match
with those on the device.
Related Topics:
• Set-Up Templates to save and reuse settings for repeat experiments.
• Using the BioLite with the iBox Explorer Imaging Microscope
• Set Standard Preferences
82
Page 97

Acquire Images
Darkroom Control
The software works with a series of darkrooms offered by UVP. The software controls the darkroom
lighting and other hardware inside the darkroom. If the system includes a motorized darkroom, the lift
platform height position will be controlled by the software as well. This software controls the following
systems:
• BioSpectrum® Systems
• iBox® Scientia Systems
Note: For iBox Explorer system settings, see separate information.
To access the darkroom controls, click onto the Acquisition Action Tab > Lighting menu button.
Hardware Settings Selection
• Filter: Click the drop down menu to select the user-defined emission filter.
• Reset Wheel: Click on this button to realign the filter wheel after accidental movement of the
darkroom.
• Epi Illumination: Darkroom supplies 365nm, 480nm and white light epi (overhead) illumination.
Click onto the radio button to make a selection.
• Transillumination: Darkroom supplies power to the UV transillumination source and also to the
white light transillumination source. Click onto a radio button to make a selection.
• Open Door Override: Under standard operating conditions, when the darkroom door opens, the
UV Light shuts off in the darkroom. When UV Safety Off is selected as the door opens, the UV
Light stays on.
Tray Height
• Open Door Override: Under normal circumstances when the darkroom door is open, the UV
light shuts down; to override this occurrence, click onto the Open Door Override switch.
83
Page 98

LS Software User Guide
• Tray Location: Slide bar adjusts the height of the automated lift platform. (Manual platform
systems do no have this option). The warning (as shown below) appears when the door is open
to help prevent UV exposure.
Note: If the darkroom door is open, the following message will appear:
Related Topics:
• Set-Up Templates to save and reuse settings for repeat experiments.
• Set Standard Preference Settings
84
Page 99

Acquire Images
Lens Control
This section contains information on adjusting lens and darkroom parameters to capture an image. To
access these functions, click on the Acquisition Action Tab > Lighting menu button. These instructions
cover a software-controlled lens included with the system.
Lens Control
• Aperture: Slidebar adjusts the amount of light that enters the lens.
• Zoom: Slidebar controls the object's apparent distance from the observer. Note: Not all systems
are configured with zoom capability. If a system does not have zoom capability, this slider will not
appear.
• Focus: Slidebar adjusts the clarity of the image.
Related Topics:
• Set-Up Templates to save and reuse settings for repeat experiments.
85
Page 100
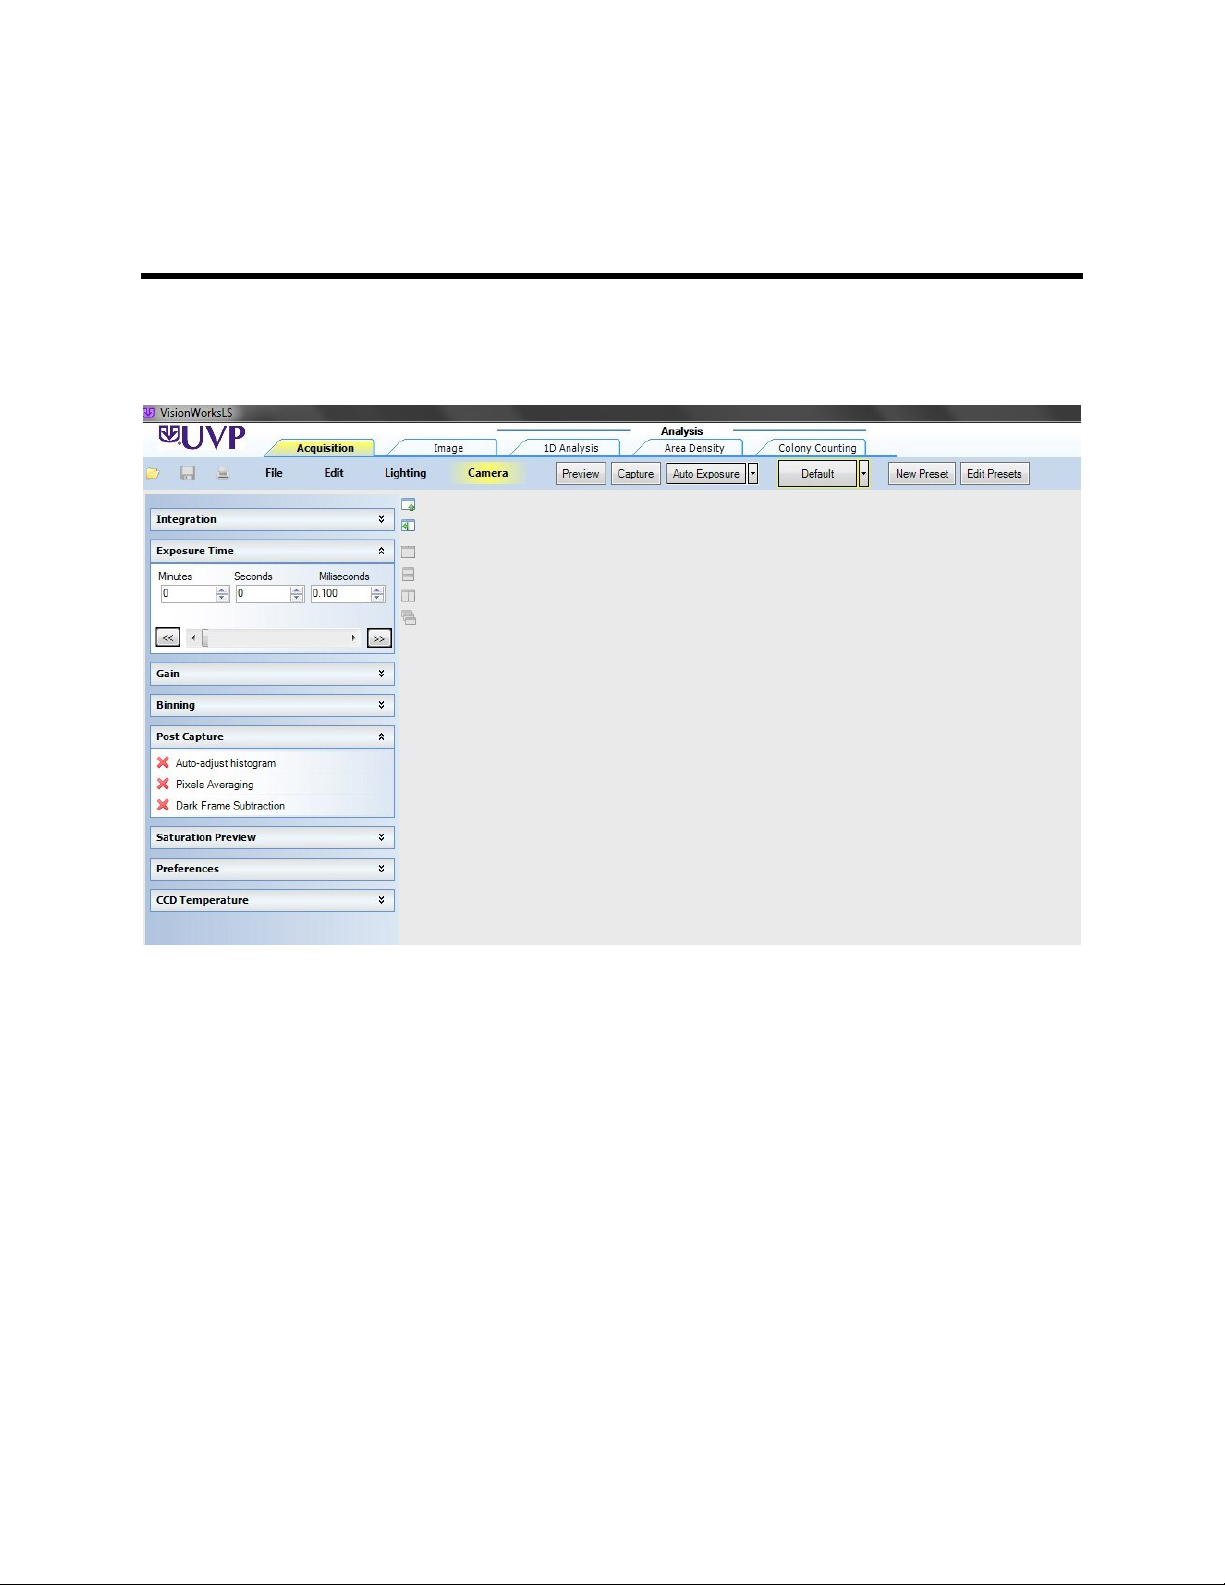
LS Software User Guide
Camera
Camera Functions
Functions under the Camera menu button include internal camera settings to control the image capture.
To access these functions click onto the Acquisition Action Tab > Camera menu button.
The camera functions are:
Integration
• On-chip Integration: When this radio-button is selected before pressing Capture, the software
takes only ONE picture, with the current exposure time set.
• Sequential integration: When this button is selected before clicking Capture, multiple pictures
are taken at a uniformly increasing exposure time.
• Dynamic Integration: With this option selected before capture, multiple pictures are taken at set
uniform intervals.
86
 Loading...