

Unitec Wash Select II POS Owner’s Manual
Wash Select II and
Wash Select II POS
Operations Manual
Unitec
www.StartwithUnitec.com
(443) 561-1200

W A S H S E L E C T I I
WASH SELECT II POS OPERATIONS MANUAL
SOFTWARE VERSION 5.55
This manual provides comprehensive operational procedures for the Wash Select II. In this
manual, we will discuss the setup, operation and maintenance of the Wash Select II.
If further assistance is needed, please contact the distributor from which the product was
purchased.
When calling for assistance, you must have the following information available:
Wash Select II Serial Number:
Distributor Name:
C O P Y R I G H T
© 2012 Unitec, Incorporated. All rights reserved. No part of this book, including text, screen
examples, diagrams, or icons, may be reproduced or transmitted in any form, by any means
(electronic, photocopying, recording, or otherwise) without prior written permission of Unitec,
Incorporated.
T R A D E M A R K S
Enterlink, Wash Select II, Wash Select II POS, VIP Wash Pass, Customized VIP Wash Pass,
VIP Wash Coupons, Unitec, and the Unitec Logo are trademarks, service marks, or
registered trademarks of Unitec, Incorporated.
GiveX is the registered trademark of GiveX Incorporated.
CoinCo is the registered trademark of Coin Acceptors, Inc.
All other products, services, and company names are trademarks or registered trademarks of
their respective owners.
Document Number: WS21002
Document Title: WSII Operations Manual
Document Revision History
Software
Version
Release
Date
Changes Made
5.55
7/2012
Added Wash Card support.
5.54
7/2011
Added cash code for Trinidad and Tobago
Added ability to have both POS4000 link and Remote Code POS4000
enabled on Wash Select II
5.53
6/2010
Bug Fixes
5.52
11/2009
Added Credit Sales Tax Option
Added Menu to Reset Memory Function
Added Date Range to Credit History Report
Modified Display so that Wash and Option Prices can exceed $99.99
Added “Cash/Token + Credit” fields to Reports
5.51
4/2009
Bug fixes
5.50
12/2008
Added Remote Code POS4000 support: Section 2.8.12, page 58
5.42
6/2008
Bug fixes
5.41
6/2008
Bug fixes
5.31
11/2007
Lower case characters added to text editing: Section 2.7, page 46
Pay Fleet Account support added to WashPay-integrated units: Section 2.3.7
5.30
6/2007
Wash Select II to WashPay Integration: Section 2.3.20, page 27
5.11
4/2007
Bug fixes
5.10
10/2006
New items added:
Split Tender for GiveX card: Section 2.3.19, page 29
Added Fleet Account Names: Section 2.2.1, page 10
Added instructions on how to “Pay Fleet Acct” in Credit System menu:
Section 2.3.7, page 22
Added instructions on how to “Pay Fleet Acct” when adding an account in
Pass Codes/Cards menu: Section 2.14.2 Table 12, page 86
Increased Credit Transaction History size from 300 to 500
5.00
3/2006
Original release.
W A S H S E L E C T I I
Document Number: WS21002
Document Title: WSII Operations Manual

W A S H S E L E C T I I
[ T H I S P A G E I N T E N T I O N A L L Y L E F T B L A N K ]
Document Number: WS21002
Document Title: WSII Operations Manual

Wash Select II Menu Tree
Version 5.55
Reporting Menu
Diagnostics Menu
Cust Interface Menu
Print Configuration
Test Outputs
Customer Stacking
View Configuration
Cycle Outputs
Forced Selection
Print Accounting
Test Inputs
Allow Upgrades
- Detailed
Test Bills/Coins
Auto Select Timer
- Summary
Dispense Coins
Paging Functions (N/A)
View Accounting
Test Card Reader
Edit Pager #
Clear Accounting
- Check Card Type
View Pager #s
Fleet Menu (N/A)
- Check Tracks
Print Pager #s
Add Account
Test Receipt Printer
Test a Pager
Edit Account
Test Keypad
Site ID Voice #
Add to Account
Test Buttons
Print Pager Log
Delete Account
Test Modem
Cash & Tokens
View Accounts
Get Network Info
Country Code
Print 1 Account
Modem Loopback
Token Value (N/A)
Print Accounts
485/POS Loopback
Max Tokens/Customer (N/A)
View Transaction History
Test Expansion Memory
Dispense Mode
Print Transaction History
Test RFID Reader
Dispense Value
Delete All Empty
RFID loopback
Cash Mode*
Edit Profile
Debit loopback
Misc. Setup
Add Per Profile
Aux P4 Loopback
System Time (N/A)
View Profiles
Aux J1 Loopback
Service Phone #
Print Profiles
Wash Setup (N/A)
Site ID
External Fleet
Wash Prices
Receipt Printer
Erase All
Wash Names
Cash Receipt
Credit System
Speech Menu (24 Messages)
Receipt Bar Code*
Credit Mode
Play Message
Alarm Duration (N/A)
Remote Setup
Record Message
Remote Reporting (N/A)
Remote Dial Up
Greeting Delay
Enable/Disable
Print Transaction Status
Repeat Delay
Set Password
Print Transaction History
Print Message List
Rings to Answer
Clear Transaction History
View Message List
Set Deaf Time
Pay Fleet Acct (N/A)
Text Messages (N/A)
Modem/Local
Return Credit (N/A)
Receipt Header
Passcodes/cards
Credit & Coupon
2nd Line of Wash
Add Code/Card
Open a Batch (N/A)
Greeting Screen*
View Codes/Cards
Close a Batch (N/A)
Wash Interface Menu
Print Codes/Cards
Clear A Batch (N/A)
Relay Stacking
Delete Code/Card
Processor Type
Relay Latching
VIP Coupons
Auto Batching
Relay Pattern
Setup Coupon
Accept Proprietary (N/A)
Auto OOS Detect
Set Manufacturer
POS Auth Timeout
Wash Handshaking
Coupon Limit
Network Params
Fault Input
POS4000 Link
Merchant ID (N/A)
OOS Timer
Interface Mode
Split Tender (N/A)
Tunnel Mode
Set Bay Address
Credit Sales Tax (N/A)
Barrier Gate*
Convey Accounting
Combo Mode
Use POS Names/Prices
Edit Combo Names
Notifications
Optioning
Remote Codes
W A S H S E L E C T I I
Document Number: WS21002
Document Title: WSII Operations Manual

W A S H S E L E C T I I
[ T H I S P A G E I N T E N T I O N A L L Y L E F T B L A N K ]
Document Number: WS21002
Document Title: WSII Operations Manual

W A S H S E L E C T I I
Table of Contents
1 System Overview ............................................................................................................................ 1
1.1 Introduction to the Wash Select II .......................................................................................... 1
1.2 Setup and Operate Modes..................................................................................................... 1
1.3 Customer Interface ................................................................................................................ 2
1.4 Wash Select II Features ........................................................................................................ 2
1.4.1 Standard Features ............................................................................................................... 2
1.4.2 Optional Features ................................................................................................................ 3
2 System Configuration and Operation ........................................................................................... 5
2.1 Reporting Menu ..................................................................................................................... 5
2.1.1 Configuration Report ........................................................................................................... 5
2.1.2 Accounting Report ............................................................................................................... 6
2.2 Fleet Accounts and Coupons Menu ...................................................................................... 7
2.2.1 Adding an Account .............................................................................................................. 7
2.2.2 Editing Accounts .................................................................................................................. 8
2.2.3 Adding Uses or Dollar Amounts to Accounts ....................................................................... 9
2.2.4 Delete an Account ............................................................................................................. 10
2.2.5 Viewing Fleet Accounts ..................................................................................................... 10
2.2.6 Print Selected Fleet Account ............................................................................................. 11
2.2.7 Print All Fleet Accounts ..................................................................................................... 11
2.2.8 View Transaction History ................................................................................................... 11
2.2.9 Print Transaction History ................................................................................................... 12
2.2.10 Delete All Empty Accounts ................................................................................................ 12
2.2.11 Create/Edit a Profile .......................................................................................................... 13
2.2.12 Create Fleet Accounts From Profiles ................................................................................. 14
2.2.13 View Current Profiles ......................................................................................................... 15
2.2.14 Print Current Profiles ......................................................................................................... 15
2.2.15 Enable External Fleet ........................................................................................................ 15
2.2.16 Erase All Fleets ................................................................................................................. 16
2.3 Credit System ...................................................................................................................... 16
2.3.1 Obtaining a Merchant Account .......................................................................................... 16
2.3.2 Credit Mode ....................................................................................................................... 17
2.3.3 Remote Setup ................................................................................................................... 18
2.3.4 Print Transaction Status .................................................................................................... 18
2.3.5 Print Credit Transaction History ......................................................................................... 18
2.3.6 Clearing the Transaction History ....................................................................................... 20
Document Number: WS21002 i
Document Title: WSII Operations Manual

W A S H S E L E C T I I
2.3.7 Pay Fleet Account ............................................................................................................. 21
2.3.8 Return Credit (Refunding a Credit Transaction) ................................................................ 21
2.3.9 Credit + Coupon ................................................................................................................ 22
2.3.10 Open a Batch Manually ..................................................................................................... 22
2.3.11 Close a Batch Manually ..................................................................................................... 22
2.3.12 Clear a Batch ..................................................................................................................... 23
2.3.13 Processor Type (Credit Mode 2 Only) ............................................................................... 23
2.3.14 Automatic Batching ........................................................................................................... 24
2.3.15 GiveX................................................................................................................................. 24
2.3.16 Accept Propriety ................................................................................................................ 25
2.3.17 Merchant ID ....................................................................................................................... 25
2.3.18 POS Auth Timeout ............................................................................................................ 26
2.3.19 Set Network Parameters (Credit Mode 5 Only) ................................................................. 26
2.3.20 Wash Select II to WashPay Integration (Credit Mode 6 Only) ........................................... 27
2.3.21 Split Tender ....................................................................................................................... 28
2.3.22 Credit Sales Tax ................................................................................................................ 28
2.4 Diagnostics Menu ................................................................................................................ 29
2.4.1 Testing Output Relays ....................................................................................................... 29
2.4.2 Cycling Output Relays ....................................................................................................... 30
2.4.3 Testing Inputs .................................................................................................................... 30
2.4.4 Testing Coin and Bill Pulse Relays .................................................................................... 31
2.4.5 Test Coin Dispenser .......................................................................................................... 32
2.4.6 Testing the Magnetic Card Reader .................................................................................... 33
2.4.7 Testing the Thermal Printer ............................................................................................... 34
2.4.8 Testing the Standard Keypad ............................................................................................ 35
2.4.9 Testing the Buttons ........................................................................................................... 36
2.4.10 Testing the Modem ............................................................................................................ 36
2.4.11 Get Network Info ............................................................................................................... 37
2.4.12 Modem Loop back ............................................................................................................. 37
2.4.13 POS/485 Loop back .......................................................................................................... 38
2.4.14 Test Exp. Memory ............................................................................................................. 38
2.5 Wash Setup Menu ............................................................................................................... 39
2.5.1 Programming Wash Package Prices ................................................................................. 39
2.5.2 Programming Wash Package Names ............................................................................... 39
2.5.3 Option Prices ..................................................................................................................... 40
2.5.4 Option Names ................................................................................................................... 41
2.6 Speech Menu ....................................................................................................................... 41
2.6.1 Playback Messages .......................................................................................................... 41
2.6.2 Record Messages ............................................................................................................. 42
2.6.3 Set Greeting Start Delay.................................................................................................... 42
Document Number: WS21002 ii
Document Title: WSII Operations Manual

W A S H S E L E C T I I
2.6.4 Set Greeting Repeat Delay ................................................................................................ 43
2.6.5 Printing Message List ........................................................................................................ 43
2.6.6 Viewing Current Message List ........................................................................................... 43
2.7 Text Messages Menu .......................................................................................................... 44
2.7.1 Configure Receipt Header Message ................................................................................. 44
2.7.2 Configure Second Line of Wash Display ........................................................................... 45
2.7.3 Greeting Message ............................................................................................................. 45
2.7.4 Option Prompt ................................................................................................................... 46
2.7.5 Second Line of Option Display .......................................................................................... 46
2.8 Wash Interface Menu ........................................................................................................... 47
2.8.1 Enable Relay Stacking ...................................................................................................... 47
2.8.2 Enable Relay Latching ...................................................................................................... 47
2.8.3 Configure the Wash Relay Pattern .................................................................................... 48
2.8.4 Enable Automatic Out-Of-Service Detection ..................................................................... 49
2.8.5 Wash Handshaking ........................................................................................................... 50
2.8.6 Wash Fault ........................................................................................................................ 50
2.8.7 OOS Timer ........................................................................................................................ 51
2.8.8 Tunnel Wash Settings ....................................................................................................... 52
2.8.9 Combo Mode ..................................................................................................................... 53
2.8.10 Edit Combo Names ........................................................................................................... 54
2.8.11 Optioning ........................................................................................................................... 54
2.8.12 Remote Code POS4000 Support ...................................................................................... 56
2.9 Customer Interface Menu .................................................................................................... 57
2.9.1 Customer Stacking ............................................................................................................ 57
2.9.2 Forced Selection ............................................................................................................... 58
2.9.3 Allow Upgrades ................................................................................................................. 59
2.9.4 Enabling and Setting Automatic Selection Timer ............................................................... 59
2.10 Paging Functions .............................................................................................................. 60
2.10.1 Pager Types ...................................................................................................................... 61
2.10.2 Pager Error Codes ............................................................................................................ 62
2.10.3 Programming/Editing Pager Numbers ............................................................................... 63
2.10.4 Disabling/Erasing Pager Slots ........................................................................................... 67
2.10.5 View Current Pager Numbers ............................................................................................ 68
2.10.6 Print Current Pager Numbers ............................................................................................ 68
2.10.7 Testing a Pager ................................................................................................................. 68
2.10.8 Programming Voice Pager Site ID Numbers ................................................................ ..... 69
2.10.9 Print Pager Log ................................................................................................................. 69
2.11 Cash and Tokens Menu .................................................................................................... 70
2.11.1 Country Code .................................................................................................................... 70
2.11.2 Defining the Value of a Token ........................................................................................... 70
Document Number: WS21002 iii
Document Title: WSII Operations Manual

W A S H S E L E C T I I
2.11.3 Set Maximum Tokens per customer .................................................................................. 71
2.11.4 Configure Coin Dispensing Mode ...................................................................................... 71
2.11.5 Configure Dispensed Coin Value ...................................................................................... 72
2.11.6 Disabling Cash Acceptance ............................................................................................... 72
2.12 Miscellaneous Setup Menu ............................................................................................... 73
2.12.1 Alarm Duration .................................................................................................................. 73
2.12.2 Set System Date and Time ................................................................................................ 73
2.12.3 Assigning a Service Phone Number .................................................................................. 74
2.12.4 Assigning a Site ID Number .............................................................................................. 74
2.12.5 Enable Receipt Printer....................................................................................................... 75
2.12.6 Cash Receipt ..................................................................................................................... 75
2.13 Remote Reporting Menu ................................................................................................... 75
2.13.1 Internet Credit and Remote Reporting ............................................................................... 76
2.13.2 Configure Remote Reporting ............................................................................................. 76
2.13.3 Using HyperTerminal to Access the Wash Select II .......................................................... 78
2.13.4 Adding a Connection to HyperTerminal ............................................................................. 78
2.13.5 Dialing and Connecting to a Site ....................................................................................... 79
2.13.6 Disconnection from a Site.................................................................................................. 81
2.13.7 Automatic Disconnection by the Wash Select II ................................................................ 82
2.13.8 Saving a Report to a File ................................................................................................... 82
2.13.9 Multiple Units at Same Site ............................................................................................... 82
2.13.10 Adding an Alternate Modem Setup .................................................................................... 83
2.13.11 Disabling Error Control ...................................................................................................... 84
2.14 Pass Codes and Pass Cards ............................................................................................ 85
2.14.1 Using PassCodes/Cards ................................................................................................... 85
2.14.2 Add Code/Card .................................................................................................................. 86
2.14.3 View Codes/Cards ............................................................................................................. 87
2.14.4 Print Codes/Cards ............................................................................................................. 87
2.14.5 Delete Code/Card .............................................................................................................. 88
2.15 VIP Wash Coupons........................................................................................................... 88
2.15.1 CoinCo Bill Validator ......................................................................................................... 88
2.15.2 Mars (MEI) Bill Validator .................................................................................................... 90
2.15.3 VIP Wash Coupon Limit .................................................................................................... 92
2.16 POS4000 Link ................................................................................................................... 93
2.16.1 Interface Mode .................................................................................................................. 94
2.16.2 Notifications ....................................................................................................................... 95
2.16.3 Set Bay Address ................................................................................................................ 95
2.16.4 Convey Accounting ........................................................................................................... 98
2.16.5 Use POS Names and Prices ............................................................................................. 98
3 Component Operation & Maintenance ..................................................................................... 101
Document Number: WS21002 iv
Document Title: WSII Operations Manual

W A S H S E L E C T I I
3.1 Component Locations ........................................................................................................ 101
3.2 Software Updates .............................................................................................................. 101
3.3 Bill Validator ....................................................................................................................... 103
3.3.1 Mars Bill Validator ........................................................................................................... 103
3.3.2 Coinco Bill Validator ........................................................................................................ 110
3.4 Single Coin Acceptor ......................................................................................................... 117
3.4.1 Replacing the Reference Coin ......................................................................................... 117
3.4.2 Adjusting the Selectivity to the Coins .............................................................................. 117
3.4.3 Removing the Coin Acceptor ........................................................................................... 118
3.5 Multi-Coin Acceptor Programming and Operation ............................................................. 118
3.5.1 Programming the IDX Acceptor ....................................................................................... 119
3.5.2 Programming the IDX to Accept Site-Specific Tokens .................................................... 121
3.5.3 Programming Token Value .............................................................................................. 123
3.5.4 Programming Dispense Value (for $1 coin dispensing only) ........................................... 123
3.5.5 Modifying the Hopper ...................................................................................................... 124
3.5.6 Program the IDX to Accept Quarters ............................................................................... 128
3.5.7 Programming the IDX to Accept $1 Coins ....................................................................... 128
3.5.8 Erasing IDX Programming ............................................................................................... 129
3.5.9 The Token Bucket ........................................................................................................... 129
3.5.10 Cleaning and General Maintenance ................................................................................ 129
3.5.11 System Settings Affecting IDX Coin Acceptor Operations ............................................... 130
3.6 Speech Module .................................................................................................................. 130
3.6.1 Recording Messages ....................................................................................................... 130
3.6.2 System Settings Affecting Speech Module Operations ................................................... 132
3.7 Proximity Sensor ................................................................................................................ 133
3.7.1 Normal Adjusting of Proximity Sensitivity ........................................................................ 133
3.7.2 Adjusting Sensitivity with the 100% Range Setting ......................................................... 133
3.7.3 System Settings Affecting Proximity Sensor Operations ................................................. 134
3.8 Coin Hopper and Assembly ............................................................................................... 134
3.8.1 Filling the Hopper ............................................................................................................ 134
3.8.2 Removing the Hopper from the Wash Select II ............................................................... 135
3.8.3 Cleaning and General Maintenance ................................................................................ 135
3.8.4 System Settings Affecting Coin Hopper Operations ........................................................ 135
3.9 Card Reader ...................................................................................................................... 136
3.9.1 Card Reader Related System Settings ............................................................................ 136
3.9.2 System Settings Affecting Card Reader Operations ........................................................ 136
3.10 Thermal Printer Assembly .............................................................................................. 137
3.10.1 Replacing the Printer Paper ............................................................................................ 137
3.10.2 Clearing a Paper Jam ...................................................................................................... 138
3.10.3 Reset and Feed Buttons .................................................................................................. 138
Document Number: WS21002 v
Document Title: WSII Operations Manual

3.10.4 Manually Printing a Self Test ........................................................................................... 138
3.10.5 Thermal Printer Control Board ......................................................................................... 138
3.10.6 System Settings Affecting Thermal Printer ...................................................................... 139
W A S H S E L E C T I I
3.11 Fuse ................................................................................................................................ 139
3.12 Modem ............................................................................................................................ 139
3.12.1 Credit Setup and Programming ....................................................................................... 140
3.12.2 System Settings Affecting Modem Operation .................................................................. 140
Appendix A. Paging Access Numbers ......................................................................................... 141
Appendix B. Wash Select II Accounting Report ......................................................................... 143
Appendix C. POS4000 Accounting Report .................................................................................. 151
Appendix D. Circuit Board Connections ..................................................................................... 165
Appendix E. Tunnel Mode ............................................................................................................. 181
Appendix F. Wash Select II/POS4000 Canadian Addendum ..................................................... 183
Appendix G. Installing HyperTerminal ......................................................................................... 191
Appendix H. Security Alarm Option ............................................................................................. 193
Appendix I. Citizen CD-S500 Printer Configuration Procedures ............................................... 199
Document Number: WS21002 vi
Document Title: WSII Operations Manual

W A S H S E L E C T I I
Index of Figures
Figure 1. Setup/Operate Toggle Switch Location ............................................................................ 1
Figure 2. Entering the IP Address Decimal Point........................................................................... 26
Figure 3. Alternate Keypad Functions ............................................................................................ 40
Figure 4. Alternate Keypad Functions ............................................................................................ 44
Figure 5. Alternate Keypad Functions ............................................................................................ 54
Figure 6. Blue Service Button Location .......................................................................................... 91
Figure 7. Wash Select II Internal Component Locations ............................................................. 101
Figure 8. Locating the EPROM and Reset System Memory Button ............................................ 102
Figure 9. Mars Bill Validator/Stacker ............................................................................................ 104
Figure 10. Mars Bill Validator—Top View .................................................................................... 104
Figure 11. Mars Bill Stacker Replacement ................................................................................... 105
Figure 12. Mars Flash Code LED ................................................................................................ 106
Figure 13. Mars with Lower Housing ........................................................................................... 108
Figure 14. Mars with Lower Housing Removed ........................................................................... 108
Figure 15. Mars DIP Switches...................................................................................................... 109
Figure 16. Bill Acceptor/Stacker ................................................................................................... 111
Figure 17. Bill Stacker .................................................................................................................. 112
Figure 18. Bill Stacker .................................................................................................................. 112
Figure 19. Flash Code LED.......................................................................................................... 113
Figure 20. Removing Lower Housing ........................................................................................... 115
Figure 21. Removing Lower Housing ........................................................................................... 115
Figure 22. Outside/ Inside of the IDX ........................................................................................... 120
Figure 23. IDX Wire Harness (Green Phoenix Connector) Configurations ................................. 121
Figure 24. Hopper View - Side Screw and Internal Hopper - Cube ............................................. 125
Figure 25. Hopper View - Removing the Hopper - Cube Top ...................................................... 125
Figure 26. Hopper View - Top Removed ..................................................................................... 126
Figure 27. Hopper View - Wheel Removed ................................................................................. 126
Figure 28. Hopper View - Guide Arm Cover Removed ................................................................ 127
Figure 29. Hopper View - Removal of the Coin Guide Arm ......................................................... 127
Figure 30. Hopper View - Coin Exit Opening and Chute ............................................................. 128
Figure 31. Proximity Sensor Power Block .................................................................................... 133
Figure 32. Outside/Inside of IDX Coin Acceptor .......................................................................... 186
Figure 33. Add/Remove Programs Properties Screen ................................................................ 191
Figure 34. Communications Screen ............................................................................................. 192
Figure 35. Shock Sensor .............................................................................................................. 195
Figure 36. Mounted Siren ............................................................................................................. 195
Figure 37. Door Switch ................................................................................................................. 196
Figure 38. WS2 Alarm Wiring Diagram ........................................................................................ 197
Document Number: WS21002 vii
Document Title: WSII Operations Manual

W A S H S E L E C T I I
Index of Tables
Table 1. Programming Fleets and Coupons .................................................................................... 8
Table 2. Editing Fleets and Coupons ............................................................................................... 9
Table 3. Creating/Editing a Profile ................................................................................................. 14
Table 4. Bill/Coin Inputs ................................................................................................................. 32
Table 5. Printer Error Codes .......................................................................................................... 35
Table 6. Pager Message Types ..................................................................................................... 61
Table 7. Pager Error Codes ........................................................................................................... 62
Table 8. Numeric Pager Parameters ............................................................................................. 64
Table 9. Voice/Tone Pager Parameters ......................................................................................... 65
Table 10. Text (TAP) Pager Parameters ....................................................................................... 67
Table 11. Country Codes ............................................................................................................... 70
Table 12. Programming Pass Codes/Cards .................................................................................. 87
Table 13. Mars Coupon ID Codes ................................................................................................. 90
Table 14. Wash Select II-POS40000 Wiring .................................................................................. 93
Table 15. POS4000 Bay Numbering .............................................................................................. 95
Table 16. Multi-Unit Bay Numbering .............................................................................................. 97
Table 17. Conveying Accounting ................................................................................................... 98
Table 18. Mars Bill Validator Flash Codes ................................................................................... 106
Table 19. Mars Bill Validator DIP Switches .................................................................................. 110
Table 20. Understanding Flash Codes ........................................................................................ 113
Table 21. Bill Validator Programming .......................................................................................... 116
Table 22. Effect of Disabling Upgrade ......................................................................................... 117
Table 23. IDX Program Configuration .......................................................................................... 121
Table 24. Wash Select II Token Values ....................................................................................... 123
Table 25. System Settings Affecting IDX Coin Acceptor Operations .......................................... 130
Table 26. System Settings Affecting Speech Module Operations ............................................... 132
Table 27. System Settings Affecting Proximity Sensor Operations ............................................. 134
Table 28. System Settings Affecting Coin Hopper Operations .................................................... 135
Table 29. Card Reader Related System Settings ........................................................................ 136
Table 30. System Settings Affecting Thermal Printer Operations ............................................... 139
Table 31. Modem Related System Settings ................................................................................. 140
Table 32. POS4000 – Wash Select II Accounting Reports .......................................................... 161
Table 33. Wash Select II Token Values ....................................................................................... 186
Table 34. Canadian IDX Program Configuration ......................................................................... 187
Table 35. CashCode Bill Validator Diagnostic Flash Codes ........................................................ 189
Table 36. CashCode DIP Switch Settings ................................................................................... 190
Table 37. Programming Pass Codes/Cards ................................................................................ 194
Table 38. Wiring Guide ................................................................................................................ 196
Document Number: WS21002 viii
Document Title: WSII Operations Manual
W A S H S E L E C T I I
1 System Overview
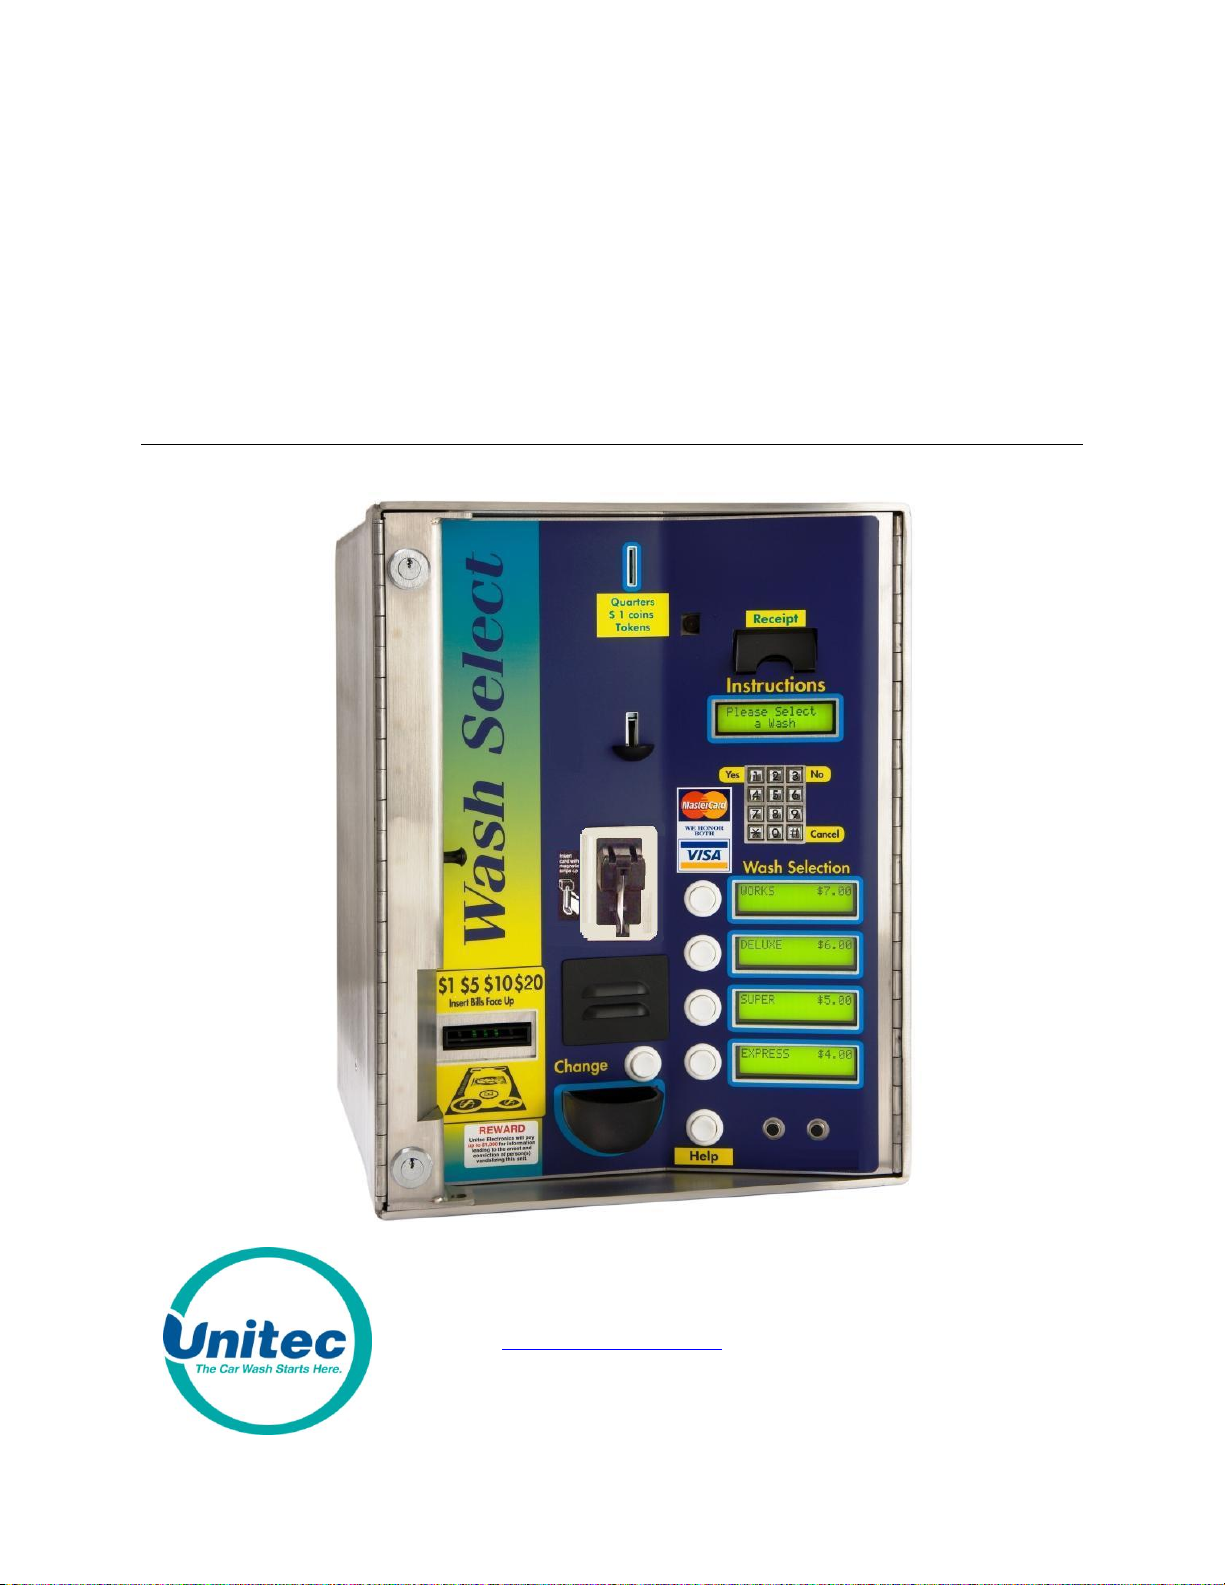
1.1 Introduction to the Wash Select II
The Wash Select II is a self-serve unattended automatic car wash entry system designed
specifically for the self-serve car wash market. The Wash Select II accepts various forms of
payment, interacts with customers at the car wash entrance, and arms the car wash.
1.2 Setup and Operate Modes
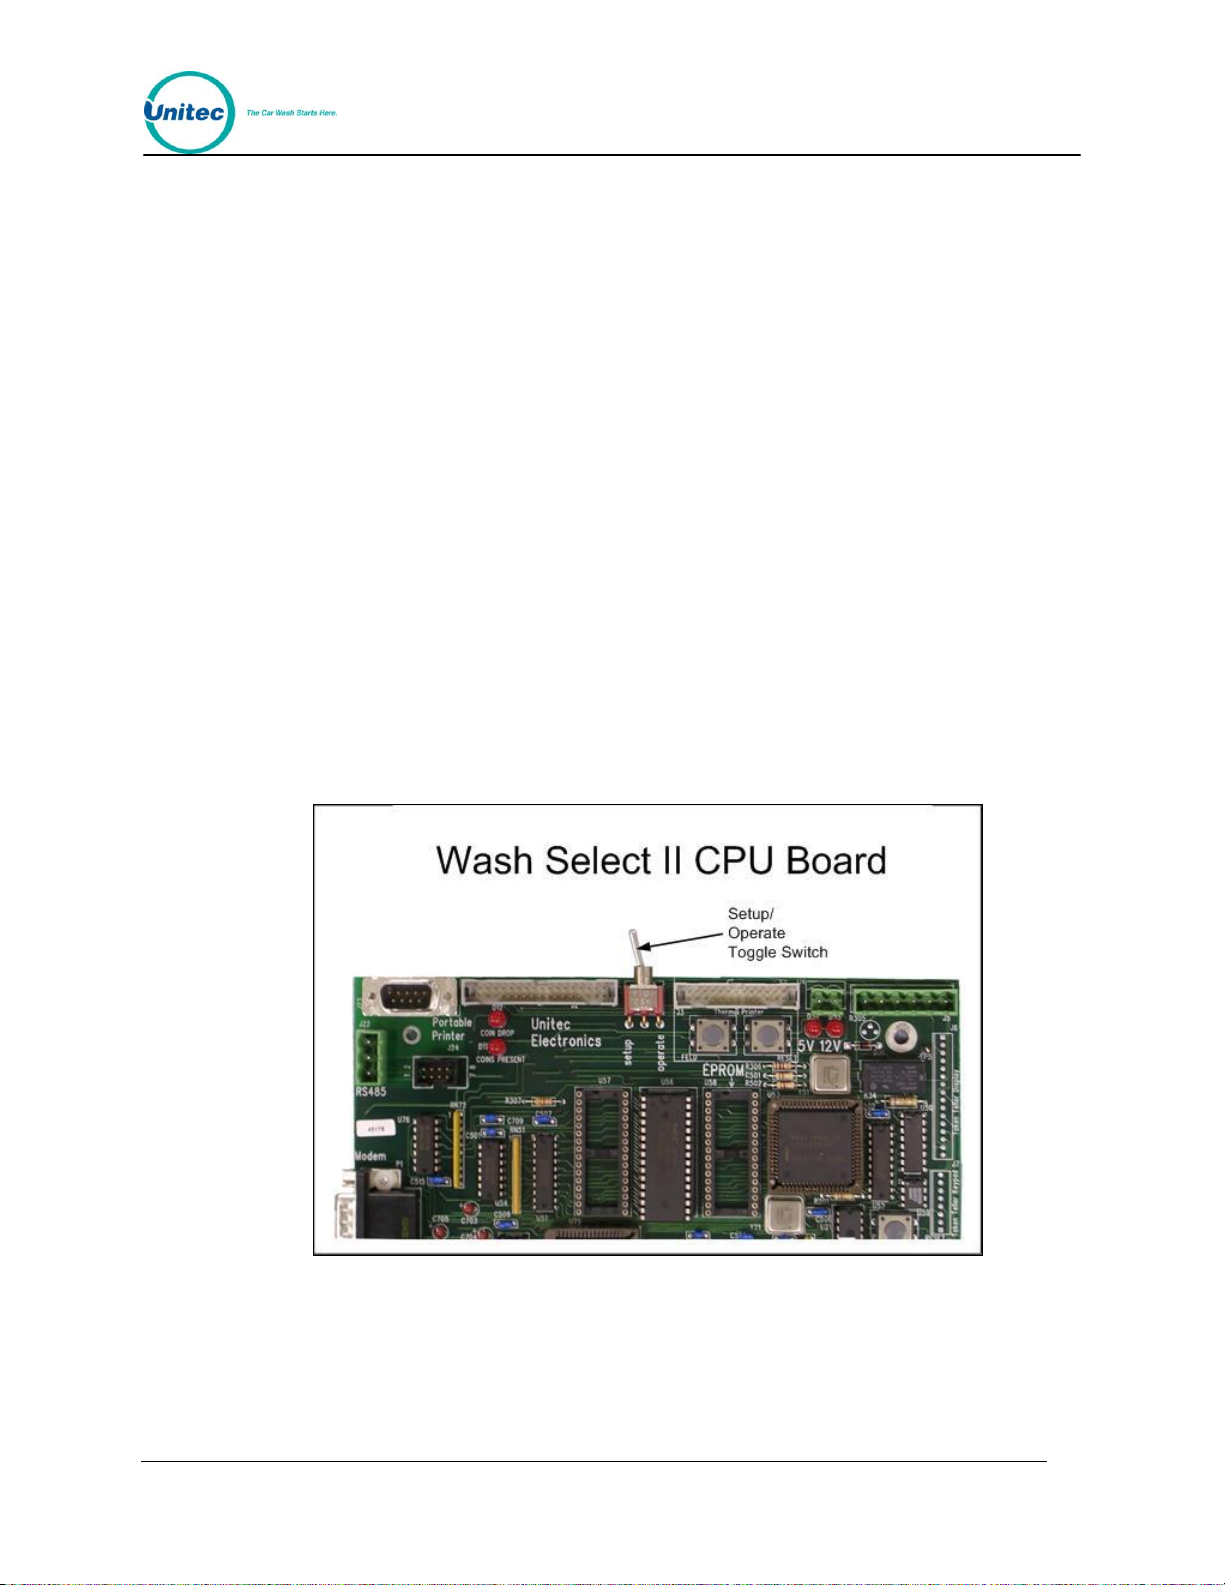
The Wash Select II functions in two different modes: Setup and Operate. It can be placed in
either mode by using the toggle switch at the top of the CPU board which is located on the
inside right wall of the Wash Select II case. While in “Setup” mode, the Wash Select II can be
programmed and reports can be viewed using the main display screen or printed using the
optional thermal receipt printer. When in “Operate” mode, the Wash Select II allows the
customer to purchase four different wash packages using several different methods of
payment.
Figure 1. Setup/Operate Toggle Switch Location
Document Number: WS21002 1
Document Title: WSII Operations Manual

*
W A S H S E L E C T I I
1.3 Customer Interface
The Wash Select II offers many features that allow effective customer interaction, such as
large-character daylight readable displays and oversized buttons. As customers approach the
entry system unit, they can be greeted with a customized, pre-recorded message*. At the
same time, instructions on the main display guide the customer through their choices.
The customer can either select their wash package first, and then insert payment, or insert
payment and then select their wash package. Whichever way they choose, the unit will
prompt them for either payment or wash package selection. When the customer has paid and
selected their wash package, they are prompted to begin the wash by either driving forward,
or by pressing the start button and following the wash bay instructions.
Within these basic parameters, there are many options available for you to program to
customize your individual customer’s wash experience.
1.4 Wash Select II Features
The Wash Select II car wash entry system provides the features you need in order to most
fully profit from your car wash.
1.4.1 Standard Features
The Wash Select II standard features provide the full range of services required by an
advanced wash entry system:
Mars Bill Validator, which allows acceptance of $1, $2, $5, $10, and $20 bills.
2500 coin capacity change hopper for dispensing U.S. quarters
Acceptance of U.S. quarters via the Slug-buster II single-coin acceptor
One large-character daylight readable main instructional display
Four large-character daylight readable wash selection displays
Ability to store as many as 350 fleet accounts and/or coupon codes
Provides up to four wash packages
Eight programmable wash arming relays
Fault and warning output relays
Pass-codes for easy entry to menus without unlocking the unit
Padlock holes for added security in top and bottom of Wash Select II Case
Pre-recorded voice messages are included with the purchase of the Speech option package.
Document Number: WS21002 2
Document Title: WSII Operations Manual

W A S H S E L E C T I I
1.4.2 Optional Features
In addition to standard features, the functionality of the Wash Select II can be expanded with
the purchase of additional optional features:
WashPay Integration – This option allows unlimited house accounts, remote
management and reporting via the Internet, and much more. Contact your Unitec
Regional Sales Manager for more information.
Credit – This option allows your unit to accept all major credit cards. It includes
credit option software, a card reader with interface cable, and a credit transaction
modem with power supply and interface cable. In addition, your site will require a
dedicated phone line on site, and a Merchant account. With the purchase of this
option package, you also receive the Remote Reporting and Paging options as
well.
Multi-Coin Acceptance – Featuring an IDX coin acceptor, the Multiple Coin
Acceptance option gives your WS II the ability to accept U.S. quarters, $1 coins
and as many as four different bimetal tokens through a single coin slot.
Enhanced Fleet Software – This option allows you to increase the number of
fleet accounts from 350 to 1000, and provides the ability to use Fleet Accounts at
any bay in the wash. This option also allows the ability to use VIP Wash Pass
Cards at the entry system, provided you have purchased either the Major Credit
Card option or the Card Reader option.
Multi-use Codes - The multi-use codes feature, also known as "bundled wash"
and similar to a fleet account, is used to sell a number of uses of a particular
wash at a preset price. The customer gets a single code for these uses. The
price, the number of uses, the type of wash in the package, and the feature
number representing this package are preset in a "template". Once a feature
(wash) number is assigned to the package, the sale of a multi-use code is similar
to that of a regular code, just ringing up the feature number for the package
defined in the template. (POS4000 console is required - no programming or setup
is needed at the WSII.)
Speech Option – This option allows the Wash Select II to give voice prompts to
the customer. This option includes a speech circuit board and a speaker. The
Speech option may be shipped with your unit, or purchased as an upgrade for an
existing unit. This option features several different voice prompts including a
greeting message (which requires the proximity option), a message asking the
customer to make a wash selection, and a message asking the customer to insert
money or codes. Detailed information for programming, operation and
maintenance of this option can be found in Section 3.6 of this manual.
Proximity Sensor – This option works with the Speech option to sense when
customer vehicles approach the unit. When it senses a vehicle, the unit plays the
customer greeting.
VIP Wash Pass Cards – With this option you can use magnetically encoded
cards for fleet sales. To use this option, your unit must also be equipped with the
Enhanced Fleet option and a magnetic card reader. VIP Wash Pass Cards are
intended for prepaid fleet sales, and allow you to program a specific amount of
washes or a set dollar amount for each account. If the account uses or dollar
value becomes low, more washes can easily be added.
Document Number: WS21002 3
Document Title: WSII Operations Manual

W A S H S E L E C T I I
VIP Wash Coupons –VIP Wash Coupons can be used as a great advertising
tool. VIP Wash Coupons are printed in magnetic ink to inhibit fraud. Each
coupon can be customized with your site name and location on the back in red
ink. These coupons can be used to offer discounts or even free washes to your
customers.
Card Reader – This option is required to enable the acceptance of VIP Wash
Pass cards and Pass cards with the Enhanced Fleet option, and also to accept
credit cards with the Credit option.
Thermal Receipt Printer – This option provides the ability to print reports, cash
and credit receipts, and customer over payment vouchers. The Thermal Receipt
Printer” option is a 27 character high-speed thermal printer. The Wash Select II
can detect printer problems and alert the operator via the warning relay output, a
page, alarm status on the configuration report, or upon login for remote reporting.
Paging – This option allows you to enable up to six different pagers of three
different types (numeric, text or voice/tone). The paging option requires you to
have purchased the Paging option or the Credit option. When equipped with the
Paging option, the Wash Select II can send an error message to your pager or
cell phone.
Remote Reporting – With the Remote Reporting option, you will be able to
access your Wash Select II unit’s reports using a PC. This feature is available as
a separate option, or is included in the Credit option.
GiveX – This option allows the Wash Select II to accept the proprietary GiveX gift
card across multiple car wash sites using a dialup network. The Credit option is
also required to accept GiveX cards.
Multi-Unit Fleet – The Wash Select II multi-unit fleet upgrade feature enables the
sharing of fleet accounts generated at a Master unit for use at any bay in your
system, including the Master. This option does not require, and is not compatible
with the POS4000 option.
POS4000 – This separate unit produced by Unitec provides the ability to sell and
share codes from a C-Store.
Remote POS4000 – This is a WIRELESS POS unit produced by Unitec that
provides the ability to sell and share codes from a C-Store or other business. The
unit issues an encrypted code that is decrypted by the Wash Select II when the
code is redeemed.
External Fleet – This option allows the use of third-party cashless card systems,
such as eWash, ExpressKey, and WashCard.
Security Alarm – This option adds an alarm to the WSII that monitors the door
for unauthorized entry, and a shock sensor for detecting attempted vandalism.
When triggered, a siren will sound from 1-60 minutes, a message will display and
print on the POS4000 controller in the store (if equipped),and a page will be sent
(if configured for paging).
Barrier Gate – With the purchase of this option, the Wash Select II can be
integrated with a gated system to control the flow of cars into either attended or
unattended tunnel washes. Sites with multiple lanes will require the installation of
the gate controller as well. For more information, see the Unitec Gate Controller
for Multi-Lane Applications Install Guide.
Document Number: WS21002 4
Document Title: WSII Operations Manual

W A S H S E L E C T I I
2 System Configuration and Operation
The Wash Select II configuration menus provide the ability to customize your unit to interface
with your site-specific options, wash equipment, and marketing plans. The following sections
provide configuration procedures for each of the available menu functions.
2.1 Reporting Menu
The Reporting menu allows you to access, view, and print (if the thermal printer option has
been purchased) system reports from the Wash Select II. This section will help you use and
understand the reporting menu functions.
2.1.1 Configuration Report
The configuration report shows the most up to date configuration of the system. These are
the settings that can be configured while in setup mode. They are categorized on the report
based on their typical use. As explained above, the report can either be viewed online or
printed. For the most complete reporting, the printed report is recommended.
2 . 1 . 1 . 1 P r i n t i n g a C o n f i g u r a t i o n R e p o r t
1. Using the toggle switch at the top of the CPU board, place the Wash Select II in
setup mode by moving the switch toward the back of the Wash Select II case.
(The CPU board is located on the inside right wall of the Wash Select II case.)
2. Using the (3) key to scroll forward and the (1) key to scroll back, scroll through the
main menu until the "Reporting" option is displayed. Press the (*) key to enter.
(This should be the first option displayed.)
3. The first option displayed will be "Print Config." Press the (*) key to print the
"Configuration Report."
2 . 1 . 1 . 2 V i e w i n g a C o n f i g u r a t i o n R e p o r t
1. Using the toggle switch at the top of the CPU board, place the Wash Select II in
setup mode by moving the switch toward the back of the Wash Select II case.
(The CPU board is located on the inside right wall of the Wash Select II case.)
2. Using the (3) key to scroll forward and the (1) key to scroll back, scroll through the
main menu until the "Reporting" option is displayed. Press the (*) key to enter.
(This should be the first option displayed.)
3. Using the (3) key, scroll forward through the "Reporting" menu until the "View
Config" option is displayed. Press the (*) key to view the configuration report. Use
the (3) key to scroll through the configuration report.
Document Number: WS21002 5
Document Title: WSII Operations Manual

Note:
This menu option will clear all accounting information. Be sure you have an accurate
record of your accounting information, as the information will be irretrievable once this
procedure is performed.
W A S H S E L E C T I I
2.1.2 Accounting Report
The Accounting Report provides a list of transactions made on the Wash Select II. For more
details and a sample Accounting Report, see Appendix B.
2 . 1 . 2 . 1 P r i n t i n g a n A c c o u n t i n g R e p o r t
1. Using the toggle switch at the top of the CPU board, place the Wash Select II in
setup mode by moving the switch toward the back of the Wash Select II case.
(The CPU board is located on the inside right wall of the Wash Select II case.)
2. Using the (3) key to scroll forward and the (1) key to scroll back, scroll through the
main menu until the "Reporting" option is displayed. Press the (*) key to enter.
(This should be the first option displayed.)
3. Using the (3) key, scroll forward until the "Print Accounting" option is displayed.
Press the (*) key to enter.
4. Next, you will be given two options, 1 = Detailed, and 2 = Summary. Press the
proper key, and then press the (*) key to enter.
2 . 1 . 2 . 2 V i e w i n g a n A c c o u n t i n g R e p or t
1. Using the toggle switch at the top of the CPU board, place the Wash Select II in
setup mode by moving the switch toward the back of the Wash Select II case.
(The CPU board is located on the inside right wall of the Wash Select II case.)
2. Using the (3) key to scroll forward and the (1) key to scroll back, scroll through the
main menu until the "Reporting" option is displayed. Press the (*) key to enter.
(This should be the first option displayed).
3. Using the (3) key, scroll forward until the "View Accounting" option is displayed.
Press the (*) key to enter.
4. Using the (3) key, scroll through the accounting report.
2 . 1 . 2 . 3 C l e a r i n g A c c o u n t i n g R e p o r t s
1. Using the toggle switch at the top of the CPU board, place the Wash Select II in
setup mode by moving the switch toward the back of the Wash Select II case.
(The CPU board is located on the inside right wall of the Wash Select II case.)
2. Using the (3) key to scroll forward and the (1) key to scroll back, scroll through the
main menu until the "Reporting" option is displayed. Press the (*) key to enter.
(This should be the first option displayed).
3. Using the (3) key, scroll forward until the "Clear Accounting" option is displayed.
Press the (*) key to enter.
4. Press the (1) key for YES or the (3) key for NO.
Document Number: WS21002 6
Document Title: WSII Operations Manual

W A S H S E L E C T I I
2.2 Fleet Accounts and Coupons Menu
Fleet Accounts are setup from the main Wash Select II unit or POS4000 unit. Large-fleet
organizations, such as taxi services or local police departments, can use your wash by using
the VIP Wash Pass Card or by entering their assigned account code. Fleet Accounts can be
purchased with a credit card (maximum value: $650 per transaction). Third-party vendor
cards can also be accepted (see Section 2.2.15 for more information). As a security feature,
fleet account receipts will not print the account number on the receipt, but will print the name
of the account, if applicable.
With the Enhanced Fleet option, fleet accounts programmed from either the WSII Bay 1 unit,
or the POS4000 are stored in the WSII Bay 1 unit. Refer to the POS4000 Operations Manual
for information on programming Fleet Accounts from the POS4000.
2.2.1 Adding an Account
Standard – A standard account is any account sold to the customer for multiple uses of a
pre-specified wash. This type of account may be offered to fleet customers with a discounted
rate to encourage volume sales. When the customer enters their code/card, the specified
wash is armed automatically unless upgrades are allowed. (Accounting information for
Standard fleet sales will show on the accounting report immediately after the account has
been sold.)
Coupon – A Coupon account provides a flat-rate discount sold to every purchase a fleet
customer makes. With a Coupon account, the customer may use their code/card at the coin
box to discount the wash being purchased. Once the code/card has been entered, the
customer must then choose the wash that is wanted and the coupon amount will be deducted
from that wash. This feature also allows you to program the Wash Select II to only apply the
coupon discount to specific wash packages (e.g. the coupon will give the fleet customer
$2.00 off a Super or Deluxe wash package, but not a Basic wash package). Accounting
information shows in the Coupon Disc. Section of the accounting report each time a wash is
purchased.
Debit – Debit accounts are fleet accounts sold for a certain pre-paid dollar amount toward the
purchase of car washes. This type of account may be used for the purchase of any wash.
The value of a debit code/card decreases with each use. When the dollar amount gets low or
is depleted, the customer may add additional money to the card for further use. Accounting
information appears in the “Debit sales” area of the accounting report immediately upon sale
of the account. Accounting information also shows the value of each wash purchased using a
debit code/card in the “Debit usage” section of the accounting report.
1. Using the toggle switch at the top of the CPU board, place the Wash Select II in
setup mode by moving the switch toward the back of the Wash Select II case.
(The CPU board is located on the inside right wall of the Wash Select II case.)
2. Using the (3) key to scroll forward and the (1) key to scroll back, scroll through the
main menu until the "Fleets & Coupons" option is displayed. Press the (*) key to
enter.
3. The "Add Account" option will be the first option displayed in this menu. Press the
(*) key to enter.
Document Number: WS21002 7
Document Title: WSII Operations Manual

1 = STD (Standard)
2 = Coupon
3 = DEBIT
1. Press the (1) key for STD, and
then press the (*) key to enter.
2. Press the (1) key for code or the
(3) key for card.
3. Enter a name for the account
and then press the (*) key to
enter. (The account name has a
max length of 12 characters.)
4. Enter the account number and
then press the (*) key to enter.
(The account number must be at
least 4 digits long and must end
with 0. You may enter a card
number by swiping the card.)
5. Enter the “Wash Number”. (This
indicates which wash will be
available for this account.) Press
the (*) key to enter.
6. “Enter Sale Price Per Wash.”
Enter the amount you have sold
the wash for and then press the
(*) key to enter.
7. Next you will be presented with 2
options, 1 = “Print Receipt”, and
3 = “Do not print.” Decide if you
want to offer the customer a
receipt and enter the proper
number.
8. “Enter Max Uses” (number of
washes that may be purchased)
and the press the (*) key to
enter.
1. Press the (2) key for COUPON,
and then press the (*) key to enter.
2. Press the (1) key for code or the
(3) key for card.
3. Enter a name for the account and
then press the (*) key to enter.
(The account name has a max
length of 12 characters.)
4. Enter the account number and
then press the (*) key to enter.
(The account number must be at
least 4 digits long and end with 0.
You may enter a card number by
swiping the card.)
5. “Enter the Coupon Value” (This is
the amount of the discount
allowed.) Press the (*) key to enter.
6. “Enter Minimum Wash Number.”
(This is the least expensive wash
that may be purchased using this
account number.) Press the (*) key
to enter.
7. You will now be presented with 2
option, 1 = Log uses and 3 = do
not log uses. Enter your desired
choice.
8. “Enter Max Uses?” Enter the
number of times the account can
be used and then press the (*) key
to enter.
1. Press the (3) key for
DEBIT, and then press
the (*) key to enter.
2. Press the (1) key for
code or the (3) key for
card.
3. Enter a name for the
account and then press
the (*) key to enter. (The
account name has a
max length of 12
characters.)
4. Enter the account
number and then press
the (*) key to enter. (The
account number must
be at least 4 digits long
and end with 0. You
may enter a card
number by swiping the
card.)
5. “Enter Max Value.” (This
is the pre-paid dollar
amount for this
account.) Press the (*)
key to enter.
6. Next you will be
presented with 2
options, 1 = “Print
Receipt”, and 3 = “Do
not print.” Decide if you
want to offer the
customer a receipt and
enter the proper
number.
4. You will now be presented with three options 1 = STD, 2 = COUPON, and 3 =
W A S H S E L E C T I I
Debit. Programming for each of these options can be found in the following table.
Table 1. Programming Fleets and Coupons
2.2.2 Editing Accounts
With this feature, you may change the parameters of any fleet account. This allows you to
change the values of such things as wash numbers, number of uses, and coupon values.
The following steps will guide you through the process of editing an account.
5. Using the toggle switch at the top of the CPU board, place the Wash Select II in
setup mode by moving the switch toward the back of the Wash Select II case.
(The CPU board is located on the inside right wall of the Wash Select II case.)
Document Number: WS21002 8
Document Title: WSII Operations Manual

Standard
Coupon
Debit
1. Enter the wash number, and then
press the (*) key to enter.
2. Enter Price Per wash, and then
press the (*) key to enter.
3. Next you will be presented with 2
options, 1 = “Print Receipt”, and 3 =
“Do not print.” Decide if you want to
offer the customer a receipt and
enter the proper number.
4. “Enter Max Uses”. Enter the new
amount and then press the (*) key
to enter. (If you choose to keep Max
uses the same, simply press the (*)
key without entering a number.
5. “Enter Current Uses.” Enter the
amount of times used, and then
press the (*) key to enter. (If this
account has not yet been used,
simply press the (*) key without
entering a number.)
6. “Accept Changes Are You Sure?”
Press the (1) key for YES or the (2)
key for NO.
1. “Enter Coupon Value” and then
press the (*) key to enter.
2. “Enter Minimum Wash #.” Press the
(*) key to enter. If you choose not to
change the minimum wash number,
press the (*) key without entering a
value.
3. Next you will be presented with 2
option, “1 = Log Uses”, or “3 = Do
not Log Uses” enter the desired
choice.
4. “Enter Maximum Uses”, and then
press the (*) key to enter. If you
choose not to change the minimum
wash number, press the (*) key
without entering a value.
5. “Enter Current Uses.” Enter the
amount of times used, and then
press the (*) key to enter. (If this
account has not yet been used,
simply press the (*) key without
entering a number.)
6. “Accept Changes Are You Sure?”
Press the (1) key for YES or the (2)
key for NO.
1. “Enter Max Value.”
Enter the pre-paid
dollar amount and
then press the (*)
key to enter.
2. “Enter Used Value.”
Enter the used debit
amount, and then
press the (*) key to
enter.
3. Next you will be
presented with 2
options, 1 = “Print
Receipt”, and 3 =
“Do not print.”
Decide if you want
to offer the
customer a receipt
and enter the
proper number.
4. “Accept Changes
Are You Sure?”
Press the (1) key
for YES or the (2)
key for NO.
6. Using the (3) key to scroll forward and the (1) key to scroll back, scroll through the
W A S H S E L E C T I I
main menu until the "Fleets & Coupons" option is displayed. Press the (*) key to
enter.
7. Use the (3) key to scroll until the "Add Account" option will is displayed. Press the
(*) key to enter.
8. Enter the account number you wish to edit. Editing instructions for each type of
account can be found in the following table.
Table 2. Editing Fleets and Coupons
2.2.3 Adding Uses or Dollar Amounts to Accounts
1. Using the toggle switch at the top of the CPU board, place the Wash Select II in
setup mode by moving the switch toward the back of the Wash Select II case.
(The CPU board is located on the inside right wall of the Wash Select II case).
2. Using the (3) key to scroll forward and the (1) key to scroll back, scroll through the
main menu until the "Fleets & Coupons" option is displayed. Press the (*) key to
enter.
3. Use the (3) key to scroll until the "Add to Account" option is displayed. Press the
(*) key to enter.
4. Enter the account number, and then press the (*) key to enter.
5. You will be prompted “Amount to add?” Enter the number of uses or dollar
amount to be added, and then press the (*) key to enter.
Document Number: WS21002 9
Document Title: WSII Operations Manual

W A S H S E L E C T I I
2.2.4 Delete an Account
1. Using the toggle switch at the top of the CPU board, place the Wash Select II in
setup mode by moving the switch toward the back of the Wash Select II case.
(The CPU board is located on the inside right wall of the Wash Select II case.)
2. Using the (3) key to scroll forward and the (1) key to scroll back, scroll through the
main menu until the "Fleets & Coupons" option is displayed. Press the (*) key to
enter.
3. Use the (3) key to scroll until the "Delete Account" option is option displayed.
Press the (*) key to enter.
4. Enter the account number that you wish to delete and then press the (*) key to
enter.
5. You will be asked “Delete Account Are You Sure?” Press the (1) key for YES or
the (3) key for NO.
2.2.5 Viewing Fleet Accounts
This command allows you to view information on an individual or all Fleet Accounts.
2 . 2 . 5 . 1 I n d i v i d u a l A c c o u n t s
1. Using the toggle switch at the top of the CPU board, place the Wash Select II in
setup mode by moving the switch toward the back of the Wash Select II case.
(The CPU board is located on the inside right wall of the Wash Select II case.)
2. Using the (3) key to scroll forward and the (1) key to scroll back, scroll through the
main menu until the "Fleets & Coupons" option is displayed. Press the (*) key to
enter.
3. Use the (3) key to scroll until the "View Accounts" option is displayed. Press the
(*) key to enter.
4. Press the (1) key to select an individual Account and press (*).
5. Enter the Account Number. If a card based account, the account number can be
entered by swiping the card if available.
6. The account information will show in the “Wash Display” windows.
2 . 2 . 5 . 2 A l l A c c o u n t s
1. Using the toggle switch at the top of the CPU board, place the Wash Select II in
setup mode by moving the switch toward the back of the Wash Select II case.
(The CPU board is located on the inside right wall of the Wash Select II case.)
2. Using the (3) key to scroll forward and the (1) key to scroll back, scroll through the
main menu until the "Fleets & Coupons" option is displayed. Press the (*) key to
enter.
3. Use the (3) key to scroll until the "View Accounts" option is displayed. Press the
(*) key to enter.
4. Press the (3) key to select all accounts and press (*).
Document Number: WS21002 10
Document Title: WSII Operations Manual

5. The account information will show in the “Wash Display” windows. The main
W A S H S E L E C T I I
display window will show instructions for viewing the fleet accounts. [Use the (3)
key to scroll forward, the (2) key to scroll back to the previous item and the (#) key
to exit.]
2.2.6 Print Selected Fleet Account
1. Using the toggle switch at the top of the CPU board, place the Wash Select II in
setup mode by moving the switch toward the back of the Wash Select II case.
(The CPU board is located on the inside right wall of the Wash Select II case.)
2. Using the (3) key to scroll forward and the (1) key to scroll back, scroll through the
main menu until the "Fleets & Coupons" option is displayed. Press the (*) key to
enter.
3. Use the (3) key to scroll until the "Print 1 Account" option is displayed. Press the
(*) key to enter.
4. Enter the account number of the account you want to print and then press the (*)
key to enter. Account information will print once the (*) key is pressed.
2.2.7 Print All Fleet Accounts
1. Using the toggle switch at the top of the CPU board, place the Wash Select II in
setup mode by moving the switch toward the back of the Wash Select II case.
(The CPU board is located on the inside right wall of the Wash Select II case.)
2. Using the (3) key to scroll forward and the (1) key to scroll back, scroll through the
main menu until the "Fleets & Coupons" option is displayed. Press the (*) key to
enter.
3. Use the (3) key to scroll until the "Print Accounts" option is displayed. Press the (*)
key to enter.
4. You will be presented with four options, 1 = FLEET, 2 = COUPON, 3 = DEBIT
and 4 = ALL. Choose the option you wish and then press the (*) key to enter.
5. You will be prompted 1 = DETAILED OR 2 = CONDENSED? Choose the option
you wish and then press the (*) key to enter. The printer will begin to print.
2.2.8 View Transaction History
1. Using the toggle switch at the top of the CPU board, place the Wash Select II in
setup mode by moving the switch toward the back of the Wash Select II case.
(The CPU board is located on the inside right wall of the Wash Select II case.)
2. Using the (3) key to scroll forward and the (1) key to scroll back, scroll through the
main menu until the "Fleets & Coupons" option is displayed. Press the (*) key to
enter.
3. Use the (3) key to scroll until the "View Trans Hist" option is displayed. Press the
(*) key to enter.
4. The “Transaction History” will be shown in the wash display windows. The main
display will show options for scrolling through the “Transaction History”. (Use the
(3) key to scroll forward, the (1) key to scroll back and the (#) key to exit.)
Document Number: WS21002 11
Document Title: WSII Operations Manual

W A S H S E L E C T I I
2.2.9 Print Transaction History
This command allows you to print the transaction history for an individual or all Fleet
Accounts. In addition, you can select the date range for the account history by entering the
beginning and ending dates for the report.
2 . 2 . 9 . 1 I n d i v i d u a l A c c o u n t s
1. Using the toggle switch at the top of the CPU board, place the Wash Select II in
setup mode by moving the switch toward the back of the Wash Select II case.
(The CPU board is located on the inside right wall of the Wash Select II case).
2. Using the (3) key to scroll forward and the (1) key to scroll back, scroll through the
main menu until the "Fleets & Coupons" option is displayed. Press the (*) key to
enter.
3. Use the (3) key to scroll until the "Print Trans Hist" option is displayed. Press the
(*) key to enter.
4. Press (1) to select an Individual Account.
5. Enter the Account number If a card based account, the account number can be
entered by swiping the card, if available.
6. Select (1) to print only the transactions within a specified date. You will be
prompted to enter the Start and End dates for the report in MMDDYY format. To
print all records press (3).
7. Printing will begin when the (*) key is pressed.
2 . 2 . 9 . 2 A l l A c c o u n t s
1. Using the toggle switch at the top of the CPU board, place the Wash Select II in
setup mode by moving the switch toward the back of the Wash Select II case.
(The CPU board is located on the inside right wall of the Wash Select II case).
2. Using the (3) key to scroll forward and the (1) key to scroll back, scroll through the
main menu until the "Fleets & Coupons" option is displayed. Press the (*) key to
enter.
3. Use the (3) key to scroll until the "Print Trans Hist" option is displayed. Press the
(*) key to enter.
4. Press (3) to select All Accounts.
5. Select (1) to print only the transactions within a specified date. You will be
prompted to enter the Start and End dates for the report in MMDDYY format. To
print all records press (3).
6. Printing will begin when the (*) key is pressed.
2.2.10 Delete All Empty Accounts
1. Using the toggle switch at the top of the CPU board, place the Wash Select II in
setup mode by moving the switch toward the back of the Wash Select II case.
(The CPU board is located on the inside right wall of the Wash Select II case.)
Document Number: WS21002 12
Document Title: WSII Operations Manual

2. Using the (3) key to scroll forward and the (1) key to scroll back, scroll through the
W A S H S E L E C T I I
main menu until the "Fleets & Coupons" option is displayed. Press the (*) key to
enter.
3. Use the (3) key to scroll until the "Delete All Empty" option is displayed. Press the
(*) key to enter.
4. You will now be prompted “Delete All Empty Are You Sure?” If you are positive
you would like to delete all of your empty accounts, press the (1) key.
2.2.11 Create/Edit a Profile
This feature allows you to create up to ten different account profiles. A profile contains
account information that can be used repeatedly to create several different accounts quickly
using the same information.
1. Using the toggle switch at the top of the CPU board, place the Wash Select II in
setup mode by moving the switch toward the back of the Wash Select II case.
(The CPU board is located on the inside right wall of the Wash Select II case.)
2. Using the (3) key to scroll forward and the (1) key to scroll back, scroll through the
main menu until the "Fleets & Coupons" option is displayed. Press the (*) key to
enter.
3. Use the (3) key to scroll until the "Edit Profile" option is displayed. Press the (*)
key to enter.
4. Enter the profile number (1-10), and then press the (*) key to enter.
5. Decide which type of account you will be creating. (You can find definitions of
account types in Section 2.2.1 of this manual. Use the following table to help you
create the appropriate account type.
Document Number: WS21002 13
Document Title: WSII Operations Manual

1 = STD (Standard)
2 = Coupon
3 = DEBIT
1. Press the (1) key for STD,
and then press the (*) key to
enter.
2. Press the (1) key for code or
the (3) key for card.
3. Enter the account number
and then press the (*) key to
enter. (The account number
must be at least four digits
long and must end with 0.
You may enter a card
number by swiping the card.)
4. Enter the “Wash Number”.
(This indicates which wash
will be available for this
account.) Press the (*) key to
enter.
5. “Enter Sale Price Per Wash.”
Enter the amount you have
sold the wash for and then
press the (*) key to enter.
6. Next you will be presented
with 2 options, 1 = “Print
Receipt”, and 3 = “Do not
print.” Decide if you want to
offer the customer a receipt
and enter the proper number.
7. “Enter Max Uses” (number of
washes that may be
purchased) and the press the
(*) key to enter.
1. Press the (2) key for
COUPON, and then press
the (*) key to enter.
2. Press the (1) key for code or
the (3) key for card.
3. Enter the account number
and then press the (*) key to
enter. (The account number
must be at least 4 digits long
and end with 0. You may
enter a card number by
swiping the card.)
4. “Enter the Coupon Value”
(This is the amount of the
discount allowed.) Press the
(*) key to enter.
5. “Enter Minimum Wash
Number.” (This is the least
expensive wash that may be
purchased using this account
number.) Press the (*) key to
enter.
6. You will now be presented
with 2 option, 1 = Log uses
and 3 = Do not log uses.
Enter your desired choice.
7. “Enter Max Uses?” Enter the
number of times the account
can be used and then press
the (*) key to enter.
1. Press the (3) key for
DEBIT, and then press
the (*) key to enter.
2. Press the (1) key for
code or the (3) key for
card.
3. Enter the account
number and then press
the (*) key to enter.
(The account number
must be at least 4 digits
long and end with 0.
You may enter a card
number by swiping the
card.)
4. “Enter Max Value.”
(This is the pre-paid
dollar amount for this
account.) Press the (*)
key to enter.
5. Next you will be
presented with 2
options, 1 = “Print
Receipt”, and 3 = “Do
not print.” Decide if you
want to offer the
customer a receipt and
enter the proper
number.
W A S H S E L E C T I I
Table 3. Creating/Editing a Profile
2.2.12 Create Fleet Accounts From Profiles
1. Using the toggle switch at the top of the CPU board, place the Wash Select II in
2. Using the (3) key to scroll forward and the (1) key to scroll back, scroll through the
3. Use the (3) key to scroll until the "Add Per Profile" option is displayed. Press the
4. Enter the profile number to base the account on, and then press the (*) key to
5. Enter the account number, and then press the (*) key to enter.
Document Number: WS21002 14
Document Title: WSII Operations Manual
setup mode by moving the switch toward the back of the Wash Select II case.
(The CPU board is located on the inside right wall of the Wash Select II case.)
main menu until the "Fleets & Coupons" option is displayed. Press the (*) key to
enter.
(*) key to enter.
enter.

Note:
When using this feature, it may be necessary to edit speech message #14 so that is
has a 1-2 second pause at the beginning. Please refer to Section 2.6.2 for instructions
on recording a new speech message.
W A S H S E L E C T I I
2.2.13 View Current Profiles
1. Using the toggle switch at the top of the CPU board, place the Wash Select II in
setup mode by moving the switch toward the back of the Wash Select II case.
(The CPU board is located on the inside right wall of the Wash Select II case.)
2. Using the (3) key to scroll forward and the (1) key to scroll back, scroll through the
main menu until the "Fleets & Coupons" option is displayed. Press the (*) key to
enter.
3. Use the (3) key to scroll until the "View Profiles" option is displayed. Press the (*)
key to enter.
4. Current profiles will be shown in the wash display windows. The main display
window will give instructions for viewing the profiles. (Press the (3) key to scroll to
the next profile, the (1) key to go back to the previous profile and the (#) key to
exit.)
2.2.14 Print Current Profiles
1. Using the toggle switch at the top of the CPU board, place the Wash Select II in
setup mode by moving the switch toward the back of the Wash Select II case.
(The CPU board is located on the inside right wall of the Wash Select II case.)
2. Using the (3) key to scroll forward and the (1) key to scroll back, scroll through the
main menu until the "Fleets & Coupons" option is displayed. Press the (*) key to
enter.
3. Use the (3) key to scroll until the "Print Profiles" option is displayed. Press the (*)
key to enter and a list of profiles will begin to print.
2.2.15 Enable External Fleet
This function will allow you to enable the External Fleet option (used for eWash, WashCard,
and Express Key). You need to have purchased the Unitec EXT FLEET card that plugs to the
I/O board for this to work. You also need to have one of the aforementioned external devices
from the manufacturer.
1. Using the toggle switch at the top of the CPU board, place the Wash Select II in
setup mode by moving the switch toward the back of the Wash Select II case.
(The CPU board is located on the inside right wall of the Wash Select II case.)
2. Using the (3) key to scroll forward and the (1) key to scroll back, scroll through the
main menu until the "Fleets & Coupons" option is displayed. Press the (*) key to
enter.
3. Use the (3) key to scroll until the "Enable Ext. Fleet" option is displayed. Press the
(*) key to enter.
4. You will be asked “Enable External Fleet System?” Press the (1) key for YES or
the (3) key for NO.
Document Number: WS21002 15
Document Title: WSII Operations Manual
Warning:
This command is used to erase all fleet accounts. Erased data cannot be recovered!
Note:
The Wash Select II is Cardholder Information Security Program (CISP) compliant:
Being CISP compliant, Wash Select II does NOT:
Store or print magnetic stripe data or card verification data subsequent to initial
authorization of a transaction;
Store complete credit card number or expiration date after the transaction is
settled.
Print complete credit card number or expiration date on any printouts, including
output through Remote Report.
5. If External Fleet is enabled, “Ack Activation?” will be displayed. Set to Yes if the
W A S H S E L E C T I I
External Fleet system requires the WSII to send back an acknowledgement of the
card approval. Please consult the manufacturer of he External Fleet system for
the proper setting.
Note: If “Ack Activation” is enabled, Optioning will be disabled automatically.
2.2.16 Erase All Fleets
1. Using the toggle switch at the top of the CPU board, place the Wash Select II in
setup mode by moving the switch toward the back of the Wash Select II case.
(The CPU board is located on the inside right wall of the Wash Select II case.)
2. Using the (3) key to scroll forward and the (1) key to scroll back, scroll through the
main menu until the "Fleets & Coupons" option is displayed. Press the (*) key to
enter.
3. Use the (3) key to scroll until the "Erase All Fleets" option is displayed. Press the
(*) key to enter.
4. You will be asked, “Delete all of the accounts?” Press the (1) key for YES or the
(3) key for no. If you answer yes, you will be asked if you are sure. Press the (1)
key for YES or the (3) key for NO.
2.3 Credit System
The Credit system manages credit transactions. These include credit cards and proprietary
cards such as the GiveX card. Credit system options are configured using the Credit System
menu.
2.3.1 Obtaining a Merchant Account
You must have a Merchant Account in order to use the Credit option.
If you have not acquired a merchant account, contact Unitec at 1-443-561-1200 for
compatible merchant account specifications to ensure that your merchant account provider
will operate with Unitec equipment.
Document Number: WS21002 16
Document Title: WSII Operations Manual
 Loading...