


 WIRELESS
For: PS4™ I PS3™
Xbox 360® I Mobile
WIRELESS DOLBY® SURROUND SOUND GAMING HEADSET
USER GUIDE
Congratulations on your purchase of the Ear Force PX4 headset from Turtle Beach. The PX4 works with your Xbox360, PS3, PS4 and all of your favorite mobile devices. Welcome to the Turtle Beach Audio Advantage!
For our Knowledgebase and Technical Support Contact info please visit: http://www.turtlebeach.com/support

Table of Contents
Package Contents |
P4 |
|
|
Features |
P5 |
|
|
PX4 Headset - Left View |
P6 |
|
|
PX4 Headset - Right View |
P7 |
|
|
PX4 Transmitter |
P8 |
|
|
PS3™ Setup/System Settings Configuration |
P9 |
|
|
Xbox 360® Setup/System Settings Configuration |
P12 |
|
|
Xbox 360® E Setup/System Settings Configuration |
P15 |
|
|
PS4™ Setup/System Settings Configuration |
P17 |
|
|
Home Theater Setup |
P21 |
|
|
Connecting a Digital Music Player |
P22 |
|
|
Dolby® Digital Processing |
P23 |
|
|
Surround Sound |
P24 |
|
|
Bluetooth Setup |
P25 |
|
|
Charging the Headset |
P27 |
|
|
Adjusting Sound |
P28 |
|
|
Pairing Instructions |
P30 |
|
|
Specifications |
P31 |
|
|
Compliance / Conformity |
P32 |
|
|
Warranty |
P35 |
|
|
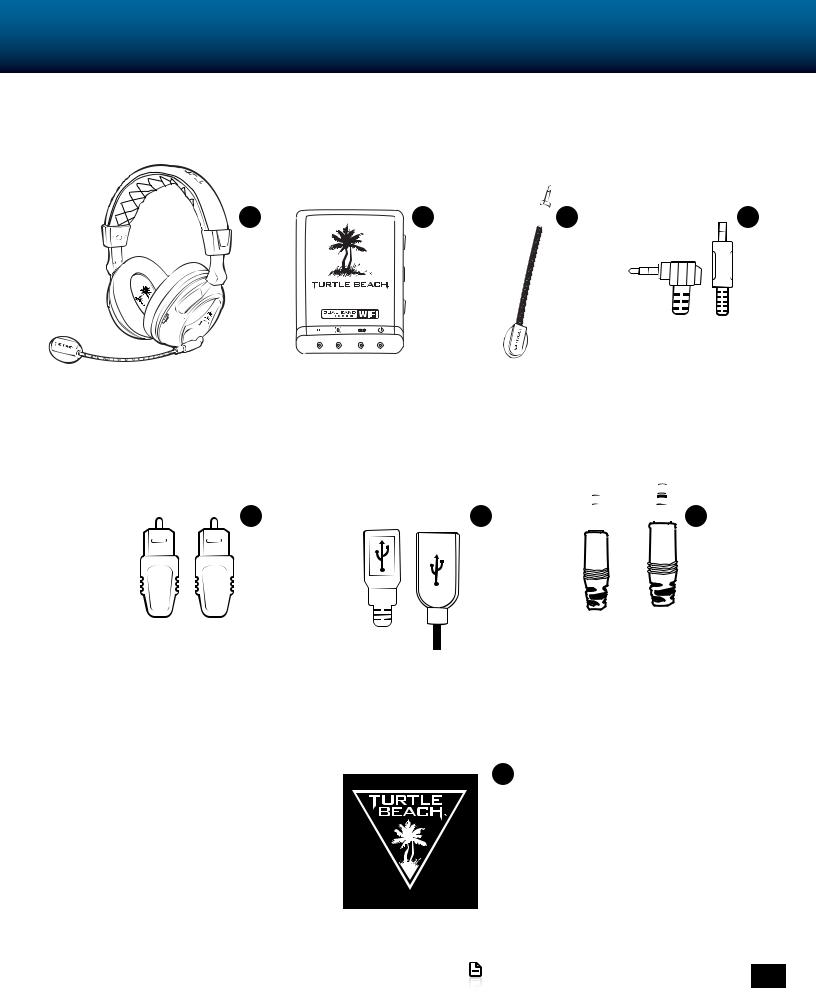
Package Contents
A  B
B  C
C  D
D
|
|
|
|
|
|
|
|
|
|
PX4 Headset |
PX4 Wireless |
|
Detachable |
|
Xbox 360 |
||||
|
Transmitter |
|
Boom Mic |
|
Talkback Cable |
||||
E 
 F
F 
 G
G
|
|
|
|
|
|
|
|
|
|
|
|
|
|
|
|
|
|
|
|
|
|
|
|
|
|
|
|
|
|
|
|
|
|
|
|
|
|
|
|
|
|
|
|
|
|
|
|
|
|
|
|
|
|
|
|
|
|
|
|
|
|
|
|
|
|
|
|
Digital Optical Cable |
Headset Charging |
|
2.5mm to 3.5mm |
|||||||||||||
|
|
|
|
|
|
|
|
Cable |
Mobile Adapter Cable/ |
|||||||
|
|
|
|
|
|
|
|
|
|
|
PS4 Chat Cable |
|||||
H
Turtle Beach Sticker
Go to Table of Contents |
4 |
|
Features
The Ear Force™ PX4 is a premium, Dolby surround sound headset designed for PS3™, PS4™ and Xbox360® gaming. To get the most from your PX4, please take a few minutes to review this introduction.
Dolby® Surround Sound
The PX4 transmitter processes Dolby Digital surround sound from your PS3™, PS4™ or Xbox360® and sends it to the headset via digital RF. The result is an immersive sound environment that makes you feel as if you’re right in the middle of the action. It also helps you react quicker by hearing exactly where the sound cues in the game are coming from.
Dual-Band Wi-Fi
The Ear Force PX4 headset provides wireless CD-quality game sound via dual-band digital RF (radio frequency) that communicates with the PX4 transmitter. This advanced dual-band Wi-Fi technology uses either 5GHz or 2.4GHz signals to transmit high fidelity digital audio and finds the optimum frequency to help eliminate interference with other wireless devices and Wi-Fi networks. Unlike the RF technology used in most other wireless headsets, the dual-band Wi-Fi technology found in the PX4 coexists with wireless networks for optimum performance.
Dual Pairing Bluetooth ®
The PX4 incorporates Bluetooth technology which can be used to simultaneously pair to two Bluetooth-enabled devices at once. For example, you can pair the PX4 to your PS3 and your mobile phone at the same time. This allows you to use your PX4 to accept phone calls all while totally immersed in the action of the game.
Rechargeable Battery
The PX4 also features a rechargeable lithium polymer battery that provides up to 15 hours of continuous game play on a single charge. The battery can also be recharged while gaming with the included charging cable so you’ll never miss out on the action.
Engineered for High-Quality Sound
The PX4 headset is engineered to deliver high-quality audio that makes it ideal for gaming, movies and digital music playback. The high-fidelity, 50mm speakers are encased in acoustically-tuned ear cups with soft fabric cushions and deliver extended bass with extraordinary dynamic range for optimum audio performance.
Go to Table of Contents |
5 |
|

PX4 Headset - Left View
2 
3
7
4 |
6 |
5
1To turn on/off the headset: Press and hold the power button until you hear two rapid tones To enter pairing mode(Headset off): Press and hold the power button until the LED begins to blink rapidly and evenly(about 6 seconds).
2Tone Button: Press this button to activate the different EQ presets. A beep will indicate which preset is selected. (see pg. 28)
3Blast Limiter Button: Press this button to activate the different Blast Limiter presets. A beep will indicate which preset is selected. (see pg. 28)
4Variable Mic Monitor: Adjusts the level of your voice heard in the headset. (see pg. 29)
NOTE: Turning up the mic monitor may cause the mic to pick up room sounds which will make the silence detector not automatically shut off the headset when it’s not being used. If the power is not automatically shutting down, turn down this mic monitor control.
5Wired Chat Jack: Used for chat on the Xbox360/ PS4 (see pg 12 & pg 17)
6Game Volume: Turn to adjust the game sound level.
7Removable Microphone with Adjustable Boom:
The microphone can be removed from the headset when chat is not required by detaching it from the boom.To properly position the mic: Make sure that the triangle indicator on the Mic Boom Plug is facing the headset. (The Metal Clip on the Microphone Foam Cover should be facing away from your mouth)
Go to Table of Contents |
6 |
|

PX4 Headset - Right View
2
1 |
3 |
4
1Bluetooth® Volume: Press Chat (+) or Chat (–) to adjust Bluetooth volume level. A tone will sound each time the volume level changes.
2Bluetooth Status LED:
Paired: Flashing Blue once per second Unpaired: Flashing blue twice per second Pairing Mode: Flashing blue and red alternating
3Bluetooth Multi-Function Button (BT MFB):
Powers on the Bluetooth and performs several other functions described in the “Bluetooth” section. (see pg. 25)
NOTE: The Bluetooth feature is normally powered on. If it is not paired to another device, it will automatically turn off after 5 minutes to conserve battery power.
4Mic Mute Button: Press to turn on/off your microphone. When the microphone is turned on you will hear a high tone. When it has been muted you will hear a low tone.
|
5 |
Headset Charging Port: The headset may be charged |
|
|
by connecting this Mini USB input to a free USB port |
6 |
5 |
on your gaming console using the included Headset |
Charging Cable. (see pg. 27) |
||
|
|
NOTE: The Headset Charging Cable included with |
|
|
the PX4 can only be used to charge the headset and |
|
|
cannot be used as a standard USB data cable. |
|
6 |
Charging LED: Turns red when charging and turns off |
|
|
when charged. |
Go to Table of Contents |
7 |
|
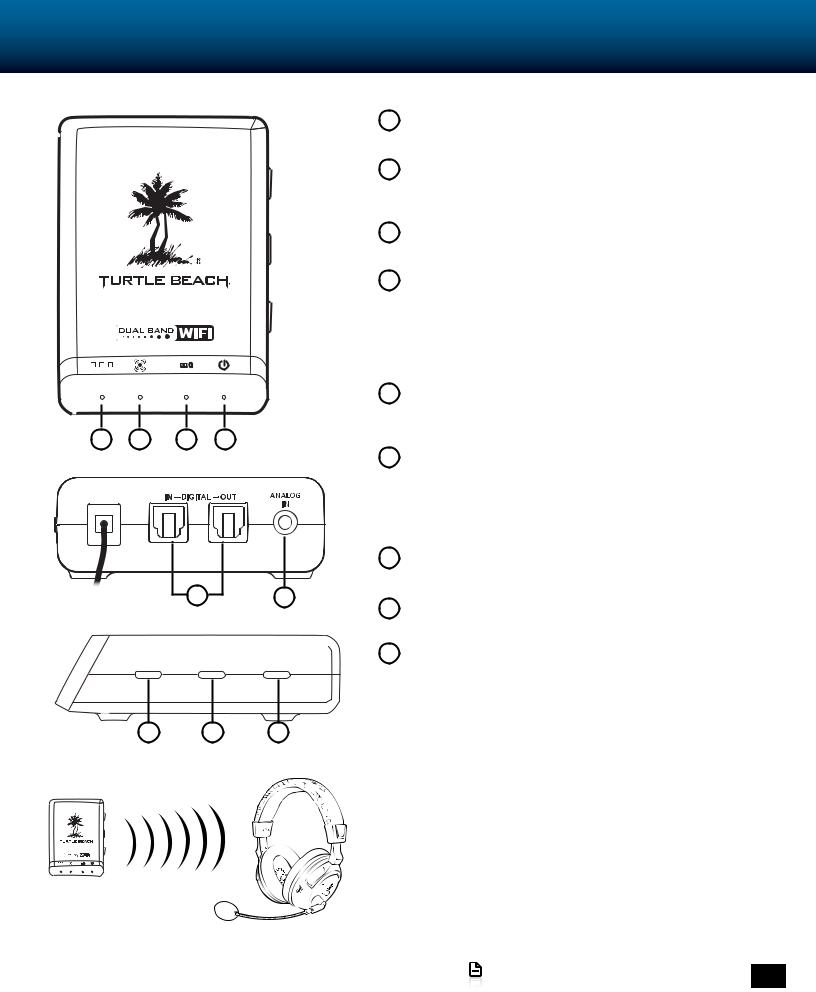
PX4 Transmitter
1 |
2 |
3 |
4 |
|
5 |
6 |
|
PaIr |
SurrouND |
SurrouND |
|
aNGleS |
oN/ oFF |
||
|
7 |
8 |
9 |
Optimum range: within 30 ft.
1Digital Input LED: This LED turns on when a digital input signal is detected. When this LED is ON, the analog input is turned off.
2Surround Sound LED: The LED will light whenever the digital input is being processed by the surround sound decoder. When this LED is off, the audio signal will be heard in stereo.
3Dolby® Digital LED: The LED will light whenever a Dolby Digital encoded signal is detected on the digital input.
4Power/Link LED: When the transmitter is powered on and communicating with the headset, this LED will be on solid. If the LED is slowly pulsing/off it indicates the transmitter can’t communicate with the headset. This could happen when the headset is out of range, turned off or not paired with the transmitter.(see pg 30)
5Digital Input and Output: The Digital In is used to connect your PX4 to a Xbox360/PS3/PS4 for audio. The Digital Out can be used to pass through audio to a home theater system.
6Analog Input Jack: Provides a 3.5mm input for digital music players or additional audio sources. (3.5mm cable sold separately) NOTE: The analog input is deactivated whenever a digital input is active, so both the digital and analog inputs cannot be used at the same time.
7Pair Button: Press and hold to activate pairing mode. (See pg. 30)
8Surround Sound Angles Button: Press to select different HRTF surround angles. (see pg. 24)
9Surround Sound On/Off Button: Pressing this button toggles between surround sound and stereo sound. When surround sound is active, the Surround Sound LED will be lit.
Transmitter Range
The transmitter sends game audio from your Xbox 360® console to the headset via digital radio frequency (RF) signal, so a direct line of sight is not required. When you’re out
of range, you may hear popping or clicking sounds if the headset loses the RF signal. For best performance, place the transmitter in an open area that is unobstructed by objects that might absorb RF signals from the internal antenna. Avoid placing it on a metal surface, such as the top of a home theater A/V receiver.
Go to Table of Contents |
8 |
|
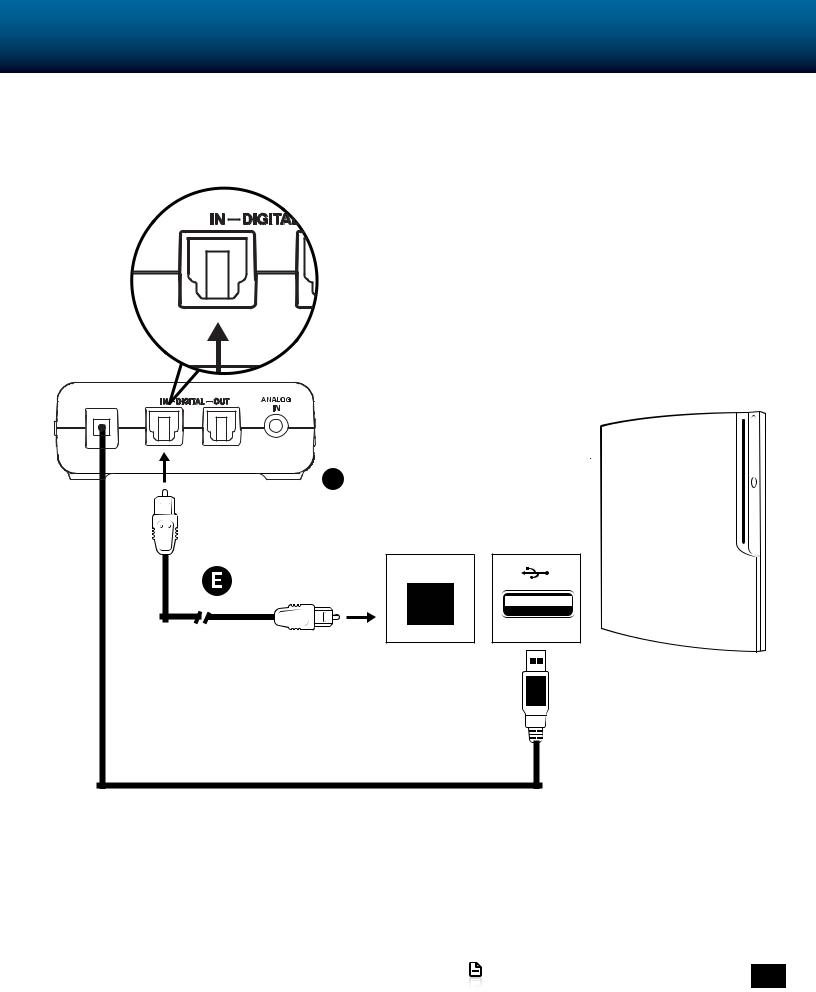
PS3™ Setup/System Settings Configuration
PS3 Hardware Setup
B |
DIGITAL OUT |
(OPTICAL) |
Note: Remove the clear plastic covers from both ends of your Digital Optical Cable before setting up your transmitter.
Go to Table of Contents |
9 |
|
PS3™ Setup/System Settings Configuration
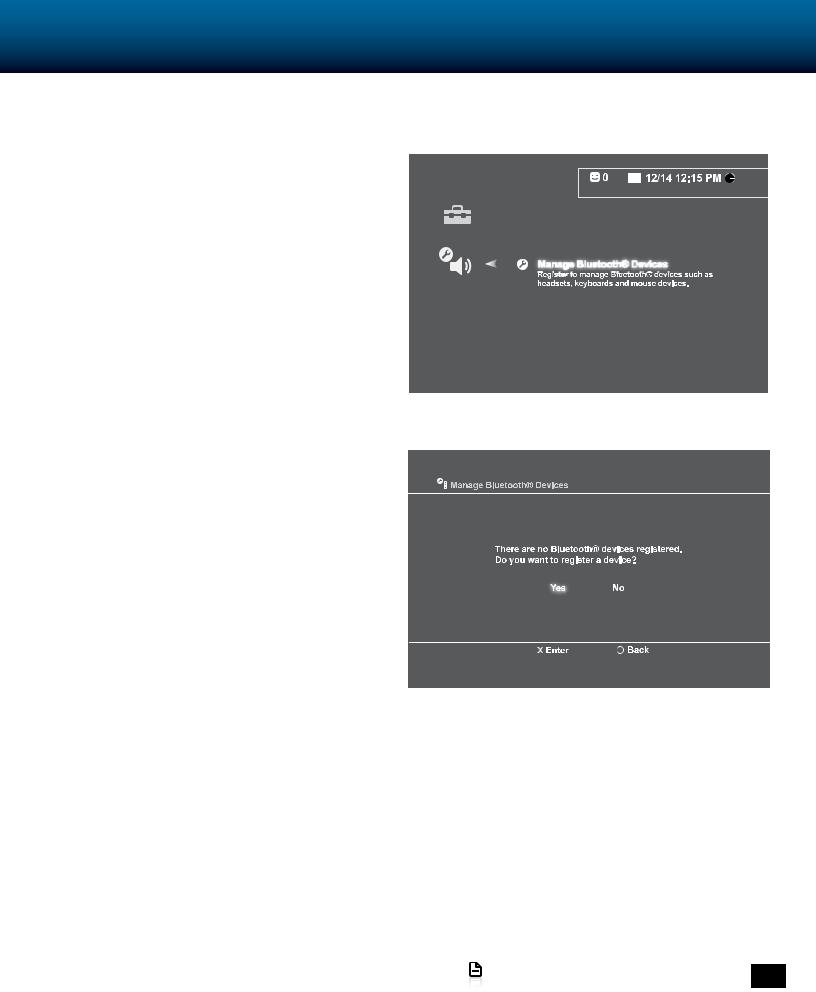
PS3 Bluetooth Configuration
1. In the PS3 menu Navigate to Settings > Accessory Settings > Manage Bluetooth Devices.
2.Power off PX4 Bluetooth. Hold BT MFB for 5 seconds until Bluetooth LED switches off.
3. On the PS3, scan for Bluetooth devices.
4. With PX4 powered ON, but Bluetooth OFF, hold BT MFB until Bluetooth LED flashes blue and red, then release.
5.On the PS3 select “Turtle Beach Bluetooth Chat”, then enter “0000” as the Pass Key. The Bluetooth LED on the headset will flash blue once per second, indicating that the PX4’s Bluetooth has paired to your PS3.
Go to Table of Contents |
10 |
|
PS3™ Setup/System Settings Configuration
PS3 Chat Configuration
Note: Make sure you have followed the PS3 Bluetooth Configuration steps above before continuing to this section.
1.In the PS3 Menu go to Settings > Accessory Settings > Audio Device Settings and set the “Input Device” and
“Output Device” fields to “Turtle Beach Bluetooth Chat”.
Turtle Beach Bluetooth Chat
Turtle Beach Bluetooth Chat
PS3 Audio Output Configuration
1. In the PS3 Menu go to Settings > Audio Output Settings > Optical Digital > Dolby Digital 5.1 Ch
Note: Make sure DTS 5.1 Ch is NOT checked.
2. In the PS3 Menu go to Settings > Audio Multi-Output and set to “On”
Go to Table of Contents |
11 |
|
 Loading...