

Page 1
ROWING MACHINE R 215
GB OWNER'S MANUAL
D BETRIEBSANLEITUNG
F MODE D'EMPLOI
NL HANDLEIDING
S BRUKSANVISNING
FIN KÄYTTÖOHJE
SERIAL NUMBER
SERIENNUMMER
NUMERO DE SERIE
SERIENUMMER
NUMERO DI SERIE
SERIENNUMMER
SARJANUMERO
583 2005 B
Page 2
GB
REMARKS AND WARNINGS
Please read this owner’s manual through carefully before assembling, using and servicing the rowing machine! Follow the
instructions described in this manual carefully.
THE EQUIPMENT HAS BEEN DESIGNED FOR DOMESTIC USE, FOR WHICH THE FULL TUNTURI WARRANTY
APPLIES.
* Before you start any training, consult a physician to check your state of health.
* If you experience nausea, dizziness or other abnormal symptoms while exercising, stop your workout at once and consult
a physician.
* Parents or others responsible for children should note that children’s natural playfulness and curiosity may lead to
situations and behaviour for which the rowing machine is not designed. If children are allowed to use the rowing machine,
they should be supervised and taught to use the rowing machine properly, keeping in mind the child’s physical and mental
development and their personality. The rowing machine is not a toy.
* Only one person may use the rowing machine at a time.
* Place the device on a firm, level surface. In heavy or long-term use the hydraulic pumps may drop oil. It is therefore advised
to place the machine on a protective base.
* Exercise only in an environment with sufficient air conditioning. However, in order to avoid catching cold, do not exercise
in draught.
* Before you start using the device, make sure that it functions correctly in every way. Do not use a faulty device.
* Wear appropriate clothing and shoes when exercising.
* To avoid muscular pain, begin and end each workout by streching, warming up and cooling down.
* Do not attempt any servicing or adjustment other than those described in this manual. The given instructions must be
followed carefully.
* The rowing machine is not recommended for use by persons weighing more than 100 kg or 225 lbs.
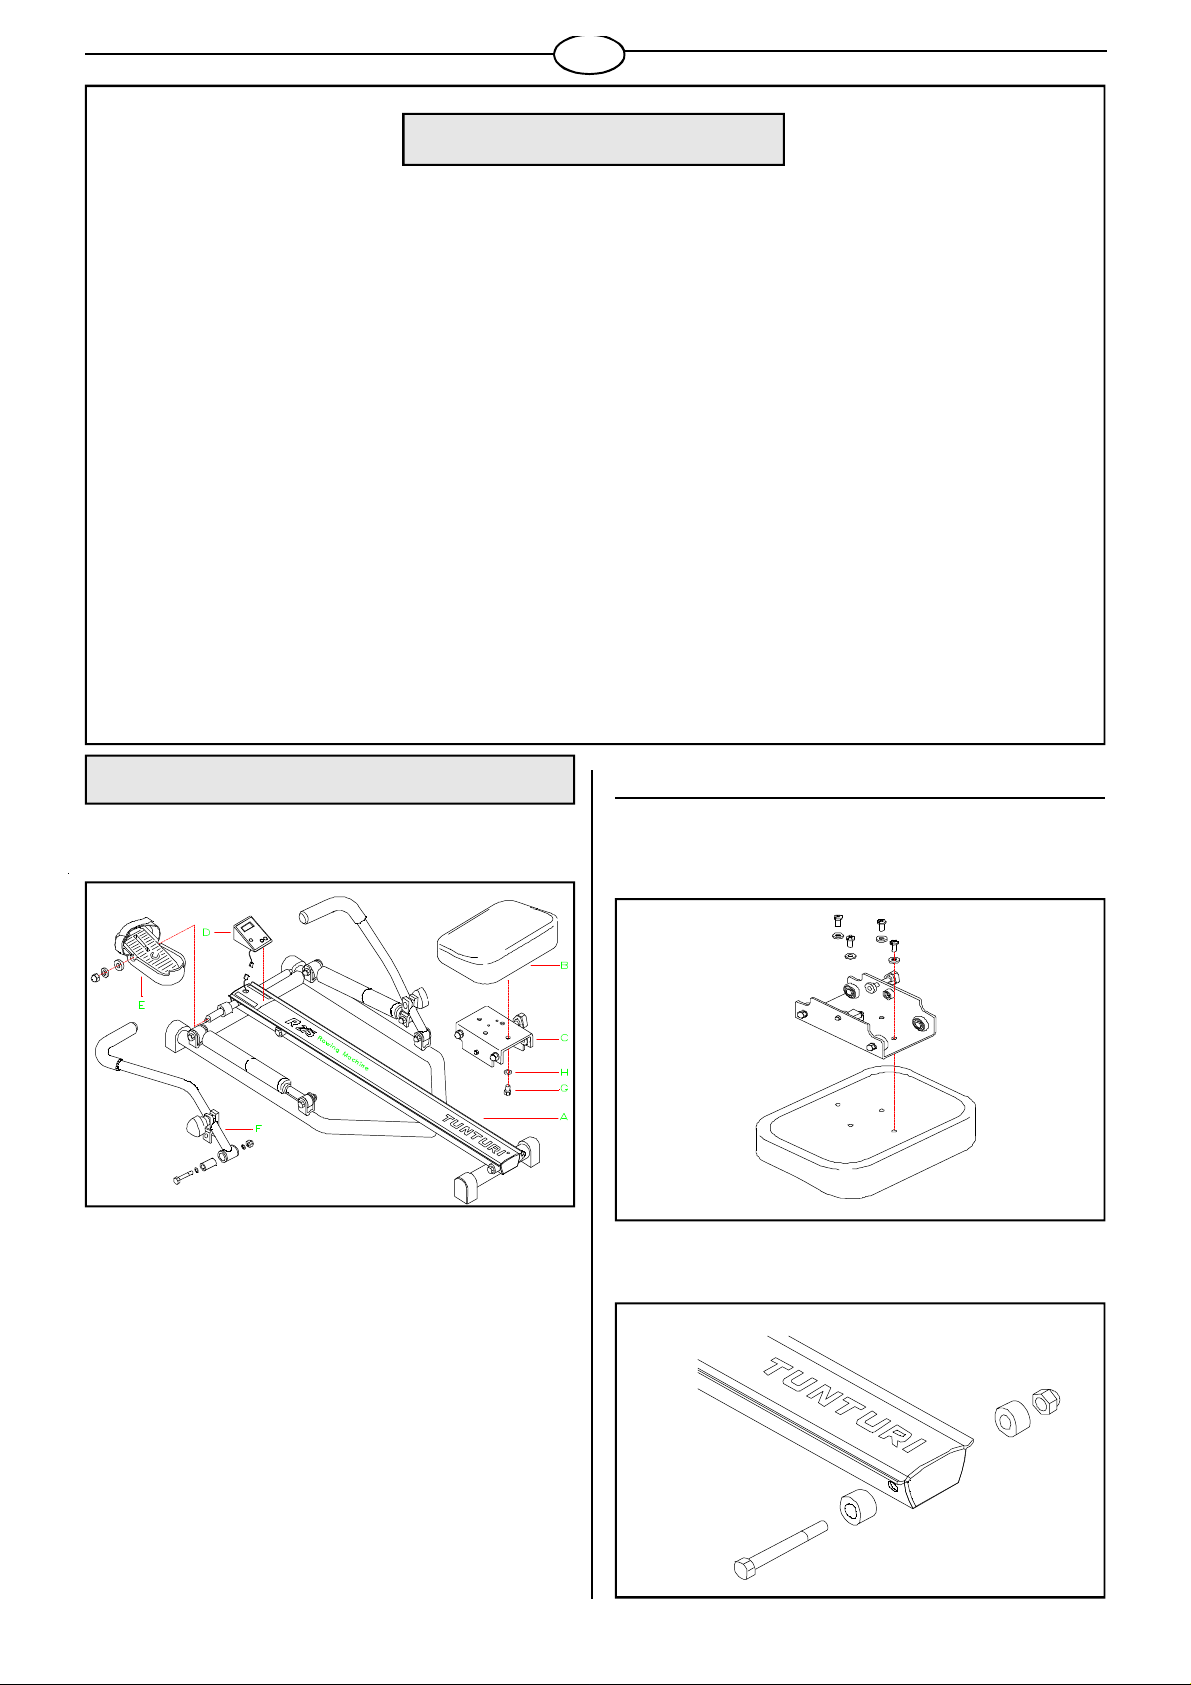
1. ASSEMBLY
Before assembling the device, make sure the following parts
are present (fig. 1):
FIG. 1
A frame
B seat
C seat frame
D meter (2 x 1,5 V batteries)
E 2 footrests 2 pcs
F 2 oars 2 pcs
1.1. SEAT ASSEMBLY
Attach the seat frame to the bottom of the seat with four screws
and washers so that the seat lock is either on the left or on the
right side of the seat (fig. 2).
FIG. 2
Remove the seat stopper (fig. 3). Put the seat onto the rail
(notice the direction of the seat) and replace the seat stopper.
Hard ware kit including the following:
G bolts 4 pcs
H washers 4 pcs
open end wrenches 2 pcs
allen key wrench
If you notice that a part is missing, contact the dealer and give
the model (R 215), serial number and spare part number from
the spare part list at the back of the manual.
FIG. 3
2
Page 3
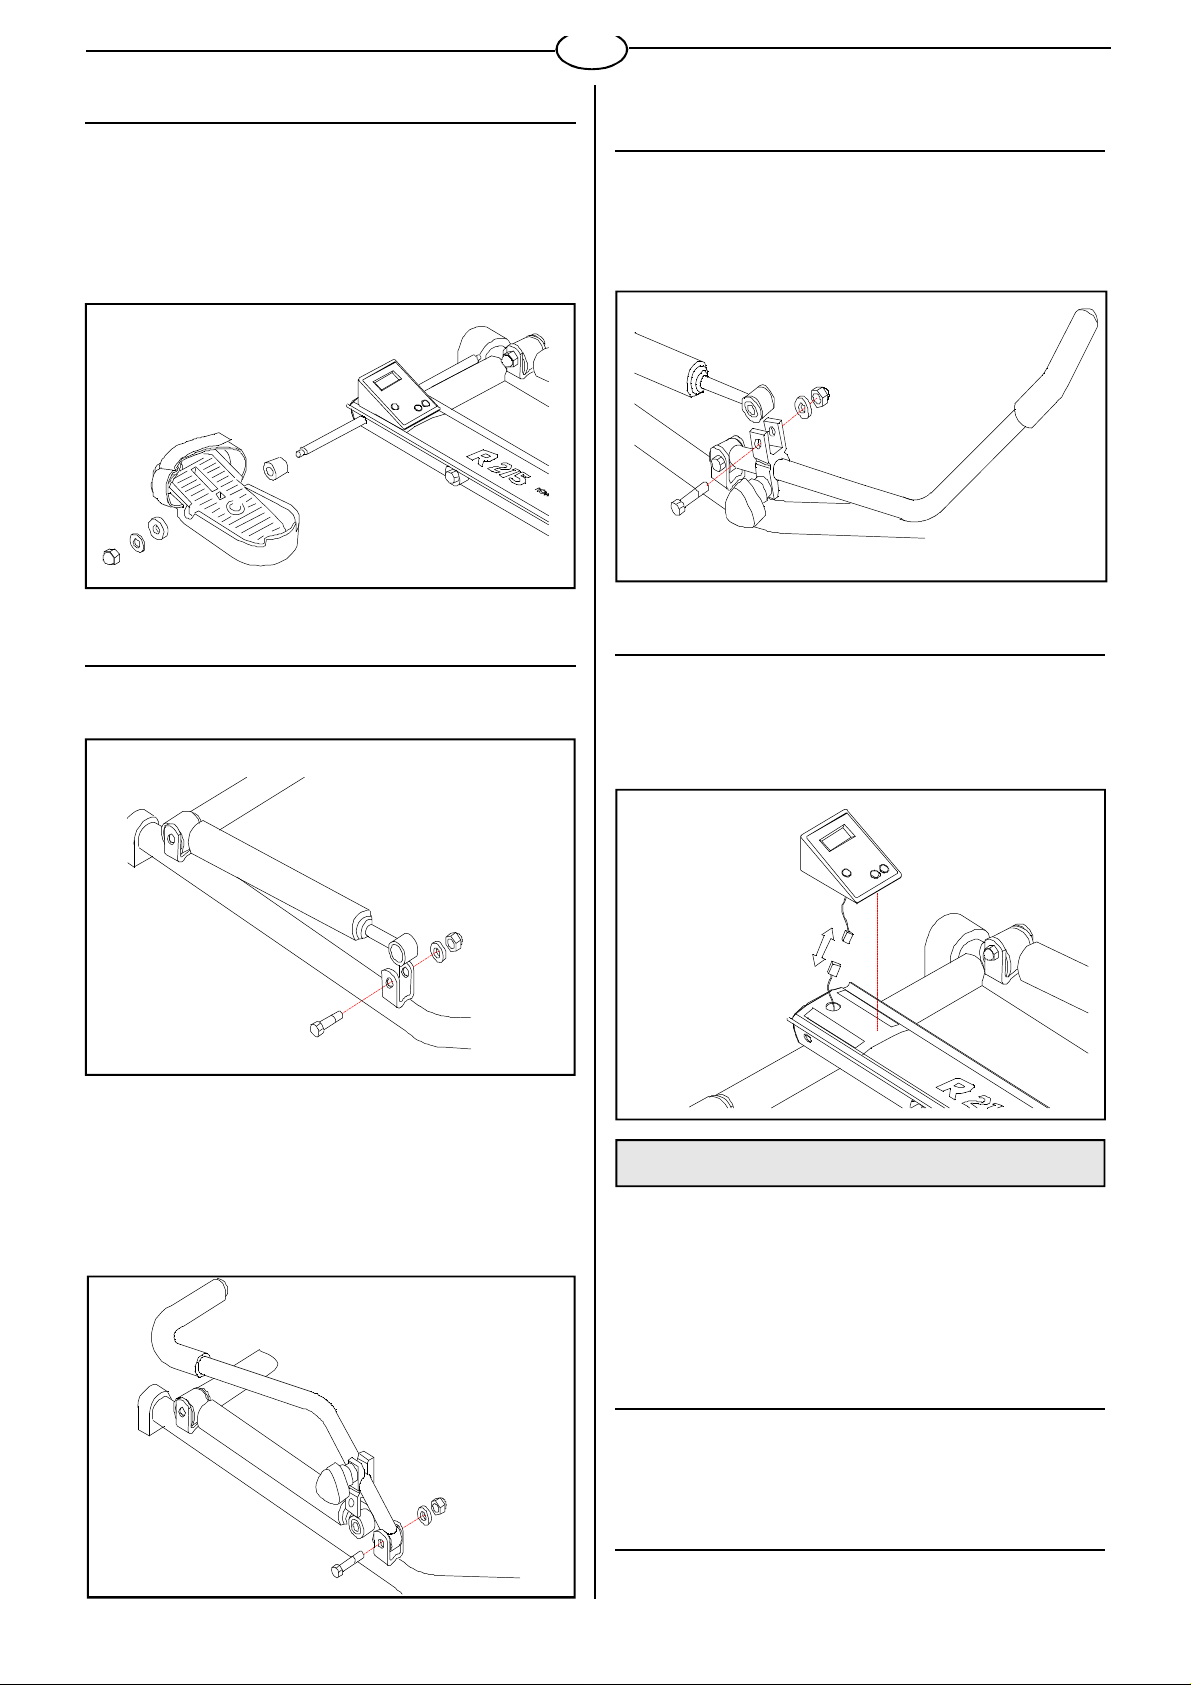
1.2. FOOTREST ASSEMBLY
GB
Remove the nut and the thin metallic and plastic washers from
the footrest shaft. Install a footrest on the shaft so that the thick
plastic washer stays between the footrest and the frame. Place
the plastic and metallic washers and a nut at the end of the shaft
(fig. 4). Install the other footrest in the same way. Tighten both
nuts simultaneously by holding the other nut in place with an
open end wrench.
FIG. 4
1.4. OAR BRAKE (SHOCK ABSORBER)
ASSEMBLY
Insert the end of the brake in the aluminium clamp, push the bolt
through the clamp and the sleeve and tighten the nut holding the
bolt in place with an open-end wrench (fig. 7). Make sure that
the resistance adjustment knob is facing outwards. Fasten the
other oar brake in the same manner.
FIG. 7
1.3. OAR ASSEMBLY
Remove the screw shown in fig. 5.
FIG. 5
Remove the plastic cover on the bearing housing of the oar.
Make sure that the sleeve bearing remains inside the bearing
housing. To install the oar, place its lower end in the oar bracket,
push the screw through the bracket and the sleeve (fig. 6).
Insert the washer and tighten the nut, holding the bolt in place
with an open-end wrench. Tighten the screw hard. Install the
other oar in the same manner.
1.5 METER ASSEMBLY
Insert two 1,5 V AA-batteries by opening the bottom of the
meter cover.Replace the top cover and connect the meter
cable with the transmitter cable Thread the cables into the
groove in the rail to avoid damage. The meter is fastened to the
rail with two straps of adhesive fabric (fig. 8).
FIG. 8
2. USE
Rowing is a very effective form of exercise. In addition to
strengthening the heart and improving circulation, it develops
the various groups of large muscles: the back, the abdomen,
the arms, the shoulders as well as the pelvis and the legs.
Rowing also develops muscular flexibility without exertion of
joints, and it is a recommended form of exercise for those who
suffer from pains in the neck and shoulder area.
FIG. 6
2.1. ADJUSTING RESISTANCE
With the adjuster in the lowest position (1), the resistance is at
a minimum, in the highest position (5) at its maximum. Do not
tighten the adjuster too hard.
2.2. TIGHTENING THE FOOT STRAPS
Pull the foot straps to correct tightness, turn over the end of the
strap and fasten it.
3
Page 4

2.3. ROWING TECHNIQUE
GB
A B
The rowing stroke step by step: tighten
the foot straps on the footrests. Take a
grip on the oars and start the rowing
stroke by leaning slightly forward, with the
knees bent and the arms straight (A).
D
2.4. ABDOMINAL MUSCLES
By tightening the knob under the seat, the
seat can be locked in its place. The locked
position can be used e.g. for exercising
the abdominal muscles or for back-rowing.
Push yourself backwards straightening
your back and your legs simultaneously
(B).
E
2.5. BACK-ROWING
You can strengthen the extensor muscles
of the arms by back-rowing, i.e. pushing
the oars instead of pulling.
C
Continue the movement until you lean
slightly backwards and flex your arms at
the same time. Return to the starting
position, lean forward and straighten your
arms (C).
F
Lock the seat as forward as possible and
sit the other way round than for rowing.
Rest the feet on the floor (E and F).
To exercise the abdominal muscles, lock
the seat at a suitable distance from the
footrests so that you can sit with the legs
slightly bent. Tie the straps of the footrests
and lift yourself up to the sitting position.
To increase the resistance hold your hands
behind your neck or hold weights in your
hands (D).
Note: Never lean on the oars when you get up off the rowing
machine, and lock the seat everytime you lift or move the
device.
4
Page 5

GB
3. METER
N.B. Protect the meter from direct
sunlight, as it may damage the liquid
crystal display. Do not expose the meter
to water or severe impacts, as these
may also damage the meter.
The power is switched on automatically
when the seat is moved or a key pressed.
If you do not press a button or move the
seat for more than 4 minutes, the meter
will automatically switch off.
3.1. KEYS
RESET:
Returns the number on the display to
zero. Resetting is possible only in the
STOP mode (STP on display).
SET:
Presets required values in STOP mode.
Pressing the SET key continuously runs
numbers forward fast.
MODE:
Alternates modes and displays. In order
to move to the STOP mode which enables
presetting, press the MODE key until the
text SCAN disappears from the screen.
3.2. FUNCTIONS
The screen shows abbreviations of functions (time = tm, strokes = cnt, distance =
dst, kilocalories = cal).
TIME:
Time count-up or count-down.
STROKES:
Stroke count-up or count-down.
DISTANCE:
Distance count-up in sea miles ( 1.00 on
display = 1 sea mile).
CALORIES:
Estimated, cumulative energy consumption in kilocalories or set kilocalories. In
theory energy consumption is calculated
from rowing resistance, speed and distance, but because different people’s
capacity to produce energy (efficiency)
varies, the energy consumption display
shows only an approximation of the real
consumption. This meter calculates the
energy consumption on the basis of
average values.
SCAN:
Automatic alternation of displays at 6
second intervals. When the SCAN mode
is on, the display shows the text SCAN.
This mode is automatically on when you
switch on the meter. You can leave the
mode by pressing the MODE key once so
that the text SCAN disappears from the
screen, and return to it by pressing the
MODE key until the text SCAN reappears.
3.3 SETTING VALUES
You can preset certain training time,
amount of strokes and/or amount of
calories.
- time 0:00-99:00 (in steps of 1 min)
- strokes 0-999 (in steps of 10 strokes)
- calories 0-999 (in steps of 1 kCal)
- distance 0-999 (in steps of 0,1 M)
You can preset values only in STOP
mode (STP on display). This mode is
automatically on when the meter is
switched on, similarly the STOP mode
goes automatically on if the exercise is
halted for at least 3 seconds. If the SCAN
mode is on (SCAN on display), presetting
can not be done. You can leave the mode
by pressing the MODE key once so that
the text SCAN disappears from the screen.
1. Press MODE key until the display
shows the desired value (time, strokes,
calories, distance).
2. Press SET key to preset the value
(RESET key returns the preset value to
zero). Pressing SET key continuously
runs numbers forward fast.
3. The meter will start counting as soon as
you start the exercise (the text STP
disappears from the display).
4. When the set values are elapsed the
meter continues counting the training
values from zero upwards.
4. SERVICE
The TUNTURI Rowing Machine R 215
requires a minimum of maintenance. From
time to time, check that all fixing screws
and nuts are securely tightened.
Periodally, it is advisable to lubricate the
moving parts within the rowing
mechanism. This is especially recommended if excessive noise is generated
5
from the rowing mechanism during use.
Undo the bolts at the pivot point of the
oars and at their joint with the piston.
Apply a small amount of light grease or
Vaseline around the bushes and bolts.
Also apply a small amount of grease or
Vaseline to the withdrawn shaft of the
piston.
Clean the device with a damp cloth. Do
not use solvents. If you notice any defects
or malfunctions in the device during the
use, contact your dealer immediately.
In spite of continuous quality control,
individual defects and malfunctions may
occur due to individual components. It is
in most cases unnecessary to take the
whole rowing machine for repair, as it is
usually sufficient to replace the defective
part.
4.1. REPLACING THE
BATTERIES
If there are only weak or no figures on
display, change the batteries (2 x 1,5 V
AA). Dismount the meter from the rail
(see assembly, fig. 8) and disconnect the
meter and the transmitter cable. Open
the meter cover and change the batteries.
Replace the top cover and reconnect the
cables. Thread the cables into the groove
in the rail to avoid damage. The meter is
fastened to the rail with two straps of
adhesive fabric.
5. STORAGE
The rowing machine can be stored in the
vertical position to save space. Keep it in
a dry, dust-free place with as little temperature variation as possible.
6. DIMENSIONS
Length 130 cm
Width 73 cm
Height 23 cm
Weight 15 kg
The information presented in this manual
is given in good faith and as accurately as
possible. However, anyone who uses this
information in installing, using or servicing
the rowing machine does so at their own
risk.
All TUNTURI models are designed to
meet the electromagnetic compatibility
directive, EMC and are affixed with the
EC conformity marking.
Specification may be changed due to
our continuous programme of product
development.
Page 6

Ref. no Part no.
Ref. no Part no.
1 103 2009 Frame F
2 103 2008 Rail F
3 60 08 016 03 Bolt F
4 653 271 87 Bolt F
5 533 2018 Stopper A
6 533 2017 End plate A
7 653 238 87 Plastic washer A
8 62 1021 10 Washer F
9 653 206 87 Cap nut F
10 363 2003 Pedal A
11 443 2007 Pedal strap L
12 533 250 87 Rubber spacer A
13 343 209 87 Shaft F
14 503 2007 Velcro tape, pair L
15a 233 2009 Meter H
15b 403 2011 Sensor H
15c 503 2008 Bracket of sensor A
16 423 2018 Label set (incl. 27.) L
17 203 219 87 Oar RH F
18 203 220 87 Oar LH F
19 213 204 87 Handle, grip & cap L
20 513 213 87 Clamp F
21 653 0060 Knob A
22 533 252 88 Spacer F
23 533 7029 Sleeve A
24 523 7006 Sleeve F
25 60 08 040 02 Bolt F
26 163 2001 Shock compl.
(incl. 23) F
28 653 273 87 Bolt F
29 523 216 87 Sleeve F
30 523 221 87 Sleeve A
31 63 08 127B Spring washer F
32 60 08 050 40 Lock hd. bolt F
33 60 39 013 57 Screw F
34 533 2019 Stand shoe A
35 103 227 87 Rear bar F
37 653 274 87 Bolt F
38 533 248 88 Sleeve F
39 533 247 88 Roller L
41 653 275 88 Bolt F
44 153 258 88 Seat frame F
45 153 2005 Seat L
46 533 2020 Sleeve F
47 403 2010 Magnet F
48 60 04 020 21 Screw F
49 61 0510 Nut F
50 153 2004 Pulley A
51 523 2010 Sleeve F
52 653 1004 Screw F
- 553 4001 Hardware kit F
- 583 2005A Owner's manual E
List for recycling / Index für Materialentsorgung:
A = Thermoplastic / Kunststoff, Thermoplast
E = Paper, Carton / Papier, Pappe
F = Metal / Metall
H = Electronics / Elektronik
L = Other / Sonstiges
30
Page 7

TUNTURIPYÖRÄ OY
P.O.Box 44
FIN - 20521 Turku FINLAND
Tel. +358-2-2603 111
Fax +358-2-2603 3323
http://www.tunturi.com
email: fitness.mail@tunturi.com
 Loading...