

Page 1
Operator’s Manual
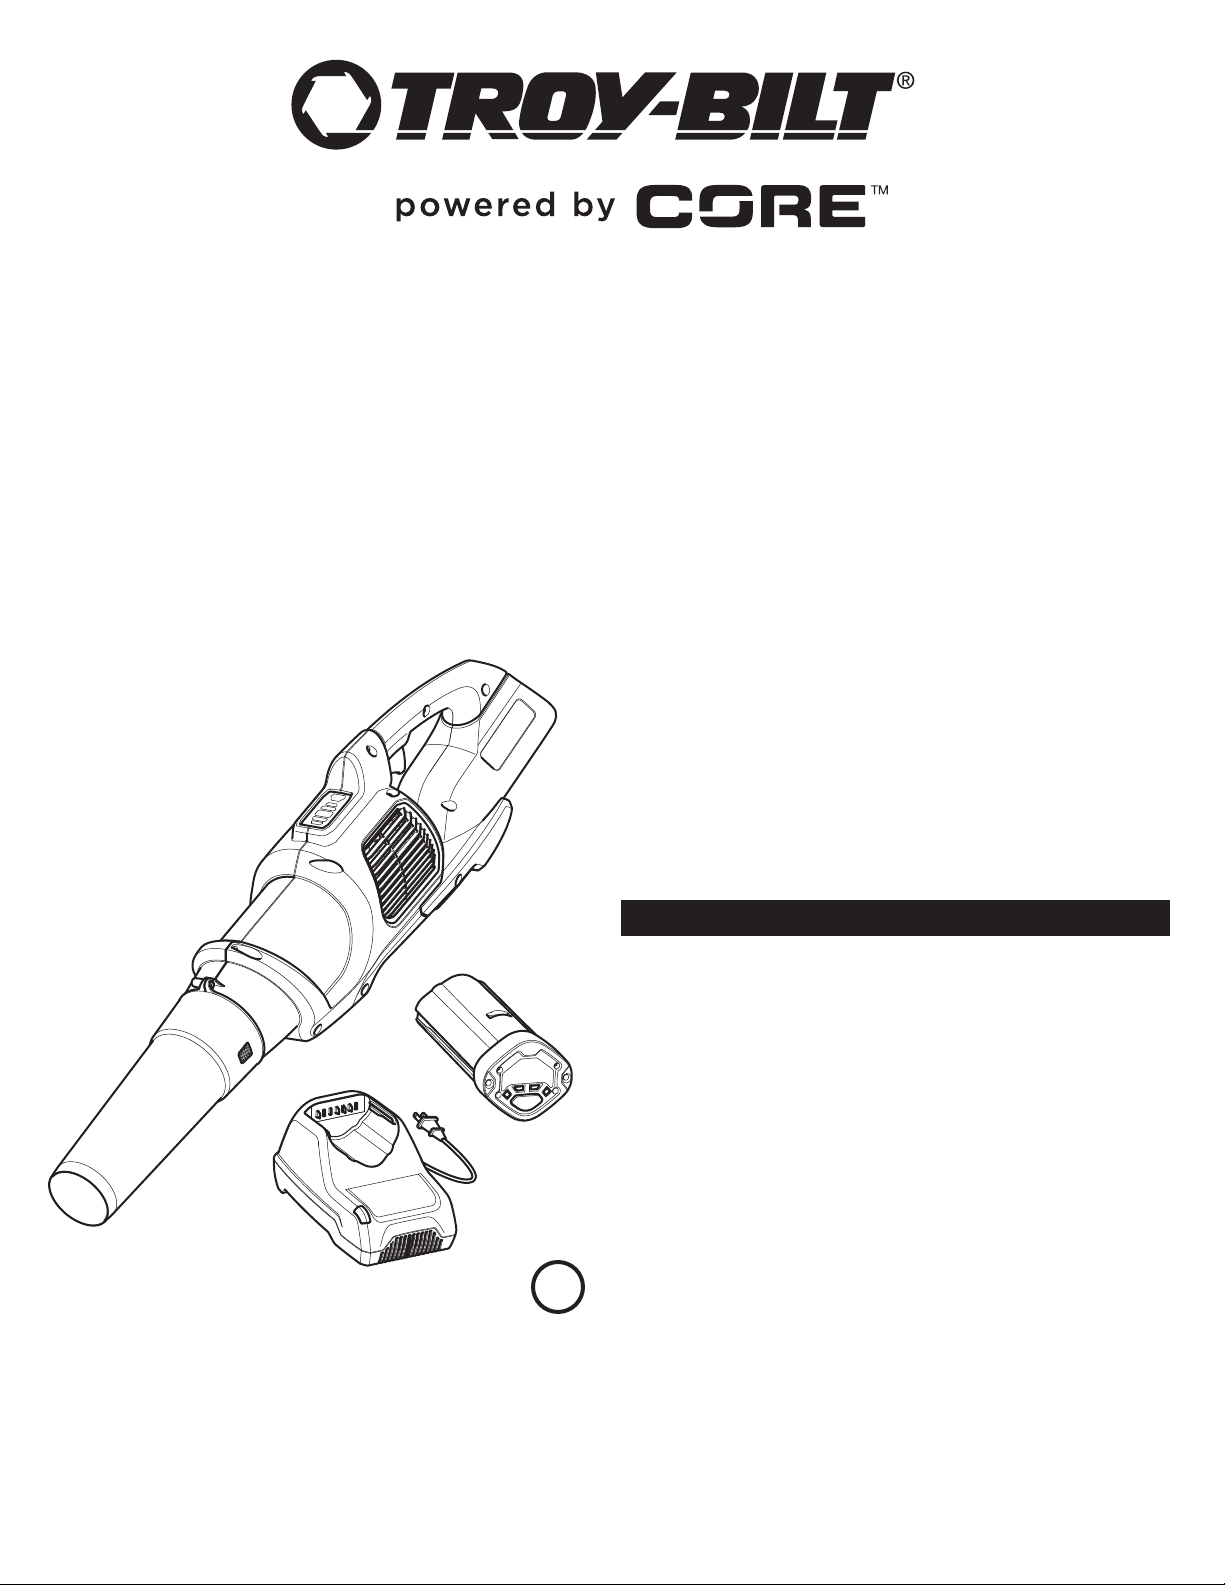
TB4300 / TB4300B
Cordless Blower
TABLE OF CONTENTS
Service . . . . . . . . . . . . . . . . . . . . . . . . . . . . . . . . . . . . . . . . . . . . . . .1
Safety . . . . . . . . . . . . . . . . . . . . . . . . . . . . . . . . . . . . . . . . . . . . . . .2
Know Your Unit . . . . . . . . . . . . . . . . . . . . . . . . . . . . . . . . . . . . . . . .7
Specifications . . . . . . . . . . . . . . . . . . . . . . . . . . . . . . . . . . . . . . . . .8
Assembly . . . . . . . . . . . . . . . . . . . . . . . . . . . . . . . . . . . . . . . . . . . . .8
Starting and Stopping . . . . . . . . . . . . . . . . . . . . . . . . . . . . . . . . . .10
Operation . . . . . . . . . . . . . . . . . . . . . . . . . . . . . . . . . . . . . . . . . . . .11
Maintenance . . . . . . . . . . . . . . . . . . . . . . . . . . . . . . . . . . . . . . . . .12
Cleaning and Storage . . . . . . . . . . . . . . . . . . . . . . . . . . . . . . . . . .13
Troubleshooting . . . . . . . . . . . . . . . . . . . . . . . . . . . . . . . . . . . . . . .14
Warranty . . . . . . . . . . . . . . . . . . . . . . . . . . . . . . . . . . . . . . . . . . . .15
SAVE THESE INSTRUCTIONS
NOTE: This operator's manual covers multiple models. Features
may vary by model. Not all features in this manual are applicable
to all models. The model depicted may differ from yours.
IMPORTANT: Read this manual thoroughly before using this product. Follow all instructions.
BC
SERVICE
DO NOT RETURN THIS UNIT TO THE RETAILER. PROOF OF
PURCHASE WILL BE REQUIRED FOR WARRANTY SERVICE.
For assistance regarding the assembly, operation or maintenance of
the unit, please call 1-800-828-5500 (in the United States) or 1-800-
668-1238 (in Canada). Additional information can be found at
www.troybilt.com (in the United States) or www.troybilt.ca (in
Canada).
Warranty service is available through an authorized service center.
To locate a service center in your area, please visit our website
all the number listed above. Service on this unit, both within and
c
after the warranty period, should only be performed by an
authorized and approved service center. When servicing, use only
identical replacement parts.
All information, illustrations, and specifications in this manual are based
on the latest product information available at the time of printing. We
reserve the right to make changes at any time without notice.
The product may vary slightly from the illustrations contained in this
manual.
Copyright© 2016 MTD SOUTHWEST INC, All Rights Reserved.
or
769-11371 / 01 03/16
Page 2
SAFETY
The purpose of safety symbols is to attract your attention to
possible dangers. The safety symbols, and their explanations,
deserve your careful attention and understanding. The safety
warnings do not by themselves eliminate any danger. The
instructions or warnings they give are not substitutes for proper
accident prevention measures.
SYMBOL MEANING
DANGER:
Failure to obey a safety DANGER symbol WILL result in
serious injury or death to yourself or to others.
WARNING:
Failure to obey a safety WARNING symbol CAN result in
serious injury to yourself or to others.
Signals an EXTREME hazard.
Signals a SERIOUS hazard.
CAUTION:Signals a MODERATE hazard.
Failure to obey a safety CAUTION symbol MAY result in
property damage or injury to yourself or to others.
NOTE: Advises you of information or instructions vital to the
operation or maintenance of the equipment.
CALIFORNIA PROPOSITION 65
WARNING:
known to the state of California to cause cancer, birth defects
or other reproductive harm.
Read the operator’s manual and follow all warnings and safety
instructions. Failure to do so can result in serious injury to the
operator and/or bystanders.
This product contains a chemical
• IMPORTANT SAFETY INSTRUCTIONS •
READ ALL INSTRUCTIONS BEFORE OPERATING
1. SAVE THESE INSTRUCTIONS - This manual contains
important safety and operating instructions.
2. Before using this product, read all instructions and cautionary
markings on the battery, battery charger, and the unit(s) powered
by the battery.
WARNING:Only use 4144 or 6216 batteries
with this unit. DO NOT use any other type of battery,
attachment or accessory with this unit. Other types of
batteries, attachments or accessories could lead to serious
injury, property damage or damage to the unit.
WARNING:
batteries with a 4044 battery charger. DO NOT attempt to
use any other battery charger to charge 4144 or 6216
batteries. Other types of battery chargers may cause the
batteries to burst, resulting in fire, personal injury or
property damage.
Only charge 4144 or 6216
WARNING:
to charge 4144 or 6216 batteries. DO NOT attempt to
charge any other batteries with a 4044 battery charger.
Other types of batteries may burst, causing fire, personal
injury or property damage.
WARNING:
instructions. Failure to follow the warnings and instructions
may result in electric shock, fire and/or serious injury.
Only use a 4044 battery charger
Read all safety warnings and all
2
Page 3

GENERAL SAFETY WARNINGS
• Read the instructions carefully. Be familiar with the controls and
proper use of the unit.
• Stay alert. Do not operate this unit when tired, ill or under the
influence of alcohol, drugs or medication.
• Never allow children to operate the unit. Teens must be trained,
accompanied and supervised by an adult. Never allow adults to
operate the unit without proper instruction.
• All gu
before operating the unit.
• Inspect the unit before use. Check for damaged parts. Make
sure all parts operate properly. Make sure all fasteners are in
place and secure. Make sure all moving parts are properly
aligned and are not bound. Have all damaged or improperly
working parts repaired or replaced by an authorized service
center. Do not operate th
• Be aware of risk of injury to the head, hands and feet.
• Carefully inspect the area before starting the unit. Remove
rocks, broken glass, nails, wire, string and other objects that
may be thrown or become entangled with the unit.
• Clear the area of children, bystanders and pets; keep them
outside a 50-foot (15 m) radius, at a minimum. Even then, they are
still at ris
eye protection. If you are approached, stop the unit immediately.
• This unit is intended for occasional, household use only.
• Do not allow the unit to be used as a toy.
s and safety attachments must be installed properly
ard
t with loose or damaged parts.
e uni
rom thrown objects. Encourage bystanders to wear
k f
SAFETY WARNINGS FOR ELECTRIC UNITS
General Electric Safety
• Do not expose the unit to rain or wet conditions.
• Do not handle the unit with wet hands.
• Do not operate the unit in the rain, i
surfaces.
• To reduce the risk of electric shock, avoid body contact with
grounded conductors, such as metal pipes or wire fences.
• Do not operate the unit in explosive atmospheres, such as in the
presence of flammable liquids, gases or dust.
Battery Charger Safety
• A nameplate on the unit indicates the voltage used. Never
connect the unit to an AC voltage that differs from thi
• An extension cord should not be used unless absolutely
necessary. Use of an improper extension cord could result in a
risk of fire, electric shock or electrocution.
• Do not use multiple extension cords.
• Make sure the extension cord is heavy enough to carry the current
drawn by the unit. An undersized extension cord will cause a drop
in line voltage, resulting in a loss of power and overheat
doubt, use the next heavier gauge cord. The smaller the gauge
number, the heavier the cord.
n wet conditions or on wet
oltage.
s v
. If in
ing
MINIMUM WIRE SIZE FOR EXTENSION CORDS FOR
120 VOLT APPLIANCES USING 0-6 AMPS
Cord Length (ft.) 25 50 100 150
Wire Size (AWG) 16 16 16 14
• Make sure the cords are in good condition. Inspect the power
cord and extension cord periodically. Look closely for
deterioration, cuts or cracks in the insulation. If a cord is
damaged in any manner while plugged in, disconnect the cord
from both the outlet and the unit. Do not use a damaged cord.
Damaged cords should be repaired or replaced.
• Do not abuse cords. Never pull or carry the unit by a cord
cords away from heat, oil, water, sharp edges, and moving
objects. Always grasp the plug when disconnecting a cord.
• Never modify a plug, cord or outlet in any way.
• Ground Fault Circuit Interrupter (GFCI) protection should be
provided on the circuit(s) or outlet(s) to be used with this unit.
For an extra measure of safety, use receptacles with built-in
GFCI protection.
• Do not place the battery ch
on, tripped over or subjected to damage.
• Do not charge batteries in the rain or in wet conditions. Keep the
battery charger in a cool and dry area.
• Keep the battery charger away from all liquid.
• Do not allow small metal items or material such as steel wool,
aluminum foil or other foreign particles into the charger port.
• Do not probe the charger with conductive mater
risk of electric shock.
• Do not cover the battery charger. The battery charger may
overheat.
• Do not allow the battery or battery charger to overheat. If they
are warm, allow them to cool down. Only charge batteries in
temperatures between 32° and 104° F (0° and 40° C).
• Always unplug the battery charger before cleaning it. Always
unplug the battery charger when it is not in use.
Battery Sa
• Do not expose the battery to fire or to temperatures over 176º F
(80º C). Doing so could cause an explosion.
• Handle batteries with care. Do not short the battery with
conductive materials, such as rings, bracelets, keys, etc.
Shorting the battery may cause personal injury, damage to the
battery or a fire.
• When the battery is not in use, keep it away from small metal
objects, such as paper clips, c
connect one terminal to another and short the battery.
• Do not attempt to charge a cracked or damaged battery.
• Do not use a damaged or modified battery. Doing so could result
in a fire, explosion or personal injury.
fety
WARNING:
fire or chemical burn if mistreated. Do not disassemble,
overheat or incinerate the battery. The battery may develop a
small leak under extreme usage or temperature conditions.
If battery fluid contacts skin:
- Immediately wash the area with soap and water.
- Neutralize the battery fluid with a mild acid (lemon
juice, vinegar, etc.).
- Seek immediate medical attenti
ttery fluid gets in the eyes:
If ba
- Immediately flush the eyes with clean water for at
least 15 minutes.
- Seek immediate medical attention.
er where cords might be stepped
arg
here is a
ial. T
, nails, etc. These items could
oins
The battery may present a risk of
on.
. K
eep
3
Page 4
DISPOSING OF DAMAGED OR WORN-OUT BATTERIES
FCC STATEMENT
WARNING:
corrosive material is used in this unit's battery:
LITHIUM-ION, a toxic material.
WARNING:
environment, contact your local waste disposal agency for
specific instructions before disposing of damaged or wornout lithium-ion batteries. Take batteries to a local recycling
and/or disposal center, certified for lithium-ion battery
disposal.
The following toxic and
To prevent contamination of the
WARNING:Do not use broken or cracked
batteries, even if there isn't leakage. Replace damaged or
worn-out batteries with new batteries. DO NOT ATTEMPT
TO REPAIR BATTERIES! Repair attempts may result in
severe personal injury, due to explosion or electrical shock.
To avoid personal injury and damage to the environment:
• Do not attempt to remove or destroy any of the battery
components. Do not open or mutilate the battery. If a leak
develops, released electrolytes are corrosive and toxic. Do not get
the solution in your eyes or on your skin, and do not swallow it.
• Do not dispose of the battery in the regular household trash.
• Do not dispose of the battery in a fi
• Do not dispose of the battery where it will become part of any
waste landfill or municipal solid waste stream.
• Cover the battery terminals with heavy-duty adhesive tape.
• Dispose of the battery according to local, state and federal
regulations.
• Dispose of the battery promptly.
. The cell may explode.
re
CAUTION:
expressly approved by the party responsible for compliance
could void the user's authority to operate the equipment.
NOTE: This equipment has been tested and found to comply with the
limits for a Class B digital device, pursuant to part 15 of the FCC
Rules. These limits are designed to provide reasonable protection
against harmful interference in a residential installation. This
equipment generates, uses and can radiate radio frequency
energy and, if not installed and used in accordance with the
instructio
communications. However, there is no guarantee that interference
will not occur in a particular installation. If this equipment does
cause harmful interference to radio or television reception, which
can be determined by turning the equipment off and on, the user
is encouraged to try to correct the interference by one or more
of the following measures:
— Reorie
— Increase the separation between the equipment and receiver.
— Connect the equipment into an outlet on a circuit different
from that to which the receiver is connected.
— Consult the dealer or an experienced radio/TV technician for help.
, may cause harmful interference to radio
ns
or relocate the receiving antenna.
nt
Changes or modifications not
WHILE OPERATING
WARNING:To reduce the risk of electric
shock, do not expose the unit to rain or wet conditions.
Store the unit indoors.
About Call2Recycle Battery Seals
Call2Recycle’s industry steward program helps
battery and product m
quirements in the U.S. and Canada, including
re
compliance with extensive state, provincial and
federal regulations, such as the MercuryContaining and Rechargeable Battery Act (The
Battery Act). Call2Recycle
Stewards, participating battery and product manufacturers and
marketers, purchase the rights to imprint the Call2Recycle Battery
Seals on their rechargeable batteries and products. When you see the
C
all2Recycle Battery Seal, you can feel confident knowing that your
battery or product can be safely and responsibly recycled.
About Call2Recycle
Since 1994, Call2Recycle has diverted more than 75 million pounds
of rechargeable batteries from local landfills and established a
network of 30,000 recycling drop-off locations. More than 200 battery
and/or prod
ted to ensure that batteries are responsibly recycled when they
uni
reach their end of life and fund the program that is operated by
Call2Recycle, Inc., a 501(c)4 nonprofit public service organization.
To locate the nearest recycling center, please call 1-800-822-8837.
uct manufacturers, Call2Recycle Industry Stewards, have
anufacturers fulfill recycling
®
Licensees/Industry
• Wear safety glasses or goggles that meet current ANSI / ISEA
Z87.1 standards and are marked as such. Wear ear/hearing
protection when operating this unit. Wear a face mask or dust
mask if the operation is dusty.
• Wear heavy long pants, boots, gloves and a long sleeve shirt. Do
not wear loose clothing, jewelry, short pants, sandals or go
barefoot. Secure hair above shoulder level.
• Use th
• Use the right tool. Only use this tool for its intended purpose.
• Always hold the unit with a firm grip when operating.
• Do not overreach. Always keep proper footing and balance. Take
extra care when working on stairs, steep slopes or inclines. To
avoid serious injury, do not operate the unit while on a ladder or
a roof.
• Keep hair, face, hands, feet and
moving parts and openings. Do not touch or try to stop moving
parts.
• Do not touch the motor or heat sink. These parts get extremely
hot from operation, even after the unit is turned off.
• Do not operate the unit faster than the speed needed to do the
job. Do not run the unit at high speed when not in use.
• Do not force the unit. It will do a better, safer job when used at
intended rate.
the
• Always stop the unit when operation is delayed or when walking
from one location to another.
• Before setting the unit down, always make sure the motor is off
and all moving parts have stopped.
t only in daylight or good artificial light.
e uni
ll other body parts away from
a
4
Page 5

• Avoid starting the unit unintentionally. Make sure your fingers are
off the throttle control before installing or removing the battery.
Never carry the unit with fingers on the throttle control.
• Remove the battery from the unit when it is not in use.
• Do not use the unit if the throttle control does not start and stop
the uni
t.
• If the unit strikes or becomes entangled with a foreign object,
stop the motor immediately, remove the battery and check for
damage. If damaged, do not restart or operate the unit until it is
repaired. Do not operate the unit with loose or damaged parts.
• Use only original equipment manufacturer (OEM) replacement
parts and accessories for this unit. These are available from your
authorized service
could lead to serious injury to the user, or damage to the unit,
and void the warranty.
• Keep the unit clean. Stop the motor, remove the battery and
allow the unit to cool. Carefully remove vegetation and other
debris that could block moving parts.
• If the unit starts to vibrate abnormally, stop the motor, remove the
battery and allow the unit to cool. Inspect
the vibration. Vibration is generally an indicator of trouble.
dealer. U
se of any other parts or accessories
he unit for the cause of
t
BLOWER SAFETY
• Stop the motor, wait for all moving parts to stop, remove the
battery and allow the unit to cool before installing or removing
the blower tube.
• Do not insert anything into the air openi
not operate the unit if any of the air openings or tubes are
blocked. Keep the air openings free from dust, lint, hair and
anything else that may reduce airflow.
• Do not operate the unit without the blower tube securely attached.
• Do not use the unit to spray liquids, especially flammable or
combustible liquids, such as gasoline. Do not use the unit in
areas where such liquids
• Do not use the unit for spreading chemicals, fertilizer or any
other substance that may contain toxic materials.
• Do not set the unit down on any surface while the unit is
running. Debris can be picked up by the air intake and thrown
out the discharge opening, resulting in damage to the unit or
property or causing serious injury to bystanders or the operator.
• During operation, never point
animals, windows or automobiles. Always direct blowing debris
away from people, animals, windows or automobiles.
• Use extra caution when blowing debris near solid objects, such
as trees, walls, fences, etc. When possible, blow away from
such objects, not toward them.
• Take care when working near valuable plants. The force of the
blown air could damage tender plants.
ever attempt to clear a clogged air intake opening while the
• N
unit is running.
re present.
a
he unit in the direction of people,
t
ngs or blower tube. Do
OTHER SAFETY WARNINGS
• Maintain the unit with care.
• Do not perform maintenance procedures other than those
described in this manual. Do not attempt to repair the unit; there
are no user-serviceable parts inside. All service, other than the
maintenance procedures described in this manual, should be
performed by an authorized service dealer.
• If the unit is not working as it should, has been dropped,
dama
ged, left outdoors or dropped into water, do not use the unit.
• Never remove, modify or make inoperative any safety device
furnished with the unit.
fore inspecting, maintaining, cleaning, storing, transporting or
• Be
replacing any parts on the unit:
1. Stop the motor. Refer to Starting and Stopping.
2. Wait for all moving parts to stop.
3. Remove the battery.
4. Allow the unit to cool.
• Secure the unit while
• Store the unit in a dry place, secured or at a height to prevent
unauthorized use or damage. Keep the unit out of the reach of
children.
• Never douse or squirt the unit with water or any other liquid.
Avoid getting water in the motor and electrical connections.
Keep handles dry and clean (free from debris, oil and grease).
Clean the unit after each use. Refer to Cleaning and Storage. Do
no
e solvents or strong detergents.
t us
• Keep these instructions. Refer to them often and use them to
instruct other users. If you loan this unit to others, also loan
them these instructions.
ransporting.
t
SAVE THESE INSTRUCTIONS
5
Page 6
• SAFETY & INTERNATIONAL SYMBOLS •
Min. 50 ft
15 m
This operator's manual describes safety and international symbols and pictographs that may appear on this product. Read the operator's
manual for complete safety, assembly, operating and maintenance and repair information.
SYMBOL MEANING SYMBOL MEANING
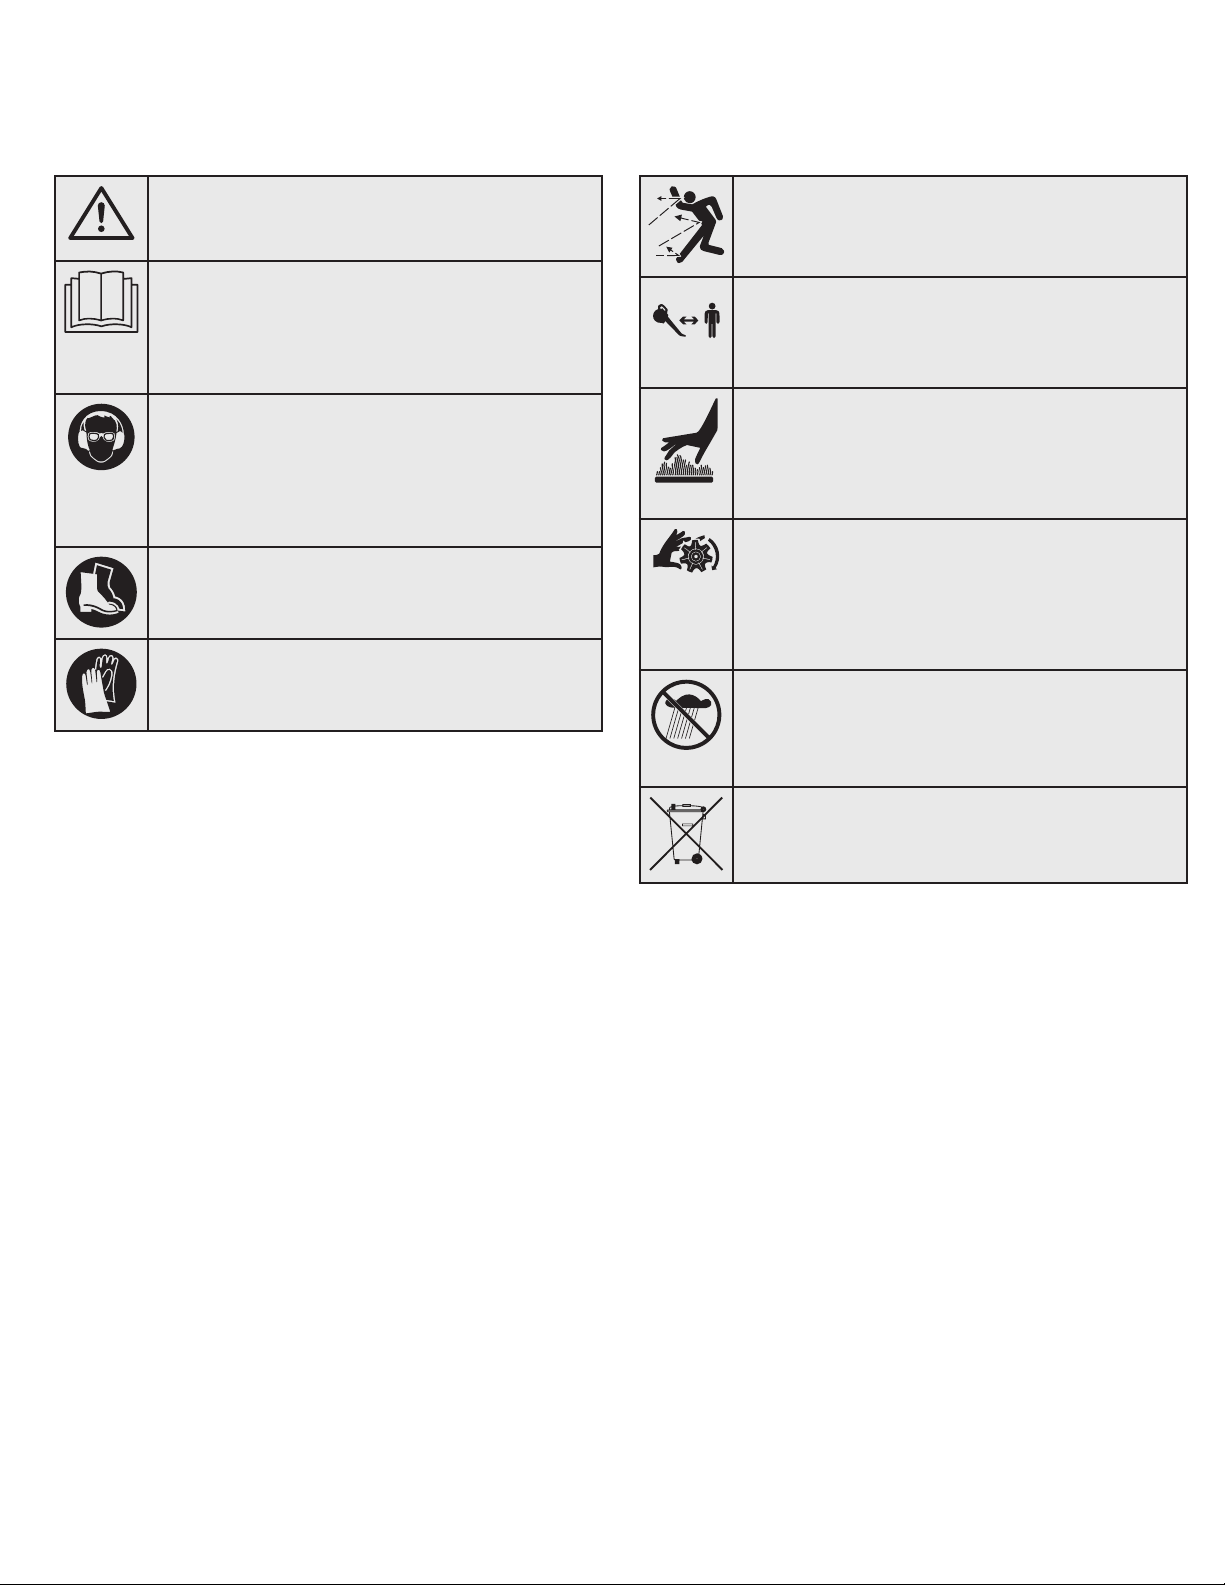
• SAFETY ALERT SYMBOL
Indicates danger, warning or caution. May be used in
conjunction with other symbols or pictographs.
• READ OPERATOR'S MANUAL
WARNING:
manual(s) and follow all warnings and safety
instructions. Failure to do so can result in serious
injury to the operator and/or bystanders.
• WEAR EYE AND HEARING PROTECTION
Read the operator’s
WARNING:Thrown objects and loud
noise can cause severe eye injury and hearing loss.
Wear eye protection meeting current ANSI / ISEA
Z87.1 standards and ear protection when operating
this unit. Use a full face shield when needed.
• WEAR FOOT PROTECTION
Always wear heavy-duty, non-slip footwear when
operating this unit.
• WEAR HAND PROTECTION
Always wear heavy-duty, non-slip gloves when
handling this unit.
• THROWN OBJECTS CAN CAUSE SEVERE INJURY
WARNING:
propelled at high speed, causing injury.
• KEEP BYSTANDERS AWAY
WARNING:
especially children and pets, at least 50 feet (15 m)
from the operating area.
• HOT SURFACE
WARNING:
heat sink. You may get burned. These parts get
extremely hot from operation. When turned off, they
remain hot for a short time.
• BLOWERS – ROTATING IMPELLER BLADES CAN
CAUSE SEVERE INJURY
Small objects can be
Keep all bystanders,
Do not touch the motor or
WARNING:Stop the unit and allow the
impeller to stop before changing tubes, cleaning or
performing any maintenance. Keep hands and feet
away from moving parts.
• DO NOT USE IN THE RAIN
WARNING:
environments. Never operate the unit in the rain or in
damp or wet conditions. Moisture is a shock hazard.
Avoid dangerous
• DO NOT DISPOSE IN HOUSEHOLD TRASH
Recycle the battery or dispose of the battery
according to local, state and federal regulations.
6
Page 7

KNOW YOUR UNIT
APPLICATIONS
• Cleaning yards, garages, driveways, porches, patios, around
walls, fences and more
Terminals
Battery*
Boost Button
Power Meter
NO ASSEMBLY TOOLS REQUIRED
Blower
Handle
Battery Latch
Battery Port
Throttle Control
Charge Meter
Button
Charge Meter
Lights
Motor
Heat Sink
Terminals
Charging Dock
Power Cord
LED
Blower Tube
Battery Charger*
* The battery and battery charger are not included with model TB4300B.
7
Page 8

SPECIFICATIONS*
Approximate Unit Weight (without the battery) . . . . . . . . . . . . . . . . . . . . . . . . . . . . . . . . . . . . . . . . . . . . . . . . . . . . . . 7.25 - 8.25 lbs. (3.3 - 3.7 kg)
Air Volume** (measured at: blower outlet / blower tube) . . . . . . . . . . . . . . . . . . . . . . . . . . . . . . . . . . . . . . . . . . . . . 545 / 450 cfm (15 / 12 m3/min)
Air Speed (Peak)** (measured at: blower outlet / blower tube) . . . . . . . . . . . . . . . . . . . . . . . . . . . . . . . . . . . . . . . . 90 / 125 mph (
Air Speed (Average)** (measured at: blower outlet / blower tube). . . . . . . . . . . . . . . . . . . . . . . . . . . . . . . . . . . . . . 75 / 100 mph (120 / 160 km/h)
Battery Type (Model 4144) . . . . . . . . . . . . . . . . . . . . . . . . . . . . . . . . . . . . . . . . . . . . . . . . . . . . . . . . . . . . . . . . . . . . . . . . . . . 40V, 4Ah Lithium-Ion
Battery Type (Model 6216) . . . . . . . . . . . . . . . . . . . . . . . . . . . . . . . . . . . . . . . . . . . . . . . . . . . . . . . . . . . . . . . . . . . . . . . . . . . 40V, 6Ah Lithium-Ion
Approximate Battery Weight . . . . . . . . . . . . . . . . . . . . . . . . . . . . . . . . . . . . . . . . . . . . . . . . . . . . . . . . . . . . . . . . . . . 3.25 - 3.75 lbs. (1.5 - 1.7 kg)
Optimum Charging Temperature . . . . . . . . . . . . . . . . . . . . . . . . . . . . . . . . . . . . . . . . . . . . . . . . . . . . . . . . . . . . . . . . . . 32° to 104° F (0° to 40° C)
Battery Charger Input . . . . . . . . . . . . . . . . . . . . . . . . . . . . . . . . . . . . . . . . . . . . . . . . . . . . . . . . . . . . . . . . . . . . . . . . . . . . . . . 120 V 60 Hz AC only
Battery Charger Output . . . . . . . . . . . . . . . . . . . . . . . . . . . . . . . . . . . . . . . . . . . . . . . . . . . . . . . . . . . . . . . . . . . . . . . . . . . . . . . . . . . . 6 A 42 V DC
Approxim
Approximate Charging Time (Model 6216). . . . . . . . . . . . . . . . . . . . . . . . . . . . . . . . . . . . . . . . . . . . . . . . . . . . . . . . . . . . . . . . . . . . . . . 60 minutes
Approximate Battery Charger Weight . . . . . . . . . . . . . . . . . . . . . . . . . . . . . . . . . . . . . . . . . . . . . . . . . . . . . . . . . . . . . 2.75 - 3.25 lbs. (1.2 - 1.5 kg)
* All specifications are based on the latest product information available at the time of printing. We reserve the right to make changes at any
time without notice.
** Measured per ANSI B175.2.
harging Time (Model 4144). . . . . . . . . . . . . . . . . . . . . . . . . . . . . . . . . . . . . . . . . . . . . . . . . . . . . . . . . . . . . . . . . . . . . . . 45 minutes
ate C
145 / 200 km/h)
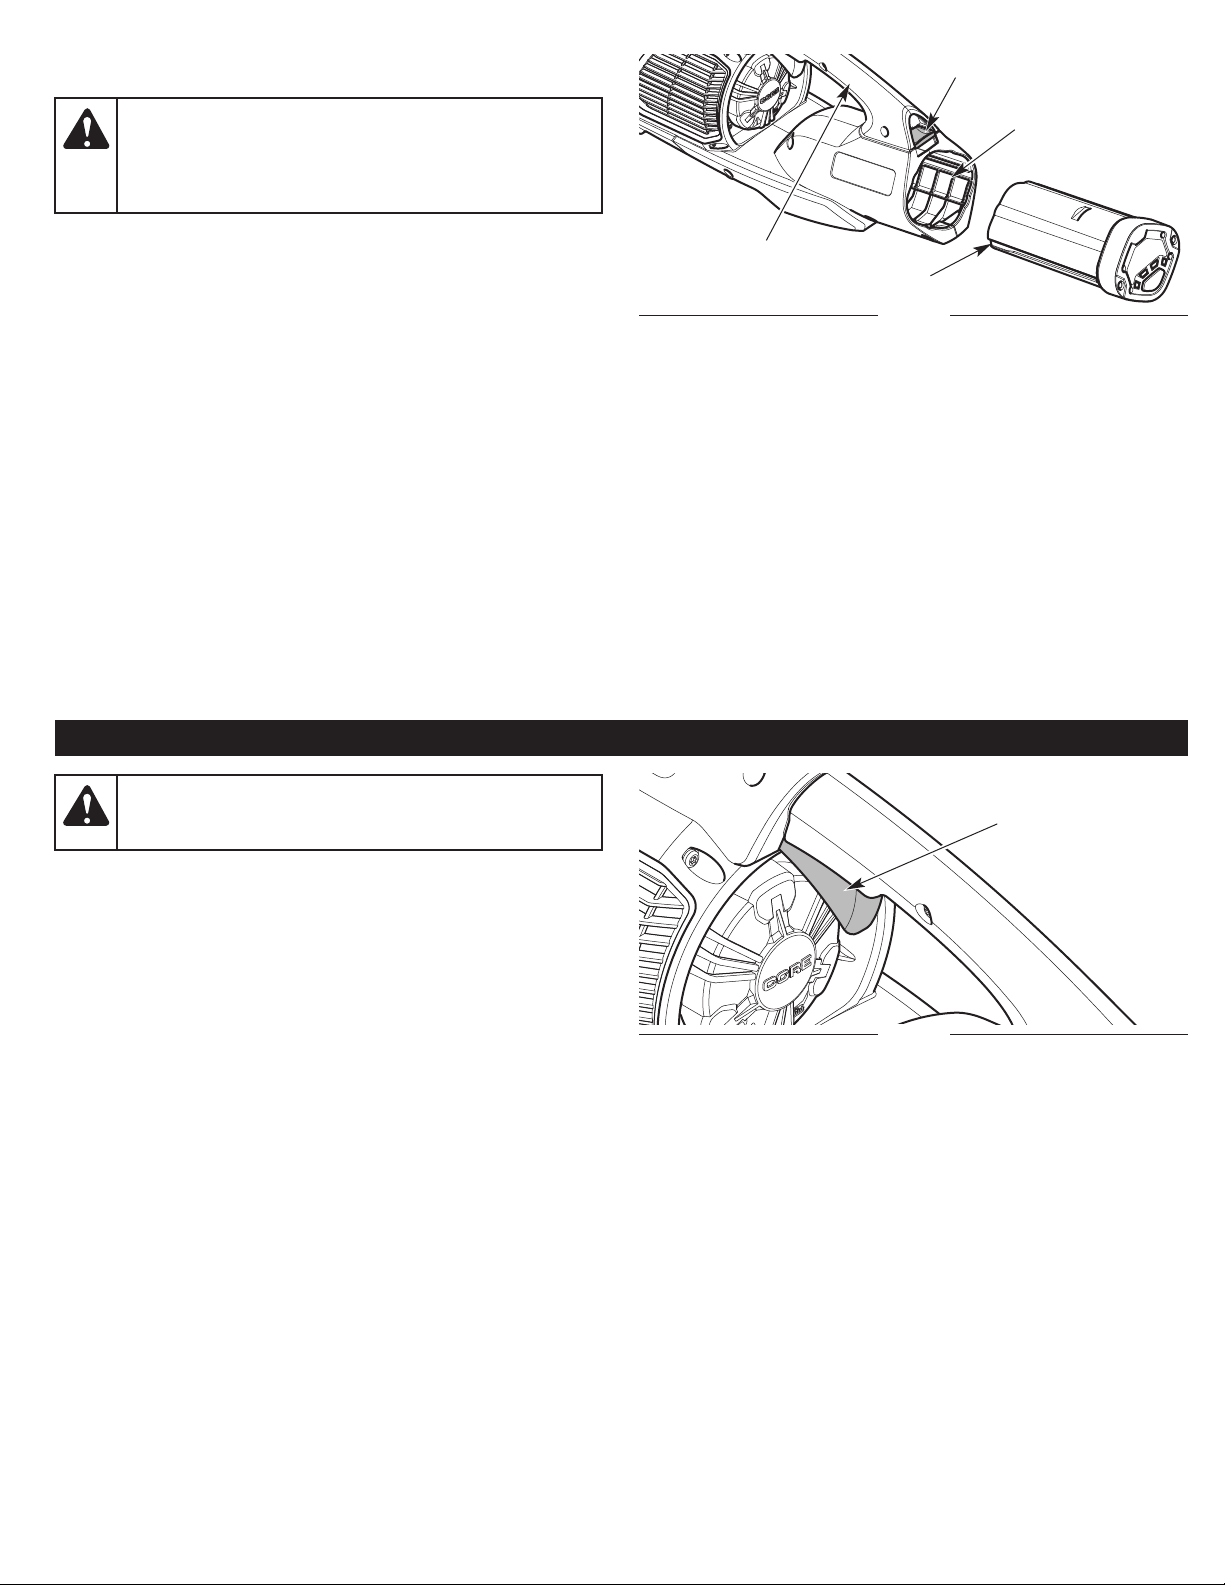
ASSEMBLY
WARNING:
damage to the unit, stop the motor and remove the battery
before installing or removing the blower tube.
WARNING:
operate the unit without the blower tube firmly installed.
INSTALLING AND REMOVING THE BLOWER TUBE
Installing the Blower Tube
1. Set the unit on a flat, level surface.
2. Align the slot on the blower tube with the tab on the blower
outlet (Fig. 1).
3. Push the blower tube onto the blower outlet until the tab locks
securely into the slot (Fig. 1).
Removing the Blower Tube
1. Set the unit on a flat, level surface.
2. Firmly press the tab inward and pull the blower tube o
blower outlet (Fig. 1).
To avoid serious personal injury and
To prevent serious personal injury, never
of the
ff
Blower Outlet
Blower Tube
Tab
Slot
Fig. 1
8
Page 9
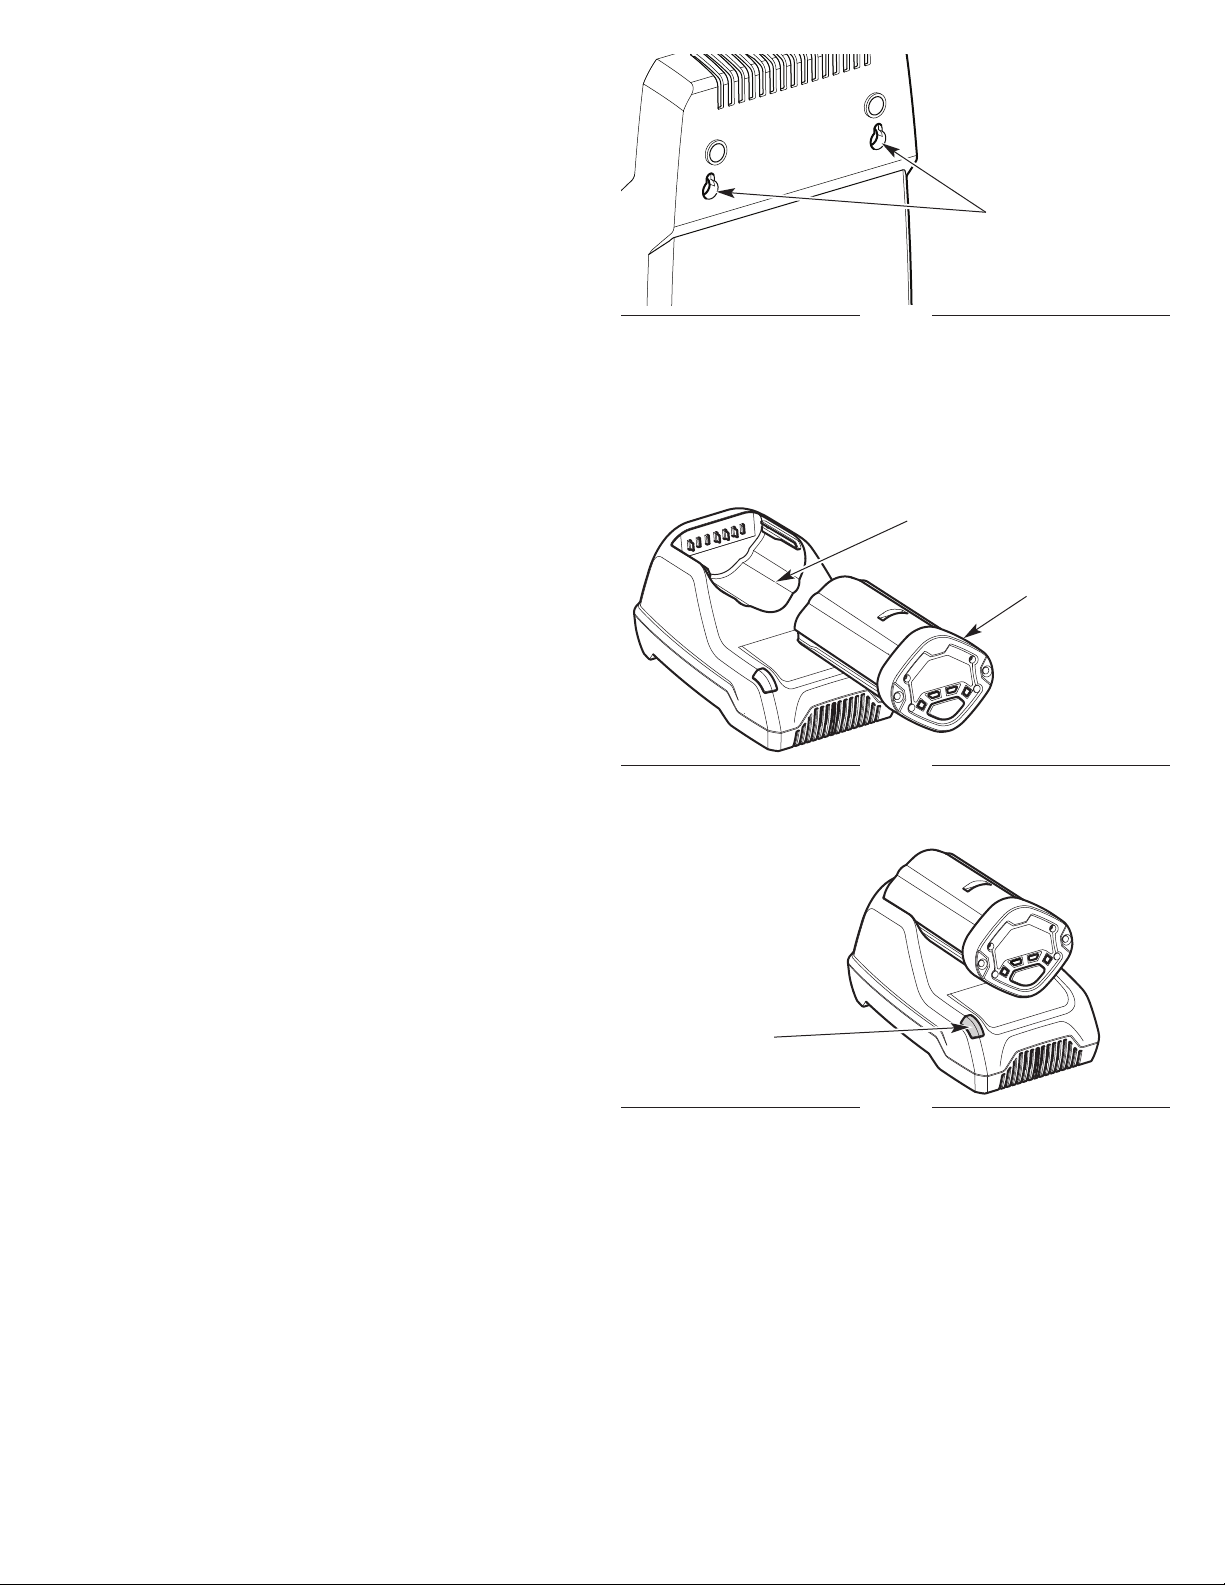
WALL-MOUNTING THE CHARGER (OPTIONAL)
The battery charger can be mounted to a permanent surface, such
as a wall or work bench. Use mounting fasteners (not included)
capable of supporting the combined weight of the battery and
battery charger. Wall-mounting holes are located on the bottom of
the charger (Fig. 2).
Wall-Mounting
Holes
Fig. 2
CHARGING THE BATTERY
NOTE: The battery is not shipped fully charged.
NOTE: Lithium-ion batteries will not develop a memory and may be
charged at any time.
For maximum run time, fully charge the battery before each use.
1. Plug the battery charger into an appropriate power outlet.
2. Insert the battery into the charging dock (Fig. 3). The LED should
illuminate (Fig. 4). If it does not:
• Make sure the battery i
• Make sure the battery charger is fully plugged into an
appropriate power outlet.
• Make sure the power outlet is functioning by testing it with
another electrical device.
3. Examine the LED. The LED will indicate the battery status:
• Green (blinking): The battery is charging. Charge the battery
until the green light stops blinking.
• Green (constant): The battery is fu
• Red (blinking): The battery and/or charger are too hot or too
cold. Make sure the battery and charger are in an environment
between 32° and 104° F (0° and 40° C). Allow time for the
battery and/or charger to warm up or cool down.
• Red (constant): The battery is no longer functional. Refer to
the Warranty section for replacement information.
4. Once the battery is fully charged, remove it from t
charger. Optionally, the battery can be stored in the battery
charger, but the battery charger should be unplugged from the
power outlet.
ully inserted into the charging dock.
s f
harged.
lly c
battery
he
Charging Dock
Battery
Fig. 3
LED
Fig. 4
9
Page 10
INSTALLING AND REMOVING THE BATTERY
Battery Latch
WARNING:
prevent serious injury, DO NOT squeeze the throttle control
when installing or removing the battery. Refer to Starting
and Stopping. Remove the battery from the unit when it is
not in use.
Installing the Battery
1. Grasp the handle firmly. DO NOT squeeze the throttle control.
Refer to Starting and Stopping.
2. Slide the battery into the battery port (Fig. 5). Push the battery
firmly until the battery locks into place (Fig. 5). There should be
an audible “click” and the battery latch should be in the upright
position (Fig. 5).
Removing the Battery
1. Grasp th
Refer to Starting and Stopping.
2. Press the battery latch down to unlock the battery (Fig. 5).
3. Pull the battery out of the battery port (Fig. 5).
e ha
Avoid accidentally starting the unit. To
ndle firmly. DO NOT squeeze the throttle control.
Battery Port
Handle
Battery
Fig. 5
STARTING AND STOPPING
WARNING:
directed toward people, animals, windows, automobiles or
loose debris.
STARTING INSTRUCTIONS
1. Install the battery. Refer to Installing the Battery.
2. Squeeze the throttle control to start the motor (Fig. 6).
3. Squeeze the throttle control to the degree needed for the operation.
STOPPING INSTRUCTIONS
1. Release the throttle control and wait for all moving parts to come
to a complete stop (Fig. 6).
When starting the unit, make sure it is not
Throttle Control
Fig. 6
10
Page 11

OPERATION
WARNING:
conditions.
Do not expose power tools to rain or wet
CHECKING THE BATTERY CHARGE LEVEL
Press the charge meter button on the battery. The number of lights
that illuminate will indicate the current charge level of the battery
(Fig. 7). If all four lights are dark, charge the battery before any
further use.
NOTE: While in use, lithium-ion batteries provide power with
minimal power fade. When the battery is fully discharged, it will
immediately cut pow
WARNING:
operate the unit without the blower tube firmly installed.
WARNING:
protection to reduce the risk of injury when operating this unit.
Wear a face mask or dust mask if the operation is dusty.
o the unit and require charging.
er t
To prevent serious personal injury, never
Always wear eye, hearing, hand, foot and body
0% - 25%
25% - 50%
75% - 100%
50% - 75%
Charge Meter
Button
Fig. 7
HOLDING THE UNIT
• Stand in the operating position (Fig. 8). Stand up straight. Do not
bend over.
• Keep feet apart and firmly planted.
• Hold the unit with a firm grip.
• Hold the unit at waist level.
TIPS FOR BEST RESULTS
• Conserve water by using the blower instead of a hose to
perform many outdoor cleaning actions.
• Operate the unit only at reasonable hours, not early in the morning
or late at night when people might be disturbed. Comply with
times listed in local ordinances. Usual recommendations are 9:00
a.m. to 5:00 p.m., Monday through Saturday.
• To reduce noise levels, operate the unit at the l
needed to do the job. Limit the number of pieces of power
equipment used at any one time.
• Use rakes or brooms to loosen debris before operation.
• In dusty conditions, slightly dampen surfaces.
• Watch out for children, pets, open windows and freshly washed
cars. Blow debris safely away. Never direct the unit toward
anyone while the unit is in operation.
• Sweep the unit from side to side with t
inches above the ground. Slowly advance, keeping the
accumulated debris in front of the operator.
• Clean up after operation. Dispose of debris appropriately.
• Remove the battery from the unit when it is not in use.
blower tube several
he
owe
st speed
Fig. 8
11
Page 12

USING THE BOOST BUTTON
Press the boost button to switch between MAX and ECO modes, as
needed (Fig. 9).
• MAX mode provides maximum power for tough jobs.
• ECO mode conserves energy for maximum run time. ECO mode
is appropriate for most jobs.
NOTE: The unit will reset to ECO mode a few seconds after the
motor is turned off.
MAINTENANCE
Boost Button
Fig. 9
WARNING:
maintenance on the unit while it is running. Always remove
the battery to prevent the unit from starting accidentally.
Always allow the unit to cool before maintaining the unit.
Before maintaining the battery charger, always unplug it
from the power outlet.
To prevent serious injury, never perform
MAINTAINING THE BATTERY CHARGER
• Keep the battery charger clean and clear of debris. Do not allow
foreign material into the charging dock or onto the terminals (Fig.
10). Inspect the battery charger for foreign material before each use.
• Make sure the charger has not been shorted by debris. Inspect
the terminals for soot and signs of melting. Do not attempt to
use a shorted charger.
Terminals
Charging Dock
Fig. 10
12
Page 13

CLEANING AND STORAGE
CLEANING
WARNING:
unit while it is running. Always remove the battery to
prevent the unit from starting accidentally. Always allow the
unit to cool before cleaning the unit. Always unplug the
battery charger before cleaning the battery charger.
WARNING:
to clean the unit, battery or battery charger. Do not use
strong detergents. Household cleaners that contain
aromatic oils such as pine and lemon, and solvents such
as kerosene, can damage plastic.
• Use a small brush or clean, dry cloth to clean the outside of the
unit, battery and battery charger.
To prevent serious injury, never clean the
To prevent serious injury, do not use water
STORAGE
• Remove the battery from the unit.
• Allow the unit, battery and/or battery charger to cool.
• Thoroughly clean the unit, battery and battery charger. Inspect
them for any loose or damaged parts. Replace damaged parts
and tighten loose screws, nuts or bolts.
• Lock up the
unauthorized use or damage.
• Store the unit, battery and battery charger indoors, in a dry, wellventilated area.
• Store the battery and battery charger in an area that is between
65 and 75˚ F (18 and 24˚ C).
• Always unplug the battery charger when it is not in use.
• Store the unit, battery and battery charger out of the reach of
children.
• If the battery is l
charge the battery before use.
t, battery and battery charger to prevent
uni
eft unus
ed for more than two months, fully
13
Page 14

TROUBLESHOOTING
PROBLEM SOLUTION
THE BATTERY WILL NOT CHARGE
The battery charger is not plugged in Plug the battery charger into a 120V 60hz AC source
The battery is not fully inserted into the battery charger
The battery and/or charger are too hot or too cold
The battery and/or battery charger are no longer functional Refer to the Warranty section for replacement information
THE BATTERY DIES QUICKLY
The battery is not fully charged Charge the battery completely
The battery and/or battery charger are no longer functional Refer to the Warranty section for replacement information
THE MOTOR WILL NOT RUN
The battery lacks sufficient charge Charge the battery completely
The battery is not installed correctly Remove and reinstall the battery
Remove and then reinsert the battery into the battery charger
completely
Make sure the battery and charger are in an environment between
32° and 104° F (0° and 40° C). Allow time for the battery and/or
charger to warm up or cool down.
THE MOTOR STOPS WHILE IN USE AND THE POWER METER BLINKS
Device protection systems have engaged Remove and reinstall the battery
If further assistance is required, contact an authorized service dealer.
14
Page 15

WARRANTY
Troy-Bilt LLC
LIMITED WARRANTY FOR CORE POWERED PRODUCT
LIMITED WARRANTY
The limited warranty set forth herein is given by Troy-Bilt LLC with respect to new Troy-Bilt-branded products powered by CORE technology
(“CORE Product”) to the Initial Purchaser (as defined herein), purchased in the United States, its possessions and territories, and Canada.
Scope of the Limited Warranty
Troy-Bilt LLC offers the f
Exclusions (defined herein), during the Warranty Period (as defined herein), the CORE Product will be free from manufacturing defects
(including workmanship and materials). The “Initial Purchaser” is the first person to purchase a new CORE Product from an authorized TroyBilt d
ealer, distributor and/or retailer of such CORE Product. This limited warranty is non-transferable.
Residential Use
Except as otherwise set forth herein, for the purposes of non-commercial (i.e. residential) use, the limited warranty period for this new CORE
Product purchased by the Initial Purchaser is five (5) years from the date of purchase as shown on the original sales receipt for the CORE
Pr
t (“Warranty Period”). Notwithstanding the foregoing, the battery and its charger shall be warranted to be free from manufacturing
oduc
defects (including workmanship and materials) for three (3) years from the date of purchase as shown on the original sales receipt for the
CORE Product for residential purposes.
ollowing limited warranty (for residential or commercial use, as detailed below) to the Initial Purchaser: except for the
Commercial Use
Except as otherwise set forth herein, for purposes of commercial use, the
shall be two (2) years from the date of purchase as shown on the original sales receipt. Notwithstanding the foregoing, the battery and its
charger shall be warranted to be free from manufacturing defects (including workmanship and materials) for one (1) year from the date of
purchase as shown on the original sales receipt for the CORE Produc
*With regard to both residential and commercial use, in addition to, and not in lieu of, the limited warranties as stated above, Troy-Bilt
extends a limited lifetime warranty specifically and exclusively for the CORE Product motor (the motor being comprised of the motor
housings, rotors, magnets, stator, and bearings) against defects in material and workmanship for the life o
Purchaser only, commencing from the date of manufacture.
Defects in Workmanship or Materials
Except for the Exclusions, the CORE Product is warranted to be free from manufacturing defects in either workmanship or materials for the
Warranty Period. During the Warranty Period, Troy-Bilt LLC will, at its option, either repair or replace any original part that is c
limited warranty and is determined to be defective in workmanship or material.
To qualify for this limited warranty the CORE Product:
1. Must have been purchased from an authorized retailer.
2. Must have been purchased within the United States its possessions or territories or in Canada, by the Initial Purchaser.
3. Must have been used in a manner consistent with the normal and proper inten
intended for rental use.
Who can perform repairs under this warranty?
In order to qualify for the limited warranty as set forth herein, the repairs made under this warranty must be performed by an authorized TroyBilt service provider.
pplicable limited Warranty Period for this new CORE Product
a
t when used commercially.
f the CORE Product to the Initial
e for the CORE Product. This CORE Product is not
ded us
overe
d by this
15
Page 16

How to Get Service Under This Limited Warranty
To locate a Troy-Bilt warranty service provider, contact your authorized Troy-Bilt dealer, distributor, or retailer or contact Troy-Bilt LLC at P.O.
Box 361131, Cleveland, Ohio 44136-0019 or call 1-800-828-5500 or log on to our Website at www.troybilt.com. For Canada, contact MTD
Products Limited, 97 Kent Ave, Kitchener, ON N2G 3R2, or call 1-800-668-1238 o
product warranty is provided by Troy-Bilt LLC and is the only product warranty provided by Troy-Bilt LLC for the CORE Product. A COPY OF
YOUR SALES RECEIPT IS REQUIRED FOR WARRANTY SERVICE.
What This limited Warranty Does Not Cover
This limited warranty does not cover the following (the “Exclusions”):
1. Damage due to lack of maintenance and
2. Normal wear and tear resulting from use of the CORE Product.
3. Any expendable, consumable, or routine maintenance item that needs replacement or service as part of normal maintenance, unless
such items have defects that cause failure or premature wear within the first thirty (30) days. Normal wear items include, where
applicable, bump kno
4. Use of the CORE Product that is not consistent with the intended use thereof, as described in the operating instructions, including, but
not limited to, abuse, misuse and/or neglect of the CORE Product or any use inconsistent with and/or non-compliant with instructions
contained in t
5. Any product that has been altered or modified in a manner not consistent with the original design of the product or in a manner not
approved by Troy-Bilt LLC.
This warranty does not cover and Troy-Bilt LLC disclaims any responsibility for:
1. Loss of time or loss of use of the CORE Product.
2. Transportation costs and other expenses incurred in connection with the transport of
Bilt service provider.
3. Any loss or damage to other equipment or personal items.
4. Damages caused by improper maintenance, exposure, or use of the product that is not consistent with the intended use thereof, as
described in the operating instructions, including, but not limited to, abuse, misuse and/or neglect of the CORE Product.
5. Damage resulting
he Operator’s Manual.
bs, outer spools, cutting line, inner reels, drive belts, saw chains, guide bars, cultivator tines, and/or blades.
rom the installation or use of any accessory or part not approved by Troy-Bilt for use with the CORE Product.
f
r improper maintenance, as described in the Operator’s Manual.
/o
r log on to our Website at www.troybilt.ca. This limited
he CORE Product to and from the authorized Troy-
t
Limitations:
1. THERE ARE NO IMPLIED WARRANTIES, INCLUDING, BUT NOT LIMITED TO, ANY IMPLIED WARRANTY OF MERCHANTABILITY OR
FITNESS FOR A PARTICULAR PURPOSE. NO WARRANTY SHALL APPLY AFTER THE APPLICABLE WARRANTY PERIOD AS SET
FORTH ABOVE AS TO THE PARTS AS IDENTIFIED. NO OTHER EXPRESS WAR
ORAL, EXCEPT AS MENTIONED ABOVE, GIVEN BY ANY PERSON OR ENTITY, INCLUDING A DEALER OR RETAILER, WITH RESPECT
TO ANY PRODUCT SHALL BIND TROY-BILT LLC. DURING THE WARRANTY PERIOD, THE EXCLUSIVE REMEDY IS REPAIR OR
REPLACEMENT OF THE DEFECTIVE PART, AS SET FORTH ABOVE. (SOME STATES DO NOT ALLOW LIMITATIONS ON HOW LONG AN
IMPLIED WARRANTY LASTS, SO THE ABOVE LIMITATION
2. THE PROVISIONS AS SET FORTH HEREIN PROVIDE THE SOLE AND EXCLUSIVE REMEDY ARISING FROM THE SALE. TROY-BILT
SHALL NOT BE LIABLE FOR INCIDENTAL OR CONSEQUENTIAL LOSS OR DAMAGES INCLUDING, WITHOUT LIMITATION, FOR
TRANSPORTATION OR FOR RELATED EXPENSES, OR FOR RENTAL EXPENSES TO TEMPORARILY REPLACE A WARRANTED
PRODUCT. (SOME STATES DO NOT ALLOW THE EXCLUSION OR LIMITATION OF INCIDEN
THE ABOVE EXCLUSION OR LIMITATION MAY NOT APPLY TO YOU.)
3. In no event shall recovery of any kind be greater than the amount of the purchase price of the product sold. Alteration of the safety
features of the product shall void this limited warranty. You assume the risk and liability for loss, damage, or injury to you and your
property and/or to others and their p
How State Law Relates To This Warranty
This limited warranty gives you specific legal rights, and you may also have other rights which vary from state to state.
*The Core Product has a useful life of seven (7) years from the date of manufacture. Please see your retailer, or visit www.troybilt.com for
more information.
roperty arising out of the use or misuse or inability to use the product.
MAY NOT APPLY TO YOU.)
TY OR GUARANTY, WHETHER WRITTEN OR
RAN
TAL OR CONSEQUENTIAL DAMAGES, SO
16
Page 17

Manual del Operador
TB4300 / TB4300B
Soplador inalámbrico
ÍNDICE
Reparación y mantenimiento . . . . . . . . . . . . . . . . . . . . . . . . . . . .17
Seguridad . . . . . . . . . . . . . . . . . . . . . . . . . . . . . . . . . . . . . . . . . . .18
Conozca su unidad . . . . . . . . . . . . . . . . . . . . . . . . . . . . . . . . . . . .24
Especificaciones . . . . . . . . . . . . . . . . . . . . . . . . . . . . . . . . . . . . . .25
Montaje . . . . . . . . . . . . . . . . . . . . . . . . . . . . . . . . . . . . . . . . . . . . .25
Arranque y parada . . . . . . . . . . . . . . . . . . . . . . . . . . . . . . . . . . . . .27
Funcionamiento . . . . . . . . . . . . . . . . . . . . . . . . . . . . . . . . . . . . . . .28
Mantenimiento . . . . . . . . . . . . . . . . . . . . . . . . . . . . . . . . . . . . . . . .29
Limpieza y almacenamiento . . . . . . . . . . . . . . . . . . . . . . . . . . . . .30
Solución de Problemas . . . . . . . . . . . . . . . . . . . . . . . . . . . . . . . . .30
Garantía . . . . . . . . . . . . . . . . . . . . . . . . . . . . . . . . . . . . . . . . . . . . .31
CONSERVE ESTAS
INSTRUCCIONES
SERVICIO
NOTA: Este manual del operador cubre múltiples modelos. Las
características pueden variar según los modelos. No todas las
características de este manual son aplicables a todos los
modelos. El modelo descripto puede diferir del suyo.
ORTANTE: Lea este manual por completo antes de utilizar este producto. Siga todas las instrucciones.
IMP
BC
NO DEVUELVA ESTA UNIDAD AL VENDEDOR. PARA
SOLICITAR SERVICIO POR GARANTÍA, DEBERÁ
PRESENTAR EL COMPROBANTE DE COMPRA.
Para obtener ayuda en relación con el montaje, el funcionamiento o el
mantenimiento de la unidad, llame al 1-800-828-5500 (en los Estados
Unidos) o al 1-800-668-1238 (en Canadá). Se puede encontrar
información adicional en www.troybilt.com (en los Estados Unidos)
o www.troybilt.ca (en C
El servicio de la garantía está disponible a través de su distribuidor
local de servicio autorizado. Para ubicar un Centro de servicio de
reparaciones en su zona, visite nuestro sitio web o llame al número que
aparece arriba. La reparación y el mantenimiento de la presente
unidad, tanto dentro del período de la garantía como después de él,
sólo deben realizarlos un centro de servicio autorizad
dar mantenimiento al equipo, utilice solo piezas de repuesto idénticas.
Toda la información, las ilustraciones y las especificaciones
contenidas en este manual se basan en la información más reciente
disponible en el momento de impresión del manual. Nos reservamos
el derecho de hacer cambios en cualquier momento sin aviso previo.
El producto puede variar ligeramente de las ilustraciones contenidas
en este manual.
Copyright © 2016 MTD SOUTHWEST INC. Todos los derechos
reserv
ados.
anadá).
o. Cuando vaya a
769-11371 / 01 03/16
Page 18

SEGURIDAD
El objetivo de los símbolos de seguridad es dirigir su atención hacia
posibles peligros. Los símbolos de seguridad, así como sus
explicaciones, necesitan su atención y comprensión completas. Las
advertencias de seguridad no eliminan por sí mismas ningún
peligro. Las instrucciones o advertencias que contienen no
reemplazan a las medidas adecuadas de prevención de accidentes.
SÍMBOLOS SIGNIFICADO
PELIGRO:
Si no se respeta un símbolo de seguridad de PELIGRO
usted mismo u otras personas sufrirán lesiones graves o la
muerte.
ADVERTENCIA:
GRAVE.
Si no se respeta un símbolo de ADVERTENCIA de
seguridad usted mismo u otras personas PUEDEN sufrir
lesiones graves.
PRECAUCIÓN:
GRAVEDAD MODERADA.
Si no se respeta un símbolo de seguridad de
PRECAUCIÓN usted mismo u otras personas PUEDEN
sufrir lesiones o se PUEDEN producir daños materiales.
Indica un peligro EXTREMO.
Indica un peligro
Indica un peligro de
PROPOSICIÓN 65 DEL ESTADO DE CALIFORNIA
ADVERTENCIA:
contiene una sustancia química que según el Estado de
California puede producir cáncer, defectos de nacimiento
u otros problemas reproductivos.
Lea el manual del operador y siga todas las advertencias e
instrucciones de seguridad. Si no lo hace, el operador y/o los
observadores pueden sufrir lesiones graves.
Este producto
NOTA: Proporciona información o instrucciones de vital importancia
para el funcionamiento o el mantenimiento del equipo.
• INSTRUCCIONES DE SEGURIDAD IMPORTANTES •
LEA TODAS LAS INSTRUCCIONES ANTES DE USAR LA
UNIDAD
1. GUARDE ESTAS INSTRUCCIONES - Este manual contiene
instrucciones importantes de seguridad y funcionamiento.
2. Antes de usar este producto, lea todas las instrucciones y las
marcas de precaución que figuran en la batería, el cargador de
baterías y las unidades que se accionan con la batería.
ADVERTENCIA:
baterías 4144 o 6216 con esta unidad. NO utilice ningún
otro tipo de batería, accesorio o aditamento con esta
unidad. Otros tipos de baterías, accesorios o implementos
podrían producir lesiones graves, daños a los bienes o
daños a la unidad.
Utilice únicamente
ADVERTENCIA:
cargador de baterías 4044 para cargar las baterías 4144 o
6216. NO intente cargar ninguna otra batería con un cargador
de baterías 4044. Otros tipos de baterías pueden explotar y
causar un incendio, lesiones personales o daños materiales.
ADVERTENCIA:
advertencias de seguridad y todas las instrucciones. Si no
se siguen las advertencias y las instrucciones se pueden
producir descargas eléctricas, un incendio y/o lesiones
graves.
Utilice únicamente un
Lea todas las
ADVERTENCIA:
baterías 4144 o 6216 con un cargador de baterías 4044.
NO intente utilizar ningún otro cargador de baterías para
cargar las baterías 4144 o 6216. Otros tipos de cargadores
de baterías pueden hacer que las baterías exploten
ocasionando un incendio, lesiones personales o daños
materiales.
Cargue únicamente
18
Page 19

ADVERTENCIAS GENERALES DE SEGURIDAD
• Lea las instrucciones con atención. Debe familiarizarse con los
controles y con el uso apropiado de la unidad.
• Manténgase alerta. No opere esta unidad si está cansado,
enfermo o bajo la influencia de alcohol, drogas o medicamentos.
• Nunca permita a los niños operar la unidad. Los adolescentes
deben ser entrenados, acompañados y supervisados por un
adulto. Nunca per
instrucciones adecuadas.
• Se deben instalar correctamente todos los protectores y
accesorios de seguridad antes de operar la unidad.
• Inspeccione la unidad antes de usarla. Verifique si hay piezas
dañadas. Compruebe que todas las piezas funcionen
correctamente. Compruebe que todas las sujeciones estén en
su lugar y bien ajustadas. Compruebe que todas las piezas
viles queden adecuadamente alineadas y no se atasquen.
mó
Haga reparar o reemplazar por un centro de servicio técnico
autorizado todas las piezas que estén dañadas o que no
funcionen adecuadamente. No utilice la unidad si hay piezas
sueltas o dañadas.
• Tenga en cuenta el riesgo de lesiones en la cabeza, las manos y
los pies.
• Inspeccione el área con atención antes de arrancar la unidad.
Extraiga las rocas
cordeles y demás objetos que podrían ser arrojados o enredarse
en la unidad.
• Despeje la zona de niños, observadores y mascotas;
manténgalos fuera de un radio de 50 pies (15 m), como mínimo.
Incluso a esa distancia, sigue el riesgo de ser alcanzados por
los objetos arrojados por el aire. Sugiérales a los observadores
que usen protección ocular. Si alguien se l
la unidad de inmediato.
• Esta unidad está diseñada para uso ocasional, para el hogar
únicamente.
• No permita que la unidad se use como un juguete.
ta a los adultos operar la unidad sin las
mi
os vidrios rotos, los clavos, los cables,
, l
proxima, detenga
e a
ADVERTENCIAS DE SEGURIDAD PARA LAS UNIDADES
ELÉCTRICAS
Seguridad eléctrica en general
• No exponga la unidad a la lluvia o a condiciones húmedas.
• No utilice la unidad con las manos mojadas.
• No utilice la unidad bajo la lluvia, en condiciones húme
superficies mojadas.
• Para reducir el riesgo de descarga eléctrica, evite el contacto del
cuerpo con elementos conductores con puesta a tierra, por
ejemplo, caños metálicos o cercos de alambre.
• No utilice la unidad en atmósferas explosivas, por ejemplo, en
presencia de líquidos, gases o polvo inflamables.
Seguridad del cargador de baterías
• La unidad lleva una placa de identificación que in
utilizado. Nunca conecte la unidad con un voltaje de CA que
difiera de este voltaje.
• No se debe utilizar un cable prolongador a menos que sea
absolutamente necesario. El uso de un cable prolongador
inadecuado puede generar riesgo de incendio, descarga
eléctrica o electrocución.
• No utilice cables prolongadores múltiples.
• Asegúrese de que el cable prolongador sea suficientemente
pesado co
el cable prolongador es de calibre inferior al requerido se
producirá una caída del voltaje de línea y esto dará lugar a la
pérdida de potencia y el sobrecalentamiento. Si está en duda,
utilice cable del calibre más grueso siguiente. A menor número de
calibre, mayor grosor de cable.
mo para transportar la corriente que toma la unidad. Si
dica e
das ni en
l voltaje
TAMAÑO MÍNIMO DEL CABLE PARA
PROLONGADORES DE ARTEFACTOS DE 120 VOLTIOS
QUE USAN 0-6 AMPERIOS
Longitud del cable (pies) 25 50 100 150
Calibre (AWG) 16 16 16 14
• Asegúrese de que los cables estén en buenas condiciones.
Inspeccione el cable de alimentación y el cable prolongador
periódicamente. Observe detenidamente para ver si hay
deterioro, cortes o grietas en el aislamiento. Si el cable se daña
de algún modo cuando está enchufado, desconecte el cable del
tomacorriente y de la unidad. No utilice un cable dañado. Los
cables dañados se deben reparar o cambiar.
•
• No modifique nunca un enchufe, un cable ni un tomacorriente
• En el(los) circuito(s) a ser usados con esta unidad siempre se
• No coloque el cargador de baterías en lugares donde se lo
• No cargue las baterías bajo la lluvia ni en condiciones mojadas.
• Guarde el cargador de baterías lejos de cualquier líquido.
• No permita que se introduzcan objetos metálicos pequeños ni
• No pruebe el cargador con material conductor. Existe el riesgo
e los cables en forma inadecuada. Nunca arrastre ni lleve
No us
la unidad tirando del cable. Mantenga los cables lejos de
fuentes de calor, aceite, agua, bordes filosos y objetos en
movimiento. Para desconectar un cable agarre siempre el enchufe.
de ninguna manera.
debe suministrar
falla a tierra (GFCI). Para proporcionar una medida adicional de
seguridad, utilice receptáculos con protección GFCI incorporada.
pueda pisar, donde alguien pueda tropezar o que se pueda dañar.
Guarde el cargador de baterías en un área
materiales, por ejemplo, lana de acero, lámina de aluminio ni
otras partículas extrañas en el puerto del cargador.
de descarga eléctrica.
tección con un interruptor de detección de
pro
resca y seca.
f
19
Page 20

• No cubra el cargador de baterías. El cargador de baterías se
p
uede sobrecalentar.
• No permita que la batería o el cargador de baterías se
sobrecalienten. Si se calientan, deje que los mismos se enfríen.
Cargue las baterías únicamente en temperaturas que se
encuentren entre 32º y 104ºF (0º y 40ºC).
• Siempre desconecte el cargador de baterías antes de limpiarlo.
Desenchufe siempre el cargador de baterías cuando no esté en uso.
Seguridad de las baterías
• No exponga l
176º F (80º C). Si lo hiciera, se podría producir una explosión.
• Manipule las baterías con cuidado. No cortocircuite la batería con
materiales conductores, por ejemplo, anillos, pulseras, llaves, etc.
Si se cortocircuita la batería se pueden producir lesiones
personales, daños a la batería o un incendio.
• Cuando la batería no se utiliza, mantenga la mis
objetos metálicos pequeños, por ejemplo, ganchos de papel,
monedas, clavos, etc. Estos elementos pueden conectar un
borne con otro y cortocircuitar la batería.
• No intente cargar una batería que esté rota o dañada.
• No utilice baterías que estén dañadas o hayan sido modificadas.
Si lo hiciera, se podría producir un incendio, una explosión o
lesiones personales.
ADVERTENCIA:
generar riesgo de incendio o quemadura química si no se
manipula la misma adecuadamente. No desarme,
sobrecaliente ni incinere la batería. La batería puede
generar una pequeña fuga en condiciones extremas de
uso o temperatura.
Si el fluido de la batería entra en contacto con la piel:
- Lave inmediatamente el área con jabón y agua.
- Neutralice el fluido de la batería con un áci
- Consulte con un médico de inmediato.
Si el fluido de la batería entra en contacto con los ojos:
- Enjuague inmediatamente los ojos con agua limpia
- Consulte con un médico de inmediato.
atería al fuego ni a temperaturas superiores a
a b
La batería puede
(jugo de limón, vinagre, etc.).
durante 15 minutos por lo menos.
lejos de
ma
do s
uave
ELIMINACIÓN DE LAS BATERÍAS DAÑADAS O AGOTADAS
ADVERTENCIA:
unidad se utiliza el siguiente material tóxico y corrosivo:
ION DE LITIO, un material tóxico.
ADVERTENCIA:
contaminación ambiental, póngase en contacto con su
agencia local de eliminación de residuos para solicitar
instrucciones antes de eliminar baterías de ion de litio
dañadas o agotadas. Lleve las baterías a un centro local
de reciclaje y/o eliminación que cuente con certificación
para la eliminación de baterías de ion de litio.
ADVERTENCIA:
o con grietas, aun cuando no tengan pérdidas. Cambie las
baterías dañadas o agotadas por baterías nuevas. ¡NO
INTENTE REPARAR LAS BATERÍAS! Los intentos de
reparación pueden producir lesiones personales graves
debido a explosión o descarga eléctrica.
Para evitar lesiones personales y daños ambientales:
• No intente retirar ni destruir ningún componente de la batería. No
abra ni mutile la batería. Si se produce una pérdida, los electrolitos
emitidos son corrosivos y tóxicos. No deje que la solución entre en
contacto con sus ojos o su piel y no trague solución.
• No arroje la batería junto con la basura domiciliaria normal.
• No arroje la batería al fueg
explotar.
• No elimine la batería en un lugar donde pase a ser parte de
algún relleno sanitario o de los desechos sólidos municipales.
• Cubra los bornes de la batería con cinta adhesiva reforzada.
• Deseche la batería de acuerdo con las regulaciones federales,
estatales y locales.
• Elimine la batería sin demora.
elemento de la batería puede
o. El
En la batería de esta
Para evitar la
No use baterías rotas
20
Page 21

Acerca de los sellos de batería Call2Recycle
El programa de auxiliares de la industria
Call2Recycle ayuda a los fabricantes de baterías
y productos a cumplir los requisitos de reciclaje
en los Estados Unidos y Canadá, incluido el
cumplimiento de amplias regulaciones estatales,
provinciales y federales, por ejemplo, la Ley de
Mercurio (la Ley de las Baterías). Los li
industria y los fabricantes y comerciantes de productos y baterías
que participan en el programa Call2Recycle
derechos de imprimir los sellos de batería Call2Recycle en sus
baterías y productos recargables. Cuando usted ve el sello de
batería Call2Recycle, puede estar seguro de que su batería o su
producto se pueden reciclar en forma segura y responsable.
Acer
Desde 1994 Call2Recycle ha desviado más de 75 millones de libras de
baterías recargables de los rellenos sanitarios locales y ha establecido
una red de 30.000 lugares donde dejar unidades para reciclaje. Más de
200 fabricantes de productos y/o baterías, auxiliares de la industria
Call2Recycle, se han reunido para asegurarse de que se realice el
reciclaje responsable de las baterías cu
solventan el programa que funciona a través de Call2Recycle, Inc., una
rganización de servicios públicos sin fines de lucro 501(c)4.
o
Para ubicar el centro de reciclaje más cercano, por favor,
comuníquese al 1-800-822-8837.
Call2Recycle
ca de
Baterías Recargables y con Contenido de
iatarios/auxiliares de la
cenc
®
adquieren los
ando llegan al fin de su vida útil y
DECLARACIÓN DE LA FCC (COMISIÓN FEDERAL DE
COMUNICACIONES DE LOS EE.UU.)
PRECAUCIÓN:Si se realizan cambios
o modificaciones que no estén específicamente aprobadas
por el responsable de cumplimiento se podría anular la
autoridad del usuario para utilizar el equipo.
NOTA: Este equipo se ha probado y se ha determinado que cumple
con los límites para dispositivos digitales Clase B de acuerdo
con la parte 15 de las Reglas de la FCC. Estos límites tienen por
finalidad suministrar protección razonable contra la interferencia
perjudicial en una instalación residencial. Este equipo genera,
utiliza y
instala y utiliza de acuerdo con las instrucciones puede causar
interferencia perjudicial en las comunicaciones de radio. Sin
embargo, no hay garantía de que no se produzca interferencia
en alguna instalación en particular. Si este equipo en efecto
causa interferencia perjudicial para la recepción de radio o
televisión, lo cual se puede determinar
el equipo, se recomienda que el usuario trate de corregir la
interferencia a través de una o más de las siguientes medidas:
— Reoriente o reubique la antena de recepción.
— Aumente la separación entre el equipo y el receptor.
— Conecte el equipo a un tomacorriente o circuito diferente a
aquél al cual está conectado el receptor.
— Consulte con el distribuidor o con un técnico de rad
experimentado para solicitar ayuda.
de irradiar energía de radiofrecuencia y si no se lo
pue
apagand
o y encendiendo
io/T
V
DURANTE LA OPERACIÓN
ADVERTENCIA:
de sufrir descargas eléctricas, no exponga la unidad a la
lluvia o condiciones húmedas. Guárdela en un lugar cerrado.
• Utilice anteojos o antiparras de seguridad que cumplan con las
normas ANSI / ISEA Z87.1 vigentes y que tengan la
identificación correspondiente. Utilice una protección auditiva al
operar esta unidad. Utilice una máscara facial o para polvos si la
máquina levanta polvo durante su funcionamiento.
• Use pantalones largos y gruesos, botas, guantes y camisa de
mangas largas. No use ropa h
cortos, sandalias ni ande descalzo. Sujétese el cabello a nivel de
los hombros.
• Use la unidad solamente con luz de día o con una buena luz artificial.
• Utilice la herramienta apropiada. Use esta herramienta sólo para
el propósito para el que fue diseñada.
• Sostenga siempre firmemente la unidad con ambas manos
durante la operación.
• No se extienda demasiado. Siempre debe esta
mantener el equilibrio adecuado. Tenga cuidado al trabajar
sobre escalinatas, cuestas empinadas o pendientes. Para evitar
lesiones graves, no haga funcionar la unidad desde una escalera
de mano o un techo.
• Mantenga el cabello, la cara, las manos, los pies y todas las
demás partes del cuerpo alejados de las piezas móviles y de las
aberturas. No toque ni intente detener las piezas móvile
o toque el motor ni el disipador térmico. Estas partes se ponen
• N
extremadamente calientes por el funcionamiento, incluso
después de que se apaga la unidad.
• No opere la unidad a una velocidad mayor a la necesaria para la
tarea. No haga funcionar la unidad a alta velocidad cuando no
está en uso.
• No exija demasiado a la unidad. Si se usa a la velocidad para la
que fue diseñada, realizará un trabajo más
• Detenga siempre la unidad cuando la operación esté demorada
o cuando camine de un lugar a otro.
• Antes de apoyar la unidad, siempre asegúrese de que el motor
esté apagado y que todas las piezas móviles se hayan detenido.
• Se debe evitar arrancar involuntariamente la unidad. Asegúrese
de tener los dedos alejados del control del acelerador antes de
colocar o extraer la batería. Nunca d
con los dedos sobre el control del acelerador.
• Extraiga la batería de la unidad cuando no la use.
• No utilice la unidad si el control del acelerador no enciende y
apaga la unidad.
• Si la unidad golpea un objeto extraño o éste se engancha en la
unidad, detenga el motor de inmediato, retire la batería y
verifique si se produjeron daños. Si hay daño, no vuelva a
arrancar o hacer fu
utilice la unidad si hay piezas sueltas o dañadas.
• Use sólo piezas de reemplazo y accesorios del fabricante del
equipo original (OEM) para esta unidad. Los puede adquirir al
distribuidor de servicio autorizado. Si usa cualquier otra pieza o
accesorio, el usuario podría lesionarse gravemente o la unidad
podría dañarse y se anularía la garantía.
• Mantenga limp
deje enfriar. Quite con cuidado cualquier resto de vegetación u
otros residuos que puedan bloquear las piezas móviles.
• Si la unidad comienza a vibrar en forma anormal, detenga el
motor, retire la batería y deje enfriar. Inspeccione la unidad para
determinar la causa de la vibración. La vibración por lo general
indica que hay algún problema.
ionar la unidad hasta hacerlo arreglar. No
nc
a unidad. Detenga el motor, retire la batería y
ia l
olgada, a
Para reducir el riesgo
lhajas, pantalones
ien afirmado y
r b
eficient
ransportar la unidad
ebe t
s.
e y seguro.
21
Page 22

SEGURIDAD DE LA SOPLADORA
• Pare el motor, espere a que se detengan todas las piezas
móviles, extraiga la batería y deje que se enfríe la unidad antes
de instalar o extraer el tubo de la sopladora.
• No inserte nada en los pasos de aire o el tubo de la sopladora.
No utilice la unidad si uno de los pasos de aire o tubos está
tapado.
y cualquier cosa que pueda reducir el flujo de aire.
• No utilice la unidad si no está bien colocado el tubo del soplador.
• No use la unidad para rociar líquidos, especialmente líquidos
inflamables o combustibles, como la gasolina. No use la unidad
en lugares donde esos líquidos están presentes.
• No use la unidad para rociar sustancias químicas, f
otras substancias que puedan contener materiales tóxicos.
• No apoye la unidad sobre ninguna superficie mientras está
funcionando. La toma de aire puede levantar residuos y
expulsarlos por el escape, dañando la unidad u otros bienes o
causando lesiones graves a los observadores o al operador.
• Durante la operación, no apunte nunca la unidad en dirección a
las personas, animales, ventanas o
los residuos soplados lejos de las personas, animales, ventanas
y automóviles.
• Tenga aún más cuidado al soplar residuos cerca de objetos
sólidos como árboles, muros, vallas, etc. Siempre que pueda,
sople en dirección opuesta a esos objetos y no hacia ellos.
• Tenga cuidado cuando trabaja cerca de plantas valiosas. La
fuerza del aire soplado puede dañar a las plantas jóvenes.
•
No i
está funcionando.
antenga los pasos de aire libres de polvo, pelusa, pelo
M
ilizantes u
ert
omóviles. Dirija siempre
aut
ntente nunca destapar una toma de aire mientras la unidad
OTRAS ADVERTENCIAS DE SEGURIDAD
• El mantenimiento de la unidad debe ser minucioso.
• No realice ningún procedimiento de mantenimiento que no
figure en este manual. No intente reparar la unidad; no tiene
piezas internas que puedan ser cambiadas por el usuario. Todas
las tareas de reparación, con excepción de los procedimientos
de mantenimiento que se describen en este manual, deben ser
realizados por un
• Si la unidad no funciona como debería, se ha caído, dañado, se
dejó al aire libre o se cayó en el agua, no la use.
• Nunca extraiga, modifique o deje inoperativo ningún dispositivo
de seguridad que venga con la unidad.
• Antes de inspeccionar, limpiar, guardar o transportar la unidad, o
de hacer tareas de reparación o mantenimiento o reemplazar
alguna de sus piezas:
1.
re el motor. Consulte Arranque y Parada.
Pa
2. Espere hasta que todas las piezas se detengan.
3. Retire la batería.
4. Deje que la unidad se enfríe.
• Fije la unidad para el transporte.
• Almacene la unidad en un lugar seco, asegurada o a una altura
que evite que se la use sin autorización o se la dañe. Mantenga
la unidad lejos del alcance de los niños.
• Nunca rocíe ni arroje chorros de agua ni de ningún otro
la unidad. Evite el ingreso de agua en el motor y las conexiones
eléctricas. Mantenga las manijas secas y limpias (sin residuos,
aceite ni grasa). Limpie la unidad luego de cada uso. Consulte
Limpieza y almacenamiento. No utilice solventes o detergentes
fuertes.
• Guarde estas instrucciones. Consúltelas con frecuencia y úselas
para capacitar a otros usuarios. Si le presta esta unidad a otras
pers
s, también debe prestarles estas instrucciones.
ona
buidor de servicio autorizado.
distri
íquido a
l
GUARDE ESTAS
INSTRUCCIONES
22
Page 23

• SÍMBOLOS INTERNACIONALES Y DE SEGURIDAD •
Min. 50 ft
15 m
Este manual del operador describe símbolos de seguridad e internacionales, así como pictogramas, que pueden aparecer en este producto.
Lea el manual del operador para obtener información completa sobre seguridad, montaje, funcionamiento, mantenimiento y reparaciones.
SÍMBOLOS SIGNIFICADO SÍMBOLOS SIGNIFICADO
• SÍMBOLO DE ALERTA DE SEGURIDAD
Indica peligro, advertencia o precaución. Puede
utilizarse junto con otros símbolos o pictogramas.
• LEA EL MANUAL DEL OPERADOR
ADVERTENCIA :
manual(es) del operador y cumpla todas las
advertencias e instrucciones de seguridad. Si no lo
hace, el operador y/o los observadores pueden sufrir
lesiones graves.
• UTILICE PROTECCIÓN OCULAR Y AUDITIVA
ADVERTENCIA:
son arrojados por el aire y los ruidos fuertes pueden
provocar graves lesiones oculares y pérdidas de
audición. Cuando opere esta unidad, utilice
protección ocular que cumpla con las normas ANSI /
ISEA Z87.1 vigentes y protectores auditivos. Utilice
una máscara que cubra todo el rostro si es necesario.
• UTILICE PROTECCIÓN DE PIES
Siempre utilice calzado reforzado, antideslizante,
cuando haga funcionar esta unidad.
• UTILICE PROTECCIÓN DE MANOS
Siempre utilice guantes reforzados, antideslizantes,
cuando manipule esta unidad.
Lea el (los)
Los objetos que
• LOS OBJETOS ARROJADOS PUEDEN PROVOCAR
LESIONES GRAVES
ADVERTENCIA:
arrojen objetos pequeños por el aire a alta velocidad,
lo cual puede provocar lesiones.
• MANTENGA ALEJADOS A LOS OBSERVADORES
Es posible que se
ADVERTENCIA:Mantenga a
todos los observadores, especialmente a los niños y
las mascotas, al menos a 50 pies (15 m) de la zona de
trabajo.
• SUPERFICIE CALIENTE
ADVERTENCIA:No toque el
motor ni el disipador térmico. Puede quemarse. Estas
piezas se calientan extremadamente durante el
funcionamiento. Una vez apagadas, continúan
calientes durante un período breve.
• SOPLADORAS – LAS CUCHILLAS EN MOVIMIENTO
PUEDEN CAUSAR LESIONES GRAVES
ADVERTENCIA:Detenga la
unidad y deje que el rotor pare antes de cambiar los
tubos, limpiar o realizar cualquier mantenimiento.
Mantenga las manos y los pies alejados de las partes
móviles.
• NO USE ESTE EQUIPO BAJO LA LLUVIA
ADVERTENCIA:
peligrosos. No utilice nunca la unidad bajo la lluvia ni
en condiciones mojadas o húmedas. La humedad
constituye un peligro de descarga.
• NO DESECHAR CON LA BASURA DOMICILIARIA
RecIcle la batería o deséchela de conformidad con las
normativas locales, estatales y federales.
Evite entornos
23
Page 24

CONOZCA SU UNIDAD
APLICACIONES
• Limpieza de jardines, garajes, caminos de acceso, porches,
patios, alrededor de muros, vallas y más
Bornes
Batería*
Medidor de energía
Botón “Boost”
(refuerzo)
NO SE REQUIEREN HERRAMIENTAS DE ENSAMBLADO
Sopladora
Manija
Enganche de la batería
Puerto de
la batería
Control del
acelerador
Botón del medidor
de carga
Luces del medidor
de carga
Motor
Disipador térmico
Bornes
Base de carga
Cable eléctrico
LED
Tubo de la
sopladora
Cargador de baterías*
* La batería y el cargador de la batería no se incluyen con el modelo TB4300B.
24
Page 25

ESPECIFICACIONES*
Peso aproximado de la unidad (sin la batería). . . . . . . . . . . . . . . . . . . . . . . . . . . . . . . . . . . . . . . . . . . . . . . . . . . . . 7.25 - 8.25 libras (3.3 - 3.7 kg)
Volumen de aire** (medido en: salida de la sopladora / tubo de la sopladora) . . . . . . . . . . . . . . . . . . . . . . . 545 / 450 pies
Velocidad de aire (Pico)** (medido en: salida de la sopladora / tubo de la sopladora) . . . . . . . . . . . . . . . . . . . . . . 90 / 125 mph (145 / 200 km/h)
Velocidad de aire (Promedio)** (medido en: salida de la sopladora / tubo de la sopladora
Tipo de batería (Modelo 4144) . . . . . . . . . . . . . . . . . . . . . . . . . . . . . . . . . . . . . . . . . . . . . . . . . . . . . . . . . . . . . . . . . . . . . . . . 40 V, Ión-litio de 4 Ah
Tipo de batería (Modelo 6216) . . . . . . . . . . . . . . . . . . . . . . . . . . . . . . . . . . . . . . . . . . . . . . . . . . . . . . . . . . . . . . . . . . . . . . . . 40 V, Ión-litio de 6 Ah
Peso aproximado de la batería . . . . . . . . . . . . . . . . . . . . . . . . . . . . . . . . . . . . . . . . . . . . . . . . . . . . . . . . . . . . . . . . 3.25 - 3.75 libras (1.5 - 1.7 kg)
Temperatura óptima de carga . . . . . . . . . . . . . . . . . . . . . . . . . . . . . . . . . . . . . . . . . . . . . . . . . . . . . . . . . . . . . . . . . . . . . . 32° a 104° F (0° a 40° C)
Voltaje de entrada del cargador de baterías . . . . . . . . . . . . . . . . . . . . . . . . . . . . . . . . . . . . . . . . . . . . . . . . . . . . . . . . 120 V 60 Hz CA únicamente
Salida del cargador de baterías. . . . . . . . . . . . . . . . . . . . . . . . . . . . . . . . . . . . . . . . . . . . . . . . . . . . . . . . . . . . . . . . . . . . . . . . . . . . . . 6 A 42 V CC
Tiempo aproximado de carga (Mode
Tiempo aproximado de carga (Modelo 6216). . . . . . . . . . . . . . . . . . . . . . . . . . . . . . . . . . . . . . . . . . . . . . . . . . . . . . . . . . . . . . . . . . . . . 60 minutos
Peso aproximado del cargador de baterías. . . . . . . . . . . . . . . . . . . . . . . . . . . . . . . . . . . . . . . . . . . . . . . . . . . . . . . 2.75 - 3.25 libras (1.2 - 1.5 kg)
* Todas las especificaciones se basan en la información más reciente sobre el producto disponible al momento de la impresión. Nos
reservamos el derecho de realizar cambios en cualquier momento sin previo aviso.
** Medición conforme a la norma ANSI B175.2.
lo 4144). . . . . . . . . . . . . . . . . . . . . . . . . . . . . . . . . . . . . . . . . . . . . . . . . . . . . . . . . . . . . . . .
). . . . . . . . . . . . . . . . . . 75 / 100 mph (120 / 160 km/h)
3
/min (15 / 12 m3/min)
. . . . . 45 minutos
MONTAJE
ADVERTENCIA:
graves y daños a la unidad, pare el motor y extraiga la
batería antes de instalar o extraer el tubo de la sopladora.
ADVERTENCIA:
lesiones personales graves, no opere nunca la unidad sin
el tubo de la sopladora firmemente instalado.
INSTALACIÓN Y EXTRACCIÓN DEL TUBO DE LA
SOPLADORA
Instalación del tubo de la sopladora
1. Coloque la unidad sobre una superficie plana y nivelada.
2. Alinee la ranura del tubo de la sopladora con la lengüeta de la
salida de la sopladora (Fig. 1).
3. Oprima el tubo de la sopladora sobre la salida de la sopladora
hasta que la lengüeta se trabe firmemente en la ranura (Fig. 1).
Extracción del tubo de la soplado
oloque la unidad sobre una superficie plana y nivelada.
1. C
2. Oprima firmemente la lengüeta hacia adentro y tire del tubo de
la sopladora para sacarlo de la salida de esta (Fig. 1).
A fin de evitar lesiones personales
A fin de evitar que se produzcan
ra
Salida del soplador
Tubo de la
sopladora
Lengüeta
Ranura
Fig. 1
25
Page 26

MONTAJE DEL CARGADOR EN LA PARED (OPCIONAL)
El cargador de baterías se puede instalar en una superficie
permanente, por ejemplo, una pared o banco de trabajo. Use
sujetadores de montaje (no incluidos) con capacidad para sostener
el peso combinado de la batería y del cargador de baterías. Los
orificios para el montaje de pared están ubicados en la base del
cargador (Fig. 2).
Orificios para el
montaje de pared
Fig. 2
CARGA DE LA BATERÍA
NOTA: La batería no se embarca con carga completa.
NOTA: Las baterías de ion de litio no desarrollan memoria y se
pueden cargar en cualquier momento.
Para obtener el máximo tiempo de funcionamiento, cargue la
batería completamente antes de cada uso.
1. Enchufe el cargador de baterías en un tomacorriente eléctrico
adecuado.
2. Inserte la batería en la base de carga (Fig. 3). Se debe encende
l LED (Fig. 4). Si no lo hace:
e
• Compruebe que la batería esté completamente insertada en la
base de carga.
• Compruebe que el cargador de baterías esté completamente
enchufado a un tomacorriente adecuado.
• Compruebe que el tomacorriente funcione bien, para lo cual
debe probarlo con otro artefacto eléctrico.
3. Examine el LED. El LED le indicará el estado de las baterías:
• Verde (parpadea): La batería se es
batería hasta que la luz verde deje de parpadear.
• Verde (constante): La batería está completamente cargada.
• Rojo (parpadea): La batería y/o el cargador están demasiado
calientes o demasiado fríos. Asegúrese de que la batería y el
cargador estén en un entorno que esté a entre 32° F y 104° F
(0° C y 40° C). Deje un tiempo para que la batería y/o el
cargador se calienten o se enfríen.
ojo (constante): La batería ya no funciona. Consulte en la
• R
sección Garantía la información referida al cambio.
4. Cuando la batería esté completamente cargada, sáquela del
cargador de baterías. Opcionalmente, la batería se puede
almacenar en el cargador de baterías, pero el cargador de
baterías debe ser desenchufado del tomacorriente.
tá cargando. Cargue la
Base de carga
Batería
r
Fig. 3
LED
Fig. 4
26
Page 27

INSTALACIÓN Y EXTRACCIÓN DE LA BATERÍA
Enganche de la batería
ADVERTENCIA:
accidentalmente la unidad. A fin de evitar lesiones graves,
NO oprima el control del acelerador al instalar o extraer la
batería. Consulte Arranque y Parada. Extraiga la batería de
la unidad cuando no la use.
Instalación de la batería
1. Sujete firmemente la manija. NO apriete el control del
acelerador. Consulte Arranque y Parada.
2. Deslice la batería en la base de de carga la batería (Fig. 5).
Oprima la batería con firmeza hasta que quede trabada en su
lugar (Fig. 5). Se debe producir un sonoro “clic” y el enganche
de la batería debe quedar en la posición vertical (Fig. 5
tracción de la batería
Ex
1. Sujete firmemente la manija. NO apriete el control del
acelerador. Consulte Arranque y Parada.
2. Oprima el enganche de la batería para destrabarla (Fig. 5).
3. Extraiga la batería del puerto de la batería (Fig. 5).
Se debe evitar arrancar
).
Puerto de la batería
Manija
Batería
Fig. 5
ARRANQUE Y PARADA
ADVERTENCIA:
asegúrese que no esté orientada hacia las personas,
animales, ventanas, automóviles o desechos sueltos.
INSTRUCCIONES DE ARRANQUE
1. Instale la batería. Consulte Instalación de la batería.
2. Oprima el control del acelerador para arrancar el motor (Fig. 6).
3. Oprima el control del acelerador hasta el grado necesario para
el funcionamiento.
INSTRUCCIONES DE PARADA
1. Libere el control del acelerador y espere hasta que todas las
piezas móviles se hayan detenido por completo (Fig. 6).
Cuando arranque la unidad,
Control del
acelerador
Fig. 6
27
Page 28

FUNCIONAMIENTO
ADVERTENCIA:
a la lluvia o a condiciones húmedas.
No exponga las herramientas eléctricas
CONTROL DEL NIVEL DE CARGA DE LA BATERÍA
Presione el botón medidor de carga de la batería. El número de
luces que se iluminan indica el nivel de carga actual de la batería
(Fig. 7). Si las cuatro luces aparecen oscuras, cargue la batería
antes de seguir utilizándola.
NOTA: Mientras se utilizan, las baterías de ion de litio suministran
electricidad con mínimo desvanecimiento. Cuando la bater
stá totalmente descargada, inmediatamente corta el suministro
e
de alimentación a la unidad y es necesario realizar la carga.
ADVERTENCIA:
lesiones personales graves, no opere nunca la unidad sin
el tubo de la sopladora firmemente instalado.
ADVERTENCIA:
auditiva, de manos, pies y corporal para reducir el riesgo
de sufrir lesiones durante la operación de esta unidad.
Utilice una máscara facial o para polvos si la máquina
levanta polvo durante su funcionamiento.
A fin de evitar que se produzcan
Utilice siempre protección ocular,
ía
0% - 25%
25% - 50%
75% - 100%
50% - 75%
Botón del
medidor de carga
Fig. 7
CÓMO SOSTENER LA UNIDAD
• Párese en la posición de arranque (Fig. 8). Párese derecho. No
se incline sobre el aparato.
• Mantenga los pies alejados y apoyados firmemente sobre el suelo.
• Sostenga la unidad con firmeza.
• Mantenga la unidad al nivel de la cintura.
RECOMENDACIONES PARA MEJORES RESULTADOS
• Conserve agua utilizando la sopladora en lugar de una
manguera para realizar muchas tareas de limpieza en e
• Opere la unidad sólo en horarios razonables, ni temprano de
mañana ni a la noche tarde cuando se puede molestar a la gente.
Acate las horas detalladas en las ordenanzas locales. La
recomendación usual es de 9:00 am a 5:00 pm, de lunes a
sábado.
• Para reducir el nivel de ruido, opere la unidad a la velocidad
mínima necesaria para la tarea. Limite el número de equipos de
potencia que se utiliz
• Use rastrillos o escobas para aflojar los residuos antes de la
operación.
• Cuando hay mucho polvo, humedezca ligeramente las superficies.
• Esté atento a los niños, las mascotas, las ventanas abiertas y los
autos recién lavados. Sople los residuos lejos de ellos. Nunca
debe apuntar la unidad hacia alguien mientras está funcionando.
l mismo tiempo.
an a
xteriores.
Fig. 8
28
Page 29

• Desplace la unidad de un lado al otro con el tubo del soplador
varias pulgadas por sobre el suelo. Avance lentamente,
manteniendo los desechos acumulados delante del operador.
• Limpie al terminar la operación. Elimine los residuos correctamente.
• Extraiga la batería de la unidad cuando no la use.
USO DEL BOTÓN "BOOST" (REFUERZO)
Oprima el botón de refuerzo para cambiar entre los modos MAX y
ECO, según sea necesario (Fig. 9).
• El modo MAX brinda la potencia máxima para trabajos pesados.
• El modo ECO conserva energía para maximizar el tiempo de
funcionamiento. El modo ECO es adecuado para la mayoría de
los trabajos.
NOTA: La unidad se restablecerá en el modo ECO unos segundos
después de apagar el motor
.
Botón “Boost”
(refuerzo)
Fig. 9
MANTENIMIENTO
ADVERTENCIA:
realice el mantenimiento de la unidad mientras está en
funcionamiento. Desconecte siempre la batería para evitar
que la unidad arranque accidentalmente. Siempre debe
esperar que la unidad se enfríe antes de hacer el
mantenimiento. Antes de realizar el mantenimiento del
cargador de baterías, desenchufe siempre el mismo del
tomacorriente.
MANTENIMIENTO DEL CARGADOR DE BATERÍAS
• Mantenga el cargador de baterías limpio y sin residuos. No
permita que ingresen materiales extraños en la base de carga ni
en los bornes (Fig. 10). Inspeccione el cargador de baterías para
ver si hay materiales extraños antes de usarlo.
• Asegúrese de que el cargador no se haya cortocircuitado a
causa de residuos. Inspeccione los bornes para detectar hollín y
signos
e fusión. No intente usar un cargador cortocircuitado.
d
Para evitar lesiones graves, nunca
Bornes
Base de carga
Fig. 10
29
Page 30

LIMPIEZA Y ALMACENAMIENTO
LIMPIEZA
ADVERTENCIA:
limpie la unidad mientras está en funcionamiento. Siempre
desconecte la batería para evitar que la unidad arranque
accidentalmente. Siempre deje que la unidad se enfríe
antes de limpiarla. Desconecte siempre el cargador de
baterías antes de limpiarlo.
ADVERTENCIA:
agua para limpiar la unidad, las baterías o el cargador de
baterías. No utilice detergentes fuertes. Los productos de
limpieza para el hogar que contienen aceites aromáticos
como pino y limón, y los disolventes como el queroseno,
pueden dañar el plástico.
• Use un cepillo pequeño o un paño limpio y seco para limpiar por
fuera la unidad, la batería y el cargador de baterías.
Para evitar lesiones graves, nunca
Para evitar lesiones graves, no use
SOLUCIÓN DE PROBLEMAS
ALMACENAMIENTO
• Retire la batería de la unidad.
• Deje que se enfríen la unidad, la batería y/o el cargador de baterías.
• Limpie completamente la unidad, la batería y el cargador de
baterías. Inspecciónelos para detectar si hay piezas flojas o
dañadas. Reemplace las piezas dañadas y ajuste los tornillos,
tuercas o pernos flojos.
• Trabe la unidad, la batería y el cargador de baterías para evitar
que se los
• Almacene la unidad, la batería y el cargador de baterías en
espacio cerrado, en un lugar seco y bien ventilado.
• Almacene la batería y el cargador de baterías en un área con
una temperatura que oscile entre 65 y 75ºF (18 y 24ºC).
• Desenchufe siempre el cargador de baterías cuando no esté en uso.
• Almacene la unidad, la batería y el cargador de baterías fuera
lcance de los niños.
del a
• Si la batería se deja sin uso durante más de dos meses, cargue
la misma totalmente antes de utilizarla.
ilice sin permiso o que se provoquen daños.
ut
PROBLEMA SOLUCIÓN
LA BATERÍA NO CARGA
El cargador de baterías no está enchufado
La batería no está bien insertada en el cargador de baterías
La batería y/o el cargador están demasiado calientes o demasiado
fríos
La batería y/o el cargador de baterías ya no funcionan Consulte en la sección Garantía la información referida al cambio
LA BATERÍA SE DESCARGA RÁPIDAMENTE
La batería no está totalmente cargada Cargue la batería completamente
La batería y/o el cargador de baterías ya no funcionan Consulte en la sección Garantía la información referida al cambio
EL MOTOR NO FUNCIONA
Le falta carga a la batería Cargue la batería completamente
La batería no está bien instalada Extraiga y reinstale la batería
EL MOTOR SE DETIENE CUANDO ESTÁ EN USO Y EL MEDIDOR DE POTENCIA PARPADEA
Se han conectado los sistemas de protección del dispositivo Extraiga y reinstale la batería
Enchufe el cargador de batería en una fuente de alimentación de
120V 60 hz CA
Retire y luego reinserte la batería en la base de carga
completamente
Asegúrese de que la batería y el cargador estén en un entorno que
esté a entre 32° F y 104° F (0° C y 40° C). Deje un tiempo para que
la batería y/o el cargador se calienten o se enfríen.
Si necesita asistencia adicional, comuníquese con un distribuidor de servicio autorizado.
30
Page 31

GARANTÍA
Troy-Bilt LLC
GARANTÍA LIMITADA PARA EL PRODUCTO ACCIONADO POR CORE
GARANTÍA LIMITADA
La garantía limitada que se extiende en el presente documento es otorgada por Troy-Bilt LLC con relación a los nuevos productos marca
Troy-Bilt-accionados con la tecnología CORE (“Producto CORE”) al Comprador Inicial (como se define en este documento), que se
adquirieron en Estados Unidos, sus territorios y posesione
Alcance de la Garantía limitada
Troy-Bilt LLC ofrece la siguiente garantía limitada (por el uso residencial o comercial, según se explica a continuación) al Comprador Inicial:
excepto por las Exclusiones (que se definen en el presente documento), durante el Período de la garantía (que se define en el presente
documento) el producto CORE estará libre de defectos de fabricación (qu
inicial” es la primera persona en comprar un nuevo producto CORE a un representante distribuidor y/o minorista Troy-Bilt autorizado de los
mencionados productos CORE. La garantía limitada es intransferible.
s, y Canadá.
ncluyen la mano de obra y los materiales). El “Comprador
e i
Uso residencial
Excepto que se disponga lo contrario en el presente documento, a los fines del uso no comercial (es decir, residencial)
limitada aplicable para este nuevo producto CORE comprado por el Comprador Inicial, es de cinco (5) años a partir de la fecha de la compra,
como se indica en el comprobante de ventas original del producto CORE (“Período de Garantía”). Sin perjuicio de lo antedicho, se garantizará
que la batería y su cargador estarán libres de defectos de fabricación (incluida la mano de obra y los materiales) durante tres (3) años a partir
e la fecha de la compra, como se indica en el comprobante de ventas original correspondiente al producto CORE para uso residencial.
d
Uso comercial
Excepto que se disponga lo contrario en el presente documento, a los fines del uso comercial, el período de la garantía limitada aplicable
para este nuevo producto CORE será de dos (2) años a partir de la
original. Sin perjuicio de lo antedicho, se garantizará que la batería y su cargador estarán libres de defectos de fabricación (incluida la mano
de obra y los materiales) durante un (1) año a partir de la fecha de la compra, como se indica en el comprobante de ventas original para el
producto CORE cuando se lo utiliza comercialmente.
*Resp
reemplazo, Troy-Bilt otorga una garantía limitada durante la vida útil de manera específica y exclusiva para el motor del producto CORE (que
está compuesto por alojamientos del motor, rotores, imanes, estator y cojinetes) contra defectos en los materiales y la mano de obra
durante l
Defectos de mano de obra o de materiales
Excepto por las Exclusiones, se garantiza que el producto CORE estará libre de defectos de fabricación en la mano de obra o los materiales
durante el Período de la Garantía. Durante el Período de la Garantía, Troy-Bilt LLC reparará o reemplazará, a
original cubierta por la presente garantía limitada y que se determine que presenta algún defecto en la mano de obra o los materiales.
el uso tanto residencial como comercial, además de las garantías limitadas establecidas precedentemente, y no en su
ecto d
a vida útil del producto CORE al Comprador inicial únicamente, que comienza a partir de la fecha de fabricación.
de la compra como se indica en el comprobante de ventas
fecha
su juicio, cualquier pieza
, el período de la garantía
Para reunir los requisitos para la presente garantía limitada, el producto CORE:
1. Debe haber sido adquirido de un minorista autorizado.
2. Debe haber sido adquirido por el Comprador Inicial dentro de los Estados Unidos, sus posesiones o t
3. Debe haberse usado de una manera coherente con el uso normal y adecuado para el que fue diseñado el producto CORE. Este
producto CORE no está diseñado para arrendamiento.
¿Quién puede realizar reparaciones conforme a la presente garantía?
A fin de reunir los requisitos para la garantía limitada según lo establecido en el presente documento, las reparaciones realizadas conforme
sta garantía debe llevarlas a cabo un proveedor de reparaciones y mantenimiento Troy-Bilt autorizado.
e
31
torios, o Canadá.
erri
a
Page 32

Cómo obtener el servicio de la presente garantía limitada
Para ubicar a un proveedor de reparaciones y mantenimiento de la garantía Troy-Bilt, comuníquese con el representante, distribuidor o
minorista Troy-Bilt autorizado o comuníquese con Troy-Bilt LLC por correo escribiendo a P.O. Box 361131, Cleveland, Ohio 44136-0019 o
telefónicamente llamando al 1-800-828-5500, o inicie sesión en nuestro sitio We
contacto con MTD Products Limited, 97 Kent Ave, Kitchener, ON N2G 3R2, o llame al 1-800-668-1238 o inicie sesión en nuestro sitio Web
en www.troybilt.ca. La presente garantía limitada de un producto es otorgada por Troy-Bilt LLC y es la única garantía de producto que
otorga Troy-Bilt LLC para el producto CORE. DEBERÁ PRESENTAR COPIA DEL COMPROBANTE DE VEN
SERVICIO DE LA GARANTÍA.
Lo que no cubre la presente garantía limitada
La presente garantía limitada no cubre lo siguiente (las “Exclusiones”):
1. Los daños producidos por la falta de mantenimiento y/o un mantenimiento inadecuado, según se describe en el manual del operador.
2. El desgaste normal resultante del uso del producto CORE.
3. Los artículos desechables, consumibles o de ma
mantenimiento normal, a menos que tales artículos presenten defectos que ocasionen fallas o un desgaste prematuro dentro de los
primeros treinta (30) días. Los artículos con desgaste normal incluyen, de corresponder, perillas de impacto, bobinas exteriores, hilo de
corte, carretes interiores, correas de transmisión, motosierra
4. El uso del producto CORE que no sea coherente con el uso para el que fue diseñado según se describe en las instrucciones de
funcionamiento, que incluye, a título de ejemplo, el uso abusivo, inadecuado y/o negligente del Producto CORE o cualquier uso que no
sea coherente con y/o no cumpla con las instrucciones que se incluyen en el Manua
5. Cualquier producto que haya sido alterado o modificado de una manera que no sea coherente con el diseño original del producto o de
una manera no aprobada por Troy-Bilt LLC.
enimiento de rutina que requieren reparaciones o mantenimiento como parte del
nt
s, barras de guía, dientes de la cultivadora y/o cuchillas.
b en www.troybilt.com. Para Canadá, póngase en
TAS PARA OBTENER EL
l del Operador.
La presente garantía no cubre y Troy-Bilt LLC rechaza todo tipo de responsabilidad respecto de:
1. Pérdida de tiempo o pérdida de uso del producto CORE.
2. Costos de transporte y otros gastos incurridos en relaci
reparaciones y mantenimiento Troy-Bilt autorizado.
3. Cualquier pérdida o daño a otros equipos o elementos personales.
4. Los daños ocasionados por un mantenimiento inadecuado, exposición o uso del producto que no es coherente con el uso para el cual
fue diseñado, según se describe en las instrucciones de funcionamiento, que incluye, a t
negligente del producto CORE.
5. Daño resultante de la instalación o el uso de cualquier accesorio o pieza no aprobados por Troy-Bilt para utilizar con el producto CORE.
Limitaciones:
1. NO EXISTEN GARANTÍAS IMPLÍCITAS, INCLUÍDAS, A TÍTULO DE EJEMPLO, LAS GARANTÍAS IMPLÍCITAS DE COMERCIABILIDAD O
ADECUACIÓN PARA UN PROPÓSITO EN PARTICULAR. NO SERÁ DE
GARANTÍA CORRESPONDIENTE SEGÚN LO ESTABLECIDO PRECEDENTEMENTE RESPECTO DE LAS PIEZAS SEGÚN SU IDENTIFICACIÓN.
NINGUNA OTRA GARANTÍA EXPRESA, YA SEA ORAL O ESCRITA, EXCEPTO LA MENCIONADA ANTERIORMENTE, OTORGADA POR
PERSONAS FÍSICAS O JURÍDICAS, INCLUIDOS LOS DISTRIBUIDORES O MINORISTAS RESPECTO DE CUALQUIER PRODUCTO,
VINCULARÁ A TROY BILT LLC. DURANTE EL PERÍODO DE GARANTÍA, EL ÚNICO RECURSO SERÁ LA REPARACIÓN O EL REEMPLAZO DE
LA PIEZA DEFECTUOSA, SEGÚN LO ESTABLECIDO PRECEDENTEMENTE. (ALGUNOS ESTADOS NO PERMITEN LA LIMITACIÓN DE LA
DURACIÓN DE LAS GARANTÍAS IMPLÍCITAS, POR LO QUE LA LIMITACIÓN ANTES MENCIONADA PUEDE NO APLICARSE EN SU CASO).
2. LAS DI
3. En ningún caso se obtendrá una compensación mayor al monto del precio de compra del producto vendido. La modificación de las
SPOSICIONES ESTABLECIDAS EN EL PRESENTE DOCUMENTO PREVÉN EL ÚNICO Y EXCLUSIVO RECURSO QUE SURGE DE
LA VEN
TÍTULO DE EJEMPLO, GASTOS DE TRANSPORTE O RELACIONADOS, O GASTOS DE ARRENDAMIENTO PARA REEMPLAZAR
TRANSITORIAMENTE UN PRODUCTO CUBIERTO POR LA GARANTÍA. (ALGUNOS ESTADOS NO PERMITEN LA EXCLUSIÓN O
LIMITACIÓN DE LOS DAÑOS Y PERJUICIOS INDIRECTOS O EMERGENTES, POR LO QUE LAS EXCLUSIONES O LIMITAC
ANTES MENCIONADAS PUEDEN NO APLICARSE EN SU CASO).
características de seguridad del producto anulará esta garantía limitada. Usted asume el riesgo y la responsabilidad por las pérdidas, los
daños o las lesiones que sufran Usted y sus bienes y / u otras personas y sus biene
de la imposibilidad de uso de este producto.
TA. TROY-BILT NO SE HARÁ RESPONSABLE DE LAS PÉRDIDAS O LOS DAÑOS INDIRECTOS O EMERGENTES, INCLUIDOS A
on el transporte del producto CORE desde y hacia el proveedor de
ón c
ítulo de ejemplo, el uso abusivo, inadecuado y/o
CACIÓN NINGUNA GARANTÍA AL CABO DEL PERÍODO DE
APLI
s como consecuencia del uso, del uso incorrecto o
IONES
Relación de la legislación estatal con esta garantía
Esta garantía limitada le otorga derechos legales específicos, pero además usted podría gozar de otros derechos que varían de un estado a otro.
*El producto Core tiene una vida útil de siete (7) años a partir de la fecha de fabricación. Consulte al m
para obtener más información.
rista o visite www.troybilt.com
ino
 Loading...