


Operator’s Manual
Electric Grass Trimmer
Model TB495
z SAFETY
z ASSEMBLY
z ADJUSTMENT z OPERATION
z MAINTENANCE z SERVICE PARTS z SPECIFICATIONS
CAUTION: Before using this product,
Read this manual and follow all safety
Rules and operating instructions.
P/N 6096-202B02
PRINTED IN CHINA
1

TABLE OF CONTENTS
Warranty |
Page |
2 |
Maintenance |
Page |
16-17 |
Safety Rules |
Page |
3-9 |
Service parts |
Page |
18 |
Assembly |
Page |
10-11 |
Specifications |
Page |
18 |
Adjustment Instructions |
Page |
12-13 |
|
|
|
Operating Instructions |
Page |
14-15 |
|
|
|
WARRANTY STATEMENT
TWO YEAR LIMITED WARRANTY ON TROY-BILT GRASS TRIMMER
For two years form the date of purchase, when this Grass trimmer is used and maintained according to the operator’s manual, Troy-Bilt will repair any defect in material or workmanship free of charge.
If this Grass trimmer is used for commercial or rental purposes, this warranty applied for only 90 days from the date of purchase.
WARRANTY SERVICE IS AVAILABLE BY RETURNING THIS GRASS TRIMMER TO THE NEAREST TROY-BILT REPAIR CENTER IN THE UNITED STATES. CALL 1-800-828-5500 FOR LOCATIONS.
This warranty gives you specific legal rights, and you may also have other rights which vary from state to state.
2

RULES FOR SAFE OPERATION
The purpose of safety symbols is to attract your attention to possible dangers. The safety symbols, and their explanations, deserve your careful attention and understanding. The safety warnings do not by themselves eliminate any danger. The instructions or warnings they give are not substitutes for proper accident prevention measures.
SYMBOL MEANING
SYMBOL MEANING
DANGER: Failure to obey
a safety warning may result in serious injury to yourself or to others. Always follow the safety precautions to reduce the risk of fire, electric shock and personal injury.
SAFETY ALERT:
Indicates danger, warning or caution. Attention is required in order to avoid serious personal injury. May be used in conjunction with other symbols or pictographs.
NOTE: Advises you of information or instructions vital to the operation or maintenance of the equipment.
Read the Operator’s Manual(s) and follow all warnings and safety instructions.
Failure to do so can result in serious injury to the operator and/or bystanders.
WARNING: Failure to
obey a safety warning can result in serious injury to yourself and others. Always follow the safety precautions to reduce the risk of fire, electric shock and personal injury.
CAUTION: Failure to
obey a safety warning may result in property damage or personal injury to yourself and others. Always follow the safety precautions to reduce the risk of fire, electric shock and personal injury.
3

RULES FOR SAFE OPERATION
zIMPORTANT SAFETY INSTRUCTIONS
Clear the area of children, bystanders, and
WARNING: When using |
pets. At a |
minimum, |
keep all |
children, |
|||||
bystanders, and pets outside a 50 feet (15 |
|||||||||
|
|
|
|
|
|||||
the unit, |
you must |
follow |
m.) radius; there still may be a risk to |
||||||
the safety rules. Please read |
bystanders |
from |
thrown |
objects. |
|||||
these |
instructions |
before |
Bystanders should be encouraged to wear |
||||||
operating the unit in order |
eye protection. If you are approached, |
||||||||
to ensure the safety of the |
stop the unit immediately. |
|
|||||||
operator |
|
and |
any |
|
|
|
|
||
bystanders. |
Please |
keep |
|
|
|
|
|||
these |
instructions for later |
|
|
|
|
||||
use. |
|
Basic |
safety |
|
|
|
|
||
precautions |
should |
always |
|
|
|
|
|||
be followed to reduce the |
|
|
|
|
|||||
risk of fire, electrical shock |
|
|
|
|
|||||
and personal injury. |
|
|
|
|
|
||||
READ ALL INSTRUCTIONS
BEFORE OPERATING
Read the instructions carefully. Be familiar with the controls and proper use of the unit.
Do not operate this unit when tired, ill, or under the influence of alcohol, drugs, or medication.
Children must not operate the unit. Teens must be accompanied and guided by an adult.
All guards and safety attachments must be installed properly before operating the unit.
Inspect the unit before use. Replace damaged parts. Make sure all fasteners are in place and secure. Replace parts that are cracked, chipped, or damaged in any way. Do not operate the unit with loose or damaged parts.
Carefully inspect the area before starting the unit. Remove all debris and hard or sharp objects such as glass, wire, etc.
4

RULES FOR SAFE OPERATION
PLEASE READ-SAVE THESE
INSTRUCTIONS
When using an electrical appliance, basic precautions should always be followed to assure maximum safety and optimum performance. Read this manual before assembling and operating this appliance. Failure to comply with instructions may result in electrical shock, burns, fire, or personal injury.
WARNING: To reduce the
risk of electric shock, burns, fire or personal injury.
1.FOLLOW ALL SAFETY INSTRUCTIONS listed in this manual before/during operation of this trimmer.
2.TO REDUCE THE RISK OF ELECTRIC SHOCK this equipment has a polarized plug (one blade is wider than the other) and will require the use of a polarized extension cord. The appliance plug will fit in a polarized extension cord only one way. If the plug does not fit fully into the extension cord, reverse the plug. If the plug still does not fit, obtain a correct polarized extension cord. A polarized extension cord will require the use of a polarized wall outlet. This plug will fit into the polarized wall outlet only one way. If the plug does not fit fully into the wall outlet, reverse the plug. If the plug still does not fit, contact a qualified electrician to install the proper wall outlet. Do not change the equipment plug, extension cord receptacle, or extension cord plug in any way.
3.INSPECT UNIT FOR DAMAGE to the housing or plug. Keep all fasteners tight. Do not use if the trigger does not turn the
unit off properly. A guard or other part that is damaged should be carefully checked to determine that it will operate properly and perform its intended function. Check for alignment of moving parts, binding of moving parts, breakage of parts, mounting, and any other condition that may affect its operation. A guard or other part that is damaged should be properly repaired or replaced by an authorized service center unless indicated elsewhere in this manual. Never use unit if cord or plug has been damaged, the motor or if unit itself is not working as it should or has been dropped, damaged, left outdoors or dropped in water. Never operate with any air opening blocked. Keep air openings free of debris that may reduce air flow. Replace damaged parts that are chipped, cracked or damaged in any way. Keep line cutting blade sharp.
4.  DOUBLE INSULATED to help protect against electric shock. Double insulation construction consists of 2 separate “layers” of electric insulation. Appliances built with this insulation system are not intended to be grounded. As a result, the extension cord used with your unit can be plugged into any conventional 120 volt electrical outlet. Normal safety precautions must be observed when operating an electrical appliance. The double insulation system is only for added protection against injury resulting from a possible internal electrical insulation failure.
5.EXTENSION CORD - Use only with an extension cord intended for outdoor use. Match wire gauge to the cord length. See table below. A 2-wire cord without a
5

RULES FOR SAFE OPERATION
ground connection may be used since this appliance is double insulated. If in doubt of proper wire size, use the next heavier gauge. Please note that the smaller the gauge number, the heavier the cord.
MINIMUM WIRE GAUGE RECOMMENDATIONS
|
EXTENSION |
WIRE SIZE |
VOLTS |
CORD |
REQUIRED |
|
LENGTH |
|
|
|
|
|
25 feet / 7.5m |
18 A.W.G.* |
120 |
50 feet / 15m |
16 A.W.G.* |
|
100feet / 30m |
16 A.W.G.* |
*American Wire Gauge
Table 1
(1). When using the appliance, an extension cord of adequate size must be used for safety and to prevent loss of power and overheating.
WARNING: To reduce the
risk of electric shock, use only with an extension cord intended for outdoor use, such as an extension cord of cord type SW-A, SOW-A, STW-A, STOW-A, SJW-A, SJOW-A, SJTW-A, or SJTOW-A.
(2). Inspect extension power cord for loose or exposed wires and damaged insulation. If damaged, replace before using appliance.
DO NOT ABUSE CORD - Never carry appliance by cord or pull cord to disconnect from outlet. Keep cord clear of operator and obstacles at all times. Do not expose cord to heated surfaces, oil or water. Do not pull cord around sharp edges, corners or close door on cord.
6. NO SERVICEABLE PARTS
INSIDE - Your double insulated
appliance has no serviceable parts inside. Do not attempt to repair it yourself. For service information, contact the Troy-Bilt Product Service Department listed on the back cover of this User Manual.
WHEN SERVICING
USE ONLY IDENTICAL
REPLACEMENT
PARTS.
7.RISK OF EYE INJURY - Always wear goggles or other suitable eye protection when operating your trimmer. Wear eye protection meeting ANSI Z787.1 standards. Edging increases the risk of injury caused by flying debris. Always keep bystanders at a safe distance.
8.KEEP HANDS AND FEET AWAY from rotating line. Do not operate without debris shield attached.
9.DRESS PROPERLY - Always wear long pants, shoes and gloves. Do not wear loose clothing, jewelry, short pants, sandals or go barefoot.
10.KEEP AREA CLEAR - Keep everyone, especially children and pets away from the area of operation 50 feet (15m). Turn off unit immediately if you are approached. Never allow children to operate the appliance, to be used as a toy, or to run unattended at any time.
11.AVOID A DANGEROUS ENVIRONMENT - Do not use in the presence of flammable liquids or gases, smoking or burning materials to avoid creating a fire or explosion. Never operate the trimmer in wet or damp conditions or around swimming pools, hot tub, etc. Do not use in rain. Do not handle plug, cord
6

RULES FOR SAFE OPERATION
or appliance with wet hands.
12.USE APPLIANCE CORRECTLY - Use this appliance only for its intended use as described in this manual. DO NOT SWEEP WITH TRIMMER - Sweeping refers to tilting string head to sweep away debris from walkways, etc. Your trimmer is a powerful tool and small stones or other such debris may be hurled 50 feet or more, causing injury or damage to nearby property such as automobiles, homes and windows. Inspect area before starting the appliance to remove debris and other objects that can cause damage during operation. To reduce the risk of disconnection of appliance cord from the extension cord during operation, use the cord retention hook provided in this manual.
13.DO NOT USE ACCESSORIES or attachments except as recommended and provided by Troy-Bilt. Do not use any type of wire or metal cutting line.
14.DO NOT OVERREACH - Keep firm footing and balance at all times.
15.AVOID UNINTENTIONAL STARTING - Do not carry plugged in trimmer with your finger on the trigger.
16.DISCONNECT trimmer from power supply when not in use and before servicing string head.
17.STORE idle trimmer indoors. Appliance should be stored in a dry, high or locked up place - out of the reach of children.
18.Don’t grasp the exposed cutting edges when picking up or holding the appliance.
19.Don’t force appliance - it will do the job better and with less likelihood of a risk of injury at the rate for which it was designed.
7

RULES FOR SAFE OPERATION
EXPLANATION OF NOTE, WARNING,
and WARRANTY SYMBOL
1.A NOTE is used to convey additional information, or highlight a particular explanation, or to expand a step instruction.
2.A WARNING identifies a procedure which, if not undertaken or if improperly done, can result in a serious personal injury or damage to the unit and/or both.
3. (WARRANTY SYMBOL) serves notice that unless instructions or
procedures are followed, any damage will void the warranty and repairs will be at owner’s expense. Service other than user maintenance should be performed by a Troy-Bilt Authorized Service Center. Damage or conditions caused by improper maintenance practices which render this product inoperable will void the manufacturer’s warranty.
4. FOR WARRANTY OR SERVICE contact the nearest Troy-Bilt Authorized Service Center by calling the 800# on the back cover of this manual.
SAVE THESE
INSTRUCTIONS
SAFETY AND INTERNATIONAL SYMBOLS
This operator's manual describes safety and international symbols and pictographs that may appear on this product. Read the operator's manual for complete safety, assembly, operating and maintenance and repair information.
SYMBOL MEANING
SAFETY ALERT
SYMBOL
Indicates danger, warning, or caution. May be used in conjunction with other symbols or pictographs.
READ OPERATOR'S
MANUAL
WARNING: Read the
Operator’s Manual(s) and follow all warnings and safety instructions. Failure to do so can result in serious injury to the operator and/or bystanders.
 WEAR EYE, HEARING AND HARDHAT
PROTECTION
WARNING: Thrown
objects and loud noise can cause severe eye injury and hearing loss. Wear eye protection meeting ANSI Z87.1-1989 standards and ear protection when operating this unit. Wear a hard hat. Use a full face shield when needed.
 MINIMUM OPERATING
DISTANCE
WARNING: Keep
children, bystanders, and animals 50 feet (15 meters) away. If approached stop unit immediately.
8
RULES FOR SAFE OPERATION
SYMBOL MEANING
DANGER:
Objects thrown up by machine.
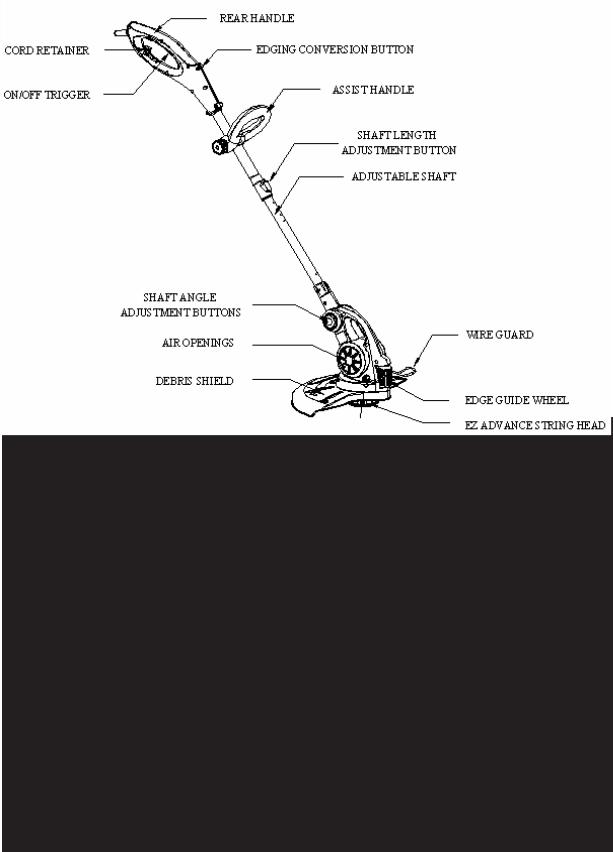
KNOW YOUR GRASS TRIMMER
9
ASSEMBLY INSTRUCTIONS
WARNING: Be sure unit is
unplugged when making any adjustment.
NOTE: The assembly required for your trimmer is to install the debris shield, the assist handle and 2 divided shafts.
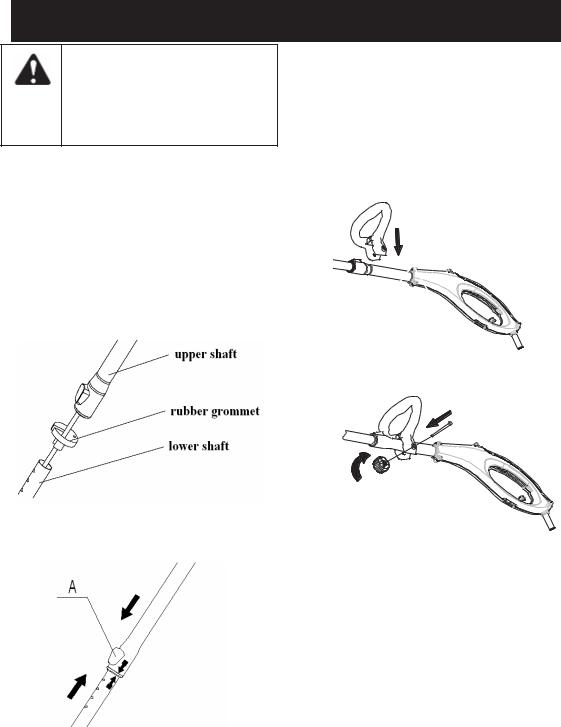
ASSEMBLY OF 2 SHAFTS
1. Remove and discard the rubber grommet ( packing material ) before assembling upper and lower shafts. ( Fig.1)
INSTALLATION OF ASSIST HANDLE
1.Remove nut and bolt from handle before assembly.
2.Place the assist handle on the upper shaft (some force is required) Fig 3.
3.Tighten the adjustment knob and bolt. (Fig. 4.)
Fig. 1
2. Align 2 arrows on upper and lower shaft as shown in Fig.2.
Fig.2
3.While pushing up on the shaft length adjustment button (A), slide upper shaft over lower shaft until it locks in place.
The shafts will not come back apart. NOTE: Once the upper and lower shafts are assembled, they will not separate again.
Fig. 3
Fig. 4
10
ASSEMBLY INSTRUCTIONS
DEBRIS SHIELD INSTALLATION
1.Align the installation arrow 1 on the debris shield with the installation arrow 2 on the housing as shown. (Fig.5 and Fig. 6.)
2.Twist the debris shield in the LOCK direction shown, until it snaps securely into place (Fig.6). Make sure the debris shield is assembled to the unit as shown in the KNOW YOUR TRIMMER section of the manual.
Fig. 5
arrow 1 |
arrow 2 |
Fig. 6
11
ADJUSTMENT INSTRUCTIONS
WARNING: Be sure unit is
unplugged when making any adjustment.
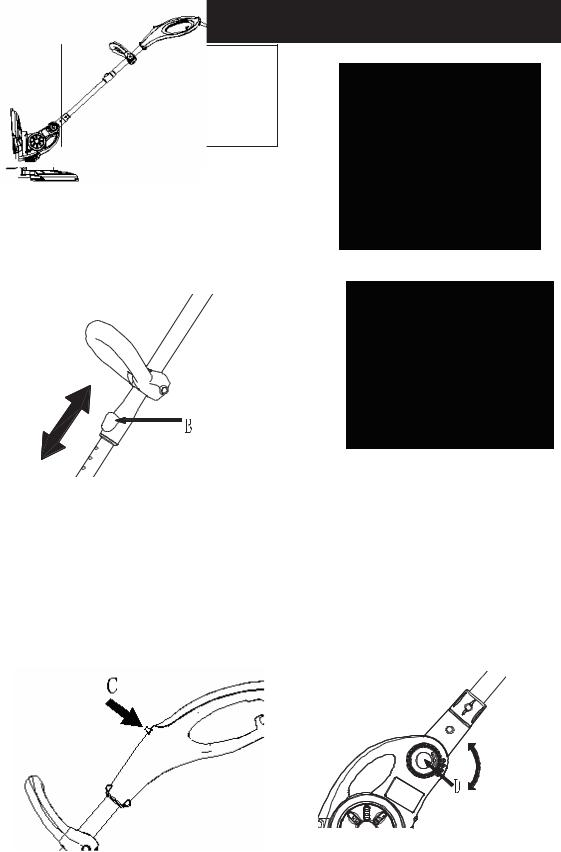
ADJUST SHAFT LENGTH
1.Grip shaft firmly.
2.Push shaft length adjustment button (B) and move upper shaft up or down to desired length. (Fig. 7)
NOTE: Shaft may be adjusted in trimming or edging mode.
Fig. 7
EDGING CONVERSION
1.Grip shaft firmly.
2.Press the edging conversion button (C) (Fig. 8) and rotate the handle assembly until it locks in place. (Fig. 9 normal trimmer mode & Fig. 10 edging mode)
Fig. 9 ( normal trimmer mode)
Fig. 10 (edging mode)
ADJUST THE ASSIST HANDLE
1.Loosen adjustment knob and move handle to a comfortable position on the upper shaft.
2.Tighten adjustment knob securely.
ADJUST THE TRIMMER SHAFT ANGLE
1.Squeeze the adjustment buttons (D) at the bottom of the shaft. (Fig. 11)
Fig. 11
Fig. 8 2. There are 4 settings to allow you to angle the shaft as needed to reach under decks, bushes etc.
12
ADJUSTMENT INSTRUCTIONS
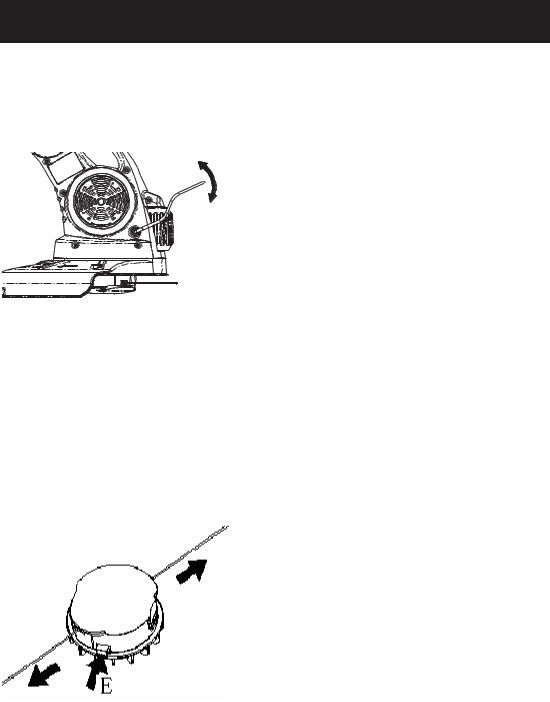
OPERATION OF THE WIRE GUARD
Rotate the wire guard as shown in Fig.12. The wire guard helps you keep the trimmer line away from fences, curbs, flowers etc.
Fig. 12
BEFORE STARTING THE UNIT
1.Make sure trimmer line is at full length. (Both lines reach out to the cutting blade on the guard. Remove protective material from cutting blade before use. )
2.To lengthen, press and release manual line feed button (E) while gently pulling two lines until the lines reach the line cutting blade. (Fig. 13).
Fig. 13
3.If line fails to feed when unit is stopped and restarted, repeat #2 (Fig. 13).
4.Use the correct extension cord as per the instructions in Section 5-1 Connect the cord.
5.Make sure the length of grass trimmer and position of assist handle are set for users comfort, adjust the length of grass trimmer by pressing the shaft adjustment
button, adjust the height of assist handle by loosening the adjustment knob.
6.The head will automatically dispense more line as unit is stopped and started.
7.To switch off the string trimmer, release the switch.
These operations should be repeated a few times before starting work to make sure that everything is functioning properly and to familiarize yourself with the grass trimmer. Start off slowly, when you have gained experience, you will be able to use the grass trimmer to its full potential.
13
OPERATING INSTRUCTIONS
WARNING: Be sure unit is
unplugged when making any adjustment.
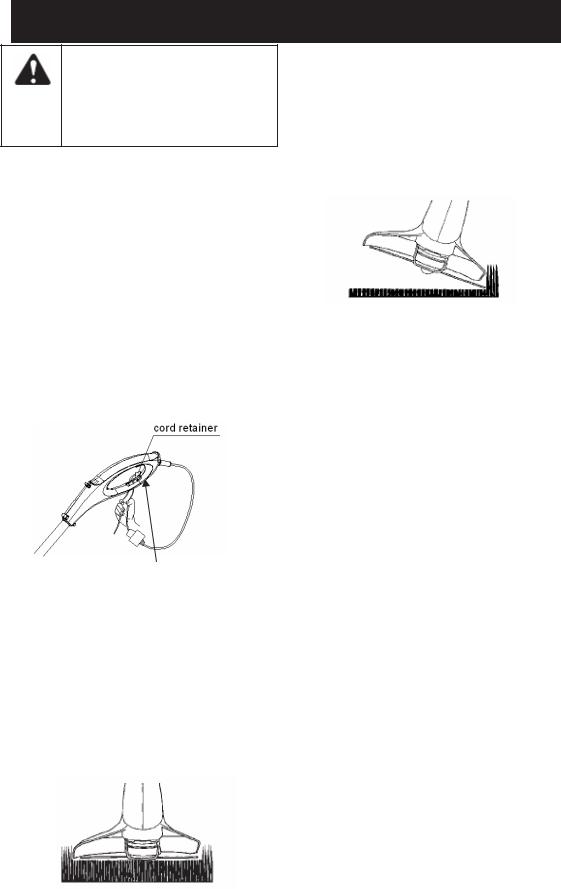
CONNECT THE CORD
1.Insure the cord is NOT plugged into a receptacle before this procedure.
2.Make a loop with 8”- 10” (20 - 25cm) of the end of the extension cord.
3.Place the loop into the slot (A) under the rear handle and lock into place on the cord retainer as shown in Fig. 14.
4.Connect the extension cord to the trimmer power cord.
5.Plug the extension cord into a receptacle ONLY when you are ready to operate the trimmer.
slot A Fig. 14
TRIMMER OPERATION
1.TRIMMING / MOWING (Fig. 15). Swing trimmer with a sickle-like motion from side to side. Do not tilt the string head during the procedure. Test area to be trimmed for proper cutting height. Keep string head at same level for even depth of cut.
Fig. 15
2.CLOSER TRIMMING (Fig. 16). Position trimmer straight ahead with a slight tilt so bottom of string head is above ground level and string contact occurs at proper cutting point. Always cut away from operator. Do not pull trimmer in toward operator.
Fig. 16
3.FENCE/FOUNDATION TRIMMING.
Approach trimming around chain link fences, picket fences, rock walls and foundations slowly to cut close without whipping string against the barrier. If the string comes in contact with rock, brick walls, or foundations, it will break or fray. If string snags fencing, it will snap off. Use wire guide.
4.TRIMMING AROUND TREES. Trim around tree trunks with a slow approach so string does not contact bark. Walk around the tree trimming from left to right. Approach grass or weeds with the tip of the string and tilt string head slightly forward.
5.SCALPING (Fig. 17). Scalping refers to removal of all vegetation down to the ground. To do this, tilt the string head to about a 30 degree angle to the left. By adjusting the handle you will have better control during this operation. Always keep a distance of 50 feet (15 meters) from other people and animals when scalping. Do not attempt this procedure if there is any chance flying debris could injure operator, other people or cause damage to property.
14
OPERATING INSTRUCTIONS
Fig. 17
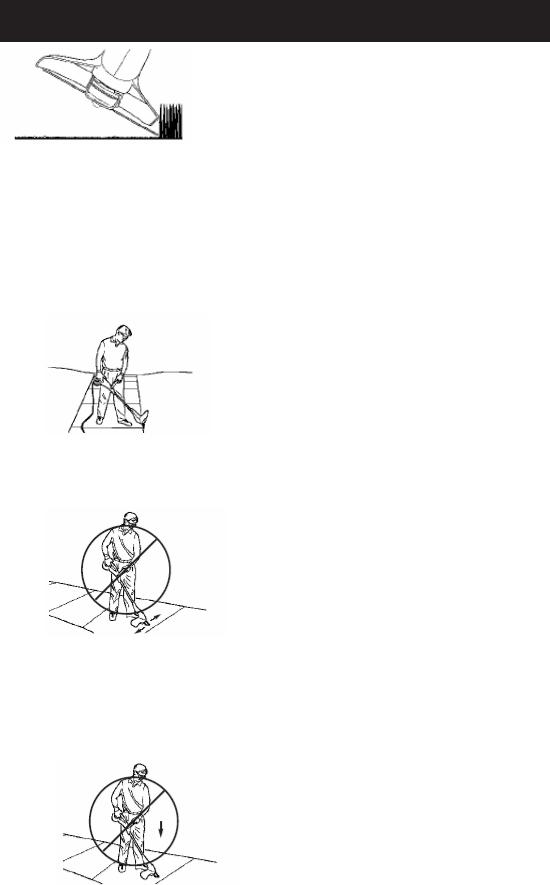
6.OPERATING AS AN EDGER (Fig. 18). With the unit configured as an edger, hold it so the motor is to your left side so that debris is thrown to the rear. Always use eye protection. Place edge guide wheel on hard surface (sidewalk. driveway etc) with trimmer line in the grass.
Fig. 18
7.SWEEPING - DO NOT SWEEP WITH TRIMMER (Fig. 19)
Fig. 19
8. DO NOT BUMP TRIMMER ON CONCRETE. This can damage the string
head |
(Fig. 20). String head feeds |
automatically.
Fig. 20
15

MAINTENANCE INSTRUCTIONS
EZ ADVANCE STRING HEAD REPLACE THE SPOOL OF NYLON LINE
1.Unplug the trimmer.
2.Remove the spool assembly from the trimmer. To do so, hold in two cap release latches with one hand. Pull cap away from the hub. (Fig.21). Remove spool.
Fig. 21
3.Using 2 pieces of .080" replacement line measure off approximately 10.5’ of line. Put 2 lines into 2 slots of the spool. (Fig. 22).
Fig. 22
4.Wind the line onto the spool by turning the spool as the arrows shown in Fig. 23.
5.Line should be wrapped snugly around the spool. Wind it until there is about 4" of line left. Be sure to not twist or cross line when winding.
6.Lock the ends of the lines in the notches of the spool. (Fig.24)
Fig. 24
Fig. 25
7.Insert the line through each eyelet in the hub. (Fig.25) Straighten the lines by removing from notches.
8.Make sure lines feed smoothly.
9.Replace cap securely on hub.
10.In the event of the line breaking inside the spool, repeat the replacement operation.
11.Start the grass trimmer following the instructions in the “BEFORE STARTING THE UNIT” section.
Fig. 23
16

MAINTENANCE INSTRUCTIONS
MAINTENANCE
CAUTION: Before
carrying out any maintenance operations, cut off the electric power supply by disconnecting the plug from the extension cord.
1.Regular cleaning and maintenance of your string trimmer will ensure efficiency and prolong the life of your machine.
2.After each cutting operation, take apart and clean out the grass and soil from the spool and its slot and in particular the debris shield.
3.During operation, keep the air slots clean and free of grass.
4.Only use a cloth soaked with hot water and a soft brush to clean the string trimmer.
5.Do not spray or wet the appliance with water.
6.Do not use detergents or solvents as these could ruin the trimmer. The parts made of plastic can easily be damaged by chemical agents.
17

|
|
SERVICE PARTS |
|
|
|
Item |
Part # |
Description |
1 |
753-05759 |
Assist handle assembly |
2 |
697-00417 |
Line on spool |
3 |
753-05760 |
Spool cap |
4 |
753-05761 |
Wire guard |
SPECIFICATIONS
Input . . . . . . . . . . . . . . . . . . . . . . . . . . . . . . . . . . . . . . . . . . . . . . . . . . . . . . . .120V, 60HZ, 4.5Amp No Load Speed . . . . . . . . . . . . . . . . . . . . . . . . . . . . . . . . . . . . . . . . . . . . . . . . . . . . . . . . 7,000RPM Cutting width . . . . . . . . . . . . . . . . . . . . . . . . . . . . . . . . . . . . . . . . . . . . . . . . . . . . . . . . .14”(360mm) Line diameter . . . . . . . . . . . . . . . . . . . . . . . . . . . . . . . . . . . . . . . . . . . . . . . . . . . . . . . . .080”(2mm) Net weight . . . . . . . . . . . . . . . . . . . . . . . . . . . . . . . . . . . . . . . . . . . . . . . . . . . . . . . . . . 7 lbs (3.2Kg)
18
 Loading...