

Page 1

Some dust created by power sanding, sawing, grinding, drilling and other construction activities contains chemicals known to the State of California to cause
cancer, birth defects or other reproductive harm. Some examples of these chemicals are:
Lead from lead-based paints
• Crystalline silica from bricks and cement and other masonry products, and
• Arsenic and chromium from chemically-treated rubber
Your risk from these exposures varies, depending on how often you do this type of work. To reduce your exposure to these chemicals: work in a well-ventilated
area, and work with approved safety equipment, such as those dust masks that are specially designed to filter out microscopic particles.
Certaines poussières générées par le ponçage, sciage, le perçage et d’autres activités de constructions électriques contiennent des substances chimiques
reconnues dans l’État de la Californie comme étant une cause de cancer, de malformations congénitales et d’autres problèmes reproductifs. Des exemples de ces
substances chimiques sont :
• Le plomb, provenant des peintures à base de plomb
• La silice cristalline, provenant des briques, du ciment et d’autre matériaux de construction
• L’arsenic et le chrome, provenant des caoutchoucs traités chimiquement
Les risques résultant de ces expositions varient en fonction de la fréquence à laquelle vous effectuez ce type de travaux. Pour réduire l’exposition à ces substances
chimiques : travaillez dans une zone ventilée et portez un équipement adapté, comme un masque à poussière conçu spécialement pour filtrer les particules
microscopiques.
Parte del polvo creado por el lijado, aserrado, esmerilado, taladrado y otras actividades de construcción contienen sustancias químicas identificadas por el estado
de California como causantes de cáncer, o defectos de nacimientos, y/u otros daños reproductivos. Algunos ejemplos de estos productos químicos son:
• El plomo de las pinturas a base de plomo.
• La sílice cristalina de los ladrillos y cemento y otros productos de mampostería.
• El arsénico y el cromo de goma tratados químicamente.
El riesgo derivado de estas exposiciones puede variar dependiendo de la frecuencia con que se realice este tipo de trabajo. Para reducir la exposición a estas
sustancias químicas, trabaje siempre en áreas bien ventilada y lleve equipos de seguridad adecuados, tales como máscaras contra el polvo especialmente
diseñadas para filtrar partículas microscópicas.
940454_Z1MANPRO1.indd 2 25/09/2014 17:25
Page 2
GB
Operating and
Safety Instructions
Instructions d’utilisation
F
et consignes de sécurité
Instrucciones de
ESP
uso y de seguridad
Instruções de
PT
Operação e Segurança
取扱説明書およ
JP
び安全の手引き
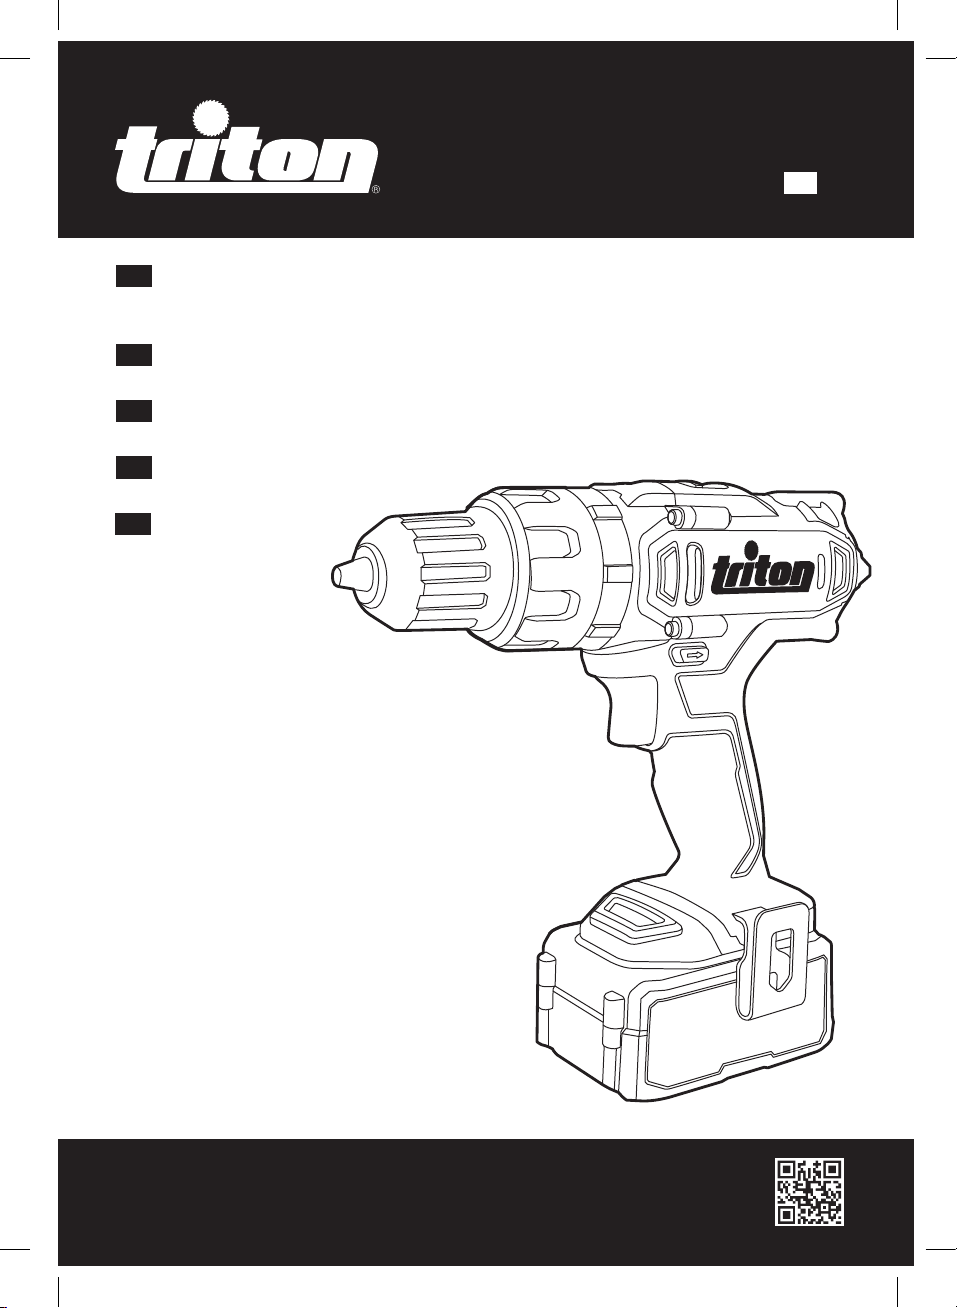
20V Combi Hammer Drill
T20 CH
tritontools.com
940454_Z1MANPRO1.indd 2 25/09/2014 17:25
Page 3

GB
Original Instructions
Thank you for purchasing this Triton tool. This manual contains information necessary for safe and effective operation of this product. This
product has unique features and, even if you are familiar with similar products, it is necessary to read this manual carefully to ensure you
fully understand the instructions. Ensure all users of the tool read and fully understand this manual.
Contents
Specification 2
Product Familiarisation 3
Description of Symbols 4
General Safety 4
Additional Safety for Battery-Operated Drills and Screwdrivers 5
Battery Pack & Charger Safety 5
Intended Use 6
Unpacking Your Tool 6
Before Use 6
Operation 7
Accessories 7
Maintenance 7
Disposal 7
Guarantee 9
Specification
Model number: T20CH
Drill
Voltage: 20V, d.c
No load speed: 0 - 450min-1 (low gear)
Impact frequency: 7200/min (low gear)
Gears: 2
Speed control: Trigger
Torque settings: 16+2
Maximum torque: 48Nm
Chuck capacity: 1.5 - 13mm ( 1⁄16 – ½" )
Drilling capacity (wood): 26mm ( 1-1⁄32" )
Drilling capacity (masonry): 10mm ( 3⁄8" )
Drilling capacity (steel): 13mm (½" )
Weight: 3.9kg (8.6lbs)
Sound and vibration information:
Sound pressure LPA: 87.6dB(A)
Sound power LWA: 98.6dB(A)
Uncertainty K: 3dB
Weighted vibration:
(metal) a
: 2.373m/s
h,D
0 - 1600min-1 (high gear)
25,600/min (high gear)
(with 4.0 Ah battery pack fitted)
2
(concrete) a
: 7.104m/s
h,ID
(no load/max.speed) a
Uncertainty K: 1.5m/s
The sound intensity level for the operator may exceed 85dB(A) and sound protection
measures are necessary.
: 1.707m/s
h,NL
Battery Pack
Technology: Samsung Li-Ion cells
Voltage: 20V, d.c.
Model & capacity: T20HCB, 4.0Ah
Battery charger
Charger model: T20BC
Charging times: 1hr (for T20HCB: 4Ah battery pack)
Input Voltage: EU: 220-240V, a.c. 50/60Hz, 80W
Power output: 20V, d.c., 3.0A
Length of power cord: 2m (6-1⁄2')
As part of our ongoing product development, specifications of Triton products may alter
without notice.
2
2
2
T20B, 2.0Ah
30min (T20B: 2Ah battery pack)
SA: 220-240V, a.c. 50/60Hz, 80W
AU: 220-240V, a.c. 50/60Hz, 80W
JP: 100-120V, a.c. 50/60Hz, 1.3A
US/CAN: 120V, a.c. 60Hz, 1.3A
WARNING: Always wear ear protection where the sound level exceeds 85dB(A) and limit the time of exposure if necessary. If sound levels are uncomfortable, even with ear protection, stop using
the tool immediately and check the ear protection is correctly fitted and provides the correct level of sound attenuation for the level of sound produced by your tool.
WARNING: User exposure to tool vibration can result in loss of sense of touch, numbness, tingling and reduced ability to grip. Long term exposure can lead to a chronic condition. If necessary, limit
the length of time exposed to vibration and use anti-vibration gloves. Do not operate the tool with hands below a normal comfortable temperature, as vibration will have a greater effect. Use the
figures provided in the specification relating to vibration to calculate the duration and frequency of operating the tool.
Sound and vibration levels in the specification are determined according to EN60745 or similar international standards. The figures represent normal use for the tool in normal working conditions.
A poorly maintained, incorrectly assembled, or misused tool, may produce increased levels of noise and vibration. www.osha.europa.eu provides information on sound and vibration levels in the
workplace that may be useful to domestic users who use tools for long periods of time.
2
940454_Z1MANPRO1.indd 2 25/09/2014 17:25
Page 4
GB
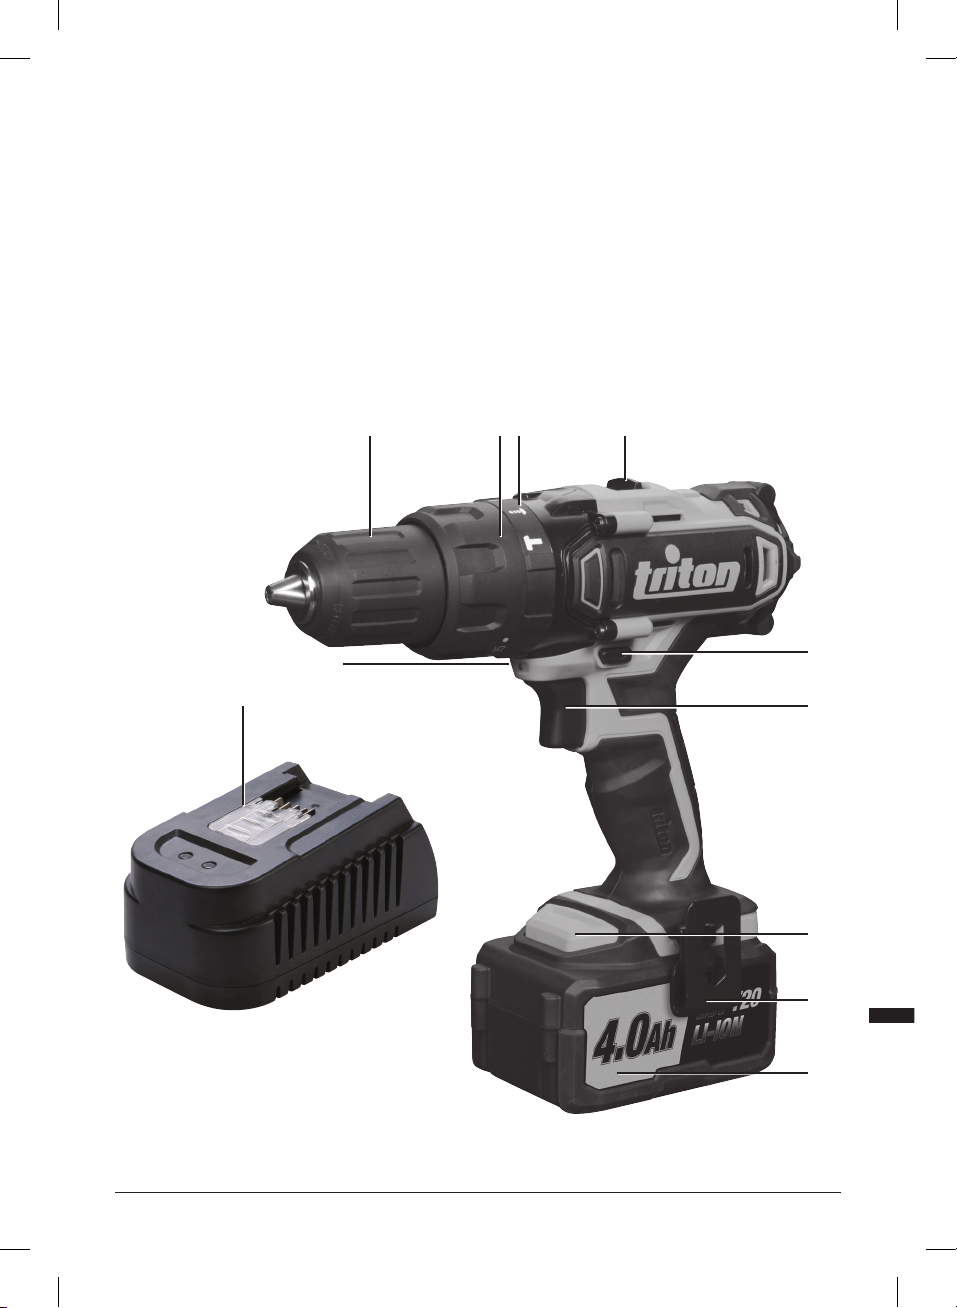
Product Familiarisation
1. Keyless Chuck
2. Torque Adjustment Collar
3. Mode Selector
4. Gear Selector
5. Forward/Reverse Switch
6. Speed Control Trigger Switch
7. Battery Release Button
8. Belt Clip
9. Battery Pack*
10. LED Guide Light
11. T20 Battery Charger
Accessories (not shown):
• Soft carry case
Converter Plug
UK users: do not attempt to remove the installed UK converter plug and use it on other
appliances.
Do not remove the installed UK converter plug and attempt to insert it directly into UK mains
power supply sockets.
If the UK converter plug is damaged, please contact an authorised Triton service centre.
1 2 3 4
11
*NOTE: Battery provided may differ from image.
10
5
6
7
8
9
3
940454_Z1MANPRO1.indd 3 25/09/2014 17:25
Page 5

GB
Description of Symbols
Wear hearing protection
Wear eye protection
Wear breathing protection
Wear head protection
Read instruction manual
General Safety
WARNING Read all safety warnings and all instructions. Failure to follow the warnings and
instructions may result in electric shock, fire and/or serious injury.
WARNING: This appliance is not intended for use by persons (including children)
with reduced, physical or mental capabilities or lack of experience or knowledge.
Save all warnings and instructions for future reference.
The term “power tool” in the warnings refers to your mains-operated (corded)
power tool or battery-operated (cordless) power tool.
Work area safety
Caution!
DO NOT incinerate batteries!
For indoors use only (battery and battery charger)!
Internal time-lag fuse with rated current 3.15A
T3.15A
Environmental Protection
Waste electrical products should not be disposed of with household waste. Please
recycle where facilities exist. Check with your local authority or retailer for recycling
advice.
Environmental Protection
Waste electrical products and batteries, including Li-Ion batteries, should not be
disposed of with household waste. Please recycle where facilities exist. Check with
your local authority or retailer for recycling advice.
Li-ion battery cells are recyclable and should not be disposed of with household
waste. Please recycle where facilities exist. Check with your local authority or
retailer for recycling advice
Li-ion
Conforms to relevant legislation and safety standards. (Only EU model)
a) Keep work area clean and well lit. Cluttered or dark areas invite accidents
b) Do not operate power tools in explosive atmospheres, such as in the
presence of flammable liquids, gases or dust. Power tools create sparks
which may ignite the dust or fumes.
c) Keep children and bystanders away while operating a power tool.
Distractions can cause you to lose control.
Electrical safety
a) Power tool plugs must match the outlet. Never modify the plug in any
way. Do not use any adapter plugs with earthed (grounded) power
tools. Unmodified plugs and matching outlets will reduce risk of electric
shock.
b) Avoid body contact with earthed or grounded surfaces, such as pipes,
radiators, ranges and refrigerators. There is an increased risk of electric
shock if your body is earthed or grounded.
c) Do not expose power tools to rain or wet conditions. Water entering a
power tool will increase the risk of electric shock.
d) Do not abuse the cord. Never use the cord for carrying, pulling or
unplugging the power tool. Keep cord away from heat, oil, sharp
edges or moving parts. Damaged or entangled cords increase the risk of
electric shock.
e) When operating a power tool outdoors, use an extension cord suitable
for outdoor use. Use of a cord suitable for outdoor use reduces the risk of
electric shock.
f) If operating a power tool in a damp location is unavoidable, use a
residual current device (RCD) protected supply. Use of an RCD reduces
the risk of electric shock.
Personal safety
a) Stay alert, watch what you are doing and use common sense when
operating a power tool. Do not use a power tool while you are tired
or under the influence of drugs, alcohol or medication. A moment of
inattention while operating power tools may result in serious personal injury.
b) Use personal protective equipment. Always wear eye protection.
Protective equipment such as dust mask, non-skid safety shoes, hard hat,
or hearing protection used for appropriate conditions will reduce personal
injuries.
c) Prevent unintentional starting. Ensure the switch is in the off-position
before connecting to power source and/or battery pack, picking up or
carrying the tool. Carrying power tools with your finger on the switch or
energising power tools that have the switch on invites accidents.
d) Remove any adjusting key or wrench before turning the power tool
on. A wrench or a key left attached to a rotating part of the power tool may
result in personal injury.
e) Do not overreach. Keep proper footing and balance at all times. This
enables better control of the power tool in unexpected situations.
f) Dress properly. Do not wear loose clothing or jewellery. Keep your hair,
clothing and gloves away from moving parts. Loose clothes, jewellery or
long hair can be caught in moving parts.
g) If devices are provided for the connection of dust extraction and
collection facilities, ensure these are connected and properly used.
Use of dust collection can reduce dust-related hazards.
Power Tool Use & Care
a) Do not force the power tool. Use the correct power tool for your
application. The correct power tool will do the job better and safer at the
rate for which it was designed.
b) Do not use the power tool if the switch does not turn it on and off. Any
power tool that cannot be controlled with the switch is dangerous and must
be repaired.
c) Disconnect the plug from the power source and/or the battery pack
from the power tool before making any adjustments, changing
accessories, or storing power tools. Such preventive safety measures
reduce the risk of starting the power tool accidentally.
4
940454_Z1MANPRO1.indd 4 25/09/2014 17:25
Page 6

GB
d) Store idle power tools out of the reach of children and do not allow
persons unfamiliar with the power tool or these instructions to operate
the power tool. Power tools are dangerous in the hands of untrained users.
e) Maintain power tools. Check for misalignment or binding of moving
parts, breakage of parts and any other condition that may affect the
power tool’s operation. If damaged, have the power tool repaired
before use. Many accidents are caused by poorly maintained power tools.
f) Keep cutting tools sharp and clean. Properly maintained cutting tools
with sharp cutting edges are less likely to bind and are easier to control.
g) Use the power tool, accessories and tool bits etc. in accordance with
these instructions, taking into account the working conditions and the
work to be performed. Use of the power tool for operations different from
those intended could result in a hazardous situation.
Battery tools use and care
a) Recharge only with charger specified by the manufacturer. A charger that is suitable
for one type of battery pack may create a risk of fire when used with another battery
pack.
b) Use power tools only with specifically designated battery packs.
Use of any other battery packs may create a risk of injury and fire
c) When battery pack is not in use, keep it away from other metal objects, like paper
clips, coins, keys, nails, screws and other small metal objects that can make a
connection from one terminal to another. Shorting the battery terminals together may
cause a burns or
a fire.
d) Under abusive conditions, liquid may be ejected from the battery; avoid contact. If
contact accidentally occurs, flush with water. If liquid contact eyes, additionally
seek medical help. Liquid ejected from the battery may cause irritation or burns.
WARNING: When used in Australia or New Zealand, it is recommended that this tool is ALWAYS
supplied via Residual Current Device (RCD) with a rated residual current of 30mA or less.
Service
a) Have your power tool serviced by a qualified repair person using only
identical replacement parts. This will ensure that the safety of the power
tool is maintained.
Additional Safety for BatteryOperated Drills & Screwdrivers
For safety relating to protective clothing/equipment and general health hazards relating to
power tools; refer to General and Electrical Safety sections in this manual
• Wear ear protectors when impact drilling. Exposure to noise can cause hearing loss
• Hold power tools by insulated gripping surfaces, when performing an operation where
the cutting accessory may contact hidden wiring. Cutting accessory and/or fasteners
contacting a “live” wire may make exposed metal parts of the power tool “live” and give
the operator an electric shock.
Important: It is imperative to follow all national safety regulations concerning installation,
operation and maintenance
• Do not allow anyone under the age of 18 years to use this tool, and ensure that operators
are qualified and familiar with the operating and safety instructions
• If batteries are to be charged outdoors, ensure that the power supply and charger are
protected against weather/moisture
• When using the drill, use safety equipment including safety glasses or shield, ear
defenders, and protective clothing including safety gloves. Wear a dust mask if the drilling
operation creates dust
• Use metal and voltage detectors to locate concealed electric, water or gas lines. Avoid
touching live components or conductors
• Ensure that the lighting is adequate
• Ensure that the drill bit is securely fixed in the chuck. Insecure drill bits can be ejected
from the machine causing a hazard
• Ensure that the drill bit is in contact with the workpiece prior to starting up the tool
• Before drilling, check that there is sufficient clearance for the drill bit under the workpiece
• Do not put pressure on the tool, to do so would shorten its service life
• Drill bits get hot during operation, allow to cool prior to handling them
• Never use your hands to remove sawdust, chips or waste close by the bit
• If you are interrupted when operating the drill, complete the process and switch off before
looking up
• Where possible, use clamps or a vice to hold your work
• Examine the chuck regularly for signs of wear or damage. Have damaged parts repaired
by a qualified service centre
• Always wait until the drill has come to a complete stop before putting it down
• Periodically check all nuts, bolts and other fixings and tighten where necessary
Battery and Charger Safety
Use the battery charger correctly
• Refer to the section of this manual relating to use of the battery charger before attempting
to charge the battery pack.
• Do not attempt to use the charger with any batteries other than those supplied. Keep your
battery charger clean; foreign objects or dirt may cause a short or block air vents. Failure
to follow these instructions may cause overheating or fire
• If the supply cord is damaged, it must be replaced by the manufacturer, its service agent
or similarly qualified persons in order to avoid a hazard
• Children should be supervised to ensure that they do not play with the appliance.
Warning: Do not recharge non-rechargeable batteries
Use batteries correctly
• Only charge batteries using the charger provided. Only use batteries provided with this
power tool, or others recommended by the supplier. Keep batteries clean; foreign objects
or dirt may cause a short. Allow batteries to cool for 15 minutes after charging or heavy
use. Failure to follow these instructions may cause overheating or fire.
• When not in use batteries should be stored at room temperature (approx. 20˚C). Ensure
that batteries cannot accidentally short in storage.
NOTICE for Battery Packs
• DANGER – Risk of battery packs include burn hazard, fire hazard and explosion hazard
• CAUTION - Do Not Open, Disassemble, Crush, Heat above 60 degree C or incinerate. Do
Not dispose of in fire or similar.
• CAUTION – for Primary batteries, do not charge.
• CAUTION – only charge battery with charger model T20BC. For Safety use of battery
charger, make reference to the instruction manual of the battery charger.
• CAUTION - Follow Manufacturer’s Instructions
Battery and charger safety features
The battery pack and charger are fitted with a number of safety features which may be
triggered during charging or operation:
• Over-charge protection: Charger automatically switches off when the battery pack has
reached full charge capacity, protecting the internal components of the battery pack
• Over-discharge protection: Prevents the battery from discharging beyond the
recommended lowest safety voltage
• Over-heat protection: Sensor switches off if the battery becomes too hot during operation.
This can happen if the tool is overloaded or being used for extended periods of time. Up to
30 minutes cooling time may be required depending on the ambient temperature
• Overload protection: Battery temporarily stops if it is overloaded or the maximum current
draw is exceeded, protecting the internal components. The battery will resume normal
operation when the current draw returns to a normal safe level. This may take a few
seconds
• Short circuit protection: The battery pack will stop working immediately if a short circuit
occurs, this prevents damage to the battery pack or tool
WARNING for Australia and New Zealand
• WARNING: When used in Australia or New Zealand, it is recommended that this tool is
ALWAYS supplied via Residual Current Device (RCD) with a rated residual current of
30mA or less.
5
940454_Z1MANPRO1.indd 5 25/09/2014 17:25
Page 7

GB
Intended Use
• Battery operated drill with screwdriver, drill and hammer drill functions suitable for
medium duty drilling and driving tasks
Unpacking Your Tool
• Carefully unpack and inspect your tool. Fully familiarise yourself with all its features and
functions
• Ensure that all parts of the tool are present and in good condition. If any parts are missing
or damaged, have such parts replaced before attempting to use this tool
Before Use
• This cordless impact driver has been shipped in a low charge condition. Charge the
battery before use
Battery charger operation
• The charger and battery pack may become warm while charging. This is normal and does
not indicate a problem
• Use the charger at normal room temperatures whenever possible. To prevent overheating,
do not cover the charger and do not charge the battery in direct sunlight or near sources
of heat
If the battery does not charge properly:
• Check current at power outlet by plugging in a lamp or other appliance
• If charging problems persist, have the impact driver, battery pack and battery charger
checked by an electrician or a power tool technician
Charging the battery pack
1. Depress the Battery Release Button (7) and remove the battery from the tool
2. Insert the battery pack into the T20 Battery Charger (11). Do not use excessive force
when inserting the battery pack. If it does not slide into place easily, it is not being
inserted correctly
3. Initially only the green LED may flash as it evaluates the status of the battery. When
charging the red LED will illuminate and the green LED will be OFF
4. When the battery is fully charged the red LED will be OFF and the green LED will
illuminate
5. The battery charger will constantly monitor the condition of the battery when charging
6. Remove the battery pack as soon as possible when completely charged
7. Disconnect the charger from the power supply and store in a clean, dry environment out of
the reach of children
• Normal battery charging time is approximately 1hour for a recently fully discharged 4Ah
battery at normal temperature. Charging times will vary outside these conditions. 2.0Ah
battery: Please note the full charging time will be approximately 30 minutes
• You do not need to fully discharge the battery before recharging but you should not
attempt to recharge a battery that is already fully charged
• You can interrupt charging at any point to use the battery. Under normal conditions the
charger charges at a higher rate but reduces the charging rate as the battery becomes
fully charged. An 80% charge is achieved after 1/2hr of charging
Battery charging table
Red LED Green LED
Charger plugged In OFF Flashing
Charger evaluating battery OFF Flashing
Fast charging ON Off
Highly discharged battery slow charging Flashing Off
Abnormal battery temperature charging Flashing Off
Fully Charged OFF On
Battery or charger fault Flashing Flashing
Temporary abnormal temperature
condition
Note: If the lights on the battery charger fail to illuminate according to the chart above or
indicate a fault condition:
• Check the battery is firmly seated in the battery charger
• Check all connections and that mains power is switched on
On On
Initial charge
• The initial charge will vary depending on the existing charge in the battery. Allow the
battery to reach full charge as indicated on the charger
• After discharging, recharge the battery completely, as indicated by the LED on the battery
charger, for the next 4 to 5 uses. This will ensure that the battery is performing to its
highest capacity
• Subsequent full charges will take approximately 1 hour (T20HCB: 4Ah battery), however
the battery can be recharged when the battery is only partially discharged
Re-charging the battery
• After use, a lithium-ion battery must be allowed to cool down before charging
• If a hot battery is inserted into the charger both LEDs will illuminate. The charger will
begin to charge when the battery has cooled sufficiently (this may take several minutes)
Installing the battery
• The battery should fit easily into the battery charger or drill unit. If the battery is difficult
to fit, check the condition of the battery and contacts
Battery - length of service
• The length of service from each charging cycle will depend on the type of workload. The
battery charger and battery for this impact driver have been designed to provide a long
trouble-free working life. The charger intelligently monitors the condition of the battery
and selects the ideal charging rate for the condition of the battery. It protects the battery
from over-charging or charging at too high a rate. However, like all batteries, performance
will be reduced over time
To maximise battery life:
• Store and charge the battery in a cool area. Temperatures above or below normal room
temperature will reduce battery life
• Never store lithium-ion batteries in a discharged condition. Recharge them immediately
after they are discharged. For storing long term, store fully charged
• All batteries gradually lose their charge, even lithium-ion batteries, but the discharge rate
is very low. If the impact driver is stored for long periods of time without use, recharge
the battery every three to four months and disconnect the battery from the power tool
before it is stored. This practice will prevent the lithium-ion battery being damaged when
stored
6
940454_Z1MANPRO1.indd 6 25/09/2014 17:25
Page 8

GB
Fitting a drill or driver bit
WARNING: DO NOT fit any attachment with a maximum speed lower than the no load speed
of the machine.
1. Rotate the Keyless Chuck (1) collar clockwise and insert the bit into the chuck
2. Rotate the Keyless Chuck collar anti-clockwise to secure the drill bit
Note: DO NOT run the tool whilst tightening or releasing the chuck. Ideally select the locked
middle position of the Forward/Reverse Switch (5).
3. When the bit is held tightly, test that it is positioned centrally by running the tool. The bit
should rotate smoothly without uneven rotation. If the bit is not central, release the chuck,
reposition the bit and retighten the chuck
Direction control
• The rotation direction can be set using the Forward/Reverse Switch (5)
• To let the chuck rotate clockwise, push the Forward/Reverse Switch to the left
• To let the chuck rotate anti-clockwise, push the Forward/Reverse Switch to the right
• When the Forward/Reverse Switch is in the central position, the tool is locked
WARNING: DO NOT attempt to move the forward/reverse selector when the tool is running
Speed control
• This drill driver features a 2-speed gearbox:
- 1st gear range: 0 – 450min
- 2nd gear range: 0 – 1600min
• Use the Gear Selector (4) to set the gear: forward for first gear, back for second gear
Note: The first gear would be used normally for driving screws for example and offers higher
torque and superior control at low rpm. The second gear would normally be used exclusively
for drilling.
-1
-1
Torque control
• This drill driver is fitted with torque control, which limits the torque output of the drill,
enabling screws to be driven without the risk of damage
• There are 16 torque settings and two drill settings. The lower the number, the lower the
torque
• To adjust the torque, select the first gear and rotate the Torque Adjustment Collar (2) until
the setting you require is aligned with the arrow on the combi hammer drill housing
• Check that the torque setting is correct by practising first on a piece of scrap material
Mode selection
• For drilling, select the correct gear, then rotate the Mode Selector (3) to the drill symbol.
This will lock the tool for maximum torque
• For screwdriving, select the correct gear, then rotate the Mode Selector to the screw
symbol. This will activate the torque clutch
• For masonry drilling, select the correct gear, then rotate the Mode Selector to the
hammer symbol. This will lock the tool for maximum torque and activate impact hammer
function
WARNING: The drill driver can be fitted with a drive adaptor for use with driving nuts and bolts.
Do not attempt to use this tool in the drill position when doing so. Use the 16 torque settings
and the first gear to allow the torque clutch to protect the tool from excessive load. The use
of a spanner to loosen or tighten a nut/bolt is recommended. This allows the tool to speed up
the operation, without risk of damage, when high torque is required at the beginning or end
of the operation.
Operation
WARNING: Always use adequate protective equipment, including eye protection, respiratory
and hearing protection, when working with this tool.
Switching on and off
• To start the tool, squeeze the Speed Control Trigger Switch (6). The LED Guide Light (10)
will illuminate
• Further pressure on the trigger will increase the running speed of the tool
• Release the Speed Control Trigger Switch to stop the tool
Note: It is possible the drill driver may switch off during heavy use due to thermal protection
of the battery and internal components. This may prevent the tool being used again for a short
period of time and does not represent a fault condition.
Drilling guidance
• Use sharp drill bits and ensure that drill bits are suitable for the material being drilled
• Never exceed the maximum drilling capacities listed in ‘Specification’
• Begin drilling at slow speeds by partially squeezing the trigger switch
• Reduce pressure on the trigger when the drill bit is about to break through to the other
side of material
• To avoid splintering on breakthrough, either clamp a piece of scrap wood to the back
of the workpiece or continue the hole from the back of the wood when the drill bit first
breaks through
Drilling metal
• Support thin material with a piece of scrap wood
• Mark the intended hole position using a hammer and centre punch
• Use only HSS (high speed steel) drill bits or others recommended for drilling into metal
• Prior to drilling large holes, use a smaller bit to drill a pilot hole
• Use a suitable coolant/lubricant to prolong the service life of the drill bit, and produce good
results
Drilling masonry
• Always use a masonry drill bit, preferably a TCT masonry bit, when drilling into walls,
stone or concrete
• DO NOT apply too much pressure to the back of the tool. If debris blocks the drill hole, run
the drill slowly and remove the bit from the hole. Repeat until the hole is clear of debris
and continue
Accessories
• A range of accessories, including a 2Ah battery (T20B), 4Ah high capacity battery
(T20HCB), drill and screwdriver bits is available from your Triton dealer. Spare parts can be
purchased from your Triton dealer or online at www.toolsparesonline.com
Maintenance
• This tool is manufactured using class leading components and makes use of the latest
in intelligent circuitry that protects the tool and its components. In normal use it should
provide a long working life
Cleaning
• Keep your machine clean at all times. Dirt and dust will cause internal parts to wear
quickly, and shorten the machine’s service life. Clean the body of your machine with a
soft brush or dry cloth. If available, use clean, dry, compressed air to blow through the
ventilation holes
Storage
• Store this tool and its accessories after use in its case, in a dry, secure place out of the
reach of children
Disposal
Always adhere to national regulations when disposing of power tools that are no longer
functional and are not viable for repair.
• Do not dispose of power tools, batteries or other waste electrical and electronic equipment
(WEEE), with household waste
• Contact your local waste disposal authority for information on the correct way to dispose
of power tools and batteries
940454_Z1MANPRO1.indd 7 25/09/2014 17:25
7
Page 9

GB
Troubleshooting
Problem Possible cause Solution
Red charging LED does not illuminate and battery not
charging
Battery pack has low capacity
Drill cannot be switched on (trigger switch does not move)
Drill does not start when on/off trigger switch is depressed
Screws do not reach deep enough into the workpiece
Screws are driven too deep into the workpiece surface Too much torque; torque clutch setting too high Choose a lower torque setting
During masonry drilling the drill bit does not penetrate
the wall
Battery not fully seated Clean battery socket of charger
Charger not powered Recheck mains connection
Battery not being fully charged Charge the battery until the charger indicates a full charge
Battery pack has been charged over 100 times and capacity
has started to reduce
The forward/reverse switch may be in the middle (‘locked’)
position
Battery completely discharged Recharge ba ttery or replace with a fully charged battery
Defective battery Replace battery
Machine defective Contact your Triton dealer or authorised service centre
Not enough torque; torque clutch setting too low Choose a higher torque setting
Low battery voltage Recharge battery or replace with a fully charged ba ttery
Unsuitable or blunt drill bit Replace drill bit with a new high quality masonry drill bit
Drill bit too large See ‘Specifications’ for maximum drilling capacities
Drill not set to hammer mode
This is normal for battery packs. Contact your Triton dealer
to purchase a replacement battery pack
Slide the forward/reverse switch either to the left or right
Rotate mode selector to switch the machine into hammer
drill mode (see ‘Mode Selection’)
8
940454_Z1MANPRO1.indd 8 25/09/2014 17:25
Page 10

GB
Guarantee
To register your guarantee visit our web site at
www.tritontools.com* and enter your details.
Your details will be included on our mailing list (unless indicated otherwise) for
information on future releases. Details provided will not be made available to any third
party.
Purchase Record
Date of Purchase: ___ / ___ / ____
Model: T20CH Retain your receipt as proof of purchase art pr
Triton Preci sion Power Tools guara ntees to the purcha ser of this product t hat if any part
proves to be d efective due to faul ty materials or wo rkmanship within 3 Y EARS fro m the
date of orig inal purchase,
Triton will rep air, or at its discretio n replace, the fault y part free of cha rge.
This guar antee does not appl y to commercial use nor d oes it extend to nor mal wear and
tear or dama ge as a result of accide nt, abuse or misuse.
* Register o nline within 30 days .
Terms & conditi ons apply.
This does not affect your statutory rights oves to be defecti
9
940454_Z1MANPRO1.indd 9 25/09/2014 17:25
Page 11

F
Traductions des instructions originales
Nous vous remercions d’avoir choisi cet équipement Triton. Ces instructions contiennent les informations nécessaires au fonctionnement
efficace et sûr de ce produit. Veuillez lire attentivement ce manuel pour vous assurer de tirer pleinement avantage des caractéristiques
uniques de votre nouvel équipement. Gardez ce manuel à portée de main et assurez-vous que tous les utilisateurs l’aient lu et bien compris
avant toute utilisation.
Table des matières
Caractéristiques techniques 16
Nomenclature 17
Consignes générales de sécurité 17
Consignes de sécurité relatives aux perceuses sans fil 18
Consignes générales de sécurité relatives aux chargeurs de batterie 18
Usage conforme 19
Avant utilisation 19
Instructions d’utilisation 20
Accessoires 20
Entretien 20
Recyclage 20
Garantie 21
Déclaration de conformité 21
Caractéristiques techniques
Numéro du modèle : T20CH
Perceuse
Tension : 20 V CC
Vitesse à vide : 0 - 450 min-1 (bas régime)
Fréquence des percussions : 7200 coups/min (bas régime)
Régime de la boite de vitesse : 2
Contrôle de la vitesse : par pression de la gâchette
Réglage du couple : 16 +2
Couple maximum : 48 Nm
Capacité du mandrin : 1,5 – 13 mm ( 1⁄16 – ½" )
Capacité de perçage (bois) : 26 mm ( 1-1⁄32" )
Capacité de perçage (matériaux
de construction) :
Capacité de perçage (acier) 13 mm (½" )
Poids : 3,9 kg (8,6 lbs)
0 - 1600 min-1 (haut régime)
25600 coups/min (haut régime)
10 mm ( 3⁄8" )
(avec batterie 4,0 Ah)
Informations sur le niveau d’intensité sonore et
vibratoire
Pression acoustique Lpa : 87,6 dB (A)
Puissance acoustique Lwa 98,6 db (A)
Incertitude K : 3 dB
Vibration pondérée
(métal) a
: 2,373 m/s2
h,D
(béton) a
: 7,104 m/s
h,ID
(vitesse à vide/vitesse max) ah: 1,707 m/s2
Incertitude K : 1,5 m/s²
2
Bloc-batterie
Technologie : Li-ion à cellules Samsung
Tension : 20 V CC
Modèle et capacité : T20HCB 4,0 Ah
T20B 2,0 Ah
Chargeur
Modèle de chargeur : T20BC
Temps de charge : 1 heure (pour T20HCB : bloc-batterie 4 Ah)
Tension d’entrée : Europe : 220-240 V CA 50/60 Hz 80 W
Tension de sortie : 20 V CC 3,0 A
Longueur du câble
d’alimentation :
Du fait de l’évolution constante de nos produits, les caractéristiques des produits
Silverline peuvent changer sans notification préalable.
30 min (T20B : bloc-batterie 2 Ah)
Afrique du Sud : 220-240 V CA 50/60 Hz 80 W
Australie : 220-240 V CA 50/60 Hz 80 W
Japon : 100-120 V CA 50/60 Hz 1,3 A
USA/Canada : 120 V CA 60 Hz, 1,3 A
2 m (6-1⁄2')
Attention : Toujours porter des protections sonores lorsque le niveau d’intensité est supérieur à 85 dB(A) et limiter le temps d’exposition si nécessaire. Si l’intensité sonore devient inconfortable,
même avec les protections, arrêter immédiatement d’utiliser l’appareil, vérifier que les protections soient bien mises et qu’elles soient adéquates avec le niveau sonore produit par l’appareil.
Attention : L’exposition de l’utilisateur aux vibrations peut engendrer une perte du toucher, des engourdissements, des picotements et ainsi réduire la capacité de préhension. De longues
expositions peuvent également provoquer ces symptômes de façon chronique. Si nécessaire, limiter le temps d’exposition aux vibrations, et porter des gants anti-vibrations. Ne pas utilisez cet
appareil avec vos mains sous des conditions en dessous de températures normales, car l’effet vibratoire en est accentué. Se référer au cas de figures des caractéristiques relatives aux vibrations
pour calculer le temps et fréquence d’utilisation de l’appareil.
Les niveaux sonores et vibratoires des caractéristiques techniques sont déterminés en fonction de la norme EN60745 ou autres normes internationales. . Ces données correspondent à un
usage normale de l’appareil, et ce dans des conditions de travail normales. Un appareil mal entretenu, mal assemblé ou mal utilisé peut augmenter les niveaux sonores et vibratoires. Pour plus
d’informations sur la directive des émissions sonores et vibratoires, visitez le site http://osha.europa.eu/fr.
10
940454_Z1MANPRO1.indd 10 25/09/2014 17:25
Page 12

F
Nomenclature
1. Mandrin sans clé
2. Bague de réglage du couple
3. Sélecteur du mode
4. Sélecteur du régime de vitesse
5. Sélecteur du sens de rotation
6. Gâchette du contrôle de la vitesse
7. Bouton de relâche de la batterie
8. Clip de ceinture
9. Batterie 4,0 Ah
10. Guide de lumière LED
11. Chargeur de batterie T20
Accessoires (non montrés)
• Sacoche de transport souple
Remarque : La batterie fournie peut différer de l’image
Prise GB/UE
Pour le Royaume-Uni seulement : N’essayez pas d’enlever l’adaptateur GB installé et de
l’utiliser avec d’autres appareils
N’enlever pas l’adaptateur GB installé et n’essayez pas de le brancher directement dans une
prise de courant
Si l’adaptateur GB est endommagé, veuillez contacter un service après-vente agréé « Triton ».
Symboles
Port de protection auditive
Port de lunettes de sécurité
Port du masque respiratoire
Port du casque
Lire le manuel d’instructions
ATTENTION!
Ne pas brûler les batteries !
Pour usage intérieur uniquement (batterie et chargeur de batterie)
Fusible à action retardée et à courant nominal de 3,15 A
T3.15A
Protection de l’environnement
Les produits électriques usagés ne doivent pas être jetés avec les ordures
ménagères. Veuillez les recycler dans les centres prévus à cet effet. Pour de plus
amples informations, veuillez contacter votre municipalité ou point de vente.
Protection de l’environnement
Les produits électriques usagés et les batteries, ainsi que les batteries au lithiumion, ne doivent pas être jetés avec les ordures ménagères. Veuillez les recycler dans
les centres prévus à cet effet. Pour de plus amples informations, veuillez contacter
votre municipalité ou point de vente.
Les batteries Li-ion ne doivent pas être jetées avec les ordures ménagères.
Veuillez les recycler dans les centres prévus à cet effet. Pour de plus amples
informations, veuillez contacter votre municipalité ou point de vente. Conforme à
la réglementation et aux normes de sécurité pertinentes. (Valable uniquement pour
Li-ion
les modèles UE)
Conforme à la réglementation et aux normes de sécurité pertinentes (pour le modèle
UE uniquement)
Consignes générales de sécurité
AVERTISSEMENT : Veuillez lire l’intégralité des consignes de sécurité et des instructions. Le
non-respect de ces consignes et instructions peut entraîner un risque de choc électrique, d’incendie et/
ou se traduire par des blessures graves.
Attention : Cet appareil n’est pas conçu pour être utilisé par des personnes (enfants compris) ayant
des capacités physiques ou mentales réduites, ou n’ayant pas la connaissance ou l’expérience
requise.
Veuillez conserver ces instructions et consignes de sécurité pour référence ultérieure.
L’expression « appareil électrique » employée dans les présentes consignes recouvre aussi
bien les appareils filaires à brancher sur le secteur que les appareils sans fils fonctionnant
sous batterie.
Sécurité sur la zone de travail
a) Maintenir une zone de travail propre et bien éclairée. Des zones encombrées et mal
éclairées sont sources d’accidents.
b) Ne pas utiliser d’outils électriques dans des environnements explosifs, tels
qu’à proximité de liquides, de gaz ou de poussières inflammables. Les appareils
électriques produisent des étincelles susceptibles d’enflammer la poussière ou les
vapeurs présentes.
c) Eloigner les enfants et les passants pendant l’utilisation d’un appareil électrique.
Ceux-ci peuvent provoquer une perte d’attention et faire perdre la maîtrise de l’appareil.
Sécurité électrique
a) La prise d’un appareil électrique doit être adaptée à la prise du secteur. Ne jamais
modifier la prise en aucune façon. Ne jamais utiliser d’adaptateur sur la prise
électrique d’appareil mis à la terre. Des prises non modifiées, adaptées aux boîtiers
de prise de courant, réduiront le risque de décharge électrique.
b) Eviter le contact corporel avec les surfaces mises à la terre telles que tuyaux,
radiateurs, cuisinières et réfrigérateurs. Le risque de décharge électrique est plus
important si le corps est mis à la terre.
c) Ne pas exposer l’appareil électrique à la pluie ou à l’humidité. L’infiltration d’eau
dans un appareil électrique accroît le risque de décharge électrique.
d) Ne pas maltraiter le cordon électrique. Ne jamais utiliser le cordon électrique pour
porter, tirer ou débrancher l’appareil. Protéger le cordon électrique de la chaleur, du
contact avec l’essence, des bords tranchants et pièces rotatives. Un cordon électrique
endommagé ou entortillé accroît le risque de décharge électrique.
e) Lors d’une utilisation de l’appareil électrique en extérieur, se servir d’une rallonge
appropriée à une utilisation en extérieur. Cela réduit le risque de décharge électrique.
f) Si une utilisation de l’appareil électrique dans un environnement humide ne peut
être évitée, utiliser une alimentation protégée par un disjoncteur différentiel.
L’utilisation d’un disjoncteur différentiel réduit le risque de décharge électrique.
Sécurité des personnes
a) Rester vigilant et faire preuve de bon sens lors de la manipulation de l’appareil.
Ne pas utiliser un appareil électrique lorsque l’on se trouve dans un état de
fatigue, ou sous l’influence de drogues, d’alcool ou de médicaments. Un moment
d’inattention pendant l’utilisation d’un outil électrique peut se traduire par des blessures
graves.
b) Porter un équipement de protection approprié. Toujours porter une protection
oculaire. Le port de masque à poussières, chaussures de sécurité antidérapantes,
casque de sécurité et protections antibruit adaptés aux différentes conditions de travail
réduit le risque de blessures corporelles.
c) Eviter tout démarrage accidentel ou intempestif. S’assurer que l’interrupteur
marche-arrêt soit en position d’arrêt avant de brancher l’appareil sur
l’alimentation secteur ou d’installer la batterie, de prendre l’appareil ou de
le transporter. Porter un appareil électrique tout en maintenant le doigt posé sur
l’interrupteur ou brancher un appareil électrique dont l’interrupteur est sur la position de
marche est source d’accidents.
d) Enlever toute clé et tout instrument de réglage avant de mettre l’appareil
électrique en marche. Une clé ou un instrument de réglage laissé fixé à un élément en
rotation de l’appareil électrique peut entraîner des blessures physiques.
e) Ne pas essayer d’atteindre une zone hors de portée. Se tenir toujours en position
stable permettant de conserver l’équilibre. Cela permet de mieux contrôler l’appareil
électrique dans des situations inattendues.
f) Porter des vêtements appropriés. Ne pas porter de vêtements amples ou des
bijoux pendants. Eloigner cheveux, vêtements et gants des pièces en mouvement.
Les vêtements amples, les bijoux pendants et cheveux longs peuvent être happés par les
pièces en rotation.
11
940454_Z1MANPRO1.indd 11 25/09/2014 17:25
Page 13

F
g) Si l’appareil est pourvu de dispositifs destinés au raccord d’équipements d’extraction
et de récupération de la poussière/sciure, s’assurer qu’ils soient bien fixés et utilisés
correctement. L’utilisation de ces dispositifs peut réduire les risques dus à la poussière.
Utilisation et entretien des appareils électriques
a) Ne pas forcer sur l’appareil électrique. Utiliser l’appareil électrique approprié au
travail à effectuer. Un appareil électrique adapté et employé au rythme pour lequel il
a été conçu permettra de réaliser un travail de meilleure qualité et dans de meilleures
conditions de sécurité.
b) Ne pas utiliser un appareil électrique dont l’interrupteur marche-arrêt est hors
service. Tout appareil électrique dont la commande ne s’effectue plus par l’interrupteur
marche-arrêt est dangereux et doit être réparé.
c) Débrancher l’appareil électrique ou démonter sa batterie avant d’effectuer tout
réglage ou changement d’accessoire et avant de le ranger. De telles mesures
préventives réduiront les risques de démarrage accidentel.
d) Ranger les appareils électriques inutilisés hors de portée des enfants et ne
pas permettre l’utilisation de cet appareil aux personnes non habituées à son
maniement ou n’ayant pas lu les présentes instructions. Les appareils électriques
sont dangereux dans les mains d’utilisateurs inexpérimentés.
e) Veiller à l’entretien des appareils électriques. Vérifier que les éléments rotatifs
soient bien alignés et non grippés. S’assurer de l’absence de pièces cassées
ou endommagées susceptibles de nuire au bon fonctionnement de l’appareil. Si
l’appareil électrique est endommagé, le faire réparer avant toute utilisation. De
nombreux accidents sont dus à l’utilisation d’appareils électriques mal entretenus.
f) Veiller à ce que les outils de coupe soient tenus affûtés et propres. Des outils de coupe
bien entretenus, aux tranchants bien affûtés, sont moins susceptibles de se gripper et sont
plus faciles à contrôler.
g) Utiliser l’appareil électrique, les accessoires et outils à monter conformément
à ces instructions, en tenant compte des conditions de travail et de la tâche à
réaliser. Toute utilisation d’un appareil électrique autre que celle pour laquelle il a été
conçu peut entraîner des situations à risque.
Utilisation et entretien des outils à batterie
a) Ne rechargez qu’avec le chargeur indiqué par le fabricant. Un chargeur qui est
adapté à un type de batterie pourrait causer un incendie lorsqu’il est utilisé avec
une autre batterie.
b) N’utilisez les outils électriques qu’avec les batteries désignées spécifiquement.
L’utilisation de toute autre batterie peut créer un risque de blessures et d’incendie.
c) Lorsque la batterie n’est pas en utilisation, gardez-la éloignée de tout objet
métallique tel que trombone, pièce, clé, clou, vis et tout autre petit objet
métallique qui pourrait créer une connexion d’une borne à l’autre. Court-circuiter
les bornes de la batterie peut causer des brulures ou un incendie.
d) En cas d’usage abusif, du liquide peut être éjecté de la batterie ; évitez le contact.
Si vous entrez accidentellement en contact avec ce liquide, lavez à grande eau. Si
le liquide entre en contact avec vos yeux, sollicitez de l’aide médicale. Le liquide
éjecté par la batterie peut causer des irritations de la peau ou des brulures.
ATTENTION : Lorsque utilisé en Australie ou en Nouvelle Zélande, il est recommandé que cet
appareil soit toujours alimenté via un disjoncteur différentiel ayant un courant résiduel de 30
mA ou moins.
Révision
a) Ne faire réparer votre appareil électrique que par un réparateur qualifié
utilisant uniquement des pièces de rechange identiques. Cela permet de
maintenir la sécurité d’utilisation de l’appareil électrique
Consignes de sécurité relatives aux
outils de perçage sans fil
Pour les aspects de sécurité concernant les équipements et l’habillement de protection ainsi
que les dangers que présente l’utilisation d’un appareil électroportatif, consultez la section «
Consignes générales de sécurité relatives aux appareils électriques » du présent manuel.
• Portez une protection auditive lorsque vous percez en mode percussion. L’exposition aux
bruits peut causer une perte de l’audition.
• Tenez les outils électroportatifs par leurs poignées isolées lorsque l’accessoire de coupe
pourrait entrer en contact avec des fils électriques cachés. Les fixations peuvent être
en contact avec un fil sous tension ce qui mettrait les parties métalliques de l’outil
électroportatif sous tension et pourraient donner un choc électrique à l’utilisateur.
• Important : Il est impératif de suivre toutes les réglementations nationales de sécurité
concernant l’installation, le fonctionnement et l’entretien de l’appareil.
• Il est interdit à toute personne de moins de 18 ans d’employer cet appareil. Tout utilisateur
de l’appareil doit être formé à l’utilisation d’une perceuse et doit connaitre les instructions
d’utilisation et de sécurité.
• Si les batteries doivent être rechargées en extérieur, assurez-vous que la source
d’alimentation et que le chargeur soient protégés des intempéries et de l’humidité.
• L’utilisation d’une perceuse demande le port d’équipements de sécurité tels que lunettes
ou visière de sécurité, casque anti-bruit et habillement protecteur tel que gants de
sécurité. Portez un masque filtrant si le perçage crée de la poussière.
• Détectez la présence de câbles électriques et de conduites d’eau ou de gaz à l’aide
d’un détecteur de métal et de tension. Ne touchez pas les composants ou conducteurs
électriques sous tension.
• Assurez-vous de disposer d’un éclairage suffisant.
• Assurez-vous que les forets soient bien fixés dans le mandrin. Les forets mal insérés
peuvent être éjectés de la machine et représentent un danger.
• Assurez-vous que la perceuse soit en contact avec la pièce de travail avant de
commencer à percer.
• Avant de commencer le perçage, assurez-vous de disposer de suffisamment d’espace
libre sous la pièce à percer.
• N’exercez pas de pression sur l’appareil car cela réduirait sa durée de vie utile.
• Les accessoires (mèches, etc.) pourront avoir atteint des températures élevées lors du
perçage, laissez-les refroidir avant de les manipuler.
• Ne retirez jamais la sciure ou la poussière avec les mains à proximité de la mèche.
• Si l’on vous interrompt pendant le perçage, terminez l’opération et éteignez l’appareil
avant de vous concentrer sur l’évènement.
• Dans la mesure du possible, et s’il y a lieu, immobilisez bien la pièce à percer.
• Examinez le mandrin régulièrement à la recherche de tout signe d’usure ou de dommage.
Faites réparer les pièces endommagées par un centre de réparation homologué.
• Attendez toujours que la machine soit parvenue à un arrêt complet avant de la déposer.
• Vérifiez régulièrement que les écrous, boulons et autres dispositifs de fixation soient
bien serrés.
Consignes générales de sécurité
relatives aux chargeurs de batterie
Utilisation correcte du chargeur de batterie
• Reportez-vous à la section du présent manuel traitant de l’utilisation du chargeur de
batterie avant de commencer à charger le bloc-batterie.
• N’utilisez pas le chargeur pour d’autres batteries que celles fournies. Maintenez le
chargeur propre car les objets étrangers et la saleté peuvent entraîner un court-circuit
ou boucher les orifices de ventilation. Le non-respect de ces consignes peut amener
l’appareil à surchauffer ou à prendre feu.
• Si le cordon électrique est endommagé, il doit être remplacé par le fabricant, par un
centre agrée de réparation ou autre personne qualifiée pour éviter tout risque.
• Les enfants doivent être surveillés pour s’assurer qu’ils ne jouent pas avec l’appareil.
Attention : Ne rechargez pas des batteries non-rechargeables.
Utilisation correcte des batteries
• Veuillez ne charger les batteries de l’appareil qu’à l’aide du chargeur fourni. N’utilisez
avec cet appareil que les batteries fournies ou des batteries recommandées par votre
fournisseur. Maintenez les batteries propres car les objets étrangers et la saleté peuvent
entraîner un court-circuit. Laissez la batterie refroidir 15 minutes après toute recharge
ou utilisation prolongée. Le non-respect de ces consignes peut amener l’appareil à
surchauffer ou à prendre feu.
• Lorsqu’elles ne sont pas utilisées, les batteries doivent être rangées dans un endroit sec
proche de la température ambiante (20 ˚C). Assurez-vous que les batteries ne peuvent pas
se court-circuiter accidentellement pendant la période de rangement.
Notice pour blocs-batterie
DANGER – Les blocs-batterie représentent un risque d’incendie et d’explosion
ATTENTION – N’ouvrez pas, ne démontez pas, n’écrasez pas, ne chauffez pas à plus de 60° C
et ne brulez pas. Ne jetez pas dans un feu.
ATTENTION – Ne chargez pas de batteries non-rechargeables.
ATTENTION – Ne chargez les batteries qu’avec le chargeur T20BC. Pour un usage en toute
sécurité du chargeur, référez-vous au manuel d’instructions du chargeur.
ATTENTION – Suivez les instructions du fabricant
Fonctionnalités de sécurité de la batterie et du
chargeur :
Le bloc-batterie et le chargeur sont munis d’un certain nombre dispositifs de sécurité qui
peuvent être activés lors du chargement ou de l’utilisation de la visseuse :
• Protection de surcharge : le chargeur s’arrête automatiquement lorsque la batterie a
atteint sa capacité de charge maximale, ce qui protège les composants internes du
bloc-batterie.
• Protection de décharge : évite que la batterie ne se décharge au-delà de la tension
minimale de sécurité.
• Protection de surchauffe : Des capteurs éteignent l’appareil si la batterie devient trop
chaude durant l’utilisation. Cela peut arriver après une longue période d’utilisation ou un
travail trop intense. Selon la température ambiante, 30minutes peuvent être nécessaire
pour le refroidissement de la batterie.
12
940454_Z1MANPRO1.indd 12 25/09/2014 17:25
Page 14

F
• Protection de surcharge électrique : la batterie s’arrête temporairement si le débit du
courant dépasse le niveau maximum. La batterie redémarre dès que le niveau de courant
redevient normal et sûr .Cela peut prendre quelque secondes.
• Protection de court-circuit : en cas de court-circuit, le bloc-batterie s’arrête
automatiquement, ce qui évite de d’endommager le bloc-batterie ou l’outil.
Avertissement pour l’Australie et la Nouvelle-Zélande
ATTENTION : Lorsque utilisé en Australie ou en Nouvelle Zélande, il est recommandé que cet
appareil soit toujours alimenté via un disjoncteur différentiel ayant un courant résiduel de 30
mA ou moins.
Usage conforme
• Visseuse à choc sans fil alimentée par batterie compatible avec des opérations moyennes
de vissage de boulons et d’écrous
Déballage
• Déballez le produit avec soin. Veillez à retirer tout le matériau d’emballage et familiarisezvous avec toutes les caractéristiques du produit
• Vérifiez que tous les pièces sont présentes. Si des pièces sont endommagées ou
manquantes, remplacer-les avant d’utiliser l’appareil.
Avant utilisation
• La perceuse-visseuse a été envoyée en condition de faible charge. Chargez la batterie
avant utilisation.
Utiliser le chargeur et la batterie
• Le chargeur etle bloc-batterie peuvent devenir chauds pendant la charge. Ceci est tout à
fait normal et n’indique pas un signe de problème.
• Si possible, utilisez le chargeur dans une pièce à température normale. Pour éviter de
surchauffer, ne pas couvrir le chargeur et ne couvrez pas la batterie directement au soleil
ou une source de chaleur.
• Si la batterie ne se charge pas correctement :
- Vérifiez le courant de la prise en branchant une lampe ou autre appareil.
- Si le problème persiste, faites contrôler l’outil, le bloc-batterie et le chargeur par un
électricien ou un technicien spécialisé.
Charger le bloc-batterie :
1. Appuyez sur le bouton de relâche de la batterie (6) et retirez la batterie de la visseuse.
2. Insérez le bloc-batterie dans le chargeur de batterie T20 (11). N’appliquez pas de force
excessive pour insérer la batterie. Si elle ne glisse pas facilement, la batterie n’est pas
insérée correctement.
3. Au début, seul le témoin lumineux vert clignotera pour indiquer l’évaluation de l’état de
charge de la batterie. Lors de la charge, le témoin lumineux vert s’éteint, et le rouge
s’allume.
4. Lorsque la batterie est entièrement chargée, le vert s’allume et le rouge s’éteint.
5. Le chargeur contrôle à tout moment les conditions de charge.
6. Retirez le bloc-batterie dès que la charge est complétée.
7. Débranchez le chargeur de sa source d’alimentation, et rangez-le dans un endroit propre,
sec et hors de portée des enfants.
• Le temps normal de charge est d’1 heure environ pour une batterie de 4 Ah récemment
déchargée sous des conditions normales de température. Le temps de charge varie selon
ces conditions. Batterie de 2,0 Ah : A noter que le temps de charge pour cette batterie
est de 30 minutes.
• Il n’y pas besoin d’attendre que la batterie soit totalement déchargée avant de recharger,
mais ne rechargez pas la batterie si elle est déjà entièrement chargée.
• Vous pouvez arrêter la charge à tout moment pour utiliser la batterie. Sous des conditions
normales, le taux de charge diminue au fur et mesure que la batterie est pleine. 80% de
la charge est obtenue en ½ heure.
Table de chargement
Témoin
lumineux
rouge
Chargeur branché éteint clignotant
Chargeur évaluant la charge éteint clignotant
Charge rapide allumé éteint
Très peu de batterie, charge lente clignotant éteint
Température de charge anormale clignotant éteint
Entièrement chargée éteint allumé
Défaut de batterie ou du chargeur clignotant clignotant
Condition temporaire de température de
charge anormale
Note : Si les lumières du chargeur n’indiquent aucune des situations ci-dessus ou indiquent
un défaut :
• Vérifiez que la batterie soit correctement positionnée sur le chargeur.
• Vérifiez tous et l’alimentation.
allumé allumé
Témoin
lumineux
vert
Charge initiale
• La charge initiale dépend de l’état de charge de la batterie. Rechargez jusqu’à ce que le
chargeur indique qu’elle soit entièrement pleine.
• Déchargez la batterie puis rechargez-la pour 3-5 heures, et re-déchargez-la. Répétez
cette opération 4-5 fois afin d’assurer une meilleure performance de charge de la batterie.
• Les prochaines charges ne dureront que 1 heure (T20HCB : batterie 4 Ah), voire moins si
la batterie n’est pas complètement déchargée.
Re-charger la batterie
• Après utilisation, il est recommandé de laisser refroidir une batterie en lithium-ion avant
de charger.
• Si une batterie est insérée dans le chargeur alors qu’elle est toujours chaude, le témoin
vert s’allumera. Il faudra attendre quelques minutes que la batterie refroidisse pour que le
chargeur commence à charger.
Insérer la batterie
• N’exercez pas de force inutile pour insérer la batterie. Si elle ne s’insère pas facilement,
positionnez la batterie correctement afin qu’elle glisse facilement dans le compartiment
(ou il est possible que la batterie et/ou la perceuse soient endommagées).
Durée de service de la batterie
La durée de service dépendra des travaux effectués. La batterie et le chargeur de cet outil ont
été conçus pour offrir une longue durée de vie maximale. Le chargeur intelligent contrôle les
conditions de charge et régule le taux de charge en fonction de l’état de charge de la batterie,
ce qui protège la batterie d’être surchargée ou de charger avec un taux trop important.
Cependant, comme toutes les batteries, le phénomène d’usure dans le temps est possible.
Maximiser la durée de vie de la batterie
• Rangez et chargez votre batterie dans un endroit frais. Des pièces à température audessus ou en dessous de la normale peuvent diminuer la durée de vie de la batterie.
• Ne rangez jamais une batterie Li-ion déchargée. Rechargez toujours immédiatement
après qu’elle ait été déchargée. Pour un rangement à long terme, chargez la batterie
complètement.
• Toutes les batteries perdent graduellement leur charge, même les batteries li-ion, bien
que leur taux de décharge soit particulièrement bas. Plus la température est élevée, plus
elles se déchargent vite. Si vous rangez la batterie pour une longue période sans l’utiliser,
il est recommandé de recharger la batterie tous les deux ou trois mois. Ceci augmentera
la durée de vie de la batterie.
13
940454_Z1MANPRO1.indd 13 25/09/2014 17:25
Page 15

F
Fixer un foret ou un embout de tournevis
Attention : Ne fixez jamais des accessoires ayant une vitesse maximale inférieure à la vitesse
à vide de l’appareil.
1. Tourner la bague du mandrin sans clé (1) dans le sens des aiguilles d’une montre et
insérez le foret ou l’embout dans le mandrin.
2. Tourner la bague du mandrin (1) dans le sens contraire des aiguilles d’une montre pour
maintenir en toute sécurité le foret ou l’embout.
Remarque : Ne faites jamais fonctionner l’outil lors du serrage ou desserrage du mandrin. De
préférence, choisissez la position de blocage du sélecteur du sens de rotation (5).
3. Lorsque le foret ou l’embout est maintenu correctement dans le mandrin, mettez la
perceuse en marche pour vérifier qu’il soit bien centré. Si la rotation n’est pas régulière
recommencez l’opération.
Choisir le sens de rotation
• Le sens de rotation se sélectionne avec le sélecteur du sens de rotation (5)
• Pour une rotation dans le sens des aiguilles d’une montre, poussez le sélecteur vers la
gauche
• Pour une rotation dans le sens contraire des aiguilles d’une montre, poussez le sélecteur
vers la droite.
• Lorsque le sélecteur est positionné au milieu, la perceuse-visseuse est bloquée.
ATTENTION : Ne changez jamais le sens de rotation lorsque l’appareil est en marche.
Contrôle de la vitesse
• Cette perceuse -visseuse possède une boite de vitesse à deux régimes :
- Première vitesse, bas régime : 0 - 450 min
- Deuxième vitesse, haut régime : 0 - 1600 min
• Utilisez le sélecteur du régime de vitesse (4).Faites glisser le sélecteur vers l’avant pour
la première vitesse, vers l’arrière pour la seconde.
Remarque : La vitesse en bas régime est normalement utilisée pour visser, en donnant un
couple important et un meilleur contrôle à faible vitesse. La seconde vitesse est généralement
utilisée pour percer.
-1
-1
Réglage de couple
• Cette perceuse-visseuse possède un contrôle de couple, qui limite le couple appliqué à
l’embout, ce qui permet d’effectuer un vissage sans risque d’endommagement.
• Il y a 16 paramètres de couple pour le vissage et un pour le perçage. Plus le numéro du
paramètre est petit, plus le couple est faible.
• Pour ajuster le couple, faites tourner la bague de réglage du couple (2), jusqu’à ce que le
numéro du paramètre voulu s’aligne avec la flèche indiquée sur la perceuse à percussion.
• Vérifiez que le paramètre de couple a bien été choisi en effectuant un test sur un support
quelconque.
Sélection du mode
• Pour le perçage, choisissez le régime de vitesse adéquat, puis tournez le sélecteur du
mode (3) sur le symbole du foret. Cela permettra de procurer et maintenir le couple
maximal.
• Pour le vissage, choisissez le régime de vitesse adéquat, puis tournez le sélecteur du
mode (3) sur le symbole de la vis. Cela activera l’embrayage du couple
• Pour le perçage dans les matériaux de construction, choisissez le régime de vitesse
adéquat, puis tournez le sélecteur du mode (3) sur le symbole du marteau. Cela permettra
d’activer le mode percussion et de procurer et maintenir le couple maximal.
ATTENTION : Un adaptateur peut être installé sur la perceuse pour visser des écrous et
des boulons. Ne jamais utiliser cet adaptateur en mode perceuse. Utilisez les 16 réglages
du sélecteur de couple et la première vitesse pour empêcher toute surcharge de travail.
L’utilisation d’une clé pour serrer ou desserrer les écrous et les boulons est recommandée.
Ceci permet de travailler également plus rapidement et en toute sécurité, surtout lorsqu’un
couple important est requis au début et à la fin d’un travail.
Instructions d’utilisation
ATTENTION : Utilisez toujours des équipements de protection tels que des protections
oculaires, auditives et respiratoires lorsque vous utilisez cet appareil.
Mise en marche
• Pour démarrer la perceuse-visseuse, appuyez sur la gâchette de contrôle de la vitesse (6).
Le guide de lumière LED (10) s’allumera automatiquement.
• Une pression plus importante sur la gâchette augmente la vitesse de rotation.
• Relâchez la gâchette pour arrêter l’appareil.
Remarque : Il est possible que la perceuse s’éteigne lors de travaux importants à cause du
déclenchement de la protection thermique de la batterie et des composants internes. La
perceuse pourra être utilisée après un certain moment, cela n’est donc pas un défaut de
l’appareil.
Conseil pour le perçage
• Utilisez un foret tranchant et assurez-vous qu’il soit compatible avec le matériau à percer.
• Ne dépassez jamais la capacité maximale de perçage indiquée dans les ‘caractéristiques
techniques’.
• Commencez par percer à faible vitesse en appuyant partiellement sur la gâchette(8).
• Réduisez la pression exercée sur la perceuse lorsque le foret est sur le point de
transpercer le matériau.
• Pour éviter que le matériau se fende lors du perçage, vous pouvez soit serrer un morceau
de bois sur la partie arrière de la pièce de travail, soit continuer à percer depuis l’autre
côté (si le foret a commencé à transpercer la pièce).
Percer le métal
• Pour les métaux peu épais, aidez-vous d’une pièce de bois
• Marquez l’endroit où vous souhaitez percer avec un marteau et un pointeau
• Utilisez des forets HSS (acier rapide) ou d’autres recommandés pour le perçage du métal.
• Pour des perçages larges, effectuez d’abord un pré-perçage avec un foret de plus petit
diamètre pour s’en servir de guide.
• Appliquez un lubrifiant ou un liquide de refroidissement sur vos forets pour garantir un
meilleur résultat, mais également pour les conserver plus longtemps.
Percer les matériaux de construction
• Utilisez toujours des forets de maçonnerie, de préférence en TCT, lorsque vous percez
dans les murs, la pierre ou le béton.
• N’exercez pas trop de pression sur l’arrière de l’appareil. Si des débris bloquent le trou de
perçage, faites tourner la perceuse lentement et retirez le foret du trou. Recommencez
jusqu’à ce que le trou soit dégagé.
Accessoires
• Une variété d’accessoires, tels que la batterie 2,0 Ah (T20B), la batterie haute capacité 4
Ah (T20HCB) ainsi que des forets et embouts de vissage, sont disponibles depuis votre
revendeur Triton. Des pièces de rechanges peuvent être obtenues depuis votre revendeur
Triton ou depuis www.toolsparesonline.com
Entretien
• Cet appareil est conçu avec des composants de qualité et utilise les derniers circuits
intelligents pour protéger au maximum l’appareil et ses composants. Un usage normal
garantit une longue durabilité de l’appareil.
Nettoyage
• Gardez l’appareil toujours propre. La poussière et la saleté provoquent l’usure rapide
des éléments internes de l’appareil et réduit sa durabilité. Utilisez une brosse souple ou
un chiffon sec pour le nettoyage. Si possible, nettoyez les orifices de ventilation à l’air
comprimé propre et sec
Rangement
• Rangez l’outil et ses accessoires dans un endroit sec et sûre, hors portée des enfants.
Recyclage
Lorsque l’appareil n’est plus en état de fonctionner et qu’il n’est pas réparable, recyclez
l’appareil conformément aux régulations nationales.
• Ne jetez pas les outils électriques, les batteries et autres équipements électriques ou
électroniques(DEEE) avec les ordures ménagères
• Contactez les autorités locales compétentes en matière de gestion des déchets pour vous
informer de la procédure à suivre pour recycler les outils électriques et les batteries.
14
940454_Z1MANPRO1.indd 14 25/09/2014 17:25
Page 16

F
En cas de problème
Problème Cause possible Solution
Le LED rouge ne s’allume pas et la batterie ne se charge pas
Les batteries sont faibles
La perceuse ne se met pas en marche
(gâchette bloquée)
La perceuse ne démarre pas, même en appuyant sur la
gâchette
Les vis ne vont pas assez en profondeur
Les vis sont trop en profondeur Le couple est trop important Choisissez un couple moins grand
Pendant le perçage des matériaux de maçonneries, le foret
ne pénètre pas dans le mur
La batterie n’est pas insérée correctement Nettoyez la prise du chargeur
Le chargeur n’est pas alimenté Vérifiez le branchement
La batterie n’est pas complètement chargée
La batterie a été rechargée plus de 100 fois et sa capacité a
commencé à diminuer
Le sélecteur du sens de rotation est au milieu Poussez le bouton à droite ou à gauche
La batterie est complètement vide Rechargez la batterie et utilisez une autre
La batterie est défectueuse Remplacez-la
La perceuse est défectueuse
Le couple n’est pas assez important Choisissez un couple plus grand
Batterie faible Rechargez la batterie ou utilisez une autre
Foret incompatible ou émoussé
Foret trop large
Mode marteau non sélectionné sur la perceuse
Chargez la batterie jusqu’à ce que le chargeur indique la
charge complète
Ceci est normal : contactez votre revendeur Triton pour
remplacer la batterie
Contactez votre revendeur Silverline ou un centre de
réparation agrée.
Remplacez le foret avec un nouveau de haute qualité adapté
pour les matériaux de construction
Faites tourner le sélecteur de mode pour mettre l’appareil en
mode marteau (voir ‘Sélection du mode’)
Rotate mode selector to switch the machine into hammer
drill mode (see ‘Mode Selection’)
Garantie
Pour valider votre garantie, rendez-vous sur notre site internet www.tritontools.com* et
saisissez vos coordonnées.
Vos coordonnées seront introduites dans notre liste de diffusion (sauf indication
contraire) afin de vous informer de nos prochaines nouveautés. Les informations que
vous nous fournirez ne seront pas communiquées à des tiers.
Pense-bête
Date d’achat : ___ / ___ / ____
Modèle: T20CH
Veuillez conserver votre ticket de caisse comme preuve d’achat. art pr
Si toute pièce de ce produit s’avérait défectueuse du fait d’un vice
de fabrication ou de matériau dans les 3 A NS suivant la date d’achat,
Triton Precision Power Tools s’engage auprès de l’acheteur de ce
produit à réparer ou, à sa discrétion, à remplacer gr atuitement la pièce
défectueuse.
Cette garant ie ne s’applique pas à l’utilisatio n commerciale et ne
s’étend pas non plus à l’usure normale ou aux dommages causés par
des accidents, des mauvais traitements ou une utilisation impropre.
* Enregis trez votre produit en ligne dans les 30 jours suivant la date
d’achat.
Offre soumise à conditions.
Ceci n’affecte pas vos droits statutaires.
15
940454_Z1MANPRO1.indd 15 25/09/2014 17:25
Page 17

E
Traducción del manual original
Gracias por haber elegido esta herramienta Triton. Estas instrucciones contienen la información necesaria para un funcionamiento seguro
y eficaz de este producto. Lea este manual atentamente para asegurarse de obtener todas las ventajas de las características únicas de su
nuevo equipo. Conserve este manual a mano y asegúrese de que todos los usuarios de la herramienta lo hayan leído y entendido
Índice
Características técnicas 34
Características del producto 35
Descripción de los símbolos 35
Instrucciones de seguridad 35
Instrucciones de seguridad para taladros y atornilladores a batería 36
Instrucciones de seguridad para cargadores y baterías 36
Aplicaciones 36
Desembalaje 36
Antes de usar 37
Funcionamiento 38
Accesorios 38
Mantenimiento 38
Reciclaje 38
Garantía 39
Características técnicas
Modelo: T20CH
Taladro
Tensión: 20 V, CC
Velocidad sin carga: 0 – 450 min-1 (velocidad baja)
Frecuencia de impacto: 7.200 gpm (velocidad baja)
Velocidades: 2
Control de velocidad: Gatillo
Ajuste de par de torsión: 16 + 2
Par de torsión máximo: 48 Nm
Capacidad del portabrocas: 1,5 – 13 mm ( 1⁄16 – ½" )
Capacidad de perforación
(madera):
Capacidad de perforación
(mampostería):
Capacidad de perforación
(acero):
Peso: 3,9 kg (incluido batería 4 Ah)
0 – 1.600 min-1 (velocidad alta)
25.600 gpm (velocidad alta)
26 mm ( 1-1⁄32" )
10 mm ( 3⁄8" )
13 mm (½" )
Información sobre ruido y vibración:
Presión acústica LPA: 87,6 dB(A)
Potencia acústica LWA: 98,6 dB(A)
Incertidumbre K: 3 dB
Vibración ponderada
(Metal) ah,D: 2,373 m/s
2
(Hormigón) ah,ID: 7,104 m/s2
(Velocidad máxima sin
carga) ah:
Incertidumbre K: 1,5 m/s
El nivel de intensidad sonora para el usuario puede exceder de 85 dB(A). Se recomiendan
usar medidas de protección sonora.
1,707 m/s2
2
Batería
Tipo de batería: Litio, Samsung
Tensión: 20 V, CC
Modelo y capacidad: T20HCB, 4 Ah
T20B, 2 Ah
Cargador
Modelo del cargador T20BC
Tiempo de carga: 1 h (T20HCB)
Tensión de entrada: EU: 220 – 240 V, CA 50/60 Hz, 80 W
Tensión de salida: 20 V, CC, 3 A
Longitud del cable de
alimentación:
Como parte de nuestra política de desarrollo de productos, los datos técnicos de los
productos Triton pueden cambiar sin previo aviso.
30 min (T20B)
SDA: 220 - 240 V, CA 50/60 Hz, 80 W
AUS: 220 - 240 V, CA 50/60 Hz, 80 W
JPN: 100 – 120 V, CA 50/60 Hz, 1,3 A
EUA/CAN: 120 V, CA 50/60 Hz, 1,3 A
2 m (6-1⁄2')
ADVERTENCIA: Utilice siempre protección auditiva cuando el nivel ruido exceda 85 dB(A) o cuando esté expuesto durante largos periodos de tiempo. Si por algún motivo nota algún tipo de molestia
auditiva incluso llevando orejeras de protección, detenga inmediatamente la herramienta y compruebe que las orejeras de protección estén colocadas adecuadamente. Asegúrese de que el nivel de
atenuación y protección de las orejeras sea adecuado dependiendo del tipo de herramienta y el trabajo a realizar.
ADVERTENCIA: La exposición a la vibración durante la utilización de una herramienta puede provocar pérdida del sentido del tacto, entumecimiento, hormigueo y disminución de la capacidad de
sujeción. La exposición durante largos periodos de tiempo puede provocar enfermedad crónica. Si es necesario, limite el tiempo de exposición a la vibración y utilice guantes anti-vibración. No
utilice la herramienta cuando sus manos estén muy frías, las vibraciones tendrán un mayor efecto. Utilice los datos técnicos de su herramienta para evaluar la exposición y medición de los niveles
de ruido y vibración.
Los niveles de vibración y ruido están determinados por la directiva EN60745 y otras directivas internacionales similares. Los datos técnicos se refieren al uso normal de la herramienta en
condiciones normales. Una herramienta defectuosa, mal montada o desgastada puede incrementar los niveles de ruido y vibración. Para más información sobre ruido y vibración, puede visitar la
página web www.osha.europa.eu
16
940454_Z1MANPRO1.indd 16 25/09/2014 17:25
Page 18

E
Características del producto
1. Portabrocas sin llave
2. Ajuste de par de torsión
3. Selector de modo
4. Selector de velocidad
5. Interruptor de sentido de rotación
6. Interruptor de gatillo
7. Botón para liberar la batería
8. Clip para cinturón
9. Batería*
10. Luz de guía LED
11. Cargador de batería T20
Accesorios (no mostrados):
• Maletín de transporte
Nota: La batería suministrada puede ser distinta a la de la imagen mostrada
Enchufe convertidor
Solo para Reino Unido: Nunca intente utilizar el adaptador BS 1363 para con otros aparatos
eléctricos.
Nunca use el enchufe directamente del adaptador BS 1363 para en una toma de corriente.
Contacte con un servicio técnico autorizado cuando el adaptador BS 1363 esté dañado.
Descripción de los símbolos
Lleve protección auditiva
Lleve protección ocular
Lleve protección respiratoria
Lleve un casco de seguridad
Lea el manual de instrucciones
¡Peligro!
No incinere las pilas/baterías
Para uso solo en interiores. (Batería y cargador)
Desfase y corriente máxima del fusible interno de 3,15 A
T3.15A
Protección medioambiental
Los productos eléctricos usados no se deben mezclar con la basura convencional.
Están sujetos al principio de recogida selectiva. Solicite información a su
ayuntamiento o distribuidor sobre las opciones de reciclaje.
Protección medioambiental
Las herramientas eléctricas, baterías y baterías de litio nunca deben desecharse
junto con la basura convencional. Por favor, recicle las baterías sólo en puntos
de reciclajes. En caso de duda, póngase en contacto con su distribuidor o con la
autoridad local encargada de la gestión de residuos.
Las baterías de litio nunca deben desecharse junto con la basura convencional. Por
favor, recicle las baterías sólo en puntos de reciclajes. En caso de duda, póngase
en contacto con su distribuidor o con la autoridad local encargada de la gestión
Li-ion
de residuos.
Conforme a las normas de seguridad y la legislación correspondiente. (Solo modelo
europeo)
Instrucciones de seguridad
ADVERTENCIA: Lea siempre el manual de instrucciones y las advertencias de seguridad.
No seguir estas advertencias e instrucciones puede causar descargas eléctricas, incendios
y/o lesiones graves.
ADVERTENCIA: No permita que los niños, personas discapacitadas o personas no cualificadas
utilicen esta herramienta. Mantenga esta herramienta fuera del alcance de los niños.
Conserve estas instrucciones de seguridad para futura referencia.
La expresión “herramienta eléctrica” se refiere a su herramienta alimentada por corriente
eléctrica (herramienta alámbrica) o una herramienta eléctrica alimentada por baterías
(herramienta inalámbrica).
Seguridad en el área de trabajo
a) Mantenga el área de trabajo limpia y bien iluminada. Las áreas de trabajo
desordenadas y oscuras son peligrosas y pueden provocar un accidente.
b) No utilice herramientas eléctricas en atmósferas explosivas que contengan
líquidos, gases o polvos inflamables. Las herramientas eléctricas producen chispas
que pueden incendiar el polvo o los vapores.
c) Mantenga alejados a los niños y personas que se encuentren a su alrededor
mientras esté trabajando con una herramienta eléctrica. Las distracciones pueden
hacerle perder el control de la herramienta.
Seguridad eléctrica
a) El enchufe de la herramienta eléctrica debe coincidir con la toma de corriente. No
modifique nunca el enchufe de ninguna manera. No utilice ningún adaptador de
enchufe sin toma de tierra. Los enchufes si modificar y el uso de tomas de corrientes
adecuadas reducirán el riesgo de descargas eléctricas.
b) Evite el contacto con materiales conductores tales como tuberías, radiadores,
estufas y refrigeradores. El riesgo de descarga eléctrica se incrementa si su cuerpo
está expuesto a materiales conductores.
c) No exponga las herramientas eléctricas a la lluvia o la humedad. El contacto de
agua en una herramienta eléctrica aumentará el riesgo de descargas eléctricas.
d) No doble el cable de alimentación. No use nunca el cable de alimentación para
transportar la herramienta eléctrica, tirar de ella o desenchufarla. Mantenga el
cable de alimentación alejado de fuentes de calor, aceite, bordes afilados o de las
piezas móviles. Los cables de alimentación dañados o enredados aumentan el riesgo
de descargas eléctricas.
e) Use un cable de extensión adecuado para exteriores cuando utilice una
herramienta eléctrica en áreas exteriores. La utilización de un cable adecuado para
exteriores reducirá el riesgo de descargas eléctricas.
f) Si es inevitable trabajar con una herramienta eléctrica en lugares húmedos, use
un suministro protegido por un interruptor diferencial o disyuntor por corriente
diferencial o residual (RCD). El uso de un RCD reduce el riesgo de descargas
eléctricas.
Seguridad personal
a) Manténgase alerta, fíjese en lo que está haciendo y use el sentido común cuando
esté utilizando una herramienta eléctrica. No use una herramienta eléctrica si
se encuentra cansado o bajo la influencia de drogas, alcohol o medicamentos.
Un momento de distracción mientras esté utilizando una herramienta eléctrica puede
provocar lesiones corporales graves.
b) Utilice siempre equipo de protección personal. Use siempre protección ocular. El
uso de dispositivos de seguridad personal (máscara antipolvo, calzado de seguridad
antideslizante, casco resistente y protecciones auditivas adecuadas) reducirá el riesgo
de lesiones corporales.
c) Evite el arranque accidental. Asegúrese de que el interruptor está en la posición de
apagado antes de enchufar la herramienta. No transporte herramientas con el dedo
en el interruptor o con el interruptor encendido, podría ocurrir un accidente.
d) Retire todas las llaves de ajuste antes de encender la herramienta eléctrica. Una
llave enganchada en una parte móvil de la herramienta eléctrica puede causar lesiones
graves.
e) No adopte posturas forzadas. Manténgase en posición firme y en equilibrio en todo
momento. De este modo, podrá controlar mejor la herramienta eléctrica en situaciones
inesperadas.
f) Vístase adecuadamente. No lleve ropa holgada ni joyas. Mantenga el pelo, la ropa
y guantes alejados de las piezas móviles. La ropa holgada, las joyas o el pelo largo
pueden quedar atrapados en las piezas móviles.
17
940454_Z1MANPRO1.indd 17 25/09/2014 17:25
Page 19

E
g) Cuando utilice sistemas de extracción y recolección de polvo, asegúrese de que
estén conectados y funcionen correctamente. El uso de estos dispositivos puede
reducir los riesgos producidos por la inhalación de polvo.
Uso y mantenimiento de las herramientas a batería
a) Recargue la batería solo con el cargador compatible recomendado por el
fabricante. Utilizar una batería con un cargador diferente puede provocar riesgo de
incendio.
b) Utilice solo cargadores y baterías compatibles con su herramienta. Utilizar una
batería o cargador no compatible puede provocar lesiones personales y riesgo de
incendio.
c) Mantenga alejada la batería y el cargador de objetos metálicos tales como clips,
monedas, llaves, clavos, tornillos, etc. para evitar que entren en contacto con los
terminales de la batería. Los objetos metálicos en contacto con las celdas de la
batería puede causar quemaduras y riesgo de incendio.
d) La batería puede desprender líquido en algunos casos extremos, evite el contacto
con el líquido de la batería. En caso de contacto directo con la piel, lávese con
agua. En caso de contacto con los ojos, solicite ayuda médica inmediatamente. El
líquido expulsado por la batería puede ser irritante y provocar quemaduras.
ADVERTENCIA: Cuando utilice esta herramienta en Australia o Nueva Zelanda, se recomienda
conectar esta herramienta en tomas de corriente protegida con dispositivo de protección de
corriente diferencial residual de 30 mA o inferior.
Mantenimiento y reparación
a) Repare siempre su herramienta eléctrica en un servicio técnico autorizado. Utilice
únicamente piezas de recambio idénticas y homologadas. Esto garantizará un
funcionamiento óptimo y seguro de su herramienta eléctrica.
Instrucciones de seguridad para
taladros y atornilladores a batería
Para más información sobre los requisitos de seguridad relacionados con vestimenta, los
equipos de protección y los riesgos de salud relacionados con las herramientas eléctricas,
consulte la sección “Instrucciones de seguridad relativas a las herramientas eléctricas” de
este manual.
• Lleve siempre protección auditiva cuando utilice un taladro percutor. La exposición al
ruido puede causar pérdida auditiva.
• Sujete siempre la herramienta por las empuñaduras aisladas, especialmente cuando esté
trabajando en zonas donde puedan haber cables ocultos bajo tensión. El contacto de los
tornillos con cables bajo tensión puede provocar descargas eléctricas al usuario.
Importante: Es esencial seguir todos los reglamentos de seguridad vigentes respecto a la
instalación, el uso y mantenimiento de su herramienta.
• Nunca permita utilizar esta herramienta a personas menores de 18 años y asegúrese
de que los demás usuarios estén familiarizados con las normas de seguridad descritas
en este manual.
• Si tiene que cargar la batería en áreas exteriores, asegúrese de que el cargador y la
fuente de alimentación estén protegidas contra las inclemencias meteorológicas y la
humedad.
• Utilice siempre equipo de protección adecuado como guantes, gafas protectoras o
protectores para el oído. Lleve máscara protectora para protegerse del polvo.
• Utilice detectores de metales y de cables bajo tensión para localizar cables eléctricos y
conductos de agua o de gas ocultos. Evite el contacto con los componentes o conductores
bajo tensión.
• Asegúrese siempre que el área de trabajo esté suficientemente iluminada.
• Asegúrese de que la broca o el cincel estén fijados correctamente en el portabrocas. Las
brocas y cinceles que no se hayan colocado correctamente pueden salir expulsadas de la
herramienta y ser un peligro para el usuario.
• Asegúrese de que la broca esté en contacto con la pieza de trabajo antes comenzar a
perforar.
• Antes de perforar, asegúrese de tener suficiente espacio libre debajo de la pieza de
trabajo.
• No presione excesivamente la herramienta cuando esté perforando, podría dañar la
herramienta.
• Las brocas se calientan, déjelas que se enfríen antes de cambiarlas.
• Nunca use sus manos para quitar impurezas y restos metálicos.
• Nunca se distraiga, desconecte siempre la herramienta antes de realizar otra tarea.
• Siempre que sea posible, sujete la pieza de trabajo con abrazaderas o en un tornillo de
banco.
• Examine el portabrocas con regularidad y compruebe que no esté desgastado o dañado.
Repare las piezas dañadas en un servicio técnico autorizado.
• Espere siempre hasta que la broca se detenga por completo antes de dejar la herramienta.
• Examine periódicamente todos los tornillos y elementos de fijación de su herramienta.
Apriételos si es necesario.
Instrucciones de seguridad para
cargadores de batería
Uso correcto del cargador de baterías
• Consulte la sección en este manual relativa al uso del cargador de baterías antes de
empezar a cargar cualquiera batería.
• No utilice el cargador con otras baterías que no sean las suministradas con este producto.
Mantenga limpio el cargador ya que los cuerpos extraños y la suciedad pueden causar un
cortocircuito u obstruir los orificios de ventilación. No seguir estas instrucciones puede
provocar sobrecalentamiento o un incendio.
• Si el cable de alimentación está dañado, deberá ser sustituido por el fabricante o un
servicio técnico autorizado.
• Mantenga a los niños alejados de esta herramienta.
Advertencia: Nunca recargue baterías no recargables.
Uso correcto de las baterías
• Sólo cargue las baterías con el cargador suministrado. Sólo utilice las baterías
suministradas con este aparato, o baterías recomendadas por el proveedor. Mantenga
limpias las baterías, ya que los cuerpos extraños y la suciedad pueden causar un
cortocircuito. Deje que se enfríen las baterías durante 15 minutos después de la carga o
de un uso prolongado.
• No seguir estas instrucciones puede sobrecalentar la batería y provocar un incendio.
• Cuando no use las baterías, deberán guardarse en un lugar seco con temperatura
ambiente (20 °C). Asegúrese de que las baterías no puedan accidentalmente
cortocircuitarse durante su almacenaje.
Nota para baterías
• PELIGRO – Las baterías pueden provocar un incendio, quemaduras o riesgo de explosión.
• ADVERTENCIA – Nunca abra, desmonte, rompa, incinere o caliente por encima de 60° C la
batería. Nunca tire la batería al fuego o similar.
• ADVERTENCIA – Nunca recargue baterías no recargables.
• ADVERTENCIA – Cargue la batería solo con el cargador T20BC. Para mayor seguridad lea
siempre las instrucciones de seguridad del cargador de batería.
• ADVERTENCIA – Siga siempre las instrucciones suministradas por el fabricante.
Características de la batería y el cargador de baterías.
La batería y el cargador incorporan varias funciones de seguridad las cuales se podrían activar
durante el proceso de carga:
• Protección contra exceso de carga: El cargador se apaga automáticamente cuando la
batería alcanza el nivel máximo de carga, protegiendo así todos los componentes de la
batería.
• Protección contra descarga: Evita que la batería se descargue por debajo del nivel de
tensión de seguridad más bajo.
• Protección contra sobrecalentamiento: El sensor apagará automáticamente la batería en
caso de que se sobrecaliente durante el funcionamiento. Esto puede ocurrir si utiliza la
herramienta durante largos periodos de tiempo. Dependiendo de la temperatura ambiente,
puede que necesite dejar enfriar la herramienta durante 30 minutos.
• Protección contra sobrecarga eléctrica: La batería se parará temporalmente si detecta
una sobrecarga eléctrica por encima del nivel máximo permitido. La batería volverá a
funcionar normalmente cuando el nivel de tensión eléctrica sea el adecuado. Esto podría
tardar unos segundos.
• Protección contra cortocircuito: La batería se parará automáticamente en caso de detectar
un cortocircuito con el fin de no dañar la herramienta ni la batería.
ADVERTENCIA para Australia y Nueva Zelanda
• ADVERTENCIA: Cuando utilice esta herramienta en Australia o Nueva Zelanda, se
recomienda conectar esta herramienta en tomas de corriente protegida con dispositivo de
protección de corriente diferencial residual de 30 mA o inferior.
Aplicaciones
• Taladro inalámbrico con función atornillador, modo taladro y percutor. Ideal para atornillar
y perforar en diferentes materiales.
Desembalaje
• Desembale e inspeccione la herramienta con cuidado. Familiarícese con todas sus
características y funciones.
• Asegúrese de que el embalaje contiene todas las partes y que están en buenas
condiciones. Si faltan piezas o están dañadas, solicite su sustitución antes de utilizar esta
herramienta.
18
940454_Z1MANPRO1.indd 18 25/09/2014 17:25
Page 20

E
Antes de usar
• Esta herramienta se suministra con el nivel de batería cargado al mínimo. Asegúrese de
cargar la batería completamente antes de utilizar esta herramienta.
Proceso de carga de la batería
• El cargador puede calentarse durante el proceso de carga. Esto es completamente normal
y no supone ningún problema.
• Siempre que sea posible, utilice el cargador a temperatura ambiente. Para evitar el
sobrecalentamiento, no tape el cargador y proteja la batería de la luz solar y de fuentes de
calor.
Si la batería no carga correctamente:
• Compruebe la toma de corriente enchufando por ejemplo una lámpara.
• Si el problema persiste, lleve la herramienta a un servicio técnico cualificado para que la
revisen.
Carga de la batería
1. Apriete el botón para liberar la batería (7) para retirar la batería de la herramienta.
2. Conecte el cargador T20 (11) al suministro eléctrico. No aplique demasiada fuerza. Si la
batería no encaja correctamente querrá decir que está mal colocada.
3. Inicialmente se encenderá la luz verde indicando el estado de la carga de la batería. La luz
roja se encenderá cuando la batería esté cargando, la luz verde permanecerá apagada.
4. Cuando la batería esté totalmente cargada la luz roja se apagará y la luz verde
permanecerá encendida.
5. El cargador de batería se encargará de monitorizar el estado de carga de la batería.
6. Desconecte la batería después de completar la carga.
7. Desconecte el cargador de la fuente de alimentación y guárdelo en un lugar limpio y seco,
fuera del alcance de los niños.
• El tiempo de duración para una carga completa a temperatura ambiente es de 1 hora. El
tiempo de carga puede verse alterado dependiendo de las condiciones de temperatura.
Batería de 2 Ah: Tenga en cuenta el tiempo de carga completa de este tipo de batería
será aproximadamente de 30 minutos.
• La batería no necesita recargarse siempre por completo. Nunca vuelva a recargar una
batería completamente cargada.
• Puede interrumpir la carga de batería en cualquier momento. Bajo condiciones normales,
el cargador cargará rápidamente. El 80 % de la carga se realizara durante los primeros 30
minutos.
Tabla de carga de la batería
LED rojo LED verde
Cargador conectado Apagado Intermitente
Cargador evaluando el nivel de carga Apagado Intermitente
Carga rápida Encendido Apagado
Batería parcialmente descargada,
carga lenta
Temperatura de batería anormal Intermitente Apagado
Carga completa Apa gado Encendido
Fallo en el cargador de batería Intermitente Intermitente
Condiciones de temperatura anormales Encendido Encendido
Nota: Compruebe la tabla anterior. Si las luces del cargador de batería no se iluminan, indicará
que existe algún fallo:
• Compruebe que la batería esté correctamente colocada en el soporte del cargador.
• Compruebe todas las conexiones y asegúrese de que la herramienta esté encendida.
Carga inicial
• La carga inicial variará dependiendo del cargador de batería que esté utilizando.
• Repita el proceso de carga y descarga aproximadamente 4 – 5 veces. Esto permitirá que
la batería funcione a su máxima capacidad.
• Las siguientes cargas pueden durar 1 hora aproximadamente (T20HCB: batería de 4 Ah),
de todas formas la batería puede recargarse estando parcialmente descargada.
Intermitente Apagado
Recarga de la batería
• Después de cada uso, la batería de litio debe de enfriarse antes de volver a cargarla.
• Si coloca la batería estando caliente en el cargador, la luz verde se iluminará. El cargador
comenzará a cargar cuando la batería se haya enfriado (esto puede tardar unos minutos).
Instalación de la batería
• No utilice demasiada fuerza cuando inserte la batería. Si no se desliza y encaja
correctamente, quiere decir que no está colocada correctamente o puede que los
terminales de la batería estén dañados.
Duración de la batería
La duración de la batería dependerá del tipo de carga de trabajo. Esta batería ha sido diseñada
para para prolongar su vida útil al máximo, aunque como todas las baterías, tienen una vida
útil limitada. El cargador inteligente controla el nivel de la batería, selecciona la velocidad ideal
de carga para la batería y protege la batería contra el exceso de carga o carga a una velocidad
muy alta. Sin embargo, como todas las baterías, el rendimiento disminuirá con el tiempo.
Prolongar la duración de la batería
• Guarde la batería en un lujar fresco. Las temperaturas con niveles superiores al de la
temperatura ambiente disminuirá la vida útil de la batería.
• Nunca guarde baterías descargadas. Cárguelas inmediatamente después de cada uso.
Cargue al máximo la batería cuando vaya a almacenarla durante largos periodos de
tiempo.
• Todas las baterías pierden carga gradualmente, incluso las baterías de litio. Cuanto más
temperatura más rápido se descargará la batería. Recargue la batería cada 3 o 4 meses y
retírela de la herramienta cuando vaya a almacenarla durante largos periodos de tiempo.
Esto evitará que la batería se pueda dañar.
Instalación de una punta o broca
ADVERTENCIA: Nunca instale ningún accesorio con una velocidad máxima inferior a la
velocidad sin carga de la herramienta.
1. Gire el portabrocas sin llave (1) en sentido horario y coloque la broca en el portabrocas.
2. Gire el collarín del portabrocas sin llave en sentido antihorario para sujetar la broca.
Nota: No encienda la herramienta cuando esté montando/desmontando la broca. Coloque el
interruptor de sentido de rotación (5) en posición central.
3. Cuando tenga la broca sujeta, encienda la herramienta para comprobar que la broca esté
centrada. La broca debería girar correctamente. Si la broca no está centrada, afloje el
portabrocas y vuelva a colocar la broca siguiendo los pasos descritos anteriormente.
Sentido de rotación
• La dirección de rotación puede establecerse utilizando el interruptor de sentido de
rotación (5).
• Para hacer que el atornillador de impacto gire hacia la derecha, empuje el interruptor de
sentido de rotación hacia la izquierda.
• Para hacer que el atornillador de impacto gire hacia la izquierda, empuje el interruptor de
rotación hacia la derecha.
• Cuando el interruptor de sentido de rotación esté en posición central, el atornillador se
bloqueará.
ADVERTENCIA: No intente mover el interruptor de sentido de giro cuando el atornillador esté
funcionando.
Control de velocidad
• Este taladro está equipado con 2 velocidades distintas:
- Primera velocidad: 0 – 450 min-1
- Segunda velocidad: 0 – 1.600 min-1
• Para seleccionar una velocidad, deslice el selector de velocidad (4) a la posición requerida.
Colóquelo hacia delante para ajustar la velocidad lenta y hacia atrás para velocidad
rápida.
Nota: Utilice la velocidad lenta para atornillar ya que le ofrecerá mayor par de torsión. Utilice la
velocidad rápida sólo para perforar.
Ajuste de par de torsión
• Este taladro está equipado con un embrague de control de torsión para limitar el par de
torsión del taladro, ideal para atornillar sin dañar la superficie de trabajo.
• Existen 16 ajustes de par de torsión diferentes. A menor par de torsión, menor será la
velocidad de rotación.
• Para ajustar el par de torsión, gire el ajuste de par de torsión (3) a la posición requerida
mediante la flecha indicada en la carcasa de la herramienta.
• Compruebe que el ajuste sea el correcto practicando con un trozo de material desechable.
19
940454_Z1MANPRO1.indd 19 25/09/2014 17:25
Page 21

E
Selector de modo
• Para perforar, seleccione la velocidad adecuada y coloque el selector de modo (3) en el
símbolo de taladro. Ahora el taladro estará ajustado al par máximo.
• Para atornillar, seleccione la velocidad adecuada y coloque el selector de modo (3) en el
símbolo de atornillar. Ahora el embrague de para de torsión estará activado.
• Para perforar mampostería, seleccione la velocidad adecuada y coloque el selector
de modo (3) en el símbolo de martillo percutor. Ahora el taladro estará ajustado al par
máximo con modo percutor.
ADVERTENCIA: Esta herramienta también puede utilizarse con un adaptador para atornillar
tuercas y pernos. Nunca utilice la velocidad rápida para atornillar. Utilice uno de los 16
ajustes de par de torsión junto con la velocidad lenta para realizar este tipo de tarea y evitar
sobrecargar la herramienta. Se recomienda previamente utilizar una llave para aflojar o apretar
tuercas y pernos, de esta forma evitará dañar la herramienta.
up the operation, without risk of damage, when high torque is required at the
beginning or end of the operation.
Funcionamiento
ADVERTENCIA: Lleve siempre protección adecuada cuando utilice esta herramienta, incluido
protección ocular, protección auditiva y guantes de protección.
Encendido/apagado
• Para encender el taladro, apriete el interruptor de gatillo (6). La luz guía LED (10) se
iluminará automáticamente.
• La velocidad del taladro es controlada por la presión ejercida en el gatillo, cuanto más se
aprieta el gatillo, más rápidamente funciona el taladro.
• Para detener la herramienta suelte el interruptor de gatillo.
Nota: El taladro puede desconectarse automáticamente debido al mecanismo de protección
térmica contra sobrecargas, el cual evitará que la herramienta se pueda dañar en caso de
sobrecarga. Esto no significa que la herramienta esté averiada.
Consejos para perforar
• Utilice brocas afiladas y solamente adecuadas para cada material.
• Nunca exceda la capacidad máxima de perforación indicada en la sección “Características
técnicas”.
• Comience perforando a velocidades bajas apretando el interruptor de gatillo ligeramente.
• Reduzca la velocidad cuando note que la broca vaya a atravesar la pieza de trabajo.
• Para evitar que se produzcan astillas o que se pueda romper la pieza de trabajo, sujete un
trozo de madera detrás de la pieza de trabajo o continúe el agujero por la parte de atrás
una vez que la broca haya atravesado la pieza de trabajo.
Perforación en metal
• Sujete materiales finos con un trozo de madera desechable.
• Marque la posición del agujero previamente con un martillo o punzón.
• Utilice solamente brocas de acero rápido (HSS) adecuadas para metal.
• Antes de realizar un agujero completo, utilice una broca pequeña para taladrar un agujero
de guía.
• Utilice lubricante adecuado para alargar la vida útil de la broca y obtener resultados de
mayor calidad.
Perforación en mampostería
• Para perforar paredes, piedra y hormigón, utilice brocas para mampostería de TCT.
• No presione la herramienta excesivamente. Cuando los restos de polvo obstruyan el
agujero, perfore lentamente y retire la broca lentamente. Repita el proceso hasta retirar el
polvo y vuelva a continuar.
Accesorios
• Existen gran variedad de accesorios (brocas y puntas para atornillar, batería de 2 Ah
(T20B), batería de alta capacidad de 4Ah (T20HCB) disponibles a través de su distribuidor
Silverline o en www.toolsparesonline.com.
Mantenimiento
• Esta herramienta está fabricada con componentes de alta calidad y utiliza sistemas
de protección para proteger y garantizar el funcionamiento de la herramienta en todo
momento.
Limpieza
• Mantenga la herramienta siempre limpia. Limpie siempre el polvo y las partículas y nunca
deje que los orificios de ventilación se bloqueen. Utilice un cepillo suave o un paño seco
para limpiar la herramienta, si dispone de un aparato de aire comprimido, sople con aire
seco y limpio para limpiar los orificios de ventilación.
Almacenaje
• Guarde esta herramienta y accesorios en un lugar seco y seguro fuera del alcance de los
niños.
Reciclaje
Deshágase siempre de las herramientas eléctricas adecuadamente respetando las normas de
reciclaje indicadas en su país.
• No deseche las herramientas y aparatos eléctricos junto con la basura convencional.
Recíclelos siempre en puntos de reciclaje.
• Póngase en contacto con la autoridad local encargada de la gestión de residuos para
obtener más información sobre cómo reciclar este tipo de herramientas correctamente.
20
940454_Z1MANPRO1.indd 20 25/09/2014 17:25
Page 22

E
Solución de problemas
Problema Causa Solución
La luz LED de color rojo no se ilumina y no carga
Capacidad de la batería baja
El taladro no se enciende (el interruptor no se mueve)
El taladro no se enciende al pulsar el interruptor de
encendido/apagado
Los tornillos no se introducen completamente en la pieza
de trabajo
Los tornillos se introducen demasiado en la pieza de trabajo Par de torsión demasiado alto Utilice un par de torsión más bajo
Al perforar mampostería la broca no se introduce
completamente
Batería mal colocada Compruebe que la batería esté colocada correctamente
El cargador no está enchufado Enchufe el cargador
Batería parcialmente descargada Cargue la batería el mismo día o el día anterior
La batería ha sido cargada más de 100 veces
y comienza a perder capacidad
El interruptor sentido de rotación está colocado en la
posición central (bloqueo)
Batería descargada Recargue la batería o sustitúyala por una nueva
Batería defectuosa Sustituya la batería
Taladro averiado
Par de torsión insuficiente o demasiado bajo Utilice un par de torsión más alto
Batería baja Recargue la batería o sustitúyala por una nueva
Broca incompatible o dañada
Broca demasiado larga
El taladro no está en modo percutor
Contacte con su distribuidor Triton o con un servicio técnico
autorizado para sustituir la batería
Deslice el interruptor sentido de rotación hacia la derecha
o izquierda
Contacte con su distribuidor Triton o con un servicio técnico
autorizado
Sustituya la broca por una broca de alta calidad para
mampostería
Véase la capacidad máxima de perforación en
“Características técnicas”
Coloque el taladro en la posición de martillo percutor (Véase
selector de modo)
Garantía
Para registrar su garantía, visite nuestra página Web en www.tritontools.com* e
introduzca sus datos personales.
Estos datos serán incluidos en nuestra lista de direcciones (salvo indicación contraria)
de manera que pueda recibir información sobre nuestras novedades. Sus datos no serán
cedidos a terceros.
Recordatorio de compra
Fecha de compra: ___ / ___ / ____
Modelo: T20CH Conserve su recibo como prueba de compra. art pr
Las herramientas Triton disponen de un período de garantía de 3 años una vez haya
registrado el producto en un plazo de 30 días contados a partir de la fecha de compra.
Si durante ese período apareciera algún defecto en el producto debido a la fabricación o
materiales defectuosos, Triton se hará cargo de la reparación o sustitución del producto
adquirido. Está garantía no se aplica al uso comercial por desgaste de uso normal, daños
accidentales o por mal uso de esta herramienta.
* Registre el producto online en un plazo de 30
días contados a partir de la fecha de compra.
Se aplican los términos y condiciones.
Esto no afecta a sus derechos legales.
21
940454_Z1MANPRO1.indd 21 25/09/2014 17:25
Page 23

PT
Tradução das instruções originais
Obrigado por comprar esta ferramenta Triton. Este manual contém as informações necessárias para a operação segura e eficiente deste
produto. Este produto apresenta recursos exclusivos, e mesmo que você esteja familiarizado com produtos similares, é necessário ler
o manual cuidadosamente para garantir que as instruções sejam totalmente entendidas. Assegure-se de que todos os usuários desta
ferramenta leiam e compreendam totalmente o manual.
Conteúdo
Especificação 40
Familiarização com o produto 41
Descrição dos símbolos 41
Segurança Geral 41
Segurança adicional para furadeiras e parafusadeiras a bateria 42
Segurança do conjunto e carregador de baterias 42
Uso pretendido 43
Desembalagem da sua ferramenta 43
Antes do uso 43
Operação 44
Acessórios 44
Manutenção 44
Descarte 44
Garantia 45
Declaração de Conformidade 45
Especicação
Número do modelo: T20CH
Furadeira
Voltagem: 20V, cc
Rotação sem carga: 0 a 450min-1 (marcha lenta)
Frequência de impacto: 7200/min (marcha lenta)
Velocidades: 2
Controle de velocidade: Gatilho
Ajustes de torque: 16+2
Torque máximo: 48Nm
Capacidade do mandril: 1,5 a 13mm
Capacidade de perfuração
(madeira):
Capacidade de perfuração
(alvenaria):
Capacidade de perfuração
(aço):
Peso: 3,9kg (8,6lbs)
Informações sobre ruído e vibração
Pressão sonora LPA: 87,6 dB(A)
Potência sonora LWA: 98,6 dB(A)
Imprecisão K: 3 dB
Vibração ponderada:
(metal) ah,D: 2,373m/s
0 a 1600min-1 (marcha rápida)
25.600/min (marcha rápida)
26mm
10mm
13mm
(com a bateria de 4,0 Ah instalada)
2
(concreto) a
: 7,104m/s
h,ID
(veloc. máx. sem carga) a
Uncertainty K: 1,5m/s
O nível de intensidade sonora para o operador poderá ultrapassar 85dB(A) e são
necessárias medidas de proteção.
: 1,707m/s
h,NL
Conjunto de baterias
Tecnologia: Células Samsung de íons de lítio
Voltagem: 20V, cc
Modelo e Capacidade: T20HCB, 4,0Ah
Carregador de bateria
Modelo do carregador: T20BC
Tempos de carga: 1hr (para o T20HCB: Conjunto de baterias de 4Ah
Voltagem de entrada: EU: 220 a 240V, CA 50/60Hz, 80W
Potência de saída: 20V, CC, 3,0A
Comprimento do cabo de
energia:
Como parte do desenvolvimento de nossos produtos, as especificações da Triton podem
ser alteradas sem aviso.
2
2
2
T20B, 2,0Ah
30min (T20B: Conjunto de baterias de 2Ah
SA: 220 a 240V, CA 50/60Hz, 80W
AU: 220 a 240V, CA 50 - 60Hz, 80W
JP: 100 a 120V, CA 50 - 60Hz, 1,3A
EUA/CAN: 120V, CA 50 - 60Hz, 1,3A
2m
AVISO: Use sempre proteção auditiva apropriada, quando o ruído da ferramenta ultrapassar 85dBA, e limite o tempo de exposição ao mínimo necessário. Caso os níveis de ruído se tornem
desconfortáveis, mesmo com proteção auditiva, pare imediatamente de usar a ferramenta e verifique se a proteção auditiva está ajustada de forma correta, de modo prover a atenuação sonora
correta, para o nível de ruído produzido pela ferramenta.
AVISO: A exposição do usuário à vibração da ferramenta pode resultar em perda de sentido do tato, dormência, formigamento e diminuição da capacidade de agarrar. A exposição por longo
prazo pode levar a uma condição crônica. Caso necessário, limite o período de tempo que fica exposto à vibração e use luvas antivibração. Não use a ferramenta com as mãos expostas a uma
temperatura abaixo da temperatura normal confortável, uma vez que a vibração tem mais impacto nessa condição. Use os valores fornecidos na especificação relativa a vibrações, para calcular a
duração e frequência de uso da ferramenta.
Os níveis sonoros e de vibração da especificação são determinados de acordo com a norma EN60745, ou por padrão internacional similar. Os valores consideram o uso normal da ferramenta, sob
condições de trabalho normais. Uma ferramenta montada, mantida ou usada incorretamente, poderá produzir níveis de ruído, e de vibração, superiores.. O site: www.osha.europa.eu fornece mais
informações sobre níveis de vibração e ruído no local de trabalho, e pode ser útil para usuários domésticos que usam ferramentas por longos períodos de tempo.
22
940454_Z1MANPRO1.indd 22 25/09/2014 17:25
Page 24

PT
Familiarização com o produto
1. Mandril de encaixe rápido
2. Colar de ajuste de torque
3. Seletor de modo
4. Seletor de marcha
5. Seletor de reverso
6. Gatilho de controle de velocidade
7. Botão de desencaixe da bateria
8. Gancho para cinto
9. Conjunto de baterias
10. LED auxiliar
11. Carregador de bateria T20
Acessórios (não mostrados):
• Bolsa para transporte
Nota: A bateria fornecida poderá diferir da exibida na imagem
Plugue de tomada do conversor
Usuários do Reino Unido: Não tente remover o plugue de tomada do conversor UK instalado e
usá-lo em outros aparelhos.
Não remova o plugue do conversor UK instalado e não tente inseri-lo diretamente em tomadas
da rede elétrica no Reino Unido.
Se o plugue de tomada do conversor UK for danificado, contate um Centro de Serviços
Autorizado da Triton.
Descrição dos símbolos
Use proteção auricular
Use proteção ocular
Use proteção respiratória
Use proteção de cabeça
Leia o manual de instruções
Cuidado!
NÃO incinere baterias!
Apenas para uso interno (bateria e carregador de baterias)
Fusível de retardo com corrente nominal de 3,15A.
T3.15A
Proteção Ambiental
O descarte de produtos elétricos não deve ser feito no lixo doméstico.
Faça reciclagem onde for possível. Consulte as autoridades locais ou seu
revendedor para saber como reciclar.
Proteção Ambiental
O descarte de produtos elétricos e baterias não deve ser feito no lixo
doméstico. Faça reciclagem onde for possível. Consulte as autoridades
locais ou seu revendedor para saber como reciclar.
As células de íons de Lítio da bateria são recicláveis, e não devem ser
descartadas em lixo doméstico. Faça reciclagem onde for possível. Consulte
as autoridades locais ou seu revendedor para saber como reciclar.
Li-ion
Cumpre a legislação e os padrões de segurança aplicáveis (apenas para o
modelo EUA)
Segurança geral
AVISO Leia todos os avisos de segurança e todas as instruções. O não cumprimento dos
avisos e instruções pode resultar em choque elétrico, incêndio e/ou ferimentos graves.
AVISO: Este aparelho não deve ser usado por pessoas (incluindo crianças)
com capacidades físicas ou mentais reduzidas, ou com falta de experiência ou
conhecimento.
Guarde todos os avisos e instruções para consulta futura.
O termo “ferramenta elétrica”, nos avisos, se refere a uma ferramenta elétrica que usa
alimentação da rede (com cabo elétrico) ou a uma ferramenta a bateria (sem cabo elétrico).
Segurança na área de trabalho
a) Mantenha a área de trabalho limpa e bem iluminada. Áreas desorganizadas ou
escuras facilitam os acidentes.
b) Não opere ferramentas elétricas em atmosferas explosivas, como na presença de
líquidos, gases ou serragens inflamáveis. Ferramentas elétricas produzem faíscas que
podem inflamar a serragem ou os gases.
c) Mantenha as crianças e observadores à distância, quando operar ferramentas
elétricas. Distrações podem fazer você perder o controle.
Segurança elétrica
a) O conector de tomada da ferramenta deve ser compatível com a tomada de
parede. Nunca modifique um conector, de maneira alguma. Nunca use conectores
adaptadores em ferramentas elétricas com fio terra (aterradas). Conectores sem
modificações e tomadas corretas reduzem o risco de choques elétricos.
b) Evite o contato de seu corpo com superfícies aterradas, como tubos, radiadores,
extensões e refrigeradores. Existe um risco maior de choque elétrico se o seu corpo
estiver aterrado.
c) Não deixe as ferramentas elétricas expostas a chuva ou condições úmidas. A água
que entra em uma ferramenta elétrica, aumenta o risco de choque elétrico.
d) Não abuse do cabo elétrico. Nunca use o cabo para carregar, puxar ou desconectar
a ferramenta elétrica. Mantenha o cabo longe de calor, óleo, bordas afiadas ou
peças móveis. Cabos danificados ou emaranhados aumentam o risco de choque elétrico.
e) Quando operar uma ferramenta elétrica ao ar livre, use um cabo de extensão
adequado para uso externo. A utilização de um cabo adequado para uso externo reduz o
risco de choque elétrico.
f) Se o uso da ferramenta elétrica em local úmido for inevitável, use uma fonte de
alimentação protegida com Dispositivo de Corrente Residual (DR). O uso de um DR
reduz o risco de choque elétrico.
Segurança pessoal
a) Mantenha-se alerta, preste atenção no que faz e use de bom senso enquanto opera
uma ferramenta elétrica. Não use ferramentas elétricas quando estiver cansado
ou sob influência de drogas, álcool ou medicamentos. Um momento de desatenção,
quando se opera uma ferramenta elétrica, pode resultar em ferimentos pessoais graves.
b) Use equipamentos de proteção individual. Use sempre proteção ocular.
Equipamentos de proteção como máscara respiratória, calçados de proteção
antiderrapantes, capacete ou protetores auditivos, usados de acordo com as condições
apropriadas, reduzem a ocorrência de ferimentos.
c) Evite partidas não intencionais. Certifique-se de que o interruptor esteja na
posição desligada, antes de conectar a ferramenta à fonte de alimentação e/ou
bateria, quando estiver pegando-a, ou quando estiver transportando-a. Transportar
ferramentas elétricas com seu dedo no interruptor ou energizar ferramentas elétricas com
o interruptor na posição ligada, propicia acidentes.
d) Remova todas as chaves ou ferramentas de trabalho, antes de ligar a ferramenta
elétrica. Uma chave deixada em uma peça rotativa da ferramenta elétrica poderá resultar
em ferimentos.
e) Não se estique demais. Mantenha sempre o equilíbrio e os pés em local firme. Isto
permite um melhor controle da ferramenta em situações inesperadas.
f) Vista-se corretamente. Não use joias, nem roupas largas. Mantenha cabelos, roupas
e luvas longe das peças móveis. Roupas largas, joias e cabelos longos podem ficar
presos nas peças móveis
g) Se for utilizar dispositivos para a aspiração e coleta de pó, assegure-se de que
estejam conectados e sejam usados corretamente. O uso da coleta de pó pode reduzir
os riscos relacionados ao excesso de pó.
Uso e cuidados com a ferramenta elétrica
a) Não force a ferramenta elétrica. Use a ferramenta correta para sua aplicação. A
ferramenta correta fará o trabalho melhor e com mais segurança, com a produtividade
para a qual foi projetada.
23
940454_Z1MANPRO1.indd 23 25/09/2014 17:25
Page 25

PT
b) Não use a ferramenta elétrica se o interruptor liga/desliga não estiver funcionando.
Qualquer ferramenta que não puder ser controlada com o interruptor liga/desliga é
perigosa e deve ser consertada.
c) Desconecte o conector de tomada da fonte de energia e/ou bateria, antes de
realizar quaisquer ajustes, trocar acessórios ou de guardá-la. Estas medidas de
segurança preventivas reduzem o risco de se ligar a ferramenta por acidente.
d) Guarde a ferramenta elétrica fora do alcance de crianças, quando não estiver em
uso, e não permita que pessoas não familiarizadas com a ferramenta, ou com estas
instruções, a operem. Ferramentas elétricas são perigosas nas mãos de pessoas não
treinadas.
e) Conserve as ferramentas elétricas. Verifique o alinhamento ou emperramento das
peças móveis, se existem peças quebradas ou outra condição que possa afetar a
operação da ferramenta. Se a ferramenta estiver danificada, providencie o conserto,
antes de usá-la. Muitos acidentes são causados por ferramentas mal conservadas.
f) Mantenha as ferramentas de corte limpas e afiadas. Ferramentas de corte com bordas
afiadas, quando mantidas corretamente, são menos propensas a emperramentos e mais
fáceis de controlar
g) Use a ferramenta elétrica, seus acessórios e outros elementos de acordo com estas
instruções, considerando as condições de trabalho e o serviço a ser executado. O
uso da ferramenta para operações diferentes daquelas para as quais foi projetada pode
resultar em uma situação de risco
Uso e cuidados com ferramenta a bateria
a) Use apenas o recarregador especificado pelo fabricante. Um carregador adequado
para um tipo de conjunto de baterias poderá provocar um incêndio quando usado com
outro tipo de conjunto de baterias.
b) Use as ferramentas elétricas apenas com os conjuntos de baterias especificados. O
uso de qualquer outro tipo poderá causar incêndios e ferimentos.
c) Quando não estiver usando um conjunto de baterias, mantenha-o longe de objetos
metálicos, como grampos de papel, moedas, chaves, pregos, parafusos, e outros
objetos de metal pequenos, que sejam capazes de conectar um terminal ao outro. O
curto-circuito dos terminais de uma bateria poderá causar um incêndio ou queimaduras.
d) Sob condições excessivas, as baterias poderão expelir líquidos; evite contato. Caso
ocorra contato acidental, lave com bastante água. Caso o líquido entre em contato
com os olhos, procure um médico. Os líquidos expelidos por uma bateria poderão
causar irritação ou queimaduras.
Serviço
a) Entregue sua ferramenta para reparos a pessoal técnico qualificado, que use
apenas peças de reposição idênticas às originais. Isto garantirá que a ferramenta
continuará oferecendo segurança.
Segurança adicional para furadeiras
e parafusadeiras a bateria
Para a segurança relacionada a vestuário/equipamento de proteção e riscos gerais à saúde,
associados a ferramentas elétricas, consulte as seções de Segurança Geral e Elétrica, deste
Manual.
• Use protetores auriculares quando realizar perfurações com impacto. A exposição a ruído
pode provocar perda auditiva
• Segure as ferramentas elétricas pelas empunhaduras isolantes, quando estiver realizando
uma tarefa em que o acessório de corte possa entrar em contato com fiação oculta. O
contato do acessório de corte e/ou parafusos com um cabo “vivo” pode tornar “vivas” as
partes metálicas expostas da ferramenta, provocando um choque elétrico no operador.
Importante: É obrigatório o cumprimento de todos os regulamentos nacionais relativos à
instalação, operação e manutenção.
• Não permita que ninguém abaixo de 18 anos use esta ferramenta, e assegure-se de que
os operadores estão qualificados e familiarizados com as instruções de segurança e de
operação.
• Se as baterias precisarem ser carregadas ao ar livre, garanta que a fonte de alimentação
e o carregador estão protegidos contra umidade e mau tempo.
• Quando operar a furadeira, use equipamento de segurança, incluindo óculos de proteção,
proteção auditiva e vestuário de proteção, inclusive luvas. Use uma máscara respiratória
se a operação de perfuração criar pó.
• Use detectores de metal e voltagem para localizar tubulações elétricas, de água ou gás.
Evite tocar em componentes ou condutores “vivos”
• Use iluminação adequada.
• Assegure-se de que a broca esteja presa firmemente ao mandril. Brocas soltas poderão
ser lançadas pela máquina, criando um perigo.
• Certifique-se de que a broca de perfuração está em contato com a peça de trabalho, antes
de ligar a ferramenta.
• Antes de perfurar, verifique se existe folga suficiente para a broca de perfuração embaixo
da peça de trabalho.
• Não exerça pressão sobre a ferramenta, pois isso poderá reduzir sua vida útil.
• As brocas ficam quentes durante o uso. Portanto, aguarde esfriarem antes de tocá-las.
• Nunca use as mãos para retirar serragem, cavacos ou resíduos próximo à broca de
perfuração.
• Caso você seja interrompido, quando estiver operando a serra, conclua o processo e
desligue a ferramenta, antes de redirecionar seu olhar.
• Sempre que possível, use suportes ou uma morsa para prender a peça de trabalho.
• Examine o mandril regularmente em busca de sinais de dano. Envie as peças danificadas
a um centro de assistência técnica qualificado.
• Aguarde sempre até que furadeira pare completamente, antes de pousá-la na bancada.
• Verifique periodicamente se todas as porcas, parafusos e outros elementos de fixação
estão apertados, e aperte onde necessário.
Segurança das baterias e
carregador
Use o carregador de bateria de forma correta
• Consulte a seção deste manual que trata do carregador de bateria, antes de tentar
carregar o conjunto de baterias.
• Não tente usar o carregador com outras baterias além das fornecidas. Mantenha seu
carregador de bateria limpo; objetos estranhos ou sujeira poderão causar curto-circuitos
ou obstruir as entradas de ar. O não cumprimento destas instruções poderá provocar
superaquecimento ou incêndio.
• Caso o cabo de alimentação elétrica esteja danificado, deverá ser substituído pelo
fabricante, pela assistência técnica autorizada, ou por pessoal qualificado, para evitar
perigos.
• Crianças devem ser supervisionadas para garantir que não brinquem com este aparelho.
Aviso: Não recarregue baterias não-recarregáveis.
Use as baterias de forma correta
• Carregue as baterias apenas com o carregador fornecido. Use apenas as baterias
fornecidas com esta ferramenta, ou outras recomendadas pelo fabricante. Mantenha as
baterias limpas; objetos estranhos e sujeira poderão causar curto-circuitos. Deixe que as
baterias esfriem por 15 minutos após a carga, ou depois de uso intenso. A não observação
destas instruções poderá provocar superaquecimento ou fogo.
• Quando não estiverem em uso, as baterias devem ser guardadas à temperatura ambiente
(aprox. 20˚C). Assegure-se de que as baterias não podem sofrer um curto-circuito
acidental, enquanto estiverem armazenadas.
AVISO referente a conjuntos de bateria.
• PERIGO – Os riscos associados a conjuntos de baterias incluem queimaduras e perigo de
explosão
• CUIDADO - Não abra, desmonte, esmague ou aqueça acima de 60° C, ou incinere. Não
jogue fora no fogo ou lugar similar.
• CUIDADO – Não carregue baterias não recarregáveis.
• CUIDADO – Carregue a bateria apenas com o carregador modelo T20BC. Para uso seguro
do carregador de baterias, consulte o manual de instruções do respectivo carregador.
• CUIDADO - Siga as instruções do fabricante
Recursos de segurança das baterias e do carregador
O conjunto de baterias e o carregador são equipados com vários recursos de segurança que
podem ser acionados durante a carga:
• Proteção contra sobrecarga: O carregador se desliga automaticamente, assim que o
conjunto de baterias atinge plena carga, o que protege os componentes internos das
baterias.
• Proteção contra descarga excessiva: Impede que a bateria se descarregue abaixo da
voltagem mínima de segurança recomendada.
• Proteção contra superaquecimento: Um sensor desliga a ferramenta, caso a bateria
aqueça demais durante a operação. Isto poderá acontecer, se a ferramenta for
sobrecarregada ou for usada durante muito tempo. Poderão ser necessários até 30
minutos para resfriamento, dependendo da temperatura ambiente.
• Proteção contra sobrecarga: A bateria se desliga temporariamente, caso fique
sobrecarregada ou seja excedido o consumo máximo de corrente, protegendo os
componentes internos. A bateria retornará a operar normalmente, quando o consumo de
corrente retornar aos níveis normais seguros. Isto poderá levar alguns segundos.
• Proteção contra curto-circuito: O conjunto de baterias interromperá seu funcionamento
imediatamente, caso ocorra um curto-circuito, o que impede que ele ou a ferramenta
sejam danificados.
AVISO para a Austrália e Nova Zelândia
• AVISO: Quando usada na Austrália ou Nova Zelândia, recomenda-se que esta ferramenta
seja SEMPRE alimentada através de um Dispositivo de Corrente Residual (DR), com
corrente residual nominal de 30mA ou menos.
24
940454_Z1MANPRO1.indd 24 25/09/2014 17:25
Page 26

PT
Uso pretendido
• Furadeira a bateria com funções de parafusadeira, furadeira e furadeira martelete,
adequada para trabalhos de perfuração e aparafusamento de carga média.
Desembalagem de seu produto
• Desembale e inspecione cuidadosamente seu produto. Familiarize-se completamente com
todos os recursos e funções
• Certifique-se de que todas as peças do produto estão presentes e em bom estado. Caso
estejam faltando peças ou existam peças danificadas, substitua-as primeiro, antes de
tentar usar a lanterna.
Antes do uso
• Esta furadeira martelete é entregue com as baterias com baixa carga. Portanto,
carregue-a antes do uso.
Segurança do carregador de bateria
• O carregador e o conjunto de baterias poderão aquecer durante a carga. Isto é normal e
não é sinal de problemas.
• Sempre que possível, use o carregador à temperatura ambiente. Para evitar
superaquecimento, não cubra o carregador, não realize a carga da bateria sob luz solar
direta, nem perto de fontes de calor.
Caso a bateria não carregue corretamente:
• Verifique a corrente na tomada elétrica, ligando uma lâmpada ou outro aparelho.
• Caso os problemas de carregamento persistam, envie a furadeira martelete, o conjunto
de baterias e o carregador para a avaliação por um técnico especializado em ferramentas
elétricas.
Carregamento do conjunto de baterias
1. Pressione o Botão de desencaixe da bateria (7) e remova a bateria da ferramenta.
2. Insira o conjunto de baterias no carregador de baterias T20 (11). Não use força excessiva,
quando inserir o conjunto de baterias. Caso a bateria não entre com facilidade, não está
sendo inserida corretamente.
3. Inicialmente, apenas o LED verde poderá piscar, uma vez que ele indica o estado da
bateria. Durante a carga, o LED vermelho se acenderá e o LED verde permanecerá
apagado.
4. Quando a bateria atingir a carga total, o LED verde se acenderá e o LED vermelho se
apagará.
5. O carregador de bateria monitora continuamente a condição da bateria, durante a carga.
6. Remova o conjunto de baterias assim que possível, logo após o término da carga.
7. Desconecte o carregador da tomada e guarde-o em um local seco e limpo, fora do
alcance de crianças.
• Normalmente o tempo de carregamento da bateria é de 1 hora, no caso de uma bateria
de 4Ah, descarregada recentemente, à temperatura normal. Os tempos de carregamento
podem variar fora dessas condições. Bateria de 2,0Ah: Note que o tempo total de
carregamento é de aproximadamente 30 minutos.
• Não é necessário descarregar completamente a bateria, antes de recarregá-la, mas não
se deve tentar carregar uma bateria que já esteja totalmente carregada.
• O carregamento de uma bateria pode ser interrompido a qualquer momento para uso da
bateria. Sob condições normais, o carregador realiza o carregamento da bateria em uma
taxa alta, e reduz a taxa à medida que o nível da bateria se aproxima da carga total. Após
1/2 hora de carregamento, a bateria atinge um nível de 80% de carga.
Tabela de carregamento de bateria
LED vermelho LED verde
Carregador ligado na tomada APAGADO Pisca
Avaliação da carga do conjunto de
baterias
Carregamento rápido ACESO APAGADO
Carregamento lento do conjunto de
baterias muito descarregado
Carregamento de bateria com
temperatura anormal
Totalmente carregada APAGADO ACESO
Falha do conjunto de baterias ou do
carregador
Temperatura anormal ACESO ACESO
Nota: Caso os LEDs do carregador não funcionem de acordo com a tabela acima, ou indiquem
uma condição de falha:
• Verifique se a bateria está encaixada firmemente no carregador.
• Verifique todas as conexões elétricas e se a energia da rede está ligada.
APAGADO Pisca
Pisca APAGADO
Pisca APAGADO
Pisca Pisca
Carregamento inicial
• O carregamento inicial dependerá do nível de carga que existir na bateria. Deixe que a
bateria carregar até que o carregador indique que foi atingida a carga total.
• Após a descarga, recarregue a bateria completamente, conforme indicação do LED do
carregador, nos primeiros 4 a 5 carregamentos. Isto fará com que a bateria trabalhe com
o melhor de seu desempenho.
• As recargas completas subsequentes exigirão aproximadamente 1 hora (T20HCB:
bateria de 4 Ah), Apesar disso, a bateria pode ser recarregada mesmo se estiver apenas
parcialmente descarregada.
Recarregamento da bateria
• Após o uso, a bateria de íons de Lítio deve esfriar, antes de ser recarregada.
• Caso uma bateria quente seja inserida no carregador, ambos os LEDs se acenderão. O
carregador iniciará a carga, apenas quando a bateria houver esfriado o suficiente (o que
pode levar alguns minutos).
Instalação da bateria
• A bateria deve entrar com facilidade no carregador ou na furadeira. Caso tenha
dificuldade de inserí-la, verifique o estado da bateria e dos contatos.
Bateria - duração da carga e vida útil
• A duração de cada carga da bateria depende do tipo de trabalho realizado com a
ferramenta. O carregador e a bateria desta furadeira foram projetados para proporcionar
uma vida útil longa e sem problemas. O carregador monitora a condição da bateria
de forma inteligente e seleciona uma taxa de carregamento ideal para essa condição.
Também, protege a bateria contra sobrecarga ou contra taxas de carregamento muito
elevadas. Apesar disso, como em todas as baterias, o desempenho diminuirá com o
passar do tempo.
Para maximizar a vida útil:
• Guarde e carregue sua bateria em locais frescos. Temperaturas abaixo ou acima da
temperatura ambiente normal reduzem a vida útil da bateria.
• Nunca guarde baterias de íons de Lítio descarregadas. Recarregue-as imediatamente,
após se descarregarem. Carregue as baterias totalmente, antes de armazená-las por
longos períodos.
• Todas as baterias perdem gradualmente a carga, mesmo as baterias de íons de Lítio,
porém a taxa de descarga é muito lenta. Caso a furadeira fique fora de uso durante
muito tempo, recarregue as baterias a cada três ou quatro meses, e desconecte-as da
ferramenta, antes de guardá-las. Esta prática evita que as baterias de íons de lítio sejam
danificadas durante o armazenamento.
25
940454_Z1MANPRO1.indd 25 25/09/2014 17:25
Page 27

PT
Instalação de uma broca ou ponta de fenda
AVISO: NÃO use nenhum acessório com rotação máxima inferior à rotação sem carga da
furadeira.
1. Gire o colar do mandril de encaixe rápido (1) no sentido horário e insira a broca no
mandril.
2. Gire o colar do mandril de encaixe rápido (1) no sentido anti-horário para prender a broca.
Nota: NÂO acione a rotação da ferramenta enquanto aperta ou desaperta o mandril.
Idealmente, escolha a posição central do seletor normal/reverso (5).
3. Quando a broca estiver bem apertada no mandril, acione a rotação da ferramenta para
verificar se está bem centralizada. A rotação da broca não deve ser irregular. Caso a broca
não esteja centralizada, solte o mandril, reposicione a broca e reaperte o mandril.
Controle de sentido de rotação
• O sentido de rotação pode ser definido com o uso do botão seletor normal/reverso (5).
• Para que o mandril gire no sentido horário, empurre o seletor normal/reverso (5) para a
esquerda.
• Para que o mandril gire no sentido anti-horário, empurre o seletor normal/reverso para a
direita.
• Quando o seletor normal/reverso está na posição central, a ferramenta fica travada.
AVISO: NÃO tente mover o seletor normal/reverso quando a ferramenta estiver funcionando.
Controle de velocidade
• Esta furadeira possui uma caixa de transmissão com duas marchas:
- 1a marcha: 0 a 450min-1
- 2a marcha: 0 a 1600min-1
• Use o seletor de marcha (4) para engatar a marcha: para a frente, engata a primeira
marcha, e para trás, a segunda marcha.
Nota: A primeira marcha normalmente seria usada para aperto de parafusos, por exemplo, e
oferece um torque maior, com mais controle em baixa rotação. A segunda marcha deve ser
usada, normalmente, exclusivamente para perfuração.
Controle de torque
• Esta furadeira é equipada com um controle de torque que limita o torque de aperto,
evitando que os parafusos sejam danificados por torque excessivo.
• Existem 16 valores de torque e um valor para perfuração. Quanto menor o número, menor
o torque.
• Para ajustar o torque, selecione a primeira marcha e gire o colar de ajuste de torque (2),
até que o valor desejado fique alinhado com a seta que existe no corpo da furadeira.
• Verifique se o torque ajustado está correto, testando o uso em um pedaço de material
descartável.
Seleção de modo
• Para perfuração, selecione a marcha correta e gire o seletor de modo (3) até ao símbolo
de perfuração. Isto travará a furadeira no torque máximo.
• Para parafusamento, selecione a marcha correta e gire o seletor de modo, até ao símbolo
de parafuso. Isto ativará a embreagem de torque.
• Para perfuração em alvenaria, selecione a marcha correta e gire o seletor de modo até ao
símbolo de martelete. Isto travará a ferramenta no torque máximo e ativará a função de
martelete de impacto.
AVISO: A furadeira pode ser equipada com um adaptador para acionamento de porcas e
parafusos. Não tente usar esta ferramenta na posição de perfuração com este adaptador
instalado. Use os 16 valores de torque e a primeira marcha, para permitir que a embreagem
de torque proteja a ferramenta de cargas excessivas. Recomenda-se o uso de uma chave
manual para soltar ou apertar porcas/parafusos. Isto permite que a ferramenta acelere a
operação, sem risco de ser danificada, quando é necessário torque muito elevado no início
ou final do aperto.
Operação
AVISO: Use sempre o equipamento de proteção adequado, incluindo a proteção ocular,
respiratória e auricular, quando trabalhar com esta ferramenta.
Acionamento e desligamento
• Para começar a operação, aperte o gatilho de controle de velocidade (6). O LED auxiliar
(10) se acenderá.
• Um aperto adicional no gatilho aumentará a velocidade de rotação da ferramenta.
• Solte o gatilho de controle de velocidade para parar a ferramenta
Nota: É possível que a furadeira desligue durante usos pesados, devido à proteção térmica da
bateria e dos componentes internos. Isso pode impedir a reutilização da ferramenta durante
um curto período, e não é uma indicação de falha.
Orientações sobre perfuração
• Use brocas afiadas e garanta que as brocas são apropriadas para o material que vai ser
perfurado.
• Nunca ultrapasse as capacidades máximas de perfuração, listadas em ‘Especificação’
• Comece perfurando com baixa velocidade com um aperto parcial no botão de gatilho.
• Reduza a pressão no gatilho se a broca estiver quase atravessando o material sendo
perfurado.
• Para evitar o despedaçamento do material, prenda um pedaço de madeira do outro lado,
ou continue a perfuração pelo lado de trás, assim que a ponta da broca aparecer nesse
lado.
Perfuração de metal
• Prenda materiais finos com um pedaço de madeira.
• Marque a posição do furo com um punção e um martelo.
• Use apenas brocas de aço de alta velocidade (HSS) ou outras recomendadas para furar
metais.
• Antes de fazer um furo grande, faça um furo piloto com uma broca menor.
• Use um fluido lubrificante/resfriador adequado para prolongar a vida útil de sua broca, e
obter bons resultados.
Perfuração de alvenaria
• Use sempre uma broca de perfuração para alvenaria, preferivelmente uma broca TCT,
quando perfurar paredes e concreto.
• NÃO aplique pressão excessiva nas costas da ferramenta. Se o furo ficar obstruído
com detritos, coloque a furadeira em baixa velocidade e retire a broca do furo. Repita o
processo até que o furo esteja sem detritos e continue.
Acessórios
• Seu revendedor Triton oferece uma linha de acessórios, incluindo a bateria de 2 Ah (T20B),
a bateria de alta capacidade de 4Ah (T20HCB), brocas de perfuração e pontas de fenda.
As peças de reposição podem ser compradas em seu revendedor Triton, ou on-line pelo
site: www.toolsparesonline.com
Manutenção
• Esta ferramenta é fabricada com o uso de componentes de primeira linha e usa os
circuitos inteligentes mais recentes para proteger a ferramenta e seus componentes. Sob
uso normal, a ferramenta deve apresentar uma vida útil longa.
Limpeza
• Mantenha sua ferramenta limpa o tempo todo. A sujeira e o pó produzem desgaste
acelerado das peças internas e encurtam a vida útil da ferramenta. Limpe o corpo de sua
ferramenta com uma escova macia e pano seco. Se houver ar comprimido disponível,
use-o para soprar a sujeira nas fendas de ventilação.
Armazenamento
• Armazene esta ferramenta e seus acessórios em sua caixa, em um local seco e firme, fora
do alcance de crianças.
Descarte
Cumpra sempre as leis nacionais ao descartar ferramentas elétricas que não funcionam mais
e cujo reparo não é mais viável.
• Não descarte ferramentas elétricas, ou outros equipamentos elétricos e eletrônicos (WEEE)
no lixo doméstico.
• Contate a autoridade local de eliminação de resíduos para saber o modo correto de
descartar ferramentas elétricas e baterias.
26
940454_Z1MANPRO1.indd 26 25/09/2014 17:25
Page 28

PT
Resolução de problemas
Problema Possível causa Solução
O LED vermelho, que indica que o carregamento está em
andamento, não acende e a bateria (5) não carrega
O conjunto de baterias está com baixa capacidade
Não se consegue ligar a furadeira (O gatilho não se move)
A furadeira não funciona quando o gatilho liga/desliga é
pressionado
Os parafusos não penetram o suficiente na peça de trabalho
Os parafusos penetram fundo demais na peça de trabalho
Durante a perfuração em alvenaria, a broca não penetra
na parede
A bateria não está instalada corretamente Limpe o soquete de bateria do carregador
O carregador de baterias não está conectado à rede elétrica Verifique a conexão à rede elétrica
A bateria não está sendo carregada totalmente
O conjunto de baterias já foi recarregado cerca de 100 vezes
e sua capacidade de carga começou a ficar reduzida
O seletor normal/reverso (2) pode estar na posição central
(“bloqueada”)
O bateria está completamente descarregada
Bateria defeituosa Substitua a bateria
A furadeira está defeituosa
Torque insuficiente; o ajuste da embreagem de torque está
muito baixo
A voltagem da bateria está baixa
Torque excessivo; o ajuste da embreagem de torque está
muito elevado
A broca está cega ou é inadequada
A broca é grande demais
A furadeira não está colocada em modo martelete
Carregue a bateria até que o carregador indique carga
completa.
Este comportamento é normal em baterias Contate seu
revendedor Triton para comprar um conjunto de baterias
de reposição
Mova o seletor normal/reverso para a esquerda ou direita
Recarregue a bateria ou substitua-a por uma bateria
totalmente carregada
Contate seu revendedor Triton ou o centro de assistência
técnica autorizado
Escolha um ajuste de torque mais alto
Recarregue a bateria ou substitua-a por uma bateria
totalmente carregada
Escolha um ajuste de torque muito baixo
Substitua a broca de perfuração por uma broca nova de alta
qualidade, específica para alvenaria
Veja as ‘Especificações’ para saber as capacidades máximas
de perfuração
Gire o seletor de modo para colocar a ferramenta em modo
de perfuração martelete (Veja ‘Seleção de modo’)
Garantia
Para registrar sua garantia, visite nosso site em www.tritontools.com* e cadastre suas
informações.
Seus dados serão incluídos em nossa lista de endereços (a menos que indicado de outro
modo) para que você receba informações sobre lançamentos futuros. Os dados que nos
fornecer não serão repassadas a terceiros.
Registro de compra
Data de compra: ___ / ___ / ____
Modelo: T20CH Retenha sua nota fiscal como comprovante de compra.
A Triton Precision Power Tools garante ao comprador de ste produto
que se qualquer peça estiver comprovadamente defeituosa devido
a falhas de material ou mão de obra durante o s próximos 3 anos a
partir da data da compra original, Triton irá reparar ou, a seu critério,
substituir a peça defeituosa sem custo.
Esta ga rantia não se aplica ao uso comercial nem se estende ao
desgaste normal ou a danos decorrentes de acidente, abuso ou uso
indevido.
* Registre-se online dentro de 30 dias após a compra.
Termos e condições aplicáveis.
Isto não afeta seus direitos legais.
27
940454_Z1MANPRO1.indd 27 25/09/2014 17:25
Page 29

EPTEPLEPTERUEPTEPLEPTEHUEPTEPLEPTERUEPTEPLEPTECZEPTEPLEPTERUEPTEPLEPTEHUEPTEPLEPTERUEPTEPLEPTEJP
オリジナル取扱説明書の翻訳
トリトン製品をお買い上げいただきありがとうございます。この取扱説明書には、当製品を安全に効率よく操作していただくた
めに必要な情報が記されていますので良くお読みください。当製品には多くのユニークな特長があります。あなたが類似の製
品を使い慣れておられても、是非この説明書をお読みになり、他に類を見ない当製品の全ての機能をご活用ください。この取
扱説明書はいつも手元に置き、当製品を使用される全ての方が、必ず説明書を読んで製品を十分に理解するようにしてしてく
ださい。
目次
仕様
各部の名称
記号の意味
安全上のご注意
バッテリー駆動ドリル&ドライバーに関する注意事項
バッテリーパック&充電器に関する注意事項
用途
製品の開梱
ご使用の前に
使用方法
アクセサリ ー
点 検・修 理
廃棄
品質保証
仕様
製品番号:
T20CH
ドリル
電圧:
無負荷速度
打撃数:
ギア数:
速度調整:
トルク数 :
最大締め付けトルク:
チャック サイ ズ :
穴あけ能力 (木材):
穴あけ能力 (石/レンガ):
穴あけ能力 (鋼鉄):
重量:
20V, DC
00 〜 450回/分 (低ギア)
0 〜 1600回/分 (高ギア)
7200回/分 (低ギア)
25,600回/分 (高ギア)
2
トリガ ースイッ チ
19段階+2
48Nm
1.5 〜13mm
26 mm
10mm
13 mm
3.9 kg (con batteria 4.0Ah
montata)
騒音および振動に関する情報:
音圧 LPA:
音響パワー LWA:
不確定要素 K:
87.6dB (A)
98.6dB (A)
3dB
補正振動値:
(金属) α
:
h,D
(コンクリート) α
h,ID
2.373m/s
7.104m/s
(無負荷/最大速度) α
不確定要素 K:
作業者に対する音響インテンシティーのレベルは85db(A)を超える可能性が
あり、防音保護具の着用が必要です。
h,N
バッテリーパック
テ クノ ロ ジ ー :
電圧:
製品番号&容量:
バッテリー充電器
製品番号:
充電時間:
入力電圧:
出力電圧:
電気コ ードの長 さ:
継続的な製品開発により、トリトン製品の機能および形状は予告なしに変更す
る場 合があります。
2
2
2
707m/s
2
1.5m/s
サムスン製リチウムイオン電池
直流20V
T20HCB, 4.0Ah
T20B, 2.0Ah
T20BC
1時間(T20HCB: 4Ahの場合)
30分 (T20B: 2Ah の場合)
UE: 230-240V a.c. 50-60Hz,
80W
SA: 230-240V a.c. 50-60Hz,
80W
AU: 230-240V a.c. 50-60Hz,
80W
日本: 100-120V, 交流 50-60Hz,
1.3A
US/CAN: 120V, a.c. 50-60Hz,
1.3A
直流20V 3.0A
2メ ートル
警告:音響レベルが85dB(A)を超える場合は、常に防音保護具を着用し、必要な場合は騒音ばく露時間を制限してください。防音保護具を着用しているにもかかわらず音響レ
ベルが不快に感じられる場合には、電動工具の使用を中止し、防音保護具が正しく装着できているか、ご使用の電動工具の騒音レベルに対して騒音の減衰レベルが適切であ
るか を確 認してください 。
警告:振動する電動工具を使用すると、触覚消失、無感覚、しびれ、あるいは握力低下などが生じる場合があります。長時間の使用は慢性的な障害を引き起こす可能性がありま
す。必要な場合は、振動へのばく露時間を制限し、振動軽減手袋を着用してください。通常の快感温度以下で電動工具を手持ちで使用しないでください。低温下では振動の影
響が通常よりも大きくなります。仕様書に記載されている振動に関する数値を電動工具の使用時間および頻度を計算するのにお役立てください。
仕様書に記載されている騒音と振動レベルの数値は、欧州規格EN60745あるいは同様の国際規格に従って測定しています。それらの数値は、通常の作業環境における通常
の使用を意味しています。整備不足、不正確な組み立て、誤った取り扱いの場合、製品の騒音および振動のレベルは増大する可能性があります。www.osha.europa.euのウェ
ブサイトには、職場における騒音および振動レベルに関する情報が提供されており、家庭において電動工具を長時間使用する場合にも役立つ手引きとなるでしょう。
28
940454_Z1MANPRO1.indd 28 25/09/2014 17:25
Page 30

EPTEPLEPTERUEPTEPLEPTEHUEPTEPLEPTERUEPTEPLEPTECZEPTEPLEPTERUEPTEPLEPTEHUEPTEPLEPTERUEPTEPLEPTEJP
各部の名称
1. キーレスチャック
2. トルク調整リング
3. モードセレクタ
4. ギアセレクタ
5. 正逆回転切替スイッチ
6. トリガースイッチ
7. バッテリー取り外しボタン
8. ベルトクリップ
9. 4.0Ahバッテリーパック*
10. LED表示ライト
11. T20バッテリー充電器
アクセサリー(図には表示されていません)
• キャリー バッグ
*注意: 付属のバッテリーは写真とは異なる場合があります。
変換プラグ
英国のユーザー様:製品の英国型変換プラグを取り外したり、プラグを他の電気製
品に使用したりしないでください。
製品の英国型変換プラグを取り外したり、製品を直接英国の電源コンセントに接続
したりし ないでくだ さい 。
英国型変換プラグが破損した場合は、トリトン製品販売店にお問い合わせください。
記号の意味
防音保護具を着用してください
保 護 メガネを 着用 してくだ さ い
防 塵 マ スクを 着 用してくだ さい
頭部保護具を着用してください
取扱説明書をお読みください
警 告!
バッテリーを焼却処分しないでください
屋内での使用に限る(バッテリーとバッテリー充電器)
内部タイムラグヒューズは定格電流3.15A
T3.15A
環境の保護
不用になった電気製品は家庭ごみとして廃棄しないでください。でき
る 限 りリ サ イクル してくだ さ い 。リサ イクル に関 しては 、お 住ま いの 自
治体あるいは販売店にお問い合わせください。
環境の保護
不要になったリチウムイオン電池を含むバッテリー製品や電気製品
は、家庭ごみと一緒に廃棄しないでください。できる限りリサイクルし
てください。リサイクルに関しては、お 住まいの自治体あるいは販売
店にお問い合わせください。
リチウムイオン電池はリサイクルが可能ですので家庭ごみとして
廃 棄 しな いで くださ い 。できる限 りリサ イクルしてくだ さい 。リサ イ
クルに関しては、お住まいの自治体あるいは販売店にお問い合わ
せください 。
Li-ion
関連する法律および安全基準に適合しています。(欧州仕様機種
に限る)
安全上のご注意
警告: 安全に関する注意事項と取扱説明書の全てをよくお読みになり
十分に理解してください。説明書に書かれている警告や指示に従わず
にこの製品を取り扱った場合、感電や火災あるいは重大な事故を起こ
す危 険があります。
警告: この製品は、精神的および身体的な能力が低下した人(子供を
含める)や十分な経験および知識のない人が使用することを意図した
もので はありませ ん。
どの取扱説明書も大切に保管してください。
下記のあらゆる警告の中で使われている「電動工具」という用語は、電
源を電気コンセントからとった(電気コードの付いた)電動工具または
電池式の(電気コードのない)電動工具を意味します。
作業場所の安全
a) 作業場所は清潔に明るくしておきます。雑然とした作業場や薄暗い
所は事 故を招 きます。
b) 引火性の液体やガスや粉塵のある爆発性のガスが発生していそう
な環境では、電動工具を使わないでください。電動工具がスパーク
するとガスに点火する恐 れがあります。
c) 電動工具の使用中は、子供や見物人を近寄らせないでください。気
が散ると手元が狂いがちになります。
電気の安全
a) 電動工具のプラグは、コンセントに合うものを使ってください。ど
んな方法にせよ、プラグに手を加えないでください。アースを要す
る電動工具にアダプタープラグを使わないでください。改造されて
いないプラグとそのプラグに 合うコンセントを使えば、感電 の危
険が減りま す。
b) アースしたり接地したりしてあるパイプ、ラジエ ーター、レンジ、冷 蔵
庫などに身体を接 触させ ないでください。身体がアースされたり接
地したりした場合、感電の危険が増します。
c) 電動工具を雨や濡れた状態にさらさないでください。水が電動工
具の中に入ると感電の危険が増します。
d) 電気コードを乱暴に扱わないでください。電気コードを持って電
動工具を 運ん だり、引っ張ったり、あるいはプ ラグを抜 いたりして
はいけません。電気コードは、熱や油や先の尖った物や動く物から
離してください。電気コードが損傷したり絡まったりすると、感電
の危 険が 増します。
e) 電動工具を屋外で使用する場合は、屋外使用に適した延長コード
を使用してください。屋外使用に適した延長コードを使用すれば感
電の 危 険が 減ります。
f) 湿気の多い場所での作業が避けられない場合は、漏電による事故
防止のために漏電遮断器(RCD)を使用してください。漏電遮断機
は感電事故の危険を減らします。
作業者の安全
a) 電動工具を扱っている時は、決して油断をせず、自分がしているこ
と に 注 意 し 、常 識 を 働 か せ て く だ さ い 。疲 れ て い る 時 や 、薬 物 や ア
ルコールあるいは医薬品の影響がある時は、電動工具を使用して
はいけません。電動工具使用中の一瞬の不注意が、深刻な人身事
故につなが ります。
b) 安全用具を利用してください。常に保護メガネを着用してください。
作業場の状態に適した防塵マスク、安全靴、安全ヘルメット、防音
保護具などの安全用具が人身事故を防ぎます。
c) 偶発的に電動工具を始動しないように注意してください。電源にプ
ラグを差し込んだり、バッテリーを取り付けたり、持ち上げたり、運
んだりする 時 は、スイッチを切って おくようにしてください 。スイッチ
に指を乗せたまま電 動工具を持ち歩いたり、スイッチの入っている
電動工具のプラグを電源につないだりすると事故を招きます。
d) 調節キーやレンチを外してから電動工具のスイッチを入れてくださ
い。電動工具の回転部分にレンチやキーを取り付けたままにする
と 、怪 我 を す る 恐 れ が あ り ま す 。
29
940454_Z1MANPRO1.indd 29 25/09/2014 17:25
Page 31

EPTEPLEPTERUEPTEPLEPTEHUEPTEPLEPTERUEPTEPLEPTECZEPTEPLEPTERUEPTEPLEPTEHUEPTEPLEPTERUEPTEPLEPTEJP
e) 無理な姿勢で作業しないように、常に安定した足場と身体のバラ
ンスに注意してください。予期しない状況下でも電動工具をコント
ロー ルし やすくなりま す。
f) 作業に適した正しい服装をしてください。ダブダブの衣服を着た
り、宝石類を身につけたりしないでください。髪の毛、衣服、手袋を
動くものに近づけないでください。ダブダブの衣服や宝石類、長い
髪 の 毛 は 動くも の に巻 き込 まれ る恐 れ が ありま す。
g) 集塵装置を接続する機能がある製品は、必ず正しく接続し確実に
取り付けてください。集塵装置を使用することで塵埃に関する危険
を減 らすことが できます。
電動工具の使用と手入れ
a) 電動工具に無理をさせないでください。使用の目的にあった電動
工具を正しくお使いください。電動工具を設計通りに正しく使用す
ると、より良くより安 全 に 作 業 をす ることが できます。
b) スイッチを入れたり切ったりできない電動工具は使わないでくだ
さい。スイッチで制御できない電動工具は危険であり、修理する必
要があります。
c) 電動工具の調整や付属部品の交換をする時や、工具を収納する時
は、必ずプラグを電源から抜くかバッテリーを取り外してください。
そのような安全防護策によって、電動工具が偶発的に動き出すと
いった 危 険 を 減らすことができま す。
d) 使わない電動工具は子どもの手の届かない場所に保管し、電動
工具やその取扱説明書に詳しくない人に電動工具の取り扱いを
させないでください。電動工具は不慣れなユーザーにとっては危
険で す。
e) 電動工具の手入れをしてください。動く部分のずれや固着、部品の
破損や、その他電動工具の操作に影響を及ぼしそうな状態を点検
し て く だ さ い 。破 損 が あ れ ば 、使 用 す る 前 に 修 理 し て も ら っ て く だ さ
い。電動工具による事故のほとんどは整備不足が原因です。
f) 刃物 はいつも切 れ味 を鋭くきれいにしておきましょう。刃 先が鋭く
正しく手入れの行き届いた切削工具は、外しづらくなることもなく、
より扱 い やす いも ので す
g) 電動工具、付属部品、工具ビットなどは、それぞれの取扱説明書に
従って使用してください。説明書に従い、作業場の状態と自分がお
こなう作業内容を考慮に入れて作業してください。本来の目的とは
異なる運用をすると危険な状況に陥ることがあります。
バッテリー式電動工具の使用と注意事項
a) 必ずメーカーが指定する充電器だけを使用して充電してくださ
い。あるタ イプのバッテリー 用 充電 器 を 異 なるタイプのバ ッテリー
の充電に使用した場合、発火する恐れがあります。
b) 電動工具には、必ず製品用に指定されたバッテリーパックを取り
付けて使用してください。指 定され たバッテリーとは 異なるバッテ
リーを使用した場合、怪我や発火の恐れがあります。
c) バッテリー を 使 用しない 時 は 、バッテリーの 両 端 子をショートさせ
る可能性のあるペーパークリップや硬貨、クギ、ネジなどの金属製
品と一緒に保管しないでください。両端子がショートすると焼け焦
げや発火の可能性があります。
d) 乱暴に取り扱うとバッテリーから液漏れする場合があります。この
液体に触れないように注意してください。液に触れた場合は水で
洗い流してください。目に入った場合は、医師の診察を受けてくだ
さい。この液体に触れると皮膚炎や火傷の可能性があります。
警 告:本機をオーストラリアおよびニュージーランドで使用する場合は、定格感度電
流が30mA以下の漏電遮断器(RCD)を経由して使用することをお勧めします。
修理
a) 電動工具の修理は、必ず同一の交換部品を使用して資格を持っ
た技術者が行ってください。電動工具の安全を維持するために大
変重要です。
バッテリー駆動ドリル&ドライバ
ーに関する注意事項
安全保護具や電動工具の使用に関する一般的な安全上の注意については、この取
扱説明書内の「安全上のご注意」の項をお読みください。
• ハンマードリルを使用するときは、防音保護具を着用してください。騒音にさらさ
れると 聴力 を損 なう恐 れが あります。
• 隠れた配電線などに工具が接触する可能性のある作業では、必ず絶縁処理され
ているハンドルやグリップを持って作業してください。偶然に電気の通った電線
に触れると金属露出面に通電して感電する危険があります。
重要: 取り付けおよび使用、点検・修理に関係する国の安全規則は絶対に守らなけ
れば なりません。
• 18歳以下の人に本機を使用させないでください。取り扱い方法や安全上の注意
事項をよく理解した資格のある人が本機を使用してください。
• バッテリーを屋外で充電する場合は、電源や充電器が雨や水分などで濡れない
ように十分注意してください。
• ドリルを使用するときは、保護メガネやシールド、防音保護具、保護手袋を含む
保護衣服などの安全用具を使用してください。粉塵の発生する穴あけ作業では
防 塵 マ スク を 着 用 してくださ い。
• 金属探知機や検電器を使って電線や水道管、ガス管などが隠れていないか確認
してくださ い。電 気が 通った ものに 触れ ないよ うに 注意 してください 。
• 十分な明るさを確保するよう照明に注意してください。
• ドリルビットが チャックにしっかりと固 定されていることを 確 認して下 さい 。しっ
かりと固定されていないと作業中にビットが外れる可能性があり大変危険です。
• 必ずビットの先端が加工材に触れた状態でスイッチを入れてください。
• 穴あけを始める前に、加工材の下に十分なスペースがあるかどうか確認して下さ
い。
• 本機に無理な力を入れて作業しないでください。工具の使用可能寿命を低下さ
せます。
• 使用中ドリルビットは熱くなります。手で触れる前に冷えるのを待ってください。
• ビットの近くの切粉や木片、ごみなどを絶対に手で取り除かないでください。
• 作業の途中で中断する時は、加工材から目を離す前に必ず行っている作業を終
わらせ てスイッチを 切ってください 。
• 可能な場合はいつでもクランプやバイスで加工材を固定してください。
• 定期的にチャックの状態を点検し、摩耗や破損がないことを確認してください。
修理が必要な場合は、トリトン製品販売店にお問い合わせください。
• ドリルを置くときは、必ず回転が完 全に止まってから置いてください。
• 全てのナットやボルトなどの金具がしっかりと締まっているかどうか定期的に点
検してく ださ い 。必 要な 場合 は締 めてくださ い 。
バッテリー&充電器に関する注意
事項
バッテリー充電器の正しい使用について
• バッテリーを充電する前に、本取扱説明書のバッテリー充電器の使用に関する
項を よく読 んでください 。
• 本製品に付属のバッテリー以外のものを充電しないでください。バッテリー充電
器はいつもきれいに保ってください。異 物や汚 れは通 風口を塞 いだりショートし
たりする原因になります。本取扱説明書に従わずに使用した場合、オーバーヒー
トや発 火の 恐れ があります。
• 本製品の電気コードが損傷した場合は、安全のためトリトン製品販売店にお問
い合わせください。
• 子供がこの製品で遊んだりしないように十分に監督してください。
警告: 再充電できないバッテリーを充電しないでください。
バッテリー の 正しい 使 用 について
• 必ず本製品付属のバッテリー充電器で充電してください。必ず本製品付属のバ
ッテリー かメー カー が指 定する バッテリー を使用してください。バッテリー はい
つもきれいに保ってください。異物や汚れはショートの原因になります。充電後や
長時間使用した後は、15分程度バッテリーが冷えるのを待ってください。本取扱
説明書に従わずに使用した場合、オーバーヒートや発火の恐れがあります。
• バッテリーは常温で保管してください。(20℃前後が最適)保管中に誤ってショ
ートし ないよう に注 意してくださ い 。
バッテリーパックに 関 する注 意
• 危険 – 火傷や爆発などの危険があります
• 警告 – バッテリーパックを開けたり、つぶしたり、60℃以上に加熱したり、焼
却処分したりしないでください。焼却および同様な方法で廃棄しないでください。
• 警告 – 充電できない1次電池を充電しないでください。
• 警告 – 必ずT20BCのバッテリー充電器で充電してください。バッテリー充電
器の正しい使用方法については、バッテリー充電器の取扱説明書をお読みく
ださい。
• 警告 – メーカーの取扱説明書に従って使用してください。
バッテリーと充電器の安全機能
本製品のバッテリーパックと充電器には、いくつかの安全機能がついています。充電
時や使用時には、以下の点に注意してください。
• 過充電保護:本製品の充電器は、バッテリーパックが満充電になるとバッテリー
内部の部品を保護するため自動的にスイッチが切れます。
• 過放電保護:バッテリーが放電し過ぎるのを防ぐため、指定最低レベルを超えて
放 電しな いようになってい ます。
30
940454_Z1MANPRO1.indd 30 25/09/2014 17:25
Page 32

EPTEPLEPTERUEPTEPLEPTEHUEPTEPLEPTERUEPTEPLEPTECZEPTEPLEPTERUEPTEPLEPTEHUEPTEPLEPTERUEPTEPLEPTEJP
• オ ー バ ー ヒー ト 保 護:使 用 中 に バ ッ テ リ ー が 熱 くな り過 ぎ ると 、セン サ ー によりス
イッチが切れるようになっています。負荷をかけ過ぎたり長時間使用し過ぎた場
合に、スイッチが自動的に切れる場合があります。温度にもよりますが、30分程
度 バッ テリ ー が冷 える のを 待っ てくだ さい
• 過負荷保護:負荷をかけすぎたり最大出力電流を超えた場合、バッテリーは内部
の部品を保護するために一時的にストップします。出力電流が安全レベルに戻れ
ば再び正常に動きます。数秒かかる場合があります。
• ショート保護:バッテリーパックがショートした場合は即座にストップし、工具本
体やバッテリーパックへの損 傷を防ぐようになっています
オーストラリア&ニュージーランドでの使用に関する警告
• 警告: 本機をオーストラリアおよびニュージーランドで使用する場合は、定格
感度電流が30mA以下の漏電遮断器(RCD)を経由して使用することをお勧
めします。
用途
• 本製品は、締め付けと穴あけ、さらにハンマードリル作業がおこなえるバッテリー
駆動のドリルで、中レベルの穴あけ&締め付け作業に最適です。
製品の開梱
• 十分注意して箱を開け、製品を確認してください。製品の特長や機能の全てを十
分に理解してください。
• 全ての部品が揃っており、良好な状態であることを確認してください。もしも、
不足部品や破損した部品があれば、必ず使用する前に部品を交換してもらっ
てくださ い 。
ご使用の前に
• このコードレスコンビハンマードリルは、出荷時には十分に充電されていません。
ご使用になる前に必ず充電してください。
充電器の使用方法
• 充電中には、充電器とバッテリーパックが温かくなる場合があります。これは正常
な現象で問題ではありません。
• 充電器はできる限り通常の室温で使用してください。オーバーヒートを防ぐため
に、充電器をカバーした状態や、直射日光の当たる場所や熱源の近くで充電しな
いよ うに してください 。
充 電 がうまくい か ない 時 は:
• 電源に電気が来ているかどうか、照明器具や他の電気製品を接続させてみて確
認してく ださ い 。
• 電源に問題がないにもかかわらず充電ができない場合は、コードレスコンビハン
マードリルとバッテリーパック、および充電器を電気技術者か電動工具技術者に
点 検 しても らってく ださ い 。
バッテリーパックの充電方法
1. バッテリー取り外しボタン(7)を押して本体からバッテリーを外します。
2. バッテリーパックをT20バッテリー充電器(11)に差し込みます。バッテリーパッ
クを差し込む時、無理な力を入れないでください。簡単に入らない場合は、正しく
差し込 めていません 。
3. 最初にバッテリーの充電状態を判断する間は、緑のライトが点滅する可能性が
あります。充 電中は緑 のライトが消えて赤のライトが点灯します。充電 中は緑 のラ
イトが 消えて 赤 のライトが 点 灯し ます 。
4. 満充電すると赤のライトは消えて緑のライトが点灯します。
5. 充電中は、常に充電状態をモニターして状態を表示します。
6. 充電が完了したら、できるだけすぐにバッテリーパックを充電器から取り出してく
ださい。
7. 充電器のプラグを電源から抜き、充電器は清潔で乾燥した子供の手の届かない
場所に保管してください。
• 完全に放電してあまり時間がたっていない4Ahバッテリーを常温で充電する場
合、通常の充電時間は約1時間です。充電時間は、バッテリーの状態やコンディ
ションによって異なります。2.0Ahバッテリ: 2Ahバッテリーは、満充電に約30分
かかります。
• 充電前にバッテリーを完全に放電する必要はありません。しかし、満充電したバ
ッテリーを再度充電することはしないでください。
• 完全に充電する前にバッテリーを取り出して使用することは可能です。通常の
状態では高速で充電を行いますが、満充電に近づくと充電速度は下がりますの
で、30分で80%の充電ができています。
充電器の表示ライトについて
赤LEDライト 緑LEDライト
電源に差し込んだ状態
バッテリーの容量を確認中
高速充電中
減速充電中
充電中ですがバッテリーが高温
充電完了
バッテリーまたは充電器に問題あり
一時的に高温のため待機中
注 意:表に示されたようにライトが点灯しない時や問題があると表示されている
場 合 は:
• バッテリーが充電 器に正しく差し込まれているか確認してください。
• 電源に問題がないか確認してください。
オフ 点滅
オフ 点滅
点灯 オフ
点滅 オフ
点滅 オフ
オフ 点灯
点滅 点滅
点灯 点灯
最初の充電
• 最初の充電は、バッテリーの容量によって充電時間が異なります。表示ライトで
確認して、完全に満充電してください。
• 最初の4〜5回の使用後は、放電したバッテリーは、表示ライトで確認して完
全に満充電してください。これにより、バッテリーが最大容量で使用できるよう
になりま す。
• その後の充電では、満充電に通常1時間かかりますが(T20HCB: 4Ahバッテリ
ーの場合)容量を残した状態でも再充電することができます。
バッテリーの再充電
• 使 用後 に熱くなったリチウムイオンバッテリーは、冷えてから充電してください。
• 高温のバッテリーを充電器に差し込むと赤ライトと緑ライトの両方が点灯しま
す。バッテリーの温度が十分に下がると充電を開始します。(充電が始まるまで数
分 か か る 場 合 が あ り ま す 。)
バッテリー の 取り付 け
• バッテリーは充電器にもドリル本体にも簡単に取り付けられます。もし取り付け
がうまくいかない場合は、バッテリーや取り付ける部分の状態を点検してくださ
い。
バッテリー の 寿 命
• バッテリーの寿命は、仕事量や作業の内容により違ってきます。本製品のバッテ
リーと充電器は、長期間、故障なしでご使用いただけるように設計されています。
本製品のインテリジェントな充電器は、バッテリーの状態をモニターし、最適な
速度で充電をおこないます。過充電を防ぎ、充電速度が速くなりすぎないように
します。しかし、どん なバ ッテリー も時 間とともに力 を失 いま す。
バッテリーを 長持ちさせ るため に:
• バッテリーの保管や充電は涼しい場所でおこなってください。気温が高過ぎたり
低過 ぎたりするとバッテリーの 寿命が 短くなります。
• リチウムイオンバッテリーは、放電した状態で保管しないでください。放電した後
は速やかに再充電を行ってください。長期間保管する時は、バッテリーを満充電
してか ら保 管してくだ さい。
• どんな バッテリーも少しずつ自然 放 電します。リチウムイオンバッテリーも例外で
はありませんが、放電速度はゆっくりです。ドリルドライバーを長期間使用しない
で保管する場合は、バッテリーを3〜4カ月おきに再充電し、ドリルドライバー本
体から取り外して保管してください。これにより、保管期間中にリチウムイオンバ
ッテリ ー が 傷 む のを 防ぐことが で きま す。
ドリル ビットおよ び ドライバ ービットの 取 り付
け
警告: 最大速度が本機の無負荷回転速度よりも低いビットを取り付けて使用しな
いでくだ さい 。
1. キーレスチャック(1)のリングを時計回りに回してビットをチャックに正しく差込
みます。
2. キーレスチャックのリングを反時計回りに回してビットを固定します。
注意: チャックを締めたり緩 めたりしている時 にドリルをスタートさせ ないでくださ
い。理想的には、ビットの取り付けをおこなう時は、正逆回転切替スイッチ(5)を真ん
中のロック位置 にしておこないます。
31
940454_Z1MANPRO1.indd 31 25/09/2014 17:25
Page 33

EPTEPLEPTERUEPTEPLEPTEHUEPTEPLEPTERUEPTEPLEPTECZEPTEPLEPTERUEPTEPLEPTEHUEPTEPLEPTERUEPTEPLEPTEJP
3. ビット がしっ かり 固定 でき たら 、ド リル を動 かしてビ ットの 中心 が合 ってい る かど
う か 確 認 し て く だ さ い 。ビ ッ ト は 、ぶ れ ず に 滑 ら か に 回 転 す る は ず で す 。ビ ッ ト の 中
心が合っていない場合 は、チャックを緩めてビットを取り付け直し、再 度締め付 け
てから再確認してください。
回転方向の切り替え
• 回転方向は、正逆回転切替スイッチ(5)で選択できます。
• チャックを時計回りに回転させたい場合は、正逆回転切替スイッチを左に動かし
ます。
• チャックを反時計回りに回転させたい場合は、正逆回転切替スイッチを右に
動か します。
• 正逆回転切替スイッチを真ん中の位置にするとドリルはロックされます。
警告: 本機を使用中に正逆回転切替スイッチを動かしてはいけません。
速度調整
• 本機 には2 速 ギアボ ックスが つい ていま す。
- 第1ギア: 0 – 400回転/分
- 第2ギア: 0 – 1600回転/分
• ギアセレクタ(4 )を動 かしてギアを選択してください。前に押すと第1ギアで後ろ
に押すと第2ギアです。
注意: 第1ギアは通常 ネジ締 めに使 用し、低い回 転数 でより強い締め 付け力と優れ た
コ ン ト ロ ー ル が 得 ら れ ま す 。第 2 ギ ア は 、通 常 は 穴 あ け に 使 用 し ま す 。
締めつけ力の調整
• 本機にはトルク調整機能がついており、トルクの出力を制限して締め付け力を調
整し 、ネジ を傷め ることなく締 め 付 けること が でき ます 。
• 16段階のトルク設定と2つのドリル設定があります。数字が低いほど締め付け力
が 弱くなり ます。
• 締め付け力を調整するには、ギアを第1ギアに設定し、トルク調整リング(2)を回
して本体ハウジングの矢印を必要な目盛りに合わせます。
• トルクの 設定 が 正しいかどうか 、不 要な部 材でテストしてください。
モードの切り替え
• 穴あけ作業には、正しいギアを選択しモードセレクタ(3)を回して矢印をドリル
の記 号に合 わせます。これで 最 大トルク にロックされ ます。
• 締め付け作業には、正しいギアを選択しモードセレクタを回してネジの記号に合
わせ ます。これで トルククラッ チが 働きま す。
• 石・レンガ・コンクリートの穴あけ 作 業には 、正 しいギアを 選 択しモードセレクタ
を回してハンマーの記号に合わせます。これで最大トルクおよびハンマー打撃
機 能が 働きます。
警 告:本機 には 、ナットやボ ルト締め付 け用のドライブアダ プター を取り付 けて使 用
できます。ドライブアダプターを取り付けて使用する場合は、絶対にドリルの位置で
使用してはいけません。ギアを第1ギアに設定して19段階のトルク設定を使用する
と、トルククラッチが 働いて締め付け過ぎを防ぎます。ナットやボルトを緩めたり締め
付けたりする 場 合は 、ス パナを 使用 することをお勧 めします。作業 の始 めや 終 わりに
非常に強い締め付け力が必要な場合には、スパナを使用することで作業がはかどり
本機の損傷を防ぐことができます。
金属の穴あけ
• 薄い金属板は、不要な木材でサポートしてください。
• 穴 をあけたい位 置にセンターポンチでくぼみをつけ、そこにドリルの先をあてがっ
て穴 をあ けます。
• HSS(高速度鋼)ドリルビットか金属に適したビットを使用してください。
• 大 きな穴をあける場 合は 、まず 小さめのビットでパイロット穴をあけてから大 き
な穴 に加工 します。
• ドリルビットの寿 命を長くするためにも、きれい に穴をあ けるためにも、適切 なク
ーラント(冷却液)や潤滑剤をつけて作業してください。
石・レンガ・コンクリートの穴あけ
• 石やコンクリートに穴をあける時は 、必 ず石 レンガ用の加 工材に適したビットを、
できればTCT超硬ビットを使用してください。
• 無 理な力でツール を押 さえな いでください。穴 に破 片が 詰まった時 は、ドリル をゆ
っくり動 かしてビットを穴から外し 、これを繰り返して破片を取り除 いてから穴あ
けを 続け ます。
アクセサリー
• 2Ahバッテリー(T20B)や高容量の4Ahバッテリー(T20HCB)およびドリルビ
ットやドライバービットなど様々なアクセサリーがトリトン製品販売店でお求め
いただけます。交換部品はトリトン製品販売店かwww.toolsparesonline.com
でもお 求めいた だけます。
点 検・修 理
• 本製品は、トップレベルの部品を使用し、工具本体および部品を保護する最新の
インテリジェント回路設計に基づいて製造されています。通常の使用であれば長
くご 使 用い た だ けま す。
クリー ニング
• 電動工具はいつもきれいにしておきましょう。汚れや粉塵は内部部品の傷みを早
め電動工具の寿命を短くします。やわらかいブラシや乾いた布を使って機体を掃
除してください。可能な場合は、きれいな乾燥した圧縮空気を通風口に吹き付け
て粉塵を取り除いてください。
保管
• この製品とアクセサリーは、使用後はキャリーバッグに収納し、子 供の手の届か
ない安全で乾燥した場所に保管してください。
廃棄
機能しなくなったり修理が不可能になったりした工具を廃棄する場合は、必ず国の
法律に従ってください。
• 電動工具やバッテリー、その他の不用になった電気&電子道具を家庭ごみとし
て廃 棄しな いでください 。
• お住まいの自治体の廃棄物処理機関に、電動工具やバッテリーの正しい処分の
方法をお問い合わせください。
使用方法
警告: 本機を使用して作業する時は、常に保護メガネや防塵マスク、防音保護具など
適切な安全用具を使用してください。
スイッチの オン / オフ
• 本機をスタートさせるには、トリガースイッチ(6)を引いてください。LED表示ラ
イト(10)が点灯します。
• さらにトリガーを引くと回転速度が上がり、トリガーの引き加減により回転速度
を調 整できま す。
• ト リガ ー スイ ッチ を 放 すと ス ト ッ プ しま す 。
注意: 本機は、使い過ぎると熱保護機能が働いてバッテリーや部品の保護のために
スイッ チ が 切れ る場 合 が あ りま す。スイッチ が 切 れてし まっ た場 合 は 、し ば らく 使 用で
きませんが故障 ではありません。
穴あけ
• 穴 あけ に は 切 れ味 の良 い ビットを 使用 してくださ い 。ビットが 加 工材 に適 している
かどうか注 意してください。
• 「仕様」に記載されている本機の最大穴あけ能力を超えた加工をしないでく
ださい。
• 穴 のあけ始 めは 、トリガースイッチを軽く引いてゆっくりと回転 させます。
• ドリルビットが加工材を抜ける時には、トリガーを引く力を弱めて注意して作業
してくださ い。
• 穴の抜け口にバリやささくれが出ないようにするには、不要な木材を加工材の
後ろにクランプで固定し、ドリルビットが加工材を貫通して当て板まで続けて穴
をあける ようにします。
32
940454_Z1MANPRO1.indd 32 25/09/2014 17:25
Page 34

EPTEPLEPTERUEPTEPLEPTEHUEPTEPLEPTERUEPTEPLEPTECZEPTEPLEPTERUEPTEPLEPTEHUEPTEPLEPTERUEPTEPLEPTEJP
トラブルシューティング
症状 想定される原因 対応方法
赤LEDライトが点灯せずバッテリーが充電しない
バッテリー パックの 容量が 小さい
ドリルが動かない(トリガースイッチが動かない)
トリガースイッチを引 いてもドリル が動 かな い
ネジ が 深く入ら ない
ネジ が 深く入りす ぎる 締め付け力が強すぎる、トルクの設定が高すぎる もう少し低いトルクに設定する
石 レ ン ガ の 穴 あ け 作 業 で 、ド リ ル ビ ッ ト が 壁 に 入 ら な い
バッテリーが充 電器に正しく入っていない 充電器のソケットを掃除する
電源が 入っていない
バッテリーが満充電できていない 満充電の表示が点灯するまで充電する
バッテリーパックの再充電を100回以上繰り返し容
量 が 低 下してい る
正逆回転切替スイッチがロックされている(真ん中の
位 置に なっている )
バッテリーが空 になっている
バッテリー が 壊れ ている 新 しいバ ッテリーと 交 換する
ドリル 本 体 が 壊 れてい る トリトン製品販売店にお問い合わせください
締め付け力が足りない、トルクの設定が低すぎる もう少し高いトルクに設定する
バッテリー の容 量が 足りな い
ビットが 適してい な い 、刃 が 摩 耗してい る 新しい高品質の石レンガ用ドリルビットと交換する
ドリルビットが大 きすぎる 「仕様」の項で最大穴あけ能力を確認してください
ハンマーモ ードになっていない
電源に電気がきているか、正しく接続しているか
確認 する
これはバッテリーパックの正常な状態です。交換用の
新しい バッテリーパックをご 購 入ください 。
正逆回転切替スイッチを右か左の位置に動かす
バッテリーパックを充電するか充電済みバッテリー
と交換 する
バッテリーを充電するか充電済みバッテリーと交
換する
モードセレクタを回してハンマードリルモ ードにする(
「モードの切り替え」参照 )
品質保証
当社のウェブサイトwww.tritontools.comで必要事項を記入
し保証登録してください。登録いただきました内容は、特に明
示さ れていない 場 合を除 いて当社 のメーリング リストに 入れさ
せていただき、新商品 情報などをお届けします。登録いた だい
たお客様の 個人情報は、いかなる第三者にも利用させることは
いたしません 。
ご購入記録
ご購入日: ___ / ___ / ____
製品: T20CH ご購入の際のレシートは購入日を証明するため
に保 管 して 下 さい 。
Triton Precision Power Toolsは、ご購入いただいたこの製
品の品質を保証し、工場 製造 上の欠陥または材質の欠陥が 認
められた場合 は、製 品をご購入いただいた日から3年間無料で
その部 品 の 交 換 ま た は 修 理 を いたしま す。
商業的利用、通常の損耗、事故や酷使や誤った取り扱いなどに
よる故 障 は 保 証 できま せん の でご了承ください。
*品質保証の登録は、ご購入日から30日以内におこなってく
ださい。
諸 条 件 が 適用 さ れます。
これは、お客様の法令で定められた権利に影響を及ぼすもの
では ありま せん 。
33
940454_Z1MANPRO1.indd 33 25/09/2014 17:25
Page 35

Notes
34
940454_Z1MANPRO1.indd 34 25/09/2014 17:25
Page 36

Notes
35
940454_Z1MANPRO1.indd 35 25/09/2014 17:25
 Loading...