


TSC 114
Saorview HD Combi Receiver
Part no. 305018
Operating Manual
SAORVIEW offers the best Irish television – free for everyone.
Downloaded from www.Manualslib.com manuals search engine |
1 |
|

Operating Manual
•The illustrations and the OSD in this operation manual are for explanation and guidance purposes only.
•The examples used throughout this manual are based on the TSC114 HD Combi Receiver model.
Dear Triax customer
Thank you for purchasing the TRIAX TSC114 (Saorview HD Combi Receiver).
To ensure safety and many years of trouble-free operation, please read the Important Safety Precautions carefully before using this product.
Contents
Introduction
Important safety precautions Remote control unit Receiver (front view) Receiver (rear view) Supplied accessories
Preparation
Inserting the batteries
Using the remote control unit
Quick guide
Initial installation overview Before turning on the power Initial auto installation
Watching TV
EPG Digital Text Subtitles
Record & Time Shift
Installation
DVB-T Auto Search DVB-T Manual Search
DVB-S Main Menu/Installation Installation Type - All Channel Management
Edit Menu Favourites List
Preference Settings
OSD Language
Preferred Subtitle Hard Hearing Preferred Audio Multimedia
PVR Config
System Settings Menu
System Settings Menu Timers
Child Lock
Date & Time
Ethernet Configuration Factory Reset Upgrade
Auto Standby
3 |
AV Settings |
27 |
|
3 |
Contrast |
27 |
|
4 |
Brightness & Stauration |
27 |
|
5 |
SPDIF |
27 |
|
5 |
Aspect Ratio |
27 |
|
6 |
Video O/P |
28 |
|
7 |
Video Resolution |
28 |
|
HDMI Colour Space |
28 |
||
7 |
|||
HDMI Deep Colour |
28 |
||
7 |
|||
HDMI Audio |
28 |
||
|
|||
8 |
Information Version |
28 |
|
8 |
Multimedia |
29 |
|
9 |
|||
Media Selection Bar |
29 |
||
9 |
|||
Movie File Browser |
29 |
||
|
|||
10 |
Movie Playback |
30 |
|
12 |
Go To Menu |
31 |
|
13 |
Music |
32 |
|
13 |
Photo File Browser |
33 |
|
13 |
Photo Playback |
34 |
|
15 |
Photo Thumbnail |
35 |
|
Recorder Manager |
36 |
||
16 |
|||
Disk Manager |
37 |
||
16 |
|||
17 |
Disk Manager Browser |
37 |
|
18 |
Rename |
37 |
|
19 |
Move / Copy |
37 |
|
19 |
E-Book Browser |
38 |
|
20 |
Software Upgrade |
39 |
|
|
|||
21 |
USB Upgrade |
39 |
|
21 |
Triax TSC114 Specification |
40 |
|
21 |
|||
|
|
||
21 |
PIN Code Reminder |
42 |
|
22 |
Appendix |
43 |
|
22 |
|||
Trademarks |
43 |
||
22 |
|||
Troubleshooting |
44 |
||
|
|||
24 |
Frequently Asked Questions |
45 |
|
24 |
Channel Moving Function |
|
|
24 |
and Re-numbering |
46 |
|
25 |
How to format and partition a HDD |
|
|
25 |
using a PC |
47 |
|
26 |
Tri-Link Connection Diagram |
49 |
|
26 |
End of Life Disposal |
50 |
|
26 |
Terms of Guarantee |
51 |
|
26 |
|||
|
|
||
|
Declaration of Conformity |
52 |
Downloaded from www.Manualslib.com manuals search engine |
2 |
|
|
|
|

Introduction
Important Safety Precautions
•Cleaning - Unplug the AC power adapter from the AC outlet before cleaning the product. Use a damp cloth to clean the product. Do not use liquid cleaners or aerosol cleaners.
•Use a soft damp cloth to gently wipe the product when it is dirty. To protect the product,
do not use a chemical cloth to clean it. Chemicals may cause damage or cracks in the casing of the product.
•Water and moisture - Do not expose the unit to wet or damp conditions.
•Do not place vases or any other water-filled containers on this product. The water may spill onto the product causing fire or electric shock.
•Ventilation - The vents and other openings in the casing are designed for ventilation.
Do not cover or block these vents and openings since insufficient ventilation can cause overheating and/or shorten the life of the product. Do not place the product on a bed, sofa, rug or other similar surface, since they can block ventilation openings. This product is not designed for built-in installation; do not place the product in an enclosed place such as a bookcase or rack, unless proper ventilation is provided or the manufacturer’s instructions are followed.
•Heat sources - Keep the product away from heat sources such as direct sunlight, radiators, heaters, stoves and other heat-generating products (including amplifiers).
•To prevent fire, never place any type of candle or naked flames on the top or near the product.
•The product uses power even in Standby. Unplug the product from the AC outlet when you are not using it.
•Servicing - Do not attempt to service the product yourself. Removing covers can expose you to electric shock and other dangerous conditions. Maintenance should be performed by a suitably qualified person.
Downloaded from www.Manualslib.com manuals search engine |
3 |
|
|
|
|
Introduction
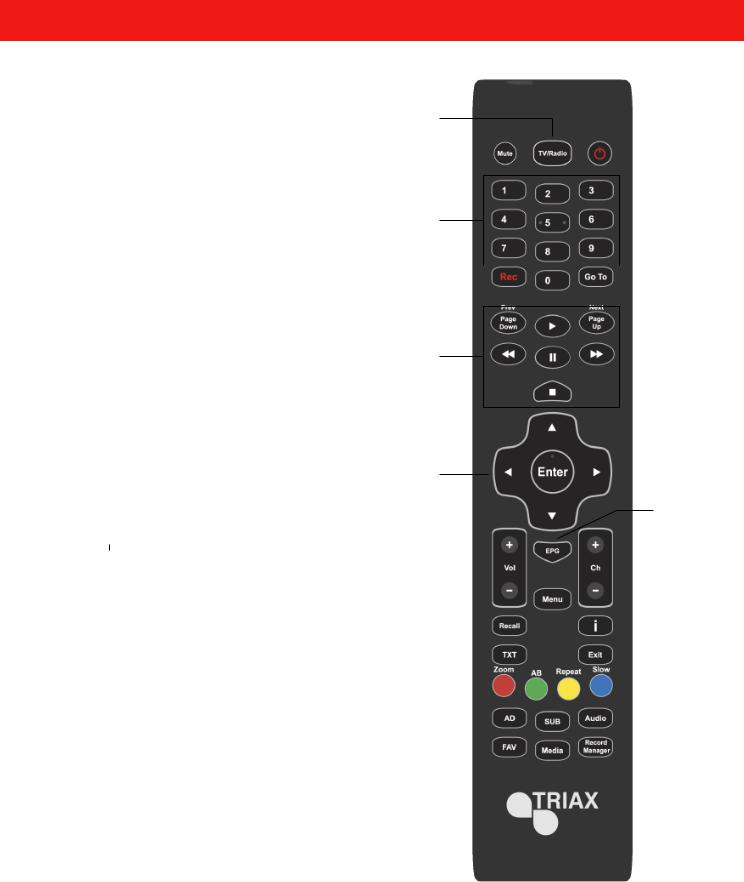
Remote Control Unit
1 TV/RADIO
Switches between TV display and Radio
2 MUTE
Volume on/off
3 NUMBER PAD
Select the channel number directly by entering its number. Set the page in digital text mode
4 REC
Use to record a programme
5 PLAYBACK CONTROLS
Play, Pause, Stop, Fast Forward, Rewind
6 NAVIGATION (Cursor)
Move up/down/left/right in menus and on screen displays
ENTER
Confirm selection in menu/on-screen display
7 VOL+/-
Increase/decrease the volume
8 RECALL
Return to the previous “MENU” screen
9 TXT
Display Digital Text
10 AD
Switch Audio Description on/off
11 FAV
Display Favourites
12 SUB
Switch subtitles on/off
13 MEDIA
Selects the Multimedia menu
14 (Standby/On)
Switch between standby and on
15 GO TO
Access the functionality in Media
16 EPG
Display the Electronic Programme Guide
17 CH +/-
Select the channel (Up/Down)
18 MENU
“MENU” screen on/off
19 i
Displays programme information
20 EXIT
Closes the “MENU” screen
21 COLOUR BUTTONS
For interactive use and navigating menus
22 AUDIO
Select the desired audio language
23 RECORD MANAGER
1
2 |
|
|
|
14 |
|
|
3
4 |
|
|
|
|
|
|
|
15 |
|
|
|
|
|||||
|
|
|
|
|
|
|
|
|
5
6
|
|
|
|
|
|
16 |
|
7 |
|
|
|
|
|
|
17 |
|
|
|
|
|
|
||
|
|
|
|
|
|
|
18 |
|
|
|
|
|
|
|
|
8 |
|
|
|
|
|
|
19 |
|
|
|
|
|
|
||
9 |
|
|
|
|
|
|
20 |
|
|
|
|
|
|
||
10 |
|
|
|
|
|
|
21 |
|
|
|
|
|
|
||
|
|
|
|
|
|
22 |
|
|
|
|
|
|
|
||
11 |
|
|
|
|
|
|
23 |
|
|
|
|
|
|
||
12 |
|
|
|
|
|
|
|
|
|
|
|
|
|
|
|
|
|
|
|
|
|
|
|
13 |
|
|
|
|
|
|
|
|
|
|
|
|
|
|
|
Downloaded from www.Manualslib.com manuals search engine |
4 |
|
|
|
|

Introduction
Receiver (Front View)
CHANNEL UP
CHANNEL DOWN
STANDBY BUTTON
Receiver (Rear View)
1 |
2 |
3 |
4 |
5 |
6 |
7 |
8 |
9 |
10 |
11 |
|
12 |
13 |
14 |
1 |
RF Out |
|
|
9 |
HDMI™ Output |
|
|
2 |
RF In |
|
|
10 |
USB: SW Upgrade and Record Function |
||
3 |
ETHERNET port - for future services |
11 |
Tri-Link SCART |
|
|
||
4 |
Audio L |
|
|
12 |
TV SCART |
|
|
5 |
Audio R |
|
|
13 |
IR In |
|
|
6 |
Digital SPDIF Coaxial |
|
14 |
DC Power Socket |
|
|
|
7Power Switch
8LNB In
Downloaded from www.Manualslib.com manuals search engine |
5 |
|
|
|
|

Introduction
Supplied Accessories
Remote Control Unit (x1)
HDMI Cable (x1)
Power Adaptor (x1)
+ + |
TSC 114 Operating Manual |
|
AAA Batteries (x2) |
--
Downloaded from www.Manualslib.com manuals search engine |
6 |
|
|
|
|

Preparation
Inserting the batteries
Before using the Receiver for the first time, insert the two supplied “AAA” size zinc-carbon batteries. When the batteries become depleted and the remote control unit fails to operate, replace the batteries with new “AAA” size batteries.
1Open the battery cover.
2Insert the two supplied “AAA” size zinc-carbon batteries.
• Place batteries with their terminals corresponding to the
(+) and (-) indications in the battery compartment.
3Close the battery cover.
CAUTION
Improper use of batteries can result in chemical leakage or explosion. Be sure to follow the instructions below.
-
+
+
-
•Do not mix batteries of different types. Different types of batteries have different characteristics.
•Do not mix old and new batteries. Mixing old and new batteries can shorten the life of new batteries or cause chemical leakage in old batteries.
•Remove batteries as soon as they have worn out. Chemicals that leak from batteries can cause skin irritation. If you find any chemical leakage, wipe thoroughly with a cloth.
•If you will not be using the remote control unit for an extended period of time, remove the batteries from it.
•When replacing the batteries, use zinc-carbon batteries instead of alkaline ones.
Note on disposing batteries:
The batteries provided contain no harmful materials such as cadmium, lead or mercury.
Regulations concerning used batteries stipulate that batteries may no longer be thrown out with the household rubbish Deposit any used batteries free of charge into the designated collection containers set up at your local recycling centre.
Using the remote control unit
Use the remote control unit by pointing it towards the front of the Receiver.
Objects between the remote control unit and sensor may prevent proper operation.
Cautions regarding the remote control unit
•Do not expose the remote control unit to shock. In addition, do not expose the remote control unit to liquids and do not place in an area with high humidity.
•Do not place the remote control unit under direct sunlight. The heat may cause deformation of the unit.
•The remote control unit may not work properly if the remote control sensor of the Receiver is under direct sunlight or strong lighting. In such cases, change the angle of the lighting or the Receiver, or operate the remote control unit closer to the remote control sensor.
Downloaded from www.Manualslib.com manuals search engine |
7 |
|
|
|
|

Quick Guide
Initial installation overview
Follow the steps below one by one when using the Receiver for the first time
1 |
2 |
3 |
|
Preparation |
Run the |
Watch TV |
|
Initial Settings |
|||
|
|
1Connect the antenna cable to the RF IN terminal and Satellite cable to LNB in
|
|
|
|
|
|
|
|
RF in |
LNB in |
||
|
|
|
|
|
|
|
|
|
|
|
|
|
|
|
|
|
|
|
|
|
|
|
|
RF out
2Connect the Receiver to your TV using the supplied HDMI cable
US B
OPTICAL SPDIF HDMI
1Turn on the standby button on the Receiver (Page 10)
2Run the first time installation (Page 9)
Ensure the antenna and / or satellite is connected
Highlight Start Search
Press ENTER to continue
1Congratulations!
You can now watch TV
2If neccessary, adjust the antenna to attain maximum signal reception
Start Searching Channels
|
L |
|
HDMI |
R |
CO |
2-CH AUDIO OUT |
|
3Connect the power adapter to the Receiver and switch socket on.
Downloaded from www.Manualslib.com manuals search engine |
8 |
|
|
|
|
Quick Guide
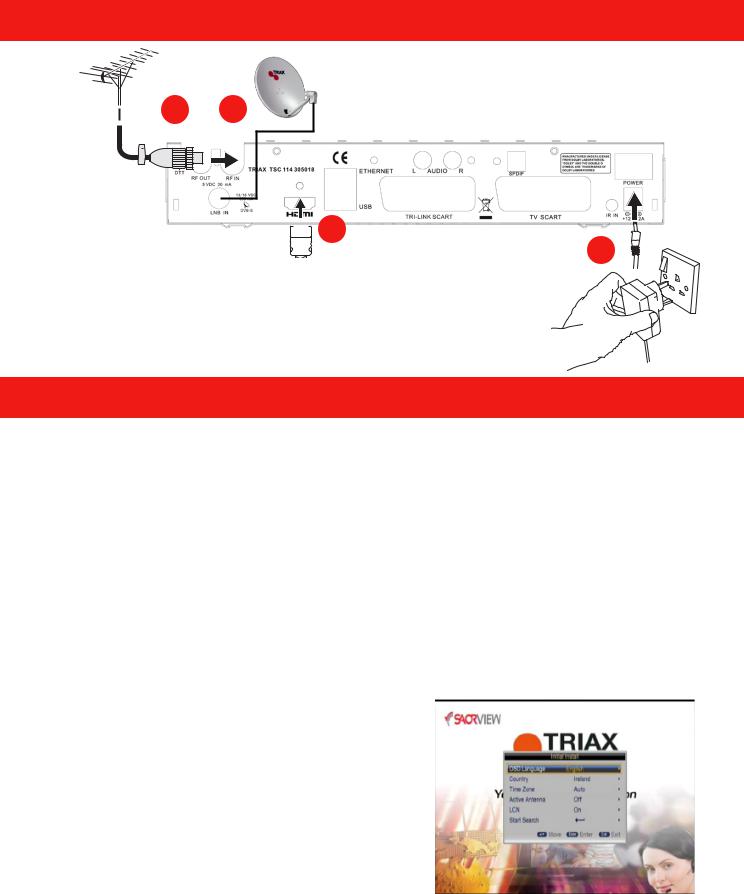
Before turning on the power
1 2
 3
3
4
1Connect the antenna (Coaxial Plug), 75ohm coaxial cable, (CAI Benchmarked cable such as Triax TX100)
2 Connect the satellite dish (F-Type Plug), 75ohm coaxial cable, (CAI Benchmarked cable such as Triax TX100)
3Connect the HDMI cable
4Connect the power adaptor and switch on at the socket
Initial auto installation
When the Receiver is powered on for the first time, the Initial Installation screen appears.
Follow the on-screen instructions to search for all available channels.
Confirm the following before turning on the power
• |
Are |
the Terrestrial |
and |
Satellite |
cables |
connected? |
||
• |
Is |
the |
power |
adapter |
connected |
and |
plugged in? |
|
• |
Is |
the |
HDMI |
cable |
connected |
between |
the receiver and your TV? |
|
|
|
|
|
|
|
|
|
|
1Ensure the aerial and satellite cables are connected before switching on.
2Press the enter key on the Receiver or Remote Control.
•The Initial Installation screen is displayed.
3 Highlight Start Search, and press ENTER to start the channel search.
•The Receiver will search for, sort and store all Terrestrial channels according to their LCN numbers.
NOTE
•After the Initial Installation has been completed, the default PIN is automatically set to ‘0000’. To change the PIN setting, refer to Page 25.
Downloaded from www.Manualslib.com manuals search engine |
9 |
|
|
|
|
Watching TV
Getting Started
Connect the Aerial to RF IN, Satellite to LNB IN and connect the External Power Supply to the DC Input. Connect the HDMI or SCART output to the TV.
Initial Power Up - Power On/Off
When in “Standby” mode, press the Standby button on the remote control to switch on the receiver. Pressing the button again will put the receiver back in to “standby” mode.
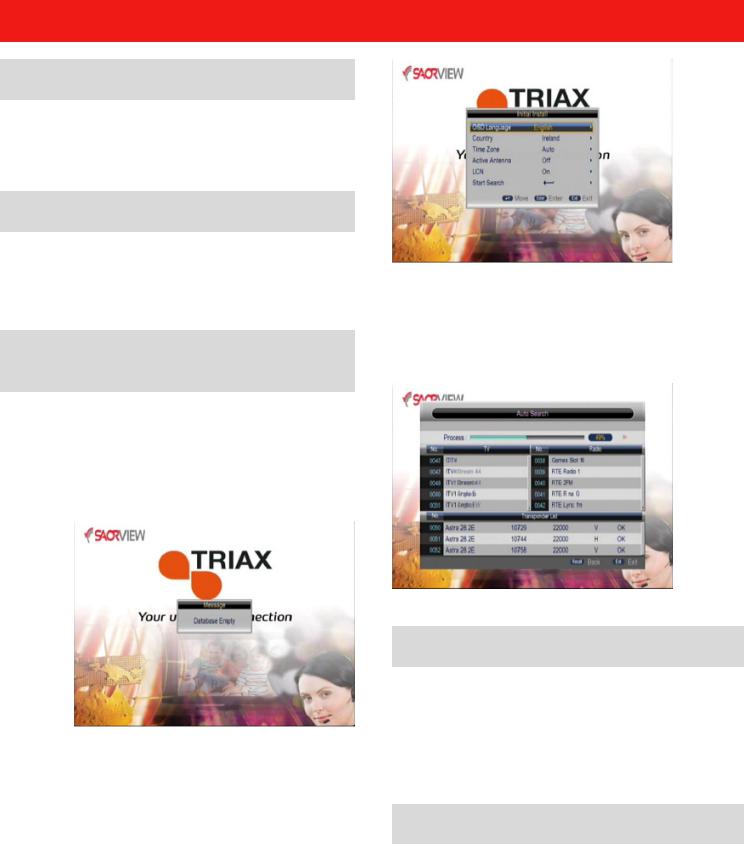
Initial Installation - Exited Prior to Channel Search
If the initial installation screen is EXITED before storing channels the receiver will have an empty database, see picture below. To store channels either perform a reset or access the Installation Menu.
The initial installation screen shows several basic set-up parameters.
The user can select the OSD Language, Country, Time Zone, Active Antenna and LCN from this menu.
Press “Start Search” to search channels.
Volume Adjustment and Mute
Press “Vol +/-” to adjust the volume when the system is in normal play mode; A volume bar is displayed
Press “Mute” to disable the sound, pressing “Mute” again will enable the sound.
Changing Channels
Press “CH+/-” to switch to the previous or next programme in the channel list.
Alternatively press the number keys to input the programme number directly.
Downloaded from www.Manualslib.com manuals search engine |
10 |
|
|
|
|
Basic Functions
Quick Channel
Press “ENTER” to display the Quick Channel Programme List. Press “LEFT/RIGHT” to move a page at time. Press “UP/DOWN” to select the desired programme.
Press “ENTER” to select channel. If there are favourite channels set up, press ‘GREEN’ to select ‘FAV’ list, then press ENTER to select required list.
Press “UP/DOWN” to select the required channels, Press “ENTER” to confirm the selection.
Programme Information
Press the “i” key twice to show information on the current programme.
Press the “EXIT” button to return to the previous selected channel.
Audio Language and L/R Channel
Buttons
Press the “AUDIO” button to switch the audio language of the current programme and switch between option:
Press LEFT/RIGHT to switch between stereo left right (stereo left channel right channel).
Press UP/DOWN to switch the audio language.
Downloaded from www.Manualslib.com manuals search engine |
11 |
|
|
|
|

Electronic Programme Guide (EPG)
Entering the EPG
You can press the “EPG” button on the remote control to enter the EPG page.
Enter the EPG menu, “Weekly” mode, (7 Day EPG), is the default setting. This menu has 6 parts:
1EPG title
2Time and date
3Selected date
4Channel list, press “UP/DOWN” to switch between channels
5Shows the time range and programme information
6Shows information for coloured keys, on the remote control
Press “LEFT/RIGHT” to switch between programmes in the list
Press the “RED” key to enter into NOW/NEXT, DAILY/WEEKLY” mode which displays the channels and programme information in different time ranges.
Press the “YELLOW” button for “Prev Day” and “BLUE” button for “Next Day”
Press “UP/DOWN” button to move upward and downwards to switch between the different channels in the list
Press “LEFT/RIGHT” button to view the programme information in different time ranges
When a programme is selected, press the “i” button to select the “Extended” information corresponding to the current program, as shown below.
When a programme is high-lighted from the channel list, press the “Green” button once to set a reminder and twice to schedule the recording.
Press “Green” button a third time to cancel the reminder or recording.
Press “Exit” to leave the EPG.
Downloaded from www.Manualslib.com manuals search engine |
12 |
|
|
|
|

Digital Text
Some channels are broadcast with digital text which contains pages of information and
entertainment. News, weather, sports information, stock exchange prices and programme previews are among the many services.
Accessing digital text
1Select a channel which broadcasts digital text.
2Press  or the
  button.
•Not all channels broadcast digital text.
•You may not be able to receive digital text if you have a poor quality signal.
Buttons for digital text operation
Buttons |
Description |
|
/// |
Navigate the digital text index |
|
page and menu system |
||
|
||
|
|
|
Coloured |
Access digital text shortcuts. |
|
These are often displayed on |
||
Buttons |
||
the bottom of the page |
||
|
||
|
|
|
Numeric |
Directly select a page |
|
Buttons 0-9 |
||
|
||
|
|
|
EXIT / TEXT |
Exit digital text |
|
|
|
Subtitles
Default subtitle setting is off. To switch on subtitles, press the “SUB” button on the remote control to enter the subtitle menu of the current programme.
Press the “UP/DOWN” button to choose the required language. Press ‘ENTER’ to select the language and leave the menu. To turn off press “Sub” button on remote control, select “Off” and press “ENTER”
Record & Time Shift
In order to use these features an external USB HDD must be used (Not supplied).
At playback screen press “REC” button to start recording. The system will take approximately 3 seconds to initialise.
Downloaded from www.Manualslib.com manuals search engine |
13 |
|
|
|
|

When a recording has been initialised, the front panel LED’s will flash slowly between red and blue. This shows the current programme is being recorded. Pressing “i” displays the information on the current recording.
Pressing the stop button while recording, will prompt a ‘Confirm Stop Rec’ message and resume normal playback.
When recording, you can also use the “REC” button to set a timer to stop recording, pressing “REC” again allows you to reset the timer.
If there is insufficient memory space while recording, the system will show a prompt message, stop recording and resume normal playback mode.
If a recording fails due to memory storage problems, the system will show a prompt message and try again.
During recording, you can also operate the Menu, EPG, TTX, Subtitle and so on, as if in normal playback mode.
Time Shift Mode
Time Shift Mode is only available when an external HDD is connected to the receiver. (Not supplied)
(1) In time shift mode, you can pause a live programme.
Downloaded from www.Manualslib.com manuals search engine |
14 |
|
|
|
|

Installation
(2) Pressing the “PAUSE” button will start the time shift mode. The “Time Shift” icon will be shown on the screen during this operation.
“PAUSE” is the default setting.
3) Pressing the “<<” rewind button or “>>” fast forward button when in time shift mode, will rewind or fast forward the “Time shift” recording.
(4)In time shift mode, when the “STOP” button is pressed, it will exit time shift mode and return to live broadcast.
(5)In time shift mode, when Fast Forward catches up with the live broadcast, it automatically exits time shift mode, and returns to the current programme.
Installation
There are three kinds of Installation modes:
(1)DVB-T (Terrestrial)
(2)DVB-S (Satellite)
(3)All
Press Menu and select “Installation” from the “Main Menu”. A PIN Number is required (default PIN is 0000).
DVB-T Main Menu / Installation
Auto Search is an intelligent and convenient mode of programme searching. It searches all frequencies within the selected region.
Countries include Ireland/Denmark/Portugal/ Turkey/Poland/Hungary/Columbia/UK/Germany/ Italy/France/Spain/Netherlands/Taiwan/China/ Norway/Sweden/Finland/Greece/Australia/ Russia. Select “Auto Search”, then press the “ENTER” button to start the “Auto Search”.
LCN
LCN is defualt to “ON” and sets the logical channel number for the terrestrial scan.
Active Antenna
Active Antenna is defaulted to “OFF” when switched on provides 5V for a masthead amplifier. Note, most mastheads operate on 12V so an external PSU would be required.
Downloaded from www.Manualslib.com manuals search engine |
15 |
|
|
|
|

DVB-T Auto Search
After selecting the “Auto Search” page, the receiver will scan all frequencies one by one for the selected country.
During scanning, you can press the “EXIT” key to stop the scanning process and exit.
If any programmes are detected and the scanning process has finished the system will exit the scanning page, save the programmes and return to the “installation menu”.
Move the cursor to “Manual Search” using the “UP/DOWN” button when in the “installation menu”. Press “ENTER” to select the manual search page.
To carry out a manual search, you need to configure the relevant parameters including:
(1)Frequency (kHz): The default frequency depends on the selected country, you can input relevant information to modify it.
(2)Bandwidth: The default value of bandwidth depends on the selected country. It can be set to 6 MHz,7 MHz, or 8 MHz.
(3)High-light “Start Search” and Press the “ENTER” button to start manual scan.
(4)Press the ‘EXIT’ button to return to normal viewing.
DVB-T Manual Search
If you know the frequency of the channels, or if you want to scan a channel at a particular frequency, you can select manual search.
Downloaded from www.Manualslib.com manuals search engine |
16 |
|
|
|
|
 Loading...