

TRAVELER DC-XZ6 User Manual

Contents
2 Introduction and Parts list
3 General Information and Safety Instructions
7 Getting to Know the Camera
16 Getting Started
29 Photography Mode
50 Playback Mode
66 Menu Options
77 Transferring Recorded Images and Videos to Your Computer
80 Connecting to a PictBridge Compliant Printer
82 Editing Software Installation
85 Camera Specifications
86 Frequently Asked Questions
90 Other Useful Information
92 Warranty Card

General Information and Safety Instructions
2
TRADEMARK INFORMATION
J Microsoft
J Pentium
J Macintosh is a trademark of Apple Computer, Inc.
J SD
J Other names and products may be trademarks or registered trademarks of their respective owners.
READ THIS FIRST
Notice:
1. Product design and specifications are subject to change without notice. This includes primary
product specifications, software, software drivers, and user’s manual. This User Manual is a
general reference guide for the product.
2. The product and accessories that come with your camera may be different from those described in
this manual. Contact the helpline or website for precise product definition and included accessories.
3. The illustrations in this manual are for the purpose of explanation and may differ from the actual
design of your camera.
4. The manufacturer assumes no liability for any errors or discrepancies in this user manual.
®
and Windows® are U.S. registered trademarks of Microsoft Corporation.
®
is a registered trademark of Intel Corporation.
TM
is a trademark.

General Information and Safety Instructions
Safety Instructions
Read and understand all Warnings and Cautions before using this product.
WARNING
If foreign objects or water have entered the camera, turn the power OFF and remove the battery and
the AC power adapter.
Continued use in this state might cause fire or electric shock. Contact the helpline or website.
If the camera has fallen or its case has been damaged, turn the power OFF and remove the battery and
the AC power adapter.
Continued use in this state might cause fire or electric shock. Contact the helpline or website.
Do not disassemble, change or repair the camera.
This might cause fire or electric shock. For repair or internal inspection, refer to our website or contact our helpline.
Use the specified AC power adapter only with the indicated power supply voltage.
Use with any other power supply voltage might cause fire or electric shock.
Do not use the camera in areas near water.
This might cause fire or electric shock. Take special care during rain, snow, on the beach, or near the shore.
Do not place the camera on inclined or unstable surfaces.
This might cause the camera to fall or tilt over, causing injury.
Keep the battery out of the reach of children.
Swallowing the battery might cause poisoning. If the battery is accidentally swallowed, immediately consult a physician.
Do not use the camera while you are riding, walking, or driving a vehicle.
This might cause you to fall over or result in traffic accident.
During the course of a thunderstorm, please do not operate the camera or use its AC adaptor.
Do not expose the camera to water.
This might cause fire or electric shock.
2

General Information and Safety Instructions
Do not expose the battery to excessive heat such as sunshine, fire, etc.
This might cause fire or electric shock.
The socket-outlet has to be installed near the equipment and must be easily accessible.
CAUTION
Insert the battery paying careful attention to the polarity (+ or –) of the terminals.
Inserting the battery with its polarity reversed might cause fire and injury, or damage to the
surrounding areas due to the battery rupturing or leaking.
Do not fire the flash close to anyone’s eyes.
This might cause damage to the person’s eyesight.
Do not subject the LCD monitor to impact.
This might damage the glass on the screen or cause the internal fluid to leak. If the internal fluid
enters your eyes or comes into contact with your body or clothes, rinse with fresh water. If the
internal fluid has entered your eyes, consult a physician to receive treatment.
This camera is a precision instrument. Do not drop it, strike it or use excessive force when
handling it.
This might damage it.
Do not use the camera in humid, steamy, smoky, or dusty places.
This might cause fire or electric shock.
Do not remove the battery immediately after long period of continuous use.
The battery becomes hot during use. Touching a hot battery might cause burns.
Do not wrap the camera or place it in cloth or blankets.
This might cause heat to build up and deform the case, resulting in fire. Use the camera in a wellventilated place.
2

General Information and Safety Instructions
Do not leave the camera in places where the temperature may rise significantly, such as
inside a car.
This might adversely affect the case or the parts inside, resulting in fire.
Before you move the camera, disconnect cables.
Failure to do this might damage cables, resulting in fire and electric shock.
2
Notes on Battery Usage
When you use the battery, carefully read and strictly observe the Safety Instructions and the notes
described below:
Use only the specified battery (3.7V).
Avoid using the battery in extremely cold environments as low temperatures can shorten the battery
life and reduce camera performance.
Fully charge and discharge battery for one complete cycle prior to first use. Using new rechargeable
batteries, or batteries which have not been used for a long time, without first charging/discharging
may cause the battery life to be shorter than optimum.
The battery may feel warm after long periods of continuous use of the digital video camera or the
flash. This is normal and not a malfunction.
The camera may feel warm after long periods of continuous use. This is normal and not a malfunction.
If the battery is not to be used for a long periods of time, remove it from the camera to prevent leakage
or corrosion.
If the battery is not to be used for a long periods of time, store it after the battery power has been
drained. If the battery is stored for a long time in a fully charged state, its performance may be
impaired.
Always keep the battery terminals clean.
There is a risk of explosion if battery is replaced with an incorrect type.
Dispose of used batteries according to the instructions.
Getting to Know the Camera
3
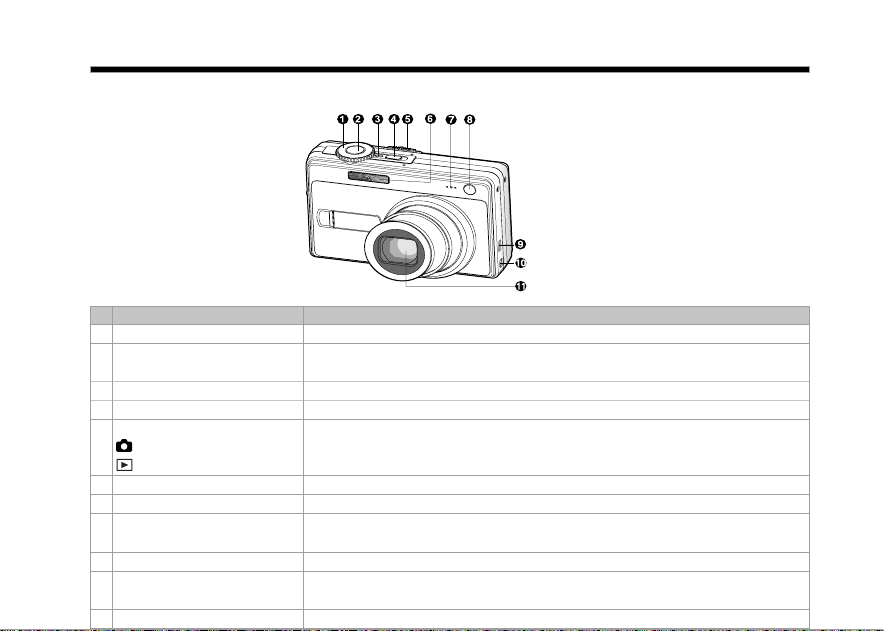
Front View
# Name Description
1. Mode dial Sets the camera mode.
2. Shutter button Focuses and locks both focus & exposure when pressed halfway down.
3. Power indicator Lights up when the camera power is turned on.
4. POWER (Power) button Turns the camera power on and off.
Mode switch Sets the camera mode.
Photography mode Selects this when capturing still images or recording video clips.
5.
Playback mode Performs image playback and deletion.
6. Flash Provides flash illumination.
7. Microphone For recording audio with video clips and voice annotation.
Self-timer LED Blinks during Self-timer mode until the image is captured.
8.
(AF auxiliary LED) Lights for auto focusing when capturing in a dark place.
9. USB or A/V OUT terminal Allows you to connect a USB cable or an A/V cable to the camera.
10. DC IN 5V terminal
11. Lens 6x optical zoom lens allows you to capture telephoto and wide-angle images.
Captures the image when pressed all the way down.
Allows you to connect an AC power adapter to operate the camera
without battery, or to charge rechargeable lithium-ion battery.
Getting to Know the Camera
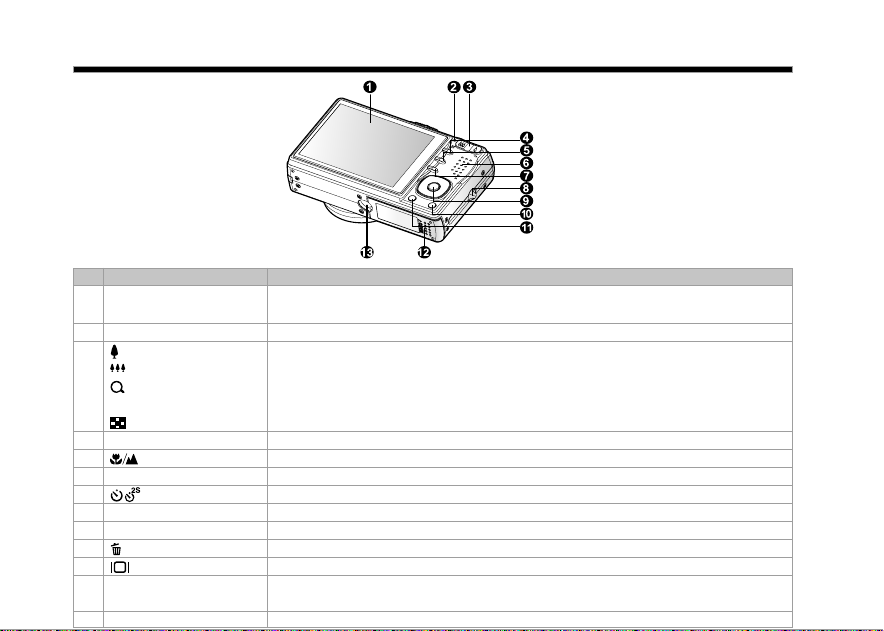
Rear View
3
# Name Description
1. LCD monitor
2. Status LED Displays the camera current state.
Zoom in button Zooms the lens to telephoto position.
Zoom out button Zooms the lens to wide-angle position.
Magnifier Allows you to enlarge your image on the selected portion of the image to
3.
Thumbnail Allows you to view 9 thumbnail images on the LCD monitor at the same time.
4. MENU (Menu) button Toggles On-Screen Display (OSD) menu on and off.
5. Focus button Allows you to choose the appropriate focus setting.
6. Speaker For playback or recorded audio.
7. Self-timer button Allows you to toggle the self-timer on and off, selects the desired self-timer mode.
8. Strap holder Camera strap attachment.
9. SET / Direction button Allows you to scroll through menus and images, and then select your choices.
10. (Delete) button Allows you to delete an image.
11. (Display) button Turns the LCD monitor display and live view on and off.
Battery / SD memory
12.
card cover
13. Tripod socket For tripod mounting.
Provides menu information to operate the camera, preview the image
before capturing it and reviews it afterwards.
check for small details.
Access to the battery and memory card.
Getting to Know the Camera
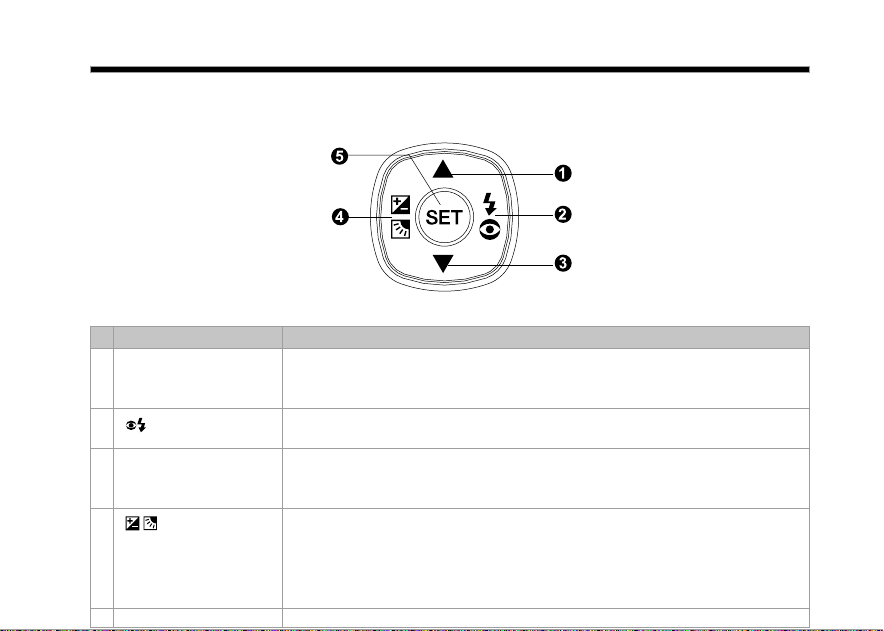
SET /Direction button
3
# Name Description
1. S button
Flash button
2.
3. T button
Exposure
4.
5. SET button Enters the menu page and confirms the chosen setting.
compensation
/ Backlight
correction button
Scrolls upwards.
Changes value of shutter speed, aperture, exposure compensation and
manual focus.
X button: Scrolls right.
Allows you to choose the appropriate flash setting.
Scrolls downwards.
Changes value of shutter speed, aperture, exposure compensation and
manual focus.
W button: Scrolls left.
Allows you to toggle the exposure compensation / backlight correction on
and off.
Getting to Know the Camera
3
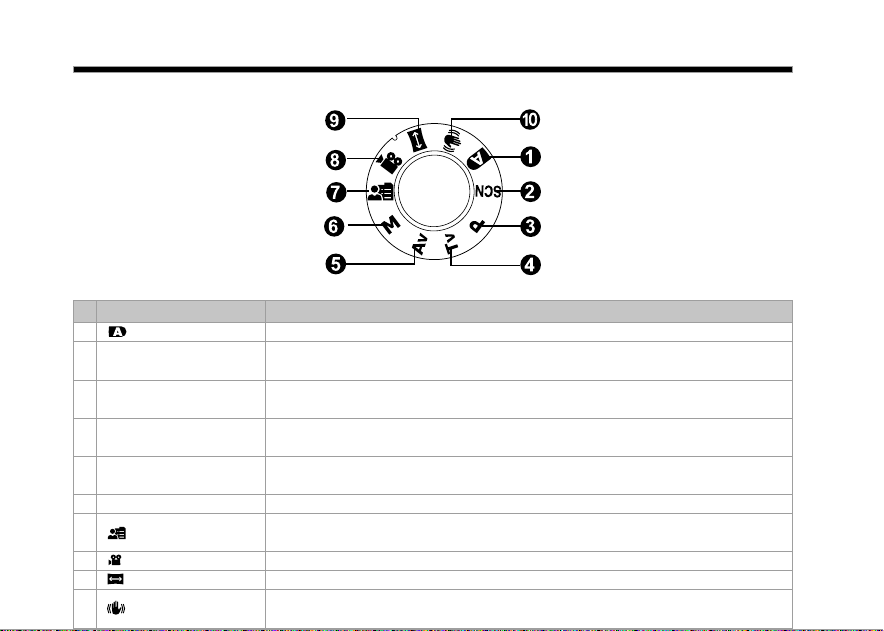
Mode dial
# Name Description
1. Auto The camera automatically sets for exposure, etc.
2. SCN Scene Mode Point-and-shoot simplicity when capturing images under 16 special
3. P Program In program mode the shutter speed and aperture will be set automatically,
(auto exposure) but other parameters may be set manually.
4. Tv Shutter Speed You may specify the shutter speed while the camera sets the corresponding
Priority aperture value.
5. Av Aperture Priority
6. M Manual For full manual control over exposure, aperture and other settings.
7. User Setting
8. Video For recording video clips.
9. Panorama Allows you to capture panorama (stitch-assist) shots.
10. Anti-Shake
conditions.
You may specify the aperture value while the camera sets the corresponding
shutter speed.
This mode allows you to manually set parameters and all these settings will
be memorized.
This mode helps you to steady the image to prevent effects caused by
hand shaking during capture.

Getting to Know the Camera
3
Status LED Indicator
The status LED indicates the current operational status of the camera. It explains the meaning of the
LED changes depending upon what the camera is doing.
Color
Green
Red
Orange
State
On
Flashing
On
Flashing
On
Flashing
During power off
Battery fully charged.
The battery is charging.
An AC power adapter is
connected, but there is
no battery in the camera.
Battery charging error.
-
-
-
During
photography
AE or AF is locked with
the shutter button held
halfway.
-
Accessing files in
progress.
The image is not in
focus.
Flash charging in
progress.
Hardware malfunction.
During connection to a
PC
-
-
In communication to PC.
(SD memory card is inserted.)
-
-
SD memory card is not
inserted.
00004
10S
12:38
01/08/2008
AEB
3M
Getting to Know the Camera
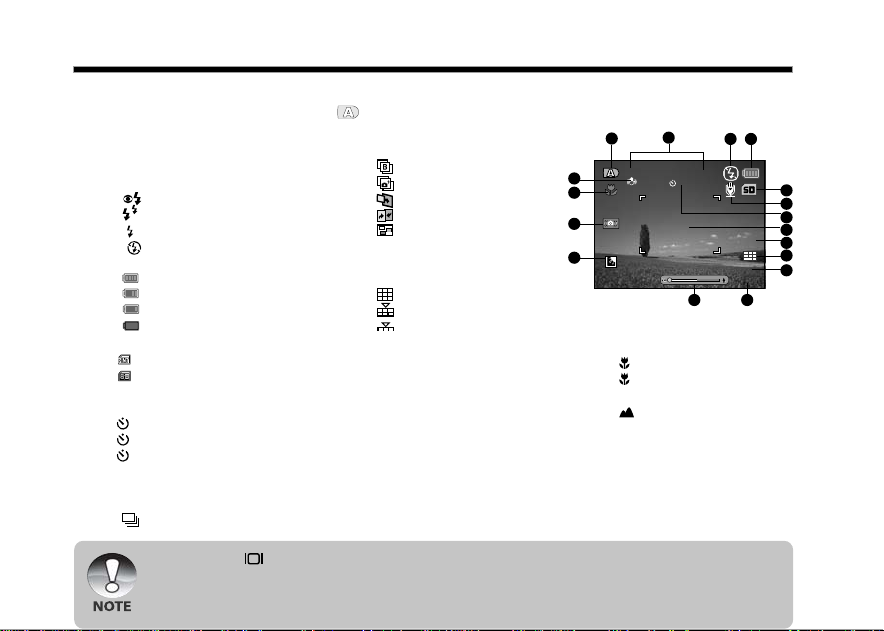
LCD Monitor Icons
For Photography modes: [ ], [ SCN ]
1. Mode icon
2. Date and time
3. Flash mode
[Blank] Automatic
[
] Red-eye Reduction
[
] Pre-Flash
[ ] Forced Flash
[
4. Battery condition
] Flash Off
[
] Full battery power
[
] Medium battery power
[
] Low battery power
[ ] No battery power
5. Storage media
[
] Internal memory (no card)
[ ] SD memory card
6. Voice memo
7. Self-timer icon
[
10s] 10 sec.
[
2s ] 2 sec.
[
10+2s ] 10+2 sec.
8. Main focus area
9. Capture mode icon
[Blank] Single
[
] Continuous
J Pressing the button changes the LCD display in the sequence of: display with icons, display helpline
without icons, display without icons.
J To prevent a blur image we recommend that you use a tripod for capturing images when slow shutter
warning icon appears.
[ AEB] Auto Exposure
Bracketing
[
] Burst
[
] Series + flash
[ ] Pre-Shot
[
] Coupling Shot
[
] Album Shot
* In [SCN] mode, Fireworks
can use single capture only.
10. Image quality
[
] Fine
[
] Standard
[
11. Image size resolution
] Economy
[10M] 3648 x 2736
[6M] 2816 x 2112
[3M] 2048 x 1536
[0.3M] 640 x 480
12. Available number of shots
13. Zoom status
14. Backlight correction
15. Slow shutter warning
* Poor lighting conditions.
Images will be vulnerable to
vibration.
2
1
17
16
15
14
16. Focus setting
[Blank]Normal Auto Focus
[
] Macro Auto Focus
[ s ] Super Macro Auto
Focus
[
] Infinity
[3M ]3m
[MF] Manual Focus
* Adjust focus distance with
the S / T buttons.
17. Anti Shake
3
3
4
5
6
7
8
9
10
11
1213

0.0
Tv
1
IS0
100
F2.8 1/200
10S
00004
AEB
3M
12:38
01/08/2008
Getting to Know the Camera
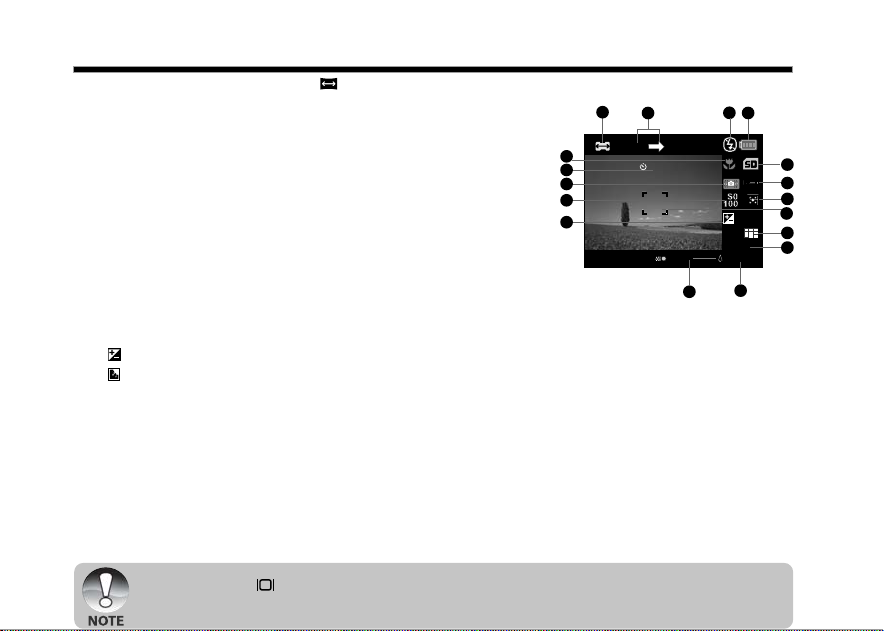
For Photography modes: [P], [Tv], [Av], [M], [ ], [ ]
1. Mode icon
2 . Date and time
3. Flash mode
4. Battery condition
5. Storage media
6. Voice memo
7. Histogram
8. Main focus area
9. Capture mode icon
10. Image quality
11. Image resolution
12. Available number of shots
13. Zoom status
14. Shutter speed / Aperture
*In [P] , [ ] and [ ] modes, Shutter
speed / Aperture icon appears at half
shutter (S1) condition.
15. [ ] Exposure compensation
[ ] Backlight correction
16. ISO
17. Metering
[ ] Multi
[ ] Spot
J Pressing the button changes the LCD display in the sequence of: display with icons, display with
icons and histogram, display helpline without icons, display without icons.
1
20
19
18
17
16
15
[ ] Average
18. White balance
[Blank] Auto
[ ] Incandescent
[ 1 ] Fluorescent 1
[ 2 ] Fluorescent 2
[ ] Day Light
[ ] Cloudy
[ ] Manual
19. Focus setting
20. Self-timer icon
3
2
3
4
5
6
7
8
9
10
11
13 1214
0.0
1
3M
00004
1
10S
Getting to Know the Camera
For Photography mode: [ ]
1. Mode icon
2. Image to be captured indicator
3. Flash mode
4. Battery condition
5. Storage media
6. White balance
7. Metering
8. Main focus area
9. Image quality
10. Image resolution
11. Available number of shots
12. Zoom status
13. [ ] Exposure compensation
[ ] Backlight correction
14. ISO
15. Slow shutter warning
16. Self-timer icon
17. Focus setting
J Pressing the button changes the LCD display in the sequence of: display with icons, display
without icons.
3
1
2
17
16
15
14
13
3
4
5
6
7
8
9
10
11
12
100-0023
1
0:18
1
2
3
4
5
6
7
89
11
10
12:38
01/08/2008
VGA
1
10S
Total
Play
0:06
0:10
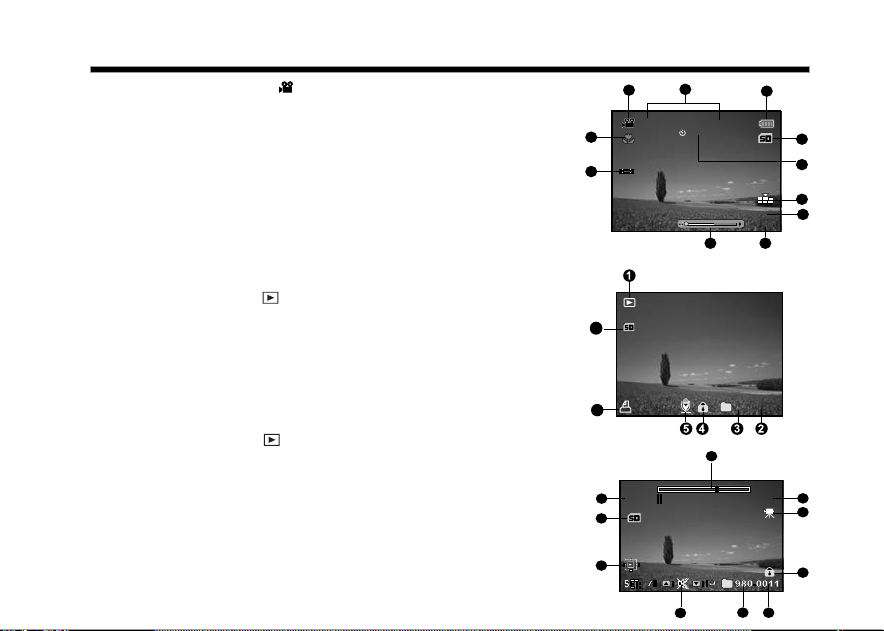
Getting to Know the Camera
3
For Video mode [ ]
1. Mode icon
2. Date and time
3. Battery condition
4. Storage media
5. Self-timer icon
6. Video quality
7. VGA
8. Available recording time/Elapsed time
9. Zoom status
10. White balance icon
11. Focus setting
Playback mode [ ] -Still image playback
1. Mode icon
2. File number
3. Folder number
4. Protect icon
5. Voice memo
6. Digital Print Order Format icon
7. Storage media
Playback mode [ ]-Video playback
1. Video status bar
2. Elapsed time
3. Mode icon
4. Protect icon
5. File number
6. Folder number
7. Sound off icon (When the S button is pressed
during video playback.)
8. Play mode
9. Storage media
10.Total recorded time
6
7
6
1
10
9
8
7
6
2
3
4
5
Getting Started
4
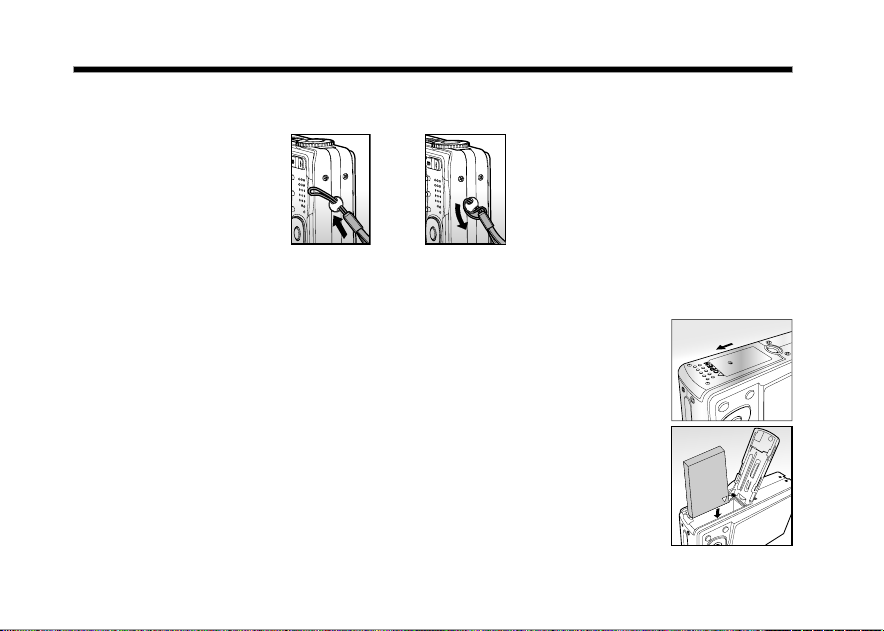
Attaching the Camera Strap
Attach the camera strap as shown in the illustration.
Inserting and Removing the Battery
We highly recommend using specified rechargeable lithium-ion battery (3.7V) to realize the full capability
of your camera. Charge the battery fully before using the camera. Make sure that the digital camera is
turned off before inserting or removing the battery.
Inserting the Battery
1. Open the battery / SD memory card cover in the direction of the
[OPEN] arrow.
2. Insert the battery in the correct orientation shown.
J Tilt the battery lock lever, and then insert the battery in the
direction of the arrow.
3. Close the battery / SD memory card cover.
Removing the Battery
Open the battery / SD memory card cover and then release the battery lock lever. When the battery has
come out a little, slowly pull it out the rest of the way.
Getting Started
4
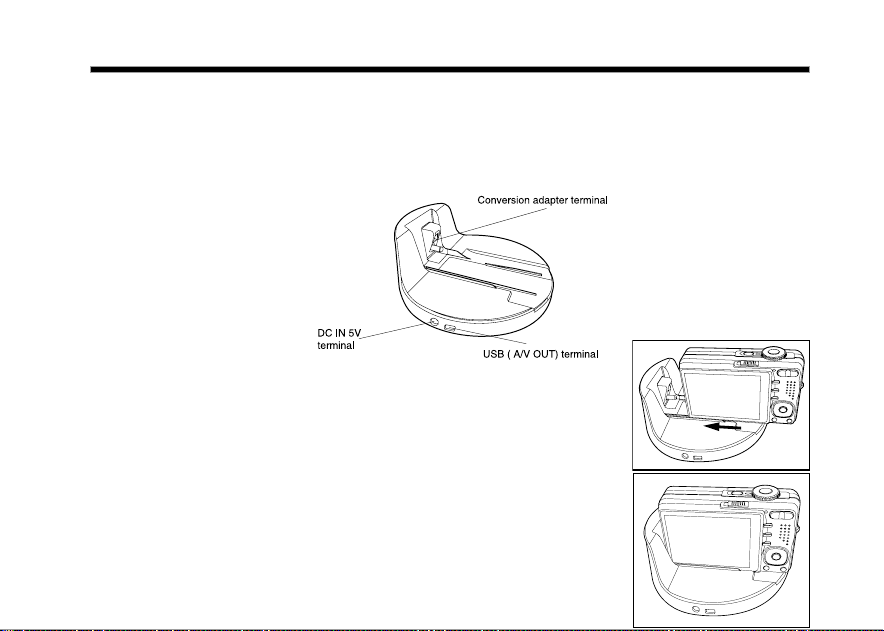
Using the Docking Station
Using the docking station, you can position your camera and play back your images and video clips on
your desktop. You may also use the docking station or connect to other media devices to play back
(output to a TV monitor, for example). The docking station will charge the camera battery inconjunction
with an AC power adapter.
1. Align the camera with the docking station.
2. Slide the camera fully into the docking station as shown in the
illustration.
3. Carefully insert the camera and match the connector until it fits
in place.
Getting Started
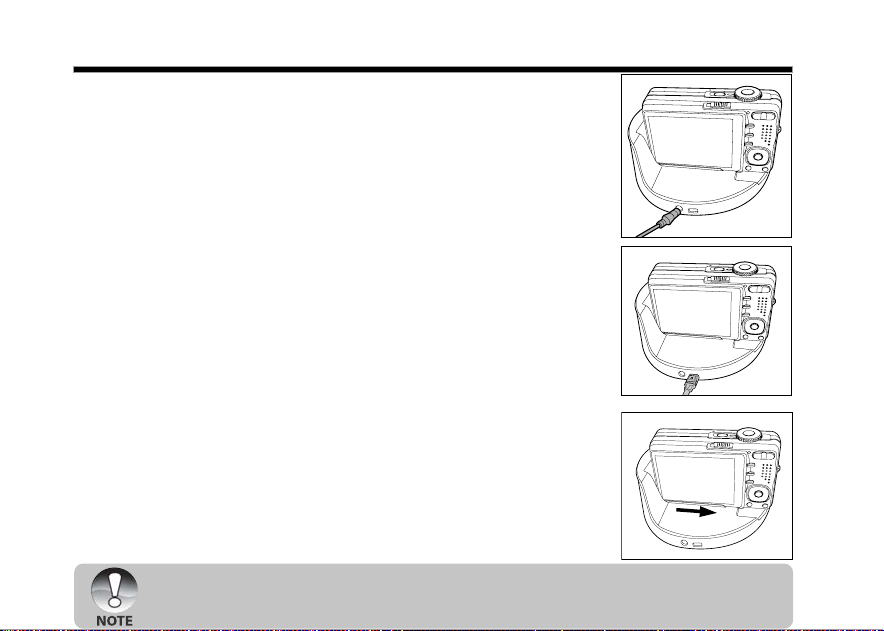
4. Connect the end of the respective cable
directly to the respective docking station
terminal.
J For charging the battery, connect
one end of the AC power adapter
directly to the DC IN 5V terminal of
the docking station.
J For USB connection or playing
back images/video clips on the TV,
connect one end of the AC power
adapter directly to the USB (A/VOUT)
terminal of the docking station.
Removing the camera from the docking station:
Push the camera carefully from the connector, and
then remove the camera from the docking station.
J Be sure to align the camera and docking station carefully before inserting/removing the camera
into/from the docking station.
4

Getting Started
Using the Car Adapter
Use the Car Adapter to charge the camera battery.
1. Remove your car’s cigarette lighter from its outlet.
2. Insert one end of the car adapter into the DC IN 5V terminal of
the battery charger.
3. Plug the other end of the car adapter into your car’s cigarette
lighter outlet.
J Never expose the car adapter to dripping or sprayed water! Moreover, never put objects or
containers filled with liquids (for example, a vase) onto the device!
J Do not charge the non-rechargeable battery.
J Do not disassemble or repair the device.
J If the devise is not to be used, remove it and place the cigarette lighter back into its outlet.
4

Getting Started
4
Charging the Battery
The AC power adapter can be used for charging the battery or as a power supply when operating the
camera. Make sure that the digital camera is turned off and then insert the battery before starting.
1. Insert one end of the AC power adapter into the DC IN 5V
terminal of the camera.
2. Plug the other end of the AC power adapter into a mains wall
socket.
J The status LED flashes green when charging is started and
lights up green when charging is completed. The LED lights
up red when a charging error has occurred.
J It is recommended to fully discharge the battery before
recharging.
J Charging time varies according to the ambient temperature
and the status of battery.
J This camera must be used with specified AC power adapter. Damage caused by the use of an
incorrect adapter is not covered under the warranty.
J Always make sure that the camera is off before removing the battery.
J The battery may feel warm after it has been charged or immediately after being used. This is
normal and not a malfunction.
J When using the camera in cold conditions, keep the camera and battery warm between shots by
storing it in a warm place such as an interior pocket.
J If you open the battery cover without removing the battery, the battery power will not be
disconnected.
J If you remove the battery, you have to insert the battery within 2 hours in order to make sure that
the date and time will not be reset.
Getting Started
4
Using an AC Power Adapter
Using an AC power adapter prevents the camera from automatically being powered off while transferring
files to your computer.
Perform the steps in the preceding section “Charging the Battery”.
Make sure you only use the AC power adapter specified for the digital camera. Damage caused
by the use of an incorrect adapter is not covered under the warranty.
Inserting and Removing an SD Memory Card
The digital camera comes with approx. 32 MB of internal memory (26 MB available for image storage),
allowing you to store captured still images or video clips in the digital camera. However, you can also
expand the memory capacity by using an SD memory card so that you can store more files.
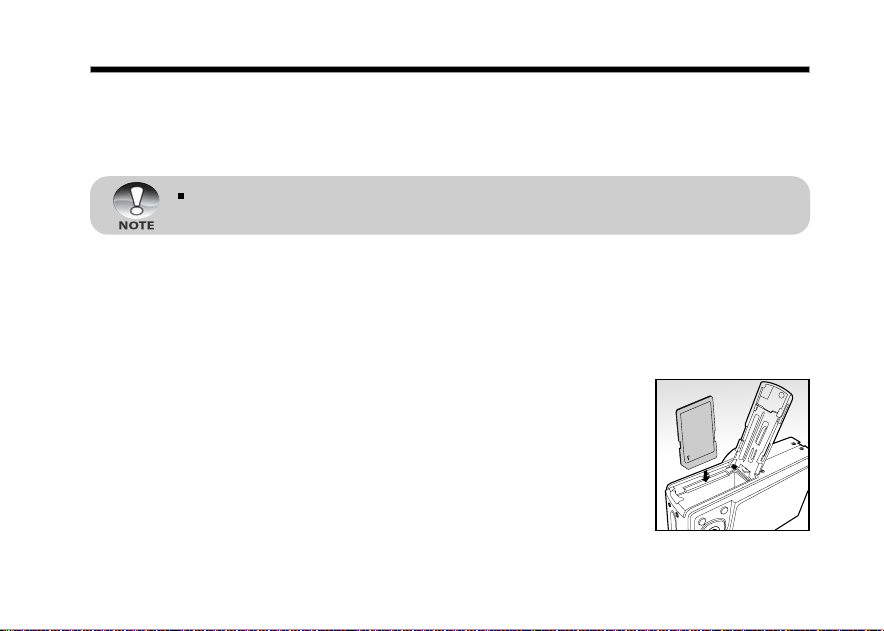
Inserting an SD memory card
1. Open the battery / SD memory card cover.
2. Insert the SD memory card in the correct orientation, as shown
in the illustration.
J Hold the SD memory card with its front side (printed arrow)
facing the rear side of the camera, and then insert the card as
far as it can go.
3. Close the battery / SD memory card cover.
Removing an SD memory card
Open the battery / SD memory card cover, press lightly on the edge of
the SD memory card and it will eject.
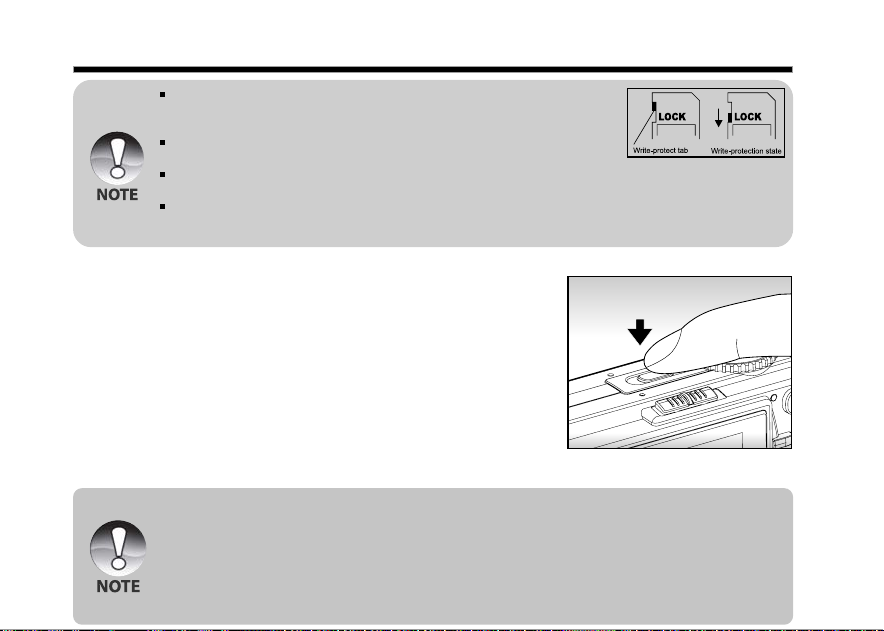
Getting Started
To prevent valuable data from being accidentally erased from an SD
memory card you can slide the write-protected tab (on the side of the
SD memory card) to “LOCK”.
However, to save, edit or erase data on an SD memory card, you must
unlock the card.
Be sure to format an SD memory card with this digital camera before using it. Refer to section in
this manual titled “Formatting an SD Memory Card or Internal Memory” for further details.
To prevent any damage to an SD memory card, please turn off the power before inserting or
removing the SD memory card. If you insert or remove the SD memory card with the power
switched on, the camera turns off automatically.
Turning the Power On/Off
1. Load the battery or connect the AC power adapter to your
camera.
2. Press the POWER button to turn on your camera.
J The status LED lights up green and the camera is initiated.
J The power indicator light turns on when the camera power is
turned on.
J When the power is turned on, the camera will start in the
mode which was selected at last use.
3. To turn off your camera, press the POWER button again.
J The power is turned off automatically when the camera has not been operated for a defined period
of time. To resume operation, turn the power on again. Refer to section in this manual titled “Auto
OFF” in the Setup1 Menu for further details.
J When the power is turned on, it may take several seconds to charge the flash. While the flash is
being charged, the status LED lights up orange.
J The camera is not ready until the flash has charged. The camera is ready when the status LED
is off.
4
Getting Started
4
Setting the Date and Time
The date/time needs to be set if/when:
J Camera is turned on for the first time.
J Camera is turned on after being left without a battery for an extended period of time.
When the date and time information is not displayed on the LCD monitor, follow these steps to set the
correct date and time.
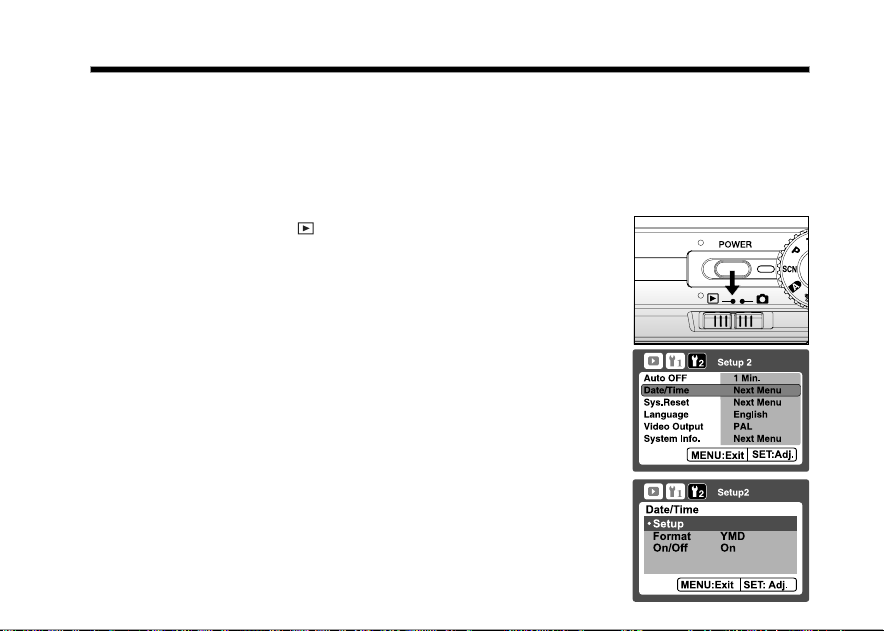
1. Slide the mode switch to [ ], and press the MENU button.
2. Select [Setup2] with the X button.
3. Select [Date/Time] with the S / T buttons, and press the SET
button.
J The Date/Time setting screen will be displayed:[Setup]
[Format], [On/Off].
4. Select [Setup] with S / T buttons,and press the SET button.
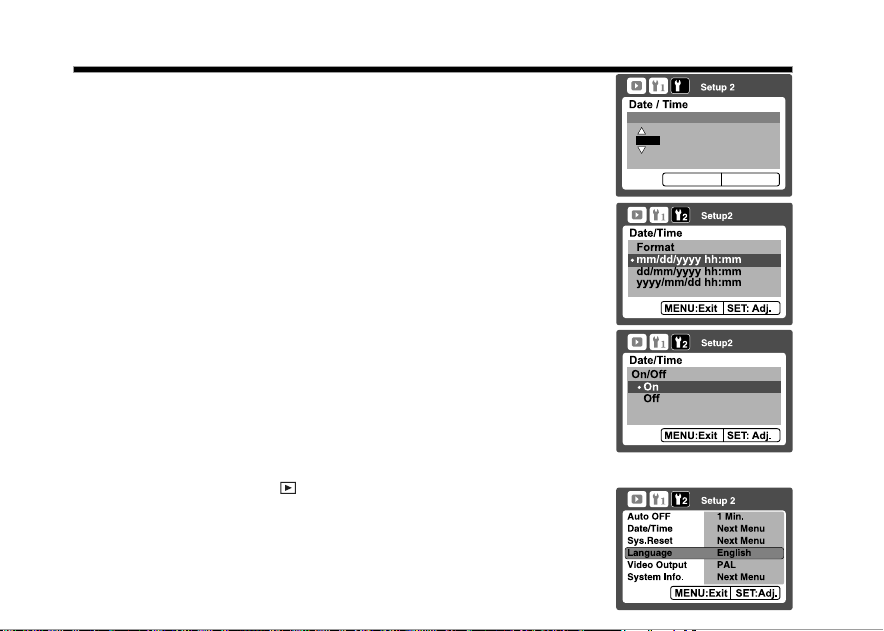
J Select the item’s field with the W / X buttons and adjust the
value for the date and time with the S / T buttons.
J The date and time is displayed according to the format you set.
J The time is displayed in 24-hour format.
J After confirming all settings are correct, press the SET button.
The setting will be stored and the screen will return to the
Setup2 menu.
MENU:Exit
SET:Enter
2
01 01
05 47
2006
Setup
Getting Started
5. Select [Format] with S / T buttons,and press the SET button.
J Select the date display format you want with S / T buttons.
6. Select [On/Off] with S / T buttons,and press the SET button.
J If your choice is Off, there is no date/time information displayed
on the LCD monitor.
7. To exit from the Setup2 menu, press the MENU button.
Choosing the Display Language
Choose an On-Screen Display (OSD) language for information to be displayed on the LCD monitor.
1. Slide the mode switch to [ ], and press the MENU button.
2. Select [Setup2] with the X button.
3. Select [Language] with the S / T buttons, and press the SET button.
J The language setting screen will be displayed.
4. Select the displayed language with the S / T buttons and press
the SET button.
J The setting will be stored.
5. To exit from the Setup2 menu, press the MENU button.
4

Getting Started
4
Formatting an SD Memory Card or Internal Memory
This function formats the internal memory (or memory card) and deletes all stored still images / video clips
and data.
1. Slide the mode switch to [ ], and press the MENU button.
2. Select [Setup1] with the X button.
3. Select [Format] with the S / T buttons, and press the SET
button.
4. Select [Execute] with the S / T buttons, and press the SET
button.
J To cancel formatting, select [Cancel].
5. To exit from the Setup1 menu, press the MENU button.
J To format the internal memory, do not insert an SD memory card into the camera. Otherwise, you
will format the SD memory card.
J Formatting the SD memory card also erases the protected images. All data other than images is
also erased. Before formatting the card, make sure that all the images are no longer required.
J Formatting is an irreversible action and data cannot be recovered at a later time.
J A defective SD memory card cannot be properly formatted.
2
Getting Started
4
Setting Image Resolution and Quality
Resolution and quality settings determine the pixel size (dimension), image file size, and compression
ratio for your images. These settings affect the number of images that can be stored. As you get to know
the camera, it is recommended that you try each quality and resolution setting to get an appreciation for
the effects that these settings will have on your images.
Higher resolution and higher quality images offer the best photographic results, but produce large file
sizes. Therefore, few images will take up a lot of memory space.
High resolution and quality settings are recommended for printed output
and situations requiring the finest detail. Lower resolution/quality images
take up less memory space and may be quite suitable for sharing images
via e-mail, in a report, or on a web page.
To change image resolution or image quality, perform these steps below:
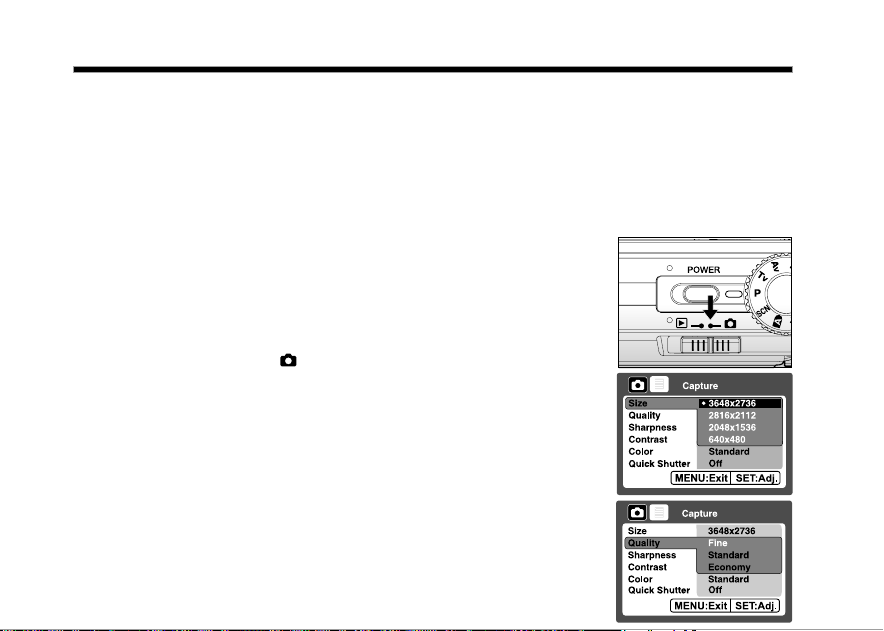
1. Slide the mode switch to [ ] and set the mode dial to one of
the photography modes.
2. Press the MENU button.
J [Capture] of the photography menu is displayed.
3. Select [Size] with the S / T buttons, and press the SET button.
4. Select the desired setting with the S / T buttons, and press the
SET button.
5. Select [Quality] with the S / T buttons, and press the SET
button.
6. Select the desired setting with the S / T buttons, and press the
SET button.
7. To exit from the photography menu, press the MENU button.

Getting Started
4
Possible number of shots (still image)
The following table shows the approximate shots that you can capture at each setting based on the
capacity of the internal memory and an SD memory card.
Size
10M
3648x 2736
6M
2816 x 2112
3M
2048x1536
M
0.3
640 x 480
* The quantity differs depending on the subjects to be captured.
Quality
Fine
Standard
Economy
Fine
Standard
Economy
Fine
Standard
Economy
Fine
Standard
Economy
Internal
Memory
4
7
11
6
11
17
9
17
26
65
113
154
32MB
4
8
12
6
12
19
10
19
30
72
126
172
64MB
352
SD memory card capacity
128MB 256MB 512MB
9
19
17
35
25
52
14
28
25
51
39
80
22
45
40
82
61
124
149
301
258
522
712
38
71
104
57
103
160
89
164
247
600
1040
1418
76
144
209
115
208
324
180
330
499
1209
2096
2858
1GB
147
277
403
221
400
623
347
636
959
2325
4030
5496
2GB
299
564
819
448
808
1254
706
1280
1921
4728
7684
10246

Getting Started
4
Possible recording time / sec (video clip)
Size
VGA
640 x 480
* Frame rate of video recording differs depending on the SD memory card access speed.
If a low access speed SD memory card is used, the frame rate and recording time is reduced.
* If the access speed of your memory card is not high enough (over 2MB/Sec for random write), the
video clip will automatically stop or some unexpected situation may occur while recording. In this
case, replace the slow card with a high-speed memory card or select standard quality.
Quality
Fine
Standard
Internal
Memory
0:28
0:39
32MB
0:31
0:43
SD memory card capacity
64MB
1:04
1:29
128MB
2:11
3:00
256MB
4:21
6:00
512MB
8:46
12:05
1GB
16:52
23:15
2GB
34:19
47:17
 Loading...