

Page 1
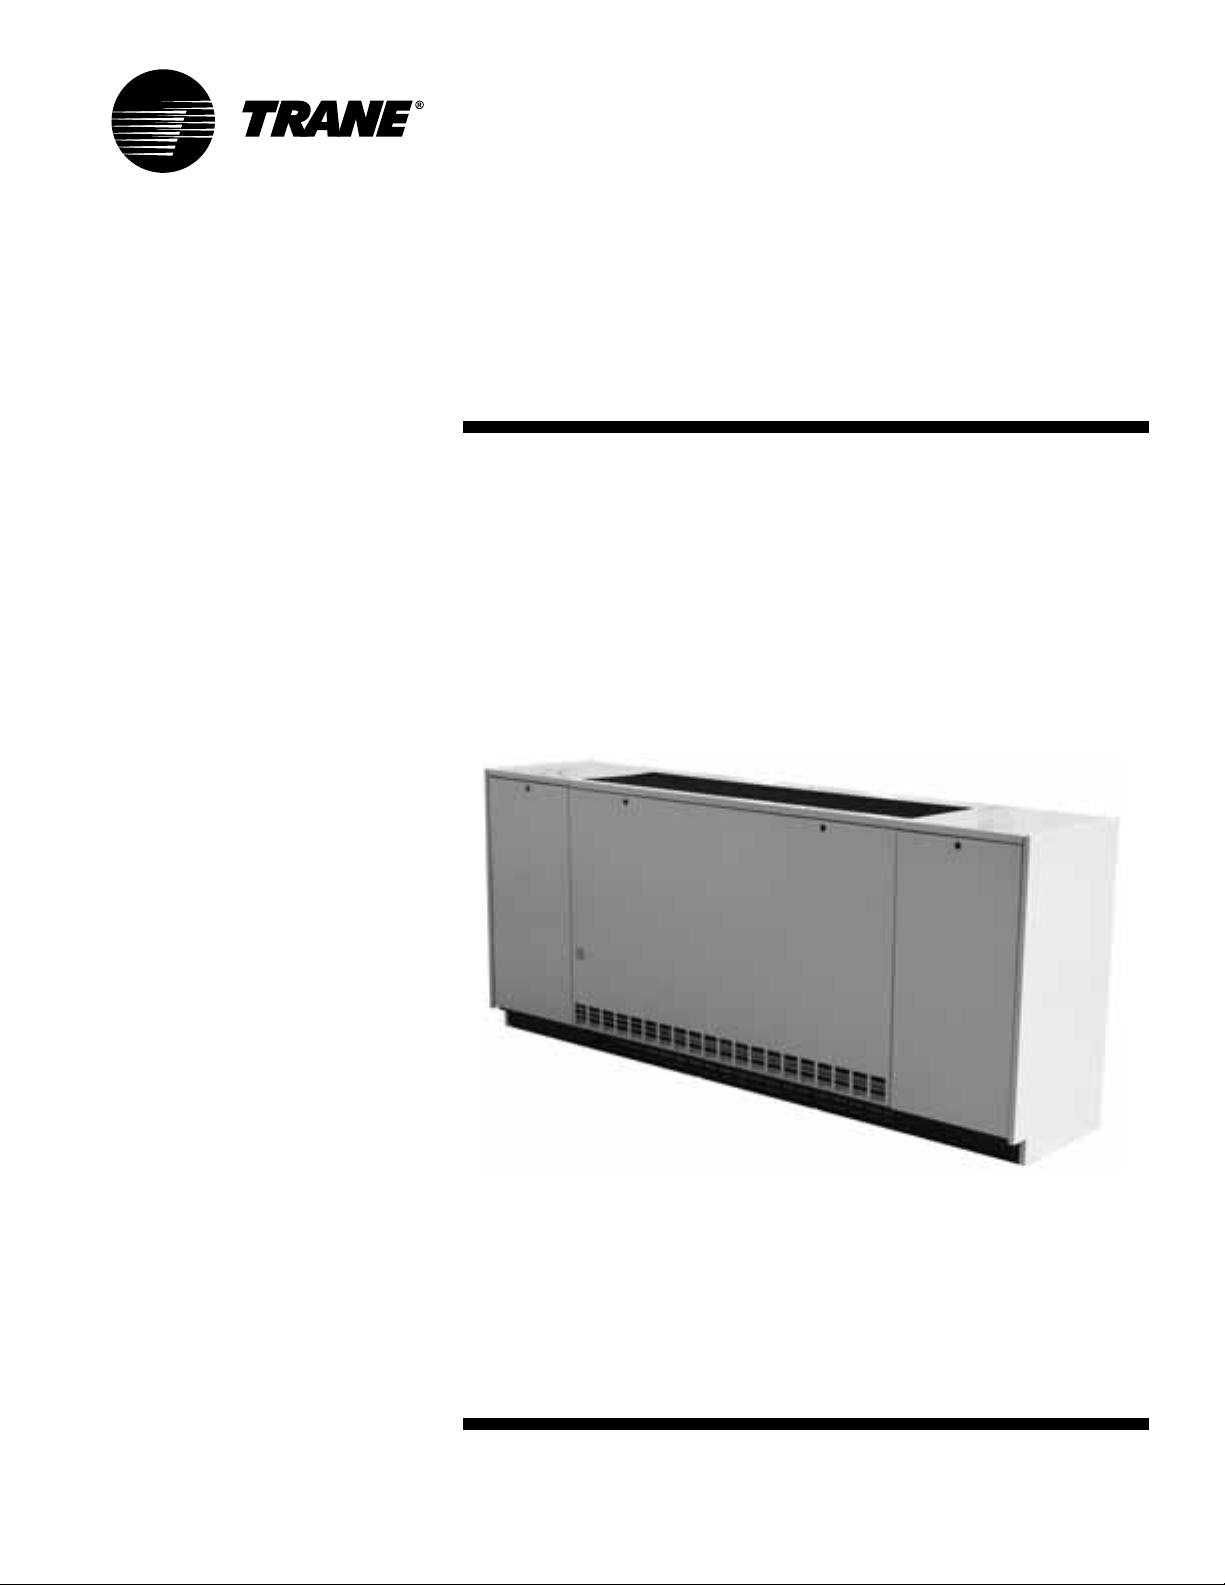
Installation
Owner
Maintenance
Vertical Unit Ventilator
Classroom Unit Ventilator
Model VUV
Models
VUVE
750 CFM
“A” and later Design Sequence
– 1500 CFM
UV-SVN03D-ENOctober 2007
Page 2
Notice
NOTICE:
Warnings and Cautions appear at appropriate sections throughout this manual.
Read these carefully.
WARNING – Indicates a potentially hazardous situation
!
which, if not avoided, could result in death or serious
injury.
!
CAUTION – Indicates a potentially hazardous situation
which, if not avoided, may result in minor or moderate
injury. It may also be used to alert against unsafe practices.
CAUTION – Indicates a situation that may result in
equipment or property-damage-only accidents.
Important!
Equipment is shipped FOB (Free on
Board) at the manufacturer. Therefore,
freight claims for damages against the
carrier must be initiated by the receiver.
© 2007 American Standard All rights reserved. UV-SVN03D-EN
Page 3
Contents
Installation/Startup/Commissioning
Pre-installation Checklist
General Information
Dimensions/Weights
Installation Instructions
Electrical Requirements
Pre-Startup Checklist
Maintenance
Warranty Information
Troubleshooting Checklist
Unit Wiring
4
4
5
7
14
24
26
27
30
31
33
UV-SVN03D-EN 3
Page 4
Pre-installation
Checklist
Jobsite Inspection
Always perform the following checks before accepting a unit:
1. Verify that the nameplate data matches the data on the sales order and bill of
lading (including electrical data).
2. Verify that the power supply complies with the unit nameplate specifications.
3. Visually inspect the exterior of the unit, for signs of shipping damage. Do not
sign the bill of lading accepting the unit(s) until inspection has been com
pleted. Check for damage promptly after the unit(s) are unloaded. Once the
bill of lading is signed at the jobsite, the unit(s) are now the property of the
SOLD TO party and future freight claims MAY NOT be accepted by the freight
company.
Microbial Growth!
Wet interior unit insulation can become an amplification site for
microbial growth (mold), which may cause odors and damage to the
equipment and building materials. If there is evidence of microbial
growth (mold) on the interior insulation, the insulation should be
removed and replaced prior to operating the system.
-
Jobsite Storage
This unit is intended for indoor use only. To protect the unit from damage due to
the elements, and to prevent possible IAQ contaminant sources from growing.
1. Place the unit(s) on a dry surface or raise above the ground to assure adequate air circulation beneath the unit.
2. Cover the unit(s) with a water proof tarp to protect them from the elements.
3. Make provisions for continuous venting of the covered units to prevent
moisture from standing on the unit(s) surfaces. Wet interior unit insulation
can become an amplification site for microbial growth (mold) which can be a
cause of odors and possible indoor air quality problems.
4. Do not stack units.
4 UV-SVN03D-EN
Page 5
General
Information
Unit Nameplate
The unit nameplate is located in the
left hand end pocket, behind the control box. It includes the unit model
number, serial number, electrical characteristics, and other pertinent unit data.
Factory Shipment
Before shipment, each unit is leak tested, and run tested for proper control
operation.
Access
A three panel front access of the unit
ventilator allows for speedy set-up
during field commissioning. This design allows for the end pocket of the
unit ventilator to be open while the fan
(airside) section stays closed.
End Pockets
Access for piping and controls is made
through the unit ventilator’s end pockets.
Coil Connections
The coil headers and drain connections are made within the unit chassis
to allow a tight seal and help prevent
air leakage around the coil. The connection sizes vary dependent upon
type of coil combination specified.
Coil Type Size (in.)
Hydronic Cooling (Main) Coil or
Heating/Cooling Changeover Coil
Heating (Auxiliary) Coil
Steam Heating Coil 1" FNPT
Direct Expansion Coil
3/4" Nominal
7/8" I.D.
1/2" Nominal
5/8" I.D.
3/8" O.D. Liquid
7/8" O.D. Suction
Unit Drain Pan
The drain pan is dual-sloped for effective condensate removal. It is made
from a non-corrosive material to help
eliminate issues associated to leaking
or standing water. It may be easily re
moved for cleaning. The drain pan
connection size for all Trane VUVE
models is 7/8" O.D.
Motor
Motors for the VUVE model do not include an external fan bearing on the
end of the fan shaft. This helps avoid
issues related to fan bearing mainte
-
nance (oiling is not needed), and/or
bearing replacement.
Filters
Filter sizing for the unit ventilator are
an off-the-shelf design to reduce or
help eliminate local stocking of the filters.
Sliding Fan Deck
Convenient access to the fan motor
and wheels for maintenance and ser
viceability may be made through
Trane’s easy-slide fan deck design.
Outside/Return-Air Dampers
The outside-air/return-air damper is a
one piece, linkage free design resulting in a superior air-tight seal.
Field Installed Controls
(Option)
The unit comes equipped with a fan
speed switch, damper blade (only),
and an optional low temperature detection.
End Device Control Package
(Option)
Units containing the End Device control design will incorporate a prewired, selected control components to
a terminal strip for wiring a field pro
vided controller and temperature sensor.
Note: for controller operation malfunction of any non-Trane, field installed
controls, consult the literature or technical support of the controls manufacturer.
Tracer™ ZN520 Control Package
(Option)
The ZN520 electronic digital controller
is a factory installed, tested and commissioned LonTalk™ certified design.
It may be used in a stand-alone control
scheme, or as part of a building auto
mation system. The controller is pre-
wired to Trane selected control com
ponents best suited for room comfort.
For more information on the ZN520
unit controller operation and service
issues, refer to CNT-SVX04A-EN
(ZN520 control manual).
-
-
-
-
UV-SVN03D-EN 5
Page 6
General
Information
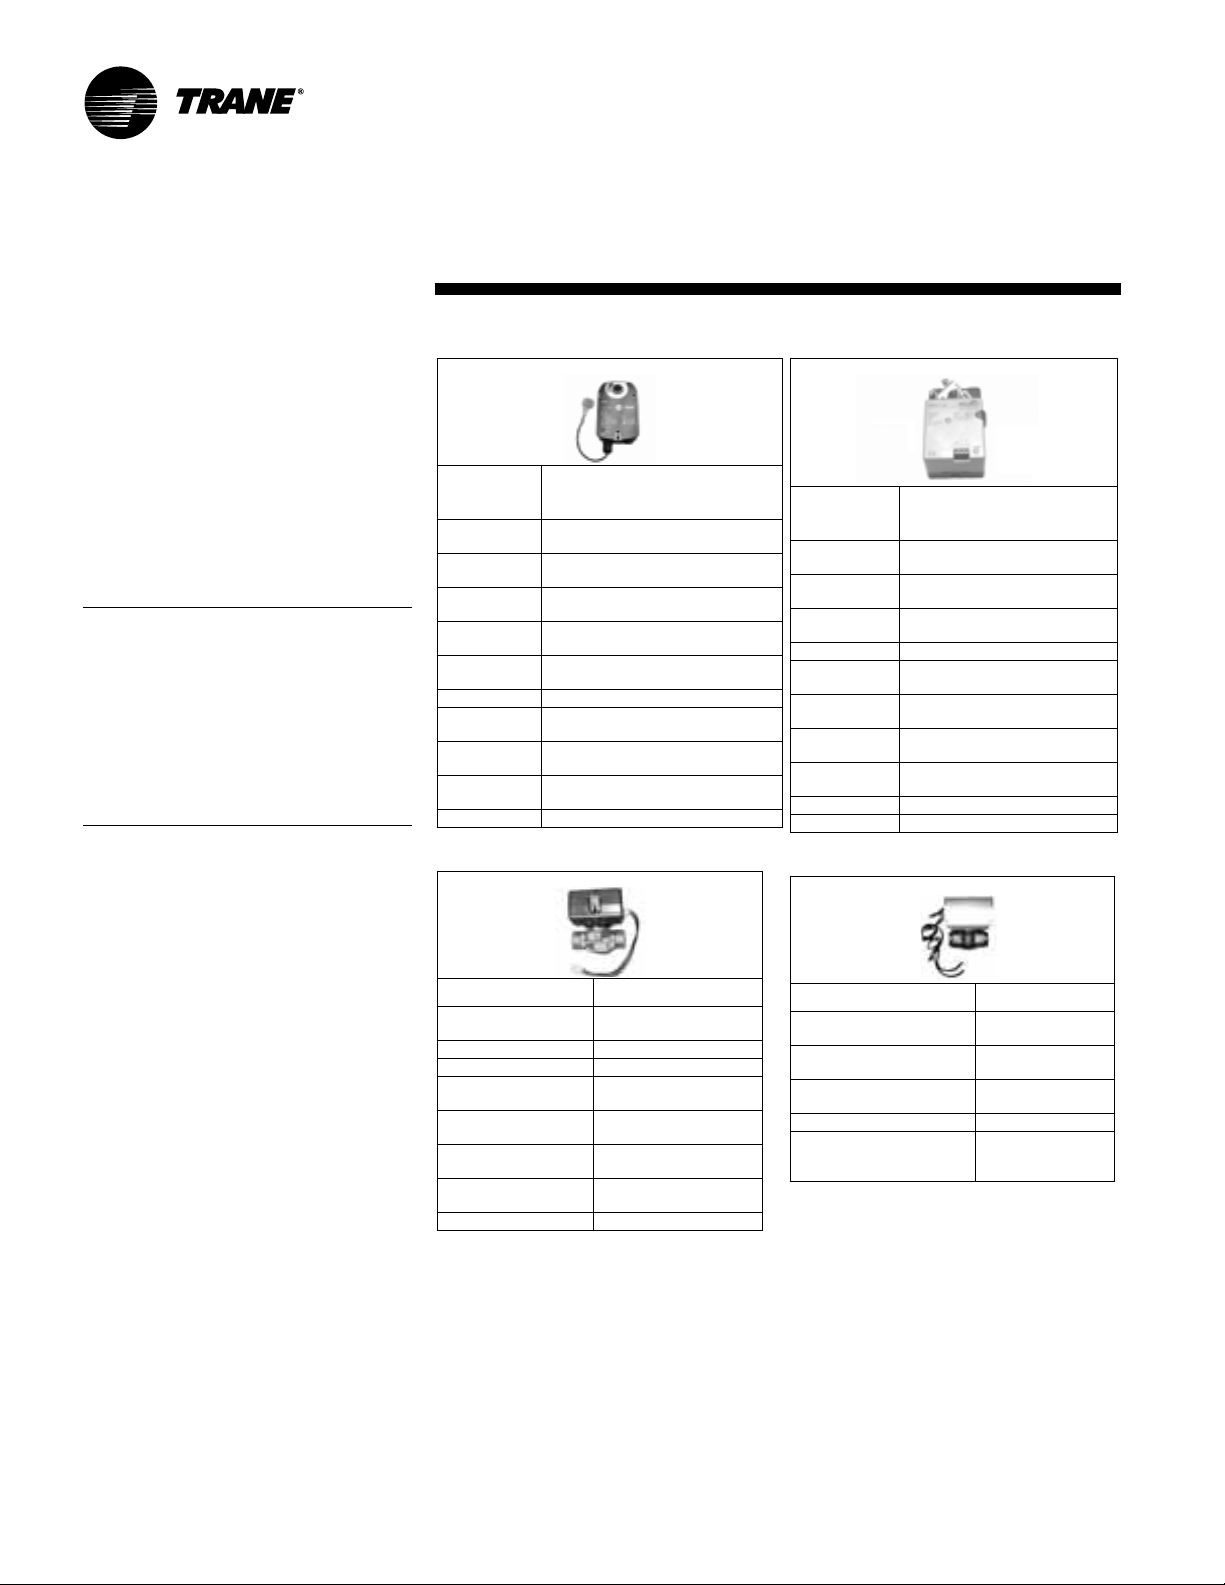
OA/RA Actuator (Option)
Table 1: OA/RA actuator specification
Table 2: Face-bypass actuator specification
The OA/RA actuator provides true
spring return operation for positive
close-off of the OA/RA damper. The
spring return system of the actuator
closes the outside damper if power is
lost to the building. When ordered
with factory controls, the actuator is a
3-point floating design. A 2 to 10 VDC
actuator is available when other than
Trane controls are specified. See Table
1 for OA/RA technical data.
Note: Because the damper actuator is
a spring return type an inner spring
will close the damper upon loss of
power. If the need to service or replace
the actuator is required, the spring
must be "loaded" for the damper to
function properly. The term loaded
means that the blade must be held in
the return air position upon replace
ment of the actuator.
Power Supply
Power
Consumption
Transformer
Sizing
Overload
Protection
Control Signal 2 to 10 VDC
Angle of
Rotation
Torque 35-inch/lb
Direction of
Rotation
Position
Indication
Run Time
-
(nominal)
Noise Level Running: 30 dB
24 VAC ± 20% 50/60 HZ
24 VAC ± 10%
Running: 2.5 W
Holding: 1 W
5 VA (class 2-power source)
Electronic throughout 0 to
95-degree rotation
3-point floating with Trane controls
Maximum 95-degree
Adjustable with mechanical stop
Spring return reversible with CW/
CCW mounting
Visual indicator, 0 to 95-degrees
90-second constant (independent of
load)
Power Supply
Power
Consumption
Transformer
Sizing
Angle of
Rotation
Torque 35-inch/lb
Direction of
Rotation
Position
Indication
Run Time
(nominal)
Manual
Override
Noise Level Less than 35 dB
Control Signal 3-point floating
24 VAC ± 20% 50/60 HZ
24 VAC ± 10%
2 W
3 VA (class 2-power source)
Maximum 95-degree
Adjustable with mechanical stop
Reversible with switch L/R
Clip-on indicator
90-second constant
External push button
Face and Bypass Actuator (Option)
The face and bypass damper actuator
Table 3: Mod. water valve specification.
Table 4: Isolation valve specification.
incorporates a direct couple design. It
provides electronic protection against
overload. A limit switch is not includ
ed, nor required as part of the design.
When reaching the damper end position, the actuator automatically stops.
The gears can be manually disen
gaged with a button on the housing.
See Table 2 for face and bypass actua
tor specifications.
Modulating Water Valves (Option)
The modulating control valve provides
optimum control of hot and chilled wa
ter flow in various heating and cooling
applications. They are designed to
provide sinusoidal valve actuator trav
Power Supply
Power
Consumption
Max. Duty Cycle 15%
-
Nominal Timing 120 sec.
Operating Ambient
Temp.
Min./Max. Fluid Temp. 1 to 95°C
Operating Pressure
-
Differential
Pressure Rating Static - 20 bar (300 psi)
Flow Characteristic Linear
-
24 VAC - 50/60 HZ
4 W
0 to 65°C
32 to 150°F
34 to 203°F
Max. - 4 bar (60 psi)
Burst - 100 bar (1500 psi)
Power Supply
Power
Consumption
Max. Fluid Temp. 94°C
Min. Fluid Temp. 1°C
Max. Operating Pressure 300 psi
Max. Close-off Pressure 1/2" = 30 psi
24 VAC - 50/60 HZ
5 W
200°F
34°F
3/4" = 20 psi
1" = 15 psi
el and operate silently, resisting water
hammer.
The actuator on the valve is a 24V, 3point floating type. See Table 3 for
modulating water valve specifications.
Isolation Valve (Option)
The isolation valve is a two position
24V, spring return type valve. It pro
vides added control in heating and
cooling applications when used in
On heating coils, and two-pipe changeover applications, the valve is normally
open to help prevent the coil from freezing in-case of power loss.
For cooling, the valve is normally closed and opens when there is a call for cool-
ing. See Table 4 for isolation valve specifications.
conjunction with the face and bypass
damper.
6 UV-SVN03D-EN
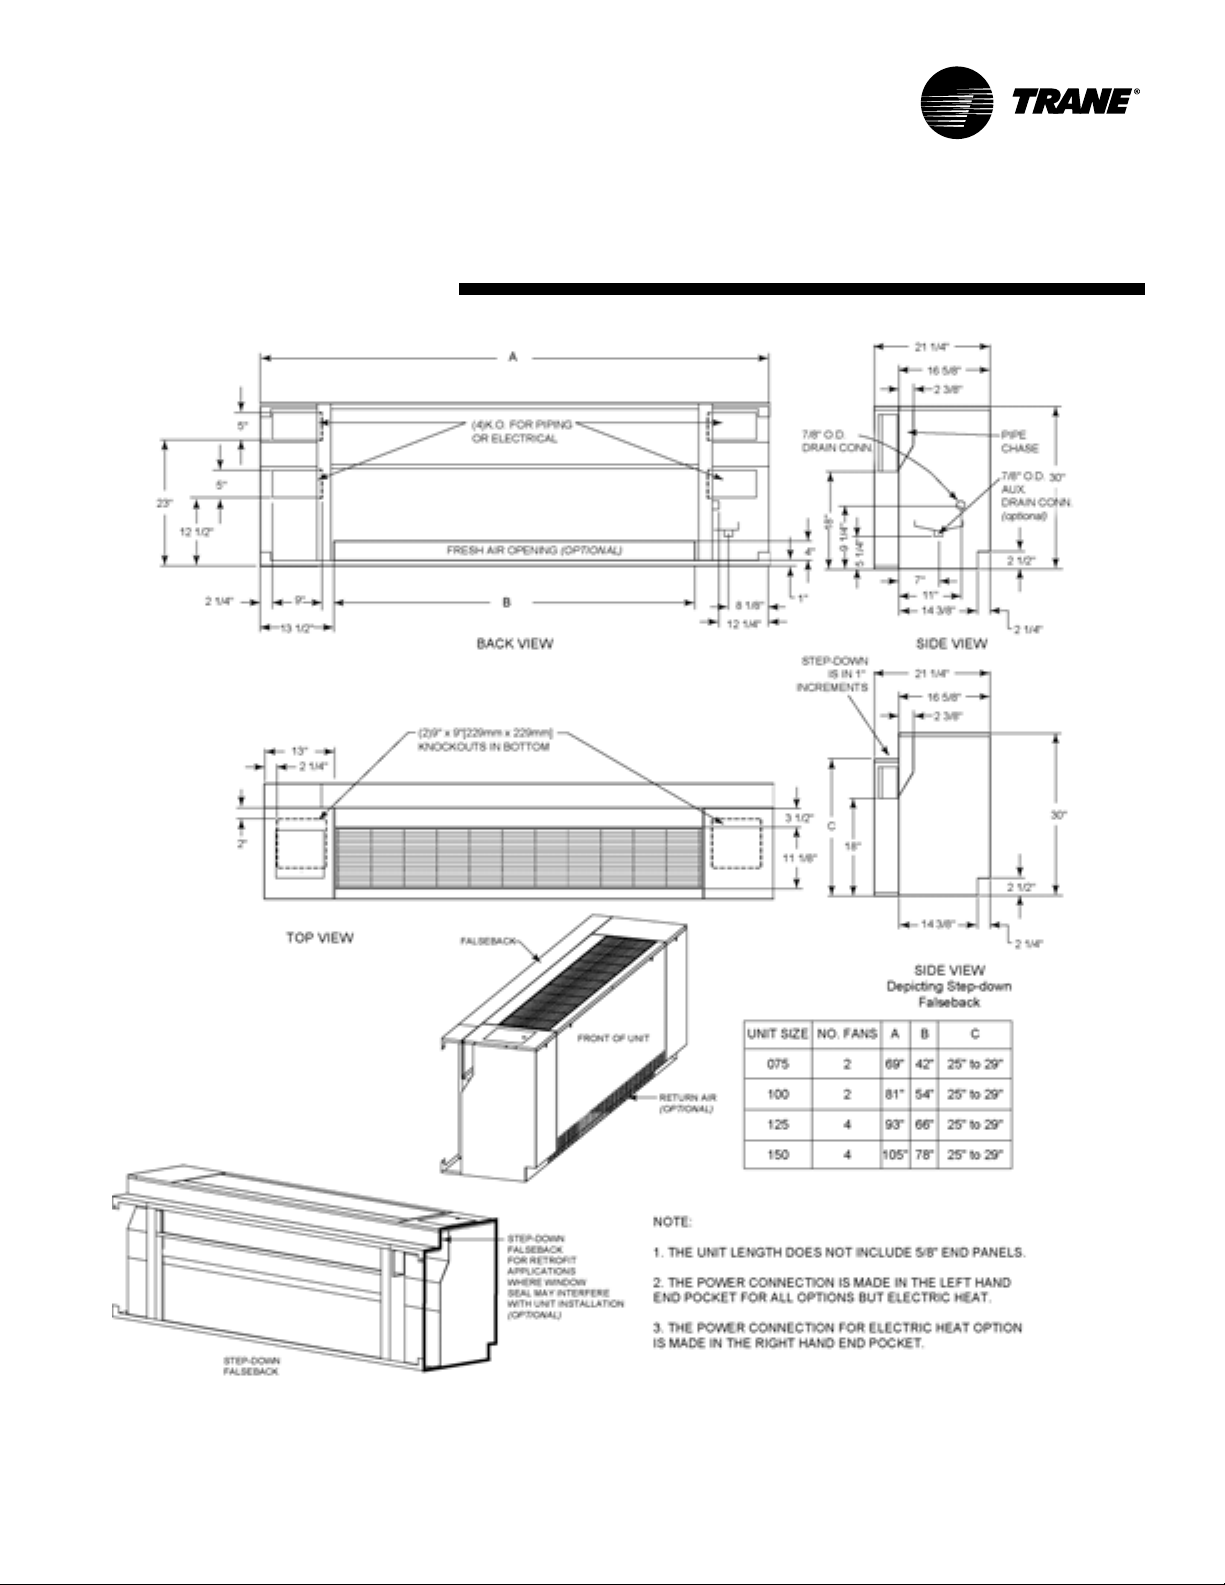
Page 7
Dimensions/Weights/
Clearance
!
WARNING
Improper Unit Lift!
Test lift unit approximately 24 inches to verify proper
center of gravity lift point. To avoid dropping of unit,
reposition lifting point if unit is not level. Failure to
properly lift unit could result in death or serious injury
or possible equipment or property-only damage.
Table G1: VUVE general data
Description Unit Size
0750 1000 1250 150 0
Unit Length w/o end covers (inches)
Unit Depth - Standard (inches)
Unit Depth - with false back (inches)
Unit Height - Standard (inches)
Shipping Weight (Lbs.)
Nominal Filter Size and
Quantity (inches)
Dynamic Air Filter Nominal
Size (inches) & Qty.
Drain Connection Size (inches)
Fan Type / Quantity
Motor Data
Quantity 1 1 2 2
Horsepower (ea) 1/4 1/4 1/10 1/10
Number of Fan Speeds (Standard)
If DX or electric heat used 1 1 1 1
Number of Fan Speed (ZN520)
If exhaust fan or ERSA used 2 2 2 2
If DX or electric heat used 1 1 1 1
Coil Volume (gal.)
Coil Type A 0.178 0.228 0.277 0.327
B 0.311 0.410 0.510 0.610
C 0.311 0.410 0.510 0.610
D 0.444 0.571 0.704 0.931
E 0.444 0.571 0.704 0.931
F 0.610 0.809 1. 014 1. 21 3
G 0.610 0.809 1. 014 1.213
H 0.395 0.593 0.742 0.837
69 81 93 105
16 5/8 16 5/8 16 5/8 16 5/8
21 1/4 21 1/4 21 1/4 21 1/4
30 30 30 30
320 405 450 470
14 x 20 x 1 (2) 14 x 24 x 1 (1) 14 x 20 x 1 (2) 14 x 24 x 1 (2)
7 x 42 x 1 (1) 7 x 54 x 1 (1) 7 x 66 x 1 (1) 7 x 78 x 1 (1)
7/8 ID Hose 7/8 ID Hose 7/8 ID Hose 7/8 ID Hose
FC / 2 FC / 2 FC / 4 FC / 4
3 3 3 3
3 3 3 3
14 x 30 x 1 (1) 14 x 24 x 1 (1) 14 x 30 x 1 (1)
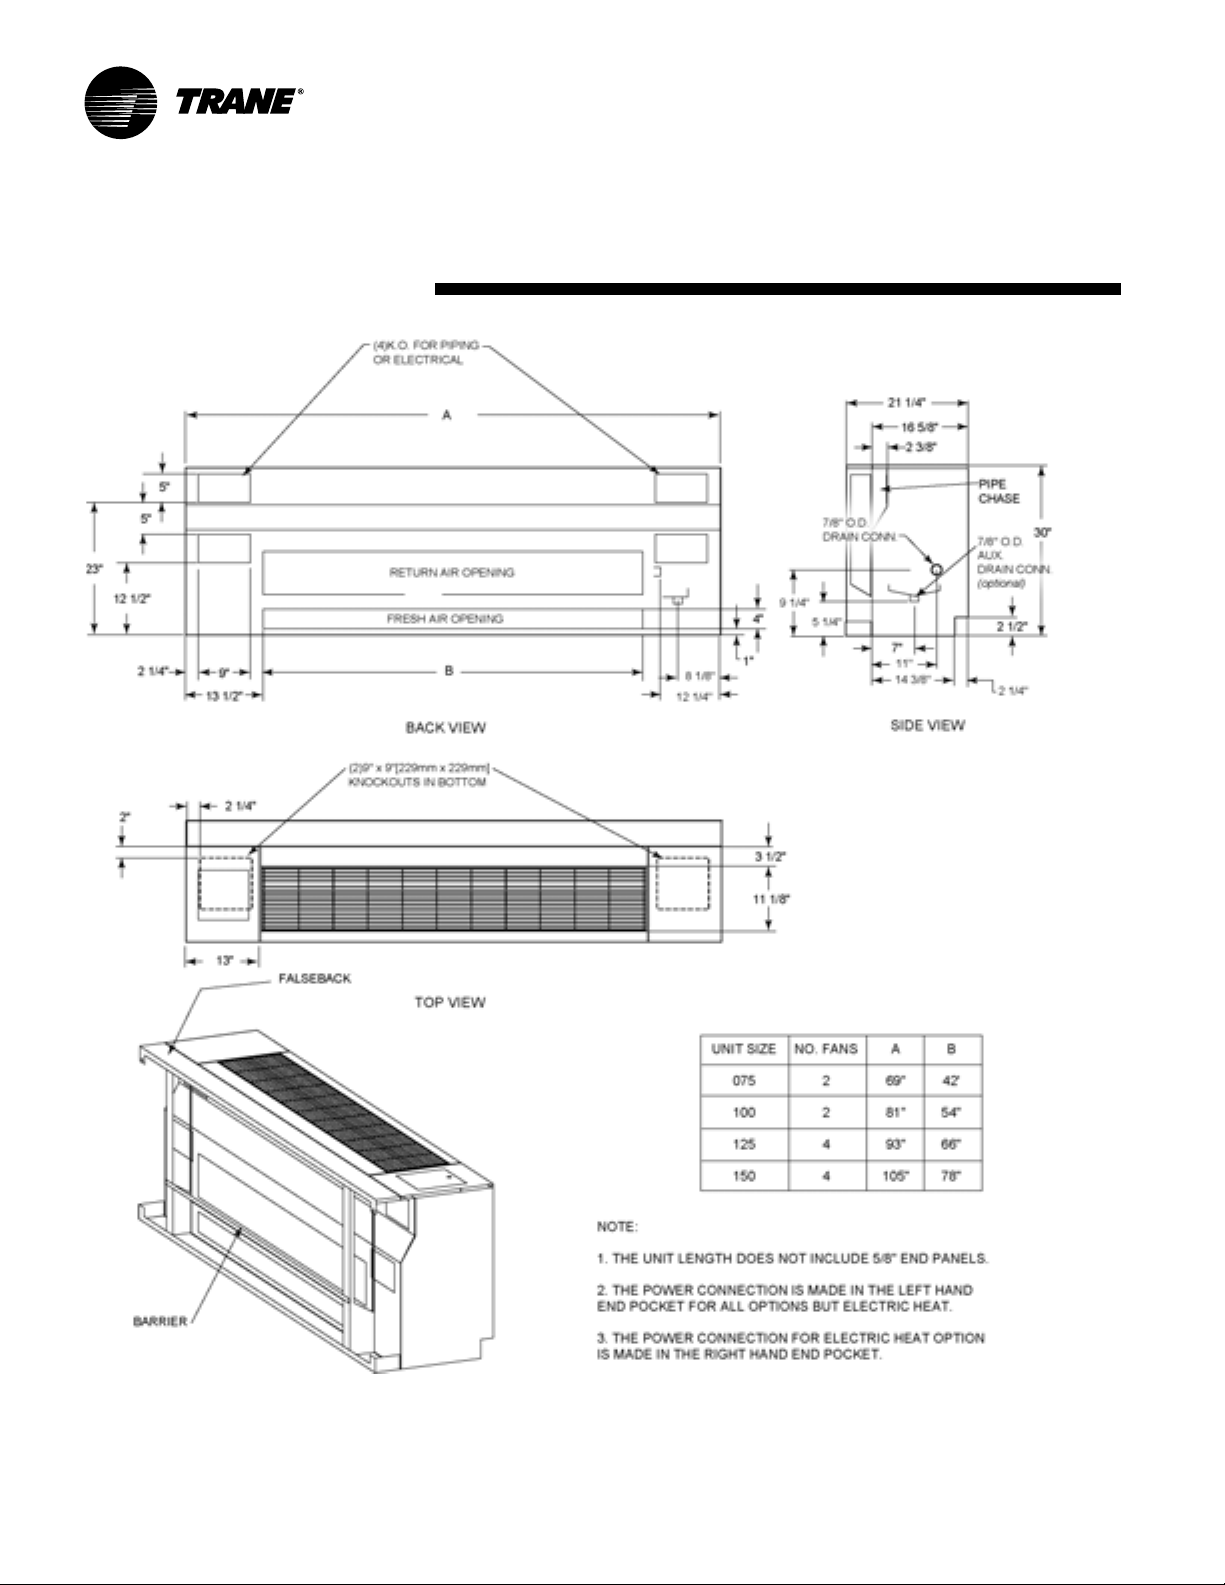
Unit Location and Clearances
Locate the unit in an indoor area. The
ambient temperature surrounding the
unit must not be less than 45°F. Do not
locate the unit in areas subject to
freezing.
Attention should be given to service
clearance and technician safety. The
unit should contain enough space for
UV-SVN03D-EN 7
service personnel to perform maintenance or repair. Provide sufficient
room to make water, and electrical
connection(s). Local and national
codes should be followed in providing
electrical power connections. A 36"
clearance at the unit front is sufficient
for maintenance and service of the
equipment.
Page 8
Dimensions
Standard Depth Unit
8 UV-SVN03D-EN
Page 9
Dimensions
Falseback Unit
UV-SVN03D-EN 9
Page 10
Dimensions
Dynamic Air Barrier Unit
10 UV-SVN03D-EN
Page 11
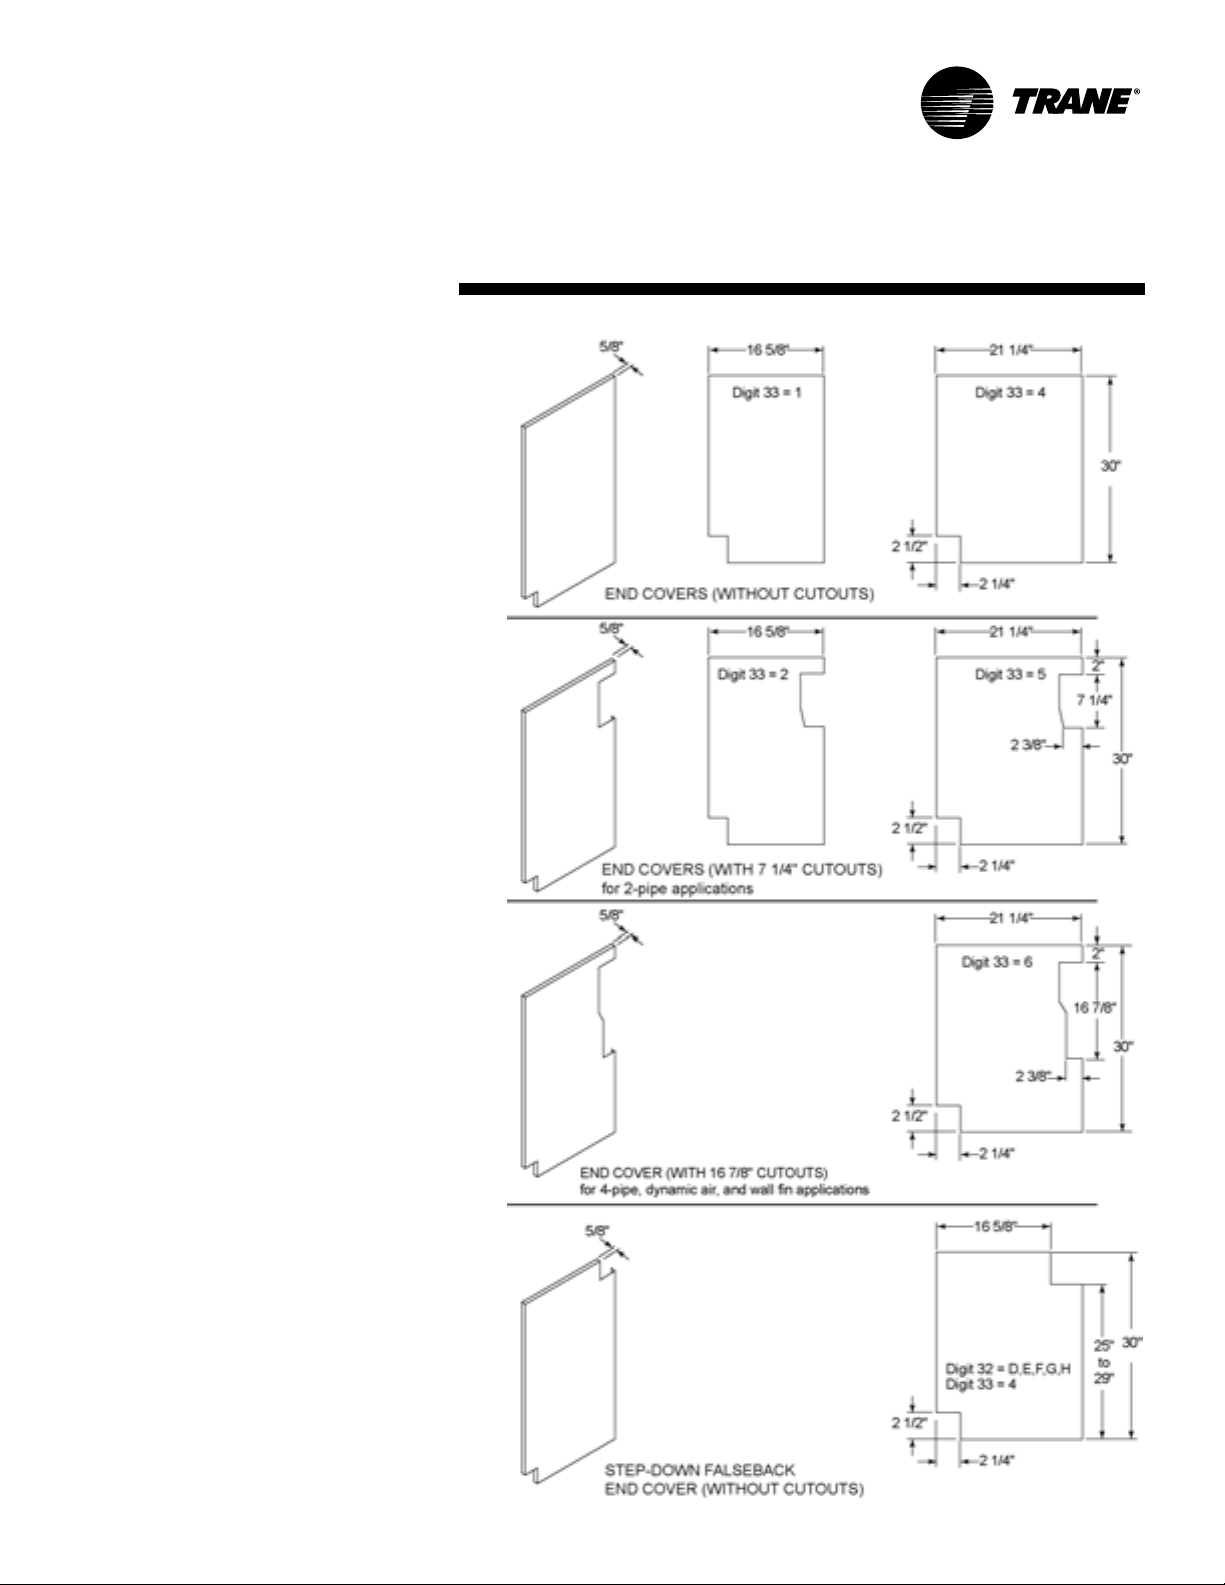
Dimensions
End Covers
UV-SVN03D-EN 11
Page 12
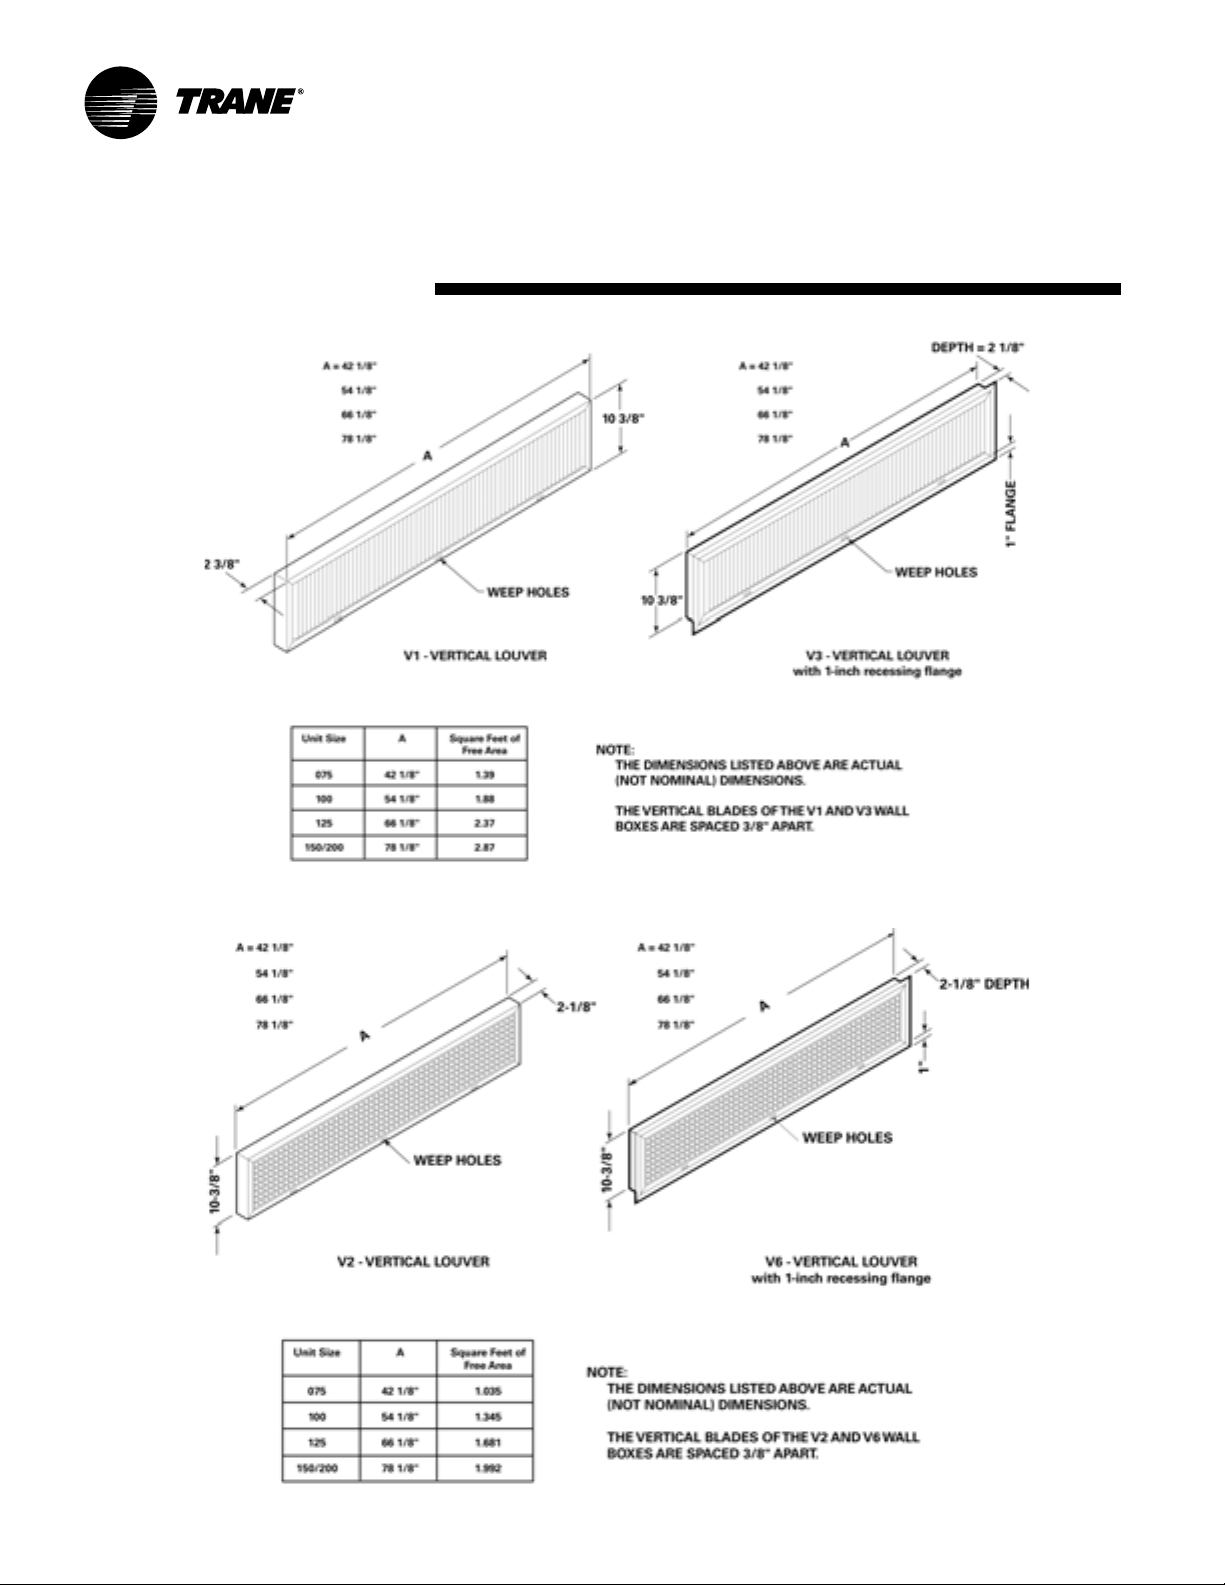
Dimensions
Wall Boxes
12 UV-SVN03D-EN
Page 13

16 5/8" DEPTH UNIT
FLUSH
Dimensions
Crossover Piping
7/8" I.D. FIELD
CONN. W/ SHUT
RS
OFF VALVE
1 1/2"
RETURN
3"
SUPPLY
TOP VIEW
21 1/4" DEPTH UNIT
FLUSH
TOP VIEW
Notes: 1-3/8" o.d. and 2-1/8" o.d. crossover piping
3 1/2"
4 1/2"
7/8" I.D. FIELD
CONN. W/ SHUT
OFF VALVE
RS
3 1/2"
4 1/2"
SIDE VIEW
1 1/4"
8 1/4"
10"
SIDE VIEW
19 3/8"
3 5/8"
5 3/8"
24"
RETURN
3"
SUPPLY
24"
19 3/8"
1 Crossover piping is available for all 2 or 4-pipe coils selections. Trane pro-
vides the crossover for the cold water only. The crossover pipe is factory insulated with 3/8"-thick insulation.
2 Expansion compensation between the factory piping package and the cross-
over piping is achieved using a flex hose rated at 250 psi working pressure.
flex hose is only available with factory mounted piping packages.
3 Expansion compensation for the crossover piping must be handled external
to the unit ventilator.
4 Crossover connections terminate in the same end pocket as the main coil con-
nection. The main coil connection for 2-pipe systems is the heating coil. the
main coil connection for 4-pipe systems is the cooling coil.
UV-SVN03D-EN 13
Page 14

Installation
Wall Box Installation
The following instructions are general
recommendations for installing wall
intake boxes. Consult the architectural
plans for specific requirements.
Additional materials required to complete any specific installations (such as
duct connections, metal mounting
plates, or flanges) are not furnished by
Trane.
For best results, all air intake boxes
should be removable from outside of
the building. Weep holes must be at
the bottom to permit free drainage. A
positive air and moisture seal should
be provided around all edges.
General Instructions
Trane wall boxes are illustrated in the
dimensional section of this manual.
Dimensions are actual, and may be
used to define the wall opening.
Vertical louvers in the wall intake box
provide extra strength for a high load
bearing capacity. The lintel may be
omitted on masonry wall installations.
Weep holes are provided in the outside face of the bottom channel in the
wallbox frame. Install all wall boxes to
permit free drainage through the weep
holes to the outside of the building.
All wallboxes are furnished with diamond pattern expanded aluminum
bird screen.
Note: V1 and V2 (vertical) wall models
are all unflanged. H2, V3 and V6 are
flanged.
Installation in Masonry Walls
A typical method of installing the wall
box in a masonry wall opening is
shown in Figure 1.
Grout the top and bottom of the wall
box frame as noted. A sloped water
dam located in the space between the
unit and wall facilitates moisture
drainage. Grouting at the ends of the
intake box will complete the seal be
tween the wall box frame and the masonry opening.
Installation in Curtain Walls
In all cases, the wall intake box should
be caulked to provide a tight, weather
proof seal, Figure 2.
Note: A minimum of 2-1/8” of clearance must be maintained between the
exterior wall and back of the unit. Failure to provide this gap will not allow
the wall box to fit properly.
Interior Wall
w/ sheetrock
Outside
Wall
Grout
Weep
Holes
-
Unit
Rubber
Seals
Water dam sloped
toward exterior
Figure 1: Masonry wall installation
Interior Wall
w/ sheetrock
Outside
Wall
Caulking
Rubber
Seals
Flanged
wallbox
Weep
Holes
Water dam sloped
toward exterior
Figure 2: Flanged wall box installation
in 2" curtain wall
Floor
Unit
14 UV-SVN03D-EN
Page 15

Installation
General Installation Checks
The checklist below is a summary of
the steps required to successfully install a unit. This checklist is intended to
acquaint the installing personnel with
procedures required in the installation
process. It does not replace the de
tailed instructions called out in the applicable sections of this manual.
1 Carefully remove the stretch wrap
and top cardboard cover. Check
the unit for shipping damage and
material shortage; file a freight
claim and notify appropriate sales
representation. If end panels have
been ordered, the panel will al
ready be mounted to the unit.
Note: The unit ventilator is packaged in clear stretch wrap to allow
for immediate visual inspection. A
protective cardboard cover helps
prevent scratching and other cos
metic blemishes during transport.
2 Remove remaining cardboard
blocking.
-
-
Location Considerations
Selecting the appropriate location for
installing a unit is very important. The
following factors should be consid
ered:
1 Floor design must have sufficient
structure to withstand the weight
of the unit while allowing for
openings in the floor for a return
air duct, electrical and piping sup
ply lines fed through the floor. See
page 7 for unit weights.
2 Wall space design should allow the
unit to be mounted to the wall se
curely. The wall surface behind
the unit should be smooth and level. Wall and floor moldings should
be removed prior to installation. A
wall slightly out of level may cause
problems with unconditioned air
leaking into the room. Remove
-
any object projecting more then
1/8” (.3175cm) from the wall surface. Note: Additional gasket or
furr strips may be installed to accommodate for an uneven wall.
5 Internal access to the unit is pro-
vided by the removable front panel. Sufficient space should be
-
-
-
allowed to lift the panel for mainte
nance purposes.
6 Ensure the floor surface is level.
Note: The unit leveling legs can be
adjusted to accommodate slight
out-of-level installation surfaces.
Unit Mounting
Note: All wall intake boxes should be
installed prior to mounting the unit
ventilator. Refer to Page 14 for wall
box installation instructions.
The 1/2” mounting or anchoring holes
are located on the back of the unit on
each end. See Figures 3.
Note: All mounting fasteners are to be
provided by the installer.
-
3 Remove the unit’s left front panel
to verify nameplate/sales order
number is correct. It is located be
hind the control box.
4 Remove shipping bracket from the
lower rear corners of the unit to
separate the unit from the skid. Ac
cess to the screws holding the
bracket to the skid is obtained inside the unit.
5 Rotate the fan wheels manually.
The wheels should move freely
and be in proper alignment. Visu
ally inspect the fan area for obstructions or shipping damage.
6 Remove all applicable knockouts
for coil piping and electrical con
nections.
UV-SVN03D-EN 15
3 There are two removable knock-
outs in the rear of the unit, on ei
-
-
-
-
ther end, for piping and electrical
supply lines. A pipe chase is locat
ed in the upper back portion of the
unit for crossover piping. The outside air opening is located in the
lower back of the unit and the path
to the wallbox on the outside wall
should be unobstructed.
4 The physical layout of the room
should accommodate any accessories ordered with the unit. Conditioned air is distributed through
the grille on top of the unit and returned through the return air grille
on the bottom of the unit. Avoid
placing any objects that may ob
struct either grille or interfere with
airflow.
-
-
-
Page 16

A
Figure 3: Mounting hole location
Installation
075
100
125
150
E
C
C
F
B
B
D
ABCDE F
Standard Unit (no Falseback) 1.31 13.50 2.75 66.39 10.38 45.64
Standard falseback 1.00 2.13 26.00 67.00 10.00 47.00
29" stepdown falseback 1.00 2.13 24.44 67.00 10.00 47.00
28" stepdown falseback 1.00 2.13 23.44 67.00 10.00 47.00
27" stepdown falseback 1.00 2.13 22.44 67.00 10.00 47.00
26" stepdown falseback 1.00 2.13 21.44 67.00 10.00 47.00
25" stepdown falseback 1.00 2.13 20.44 67.00 10.00 47.00
Standard Unit (no Falseback) 1.31 13.50 2.75 78.39 10.38 57.64
Standard falseback 1.00 2.13 26.00 79.00 10.00 59.00
29" stepdown falseback 1.00 2.13 24.44 79.00 10.00 59.00
28" stepdown falseback 1.00 2.13 23.44 79.00 10.00 59.00
27" stepdown falseback 1.00 2.13 22.44 79.00 10.00 59.00
26" stepdown falseback 1.00 2.13 21.44 79.00 10.00 59.00
25" stepdown falseback 1.00 2.13 20.44 79.00 10.00 59.00
Standard Unit (no Falseback) 1.31 13.50 2.75 90.39 10.38 69.64
Standard falseback 1.00 2.13 26.00 91.00 10.00 71.0 0
29" stepdown falseback 1.00 2.13 24.44 91.00 10.00 71.00
28" stepdown falseback 1.00 2.13 23.44 91.00 10.00 71.00
27" stepdown falseback 1.00 2.13 22.44 91.00 10.00 71.00
26" stepdown falseback 1.00 2.13 21.44 91.00 10.00 71.00
25" stepdown falseback 1.00 2.13 20.44 91.00 10.00 71.00
Standard Unit (no Falseback) 1.31 13.50 2.75 102.39 10.38 81.64
Standard falseback 1.00 2.13 26.00 103.00 10.00 83.00
29" stepdown falseback 1.00 2.13 24.44 103.00 10.00 83.00
28" stepdown falseback 1.00 2.13 23.44 103.00 10.00 83.00
27" stepdown falseback 1.00 2.13 22.44 103.00 10.00 83.00
26" stepdown falseback 1.00 2.13 21.44 103.00 10.00 83.00
25" stepdown falseback 1.00 2.13 20.44 103.00 10.00 83.00
16 UV-SVN03D-EN
Page 17

Installation
Unit Mounting
Note: All wall intake boxes should be
installed prior to mounting the unit
ventilator. Refer to Page 14 for wall
box installation instructions.
The 1/2” mounting or anchoring holes
are located on the back of the unit on
each end. See Figure 3.
1 Note: All mounting fasteners are to
be provided by the installer. Check
the gasket on the rear of the unit
and around the fresh air opening. Gaps around the openings
can lead to outside air leaks into
the room.
2 Remove all electrical and piping
knockouts where required for installation.
!
WARNING
Improper Unit Lift!
Test lift unit approximately 24
inches to verify proper center of
gravity lift point. To avoid dropping of unit, reposition lifting
point if unit is not level. Failure to
properly lift unit could result in
death or serious injury or possible
equipment or property-only dam
age.
3 Set the unit into selected location
and adjust leveling legs if neces
sary to ensure level fit.
Note: Care should be taken when
handling the unit to ensure that the
front return air grille does not
bend.
4 Push the unit tightly against the
wall to compress the seal on the
back edge of the unit and intake
opening. Anchor the unit by using
the 1/2” mounting holes in both
end pockets.
Units containing a falseback; The
falseback unit ventilator contains
mounting holes located on the
falseback metal. Use these holes
-
-
rather than the holes located in the
unit’s end pockets.
Note: Ensure the unit is level. Coils
and drain pans inside the unit are
pitched properly for draining before
shipment.
5 Ensure the unit rests tightly
Subbase (option)
A subbase may be used to increase the
unit height and aid in leveling the unit.
The subbase is shipped separately for
field installation. Slots and leveling
screws are provided on the subbase.
1 Remove the leveling legs provided
2"- 6"
Figure 4: Subbase with leveling legs
2 Set the unit on the subbase and
against the wall. Check for proper
seal and that air does not leak un
derneath the unit.
with the unit. See Figure 4.
Unit Base
Weld
Nuts
Subbase
For leveling legs
fasten with four, 3/8” x 16’ x 1”
hex head cap screws and 3/8" lock
washers.
Note: Hex screws and lock washers are provided by the factory.
They are located in a baggy and are
used to attach the base to the unit
ventilator. Pre-drilled slots in the
subbase flange will line up with
the weld nuts in the bottom of the
unit.
3 The bottom of the subbase has
weld nuts in four slots. Place the
leveling legs in those slots and lev
el the unit.
End Panels
When ordered as an option, end covers ship already attached to the vertical unit ventilator. The following
section is for installing end covers purchased as an add-on.
It is recommended end panels be installed on the unit ventilator after all
piping, wiring and accessory installa
tion is completed. To install the end
-
panel:
1 Insert the four factory provided
metal studs into the four premounted nuts on the inside of the
panel.
2 Align each stud with the four pre-
drilled holes on the side of the
unit.
3 Secure the panel to the unit by fas-
tening with the four factory provided nuts.
4 Do not overtighten screws.
CAUTION
Equipment Damage!
Do not run units for any length of
time without all panels and filters
properly installed. Failure to do so
may result in equipment failure.
-
-
UV-SVN03D-EN 17
Page 18

Installation
Piping Installation
Before installation of piping package,
the shipping bracket holding the piping in place, must be removed.
Proper installation of piping is necessary to provide efficient coil operation
and to prevent damage during opera
tion. Follow standard piping practices
and include all accessories as neces
-
sary.
Piping connection knockouts are
shown pages 8 to 10. Field connection
types and sizes for unit coils are listed
in Table 5. These sizes are provided for
field piping connection.
A 7/8’’ OD condensate drain connection is provided on the chilled water
supply end of the unit.
1 Attach a flexible condensate drain
hose over the drain pan connection and secure with a hose clamp.
The drain pan on the vertical is vacuum molded with a drain connection
and P-Trap on the cooling coil, connection side.
Note: Condensate removal to the main
system should be made through the
bottom of the unit ventilator. If other
location for condensate removal is de
sired, a specific field cut-out for the
connection should be made in the back
of the unit ventilator. To help avoid
cold air infiltration, the field cut-out
should only be large enough to allow
for the condensate hose to exit the
unit.
To field reverse the slope of a vertical
unit drain pan.
2 Slide out fan deck (disconnecting
the condensate line and fan plug
will release fan deck for sliding).
3 Remove pipe clamp that hold the
p-trap to the drain pan.
4 Remove clips that hold the drain
pan in-place.
5 Lift and rotate the drain pan.
6 Reconnect p-trap to the drain pan
and replace clips to secure the pan
to the fan deck.
7 After the condensate drain piping
has been completed, check water
flow to ensure the system proper
ly carries and away all condensate
accumulation.
Note: A P-trap is factory supplied in ev-
-
ery vertical unit ventilator.
Trane Piping Packages (Option)
Trane Standard Piping Package includes a 2-way or 3-way valve with bypass balance valve, ball valves, Pete’s
plugs and unions. A strainer and circuit balancing valve are optional.
1 All union connections should be
tightened in the field. Units are
shipped with union connections
hand tightened only in the factory.
Note: All connections made in the field
should be sweat connections.
Piping packages are not shipped insulated. Any insulation should be provided in the field by the installing
contractor.
The auxiliary drain pan (optional) is
the main condensate connection to
the unit when specified. The chilled
water or DX coil drain pan will empty
into the auxiliary drain pan if a factory
-
installed, auxiliary pan is ordered. All
field piping condensate connections
should be made at the auxiliary drain
pan.
Installation Crossover Piping
Crossover piping is available for all hy-
-
dronic coils. It is either 1 3/8’’ \[34.9\] or
2 1/8’’ \[54\] in diameter (O.D.) as spec
ified by the customer. Crossover piping can be found in either the left or
right hand end pocket. See crossover
submittal drawings page 13 for dimen
sional data.
On 4-pipe coils, crossover piping connects to the main cooling coil.
Factory insulation is provided on all
crossover piping.
When a Trane piping package is ordered, it is installed with the connections made to the supply and return of
both the coil and the crossover piping.
However, supply and return connections must be made in the field when a
piping package is furnished by the installer.
The crossover piping is located at the
back of the unit along the wall and the
ends of the piping are flush with the
end of the unit.
Expansion compensation between the
piping package and the crossover piping is achieved using flex hoses rated
at 250 psi working pressure. Expansion compensation for the crossover
piping must be handled external to the
unit ventilator.
Table 7: Coil data for field piping
Coil Type Connection Locat ion Field Connection Size
4-Pipe Chilled Water/Hot Water Left or Right (opposite ends) 7/8" OD/5/8" OD
2-Pipe Changeover Coil Left or Right 7/8" OD
Hot Water Only Left or Right 7/8" OD
Steam Left or Right 1" MPT
Chilled Water/Electric Heat Left Cooling 7/8" OD
Chilled Water/Steam Left or Right 7/8" OD/1" MPT
DX Left 7/8" Suction, 3/8" Discharge
DX/Hot Water Left Cooling/Right Heating 7/8" Suction, 3/8" Discharge/5/8" OD
DX/Steam Left Cooling/Right Heating 7/8" Suction, 3/8" Discharge/1" MPT
DX/Electric Heat Left Cooling/Right Heating 7/8" Suction, 3/8" Discharge/NA
Electric Heat Right NA
Notes:
1. Supply and return connections are located on the same end of each coil.
2. All Trane piping packages have union connections; all units with piping packages by others have sweat
connections.
3. Coil connections are sweat except steam coils, which are threaded.
-
-
18 UV-SVN03D-EN
Page 19

Installation
Split System Units
The following refrigerant piping and
interconnecting wiring instructions
apply to unit ventilators with direct ex
pansion type cooling coils used in conjunction with air-cooled condensing
units. Reference must also be made to
the condensing unit installation and
wiring manuals which are shipped
with the condensing unit.
Note: The ETL listing mark applied to a
unit ventilator does not apply to any
associated refrigerant condensing
unit.
Refrigerant Piping
Unit ventilators with direct expansion
cooling contain a nitrogen holding
charge in the evaporator coils. Con
nections are ‘‘pinched-off’’ at the factory.
To connect the condensing unit lines,
cut off the stubouts and swage. The
condensing unit lines can then be
brought into the swage and brazed.
Trane recommends the use of nitro
gen purge when brazing refrigerant
lines to prevent formation of oxides in
the lines.
Install the refrigerant suction and liquid lines as described in the condensing unit installation instructions. The
TXV is factory installed on the Unit
Ventilator. Piping should be run
straight out through the back of the
unit. Access piping knockouts are lo
cated in the rear panels of the unit, as
shown in dimensional section of this
manual.
Recommended refrigerant line connections for various unit combinations
are given in Table 7. Typical Superheat
Charging Charts are shown in the
Trane Service Facts found in the con
densing unit section manual. Refrigerant charge weights can also be
determined with your local Trane
sales engineer using a valid Trane Se
lection Program.
Steam Piping
When air, water or another product is
heated, the temperature or heat trans-
-
fer rate can be regulated by a modulating steam pressure control valve.
Since pressure and temperature do
not vary at the same rate as load, the
steam trap capacity, which is deter
mined by the pressure differential between the trap inlet and outlet, may be
adequate at full load, but not some
lesser load.
There are detailed methods for determining condensate load under various
operating conditions. However, in
most cases this is not necessary if the
coils are piped as shown in Figure 5.
Follow the procedure documented in
the ASHRAE Systems Handbook,
Steam Systems.
Temp. Regulating Valve
Coil
To Condensate
return
Vacuum Equalizer
F&T Trap
See text for sizing
Gravity flow to
vented receiver
Figure 5: Steam piping
-
-
-
H= 12"
minimum
UV-SVN03D-EN 19
Page 20

Installation
Modulating Water Valves (Option)
The actuator on the valve is a 24V, 3point floating valve. The actuator can
be easily removed from the valve body
by pressing in on the locking tab and
rotating the actuator 45° counterclockwise (See Figure 6a). The 2-way
valves are bi-directional flow. The 3way valves can be mixing or diverting
(See Figure 6b).
Note: The actuator must be removed if
soldering is being conducted near the
valve. High heat may cause damage to
the actuator’s plastic body/mecha
-
nisms.
Figure 6a: Remove modulating valve
actuator by pressing in tab (inset) and
turning actuator 45° counterclockwise.
Figure 6b: Steam piping
Closed
A
A
B
Open
B
2-way valve
AB<->B
B
AB
AB<->A
A
3-way valve
AB
On applications without the optional,
factory installed piping packages, it is
important to remove the cartridge as
sembly from the valve body with the
provided tool (Figure 7).
Figure 7: Cartridge removal tool
Use the following steps to complete
cartridge assembly removal:
1 Remove valve actuator.
2 Remove the cartridge assembly
from the valve body with the enclosed tool.
3 Solder the valve in accordance with
normal soldering practices.
4 Re-install the cartridge after solder-
ing by tightening until it bottoms
out. The top surface of the cartridge will be flush with the top
edge of the body casting.
Note: Do not overtighten. Maximum torque is 40 in-lb.
5 Replace valve actuator and wire in
accordance with instructions.
Plumbing the Valve
The valve may be plumbed in any angle but preferably not with the actuator below horizontal level of the body.
Make sure there is enough room
around the actuator for servicing or re
placement.
For use in diverting applications, the
valve is installed with the flow water
entering through the bottom AB port
and diverting through end ports A or
B. In mixing applications the valve is
-
installed with inlet to A or B and outlet
through AB.
Mount directly to the tube or pipe. Do
not grip the actuator while making or
tightening plumbing connections. Ei
ther hold valve body by hand or attach
an adjustable spanner (38mm/1-1/2”)
across the hexagonal or flat faces on
the valve body. See Figure 8.
-
-
Figure 8: Proper plumbing technique
for modulating valves
20 UV-SVN03D-EN
Page 21

Installation
Manually Opening Valve
The manual opener can be manipulated only when in the up position. The A
port can be manually opened by firmly
pushing the white manual lever down
to the midway position and pushing
the lever in. In this position, both A
and B ports are open. This “manual
open” position may be used for filling,
venting and draining the system or
opening the valve during power fail
ure.
The valve can be closed by depressing
the white lever lightly and then pulling
the lever outward. The valve and actuator will return to the automatic position when power is restored.
Note: If the valve is powered open, it
cannot be manually closed, unless the
actuator is removed.
Wiring
A controller and a separate transformer is required to operate each valve.
See Figures 9 and 10. Port A “open”
and “closed” denote valve open and
closed positions.
-
the normally open (NO) or normally
closed (NC) contacts, driving the valve
to an intermediate position until a fur
ther change at the controller.
The valve is set between the limits of
the controller to satisfy various load
requirements. In the event of power
failure, the valve will stay in the posi
tion it was in before loss of power.
When power is restored, the valve will
again respond to controller demand.
Isolation Valves
Installation
The valve can be mounted in any position on a vertical line. If the valve is
mounted horizontally, the actuator
must be even with or above the center
line. Make sure there is enough room
to remove actuator cover for servicing.
Mount the valve on the tube or pipe.
Note: Ensure the flow through the
valve is in the direction indicated by
the arrow stamped on the valve body.
Figure 12: Removing valve actuator
-
-
To install the actuator to the valve
body:
3 Align the slot on the shaft of the
valve with the valve body notch on
side of body. See Figure 13.
Figure 9: Wiring for modulating valve
actuator
Figure 11: Proper mounting for
isolation valves.
Servicing/Removal of Valves
The actuator can be removed from the
valve body. Removing the actuator is
recommended if soldering is being
conducted near the valve. To remove
Figure 10: Wiring for modulating valve
actuator
The typical floating controller is an
SPDT controller with a center-off posi
tion. On a change in temperature from
the set point, the controller will close
UV-SVN03D-EN 21
the actuator:
1 Place the manual operating lever
to the Open position, Figure 12
2 Depress the locking button and lift
actuator until it separates from the
valve body.
Figure 13: Installing isolation valve
4 Install body valve into pipe.
5 Wiring connections may be made
either before or after actuator installed on body.
6 Place the manual operating lever
on the actuator in the OPEN position.
7 Align actuator coupling to slot on
the shaft of the valve body and fit
the head onto the valve body to
ensure the shaft seats correctly,
Figure 11.
8 Press the actuator and valve body
until it secures together.
Page 22

Installation
Soldering procedures are as
follows:
1 Remove actuator as stated earlier.
2 Place valves on the pipe. Rotate
valve stem so the shaft slot points
at the notch in the side of the body
(90° to flow direction). This pro
tects the plug inside the valve by
removing it from the seat, Figure
14.
3 Sweat the joints, keeping outer
surface free from solder.
Note: Do not use silver solder due
to high temperature requirements.
Figure 14: Preparation for soldering
Heating Coils with Direct
Expansion Cooling
Heating options for direct expansion
cooling in the unit ventilator are hot
water, steam or electric heat.
These coils facilitate direct expansion
cooling with standard capacities. The
supply and return connections are lo
cated in the right hand end pocket. Hot
water field connections are made with
a 5/8’’ \[15.9\] OD male sweated joint,
while steam coils have a 1’’ \[25.4\]
male pipe thread (MPT) connection.
See Table 7 for coil connection sizes.
Electric heat coils provide a third way
to supply heating to the direct expan
sion cooling. The coil utilizes three to
six preheat elements which are factory
wired.
-
-
-
Wiring
All classroom unit ventilators have
115V motor power. Motor data can be
found in Tables G1.
Control Power
!
WARNING
Hazardous Voltage!
Disconnect all electric power, including remote disconnects before servicing. Follow proper
lockout/tagout procedures to ensure the power can not be inadvertently energized. Failure to
disconnect power before servicing could result in death or serious injury.
CAUTION
Equipment Damage!
-Wiring diagrams provided in this
manual are for reference only. Actual wiring for particular options/
units may vary. Refer to the dia
gram provided on the equipment
for specific information. Failure to
do so may result in equipment fail
ure.
-When installing field provided
controls, do not alter or remove
any built-in unit safeties. Tamper
ing with unit safeties may cause
unit overheating and possible fire
hazard.
-Do not remove or alter the wiring
of the Time Delay Relay (DL). Do
ing so may result in premature
motor failures.
Unit ventilator controls and control
wiring can be factory mounted or field
installed.
Wiring diagrams illustrate the standard unit motors with one and two
speed control. Terminal wiring is provided by Trane and the actual components used for a particular installation
may differ. Control and line diagrams
for the exact control system used are
provided with each unit.
-
Supply Power
CAUTION
Use Copper Conductors
Only!
Unit terminals are not designed to
accept other types of conductors.
Failure to use copper conductors
may result in equipment damage.
Power supply wiring is to be connected to terminals 1 and 2 at the junction
box in the left end pocket, below the
discharge air grille.
Electric Heat (option)
Supply Power
Supply power wiring is to be connected to the following line terminals in
the right hand end pocket:
• 208V or 240V, 3-phase,
3 wire system: L1, L2 and L3.
• 480V, 3-phase, 4 wire system:
L1, L2, L3 and N (neutral)
See Page 34 for a typical unit line and
interconnecting wiring diagram for
-
Electric Heat Coils.
CAUTION
Equipment Damage!
-
480 V/3-Wire is NOT compatible
with Trane Classroom Unit Ventilator equipment. There must be a
4-wire system with a separate
ground. Failure to provide a 4-wire
-
system may result in equipment
damage.
Note: The supply neutral wire must
be connected to the neutral terminal
block.
Operational controls and an electric
heating safety device are factory
mounted. The safety device is a high
temp cut-out which de-energizes elec
tric heating elements through the K1
safety contactor.
-
22 UV-SVN03D-EN
Page 23

!
WARNING
Hazardous Voltage!
Disconnect all electric power, including remote disconnects before servicing. Follow proper
lockout/tagout procedures to ensure the power can not be inadvertently energized. Failure to
disconnect power before servicing could result in death or serious injury.
Installation
IMPORTANT:
INSTALLER MUST MOUNT THERMAL
EXPANSION VALVE BULB AND FROST
PROTECTION BULB (if suppled) TO
SUCTION LINE AFTER CONNECTION
OF FIELD REFRIGERANT PIPING
X39001939010A
Wiring (continued)
DX System
A typical unit ventilator with DX coil includes an outside air thermostat, a
frost prevention thermostat and a 24V
transformer for condensing unit con
trol.
Wire sizing is the same as given for the
thermostat wiring in the condensing
unit installation instructions, or may
be obtained from the nameplate. The
condensing unit must be controlled by
the same room thermostat that also
controls the unit ventilator.
Split System Start-Up
After all piping and wiring has been
completed, follow the instructions
provided with the condensing unit for
control testing and system start-up. If
sweat type field-piped systems are be
ing used, then pressure testing, evacuation and refrigerant charging will be
required.
Two bulbs will also be shipped with a
split system unit:
-
9:00
8:00
MOUNT BULB IN
HORIZONTAL PLANE
Figure 15: Frost stat/TXV valve
installation tag
Note: Depending on the controls package ordered with the unit, not all installations will require mounting the
frost stat bulb.
-
RECOMMENDED
BULB PLACEMENT
X
12
93:00
3
6
4:00
X
• Frost stat bulb
• TXV valve (used with R410a).
Both components are to be field installed using the installation kit
shipped with the unit. For complete in
stallation instructions and locations,
refer to the tag attached to the installa
tion kit within the unit. See Figure 15
for an example of the installation tag.
UV-SVN03D-EN 23
-
-
Page 24

Electrical
Requirements
Table E1: VUV 075-150, Electrical Performance
Unit Motor Motor No. of Heating Heat Heat Total Circuit Protective
Model No. Voltage FLA (ea) HP Fan Motor Elements kW Amps FLA Ampacity Device
VUVE075 115/60/1 3.0 1/4 1 0 0.00 0.00 3.00 3.8 15
208/60/1 1.6 1/4 1 0 0.00 0.00 1.60 2.0 15
208/60/1 1.6 1/4 1 3 4.39 21.10 22.70 28.4 30
208/60/1 1.6 1/4 1 4 5.86 28.20 29.80 37.3 40
208/60/1 1.6 1/4 1 6 8.79 42.30 43.90 54.9 60
208/60/3 1.6 1/4 1 0 0.00 0.00 1.60 2.0 15
208/60/3 1.6 1/4 1 3 4.39 12.20 13.80 17.3 20
208/60/3 1.6 1/4 1 4 5.86 18.69 20.29 25.4 30
208/60/3 1.6 1/4 1 6 8.79 24.40 26.00 32.5 35
230/60/1 1.6 1/4 1 0 0.00 0.00 1.60 2.0 15
230/60/1 1.6 1/4 1 3 5.85 24.40 26.00 32.5 35
230/60/1 1.6 1/4 1 4 7.80 32.50 34.10 42.6 45
230/60/1 1.6 1/4 1 6 11.70 48.80 50.40 63.0 70
230/60/3 1.6 1/4 1 0 0.00 0.00 1.60 2.0 15
230/60/3 1.6 1/4 1 3 5.85 14.10 15.70 19.6 20
230/60/3 1.6 1/4 1 4 7.80 21.49 23.09 28.9 30
230/60/3 1.6 1/4 1 6 11.70 28.10 29.70 37.1 40
265/60/1 1.0 1/4 1 0 0.00 0.00 1.00 1.3 15
265/60/1 1.0 1/4 1 3 5.82 21.00 22.00 27.5 30
265/60/1 1.0 1/4 1 4 7.80 28.20 29.20 36.5 40
265/60/1 1.0 1/4 1 6 11.70 42.20 43.20 54.0 60
460/60/3 1.0 1/4 1 0 0.00 0.00 1.00 1.3 15
460/60/3 1.0 1/4 1 3 5.85 7.00 8.00 10.0 15
460/60/3 1.0 1/4 1 4 7.80 14.10 15.10 18.9 20
460/60/3 1.0 1/4 1 6 11.70 14.10 15.10 18.9 20
VUVE100 115/60/1 3.0 1/4 1 0 0.00 0.00 3.00 3.8 15
208/60/1 1.6 1/4 1 0 0.00 0.00 1.60 2.0 15
208/60/1 1.6 1/4 1 3 5.86 28.20 29.80 37.3 40
208/60/1 1.6 1/4 1 4 7.81 37.50 39.10 48.9 50
208/60/1 1.6 1/4 1 6 11.72 56.30 57.90 72.4 80
208/60/3 1.6 1/4 1 0 0.00 0.00 1.60 2.0 15
208/60/3 1.6 1/4 1 3 5.86 16.30 17.90 22.4 25
208/60/3 1.6 1/4 1 4 7.81 24.79 26.39 33.0 35
208/60/3 1.6 1/4 1 6 11.72 32.50 34.10 42.6 45
230/60/1 1.6 1/4 1 0 0.00 0.00 1.60 2.0 15
230/60/1 1.6 1/4 1 3 7.80 32.50 34.10 42.6 45
230/60/1 1.6 1/4 1 4 10.40 43.30 44.90 56.1 60
230/60/1 1.6 1/4 1 6 15.60 65.00 66.60 83.3 90
230/60/3 1.6 1/4 1 0 0.00 0.00 1.60 2.0 15
230/60/3 1.6 1/4 1 3 7.80 18.80 20.40 25.5 30
230/60/3 1.6 1/4 1 4 10.40 28.66 30.26 37.8 40
230/60/3 1.6 1/4 1 6 15.60 37.50 39.10 48.9 50
265/60/1 1.0 1/4 1 0 0.00 0.00 1.00 1.3 15
265/60/1 1.0 1/4 1 3 7.80 28.20 29.20 36.5 40
265/60/1 1.0 1/4 1 4 10.40 37.50 38.50 48.1 50
265/60/1 1.0 1/4 1 6 15.60 56.30 57.30 71.6 80
460/60/3 1.0 1/4 1 0 0.00 0.00 1.00 1.3 15
460/60/3 1.0 1/4 1 3 7.80 9.40 10.40 13.0 15
460/60/3 1.0 1/4 1 4 10.40 18.80 19.80 24.80 25
460/60/3 1.0 1/4 1 6 15.60 18.80 19.80 24.8 25
Blower Blower Number of Electric Electric Minimum Overcurrent
24 UV-SVN03D-EN
Page 25

Electrical
Requirements
Table E1: VUV 075-150, Electrical Performance (continued)
Unit Motor Motor No. of Heating Heat Heat Total Circuit Protective
Model No. Voltage FLA (ea) HP Fan Motor Elements kW Amps FLA Ampacity Device
VUVE125 115/60/1 2.0 1/10 2 0 0.00 0.00 4.00 4.5 15
208/60/1 1.0 1/10 2 0 0.00 0.00 2.00 2.3 15
208/60/1 1.0 1/10 2 3 7.32 35.20 37.20 46.3 50
208/60/1 1.0 1/10 2 4 9.76 46.90 48.90 60.9 70
208/60/1 1.0 1/10 2 6 14.65 70.40 72.40 90.3 100
208/60/3 1.0 1/10 2 0 0.00 0.00 2.00 2.3 15
208/60/3 1.0 1/10 2 3 7.32 20.30 22.30 27.6 30
208/60/3 1.0 1/10 2 4 9.76 31.03 33.03 41.0 45
208/60/3 1.0 1/10 2 6 14.65 40.70 42.70 53.1 60
230/60/1 1.0 1/10 2 0 0.00 0.00 2.00 2.3 15
230/60/1 1.0 1/10 2 3 9.75 40.60 42.60 53.0 60
230/60/1 1.0 1/10 2 4 13.00 54.20 56.20 70.0 80
230/60/1 1.0 1/10 2 6 19.50 81.30 83.30 103.9 110
230/60/3 1.0 1/10 2 0 0.00 0.00 2.00 2.3 15
230/60/3 1.0 1/10 2 3 9.75 23.50 25.50 31.9 35
230/60/3 1.0 1/10 2 4 13.00 35.82 37.82 47.0 50
230/60/3 1.0 1/10 2 6 19.50 46.90 48.90 60.9 70
265/60/1 0.9 1/10 2 0 0.00 0.00 1.80 2.0 15
265/60/1 0.9 1/10 2 3 9.75 35.20 37.00 46.0 50
265/60/1 0.9 1/10 2 4 13.00 46.90 48.70 60.7 70
265/60/1 0.9 1/10 2 6 19.50 70.40 72.20 90.0 100
460/60/3 0.9 1/10 2 0 0.00 0.00 1.80 2.0 15
460/60/3 0.9 1/10 2 3 9.75 11.70 13.50 16.6 20
460/60/3 0.9 1/10 2 4 13.00 23.50 25.30 31.40 35
460/60/3 0.9 1/10 2 6 19.50 23.50 25.30 31.4 35
VUVE150 115/60/1 2.0 1/10 2 0 0.00 0.00 4.00 4.5 15
208/60/1 1.0 1/10 2 0 0.00 0.00 2.00 2.3 15
208/60/1 1.0 1/10 2 3 8.56 41.20 43.20 53.8 60
208/60/1 1.0 1/10 2 4 11.42 54.90 56.90 70.9 80
208/60/1 1.0 1/10 2 6 17.13 82.40 84.40 105.3 110
208/60/3 1.0 1/10 2 0 0.00 0.00 2.00 2.3 15
208/60/3 1.0 1/10 2 3 8.56 23.80 25.80 32.0 35
208/60/3 1.0 1/10 2 4 11.42 36.36 38.36 47.7 50
208/60/3 1.0 1/10 2 6 17.13 47.50 49.50 61.6 70
230/60/1 1.0 1/10 2 0 0.00 0.00 2.00 2.3 15
230/60/1 1.0 1/10 2 3 11.40 47.50 49.50 61.9 70
230/60/1 1.0 1/10 2 4 15.20 63.30 65.30 81.4 90
230/60/1 1.0 1/10 2 6 22.80 95.00 97.00 121.0 125
230/60/3 1.0 1/10 2 0 0.00 0.00 2.00 2.3 15
230/60/3 1.0 1/10 2 3 11.40 27.40 29.40 36.5 40
230/60/3 1.0 1/10 2 4 15.20 41.87 43.87 54.6 60
230/60/3 1.0 1/10 2 6 22.80 54.80 56.80 70.8 80
265/60/1 0.9 1/10 2 0 0.00 0.00 1.80 2.0 15
265/60/1 0.9 1/10 2 3 11.40 41.20 43.00 53.5 60
265/60/1 0.9 1/10 2 4 15.20 54.90 56.70 70.7 80
265/60/1 0.9 1/10 2 6 22.80 82.30 84.10 104.9 110
460/60/3 0.9 1/10 2 0 0.00 0.00 1.80 2.0 15
460/60/3 0.9 1/10 2 3 11.40 13.70 15.50 19.1 20
460/60/3 0.9 1/10 2 4 15.20 27.40 29.20 36.30 40
460/60/3 0.9 1/10 2 6 22.80 27.40 29.20 36.3 40
Blower Blower Number of Electric Electric Minimum Overcurrent
UV-SVN03D-EN 25
Page 26

Pre-Start
Checklist
Pre-Start-up Checklist
Before energizing the unit, the following system devices must be checked:
____ Is the high voltage power supply correct and in accordance with the nameplate ratings?
____ Is the field wiring and circuit protection the correct size?
____ Is the low voltage control circuit wiring correct per the unit wiring diagram?
____ Is the piping system clean/complete and correct?
____ Is unit serviceable? (See clearance specifications on page 7).
____ Are all the unit access panels secure and in place?
____ Is the water flow established and circulating through all the units?
____ Is the condensate line properly sized, run, trapped and pitched?
____ Does the indoor blower turn freely without rubbing?
____ Has all work been done in accordance with applicable local and national codes?
____ Has heat transfer fluid been added in the proper mix to prevent freezing if required?
26 UV-SVN03D-EN
Page 27

Maintenance
!
WARNING
Hazardous Service
Procedures!
The maintenance and troubleshooting procedures recommended in this section of the manual
could result in exposure to electri
cal, mechanical or other potential
safety hazards. Always refer to
the safety warnings provided
throughout this manual concern
ing these procedures. When possible, disconnect all electrical
power including remote disconnects before servicing. Follow
proper lockout/tagout procedures
to ensure the power can not be in
advertently energized. When necessary to work with live electrical
components, have a qualified licensed electrician or other individual who has been trained in
handling live electrical components perform these tasks. Failure
to follow all of the recommended
safety warnings provided, could
result in death or serious injury.
-
Periodic Maintenance
The following maintenance suggestions apply to all types of unit ventilators, chilled water, hot water, split
systems and electric. Additional information for controls not supplied by
The Trane Company should be ob
tained from the controls manufactur-
-
er.
Split system unit ventilators include a
condensing unit and the instructions
provided with the condensing unit will
apply to the entire refrigerant system.
Filters
The air filters supplied with Trane UV’s
are specially designed for high lint
content. Depending upon room condi-
-
tions, these filters will normally need
to be replaced every 4 to 8 weeks. To
assure proper unit operation, inspect
the filters monthly and clean or re
place as required.
Overloaded filters will reduce unit air
handling capacity, which may result in
insufficient heating during the morn
ing warm-up period and loss of natural
cooling capacity during mild weather.
Cleaning of the Drain Pan
The unit ventilators drain pan is removable for periodic cleaning or easy
access for maintenance/drainage is
sues. Use Figure 16, and the steps below for removing the drain pan.
1 Turn off power to the unit and re-
move the front panel.
2 Disconnect the condensate drain
line from the P-trap.
3 Disconnect fan plug.
4 Remove (4) pan clips located at
each end of the pan’s front.
5 Slide out fan board.
6 Remove drain pan for cleaning.
7 When reinstalling, reverse se-
quence.
-
-
Service Access
To access the unit for water balancing,
motor access or other start-up and
maintenance functions, use one of the
following methods:
1 Remove the end pocket front
panel.
2 Remove the return air grille by re-
leasing the mounting screws.
3 If there is no shelving or other ob-
structions, removing the end panel
may allow more access.
Filter Replacement
The air filter on the vertical unit is located near the bottom of the unit Filter
sizing may be found on Table G1.
.
1 To remove the filters, take-off the
air section’s front panel.
2 Slide the filter out of the filter rack
on the bottom of the unit.
3 Replace old filter with new filter
and re-attach front panel.
CAUTION
1
2
Figure 16: Removal of drainpan
Slide out fanboard
3
4
Equipment Damage!
Do not operate unit without filters
or grilles in place. Failure to do so
may cause equipment failure
UV-SVN03D-EN 27
Page 28

Maintenance
!
WARNING
Hazardous Service
Procedures!
The maintenance and troubleshooting procedures recommended in this section of the manual
could result in exposure to electri
cal, mechanical or other potential
safety hazards. Always refer to
the safety warnings provided
throughout this manual concern
ing these procedures. When possible, disconnect all electrical
power including remote disconnects before servicing. Follow
proper lockout/tagout procedures
to ensure the power can not be in
advertently energized. When necessary to work with live electrical
components, have a qualified licensed electrician or other individual who has been trained in
handling live electrical components perform these tasks. Failure
to follow all of the recommended
safety warnings provided, could
result in death or serious injury.
Access to Fanboard & Motor
The unit ventilator fan board can be removed for service to the blower motor
and fan wheels. The fan board must
also be removed for easier access to
the unit coils for cleaning and mainte
nance. Utilize the following steps for
proper removal of the fanboard.
1 Turn off power to the unit and re-
move the front panel.
2 Disconnect P-trap from drain pan.
-
CAUTION
Equipment Damage!
Support the fanboard to prevent
the deck from sliding too far for
ward and falling out of the unit.
Failure to do so may cause equipment damage.
-
5 When reinstalling, use the same
steps in reverse order.
Motor
The fan motor is a permanent split capacitor type motor with voltage specific power. See Table E1 through E3 for
electrical performance and motor volt
age.
Table E3: Motor Voltage
Unit Voltage Motor Voltage
115-60-1 115-60-1
208-60-1 208/230-60-1
230-60-1 208/230-60-1
208-60-3 208/230-60-1
460-60-3 265-60-1
265-60-1 265-60-1
230-60-3 208/230-60-1
If a replacement motor is required, it
should be ordered from The Trane
Company. To replace the fan motor,
complete the following steps:
-
6 Complete steps for removal of
fan board.
7 Disconnect the motor ground
wire.
8 Using a 7/16” Allen wrench, loos-
en the coupling on the fan shaft.
11 Attach new motor to fan shaft
and reverse steps to complete in
stallation.
-
-
Figure 17: Fan board removal for fan/
motor access
Figure 18: Loosen screws
-
3 Disconnect fan plug.
4 Slide fan board by pulling deck
forward, Figure 17.
28 UV-SVN03D-EN
9 Loosen the screw on the motor
clamp until it allow the motor to
be lifted off the base, Figure 18.
10 Lift the motor and pull forward
until fan shaft separates from the
motor, Figure 19.
Figure 19: Lift/pull motor forward
Page 29

Maintenance
!
WARNING
Hazardous Service
Procedures!
The maintenance and troubleshooting procedures recommended in this section of the manual
could result in exposure to electri
cal, mechanical or other potential
safety hazards. Always refer to
the safety warnings provided
throughout this manual concern
ing these procedures. When possible, disconnect all electrical
power including remote disconnects before servicing. Follow
proper lockout/tagout procedures
to ensure the power can not be in
advertently energized. When necessary to work with live electrical
components, have a qualified licensed electrician or other individual who has been trained in
handling live electrical components perform these tasks. Failure
to follow all of the recommended
safety warnings provided, could
result in death or serious injury.
-
Note: These hydronic valves are designed and tested for silent operation.
However, water noise may occur as a
result of high water velocity. Piping
noises may also occur in high temper
ature (over 212° F) systems with insufficient water pressure.
Note: Do not use petroleum-based or
-
mineral oil type boiler additives. Com
pounds with a 50% water dilution that
can be used are diethylene glycol,
etheylene glycol and propylene glycol.
Coil Cleaning
Periodically the hydronic coils should
be cleaned from dirt accumulation that
could reduce the unit performance. To
clean the equipment coil:
-
1 Remove the unit’s front panel.
2 Remove the unit’s front nosing.
3 Removed the coil’s solid steel
front cover.
4 Vacuum the dust/particles from
the coil face.
-
-
Modulating Valves
The valve should be serviced by a
trained, experienced technician. For
detailed installation and removal
steps, refer to Pages 18-20 in this man
ual.
For general servicing or malfunction,
follow one of the appropriate steps:
1 If the valve is leaking, drain system
OR isolate valve from the system.
DO NOT remove valve body from
plumbing.
2 Ensure the cartridge needs to be
replaced. If so, follow appropriate
steps explained for cartridge as
sembly removal.
3 If the motor or other internal parts
of the actuator is damaged, replace
the entire actuator assembly.
UV-SVN03D-EN 29
5 Reverse order for re-installation.
Preventive Maintenance
A comprehensive preventive maintenance program should be established
for a unit ventilator system. The fol-
lowing are several key elements:
• Inspect the filters monthly. Follow
the Filter Replacement instruc-
tions.
• Inspect and clean the drain pan
every three months.
• Check the coils for ‘‘dirt’’ accumu-
-
lation every three to six months.
Clean the coils at least once each
year.
• Inspect the unit ventilator insula-
tion every three months; thoroughly clean as needed.
Page 30

Warranty
Information
Warranty Information
Standard Warranty
The standard unit ventilator warranty is Trane’s parts-only warranty, running 12-months from startup, not to
exceed 18-months from shipment.
Extended Warranty
The optional extended warranty is a second through fifth year warranty. The time starts at the end of standard
1-year coverage through the fifth year.
These extended warranties apply only to new equipment installed in domestic Trane Commercial Systems
Group sales territories and must be ordered prior to start-up.
30 UV-SVN03D-EN
Page 31

Trouble Shooting
Checklist
!
WARNING
Hazardous Service Procedures!
The maintenance and trouble shooting procedures recommended in this section of the manual could result in
exposure to electrical, mechanical or other potential safety hazards. Always refer to the safety warnings provided throughout this manual concerning these procedures. When possible, disconnect all electrical power
including remote disconnects before servicing. Follow proper lockout/tagout procedures to ensure the power
can not be inadvertently energized. When necessary to work with live electrical components, have a qualified
licensed electrician or other individual who has been trained in handling live electrical components per these
tasks. Failure to follow all of the recommended safety warnings provided, could result in death or serious injury.
If operating difficulties are encountered, refer to page 31 and 32 for probable causes and corrective measures. If suggested
corrective measures have been taken, and the trouble still persists, contact the control supplier or the local Trane Sales Office.
Problem Heating Cooling Cause Correction
X Main power off Check fuses
X Room sensor is not properly set Reset room sensor temperature
Start the warm-up cycle earlier in the
morning to provide appropriate timeframe to increase room temperature prio r
to space occupation.
Relocate sensor.
Replace malfunctioning component, or
contact the control’s contra ctor , or if Trane
controls, see CNT-SVX04A-EN for more
information concerning Tracer™ controls.
Replace malfunctioning component, or
contact the control’s contra ctor , or if Trane
controls, see CNT-SVX04A-EN for more
information concerning Tracer™ controls.
Ensure OA damper is in the open
position.
Check flow of hot water through the
control valve.
Check the boiler reset schedule to
determine if the loop temperature can be
decreased.
The economics of the unit ventilator
selection dictate that, in most cases, the
unit will be sized to provide adequate
natural (ventilation) cooling without
outside temperatures up to 60-65 F.
Above this point, a changeover should be
made to the mechanical cooling cycle.
Room too warm
(outside air temperature is below 35° F)
Room too warm
(outside air temperature is above 35° F)
Room too warm
(outside air temperature is above 35° F)
Unit utilizes Wall Fin auxiliary radiation:
X
X
X
X Room sensor is not properly set Reset room sensor temperature
X
X OA damper is in the closed position
X Clogged filter Replace filter
X Control valve is malfunctioning
XBoiler
X Steam Check the operation of the control valves
X Outside air temperature is above 60 to 65° F
Room sensor is providing a false reading due
to walls being cold from the night temperature
setting.
Sensor is mounted on a block wall that is
leaking cold air into the room through the
mounting holes.
Face and bypass damper, or coil valve is
malfunctioning.
Face and bypass damper or coil control valve
is malfunctioning.
UV-SVN03D-EN 31
Page 32

Trouble Shooting
Checklist
Problem Heating Cooling Cause Correction
X Room sensor is not properly set Reset room sensor temperature
X Clogged filter Replace filter
Replace malfunctioning component, or
contact the control’s contract or, o r if Trane
controls, see CNT-SVX04A-EN for more
information concerning Tracer™ controls.
Ensure OA damper is in the closed or
minimum outside air position.
On hot water and steam type units, check
the boiler pressure or temperat ure to
ensure that the requirements are being
met.
Check the operation of the wall fin
controls.
Replace malfunctioning component, or
contact the control’s contract or, o r if Trane
controls, see CNT-SVX04A-EN for more
information concerning Tracer™ controls.
Ensure OA damper is in the minimum
outside air position.
Check the temperature of the water
leaving the chiller to ensure that it meets
design requirements.
Check the unit switch to ensure it is in the
ON position.
Check for loose switch or motor
connection.
Room too cool
Room too cool
Unit utilizes Wall Fin auxiliary radiation:
Room too hot
Motor
Face and bypass damper, or coil valve is
X
malfunctioning.
X OA damper is in the open position
Boiler pressure or temperature de sign
X
requirements not being met
X Radiation controls malfunctioning
X Room sensor is not properly set Reset room sensor temperature
X Clogged filter Replace filter
Face and bypass damper, or coil valve is
X
malfunctioning.
X OA damper is in the open position
Chiller temperature design requirements not
X
being met
If the motor fails to start, and other motors on
X
the same circuit are functioning
If the motor fails to start, and other motors on
X
the same circuit are functioning
32 UV-SVN03D-EN
Page 33

120V/1 PH - 3-Speed
Unit Wiring
Field Installed Wiring
UV-SVN03D-EN 33
Page 34

120V/1 PH - 3-Speed, DX/Hot Water
Unit Wiring
End Device Controls
34 UV-SVN03D-EN
Page 35

Unit Wiring
End Device Package
480V/3 PH - 3-Speed, Chilled Water/Electric Heat (6-Element) -page 1
UV-SVN03D-EN 35
Page 36

Unit Wiring
End Device Package
480V/3 PH - 3-Speed, Chilled Water/Electric Heat (6-Element) -page 2
36 UV-SVN03D-EN
Page 37

Unit Wiring
End Device Package
120V/1 PH - 3-Speed, 4-Pipe Hot Water/Chilled Water
UV-SVN03D-EN 37
Page 38

Unit Wiring
Tracer ZN520
120V/1 PH - 3-Speed, 4-Pipe Hot Water/Chilled Water
38 UV-SVN03D-EN
Page 39

UV-SVN03D-EN 39
Page 40

Trane
A business of American Standard Companies
www.trane.com
Literature Order Number UV-SVN03D-EN
Date October 2007
Supersedes UV-SVN03C-EN May 2006
For more information, contact your local district
office or e-mail us at comfort@trane.com
Trane has a policy of continuous product and data improvement and reserves the right to change
design and specifications without notice.
 Loading...