

Operation Mode
Install the plug and choose the operation mode of the router as needed.
Operation Modes Application
Quick Installation Guide
300Mbps Wi-Fi Pocket Router/AP/
TV Adapter/Repeater
*TL-WR810N (European version) is used
for demonstration in this QIG.
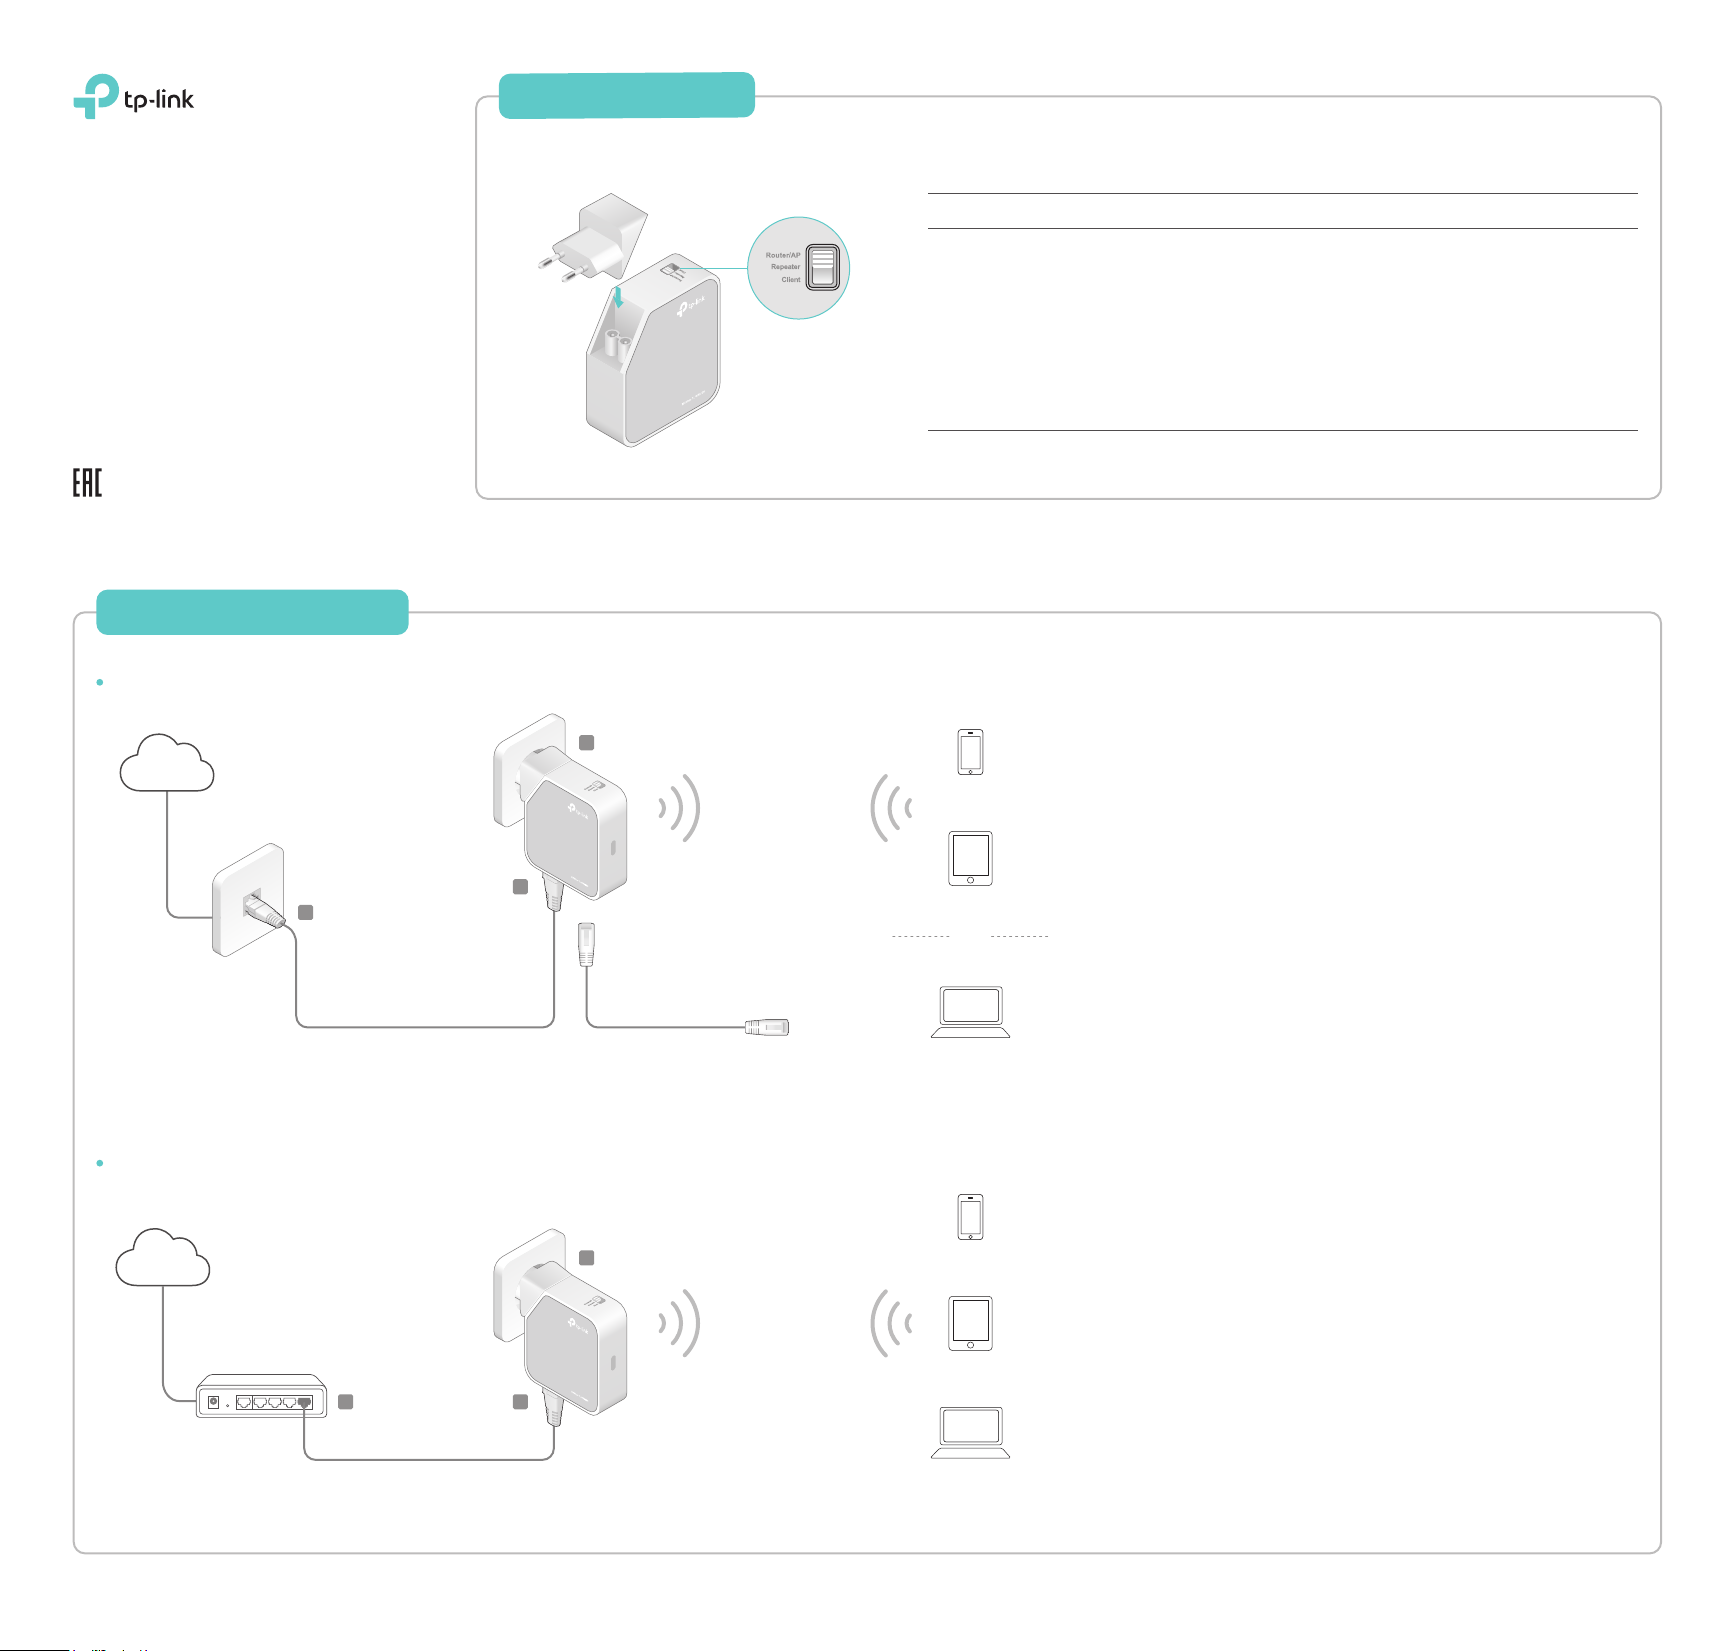
Congure the Router
Standard Wireless Router
Internet
C
7106506715 REV3.0.0
B
LAN/WAN
Standard Wireless Router
Access Point
Mode Switch
A
LAN
OR
Repeater
Client
To share a wired (Ethernet) connection to wireless devices, when in a
hotel room, small office and so on.
To transform an existing wired (Ethernet) network to a wireless one.
To extend the range of an existing Wi-Fi network.
To enable your wired device (such as Blu-ray® players, smart TVs, or
game consoles) to connect to a Wi-Fi network.
1 Switch the Operation Mode to Router/AP and connect the hardware
according to Step A to C in the left diagram.
2 Connect your device to the router wirelessly or via an Ethernet
cable. The SSID (Network Name) and Wireless password are on the
router’s label.
3 Launch a web browser and type http://tplinkwifi.net in the address
bar. Enter admin (in lowercase) for both username and password to
log in.
4 Click Next to start the Quick Setup. Select Standard Wireless
Router and click Next.
5 Select the WAN Connection Type and follow the instructions. When
using the router in a hotel room or a small office, select Dynamic IP.
Note: If the router is successfully connected to internet, this step will be skipped.
6 On the Wireless page, either customize your Wireless Network
Name and Wireless Password or keep the default ones, and then
click Next.
7 Click Finish to complete the configuration.
Access Point
Internet
Wired Router
1 Switch the Operation Mode to Router/AP and connect the hardware
according to Step A to C in the left diagram.
A
C
B
LAN/WAN
2 Connect your device to the router wirelessly or via an Ethernet
cable. The SSID (Network Name) and Wireless password are on the
router’s label.
3 Launch a web browser and type http://tplinkwifi.net in the address
bar. Enter admin (in lowercase) for both username and password to
log in.
4 Click Next to start the Quick Setup. Select Access Point and click
Next.
5 Either customize your Wireless Network Name and Wireless
Password or keep the default ones, and then click Next.
6 Select the LAN IP type of the router or leave the default setting
Smart IP for most cases, and then click Next.
7 Click Reboot to complete the configuration.

Client (TV Adapter)
Internet
Repeater
Internet
Host AP
Host AP
Host network name
and password
Host network name
and password
TV
OR
OR
Other
Device
1 Switch the Operation Mode to Client and plug the router into an
electrical outlet within the range of your host AP.
2 Connect your device to the router via an Ethernet cable.
3 Launch a web browser and type http://tplinkwifi.net in the
address bar. Enter admin (in lowercase) for both username and
password to log in.
4 Click Quick Setup on the left panel and click Next to start.
5 Click Survey to find your host network and click Connect. Enter
the host network’s password in the Wireless Password field and
click Next.
6 Select the LAN IP type of the router or leave the default setting
Smart IP for most cases, and then click Next.
7 Click Finish to complete the configuration.
8 Connect your wired-only device to the router’s LAN or LAN/WAN
port using an Ethernet cable.
1 Switch the Operation Mode to Repeater and plug the router into
an electrical outlet next to your host AP.
2 Connect your device to the router wirelessly or via an Ethernet
cable. The SSID (Network Name) and Wireless password are on
the router’s label.
3 Launch a web browser and type http://tplinkwifi.net in the
address bar. Enter admin (in lowercase) for both username and
password to log in.
4 Click Quick Setup on the left panel and click Next to start.
5 Click Survey to find your host network and click Connect. Enter
the host network’s password and click Next.
6 Select the LAN IP type of the router or leave the default setting
Smart IP for most cases, and then click Next.
7 Click Finish to complete the configuration.
8 Relocate the router about halfway between your host AP and
the Wi-Fi dead zone.
Note: The extended network shares the same SSID (network name) and password as
those of your host network.
Q1. What can I do if I cannot access internet?
• If using a cable modem, unplug the Ethernet cable and reboot the
modem. Wait until its LED is on and stable, and then reconnect the
Ethernet cable to the modem.
• If you're in a hotel room or on a trade show, the internet may be
limited and requires that you authenticate for the service or
purchase the internet access.
• If your internet access is still not available, contact TP-LINK
Technical Support.
Q2. How do I restore the router to its factory default settings?
• With the router powered on, press and hold the Reset button until
the LED starts blinking, and then release the button.
Q3. What can I do if I forgot my web management password?
• Refer to FAQ > Q2 to reset the router, and use the default admin
(all lowercase) for both username and password to log in.
Q4. What can I do if I forgot my wireless network password?
• If you have not changed the default Wireless Password, it can be
found on the label of the router.
• Connect a computer to the router via an Ethernet cable. Log in
to the web management page, and go to Wireless > Wireless
Security to retrieve or reset your wireless password.
Q5. What can I do if my wireless signal is unstable or weak?
It may be caused by too much interference.
• Change your wireless channel to a dierent one.
• Choose a location with less obstacles that may block the signal
between the router and the host AP. An open corridor or a
spacious location is ideal.
• Move the router to a new location away from Bluetooth devices
and other household electronics, such as cordless phones,
microwaves, and baby monitors, to minimize signal
interference.
• When in Repeater mode, the ideal location to place the router is
about halfway between your host AP and the Wi-Fi dead zone. The
location you choose must be within the range of your existing host
network.
©2016 TP-LINK
 Loading...