

Page 1
j
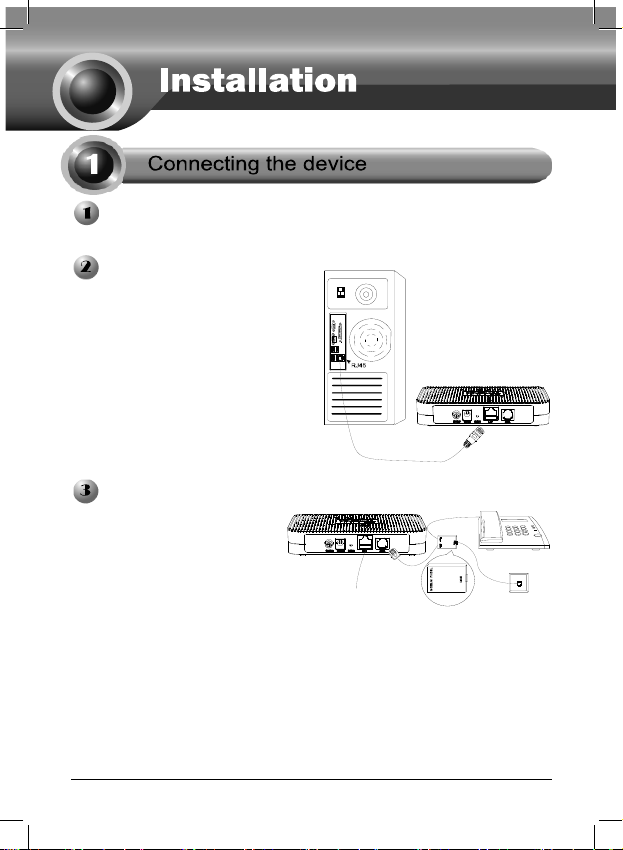
Turn off all of your network devices, including your computer and the Modem.
Connect your computer to the
Port labeled “LAN” on the
Modem with an Ethernet cable.
Connect the splitter to the wall
ack using a telephone line,
then use the other telephone
line to directly connect it to the
ADSL port on the Modem and
the MODEM port of the
splitter, also have the PHONE
port of the splitter connected
to a telephone.
1
Page 2
f
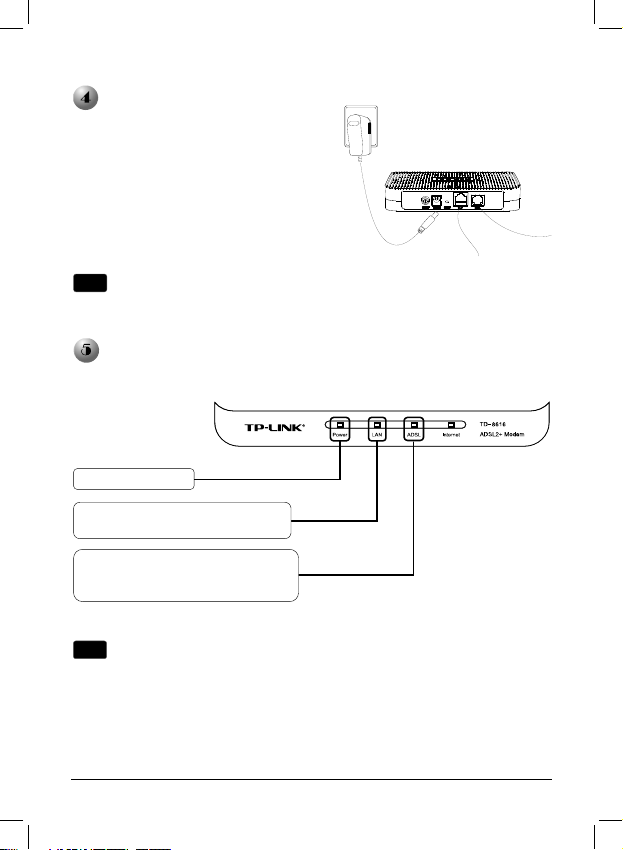
Plug the provided Power Adapter
into the Power jack on the back o
the Modem and the other end to a
standard electrical wall socket.
If no telephone is needed, please connect the ADSL port of the Modem to the
Note
wall jack using the telephone line directly.
Turn on all of your network devices, including your computer and the Modem
then check to see if the LEDs of the Modem display normally as the diagram
below describes.
Power: Solid light
LAN: Solid light if the LAN port is
connected
ADSL: Flashing when the modem
is synchronizing; Solid light if the
modem is synchronized
If the LEDs display abnormally, please check to see if all the cable connectors
Note
(power adapter, phone line and Ethernet cable) are well connected to your
device. With the phone line well connected, if the ADSL LED turns off after a
quick-flash, please contact your ISP (Internet Service Provider) to ensure that
your internet connection is active.
2
Page 3
To connect to the Internet, please run the dialing software such as WinPoet
Note
or EnterNet to do the virtual dialing as the following described.
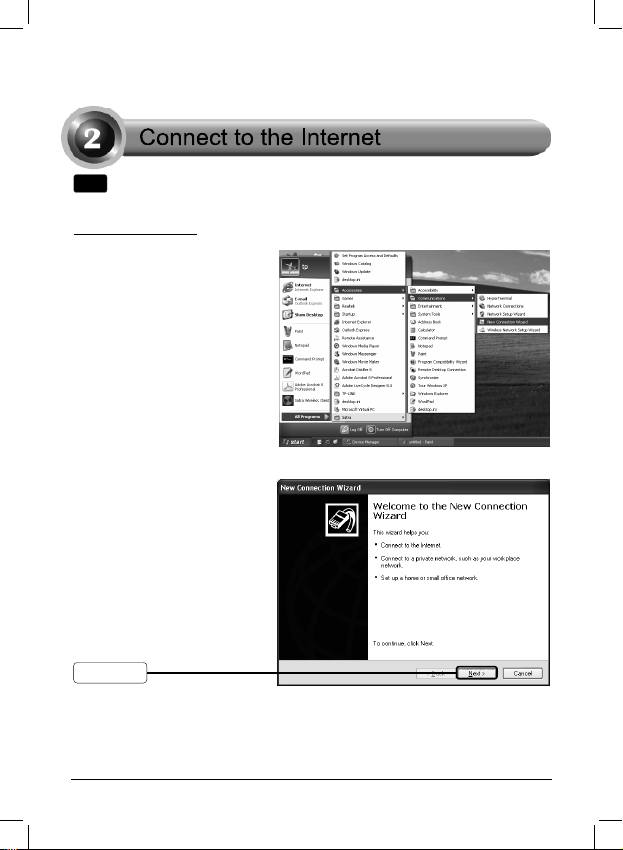
For Windows XP OS
Click the “StartÆAll
ProgramsÆAccessoriesÆ
CommunicationsÆNew
connection wizard” to
launch the wizard.
Click Next
3
Page 4
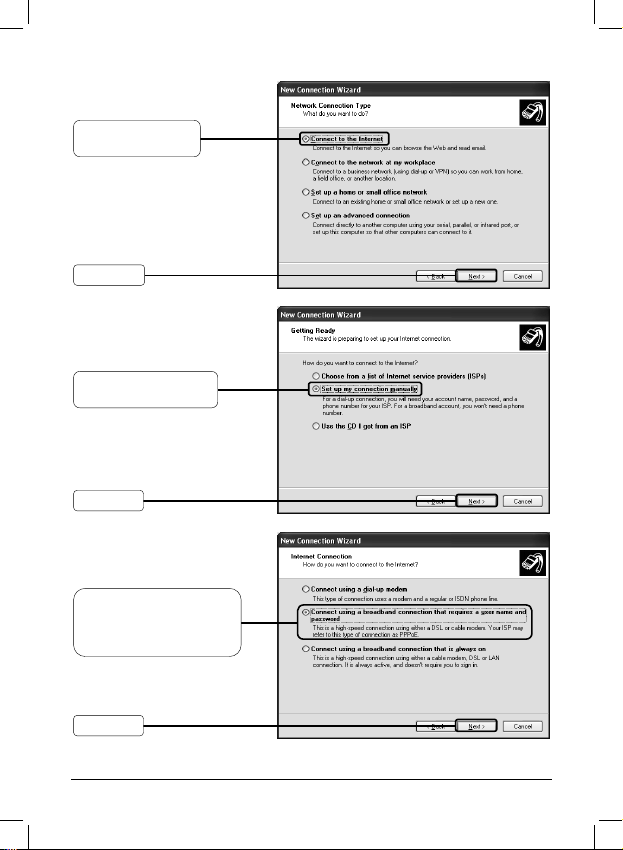
Select the “connect
to the Internet”
Click Next
Select the “set up my
connection manually”
Click Next
Select the “connect using
a broadband connection
that requires user name
and password”
Click Next
4
Page 5

r
Type an ISP Name to
identify your connection
Click Next
Enter the User name
and Password given
by your ISP
Click Next
If you did not get the User name or Password, please contact your ISP fo
Note
.
this information.
Add a shortcut to this
connection to my
desktop for convenience
Click Finish
5
Page 6

A
fter you have successfuly created the
r
connection, the shortcut icon
this connection will appear on you
desktop. When you want to access the
Internet, double-click the icon
load the following screen.
of
to
Click Connect
The User name and Password displayed here are given by your ISP,
Note
which you have entered during the New Connection Wizard.
For Windows Vista OS
Click the “StartÆ
Control Panel”
6
Page 7

Double-click Network
and Sharing Center
Click Set up a
connection or network
Click Connect to
the Internet
Click Next
7
Page 8

Click Broadband
(PPPoE)
Enter the User name and
Password given by your ISP
Type a Connection name
to identify your connection
Click Connect
Click Connect
The User name and Password displayed here are given by your ISP,
Note
which you have entered on last step.
8
Page 9

Click Close to
finish the setup
To connect to the Internet next time, click the Start button; click Connect to,
Note
and then click the connection you just created.
For Windows 7 OS
Click the “StartÆ
Control Panel”
9
Page 10

Click Network and
Sharing Center
Click Set up a
connection or network
Click Connect to
the Internet
Click Next
10
Page 11

Click Broadband (PPPoE)
Enter the User name and
Password given by your ISP
Type a Connection name
to identify your connection
Click Connect
Click Connect
The User name and Password displayed here are given by your ISP,
Note
which you have entered on last step.
11
Page 12

Click Close to
finish the setup
To connect to the Internet next time, click the icon
Note
your screen in your system tray, and then click the connection you just
created.
The basic settings for your Modem are completed. Please open the web browser
and log on to the following websites:
http://www.tp-link.com
http://www.google.com
If the above websites can be accessed, it indicates that your Modem has been
configured successfully and you can start to enjoy the Internet. If the websites
cannot be accessed, please refer to “T3. What can I do if I cannot access the
internet?” in the Troubleshooting guide.
For the advanced configurations, please refer to the User Guide on the
Note
Resource CD provided.
12
or at the bottom of
 Loading...