

Page 1

User Guide
4G LTE Mobile Wi-Fi
M7350
REV6.20.0 1910012869
Page 2

Contents
About This Guide . . . . . . . . . . . . . . . . . . . . . . . . . . . . . . . . . . . . . . . . . . . . . . . .1
Chapter 1. Get to Know About Your Mobile Wi-Fi . . . . . . . . . . . . . . . . .2
1. 1. Product Overview . . . . . . . . . . . . . . . . . . . . . . . . . . . . . . . . . . . . . . . . . . . . . . . . . . . . . 3
1. 2. Physical Description. . . . . . . . . . . . . . . . . . . . . . . . . . . . . . . . . . . . . . . . . . . . . . . . . . . 4
1. 2. 1. The Exterior . . . . . . . . . . . . . . . . . . . . . . . . . . . . . . . . . . . . . . . . . . . . . . . . . . . . 4
1. 2. 2. The Interior . . . . . . . . . . . . . . . . . . . . . . . . . . . . . . . . . . . . . . . . . . . . . . . . . . . . . 6
Chapter 2. Set Up Internet Connection . . . . . . . . . . . . . . . . . . . . . . . . . . .7
2. 1. Install the SIM Card and Battery . . . . . . . . . . . . . . . . . . . . . . . . . . . . . . . . . . . . . . . 8
2. 2. Power On the Mobile Wi-Fi. . . . . . . . . . . . . . . . . . . . . . . . . . . . . . . . . . . . . . . . . . . . . 9
2. 3. Connect to the Internet. . . . . . . . . . . . . . . . . . . . . . . . . . . . . . . . . . . . . . . . . . . . . . .10
Chapter 3. Log In. . . . . . . . . . . . . . . . . . . . . . . . . . . . . . . . . . . . . . . . . . . . . . . 15
3. 1. Via Phone Login Entry . . . . . . . . . . . . . . . . . . . . . . . . . . . . . . . . . . . . . . . . . . . . . . . .17
3. 2. Via PC Login Entry. . . . . . . . . . . . . . . . . . . . . . . . . . . . . . . . . . . . . . . . . . . . . . . . . . . .17
3. 3. Via tpMiFi App . . . . . . . . . . . . . . . . . . . . . . . . . . . . . . . . . . . . . . . . . . . . . . . . . . . . . .18
Chapter 4. Manage Your Data Usage . . . . . . . . . . . . . . . . . . . . . . . . . . . 20
4. 1. Track Data Usage. . . . . . . . . . . . . . . . . . . . . . . . . . . . . . . . . . . . . . . . . . . . . . . . . . . . .21
4. 1. 1. Check Data Usage on Screen . . . . . . . . . . . . . . . . . . . . . . . . . . . . . . . . . .21
4. 1. 2. Check Data Usage on the Web Management Page . . . . . . . . . . . . . 21
4. 1. 3. Check Data Usage via SMS . . . . . . . . . . . . . . . . . . . . . . . . . . . . . . . . . . . .22
4. 1. 4. Revise Data Usage . . . . . . . . . . . . . . . . . . . . . . . . . . . . . . . . . . . . . . . . . . . .23
4. 2. Limit Data Usage . . . . . . . . . . . . . . . . . . . . . . . . . . . . . . . . . . . . . . . . . . . . . . . . . . . . .24
4. 2. 1. Limit Data Package . . . . . . . . . . . . . . . . . . . . . . . . . . . . . . . . . . . . . . . . . . . .24
4. 2. 2. Limit Monthly Data Usage . . . . . . . . . . . . . . . . . . . . . . . . . . . . . . . . . . . . . .25
4. 3. Set Up Free Data Period . . . . . . . . . . . . . . . . . . . . . . . . . . . . . . . . . . . . . . . . . . . . . .26
4. 4. Enable Mobile Data. . . . . . . . . . . . . . . . . . . . . . . . . . . . . . . . . . . . . . . . . . . . . . . . . . .27
4. 5. Enable Data Roaming. . . . . . . . . . . . . . . . . . . . . . . . . . . . . . . . . . . . . . . . . . . . . . . . .28
Chapter 5. Secure Your Network . . . . . . . . . . . . . . . . . . . . . . . . . . . . . . . 29
5. 1. Secure Wireless Network. . . . . . . . . . . . . . . . . . . . . . . . . . . . . . . . . . . . . . . . . . . . .30
Page 3

5. 2. Block Unwelcome Devices . . . . . . . . . . . . . . . . . . . . . . . . . . . . . . . . . . . . . . . . . . . 31
5. 3. Lock SIM Card. . . . . . . . . . . . . . . . . . . . . . . . . . . . . . . . . . . . . . . . . . . . . . . . . . . . . . . .32
Chapter 6. Share Files on SD Card. . . . . . . . . . . . . . . . . . . . . . . . . . . . . . 35
6. 1. Access via Wi-Fi Mode . . . . . . . . . . . . . . . . . . . . . . . . . . . . . . . . . . . . . . . . . . . . . . .36
6. 2. Access via USB Mode . . . . . . . . . . . . . . . . . . . . . . . . . . . . . . . . . . . . . . . . . . . . . . . .41
Chapter 7. Customize Your Network. . . . . . . . . . . . . . . . . . . . . . . . . . . . 43
7. 1. Specify Network Mode . . . . . . . . . . . . . . . . . . . . . . . . . . . . . . . . . . . . . . . . . . . . . . .44
7. 2. Configure Dial-up . . . . . . . . . . . . . . . . . . . . . . . . . . . . . . . . . . . . . . . . . . . . . . . . . . . .45
7. 2. 1. Configure Dial-up Settings . . . . . . . . . . . . . . . . . . . . . . . . . . . . . . . . . . . . .45
7. 2. 2. Configure Network Search . . . . . . . . . . . . . . . . . . . . . . . . . . . . . . . . . . . . .46
7. 3. Configure DHCP Server . . . . . . . . . . . . . . . . . . . . . . . . . . . . . . . . . . . . . . . . . . . . . .46
Chapter 8. Manage Your Mobile Wi-Fi . . . . . . . . . . . . . . . . . . . . . . . . . . 48
8. 1. Save the Mobile Wi-Fi’s Power . . . . . . . . . . . . . . . . . . . . . . . . . . . . . . . . . . . . . . . .49
8. 2. Change Admin Account . . . . . . . . . . . . . . . . . . . . . . . . . . . . . . . . . . . . . . . . . . . . . .50
8. 3. Set Up System Time. . . . . . . . . . . . . . . . . . . . . . . . . . . . . . . . . . . . . . . . . . . . . . . . . .51
8. 4. Restore Configuration Settings . . . . . . . . . . . . . . . . . . . . . . . . . . . . . . . . . . . . . . .51
8. 5. Update the Firmware . . . . . . . . . . . . . . . . . . . . . . . . . . . . . . . . . . . . . . . . . . . . . . . . .52
8. 6. Update ISP Parameters . . . . . . . . . . . . . . . . . . . . . . . . . . . . . . . . . . . . . . . . . . . . . . .53
8. 7. System Log . . . . . . . . . . . . . . . . . . . . . . . . . . . . . . . . . . . . . . . . . . . . . . . . . . . . . . . . . .54
FAQ . . . . . . . . . . . . . . . . . . . . . . . . . . . . . . . . . . . . . . . . . . . . . . . . . . . . . . . . . . . . 56
Page 4
About This Guide
This guide is a complement of Quick Installation Guide. The Quick Installation
Guide provides instructions for quick internet setup, while this guide contains
details of each function and demonstrates how to configure them.
Features available in the Mobile Wi-Fi may vary by model and software version.
Mobile Wi-Fi availability may also vary by region or ISP. All images, steps, and
descriptions in this guide are only examples and may not reflect your actual
Mobile Wi-Fi experience.
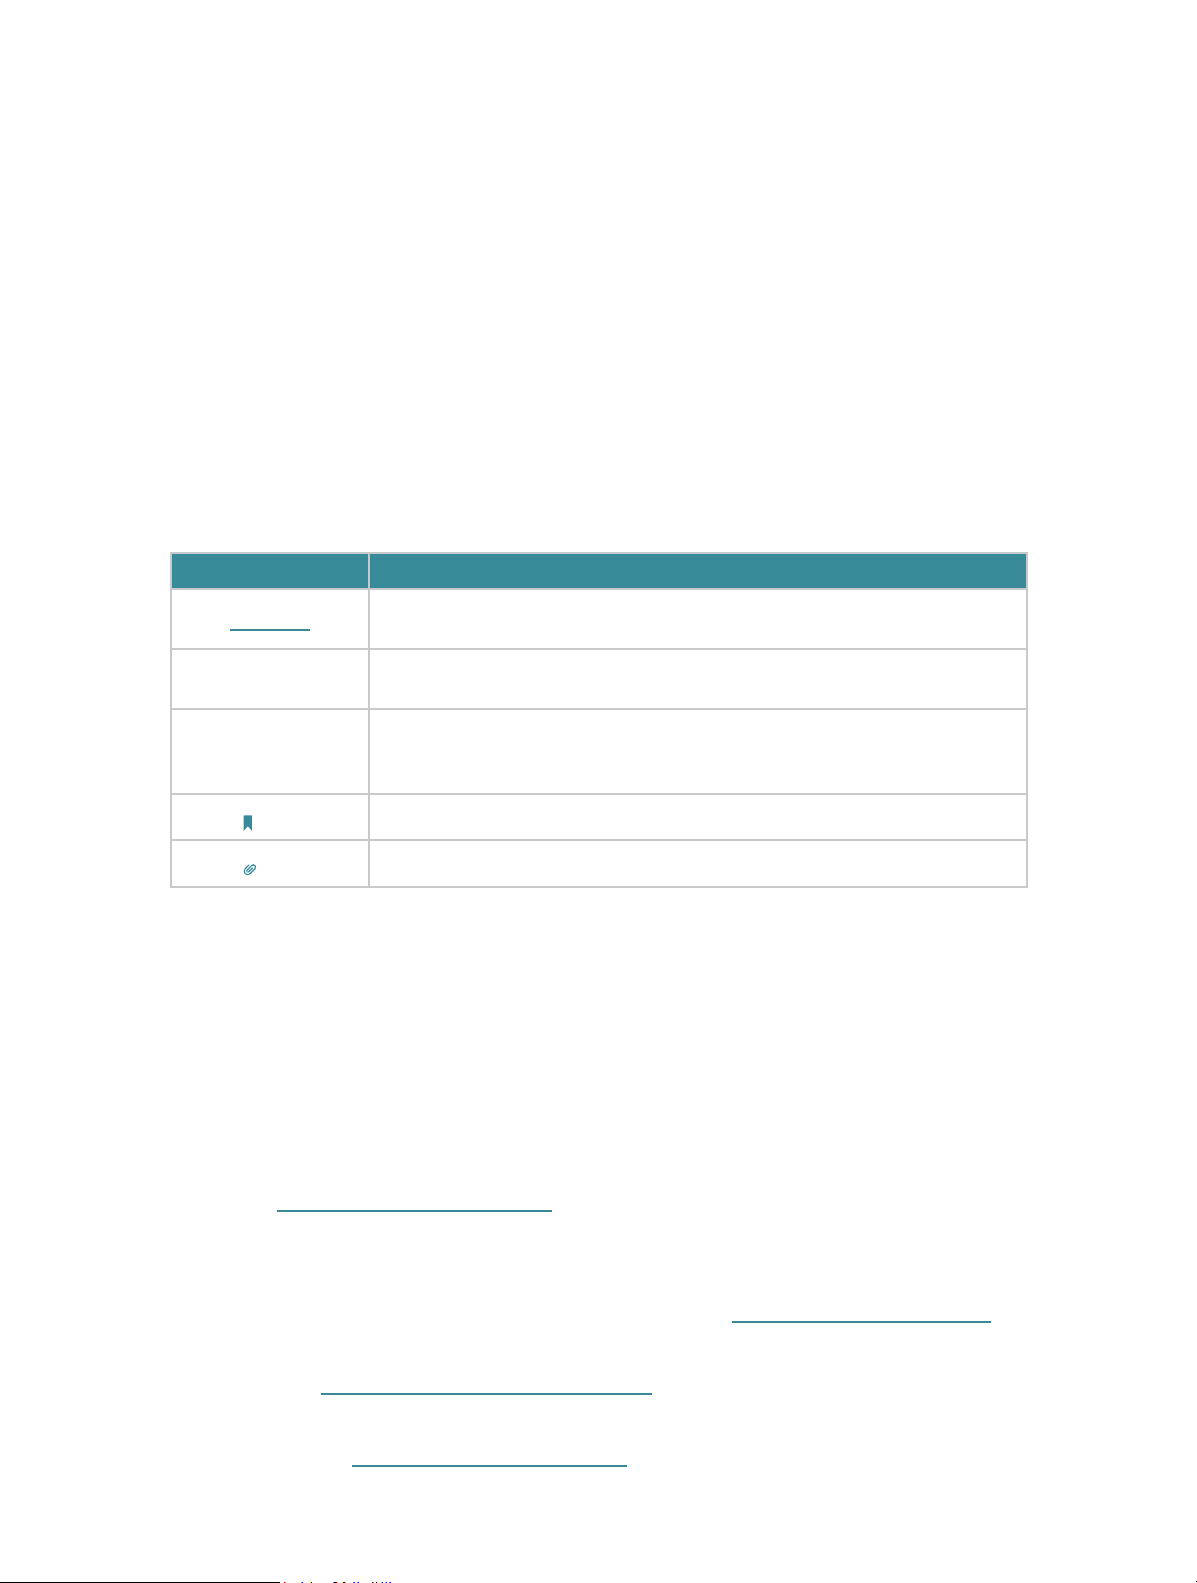
Conventions
In this guide the following conventions are used:
Convention Description
Underlined
Underlined words or phrases are hyperlinks. You can click to redirect to a website or a
specific section.
Teal
>
Note:
Tips:
*Maximum wireless signal rates are the physical rates derived from IEEE Standard 802.11
specifications. Actual wireless data throughput and wireless coverage are not guaranteed and
will vary as a result of 1) environmental factors, including building materials, physical objects,
and obstacles, 2) network conditions, including local interference, volume and density of traffic,
product location, network complexity, and network overhead, and 3) client limitations, including
rated performance, location, connection, quality, and client condition.
*Battery life estimates obtained through testing in a laboratory setting.
Contents to be emphasized and texts on the web page are in teal, including the menus,
items, buttons and so on.
The menu structures to show the path to load the corresponding page. For example,
Advanced > Wireless > Black List means the Black List page is under the Wireless menu
that is located in the Advanced tab.
Ignoring this type of note might result in a malfunction or damage to the device.
Indicates important information that helps you make better use of your device.
More Info
The latest software, management app and utility are available at the Download
Center at www.tp-link.com/support.
The Quick Installation Guide can be found in the same place you found this guide
or inside the package of the Mobile Wi-Fi.
Specifications can be found on the product page at https://www.tp-link.com.
TP-Link Community is provided for you to discuss our products and share
knowledge at https://community.tp-link.com.
Our Technical Support contact information can be found at Contact Technical
Support page at www.tp-link.com/support.
1
Page 5

Chapter 1
Get to Know About Your Mobile Wi-Fi
This chapter introduces what the Mobile Wi-Fi can do and its appearance.
It contains the following sections:
• Product Overview
• Physical Description
Page 6

Chapter 1
Get to Know About Your Mobile Wi-Fi
1. 1. Product Overview
The Faster Connections, The More You Can Do
Just insert a 4G SIM card to create your reliable personal Wi-Fi hotspot and
share instant 4G/3G connectivity with friends. The Mobile Wi-Fi, supporting the
latest generation 4G LTE network, can reach a faster download speed so that
users can enjoy HD movies without interruption, download files in seconds, and
hold a video chat without dropouts.
Artful Little Gadget and Built-in Battery for Life on the Go
The TP-Link Mobile Wi-Fi features a compact, elegant design and built-in powerful
battery very suitable for travel, business trips and outdoor activities. With added
flexibility, the device can be charged via a micro USB cable connected to an
adapter, laptop or portable charger for endless hours of 4G sharing.
Easy Management with the tpMiFi App
With the tpMiFi App, you can conveniently access and manage the Mobile Wi-Fi
right on your iOS/Android devices. The tpMiFi app allows you to set data limits,
control which devices can access your Wi-Fi, send messages, and share media
files to/from a removable micro SD card.
3
Page 7
Chapter 1
een
C
e
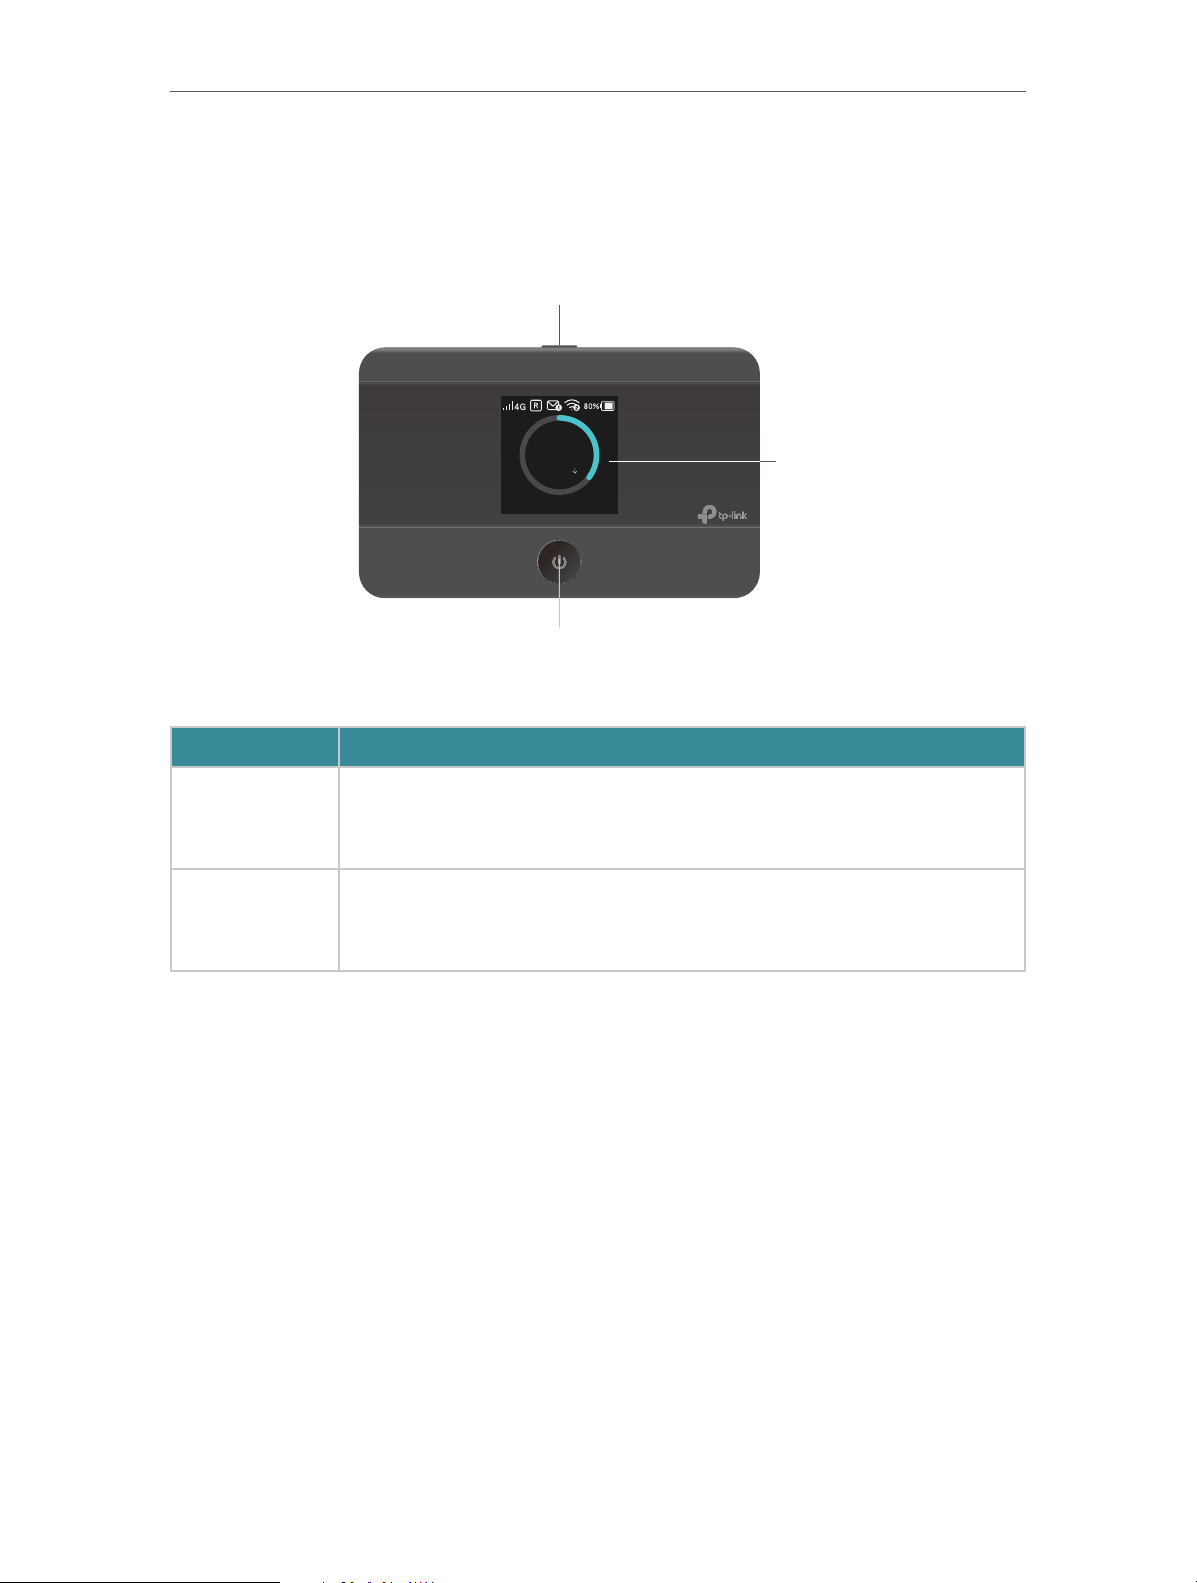
1. 2. Physical Description
1. 2. 1. The Exterior
Menu Button
Get to Know About Your Mobile Wi-Fi
560MB
5.0M/S
arrier Nam
Power Button
Button Explanation
Button Description
• Press this button to enter the Menu Screen from the Home Screen.
Menu Button
Power Button
• Press this button to switch the icons or options.
• Press this button to light on the screen.
• Press and hold this button to power on or off the Mobile Wi-Fi.
• Press this button to light on or off the screen.
• Press this button to select the icon or option.
Scr
4
Page 8
Chapter 1
Get to Know About Your Mobile Wi-Fi
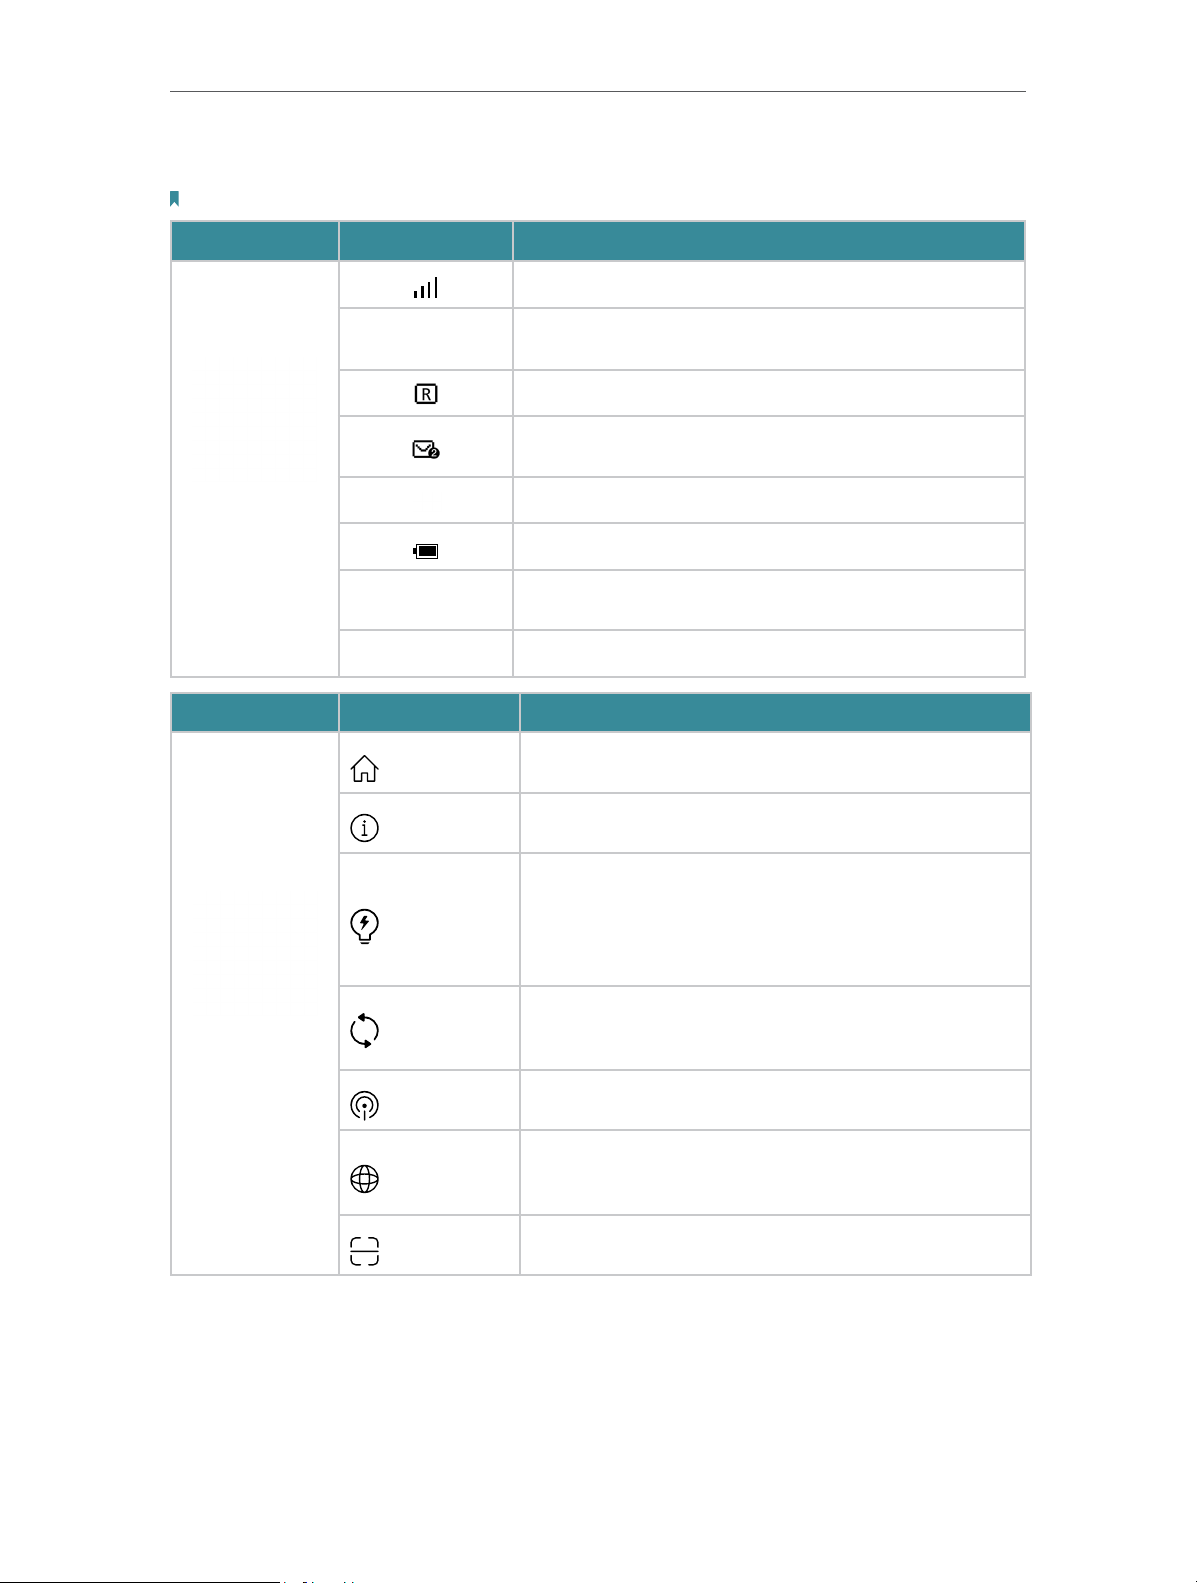
Screen Display
Note: Images are for demonstration only.
Home Screen Displayed Item Indication
4G/3G/2G
560MB
5.0 M/S ↓ Indicates the download speed of current data transmission.
Indicates the signal strength of the current network.
Indicates successful network connection and the current network
type: 4G, 3G or 2G.
Indicates you are in roaming service.
Indicates that there is un-read message(s) and the number of un-
read messages.
Displays the Wi-Fi status and the number of current wireless clients.
Displays the remaining battery power.
Indicates the total data used. It will be cleared after the Mobile Wi-Fi
is reset.
Menu Screen Menu Description
Home
Device Info
Displays the information of data, signal strength, battery life and so
on.
Displays the SSID (network name), password and login address of
the Mobile Wi-Fi.
Power Saving
WPS
Network Mode
Data Roaming
App Download
To turn on or off the power saving mode. If enabled, the Wi-Fi will
be shut down if no clients are connected to the Mobile Wi-Fi for a
period of time (10 minutes by default). You can also save power by
changing the Wi-Fi range on Advanced > Power Saving of the web
management page.
To enable the WPS function. Enable this function and immediately
press the WPS button on your client device. A success message will
appear on the screen, indicating successful WPS connection.
To change the network mode to 4G preferred, 4G only or 3G only as
needed.
To enable or disable the Data Roaming function as needed. We
recommend you to enable it on when you are out of the carrier
service area.
Displays the QR code of the TP-Link tpMiFi app that helps you
manage your Mobile Wi-Fi. Scan it to download the app.
5
Page 9
Chapter 1
rt
Re
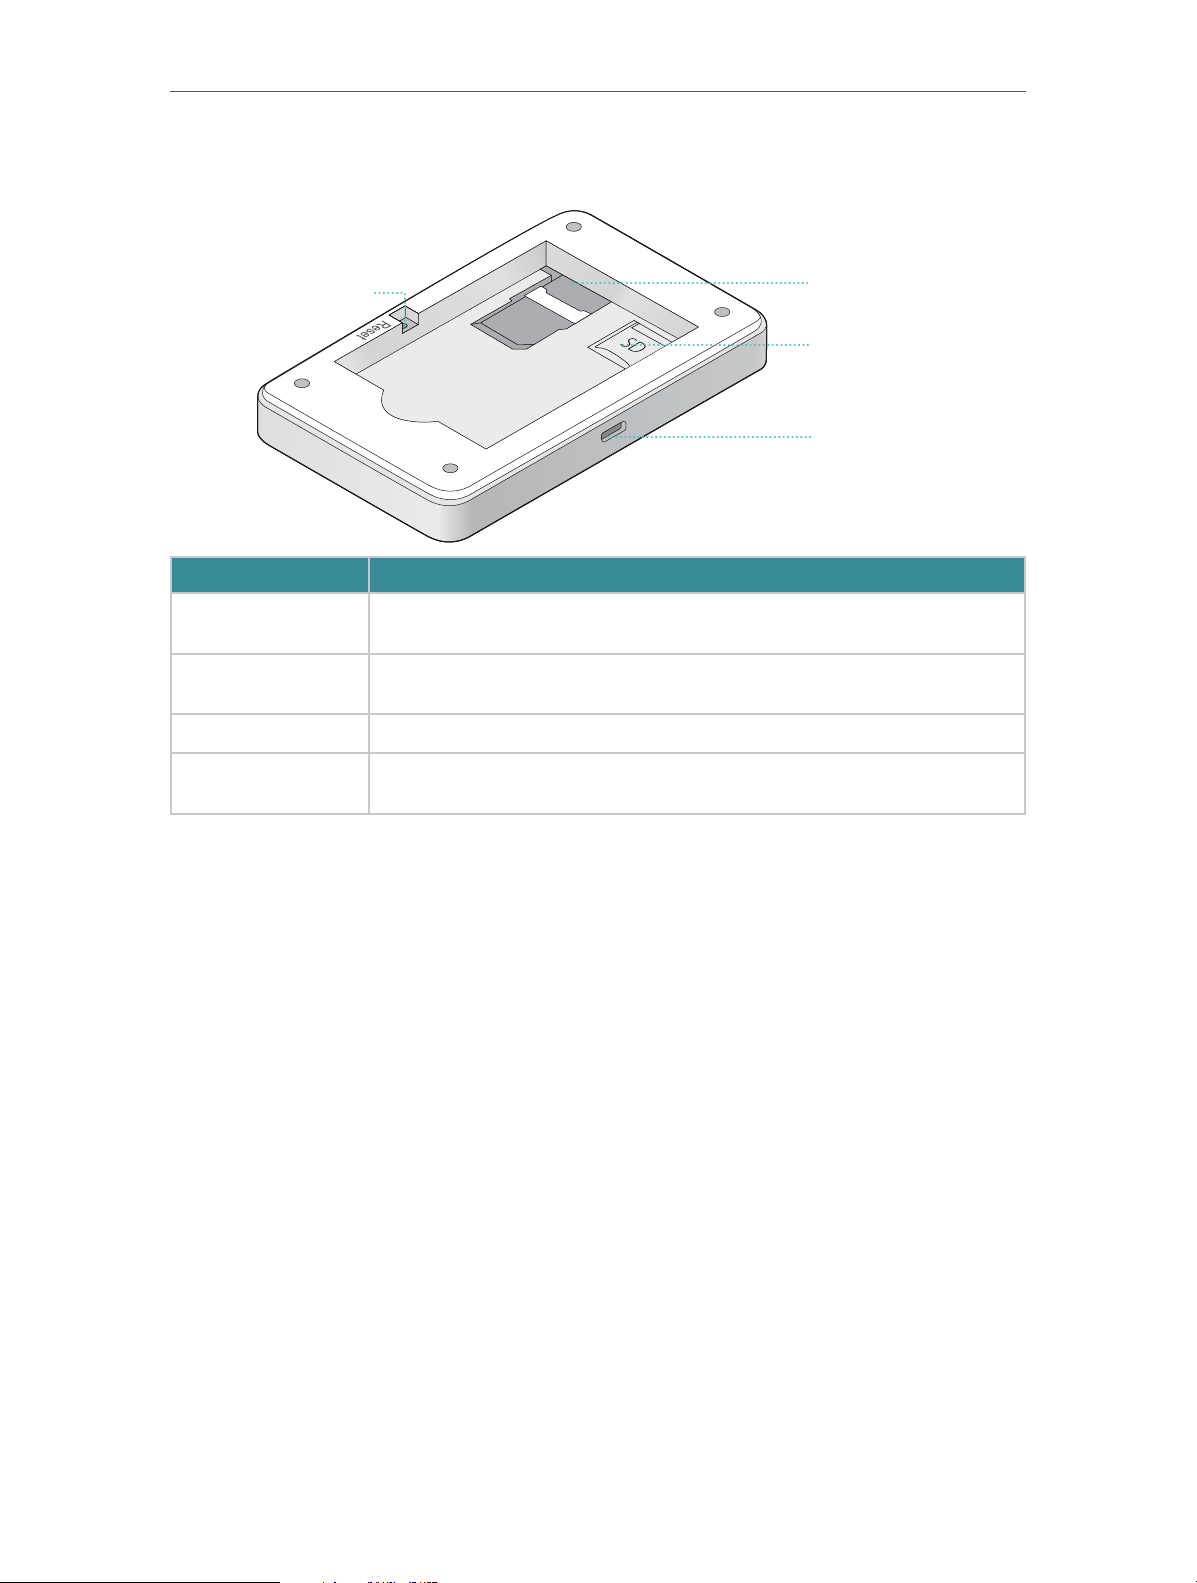
1. 2. 2. The Interior
Get to Know About Your Mobile Wi-Fi
set Button (Hole)
SIM Card Slot
Micro SD Card Slot
Micro USB Input Po
Item Description
SIM Card Slot
Micro SD Card Slot
Micro USB Input Port Plug in the USB cable to this port to charge your Mobile Wi-Fi or share SD card contents.
Reset Button (Hole)
Insert the SIM card into the slot. A nano or micro SIM card must be converted using the
provided SIM card adapter.
Slide and lift up the slot cover, insert the SD card and slide the cover back to lock. The
inserted SD card can be used for storage and media sharing.
With the Mobile Wi-Fi powered on, use a pin to press and hold this button (hole) until
“Power Off” appears on the screen to reset the Mobile Wi-Fi.
6
Page 10

Chapter 2
Set Up Internet Connection
This chapter introduces how to install the hardware and set up the internet
connection of your Mobile Wi-Fi.
It contains the following sections:
• Install the SIM Card and Battery
• Power On the Mobile Wi-Fi
• Connect to the Internet
Page 11
Chapter 2
Set Up Internet Connection
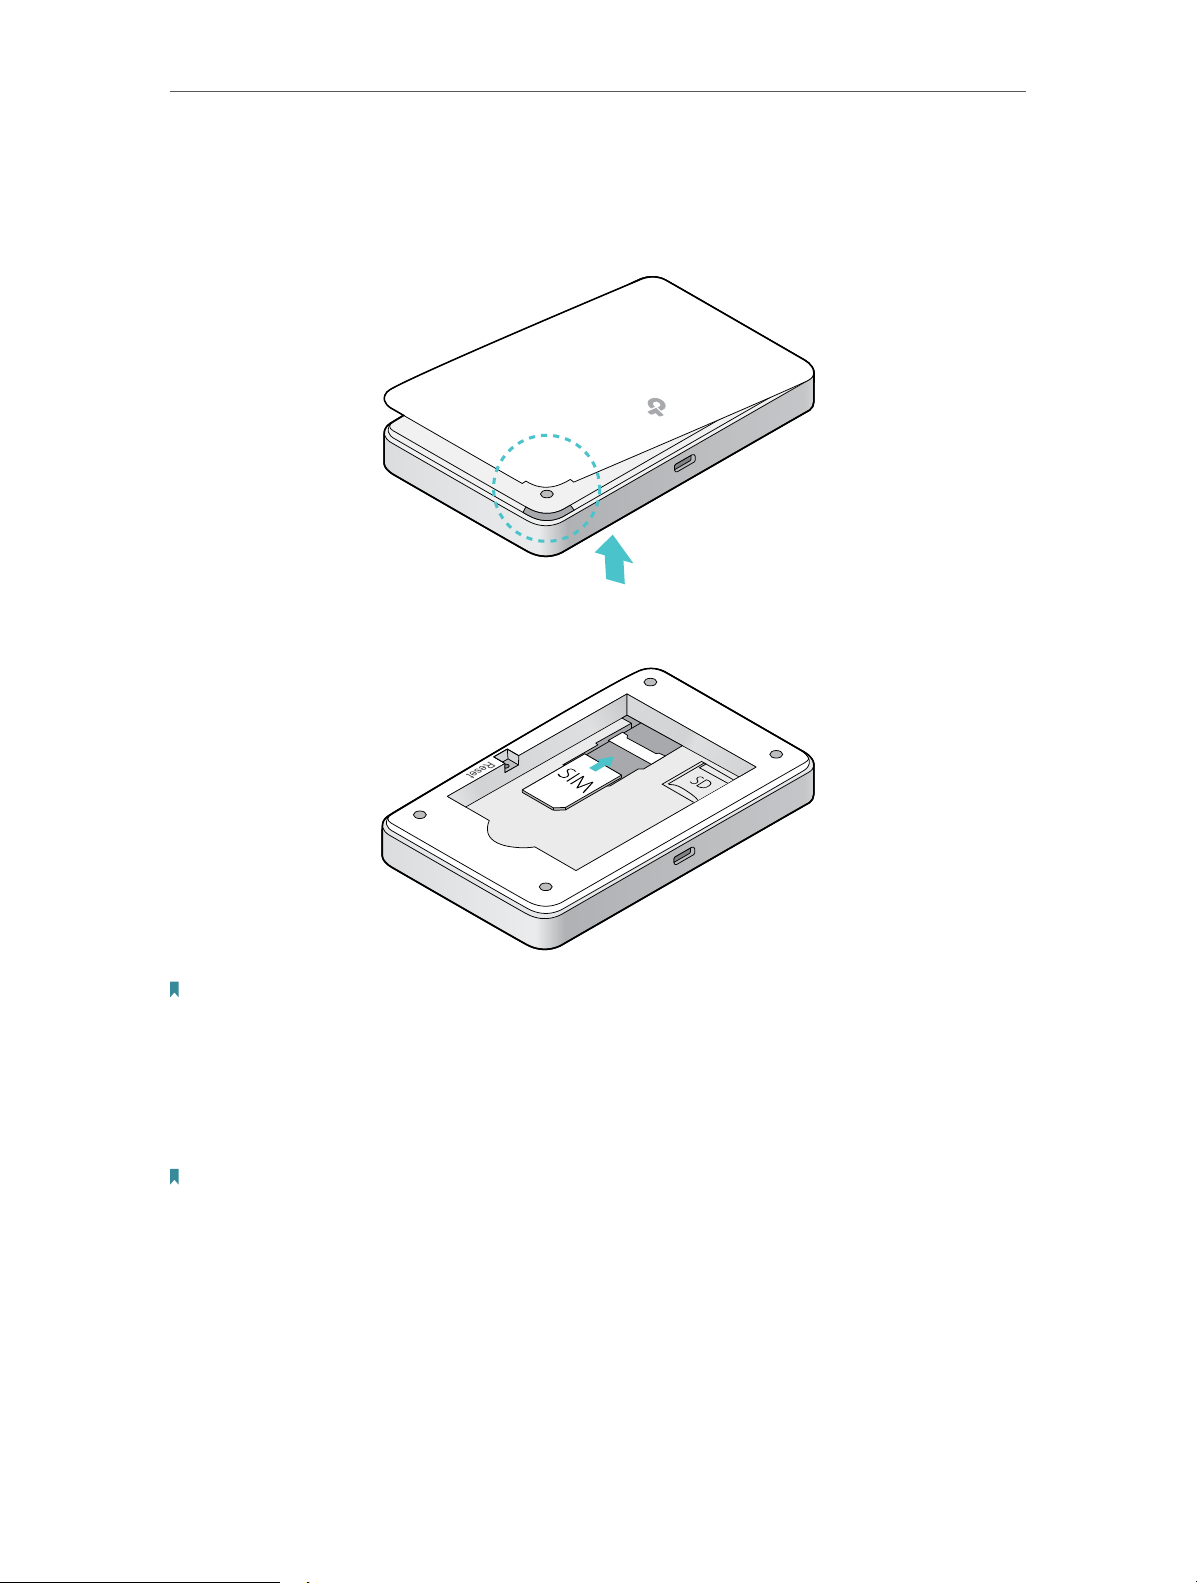
2. 1. Install the SIM Card and Battery
1. Remove the cover.
2. Insert the SIM card.
2
1
Note:
• A nano or micro SIM card must be converted using the provided SIM card adapter.
• The SIM card is not provided by TP-Link.
3. Install the SD card if any. Slide and lift up the slot cover, insert the SD card and
slide the cover back to lock. The inserted SD card can be used for storage and
media sharing.
Note:
• The SD card is not provided by TP-Link.
4. Install the provided battery.
8
Page 12

Chapter 2
Set Up Internet Connection
5. Replace the cover.
2
2
1
1
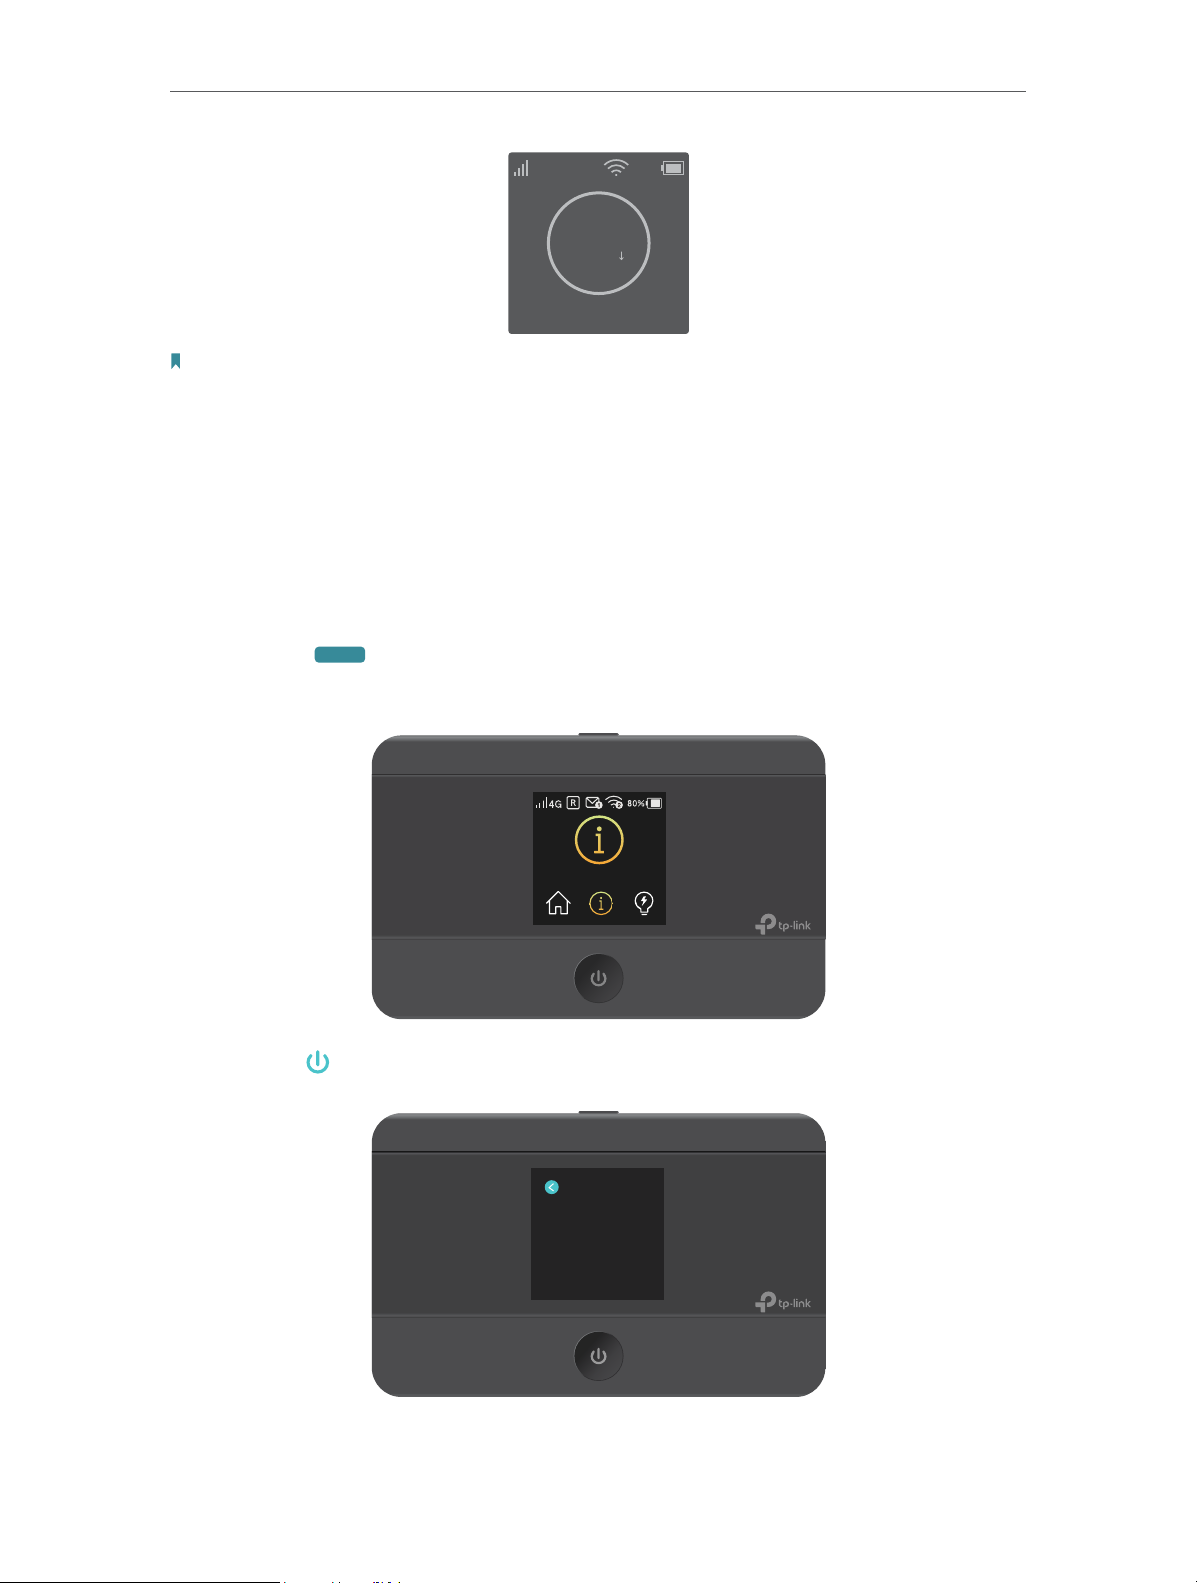
2. 2. Power On the Mobile Wi-Fi
1. Press and hold (power button) until the welcome screen appears.
Note:
To power off, press and hold
2. The following screen will come up.
(power button) until “Power Off” appears on the screen.
9
Page 13
Chapter 2
Carrier Name
MENU
Set Up Internet Connection
4G
Note: If other messages appear on the screen, please refer to FAQ > Q2.
100%
0MB
0.0 K/S
2. 3. Connect to the Internet
Method One: Using the SSID and Wireless Password
1. Find the default SSID (network name) and wireless password from the screen
or on the Wi-Fi info label.
• On the screen:
1 ) Press
Device Info menu.
(menu button) to enter the menu page and switch to the
Device Info
2 ) Press (power button) to enter the Device Info page.
Device Info
SSID: TP-Link_XXXX
Password: 121345678
Login Address:
http://tplinkmi.net
10
Page 14
Chapter 2
MENU
Set Up Internet Connection
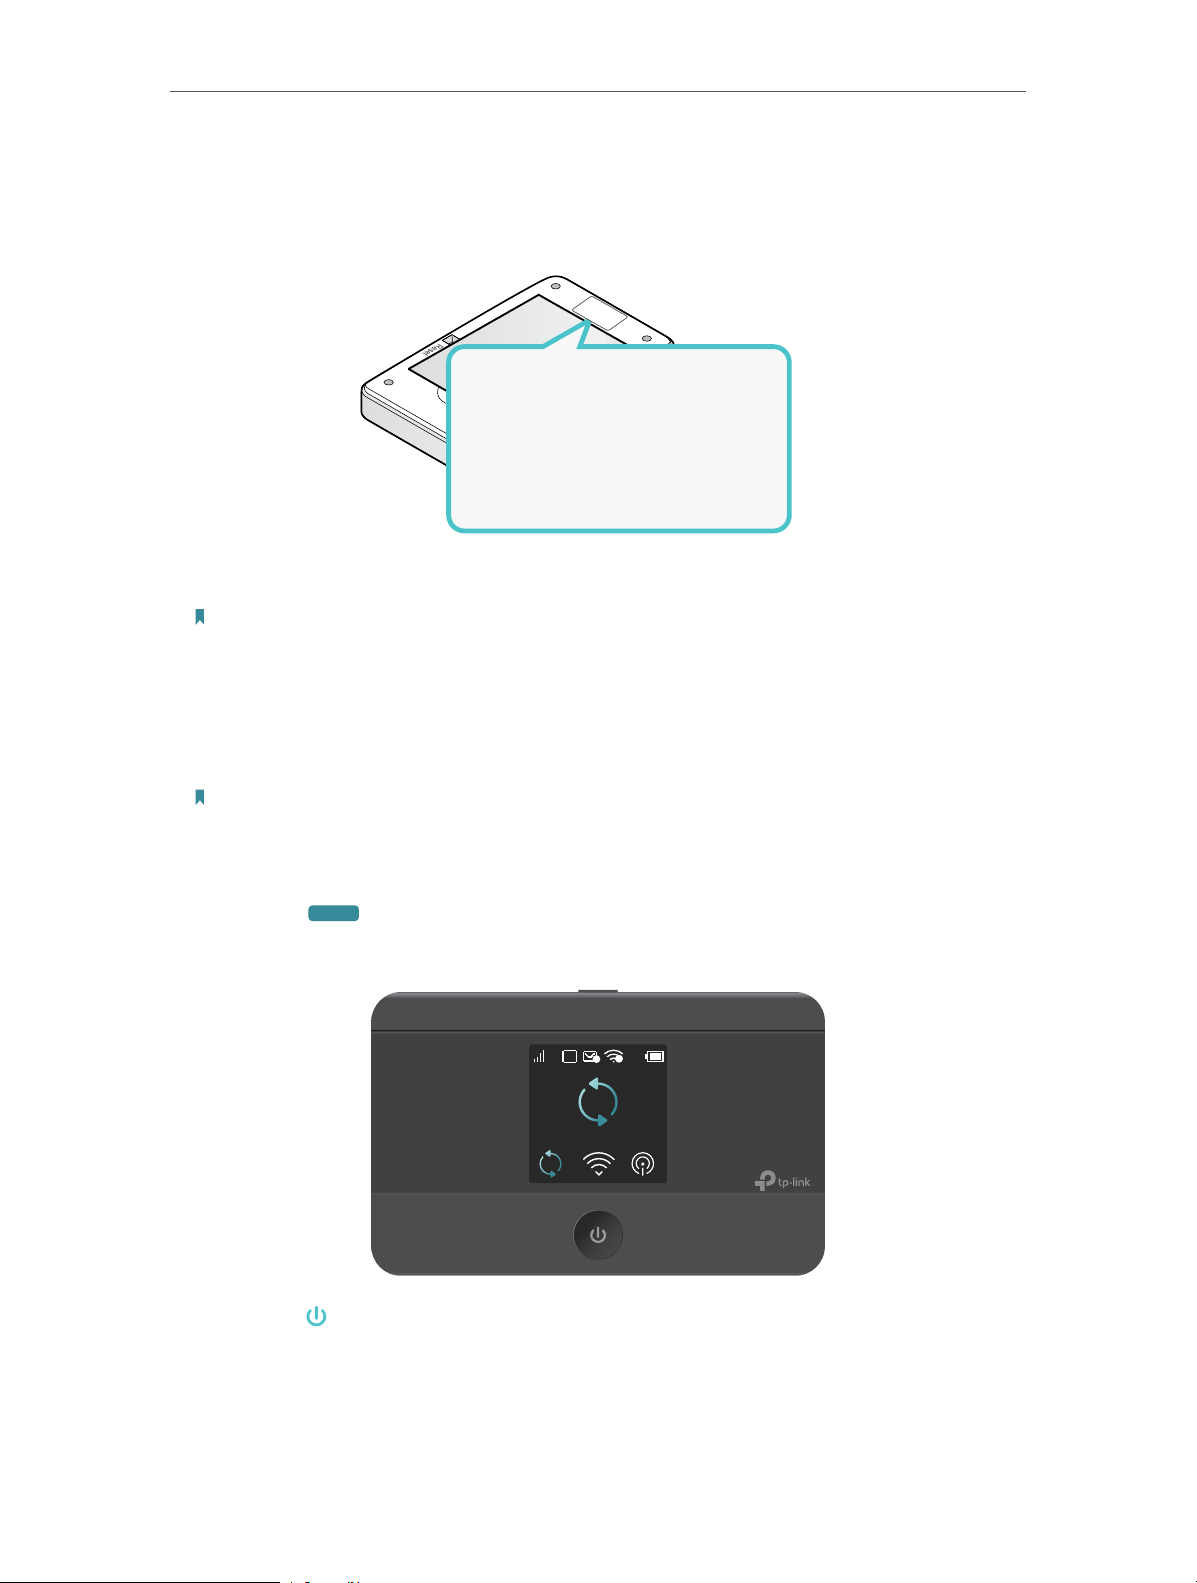
• On the Wi-Fi info label:
Remove the cover, note down the default SSID and password, then replace
the cover.
SSID:
TP-Link_XXXX
Wireless Password:
XXXXXXXX
SSID:
TP-Link_XX XX
Wireless Password:
XXXXXXXX
2. On your device, select the SSID and enter the wireless password.
Note: If you use a computer to connect to the Mobile Wi-Fi, please set it to obtain an IP address
automatically.
Method Two: Via WPS (Wi-Fi Protected Setup)
If you have a WPS-supported device (such as Android phones or tablets), you
can connect to the Mobile Wi-Fi more easily using WPS button or PIN.
Note:
The WPS function takes effect only when the SSID Broadcast function and wireless function are enabled.
• Via the WPS button
1 ) Press
(menu button) to enter the menu page and switch to the WPS
menu.
100%
R
1
WPS
2
4G
2 ) Press (power button) to enter the WPS page.
11
Page 15
Chapter 2
MENU
WPS
Set Up Internet Connection
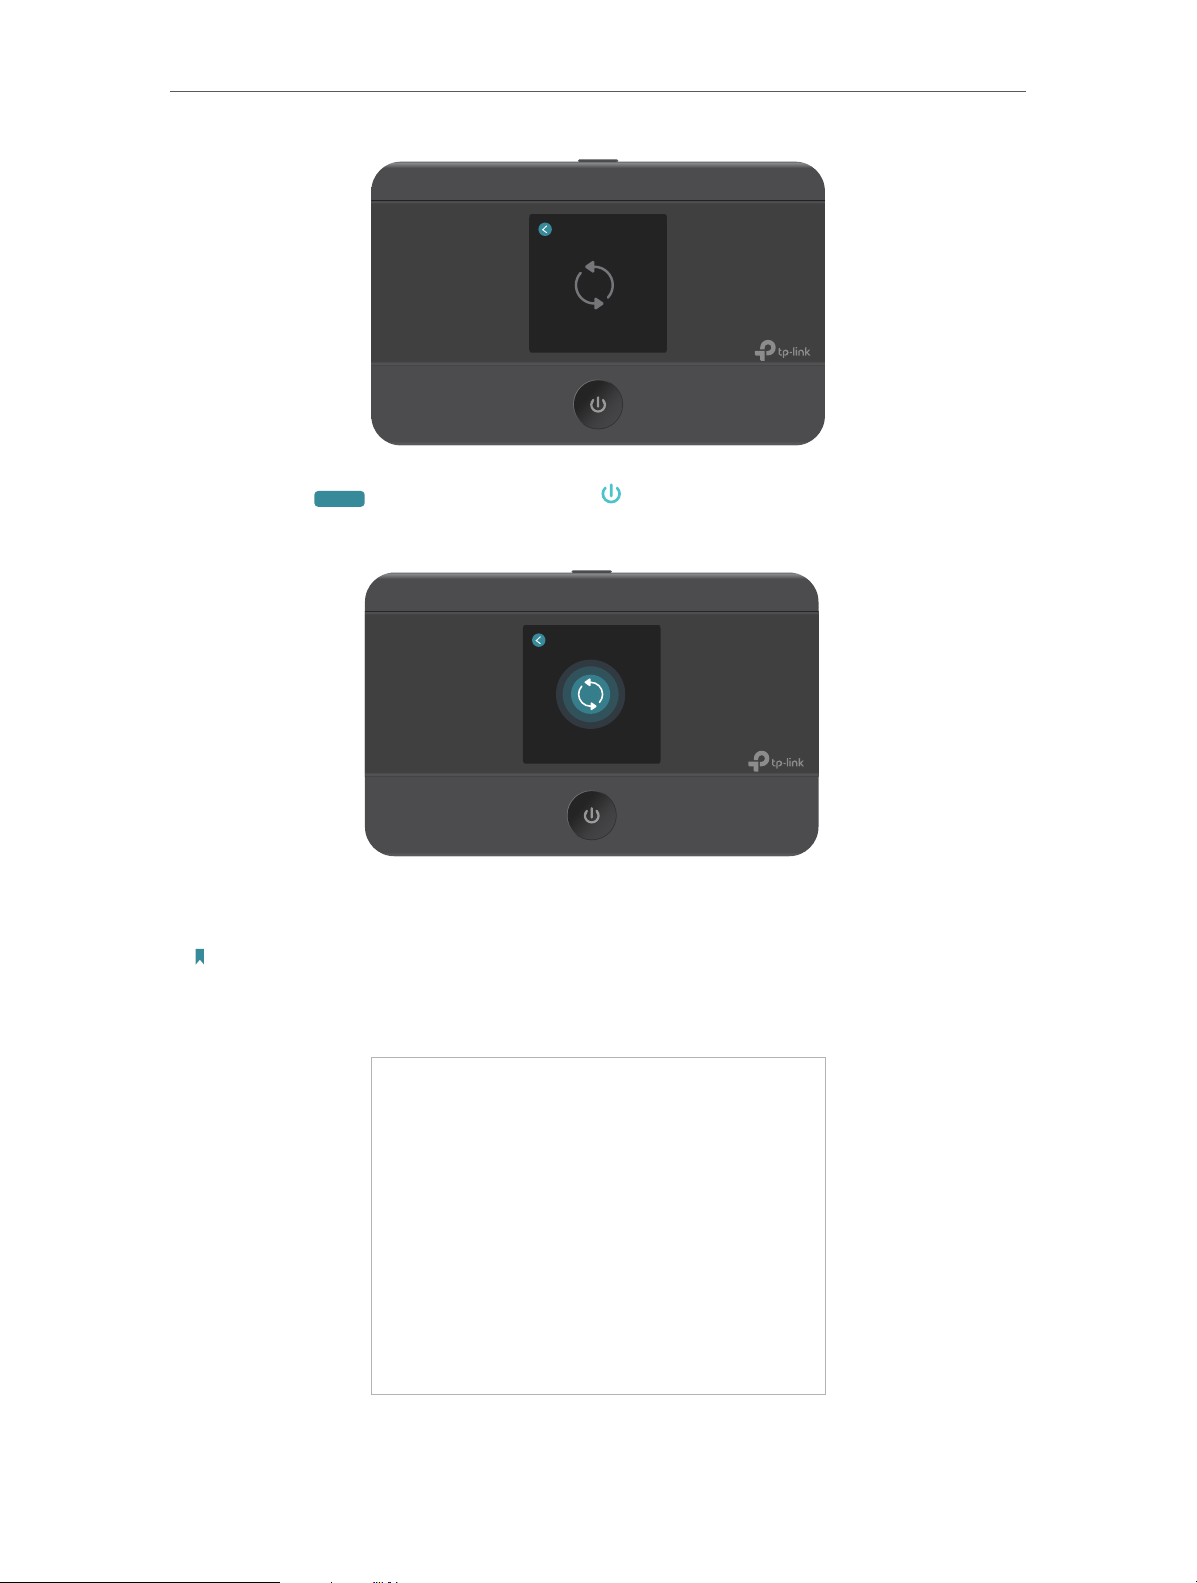
3 ) Press
(menu button) and (power button) to enable the WPS
function, and then the Mobile Wi-Fi starts to scan WPS-supported devices.
WPS
Connecting
4 ) On your WPS-supported device, go to Settings, turn on Wi-Fi, and enable
WPS within 2 minutes.
Note:
The entry to the WPS function may differ form the example below and has different names on different
devices.
5 ) The status of WPS will change from Connecting to Succeeded after your
WPS-supported device is successfully connected to the Mobile Wi-Fi.
12
Page 16
Chapter 2
WPS
Succeeded
Set Up Internet Connection
• Via the PIN
1 ) On your WPS-supported device, go to Settings, turn on Wi-Fi, enable WPS
PIN connection and get the PIN.
Note:
The entry to the WPS function may differ from the example below and has different names on different
devices.
2 ) On another device already connected to the Mobile Wi-Fi, visit
http://tplinkmifi.net, and log in with the default password: admin.
13
Page 17

Chapter 2
Set Up Internet Connection
3 ) Go to Device > Advanced > WPS, check the PIN box and enter the PIN of
your WPS-supported device in the field.
4 ) Click Start to start the WPS process, and the Current Status will change
from Idle to Succeed after your WPS-supported device is successfully
connected to the Mobile Wi-Fi.
14
Page 18

Chapter 3
Log In
This chapter introduces how to log in to the web management page of the
Mobile Wi-Fi using different interfaces. This User Guide presents the features
of the Mobile Wi-Fi on the phone web management interface. Instructions for
some features have been taken from the PC web management interface as they
are only available on that platform.
It contains the following sections:
• Via Phone Login Entry
• Via PC Login Entry
• Via tpMiFi App
Page 19

Chapter 3
3. 1. Via Phone Login Entry
1. Visit http://tplinkmifi.net, and log in with the default password: admin.
Log In
2. Create a new login password for security purposes and use it for future logins.
3. 2. Via PC Login Entry
The PC web management interface displays all features of the Mobile Wi-Fi.
If you want to use a feature (such as Configure DHCP Server) the Phone web
management interface or tpMiFi app does not have, please log in via the PC
entry. Computer or tablet is recommended.
1. Visit http://tplinkmifi.net, and log in with the default password: admin.
17
Page 20

Chapter 3
Log In
2. Go to Wizard, create a new login password for security purposes and use it for
future logins.
3. 3. Via tpMiFi App
1. Search “tpMiFi“ at the App Store or Google Play Store or simply scan the QR
code to download the tpMifi app.
2. Connect your device to the Mobile Wi-Fi.
3. Launch the tpMiFi app, and log in with the default password: admin.
18
Page 21

Chapter 3
4. Create a new password for security purposes and use it for future logins.
Log In
19
Page 22

Chapter 4
Manage Your Data Usage
This chapter explains how to manage the data usage of your Mobile Wi-Fi.
It includes the following sections:
• Track Data Usage
• Limit Data Usage
• Set Up Free Data Period
• Enable Mobile Data
• Enable Data Roaming
Page 23

Chapter 4 Manage Your Data Usage
4. 1. Track Data Usage
This feature allows you to monitor the amount of data you have used on your
Mobile Wi-Fi and revise the displayed data usage as needed.
4. 1. 1. Check Data Usage on Screen
You can view data usage on the screen of your Mobile Wi-Fi.
100%
R
2
1
4G
2.59 MB
5 M/S
Carrier Name
4. 1. 2. Check Data Usage on the Web Management Page
1. Visit http://tplinkmifi.net, and log in with the password you set for the Mobile
Wi-Fi.
2. You can view the data usage on the Status page as shown below.
21
Page 24

Chapter 4 Manage Your Data Usage
Note:
1. Actual data usage may vary from the estimated data usage displayed on the usage meter.
2. The page above displays the monthly data usage if you have enabled Monthly Data Statistics.
4. 1. 3. Check Data Usage via SMS
You can also obtain the data usage information by sending a message to the
carrier of your SIM card, which is recommended if you need more accurate
information.
1. Visit http://tplinkmifi.net, and log in with the password you set for the Mobile
Wi-Fi.
2. Go to SMS.
3. Tap New Message.
4. Create a message to your carrier and then tap
to send it. For the phone
number and message content, check from your carrier. Taking China Unicom
as example, send CXLL to 10010 and you will receive a message about the
data usage of your SIM card.
22
Page 25

Chapter 4 Manage Your Data Usage
4. 1. 4. Revise Data Usage
If the data usage displayed is not accurate, you can modify it as needed.
1. Visit http://tplinkmifi.net, and log in with the password you set for the Mobile
Wi-Fi.
2. Go to Device > Data Usage Settings.
3. The figure below displays the current data usage. Tap Correct, enter a more
accurate value for the data usage and specify a unit of measure.
4. Tap Done.
Note:
1. You can check the exact data usage from your carrier.
2. The page above displays the monthly data usage if you have enabled Monthly Data Statistics.
23
Page 26

Chapter 4 Manage Your Data Usage
4. 2. Limit Data Usage
This feature allows you to establish data limits for different data packages so
that you can better control your data usage.
4. 2. 1. Limit Data Package
I want to:
Limit my data usage so that I will not exceed my data package (2GB). I wish to:
1. Receive an alert when the data usage reaches 1.8GB (90% of the allowance);
2. Disable the internet access automatically when it reaches the allowance
(2GB).
How can I do that ?
1. Visit http://tplinkmifi.net, and log in with the password you set for the Mobile
Wi-Fi.
2. Go to Device > Data Usage Settings.
3. Enable Data Usage Limit.
4. Enter 2 in Total Allowance field and specify GB as the unit of measure. To
inform you that your data usage has reached the allowance, the internet
2GB
access will be disabled automatically and the data usage circle
5 M/S
on the
Home Screen will turn to red.
5. Set 90 as the Usage Alert percentage. To inform you that your data usage
1.8GB
has reached the alert value, the data usage circle
5 M/S
on the Home Screen will
turn to orange.
6. Tap Done.
Done!
Now your data usage is limited according to your settings.
24
Page 27

Chapter 4 Manage Your Data Usage
4. 2. 2. Limit Monthly Data Usage
I want to:
Limit my data usage so that I will not exceed my monthly data package (800MB).
I wish to:
1. Receive an alert when the data usage reaches 720MB (90% of the allowance).
2. Disable the internet access automatically when it reaches the allowance
(800MB).
How can I do that?
1. Visit http://tplinkmifi.net, and log in with the password you set for the Mobile
Wi-Fi.
2. Go to Device > Data Usage Settings.
3. Enable Data Usage Limit and Monthly Data Statistics.
4. Enter 800 in Monthly Allowance field and specify MB as the unit of measure.
To inform you that your data usage has reached the allowance, the internet
800MB
access will be disabled automatically and the data usage circle
Home Screen will turn to red.
5 M/S
on the
5. Set 90 as the Usage Alert percentage. To inform you that your data usage
720MB
has reached the alert value, the data usage circle
turn to orange.
5 M/S
on the Home Screen will
6. Enter the Start Date.
Note:
The monthly data usage statistics will be cleared and recounted from the day you have set every month.
25
Page 28

Chapter 4 Manage Your Data Usage
7. Tap Done.
Done!
Now your data usage is limited according to your settings.
4. 3. Set Up Free Data Period
Free Data Period is the time period when you will not be charged for data by
your mobile carrier. If your mobile carrier has provided this data service, you can
specify the free data period during which the data usage will not be counted for
data alert and limitation.
1. Visit http://tplinkmifi.net, and log in with the password you set for the Mobile
Wi-Fi.
2. Go to Device > Data Usage Settings.
3. Enable Free Data Period.
4. Enter the Start Time and End Time of Free Data Period.
26
Page 29

Chapter 4 Manage Your Data Usage
5. Tap Done.
4. 4. Enable Mobile Data
With Mobile Data (also known as cellular data) enabled, devices connected to
the Mobile Wi-Fi can access the internet. This feature is enabled by default.
1. Visit http://tplinkmifi.net, and log in with the password you set for the Mobile
Wi-Fi.
2. Go to Dial-up.
3. Enable Mobile Data.
4. Tap Done.
27
Page 30

Chapter 4 Manage Your Data Usage
4. 5. Enable Data Roaming
If you are out of your carrier’s service area, the icon will appear on the Mobile
Wi-Fi’s screen, and you will need to enable data roaming to access the internet.
1. Visit http://tplinkmifi.net, and log in with the password you set for the mobile
Wi-Fi.
2. Go to Dial-up.
3. Enable Data Roaming.
4. Tap Done.
28
Page 31

Chapter 5
Secure Your Network
This chapter explains how to secure your network in various ways. You can
change the SSID, manage the blacklist and lock your SIM card to safeguard your
network.
It includes the following sections:
• Secure Wireless Network
• Block Unwelcome Devices
• Lock SIM Card
Page 32

Chapter 5 Secure Your Network
5. 1. Secure Wireless Network
The SSID(wireless network name), wireless password of the Mobile Wi-Fi and
security options are preset as default. The default SSID and password can
be found on the screen of your Mobile Wi-Fi. You can customize the wireless
settings as needed.
1. Visit http://tplinkmifi.net, and log in with the password you set for the Mobile
Wi-Fi.
2. Go to Wireless.
• To change the SSID and wireless password:
1. Enter a new SSID and wireless password in the Wireless Network Name and
Wireless Password fields respectively.
2. Tap Done.
• To hide the SSID:
1. Disable SSID Broadcast, so the SSID will not be displayed when you scan for
wireless networks.
2. Tap Done.
Note:
If the SSID is hidden, it will not be displayed on your wireless device when you scan for local wireless
networks. And you need to manually enter the SSID to join the network.
30
Page 33

Chapter 5 Secure Your Network
• To hide password on screen:
1. Disable Display password on screen, so the wireless password will not be
displayed on the screen of your Mobile Wi-Fi.
2. Tap Done.
5. 2. Block Unwelcome Devices
This feature allows you to restrict unwelcome devices to access the wireless
network of your Mobile Wi-Fi.
1. Visit http://tplinkmifi.net, and log in with the password you set for the mobile
Wi-Fi.
2. Go to Status > Current Clients.
3. Tap
4. Select the device(s) that you want to block from the Online Clients list.
.
31
Page 34

Chapter 5 Secure Your Network
5. Tap Block.
5. 3. Lock SIM Card
This feature allows you to lock your SIM card with the PIN lock. Once the PIN lock
is enabled, every time you start your Mobile Wi-Fi with your SIM card inserted,
you need to enter the PIN code to access the internet.
If you don’t wish to enter the PIN code every time you start your Mobile Wi-Fi,
you can enable the Auto-unlock PIN upon Power-on function. You will still have
to enter the PIN code on other devices with this SIM card, however.
1. Visit http://tplinkmifi.net, and log in with the password you set for the Mobile
Wi-Fi.
2. Go to Device > Advanced > PIN Management.
• To enable the PIN lock:
1. Toggle on Enable PIN.
2. Enter the PIN code of your SIM card, which consists of 4 to 8 digits.
32
Page 35

Chapter 5 Secure Your Network
3. Tap Done.
4. Visit http://tplinkmifi.net and enter the PIN code to access the internet every
time you start your Mobile Wi-Fi.
Note:
1. The PIN code of your SIM card is preset by your mobile carrier and usually can be found on the package
of the SIM card.
2. After 3 failed verification attempts the SIM will be locked, and you will need to enter the PUK code to
unlock it. The PUK code can usually be found on the package of the SIM card.
• To reset PIN code:
1. Visit http://tplinkmifi.net from the PC login entry, and log in with the password
you set for the Mobile Wi-Fi.
2. Go to Advanced > Dial-up > PIN Management.
3. Select Enable PIN from the drop-down list if SIM Card Status is disabled. Enter
the PIN code of your SIM card, and then click Apply.
4. Select Modify from the drop-down list.
5. Enter the current PIN code and a new PIN code twice. The new PIN code must
consist of 4-8 digits.
33
Page 36

Chapter 5 Secure Your Network
6. Click Apply.
7. Use the new PIN code for future PIN verifications.
• To enable Auto-unlock PIN upon Power-on:
1. Toggle on Enable PIN, enter the PIN code of your SIM card, and then tap Done.
2. Enable Auto-unlock PIN upon Power-on.
3. Once enabled, you can save the trouble of entering the PIN code every time
you start your Mobile Wi-Fi.
34
Page 37

Chapter 6
Share Files on SD Card
This chapter describes how to share and access files on an SD card via Wi-Fi
and via a USB cable.
It contains the following sections:
• Access via Wi-Fi Mode
• Access via USB Mode
Page 38

Chapter 6
Share Files on SD Card
6. 1. Access via Wi-Fi Mode
You can share files on an SD card via Wi-Fi mode so clients connected to the
Mobile Wi-Fi can access the SD card.
1. Visit http://tplinkmifi.net, and log in with the password you set for the Mobile
Wi-Fi.
2. Go to Device > Advanced > Storage Sharing.
• To access via an Android or iOS device
1. Select By Wi-Fi for the access mode.
2. Select Signed or Anonymous for the login permission.
36
Page 39

Chapter 6
Share Files on SD Card
Note:
If you have selected Signed, please specify Username and Password for access (admin by default).
3. Tap Done.
4. Search tpMiFi at the App Store or Google Play Store or simply scan the QR
code to download it.
5. Connect your mobile device to the Mobile Wi-Fi.
6. Launch tpMiFi and enter the password you set for the Mobile Wi-Fi.
7. Tap SD Sharing to access the SD card. You can then view, download and
upload multimedia files as needed.
37
Page 40

Chapter 6
Share Files on SD Card
• To access the SD card via a PC:
1. Select By Wi-Fi for the access mode.
38
Page 41

Chapter 6
Share Files on SD Card
2. Select Signed or Anonymous for the login permission.
39
Page 42

Chapter 6
Share Files on SD Card
Note: If you have selected Signed, please specify Username and Password for access (admin by default).
3. Tap Done.
4. Connect your computer to the Mobile Wi-Fi.
5. Open Run and input “\\192.168.0.1“ (by default) or ftp://192.168.0.1. Then
click OK to continue.
40
Page 43

Chapter 6
Share Files on SD Card
6. For anonymous access, you can now access the SD card. For signed access,
enter the login username and password in the authentication window and
click OK. Then you can access the SD card.
6. 2. Access via USB Mode
You can connect your computer to the Mobile Wi-Fi via a USB cable to access
the SD card directly.
1. Select By USB for the access mode.
41
Page 44

Chapter 6
Share Files on SD Card
2. Tap Done.
3. Connect your computer to the Mobile Wi-Fi via a USB cable and access the
SD card directly.
42
Page 45

Chapter 7
Customize Your Network
This chapter guides you on how to configure network settings of your Mobile
Wi-Fi.
It contains the following sections:
• Specify Network Mode
• Configure Dial-up
• Configure DHCP Server
Page 46

Chapter 7 Customize Your Network
7. 1. Specify Network Mode
This Mobile Wi-Fi supports three modes of network connection: 4G Preferred,
4G Only and 3G Only. If your SIM card supports WCDMA, select 3G Only; if your
SIM card supports FDD-LTE or TDD-LTE, select 4G Preferred or 4G Only as
needed. In general, the 4G network is faster than the 3G one.
1. Visit http://tplinkmifi.net, and log in with the password you set for the Mobile
Wi-Fi.
2. Go to Device > Advanced > Network Mode.
3. Select 4G Preferred, 4G Only or 3G Only as needed.
4. Tap Done.
44
Page 47

Chapter 7 Customize Your Network
7. 2. Configure Dial-up
7. 2. 1. Configure Dial-up Settings
If you are in a location beyond your mobile carrier’s service area, you may need to
configure the dial-up settings to access the internet provided by a local mobile
carrier.
1. Visit http://tplinkmifi.net, and log in with the password you set for the Mobile
Wi-Fi.
2. Go to Dial-up.
3. Tap Create to build a dial-up profile.
4. Specify a name for the profile and fill in the parameters provided by your
carrier.
5. Tap Done and then tap Ye s in the pop-up to apply the new profile.
Note:
1. Mobile Data is enabled by default. If disabled, internet access is prohibited.
2. Data Roaming is disabled by default. If enabled, data service is allowed when roaming.
45
Page 48

Chapter 7 Customize Your Network
3. You can click View Profile details to check the current profile. If any parameter is wrong, you can click
Create to build a new one.
7. 2. 2. Configure Network Search
The Mobile Wi-Fi provides two types of network connection: Auto and Manual.
• Auto: The Mobile Wi-Fi will automatically establish internet connection
when it is started.
• Manual: When you have selected Manual, click Search and the Mobile
Wi-Fi will scan for mobile networks. You can choose a network with better
performance to connect to. The mobile carrier providing the network
must be or have cooperation with your SIM card provider.
1. Visit http://tplinkmifi.net from the PC login entry, and log in with the password
you set for the Mobile Wi-Fi.
2. Go to Advanced > Dial-up > Network Settings.
3. Select Auto or Manual for Network Search as needed.
4. Click Save.
7. 3. Configure DHCP Server
The Mobile Wi-Fi acts as a DHCP (Dynamic Host Configuration Protocol) server,
dynamically assigning TCP/IP parameters to devices from the IP Address pool.
You can change the settings of the DHCP server if necessary.
1. Visit http://tplinkmifi.net from the PC login entry, and log in with the password
you set for the Mobile Wi-Fi.
2. Go to Advanced > DHCP Server.
3. Enter a new IP address in the IP Address field and leave the Subnet Mask as
default. And enter the starting and ending IP addresses in the Start and End IP
Address fields respectively.
Note:
1. The start and end IP addresses should be on the same network segment as the IP address you have
entered.
46
Page 49

Chapter 7 Customize Your Network
2. If you have changed the IP address of your Mobile Wi-Fi, you should use the new IP address or
http://tplinkmifi.net to log in to the web management page.
4. Enter the lease time in the Lease Time field. When the lease time expires, the
Mobile Wi-Fi will reassign IP addresses.
5. Enter the primary DNS IP address which usually accords with the IP address.
6. Enter the secondary DNS IP address if provided by your carrier.
7. Click Save.
47
Page 50

Chapter 8
Manage Your Mobile Wi-Fi
This chapter presents how to manage and maintain your Mobile Wi-Fi.
It includes the following sections:
• Save the Mobile Wi-Fi’s Power
• Change Admin Account
• Set Up System Time
• Restore Configuration Settings
• Update the Firmware
• Update ISP Parameters
• System Log
Page 51

Chapter 8
Manage Your Mobile Wi-Fi
8. 1. Save the Mobile Wi-Fi’s Power
The Power Saving feature allows you to slow down the power consumption of
your Mobile Wi-Fi. You can reduce the Wi-Fi range to save power. Alternatively,
you can enable the Wi-Fi Auto-disable Time feature to disable the Wi-Fi of your
Mobile Wi-Fi in the idling period.
1. Visit http://tplinkmifi.net, and log in with the password you set for the Mobile
Wi-Fi.
2. Go to Device > Power Saving.
• To set Wi-Fi Range:
1. Enable Power Saving Mode.
2. Select Long, Medium or Short from the Wi-Fi Range drop-down list.
Note:
The shorter the Wi-Fi Range is, the less power your Mobile Wi-Fi uses.
3. Tap Done.
4. Tap Restart Wi-Fi on the pop-up to make the configurations take effect, and
then reconnect to the Mobile Wi-Fi after the Wi-Fi restarts.
• To set Wi-Fi Auto-disable Time:
1. Enable Power Saving Mode.
2. Specify the Wi-Fi Auto-disable Time.
49
Page 52

Chapter 8
Manage Your Mobile Wi-Fi
3. Tap Done. If there are no devices connected to the Mobile Wi-Fi during the
period you have specified, the Wi-Fi will be disabled automatically.
Note:
To recover the Wi-Fi, press the Power Button or the Menu Button.
8. 2. Change Admin Account
The account management feature allows you to change your login password of
the web management page to prevent other users from logging in to your web
management page.
1. Visit http://tplinkmifi.net, and log in with the password you set for the Mobile
Wi-Fi.
2. Go to Device > Account.
3. Enter the current password. Then enter the new password twice (both casesensitive) and tap Done.
4. Use the new password for future logins.
50
Page 53

Chapter 8
Manage Your Mobile Wi-Fi
8. 3. Set Up System Time
System time is the time displayed when the Mobile Wi-Fi is running. The system
time you configure here will be used for time-based functions.
Note:
Make sure your Mobile Wi-Fi has access to the internet before you set the system time. Otherwise, it can
not synchronize the current time and date.
1. Visit http://tplinkmifi.net, and log in with the password you set for the mobile
Wi-Fi
2. Go to Device > Advanced > Time Settings.
3. Select your local Time Zone from the drop-down list.
4. Tap Done.
8. 4. Restore Configuration Settings
The Factory Defaults feature allows you to restore your Mobile Wi-Fi to its factory
defaults. After you restore your Mobile Wi-Fi, all previous settings will be cleared
and you have to reconfigure them.
• To reset on the Mobile Wi-Fi:
With the Mobile Wi-Fi powered on, remove the cover. Use a pin to press and hold
the RESET button until the “Power Off” appears on the screen.
• To reset on the webpage:
1. Visit http://tplinkmifi.net from the PC login entry, and log in with the password
you set for the Mobile Wi-Fi .
2. Go to Advanced > Device > Factory Defaults.
3. Click Restore.
51
Page 54

Chapter 8
Manage Your Mobile Wi-Fi
4. Wait a few minutes for the resetting and rebooting.
Note: During the resetting process, do not power off the Mobile Wi-Fi and make sure it has sufficient
power.
8. 5. Update the Firmware
TP-Link is dedicated to improving product features to enrich your network
experience. We will inform you through the screen and web management page
if there’s any newly released update firmware for your Mobile Wi-Fi. Also, the
latest firmware will be released at TP-Link official website, you can download it
from the Support page of our website www.tp-link.com for free.
Note:
1. Make sure the latest firmware file is matched with the hardware version (as shown in the Download
section of the Support page).
2. Make sure that you have a stable connection between the Mobile Wi-Fi and your computer.
3. Do NOT power off the Mobile Wi-Fi during the firmware update and make sure it has sufficient power.
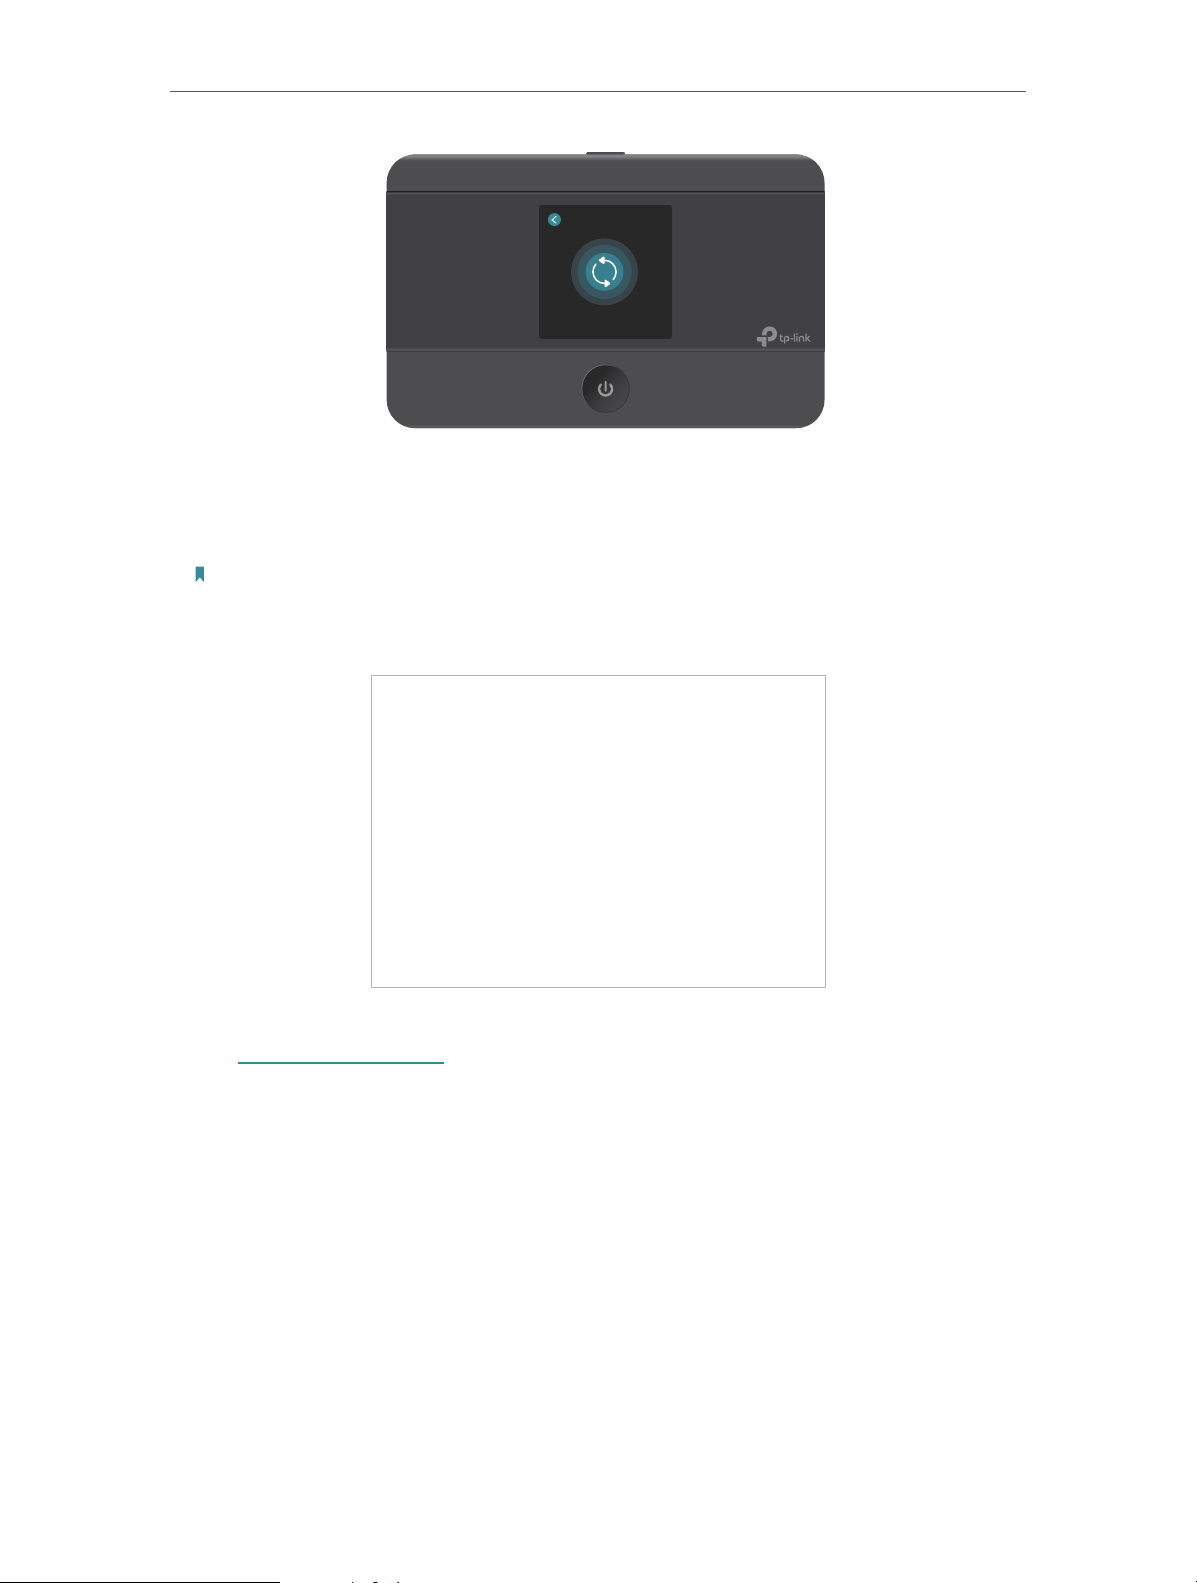
• To update the firmware on screen:
1. Press
(the power button)to update your Mobile Wi-Fi when the following
screen appears.
2. Wait a few minutes for the update and reboot.
• To update the firmware locally:
1. Download the latest firmware file for the Mobile Wi-Fi from our website
www.tp-link.com.
2. Visit http://tplinkmifi.net from the PC login entry, and log in with the password
you set for the Mobile Wi-Fi.
52
Page 55

Chapter 8
Manage Your Mobile Wi-Fi
3. Go to Advanced > Device > Firmware Update.
4. Select Update via the local server, click Browse to locate the downloaded file,
and then click Update.
5. Wait a few minutes for the update and reboot.
• To update the firmware online:
1. Visit http://tplinkmifi.net from the PC login entry, and log in with the password
you set for the Mobile Wi-Fi.
2. Go to Advanced > Device > Firmware Update.
3. Select Update via the cloud server.
4. Click Update.
5. Wait a few minutes for the update and reboot.
Note:
To download the latest firmware file, you can also click the New Version number, such 1.0.5 in the page
above. To view update details, click Release Note.
8. 6. Update ISP Parameters
You can update the ISP information.
53
Page 56

Chapter 8
Manage Your Mobile Wi-Fi
1. Download the latest ISP update file from the Support page at www.tp-link.
com.
2. Visit http://tplinkmifi.net from the PC login entry, and log in with the password
you set for the Mobile Wi-Fi.
3. Go to Advanced > Dial-up > ISP Update.
4. Click Browse to locate the downloaded file.
5. Click Update.
8. 7. System Log
When the Mobile Wi-Fi does not work normally, you can save the system log and
send it to our technical support for troubleshooting.
1. Visit http://tplinkmifi.net from the PC login entry, and log in with the password
you set for the Mobile Wi-Fi.
2. Go to Advanced > Device > System Log.
• To save the system logs in local:
Click Save Logs to save the logs to your local device.
54
Page 57

Chapter 8
Manage Your Mobile Wi-Fi
• To debug logs:
The Debug Log feature can save logs for specific troubleshooting. This function
should be enabled under the requirement of our technical support.
1. Insert an SD card of at least 100MB storage in your Mobile Wi-Fi.
2. Put the file provided by our technical support in the SD card.
3. Go to the Advanced > Storage Sharing and set By Wi-Fi as Access Mode.
4. Enable Debug Log.
5. Click Save Logs.
6. Visit the SD card and send the saved files to our technical support.
Note:
Do not remove the SD card or switch the storage sharing mode when using this function.
55
Page 58

FAQ
Q1. What can I do if I cannot log in to the web management page?
• Verify that your device is connected to the Mobile Wi-Fi.
• Verify that you have entered http://tplinkmifi.net or http://192.168.0.1 correctly.
• Verify that your computer is set to obtain an IP address automatically.
Q2. What can I do when one of the following messages appears on the screen
or I cannot access the internet?
• PIN Required
• Log in to the web management page http://tplinkmifi.net. Enter the PIN
provided by your carrier and tap Done.
• No SIM Card
• Power off the Mobile Wi-Fi and reinsert the SIM card.
• No Service
• Verify that your SIM card is an LTE , WCDMA or GSM SIM card.
• Verify that your SIM card is in your mobile carrier’ s service area and has
sufficient credit.
• Verify that your mobile carrier parameters are correct: Log in to the web
management page, go to Dial-up and tap View profile details to check
if APN, Username and Password are correct. If not, return to the Dial-up
page and create a new profile with the correct information. Then tap Done
and confirm on the pop-up.
•
icon
• Log in to the web management page, and go to Dial-up to enable Data
Roaming.
56
Page 59

Q3. What can I do if my internet speed is slow?
• From the menu screen, go to Network Mode and try a different network.
Q4. How to reset the Mobile Wi-Fi to its factory default settings?
• With the Mobile Wi-Fi powered on, remove the cover. Use a pin to press and
hold the RESET button until Power Off appears on the screen and then release
the button.
• Log in to the Mobile Wi-Fi’s web management page via the PC login entry. Go
to Advanced > Device > Factory Defaults and click Restore.
57
Page 60

COPYRIGHT & TRADEMARKS
Specifications are subject to change without notice.
is a registered
trademark of TP-Link Technologies Co., Ltd. Other brands and product names
are trademarks or registered trademarks of their respective holders.
No part of the specifications may be reproduced in any form or by any means or
used to make any derivative such as translation, transformation, or adaptation
without permission from TP-Link Technologies Co., Ltd.
Copyright © 2020 TP-Link Technologies Co., Ltd. All rights reserved.
58
Page 61

CE Mark Warning
This is a class B product. In a domestic environment, this product may cause
radio interference, in which case the user may be required to take adequate
measures.
OPERATING FREQUENCY(the maximum transmitted power)
2400MHz—2483.5MHz (20dBm)
WCDMA: (24dBm+1/-3dB)
LTE: (23dBm+2/-2dB)
EU declaration of conformity
TP-Link hereby declares that the device is in compliance with the essential
requirements and other relevant provisions of directives 2014/53/EU, 2011/65/
EU and (EU)2015/863.
The original EU declaration of conformity may be found at https://www.tp-link.com/en/ce
RF Exposure Information
This device meets the EU requirements (2014/53/EU Article 3.1a) on the
limitation of exposure of the general public to electromagnetic fields by way of
health protection.
This device has been tested and meets the ICNIRP exposure guidelines and
the European Standard EN 62209-2. SAR is measured with this device at a
separation of 0.5 cm to the body, while transmitting at the highest certified
output power level in all frequency bands of this device. Carry this device at
least 0.5 cm away from your body to ensure exposure levels remain at or below
the as-tested levels.
NCC Notice
注意!
依據 低功率電波輻射性電機管理辦法
第十二條 經型式認證合格之低功率射頻電機,非經許可,公司、商號或使用者均
不得擅自變更頻率、加大功率或變更原設計之特性或功能。
第十四條 低功率射頻電機之使用不得影響飛航安全及干擾合法通信;經發現有干
擾現象時,應立即停用,並改善至無干擾時方得繼續使用。前項合法通信,指依
電信規定作業之無線電信。低功率射頻電機需忍受合法通信或工業、科學以及醫
療用電波輻射性電機設備之干擾。
減少電磁波影響,請妥適使用。
59
Page 62

BSMI Notice
安全諮詢及注意事項
• 請使用原裝電源供應器或只能按照本產品注明的電源類型使用本產品。
• 清潔本產品之前請先拔掉電源線。請勿使用液體、噴霧清潔劑或濕布進行清
潔。
• 注意防潮,請勿將水或其他液體潑灑到本產品上。
• 插槽與開口供通風使用,以確保本產品的操作可靠並防止過熱,請勿堵塞或覆
蓋開口。
• 請勿將本產品置放於靠近熱源的地方。除非有正常的通風,否則不可放在密閉
位置中。
• 不要私自拆開機殼或自行維修,如產品有故障請與原廠或代理商聯繫。
限用物質含有情況標示聲明書
設備名稱:4G LTE Mobile Wi-Fi
Equipment name
Restricted substances and its chemical symbols
單元
Unit
PCB ○ ○ ○ ○ ○ ○
外殼 ○ ○ ○ ○ ○ ○
锂电池 ○ ○ ○ ○ ○ ○
備考1.〝超出0.1 wt %〞及〝超出0.01 wt %〞係指限用物質之百分比含量超出百分比含量基準值
Note 1:“Exceeding 0.1 wt %” and “exceeding 0.01 wt %” indicate that the percentage content of
the restricted substance exceeds the reference percentage value of presence condition.
備考2.〝○〞係指該項限用物質之百分比含量未超出百分比含量基準值。
Note 2:“○” indicates that the percentage content of the restricted substance does not exceed the
percentage of reference value of presence.
備考3.〝-〞係指該項限用物質為排除項目。
Note 3:The “-” indicates that the restricted substance corresponds to the exemption.
鉛
Lead
(Pb)
汞
Mercury
(Hg)
鎘
Cadmium
(Cd)
型號(型式):M7350
Type designation (Type)
限用物質及其化學符號
六價鉻
Hexavalent
chromium
+6
(Cr
Polybrominated
)
多溴聯苯
biphenyls
(PBB)
多溴二苯醚
Polybrominated
diphenyl ethers
(PBDE)
Продукт сертифіковано згідно с правилами системи УкрСЕПРО на
відповідність вимогам нормативних документів та вимогам, що передбачені
чинними законодавчими актами України.
Page 63

Safety Information
• Keep the device away from water, fire, humidity or hot environments.
• Do not attempt to disassemble, repair, or modify the device. If you need service,
please contact us.
• Do not use any other chargers than those recommended
• Do not use the device where wireless devices are not allowed.
CAUTION!
• Avoid replacement of a battery with an incorrect type that can defeat a
safeguard.
• Avoid disposal of a battery into fire or a hot oven, or mechanically crushing
or cutting of a battery, that can result in an explosion.
• Do not leave a battery in an extremely high temperature surrounding
environment that can result in an explosion or the leakage of flammable
liquid or gas. Do not leave a battery subjected to extremely low air pressure
that may result in an explosion or the leakage of flammable liquid or gas.
CAUTION!
• Danger of fire due to removal of the back cover.
• To install accessories, remove the housing as indicated in section 1 of the
Quick Installation Guide.
• The back cover must be restored after the accessories are installed.
CAUTION!
Risk of explosion if the battery is replaced by an incorrect type.
• Operating Temperature: 0℃ ~ 40℃(32℉ ~ 104℉)
Storage Temperature: -40℃ ~ 70℃(-40℉ ~ 158℉)
Please read and follow the above safety information when operating the device.
We cannot guarantee that no accidents or damage will occur due to improper
use of the device. Please use this product with care and operate at your own risk.
Explanations of the symbols on the product label
Symbol Explanation
DC voltage
Page 64

Symbol Explanation
RECYCLING
This product bears the selective sorting symbol for Waste electrical and electronic
equipment (WEEE). This means that this product must be handled pursuant to European
directive 2012/19/EU in order to be recycled or dismantled to minimize its impact on
the environment.
User has the choice to give his product to a competent recycling organization or to the
retailer when he buys a new electrical or electronic equipment.
Caution
Operator’s manual
 Loading...