

Toyota PZQ60-0041, PZQ60-0044, PZQ60-0042 Owner's Manual

@ToYorA
AM.FM RADIO
WITH
ELECTRONIC
TUNER
AND COMPACT
DISC
PLAYER
ToYoTA
PART r{0.
P2Q60,0041,
p2Q60.0042
PZQ60-0044
OWNER'S
MANUAL
DISC FtD ART IN
Thank
you
for
purchasing
the TOYOTA Gr.::
Please
note
that this manual
explains all
i,:,
,i,-r rs.
-
.rlr'
MF3
WMA
qvstem.
nent,
including
operations.
FM
Therefore,
you
may find
some explanatio;:r
.-.
i:atures
or
--,
,ment
not
included
in
your
AUDIO
system.
TOYOTA
MUTOR
CORPORATION
TABLE OF CONTENTS
OPERATING
PRECAUTIONS
........
5
RAD|O........ ........5
CD PLAYER ....... 6
COMPACT
DISCS ..............:....
................7
PIN
(PERSONAL
TDENTTFTCATTON NUMBER)
sEcuRrTY
oPERAT|ON ................. 9
HOW TO PROGRAM
YOUR PtN
............................... 9
HOW TO
CANCEL THE PtN.....
............... 9
HOW TO RESUME
NORMAL AUDIO
oPERAT|ON................ ....... 10
rF wRoNG
PtN tS |NPUT........
.............. 10
BASTC
OPERATTON
.......... ............ 11
HOW
TO FEED POWER ....................... 11
HOW TO ADJUST THE VOLUME
&
TONE.......,......11
swrTcHrNG AUD|O
CONTROL
MODES ................ 1 1
HOW
TO TURN TIME
DISPLAY
ON/OFF
...........,....12
HOW
TO SET THE T|ME.......... .............12
HOW TO
VIEW THE AUDTO MODE.........................12
RAD|O
OPERAT|ON.......... ............ 13
HOW
TO TURN
ON
THE RADIO .,........ 13
HOW
TO TUNE...,..... .......... 13
HOW
TO
STORE BROADCASTING STATIONS
(PRESET)
........ 13
HOW TO
SCAN BROADCASTING STATIONS
AVAILABLE FOR
RECEPTION .............14
cD AND MP3/WMA
OPERATION..................
15
Dtsc
PLAY
...... 15
EJECTING THE
DISC.. .......
15
ADVANCE TO
THE NEXT TRACK OR RETURN
TO
THE BEGINNING
OF THE
TRACK
BEING PLAYED..... ............. 15
FAST FORWARD
AND REWIND THROUGH
A
TRACK...... ....... 15
PLAYING THE BEGINNING
OF
TRACKS
(scAN).....
REPEATING THE
SAME
TRACK
(REPEAT)
PLAYING TRACKS
IN RANDOM ORDER
(RANDOM).
SHOWING THE TEXT INFORMATION ....................
1
6
ABOUT
MP3MMA..
............
16
PLAYING MP3MMA .......... 18
TO GO
BACK
TO FIRST POSITION
(HOME
JUMP)
....................
18
SHOWING MP3MMA TEXT INFORMATION.......... 19
PLAYING THE BEGINNING
OF FILES
(scAN)......
.......
1e
REPEATING
THE SAME FILE OR FOLDER
(REPEAT)
........ 19
15
16
16
-'l
PLAYING
FILE
IN RANDOM
ORDER
(RANDOM)...
usB
oPERATION
..........
20
ON THE SPECIFICATIONS
FOR
THE USB
MEMORY
THAT lS
P1AYA81E................................
20
LISTENING
TO
MUSIC
FILES
IN
THE USB
MEMORY
(WHEN
THE USB
MEMORY
IS NOT
CoNNECTED)
...............
--.-.20
LISTENING
TO MUSIC
FILES
IN
THE USB
MEMORY
(WHEN THE USB
MEMORY
IS
CoNNECTED)
...............
.-.-- 20
PAUSING
THE
USB
MEMORY
.............21
ADVANCE
TO THE
NEXT
MUSIC
FILE
OR
RETURN
TO
THE BEGINNING
OF
THE
MUSIC
FILE
BEING
PLAYED
.........21
FAST FORWARD
AND
REWIND
THROUGH
A
MUSTC
F|LE...........
...........--21
TO SELECT
THE
DESIRED
FOLDER
...,.................21
TO GO
BACK TO
FIRST
POSITION
(HOME
JUMP)
...........--..-.-.-
21
PLAYING
THE
BEGINNING
OF
FILE
(SCAN)--...--.-22
REPEATING
THE SAME
FILE OR
FOLDER
(REPEAT)
...--...22
PLAYING
FILE
lN RANDOM
ORDER
(RANDOM)...
22
SHOWING THE
TEXT
INFORMATION
............
........
22
ipod@ OpERAT;ON
..........
..............
23
LISTENING
TO THE
iPod
(WHEN THE
iPod
lS
NOT CONNECTED)......
-.....23
LISTENING
TO
THE
iPod
(WHEN THE
iPod
lS
CoNNECTED)
...............
.....23
PAUSING
THE
iPod....
-.-.-...24
ADVANCE
TO
THE NEXT
MUSIC
FILE OR
RETURN
TO THE
BEGINNING
OF
THE
MUSIC
FILE
BEING
PLAYED
.........24
FAST FORWARD
AND
REWIND
THROUGH
A
REPEATING
THE SAME
MUSIC
FILE
(REPEAT)-.-24
PLAYING
MUSIC
FILES
IN RANDOM
ORDER
(SHUFFLE)
.-.-.-
24
SEARCHING
FOR
A
MUSIC
F11E...........
..-,-.-....-.-...
24
SHOWING
THE
TEXT
INFORMATION
..,....,....
......,.
25
iPod
COMPATIBILITY..
-.....-25
BLUETOOTH
AUDIO
OPERATION
..........
.....
26
ABOUT
BLUETOOTH
AUDIO
...............26
ABOUT
THE DISPLAY
.............
.-......-....26
REGISTERING
THE PORTABLE
DEVICE......
........'
26
CONNECTING
THE
PORTABLE
DEVICE
............."
27
DELETING
A REGISTERED
PORTABLE
DEV|CE......
.-.-'.28
CHANGING
BLUETOOTH
INFORMATION..........,...
29
DISPLAYING
DEVICE
INFORMATION
OF
THE
MAIN
DEV|CE......
.-.-..-29
rNlTlALlSlNG
SETTINGS
................
.-.-..29
LISTENING
TO MUSIC.
......29
STOPPING
THE MUSIC
.....29
PAUSING
THE MUSIC
.......29
-2-
19
24
l
BOOK.........
......42
AUx
OPERAT|ON................
..........
31
cANcELLTNG
THE
RESTRIcIoNS
oN
pHoNE
ADVANCE
TO
THE NEXT
TRACK
OR RETURN
TO THE
BEGINNING
OF THE TRACK
BEING
PLAYED
..........,29
FAST
FORWARD
AND REWIND
THROUGH
A
F|LE
..............
30
HOW
TO
USE THE
AUX ...........
............
31
HANDS.FREE
OPERATION
..........
32
HANDS-FREE
SYSTEM
.....32
ABOUT
THE
DtSplAy.............
.............
33
REGISTERING
A BLUETOOTH
TELEPHONE
sET............
......
33
CONNECTING
A MOBILE
TELEPHONE
........... ......
34
CHANGING
THE PASS
KEY............
.....34
DELETING
A REGISTERED
TELEPHONE
SET...... 35
MAKTNG
A PHONE
CA11..........
............
35
MAKING
A PHONE
CALL FROM
A REGISTERED
NUMBER....
......35
MAKING
CALLS FROM
OUTGOING CALL
HtsToRY
.........36
MAKING
CALLS
FROM
INCOMING
CALL
HrsToRY
.........36
ANSWERTNG
A
pHONE
CA11.................................
37
REFUSING
AN
INCOMING
CALL
...,.....
38
REGISTERING
A PHONE
NUMBER
TO SPEED
D1A1...........
......
38
DELETING
A
SPEED
DIAL ENTRY.........................
38
REGISTERING
INFORMATION
IN THE
PHONE
8OOK.........
......38
CHANGING
THE
DATA
OF THE PHONE
BOOK..... 41
DELETING
THE
DATA IN THE
PHONE
BOOK .......42
RESTRICTING
THE FUNCTIONS
OF THE PHONE
BOOK FUNCTTONS
............43
REGISTERING/CHANGING
THE PIN
CODE .......... 44
DISPLAYING
THE
DEVICE
INFORMATION
OF
THE MA|N
DEV|CE......
.......45
INITIALISING
THE
SETTINGS
..............45
SETT|NG
THE VO1UME................
....... 46
cD GHANGER(OPT|ONAL)
OPERAT|ON
..... 47
Dtsc PLAY
......47
STOPPING PLAYBACK
......47
PLAYTNG
CD .............
.........47
ADVANCE
TO THE
NEXT TRACK
OR RETURN
TO THE BEGINNING
OF THE
TRACK
BEING
PLAYED
...........47
FAST FORWARD
AND REWIND
THROUGH
A
TRACK
.............47
PLAYTNG
THE
BEG|NNtNG
OF TRACK
(SCAN).....
4S
REPEATTNG
THE
SAME TRACK (REPEAT)...........
48
PLAYING
TRACKS
IN RANDOM
ORDER
(RANDOM).
......48
SHOWI NG
THE
TEXT INFORMATION
....................
48
-3-
STEERING
WHEEL
SWITCHES
opERATtON..........
.........
49
HOW
TO FEED
POWER
.......................
49
HOW
TO ADJUST
THE VOLUME
................
............
49
HOW TO SELECT
TRACKS
AND RADIO
STATIONS
..........:........
.......49
MESSAGES...........
.........
50
SPECTFTCATION
............
51
-4-
The
AUDIO system
works
only when
the ignition
key
(switch)
is
at "ON"
or
"ACC"
position.
However,
do not leave
the ignition
switch
at
"ON"
position
when
the engine
is not running.
lf
you
desire to listen
to
the AUDIO
system when
the engine
is
not
running,
place
the ignition
key
(switch)
to
"AGC" position.
RADIO
Adjust
the length
of
your
antenna for
best reception.
Usually,
a short
antenna
length is
best in large
cities,
and a fully
extended antenna is best
for distant reception.
To
prevent
damage
to
the antenna, make
sure
11 ls retracted
before
running
your
vehicle
through
an automatic
car wash.
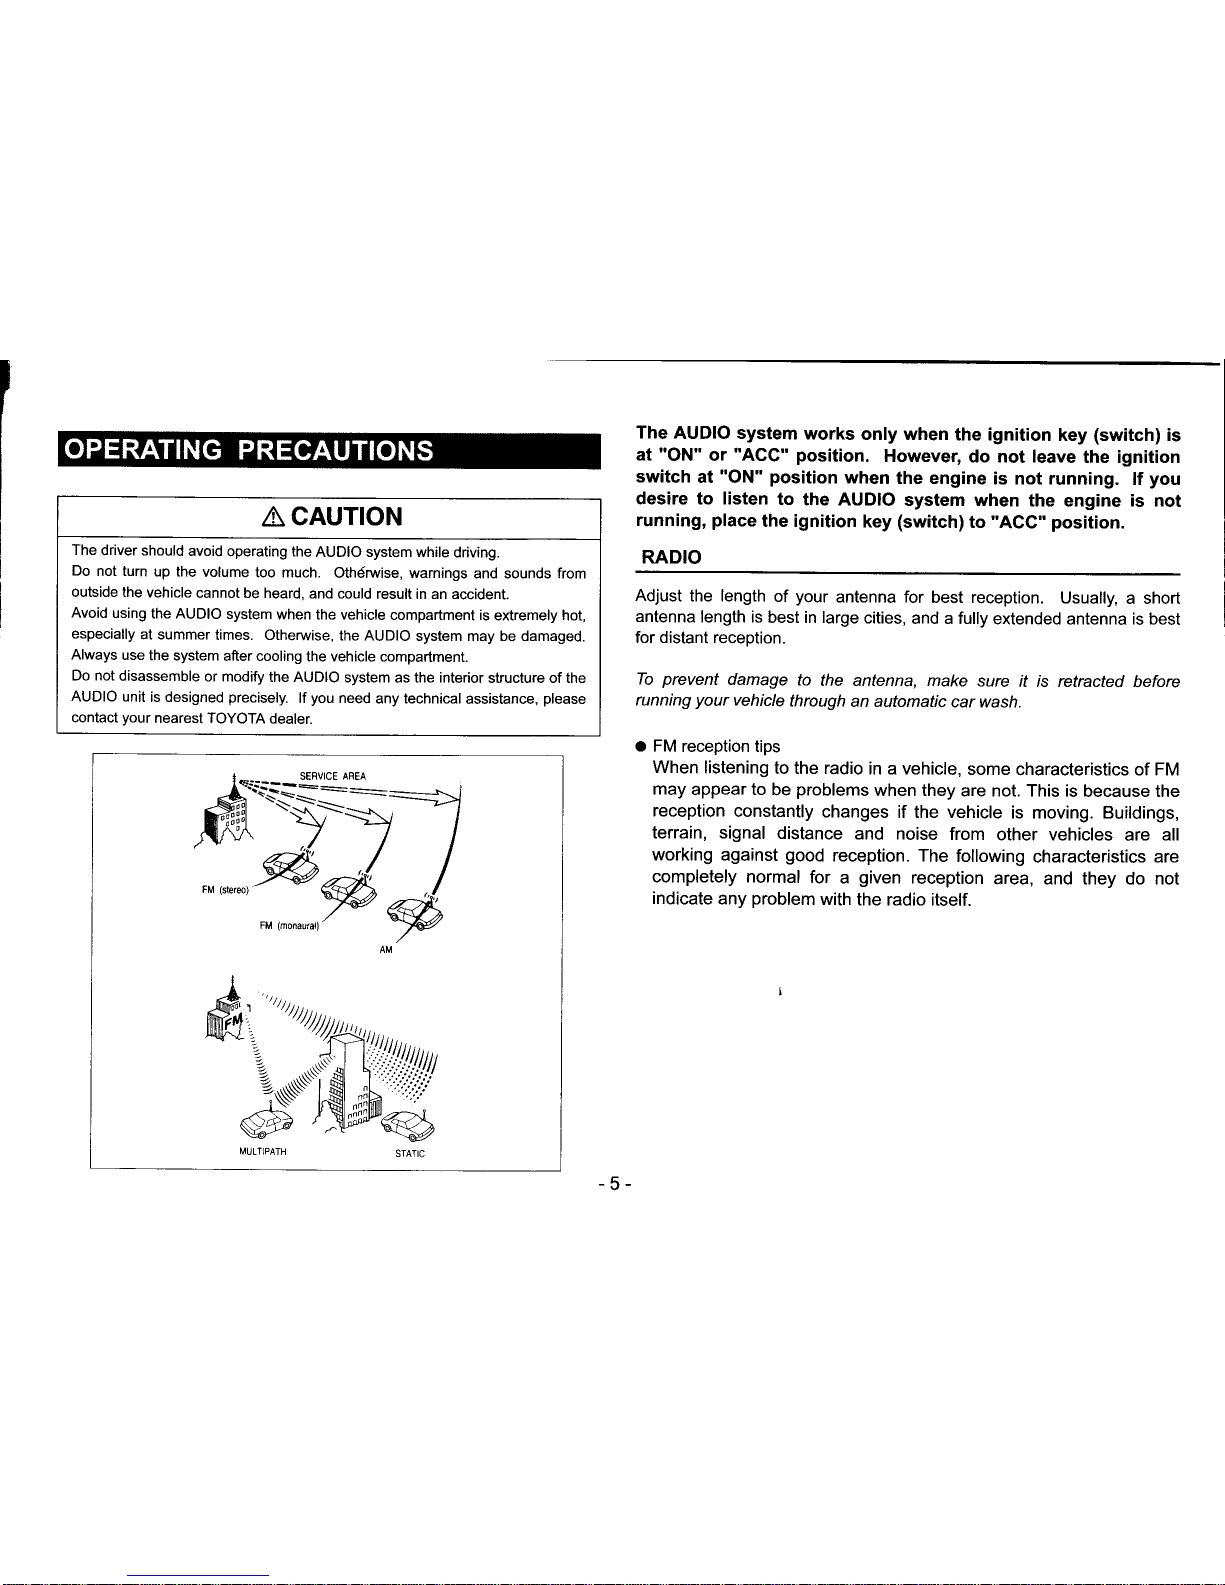
a FM
reception tips
When
listening
to the radio
in a vehicle,
some
characteristics of FM
may
appear to
be
problems
when they
are not. This is
because the
reception
constantly
changes
if the vehicle
is moving. Buildings,
terrain, signal
distance
and noise
from
other vehicles
are
all
working against
good
reception. The
following
characteristics are
completely normal
for
a
given
reception
area, and they do not
indicate
any
problem
with
the radio itself.
ffiw
A
CAUTION
The
driver should
avoid
operating the
AUDIO system while
driving.
Do
not turn
up the
volume
too much.
Othdrwise, warnings
and sounds from
outside the
vehicle
cannot be heard,
and could
result in an accident.
Avoid using
the AUDIO
system
when the vehicle
compartment is
extremely hot,
especially
at summer
times. Otherwise,
the AUDIO
system may be damaged.
Always
use
the system
after cooling
the vehicle
compartment.
Do not
disassemble
or modify
the AUDIO
system as the interior
structure of the
AUDIO unit
is designed
precisely.
lf
you
need
any technical
assistance,
please
contact
your
nearest TOYOTA
dealer.
-5-
a
Fading
and
Drifting: FM
range is limited
to
except for
some
high
power
stations.
about 25 miles
(40km),
CD PLAYER
lf a vehicle
is moving
away from
the desired station'
s transmitter, the
signal will tend
to fade
and/or drift. This is
a common condition with FM
and is
accompanied
by distortion.
Fading
and drifting
can be
minimized to a
certain degree by fine tuning
or tuning
your
radio
to a stronger
signal.
a Static
and Fluttering:
When
the line-of-sight link
between a transmitter
and the
vehicle is
blocked
by
large
buildings or the like,
the radio sound
may be
accompanied
with
static or fluttering due
to the characteristics
of FM.
Similarly,
a fluttering noise
is sometimes heard when driving
along a
tree-lined road.
This static
and fluttering
can be reduced
by adjusting the tone control
for
turning
off treble response
until the disturbance has
passed.
o Multipath:
Due
to the reflecting
characteristics
of
FM,
direct and
reflected
signals
may reach
the antenna simultaneously
(multipath),
and cancel
each other
out.
As
the vehicle
moves
through these
electronic dead spots, a
momentary
flutter
or loss of reception
may occur.
a
Station Swapping:
When
two
FM
stations are located
closely,
and
the
original
signal is interrupted
by an electronic dead
spot such as
static
or
multipath
area, sometimes
the stronger
second signal will be selected
until
the original
one returns.
This swapping
can also occur
as
you
drive
away
from
the selected
station and
approach
another station of
a stronger signal.
For
high
performance
from
your
CD
player
and CD's, observe the
following
precautions:
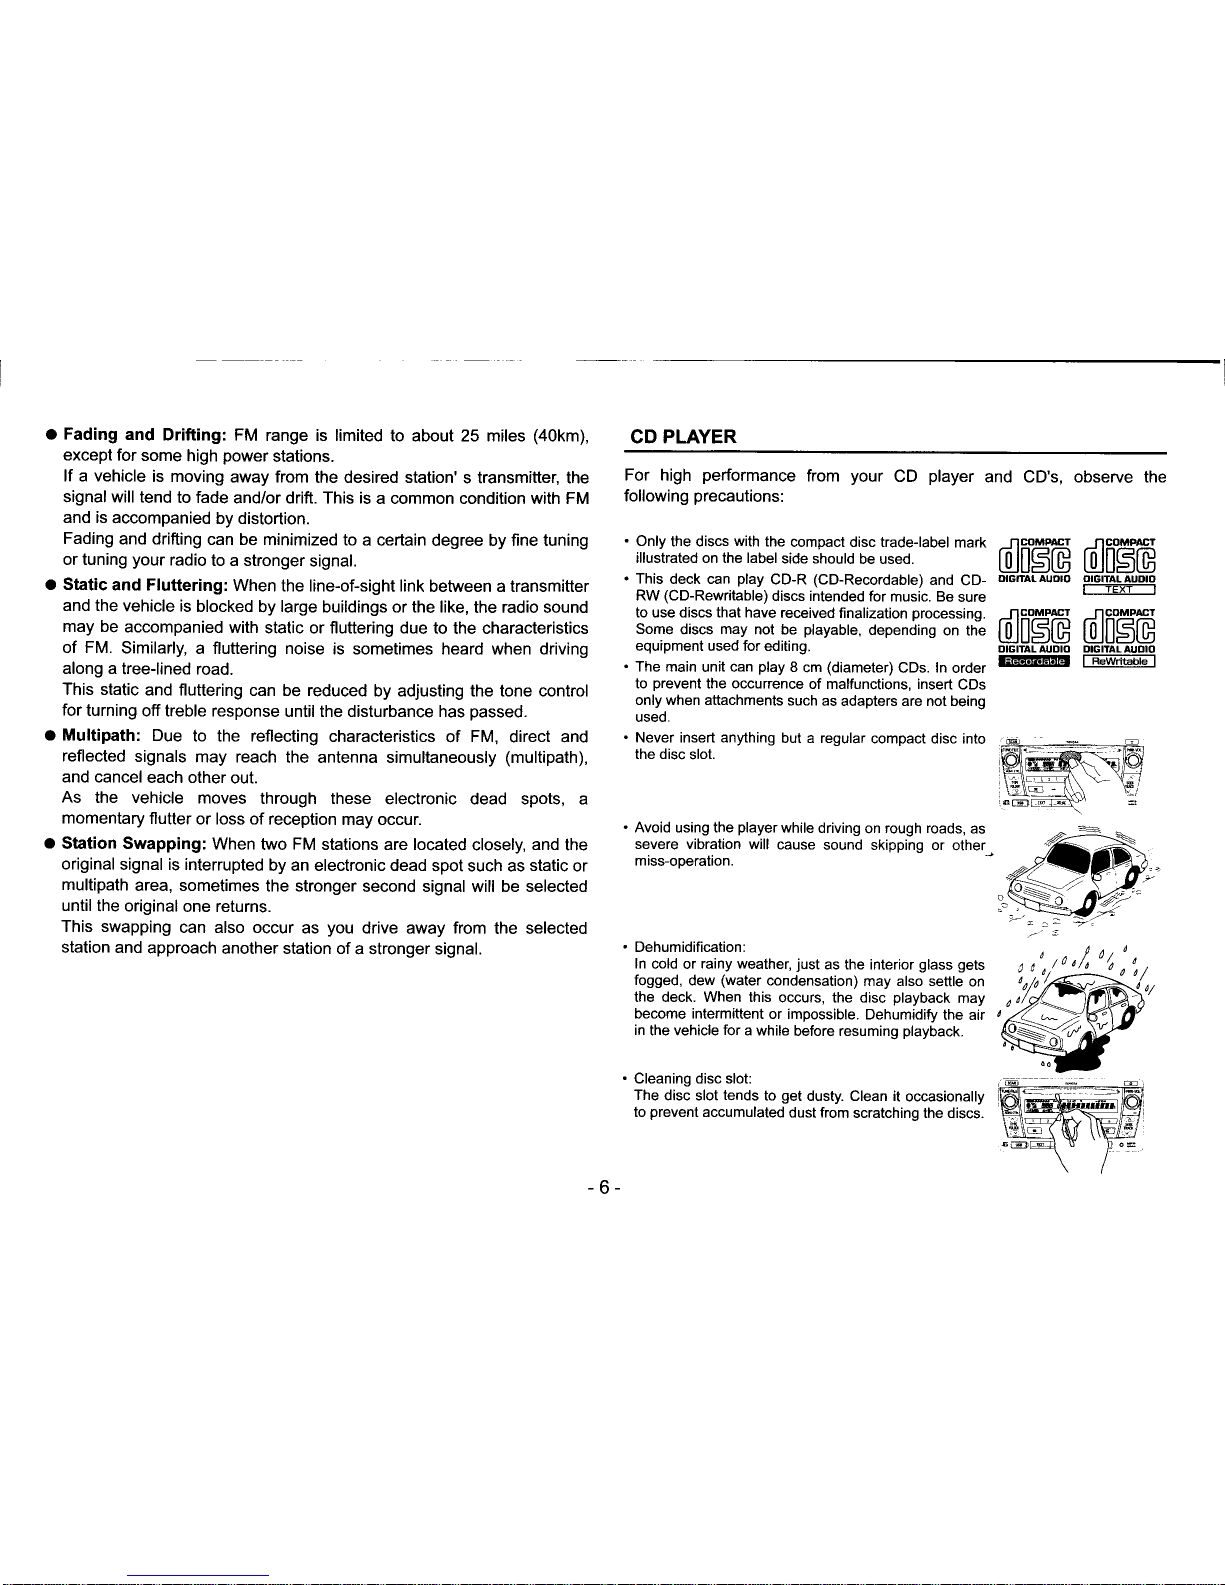
.
Only
the discs
with
the
compact disc kade-label
mark
-.119oumr
illustrated on the label
side should
be used.
EJ[$G
.
This
deck can
play
CD-R
(CD-Recordable)
and
CD-
orcnalAuoro
RW
(CD-Rewritable)
discs intended
for music. Be
sure
ncomffi
EJ[5G
OIGITAL
AUDIO
r--TE T----'l
to use discs that have received
finalization
processing.
.l'lgoltlEl
-Jlgo;uPrEI
Some
discs
may
not be
playabte,
dependins
on tne
lQlll$[U tll|l$tg
equipment used for editing.
oGrrALAuDro DrcrrALAUoro
'
The main
unit can
play
8
cm
(diameter)
cDs.
ln
order
E@EE
f
Rew'ibble-l
to
prevent
the occurrence
of malfunctions, insert
CDs
only when attachments
such
as adapters are not being
used.
.
Never insert anything
but a regular
compact disc into
the disc
slot.
.
Avoid using the
playerwhile
driving
on
rough roads,
as
severe vibration will
cause
sound skipping or
other
miss-operation.
.
Dehumidification:
ln
cold or
rainy weather,
just
as the interior
glass gets
fogged,
dew
(water
condensation)
may also settle
on
the deck. When this
occurs, the disc
playback
may
become intermittent
or impossible.
Dehumidify
the air
in
the vehicle
for
a while
before resuming
playback.
.
Cleaning disc slot:
The
disc slot
tends
to
get
dusty. Clean it
occasionally
to
prevent
accumulated
dust from
scratching the discs.
-6-
COMPACT
DISCS
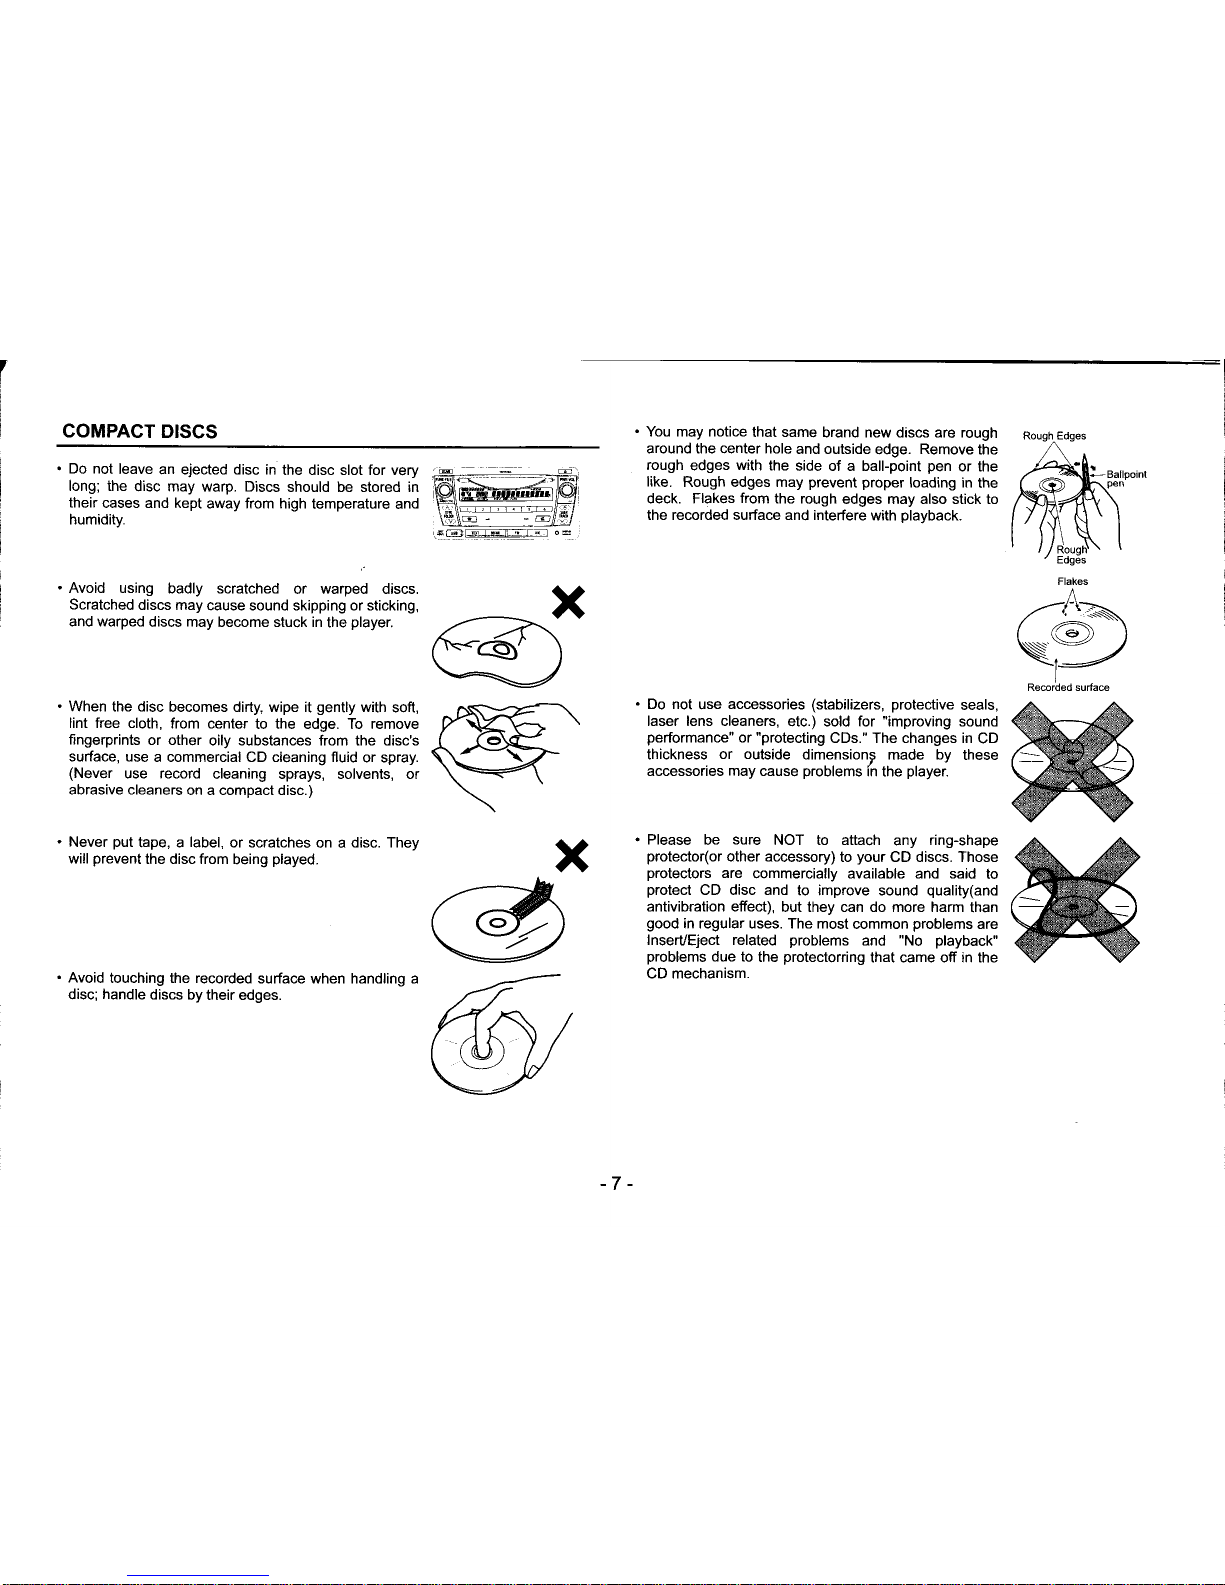
.
You may notice
that same
brand new discs are rough
around the center hole
and outside
edge.
Remove
the
rough
edges
with
the
side of a ball-point
pen
or the
like.
Rough edges may
prevent proper
loading in
the
deck. Flakes
from
the rough
edges may also stick to
the recorded surface and interfere
with
playback.
Do not
use
accessories
(stabilizers, protective
seals,
laser lens cleaners,
etc.) sold for
"improving
sound
performance"
or "protecting
CDs." The changes in
CD
thickness
or outside
dimensionp made by
these
accessories may cause
problems
in
the
player.
Please
be
sure
NOT to attach
any
ring-shape
protector(or
other accessory)
to
your
CD discs. Those
protectors
are
commercially available and said
to
protect
CD disc and
to improve sound
quality(and
antivibration effect),
but they can do more harm
than
good
in regular uses. The most
common
problems
are
lnseruEject related
problems
and
"No playback"
problems
due to
the
protectorring
that came ofi in the
CD mechanism.
.
Do not
leave
an ejected disc in
the disc slot for very
long; the
disc may warp. Discs
should be stored in
their
cases and kept
away from high
temperature and
humidity.
.
Avoid using
badly scratched
or warped discs.
Scratched
discs may
cause sound skipping or sticking,
and warped
discs may become stuck in
the
player.
.
When the disc
becomes dirty, wipe it
gently
with
soft,
lint free cloth,
from center
to the edge. To remove
fingerprints
or other
oily substances from the disc's
surface, use
a commercial CD cleaning fluid
or spray.
(Never
use record
cleaning sprays, solvents, or
abrasive cleaners
on a compact disc.)
.
Never
put
tape, a
label,
or scratches
on a
disc. They
will
prevent
the disc from
being
played.
.
Avoid
touching the recorded
surface when handling a
disc;
handle
discs
by their edges.
rffi._,ffi-'
.A\
su
M
W
-7
-
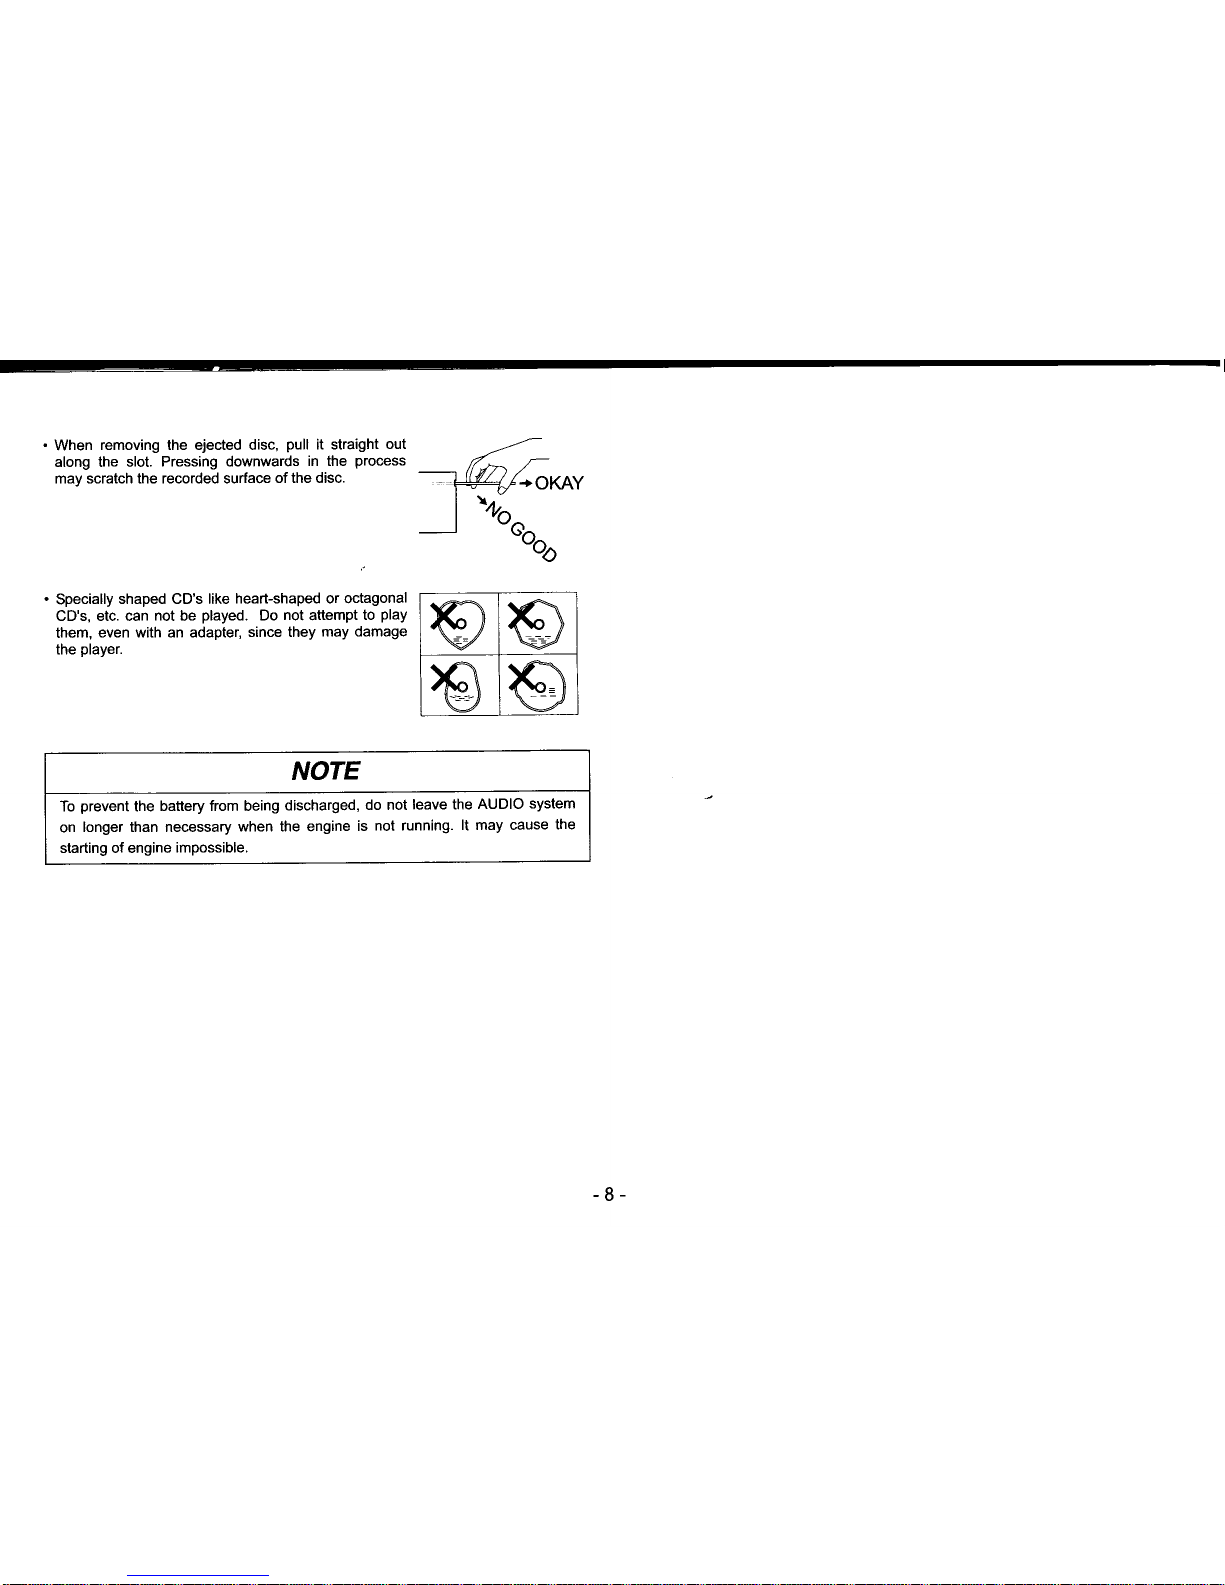
.
When
removing the ejected disc,
pull
it straight
out
along the slot.
Pressing downwards
in the
process
may scratch the recorded surface
of the disc.
.
Specially
shaped CD's like
heart-shaped or octagonal
CD's, etc. can
not
be
played.
Do
not
attempt
to
play
them,
even with an adapter,
since they
may damage
the
player.
NOTE
To
prevent
the
battery from being
discharged,
do not
leave the
AUDIO
system
on
longer than necessary
when the engine
is
not running.
lt may cause
the
starting of engine
impossible.
p
\z
s
€/
€
)c)
\7
-8-
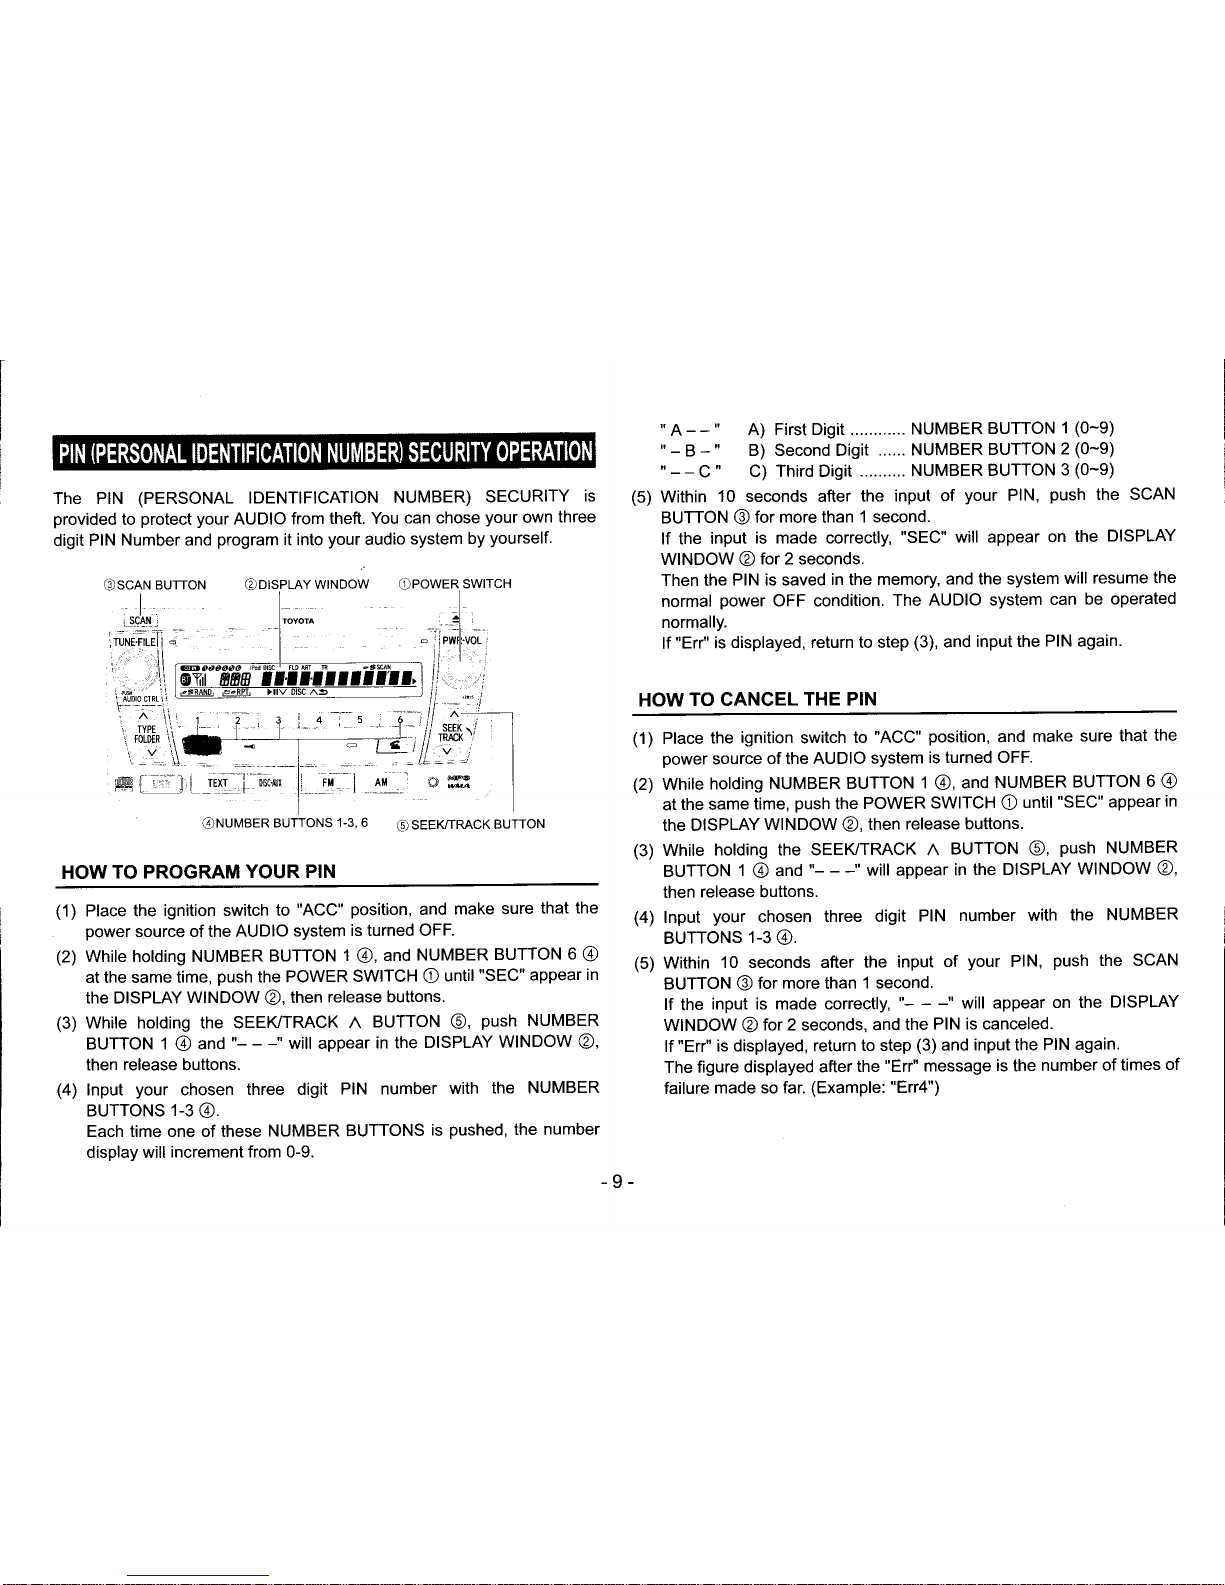
The PIN
(PERSONAL IDENTIFICATION
NUMBER)
SECURITY
iS
provided
to
protect your
AUDIO from
theft. You
can chose
your
own
three
digit PIN
Number and
program
it into
your
audio
system
by
yourself.
"
A
--
"
A) First Digit ............
NUMBER
BUTTON
1
(0-9)
'- B
-'
B) Second Digit
...... NUMBER
BUTTON
2
(0-9)
'-
-
C
' C) Third Digit
.......... NUMBER
BUTToN
3
(0-9)
(5)
Within
10 seconds after the
input
of
your
PlN,
push
the SCAN
BUTTON
@
for more
than
1 second.
lf the
input
is made correctly,
"SEC"
will
appear
on
the
DISPLAY
WINDOW
@tor2
seconds.
Then the
PIN is saved
in
the
memory,
and the system
will
resume
the
normal
power
OFF condition.
The
AUDIO system
can be
operated
normally.
lf
"En" is
displayed, return to step
(3),
and
input the
PIN again.
HOW
TO CANCEL
THE PIN
(1)
Place
the
ignition
switch
to
"ACC"
position,
and
make
sure that
the
power
source
of the AUDIO system
is turned OFF.
(2)
While
holding
NUMBER BUTTON
1
@,
and
NUMBER
BUTTON
6
@
at
the same
time,
push
the
POWER
SWITCH
O
until
"SEC"
appear
in
the DISPLAY
WINDOW
@,
then
release buttons.
(3)
While
holding the SEEK/TRACK n
BUTTON
@,
push
NUMBER
BUTTON
1
@
and
"-
- -"
will appear
in
the DISPLAY
WINDOW
@,
then
release buttons.
(4)
lnput
your
chosen
three digit
PIN
BUTTONS
1-3
@.
(5)
Within
10 seconds after the
input
of
BUTTON
@
for
more
than
1 second.
lf
the
input is made correctly,
will appear
on the
DISPLAY
WINDOW
@
for 2 seconds, and
the
PIN is canceled.
lf "En"
is displayed, return
to step
(3)
and
input the
PIN again.
The figure
displayed after
the
"Err"
message
is
the
number
of times
of
failure
made so far.
(Example:
"Err4")
IDNUMBER
BUTTONS
1-3,6
HOW
TO PROGRAM
YOUR PIN
6)
SEEK/IRACK
BUTTON
(1)
Place the
ignition switch to
"ACC"
position,
and
make sure
that
the
power
source
of the AUDIO
system
is turned OFF.
(2)
While holding NUMBER
BUTTON
1
@,
and
NUMBER
BUTTON
6
@
at the same time,
push
the POWER
SWITCH
O
until
"SEC"
appear
in
the DISPLAY
WINDOW
@,
then
release buttons.
(3)
While holding the SEEK/TRACK n
BUTTON
@,
push
NUMBER
BUTTON 1 @ and
"-
-
-"
will appear
in the
DISPLAY
WINDOW
@'
then release buttons.
(4)
lnput
your
chosen
three digit
PIN number
with the
NUMBER
BUTTONS
1-3
@.
Each time one of these
NUMBER BUTTONS
is
pushed,
the number
display will
increment from 0-9.
number with
the NUMBER
your
PlN,
push
the SCAN
Hl'
li
TEXT
j
D$ilr
-9-
HOW TO RESUME
NORMAL AUDIO OPERATION
lf the
power
supply
to this system is cut off while the PIN security system
is
operating, the security
system
will
activate
when
the
power
supply is
restored to
the system. When the ignition
switch
is turned to
"ACC"
or
"ON"
position,
"SEC"
will appear in the DISPLAY WINDOW
@.
Take the
following
steps to resume normal
AUDIO operation:
(1)
Place ignition
switch to
"ACC"
and
"SEC"
will appear in the
DISPLAY
WINDOW@.
(2)
While holding
the SEEK/TRACKn BUTTON
@,
push
the
NUMBER
BUTTON 1@
and
"-
- -"
will
appear in the DISPLAY
WINDOW
@.
(3)
lnput
your
chosen three digit PIN number with the
NUMBER
BUTTONS 1-3
@.
(4)
Within 10
seconds after the input of
your
PlN,
push
the
SCAN
BUTTON
@
for more
than
1
second.
lf the correct PIN is input,
"SEC"
will appear
on the DISPLAY WINDOW
@
tor 2 seconds, and
normal
operation
of the AUDIO system will become
possible.
IF WRONG PIN IS INPUT
"Err"
and the number
of
failures made
(1
-
9 times)
will be displayed
for
2
seconds, then
the display will change to "SEC".
lf a wrong PIN is input
for 10 times in succession,
"HELP' will appear on
the DISPLAY WINDOW
@,
and the AUDIO system
will be locked
(can
not
be operated.)
ln that case, the system can not be recovered by
the user.
Please contact
your
nearest TOYOTA
dealer
for
technical
assistance.
10-
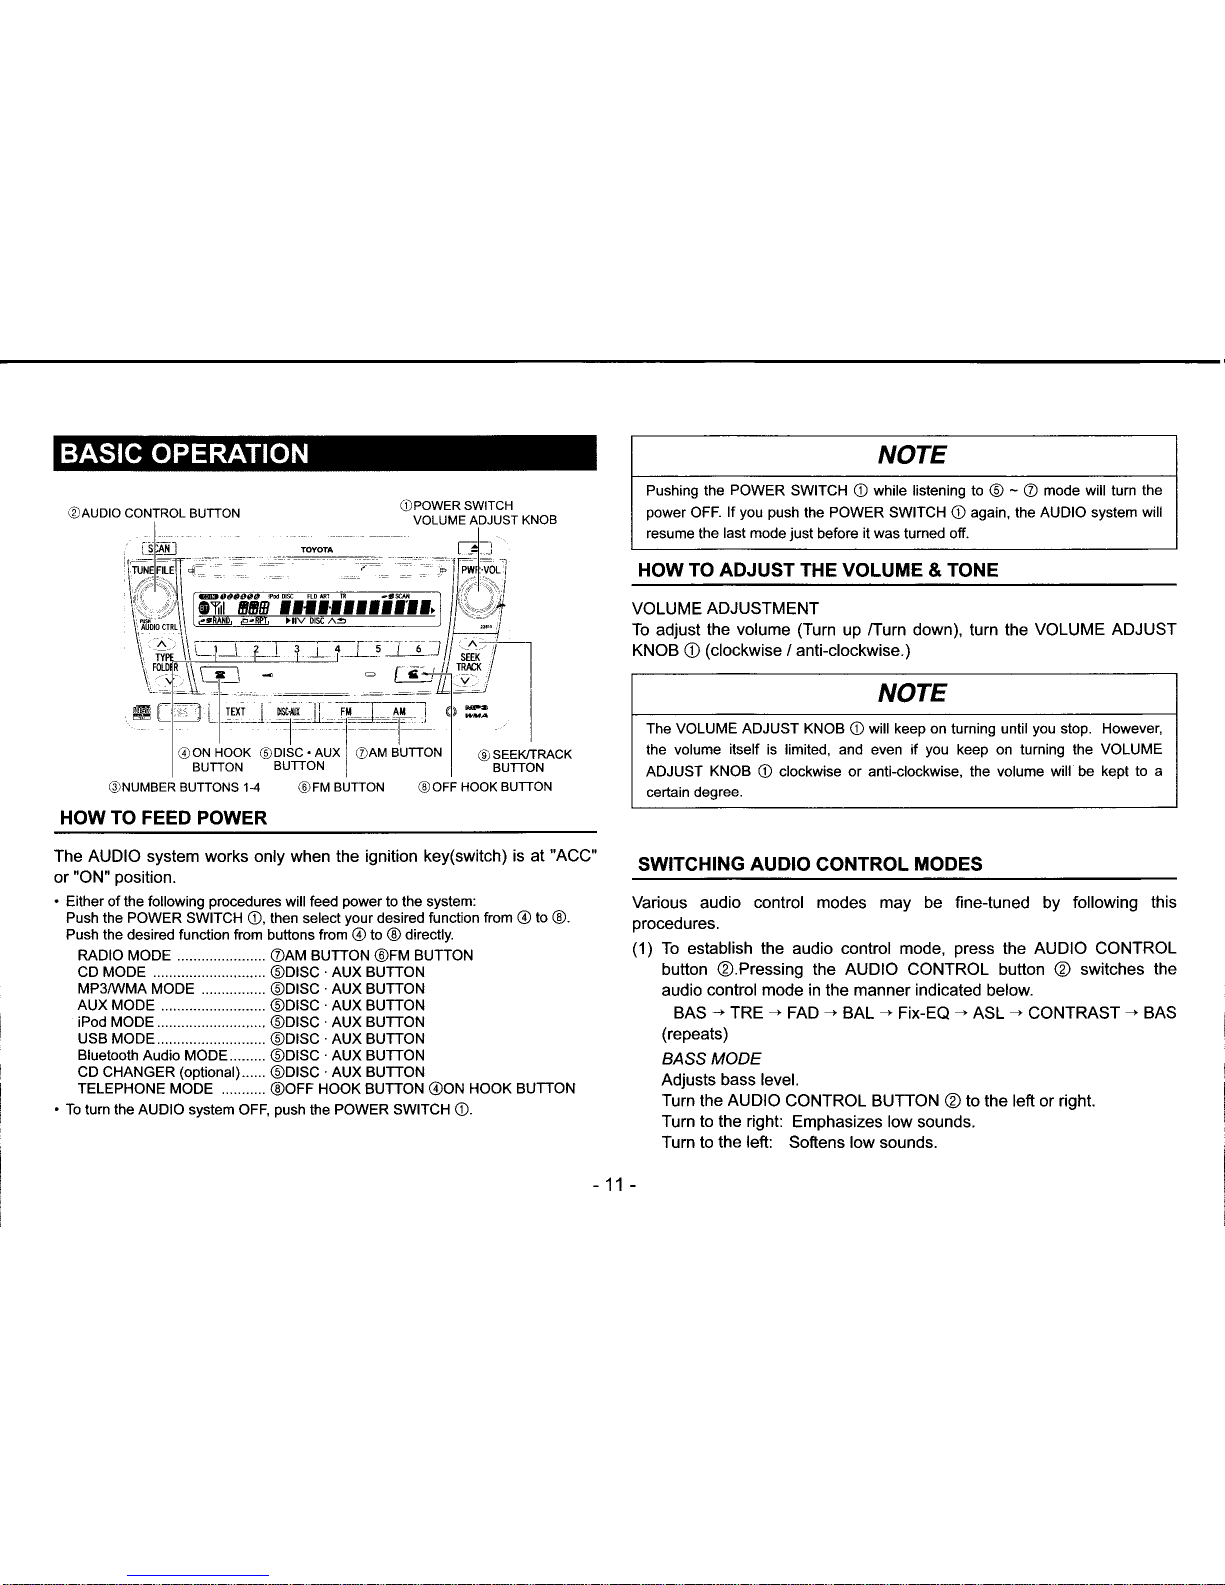
OAUDIo
CoNTRoL BUTToN
@NUMBER
BUTTONS 14
@FM
BUTTON
@OFF
HOOK BUTTON
HOW TO FEED POWER
The AUDIO system works only when the ignition key(switch)
is at
"ACC"
or
"ON"
position.
.
Either of the following
procedures
will feed
power
to the system:
Push the POWER SWITCH
O,
then select
your
desired function
from @ to
@.
Push the desired function from
buttons from @ to
@
directly.
RADIO MODE
@AM
BUTTON
@FM
BUTTON
CD MODE .
@DISC
.AUX
BUTTON
MP3MMA
MODE ................
@DISC
.AUX
BUTTON
AUX MODE
@DISC
AUX BUTTON
iPod MODE.......
@DISC
.AUX
BUTTON
USB MODE.,......
@DISC
AUX BUTTON
Bluetooth
Audio MODE.........
@DISC
.AUX
BUTTON
CD CHANGER
(optional)......
@DISC
.AUX
BUTTON
TELEPHONE MODE
@OFF
HOOK BUTTON
@ON
HOOK BUTTON
NOTE
Pushing the
POWER
SWITCH O while listening to
@ - @
mode will turn the
power
OFF.
lf
you push
the POWER SWITCH O again, the AUDIO system
will
resume the
last mode
just
before
it
was turned off.
HOW TO ADJUST THE VOLUME
& TONE
VOLUME
ADJUSTMENT
To adjust the
volume
(Turn
up /Turn down), turn the
VOLUME ADJUST
KNOB
O
(clockwise
i anti-clockwise.)
NOTE
The VOLUME ADJUST KNOB
O
will keep on
turning
until
you
stop. However,
the volume
itself
is limited, and even if
you
keep on turning the VOLUME
ADJUST KNOB O clockwise or anti-clockwise, the volume will be
kept to a
certain degree.
SWITCHING
AUDIO
CONTROL
MODES
Various
audio
control modes may be fine{uned
by
following this
procedures.
(1)
To establish the audio control mode,
press
the AUDIO CONTROL
button
@.Pressing
the AUDIO CONTROL button
@
switches
the
audio
control mode
in the manner
indicated
below.
BAS
-
TRE
r
FAD
-
BAL - Fix-EQ
-
ASL
+
CONTRAST
T
BAS
(repeats)
BASS MODE
Adjusts bass level.
Turn
the
AUDIO
CONTROL BUTTON @ to the left or right.
Turn to the right:
Emphasizes low sounds.
Turn to the
left:
Softens low sounds.
11
,f- 7__l
T!4q
1 I
Yl
I
;;i
(toN
HooK
BUTTON
OSEEIVTRACK
BUTTON
5i--c.J
.
To turn the AUDIO system
OFF,
push
the
POWER SWITCH
O.
-11
TRE
(TREBLE)
MODE
Adjusts
treble
level-
Turn the AUDIO
CONTROL
BUTTON @ to the lefi or
right.
Turn to the right: Emphasizes high sounds.
Turn to
the
left:
Softens
high
sounds.
FAD
(FADER)
MODE
Adjusts fronVrear speaker balance.
Turn the AUDIO CONTROL
BUTTON'@ to the lefr or
right.
Turn to the right: Emphasizes front speakers.
Turn to
the
left:
Emphasizes
rear speakers.
BAL
(BALANCE)
MODE
Adjusts lefl/right speaker balance.
Turn the AUDIO CONTROL BUTTON
@
to the left or
right.
Turn to the right: Emphasizes
right speakers.
Turn to
the
left: Emphasizes left speakers.
FIX-EQ MODE
The audio control modes can be
fine-tuned according
to different
car
types.
Pressing
the
AUDIO
CONTROL
BUTTON
@
switches
the car
modes
in the manner indicated below.
OFF * COMPACT * SEDAN
*
SUV
COMPACT: Compact
Car
SEDAN: Sedan
SUV: Sports Utility Vehicle
OFF:
Selection cancelled
ASL
(Automatic
Sound Levelizer)
MODE
The sound
quality
and
volume can be fine-tuned
to respond
to the car
speed.
Pressing the AUDIO CONTROL
BUTTON @ switches
the adjustment
effects in the manner
indicated below.
oFF*LOW*MtD*H|GH
LOW: Minimally
effective
MID: Moderately effective
HIGH: Highly
effective
OFF: No adjustment
CONIRASTCONTROL
Push the
AUDIO
CONTROL BUTTON @ until
"CONTRAST
dcHl
then tum
the
button as follows.
Clockwise:
lncrease Contrast level
Anti-clockwise: Decrease Contrast
level
HOWTO
TURN TIME DISPLAY
ON/OFF
(1)
To turn the clocf mode ON,
push
the SEEI(TRACK n
BUTIORI
'9,
while
pushing
down the
NUMBER BUTTON 4
€).
To turn
it OFF, repeat
the
operation above.
(Only
when
power
source of the AUDIO system
is tumed OFF
(1)
While
holding the AM BUTTON
O,
adjust
the time
by
pusr"rr,q
filt
NUMBER
BUTTONS 1-2
O.
Houradjustment
.....-.... NUMBER BUTTON 1
Minute adjustment ....... NUMBER
BUTTON 2
(2)
To set
the time to 00 min. 00 sec.
(JUST)
push
fite
Nl-ilEEm
BUTTON 3
@
while
pushing
the
AM BUTTON
@.
ln thb e
ill:
time is
rounded
up to the current
hour or the next hour adnry
tu
the minute.
Minute
0-29
Current
hour
(ex.
5:29 - 5:00)
Minute 30-59 Next hour
(ex.
5:30 - 6:00)
(Only
when
power
source of the
AUDIO system is tumed OFF-!
HOW TO
VIEW THE AUDIO MODE
(1)
Push and
hold down
the
AM BUTTON
@
until it beeps.
Each
time the button is
pushed,
the display will change
frun
CL@l[
mode to
AUDIO mode.
(Only
when the clock mode is turned Oif
I
]'ime is not
reset when
clock mode
is
turned
ofi.
HOW TO SET THE TIME
-12-
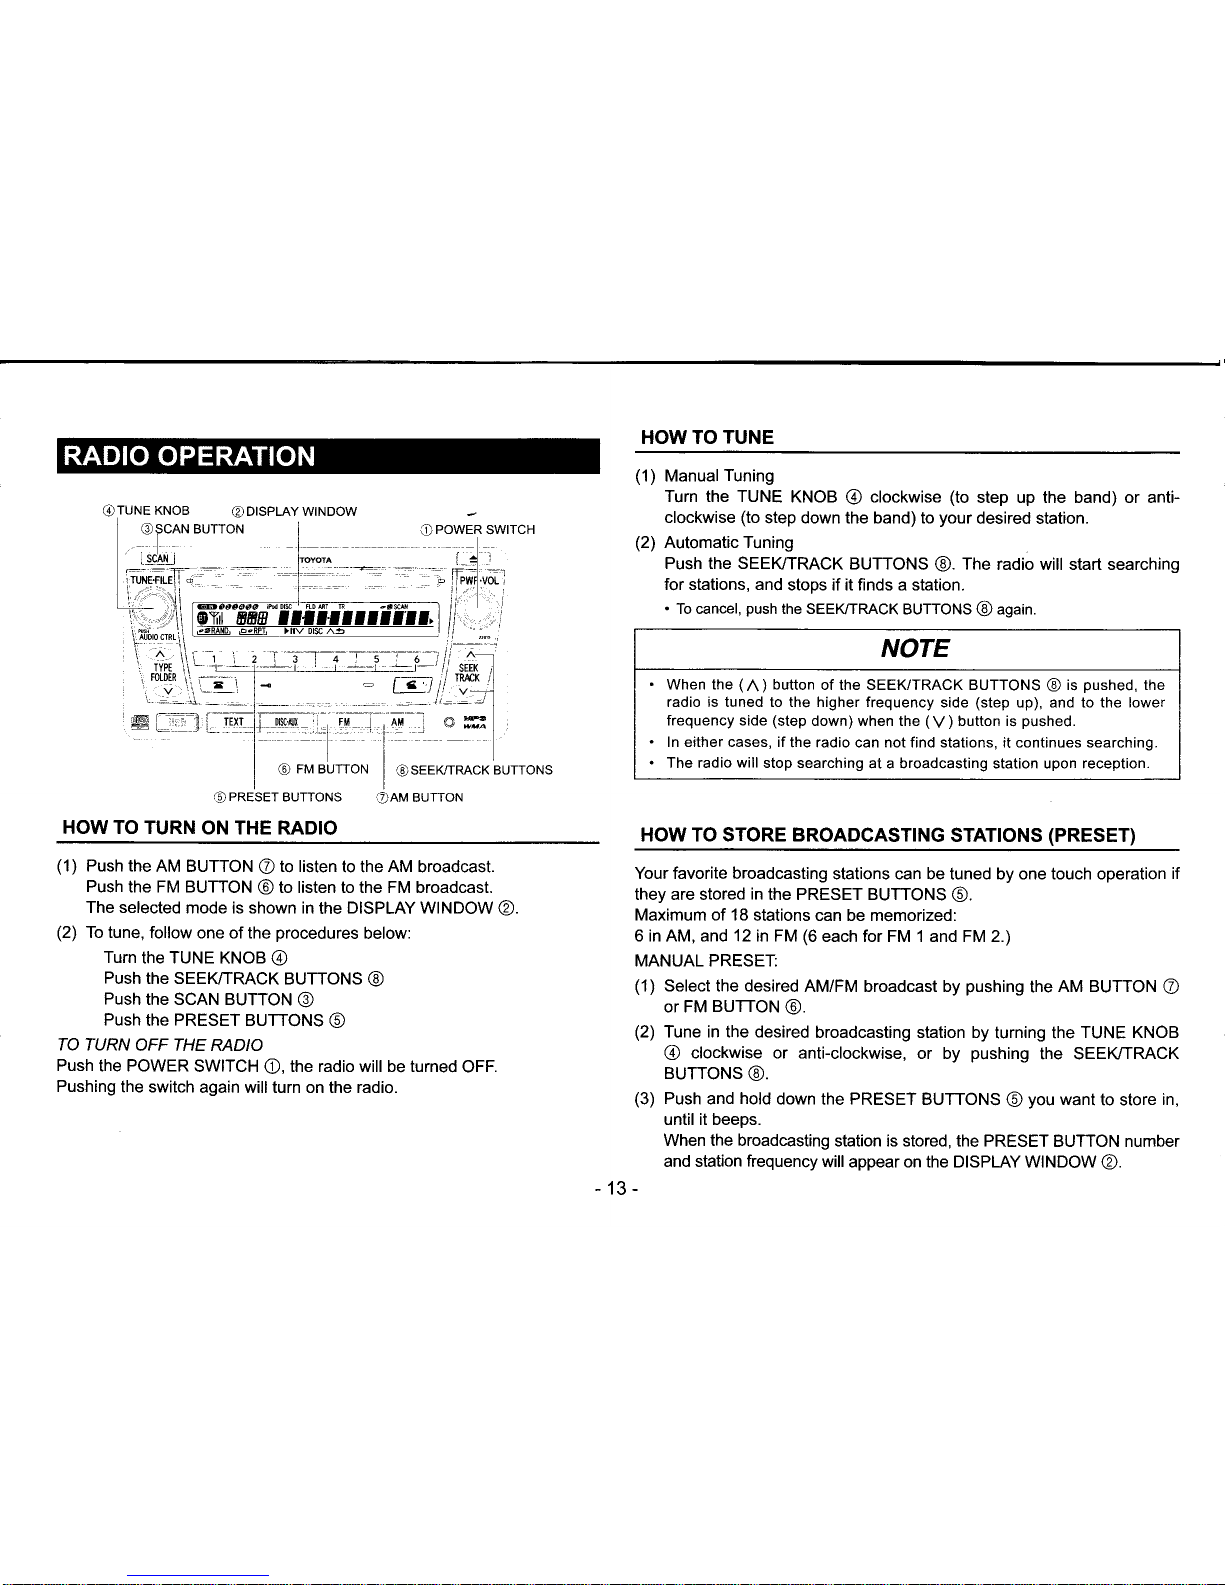
HOW TO TUNE
(1)
Manual
Tuning
Turn the TUNE
KNOB @ clockwise
(to
step up the band) or anti-
clockwise
(to
step down the band) to
your
desired station.
(2)
Automatic Tuning
Push the SEEI(TRACK
BUTTONS
@.
The
radio will start searching
for stations, and
stops if it finds a station.
.
To cancel,
push
the SEEI(TRACK
BUTTONS @ again.
HOW TO STORE BROADCASTTNG
STATTONS
(PRESET)
Your favorite broadcasting
stations can be tuned by one touch operation
if
they are stored
in
the PRESET BUTTONS
O.
Maximum of 18
stations can be memorized:
6 in AM, and 12 in FM
(6
each for FM 1 and FM 2.)
MANUAL PRESET:
(1)
Select the desired
AM/FM broadcast by
pushing
the
AM BUTTON
O
or FM
BUTTON
@.
(2)
Tune in the desired
broadcasting station by
turning the
TUNE KNOB
@
clockwise or anti-clockwise,
or by
pushing
the SEEI(TRACK
BUTTONS
@.
(3)
Push
and
hold
down
the
PRESET
BUTTONS
@
you
want
to store
in,
until it beeps.
When the broadcasting
station is stored, the PRESET
BUTTON number
and station
frequency
will appear on the DISPLAY WINDOW
@.
13-
C)
POWER
SWITCH
-
I
I
I
:-t-:
f--
l' ,A- i
f6T.1
ncK,
',t
i
r-*-
_-
;M -
AM-*
a
ffi,
i
i
G)
FM BUTTON
I
rsEEKrrMcK
BUTTONS
€)PRESET
BUTTONS
OAM
BUTTON
HOW TO TURN
ON THE RADIO
(1)
Push the
AM BUTTON O to listen
to the
AM
broadcast.
Push
the FM BUTTON
@
to listen to the FM broadcast.
The selected
mode is shown in
the
DISPLAY WINDOW
@
(2)
To tune,
follow one of the
procedures
below:
Turn
the TUNE KNOB
@
Push
the SEEI(TRACK
BUTTONS
@
Push
the SCAN BUTTON
@
Push
the
PRESET
BUTTONS
@
TO TURN
OFF
THE
RADIO
Push
the POWER
SWITCH
O,
the radio will be turned
OFF.
Pushing
the switch
again will turn on the radio.
r^
,i't''
NOTE
.
When the
(n
)
button
of the SEEK/TRACK BUTTONS @ is
pushed,
the
radio is tuned to the higher frequency
side
(step
up), and to the lower
frequency side
(step
down) when the
(V)
button is
pushed.
.
ln either cases, if
the radio can not find stations, it continues searching.
.
The radio
will
stop searching
at a broadcasting station upon reception.
HOW TO
SCAN
BROADCASTING STATIONS AVAILABLE
FOR RECEPTION
You
can either scan
all the frequencies on the band or
scan
only the
preset
stations
for that
band.
TO SCAN ALL
THE FREQUENCIES:
\
(1)
Push
the SCAN
BUTTON
@
quickly
(for
less
than 0.8 seconds.)
(2)
Then
'SCAN"
will appear in
the DISPLAY WINDOW
@,
and the
radio
will search
available
broadcasting stations from the low-frequency
range to high-frequency
range. lt will
stop at every broadcasting
station available
for approximately 5 seconds, and continue scanning.
.
To cancel
the scanning,
push
the SCAN BUTTON
@
again.
(SEEK
function
starts after SCAN is
completed.)
TO SCAN THE
PRESET FREQUENCIES:
(1)
Push and
hold down the
SCAN
BUTTON
@
(for
more than 0.8
seconds.)
(2)
The radio
beeps and scans
only through the broadcasting
stations
stored under
the PRESET BUTTONS
@.
At this time, the PRESET
BUTTON
number
and station frequency will appear on the
DISPLAY
WINDOW@.
.
To cancel
the scanning,
push
the SCAN BUTTON
@
again.
NOTE
The PRESET
station memory is
canceled when the
power
source is
interrupted
by battery disconnection
or a blown fuse.
14-
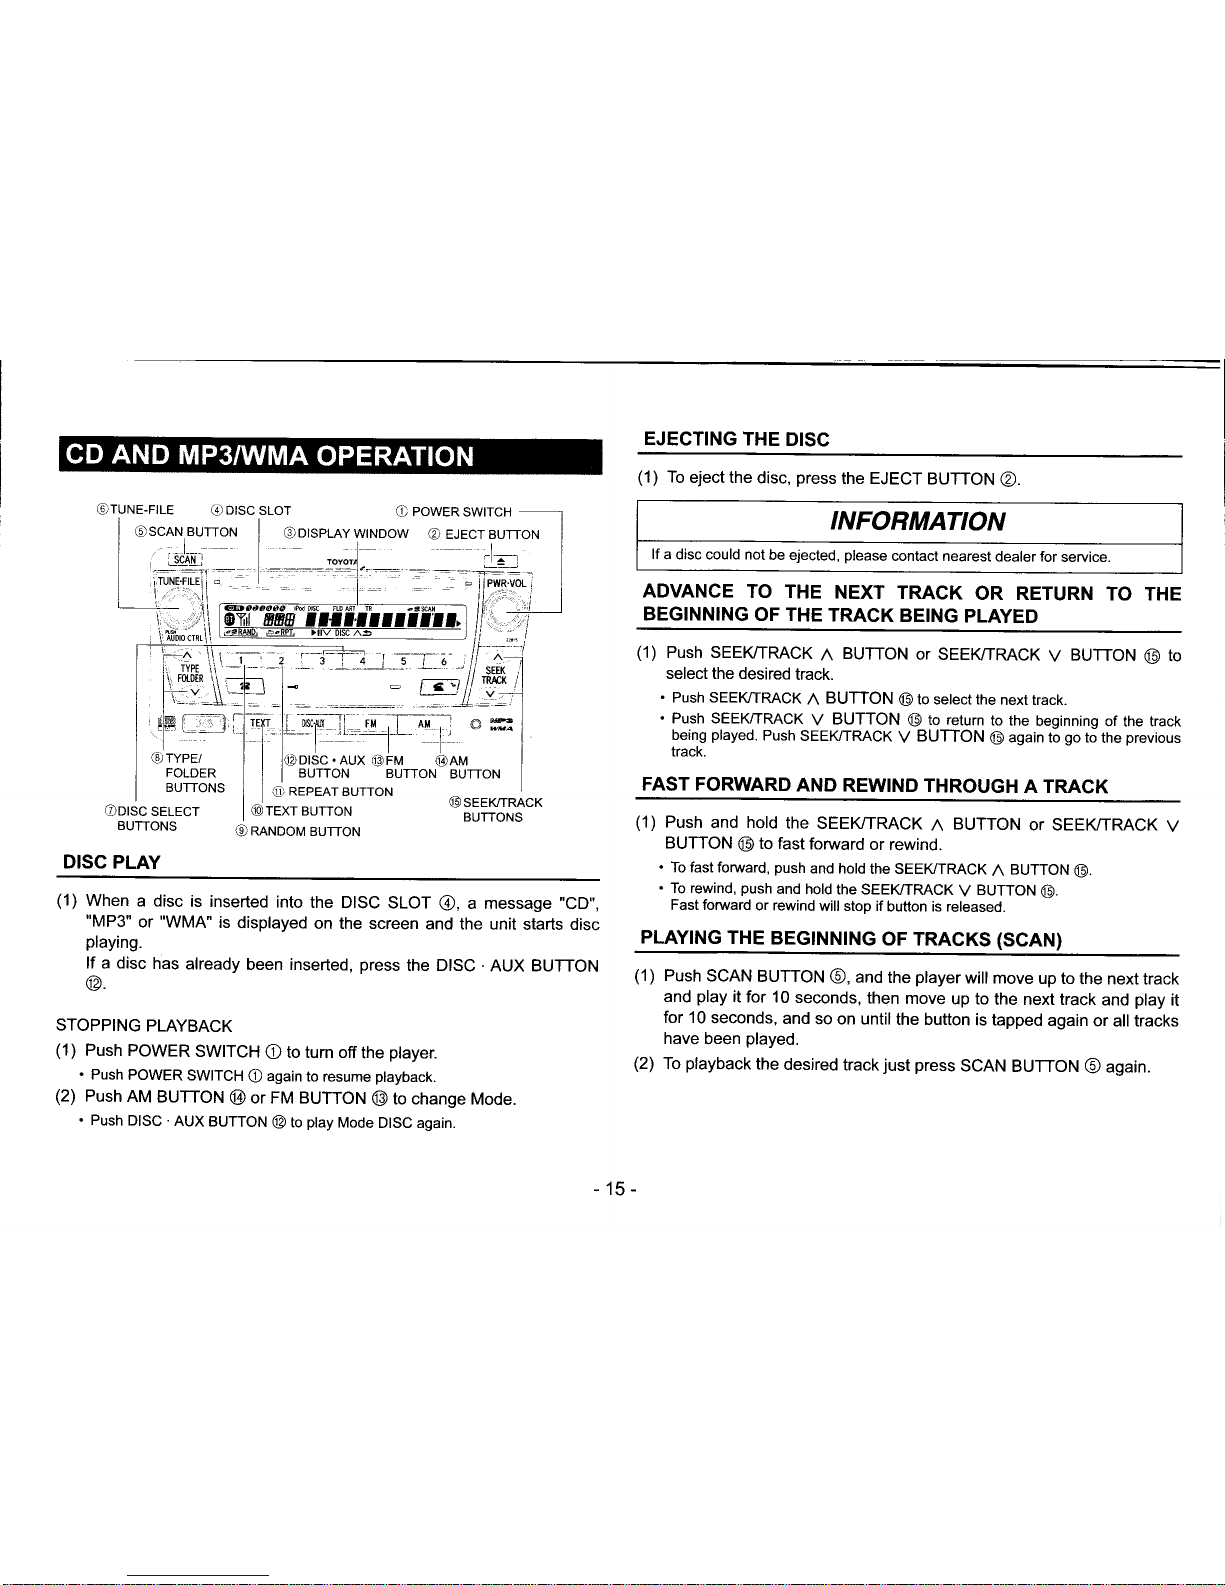
(1)
When
a disc
is inserted
into
the DISC
SLOT
@,
a message',CD,',
"MP3"
or "WMA"
is
displayed
on the screen
and the unit
starts disc
playing.
lf a disc
has
already
been inserted,
press
the DISC
.AUX
BUTTON
@.
STOPPING
PLAYBACK
(1)
Push POWER
SWITCH
O
to turn off
the
ptayer.
.
Push
POWER
SWITCH
O
again to resume
playback.
(2)
Push
AM
BUTTON
@
or FM BUTTON
@
to change
Mode.
.
Push
DISC
.AUX
BUTTON
@
to
ptay
Mode
D|SC again.
EJECTING
THE
DISC
(1)
To
eject the
disc,
press
the EJECT
BUTTON
@.
INFORMATION
lf
a disc could not
be ejected,
please
contact nearest
dealer for
service.
ADVANCE
TO THE
NEXT TRACK
OR RETURN
TO
BEGINNING
OF THE
TRACK
BEING
PLAYED
THE
(1)
Push SEEKiTRACK
n
BUTTON
oT SEEI(TRACK
V
BUTToN
@
to
select the desired
track.
.
Push SEEI(TRACK
A
BUTTON
@
to setect the
next track.
.
Push SEEK/TRACK
V
BUTTON
@
to return
to the
beginning
of the track
being
played.
Push
SEEK/TRACK
V
BUTTON
@
again to
go
to
the
previous
track.
FAST FORWARD
AND
REWIND THROUGH
A TRACK
(1)
Push
and hold
the
SEEKTRACK
A
BUTTON
or SEEK/TRACK
V
BUTTON
@
to fast
forward
or rewind.
.
To fast forward,
push
and hotd
the SEEI(TRACK
n
BUTTON
@.
.
To rewind,
push
and hold
the SEEI(TRACK
V
BUTTON
@.
Fast forward
or rewind
will stop if
button is released.
PLAYTNG
THE
BEGINN|NG
OF TRACKS (SCAN)
(1)
Push
SCAN
BUTTON
@,
and the
player
will move
up to
the next track
and
play
it
for 10
seconds,
then
move
up to
the next track
and
play
it
for 1
0 seconds,
and
so on until
the button
is tapped
again
or all tracks
have
been
played.
(2)
To
playback
the
desired
track
just
press
SCAN
BUTTON
@
again.
15-
 Loading...